

Page 1

Nikon Motor Drive
www.mynikon.com.pl
MD-12
INSTRUCTION MANUAL
Page 2

NOMENCLATURE
www.mynikon.com.pl
Battery chamber lid
Battery chamber lid
S-C selector lock
S-C selector
Camera electrical
contacts
Attachment thumb
wheels
Pilot lamp
Power switch
Rewind slide
Tripper button
Shutter release pin
Drive shaft coupling
Rewind button
extension
Page 3
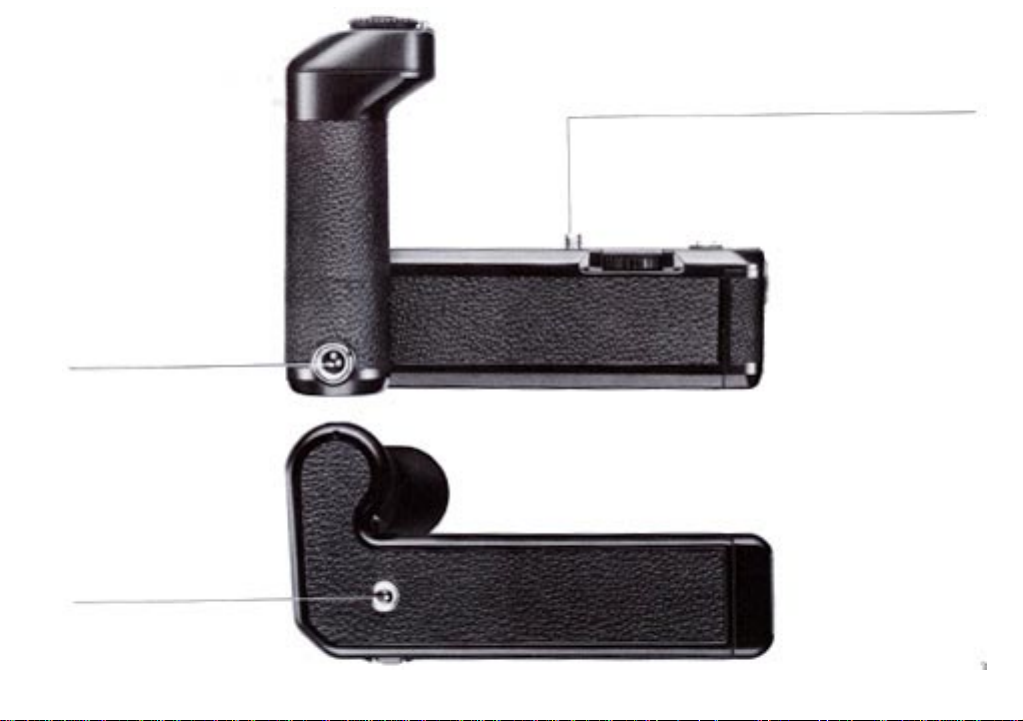
Remote control socket
www.mynikon.com.pl
Tripod socket
Attachment screw
Page 4

CONTENTS FOREWORD
www.mynikon.com.pl
Foreword . . . . . . . . . . . . . . . . . . . . . . . . . . . . . . . . . . . . 4
Loading the batteries . . . . . . . . . . . . . . . . . . . . . . . . . . . 5
Attaching the motor drive . . . . . . . . . . . . . . . . . . . . . . . 6
Operation . . . . . . . . . . . . . . . . . . . . . . . . . . . . . . . . . . . . 8
Single-frame shooting . . . . . . . . . . . . . . . . . . . . . . . 8
Continuous shooting . . . . . . . . . . . . . . . . . . . . . . . . . 9
Film rewinding . . . . . . . . . . . . . . . . . . . . . . . . . . . . . . 10
Manual film advance . . . . . . . . . . . . . . . . . . . . . . . . . . 10
Double/multiple exposures . . . . . . . . . . . . . . . . . . . . . 11
Time lapse . . . . . . . . . . . . . . . . . . . . . . . . . . . . . . . . . . 12
Accessories . . . . . . . . . . . . . . . . . . . . . . . . . . . . . . . . . 13
Remote Cord MC-4 . . . . . . . . . . . . . . . . . . . . . . . . 13
Remote Cord MC-10 . . . . . . . . . . . . . . . . . . . . . . . 14
Pistol Grip Model 2 and Connecting
Cord MC-3 . . . . . . . . . . . . . . . . . . . . . . . . . . . . . . 14
Intervalometer MT-1 and Connecting
Cord MC-5 . . . . . . . . . . . . . . . . . . . . . . . . . . . . . . 15
Modulite Remote Control Set ML-1 and
Connecting Cord MC-8 . . . . . . . . . . . . . . . . . . . . 15
Radio Control Set MOO-1 and Connecting
Cord MC-5 . . . . . . . . . . . . . . . . . . . . . . . . . . . . . . 16
Terminal Release MR-2 . . . . . . . . . . . . . . . . . . . . . 16
Troubleshooting. . . . . . . . . . . . . . . . . . . . . . . . . . . . . . 17
Battery performance . . . . . . . . . . . . . . . . . . . . . . . . . . 18
Specifications . . . . . . . . . . . . . . . . . . . . . . . . . . . . . . . 18
Although supplied as an accessory for the Nikon FM and FE
compact cameras, the MD-12 was, in fact, a major feature in
their design concept. Consequently, the only significant difference between operating these cameras with the motor drive
attached, as opposed to without it, is that their operation is
made considerably easier. So, rather than regarding your
Motor Drive MD-12 unit as a special accessory for use only
on rare occasions, you should consider it as the normal
complement to your Nikon compact camera. For, in fact, the
two together represent a major advance in camera-handling
technique.
To obtain the best results from your Motor Drive MD-12,
read the instructions in this manual carefully before use. Keep
this booklet handy for quick reference until you have fully
mastered operation. A few minutes preparation will help you
avoid costly mistakes.
Page 5
LOADING THE BATTERIES
www.mynikon.com.pl
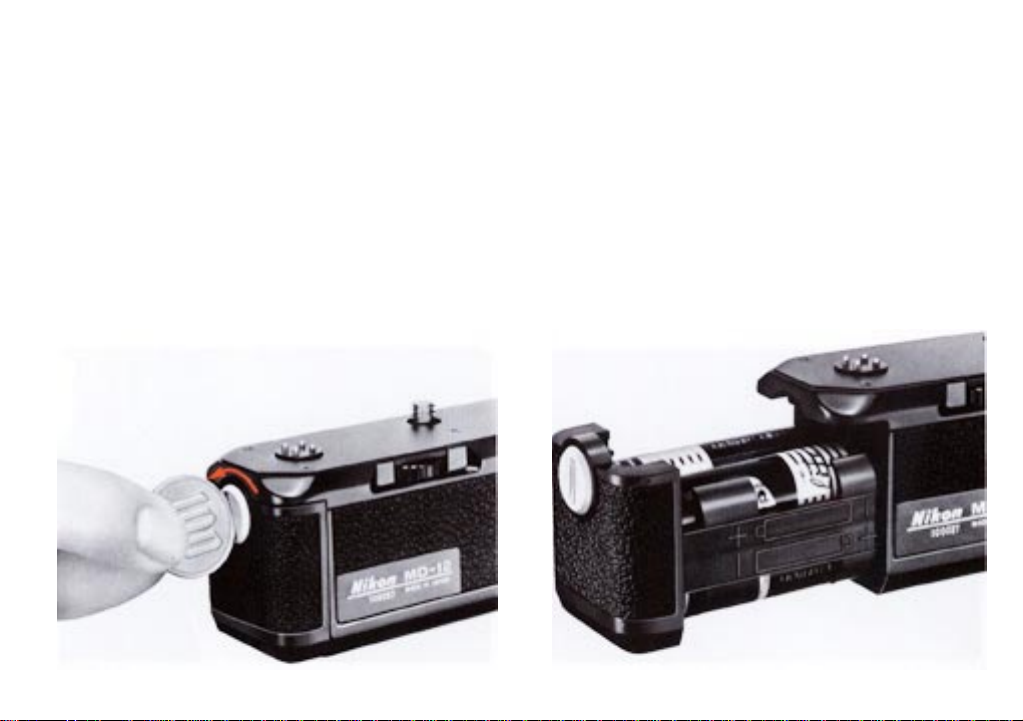
The MD-12 is powered by eight 1.5V penlight (AA size) batter ies which are housed in the unit's battery chamber. To load or
replace batteries, turn the coinslotted locking screw on the battery chamber lid counterclockwise. The lid will come loose and
the battery clip, which forms a single unit with the lid, can be
removed. Load the batteries, taking care that they are inserted
correctly. Referring to the diagrams on the sides of the clip that
show the correct ~vay to insert the batteries, ensure that the
positive (+) and negative ( - ) terminals of the batteries are properly positioned. If the batteries are loaded incorrectly, not only
will they be depleted—the motor drive could also be damaged.
When the batteries are correctly positioned, replace the battery
clip. Push the chamber iid down gently until it seats correctly;
then, tighten the locking screw on the lid with a coin or similar
object until the battery clip fits securely into the battery chamber.
Page 6
ATTACHING THE MOTOR DRIVE
www.mynikon.com.pl
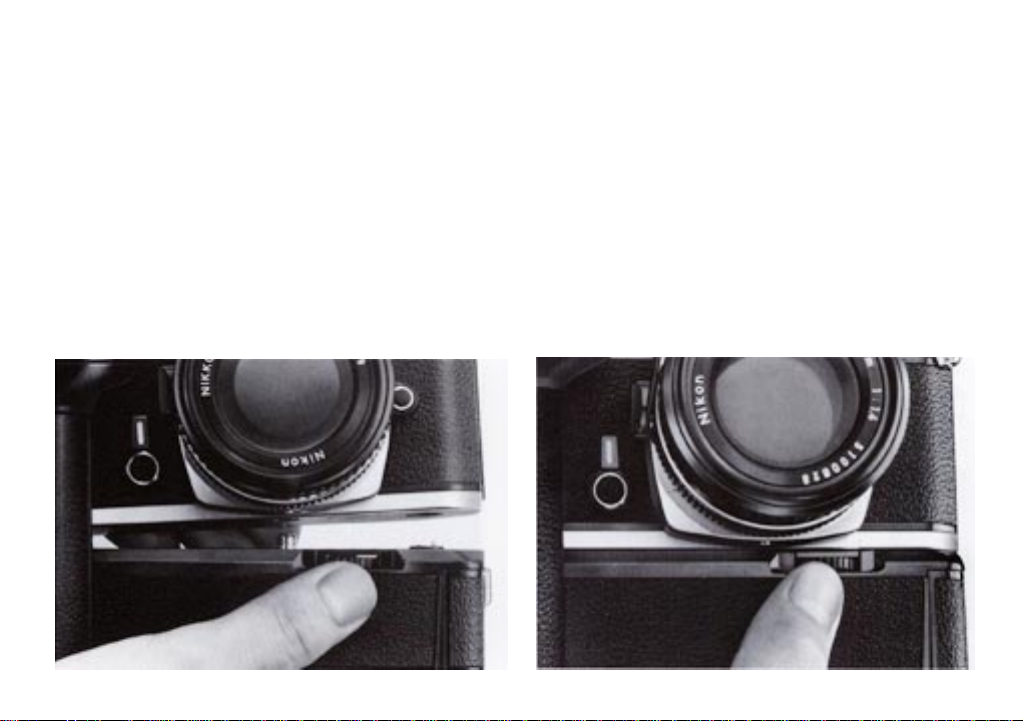
Mounting the MD-12 on your camera is simple; the unit has
been designed such that it can be attached or removed at any
time regardless of whether or not the camera is loaded with film.
Before attaching the MD-12, make sure that its power switch is
turned off. Then, position the motor drive on the camera's bottom plate, its handgrip should be at the same end of the camera
as the film advance lever. Ensure that the raised ring around the
drive shaft is correctly seated inside the locating collar, coaxial
with the camera's film advance coupling. Then, fasten the motor drive's attachment screw, turning it clockwise by means of
the thumb wheels on either side. Simultaneous use of both fore
finger and thumb will speed up attachment. Make sure there is
no gap between the motor drive and the camera body; then
tighten the attachment screw firmly.
When the MD-12 is mounted on an FM camera (Serial No. below 3,000,000) *, the camera's mode selector switch around the
shutter release button should be set to "M" (motor)—the red
line on the selector being aligned with the line on the camera
body. This is not necessary with FM cameras (Serial No. over
3,000,000)* or the FE, because the switchover from manual film
advance to motor drive operation is made electronically and
automatically when the motor drive is switched on. Then, turn
the motor drive's power switch to "ON." If the film has been
advanced prior to attaching the motor drive, the motor drive
Page 7

will not operate until you make an exposure using the trigger
www.mynikon.com.pl
button on the handgrip. If the film has not been advanced prior
to its attachment, the motor drive will operate when its power is
turned on, and advance the film and cock the shutter ready for
the next exposure. The motor drive will stop and the pilot lamp
go out after advancing the film one frame only, regardless of
the setting of the S-C selector on the handgrip.
*The serial number appears on back of the camera body just below the
film advance lever.
Nikon FM
Page 8

OPERATION
www.mynikon.com.pl
The camera/MD-12 combination operates in virtually the same
manner as the camera on its own. Please refer to your camera's
instruction manual for details. When the MD-12 is attached,
leave the film advance lever flush with the camera body. Then,
when the motor drive's power switch is turned on, the camera's
meter can be activated by halfway depressing the trigger button. After releasing your finger from the button, the meter will
remain on for approx. 50 seconds giving you enough time to set
the correct exposure or adjust the controls. Then the meter will
turn itself off automatically to conserve battery power.
With the motor drive attached all exposures should be made via
the trigger button on the motor drive grip. Concentric with this
triggering button is the motor drive S-C selector, giving you a
choice of either single frame (S) or continuous (C) shooting. T o
set the motor drive to either S or C, depress the lock and turn the
selector to the required setting.
Single-frame shooting: In this mode, depressing the trigger button on the motor drive grip fires the shutter, advances the film
one frame and cocks the shutter. You can lift your finger from
the trigger button even before the exposure is completed since
the electronic interlock prevents the film from advancing until
the shutter has completed its travel. The usable shutter speed
range when the MD-12 is set at "S" is from 1 second to 1/1000
second with the FM. With the FE, in addition to the automatic
setting (AUTO), you can set any of the marked speeds including M90. The "B" setting cannot be used with either camera.
Page 9

Continuous shooting: In this mode, the motor drive will auto-
www.mynikon.com.pl
matically trigger the shutter and wind the film for as long as the
trigger button is depressed. Framing rate will depend on the
shutter speed setting, as the motor drive's electronic interlock
with the camera's shutter automatically advances the film as
soon as the exposure is completed. Maximum framing rate is
approximately 3.5 frames per second (fps) at shutter speeds faster
than 1/125 sec.
Remember that continuous shooting at the maximum rate of 3.5
fps will result in a standard 36 exposure cassette being completely exposed in a little less than 11 seconds. Consequently,
you should exercise restraint when operating with the motor set
for continuous shooting. Many photographers, however, prefer
to leave the camera set for continuous shooting, lifting their
finger off the trigger button the instant the exposure is made.
This technique results in single-frame operation, but readies the
photographer for taking sequence photographs should the situation or need arise. The usable shutter speed range when the
MD-12 is set at "C" is from 1/2 second to 1/1000 second with
the FM. With the FE, in addition to the automatic setting
(AUTO), you can set any of the marked speeds including M90.
The "B" setting cannot be used.
The FE's automatic exposure capability allows you to follow
subjects as they pass through areas of differing brightness, yet
still obtain~ correctly exposed results.
Although widely varying brightness changes of EV 4 or more
may sometimes result in over- or underexposure for the first
frame following the transition, this situation is rare in practice
and thus likely to be of little consequence to the average photographer.
Important! After shooting, make sure that you turn the motor
drive off.
Note: The camera/MD-12 combination is designed to work smoothly
under a wide range of climatic conditions. Sub-zero (centigrade) temperatures, however, have a very severe effect on any mechanism. For
faultless performance under these conditions, we recommend that, for
continuous shooting, you do not use shutter speeds of less than 1/30
sec. The use of slower shutter speeds may result in erratic operation. If
it is imperative to use shutter speeds of less than 1/30 sec., switch to
single frame shooting.
Page 10

FILM REWINDING MANUAL FILM ADVANCE
www.mynikon.com.pl
When the roll of film in the camera has been fully exposed, the
MD-12's motor will automatically stop, releasing film tension,
with the pilot lamp remaining lit. Turn the power switch off to
prevent unnecessary battery drain. Then, push the rewind slide
on the motor drive up. Rewind the film normally. See your
camera's instruction manual for details.
If at any time you wish to manually advance the film without
removing the MD-12 from the camera, turn off the motor drive's
power switch after it has finished advancing the film from the
previous exposure. Then, in the case of the FM (Serial No. below 3,000,000), turn the mode selector switch so that the black
line (white, on black camera bodies) is adjacent to the line on
the camera body. As for the FM (Serial No. over 3,000,000) or
the FE, it switches automatically from motor drive to manual
film advance operation when the motor drive is switched off.
Page 11

DOUBLE/MULTIPLE EXPOSURES
www.mynikon.com.pl
Your camera has a special double/multiple exposure provision
built-in in the form of the multi-exposure button or lever. Merely
depressing this button or lever allows you to superimpose any
number of pictures on the same frame. This provision not only
continues to function with the motor drive attached, but opens
up creative possibilities that are just not possible when the camera is operated manually.
When the motor drive S-C selector is set to "S," the double/
multiple exposure situation is exactly the same as for the camera alone, except that the trigger button on the motor drive is
used to trigger the exposure. Remember to depress and hold the
multi-exposure button or lever, with your left hand, before you
remove your finger from the trigger button. Otherwise, the film
will be advanced.
On the "C" setting, triggering the release button, while holding
the multi-exposure button or lever depressed, will produce multiple images on the same frame. Either the motion of the subject
or your movement of the camera will result in the images being
separated, producing an original and interesting effect. Hold the
multi-exposure button or lever depressed with your left hand,
while holding the camera normally with the right. Remember to
release the multi-exposure button or lever just before the last
exposure, so that the camera is left ready for the next sequence
with an unexposed frame in the film gate. If not, cap the lens
and make one "blank" exposure. The camera is then ready for
the next shot.
Nikon FMNikon FE
Page 12

TIME LAPSE
www.mynikon.com.pl
Time lapse photography, the taking of a series of photographs
over a period of time from a fixed position, is easily accomplished with your MD-12 equipped camera and a suitable timing device. Timing devices for time lapse photography—the
Nikon Intervalometer MT-1,for example—usually have two
variable controls: one for puIse duration and the other for interval time. Pulse duration refers to the length of time that the triggering pulse lasts. Interval time is the time interval between
pulses and governs the frequency of the photographs. Additionally, the S-C selector on the MD-12 provides you with the option of taking single photographs or shooting in bursts.
With the S-C selector set to "S," one exposure will be made for
each triggering pulse, the motor winding on automatically at
the end of the triggering pulse or the exposure, whichever is
longer. The interval time can be set at any duration, but avoid
setting the trigger pulse longer than the interval time. Otherwise continuous or erratic operation will occur.
With the S-C selector set to "C," if the triggering pulse's duration is longer than the shutter speed set (or 0.25 sec. in the case
of the higher shutter speeds), bursts will be fired at each interval. For example, if the shutter speed is set at 1/1000 sec., and
the trigger pulse duration is 2 sec., then approximately 7 exposures will be made at each interval.
Generally speaking you will find that operation with the S-C
selector set to "S" and the trigger pulse duration set between 0.1
and 0.25 sec. is advisable for the majority of time lapse situations. The variable trigger pulse duration found on some intervalometers is a feature necessitated by the design of the older
generation of motor drives, and is largely redundant with the
MD-12. Time lapse photography is not possible with the shutter
speed dial set to "B." Should you attempt this, the camera's mirror may lock up, with the shutter remaining open, making operation impossible. To restore normal operation in the event of
this happening, merely turn the shutter speed dial away from
the "B" setting.
Page 13

ACCESSORIES
www.mynikon.com.pl
Remote Cord MC-4
The Remote Cord MC-4 serves two purposes: it can be used
singly as a remote cord or in combination with other MC-4 cords
for simu Itaneous operation of multiple motor-driven cameras.
One end of the MC-4 features a plug for connection into the
camera's remote control socket while the other end has plus and
minus banana-type plugs.
For remote control operation, you can attach the banana plugs
to a triggering circuit of your own design. The cable can be
extended to any length, provided that circuit resistance does not
exceed 1 kQ. For longdistance operation, however, you will find
that Modulite orfadio control systems are more convenient.
For simultaneous operation, you can connect two or more motor-driven cameras in parallel using a circuit containing two or
more MC-4 cords, plus additional wiring. (Refer to the diagram
for details.) For troublefree operation, the common electrical
leads (indicated by bold lines in the diagram) should be kept as
short as possible. In particular, the total length of each connecting cord (including the MC-4 cord) from motor drive to switch
and back again must not create a resistance of more than 5Q. In
certain installations in which long cords are required, the use of
a relay box is strongly recommended.
Note: When the MC-4 cord is connected to the MD-1 2's remote control socket, the camera's meter is switched on as soon as you turn on the
motor drive's power switch.
Remote Cord MC-4
Page 14

ACCESSORIES - continued
www.mynikon.com.pl
Remote Cord MC-10
With a convenient handgrip and trigger button, the Remote MC10 Cord can be used to fire the MD-12 remotely at up to a distance of 3 meters (10 feet).
Note: When the MC-10 cord is connected to the MD-12's remote control socket, the camera's meter is switched on as soon
as you turn on the motor drive's power switch.
Pistol Grip Model 2 and Connecting Cord MC-3
The Pistol Grip Model 2 screws into the tripod socket of the
lens or motor drive to serve both as a means of support and
as a means of motor triggering when working with long telephoto lenses. For electrical connection between the pistol
grip and the remote control socket on the motor drive, you
will also need an MC-3 cord.
Note: When the MC-3 cord is connected to the MD-12's remote control socket, the camera's meter is switched on as soon as you turn
on the motor drive's power switch.
Page 15

ACCESSORIES - continued
www.mynikon.com.pl
Intervalometer MT-1 and Connecting Cord MC-5
The Nikon MT-1 is a precision digital timing unit for slow sequence shooting of experiments or work study programs. Fully
solid state, the unit requires only four AA size penlight batteries
for operation; this makes it convenient for use on location, as
well as in the laboratory. Use of the MT-1 in conjunction with
your MD-12 equipped camera is merely a matter of connecting
the two units w~th the MC-5 cord supplied with the intervalometer. Exposure intervals of up to eight minutes can be set on
the MT-1 control panel.
Note: When the MC-5 cord is connected to the MD-12's remote control
socket, the camera's meter is switched on as soon as you turn on the
motor drive's power switch.
Modulite Remote Control Set ML-1 and Connecting
Cord MC-8
With the ML-1 set, you can trigger your MD-12 equipped camera by remote control at distances of up to 60 meters. Using
Nikon's modulated light system, the ML-1 set assures you of
trouble-free remote control operation over moderate distances.
The set's lightweight and compact size, plus its use of a 9V laminated dry battery, make it ideal for use in both field and studio
applications. Connection to the motor drive's remote control
socket is by the MC-8 cord supplied with the set.
Note: When the MC-8 cord is connected to the MD-1 2's remote control socket, the camera's meter is switched on as soon as you turn on the
motor drive's power switch.
Page 16

ACCESSORIES - continued
www.mynikon.com.pl
Radio Control Set MOO-1 and Connecting Cord MC-5
The MOO-1 provides you with a wireless, remote control triggering capability for your MD-12 equipped Nikon FM or FE.
The set can operate up to three cameras, either simultaneously
or individually, at ranges up to 0.7km. Battery powered, the
MOO-1 is compact and lightweight, making it ideal for field
use. it connects to the remote control socket on the MD-12 via
the MC-5 cord supplied with the set.
Note: When the MC-5 cord is connected to the MD-12's remote control
socket, the camera's meter is switched on as soon as you turn on the
motor drive's power switch.
Terminal Release M R-2
Plugging into the remote control socket, this accessory provides
an additional trigger button for firing the motor drive with the
camera in the vertical position. It also allows the MD-12 to be
triggered with either the Nikon Cable Release AR-2 or the
Double Cable Release AR-4. By depressing the button halfway ,
you can take a meter reading; the meter will automatically stay
on for approx. 50 sec. after pressure is removed from the button. To take the picture, depress the button all the way.
Page 17

TROBLESHOOTING
www.mynikon.com.pl
Your MD-12 has been designed to make motor drive photography as simple and trouble-free as possible. However,
should you operate the camera incorrectly or without clearly
understanding what you are doing, minor "hitches" may
occur. If this occurs, please follow the instructions below.
If the motor drive "jams" during operation, this usually
means that the controls have either been operated incorrectly
or in the wrong sequence, and the coupling mechanism has
disengaged. Should this occur, turn the MD-12's power
switch off and make one exposure with the camera's shutter
release button, remembering, in the case of the FM (Serial
No. below 3,000,000), to switch over to manual film advance.
You may find that the motor drive did not finish advancing
the film. If so, complete the film advance using the camera's
film advance lever , then press the shutter release button. Do
not advance the film. Switch the motor drive back on and,
in the case of the FM (Serial No. below 3,000,000), revert to
the motor drive mode. The motor drive should advance the
film ready for the next exposure. If this does not clear the
malfunction or you are unable to move the film advance le-
ver at all, do not try to force the controls. Turn the motor
drive off once more and simply remove the motor drive fr om
the camera. This will clear the tension in the film advance
mechanism, allowing you to advance or finish advancing the
film and make one exposure, again do not advance the film.
Reattach the motor drive and, in the case of the FM (Serial
No. below 3,000,000), switch to motor drive operation. When
you switch the motor drive back on, the film should then
advance one frame ready for the next exposure.
Should you trigger the motor drive with the shutter speed
dial set to "B" the absence of an "exposure complete signal" may result in the camera's mirror locking up and the
shutter remaining open. To restore normal operation in the
event of this happening, merely move the shutter speed dial
away from "B."
At all times during motor drive operation, the film advance
lever should remain flush with the back of the camera. If
you move it out to its stand-off position, the motor_drive
will stop. Returning the lever to its flush position will automatically start the motor drive once more.
Page 18

BATTERY PERFORMANCE SPECIFICATIONS
www.mynikon.com.pl
Battery performance varies greatly, depending on its type
and age, as well as on operating conditions, including temperature. Consequently, the number of rolls that can be exposed with one set of batteries cannot be accurately predicted. As a guide, however, you can expect to be able to
expose more than a hundred 36-exposure rolls of film per
set of alkaline-manganese batteries.
Since batteries have poor low-temperature characteristics,
battery performance diminishes considerably as the temperature decreases. This r esults in slower shooting speed and
reduced film transport capacity. Alkalinemanganese batter ies, in particular , suffer severely at temperatures below 0 C.
Camera fitting: Shooting speed:
Shooting speed: 3.5 fgs approx. maximum (at shut-
ter speeds faster than 1/125 sec.)
Shooting mode: Single frame (S)
Continuous (C)
Usable shutter
speeds: At "S" setting
FM 1 ~ 1/1000 sec.
FE 8 ~ 1/1000 sec., Auto, M90
At "C" setting
FM 1/2 ~ 1/1000 sec.
FE 8 ~ 1/1000 sec., Auto, M90
Pilot lamp: LED lights up when in operation
Power switch: On/off switch provided (also acts as
camera's meter switch
Meter switch: Trigger button also acts as meter
"on" switch and automatically goes
"off" approx. 50 seconds later
Remote control: Possible; uses standard Nikon 3pin
connector .
Power source: Eight 1.5V penlight batteries (AA
size, in integral battery chamber)
Weight: Dimensions: Approx. 41 0g (without batteries)
Nikon FM, Nikon FE Approx. 144 x 36 x 42mm;
approx. 144 x 68.5 x 109.5mm (including the grip)
 Loading...