

Page 1
Nikon
Fun
Instruction Manual
Manual de instrucciones
>Tbuch
4
Page 2
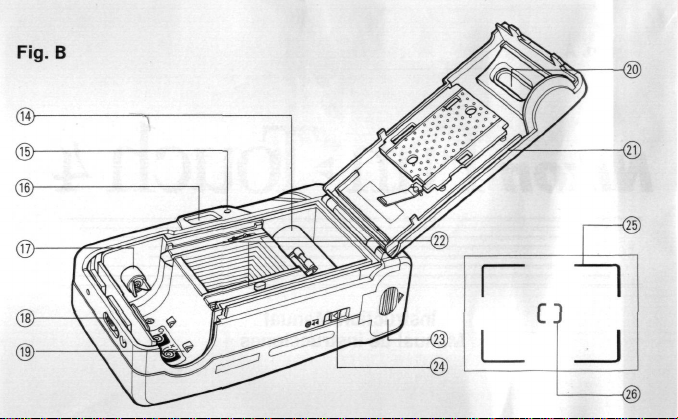
Fig.
(JD-
B
-®
-©
^
4$)
Page 3
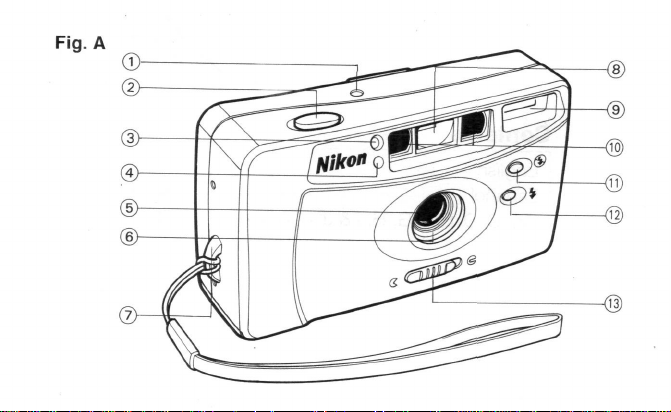
Fig.
A
Page 4
Contents
English
Espanol
Fig.
1-11
13-24
C, D, E,
F,
G, H, I & J 25-31
Page 5
English
Foreword
Thank you for purchasing the Nikon Fun Touch 4/Fun Touch 4 QD.
It is a very enjoyable, easy-to-use camera. However, in order to obtain the best
results, be sure to read this instruction manual thoroughly before you begin.
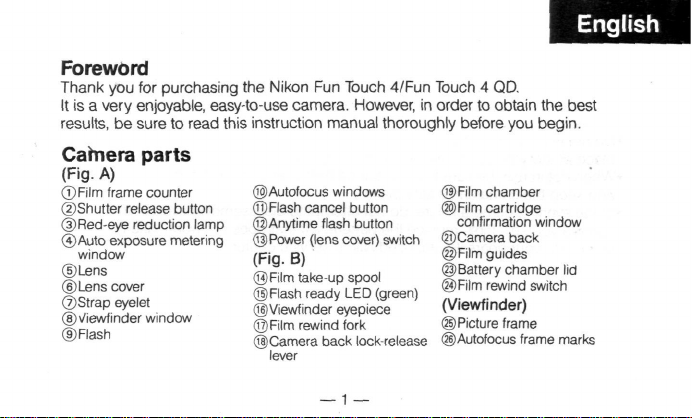
Camera parts
(Fig.
A)
©Film frame counter
©Shutter release button
©Red-eye reduction lamp
©Auto exposure metering
window
©Lens
©Lens cover
©Strap eyelet
©Viewfinder window
©Flash
©Autofocus windows
©Flash cancel button
©Anytime flash button
©Power (lens cover) switch
(Fig-
B)
©Film take-up spool
©Flash ready LED (green)
©Viewfinder eyepiece
©Film rewind fork
©Camera back lock-release
lever
©Film chamber
©Film cartridge
confirmation window
©Camera back
©Film guides
©Battery chamber lid
©Film rewind switch
(Viewfinder)
©Picture frame
©Autofocus frame marks
Page 6
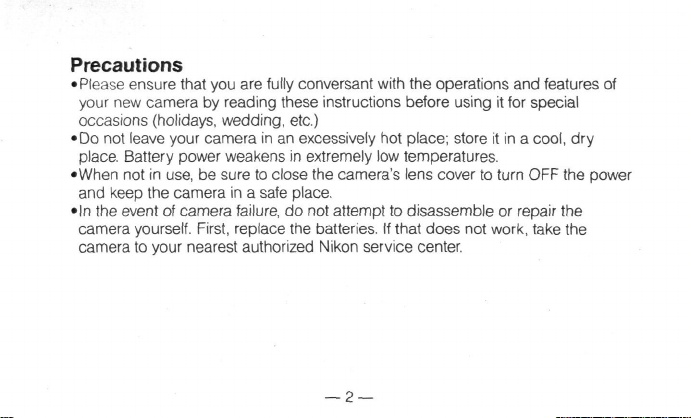
Precautions
•
Please
ensure that you are fully conversant with the operations and features of
your new camera by reading these instructions before using it for special
occasions (holidays, wedding, etc.)
•
Do
not leave your camera in an excessively hot place; store it in a
place.
Battery power weakens in extremely low temperatures.
•When not in use, be sure to close the camera's lens cover to turn OFF the power
and keep the camera in a safe place.
•In the event of camera failure, do not attempt to disassemble or repair the
camera yourself. First, replace the batteries. If that does not work, take the
camera to your nearest authorized Nikon service center.
— 2 —
cool,
dry
Page 7
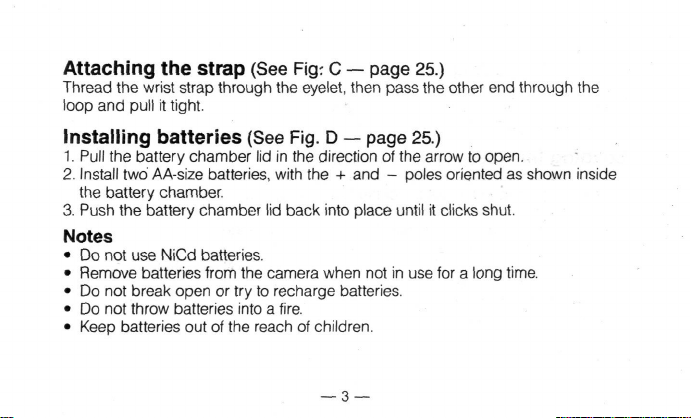
Attaching the strap (See
Thread the wrist strap through the eyelet, then pass the other end through the
loop and pull it tight.
Fig: C — page 25.)
Installing batteries (See Fig. D — page 25.)
1.
Pull the battery chamber lid in the direction of the arrow to open.
2.
Install two AA-size batteries, with the + and - poles oriented as shown inside
the battery chamber.
3. Push the battery chamber lid back into place until it clicks shut.
Notes
• Do not use NiCd batteries.
• Remove batteries from the camera when not in use for a long time.
• Do not break open or try to recharge batteries.
• Do not throw batteries into a fire.
• Keep batteries out of the reach of children.
— 3 —
Page 8
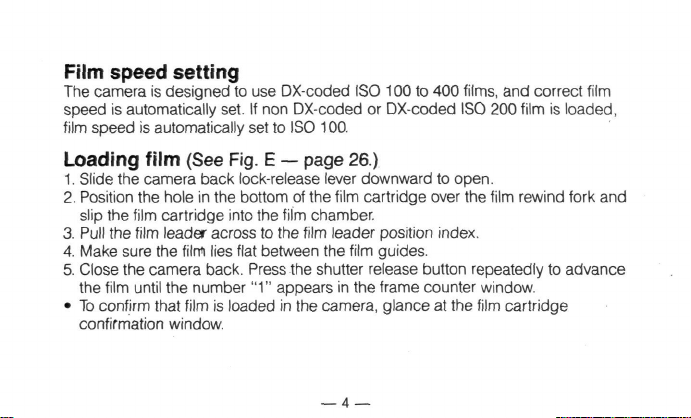
Film speed setting
The camera is designed to use DX-coded ISO 100 to 400 films, and correct film
speed is automatically set. If non DX-coded or DX-coded ISO 200 film is loaded,
film speed is automatically set to ISO 100.
Loading film (See
1.
Slide the camera back lock-release lever downward to open.
2.
Position the hole in the bottom of the film cartridge over the film rewind fork and
slip the film cartridge into the film chamber.
3. Pull the film leader across to the film leader position index.
4.
Make sure the film lies flat between the film guides.
5. Close the camera back. Press the shutter release button repeatedly to advance
the film until the number
• To confirm that film is loaded in the camera, glance at the film cartridge
confirmation window.
Fig. E — page 26.)
"1"
appears in the frame counter window.
— 4 —
Page 9
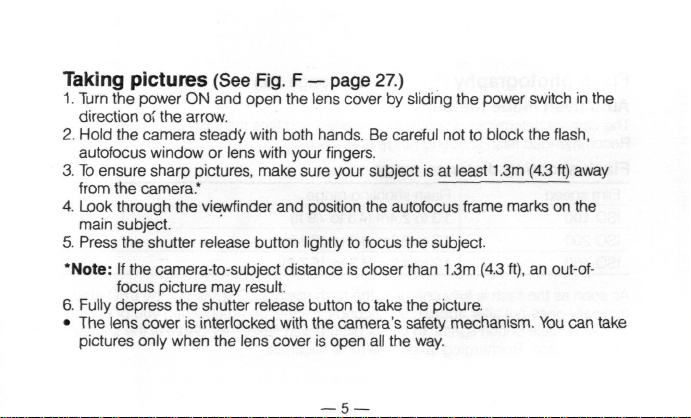
Taking pictures (See Fig.
1.
Turn the power ON and open the lens cover by sliding the power switch in the
direction o( the arrow.
2.
Hold the camera steady with both hands. Be careful not to block the flash,
autofocus window or lens with your fingers.
3. To ensure sharp pictures, make sure your subject is at least 1.3m (4.3 ft) away
from the camera*
4.
Look through the viewfinder and position the autofocus frame marks on the
main subject.
5. Press the shutter release button lightly to focus the subject.
*Note:
If the camera-to-subject distance is closer than 1.3m (4.3 ft), an out-of-
focus picture may result.
6. Fully depress the shutter release button to take the picture.
• The lens cover is interlocked with the camera's safety mechanism. You can take
pictures only when the lens cover is open all the way.
F —
page 27.)
— 5 —
Page 10
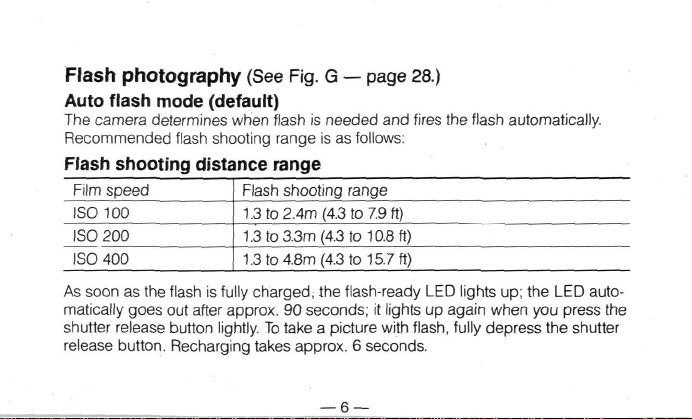
Flash photography (See Fig. G — page 28.)
Auto flash mode (default)
The camera determines when flash is needed and fires the flash automatically.
Recommended flash shooting range is as follows:
Flash shooting distance range
Film speed
ISO 100
ISO
200
ISO
400
As soon as the flash is fully charged, the flash-ready LED lights up; the LED automatically goes out after approx. 90 seconds; it lights up again when you press the
shutter release button lightly.
release button. Recharging takes approx. 6 seconds.
Flash shooting range
1.3 to 2.4m
1.3 to 3.3m
1.3 to 4.8m
(4.3
to
7.9
ft)
(4.3
to 10.8 ft)
(4.3
to
15.7
ft)
To
take a picture with flash, fully depress the shutter
— 6 —
Page 11
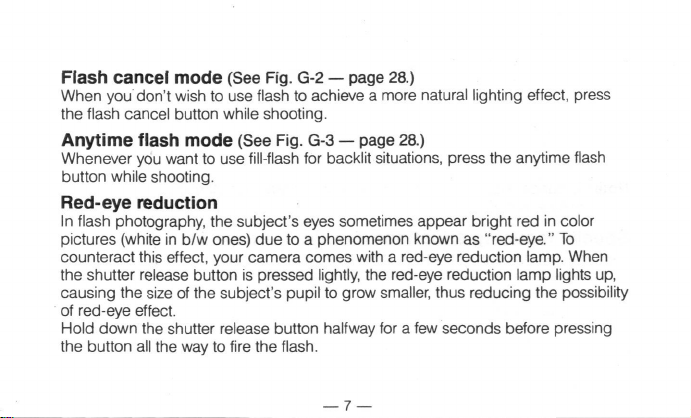
Flash cancel mode (See Fig. G-2 — page 28.)
When you don't wish to use flash to achieve a more natural lighting effect, press
the flash cancel button while shooting.
Anytime flash mode (See Fig. G-3 — page 28.)
Whenever you want to use fill-flash for backlit situations, press the anytime flash
button while shooting.
Red-eye reduction
In flash photography, the subject's eyes sometimes appear bright red in color
pictures (white in b/w ones) due to a phenomenon known as "red-eye." To
counteract this effect, your camera comes with a red-eye reduction lamp. When
the shutter release button is pressed lightly, the red-eye reduction lamp lights up,
causing the size of the subject's pupil to grow smaller, thus reducing the possibility
of red-eye effect.
Hold down the shutter release button halfway for a few seconds before pressing
the button all the way to fire the flash.
— 7 —
Page 12
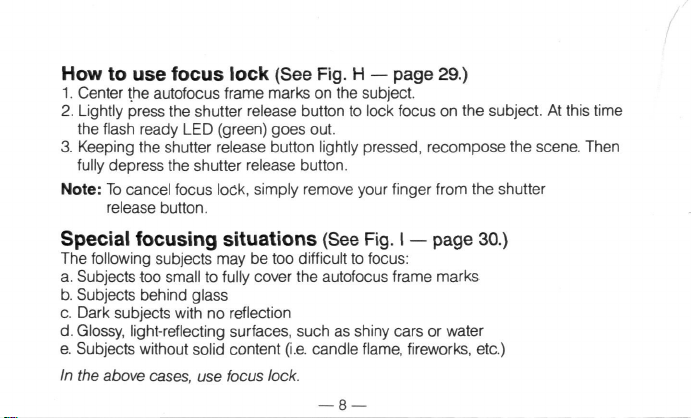
How to use focus lock (See
1.
Center the autofocus frame marks on the subject.
2.
Lightly press the shutter release button to lock focus on the subject. At this time
the flash ready LED (green) goes out.
3. Keeping the shutter release button lightly pressed, recompose the scene. Then
fully depress the shutter release button.
Note:
To cancel focus lock, simply remove your finger from the shutter
release button.
Special focusing situations (See
The following subjects may be too difficult to focus:
a. Subjects too small to fully cover the autofocus frame marks
b. Subjects behind glass
c. Dark subjects with no reflection
d.
Glossy, light-reflecting surfaces, such as shiny cars or water
e. Subjects without solid content
In the above
cases,
use focus
Fig. H —
page 29.)
Fig. I — page 30.)
(i.e.
candle flame, fireworks, etc.)
lock.
— 8 —
Page 13
Rewinding the film (See Fig. J — page 31.)
1.
At the end of the
2.
To
rewind the
the film rewinds automatically.
3. Check to see if the frame counter has returned to "S".
4.
Open the camera back and remove the film for processing without delay. Open
the camera back to release the film rewind switch.
To
rewind the film in mid
the
arrow.
roll,
the film advance motor stops and the shutter is locked.
film,
slide the film rewind switch in the direction of the arrow, and
roll,
also slide the film rewind
— 9 —
switch
in the direction of
Page 14

Specifications
Type:
Film format:
Lens:
Focusing:
Shooting distance:
Shutter:
View/finder:
Frame counter:
Film speed:
Film transport:
Flash:
35mm lens shutter camera with built-in flash
24mm x 36mm (standard 35mm format)
29mm f/4.5 lens (3 elements in 3 groups)
Active autofocus system with focus lock
1.3m (4.3 ft.) to infinity
Mechanical lens shutter, fixed shutter speed of 1 /125 sec.
Albada-bright frame type (Magnification:
coverage over 80%)
Additive type, automatic resetting to "S" when the
camera back is opened.
Auto setting to ISO 100 or 400 for DX-coded film (ISO
100 for DX-coded ISO 200 film and non-DX-coded film)
Automatic advancing, rewinding via film rewind switch,
mid-roll rewind possible.
Built-in auto flash with recycling time of approx. 6 sec.
Guide No. 8 (ISO 100 and meters)
— 10 —
0.45x;
field
Page 15

Flash shooting distance 1.3 — 2.4m (4.3 - 7.9 ft) at ISO 100, 1.3 — 3.3m (4.3 range:
10.8 ft) at ISO 200, and 1.3 — 4.8m (4.3 — 15.7 ft) at ISO
Battery life: Approx. 30 rolls of 24-exposure film (20 rolls of 36-exposure
Red-eye reduction: Red-eye reduction lamp lights up when the shutter
Auto power off: With the power switch ON, camera power automatically
Power source: Two 1.5V AA-size
400
film) with flash for half of all exposures
release button is pressed lightly. Hold down the shutter
release button halfway for a few seconds before pressing
the button all the way to fire the flash.
turns OFF after approx. 90 seconds when the camera is
not in use. To turn the power ON again, lightly press the
shutter release button or turn the power switch ON.
usable
(R6,
— 11 —
LR6) batteries, NiCd battery not
Page 16

Dimensions(WxHxD): Approx. 118x65x 42mm
Approx. 118 x 65 x 47mm [4.6 x 2.6 x 1.9 in.]
(Fun Touch 4 QD)
Weight (without Approx. 165 g (5.8 oz) (Fun Touch 4)
batteries): Approx. 175 g (6.2 oz) (Fun Touch 4 QD)
Specifications and design are subject to change without
— 12 —
[4.6
x2.6x 1.7 in.]
notice.
(Fun Touch
4)
Page 17

Espanol
Prefacio
Muchas gracias por su compra de la Nikon Fun Touch 4/Fun Touch 4 QD.
Es una-camara facil de usar que le ayudara a conservar sus momentos mas
felices. Sin embargo, para que pueda disfrutar al maximo de esta camara, lea
todas las instrucciones de este manual hasta entenderlas perfectamente.
Nomenclatura
(Figuras A)
©Contador de fotogramas
©Disparador
©Luz de reduccion de ojos rojos
©Ventanilla de medicion de exposicidn automatica
©Objetivo
©Tapa del objetivo
©Argolla de la correa
©Ocular
©Flash
©Ventanillas de enfoque automatico
©Boton de cancelation del flash
©Botbn de flash en todo momento
©Interrupter principal (tapa del objetivo)
— 13 —
(Figuras B)
©Bobina de la pelfcula
©LED de flash listo (verde)
©Ocular del visor
©Horquilla de rebobinado de pelfcula
©Palanca de apertura del respaldo trasero
©Compartimiento del rollo
©Ventanilla de confirmacidn del cartucho de la pelicula
©Respaldo de la camara
©Gufas de pelicula
©Tapa del compartimiento de las pilas
©Interruptor para rebobinado de pelicula
(Visor)
©Marco de la imagen
©Marcas del encuadre de enfoque automatico
Page 18

Precauciones
•Asegurese de que entiende perfectamente el funcionamiento y las
caracteristicas de su nueva camara leyendo estas instrucciones antes de
utilizarla para una ocasion especial (para sus vacaciones, para un casamiento,
etc.)
•No deje la camara en un lugar muy caliente; guardela siempre en un lugar seco
y a la sombra. La corriente de la pila se debilita a temperaturas muy bajas.
•Cuando no se este utilizando, cierre la tapa del objetivo de la camara para
desconectar la corriente y guarde la camara en un lugar seguro.
•En el caso de que la camara no funcione, no trate de desarmarla o reparar la
camara por su cuenta. Pruebe a cambiar primero las pilas. Si no se soluciona el
problema, lleve la camara
al
centra de servicio autorizado de Nikon mas cercano.
— 14 —
Page 19

Fijacion de la correa (Vea la figura C-pagina 25.)
Pase la correa munequera por la argolla y pase la otra punta por el bucle,
apretando firmemente el nudo.
Instalacion de las pilas (Vea la figura D-pagina 25.)
1.
Abra la fapa del compartimiento de las pilas en el sentido de la flecha.
2.
Instale dos pilas de tamano AA con los polos + y - en el sentido indicado por
el dibujo dentro del compartimiento de las pilas.
3. Vuelva a cerrar la tapa del compartimiento de las pilas hasta que se asegure en
su lugar.
Notas:
• No utilice pilas de niquel-cadmio.
• Saque las pilas de la camara si no se la va a utilizar durante mucho tiempo.
• No trate de desarmar o de recargar las pilas.
• No tire las pilas al fuego.
• Guarde las pilas en un lugar fuera del alcance de los ninos.
— 15 —
Page 20

Ajuste de sensibilidad de la pelicula
La camara fue disenada para utilizar peliculas con codigo DX con ISO 100 a 400
para un ajuste automatico de la sensibilidad de la pelfcula. Si se coloca una
pelicula sin codigo DX o una pelfcula con codigo DX ISO 200, se ajustara
automaticamente la sensibilidad de la pelicula a ISO 100.
Carga de la pelicula (Vea la figura E-pagina 26.)
1.
Mueva la palanca de apertura del respaldo trasero hacia abajo para abrir.
2.
Instate el orificio en la parte inferior del cartucho de pelicula sobre la horquilla
de rebobinado de la pelicula e introduzca el cartucho de pelicula en el
compartimiento del rollo.
3. Tire de la punta de la pelicula hasta el indice de posicion de punta de la pelicula.
4.
Verifique que la pelicula esta apoyada contra las guias de pelicula.
5. Cierre el respaldo de la camara. Presione varias veces el obturador para que la
pelicula avance hasta que el numero
de fotogramas.
• Para confirmar que la pelicula esta cargada en la camara, mire por la ventanilla
de confirmacion del cartucho de pelicula.
"1"
aparezca en la ventanilla del contador
— 16 —
Page 21

Para tomar fotografias (Vea la figura F-pagina 27.)
1.
Conecte la camara y abra la tapa del objetivo deslizando el interrupter principal
en el sentido de la flecha.
2.
Sujete firmemente la camara con ambas manos. Tenga cuidado de que no esta
tapando el flash, la ventanilla de enfoque automatico o el objetivo con sus
dedos.
3. Para que las fotografias sean mas nitidas, verifique que el objeto esta alejado
por lo menos 1,3 m (4,3 pies) de la camara*
4.
Mire por el visor y apunte el objeto principal para que quede dentro de las
marcas del encuadre de enfoque automatico.
5. Presione el disparador hasta la mitad para enfocar sobre el objeto.
*Nota:
Si la distancia entre la camara y el objeto es de menos de 1,3 m (4,3 pies)
la imagen puede aparecer desenfocada.
6. Presione el disparador hasta el fondo para tomar la fotograf
• La tapa del objetivo esta conectada al mecanismo de seguridad de la camara.
Se pueden tomar fotografias solo cuando la tapa del objetivo esta totalmente
abierta.
— 17 —
ia.
Page 22

Fotografi'a con flash (Vea la figura G-pagina 28.)
Modalidad del flash automatico (por omision);
La camara determina las circunstancias que hacen necesario el disparo del flash
y hace que destelle automaticamente. Las distancias maximas recomendadas
para el uso del flash son las siguientes:
Distancias maximas para la fotografi'a con flash
Sensibilidad de la pelfcula
ISO 100
ISO 200
ISO
400
Cuando se haya cargado completamente el flash, se encendera la luz LED de
flash listo; el LED se apaga automaticamente despues de aproximadamente 90
segundos; se vuelve a encender nuevamente cuando se presione ligeramente el
obturador. Para tomar una fotografi'a con flash, presione el disparador hasta el
fondo. Demora unos 6 segundos en volverse a cargar el flash.
Distancia de la fotografi'a con flash
1,3 a 2,4 m (4,3 a 7,9 pies)
1,3 a 3,3 m (4,3 a 10,8 pies)
1,3 a 4,8 m (4,3 a 15,7 pies)
—
18
—
Page 23

Modalidad de cancelacion del flash (Vea la figura G-2-pagina 28.)
Si no desea que destelle el flash porque prefiere que su fotografi'a tenga un efecto
de iluminacion mas natural, presione el boton de cancelacion del flash mientras
hace la fotografia.
AModalidad de flash en todo momento (Vea la figura G-3-pagina 28.)
Si desea utilizar un flash de relleno, por ejemplo, en el caso de que el objeto esta
iluminado por atras, presione el boton de flash en todo momento mientras hace la
fotografia.
Reduccion de ojos rojos
En la fotografia con flash, los ojos de las personas fotografiadas aparecen,
a veces, con un color rojo brillante en las peli'culas en color (o blancos en las
fotografias en bianco y negro) debido a un fenomeno conocido como de "ojos
rojos".
Para evitar este efecto, su camara tiene una luz de reduccion de ojos rojos.
Cuando se presiona el disparador hasta la mitad, se enciende la luz de reduccion
de ojos rojos, haciendo que disminuya el tamaho de la pupila de las personas
que estan frente a la camara, reduciendo asi la posibilidad de que se produzca
este efecto de ojos rojos.
—
19
—
Page 24

Mantenga presionado el disparador hasta la mitad durante unos segundos y,
a continuacion, presione el disparador hasta el fondo para que destelle el flash.
Forma de utilizar el bloqueo del enfoque
(Vea la figura H-pagina 29.)
1.
Apunte el objeto principal para que quede dentro de las marcas de encuadre
del enfoque automatico.
2.
Oprima ligeramente el obturador para que se bloquee el enfoque sobre el
objeto. Se apaga en este momento el LED de flash listo (verde).
3. Mantenga presionado ligeramente el disparador y vuelva a componer la
escena. A continuacion, presione el disparador hasta el fondo.
Nota:
Para cancelar el bloqueo del enfoque, simplemente levante el dedo del
disparador.
Situaciones de enfoque especiales (Vea la figura l-pagina 30.)
Los siguientes objetos pueden no poder enfocarse
a. Objetos demasiado pequehos como para llenar las marcas del encuadre del
enfoque automatico
— 20 —
bien:
Page 25

b. Objetos que estan detras de un vidrio
0. Objetos oscuros que no reflejan la luz
d.
Objetos brillantes, que reflejan mucho la luz, por ejemplo un coche lustrado o
el agua.
e. Objetos no solidos (por ejemplo la llama de una vela, fuegos artificiales, etc.)
En
estos
casos,
utilice el bloqueo del
enfoque.
Rebobinado de la pelicula (Vea la figura J-pagina 31.)
1.
Cuando llegue al final del rollo de la pelfcula, el motor de avance se para y el
disparador queda bloqueado.
2.
Para rebobinar la pelfcula, deslice el interruptor de rebobinado de la pelfcula
en el sentido de la flecha, para que la pelfcula se rebobine automaticamente.
3. Verifique que el contador de fotogramas haya vuelto a "S".
4.
Abra el respaldo de la camara y saque inmediatamente la pelfcula para llevarla
a la tienda de fotograffas. Abra el respaldo de la camara para soltar el
interruptor de rebobinado de la pelfcula.
Si se desea rebobinar
rebobinado de la pelicula en el
la
pelicula en la mitad del
sentido
de
—
21
la
flecha.
—
rollo,
mueva el
interruptor
de
Page 26

Especificaciones
Tipo:
Camara con obturacion en el objetivo, de 35 mm, con
Formato de fotografia: 24 mm x 36 mm (formato normal de 35 mm)
Objetivo: Objetivo de 29 mm f/4,5 (3 elementos en 3 grupos)
Enfoque: Sistema de enfoque automatico activo con bloqueo del
Distancia de disparo: 1,3 m (4,3 pies) a infinito
Obturador: Obturador en el objetivo mecanico, velocidad de
Visor: Tipo imagen brillante cortada
Contador de Tipo aditivo; reposition automata a "S" cuando se abre
fotogramas: el respaldo de la camara.
Sensibilidad de la Ajuste automatico a ISO 100 o 400 para pelfculas con
pelfcula: codigo DX (ISO 100 tambien para las pelfculas ISO 200
flash incorporado
enfoque
obturacion fija de 1/125 de segundo
(Aumento:
con codigo DX y para las pelfculas sin codigo DX)
0,45x;
cobertura de campo de mas del 80%)
—
22
—
Page 27

Transporte de pelicula: Avance automatico, rebobinado mediante interruptor de
Flash:
Distancia maxima de
la fotografia con flash:
Duracion de la pila:
Reduccion de ojos
rojos:
rebobinado de la pelicula, es posible el rebobinado a
mitad del rollo.
Flash automatico incorporado con tiempo de reciclado de
aproximadamente 6 segundos
Numero de guia 8 (ISO 100 en metros)
1,3 - 2,4 m (4,3 — 7,9 pies) con ISO 100, 1,3 — 3,3 m
(4,3 — 10,8 pies) con ISO 200 y 1,3 — 4,8 m
(4,3 -r 15,7 pies) con ISO 400
Aprox. 30 rollos de pelicula de 24 fotogramas (20 rollos de
pelicula de 36 fotogramas) con flash en la mitad de los casos
Se enciende la luz de reduccion de ojos rojos cuando se
oprime ligeramente el obturador. Mantenga oprimido el
obturador hasta la mitad durante unos segundos antes de
oprimir a fondo el boton para que destelle el flash.
—
23
—
Page 28

Desconexion Aunque la camara este oonectada, esta se desconecta
automatica: automaticamente al transcurrir aprox. 90 segundos sin
Fuente de energia: Dos pilas de tamano AA de 1,5 V (R6, LR6), no se
Dimensiones Aprox. 118 x 65 x 42 mm [4,6 K 2,6 x 1,7 pulg.]
(An. x Al.
El
x Prof.); (Fun Touch 4)
Peso (sin pilas): Aprox. 165 g (5,8 oz.) (Fun Touch 4)
diseno y
las especificaciones estan sujetos
usarla.
Para volver a conectar la camara, presione
ligeramente el obturador o conecte el interrupter principal.
pueden utilizar las pilas de niquel-cadmio
Aprox. 118 x 65 x 47 mm [4,6 x 2,6 x 1,9 pulg.]
(Fun Touch 4 QD)
Aprox. 175 g (6,2 oz.) (Fun Touch 4 QD)
a cambios sin previo
—
24
—
aviso.
Page 29

Fig.C
Fig.
D
•25
—
Page 30

Fig.
E
Tt^fe^
•'•
i i ii" Tin
ril
" oJ-=f
t
2
26 —
Page 31

Fig.
F
2^
/"mn_ifo
—
27
—
Page 32

Fig.G
I ffinfi
ai
•28
—
Page 33

Fig.
H
—
29
—
Page 34

Fig.
I
1 ' teA^J
d.
<7"?*^]
— 30 —
Page 35

Fig.
J
V-2.
S))
cs
•31
Page 36

Fun
.Touch
Fun
4
.Touch t QD
Nikon
IMPORTANT NOTICE:
YOU MUST PRESENT THE ATTACHED WARRANTY FORM (PART 1)
TOGETHER WITH PROOF-OF-PURCHASE AND PROOFOFPURCHASE
DATE
TO OBTAIN WARRANTY SERVICE
— 32 —
Page 37

THIS FORM MUST BE PRESENTED FOR WARRANTY SERVICE
Fun»Tbuch4
Fun
»T6uch 4
QD
TOO MUST PRESENT THIS FORM <PART 1) TOGETHER WITH PROOF-OF-PURCHASE AND PROOF OF PURCHASE DATE TO
OBTAIN WARRANTY SERVICE.
This
WNM
Product is warranted by MBm Inc. to be free from delects in material and workmanship tor a period of one (1)
f *"— B»fJSw)w1 | *•— Dadai -"r aSReJ • ffitr Pnnriirt ti fminri
a aufhorbad service station will at Ha option either repair or replace this Product without charge aubfect to the following
This warranty extends to the original consumer purchaser only and is not assignable or transferable
This warranty shall not apply to the following
i Any product which has been subject to misuse, abuse, negligence or accident
2 Any detects or damage directly or indirectly caused by the use of unauthorized replacement parts and/or service performed
by unauthorized personnel.
3. Any batteries.
AU.
WARRANTIES IMPLIED BV LAW INCLUDING ANY WARRANTY OF MERCHANTABILITY OR FITNESS FOR A PARTICULAR
PURPOSE SHALL BE OF A DURATION OF ONE (1) YEAR FROM DATE OF PURCHASE. THE WARRANTIES HEREIN ARE
EXPRESSLY IN LIEU OF AU OTHER EXPRESS WARRANTIES INCLUDING THE PAYMENT OF CONSEQUENTIAL OR
INCIDENTAL DAMAGES FOR THE BREACH OF ANY WARRANTY.
Soma state* do not allow (a) •mrtatkme on how long an Implied warranty beta or (b) the exclusion or limitation of Incidental
orewaiiejrawawteaVawjwete^
and you may also have other rlghta which rary from state to state.
m order to obtain performance of the warranty ooUgo-
purchae* and proof of purchase data (b» of eele) either
in person or addressed to the warranty department of
Mfton Inc., al 1300 Walt Whitman Rd. Melville, NY. 11747- ^^ ' , , , ', ,' , ", , , , , ,
3064 or any one ol the aulhorized service stations al Iheir ADDRESS I 1 I 1 1
respeclive addresses listed on the reverse side. The original r 1—-i 1 r 1 1 1 1 1—i __ \~1~\
consumer purchaser in returning this MMron product must
prepay all postage, shipping, transportation, Insurance gp
and delivery costs to the repair facility.
THIS WARRANTY FORM MAY NOT BE REPRODUCED OR COPIED AND eV/llDfl PART 1
SHALL BE VALID ONLY WITH PRODUCTS o o
SOLD BY fakon eve. °°
turner purchaeer must return this
n product together with proof of LAST r r—t j i i r i i r r i i i I
L
This
Is
your Nikon
Warranty (valid
States,
Alaska,
U.S.
Virgin
»n
hi rtsfsrtrri In malarial nr »nrtmwwMp.
•••*
j—J- '• •• '
r,R2I
I I [~| I I I I I j I I j I j
crTV
I 1 I 1 I I J 1 1 I I STATE | | )
' ' ' '
Inc. One
In the
Hawaii,
Islands).
''''''
Year Limited
Continental United
Puerto
Rico,
U.S. and
r—MI
' i '
fcm
Page 38

NikOlt AUTHORIZED SERVICE STATIONS
DISTRICT
OF :
WaVVngtoiv
D
52
Biscayne
Prmcrpal-Karl
(305>M9-J3S6
Orlando. FL
32903
1071
B96-0}22
o
Photo
TMh
Ctucaoo. IL 6C
THE
AUTHORIZED SERVICE STATIONS LISTED ABOVE
WiTI
Blvd.
Service
Pho-TBCh Slivice
HassLon.
KS
III
MMMOHUSETTS
wssssa
Prlncipal-Theooo
(HI3)
S9B-B0O5
SanlorQ Camera
Arlinglon.
MA 02
fVfncuMr-Pfltir
(61?)
648-2505
23
:••,••.!"•'>
ARE
Gen
67062
-
"-""-"
C-
Sdn'a.-^
Awanua
SUBJECT
rs.
TO
— 34 —
w
»
233Wc5IHoNle59
Pnncipal-Joal vogei
NOHTH CAHOUNA
CHANGE WITHOUT
NOTICE.
Hi
OKLAHOMA
Pnolo Products
Oklahoma
(405I521-B022
OREGON
Portland.
OR
High Slrest
Rep
City. OK
97232
WASHINGTON
Page 39

Fun
>T6uch
Fun'Touch 4
4
QD
Welcome to the worldwide family of Nikon owners.
Your Nikon equipment has been manufactured to the highest quality standards by NIKON CORPORATION. Tokyo, Japan
This warranty entitles the original consumer to worldwide warranty protection in accordance with the terms and conditions It
affords the consumer warranty protection outside the continental United Slates, Alaska. Hawaii. Puerto Rico and the US Virgin
Island Such warranty coverage is supplemental to and not in lieu of the United States Nikon One Year Limited Warranty which
is received by the customer with the Nikon product
This ajajcon product except for batteries is warranted by NIKON CORPORATION, Tokyo, Japan to be free from defects in materials
or workmanship tor a period of one year from the date of purchase During this period any one of the worldwide repair facilities
listed on the reverse side will repair without charge any parts or assembly of parts found to be defective in material or workmanship
subject to the following limitations:
1.
This warranty extends to the original consumer purchaser only and is not assignable or transferable
2 This warranty shall not extend to any product which has been subject to misuse, abuse, negligence, accident or unauthorized repair
All warranties implied by law Including any warranty of merchantability or fitness tor a particular purpose shall be of a dura-
tion of one (1) year from date of purchase. The warranties herein are expressly in lieu of all other express warranties Including
the payment of consequential or incidental damages tor the breach of any warranty-
No warranties, whether express or implied, Including the warranties of merchantability or fitness for a particular purpose
are made by any distributor or dealer of the product herein warranted; nor shall such dealer or distributor be liable for the
payment of any direct incidental or consequential damages.
In
order to
obtain
worldwide
service,
return the fMun product, either in person or addressed to
the Warranty Department of any authorized service repair
station listed on the reverse side together with proo) of purchase and this waiTarfty The original consumer in return-
ing this product, must prepay all postage, shipping,
transportation, insurance and iJelivery costs to the repair
facility
For prompt response of worldwide warranty inquiries,
please direct all correspondence to
NIKON CORPORATION
the consumer should
Nikon ONE YEAR WORLDWIDE
LIMITED WARRANTY
(Excluding the Continental United States, Alaska, Hawaii,
Puerto Rico. U.S. and U.S. Virgin Islands)
LAST
NAME
rrrr i i i i i i i i i n
FIRST
NAME
i II in
ADDRESS
CTTY
^n:
cr
STATE [JJ
Nikon
35-
Page 40

Nikon SERVICE FACILITIES
Argentina EOuardo UOenio
Phone:
(0&2J93I
Peler Benoilslraal
7-9, E
Phone.
03/216 0060
Phone
.11 825
2255
Phone: (905) 625 9910
SanlaC-uIoelenenk.
F
Phone:
AJS
56-a-2049030
Phone
2-463795'
Sleoanska
15/640.
Ill 21
PrMuklionsvej
23R, OK
•'-o-f •.ii:0-,50,,4J0C
191.
lueOu Marthe
Rollav.
Phone:
(01)9410
868
- »ea25.
1134 audioes!,
Devai
-,. "
Phone:
270-55-25
245
iV UN
Road.
Foil,
•"-"'•'-:i-c
iS-i*?,"!!-.--*--!.•;•«•;
PO
Bwl6B6.TelAv,v
Phone:
03-5603947
- 53
10132.
P O. Boi 3555. laW, P
Phone-
531?96C
I •• •
•
•Anssar
Pi.
2600
90504 Charnpigny
4047;
'DDsseKc'
8V
Hong Kong
u 26 36 1 em
Bon
61016
Tbiino
Casalla Raslale
13036
Code
on61A.16100Peta!ing
14 Ka
Haailem Phone
Salal.
Kuwail
Sur Mai
1 aoo
0
Cyprai:
K H.
Paoasian
Denmark'
V-ans*
il:
Hadar Pholo Suoply Agent
LID
fDloaoenlur
Slntjipon:
U-SJL:
JtBan:
36 —
Shmo (Sing
N.kon
Inc.
NIKON COHPORA1
Osaka
Camera
Seivi-
ION
Kasoac
Fennel
-Strai
Phone: 1516)
547-4200
6-19-27,Ohmo«*llB.Ohlaki
Phone (03)3764-2605
Ohocii
Bus .
• is
Phone'(03)
Koutoku
Blag..
2
•
3:
Page 41

Page 42

No reproduction in any form of this manual, in whole or in part (except for brief quotation in
critical articles or reviews), may be made without written authorization from
NIKON CORPORATION.
Queda prohibida la reproduction total o parcial de este folleto (salvo- en lo que se refiere a
citas breves en articulos o revistas especializadas), sin la autorizacion escrila de
NIKON CORPORATION.
NIKON CORPORATION
FUJI BLDG., 2-3, MARUNOUCHI 3-CHOME,
CHIYODA-KU, TOKYO 100, JAPAN
PHONE:
81-3-3214-5311 TELEX: NIKON J22601
FAX: 81-3-3201-5856
Nikon
18639-400 C -NIK
 Loading...