

Page 1
Instruction Manual
Manual de instrucciones
Page 2
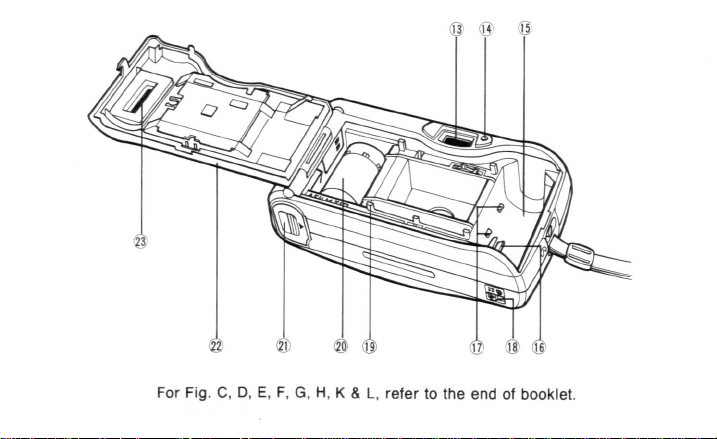
For Fig. C, D, E, F, G, H, K & L, refer to the end of booklet.
Page 3

©
@® © @
©®
Page 4
English
Espanol
(p. 1 — p. 14)
(p. 15 — p. 28)
Page 5
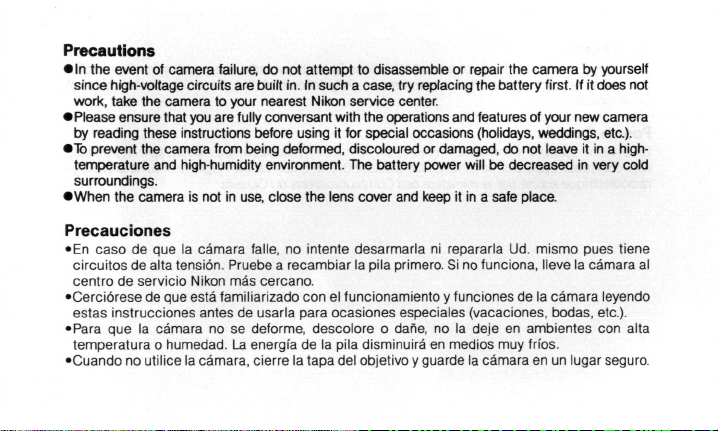
Precautions
• In the event of camera failure, do not attempt to disassemble or repair the camera by yourself
since high-voltage circuits are built in. In such a case, try replacing the battery first. If it does not
work, take the camera to your nearest Nikon service center.
•Please ensure that you are fully conversant with the operations and features of your new camera
by reading these instructions before using it for special occasions (holidays, weddings, etc.).
•To prevent the camera from being deformed, discoloured or damaged, do not leave it in a hightemperature and high-humidity environment. The battery power will be decreased in very cold
surroundings.
•When the camera is not in use, close the lens cover and keep it in a safe place.
Precauciones
•En caso de que la camara falle, no intente desarmarla ni repararla Ud. mismo pues tiene
circuitos de alta tension. Pruebe a recambiar la pila primero. Si no funciona, Neve la camara al
centra de servicio Nikon mas cercano.
• Cerciorese de que esta familiarizado con el funcionamiento y funciones de la camara leyendo
estas instrucciones antes de usarla para ocasiones especiales (vacaciones, bodas, etc.).
•Para que la camara no se deforme, descolore o dane, no la deje en ambientes con alta
temperatura o humedad. La energia de la pila disminuira en medios muy frios.
•Cuando no utilice la camara, cierre la tapa del objetivo y guarde la camara en un lugar seguro.
Page 6

For Canada
"This digital apparatus does not exceed the (Class B) limits for radio noise emissions from digital
apparatus set out in the Radio Interference Regulations of the Canadian Department of
Communications."
Pour le Canada
Le present appareil numerique n'emet pas de bruits radioelectriques depassant les limites
applicables aux appareils numeriques
radioelectrique edicte par le ministere des Communications du Canada.
(de
la classe
B)
prescrites dans le Reglement sur le brouillage
Page 7
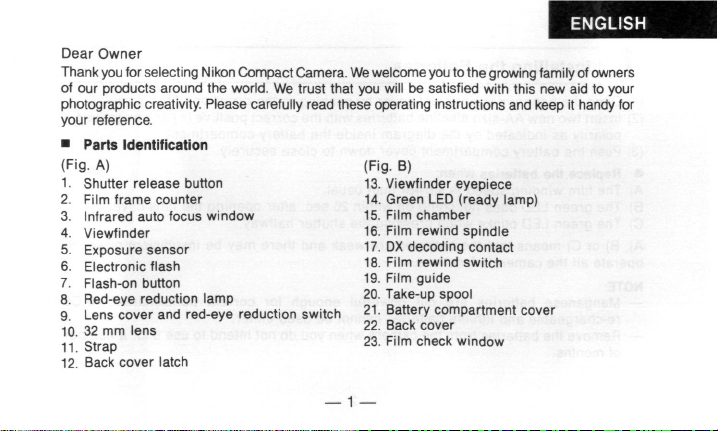
ENGLISH
Dear Owner
Thank
you
of our products around the world. We trust that you will be satisfied with this new aid to your
photographic creativity. Please carefully read these operating instructions and keep it handy for
your reference.
•
(Fi
1.
2.
3.
4.
5.
6.
7.
8.
9.
10
11
12.
for selecting Nikon Compact
Parts Identification
g.
A)
Shutter release button
Film frame counter
Infrared auto focus window
Viewfinder
Exposure sensor
Electronic flash
Flash-on button
Red-eye reduction lamp
Lens cover and red-eye reduction switch
32 mm lens
Strap
Back cover latch
Camera.
We
welcome
you
to the growing family of owners
(Fig-
B)
13.
Viewfinder eyepiece
14.
Green LED (ready lamp)
15.
Film chamber
16.
Film rewind spindle
17.
DX decoding contact
18.
Film rewind switch
19.
Film guide
20.
Take-up spool
21.
Battery compartment cover
22.
Back cover
23.
Film check window
Page 8
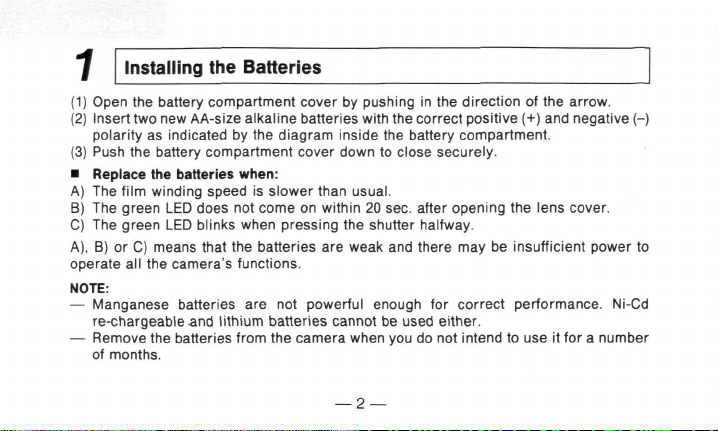
Installing the Batteries
(1) Open the battery compartment cover by pushing in the direction of the arrow.
(2) Insert two new AA-size alkaline batteries with the correct positive (+) and negative (-)
polarity as indicated by the diagram inside the battery compartment.
(3) Push the battery compartment cover down to close securely.
• Replace the batteries when:
A) The film winding speed is slower than usual.
B) The green LED does not come on within 20 sec. after opening the lens cover.
C) The green LED blinks when pressing the shutter halfway.
A),
B) or C) means that the batteries are weak and there may be insufficient power to
operate all the camera's functions.
NOTE:
— Manganese batteries are not powerful enough for correct performance. Ni-Cd
re-chargeable and lithium batteries cannot be used either.
— Remove the batteries from the camera when you do not intend to use it for a number
of months.
— 2 —
Page 9

Opening the Lens Cover
Slide the lens cover switch to open and close the lens cover. (Fig. C)
Close Open Red-eye reduction
@ (§ <D
^
z
• •^
NOTE:
When the lens cover is closed, the shutter will not operate. When the camera is not in
use,
close the cover to prevent accidental exposure and to protect the lens.
— 3 —
Page 10
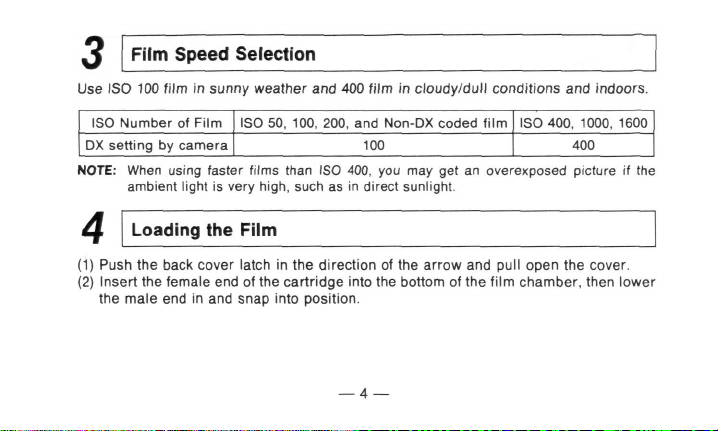
Film Speed Selection
Use ISO 100 film in sunny weather and 400 film in cloudy/dull conditions and indoors.
ISO Number of Film
DX setting by camera
NOTE:
When using faster films than ISO 400, you may get an overexposed picture if the
ambient light is very
ISO 50, 100, 200, and Non-DX coded film
100
high,
such as in direct sunlight.
ISO 400, 1000, 1600
400
Loading the Film
(1) Push the back cover latch in the direction of the arrow and pull open the cover.
(2) Insert the female end of the cartridge into the bottom of the film chamber, then lower
the male end in and snap into position.
— 4 —
Page 11
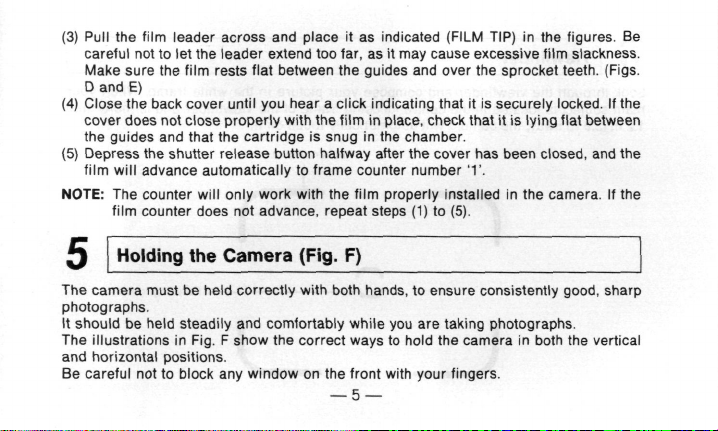
(3) Pull the film leader across and place it as indicated (FILM TIP) in the figures. Be
careful not to let the leader extend too far, as it may cause excessive film slackness.
Make sure the film rests flat between the guides and over the sprocket teeth. (Figs.
D and E)
(4) Close the back cover until you hear a click indicating that it is securely locked. If the
cover does not close properly with the film in place, check that it is lying flat between
the guides and that the cartridge is snug in the chamber.
(5) Depress the shutter release button halfway after the cover has been closed, and the
film will advance automatically to frame counter number T.
NOTE:
The counter will only work with the film properly installed in the camera. If the
film counter does not advance, repeat steps (1) to (5).
Holding the Camera (Fig. F)
5
The camera must be held correctly with both hands, to ensure consistently good, sharp
photographs.
It should be held steadily and comfortably while you are taking photographs.
The illustrations in Fig. F show the correct ways to hold the camera in both the vertical
and horizontal positions.
Be careful not to block any window on the front with your fingers.
— 5 —
Page 12
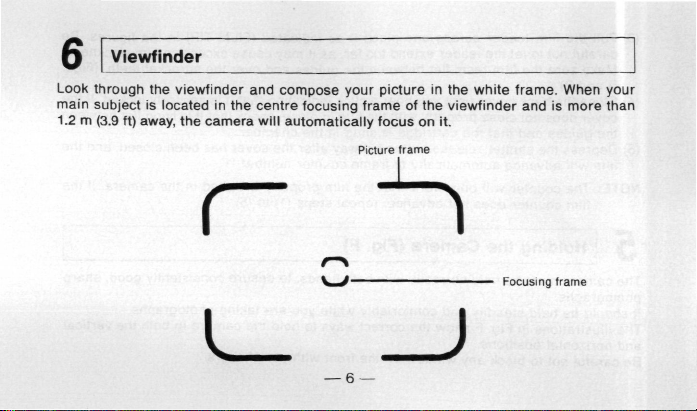
Viewfinder
Look through the viewfinder and compose your picture in the white frame. When your
main subject is located in the centre focusing frame of the viewfinder and is more than
1.2 m (3.9 ft) away, the camera will automatically focus on it.
Picture frame
Focusing frame
Page 13
Taking Pictures
7
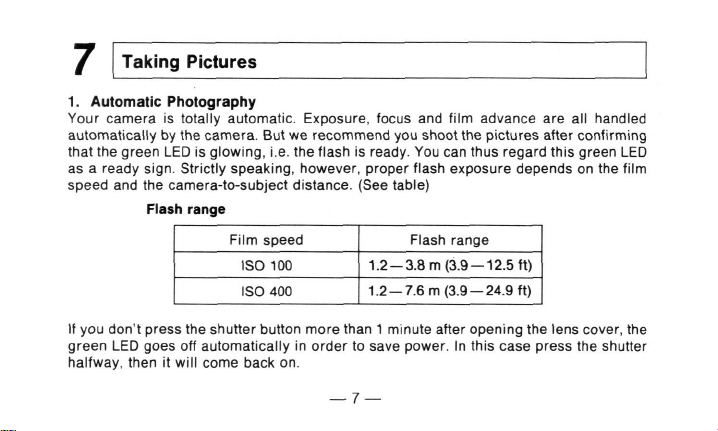
1.
Automatic Photography
Your camera is totally automatic. Exposure, focus and film advance are all handled
automatically by the camera. But we recommend you shoot the pictures after confirming
that the green LED is glowing, i.e. the flash is ready. You can thus regard this green LED
as a ready
speed and the camera-to-subject distance. (See table)
If you don't press the shutter button more than 1 minute after opening the lens cover, the
green LED goes off automatically in order to save power. In this case press the shutter
halfway, then it will come back on.
sign.
Strictly speaking, however, proper flash exposure depends on the film
Flash range
Film speed
ISO 100
ISO 400
Flash range
1.2 —3.8 m (3.9 — 12.5 ft)
1.2 —7.6 m (3.9 — 24.9 ft)
Page 14
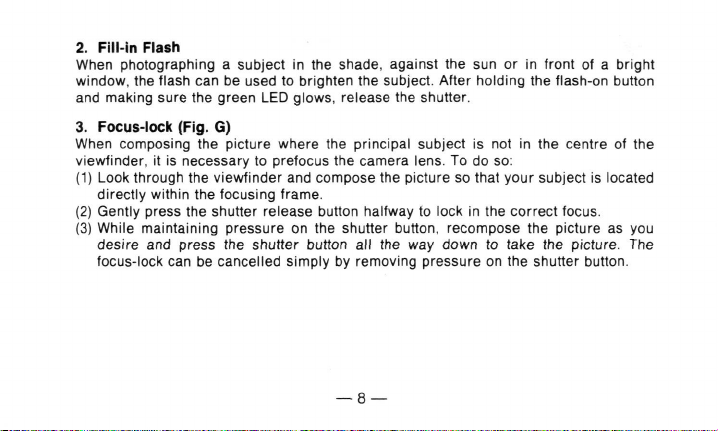
2.
Fill-in Flash
When photographing a subject in the shade, against the sun or in front of a bright
window, the flash can be used to brighten the subject. After holding the flash-on button
and making sure the green LED glows, release the shutter.
3. Focus-lock {Fig. G)
When composing the picture where the principal subject is not in the centre of the
viewfinder, it is necessary to prefocus the camera lens. To do so:
(1) Look through the viewfinder and compose the picture so that your subject is located
directly within the focusing frame.
(2) Gently press the shutter release button halfway to lock in the correct focus.
(3) While maintaining pressure on the shutter button, recompose the picture as you
desire and press the shutter button all the way down to take the picture. The
focus-lock can be cancelled simply by removing pressure on the shutter button.
— 8 —
Page 15

4. Special Auto Focus situations
The auto focus system will focus accurately on the majority of the subjects you wish to
photograph. However, there are a few situations where the auto focus mechanism may
not function properly. These are:
A) When the subject has strong reflections, such as polished metals, exterior of cars,
bodies of water, or mirrors.
B) Subjects with little or no reflection, such as black objects, hair, a flame or smoke.
C) Subjects that are very small.
D) Subjects with an object in front of them, such as a wire net or a cage.
In situations A) — D), prefocus on another subject approximately the same distance
away and then recompose the scene and take the picture. (See Section 3 on Focus-lock).
E) Taking pictures through glass windows:
Shoot with camera lens nearer the glass and at an angle of approximately 20°.
— 9 —
Page 16

S.
Red-eye reduction effect (Fig. H)
Try this mode to reduce the possibility of showing red eyes in your flash photo. Just shift
the lens cover and red-eye reduction switch all the way to the red-eye reduction position
to set this mode. When the shutter release button is pressed in this mode, the red-eye
reduction lamp will glow for a few seconds and then the shutter is automatically released
together with a burst of flash. (The red-eye reduction mode is not recommended for a
snap-shot).
* Even when the red-eye reduction mode is used, red-eye may still present itself due
to the differences between individuals and photographing conditions. Basically,
red-eye is more pronounced with light coloured eyes and dark conditions.
— 10 —
Page 17

Removing the Film
At the end of the
shutter release button. Rewind the film by sliding the film rewind switch in the direction
of the arrow (Fig. K). When rewinding is complete and the motor has stopped, open the
back cover and remove the film cartridge from the chamber. The film rewind switch will
return to its original position automatically.
— To rewind the film before it is completely used, take the same steps as above.
— Do not open the back cover while rewinding the
— Do not attempt to pull the film out yourself. (Fig. L)
film,
the frame counter will cease to advance or you cannot press the
film.
— 11 —
Page 18

Troubleshooting Guide
Problem
Subject is out of focus
Flash fails to function
Flash pictures have dark
area(s)
Flash pictures are too
dark overall
Flash pictures are too
light
Short battery life
Solution
Subjects must be 1.2 m (3.9 ft) or more away from the
camera.
Clean the battery terminals with a pencil eraser if dirty
or corroded. Replace batteries immediately if
exhausted.
Make certain fingers are clear of the flash when
shooting.
(Have your subject watch for this.)
Subject(s) must be within the specified flash range.
See section 7-1.
Place subjects at least 1.2 m (3.9 ft) from the camera.
Only use AA alkaline batteries.
— 12 —
Page 19

Specifications
Type:
35 mm lens shutter camera with built-in flash and auto-focus
Film format: 24 mm x 36 mm (135 film magazine)
Lens:
32 mm F4.5 (3 elements in 3 groups)
Focus: Auto-focus (with focus lock)
Focus range: 1.2 m (3.9 ft) — infinity
Shutter: Programmed electronic shutter
Photographic modes and exposure (ISO 100):
Viewfinder: Albada-type bright-frame finder
Viewfinder indications: Picture frame, Focusing frame
Green LED. On: Ready for shooting
AUTO/Red-eye reduction: Programmed exposure.
F4.5,
1/50 sec. (EV10) F8, 1/125 sec. (EV13)
Less than approx. EV10: Automatic switchover flash
FILL-IN FLASH/Red-eye reduction
Blinking:
Replace the batteries
— 13 —
Page 20

Film-speed setting (ISO):
Film loading: Automatic
Film advance: Automatic
Film rewind: Automatic via film rewind switch
Built-in flash: With pre-charge system
Flash operating range (ISO 100):
Flash recycling time: Approx. 5 sec. (with new batteries)
Battery life: Approx. 30 rolls of 24 exposures film (20 rolls of 36 exposures film)
Power source: Two 1.5 V AA-size alkaline batteries
Dimensions: 125 (W) x 45 (D) X 70 (H) mm [4.9 (W) x 1.8 (D) X 2.8 (H) in.]
Weight: Approx. 180 g (6.4 oz) (without battery and film)
Specifications are based on an operating ambient temperature of 20°C, and subject to change
without notice.
DX automatic settings (ISO 100, 400)
AUTO:
Automatic switchover for low lighting levels
FILL-IN FLASH: Flash
1.2 —3.8 m (3.9 — 12.5 ft)
(with new batteries, using flash for approx. 50% of shots)
— 14 —
Page 21

Estimado usuario:
Gracias por adquirir una camara compacta Nikon. Le damos la bienvenida a la creoiente familia
de usuarios de nuestros productos por todo el mundo. Nosotros confiamos que usted quedara
satisfecho con esta nueva ayuda a su creatividad totogratica. Lea por favor estas instrucciones
de operacion atentamente y tengalas a mano para consultarias.
•
Identification de partes
g.
A)
(Fi
1.
Boton
del
2.
Contador
3.
Ventanilla
4
Visor
Sensor
5.
6.
7.
8
9.
11
10
12
de
Flash electr6nico
Boton
de
Lampara
rojos
Interruptor
reduccidn
Objetivo
de 32 mm
Correa
Reten
de la
disparador
de
exposiciones
del
autofoco infrarrojo
exposicipn
activacipn
de
del
del
reduccion
de la
tapa
efecto
de
tapa posterior
flash
del
efecto
del
objetivo
ojos rojos
de
(Fig.
B)
13.
Ocular
del
14 LED verde (Indicador de lampara preparada)
15.
Compartimiento
16.
Eje de
17.
Contacto
18.
Interruptor
19.
Guia
20.
ojos
y
de
—
Carrete receptor
21.
Tapa
22.
Tapa posterior
23.
Ventanilla
cula
15
—
visor
rebobinado
de
decodificacion
de
de la
pelicula
del
compartimiento
de
de la
pelicula
de la
rebobinado
comprobacion
pelicula
DX
de la
de las
de la
pelicula
pilas
peli-
Page 22

Colocacion de las pilas
(1) Abra la tapa del compartimiento de las pilas empujando en la direccion indicada por la
flecha.
(2) Introduzca dos pilas alcalinas nuevas de tamano AA, con las polaridades positivas (+) y
negativas (-) colocadas correctamente como se muestra en el diagrama del interior del
compartimiento de las pilas.
(3) Empuje hacia abajo la tapa del compartimiento de las pilas para cerrarla fijamente.
• Cambie las pilas cuando:
A) La velocidad del enrollamiento de la pelicula sea mas lenta de lo normal.
B) Transcurridos 20 segundos despues de abrirse la tapa del objetivo el LED verde no se
encienda.
C) Al presionar el disparador a mitad de su recorrido el LED verde parpadee.
A),
B) o C) significan que las pilas estan debilitadas y que la alimentacion puede ser
insuficiente para la operacibn de todas las funciones de la camara.
NOTA:
— Las pilas de manganeso no tienen la potencia suficiente para el funcionamiento correcto
de la camara. Las pilas de Niquel-cadmio recargables y las de litio tampoco pueden ser
osadas.
— Retire las pilas de la camara cuando no tenga intencion de utilizarla durante unos cuantos
meses.
— 16 —
Page 23

Apertura de la tapa del objetivo
Deslice el interruptor de la tapa del objetivo para abrirla y cerrarla. (Fig. C)
Cerrada Abierta
@
<§ <a>
Reduccion de
ojos roios
<8
TIM
• * +
NOTA: Cuando la tapa del objetivo este cerrada, el obturador no funcionara. Cuando no este
utilizando la camara, cierre la tapa para evitar la exposicion accidental y proteger el
objetivo.
—
17
—
Page 24

Seleccion de la sensibilidad de la pelicula
3
Utilice peliculas ISO 100 en tiempo soleado y peliculas ISO 400 en condiciones de tiempo
nublado/obscuridad y en interiores.
ISO
50,
100,
100
200,
ISO 400, 1000, 1600
400
Numero ISO de la pelicula
Ajuste DX hecho por la camara
NOTA: Cuando utilice peliculas de sensibilidades superiores a ISO 400, tal vez obtenga una
imagen sobreexpuesta si la luz ambiental es demasiado fuerte, tal como la luz solar
directa.
Introduccion de la pelicula
4
(1) Empuje el reten de la tapa posterior en la direccion indicada por la flecha y tire para
abrir la tapa.
(2) Introduzca el extremo hembra del carrete en el fondo del compartimiento de la
pelicula; luego baje el extremo macho fijandolo en dicho compartimiento.
y peliculas no codificadas DX
— 18 —
Page 25

(3) Tire de la guia de la pelicula a traves del compartimiento (FILM TIP (EXTREMO DE LA PELlCULA))
como se indica en las figuras. Tenga cuidado de no dejar extender demasiado la gula de la
pelicula, porque esto podria causar excesiva holgura en ella. Asegurese de que la pelicula quede
plana entre las guias y sobre los dientes de los rodillos. (Figs. D y E).
(4) Cierre la tapa posterior hasta que oiga un "click" indicando que ha quedado bloqueada
fijamente. Si la tapa no cierra debidamente con la pelicula colocada, compruebe que la misma
este plana entre las guias y que el carrete este ajustado en el compartimiento.
(5) Despues de cerrar la tapa, presione ei boton del disparador hasta la mitad de su recorrido y la
pelicula avanzara automaticamente hasta el contador de exposicion numero T.
NOTA: El contador funcionara solamente con una pelicula instalada correctamente en la
camara. Si el contador no avanza, repita los pasos (1) a (5).
Sujecion de la camara (Fig. F)
5
Para asegurarse de tomar fotografias buenas y nitidas, la camara debe sujetarse correctamente con
las dos manos.
Mientras toma fotografias, debe sostenerla firme y comodamente.
Las ilustraciones de la figura F muestran como sostener correctamente la camara, tanto en posicion
vertical como en horizontal.
Tenga cuidado de no tapar con sus dedos ninguna de las ventanillas de la parte delantera.
—
19
—
Page 26

Q Visor
Mire a traves del ocular del visor y encuadre su fotografia dentro del cuadro bianco
Cuando su sujeto principal este localizado en el centra del cuadro de enfoque del visor
y se encuentre a mas de 1,2 metros (3,9 pies), la camara se enfocara
automaticamente en el.
Cuadro de la fotografia
•h
Cuadro de enfoque
— 20-
Page 27

Toma de fotografias
7
1.
Fotografiado automatico
Su camara es totalmente automatica. La exposicion, el enfoque y el avance de la
pelicula son realizados automaticamente por la camara. Pero le recomendamos que
dispare la fotografia despues de confirmar que el LED verde esta encendido, esto es,
que el flash esta listo. Por lo tanto usted podra tomar el LED verde como una serial de
que todo esta listo. Propiamente dicho, sin embargo, la exposicion apropiada del flash
depende de la sensibilidad de la pelicula y de la distancia entre la camara y el sujeto a
fotografiar. (Vea la tabla).
Alcance del flash
Sensibilidad de la pelicula
ISO 100
ISO 400
Si no presiona el boton del disparador antes de transcurrir un minuto despues de abrirse
la tapa del objetivo, el LED verde se apagara automaticamente para ahorrar energia. En
este caso, presione el disparador hasta la mitad de su recorrido y se volvera a encender.
Alcance del flash
1,2 —3,8 m (3,9 —12,5 pies)
1,2-7,6
m (3,9 — 24,9 pies)
— 21 —
Page 28

2.
Flash de relleno
Al fotografiar un sujeto en la sombra, contra la luz del sol o enfrente de una ventana
luminosa, se puede usar el flash para iluminar el sujeto. Despues de ajustar el boton de
activacion del flash y asegurarse de que el LED verde esta encendido, dispare el
obturador.
3. Bloqueo del enfoque (Fig. G)
Cuando componga una fotografia en la que el sujeto principal no este en el centro del
visor, sera necesario enfocar previamente el objetivo de la camara. Para hacerlo:
(1) Mire a traves del visor y componga la fotografia de forma que su sujeto este situado
directamente dentro del cuadro de enfoque.
(2) Pulse suavemente el boton del disparador hasta la mitad de su recorrido para
bloquear el enfoque correcto.
(3) Mientras ejerce presion sobre el boton del disparador, recomponga la fotografia de
la forma deseada y presione el boton del disparador completamente hasta el final
para sacar la fotografia. El bloqueo del objetivo podra ser cancelado simplemente
con liberar la presion ejercida sobre el boton del disparador.
— 22 —
Page 29

4. Situaciones especiales de enfoque automatico
El sistema de enfoque automatico enfocara con precision la mayoria de los escenas que
desee fotografiar. Sin embargo, existen unas cuantas situaciones en las que el
mecanismo del enfoque automatico quiza no funcione debidamente. Estas son:
A) Cuando el sujeto tenga una gran reflexion, tal como metales pulidos, el exterior de
los coches, balsas de agua o espejos.
B) Sujetos con poca o ninguna reflexion, tal como objetos de color negro, pelo, una
llama o humo.
C) Sujetos que sean muy pequenos.
D) Sujetos con un objeto enfrente de ellos, tal como una red o una jaula.
En las situaciones A) a D), enfoque previamente en otro sujeto que se encuentre
aproximadamente a la misma distancia y luego vuelva a componer la escena y tome la
fotografia. (Vea la seccion 3 Bloqueo del enfoque).
E) Toma de fotografias a traves de cristaleras:
Dispare con el objetivo cerca del cristal y en un angulo de aproximadamente
20 grados.
— 23 —
Page 30

5. Reduction del efecto de ojos rojos (Fig. H)
Utilice este modo para reducir la posibilidad de obtener ojos rojos en su fotografia
tomada con flash. Mueva simplemente el interrupter de la tapa del objetivo y de
reduccion del efecto de ojos rojos completamente hasta la posicion de reduccion del
efecto de ojos rojos para ajustar este modo. Cuando se presione el boton del disparador
en este modo, la lampara de reduccion de ojos rojos se encendera durante unos cuantos
segundos y luego el obturador se disparara automaticamente junto con el destello del
flash.
(El modo de reduccion de ojos rojos no es recomendado para una instantanea.)
* Incluso cuando se utilice el modo de reduccion del efecto de ojos rojos, tal vez salgan
rojos los ojos debido a las diferencias entre los individuos y las condiciones de
fotografiado. Basicamente, el efecto de los ojos rojos resulta mas destacado con los
ojos de color claro y en condiciones oscuras.
— 24 —
Page 31

Extraccion de la pelicula
Al final de la pelicula, el contador de exposiciones dejara de avanzar o usted no podra
pulsar el boton del disparador. Rebobine la pelicula deslizando el interruptor de
rebobinado de la pelicula en la direccion de la flecha (Fig. K). Cuando se haya
rebobinado completamente y se haya parado el motor, abra la tapa posterior y extraiga
el carrete del compartimiento. El interruptor de rebobinado de la pelicula volvera
automaticamente a su posicion original.
— Para rebobinar la pelicula antes de que llegue al
descritos arriba.
— No abra la tapa posterior durante el rebobinado de la pelicula.
— No intente tirar de la pelicula. (Fig. L)
— 25 —
final,
siga los mismos pasos
Page 32

Guia para la localizacion de averias
Problema Solucion
Sujeto fuera de enfoque Los sujetos han de estar a 1,2 m (3,9 pies) o mas de la camara.
El flash no funciona Limpie los terminales de las pilas con una goma de
Las fotografias con flash Asegurese de no tapar el flash con los dedos cuando
tienen zona(s) negra(s) toma la fotografia. (Digale al sujeto que le avise de
Las fotografias con flash El(los) sujeto(s) deben estar dentro del margen de
son demasiado oscuras en alcance del flash especificado.
toda su superficie Vea la seccion 7-1.
Las fotografias con flash Coloque los sujetos por lo menos a 1,2 m (3,9 pies) de la
salen demasiado claras camara.
Las pilas duran poco Utilice unicamente pilas alcalinas AA.
borrar si estan sucios o con corroxion. Cambie las
pilas inmediatamente si estan gastadas.
ello.)
— 26 —
Page 33

Especificaciones
Tipo:
Camara con obturador de objetivo de 35 mm con flash
Formato de pelicula:
Objetivo:
Enfoque:
Alcance de enfoque:
Obturador:
Modos fotograficos y exposicion (ISO 100):
Visor:
Indicaciones del visor:
LED verde:
incorporado y autofoco.
24 x 36 mm (rollo de pelicula de 135)
32 mm F4,5 (3 elementos en 3 grupos)
Autofoco (con bloqueador de enfoque)
1,2 m (3,9 pies) —infinito
Obturador electronico programado
AUTO/reduccion de ojos rojos: Exposicion programada.
F4.5,
1/50 seg. (EV10) F8, 1/125 seg. (EV13)
Menos de aprox. EV10: Activacion automatica del flash
FLASH DE RELLENO/reduccion de ojos rojos
Tipo albada, con cuadro de enfoque brillante
Cuadro de la fotografia, Cuadro de enfoque
On:
Listo para disparar
Parpadeando: Cambie las pilas
— 27 —
Page 34

Ajuste de sensibilidad de pelicula (ISO):
Carga de la pelicula: Automatica
Avance de la pelicula: Automatico
Rebobmado de la pelicula:
Flash incorporado: Con sistema de precarga
Gama de alcance del flash (ISO 100):
Tiempo de carga del flash:
Duracion de las pilas: Aprox. 30 rollos de 24 exposiciones (aprox. 20 rollos de 36
Fuente de energia: Dos pilas alcalinas tamano AA, de 1,5 V.
Dimensiones: 125 (an) x 45 (p) x 70 (al) mm [4,9 (an) x 1,8 (p) x 2,8 (al) pulgada]
peso:
Aprox. 180 g (6,4 onzas) (sin pilas y sin pelicula)
Las especificaciones se basan en una utilizacion a temperatura ambiente de 20°C, y sujetas
a cambios sin previo aviso.
Ajustes atomaticos con pelicula DX (ISO 100, 400)
Automatico mediante interruptor de rebobinado de pelicula
AUTO:
Activacion automatica para niveles de poca iluminacion
FLASH DE RELLENO: Flash
1,2 —3,8 m (3,9 —12,5 pies)
Aprox. 5 seg. (con pilas nuevas)
exposiciones) (con pilas alcalinas nuevas, usando el flash para aprox. el
50%
de los disparos)
— 28 —
Page 35

Fig.
C
29
—
Page 36

Fig.
E
Not
OK
.•
OK
^S
Page 37

Fig.
Fig.
F
G
•31
—
Page 38

Fig.
H
—
32
—
Page 39

Fig.
K
33
—
Fig.
L
Page 40

M*onFun>Tbuch3
Nikon
IMPORTANT NOTICE:
YOU MUST PRESENT THE ATTACHED WARRANTY FORM (PART 1)
TOGETHER WITH PROOF-OF-PURCHASE AND PROOF-OFPURCHASE DATE TO OBTAIN WARRANTY SERVICE.
— 34 —
i
Page 41

THIS FORM MUST BE PRESENTED FOR WARRANTY SERVICE
YOU MUST PRESENT THIS FORM (PART 1) TOGETHER WITH PROOFOF- PURCHASE AND PROOF-OF- PURCHASE DATE TO
OBTAIN WARRANTY SERVICE.
This Mfcon Product is warranted By
year from the date of purchase. During this period. If this Product la found to be detective in rrumrlal orworkmarumip. Iwfeon Inc.
or Its authorlzad service station will at Its option either repair or replace this Product without charge subject to the following
limitations and exclusions:
This warranty extends lo the original consumer purchaser only and is not assignable or transferable.
This warranty shall not apply to the tallowing.
1 Any product which has been subject to misuse, abuse, negligence or accident.
2.
Any defects or damage directty or indirectly caused by the use of unauthorized replacement parts and/or service performed
by unauthorized personnel.
3. Any batteries.
ALL WARRANTIES IMPLIED BY LAW INCLUDING ANY WARRANTY OF MERCHANTABILITY OR FITNESS FOR A PARTICULAR
PURPOSE SHALL BE OF A DURATION OF ONE (1) YEAR FROM DATE OF PURCHASE. THE WARRANTIES HEREIN ARE
EXPRESSLY IN LIEU OF ALL OTHER EXPRESS WARRANTIES INCLUDING THE PAYMENT OF CONSEQUENTIAL OR
INCIDENTAL DAMAGES FOR THE BREACH OF ANY WARRANTY.
Some state* do not allow (a) limitations on how long an Implied warranty lasts or (b) the exclusion or limitation of Incidental
ot consequential damages so the above limitations or exclusions may not apply to
and you may slso ham other rights which vary from state to state.
In order to obtain performance of the warranty obligations,
the original consumer purchaser must return this
warranty and this Mknn product together with proof of LAST r j j i i i i i r—i i j r r i
purchase and proof of purchase date I bill
in person or addressed to the warranty department of y^SL f"
Nikon Inc., at 1300 Walt Whitman Rd Melville, NY 11747- " ' ••,
3064 or any one of the authorized service stations at their ADDRESS I I I "I 1 I I I I I
respective addresses listed on the reverse side The original __„ [ 1 ] [ ]~~] 1 1 1 T—1 ,T,TC [—I—1
consumer purchaser in returning this Nikon product must
prepay all postage, shipping, transportation, insurance ZIP
and delivery costs to the repair facility. ' ' ' ' '
THIS WARRANTY FORM MAY NOT BE REPRODUCED OR COPIED AND
SHALL BE VALID ONLY WITH PRODUCTS QC
SOLD BY Nftron Inc.
NBHNI
fete, to be tree tram defecis in material and workmanship tor a parted ol one (1)
of sale) either SiSJf • - ••
J
This
is
your Nikon
Warranty (valid
States,
U.S. Virgin Islands).
CfTY
I I I I L I I I 1 1 I
3 —
in the
Alaska, Hawaii, Puerto Rico,
you.
This warranty gives you specific legal rights
',,,•,•
Inc. One
Year Limited
Continental United
U.S. and
• ,
STATE
Nikon
I I I
Page 42

NikOn AUTHORIZED SERVICE STATIONS
PENNSYLVANIA
THE AUTHORIZED SERVICE STATIONS LISTED ABOVE ARE SUBJECT TO CHANGE WITHOUT NOTICE
— 36 —
Page 43

Nikon
Fun
»1buch
3
Welcome to the worldwide family of Nikon owners.
Your Mkun equipment has been manufactured to the highest quality standards by NIKON CORPORATION, Tokyo, Japan
This warranty entitles the original consumer to worldwide warranty protection in accordance with the terms and conditions it
affords the consumer warranty protection outside the continental United Stales. Alaska, Hawaii, Puerto Rico and the U.S. Virgin
Island Such warranty coverage is supplemental to and not in lieu of the United States Nikon One Year Limited Warranty which
is received by the customer with the Nikon product.
This
MSMMI
product except lor batteries is warranted by NIKON CORPORATION, Tokyo, Japan to be free from defects in materials
or workmanship for a period ot one year from the date of purchase. During this period any one of the worldwide repair facilities
listed on the reverse side wiH repair without charge any parts or assembly of parts found to be detective in material or workmanship
subject to the following limitations:
1 This warranty extends to the original consumer purchaser only and is not assignable or transferable
2 This warranty shall not extend to any product which Has been subject to misuse, abuse, negligence, accident or unauthorized repair
All warranties implied by lew including any warranty of merchantability or fitness tor a particular purpose shall be of a dura-
tion ot one (1) year from date of purchase. The warranties herein are expressly In lieu of all other express warranties including
the payment of consequential or incidental damages tor the breach of any warranty.
No warranties, whether express or implied, including the warranties of merchantability or fitness tor a particular purpose
are made by any distributor or dealer of the product herein warranted; nor shall such dealer or distributor be liable for the
payment of any direct incidental or consequential damages.
In order to obtain worktoide service, the consumer should
return the Mean product, either in person or addressed to
the Warranty Department of any authorized service repair
station listed on the reverse side together with proof of purchase and this warranty The original consumer in returning this product, must prepay all postage, shipping,
transportation, insurance and delivery costs to the repair
facility
For prompt response of worldwide warranty inquiries,
please direct all correspondence to:
NIKON CORPORATION
Nikon ONE YEAR WORLDWIDE
LIMITED WARRANTY
(Excluding the Continental United States, Alaska, Hawaii,
Puerto Rico, U.S. and U.S. Virgin Islands)
LAST
NAME
FIRST
NAME
ADDRESS
CITY
— 37
T~n
—
Mil
Nikon
STATE
PART
[JJ
2
Page 44

Nikon SERVICE FACILITIES
410)
AyacuCho
• •••
'22)931521
m Francisco, 436
iwood
Drive,
• • •
'6 22
44Ze(yroiiS:. 175
Phone:
(01)9410888
••--:-
tOm Weg?5, 40
Phone0211/9414-0
2nd
Fbor,
Huteti :•-..-• - •
(Postal Address)
G P.O.
Phone:
524-5031
• • •: • :• •
Phone:
(36-1)
138
2975
245,
Dr. D.N.
Road.
PO
BOK
1686.Tel-Avivet016 Israel
fro-e 3S234QW
Via
Tabacchi
33-10132, Torino.
Phone:
(011|3102151
P.O.
Bo.
3555.
Salal. P Code 13036-Safal
•
'..-,••.••
Jaya.5elango<(P.O.Bo*
1235,
Bjunos
-....•••.;
(Sta.
Cecilia
Mississauga. Ont
"9.
SF-00401
Helf
ay,
94504 Chamq
64PateoFaii,o Athen
472Diisseldoi
Bo*
181,
Hong
Fori,
Bombay
400 00
Casella
•=••-'-'
•"•- _
10571
50718Ku:
K(
PQ!
ESS'"
Jipin:
— 38-
U.S.A.:
Nikon
Inc.
NIKON
CORPORATION
Ginza Service Center
Kjtanama Service Station
Nagoya Service
Osaka Camera Service
Osaka Umeda Service Station
Center
Dept.
CalleFteina
Mercedes,
Phone: (91)
2539392
Pyramidvagen
7. B "
Phone: 8 734
0O9C
Phone: 14
(081|541
e: (03)
3764 2605
<u
Center
BKJg.,
Tokyo 163-06
Phone: ((
Ginja
INZ-2,
2-2,
Phone:(03)356i-0M
Wisso Daisan
SWg..
Phone:(045)3l2-1K
Dai-Nagoya
BkJg
Phone
(052)
563-2M
KoukokuBldg..2-11-1
lie.
B.P.
288,
97467 Saml-Denis
ah
(Postal Address) Hail Comme
se 6,
8700
Kiisnacni/ZH
<
a.Olilaku,
Tokyo
1-25-1.
Ginr"
I
. 3-:
143
u,
Osaka
542
Kila-ku.
Osaka
530
Page 45

MEMO
Page 46

No reproduction in any form of this manual, in whole or in part (except for brief quotation in
critical articles or reviews), may be made without written authorization from
NIKON CORPORATION.
Oueda prohibida la reproduction total o parcial de este folleto (salvo en lo que se refiere a
citas breves en articulos o revistas especializadas), sin la autorizacibn escrita de
NIKON CORPORATION.
NIKON CORPORATION
FUJI BLDG., 2-3, MARUNOUCHI 3-CHOME,
CHIYODA-KU, TOKYO 100, JAPAN
PHONE: 81-3-3214-5311 TELEX: NIKON J22601
FAX: 81-3-3201-5856
Nikon
 Loading...