Timer: Set or cancel type self timer, approximately 10 seconds shutter release delay
Viewfinder: Eye Level, 93 percent frame coverage
Displays: Shutter number and f/number, plus LED displays for over, normal, and underexposure.
Screens: Provided as standard split image microprism focusing screen type K2 with optional. Matte type screen and matte etched vertically and horizontally screen optional
Mirror: Type Quick return
Film wind: Lever, 30 degrees stand off angle and 135 degrees winding angle
Electric film advance: When the optional Motor Drive MD-12 is attached.
Exposures counting lever: Self disengaging frame counter during correct counting
Exposure count: Type Incremental (S, 0 - 36); Goes to S when the camera back is removed automatically
Rward film: Wind by hand lever after the film rewind.
Flash: Flash units are attached to it through a suitable fitted shoe socket. Synchronizing delay is 1/250 seconds.
Ready-light: It is included within the Viewfinder.
Exposure meter: The Metropolitan university owned exposure measuring system possesses a TTL center-weighted full aperture exposure measuring system which ranges from a value of one EV to eighteen EV at ASA/ISO 100 and for a 50 millimeter f/1.4 lens.
Frequently Asked Questions
What type of batteries are used by Canon Nikon FM2?
Nikon fM2 accepts: One 3V lithium battery or Two 1.55V silver-oxide batteries or alternatively 2 1.5V alkaline-manganese batteries
What is the film changing process like on Nikon FM2?
Reported changes include using the camera back lock lever to undo the camera to the back then Changing the film cartridge at the film chamber to the new one and then move the film leader into the takeup spool and then turn the film until its set up is properly done
How long can the shutter stay open on an FM2?
Aside from the shutter speeds being able to go as far as 1/4000 sec while in automatic exposure mode, none have been specified as to the maximum tethered parameter
Is flash photography allowed in conjunction with the FM2?
Sure enough, the FM2 model is a compatible camera with speed flash units and Nikon speedlights that are used with the FM2 hot shoe model’s.
What is the self-timer lever for and what purpose does it serve?
Self-timer lever is most useful for a self-portrait as it does not require the user to stand at the front of the camera and only presses the shutter release button.
What method is appropriate for checking the battery power?
Whenever there is enough power left in the battery, the LED exposure display mounted in the viewfinder will be lit when the shutter release button is lightly depressed, thus enabling the exposure meter.
Exposure determination . ..
Exposure display
Metering range
Stop-down exposure measurement . ..
Exposure measurement in special cases
Duplication work and photomicrography . . .
Viewfinder/viewing & focusing ...
Depth-of-field preview lever .
Self-timer lever .
Multiple exposure lever .
Memo holder .
Infrared compensation index
you
to Nikon's world of photography. The Nikon
special features including top shutter speed
and flash synchronization speeds
FM2
and high-precision mechanically-controlled shutter curtains.
These features enable full manual operati
control-the
a wide range of purposes. Whenever
afield, you'
best results with your
manual handy until you'
a few minutes to ensure many years of rewardi
for your purchase of the Nikon
also incorporates a TTL full·aperture metering system
FM2
works without batteri
ll
always
be
ready for great shooting.
FM2, be sure to
ve
fully mastered its operation- just
as
FM2
FM2
of
fast
as
1/250 sec. The
on
and mechanical
es
at all speeds, for
you
are
, at home or far
keep
this instruction
ng
and welcome
offers many
1/4000 sec
To
obtain the
photography.
.,
5
BASIC
1
Remove
•
chamber
Use a coin to unscrew the lid
clockwise direction.
OPERATION------------
the
battery
lid
58
•
in
a counter-
2
Install
• Wipe the battery terminals clean
in
sert the batteries, making sure that
and
+ signs are up. Usable batteries are:
the
3V
lithium battery
•
• 1.55V silver-oxide batteries,
(2 units)
• 1.5V alkaline-manganese batteries,
(2 units)
Caution:
small children. In case
swallowed, call
material inside the batteries can cause serious
problems.
the
baUery.
(1
unit)
3.1V,
3V
Keep batteries away from infants and
a battery
is
a doctor immediately as the
accidentally
"
3 Put
Slip the battery clip back into the camera
body baseplate and screw
tightly into place.
Note: For more information on batteri
to page
,
• lid
45.
the
back
battery
in Its
chamber
place.
it
clockwise
es
, refer
6
4 Pull
shutter
The film
shutter release button lock.
lock the shutter release button
pulling out the film advance lever slightly
from the flush to the standoff position.
out
•
lever
(lI
the
to
release
advance lever doubles
film
advance
unlock
button
You
the
(g
can
by
•
as
un-
simply
5 Press
•
release
switch
a
on.
The
shutter release button activates the
exposure meter when lightly pressed.
meter itself stays
after
you
button.
the
shutter
button
the
exposure
on
have taken your finger off the
for approx.
lightly
meter
30
6
Check
to
The
sec.
• Switch the exposure meter
looking through the viewfinder. If one or
two of the
lamps inside lights
normal condition.
Note:
When
(bulb), none
light
up.
tion.
If none
up
, either
light
stal/ed-in
properly-or
in
which case
battery
red
LED
exposure indicator
up
the shutter speed dial ®
of
the exposure indicator lamps will
Be
sure
to
set the dial at another posi-
of
the exposure indicator lamps
the
battery
which case
battery power
you
you
should change the battery.
power.
on
while
this would mean
is
on B
is
improperly
should instal/ it
is
not sufficient,
in-
7
-BASIC
7.
Mount
• Place the lens onto the camera, lining
focusing index
on
the camera body.
counterclockwise until it clicks into place. Confirm that the
aperture/focusing index
To
remove:
mounting ring clockwise until the lens comes off.
Note:
When
not to expose the mirror box to direct sunlight.
OPERATION-continued----------
the
lens onto
@
on
the lens with the lens mounting index ®
Then
Pu
sh
changing lenses with film loaded
is
the lens release button @
the
camera.
twist the lens mounting
right
on
top.
and
in
the camera, be careful
up
the aperture/
turn the lens
ring
~
8 Open
•
counterclockwise with your index finger
while lifting the film rewind knob @.
camera back will pop
Caution: Never touch the shutter curtains.
the
Push
camera
the camera back lock lever ®
open.
back
60
The
•
8
9
Install
• Position the film cartridge
film cartridge chamber
leader pointing towards the takeup spool
@,
and push the rewind knob back down
to secure it
Note:
You
tridges available on
to
handle film
posure to sunlight.
the
in
place.
can use any
the
in
the
shade
film
cartridge.
@ with the film
of
the 3Smm film car-
market. It is advisable
to
in
avoid direct ex-
the
10
Pull
into one of the slots
spool. Slowly rotate the takeup spool
inwards wi
latch
ond perforation along the side of the film
leader.
Insert
• In
the leader across gently and insert it
in
the slot engages the first or sec-
the
film
the
takeup
th
your thumb, making sure the
leader
spool.
in
-the film takeup
Wind
the
film
11
•
lever
onto
the
Wind the film advance lever and depress
the shutter release button until the film
sprockets ® engage the perforations
the edges of the film. Make sure
the lever fully until it comes to a stop.
to
takeup
advance
advance
spool.
film
you
on
wind
9
-BASIC
12
•
Close the camera back until it snaps shut,
making sure that the perforations are
perfectly meshed with the sprockets and
that the film
rails
@.
OPERATION-continued----------
Close
back.
the
camera
is
set between the film guide
13
@ and rotate it
arrow
stops. Then fold the crank back in.
Take
up
• Fold out the fi
on
the film rewind knob until
film
lm
in
the direction of the
slack.
rewind crank
Make
blank
14
• until
counter
it
Press
the shutter release button and wind
the
film advance lever until the frame
counter reaches frame 1.
lever, confirm that the film rewind knob
rotates counterclockwise. This indicates
the film
advanced correctly. If the knob fails
rotate, reload the film cartridge.
the
53
reaches
has
been loaded and
exposures
frame
frame
As
you
1.
wind the
is
being
to
10
15
Lift the ASA/ISO film speed ring
rotate it
ASAIISO film speed indicator ®
site the ASAIISO film speed indication
use. Unless the film speed
you cannot obtain correct exposure. For
film speeds not indicated
film speed dial
Set
the
ASAIISO
•
speed.
in
either direction until the
®, refer to page
film
CD
is
is
set correctly,
in
the ASAIISO
18
.
and
red
oppo-
16
Basic holding posture: Use your left hand
to cradle the camera, with your fingers
wrapped around the lens and the elbow
propped against your body for support, as
in
you look through the viewfinder. Use your
right hand's index finger to depress the
shutter release button and your thumb to
wind the film advance lever. Wrap the
other fingers of your right hand around
the camera body.
basic posture to both horizontal and vertical format shooting.
steady, it
something strong and stable
Also, you can look through the viewfinder
with the right or left eye, with the other
eye closed or open.
Hold
• point
is
advisable to lean
the
It
at
camera
You
To
the
subject.
can adapt this
hold the camera
on
(e.g.,
and
or against
a wall).
11
-BASIC
OPERATION-continued----------
1l
12mm-diameter circle) of the field of view inside the viewfinder.
Then
until the
lights
12
Set
the
• First, position your main subject at the center (i.e
correct
turn the shutter speed dial ® and/or lens aperture ring @
LED
up.
lamp for the symbol for correct exposure 0
exposure.
.,
the
Important! Intermediate settings
speed are usable.
Nota:
The
a distinct bias on the central 12mm-diameter area.
meter reads the light over the entire focusing screen but has
of
lens aperture but not
of
shutter
18
focusing
The FM2
cusing screen as standard. Look through
the viewfinder while turning the focusing
ring until the two halves of the split image
rangefinder coincide perfectly to form a
single unbroken image and the image
the microprism grid appears sharp. Cor-
rect focus will then
Focus
•
by
rotating
ring
is
provided with the
on
46
be
secured.
the
the
•
subject
lens
Type
K2
fo-
in
13
-BASIC
OPERATION-continued-----------
19
Look
the shutter release button.
the shutter release button, apply light but
steady pressure with the ball of your
index finger to avoid camera shake that
might result
14
Depress
•
release
through the viewfinder, and depress
in
the
button.
image blur.
shutter
In
depressing
20
far
next frame and ready the camera for the
ne
sure in winding the lever.
the lever when the film is at
should then rewi
Advance
• Wi
as
xt shot.
nd
it
will go to transport the film to the
Do
the
the
film advance lever
not apply excessive pres-
nd
the film.
film.
You
an
cannot wind
end-you
21 Press
•
as
After the last exposure
turn the camera upside down and press
the
posed film can
cartridge.
button all the
button
film rewind button, so that the ex-
the
film
'
43
•
has
be
You
rewound back into its
don't have to depress the
way.
rewind
been made,
22
turn it
end
resistance. Continue winding one or two
more turns until
this will indicate that
now fully rewound into the cartridge.
Rewind
• Lift
the
in
the direction of
of film rewind,
the
the
film.
film rewind crank
the
arrow. At
you
will
feel
a slight
crank feels lighter;
the
film leader
and
the
23
Push
direction of
rewind crank
Take
is
ing
Remove
cartridge.
•
the camera back lock lever
the
out the film cartridge.
film
in
direct sunlight.
arrow
to
open
the
film
as
you
the
camera back.
Avoid
in
the
lift the film
unload-
24
Close
advance lever into place.
not
film advance lever
locks
keeps
side
the
pressed.
Note:
it will automatically be switched off in approx.
30 sec., and the exposure measuring circuit
will simultaneously be
Put
the
•
lever
the
camera back
using the camera,
the
the
exposure indicator lamps
the
viewfinder switched off
shutter release button
Even
if
film
back
and
you
to
shutter release button
the exposure indicator lamp
this position which
cut
off
advance
into
place.
push
the
When
should set
even
is
accidentally
.
film
you're
the
and
in-
is
lit
if
,
15
CONTROLS IN DETAIL
-----------
Film
advance
The
film advance lever also functions
release button.
is
pulled out to the standoff position.
lever
wind the lever to the right
matically returns to the standoff position the moment
your thumb off
vances the film by a single frame and simultaneously cocks
the shutter.
16
lever
The
shutter release button
it.
A single, completed stroke of the lever
®
as
a lock for the shutter
is
unlocked when the
To
all
the way until it stops. It auto-
advance the film,
you
take
ad-
Frame
The
up
dots
camera , the frame counter
frame every time the film advance lever
frame
ate even if
wind the film advance lever; film will
until the actual
reset to S when the camera back
counter
additive type frame counter
to
36
in
even numbers with odd numbers indicated by white
in
between the even numbers.
36
of a 36-exposure roll of film, the counter will not oper-
you
®l
is
graduated from S· ·1
Even
is
operative, advancing by a single
repeatedly press the shutter release button and
end
of the film roll. T
he
is
opened.
be
counter
24-
if there 's
no
film
in
is
fully wound. After
advanced, however,
is
automatically
the
Shutter
The shutter release button also serves to activate the FM2's
built-in exposure meter. When the film advance lever
flush position, the shutter release button
operate.
the film advance lever to the standoff position. Slight pressure
on
the shutter release button will then switch
posure meter and the
the viewfinder.
30
sec. after the finger
they are automatically switched off to conserve battery power.
Pressing the shutter release button all the way down releases
the shutter. When
guard ® with the tip of your index finger and depress it lightly
with smooth, even pressure. This makes shutter release operation smooth and stable. With a shutter speed of
re.e
•• e button
To
release the button from its locked position, pull out
LED
The
meter and the display remain
is
removed from the button, after which
you
depress the button, touch the finger-
®
is
locked and will not
on
exposure information display inside
both the
on
for approx.
1/30 sec. or
is
in
the
ex-
slower, it
a cable release to release the shutter; this will prevent camera
shake which results
nector can
release button. If the tripod
the
lens aperture ring.
supplied with the camera between the tripod head and the
camera body.
is
advisable to attach the camera to a tripod and use
in
be
screwed into the hole at the center of the shutter
lens barrel and the head may make it impossible
blurred photographs. The cable con-
has
a large head, contact between
In
this case, use ,
he
special tripod adapter
to
turn the
17
-CONTROLS IN
DETAIL-continued--------
. -
, '.
"
-• • I
.:.-:: .
•
-
ASAIISO
The ASAIISO scale on the dial has numbered settings for
speeds from ASAIISO
AS
AIISO numbers stand for intermediate settings, such
80
, etc. The illustration above gives the speeds for all intermediate settings. ASAIISO
they are used quite often.
ASAIISO
amount of light. The higher the number, the greater the sensi-
tivity, and vice versa. The ASAIISO of your film is indicated
the cartridge itself. It
the data sheet packed inside.
18
film
speed
12
is
a numerical rating of the film's sensitivity to a given
is
dial
®
to 6400. The dots between each pair of
100
and 400 are indicated
also printed
on
the film carton and
in
as 64,
red
as
on
on
Shutter
speed dial ®
'exposure
determination
Setting
To
or left until the desired shutter speed number click-stops and
aligned with the shutter speed index ® . The dial has indications
for B (bulb) and for shutter speeds from 1 to 1/4000 sec. The 250
engraved in
flash unit.
as
ing one second, 2 for 1/2 sec
the two adjoining numbers, excluding B
much
shutter speeds between printed numbers (i.e
speeds) cannot
shutter speed number inside the viewfinder,
see the shutter speed dial
the
set the shutter speed, turn the shutter speed dial
shutter
red
On
the shutter release button
as
the exposure amount of the other number. Note that
speed
indicates the fastest sync speed for
B, the shutter curtains @ remain op
be
used. Since you can always confirm the
is
kept depressed. 1
.,
60
for 1/60 sec. and
as
you turn it.
is
two times or 1/2 as
you
en
.,
don't have to
to
the right
an
electronic
for as long
is
for indicat-
so on. One of
intermediate
is
Fast shutter speed
SlOw
snutter speed
19
- CONTROLS IN DETAIL-continued
---------
Setting the aperture
The lens aperture determines the amount of light reaching the
film plane. Generally, when
graduation
reduced by 1/2. (This
means.)
graduation
light
stop.) The lens aperture ring clicks at the position of the numbers
engraved although intermediate lens apertures are usable con-
tinuously. Lens aperture greatly affects depth of field (see page
28)
20
in
the direction of the larger numbers, the amount
On
the other hand, when the aperture ring
in
is
. With the exception of a few special lenses, Nikkor and
the direction of smaller numbers, the amount of
doubled. (This
you
turn the aperture ring one
is
what stopping down
is
known
as
opening the aperture
by
one graduation
is
turned one
by
Nikon Series E lenses enable full-aperture light measurement
even when the aperture ring
said to have
is
aperture only at the instant the shutter release button
depressed.
1
an
automatic diaphragm, stop down to the set
is
moved. These lenses, which are
is
Exposure
The amount of light reaching the film plane
determination
is
determined by a
combination of the shutter speed and the lens aperture. A
shutter speed of
ting of 1/1000 sec
aperture setting of
as
much
picture-taking situation
111000
at
1/500 sec. lets
.,
and only half as much light as 1/250 sec.
1111
118.
118
will give the same exposure. It
lets
Thus, if the correct exposure for a particular
in
twice as much light as a set-
in
twice as much light as
is
1/500 at
1111,
1116,
then 1/250 at
is
very convenient
half as
1116
An
or
to know this interrelation when considering depth of field. The
following table illustrates the interrelation between shutter
speed and aperture.
1/4000
112000
1/1000 1/500 1/250
4 5.6 8
11
16
Exposure
The
display
LED
exposure indicator lamps can
be
seen
on
the right side
of the viewfield frame within the viewfinder. The shutter speed
number and IInumber
display indicates exposure five ways, as shown
below,
in
accordance with the conditions of each exposure.
in
use are also visible. The
LED
in
exposure
the table
Overexposure by more than 1 stop
1/5
Overexposure by
to 1 stop
Correct exposure
Underexposure by
1/5
to
1 stop
Underexposure by more than 1 stop
is
As correct exposure
inside the viewfinder
approached, the
is
liable to change rapidly and easily within
the very narrow range, so it
is
important to turn the lens aper-
LED
exposure display
ture ring and shutter speed dial carefully. Although intermediate
shutter speeds cannot
can-just
Note: When the shutter speed dial
display inside the viewfinder is turned off.
turn the aperture ring for fine adjustment.
be
used, intermediate lens apertures
is
set at B (bulb), the
LEO
exposure
21
IN
DETAIL-contlnued--------
--,
Metering range of exposure meter
When there
speed,
light
suitable for correct exposure. Also, if the combination of aperture and shutter speed
subject, the exposure meter will not give
rect exposure even if
a very narrow range.
binations of aperture and shutter speed. If
an
indication for correct exposure, then subject brightness
is
a proper combination of lens aperture and shutter
0 lights
up,
up
when the aperture and shutter speed combination
indicating correct exposure. This sign will not
is
improper for the brightness of the
you
vary the neighboring settings within
You
should try altogether different com-
an
indication for cor-
you
still fail to obtain
is
not
probably beyond the metering range of the exposure meter. It
is
necessary to illuminate the subject or to
density) filter
measurement, the range of brightness that can
by the meter varies with the maximum flnumber of the lens
in
use, as
With a 50mm
and
ASAIISO
With a 135mm f/2.
is
and ASAIISO
to
adjust brightness. Note that
follows:
f/1
.4
lens (1
100
100
film, the
8lens (1
film, the
sec. at f/1.4 and 1/4000 sec. at fiB)
EV
range is from
sec .. at f/2.B
EV
range
use
EV
and
1/4000 sec. at f/16)
is
from
EV3
an
NO
in
full-aperture
be
1 to
EV 1B.
to
EV20
(neutral
measured
22
Stop-down
This exposure measurement method
phragm
on the camera body, such as when a non-AI lens or
sion ring
1)
Set the
2)
Compose your picture and·secure subject focus.
3)
Press the shutter release button lightly to turn the meter on.
Determine the correct exposure while pressi
of-field preview lever
and depress the
exposure
on
the lens does not link with the meter coupling lever
is
mounted
ASA/ISO
measurement
is
on
the camera. The procedure
number.
used when the dia-
is
as follows:
on
the type of
ng
the depth-
® , then take your finger off the lever
sh
utter release button.
an
exten-
ia
• Lens without automatic d
First, determine the correct exposure
shutter speed and aperture. Then, focus at full aperture.
Shift the lens so that you get the desired composition.
turn the aperture setting to the preset position and shoot.
• Lens with fixed aperture (Reflex-Nikkor lens)
Exposure cannot
in
cause
the correct exposure
correct exposure is unobtainable, use
sity) filter or change the illumination
be
this type of lens, the aperture
phragm (PC-Nikkor lens)
changed according
by
turning the shutter speed dial. If
by
adjusting the
to
the aperture be-
is
fixed. Determine
an
ND
to
(neutral den-
adjust the exposure.
Re-
23
IN
DETAIL-continued-----
Exposure measurement in special cases
The exposure
weighted exposure measurement system in which approximately 60
12 mm·diameter circle at the center of the focusing screen.
When the background of the main subject is too bright and the
main subject is not centered within the frame , the result is
underexposure (see Fig.
and the main subject is too bright with the same framing as
above, the result is overexposure.
To
compensate-
1)
Focus on the main subject with the composition you have
in
mind.
2) Move the camera to center the main subject in the viewfinder
(see Fig. 2) and perform exposure measurement.
3) Move the camera back to the position described
exposure setting described in 2) and depress the shutter
release button.
This way, you will be able to obtain
meter
of the Nikon FM2 adopts the center-
% of the total amount of light is measured by the
1)
. When the background is too dark
in
1) with the
correct
exposure.
Fig. 1
----
o
Underexposure
I---
I I
~
~
--------------I
..... --,
+ I
____
J
I
I
I
I
I
Ie
I
I
I
I
24
Fig. 2
Correct exposure
Duplication work and photomicrography
In
copy work, slide duplication,
cannot obtain correct exposu
exposure meter display because these types of photography
represent unusual contrast
is
required. Shown here
specific photo types a
to
be
a guide,
in
by experimentation until
Copy
work
Sl
ide
duplication
Photomi
crography
+ "
more
practice you should make further. compensation
Photographs
pictures
cont
Documents
dr
awings
contras
Gene
.tinuous
Film
and
photographed
Prepared
exposure;
is
nd
proper exposure. Since this
you
Subject
and
with
inuous gradation
and
of
high
t
ral
film
with
con-
gradation
of
documents Stop
drawings
specimen
-,'
less
exposure
and
re
si
tuation
the
table of the relationship between
achievelthe proper result
photomicrography,
by simply referring to the
s.
Exposure compensation
s.
Method
of
exposure
measurement
Full-aperture
stop-down
-down
Stop-down
or
compensatio
Compensa
necessary
Approx
. + 1
stops
for
on
white
approx.
stop
for white
on
bla
ck
Approx.
A
ppro
x.
+
2-1/2
letters
on
o
to
approx.
w
hite lette
background
Approx.
you
FM2
is
meant
Exposu
re
tion
not
to
+2
black letters
background
-112
to
-1
letter
background
+ 1
to
+2
+1-112
to
sto
ps
for
white
background
-1
/2
rs
on
black
+ 1 st
op
•
The
's
n
s
stops
black
stop
exposure compensation values list
data obtained when general-purpose film was used. With color
rever
sal
film or microfilm for duplication work, it
take additional shots with ± one-stop exposu
as
the
se
•
To
illumination
•
It
;
.
for
films have very
avoid vibration,
is
Required
Micro-Nikkor or
Micro-Nikkor
Cable
Micro-Nikkor
Micro-Nikkor
Nikon
Adapter
Nikon
ing
Cable
Microflex
on
advisable to u
accessories
lens'
rel
ease
or
lens'
Slide
Copying
PS-
6
Bellows
Focus-
Attachment
release
PFX
and off.
AF
AF
PB-6
sma
ll
you
se
a cable release to avoid camera vibration .
For
reflectance
is recommended.
compensa
the background
When using
set the
Generally,
exposure
sa
the
exposure latitude.
can make the exposure
high-contrast
gray
tion
Nikon Slide
flood
lamp
results
in
photomicrography. The
tion valu
e on the
compensation
ed
Remark
subjects, use
card
in
determining
With the card, no
is
required
regardless
is
bla
ck
or whit
Copying
30cm
away
come
out
left
is only a
value
by
test sho
'Set
the
below are reference
re
s
of
an 1
e.
Adapter PS-6,
from
better with
guide; determine
len
s'
is
advisable
compensation
by
turning the
8%
exposure
exposure
of
whethe
r
its
opal
plate
.
more
compen-
oting.
A-M
ring
to
"M."
to
25
DETAIL-continued---------
Inside the viewfinder:
1. Fine mattel Fres
2.
Mi
croprism collar
3.
Split-image rangefinder spot
4. 12mm-diameter reference circle
2 3 4
V.
lewflnder/vlewlng & focusing
The
conventional way of securing correct focus
lens focusing ring until the image
The
sharp.
K2 focusing screen that comes with the camera
standard equipment has three focus
with the split imag
e,
turn the ri
in
the viewfinder appears
ing
ng
until the image
halves becomes whole. With the microprism grid, turn the
until the shimmering image appears sharp. With the matte outer
field, turn the ring until the image appears sharp.
rangefinder works well for subjects with definite lines, contours
and
boundarie
s.
The
microprism collar
is
moving subjects or those with indistinct lines,
outer field
ma
is
suitable for close-ups or when us
ximum aperture smaller than f/4.5.
is
to turn the
as
aids. When focusing
in
the two
ring
The
split-image
for focus
ing
while
the matte
ing lenses
on
with a
fast-
nel
outer field
There's another way of securing correct focus. Using the distance scale
with the measured distance.
between the subject and the film plane indicator
Note: The FM2 viewfinder covers approx.
actual photograph
in
the viewfinder. Not e that the picture comes out trimmed down
case
With
to "M
@
on
the lens, set the focusing
Be
so
the actual picture comes out larger
of
mounted slides or service-size
AF
Nikkor lenses: Set the lens' A-M r
."
ring
in
accordance
sure to gauge the distance
-e-@
93
%
of
prints from negatives.
.
the image area
tha
n the image
ing
or A-M switch
of
in
the
the
26
Split· image
focusing
Microprism grid
focusing
Matte outer
field focusing
Out of focus
In
focus
27
IN
DETAIL-continued---------
Depth-of-fleld
What depth
When
you
find that not only
certain distance range both
sharp. Objects increasingly out of this range become
creasingly out of focus.
of
field
said to
The
focusing distance:
1)
2)
3)
focus
field." When this zone
is
said to
be
shallow.
following can
The
smaller the taking aperture (i.e., the higher the flstop
number), the deeper the depth of field ,
aperture, the shallower the depth of field.
The
farther away the subject
depth of field becomes ; the closer to the lens, the shallower
the depth of field.
There
's
greater depth of field behind the main subject than
in
front of
it.
preview
of
field
is
on
your subject at a certain aperture,
is
the subject itself
Thi
s "in-focus zone"
be
of
deep; when it
be
said
lever
in
in
front of
sharpness
is
small, the depth of field
of
depth of field, given the same
is
from the lens, the deeper the
®
focus but objects
and
behind it appear
is
known
is
large, the depth of
and
you
as
"depth
the larger the
will
Note, too, that
but
of
in
a
in
-
is
the same maximum flnumber, the shorter the focal length
of
the lens, the larger the depth of field, and vice versa.
depth of field
coded lines having the same color
and
which correspond to the distance sca
ring. The
Shown
field with a 50mm
tings
at
enables selective blurring
picture either to let the major subject stand out or for overall
sharpness, so that
sharp.
it
different from other pictures.
Getting the subject
When
in
the case of lenses with different focal lengths
at
the taking aperture
range
is
in
a set focusing distance
This
you
indicated
the photo
will give your picture its
take pictures,
is
an
example of the difference
f/1.4 lens when using different aperture set·
all
elements
in
focus
be
is
indicated
as
that of the aperture set
by
the distance between the lines.
of 2 m.
of
the background elements
in
the entire picture field appear
own
is
only
sure to consider depth
le
Control of depth of field
character,
one
aspect of photography.
by
the color·
on
the focusing
in
thu
s making
of
field, too.
The
depth of
of
a
28
Lens set
Only major subject
at
1/1.4
is
in
focus.
Most objects near to far are
Lens set
at
1/16
in
focus.
29
-CONTROLS IN
DETAIL-continued---------
Depth-of-field
When a lens with
in
the viewfinder
lens wide open. However, pressing the depth-of-field preview
lever will cause the lens
to enable
image
in
f/number-the
number), the "darker" the image. Components of the picture
that appear
zone of sharp focus.
Note:
Be sure
the
lever
when
preview
is
you
to examine depth of field before shooting_
the viewfinder "darkens" according to the selected
smaller the aperture (i.e
in
focus when the lever
to
pre
you
depre
lever
an
automatic diaphragm
viewed with the aperture diaphragm of the
ss
the
depth-of-field preview lever
ss
the
®
is
used, the image
to
be stopped down to the fin umber set
.,
the
larger the fl
is
shutter
relea
pressed will
se button.
be
fully. Also, release
in
The
the
30
Self·tlmer
This device
yourself with other people.
as
far
as
photo. This can
vanced. After the self-timer
release button. Reflex mirror
start to operate; the shutter
10
sec. If
has
been set, move it back to its original position with your
finger.
You
However, turning the self-timer lever when
operation will result
the lever
self-timer can
lever
is
useful
it
will go
you want
can then take the picture the standard way
is
back
be
®
in
self-portraits or when taking a picture of
Set
the
in
the direction of the arrow shown
be
done either before or after the film
to cancel self-timer operation after the lever
in
the shutter's being released the moment
in
its original position. Except for B (bulb), the
used at any shutter speed.
self-timer
has
been set, press the shutter
@ will go
is
released after a delay of approx.
by
turning the lever
up
and the self-timer will
it
is
in
is ad-
as
before.
already
the
in
Multiple
Taking a picture of different subjects or two or more of the same
subject
multiple exposure, observe the following :
1)
Take
2)
Pull
shown
The frame counter will not advance; only the shutter
to be released again. Although the finger pulling the multiple
exposure lever will automatically slip off the lever as the film
advance lever
have been performed correctly.
3)
After winding the film advance lever fully, take the second
shot.
To
take three exposures or more
procedures described
No
te: In multiple exposure photography, the FM2
film dislocation to the minimum. But it may occur due to film curling, film
slack
exposure
on
the same frame means multiple exposure.
the first shot. (Press the shutter release button.)
the multiple exposure lever
in
the photo, as you wind the film advance lever fully.
is
or
inappropriate film winding.
lever
wound, multiple exposure operation will
in
2)
and 3).
5
in
the direction of the arrow
on
the same frame , repeat the
is
designed to reduce
To
make a
is
ready
~
'--"
"tt
-~-~---~--
-
-----
31
---
---
---
Memo
To
the roll of film
insert it into the memo holder. Of course, you can use the memo
holder to store anything, including your name card.
holder
remind yourself of the film type and number of exposures
4
in
use, clip off the end of the film package and
on
32
Infrared
When
focus
graphy.
in
focus
form of either a dot or a line) near
barrel.
compensation.)
After focus
the focused distance and turn the focusing ring to the left until
the red infrared compensation index lines
distance.
R60
, etc
at
00.)
compensation
you
shoot infrared film, note that the plane of sharpest
is
slightly farther away than that in visible-light photo-
As
a rule of thumb,
by
referring to the infrared compensation index
(Some
lenses, including the Reflex Nikkor,
ing
the image sharply through the viewfinder, check
Be
sure to shoot with appropriate filter, such
.,
(In this photo, the subject-to-camera distance
.
index
you
can compensate for this shift
the
focus
®
ing index
do
up
with the prefocused
on
not
the
(in
as
is
the
lens
need
the
set
Flash photography
A Nikon electronic flash unit will prove very convenient for
indoor or nighttime shooting or for use
plementary lighting. The FM2's built-in hot-shoe contact
enables direct mounting of the Nikon S8-27, S8-26, S8-25,
S8-24, S8-22, S8-20, S8-19 or
no special connecting cords. When shooting with a
you
should determine the aperture setting that corresponds to
the shooting distance after checking the guide number of the
ash
electronic fl
requires the
unit or flashbulb
use
of a connecting cord, insert the cord into the
camera body's sync cord terminal
shoe contact becomes active only when
is
mounted, touching it accidentally
The use of flash units not provided with a hot-shoe contact'
not recommended because accidental firing
due to short circuiting at the contact. When using such flash
seal
units,
the hot-shoe contact on the camera body with
tape or something appropriate to insulate
in
the daytime
S8-168
Speedlight, requiring
flash
in
use.
Also,
if
the speed light
@. Since the FM2's hot-
an
electronic flash unit
is
harmless.
is
likely to occur
it.
as
sup-
@
unit,
vinyl
T
he
FM2, provided only with
an
X-contact for synchronization,
synchronizes with the speedlight when the shutter speed set
1/250 sec. or slower.
'Old type
flash
units with metallic leaf spring on mounting portion.
Synchronization
Shutte
r s
peed
11
(sec
SpeedUghl
M.
FPandMF
Fl
ashbu
[=:::J
[=:::J
is
Note:
electronic flash unit with long flash duration, the Medical-Nikkor 120mm fl4
IP',
speed down to 11125 sec.
1130
'Not available
4000
I
lbs
Synchronized
Cannot be used
When
using a special electronic
or
the Nikon Repeating Rash Unit 58-6 at
sec.
or
slower.
in
112
EU
countries.
Range
11500
000
'/1000
or
slower. With flashbulbs, set shutter speed at
1/250
11'25
flash
unit with provision for time lag, an
112
or
full output, adjust shutter
' /
60
1/30- 1
is
B
33
IN
DETAIL-continued--
l
Ready-light ®
When the 8B-28, 8B-27, 8B-26, 8B-25, 8B-24, 8B-22, 8B-20,
8B-19
ready-light tells you when the speed light
to fire or when the shutter speed
without your having to remove your eye from the viewfinder.
Before you shoot, make sure the ready-light
the shutter
light will go out.
If
the shutter speed
the ready-light will blink when the speedlight
warn you that the shutter speed
For ready-light availability with
8B-28, 8B-27, 8B-26, 8B-25 , 8B-24, 8B-22, 8B-20 , 8B-19 and
8B-16B, refer
-
------
I
II
11
1111111
' I I
or 8B-16B is
is
released, the speedlight will fire and the ready-
to
page 35.
III
attached
is
set between 1/500 sec. and 1/4000 sec
to the FM2, the built-in LED
is
recycled and ready
is
set outside sync range,
is
on. The moment
is
is
outside sync range.
speedlights
fully charged ,
.,
to
other than the
Picture taken by balancing the flash exposure with daylight.
34
Ready-Light
Shutler
1/4000 sec. - 1/500
11250
Notes:
1)
No
matter how the shutter speed dial
when the ready-light
depressed.
The
ready-light will function regardless
2)
pcsure meter is
3)
When
i
ns
ide the viewfinder shows the expcsure conditi
regardless
at B, the
Caution: For
dedicated electronic
of
any other
Use
camera
the Nik
on
Status
Per
Shutter
speed dial
setting complete incomplete
I Speedlight charging I Speedlight charging
sec.
sec.
- 1 sec. Lights up continuously Off
B
the camera 's expcsure meter
of
LED
exposure display will not be activated.
fla
's
circuitry. Any damage caused by such use
Warrant
Ligh
ts up continuously
is
on
the moment the shutter release button
on
or off.
whether
or
not the flash fires. If the shutter speed
sh photography, it is recommended that you use a Nlkon
fla
sh unit which operates at a low voltage current.
fla
sh which operates at high voltages may damage the
y.
Speed
Bli
nks
is
set, the speedlight will fire
of
whether the camera's ex-
is
on, the
Dial
Setting
O
Off
LED
expcsure display
on
of
is
not covered by
ff
the moment
is
set
Combination
88-21A'
88
-21
S
B-2
41SB-2WB-2&SB-28 D
88
-20/S8-221S8-27
88
-19
S8-17
S8
-16A
is
S8
-16
88
-11
S8
-1O
S8-6
R
inglight
M
acro
SM-2
M
edical-Nikk
120mm
-
Not
..
With S8-140,
Flash
.. ,
to
the
Speedloght
8' D
8
1S8-14/S8-140
Unil 8R-2
Ringlight
Uni
t
or'
f14
1F
available
in
EU
usable
output
is
determined
the
diaphragm, so
correct
exposure.
Chart
Via
AS-6
irect
irecl
D
irect
Direct
Vi
a A
Via
AS-6
Direct
Via SCVia
SC-13
Via
SC-23
D
irect
Via
SC-6 sync
Via
AS-2
extension
Via
sync
Via
sync
Via
2-pln
(provided)
V
ia
3-pln
(provided)
countries
only
as
of
Connection
couple
S-6
coupler
coupler
11
sync
sensor
ill
coupler with
cord
cord
co
rd
sync
sync
.
for
visible-light
by
the
the
lens
Nlkon
cord
cord
r
emote
cord
(provided)
(provided)
cord
cord
lens'
ASA/ISO
Is
focused,
FM2
cord
SC-9
SC-20
8C-22
flash
the
and
Camer
a's
ready-light
operate
Yes
Yes
Yes
Yes
Yes
Yes
Yes
Yes
No
Yes
Yes Manual
Yes Aut
No Manual
No
No
No
No
Yes
photography
ring
setting. The
aperture
Is
Nlkon
Speed
Us
able flash
I
s
Manual
Manual
Auto,
manual,
Auto,
manual
Auto
Auto, manual,
Auto,
manual,
Auto,
manual,
Auto
" ,
Auto",
o,
manual
Auto, man
Manual
Manual
.
focusing
simultaneously
mod
es
manual
manual
ual
..
.
ring
set
lights
repealing
MD
MO
MD
is
coupled
to
provide
35
ACCESSORIES---------------------------
Interchangeable
Three different types of focusing screens are usable with the
Nikon FM2. The
standard accessory.
(matte/Fresnel with focusing spot) and
with focusing spot and etched grid lines) are also available for
the FM2
Type
to
match your particular requirements.
focusing
K2
screen comes with the camera
Two
optional focusing screens,
screens
Type
E2
as
Type
(matte/Fresnel
B2
36
To
change focusing
1. Remove the lens from the camera body.
2. Slip the small tip of the special tweezers (that come with the
a
optional screens) under the focusing screen release latch
at the top front of the mirror box casting and pull outward
spring open the holder.
3.
Take
the screen out by grasping the small tab with the tweez-
ers.
4. Carefully position another screen
facing down and the side with the tab facing up.
5.
Then push the front edge of the holder upward with the tweez-
ers until
it
Note:
surface, do not handle the screen with your fingers.
clicks into position.
To
avoid getting smudges or fingerprints
screens,
follow
this
procedure:
in
place with the flat side
on
the screen
's
®
to
optical
Focusing
Screen
Selector
Qulde
Type I Name/style I Features
Suitable lor general photography.
Has microprism collar around the
Split-image range-
finder/microprism
system
Matte system
Horizontal and
vertical line
etched system
central split-image rangefinder spot.
With PC-Nikkor or lenses having a
maximum
the
split-image
prism
on the surrounding matte area .
Works well for general photography,
close-up photography and duplication
work. Especially useful for people
who prefer to focus on the matte
locusing spot
screen, or
use the split-image rangefinder for
focusing, as
lenses.
Extremely useful
sition. Consists of
with etched horizontal and vertical
lines. Also useful with PC-Nikkor
lenses.
collar
aperature
range
is
dim. In
at
the center of the
when
it
is
the
in
Type
slower
than
finder
or
micro-
this
case, focus
is
inconvenient
case
with
telephoto
pictorial compo-
B2
matte field
f/4.5,
to
Caution
the Type
: T
Type
clear-matte screen
KlBlE screen,
K2
ype
K2IB2IE2 focusing screens
you
must
have
make
a notched
exposure compensation.
Type
screen
K
tab.
If
you
use
37
I
ES-continued------------
Close-up
The
following are some of
close-up photography.
1)
Close-Up
NO.6T
Since these lenses are attached
use,
2)
Auto
3)
Bellows Focusing Attachment PB-6
The
the lens
AI
lens,
the exposure meter
the
is
necessary because the exposure meter
the automatic diaphragm
fications continuously
Note, too, that it
the PB-6
lenses.
tography offer continuous focusing from infinity down
(Micro-Nikkor
The
ft.)
, 0.23m (0.75
0.314m (1.03
Note
that
Thus, you
with
very
field
for
focus
with
38
equipment
the
accessories
Lenses
No.
0, No.
.
metering can still
Extension
Auto Extension
lens. As
closest focused distance of the
in
should
little
focusing (or
the
Rings
and
exposure determination
all
These
close-up
depth. Also, it
split-Image
Rings
camera
for the
PB-6
is
possible
at
the
same time.
fl4,
AF
f/2.8 0 and
specially designed
lenses)
ft.),
ft.)
and
photography, the
stop
down
to
change
or
1, No.
be
done
PK-llA,
body.
is
or 1/1
0.5m (1.64
as
microprism
at
12
and
and
the
If
one
linked
to
the automatic diaphragm
, stop-down exposure measurement
of
the
extending
to
use
AF
Micro-Nikkor
lifesize
depth
as
possible
advisable
focusing
ring.
lens.
to
screens)
by
Micro-Nikkor 60mm f/2.8 0,
0.41m (1.34 ft.),
much
is
you
2, No.
3T, No.
to
the
front
full aperture.
13.
.
PB-6
of
the
is
at
You
the
a close-up
lenses
(AF
lenses
ft.), respectively.
of
use
of
are attached between
rings
is
full aperture because
is
not
can
change magni-
bellows.
lens,
ED
200mm f/4 0
for close-up pho-
Micro-Nikkor
are
0.219m (0.719
field
is
generally
in
photographing a subject
the
Type
K2's
because
can
4T, No.
the
used
linked with
AF
0.25m
matte
it
is
no
use
lens
with
ring
and
Micro-
to
1/2
lenses).
(0.82
ft.),
shallow.
outer
easy
Note: Non-AI extension rings such
attached to the FM2.
for
5T,
in
an
of
Auto Extension Rings
Close-Up
to
lenses
as
the PK-I, 2,
3,
PN
-I , etc. cannot be
Motor
The
automatic film advance when the unit's trigger button
In
maximum rate of 3.2 frames per second
the shutter speed set
motor drive unit proves very convenient when shooting fastmoving subjects since the photographer does not have to wind
film manually or take his eye off the viewfinder.
The
and tightening its builtbase of the camera
trigger activates the FM2's exposure meter.
Drive
use of the
addition to single-frame shooting, continuous firing at the
MO-12
MD·12
MO-12
motor drive unit with the FM2 enables
is
is
between 1/125 and 1/4000 sec.).
can
be
mounted onto the FM2 by simply inserting
in
screw into the tripod socket @ at the
body.
Note that lightly pressing the
possible (i.e
is
pressed.
.,
MO-12
when
The
's
39
Nikon
Nikon speed lights are convenient for shooting
taking backlit portraits, as
Various models are available-from speed lights for beginners
those for professionals. The Nikon 88-28 , 88-27, 88-26, 88-25,
88-24, 88-22, 88-20, 88-19
directly
speed lights also activate the camera's
viewfinder which lights up when the flash unit
and ready to fire, and blinks when the shutter speed set
outside the synchronization
your eye from the viewfinder (see page 34.)
Speed
mounted
lights
in
well
as for synchro-sunlight shooting.
, or
onto the FM2's built-in hot shoe . These
88-168
range-all
LED
without having
dim light or
Speed light can be
ready-light inside the
is
fully recycled
to
remove
to
is
8B·16B
40
Data
Back
To
keep track of when photos were taken, the FM2 accepts the
im
, lightweight Data Back MF-t6. This back attaches
sl
FM
of the
Three imprinti
hour/minute, or picture counti
di
splayed
by
LED
's,
as a handy clock, a quartz timer with alarm
Note:
The
cord provided wi
12
to the sync termi
MF-
MF·16
2's regular camera back with
ng
modes are provided : year/month/day, day/
ng (up
on the
data back
on the photo
Nikon FM2 a/so
th
the data back to connect the socket contact of the
accept
na/of
in
clear L
in
unobtrusive
s Data B
the camera.
no
sync cord requi
to 2000); each mode is
CD
numerals and printed
red
is
incorporated.
ack
MF-12. In this case, use the
numeral
in
s.
place
red
Serving
.
MF-16
41
Anti-Cold
In
cold weather, use the Anti-Cold Battery Pack OB-2, which
accepts two M -type batteries,
to the batteries inside the camera body. Simply connect the
OB
-2 to the camera body, then slip the assembly inside your
pocket or coat to keep it warm. This assures that the camera's
metering system will function even
Battery
Pack
as
DB-2
an
alternative power supply
in
very cold temperatures.
piece correction lens most suitable for
trying out various models at the camera shop.
Cable
The
Release AR-3
screw-type AR-3 makes for vibration-free shutter release.
you
only after actually
Right-Angie
Screws onto the viewfinder eyepiece
image at a
for closeup photography, duplication work
Eyepiece
Attached to the viewfinder eyepiece, this accessory enlarges
the image at the center of the viewfinder to assure ever precise
focusing in closeup photography, duplication work
photography.
Viewing
90·
angle to the camera's optical axis.
Magnifier
Attachment
@)
DG-2
DR-3
to provide a viewfinder
and
Very
and
helpful
tele-
photomicrography.
Rubbereyecup
Attached to the finder eyepiece, this eyecup excludes strong
light and helps prevent eye fatigue.
Eyepiece
Accessory lenses that screw onto the viewfinder eyepiece to
enable nearout having to wear eyeglasses. Nine models are available,
offering a choice of the following diopters:
+0.5, +1,
dioptry
eyepiece correction lens only.
42
correction
and
farsighted photographers.to take pictures with-
+2
of
and +3; the diopters represent the combined
the viewfinder
lenses
and
lens,
and
For
best results, choose the
-5, -4, -3, -2
not the dioptry of the
, 0,
eye
DG
DR-3
q~a-
-
Eyepiece correction lenses
_____________
-2 Rubber eyecup
~~
AR-3
Filters
As
is
shown on the table, Nikon filters are broadly divided into
the screw-in, drop-in, and bayonet type, Because the FM2
incorporates a
be ignored except in the case of the R60, For exampl
using the R60
TIL
full-aperture metering, the filter factor can
e,
in
daylight, set the aperture three f/stops wider
when
than the figure indicated by the exposure meter,
Notes:
1)
For lens protection, the
2)
When shooting a backlit subject
frame,
a ghost Image
you should take the picture without
NC
filter
is
recommended,
or
if
is
likely to resuff from the use
there's a bright light source
a
filter,
of a finer,
In
this case,
in
the
Lenshoods
Recommended to prevent extraneous light from striking the
lens, Nikon
snap-on, and collapsible-rubber. Every lens should
the lens hood specially designed for
lens hoods can be used
's
lens hoods come
in
in
four styles: screw-in, slip-on,
be
it.
Note, however, that some
common by several lenses,
fitted with
Black&wni1.
'""-
G
..
"
So'
12
'hi
43
Camera
Semi-soft cases, such
available.
with a lens smaller than
camera mounted with any lens from 50mm
When
The
cases
The
a motor drive
soft-type CS-
as
CF-27 case accommodates the FM2 mounted
16
the CF-27, CF-
50
mm
f/1
is
attached to the FM2,
case
is
also available.
28
.4.
The CF-
fl1
.2 to 105mm f/2.5.
use
and CF-29, are
28
is
for the
the CF-29 case.
Neckstraps
Available are the leather neckstrap
neckstraps AN-4Y (yellow) and AN-4B (black), and wider
webbed nylon neckstraps AN-6Y (yellow) and
AN-1
(black), webbed nylon
AN-6W
(brown).
Compartment
A wide selection of six types to choose from, ranging from a
compact type to a large type which can accommodate large or
bulky camera equipment:
and FB-17.
44
cases
FB-8, FB-11A, FB-14, FB-15,
FB-16
TIPS
ON BATTERY USE
• Keep batteries away from infants and small children.
case a battery
immediately
serious problems.
• Battery power falls off
this may cause the camera's photometeric circuit to mal-
function.
the camera body from the cold. Note that battery power
be
recovered
will
normal.
• Should the battery
period, insufficient contact may occur due to battery
leakage. Thus, it
battery and the contact section
with a soft cloth. If the battery chamber
leaking battery, remove the battery at once and clean
the chamber.
• If you're using a pair of batteries, change them at the same
time; never mix new and old batteries .
• When not using the camera for a long period, take batteries out and store them
• Never disassemble batteries or discard them
• When using a pair of batteries, make sure they are of the
same make.
• Always check battery power before the shooting session
because battery power can become exhausted without
warning.
during a protracted shooting assignment.
In
normal
•
battery packed with this camera, however,
poses only
is
accidentally swallowed, call a doctor
as
the material inside the batteries can cause
in
extremely cold temperatures and
In
this situation,
is
It
is
a good idea to have spare batteries
use
, a battery's lifespan
so
its lifespan may
use
new batteries
as
soon
as
the temperature becomes
be
left
in
the battery chamber for a long
good practice to periodically clean the
in
in
the battery chamber
is
a cool, dry place.
is
about one year.
be
shorter than usual.
and
protect
stained with a
in
fire.
on
hand
is
The
for test pur-
In
45
TIPS
Although the FM2
ON CAMERACARE
is
a tough
and durable camera, bear
mi
nd
that
is
or
rough handli
a precision opti-
and
that care-
ng
cal instrument,
less
damage it. Observe the
and
the
lowing tips,
always work
the d
ay
you
bought
FM2 will
as
perfectly as
it.
may
fol
in
-
• Don't touch
the
focusing screen
them from getting scratch
Remove dust with a blower·type
brush.
the
reflex mirror or
to
-----------
•
Do
prevent
ed
.
not tou
tains.
x
ch
the shutter cur-
• Clean glass
the lens or
with a blower-type brush ; avoid
usi
ng lens tissue
possible. Gently wipe dirt,
smudges
soft cotton moistened
small amount
cohol, using a spiral motion
from center
sure
you
leave
su
rfaces such
the
finder
as
or
fingerprints with
of
absolute
to
periphery. M
no
wiping traces.
eyepiece
much
With
as
as
al-
ake
a
• Generally, t
need lubrication.
46
he
camera does not
If
the
camera body
•
to
rain or mist, wipe
gently with a soft cloth a
t
he
camera. After
camera nea
care that
cloth moistened with pure
to
water
traces
of
salt.
is
exposed
mOistu
usi
r salt water, t
you
wipe
it
remove possib
nd dry
ng t
with a
he
ake
•
If
the
Inside
accidentally gets wet, its inter-
re
nal
precision parts
ake
rusty. T
away
to
the
Ni
kon
dealer for a checkup
which may require repair pay-
ment.
le
of
the
camera body
may
the camera right
nearest
authorized
get
When
not
•
a long time,
teries
away from
high
humidity, naphtha
camphor,
and
uSing
store
high
the
camera
take out
the
temperatur
the
bat-
camera
line,
for
e,
or
Caution:
Please note that the use
of
a spray-gun type blower to clean
the lens may cause possible damage to the glass (especially when
ED
glass
is
element),
temperature on the lens surface.
avoid
upright, keep its nozzle more than
30cm
from the lens surface and move the
•
used for the front lens
by
suddenly lowering the
damage, hold
(approx. 12 inches)
In
a humid envi
best to store
vinyl
bag
keep away dust, moisture and
salt.
ronment,
the
camera in a
with a desiccant to
the
To
blower
away
it
nozzle around
air
is
not concentrated
x
is
• Note that stori
in
a vinyl
leather to deteriorate,
cise
so
that the stream
in
one spot.
of
ap~
\ (
.
....."
ng
leather cases
bag
due
may cause
care.
so
the
exer·
•
Clean
metallic parts with a
blower·type brush
soft cloth.
If
the camera malfunctions,
take
it
immediately
authorized
service center.
Nikon
or
with a dry.
to
dealer
an
or
• Before
usi
good practice
oughly first.
ng
the
to
camera.
check
it
is
a
it
thor·
47
SPECIFICATIONS------------
Type of camera:
Usable film :
Picture format:
Lens mount:
Shutter:
Shutter speed settings:
Self-timer:
Viewfinder:
Viewfinder display:
ng
Focusi
Mirror:
screen:
35mm single-lens reflex (SLR) focal
plane shutter camera
Any cartridge-type
24mmx36mm
Nikon F bayonet mount
Vertical-travel, metal focal plane
sh
utter
sec_"'
1/4000 sec
1
fixed settings
Set/cancel type provided;
10-sec. shutter release delay
Eye
-level type, with 93 % frame
coverage
Shutter speed, flnumber, and LED
exposure display for overexposure
35
mm film
.,
B (bulb);
in
all
14
approx.
+ , correct exposure 0 and under-
exposure Split-image microprism type (Type
K2)
provided
type (B) and matte with horizontal
and vertical line etchings (E)
optionally available.
Quick-return type
as
standard; matte
Film advance: Lever provided;
Automatic film advance: Possible with optional Motor Drive
Multiple exposure lever:
Frame counter:
Film rewind:
Flash synchronization:
Ready-light:
Exposure meter:
and 1350 winding angle
MD-12
Provided, disengages frame
counter for correct count
Additive type
matically resets to S when camera
is
back
By crank provided after film rewind
button
is
Built-
in
unit; sync cord terminal also
provided;
Provided inside the viewfinder
TTL center-weighted full aperture
exposure measuring system using
a pair of
as
photoelectric element ; measures
from
EV
100
and with 50mm f/1.4 lens (i.e
from 1 sec.
fl8)
300 standoff angle
(S, 0"'36);
opened
pressed
hot shoe for mounting flash
1/250
SPD
's (silicon photodiodes)
1 to
EV
at
fl1 .4 to 1/4000 sec. at
sec. sync
18
at ASAIISO
auto-
.,
48
Film sensitivity range:
Power source:
Exposure meter switch:
Battery power check:
Camera back:
Dimensions (W x H x D):
(camera body only)
Weight:
(camera body only)
ASAIISO
12"'6400
Choice of one 3V lithium battery,
two
1.
55V
two 1.
silver-oxide batteries,
5V
alkaline-manganese
or
batteries
Light pressure on shutter release
button switches
meter
on;
meter
stays on for approx. 30 sec . after
finger leaves button, then automatically switches off
LED
exposure display inside viewfinder lights up when the exposure
meter is switched on if there
sufficient power (i.e
.,
is
the shutter
speed dial should be set anywhere
except B)
Pops open when the film rewind
knob as the camera back lock is
memo
pushed; detachable;
holder
provided.
Approx. 142.5mm x 90mm x 60mm
in
or 5.6 x 3.5 x 2.4
.
Approx. 540g or 19 oz.
Specifications
are
subject to change without not
ice
.
49
IMPORTANT!
The Nikon FM2
which performs full-aperture metering with
these lenses are fitted with meter coupling ridges
now manufactured by Nikon are the
not your lens
Although almost
is
an
AI-type (Automatic Maximum Aperture Indexing) camera
is
AI
before using
all
Nikkor lenses that have the Nikon F bayonet mount,
it
with the FM2.
AI
-type lenses. The aperture rings of
(see
AI
type. However, please confirm whether or
illustration). Almost
as
all
lenses
well
as
the Nikon Series E lenses, can be mounted on the FM2, the FM2 cannot be used
with Nikkor lenses that have not yet been modified
few special-purpose lenses because the FM2's meter coupling ridge
to
offer the
AI
facility and with a
is
fixed, and
the FM2 does not have a mirror lock-up mechanism. For particulars, refer to the
table below.
Lens
Fi
sheye-Nikkor
Rsheye-Nikkor 1 Omm
PC-Nikkor 2Smm fl4 Serial N
C-
P
Reflex-Nlkkor 1
Reflex-Nlkkor
Zoom-Nikkor
Zoom-Nikkor
Zoom-Nikkor ED
Focu
Other Nikkor lenses that have not
been modified to offer the
6mm
1/5.6
fl5.6 OP Requires mirror l
Nikkor 35mm f/2.S
000mm
fl11
2oo0mm
f/
11
200 -600mm
ED
1S0 -
si
360
ng Unit AU-1 Not usab
f/9.5 coupler lever
600mm
f/S Serial N
- 1200mm f/11 S
AI
facility
Reason Remark s
Requires mirror l
H
its
camera's
ock
-up Not usable
oc
k-up Not usable
meter
Serial Nos. 851
Serial N
than 143000 usable
Serial N
Serial No. 300491 and higher usab
eri
al N
Not usable
o.
1809
01
and higher usable
001
to 906200 not usab
o.
lower than 142361 and higher
o.
2003
11 and higher usable
o.
174167 and higher usab
o.
1740S8 a
nd high
le
er usable
le
le
le
50
No
reproduct
whole
articles
authorization
or
In
or
reviews).
ion
in
any
part (except
may
from
NIKON
,
'~
form
of
this
for
be
manual,
brief quotation
made without
CORPORATION.
NIKON CORPORATION
FUJI BLDG.,
PHONE: 81-3-3214-531 1 TELEX:
2-3, MARUNOUCHI3-CHOME,
In
In
written
NIKON
critical
CHIYODA-KU,
J22601
Nikon
FAX:
TOKYO
81-3-3201-5856
r
100-8331,
JAPAN
Printed
in
Japan
K8A
1505601
(S391)
Loading...
+ hidden pages
You need points to download manuals.
1 point = 1 manual.
You can buy points or you can get point for every manual you upload.


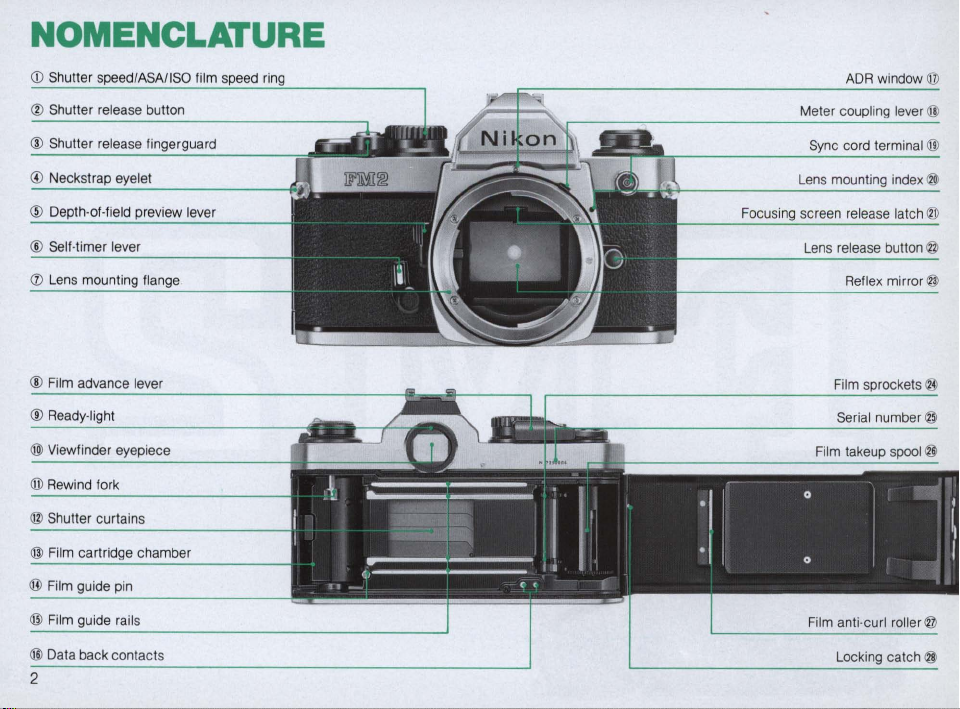
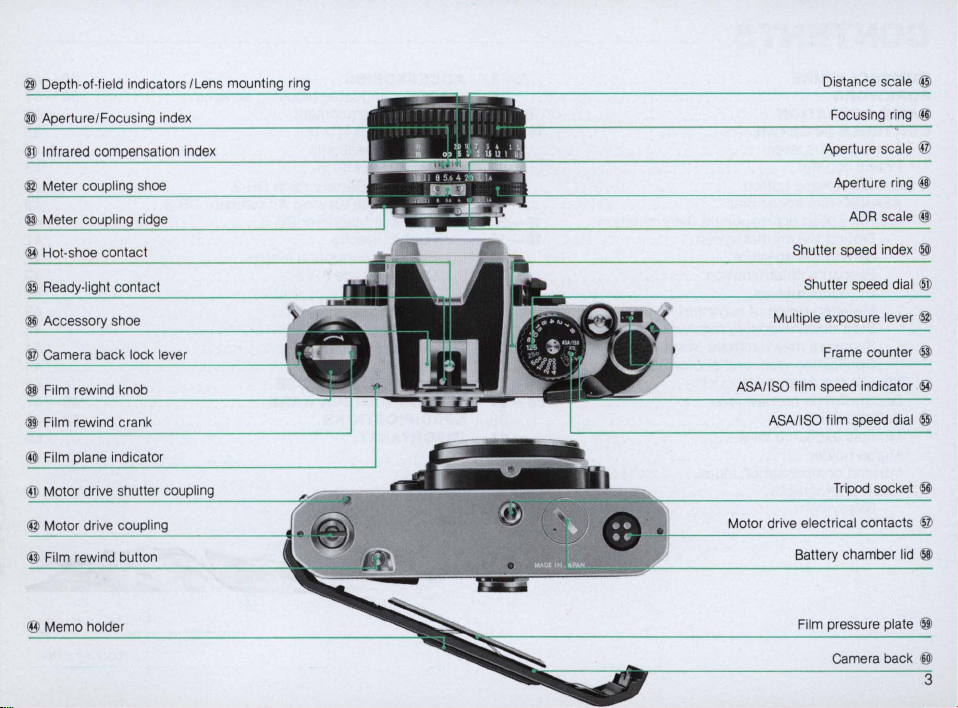
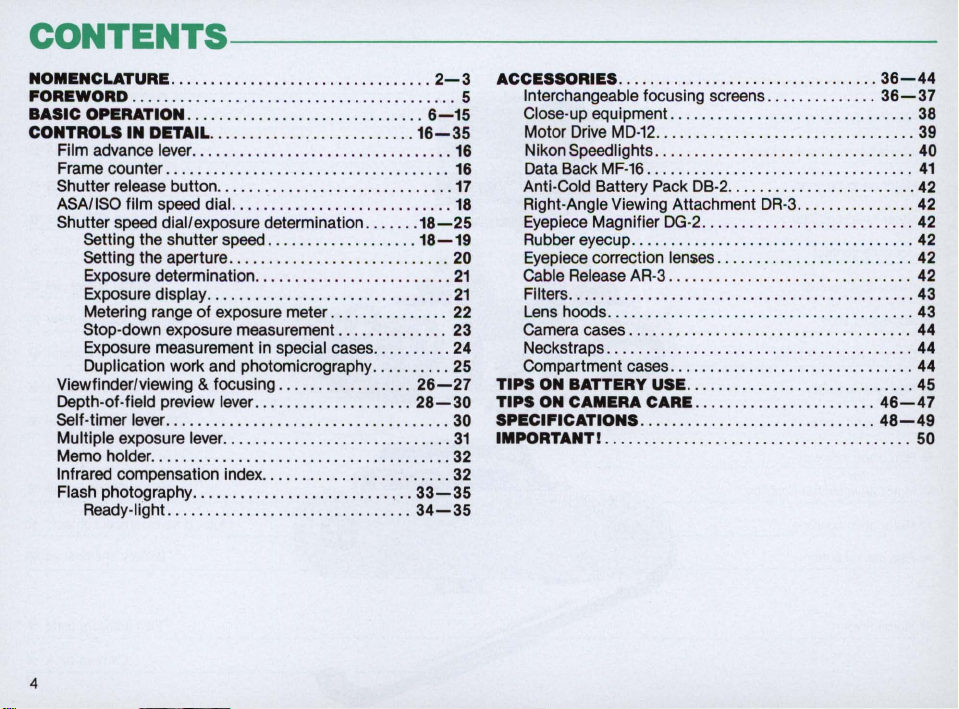

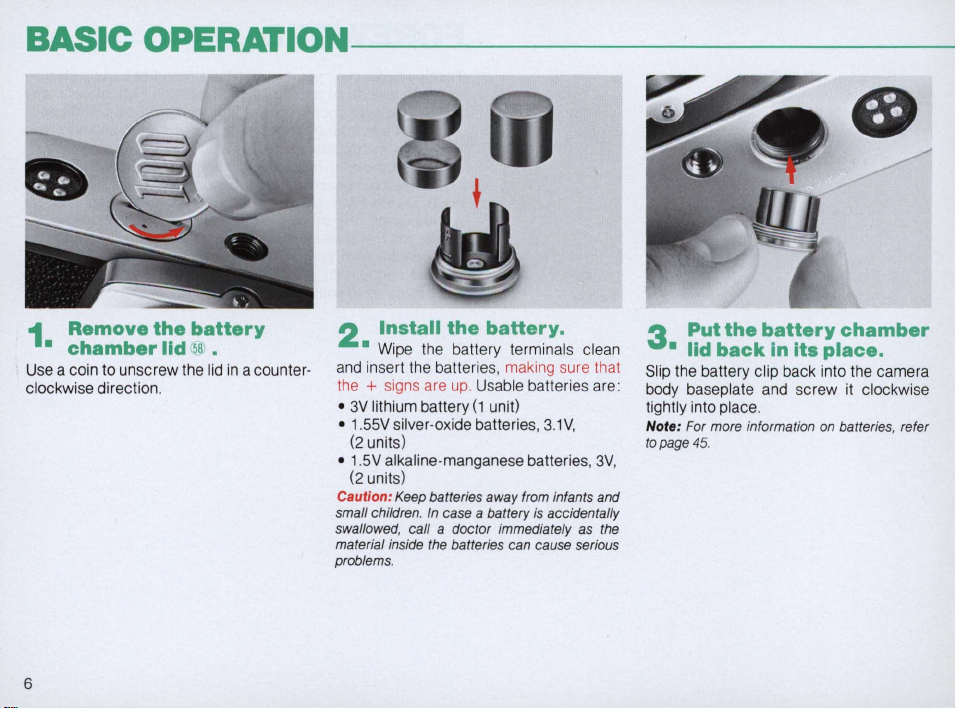
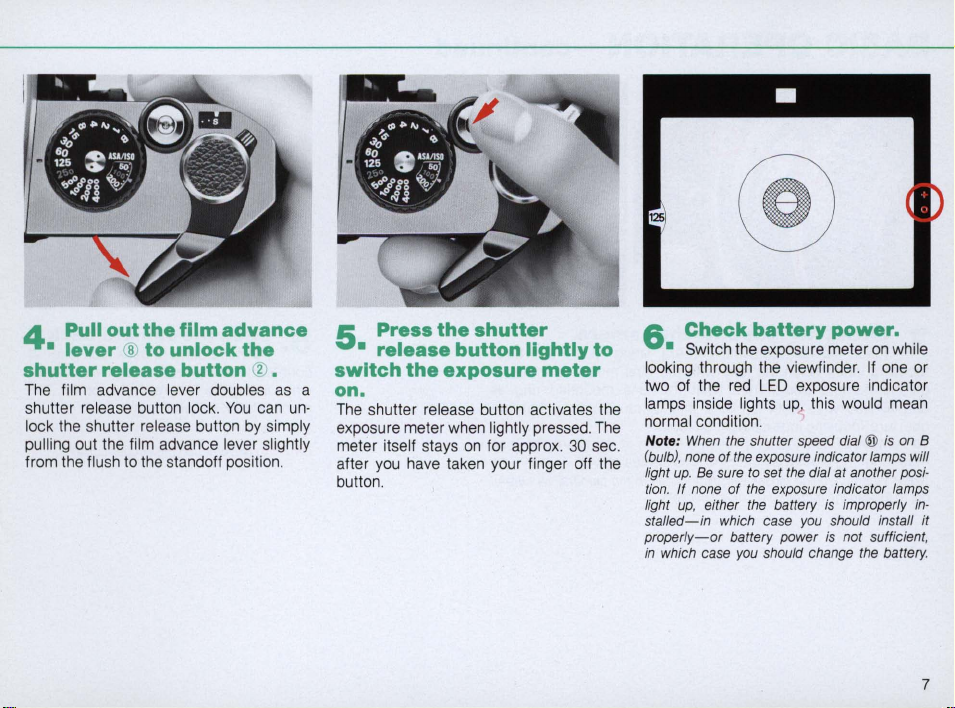

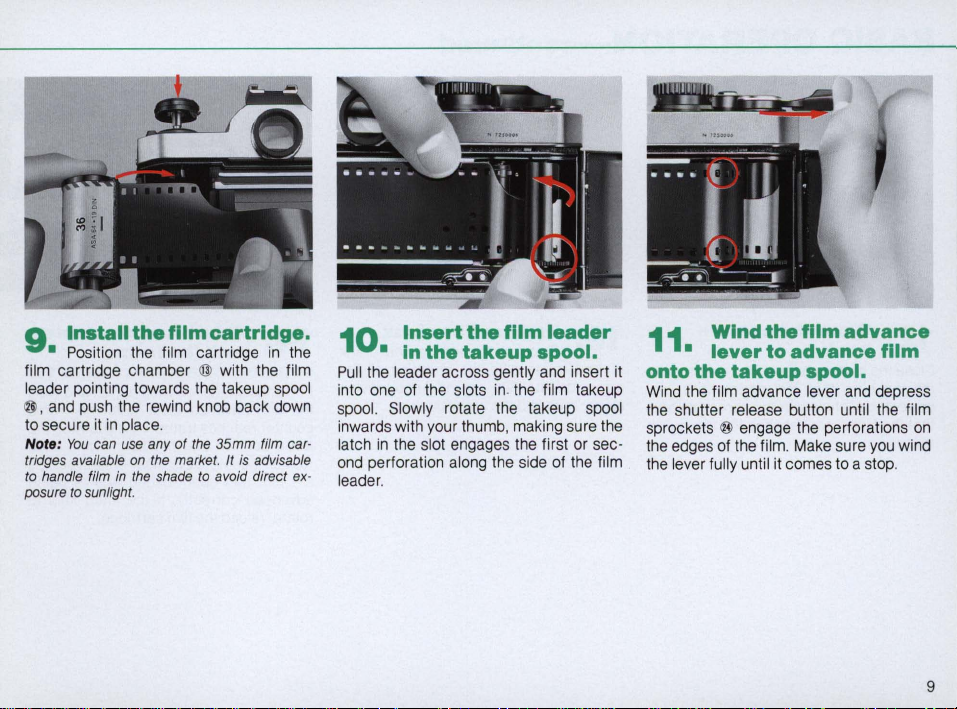
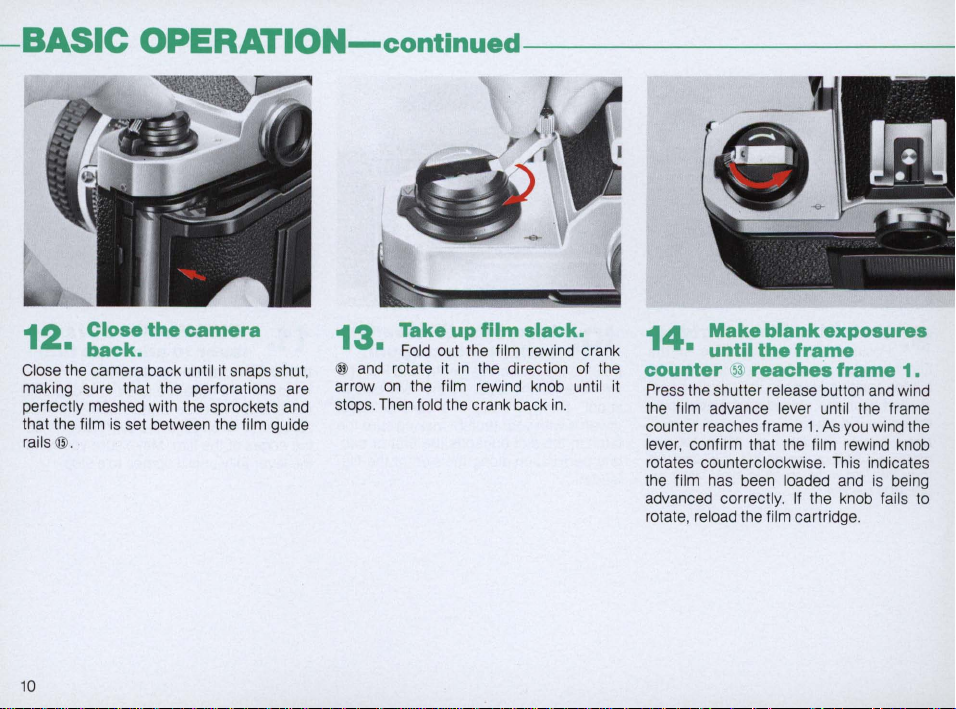
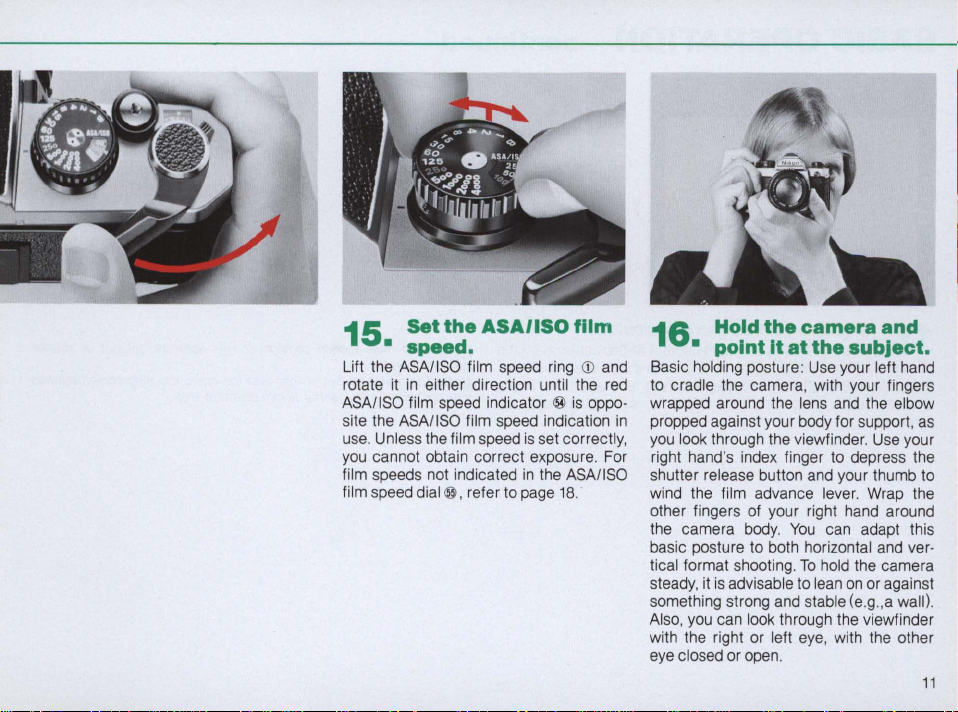
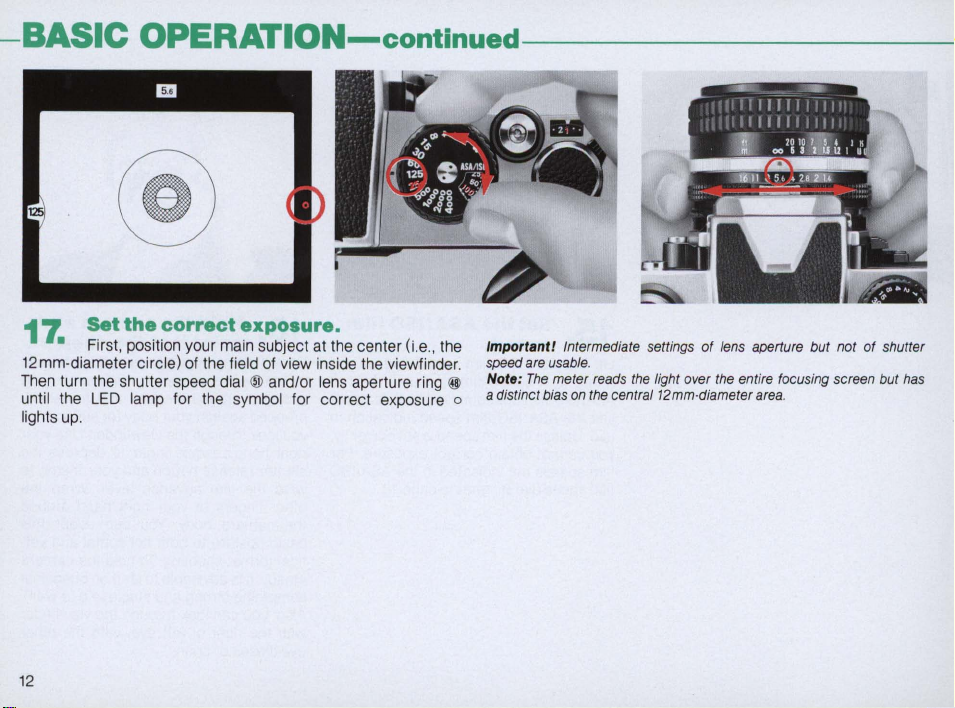
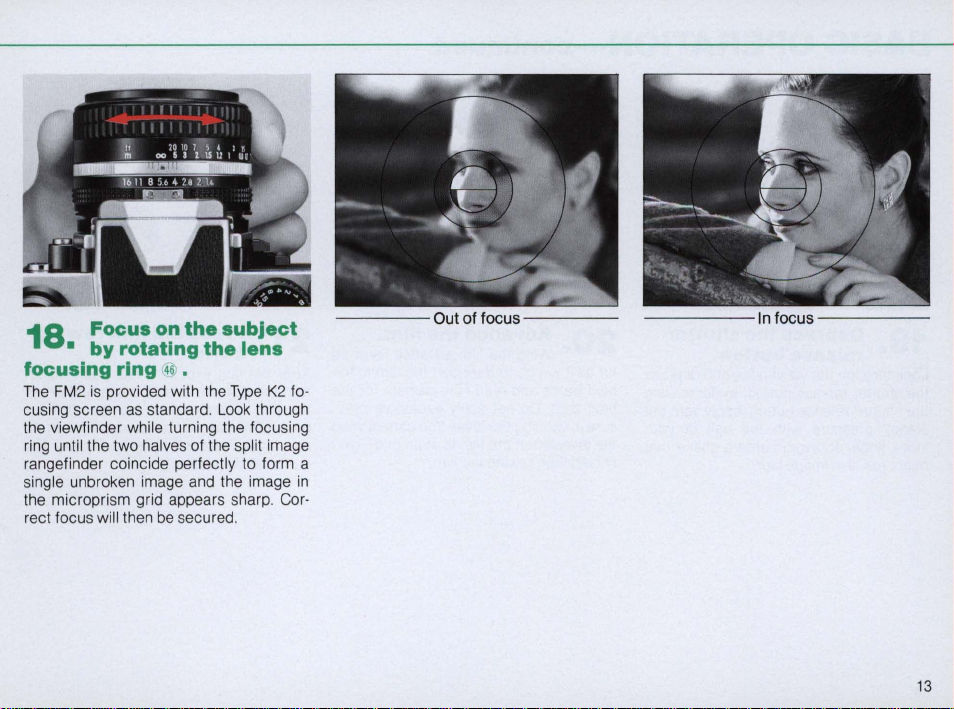
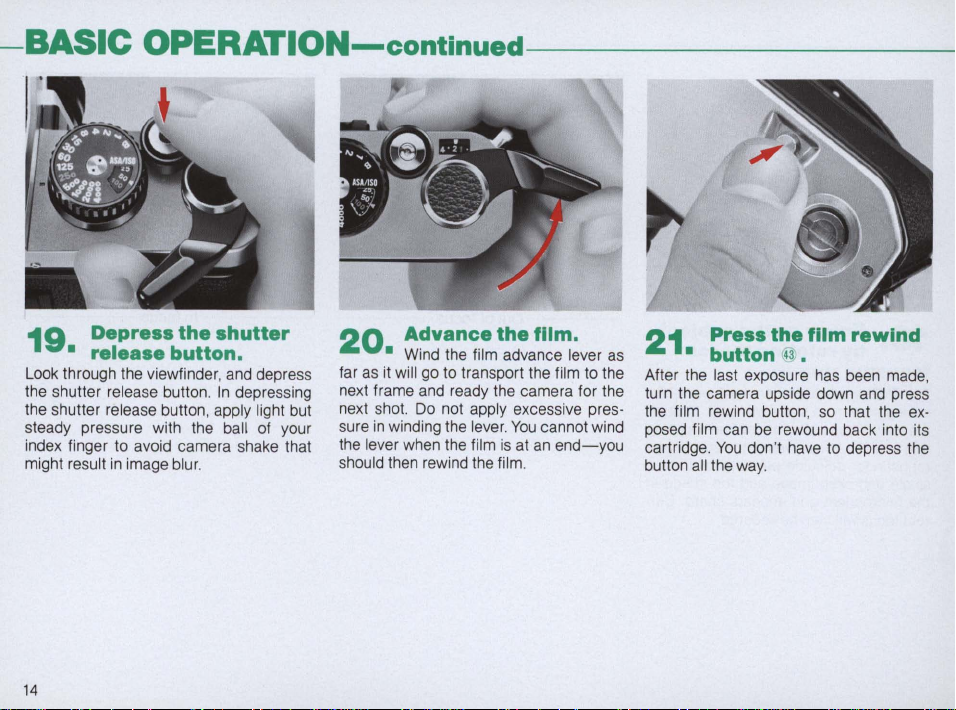
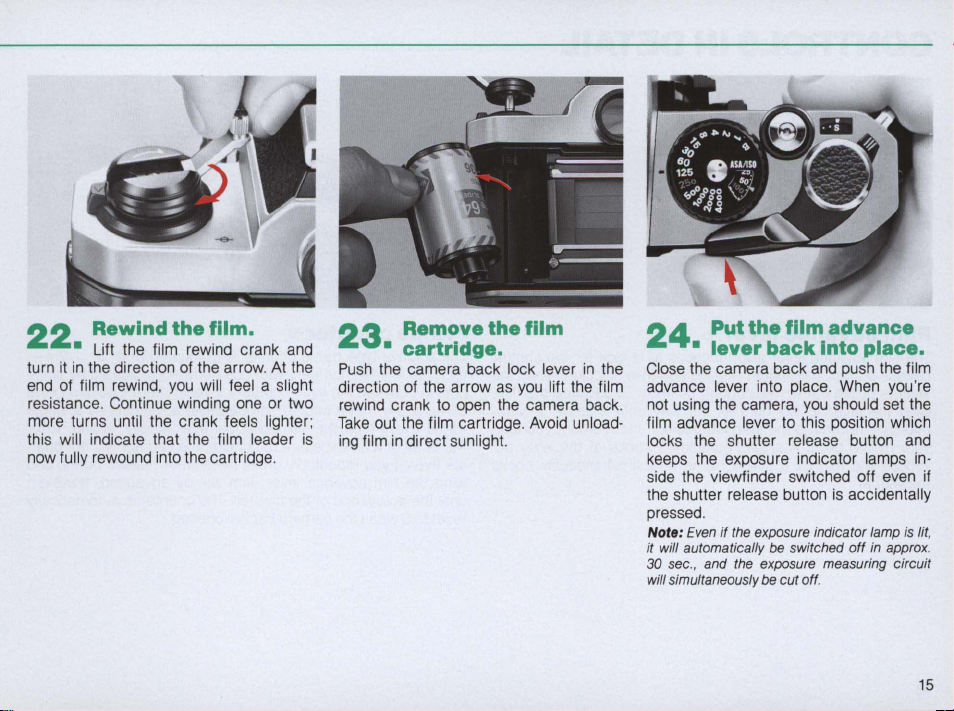
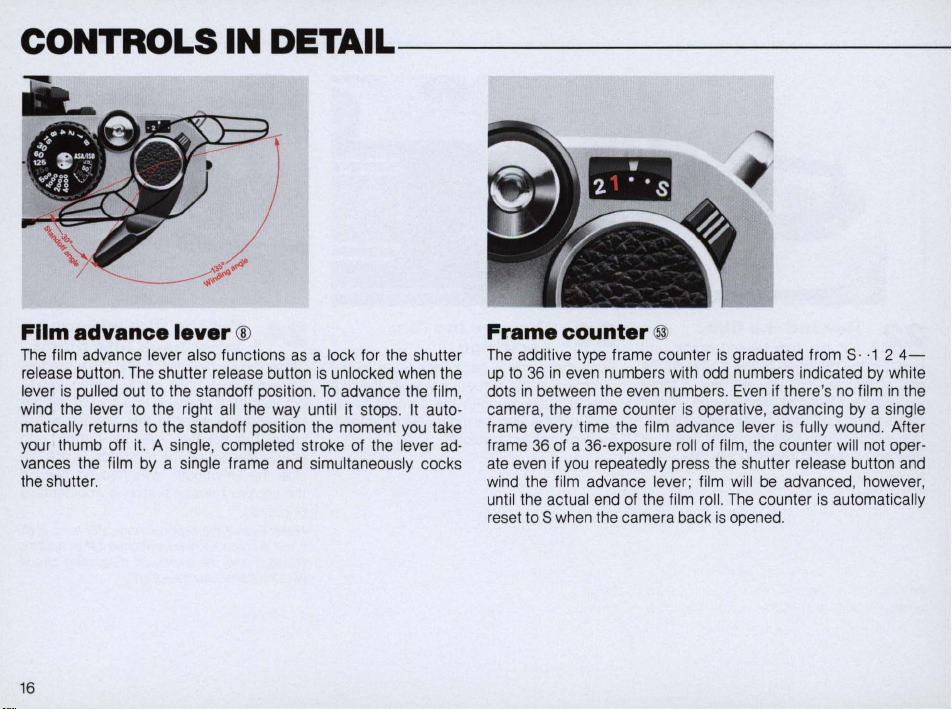


 Loading...