

Page 1

Page 2

Page 3

DIGITAL CAMERA
COOLPIX 900
User’s Guide
Page 4
Cautions
• The reproduction of all or part of this manual is prohibited save in cases
in which Nikon’s prior permission has been obtained.
• The information contained in this manual is subject to change without
notice.
• Nikon has made every effort to produce a perfect manual, but should
you find any mistakes, we would be grateful if you would kindly let us
know. The address of Nikon’s representative in your area is provided
separately.
• Nikon is not liable for damages resulting from the use of this product.
Important!
The symbols in this manual indicate important safety precautions.
Passages marked with this indication should be read before use to prevent
injury to yourself or to others.
✔ Caution
The ✔ symbols in this manual indicate areas in which caution is needed to
avoid damaging the product. Sections marked with this symbol should be
read before use to ensure that the product continues to operate properly.
Trademark Information
Macintosh is a registered trademark of Apple Computer Inc.
Microsoft is a registered trademark, and Windows a trademark, of Microsoft
corporation.
IBM PC/AT is a trademark of International Business Machines Corporation.
CompactFlash is a trademark of SanDisk Corporation.
Adobe and Acrobat are registered trademarks of Adobe Systems Inc.
All other trade names mentioned in this manual are trademarks or registered
trademarks of their respective holders.
ii
Page 5

Federal Communications Commission (FCC) Radio
Frequency Interference Statement
This equipment has been tested and found to comply with the limits for a Class B
digital device, pursuant to Part 15 of the FCC Rules. These limits are designed to
provide reasonable protection against harmful interference in a residential installation. This equipment generates, uses, and can radiate radio frequency energy and,
if not installed and used in accordance with the instructions, may cause harmful
interference to radio communications. However, there is no guarantee that
interference will not occur in a particular installation. If this equipment does cause
harmful interference to radio or television reception, which can be determined by
turning the equipment off and on, the user is encouraged to try to correct the
interference by one or more of the following measures:
• Reorient or relocate the receiving antenna.
• Increase the separation between the equipment and receiver.
• Connect the equipment into an outlet on a circuit different from that to which
the receiver is connected.
• Consult the dealer or an experienced radio/television technician for help.
CAUTION
Modifications
The FCC requires the user to be notified that any changes or modifications made to
this device that are not expressly approved by Nikon Corporation may void the
user’s authority to operate the equipment.
Serial Cables
Please use the serial cables supplied with your COOLPIX 900 (see page 3 of this
manual). Other interface cables may exceed the limits specified for Class B devices in
Part 15 of the FCC rules.
Notice for customers in Canada
CAUTION
This class B digital apparatus meets all requirements of the Canadian Interference
Causing Equipment Regulations.
ATTENTION
Cet appareil numérique de la classe B respecte toutes les exigences du Règlement
sur le matériel brouilleur du Canada.
Notice for customers in European countries
ACHTUNG
Dieses Gerät entspricht den Bestimmungen der EG-Direktive 87/308/EEC zur
Störungsunterdrückung. Lärmemission kleiner 70 dBA.
iii
Page 6
Safety Precautions
Be sure to observe the following safety precautions when using and storing
your COOLPIX 900.
Do not look directly at the sun through the viewfinder
Viewing the sun or other strong light source through the viewfinder could
cause permanent visual impairment.
Turn off immediately in the event of malfunction
Should you notice smoke or an unusual smell coming from the camera,
remove the batteries immediately, taking care to avoid burns. Continued
operation could result in injury. After removing the batteries, take the
camera to an authorized Nikon service center for information on repairs.
Do not use in the presence of flammable gas
Do not use electronic equipment in the presence of flammable gas, as this
could result in explosion or fire.
Do not disassemble
Touching the camera’s internal parts could result in injury. In the event of
a malfunction, the camera should be repaired only by a qualified technician. Should the camera break open as the result of a fall or other accident,
remove the batteries and then take the camera to an authorized Nikon
service center for information on repairs.
Keep out of reach of children
Particular care should be taken to prevent infants from putting the camera’s
batteries or other small parts into their mouths.
Do not walk while looking through viewfinder
Walking while looking through the camera’s viewfinder or color LCD
monitor could result in a fall or other injury.
iv
Page 7

Other Cautions
To ensure that you can continue to enjoy the use of your COOLPIX 900,
you should observe the following precautions.
✔ Do not touch the lens with your fingers
The proper procedure for cleaning the camera’s lens is described in
“Caring for Your Camera.”
✔ Handle the lens and moving parts with care
Do not apply force to the lens or to the battery, card, or connector covers.
These parts are especially susceptible to damage. Do not attempt to rotate
the lens and viewfinder past the limits of the hinge. When carrying the
camera, do not pick the camera up by the lens.
✔ Do not drop
Your camera may malfunction if subjected to strong shocks or vibration.
✔ Keep away from strong magnetic fields
Do not use or store your camera in the vicinity of equipment that produces
strong electromagnetic radiation or magnetic fields. The magnetic fields
produced by equipment such as radio transmitters or household television
sets could cause interference on the color LCD monitor, damage data
stored on the flash memory card, or affect the camera’s internal circuitry.
✔ Keep dry
The COOLPIX 900 is not waterproof, and may malfunction if immersed in
water or exposed to high levels of humidity.
✔ Keep free of salt, sand, and dust
After using your camera at the beach or seaside, wipe off any sand or salt
with a lightly dampened cloth and then dry your camera thoroughly.
✔ Avoid sudden changes in temperature
Sudden changes in temperature, such as occur when entering or leaving a
heated building on a cold day, can cause condensation inside the camera.
To prevent condensation, place the camera in its carrying case or a plastic
bag before exposing it to sudden changes in temperature.
v
Page 8

Notice concerning prohibition of copying or reproduction
Note that simply being in possession of material which has been copied or
reproduced by means of a digital camera may be punishable by law.
Items prohibited by law from being copied or reproduced
Do not copy or reproduce paper money, coins, securities, government
bonds, or local government bonds, even if such copies or reproductions are
stamped “Sample”.
The copying or reproduction of paper money, coins, or securities which are
circulated in a foreign country is prohibited.
The copying or reproduction of unused postage stamps or post cards issued
by the government without obtaining approval from the government is
prohibited.
The copying or reproduction of stamps issued by the government and
certified documents stipulated by law is prohibited.
Cautions on certain copies and reproductions
The government has issued cautions on copies or reproductions of securities issued by private companies (shares, bills, checks, gift certificates,
etc.), commuter passes, or coupon tickets, except when a minimum of
necessary copies are to be provided for business use by a company. Also,
do not copy or reproduce passports issued by the government, licenses
issued by public agencies and private groups, ID cards, and tickets, such as
passes and meal coupons.
Comply with copyright notices
The copying or reproduction of copyrighted creative works such as books,
music, paintings, woodcut prints, maps, drawings, movies, and photographs is prohibited except when it is done for personal use at home or for
similar restricted and non-commercial use.
vi
Page 9

Contents
Safety Precautions ................................................................. iv
Other Cautions ...............................................................................v
Overview ......................................................................1
Parts and Accessories ................................................ 3
What’s in this Package ..................................................................3
Parts of the COOLPIX 900.............................................................. 4
First Steps ......................................................................9
Attaching the Camera Strap ................................................ 9
Putting Batteries in Your Camera ........................................ 10
Inserting and Removing Memory Cards ................................... 12
Checking the Battery Level ........................................................13
Choosing a Language for the Menus .......................................14
Setting the Time and Date ......................................................... 15
Taking Your First Photograph....................................................... 17
Nikon View 900 ..........................................................25
Connecting the Camera to a Computer ................................. 25
Software Installation .................................................................... 28
vii
Page 10

viii
Page 11

Overview
Thank you for buying a Nikon COOLPIX 900 digital camera. The
COOLPIX 900 is a full-featured digital camera with optical and digital
zoom and a built-in flash. In automatic mode the camera’s programmed
autofocus, autoexposure, auto white-balance, and matrix metering allow
for “point-and-shoot” photography that produces excellent results in a
variety conditions. The menu-driven manual mode offers a choice of
metering methods, exposure compensation, and white balance programs in
addition to a variety of digital effects. Photographs taken in either mode
can be played back instantly on the camera’s color LCD monitor, or the
camera can be connected to a television for demonstration. The COOLPIX
900 can also be attached to a computer, where your images and recordings
can be viewed using the Nikon View 900 software provided with your
camera, or edited for use in other applications.
The manuals for your COOLPIX 900 and the Nikon View 900 browser
software are divided into three parts. The User’s Guide (this manual)
offers a brief introduction to using your camera and describes how to
install Nikon View 900. Separate reference guides for camera and software
(both Macintosh and Windows versions) are provided on CD-ROM. These
reference guides can be viewed on-line or printed when you need more
detailed information on using the camera and software. In addition, a onepage Fast Track Guide is provided for experienced users who want to get
started with a minimum of instruction. Where appropriate, this guide will
refer readers to the reference manuals or Fast Track Guide for more
information. References to manuals on CD are indicated by a icon,
references to the Fast Track Guide by a icon.
The chapters that follow guide you, step-by-step, through the basics of
using your camera and installing the browser software for your platform.
The next chapter, “Parts and Accessories,” introduces you to the parts of
the camera. This is followed by “First Steps,” which outlines the steps you
will take after you remove the camera from the box, from inserting the
batteries to taking your first photographs and playing them back. Information on installing the browser software provided with your camera may be
Overview
1
Page 12

found in “Nikon View 900,” which also describes how to install the Adobe
Acrobat Reader software you will need to view the manuals on CD-ROM.
Please read all instructions carefully to ensure that you get the most from
your camera.
Note: The illustrations in this manual are composites. Photographs taken
with the COOLPIX 900 may differ from those shown here.
Note: The illustrations in this manual show the color LCD monitor used
in the NTSC-compatible model of the COOLPIX 900. Owing to differences
in video standards, the PAL-compatible model will display items in positions slightly different from those shown here.
2
Overview
Page 13
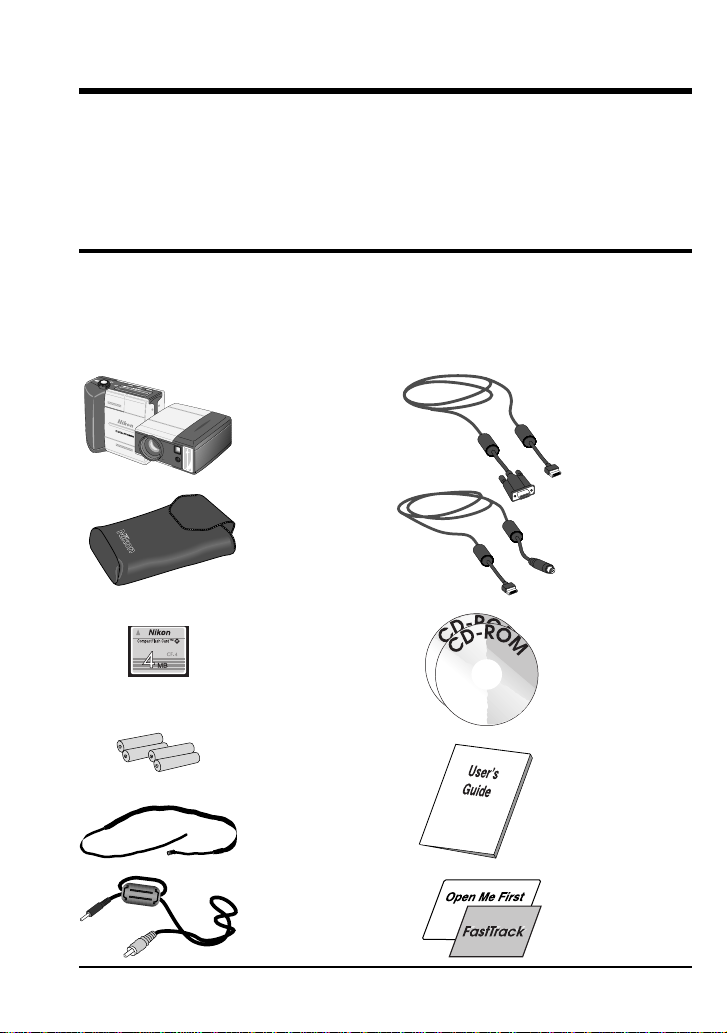
Parts and Accessories
The chapter identifies the parts of the COOLPIX 900 and lists the items
packaged with your camera.
What’s in this Package
Purchasers of the COOLPIX 900 should find that the package contains all
the items listed below. Should you notice that anything is missing or
damaged, contact your retailer immediately.
OFF
PLAY
A
MREC
QUALITY
DIGTAL CAMERA
COOLPIX 900
digital camera
(1)
Carrying case
(1)
SC-900 serial
cable (IBM PC/
AT RS-232C)
(1)
SC-900M serial
cable (Macintosh
RS-232C/RS-
422) (1)
CF-4 4MB
compact flashmemory card
(1)
AA (LR6)
alkaline
batteries (4)
Camera strap
(1)
EG-900 video
cable (1)
Parts and Accessories: What’s in this Package
Software CDROM (1)
Reference CDROM (1)
User’s Guide
(this manual)
(1)
Open Me First
envelope (1)
and Fast Track
guide (1)
3
Page 14

Parts of the COOLPIX 900
[1]
[2]
[3]
[6] [7]
[5]
[4]
m
1
m
:
4
2
.
.
7
4
1
-
8
.
5
R
Z
O
O
K
O
K
I
M
N
FINE
-
3
NORMAL
.
6
BASIC
AUTO
SLOW
CARD
[10] [11] [12] [13]
[14]
[17]
[18]
[19]
[20]
M
REC
[8]
OFF
RECA
WT
PLAY
[9]
[15]
[16]
NIKON CORP.
MADE IN JAPAN
N150
4.8V/6V = 0.9A/0.8A (PAL)
Nikon
AF
DIGITAL CAMERA E900
CARD
PUSH
BATT.
[21]
[25][23]
[22]
4
Parts and Accessories: Parts of the COOLPIX 900
[24]
Page 15

[ 1] Speedlight (flash)
[ 2] Red-eye reduction lamp
[ 3] Photocell
[ 4] Lens
[ 5] Control panel
[ 6] Connector for AC adapter
(under cover)
[ 7] Connector for video cable
(under cover)
[ 8] Selector dial/Shutter-release
button
[ 9] Connector for serial cable
(under cover)
[10] Viewfinder window
[11] QUALITY/Delete button
[12] Focus/Thumbnail button
The Control Panel
[2] [3] [4] [5]
[13] Flash/Multiple Selection button
[14] Color LCD monitor
[15] Zoom switch
[16] Hole for camera strap
[17] MONITOR button
[18] MENU button
[19] Flash indicator
[20] Tripod connector
[21] Battery cover
[22] Diopter dial for adjusting
viewfinder focus
[23] Autofocus lamp
[24] Compact flash memory card slot
(under cover)
[25] Battery cover release button
[1]
[8]
[10][9]
[12]
[11]
[ 1] Image quality
[ 2] Focus setting
[ 3] Self-timer
[ 4] Digital motor-drive
[ 5] Flash mode
[ 6] Red-eye reduction indicator
Parts and Accessories: Parts of the COOLPIX 900
[ 7] Number of exposures remaining
at current image quality setting
[ 8] Metering mode
[ 9] Exposure compensation
[10] Data transfer icon
[11] Memory card indicator
[12] Battery indicator
[6]
[7]
5
Page 16

The Color LCD Monitor
When the selector dial is set to A-REC or M-REC, the color LCD monitor
shows the view through the camera’s lens, adjusted for such settings as
white balance, exposure, and digital zoom. When the dial is set to PLAY,
the monitor displays the most recently recorded photograph. The MONITOR button below the monitor controls whether camera settings or recording information will be shown superimposed on the image displayed, and
can also be used to turn the monitor off, increasing battery life. In manual
(M-REC) and playback (PLAY) modes, pressing the MENU button causes
the settings menus for the current mode to be displayed. The zoom-out
(W/▼) and zoom-in (T/▲) buttons are used to highlight the various menu
items. The currently highlighted menu item can be selected by pressing the
shutter button.
WT
MONITOR
button
MENU
button
Zoom switch
When the monitor is on and information is shown, pressing the MONITOR
button will hide the information display. Pressing the button a second time
will turn the monitor off. To turn the monitor on, press the MONITOR
button once.
6
Parts and Accessories: Parts of the COOLPIX 900
Page 17

Camera settings (A-REC, M-REC)
Zoom indicator
Autoexposure lock
White-balance lock
Lens adapter
Image adjustment
VGA indicator
Image quality
Exposure compensation
Metering
Recording information (PLAY)
Filename
(the first four
letters of the
filename are
omitted)
Image quality
Battery indicator
Self-timer
Number of exposures remaining
White balance program
Focus setting
Date and
time of recording
Battery indicator
Protected image
Position in memory
Parts and Accessories: Parts of the COOLPIX 900
7
Page 18

Through the Viewfinder
[1]
[2]
[3]
[1] Macro close-up field-of-view
Use this frame when composing photographs with focus set to
macro close-up (appropriate at ranges of 8cm–50cm, or 3˝–20˝)
[2] Focus point indicator
For best autofocus results, compose photograph with subject at
focus point
[3] Field of view at ranges of 50cm (20˝) to infinity
8
Parts and Accessories: Parts of the COOLPIX 900
Page 19

First Steps
This chapter guides you through the steps you will take after removing the
camera from the box, from inserting the batteries to making your first
photographs and playing them back. Before you will be able to use your
camera, you will need to:
• attach the camera strap
• insert batteries
• insert the compact flash-memory card
• choose the language to be used in the setting and playback menus
• set the camera’s clock-calendar to the current date and time
These tasks are detailed on the pages that follow. Once these steps have
been completed, your camera will be ready to take photographs and play
them back as described at the end of this chapter. More detailed information on camera settings and on playing images back may be found in the
camera reference manual on CD-ROM.
Attaching the Camera Strap
Attach the camera strap as shown below.
Note: Feed at least 5 cm (2″) of
the strap through the final hole.
Keep the strap over your shoulder or around your wrist when carrying the camera.
Caution
To prevent accidental strangulation, do not place the camera strap around
your neck. Special care should be taken to avoid placing the strap around
the neck of an infant or child.
First Steps: Attaching the Camera Strap
9
Page 20

Putting Batteries in Your Camera
1. Turn the camera off
When putting new batteries in your camera, first
rotate the selector dial to OFF. If the camera is on
a tripod, the camera must be removed from the
tripod before the batteries can be replaced.
2. Open the battery cover
Turn the camera upside down and unlatch the
battery chamber by pushing the button and sliding
the cover away from the camera. Then raise and
open the lid.
3. Insert batteries
Insert the batteries with the positive (+) and
negative (-) poles aligned as shown in the diagram
on the underside of the cover.
10
4. Close the battery cover
Close the cover and slide it back until it latches.
First Steps: Putting Batteries in Your Camera
Page 21

Cautions
Batteries may leak or explode if improperly handled. Observe the following precautions when handling batteries for use in this camera.
• Turn the selector dial to OFF before replacing the batteries. If you are
using the AC adapter, be sure to unplug the camera.
• Use only 1.5V AA (LR6) batteries. Alkaline batteries are
recommended, but nickel-cadmium (NiCd), nickel metal-hydride
(NiMH), and lithium batteries may also be used. Note however that the
battery indicator may not function properly with these types. Because
of their short life-span, the use of manganese batteries is not
recommended. Using other types of battery could cause fire.
• Be sure that the batteries are aligned as shown in the illustration
opposite.
• Replace all batteries at the same time using only one type of battery. Do
not mix batteries of different types or use old batteries together with new.
• Do not attempt to recharge, short, or disassemble the batteries.
• Do not expose the batteries to flame or to excessive heat or moisture.
• Batteries are prone to leakage when fully discharged. To avoid damage
to the camera, be sure to remove the batteries when no charge remains.
• When the camera is used continuously for a long time on battery power,
the batteries may become hot. When removing the batteries, due
caution should be observed to prevent burns.
Note: The camera’s clock-calendar is powered by a separate rechargable
battery. When you put batteries in your camera for the first time or after a
long period of storage, wait a few hours for the clock battery to recharge
before removing the main batteries. Once the clock battery has charged,
removing the batteries will not affect the clock-calendar.
Note: Photographs stored on the flash memory card are not affected
when the batteries are removed. All manual-mode settings, with the
exceptions of the date and language, will however be reset.
First Steps: Putting Batteries in Your Camera
11
Page 22

Inserting and Removing Memory Cards
The COOLPIX 900 records photographs on compact flash-memory cards.
Before you will be able to take photographs, you must insert a memory
card in the camera.
1. Turn the camera off
Cards can only be inserted in, and removed from,
the camera when the selector dial is set to OFF.
✔Caution: Inserting memory cards when the
power is on could render the card unusable.
2. Open the card-slot cover
If the camera is on a tripod, remove it from the
tripod before inserting or removing memory cards.
To insert a card, turn the camera upside down.
Then lift the card-slot cover up and flip it open.
3a. Insert the memory card, or…
Insert the card as shown below, sliding it in until it
is firmly in place at the back of the slot.
✔Caution: Be sure to insert the card as shown
in the illustration, with the connectors towards the
bottom of the slot and the label facing out. Inserting the card upside-down or backwards could
result in damage to the camera or to the card.
12
3b. …remove the memory card
Push the card-release button until the card can be
removed by hand.
✔Caution: Memory cards may become hot
during use. Observe due caution when removing
memory cards immediately after the power has
been turned off.
4. Close the card-slot cover
First Steps: Inserting and Removing Memory Cards
Page 23

Checking the Battery Level
Before using your camera, you should check the battery level to be sure
that the batteries do not need to be replaced. To check the battery level,
turn the selector dial to M-REC, A-REC, or PLAY. A battery indicator
will appear in the control panel on top of the camera. An identical indicator will appear in the LCD monitor when camera settings are displayed. At
critical battery levels, a flashing battery icon will appear in the monitor
regardless of whether camera settings are currently displayed or not.
Battery level normal
Low battery—replace batteries as soon as possible
Battery level critical—replace batteries before use
If nothing at all is showing in the control panel display, either the batteries
are not correctly installed or the batteries are dead. Check to see that the
batteries have been installed correctly. If this does not solve the problem,
insert new batteries and check the battery level as shown above.
Note that the camera will not display the battery level correctly if lithium,
NiCd, or nickel hydride batteries are used, if the batteries have been
replaced with used batteries, or if the batteries do not meet performance
standards.
Note: At low battery levels, you may find that the camera will not record
images under some settings. There may also not be enough power to
charge the flash, in which case the flash will automatically be set to “Off.”
At critical levels, the camera will not record a photograph when the
shutter button is fully pressed.
First Steps: Checking the Battery Level
13
Page 24

Choosing a Language for the Menus
For the display of messages and menu items in its LCD monitor, the
COOLPIX 900 offers a choice of English, French, German, and Japanese.
When you first turn your camera on, you may find that the menus are in a
language other than English. To select a new language for the display,
follow the steps given below.
1. Turn the selector dial to M-REC
After turning the dial to M-REC, wait one or two
seconds for the camera to start up. The color LCD
monitor should show the camera’s current settings
superimposed on the view through the lens. If the
monitor is off, press the MONITOR button until it
comes on.
XX XXXXXXXX
XXXXXX XXXX
XXXXXX XXXX
XXXXXX XXXX
XXXXXX XXXX
XXXXXX XXXX
X
XXX XXXXXXXX
Select the last item
in the first page of
options
2. Display the shooting menu
Press the MENU key to bring up the shooting
menu. If the menu is not in English, press the
zoom-out switch (W/▼) until the last item in the
first page of options is selected (in the illustrations
on this page, “XXX…” has been substituted for
the letters actually appearing in the display). With
the last item selected, press the shutter button.
The following menu will appear.
German
English
French
Japanese
Select the desired language using the zoom switch and then press the
shutter button to register your choice. The menus and dialogs shown in the
color LCD monitor will then be displayed in the chosen language.
14
First Steps: Choosing a Language for the Menus
Page 25

Setting the Time and Date
The camera’s clock-calendar is not set at the factory. When you first turn
on your camera, you will need to set the time and date.
1. Turn the selector dial to M-REC
After turning the dial to M-REC, wait one or two
seconds for the camera to complete start-up. The
color LCD monitor should show the camera’s
current settings superimposed on the view through
the lens. If the date has yet to be set, the date
“00.00.00/00:00” will be shown flashing at the top
right corner of the display.
Note: If there is no card currently in the camera,
in place of the camera settings the monitor will
show a message indicating that no card is present.
If the monitor is blank, press the MONITOR button
until the view through the camera’s lens is visible.
Should the monitor remain blank, check whether
the control panel on top of the camera is on. If not,
rotate the selector dial to OFF and check that the
batteries are properly inserted or that the AC
adapter is connected and plugged in.
BK SHOOT I NG
EXP.+/–
ME TER I NG
CON T I NUOUS
DAT E
LANGUAGE
E
SET➔SHU T TER
First Steps: Setting the Time and Date
2. Display the shooting menu
Press the MENU button to display the shooting
menu shown at left.
15
Page 26

Press the zoom-out switch (W/▼) until the DATE item is selected as
shown above, then press the shutter button to display the date menu.
Year
DA TE
YMD
▲
9198.01.01
▼
00:00
ADJ. S➔
SET ➔SH UT T ER
ZOOM
Hour
Minute
Day
Month
▼▲W
The currently selected item will flash. Edit the selected item by pressing
the zoom-in switch (T/▲) to increase its value or the zoom-out switch (W/
▼) to decrease its value. To accept the current value and select the next
item for editing, press the shutter button. When Y M D is highlighted, the
order in which the date is displayed can be changed by pressing the shutter
button to cycle through available settings in the order Y M D (year/month/
day), M D Y (month/day/year), D M Y (day/month/year). Press the shutter
button when the order is highlighted to register any changes and return to
the previous menu. To exit the date menu without making any changes,
press the MENU button.
Note: The clock-calendar is powered by a separate, rechargeable battery,
which is charged as necessary when the main batteries are in place or the
AC adapter is connected. If the camera has been stored with the main
batteries removed for a long period of time, the clock may need to be reset.
Once the main batteries have been reinserted, the clock battery will
recharge in a few hours, during which time the batteries should be left in
the camera.
16
First Steps: Setting the Time and Date
Page 27

Taking Your First Photograph
The COOLPIX 900 offers a choice of two modes
for recording photographs: automatic (A-REC)
and manual (M-REC). In automatic mode, the
user can control flash settings, image quality,
focus settings, and zoom. In manual mode, the
user can also make adjustments to exposure
compensation, metering, and white balance, and in
addition can experiment with a variety of digital
effects. The present section provides a brief
overview of how to use the camera in automatic
mode. The settings available in automatic and
manual modes are described in greater detail in the
camera reference manual on CD-ROM.
Step 1—Turn the selector dial to A-REC
To enter automatic recording mode, turn the
selector dial to A-REC. After a one- to twosecond pause while the camera starts up, current
settings will be displayed in the control panel and
color LCD monitor (if not visible in the monitor,
settings can be displayed by pressing the MONITOR button until they appear).
Note: The camera may become warm during use, but this does not
indicate a malfunction.
First Steps: Taking Your First Photograph
17
Page 28

Note: To save battery power, the camera will automatically turn the color
LCD monitor off if no operations are performed for thirty seconds (three
minutes when menus are displayed). Press the MONITOR button to turn
the monitor back on (if the monitor has not been turned off manually, the
monitor will come on when the shutter button is half pressed).
Step 2—Check the number of exposures remaining
The control panel and color LCD monitor show the number of exposures
remaining at the current image quality setting.
Number of exposures remaining
When this number reaches zero, you will need to insert a new memory card
or delete items already in memory before you will be able to take more
photographs. It may be possible to record more photographs at a different
image quality setting.
Step 3—Check the camera’s settings
In automatic mode, the user can adjust image-quality, flash, and focus
settings. The default settings, which produce the best results in most
circumstances, are autofocus, automatic flash, and an image quality of
“normal.”
Flash (auto)
Image quality (normal)
18
First Steps: Taking Your First Photograph
Page 29

Step 4—Ready the camera
The COOLPIX 900’s color LCD monitor is joined to the lens by a rotating
hinge, allowing the user to hold the camera at almost any angle while
making photographs. When framing photographs in the monitor, the
camera can be held as shown below.
Framing photographs
in the color monitor
Self-portrait mode
Note: When the lens is rotated to point at the user, the monitor will show
a mirror image of the view through the lens and camera settings will be
hidden. Photographs taken in this mode will not however be reversed.
When framing photographs in the viewfinder, hold the camera as shown
below.
Note: Be sure that the lens and flash window are not obstructed by your
fingers, hair, the camera strap, power cord, or video cable.
First Steps: Taking Your First Photograph
19
Page 30

Step 5—Compose a photograph
Frame your subject in the viewfinder or the color LCD monitor. Press the
zoom-in switch (T/▲) to magnify the subject so that only a portion of it
fills the frame, or use the zoom-out switch (W/▼) to expand the field-ofview so that more of the subject is visible. While the zoom switch is
pressed, an indicator showing the amount of zoom is displayed in the color
LCD monitor.
Zoom indicator
Note: Wait a moment for the camera to focus after zooming in or out.
At maximum zoom, the subject can be further magnified by holding the
zoom-in switch down for two seconds. If the LCD monitor is on, the
camera will enter digital-zoom mode, magnifying the subject digitally by
two times. While the camera is in digital-zoom mode, the zoom indicator
and AF lamp will blink.
Note: The viewfinder is equipped with optical zoom linked to the lens.
The viewfinder does not however show images framed in digital-zoom
mode at the actual zoom ratio. Use the monitor when taking photographs
with digital zoom.
20
First Steps: Taking Your First Photograph
Page 31

Step 6—Half-press the shutter-release button
When the shutter-release button is pressed halfway, the camera will
determine the the distance to the subject. Once an the focus operation is
complete, the green autofocus lamp next to the viewfinder will glow
steadily. These settings will remain unchanged as long as the shutter button
is half-pressed, even if the distance to the subject should change (this is
known as “focus lock”)
lock is in effect.
If the camera is unable to determine the distance to the subject, the
autofocus lamp will flash. In this case you should focus on a new subject
at the same distance as the original subject and half-press the shutterrelease button, then check to be sure that the autofocus lamp is glowing
steadily. With the shutter release button held half-way down, return the
camera to its original position and press the button the rest of the way
down.
.
The zoom ratio cannot be changed while focus
Note: When the monitor is on, the camera will record a photograph even
when it is unable to determine the distance to the subject. Check the
monitor to be sure that the camera is in focus before pressing the shutterrelease button all the way down.
If the red flash lamp next to the viewfinder blinks when the shutter is halfpressed, the flash is charging, and you will need to wait a few seconds
before taking a photograph.
First Steps: Taking Your First Photograph
21
Page 32

Step 7—Take a photograph
To take a photograph, press the shutter-release button all the way down.
The autofocus lamp will flash rapidly and an hourglass icon ( ) will be
displayed in the color LCD monitor while the photograph is being recorded
to the compact flash memory card. Once the process of recording the
photograph to memory is complete, the exposure count in the control panel
and color LCD monitor will go down by one.
Number of exposures remaining
The camera will then be ready to shoot another photograph.
Note: At some settings, the exposure count may not change when a
photograph has been recorded.
22
First Steps: Taking Your First Photograph
Page 33

Step 8—Play the photograph back
To play a photograph back, turn the selector dial to
PLAY. An hourglass icon ( ) will be displayed in
the color LCD monitor while the camera reads a
photograph from memory. The most recently
recorded photograph will then appear, together
with information on the date of recording, the
image quality setting, and the photograph’s
filename and position in memory.
Filename
Image quality
Date and
time of recording
Battery indicator
Position in memory
Other photographs in memory, if any, can be reviewed by pressing the
zoom-in switch (T/▲) to page through the photographs one at a time in the
order in which they were recorded, or the zoom-out (W/▼) switch to page
through the photographs in reverse order. To delete the photograph
currently on view, press the QUALITY/ button. The following dialog
will be displayed.
BK DE L E TE
Press the zoom-in switch once to select
YES and then press the shutter button to
DE LE TE
1IMAG
YES
NO
SET➔SHUT T ER
E
delete the photograph. Select NO or press
the MENU button to return to playback
mode without deleting the photograph.
For more information on playing back and deleting photographs, refer to the camera reference
manual on CD-ROM.
First Steps: Taking Your First Photograph
23
Page 34

Step 9—Turn the camera off
When you have finished using the camera, be sure to turn the selector dial
to OFF.
The camera is off when the control panel display is blank; if the monitor is
off but the control panel is on, the camera has not been turned off. Check
that the camera is off before putting it away.
24
First Steps: Taking Your First Photograph
Page 35

Nikon View 900
This chapter describes how to connect your
COOLPIX 900 to a Macintosh or
compatible computer and install the Nikon View
900 software that allows you to browse the
contents of the camera’s memory from a
It also explains how to install the Adobe Acrobat
Reader software
reference manuals provided on CD-ROM. For
details on using Nikon View, see the reference
manual for your platform.
you will need to view the
Connecting the Camera to a Computer
S
erial cables are provided with your COOLPIX 900 for connection to
Macintosh and IBM-compatible computers. To connect the camera to a
computer, remove the rubber cap that covers the camera’s serial connector.
Then, after making sure that both camera and
serial cable as shown below. The cable can be
camera and computer are on or when they are off.
computer are off, connect the
connected when both the
IBM PC/AT
computer.
Nikon View 900: Connecting the Camera to a Computer
25
Page 36

Attach the other end of the cable to the computer’s serial port (IBM
compatibles) or printer or modem port (Macintosh).
QUALITY
IBM compatible
DIGITAL
M
REC
OFF
PLAY
DIGTAL
Macintosh
Note: When connecting the COOLPIX 900 to a computer, use only the
cables provided with the camera.
Once you have connected your camera to the computer’s serial port, turn
the camera’s selector dial to M-REC, A-REC, or PLAY. A data-transfer
icon will appear in the control panel together with a battery indicator and
the card icon. If no memory card is inserted in the camera, the card icon
will flash.
All other indicators and the color LCD monitor will be off, and the camera
will not respond when the zoom switch and control panel or monitor
buttons are pushed. The only control operative when the serial cable is
connected is the selector dial, which can only be used to turn the camera on
(by turning the dial to M-REC, A-REC, or PLAY) or off. To restore
normal operation, remove the serial cable.
✔Caution: Do not disconnect the serial cable while the data transfer
icon is flashing.
26
Nikon View 900: Connecting the Camera to a Computer
Page 37

Once the camera has been connected to your computer, you can use Nikon
View to browse the contents of the camera’s memory or to copy items from
the camera to disk.
Note: When unplugging the cable from the camera, pull the cable from
the camera while pushing the cable’s release button (located on the
underside of the connector). Unplug the cable by the connector, not by
pulling directly on the cable itself.
✔Caution: Do not use the camera with a computer when battery power
is low or critical. If the battery indicator in the control panel shows low or
critical when the camera is connected to a computer, wait for the data
transfer icon to stop flashing, then disconnect the camera and replace the
batteries.
Nikon View 900: Connecting the Camera to a Computer
27
Page 38

Software Installation
This section describes how to install the Nikon
View 900 software provided with your camera.
For reasons of space, detailed installation
instructions are not provided in this user’s guide.
Details may be found in the reference guides
provided separately on CD-ROM. Users who
would like to review installation procedures
should refer to these reference manuals, which can
be read using the Adobe Acrobat software
provided on the reference CD-ROM.
Step 1—Review the system requirements
To install and run Adobe Acrobat and Nikon View, your computer system
must have a CD-ROM drive, a serial port for connection to the camera, and
a
video system with a resolution of 640 × 480 pixels or higher, supporting a
color depth of at least eight bits, or 256 colors (a
bits, or 16.7 million colors, is recommended). Your system must also
meet the platform requirements given below.
Macintosh
• Macintosh or Power Macintosh with a 68040 CPU or better
color depth of twenty-four
• MacOS System 7.5.1 or later
• a minimum of 8 MB RAM for Nikon View and 5 MB RAM for Adobe
Acrobat Reader.
• 25 MB or more free hard disk space
Windows
• IBM PC/AT or compatible with i486, Pentium, or better CPU
• Windows 95 or later
• a minimum of 8 MB RAM for Nikon View and 8 MB RAM for Adobe
Acrobat Reader.
• 25 MB or more free hard disk space
28
Nikon View 900: Software Installation
Page 39

Step 2—Install Adobe Acrobat Reader
To install Adobe Acrobat Reader, follow the installation instructions for
your platform given below.
Windows
Turn on your computer and
place the reference CD in the
drive. Double-click the My
Computer icon and then
double-click the Nikon CD
icon. Open the folder for the
language of your choice (the
reference CD for cameras
sold in the U.S.A. contains
an English folder only) and
then double-click setup.exe
to start the installer. Follow
the on-screen directions to
install Adobe Acrobat
Reader in the location of
your choice.
Macintosh
Turn on your computer
and place the reference
CD in the drive. The
folder shown at right
will open on the
desktop. Open the
folder for the language
of your choice
reference CD for
camera sold in the U.S.A. contains an English folder only)
click the installer icon. Follow the on-screen instructions to install
Adobe Acrobat Reader in the location of your choice.
(the
and double-
Nikon View 900: Software Installation
29
Page 40

Once you have installed Adobe Acrobat Reader,
you are ready to read the on-line documentation
for the COOLPIX 900. To view the on-line
reference manuals, double-click the INDEX.pdf
icon in the root directory of
above). Before proceeding to the next step, you
may
wish to read Before You Begin in the Nikon
View 900 Reference Manual for
After reviewing the reference manuals, proceed to
Step 3.
the reference CD (see
your platform.
Step 3—Install
Windows
Insert the Nikon View 900 installer disk in the CD-ROM drive. The
Welcome dialog for the Nikon View installer will appear on the desktop
(the Welcome dialog differs depending on the region in which your camera
was purchased; see the reference manual for details).
Click
Nikon View900
you will be prompted to choose a language for Nikon View’s menus and
dialogs. Installation can now be completed by following the instructions
provided by the installer (see the Nikon View 900 for Windows Reference
Manual for details).
Nikon View 900
. If your camera was purchased outside the U.S.A.,
30
Nikon View 900: Software Installation
Page 41

Macintosh
Place the Nikon View CD in the CD-ROM drive. The folder shown below
will open on the desktop .
Double-click the installer for the desired language (DE for German, EN for
English, ES for Spanish, or FR for French; the U.S. version of the CD
contains an English installer only) and follow the instructions on the screen
to complete installation. See the Nikon View 900 for Macintosh Reference
Manual for details.
Step 4—Start
Nikon View 900: Software Installation
Nikon View 900
Once you have installed Nikon View 900 and
connected your camera to your computer, you are
ready to use Nikon View 900 to browse the
contents of the camera’s memory. See the Nikon
View 900 reference manual for your platform for
details.
31
Page 42

EC DECLARATION OF CONFORMITY
We
Name: Nikon Europe BV
Address:
declare that the product
Product Name: Nikon Digital Camera E900 (PAL), AC Adapter EH-30
Manufacturer’s Name: Nikon Corporation
Manufacturer’s Address:
is in conformity with the following Standards
Safety: EN60950 (EH-30)
EMC: EN55022 Class B
following the provisions of the Low Voltage Directive (73/23/EEC) and the EMC Directive (89/336/
EEC)
Schipholweg 321, 1171 PL Badhoevedorp, The Netherlands
Fuji Bldg., 2-3, Marunouchi 3-chome, Chiyoda-ku, Tokyo 100-8331,
Japan
EN61000-3-2 1995
EN61000-3-3 1995
EN50082-1
IEC801-2: 1991 4kV (direct discharge), 8kV (air
discharge)
IEC801-3: 1984 3V/m
IEC801-4: 1988 1kVAC, (0.5kV, I/O)
DECLARATION DE CONFORMITÉ DE LA CEE
Nous
Nom: Nikon Europe BV
Adresse:
déclarons que ce produit
Nom du produit: Nikon Digital Camera E900 (PAL), AC Adapter EH-30
Nom du fabricant: Nikon Corporation
Adresse du fabricant:
est conforme aux normes suivantes
Sécurité: EN60950 (EH-30)
CEE: EN55022 Classe B
selon les dispositions de la directive Basse tension (73/23/EEC) et de la directive de la CEE (89/336/
EEC)
Schipholweg 321, 1171 PL Badhoevedorp, The Netherlands
Fuji Bldg., 2-3, Marunouchi 3-chome, Chiyoda-ku, Tokyo 100-8331,
Japon
EN61000-3-2 1995
EN61000-3-3 1995
EN50082-1
IEC801-2: 1991 4kV (décharge par court-circuit), 8kV
(décharge par amorçage)
IEC801-3: 1984 3V/m
IEC801-4: 1988 1kVAC, (0.5kV, I/O)
Page 43

ERKLÄRUNG ÜBER EG-NORMENGERECHTHEIT
Wir
Name: Nikon Europe BV
Anschrift:
erklären hiermit, daß das folgende Produkt
Produktbezeichnung: Nikon Digital Camera E900 (PAL), AC Adapter EH-30
Name des Herstellers: Nikon Corporation
Anschrift des Herstellers:
den nachstehend aufgeführten Normen genügt:
Sicherheit: EN60950 (EH-30)
EMC: EN55022 Klasse B
und zwar gemäß der Niederspannungs-Richtlinie (73/23/EEC) und den Bestimmungen der EMCRichtlinie (89/336/EEC)
Badhoevedorp, The Netherlands April 28, 1998
Place Date Signature/Managing Director
Lieu Date Signature/Directeur général
Ort Datum Unterschrift/Geschäftsführer
Schipholweg 321, 1171 PL Badhoevedorp, The Netherlands
Fuji Bldg., 2-3, Marunouchi 3-chome, Chiyoda-ku, Tokyo 100-8331,
Japan
EN61000-3-2 1995
EN61000-3-3 1995
EN50082-1
IEC801-2: 1991 4kV (Direkt Entladung), 8kV (Raum
Entladung)
IEC801-3: 1984 3V/m
IEC801-4: 1988 1kVAC, (0.5kV, I/O)
 Loading...