

Page 1

Nikon
Digital Still Camera
Instruction Manual
Page 2

WARNING
WARNING
A
CAUTION: TO REDUCE THE RISK OF ELECTRIC SHOCK.
REFER SERVICING TO QUALIFIED SERVICE PERSONNEL.
A
ATTENTION
CONTAINS NICKEL-CADMIUM BATTERY. MUST BE RECYCLED OR
DISPOSED OF PROPERLY.
Ni-Cd illegal to dispose of this battery into the municipal waste
To reduce the risk of fire or eiectric shock, do not expose this product to rain or moisture.
CAUTION
RISK OF ELECTRIC SHOCK
DO NOT OPEN
DO NOT REMOVE COVER (OR BACK).
NO USER-SERVICEABLE PARTS INSIDE.
This symbol is intended to alert the user to the presence of
uninsulated "dangerous voltage" \within the product's
enclosure that may be of sufficient magnitude to constitute
a risk of electric shock to persons.
This symbol is intended to alert the user to the presence of
important operating and maintenance (servicing)
instructions in the literature accompanying the appliance.
This product that you have purchased contains a
rechargeable battery. This battery is recyclable. At the end of
its useful life, under various state and local laws, it may be
stream. Check with your local solid waste officials for details in
your area for recycling options or proper disposal.
Page 3

For customers in the U.S.A.
WARNING
This equipment has been tested and found to compiy with the
iimits for a Ciass B digitai device, pursuant to Part 15 of the FCC
Ruies. These iimits are designed to provide reasonable protection
against harmful interference in a residential installation. This
equipment generates, uses, and can radiate radio frequency
energy and, if not installed and used in accordance with the
instructions, may cause harmful interference to radio
communications. However, there is no guarantee that interference
will not occur in a particular installation. If this equipment does
cause harmful interference to radio or television reception, which
can be determined by turning the equipment off and on, the user is
encouraged to try to correct the interference by one or more of the
following measures:
—Reorient or relocate the receiving antenna.
—Increase the separation between the equipment and receiver.
—Connect the equipment into an outiet on a circuit different from
that to which the receiver is connected.
—Consult the dealer or an experienced radio/TV technician for
help.
Changes or modifications not expressly approved by the
manufacturer for compliance could void the user’s authority to
operate the equipment.
Notice for customers in Canada
CAUTION
This Class B digital apparatus meets all requirements of the
Canadian Interference-Causing Equipment Regulations.
Cet appareil numérique de la classe B respecte toutes les
exigences du Règlement sur le matérial brouilleur du Canada.
Notice for customers in SWITZERLAND
Nach Gebrauch der Verkaufsstelle zurückgeben.
Après usage à rapporter au point de vente.
Ritornare la pila usate al negozio.
Page 4

I
WARNING
EC DECLARATION OF CONFORMITY
We
Name:
Address:
declare that the product
Nikon UK Limited
Nikon House, 380 Richmond Road,
Kingston, Surrey KT2 5PR, UK
Product Name:
Manufacturer's Name:
Manufacturer's Address:
is in conformity with the following Standards
Safety; EN60950
EMC: EN55022: 1987 Class B
following the provisions of the EMC Directive (89/336/EEC) and the
Low Voltage Directive (73/23/EEC).
DECLARATION DE CONFORMITE DE LA CEE
Nous
Norn:
Adresse:
déclarons que ce produit
Nom du produit:
Nom du fabricant:
Adresse du fabricant:
Nikon Digital Still Camera E2/E2s
Nikon Corporation
Fuji Bldg., 2-3, Marunouchi 3-chome,
Chiyoda-ku, Tokyo 100, Japan
EN50082-1
IEC801-2: 1991 4kVCD, 8kVAD
IEC801-3: 1984 3V/m
IEC801-4: 1988 IkV AC, 0,5kV I/O
Nikon UK Limited
Nikon House, 380 Richmond Road,
Kingston, Surrey KT2 5PR, UK
Nikon appareil photo numérique
E2/E2S
Nikon Corporation
Fuji Bldg., 2-3, Marunouchi 3-chome,
Chiyoda-ku, Tokyo 100, Japan
Page 5

est conforme aux normes suivantes
selon les dispositions de la directive de la CEE (89/336/EEC) et de la
directive Basse tension (73/23/EEC).
Sécurité: EN60950
CEE: EN55022: 1987 Classe B
EN50082-1
IEC801-2: 1991 4kVCD, 8kVAD
IEC801-3: 1984 3V/m
IEC801-4: 1988 IkV AC, 0,5kV I/O
ERKLÄRUNG ÜBER EG-NORMENGERECHTHEIT
Wir
Name:
Anschrift:
erklären hiermit, daß das folgende Produkt
Nikon UK Limited
Nikon House, 380 Richmond Road,
Kingston, Surrey KT2 5PR, UK
Produktbezeichnung:
Name des Herstellers:
Anschrift des Herstellers:
den nachstehend aufgeführten Normen genügt:
und zwar gemäß den Bestimmungen der EMC-Richtlinie (89/336/EEO)
und der Niederspannungs-Richtlinie (73/23/EEC).
Kingston, UK
Place
Lieu
Ort
Sicherheit: EN60950
EMC: EN55022: 1987 Klasse B
March 1, 1995
Date
Date
Datum
Nikon Digital Still Camera E2/E2s
Nikon Corporation
Fuji Bldg,, 2-3, Marunouchi 3-chome,
Chiyoda-ku, Tokyo 100, Japan
EN50082-1
IEC801-2
IEC801-3
IEC801-4
1991 4kVCD,8kVAD
1984 3V/m
1988 IkV AC, 0,5kV I/O
; '
Signature/Managing Director
Singature/Directeur général
Unterschrift/Geschäftsführer
Page 6

Nomenclature
I
1 Focus mode selector (See page 42.)
2 Lens release button (See page 20.)
3 Lens mounting Index (See page 20.)
4 White balance window (See page 39.)
5 Camera strap eyelet
6 Accessory shoe (See page 65.)
7 Eyepiece ring (See page 29.)
8 Remote terminal (See page 63.)
9 Aperture dial (See page 53.)
10 LCD panel (See page 17.)
Standard accessories
Page 7

11
12
13
15
16
17
14
11 MODE (exposure mode) button (See page 35.)
12 Metering system button (See page 36.)
13 Exposure Compensation button (+/-) (See page 58.)
14 SENS (sensitivity selector) button (See page 41.)
15 Main dial lock-release button (See page 34.)
16 Shutter release button (See page 30.)
17 Main dial (L, S, C, SD*. PB) (See page 34.)
18 Command dial (See page 27.)
19 AF-L (Auto Focus Lock) button (See page 61.)
20 AF/AE-L (double lock) lever (See page 57.)
To remove the terminal cap: loosen the screw
approx, two turns counter-clockwise.
To attach the terminal cap: first push the
rubber portion of the cap back into place
securely and tighten the screw by turning it
clockwise.
18
19
20
Page 8

II- 'WiiAQl
SiSiiisi;
21
CMND-L (command lock) button (See page 46.)
22
V-Out (Video Output) terminal (See page 47.)
23
D-Out (Digital Output) / E. Trig. (External Triggering) terminal
(See page 62.)
24
QUALITY (image quality) button (See page 37.)
25
W. BAL (white balance mode) button (See page 38.)
26
DATE (date setting) button (See page 23.)
27
SEND DATA (batch data transfer) button*
28
FORMAT (ERASE) buttons (See page 50.)
29
ERASE LAST (last data erase) buttons (See page 50.)
30
Image Memory Card confirmation window (See page 25.)
31
AE-L (Auto Exposure Lock) button (See page 56.)
32
Eject knob lock-release button (See page 24.)
33
Image memory card (PC card) eject knob (See page 24.)
34
Camera back (incorporating the Image Memory Card slot)
(See page 24.)
35
Battery eject lever (See page 21.)
36
Tripod socket
Page 9

Foreword
Thank you for choosing the Nikon Digital Still Camera
E2/E2S. In addition to this camera’s advanced digital
imaging technology, it also includes many high
performance Nikon features such as Matrix metering,
Autofocus operation and compatibility with Nikon’s
advanced Speedlight System for Automatic Balanced Fill-
Flash, and wireless multiple flash photography. Through its
digital technology, images taken and stored on the
camera’s accessory memory card can be viewed on a
compatible computer (PC or Mac) or displayed on a TV
monitor; through compatible computer software the images
can be enhanced on screen and then printed using
optional printing devices. We hope that you will enjoy using
this professional Nikon product and that it will help you
expand your professional opportunities in photography. We
would appreciate hearing about your experience with your
new Nikon E2/E2s camera. To ensure that you fully
understand the operation of the E2/E2s camera, we urge
you to thoroughly read this manual. Thank you.
About this manual
The instruction materials consist of the main manual and a
separate Quick Reference sheet for easy reference. Read these
manuals thoroughly in order to make the most of your camera's
potential.
In the main manual, we begin with instructions on how to
prepare the camera for shooting and move on to a variety of
basic and advanced photographic techniques using all available
functions. In the separate Quick Reference sheet, we explain
some basic photographic procedures for taking pictures using
the camera's simple and convenient functions.
Marks used in this manual
•CAUTION Denotes important points where caution or
mandatory action is required.
► NOTE
See page . Indicates the reference page.
Useful points that should be remembered
for future reference.
Page 10

General recommendations
iWarranty/registration cards
Confirm that warranty and registration cards are included in this package.
Please fill out all necessary items on your cards and send them without delay
to your nearest Nikon service facility to ensure coverage under Nikon's stated
guarantee.
¡Take some trial shots.
When you first handle your E2/E2s camera, and before going on an important
assignment, be sure to test the camera and all its functions first. Should you
find any problems, immediately take your camera to an authorized Nikon
service center for repair.
—Nikon is not liable for any financial loss resulting from equipment malfunction.
■ Have Nikon check your camera regularly.
As this camera is a precision instrument, we recommend that customers have
their camera serviced once every one or two years, and overhauled once every
three to five years.
—I'Ve especially recommend these procedures if the camera is being used for commercial
applications.
I Use only Nikon-approved equipment
This camera has been designed for use in combination with Nikon lenses,
speedlights and accessories.
—Using lenses or accessories other than those specified by Nikon may adversely affect
the camera and cause damage.
—Please refer to the chart for a complete list of usable lenses. (See page 75.)
I Note on copyright
Television programs, films, video tapes and other materials may be
copyrighted. Unauthorized recording of such materials may be contrary to the
provisions of the copyright laws.
10
Page 11

Description of acronyms
NTSC
..........
...National Television System Committee, color television
telecasting specifications adopted mainly in Japan and
the U.S.
PAL
.............
...Phase Alternation Line, a color television system
adopted mainly by European countries and China.
JPEG
..........
...Joint Photographic Experts Group, a joint organization
of the ISO and the CCITT promoting standard
specifications for a graphic file coded compression
system.
TIFF
............
...Tagged Image File Format, a high density bit-mapped
graphics format for scanned images.
PC Card......
...Computer memory card complying with PCMCIA/JEIDA
standards.
PCMCIA......
...Personal Computer Memory Card International
Association.
JEIDA
..........
...Japan Electronic Industry Development Association
MS-DOS
.....
...Microsoft Disk Operating System, a single-user
operating system for personal computers.
SRAM card
...Static Random Access Memory card, an Image
Memory Card incorporating SRAM memory devices.
ATA card
.....
...A high-speed memory card complying with PC Card
(ATA) specifications.
11
Page 12

Contents
WARNING...................................................................................2-5
Nomenclature..............................................................................6-8
Foreword
About this manual ..........................................................................9
General recommendations
Description of acronyms................................................................11
System chart.................................................................................14
Major features
Viewfinder indications...................................................................16
LCD panel indications
Dedicated accessories
......................................................................................
...........................................................
..............................................................................
..................................................................
.................................................................
9
10
15
17
18
Preparations for taking pictures
Mounting and removing the lens
Installing and removing the battery
Checking battery power................................................................22
Setting and checking date and time
Inserting the Image Memory Card
Basic camera settings
Selecting Programmed Auto mode
Holding the camera and composing the picture...........................29
Focusing and shooting
Playing back the pictures........................................................31-32
.................................................................
..................................................
...........................................
..........................
...............................................
.............................................
.........................................
.............................................
24-25
i9
20
23
27
30
Functions and settings..........................................33
Setting the frame advance mode
Setting the exposure mode
Setting the metering systems ......................................................36
Setting image quality....................................................................37
Adjusting white balance
Setting the sensitivity level...........................................................41
Setting the focus mode
Setting the six basic modes simultaneously.................................45
Command lock..............................................................................46
Playing back pictures..............................................................47-49
Erasing data in the Image Memory Card
..........................................................
...........................................................
.................................................
..........................................................
38-40
42-44
.....................................
34
35
21
26
50
12
Page 13

Advanced photography
Shutter-Priority Auto Exposure Mode...........................................52
Aperture-Priority Auto Exposure Mode
Manuai Exposure Mode..........................................................54-55
Exposure compensation
Autofocus with main subject off-center....................................60-61
Externai synchro-fiash shooting...................................................62
Remote photography (générai)
.........................................
........................................
.........................................................
....................................................
51
53
56-59
63
I
Flash photography
Avaiiabie Nikon Speediights.........................................................65
Flash modes available with Nikon Speediights............................66
Notes on using the Speedlight
Taking flash pictures in TTL auto flash mode
Taking pictures in rear-curtain sync flash mode
...............................................
.....................................................
.........................
.....................
64
67
68-69
70-71
Controls in detail....................................................72
Usable lenses..........................................................................73-74
Lens usability chart
Shutter speed and aperture
Special focusing situations...........................................................78
Downloading image data..............................................................79
Cleaning the camera's built-in lens.........................................80-81
Image Memory Card
The dedicated Rechargeable Battery Pack
Troubleshooting.......................................................................85-86
Optional accessories...............................................................87-89
EV chart for flash photography.....................................................90
Camera care tips.....................................................................91-93
Specifications .........................................................................94-96
.................................................................
.........................................................
....................................................................
............................
75-76
77
83-84
82
13
Page 14

System chart
ot
PC Card Drive
ED-10 Persorral computer
Image
Memory Card
EC-15
Personal computer
Printer
Data transfer
Modem
Printer
Data transfer
Modem
Digital Still Camera
E2/E2S
14
DC Adaptor
ES-1
Rechargeable
Battery Pack
EN-1
Quick Charger
EH-1 (EH-2)
External Sync Adaptor
EX-10
AC power outlet
I I Nikon product
Page 15

Major features
■ High resolution, high quality images
1.3 million pixel CCD (1280 x 1000 pixels) and digital image
recording systems capture crisp full-color, high quality, high
resolution pictures. Picture quality does not become degraded
through repeated duplication.
■ JPEG image data compression system
You can record image data in either compressed or non
compressed format. The internationally recognized JPEG
compression system is in use with this camera. Non-compressed
images are stored as TIFF files, a standard image file format. Image
files can be used in a variety of applications.
■ PC Card
A PC card (Image Memory Card EC-15) complying with the PCMCIA
and JEIDA standards is used for storing image data.
I MS-DOS file management system
This camera is compatible with the MS-DOS file management
system. Image data can be transferred directly to a personal
computer without the need for file conversion. Use PC Card Drive
ED-10 or a computer with a built-in PC card slot.
lAF and AE controls
Fligh performance, high precision photography is possible due to
Nikon F4 series camera-based AF and AE control systems.
IVarious interchangeable Nikon F-mount lenses
Most F-mount AF Nikkor and Al-type Nikkor lenses for Nikon 35mm
SLR cameras can be used without any modification.
Note; Please refer to the chart for a complete list of usable lenses.
(See pages 75-76)
I Built-in playback function
The camera comes with a video output terminal (NTSC and PAL)
that allows you to playback exposed images on an external TV
monitor.
I Built-in aperture control unit
A newly developed, high-precision aperture control unit is built into
the camera to increase exposure accuracy. (You cannot set the
aperture by turning the lens aperture ring.)
15
Page 16

Viewfinder indications
I
X ► • ^ ^ V
lE3[®]ee8oFG
3
-------------------------
4 ------------------5 ----------------------------------------------------------------------------9
1 Exposure compensation
2 Focus indicators
3 Metering system
4 Automatically selected shutter speed (in P and A mode)
Manually selected shutter speed (in S and M mode)
5 Automatically selected aperture (In P and S mode)
Manually selected aperture (In A and M mode)
6 Flash-ready light
7 Exposure modes
P (Programmed auto mode)
S (Shutter-priority auto mode)
A (Aperture-priority auto mode)
8 Frame counter
9 Exposure indicators (in M mode)
10 5mm-dia. reference circle for spot metering
11 12mm-dia. reference circle for center-weighted metering
12 Focus brackets
A complete set of viewfinder indications are shown in the above illustration
for purposes of reference only. All these viewfinder indications would
never appear at one time in normal operation.
16
I________________________________8
12
Page 17

LCD panel indications
Exposure compensation
Exposure mode
Image Memory Card
Battery
Lock indicator
Aperture
Shutter speed
Frames-remaining counter
8
Metering system
9
Image quality
10
Frames-shot counter
11
Sensitivity
12
White balance mode
13
I
A complete set of indications are shown on the above LCD panel for
purposes of reference only. All these indications would never appear
at one time in normal operation.
LCDs are temperature sensitive, and may turn black at high
temperatures. They clear up when the temperature drops back to
normal.
In cold temperatures, LCDs may take longer to change the display
mode. This is typical of LCDs and not a problem.
It is common for an LCD to diminish in contrast after approximately 6 to 7
years. When the LCD in your E2/E2s exhibits reduced contrast, the LCD
can be replaced by the Nikon Service Center for a fee.
See pages 85-86 for details on LCD panel indications.
17
Page 18

Dedicated accessories
The following accessories are not included with the E2/E2s, but are required for proper operation of the camera.
—See page 87 for other optional accessories.
I
■ Rechargeabie Battery Pack EN-1
The EN-1 is the dedicated NiCd battery
pack for this camera. Be sure to charge
the battery pack fully before using it for
the first time.
—The battery pack was not charged when
shipped from the factory.
—See page 83 for details about the battery
pack.
■ Quick Charger EH-1* (EH-2)**
The EH-1 (EH-2) is the dedicated charger
for rechargeable battery pack EN-1. It
takes approx. 60 minutes to fully
recharge the EN-1 (at room temperature).
—For more details, refer to the instruction
manual provided with the Quick Charger.
—DC adaptor (ES-1) is provided.
■ Nikon image Memory Card EC-15
The EC-15 Image Memory Card is a
dedicated ATA PC card for this camera
complying with PCMCIA Pel. 2.1 and
JEIDA Ver. 4.2 standards. Be sure to
initialize the card before using it for the
first time. (See page 25.)
—See page 82 for details on the Image
Memory Card.
*The EH-1 is sold exclusively in the US and Canada.
*The EH-2 is sold outside the US and Canada.
18
Page 19

Preparations
for taking pictures
19
Page 20

Mounting and removing the iens
Only the Nikkor lenses which are listed In the usability chart can be used with the E2/E2s. (See pages 75-76.)
—Be sure to set the Main dial to L. (See page 34.)
—Be careful not to touch, smear or damage the CPU contacts as this may
cause the camera to malfunction. If this occurs, clean the contacts with a
soft, clean, dry cloth.
Removing the body cap
1
Rotate the body cap clockwise to remove.
Mounting the lens
Mount the lens by aligning the
2
distance/aperture index line on the lens with
the lens mounting index on the camera.
Rotate the lens counter-clockwise until it
locks into place.
—Do not press the lens release button when
mounting the lens.
Removing the lens
Depress and hold the lens release button;
securely grip the lens and rotate it
clockwise, in the direction of the arrow.
When leaving the camera without a lens
Attach the body cap to the camera body; align the indexes on both the cap
and the body, and rotate the cap counter-clockwise as far as it will go.
If the lens release button remains stuck in the pressed position
Make sure you rotate the lens until the lens release button returns back to
the normal position with a click.
20
Page 21

Installing and removing the battery
Use the Rechargeable Battery Pack EN-1. The battery pack
was not charged when shipped from the factory. You must
charge the battery fully before installing it for the first time, (See
page 83.)
—Never touch the battery pack's metal port with another metal object.
—Be sure to set the Main dial to L when installing and removing the battery
pack.
—See page 83 for handling batteries.
Fully recharging the battery pack
Use dedicated Quick Charger EH-1 (EH-2).
1
A full recharge takes approx. 60 minutes.
Installing the battery pack
Install the fully charged battery pack (EN-1)
into the battery chamber at the bottom of
the camera and push it down until it locks
into place.
Removing the battery pack
Turn the battery eject lever in the direction
of the arrow; the battery pack then pops out
and can be removed.
I
21
Page 22

Checking battery power
Be sure to check the camera’s battery power after installing a
fresh battery pack or prior to taking photographs in order to
avoid accidental failure,
Set the Main dial to any position
other than L. Confirm that the
1
indicators appear in the LCD panel
and inside the viewfinder.
While pressing the Main dial lock-release
button, rotate the Main dial.
—If no indicators appear, reinstall the
battery pack. (See page 21.)
Confirm that no warning indicator
appears.
2
If the da mark (Insufficient battery power
Indicator) blinks In the LCD panel, the
battery is weak. Replace with a fully
charged battery.
—If you continue to use the camera with the
indictor blinking, the camera may not
work correctly.
if the d3] mark blinks in the LCD panel,
immediately replace the battery with a
fully charged one.
-Battery power is exhausted.
22
Page 23

Setting and checking date and time
You can check the current data by pushing the DATE button.
The display in the LCD panel changes in the following order:
Year, Month, Day, Hour, and Minute as you push the DATE
button.
To correct the data, adjust in the following way.
—You cannot check and adjust the data when the Main dial is set to PB.
Press the shutter release button
halfway and push the DATE button.
1
Push the DATE button for at least one
second so that the "year" section starts to
blink. Next remove your finger from the
shutter release button.
Rotate the command dial to set the
correct “year” and push the DATE
2
button.
Rotate the command dial counter-clockwise
to increase the setting values, and rotate
clockwise to decrease the setting values.
Then push the DATE button again, and the
"month" section starts to blink.
Follow the same procedure to set the “month,” “day,” “hour”
and “minute.”
Rotate the command dial to set the correct “month”, "day,” “hour” and
“minute,” and push the DATE button. When the "minute” is set and the DATE
button is pushed, the clock starts working.
—The dock oniy starts working from 00 sec. when the "minute" setting is
corrected.
—If the camera is left untouched in the date/time setting mode for more than
90 seconds, the LCD panel returns to the normal display mode.
—If the shutter is released while date/time setting is in progress, the
date/time setting mode will be canceled, and all data set will be Invalid.
23
Page 24

Inserting the Image Memory Card
Use the Nikon Image Memory Card EC-15 and be sure to initialize the card before using it for the first time.
—The Image Memory Card EC-15 is an ATA PC card and is in compliance with
the PCMCiA Pel. 2.1 and JEIDA Ver. 4.2 standards.
—See page 82 for details on the Image Memory Card.
Inserting the Image Memory Card
Opening the camera back
Holding down the eject knob lock-release
1
button, slide the Image Memory Card eject
knob in the direction of the arrow to open
the camera back.
Inserting the memory card
Holding the Image Memory Card face up
2
{with the <1 arrow pointing left), insert it into
the card slot in the camera back.
—Never touch the terminals with your finger
or with a metallic object.
Closing the camera back
Close the camera back by pushing it down
carefully until it clicks shut.
—If the camera back is not shut properly, a
warning indicator appears in the LCD
panel and the viewfinder. (See page 85.)
LCD confirmation
The Image Memory Card indicator appears
in the LCD panel and the viewfinder.
24
Page 25

• CAUTION
• If no memory card is inserted, the Image
Memory Card indicator in the LCD panel
and the viewfinder blinks as a warning. You
should then insert an Image Memory Card.
• To confirm that an Image Memory Card is
inserted, look at the Image Memory Card
confirmation window.
• Be aware that the camera will function
even with no Image Memory Card
inserted.
Initializing (formatting) the card
Open the cover on the camera side.
1
Press the shutter release button halfway.
Press the FORMAT (ERASE)
buttons simultaneously for at least
3
one second to start initializing the
Image Memory Card.
—When the initialization is complete, the
frame counter advances to “1".
—Initializing time depends on the type and
capacity of the memory card.
ICAUTION
Any data in the memory card will be deleted during initialization.
• This data will not be recoverable.
• Take special care when initializing a memory card other than
for the first time.
25
Page 26

Basic camera settings
The following lens type and settings selection
provide highly automatic, convenient operation.
You may use any usalbe Nikkor lens or make any
combination of settings according to your
preferences or picture taking requirements.
26
• Lens:
• Exposure mode:
• Metering system:
• Image quality:
• White balance:
• Sensitivity:
To automatically and quickly reset the camera to the
preceding settings, press the MODE button and SENS button
simultaneously. (See page 45.)
AF Nikkor lens
P (Programmed auto)
Matrix metering T*!!
NORMAL
Auto (A)
STD (Standard)
Page 27
Selecting Programmed Auto mode
Programmed Auto is ideal for quick operation and is the simplest method for exposure control. Use this mode for most general photographic situations.
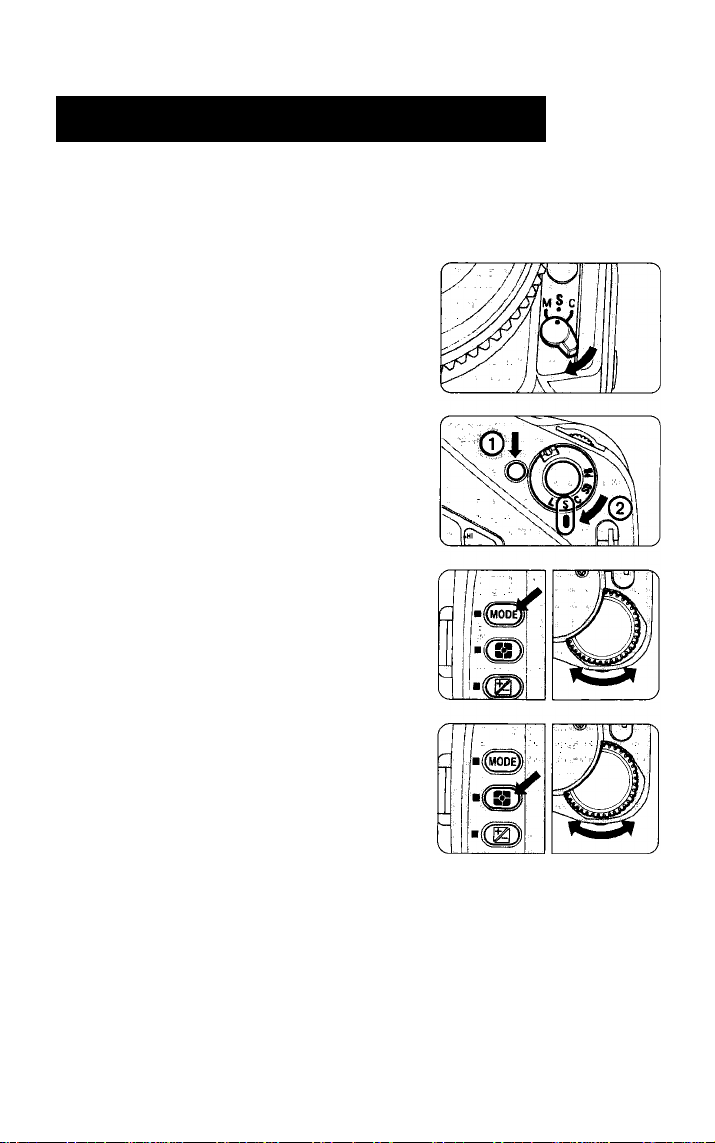
Set the focus mode to S.
1
Rotate the focus mode selector to S (Single
Servo Autofocus).
—See page 42 for details on focus modes.
Set the frame advance mode to S.
While pressing the Main dial lock-release
2
button, rotate the Main dial to S (Single
frame shooting),
—See page 34 for details on the frame
advance mode.
Set the exposure mode to P.
Keeping the MODE button pressed, rotate
3
the command dial to set the exposure mode
to P (Programmed Auto) mode.
—See page 35 for details on the exposure
mode.
Set the metering system to K.
While pressing the metering system button,
rotate the command dial to set the metering
system to Matrix Metering E*3.
—See page 36 for details on metering
systems.
I
27
Page 28

Selecting Programmed Auto mode
Set the image quality to NORMAL.
Keeping the QUALITY button pressed,
rotate the command dial to set the image
quality to NORMAL.
—See page 37 for details on image quality.
Set the white balance to A.
While pressing the W.Bal button, rotate the
command dial to set the white balance to A
(auto)
—See page 38 for details on white balance.
I
Set the sensitivity to STD.
While keeping the SENS button pressed,
7
rotate the command dial to set the
sensitivity to STD (standard).
—See page 41 for details on sensitivity.
28
Page 29

Holding the camera and composing the picture
Adjust the eyepoint.
You can select the best viewing position by
1
adjusting the eyepoint. Eyeglass wearers
will benefit from pushing in the eyepiece,
while others can pull the eyepiece out for
better viewing.
To pull the eyepiece out, rotate the
eyepiece ring counter-clockwise until it
comes off the thread, and pull it out until it
stops. Then rotate the eyepiece ring
counter-clockwise to secure it.
—To push the eyepiece in, repeat the same
operation in reverse.
Hold the camera and look through the viewfinder.
2
Hold the camera steady to avoid camera
shake or incorrect focusing.
—In autofocus mode, keep your hands off
the lens focusing ring when shooting.
Compose the picture.
Position the focus bracket on the main
subject and compose.
—If the main subject is off-center, use the
AF-L button. (See page 60.)
29
Page 30

Focusing and shooting
Set the Main dial to any position
other than L, and press the shutter
1
release button halfway.
Confirm that the in-focus indicator •
appears in the viewfinder.
—In autofocus mode, keep your hands off
the lens focusing ring when shooting.
• NOTE
Shutter release operation
• Press the shutter release button lightly to power the camera ON;
indicators appear in the LCD panel and inside the viewfinder.
• Power-hold timer allows the indicator illumination to last for 16 seconds
after you remove your finger from the shutter release button.
I
• Fully depress the shutter release button to take pictures.
Confirm that the in-focus indicator
• appears and release the shutter
2
to take a picture.
Also confirm that the shutter speed and
aperture indicators are visible.
If the following indications appear:
Autofocus is not possible. (See page 78.)
X
►
◄
Hi, Lo
The subject is out of focus and the area in front of the subject
is in focus. (See page 86.)
The subject is out of focus and the area behind the subject is
in focus. (See page 86.)
Out of exposure control range (overexposure or underexpo
sure alert) (See page 86.)
Check the frame counter.
Each time the shutter is released, the
frames-shot counter advances to the next
frame number, while the frames-remaining
counter counts down by one frame. When
the memory card is full, "0" blinks in the
LCD panel to alert you, and the shutter
locks up.
30
Page 31

Playing back the pictures
The camera has a built-in video output terminal that enables
you to immediately playback the exposed images on a TV
monitor with a video input terminal.
—Both NTSC and PAL color television systems are available with this camera.
See page 48 for switching from the NTSC to the PAL system or vice versa.
Connect the camera to a TV monitor.
1
Connect the Video Cable EG-10 (provided)
to the camera's video output terminal and
the monitor’s video input terminal.
—See page 7 on removing the terminal cap.
Rotate the Main dial to PB (playback).
Rotate the command dial.
Rotate the command dial once in either
3
direction to playback one frame.
—When you wish to playback a particular
frame, first rotate the command dial while
pressing the SENS button to specify the
frame number, then remove your finger
from the SENS button.
I
31
Page 32

Playing back the pictures
When finished, rotate the Main dial to L.
Camera power will turn OFF automatically
after approx. 3 minutes when the camera is
not in use. We recommend setting the Main
dial to L to conserve battery power.
32
Page 33

Functions and settings
This section expiains basic camera functions
and how best to utiiize them to obtain optimum
resuits in a variety of photographic situations.
When setting the exposure mode, metering
system, image quality, white balance and
sensitivity, be sure to set the Main dial to any
position other than L, lightly press the shutter
release button and make your selection
within 16 seconds.
New settings for this camera
In most ways, this camera is no different than
other Nikon professional 35 mm SLR
cameras. However this camera differs in one
significant way: you are no longer creating an
image on film, but instead reproducing an
image on a memory card. Therefore, you are
now required to pay attention to three new
settings which pertain to digital technology:
image quality, white balance and sensitivity.
33
Page 34

Setting the frame advance mode
The Main dial turns the power ON and OFF, and selects shooting, data transfer and playback modes.
While pressing the Main dial lock
release button, rotate the Main dial to
the desired mode.
—Make sure that the Main dial clicks into
position.
L: Camera power is OFF.
Set the Main dial to L when the camera is not in use to preserve
battery power and prevent accidental release of the shutter.
S: Single-frame shooting mode
Shooting operation is limited to one frame at a time.
C: Continuous shooting mode
Shooting operation continues as long as the shutter release button
is depressed.
Model Shooting speed
E2 1 frame/sec.*'
E2s
*1 A shutter speed faster than 1/250 sec. is selected and image quality is
set to BASIC (when using Image Memory Card EC-15).
*2 A shutter speed faster than 1/250 sec. is selected.
*3 One shooting operation comprises a maximum of 7 frames. An interval of
approx. 7 seconds is required before proceeding to the next shooting
operation (when using Image Memory Card EC-15).
Approx. 3 frames/ sec.*^
Max. number of frames
—
7 frames/sec.*^
SD: Digital output mode.
The shutter can be released but no image will be recorded on the Image
Memory Card.
PB: Playback mode
Image data stored in the memory card can be played back on a
TV monitor.
34
Page 35

Setting the exposure mode
This camera offers four exposure modes: Programmed Auto (P), Shutter-Priority Auto (S), Aperture-Priority (A) and Manuai (M).
—If no lens is mounted, the exposure mode is automatically set to M and the
exposure mode indicator blinks in the viewfinder to alert you.
Set the Main diai to either S, C or SD,
press the shutter reiease button haifway
and rotate the command diai whiie
pressing the MODE (exposure mode)
button.
The exposure mode indicators in the LCD
panei appear in sequence as shown
beiow.
-M
c:
P: Programmed Auto Exposure Mode
The camera’s microcomputer automaticaiiy seiects a combination
of shutter speed and aperture. This mode is recommended for most
common shooting situations as weli as for users who are new to
35mm SLR photography, and for those situations when there is no
time to fine tune exposure settings.
S: Shutter-Priority Auto Exposure Mode
You set the shutter speed manuaiiy using the command diai. The
camera automaticaiiy selects the proper aperture to match the
manually selected shutter speed for correct exposure.
□
A: Aperture-Priority Auto Exposure Mode
The camera automaticaiiy selects the correct shutter speed to
match the aperture you have set. We recommend this mode when
depth-of-field is a prime consideration.
M: Manuai Exposure Mode
Both shutter speed and aperture can be set manually to achieve
the desired effect. Adjust aperture and/or shutter speed referring to
the over/correct/under exposure indicators.
35
Page 36

Setting the metering systems
This camera features three types of exposure metering
systems—Matrix Metering, Center-Weighted Metering and Spot
Metering.
Rotate the command dial while pressing
the Metering system button.
—The metering system indicators in the LCD
panel appear in sequence as shown below.
M : Matrix Metering
Data on scene brightness and contrast are detected by the
camera’s 5-segment advanced matrix sensor. By analyzing
these data, the camera’s built-in computer is able to provide
correct exposure even in extremely complex lighting situations.
: Center-Weighted Metering
This system concentrates the meter's sensitivity on the 12mmdia. circle in the viewfinder. This type of metering is useful in
situations where you want to base exposure on a specific,
centrally located area in the scene.
[•] : Spot Metering
Most of the meter's sensitivity is concentrated in the 5mm-dia.
circle in the center of the viewfinder. This meter is effective when
precise measurement of a particular portion of the subject is
required.
36
Page 37

Setting image quality
Depending on the effect you wish to achieve, four image quality
modes are provided with this camera. Pictures taken in Hi
image quality mode are uncompressed images with much
detail, while pictures taken at the Basic setting have lower
quality due to high compression. It follows that more frames
can be shot using the Basic mode than the Hi mode, as
uncompressed images take up a considerable amount of
memory space (see chart below for details).
While pressing the QUALITY button, rotate
the command dial.
—The ► arrow in the LCD panel points to one of
the fotiowing settings.
BASIC — NORMAL — FINE
L
HI
□
Refer to the table below for mode specifications and corresponding
number of frames.
Image quality
mode
HI
FINE
NORMAL
BASIC
-Seiect HI mode when image quality is a priority.
-Select BASIC mode when the number of frames is a priority.
Image compression
factor
Non compression
1/4 (4 bit/pixel)
1/8 (2 bit/pixel)
1/16 (1 bit/pixei)
Data size
per frame
Approx. 2.45MB
Approx. 640KB
Approx. 320KB
Approx. 160KB
Min. number of frames
per EC-15 (15 MB)
5
21
43
84
37
Page 38

Adjusting white batanee
In order to ensure proper white balance, an Auto white balance
mode and five manual white balance modes are provided with
this camera. For most scenes, select the auto white balance
mode. Choose the manual modes for particular lighting
situations. We recommend that you experiment with the various
settings until you are fully familiar with them.
—When using a speedlight in external synchro-flash shooting mode, the white
balance is adjusted between subject brightness and the light from the flash.
• NOTE
Human vision adapts to illumination color so that a white subject
remains white even when the illumination color changes. Not so for
video cameras and digital cameras. They have to adjust color and
white balance depending on background illumination in order for a
white subject to appear white under varying illumination.
While pressing the W.Bal button, rotate the
command dial to change the mode.
—The ■ mark in the LCD panel settles above
one of the following symbols.
pA- # - e - A-I
38
Page 39

Auto white balance mode
White balance is adjusted automatically by measuring the color
temperature of light passing through the white balance window.
—If insufficient light passes through the white balance window, the color
temperature is adjusted at 5100° K.
Incandescent light mode
Suitable for shooting under incandescent light. The color
temperature is fixed at 3000° K (halogen lamp).
¡;ì;6
Fluorescent light mode
Suitable for shooting under fluorescent light. The camera
measures the color temperature of the light passing through the
white balance window and makes adjustments for either
daylight, white, or cool white fluorescent light.
Color temperature at 6700° K (daylight fluorescent light)
Color temperature at 5000° K (white fluorescent light)
Color temperature at 4200° K (cool white fluorescent light)
—If insufficient light passes through the white balance window, the color
temperature is set at 4200 °K (white fluorescent light).
Fine mode
Suitable for shooting a front-lighted subject in fine weather. The
color temperature is set at 5300° K (natural light).
Cloudy mode
Suitable for shooting in cloudy weather. The color temperature is
set at 6500° K (natural light).
Shade mode (fine weather)
Suitable for shooting shaded subjects such as someone
standing in the shadow of a building in fine weather. The color
temperature is set at 8000° K (natural light).
39
Page 40

Adjusting white balance
► CAUTION
In the following situations, auto white balance mode (A) will
not function.
• Taking pictures where the illumination at the camera and the
subject differs, such as taking pictures of an outdoor subject from
inside a room, or shooting a spot-lighted subject on a stage.
• Taking pictures in mixed light sources. For example, taking
pictures at a party with fluorescent lights, incandescent lights, etc.
• Taking pictures in special light sources. For example, sodium
lamps or other special lighting sources,
► NOTE
Color temperature
The color temperature of most illumination sources varies in tones
ranging from reddish to bluish. These colors are subject to change
depending on individual perception. In order to represent the color
of light objectively, we use a color temperature scale expressed in
absolute temperature (° K). As shown below, the lower the color
temperature, the more reddish the light becomes, and the higher
the color temperature the more bluish it becomes.
Redder Bluer
2000 3000
£
CD
CD
0
0
d
TO
0
c
(/)
03
O
o
0
40
4000 5000 6000
Q.
d
£
g>
B
c
c
0
0
o
CD
ID
CO
O
3
0
CD
n
TO
X
c
.d
(D
O)
O
c
_J
o
JZ
£
B
o
o sz
O CJ)
CD
D
8000 10000 12000 [° K]
0
>
O
CC
Q
O)
n
Page 41

Setting the sensitivity level
Two shooting sensitivity levels equivalent to film speeds of ISO 800
(STD) and ISO 1600 (HIGH) can be selected. Set the sensitivity to
“STD” when taking pictures outside in bright weather, and “HIGH" for
dark interiors.
While pressing the SENS button, rotate the
command dial in either direction to alter
the sensitivity.
—The ► arrow in the LCD panel points to one of
the following settings.
STD—HIGH
»NOTE
Sensitivity and film speed
This camera’s shooting sensitivity is equivalent to ISO film speeds of
800 and 1600. Equivalent shutter speed/f-stop combinations can be
calculated based on this ISO rating. For example, to compare
traditional film to digital, at 1/250 second for the same scene
brightness, the E2 might use f/6.7 at ISO 800 which would be
equivalent to f/2.8 at ISO 150 on a regular Nikon SLR.
I
41
Page 42

Setting the focus mode
This camera provides t\wo autofocus modes—Single Servo
Autofocus (S) and Continuous Servo Autofocus (C)— and a
Manual Focus mode (M) selected by setting the focus mode
selector to S, C or M,
S : Single Servo Autofocus
Lightly press the shutter release
button; the shutter can only be
released when the subject is in
focus and the in-focus indicator •
appears in the viewfinder, as the
priority is on correct focus. After
bcus is achieved, it remains locked
for as long as the shutter release
button remains lightly pressed.
Remove your finger from the
shutter release button once and
lightly press the button again when
I
you wish to refocus on a different
subject.
—If the shutter release button is fully
depressed from the start, the lens starts
adjusting for focus and the shutter is
released as soon as the subject is in focus.
With E2s cornera, both focus and exposure
are locked.
C : Continuous Servo Autofocus
The shutter can be released anytime,
regardless of focus status, since the
priority is on shutter release. The
camera continues focusing for as long
as you keep the shutter release button
lightly pressed, even when the in-focus
indicator • appears in the viewfinder.
—In Continuous Shooting mode (the Main
dial is set to C), the lens adjusts focus for
the first frame only, then the focus is
locked when continuous shooting starts.
42
Page 43

Viewfinder indications in autofocus modes (S, C)
• The subject is in-focus.
X
►
◄
Autofocus is not possible. The subject is located closer than
the lens's closest focusing distance.
The subject is out of focus and the area in front of the subject is
in focus.
The subject is out of focus and the area behind the subject is
in focus.
iCAUTION
Keep your fingers off the lens focusing ring when shooting in
autofocus modes (S, C), as correct focusing is achieved
automatically.
43
Page 44

Setting the focus mode
M: Manual Focus mode
In this mode, there are two ways of
assuring precise manual focus: with
the Electronic Rangefinder and with the
viewfinder's clear matte field. The
shutter release button can be
depressed fully anytime.
r ^ / rVi
/ yjj
■fU 1
Manual focus with the viewfinder’s clear matte field
Rotate the lens focusing ring manually to
focus on the subject using the clear
matte field.
Manual focus with the Electronic Rangefinder
Lightly press the shutter release button
and rotate the lens focusing ring
manually. The in-focus indicator •
appears in the viewfinder when the
subject is in focus.
—Manually rotate the lens focusing ring In the
direction indicated ► A until the in-focus
indicator appears.
—When the focus indicators ► and 0 or %
and A blink alternately, simultaneously or
singly, the subject is almost in focus.
i
^1
O [I "'1.'-
■\\ L
' \
/
j J
44
Page 45

Setting the six basic modes simultaneousiy
Press the MODE button and SENS
button simultaneously for at least 2
seconds; the camera settings are
automatically reset for basic shooting
as shown below:
Exposure mode
Metering system
image quality
White balance
Sensitivity
Exposure compensation
-Command lock is cancelled. (See page 46.)
: P(Programmed Auto) See page 35.
: M Matrix See page 36.
: NORMAL (Normal) See page 37.
: A (Auto) See page 38.
: STD (Standard) See page 41.
: 0.0 See page 58.
45
Page 46

Command lock
In S (Shutter-Priority Auto), A (Aperture-Priority Auto), or M (Manual) exposure mode, you can lock the shutter speed or aperture value.
—Use command lock to prevent changes in shutter speed or aperture value
caused by accidentally rotating the dial during shooting.
In S or M mode
While pressing the CMND-L button, rotate
the command dial in either direction, and
the shutter speed will be locked with an L
appearing next to the shutter speed in the
LCD panel.
To release the lock, rotate the command
dial in either direction while pressing the
CMND-L button.
In A or M mode
While pressing the CMND-L button, rotate
the aperture dial in either direction, and
the aperture value will be locked with an L
appearing next to the aperture value in the
LCD panel.
To release the lock, rotate the aperture dial
in either direction while pressing the
CMND-L button.
46
Page 47

Playing back pictures
Besides being able to playback exposed Images on a TV
monitor through a video output connector, exposed image data
can easily be downloaded to a personal computer using
Nikon’s PC Card Drive ED-10 or other digital processing
equipment.
In this manual we will explain how to playback pictures on a TV
monitor only.
—For details on other systems, refer to the instruction manuals for the relevant
equipment.
Playback on a TV monitor
Connect the camera to a TV
monitor.
1
Connect Video Cable EG-10 (provided) to
the camera's video output terminal and the
monitor’s video input terminal.
—Remove the terminal cap on the V-Out
and D-Out/E. Trig, terminals.
(See page 7.)
Rotate the Main dial to PB
(playback) while pressing the Main
2
dial lock-release button.
The white balance mode marks ■ in the
LCD panel all blink at once.
Rotate the command dial once in either
3
direction to playback one frame. Rotate the
dial in the direction of the arrow to move the
frames forward and rotate in the opposite
direction to move the frames backward.
While playing back pictures, the white
balance mode marks ■ light up one after
the other.
—When you wish to playback a particular
frame, first rotate the command dial while
pressing the SENS button to specify the
frame number, then remove your finger
from the SENS button.
47
Page 48

Playing back pictures
When finished, rotate the Main dial
The playback function automatically stops
after 3 minutes when the camera is not in
use, and then the power turns OFF after a
further 16 seconds. We recommend setting
the Main dial to L to conserve battery
power.
Switching the NTSC/PAL systems
Both NTSC and PAL color television systems are available with this
camera. You can switch from NTSC to PAL or vice versa.
To change the system, rotate the command dial while pressing the
Metering system and Exposure compensation buttons simultaneously
during playback operation.
—The NTSC and PAL systems change alternatively and the system Indicator
will appear In the LCD panel.
Shooting data displayed on the playback screen
The following shooting data can be displayed on the TV monitor.
48
File name
-Frame number
-Date (month/day/year)
-Time (hour/minute)
*The above screen shows the NTSC system. The date order
differs in the PAL system (day/month/year).
Page 49

To change on-screen data, rotate the command dial while pressing the
MODE button during playback of exposed images.
On-screen data appears in order as shown below.
LCD panel
dSP 0 None
dSP 1
dSP 2
dSP 3
TV monitor
Frame number
Frame number, date and time
Frame number, date and time, file name
Long play playback method
You can playback continuously for approx. 60 minutes using a fully
charged battery pack (EN-1). If you want to playback for a much longer
period of time, use the optional battery charger (EH-1/EH-2) and the DC
adaptor (ES-1) to power the camera from the AC power outlet.
"For more details, read the instruction manuals provided
with the Quick Charger EH-1 (EH-2) /DC Adaptor ES-1.
49
Page 50

Erasing data in the Image Memory Card
There are two ways to erase the image data stored in the Image
Memory Card.
1) Erasing the data frame by frame.
2) Initializing the memory card (batch erasing)
1. Deleting data frame by frame
Lightly press the shutter release button;
within 16 seconds, push the ERASE LAST
buttons simultaneously and hold for at
least 1 second.
The most recently recorded data will be
erased and the frames-shot counter In the
LCD panel and the viewfinder will count
down by one frame.
—To continue erasing data, remove your finger
once and press the buttons again.
Initializing the memory card (batch erasing)
Lightly press the shutter release button;
within 16 seconds, push the FORMAT
(ERASE) buttons simultaneously and hold
for at least 1 second.
All recorded data will be erased and the
frames-shot counter in the LCD panel and
the viewfinder will return to 1.
When using a new Image Memory Card,
be sure to initialize the oard.
—Erasing time varies depending on the type of
card and storage capacity.
50
Page 51

Advanced photography
In this section we provide some useful information
on a variety of photographic techniques.
See page 27 for details on Programmed Auto operation.
51
Page 52

Shutter-Priority Auto Exposure Mode
Set the MODE button to S.
1
Press the shutter release button lightly.
Rotate the command dial while pressing the
MODE button.
Set the shutter speed.
2
Rotate the command dial to set the shutter
speed.
—You can set shutter speeds from 1/8 to
1/2000 sec. in 1/2 step increments.
—The selected shutter speed appears in
the viewfinder and the LCD panel.
Compose the picture and press the shutter release button lightly.
3
Check the focus and fully depress
the shutter release button.
4
^ji
—See pages 85-86 on warning indications.
52
Page 53

Aperture-Priority Auto Exposure Mode
Set the exposure mode to A.
Press the shutter release button lightly.
1
Rotate the command dial while pressing the
MODE button.
Set the aperture value.
Rotate the aperture dial to set the aperture
2
value.
—You can set aperture values from f/6.7 to
f/38 in 1/2 step increments.
—The selected aperture value appears in
the viewfinder and the LCD panel.
Compose the picture and press the shutter release button lightly.
3
Check the focus indicator and fully depress the shutter release button.
—See pages 85-86 on warning indications.
INOTE
Rotating the lens aperture ring does not change the aperture value.
You can leave the lens aperture ring at any position when mounting
the lens.
53
Page 54

Manual Exposure Mode
Set the exposure to M.
1
Press the shutter release button lightly.
Rotate the command dial while pressing the
MODE button.
Compose the picture.
2
Set the shutter speed.
Rotate the command dial to set the shutter
speed.
—You can set shutter speeds from 1/8 to
1/2000 sec. in 1/2 step increments.
—The selected shutter speed appears in
the viewfinder and the LCD panel.
Set the aperture value.
Rotate the aperture dial to set the aperture.
—You can set aperture from f/6.7 to f/38 in
1/2 step increments.
—The selected aperture appears in the
viewfinder and the LCD panel.
< 3C
• C J
REMY COUNT
гз[ E3
54
Page 55

Press the shutter release button
lightly. Set shutter speed and
5
aperture manually referring to the
exposure indicators.
Using exposure indicators
The exposure indicators in the viewfinder monitor differences between the in
camera measured exposure value and that set by the user.
+ 0 —
+ 0 —
-1-0 —
+ 0 —
-f-O —
Check the focus and depress the
shutter release button.
6
Overexposure by more than -hIEV
Overexposure by more than +1/4EV (within 1EV)
Correct exposure (within ±1/4EV)
Underexposure by more than -1/4EV (within 1EV)
Underexposure by more than -1EV
55
Page 56

Exposure compensation
When shooting an extremely small subject, if the main subject
contrasts markedly with the background, or if you identify an
extreme condition which might prove difficult for Matrix
metering, we recommend using exposure compensation.
Four exposure compensation methods are available with this camera.
1. Using AE-L (Auto Exposure Lock)
2. Using AF/AE-L (double lock)
3. Using Exposure Compensation
4. Using Manual Exposure
Using AE-L (Auto Exposure Lock)
Set the exposure mode to either P,
S, or A.
I
Do not set the exposure mode to M
(Manual).
Set the Metering system.
We recommend using Center-Weighted or
2
Spot Metering.
Center the main subject inside the
viewfinder.
3
Move in close until the 12mm-diam.
reference circle for Center-Weighted
metering or 5mm-diam. reference circle for
Spot metering is fuliy covered by the
subject.
56
Page 57

Lightly press the shutter release button, and press the AE-L button.
Confirm that no exposure warning indicator
appears and press the AE-L button.
—You can remove your finger from the
shutter release button, since the exposure
value is kept stored in the camera for as
long as the AE-L button remains
depressed. You can change the shutter
speed in S mode and aperture value in A
mode.
Recompose the picture and shoot
while keeping the AE-L button
5
pressed.
Check the focus indicator and depress the
shutter release button.
—Remove your finger from the AE-L button
to release the lock.
Using AF/AE-L (double lock)
•4 Set the AF/AE-L lever.
I Slide the AF/AE-L lever to the double lock
index
Repeat the same procedures as in “Using AE-L” above.
2
Press the AF-L button instead of the AE-L
button. Focusing and exposure values are
kept stored in the camera as long as the AF
L button remains depressed.
57
Page 58

Exposure compensation
Using Exposure Compensation
Set the metering system
We recommend using Center-Weighted or
I
Spot Metering.
Set the exposure compensation value.
2
Rotate the command dial while pressing the
exposure compensation button.
—You can compensate exposure within a
range of +2.0 EV to -2.0 EV (in 1/4 EV
increments.)
—Rotate the command dial to increase the
value (-) when the background is dark,
and decrease the value (+) when the
background is bright.
Remove your finger from the
i exposure compensation button.
When the compensation is set, the exposure
compensation mark appears in the
viewfinder and the LCD panel.
—Press the exposure compensation button
to confirm the value set and the
compensation value will appear in the
LCD panel.
Check the focus indicator and fully
' depress the shutter release button.
To cancel exposure compensation
Set the compensation value to 0.0.
58
Page 59

Using Manual Exposure
Set the exposure mode to M.
1
Set the metering system.
We recommend using Center-Weighted
Metering or Spot Metering.
Center the main subject inside the
I viewfinder
Move in close until the 12mm-dia. reference
circle for Center-Weighted metering or
5mm-dia. reference circle for Spot metering
is fully covered by the subject.
Set the shutter speed and aperture to obtain a correct exposure.
Recompose the picture and shoot.
Check the focus and fully depress the
5
shutter release button.
I
_______
CfS. 0
oss
REMY COUNT
I
k
59
Page 60

Autofocus with main subject off-center
In autofocus mode, the subject inside the focus brackets is
in-focus. With an off-center subject, use the Auto Focus Lock
function.
In Single Servo Autofocus mode
Position the focus brackets on the
subject and lightly press the shutter
1
release button.
Confirm the in-focus indicator • appears in
the viewfinder; focus remains iocked as
long as the shutter release button is lightly
pressed.
Keeping the shutter release button
lightly pressed, recompose, then
fully depress the shutter release
button to take a picture.
Do not change the shooting distance after
the in-focus indicator • appears in the
viewfinder.
60
Page 61

In Continuous Servo Autofocus mode
Position the focus brackets on the
subject and lightly press the shutter
1
release button.
Confirm that the in-focus indicator
• appears in the viewfinder, then
2
press and hold the AF-L button.
Focus is locked even if you remove your
finger from the shutter release button as
long as the AF-L button remains pressed.
While holding in the AF-L button,
recompose and then fully depress
the shutter release button to take a
picture.
Do not change the shooting distance after
the in-focus indicator • appears in the
viewfinder.
i
61
Page 62

External synchro-flash shooting
In manual exposure mode, this camera’s shutter release can be
triggered by the firing of a flash on another camera situated
nearby. Shutter speed is set at 1/60 sec.
—Optional External Sync Adaptor EX-10 (with a light sensor) is necessary.
—^/\s no exposure indicators appear in the viewfinder, we recommend that you
predetermine the correct exposure.
Connect the External Sync Adaptor
(EX-10) to the camera’s
1
D-Out/ E. Trig, terminal.
—Remove the terminal cap on the V-Out and
D-Out/E.Trig. terminals. (See page 7.)
Set the exposure mode to M and
shutter speed to Sy.
2
Set the exposure mode to M (manual) and
rotate the command dial to set the shutter
speed to Sy.
Depress the shutter release button.
I 3
The “Sy" mark blinks in the LCD panel to
indicate that the camera is in standby
mode; pictures are taken in sync with the
firing of the remote speedlight
—The standby mode will be canceled
approx. 10 seconds after depressing the
shutter release button if the bring of the
remote speedlight is not detected by the
camera.
—Lightly depress the shutter release button
after shooting and the camera returns to
standby mode.
62
Page 63

Remote photography (general)
The optional accessories listed below make it possible for you
to release this camera’s shutter from a remote location by
connecting them to the camera’s remote terminal. Halfway
shutter release operations are possible with power-hold timer
enabled accessories, but not with the others.
Accessories (with power-hold timer capabiiity)
Remote Cord MC-12A, Modulate Remote Control Set ML-2, Radio
Control Set MW-2, Intervalometer MT-2, Double Cable Release AR-10
—You can set the focus mode to either S, C, or M.
Accessories (without power-hoid timer capabiiity)
Terminal Shutter MR-3, Remote Cord MC-4A, Connecting Cord MC-3A,
Modulate Remote Control Set ML-1, Radio Control Set MW-1
—Set the focus mode to S or M. (C is not an option).
—Fuily depress the shutter release button to take a picture.
—Remove your finger from the shutter release button once before taking the
next picture.
—When using Modulate Remote Control Set ML-1, read the ML-1 instruction
manual.
63
Page 64

Flash photography
This section covers the camera’s
advanced flash technology for fill-flash in
backlit scenes, brightening dull scenes,
and various other picture taking situations.
64
Page 65

Available Nikon Speediights
Nikon Speediights SB-26 and SB-25 are highly recommended
for use with this camera.
—Nikon Speediights SB-20, SB-22, and SB-23 can aiso be used with this
camera.
—Nikon Speedlight SB-24 is not recommended due to a difference in color
temperature setting.
• CAUTION
The accessory shoe is designed for the Nikon dedicated
Speediights. Do not use models from other manufacturers since
higher voltages and/or extra hot shoe contacts may damage the
camera.
Mounting the Speedlight
Simply mount the Nikon Speedlight on
the accessory shoe with no sync cord
connected.
' To loosen, rotate the mounting foot locking
wheel in the direction of the arrow. Insert the
mounting foot of the speedlight as far as it will
go, then fully secure the mounting foot locking
wheel.
A safety lock system is provided with this
camera to prevent the Speedlight from
detaching. Make sure you insert the mount
pin into the iocking hole.
’ To remove the speedlight, unfasten the
mounting foot locking wheel.
65
Page 66

Flash modes available with Nikon Speedlights
With Nikon Speedlights SB-26 and SB-25 the following flash
modes are available.
■ Matrix Balanced Fill-Flash
The camera's Matrix Metering System determines correct exposure
and flash illumination is automatically balanced against the scene's
ambient light. This flash mode is recommended for most common
flash shooting situations when the subject is backlit in the daytime or
for a dark subject with a bright background at night.
■standard TTL Flash
Standard TTL flash is recommended to give more illumination to the
main subject, resulting in a bright subject against a dark
background. The flash output is compensated manually.
■ Non-TTL Auto Flash
The flash automatically fires after a flash illumination reading is
taken through the light sensor on the Speedlight, instead of through
the lens.
■ Manual Flash
You can select the flash power output and set the aperture
according to the flash-to-subject distance to obtain well exposed
results.
■ Rear-curtain sync flash
The flash fires at a later stage in the exposure, just before the rear
shutter curtain starts to close to give a natural lighting effect. This is
effective for highlighting the movement of subjects at a slow shutter
speed.
I
66
Page 67

Notes on using the Speedlight
Be sure to read the instruction manual provided with each Speedlight model before use. Following are some important notes on using Nikon Speedlights SB-26 and SB-25.
—If there is no mention of this camera in the instruction manual, refer to the F4
camera's instruction manual.
Shutter speeds slower than 1/250 sec.
Exposure mode
P 1/60 to 1/250 sec. (auto)
S 1/8 to 1/250 sec. (manual)*
A 1/60 to 1/250 sec. (auto)
M 1/8 to 1/250 sec. (manual)*
("When the shutter speed is set to 1/350 to 1/2000 sec., it is automaticaily
controlled at 1/250 sec.)
iFlash ready-light
If lit: Flash is ready to fire.
If blinking: Flash fires at full output when exposure is not sufficient.
Reconfirm the distance between the camera and the
subject or select a wider aperture.
Iln Manual exposure mode
You may continue to take pictures regardless of the underexposure
indicators which appear in the viewfinder, (the exposure indicators
refer to the amount of background light). If you decide to ignore the
indicators, the major subject will be correctly exposed for ambient
light, but the background may be underexposed.
If you wish to have both the main subject and the background
correctly exposed, use slow sync flash.
(1) Set the exposure mode to S or M.
(2) Set the shutter speed and the aperture to obtain a correct
exposure for both the main subject and the background; fully
depress the shutter release button.
—Use a tripod to minimize camera shake.
Shutter speed
IWhen the TTL flash output level of the Speedlight is adjusted
manually, the exposure compensation mark appears in the LCD
panel, but the compensation value does not appear.
67
Page 68

Taking flash pictures in TTL auto flash mode
Flash photography in TTL auto flash nnode with SB-26 and SB-25 Nikon Speedlights.
—For more details, read the instruction manual provided with each Speedlight
model before use.
Set up your camera.
Set the metering system to Matrix Metering.
1
Set other settings to desired modes.
Set up your Speedlight.
Set the power switch to STBY (standby
2
position) or ON. Set the flash mode selector
to TTL. Set the flash sync mode selector to
NORMAL.
Confirm the settings in the LCD panel.
If the [in flash mode Indicators appear
In the LCD panel, Matrix Balanced Fill Flash
Is selected. If the OD Indicator lights up In
the LCD panel, Standard TTL flash is
selected.
—Press the [M] button to change the flash
mode.
68
Page 69

Press the shutter release button
' lightly and check the indicators in
the viewfinder.
Confirm that the ready-light is lit and the
subject is in focus.
—If the exposure indicators tight up, see
page 55. if the exposure warning
indicators appear, see page 86.
Check the flash shooting range, and release the shutter.
5
Check if the subject falls within flash
shooting range by glancing at the
speedlight's shooting distance indicator
bars.
If the “ready” light blinks for a few seconds
after shooting, the flash has fired at full
output but the light may not have been
sufficient.
—Reconfirm the shooting distance and
move cioser or setect a wider aperture.
69
Page 70

Taking pictures
In “NORMAL” flash synchronization, the flash fires at an early
stage of exposure (front-curtain sync), resulting in unnatural
light patterns at slow shutter speeds with a moving subject.
With Nikon Speedlights SB-26 and SB-25, Rear-Curtain Sync is
possible, where the flash is set to fire the instant before the
rear-curtain begins to close. This transforms available light into
a stream of light that follows the moving, flash-illuminated
subject.
—Use a tripod to minimize camera shake.
in rear-curtain
sync
fiash
mode
Front-curtain sync
Set the Speedlight’s flash sync
selector to “REAR”.
1
Set the Speedlight’s flash mode
selector to either TTL, A, or M.
2
Rear-curtain sync
70
Page 71

Set the camera’s exposure mode to S or M.
3
—You can select P or A exposure mode, but
Shutter-Priority Auto and Manual mode
are strongly recommended.
Set the shutter speed and aperture.
The slower the shutter speed, the more
marked the Rear-Curtain Sync effect.
—In S mode, you do not need to set the
aperture.
Check the flash shooting range and flash ready-light, and release the shutter.
((MODI
t ■»
lE3
-
30 F16 ^ ia3)|
71
Page 72

Controls in detail
In this section we provide some useful
information on a variety of photographic
controls.
72
Page 73

Usable lenses
iMost AF Nikkor lenses, Al-type Nikkor lenses and Teleconverters
can be used.
Nikkor lenses are designed to provide full coverage of the 35mm film
format (24mm x 36mm). The CCD in the E2/E2s is 8.7mm x 6.8mm,
which is smaller than the 35mm format, In order to provide you with
the full angle of view which you associate with your use of Nikon
35mm cameras for each usable Nikkor lens, the E2/E2s incorporates
high-quality image size reduction optics. To ensure lens
performance commensurate with Nikon’s customarily high
standards, only the lenses listed in the following chart are regarded
as usable with the E2/E2s camera’s image reduction system.
■Maximum lens apertures
The E2/E2S does not use the Nikkor lens’ aperture for exposure
control. The lens’ aperture remains open all the time for the brightest
viewing. Instead, an aperture is built into the camera’s image
reduction optics. The maximum aperture available is indicated in the
following table.
Lens max. aperture
f/1.2tof/5.6 f/6.5 to f/38
Slower than f/5.6 to f/7.3
Slower than f/7.3 to f/9.5
Slower than f/9.5
Apertures can be set in 1/2 step increments.
Apertures outside the above range cannot be set.
The depth-of-field that you see in the viewfinder is controlled by the lens’
aperture. The actual depth-of-field for the picture will be controlled by the
image reduction optics’ aperture. Therefore, the actual depth-of-field will
be greater than that seen in the viewfinder.
Available aperture range
f/8 to f/38
f/9.5 to f/38
Max. aperture value* to f/38
I
73
Page 74

Usable lenses
■Understanding exposure control
The E2/E2S provides sensitivity settings with ISO equivalents of
800 and 1600. The following table illustrates differences in exposure
between a 35mm SLR and the E2/E2s.
Len s a pe rtu re Effe ct ive ap er tu re Shut ter sp ee d
E2/E2S
35mm SLR f/2.8
Depth-of-field will be controlled by the aperture control of the reduction
optics.
f/2.8 f/6.7
f/2.8
1/1000 sec. 1600
1/1000 sec. 300
ISO re qu ire d
I
74
Page 75

Lens usability chart
With AF Nikkor lenses or certain non-AF Nikkor lenses in combination with
TC-14B, TC-14E or TC-20E autofocus teleconverters, the E2/E2s provides full
autofocus operation. For usability information, refer to the following chart.
O: Fully usable
O: Usable
Pictures may be slightly dim around
the edges of the frame in close-up
shots or with infinity-distant subject.
A: Usable subject to conditions
Piotures may be colored or dim around
the edges of the frame depeding on
AF Nikkor 18mm f/2.8D
AF Nikkor 20mm f/2.8D
AF Nikkor 24mm f/2.8D
AF Nikkor 24mm f/2.8
AF Nikkor 28mm f/1,4D
AF Nikkor 28mm f/2.8D
AF Nikkor 28mm f/2.8
AF Nikkor 35mm f/2
AF Nikkor 50mm f/1.4
AF Nikkor 50mm f/1.8
AF Nikkor 85mm f/1.80
AF DC-Nikkor lOSmm f/2D
AF DC-Nikkor 135mm f/2
AF Nikkor 180mm f/2.8D IF-ED
AF Nikkor 180mm f/2,8 IF-ED
AF Nikkor 300mm f/2.8 IF-ED
AF Nikkor 300mm f/4 IF-ED
AF-I Nikkor 300mm f/2,8D IF-ED
AF-I Nikkor 400mm f/2.8D IF-ED
AF-I Nikkor SOOmm f/4D IF-ED
AF-I Nikkor eOOmm f/4D IF-ED
AF Micro-Nikkor 55mm f/2.8
AF Micro-Nikkor 60mm f/2.8D
AF Micro-Nikkor 105mm f/2.8D
AF Micro-Nikkor 200mm f/4D IF-ED
AF Zoom-Nikkor
20-35mm f/2.8D
AF Zoom-Nikkor
24-50mm f/3.3-4.5
AF Zoom-Nikkor
28-70mm f/3.5-4,5D
-
-
-
O
-
A
o
-
o
o
0
o
o
o
A
o
A
-
-
-
-
o
o
©
the aperture value selected.
Usable subject to conditions
Pictures are colored or dim around the
edges of the frame.
Not usable
A shadow appears around the edges
of the frame.
AF Zoom-Nikkor
28-85mm f/3.5-4.5
AF Zoom-Nikkor
35-70mm f/2.8D
AF Zoom-Nikkor
35-70mm f/3.3-4.5D IF
AF Zoom-Nikkor
35-80mm f/4-5.6D
AF Zoom-Nikkor
35-105mm f/3.5-4.5
AF Zoom-Nikkor
35-105mm f/3.5-4.5D IF
AF Zoom-Nikkor
35-135mm f/3.5-4.5
AF Zoom-Nikkor
70-21 Omm f/4
AF Zoom-Nikkor
70-21 Omm f/4-5.6D
AF Zoom-Nikkor
75-300mm f/4.5-5.6
AF Zoom-Nikkor
80-200mm f/2.8D ED
Non-AF lenses
Nikkor 6mm f/2.8
Nikkor 8mm f/2.8
Nikkor 16mm f/2.8
Nikkor 13mm f/5.6
Nikkor 15mm f/3.5
Nikkor 18mm f/3.5
Nikkor 20mm f/2.8
Nikkor 24mm f/2
Nikkor 24mm f/2.8
Nikkor 28mm f/2
A
o
-
-
A
-
A
o
A
A
o
o
o
-
-
-
-
-
I
o
o
75
Page 76

Lens usability chart
Nikkor 28mm f/2,8
PC-Nikkor 28mmf/3.5
Nikkor 35mm f/1.4
Nikkor 35mm f/2
PC-Nikkor 35mm f/2.8
Nikkor 50mm f/1.2
Noci Nikkor 58mm f/1.2
Nikkor 85mm f/1.4
Nikkor 85mm f/2
Nikkor 105mm f/1.8
Nikkor lOSmm f/2.5
Nikkor 135mm f/2
Nikkor 135mm f/2.8
Nikkor 180mm f/2.8 ED
Nikkor 200mm f/2 ED IF
Nikkor 200mm f/4
Nikkor 300mm f/2.8 IF-ED
Nikkor 300mm f/4.5 IF-ED
Nikkor 400mm f/2.8 IF-ED
Nikkor 400mm f/3.5 IF-ED
Nikkor 400mm f/5.6 IF-ED
Nikkor SOOmm f/4P IF-ED
Nikkor eOOmm f/4 IF-ED
Nikkor 600mm f/5.6 IF-ED
Nikkor 800mm f/5.6 IF-ED
MIcro-Nikkor 55mm f/2.8
Micro-Nikkor 105mm f/2.8
Micro-Nikkor 105mm f/2.8
MIoro-NIkkor 200mm f/4 IF
Zoom-NIkkor 28-85mm f/3.5-4.5
Zoom-NIkkor 35-70mm f/3.3-4.5
Zoom-NIkkor 35-105mm f/3.5-4.5
Zoom-NIkkor 35-135mm f/3.5-4.5
Zoom-Nikkor 35-200mm f/3.5-4.5
I
Zoom-Nikkor 50-135mm f/3.5
Zoom-Nikkor 50-300mm f/4.5 ED
Zoom-Nikkor 80-200mm f/4
with PN-11
-
-
o
o
-
o
o
o
o
o
o
o
o
o
o
A
o
▲
o
▲
-
-
-
-
-
-
o
▲
A
-
A
o
-
o
▲
A
Zoom-Nikkor 100-300mm f/5.6
Zoom-Nikkor 180-600mm f/8 ED
Zoom-Nikkor
1200-1700mm f/5.6-8 P IF-ED
Zoom-Nikkor 200-400mm f/4
With Teleconverter
AF Nikkor 300mm f/2.8 IF-ED
A F Nikkor 300mm f/4 IF-ED
Nikkor 300mmf/4.5 IF-ED
Nikkor 400mm f/2.8 IF-ED
Nikkor 400mm f/3.5 IF-ED
Nikkor 400mm f/5.6 IF-ED
Nikkor SOOmm f/4P IF-ED
Nikkor 600mm f/4 IF-ED
Nikkor 600mm f/5.6 IF-ED
Nikkor 800mm f/5.6 IF-ED
AF-I Nikkor 300mm f/2.8D IF-ED
AF-I Nikkor 400mm f/2.8D IF-ED
AF-I Nikkor SOOmm f/4D IF-ED
AF-I Nikkor SOOmm f/4D IF-ED
AF-I Nikkor 300mm f/2.8D IF-ED
AF-I Nikkor 400mm f/2.8D IF-ED
Fish Eye, Reflex, Medical-Nikkor, UV
with TC-14B
with TC-14B
with TC-14B
with TC-14B
with TC-14B
with TC-14B
with TC-14B
with TC-14B
with TC-14B
with TC-14B
with TC-14E
with TC-14E
with TC-14E
with TC-14E
with TC-20E
with TC-20E
-
-
-
A
o
o
o
o
o
A
o
o
A
A
o
o
o
A
A
A
-
76
Page 77

Shutter speed and aperture
Light reaching the CCD image device is controlled by shutter
speed and aperture. The proper combination results in a
correct exposure. You can use shutter speed to freeze the
action by using a high shutter speed, or create a motion effect
by choosing a slower shutter speed. You can control depth of
field by varying the aperture. Smaller apertures make the
background and foreground sharper while larger apertures
tend to blur the background.
Taken with high shutter speed Taken with slow shutter speed
The higher the shutter speed the more effectively you can stop the action, and
the slower the shutter speed the more blurry the action becomes.
Taken with narrow aperture
Depth of field is the zone of sharpness in front of, behind and around the
subject on which the lens is focused, and it is greatly affected by aperture.
The smaller the aperture, the more distinct the background and foreground, and
the larger the aperture the sharper the main subject appears against a blurred
background.
Taken with wide aperture
77
Page 78

Special focusing situations
Autofocus operation depends on lighting, subject contrast and
other technical factors. In rare situations where autofocus is not
possible, an “X" appears in the viewfinder signaling the need
for you to focus manually with the clear matte field.
Very dark subject
Focus manually with the clear matte field.
(See page 44.)
Use a Nikon autofocus Speedlight
(optional) to perform autofocus with the
help of the Speedlight’s AF assist
illuminator.
Low-contrast subject (against a white background or dressed in a
coior simiiar to that of the background).
Focus manually with the clear matte field
(see page 44) or focus on another subject
f[(Q
Something is behind or in front of the subject
(e.g. an animal inside a cage or a person standing next to a tree).
%
fi
sC
at the same distance but with more
contrast, then use the auto focus lock.
(See page 60.)
Focus manually with the clear matte field
(see page 44) or focus on another subject
at the same distance but with more
contrast, then use the auto focus lock.
(See page 60.)
Subject is strongly backlit or has a bright shiny surface.
• Focus manually with the clear matte field.
(See page 44.)
78
Page 79

Downloading image data
Image data can be downloaded to external equipment such as
a personal computer using the Image Memory Card.
Using the Image Memory Card
To download the image data, insert an Image Memory Card (PC card) into PC
Card Drive ED-10 or a personal computer with a built-in PC card slot.
79
I
Page 80

Cleaning the camera’s built-in lens
When removing dirt and smudges from the camera’s built-in
lens (situated behind the shutter curtains), proceed in the
following way.
—Be sure to use DC adaptor ES-1 (optional) and Quick Charger EH-1 (EH-2)
(optional). You cannot use battery power for this operation.
—Read the instruction manuals provided with the DC adaptor, Quick Charger
and the Battery Pack.
Set the selector switch of the DC
adapter to BULB.
1
Connect the camera to the Quick
Charger with the DC adaptor.
Remove the lens mounted on the
camera, then turn the power ON.
Set the Main dial to any position other
than L.
—The "BULB" indicator appears in the LCD
panel.
Depress the shutter release button.
When the shutter is released, the shutter
curtains open, then the "BULB" indicator
starts to blink.
80
Page 81

Use a blower to remove dust and particles from the built-in lens.
5
—If this proves ineffective, take your
camera to an authorized Nikon Service
Center.
Set the Main dial to L.
—Make sure that the camera's reflex mirror
is kept in the up position.
—Do not touch the shutter curtains.
Set the Main dial to any position
other than L and press the shutter
7
release button halfway.
—Make sure that the camera's reflex mirror
is down in the normal position.
Set the Main dial to L and turn the power OFF.
8
81
Page 82

Image Memory Card
I Usable Image Memory Cards
We recommend using dedicated Image Memory Card EC-15
(optional) with this camera for best performance.
PC cards with the following specifications are also usable.
Type
Series
Power source
Standard
—The above description is just an overview of usable PC cards.
—If you have any questions concerning PC cards, please ask your nearest
authorized Nikon dealer and furnish the necessary information (type of
card, maker, and specifications).
I Write-protect switch (EC-15)
To protect your image data, use a writeprotect switch.
Slide the write-protect switch in the
direction of the arrow to protect against
overwriting.
Slide the switch in the reverse direction
to cancel protection.
■Tips on using the image Memory Card
• When using a new Image Memory Card, be sure to initialize the
card. (See page 25).
• Never touch the terminals with your fingers or with a metallic
object.
• Do not bend, drop or apply physical shock to the card,
• Do not leave the Image Memory Card in an excessively hot or
humid environment or under direct sunlight.
• Thoroughly read the Image Memory Card Instruotlon manual for
correct usage.
• See page 85 on Image Memory Card warning indications.
SRAM card and ATA card
Type I and Type II
+5V only
PCMCIA Release 2.1/JEIDA Version 4.2
82
Page 83

The dedicated Rechargeable Battery Pack
Use dedicated Rechargeable Battery Pack EN-1 with this
camera. Take special note of the following.
—The EN-1 contains NiCd batteries.
—The battery pack was not charged when shipped from the factory. Be sure to
futly charge the battery before use.
■Characteristics of the Rechargeable Battery Pack
• The battery will self-discharge even though the battery is unused.
• Typically, the voltage of Battery Pack EN-1 drops quickly when the
battery becomes weak. Be sure to load a fully charged battery
every time you set out to take pictures.
• If the battery is weak or the camera is used in a cold outdoor
environment, the number of available frames decreases. We
recommend that you carry spare fully-charged battery packs when
shooting in a cold environment or taking a large number of
pictures at one sitting.
• Be sure to use the battery charger specified by Nikon.
• After recharging or shooting, the battery pack may become warm.
This is no cause for concern.
■Charging the Rechargeable battery pack
• Be sure to use dedicated Quick Charger EH-1 (EH-2) and read the
instruction manual.
• Use only the Quick Charger EH-1 (EH-2).
• Charging should be made in an ambient temperature ranging from
0°C to 40°C (32°E to 104°E). [Approx. 5°C to 35°C (41°E to 95°E) is
ideal.]
• Do not attempt to recharge a fully charged battery.
• When you recharge a NiCd battery which has not been fully
discharged, the battery develops a “memory effect’’ which may
prevent it from becoming fully recharged with ordinary use. To
help avoid this effect, you should fully discharge the battery once
every 20 to 30 chargings. Please refer to your EH-1 (EH-2)
instruction manual for further details.
■Handling the battery pack safely
• Never touch the battery pack’s metal portion with another metal
object. Although a fuse is built into the battery pack, if the
terminals are short-circuited, damage and malfunction will occur.
• Keep used battery packs away from fire and do not throw batteries
into a fire.
• Do not try to disassemble or modify the battery pack.
83
Page 84

The dedicated Rechargeable Battery Pack
■ Handling the battery pack for long time use
• Do not apply strong physical force to the battery pack or drop it
on a hard surface.
• Do not splash water on the battery.
• Do not keep on charging a fully charged battery pack.
■storage
• Keep the battery terminals clean.
• Store the battery pack in a cool, dry place. If the battery is left in
a hot place for a long time, the battery will self-discharge or its
life will be shortened.
I Lifespan
• When a battery approaches the end of its lifespan, it will no
longer hold a full charge despite repeated attempts to recharge
it. You should replace it with a new one.
84
Page 85

Troubleshooting
If your camera detects a defect or malfunction, a warning indicator
appears or blinks in the viewfinder and/or in the LCD panel to alert
you. Refer to the troubleshooting charts provided below and follow the
suggestion for correcting the problem before bringing your camera to
a Nikon Service Center for repair.
Warnina indication Check this
blinks
blinks
blinks
jCH*NO^
blinks
blinks
da
blinks
LCD
panel
□
n
u
BODY
blinks
CARD
blinks
Viewfinder
1 --1
blinks
(Cd)
blinks
Display
segment
blinks
Cause Remedy
Camera back Is open
or camera back is
closed with no Image
Memory Card inside.
A write-protected
Image Memory Card
is inserted.
An uninitialized
Image Memory Card
is inserted.
An Image Memory
Card not specified by
Nikon in the
instruction manual is
inserted.
No frames remain. Insert a new Image
Camera's NiCd
battery is weak.
Battery power for
SRAM is weak.
Insert a Nikon
approved Image
Memory Card. Close
the camera back.
Cancel writeprotection.
Initialize the Image
Memory Card as
instructed in this
instruction manual.
Insert a Nikon
approved Image
Memory Card.
Memory Card.
Recharge the NiCd
battery.
Replace the battery
according to the
instruction.
Ref,
page
P. 24
P. 82
P. 82
P. 25
P. 82
P. 24
P.83
—
CLOCK
blinks
Normal
display
Lithium battery for
clock is weak.
Replace the lithium
battery at a Nikon
Service Center.
—
85
Page 86

Troubleshooting
BODY
blinks
segment
CARD
CI3I
blinks
blinks
CLOCK
blinks
appears appears
Err
blinks
goes out
All indicators
Display
Normal
display
+ o —
blinks
appear
V
blinks
X
appears
<
appears
►
appears
Camera's NiCd battery
is exhausted.
Battery power for SRAM
is exhausted.
Lithium battery tor clock
is exhausted.
Exposure compensation
is activated.
No lens is mounted.
Camera detects a
malfunction.
Speedlight fires at full
output when exposure is
insufficient.
Subject is too dark and
focus is impossible.
Subject is out of focus
and the area behind
subject is in focus.
The subject is out of
focus and the area in
front of the subject is in
focus.
Recharge the NiCd
battery.
Replace the battery
accordihg to the
instruction.
Replace the lithium
battery at a Nikon
Service Center.
Cancel exposure
compensation if
necessary.
Mount a lens.
Bring the camera to a
Nikon Service Center.
Reconfirm the distance
between the camera
and the subject or
select a wider aperture.
Use autotocus assist illumi
nator or manual focusing.
In manual focus mode,
rotate the lens focusing
ring manually so that in
focus indicator •
appears in the
viewfinder.
P. 83
—
—
P. 58
P. 20
—
P. 67
P. 78
P. 44
I
86
Hi
appears
L 0
appears
Hi
appears
L 0
appears
Out of exposure control
range (the subject is too
bright.)
Out of exposure control
range (the subject is too
dark.)
In A mode, change
aperture value, and in S
mode change shutter
speed.
Set SENS button to
STD.
Or Use ND filter (Hi
blinks) or use
speedlight (L blinks)
P. 41
P. 52
P. 53
P. 64
P. 87
Page 87

Optional accessories
iNikon Speedlights: SB-26 and SB-25
Matrix Balanced Fill-Flash operation for
automatically balanced flash output and
ambient light, and Standard TTL Flash
operation for manual flash output
compensation are available. An autofocus
assist illuminator is also provided to assist
autofocusing in the dark.
Nikon Filters
Type
Ultraviolet
desig
nation
L39
Filter
Filter factor
Daylight
Tungsten
llaht
U9htY44 1.5(/,)
E
Medium
Yellow
iZ
s
CD
Orange
O
u.
Red R60 8(3)
Green
Skylight LIBO 1
sk
Ultraviolet L37C 1
Ê
Circular PdariztrtçC-PL
li,
cog
Soft filters
•DC
C ID
Oü
Neutral
CD —
Density
S
. .
E
ii_
o
o
o
o
Blue
*For Both Color and B/W Film
1. Conventional polarizing filters cannot be used due to the characteristics of this
camera's metering system. Use circular polarizing filters.
2. To protect the lens surface from dirt or damage, the use of an L37C filter is
recommended .
3. When using ND-8, ND-4, R60 or 056 filters with exposure factors, Center-Weighted
metering is recommended.
4. Remove filters when shooting a backlit subject.
5. In practice only the R60 filter requires exposure compensation. Overexpose by one
f/stop when shooting under the tungsten light using an R60 filter.
Y48 1.7(y.)
Deep Y52 2(1)
056 3.5 (iy.)
xo
Liptit
Deep XI
No. 1 1
No. 2 1
ND2X
ND4X 4(2)
ND8X
ND400X
Li9ht
A2 1.2('/0
Deep A12
Light B2
MediumB8
Deep B12 2.2(170
2(1) 1.7(7.)
5 (27.) 3.5 (17a)
2-^4 (1-2)
2(1)
8(3)
400 (8.6)
2(1)
1,2 (y.)
1.6(7.)
1.2('/.)
1.4(/.)
2(1) o o
5 (27.)
Screw-in type (mm)
39 52 62 72 77 82
95 122 160
Drop-in
(Series tX)
o
o o
o o o o o o o
o o
o o o o o o
o o o
o o o o o
o
o
o o
o o o
o o
0 0 o o o o o
o o
o
o o
o o o
o
o
o
o
o o
o
o o o o
o o o
o o o
o o
o o
o o
o
type
o
o
Bayonet-
mount
type
o
o
87
Page 88

Optional accessories
iNikon Remote Control Accessories
Convenient for remote or unmanned operation using the following
remote cords connected to the camera's remote terminal.
1) Remote Cord MC-12A: Convenient for stable handheld, close-up or
remote shooting up to approx. 3m. Power-hold timer capability and
release-hold mechanism are provided.
2) Remote Cord MC-4A: Convenient for long distant remote shooting by
connecting several remote cords.
3) Radio Control Set MW-2: Enables wireless remote operation of cameras at
distances up to approx. 0.7 km (outside the city) and approx. 0.3 km (in
the city). Power-hold capability is provided.
4) Intervalometer MT-2: Provides single or continuous frame time-lapse
shooting. A pulse delay time setting switch is provided which activates
when the shutter release button is pressed halfway.
5) Modulate Remote Control Set ML-2: Enables automatic remote control
using modulated light for distances up to approx. 100m. Using more than
one ML-2, remote control is possible from more than 100m.
INikon Lens hood
Used to protect intensive light from directly entering the lens from
the side. Dedicated hood for each lens and lens hood for several
lenses in common are available.
INikon Eyepiece Correction Lenses
An easy-to-use viewing and focusing
aid for near and far-sighted
photographers which attaches to the
viewfinder eyepiece. Five types of
correction lenses ranging from +2, -i-l,
0, -2, and -3 diopter are available.
(These figures do not refer to the
diopter of the lens itself. Be sure to try
out these lenses at the camera shop as
diopter compensation differs from
person to person.)
88
Page 89

iNikon Rubber Eyecup DK-2
Attached to the viewfinder eyepiece,
the rubber eyecup increases viewing
comfort, eliminates eye fatigue and
prevents stray light from entering the
viewfinder from the rear.
■Nikon Eyepiece Adaptor DK-7
Enables you attach the Eyepiece Magnifier DG-2 to the finder eyepiece.
■Nikon Close-up accessories
The following close-up accessories are available:
• Close-up attachment lenses: No. 0, No. 1, No. 2, No. 3T, No. 4T, No. 5T,
and No. 6T
• Auto extension rings: PK-11 A, PK-12, PK-13, and PN-11
—Shadows may appear around the edges of the frame.
Required accessories
■Nikon Rechargeable Battery Pack EN-1
Dedicated rechargeable battery pack for use with this camera.
■Quick Charger EH-1* (EH-2**)/DC Adaptor ES-1
Recharges battery pack EN-1 as quickly as approx. 60 minutes. DC
power can also be supplied to the camera through DC adaptor ES-1
from an AC power outlet. The EH-1 (EH-2) is to be used only with the
ES-1 and the EN-1.
• The EH-1 is sold exclusively in the US and Canada.
** The EH-2 is sold outside the US and Canada.
■External Sync Adaptor EX-10
Plugs into the camera's terminal for flash shooting in sync, with the
firing of a flash mounted on another camera.
■Image Memory Card EC-15
Dedicated ATA PC card for recording image data with this camera.
89
Page 90

EV chart for flash photography
(Sensitivity: STD (equivalent to ISO 800), AFSOmm f/1,4 lens)
In Programmed Auto mode
15 30 60 125 250 500 1000 2000
Shutter speed
90
Page 91

Camera care tips
iDo not drop or hit the camera against a
hard surface as it may cause damage
and malfunction to the precision
mechanism.
iNever disassemble the camera if
damaged. This camera houses highvoltage circuitry which is highly
dangerous.
iTake care not to splash water on the
camera. If water is present, parts may
corrode, increasing repair costs; in
extreme cases, repair may be
impossible.
iBe sure to prevent foreign matter from
entering inside the camera through the
lens mount or the camera back as they
cause damage.
r
V
\
I If you hear a strange sound, if there is
smoke inside the camera, or some
foreign matter has entered the camera,
turn OFF the power switch, remove the
battery pack, and immediately take the
camera to an authorized Nikon Service
Center.
91
Page 92

Camera care tips
lUse a blower to remove dust from the
camera and then wipe the camera clean
with a soft, dry cloth. Do not use thinner,
benzene, or other active agents.
Ilf the camera is not going to be used for
a long time, remove the Rechargeable
Battery Pack; store it in a cool, dry
place. We recommend taking the
camera out of storage from time to time
and releasing the shutter a few times at
least once a month.
iStore the camera in a cool, dry place to
prevent mold. Do not leave it inside an
enclosed space exposed to chemicals
such as camphor and naphthalene. Do
not leave the camera near electronic
appliances subject to electromagnetic
waves (e.g. TVs and radios) . Avoid
leaving the camera in hot places such
as a car in the summer time or near a
heater.
iMake sure that your camera is securely
mounted on the tripod before shooting
when using a tripod.
92
Page 93

iDamage Requiring Service—Refer servicing to qualified service
personnel under the following conditions:
If liquid has been spilled, or objects have fallen Into the product.
If the product has been exposed to rain or water.
If the product does not operate normally according to the operating
instructions. Adjust only those controls that are covered by the
operating instructions as improper adjustment of other controls may
result in damage and will often require extensive work by a qualified
technician to restore the product to normal operation.
If the product has been dropped or damaged in any way.
When the product exhibits a distinct change in performance—this
indicatesa need for service.
I Heat—The product should be kept away
from heat sources such as radiators,
heat registers, stoves, or any other heat
generating products.
93
Page 94

Specifications
Type of camera
Lens mount
Usable lenses
Frame advance
mode
Exposure control
mode
Exposure
metering system
Metering range
Exposure
compensation
Auto Exposure
Lock
Shutter
Shutter speeds
Viewfinder
Viewfinder
magnification
I
Focusing screen
Interchangeable-lens SLR-type digital still camera
Nikon F mount (with AF coupling and AF contacts)
AF Nikkor lenses and Al-type Nikkor lenses (with some
exceptions)
S: Single frame shooting
C: Continuous shooting (when using EC-15)
E2: Approx. 1 frame/sec. (in BASIC mode)
E2s: Approx. 3 frames/sec. up to 7 frames continuously
SD: Data send function not supported by Nikon
PB: Playback mode
P: Programmed Auto
S: Shutter-Priority Auto
A: Aperture-Priority Auto
M: Manual
■ TTL Matrix Metering using a multi-segment sensor
(5 segments) with vertical sensors
• TTL Center-Weighted Metering concentrating 70% of the
meter's sensitivity into the center of the viewfinder.
■ TTL Spot Metering the area metered is represented by
the approx. 5mm-diameter circle in the center of the
viewfinder.
EV1 to EV20 (at equivalent to ISO 100 with f/1.4 lens)
EV2 to EV20 (in Spot Metering)
EV1 to EV16-1/3 (in Matrix Metering)
With the exposure compensation button; ±2EV
range, in 1/4EV increments (Exposure compensation mark
appears in the viewfinder.)
BV memory system with AE-L button
Electromagnetically controlled vertical-travel focal-plane
shutter (shutter balancer incorporated)
Controlled speed from 1/8 to 1/2000 sec., Sy
Optical eye-level type, with approx. 98% frame coverage
Approx. 0.7x
Dedicated Type B clear matte field with focus brackets
94
Page 95

Viewfinder
information
Reflex mirror
Autofocus
Autofocus
detection range
Autofocus
actuation method
Autofocus lock
Image pickup
device
Sensitivity
Image recording
system
Resolution
No. of frames
(Image Memory
Card EC-15)
LCD panel
information
Flash
synchronization
By LCD—Metering system, Shutter speed, Aperture,
Exposure indicators. Exposure modes. Frame counter
By LED—Focus indicators (in-focus, front-focus, rearfocus), Exposure compensation mark. Flash-ready light
(lights up when charging is completed, and blinks to alert
the subject is out of the flash shooting range when used
with SB-26 or SB-25)
Automatic, instant-return type
TTL phase detection system using Nikon advanced AM200
autofocus module
Approx. EV-1 to EV18 at ISO equivalent 100 (under
Nikon inspection conditions)
Single-Servo AF mode (S)
Continuous-Servo AF mode (C)
Manual Focus (M) mode
By lightly pressing the shutter release button in Single
Servo AF mode or by using AF-L button (AE and AF are
simultaneously locked by using AF/AE-L (double lock)
lever)
2/3 inch VT (Vacant Transfer) system color CCD with
1,300,000 pixel resolution
ISO equivalent 800 (STD) and 1600 (HIGH) switchable
Digital recording on PCMCIA compatible PC card in
either compressed or non-compressed format
700 (horizontal), 650 (vertical) lines
Approx. 5 (HI mode, non-compressed)
Approx. 43 (NORMAL mode, 1/8 compressed), Approx. 21
(FINE mode, 1/4compression), Approx. 84 (BASIC mode,
1/16 compresión)
Exposure mode, Image Memory Card, Battery,
Aperture, Shutter speed. Lock indicator, Frames-remaining
counter. Exposure compensation. Metering system, Image
quality, Frames-shot counter. Sensitivity, White balance mode
X-contact only; shutter operates at 1/250 sec. or
slower; in Shutter-Priority Auto or Manual exposure mode,
shutter can be set to 1/250 sec. or slower; (Shutter cannot
be set to 1/350 to 1/2000 sec.)
With Nikon Speedlight SB-26 or SB-25, Matrix Balanced
Fill-Flash and Standard TTL Flash operations are possible.
I
95
Page 96

Specifications
Video output
terminal
Accessory shoe
Tripod socket
Power source • Nikon dedicated Rechargeable Battery Pack EN-1 or DC
Checking battery
power
Operating
temperature
Operating
humidity
Dimensions
(WxHxD)
Weight
Required
accessories
Pin Jack, IV p-p, 75 n, unbalanced, sync negative
• Hot shoe (flash, monitor preflash, TTL flash, ready-light
contacts)
• Safety lock system (a mount pin is automatically inserted
into the locking hole in accessory shoe to secure
Speedlight on the accessory shoe.)
1/4 in. (JIS standard)
Adaptor ES-1
Voltage: 7.2V
Charging time; Approx. 1 hour
Power capacity: 1200mAh
• Quick Charger EH-1 (EH-2)/DC Adaptor ES-1
With the power ON, if CTI in LCD panel and display
segment in viewfinder blink, battery is weak. If cn in LCD
panel blinks and display segment in viewfinder goes out,
battery is exhausted.
O^C to -1- 40°C (32°F to 104°F)
80% or less (no condensation)
164.1 X 159.2 X 120.2mm (6.5 x 6.3 x 4.7 in.) (E2s)
164.1 X 139.8 X 120.2mm (6.5 x 5.5 x 4.7 in.) (E2)
Approx. 1850g (4.1 lbs) (E2s)
Approx. 1720g (3.8 lbs) (E2)
Rechargeable Battery Pack EN-1
Quick Charger EH-1 (EH-2)
DC Adaptor ES-1
External Sync Adaptor EX-10
Video Cable EG-10
Image Memory Card EC-15
All specifications apply when a fully charged Battery Pack is used, at
normal temperature (20°C or 68°F).
Specifications and design are subject to change without notice.
96
Page 97

No reproduction in any form of this manuai, in whoie
or in part (except for brief quotation in criticai articies
or reviews), may be made without written authorization
from NIKON CORPORATION.
Nikon
NIKON CORPORATION
FUJI BLDG., 2-3, MARUNOUCHI 3-CHOME,
CHIYODA-KU, TOKYO 100, JAPAN
PHONE: 81-3-3214-5311 TELEX: J22601 (NIKON)
FAX: 81-3-3201-5856
Printed in Japan 6ME40100
 Loading...