

Page 1
Page 2

Page 3

E2 Browser for Windows
User’s Manual
Nikon
E2 Browser for Windows User's Manual
i
Page 4

Introduction
Introduction
Thank you for purchasing the Nikon E2 Browser for Windows.
This manual explains how to install the software and how to use it.
Please read this manual thoroughly to ensure a good understanding of its
contents.
Cautions
• The reproduction of all or part of this manual without permission is
prohibited.
• The information contained in this manual is subject to change without
notice.
• We have made every effort to produce an accurate manual, but should
you find any mistakes, we would be grateful if you would kindly let us
know.
• We shall take no responsibility for consequences resulting from the
operation of this product, despite the terms mentioned above.
Trademark Information
IBM and IBM PC/AT are registered trademarks of International Business Machines
Corporation.
Adobe and Adobe Photoshop are trademarks of Adobe Systems Incorporated.
Windows is a trademark of Microsoft Corporation.
Other brand or product names are the trademarks or registered trademarks of their
respective holders.
ii
Nikon
E2 Browser for Windows User's Manual
Page 5

Table of Contents
Table of Contents
1. E2 Browser Functions...................................................................... 1
2. Package Contents ............................................................................. 1
3. System Requirements ...................................................................... 2
4. Installation ........................................................................................ 3
5. Main Window ................................................................................... 6
5.1 Starting-up the Browser ............................................................... 6
5.2 Selecting images .......................................................................... 7
5.3 Quitting the Browser.................................................................... 8
Nikon
5.4 Main window functions ............................................................... 8
5.5 Pop-up menu ................................................................................ 9
5.6 Icon buttons ............................................................................... 10
E2 Browser for Windows User's Manual
iii
Page 6

Table of Contents
6. E2 Browser Operation...................................................................11
6.1 Displaying images ..................................................................... 11
6.2 Saving images ............................................................................ 12
6.3 Deleting images ......................................................................... 15
6.4 Attribute information ................................................................. 16
6.5 Preferences................................................................................. 17
6.6 Delivering images to other applications .................................... 21
6.7 Refreshing the thumbnail images .............................................. 22
6.8 About dialog .............................................................................. 22
7. Troubleshooting ............................................................................. 23
Index................................................................................................25
iv
Nikon
E2 Browser for Windows User's Manual
Page 7

1. E2 Browser Functions
1. E2 Browser Functions
The E2 Browser for Windows makes it possible to transfer to IBM PC/AT
compatible computers images recorded on image memory cards using the
Nikon E2/E2s digital still camera. Images recorded by the E2/E2s can be
read using a PC card drive.
The E2 Browser supports the following functions:
• thumbnail listing of all images stored in an image memory card
• display of image attribute information
• transfer of image files from image memory cards to local disk, where
they can be saved for future reference
• deletion of image files from image memory cards
• multi-display support
• storage of image files
•
delivery of selected images to other applications which support
and BMP formats (these applications can be started from within the
browser)
• support of uncompressed images
JPEG
2. Package Contents
The E2 Browser for Windows package contains the items listed below.
Check that nothing is missing from your package. If there are any items
missing, please contact your dealer immediately.
• User's manual (1)
• Install disk (1)
Nikon
E2 Browser for Windows User's Manual
1
Page 8

3. System Requirements
3. System Requirements
In order to operate the E2 Browser for Windows, the following system
environment and software are necessary:
• an IBM PC/AT compatible computers with i386, i486, or Pentium CPU
• MS-DOS 5.0 or higher
• Windows 3.1
• 5MB memory minimum (over 16MB is recommended)
If other applications are to be launched from the browser, there must be
enough free memory to support these applications while the browser is
running.
• 4MB minimum available hard disk space (over 40MB is recommended).
Note that applications launched from the browser may require additional working hard-disk space.
• 640 x 480 pixels
• a color monitor of 640 x 480 pixels or more and which supports 16.7
million, 64K, 32K, or 256 colors
• a Nikon ED-10 PC card drive
• an ADAPTEC AHA-1542CF SCSI card
• ADAPTEC Inc.'s ASPIDISK software (included with the Nikon ED-10
PC card drive)
• an application to which images can be delivered
(any application, such as Adobe Photoshop, which supports JPEG and
BMP formats)
Note: The version of ASPIDISK.SYS included with the Nikon ED-10
PC card drive must be used.
Note: A detailed description of the proper settings for ASPIDISK.SYS,
may be found in the manual which comes with the ED-10.
2
Nikon
E2 Browser for Windows User's Manual
Page 9

4. Installation
4. Installation
Confirm that the Install disk is write protected and then install the E2
Browser for Windows as described below.
Step 1
Start up Windows.
Step 2
Insert the install disk into the floppy-disk drive.
Step 3
Open the Program Manager window.
Step 4
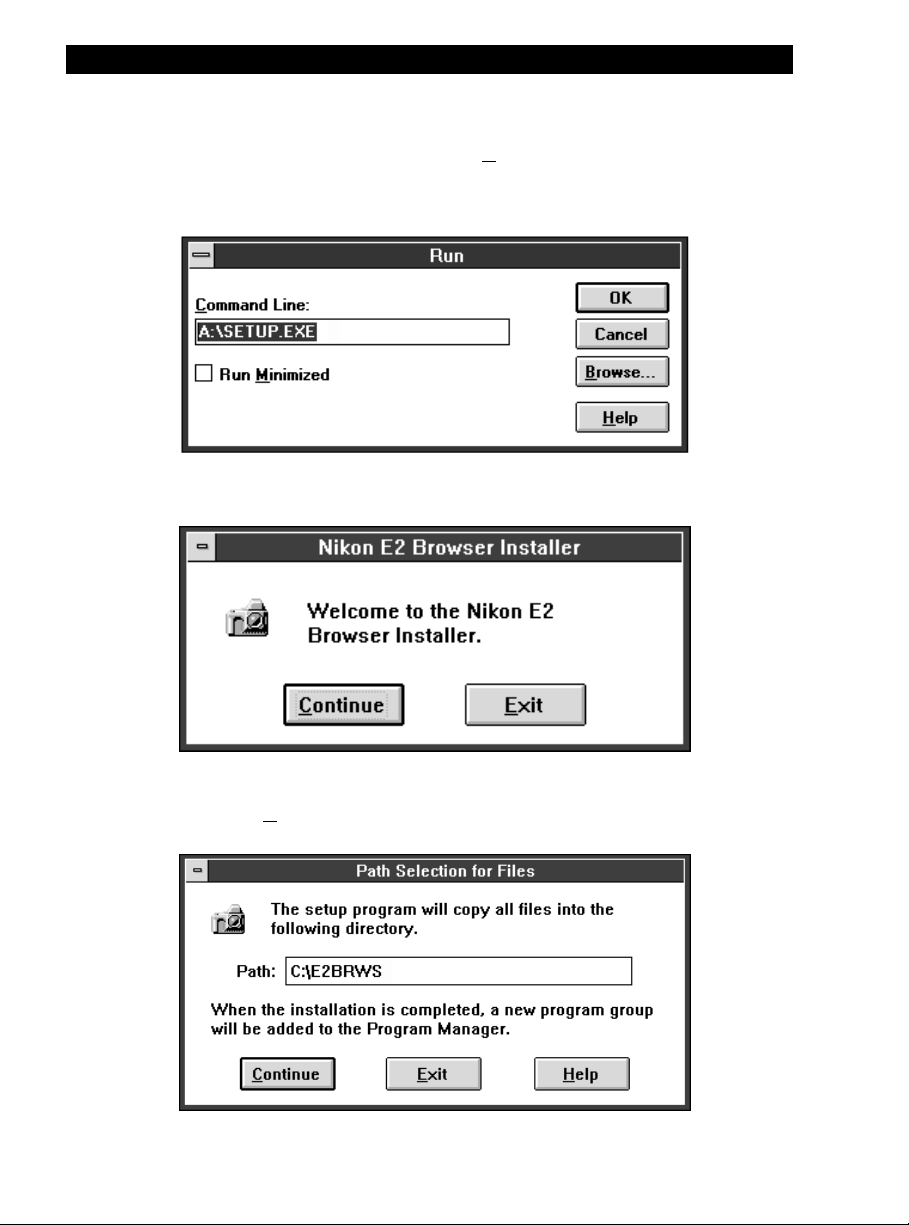
Pull down the File menu and choose the “Run…” command.
Nikon
E2 Browser for Windows User's Manual
3
Page 10
4. Installation
Step 5
The Run window will appear. In the Command Line text box, enter the
drive letter of the floppy-disk drive followed by “\SETUP.EXE” (if, for
example, the install disk were in drive A:, you would enter “A:\SETUP.EXE”).
Click “OK”. An initialization message will be displayed, and then the
following dialog will appear:
Step 6
Clicking “Continue” causes the following window to be displayed.
4
Nikon
E2 Browser for Windows User's Manual
Page 11

4. Installation
Enter the path to the directory in which you wish to install the E2 Browser
(if no other path is chosen, the program will be installed in the directory
“C:\E2BRWS”) and click “Continue”. The following message will appear
while the browser is being installed.
To stop installation, click “Cancel”.
Step 7
When installation is complete, the following window will appear.
Nikon
Click “OK” to finish the installation.
Note: When you first start the E2 Browser after installation, the message
‘Cannot find E2 image files in “C:\E2BRWS”…’ will appear and
thumbnail images will not be displayed in the Main Window. Click
the Source Folder icon shown on page 11 to select the drive and
directory containing the image files you wish to display.
E2 Browser for Windows User's Manual
5
Page 12

5. Main Window
5. Main Window
5.1 Starting-up the Browser
The Browser can be started by double-clicking
the E2 Browser icon shown at right. The Main
window will then appear.
When you first start the E2 Browser after
installation, thumbnail images will not be
displayed. Refer to Section 6.1 for information on selecting the images to
be displayed.
Control menu
box
Icon buttons Title bar Nikon logo
Thumbnail image
Total
number of
images
Scroll bar
Month/Day Hour/Minute
6
Nikon
E2 Browser for Windows User's Manual
Page 13

5. Main Window
The maximum number of images which can be displayed in the window at
one time depends on the resolution of the monitor. If the monitor is larger
than 800 x 600 pixels, up to 30 thumbnail images can be displayed. A
maximum 20 thumbnail images can be displayed when the monitor is
smaller than 800 x 600 pixels, while if the monitor is exactly 800 x 600
pixels either 20 or 30 thumbnails will be shown depending on what font
has been chosen as the system font.
5.2 Selecting images
Click a thumbnail image once to select it.
To cancel the selection, click the selected thumbnail image again while
pressing the Ctrl key, or click another thumbnail image.
To select two or more thumbnail images, click each image in succession
while pressing the Ctrl key.
To select all thumbnail images, pull down the Control menu and choose
“Select All”.
Nikon
E2 Browser for Windows User's Manual
7
Page 14

5. Main Window
5.3 Quitting the Browser
To quit the browser, select “Close” from the Control menu or double-click
the control menu box.
5.4 Main window functions
Title bar: Drag the title bar to move the window.
Control menu: Offers the following functions: “Move”,
“Minimize”, “Close”, “Switch to ...” and
“Select All”.
Icon buttons: The icon buttons can be used to access most
Browser functions.
Total number of images: Displays the total number of files in the
selected folder.
Thumbnail images: Displays thumbnail previews of image files
recorded using the Nikon E2/E2s digital still
camera. Depending on the size of the monitor,
up to 20 or 30 images are displayed at one time
from left to right and top to bottom in the order
recorded. (Up to 999 thumbnail images can be
displayed in one folder.)
8
Nikon
E2 Browser for Windows User's Manual
Page 15

5. Main Window
Date and Time: Gives the date (Month/Day) and time
(Hour:Minute:Second) the file was created.
Scroll bar: When all files cannot be displayed at one time,
click the scroll bar or arrow buttons to view the
remaining thumbnails.
Nikon logo: Clicking the Nikon logo displays the About
dialog. The About dialog gives a list of icon
buttons together with a brief description of
their functions (see the “About Dialog” section
on page 22 of this manual).
5.5 Pop-up menu
Clicking a selected image with the right mouse button brings up the pop-up
menu shown below, making it possible to perform the operations listed in
the menu by selecting the relevant item instead of using the icon buttons.
Nikon
E2 Browser for Windows User's Manual
9
Page 16

5. Main Window
5.6 Icon buttons
The icon buttons are listed below, together with their functions. Click the
icon button once to perform the associated operation.
Source folder icon
Duplicate icon
Delete icon
Click this button to choose the image folder to be
displayed in the Main window.
Saves selected images.
Deletes selected images.
Gives the attribute information for selected images.
Information icon
Open with.. icon
Preferences icon
Refresh thumbnail icon
10
Click this button to open selected images in another
application.
Click this button to adjust the monitor gamma and to
specify the application that will be used to open image
files.
Updates the thumbnail images in the Main window.
Nikon
E2 Browser for Windows User's Manual
Page 17

6. E2 Browser Operation
6. E2 Browser Operation
To operate each function, click the icon button or use the pop-up menu.
Confirm that the PC card drive is connected to the computer.
6.1 Displaying images
This section explains how to select the drive and directory containing the
images to be displayed.
Source folder icon
Click the “Source folder” icon in the Main window to display the “Disk
drive/directory change” window.
Nikon
Select the drive and directory containing the images to be displayed and
click “Read from here”. Once a drive and directory have been selected,
thumbnail previews of the files in that location will be displayed in the
Main window.
E2 Browser for Windows User's Manual
11
Page 18

6. E2 Browser Operation
Functions of the items in the “Disk drive/directory change” window:
List Files of Format Type:
Directories Select the directory containing the images to be
Drives Selects the drive containing the images to be
“Read from here” Displays the images in the currently selected
➤
“Cancel” Closes the window without changing the
6.2 Saving images
Files of the selected type are displayed in the
“File Name” list box. Select either “JPEG &
TIFF” or “All Files (*.*)”.
displayed from this list.
displayed from the pop-up menu.
drive and directory.
selected drive and directory.
12
This section explains how to save selected images.
Duplicate icon
Select images to be saved from the Main window, then select “Save…”
from the right-button pop-up menu or click the Duplicate icon in the Main
window. The ”Saving images” window will be displayed.
Nikon
E2 Browser for Windows User's Manual
Page 19

6. E2 Browser Operation
If two or more thumbnail images are selected, the Browser saves the
images in the order recorded.
Select the drive and directory to which the images are to be saved and, if
“Manual” has been selected from the “File Names” list of radio buttons,
enter a file name in the File Name text box. Clicking “Save” then saves the
file in the specified location.
Nikon
Functions of the items in the “Saving Images” window:
Save Files as Type: Specifies the format under which the current
image will be saved. One of “No conversion
(*.*)”, “TIFF (*.TIF)” or “BITMAP (*.BMP)”
can be chosen (if “No file name change” has
been selected from the “File Names” list of
radio buttons, however, the only option available will be “No conversion (*.*)”).
E2 Browser for Windows User's Manual
13
Page 20

6. E2 Browser Operation
File Names: Specifies how file names will be assigned. The
Automatic: A name is automatically assigned according to the
Manual: A user-specified file name is used.
No file name change: Files are saved under the name assigned by the E2/
File Name: A file name can be entered in this text box if
Directories: The directory to which the currently displayed
Drives: The drive to which the currently displayed
following options are available:
computer’s internal clock calendar and the format
(JPG/TIF/BMP) in use at the time the file is saved.
E2s when the image was originally recorded.
“Manual” has been chosen from the “File
Names” list of radio buttons. Clicking one of
the file names displayed in the list box causes
the selected file name to appear in the text box.
image is to be saved can chosen from this list.
image is to be saved can chosen from this popup menu.
14
“Save” Saves the image currently displayed. If more
images remain to be saved, the “Save Images”
window will reappear after this button is
clicked.
“Save All” Saves all selected images.
“Skip” Causes the next image to be displayed. The
image currently displayed will not be saved.
“Cancel” Cancels the save operation and returns you to
the Main window.
Nikon
E2 Browser for Windows User's Manual
Page 21

6. E2 Browser Operation
6.3 Deleting images
This section explains how to delete selected images.
Delete icon
Select images to be deleted from the Main window, then select “Delete…”
from the right-button pop-up menu or click the Delete icon in the Main
widow. The Delete window will be displayed.
If two or more thumbnails are selected, the Browser will delete the files in
the order recorded.
Nikon
E2 Browser for Windows User's Manual
15
Page 22

6. E2 Browser Operation
Delete window buttons:
“Delete” Deletes the image currently previewed in the
“Delete All” Deletes all selected images.
“Skip” When two or more items remain to be deleted,
“Cancel” Cancels the operation and returns to the Main
6.4 Attribute information
Attribute information for each image is recorded on the E2/E2s PC memory
card. This section explains how to display the attribute information for
selected images.
Delete window.
clicking “Skip” allows you to move to the next
item without deleting the image currently
previewed in the Delete window.
window. The images that have been deleted
before pressing “Cancel” will not be restored.
16
Information icon
In the Main window, select the images for which you want attribute
information. Then select “Attribute information…” from the right-button
pop-up menu or click the Information icon in the Main window. The
“Attribute information” window will be displayed.
When two or more images are selected, the Browser will display the
attribute information for each image in succession, starting from the
earliest image and continuing in the order the images were recorded.
The Attribute Information window gives the file name and date and time of
recording, as well as the image quality (Hi/Fine/Normal/Basic), shutter
speed, and aperture settings used to record the image.
Nikon
E2 Browser for Windows User's Manual
Page 23

6. E2 Browser Operation
Attribute information window buttons:
“OK” Clicking this button displays the attribute
information for the next image selected, if any.
“Cancel” Closes the “Attribute information” window and
6.5 Preferences
The Preferences window provides options which allow you to adjust
monitor gamma and to specify the application to which images will be
delivered. Clicking the Preferences icon in the Main window opens the
Preferences window.
Nikon
E2 Browser for Windows User's Manual
returns you to the Main window.
Preferences icon
17
Page 24

6. E2 Browser Operation
Preferences window buttons:
Option buttons: Choose either “Select image delivery target
“OK” Opens a window which allows you to change
Application” or “Adjust display Gamma…”.
the settings for the option specified using the
option buttons (see below).
18
“Cancel” Closes the Preferences window.
Nikon
E2 Browser for Windows User's Manual
Page 25

6. E2 Browser Operation
Target Application Selection window
When “Select image delivery target Application” is selected in the Preferences window, the window shown below will be displayed when the “OK”
button is clicked. Using this window, the application to which images are
to be delivered can be selected.
Functions of the items in the Target Application Selection window:
Nikon
File Name: The name of the target application can be
entered in this text box. Clicking the name of
one of the files in the list below the text box
causes that application to appear in the text box.
Directories: The directory containing the target application
can be chosen from this list.
Drives: The drive containing the target application can
be chosen from this pop-up menu.
List Files of Type: Select either “Execute file (*.EXE)” or “All
files (*.*)”.
“OK” The application displayed in the “File Name”
text box will be selected as the target application, returning you to the Main window.
“Cancel” Cancels any changes to settings and returns
you to the Main window.
E2 Browser for Windows User's Manual
19
Page 26

6. E2 Browser Operation
Display Gamma Adjustment window
When “Adjust display Gamma…” is selected in the Preferences window,
the window shown below will be displayed when the “OK” button is
clicked. This window is used to adjust the monitor gamma so that images
as displayed in the E2 Browser more closely match the image data recorded
in the camera.
20
Functions of the items in the Display Gamma Adjustment Window:
Scroll bar: Drag the slider or click the arrow buttons to
adjust the monitor gamma so that the area
above the bar shows a single pattern with no
striped areas.
Gamma value: Gives the gamma value represented by the
position of the slider bar.
“OK” Returns you to the Main window. All images
in the browser will be displayed under the new
gamma setting.
“Cancel” Returns you to the Main window without
changing the gamma adjustment value.
Nikon
E2 Browser for Windows User's Manual
Page 27

6. E2 Browser Operation
6.6 Delivering images to other applications
Selected images can be delivered to an application, such as Adobe
Photoshop, which supports JPEG and BMP formats. If the application is
not running at the time the images are delivered, it will be launched
automatically. The destination application for this operation is set through
the Target Application Selection window in the Preferences dialog (see 6.5,
“Preferences”).
Open with.. icon
In the Main window, select the images to be delivered to the other application. Select “Deliver Images” from the right-button pop-up menu or click
the Open with… icon in the Main window. Copies of the selected images
will then be opened in the destination application.
Nikon
Note: So that the original image files will not be affected, the Browser
saves copies of the images to a directory located in the same
directory as the E2 Browser and named “To_application” (the
“application” portion of the directory name gives the first five
letters of the target application’s name). These copies are then
opened in the target application.
Note: The copies delivered to the target application remain as back-ups
after the application has closed. These files must be deleted manually when no longer needed.
E2 Browser for Windows User's Manual
21
Page 28

6. E2 Browser Operation
6.7 Refreshing the thumbnail images
Updates the thumbnail previews in the Main window.
Refresh thumbnail icon
To update the display, click the “Refresh thumbnail” icon in the Main
window.
6.8 About dialog
The About dialog can be displayed by
window.
clicking the Nikon logo in the Main
22
Nikon
E2 Browser for Windows User's Manual
Page 29

7. Troubleshooting
7. Troubleshooting
When an error occurs, one of the following error messages will be displayed. Take the action prescribed in the message or in the table below.
Message: An unexpected error occurred. Contact Nikon Technical
Support.
Message: Cannot load files necessary for program execution. E2
Browser will quit. Please install the Nikon E2 Browser again.
Message: Cannot find settings file. Click [OK] use factory default.
Action: Follow the messages on the screen to take necessary measures.
Message: Cannot find E2 image files in (“Filename”). Please change to
the disk drive/directory where the file is stored. If you have
moved the file to the current disk drive/directory, click the
refresh button.
Message: Cannot find displayed thumbnails. Thumbnails will be
refreshed.
Nikon
Message: The displayed thumbnail does not represent the actual image
file. Thumbnails will be refreshed.
Message: This program cannot support over 999 images. Some
images may not be displayed.
Message: The current operation cannot continue due to insufficient disk
space.
Action: Increase space on the hard disk by erasing unnecessary files.
Message: Cannot save (“Filename”). The target disk drive or the file to
be saved is locked.
Message: Cannot delete (“Filename”). The target disk drive or the file
to be deleted is locked.”
Message: Drive (“Drive:”) is not ready. Insert a disk or a card, and then
try again.
Message: Cannot read (“Filename”). The file may be damaged.
Action: Confirm whether the selected file exists or not.
E2 Browser for Windows User's Manual
23
Page 30

7. Troubleshooting
Message: Cannot find (“Filename”).
Action: Confirm whether the selected file exists or not.
Message: Cannot automatically generate (“Filename”). The same file
name already exist in the current disk drive/directory.
Action: Save the file manually.
Message: The same file name as (“Filename”) already exists. Over-
write it?
Message: The same file name as (“Filename”) already exists. The file
to be overwritten is a copy, and not the original file. Overwrite it?
Message: Failed to launch (“Filename”). Set up target application in
Preferences.
Message: Target application does not support Drag & Drop. Set up
new target application in Preferences.
Message: File name is illegal. Input new file name again.
Message: Cannot save (“Filename”). The destination disk drive/
directory is the same as the source disk drive/directory.
Please reset the destination disk drive/directory.
24
Message: Cannot read (“Filename”). The file may be damaged.
Cannot display the thumbnail of this file.
Message: The current operation cannot continue due to insufficient
memory. Please quit other applications.
Message: Program execution cannot continue due to insufficient
memory. Try setting a smaller size font, or quit other applica-
tions to make more memory available.
Message: E2 Browser may have problems. Due to incorrect
(“Filename”) library is used by other application. Please quit
other application, and then re-start E2 Browser. Quit E2
Browser?
Message: E2 Browser cannot run using this version of Windows.
Please use Windows 3.1.
Message: Target application does not support Drag & Drop. Set up
new target application in Preferences.
Nikon
E2 Browser for Windows User's Manual
Page 31

Index
Index
A
About dialog 22
Attribute information window 16
C
cancel the selection 7
Control menu 8
D
Date and Time 9
Delete window 15
Deleting images 15
Delivering images to other applications 21
Display Gamma Adjustment window 20
Displaying images 11
drive/directory change window 11
E
E2 Browser icon 6
F
Functions 1
I
Icon buttons 8, 10
Attribute information 16
Information icon 10, 16
Delete icon 10, 15
Duplicate icon 10, 12
Open with.. icon 10, 21
Preferences icon 10, 17
Refresh thumbnail icon 10, 22
Source folder icon 10, 11
Install disk 3
Installation 3
N
Nikon logo 9, 22
O
Operation 11
P
Package Contents 1
Pop-up menu 9
Attribute Information... 16
Delete... 15
Deliver Images 21
Save... 12
Preferences 17
Preferences window 18
Q
Quitting the Browser 8
R
Refreshing the thumbnail images 22
S
Save Files as Type 13
Saving images 12
Saving images dialog 12
Scroll bar 9
select all thumbnail images 7
select two or more thumbnail images 7
Selecting images 7
SETUP.EXE 4
Starting-up the Browser 6
System Requirements 2
Nikon
E2 Browser for Windows User's Manual
25
Page 32

Index
T
Target Application Selection window 19
Thumbnail images 8
Title bar 8
Total image number 8
Troubleshooting 23
26
Nikon
E2 Browser for Windows User's Manual
 Loading...