

Page 1
Professional
Technical Guide
— Useful Features—
Revision 1.0
En
Page 2

Table of Contents
Camera Setup 5Camera Setup 5
Synchronizing Clocks ................................... 6
• Via GNSS ............................................................................................. 7
• Via Ethernet/Wireless LAN ............................................................. 9
• Via Nikon Transfer 2 .......................................................................11
Recording Location Data ................................................. 14
Track Logs ...........................................................................17
• Recording Track Logs ....................................................................17
• Opening Log Files in ViewNX‑i ...................................................21
• Adding Location Data to Existing Pictures ..............................23
IPTC Metadata ...................................................................29
• Editing IPTC Metadata ..................................................................29
• Importing Presets .................................................31
Taking Pictures 35Taking Pictures 35
Recording Photos at Two Dierent Sizes ...................... 36
Recalling Settings at the Touch of a Button ................. 38
• Saving Settings...............................................................................39
• Recalling Settings ..........................................................................41
• Suggested Uses ..............................................................................42
White Balance Lock ........................................................... 47
• ”Choose Color Temperature” .......................................................47
• Preset Manual .................................................................................48
• Copying White Balance from Existing Pictures.......................50
• Locking Auto White Balance ..............................51
2
Page 3

Playback 53Playback 53
Viewing Dual-Format Photos .................... 54
• Choosing a Playback Slot .............................................................54
• Viewing Copies ...............................................................................55
• Deleting Dual‑Format Photos .....................................................55
Marking Pictures ............................................................... 57
• Markings ..........................................................................................57
• Flick Gestures ........................................................59
Filtering by Marking ......................................................... 61
• Filtered Playback Criteria .............................................................61
• Enabling Filtered Playback ..........................................................62
Cropping Pictures ............................................................. 63
• Playback Zoom ...............................................................................63
• The Retouch Menu ........................................................................64
Networks 65Networks 65
Priority Upload ............................................ 66
Band Selection (WT-6) ................................ 67
3
Page 4

4
Page 5

Camera Setup
5
Page 6
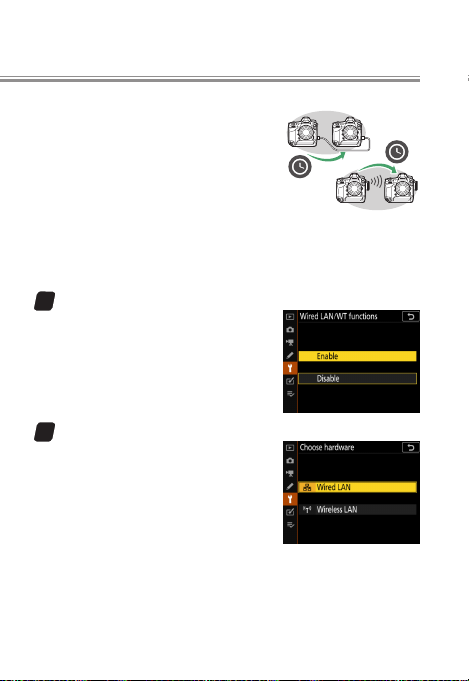
Synchronizing Clocks
We recommend that you set the camera clock to the cor‑
rect time and date before shooting. If you are using mul‑
tiple cameras, it is particularly important that their clocks
agree so that pictures can be correctly sorted by time and
date of recording when displayed in ViewNX‑i or other
software after transfer to a computer.
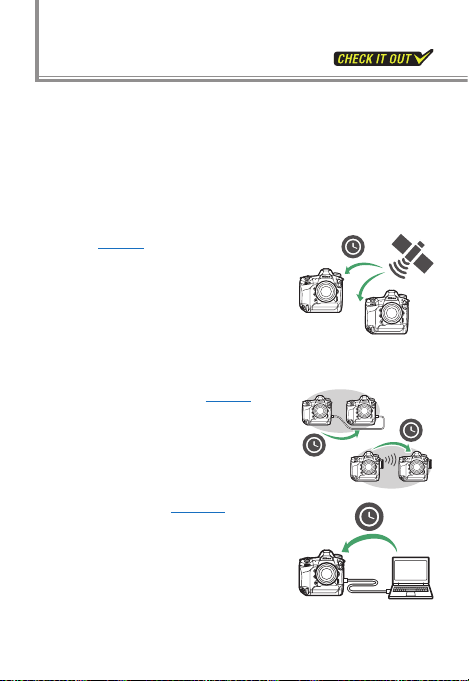
Clocks can be synchronized via:
• GNSS (page page 77): Use the location
data function to set the camera
clock to the current time (UTC, or
Universal Coordinated Time) sup‑
plied by satellite to the camera’s
built‑in GNSS receiver. You can set
the clocks on multiple cameras with no additional devic‑
es or applications or syncing between cameras.
• Ethernet/wireless LAN (page page 99): A
D6 “master” camera can be used
to set the clock on a “remote” D6
connected via an Ethernet cable or
a WT‑6 wireless transmitter.
• Nikon Transfer 2 (page page 1111): Where
supported, the clock synchroniza‑
tion feature in Nikon Transfer 2 can
be used to set clocks on cameras
of many dierent types to the time
reported by the computer.
6
Page 7
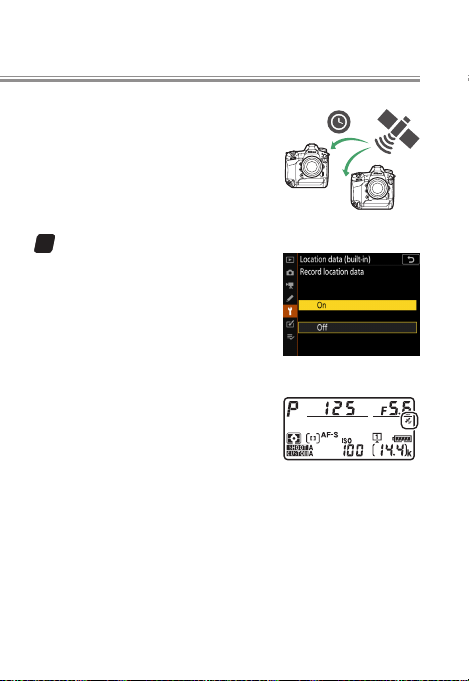
Via GNSS
l
Use the [Location data (built-in)]
option in the setup menu to set
the camera clock to the time (UTC,
or Universal Coordinated Time) re‑
ported by the navigation satellite
system.
Enable location data.
1
Select [On] for [Location data
(built-in)] > [Record location
data] in the setup menu to en‑
able the camera’s built‑in loca‑
tion data feature and start
downloading location data
from the satellite system.
A ashing o icon will appear in
the top control panel while the
camera connects to the satellite
system. The ashing stops when
a connection is established.
7
Page 8
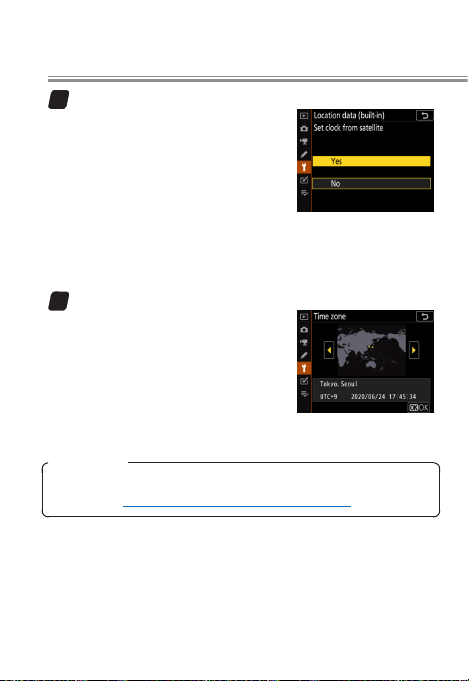
Select [Ye s] for [Set clock from satellite].
2
After conrming that the o
icon in the top control panel
has stopped ashing, return to
[Location data (built-in)] in the
setup menu and select [Yes] for
[Set clock from satellite] to set
the camera clock to the time reported by the satellite
system. The clock will be resynchronized the next
time the camera is turned on.
Choose a time zone.
3
The clock is set to UTC, not to
the current time zone. To set
the camera clock to the time in
your current time zone, select
[Time zone and date]> [Time
zone] in the setup menu and
choose the desired zone.
Location Data
For more information on the camera’s built-in location data
feature, see “Recording Location Data” (page “Recording Location Data” (page 1414)).
8
Page 9
Synchronizing Clocks
l
Via Ethernet/Wireless LAN
When [No] is selected for [Location
data (built-in)] > [Set clock from
satellite] in the setup menu, a mas‑
ter D6 can be used to set the clock
on a remote D6 camera connected
via an Ethernet cable or an optional
WT‑6 wireless transmitter. All [Time zone and date] set‑
tings in the remote camera’s setup menu will be adjusted
to match the settings on the master camera.
Enable wired LAN/WT functions.
1
Select [Enable] for [Wired
LAN/WT] > [Wired LAN/WT
functions] in the setup menus
for both the master and remote
cameras.
Choose the network hardware.
2
On both the master and re‑
mote cameras, select [Wired
LAN/WT]> [Choose hardware]
and choose the option match‑
ing the hardware that will be
used to connect the cameras.
Choose [Wired LAN] if the cameras will be connected
via an Ethernet cable or [Wireless LAN] if you are using
WT‑6 wireless transmitters.
9
Page 10
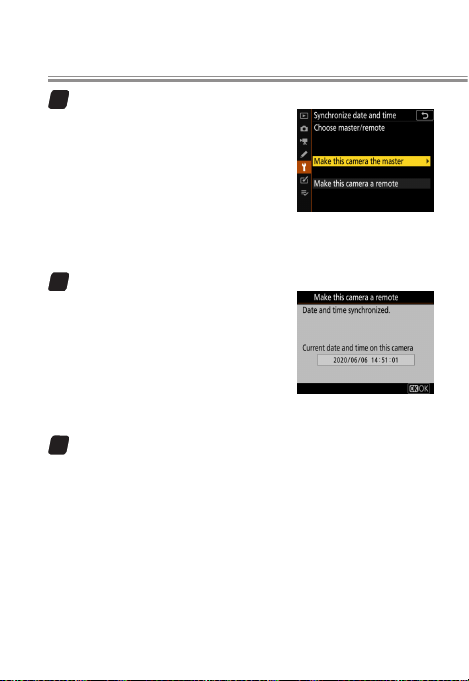
Choose the camera roles.
3
Choose one camera as the
master by selecting [Make this
camera the master] for [Network
settings] > [Synchronize date
and time] and make the other a
remote by choosing [Make this
camera a remote]. Both cameras will enter synchroni‑
zation mode and display current clock settings.
Press J on the remote camera.
4
The remote camera will connect
to the master using the chosen
network type and synchronize
its clock with the clock on the
master camera. The remote
camera will display a message
when the process is complete.
Exit synchronization mode.
5
Press J on both cameras to exit synchronization
mode and return to the [Network settings] menu.
Repeat Steps 1–5 for each additional camera you want to
synchronize.
10
Page 11

Synchronizing Clocks
l
Via Nikon Transfer 2
With the help of the Nikon Transfer 2 compo‑
nent of Nikon’s ViewNX‑i and Capture NX‑D
computer software, you can use the computer
to set the clocks for cameras such as the D6,
D5, and D4S. ViewNX‑i and Capture NX‑D are available via
the Nikon Download Center:
https://downloadcenter.nikonimglib.com/https://downloadcenter.nikonimglib.com/
Setting the Clock from a Computer
For accurate time-keeping, congure the computer to set
its clock automatically (for more information, see the documentation for the computer operating system). The clock
may not report the correct time and date when the clock
is set manually. Note that if [Yes ] is selected for [Set clock
from satellite] and the location data feature is enabled, the
camera will preferentially set its clock to the time reported by
GNSS. Select [No] when setting the clock from a computer.
11
Page 12
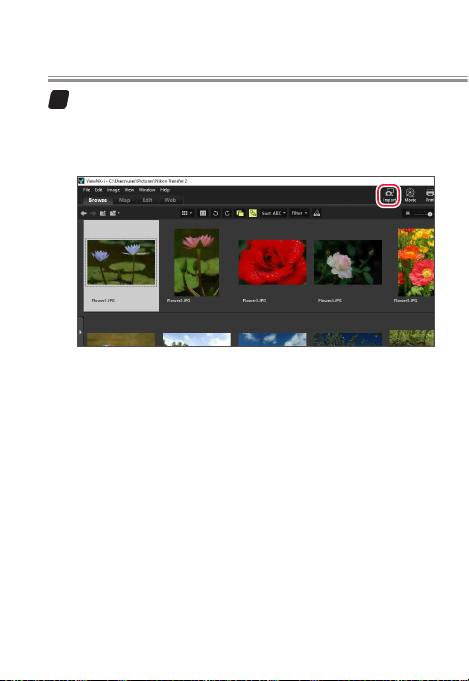
Launch Nikon Transfer 2.
1
After connecting the camera to the computer via USB
and starting ViewNX‑i or Capture NX‑D, click [Import]
to launch Nikon Transfer 2.
The illustration above shows ViewNX‑i.
12
Page 13

Synchronizing Clocks
Click [Synchronize].
2
In the [Preferences] tab, click the [Synchronize] but‑
ton under [Synchronize camera date and time to
computer when camera is connected (supported
cameras only)].
A conrmation dialog will be displayed when syn‑
chronization is complete. Click [OK] to return to Nikon
Transfer 2.
Repeat Steps 1–2 for each additional camera you want to
synchronize.
13
Page 14
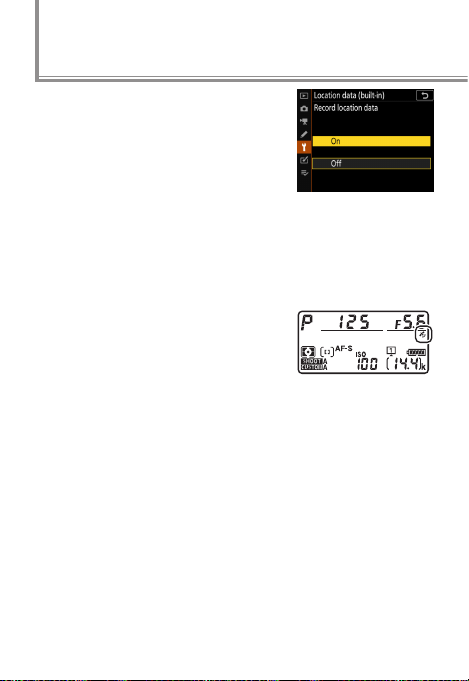
Recording Location Data
When [On] is selected for [Location
data (built-in)] > [Record location
data] in the camera setup menu, the
camera will record the current longi‑
tude, latitude, altitude, and time
(UTC, or Universal Coordinated
Time) with each new picture taken. The location can be
displayed on a map when the pictures are viewed in soft‑
ware such as ViewNX‑i. Note that the camera continues to
acquire location data even while o; to disable the loca‑
tion data feature, select [O] for [Record location data].
When the built‑in location data fea‑
ture is enabled, the strength of the
signal from the global navigation
satellite system (GNSS) providing
the location data can be gauged via
the o icon in the top control panel:
• A static o icon indicates that the camera is able to record
the current longitude, latitude, and altitude.
• A flashing o icon indicates that the camera is unable to
determine or record its current location. Wait for the icon
to stop ashing.
• If the o icon is not displayed, no signal has been received
for at least two seconds and location data will not be
updated until the signal is reacquired. The location data
last received before the signal was lost will however be
recorded with new pictures if available.
14
Page 15
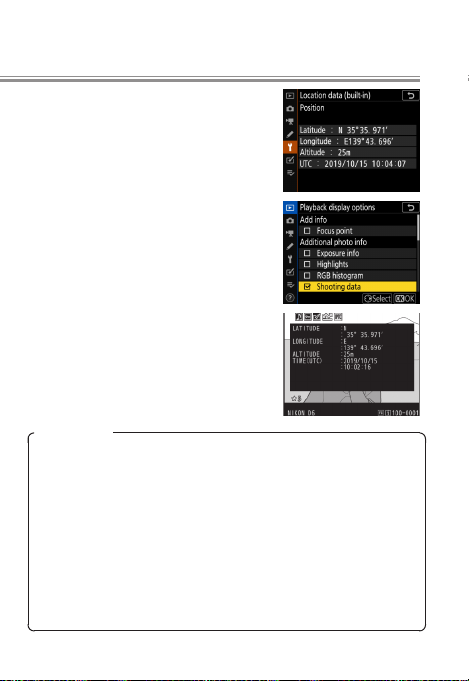
To view current location data, select
[Location data (built-in)]> [Position].
To include location data in the pho‑
to info display, select [Shooting data]
and [Detailed shooting data]> [Lo-
cation data] for [Playback display
options] in the playback menu.
You can then press 1 or 3 in the pho‑
to info display to scroll to the location
data page during playback.
Location Data
Personal information may be inferred from pictures with embedded location data. Exercise caution when sharing photos,
movies, or track logs or when posting them to the Internet or
other locations where they can be viewed by third parties.
Location data provided by satellite navigation systems are accurate to within a few hundred meters. Depending on the accuracy of the data acquired and the eects of local topography
on satellite reception, the location data recorded with pictures
may dier from the actual location.
15
Page 16

Recording Location Data
Location Data (Continued)
The camera may in certain cases need additional time to acquire location data, for example immediately after the battery is inserted, when the location data function is enabled
for the rst time, or after an extended period of disuse. The
positions of navigation satellites are continuously changing,
preventing or delaying the acquisition of location data in
some locations or at certain hours of the day. In addition, the
camera may be unable to receive location data or may report
its location incorrectly indoors, underground, under bridges,
or in tunnels, metal containers, or the vicinity of high-voltage transmission lines, large structures, trees, or other objects
that block or reect satellite signals. The presence of cellular
telephones or other devices that produce magnetic elds
or that cause radio noise or transmit on frequencies close
to those of navigation satellites may also interfere with the
acquisition of location data.
The location data recorded with movies are those reported at
the start of recording.
Before travelling, check with your travel agent or the embassy
or tourism board of the countries you will be visiting for information concerning restrictions on the recording of location
data. China, for example, prohibits unauthorized recording of
location data. Note that as of December, 2019, the location
data function may not perform as expected in China and in
the vicinity of the Chinese border.
16
Page 17
Track Logs
l
The camera location data feature can be used to record
track logs that when opened in ViewNX‑i show the route
of your travels for a given day. Location data from the logs
can be added to pictures taken with other cameras.
Log Files
Log les are stored in the “NIKON” > “GNSS” folder on the
memory card and have names of the form “Nyymmddx.log”,
where “yy” is the last two digits of the current year, “mm” the
month, “dd” the day, “x” a single-character identier from “0”
(zero) to “Z” assigned in ascending order by the camera, and
“.log” the extension. Logs are in NMEA format, although this
does not guarantee that they will display correctly in all software or on all devices.
Recording Track Logs
Track logs can be recorded as described below.
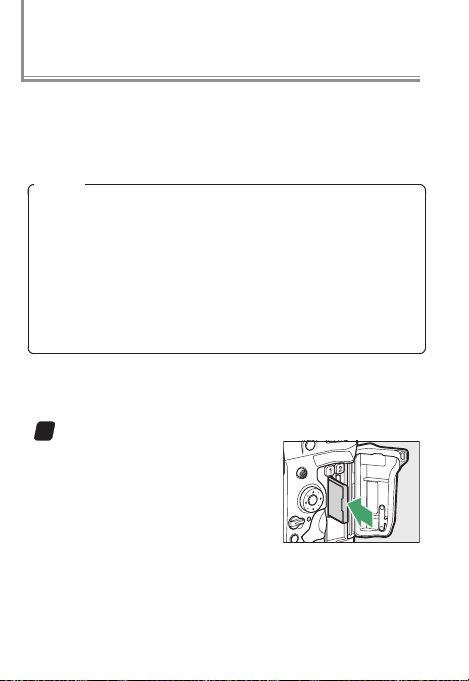
Insert a memory card in Slot 1.
1
Log les are recorded to the
memory card in Slot 1. Log les
will not be recorded if no card is
inserted or if a card is inserted
only in Slot 2.
17
Page 18

Enable location data.
2
Select [On] for [Location data
(built-in)] > [Record location
data] in the setup menu to en‑
able the camera’s built‑in loca‑
tion data feature and start
downloading location data
from the satellite system.
Conrm that the o icon has lit
in the top control panel.
18
Page 19
Track Logs
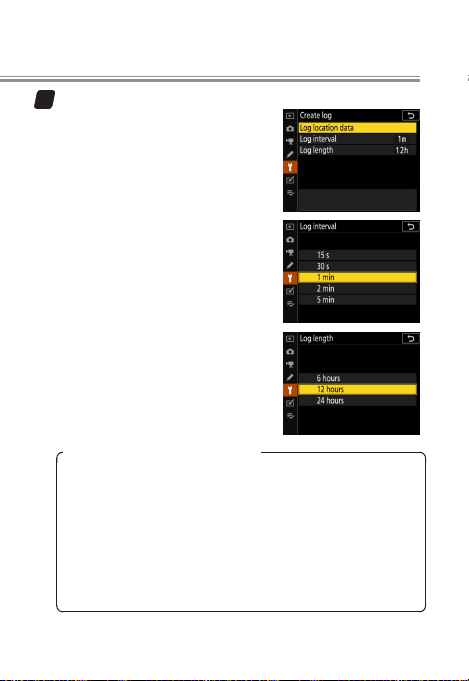
Adjust log settings.
3
In the setup menu, select [Location data (built-in)]> [Create
log] and choose the log interval
and length.
• [Log interval]: Choose wheth‑
er the camera logs its position
once every 15 or 30 seconds,
once a minute, or once every
2 or 5 minutes.
• [Log length]: Choose whether
the camera will continue to
log its position at the selected
interval for 6, 12, or 24 hours.
Choosing a Log Interval and Length
Choose the interval according to your anticipated rate
of travel. For example, choose a short interval when
travelling by train or helicopter and a long interval when
travelling on foot.
The log length and interval cannot be changed once
tracking has started. You can however opt to end the
current log and create a new le with dierent settings.
19
Page 20
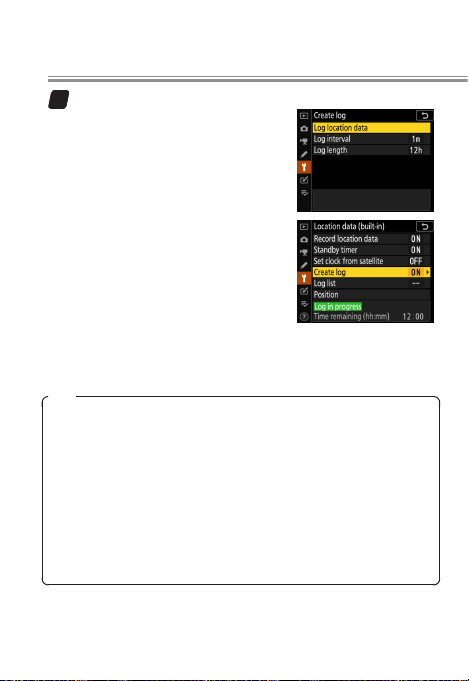
Start the log.
4
After returning to [Location
data (built-in)]> [Create log] in
the setup menu, highlight [Log
location data] and press
The camera will log its position
at the selected interval for the
selected time; the time remain‑
ing can be viewed by selecting
[Location data (built-in)]. To
end, pause, or resume record‑
ing, highlight [Log location
data] and press 2.
Logs
Logs can only be created if the camera clock is set. When
tracking is active, the camera continues to monitor its position even when o; tracking will only end before the specied
log length is reached if the battery is exhausted or removed
or if [O] is selected for [Location data (built-in)]> [Record
location data] in the setup menu. Note, however, that no
log entries will be added at times when the camera is unable
to acquire location data. To prevent logs ending prematurely,
be sure the battery is fully charged before tracking starts.
J
.
20
Page 21
Track Logs
l
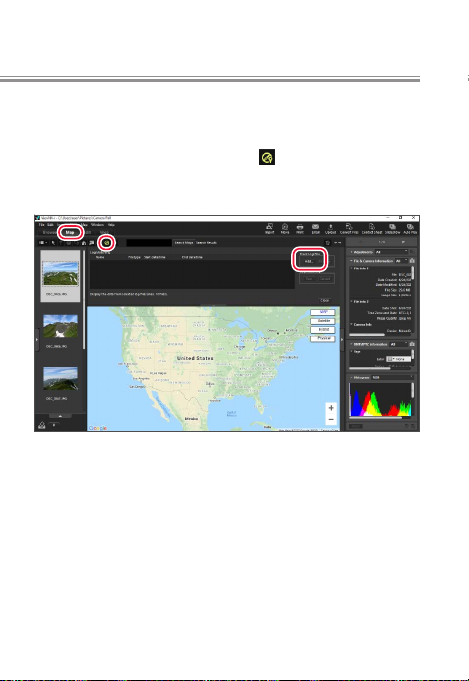
Opening Log Files in ViewNX‑i
To view tracks on a map, you can copy log les to a com‑
puter using a card reader or by other methods and then
open them in ViewNX‑i. Click the
and then click [Add] under [Track Log File] and choose a
log le.
icon in the [Map] tab
21
Page 22

The track will appear on the map.
The start ( ) and end ( ) pins mark the start and end of
the track.
22
Page 23

Track Logs
l
Adding Location Data to Existing Pictures
If you take your D6 on a shoot with a second camera, say
a D5, the location data from the D6 can be used to add
location data to pictures taken with the D5 based on the
time of recording.
Choose the folder containing the target pictures.
1
Under [Folders] in the [Navigation] palette, choose a
folder containing pictures to which you want to add
location data.
23
Page 24

Load the log le.
2
Click the icon in the [Map] tab and then click [Add]
under [Track Log File].
Select the log le created with the D6 and click [Open].
The le will be loaded into ViewNX‑i and the track will
appear on the map.
24
Page 25

Track Logs
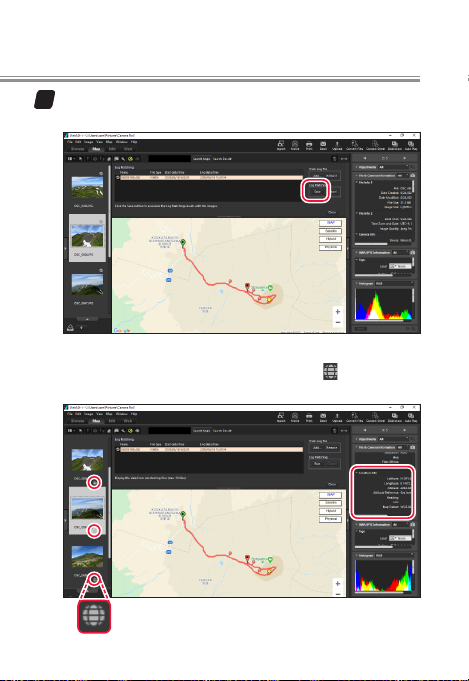
Run log matching.
3
Under [Log Matching], click [Run].
Pictures shot in the time spanned by the log loaded in
Step2 are indicated by check marks ( ) and map pins
( or ). By default, the pins appear at waypoints with
times nearest to the times the pictures were taken.
25
Page 26

Check the matches on the map.
4
Select pictures in the thumbnail list to view their lo‑
cation on the map. The pin for the selected picture is
displayed in yellow ( ).
Removing Matches
Pictures can be removed from the map by clicking the
check marks ( ); the check marks will change to and
location data will not be added when the pictures are
saved in Step5.
26
Page 27
Track Logs
Add the location data to the pictures.
5
Under [Log matching], click [Save].
When prompted, click [Yes ] to add location data to the
selected pictures. Location data icons ( ) will appear
on the pictures in the thumbnail list.
27
Page 28

Track Logs
Manipulating Location Data in ViewNX‑i
Use ViewNX-i to edit location data while viewing locations
on a map. For more information, see ViewNX-i online help.
28
Page 29

l
IPTC Metadata
Add IPTC metadata to pictures.
Editing IPTC Metadata
The following tools can be used to edit and save IPTC
metadata that will later be appended to pictures:
• On-camera editing: Use the [IPTC] >
[Edit/save] item in the setup menu
to create or edit IPTC presets.
• HTTP server mode: Using the
text‑entry option available
in HTTP server mode (a D6
network feature), you can
enter image comments,
copyright information, and
IPTC preset metadata di‑
rectly from a computer or
iOS/Android device.
29
Page 30

• IPTC Preset Manager: Using Nikon’s own IPTC
Preset Manager software, you can create and
edit IPTC presets that can later be copied to
the camera and appended to pictures. IPTC
Preset Manager is available from the Nikon
Download Center:
https://downloadcenter.nikonimglib.com/https://downloadcenter.nikonimglib.com/
IPTC Preset Manager can be used to create presets with
the 14 elds supported by the camera and save the re‑
sults in NMS format (extension “.nms”). From version 1.2,
presets can also be saved in XMP/IPTC format (extension
“.xmp”).
• Third-party software (
third‑party XMP/IPTC software can be imported to the
camera, allowing you to create presets using elds other
than the 14 supported by the camera.
page page 3131): IPTC presets created with
30
Page 31
IPTC Metadata
l
Importing Presets
Follow the steps below to import XMP/IPTC presets creat‑
ed using third‑party software.
Save the presets on the computer.
1
For more information, see documentation for the
XMP/IPTC software.
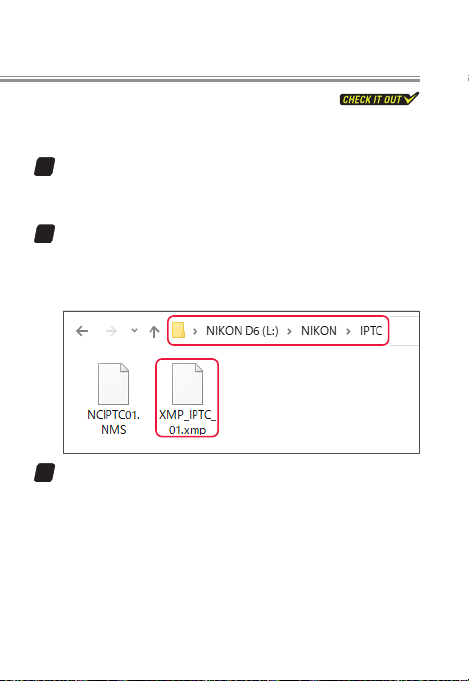
Copy the presets to a memory card.
2
Create a folder on the memory card as shown and
copy the XMP/IPTC presets (extension “.xmp”) to the
folder.
Insert the memory card in the camera.
3
The card can be inserted in either slot.
31
Page 32

Display the presets.
4
In the setup menu, select [IPTC]>
[Load/save], choose the slot in
which you inserted the memory
card in Step3, and then highlight
[Copy to camera] and press 2 to
display a list of the presets on the
card in the selected slot.
Select a preset.
5
Highlight a preset and press 2.
Choose a destination.
6
Highlight the desired destina‑
tion (P11, P12, or P13) and press
2.
32
Page 33

IPTC Metadata
Copy the preset to the camera.
7
A text‑entry dialog will be dis‑
played; name the preset and
to copy the selected
press
J
preset to the camera.
Select the preset for auto embedding.
8
In the setup menu, select [IPTC],
then highlight [Auto embed
during shooting], press 2, and
choose the preset you copied
to the camera in Step7. The se‑
lected preset will be embedded
in all subsequent photographs.
XMP/IPTC Presets
XMP/IPTC presets cannot be exported from the camera to a
memory card.
During playback, the camera will not display IPTC metadata
for pictures in which XMP/IPTC presets have been embedded.
33
Page 34

34
Page 35

Taking Pictures
35
Page 36

Recording Photos at Two Dierent Sizes
When two memory cards are inserted, the role played by
the card in Slot 2 can be chosen using [Role played by card
in Slot2] in the photo shooting menu. While the D6 natu‑
rally supports the [RAW Slot1- JPEG Slot2] option famil‑
iar to users of earlier cameras, it also oers a [JPEG Slot1-
JPEG Slot2] option that can similarly be used to record two
copies of each shot: one to the card in Slot1 at the image
quality and size selected in the photo shooting menu or
via the T button, and a second to the card in Slot2 at
a size of [Medium] or [Small] and a quality of [JPEG basic].
Thus for example you could record high‑quality photos to
the card in Slot1 while simultaneously recording copies
to the card in Slot2 at le sizes suitable for quick upload.
The size of the copies recorded to
the card in Slot 2 can be selected
by highlighting [JPEG Slot1 - JPEG
Slot2] and pressing 2.
The size of the copies recorded to
the card in Slot2 is shown on the left
side of the rear control panel.
36
Page 37

Dual‑Format Photos
You can choose a slot for playback of dual-format photos and
temporarily switch to the second copy when the copy on
the card in the selected slot is displayed (page page 5454). When
deleting dual-format pictures, you can choose whether to
delete both copies or only the copy on the card in a selected
slot (page page 5555).
Watch and learn!
More information on [JPEG Slot1- JPEG Slot2] is available
via the “Digitutor” (Nikon digital camera tutorial) channel on
YouTube.
D6 NPS #1, Smooth Image Transfer Using New D6 Func-
tions, Chapter ①: ‘Congure the camera to simultane-
ously record each photo at two dierent sizes.’
37
Page 38

Recalling Settings at the Touch of a Button
When [Recall shooting functions]
is assigned to a button using Cus‑
tom Setting f3 [Custom controls],
previously‑saved values for expo‑
sure mode, metering, and other
settings can be recalled by pressing
and holding the selected control. Current settings are re‑
stored when the button is released, letting you instantly
switch between fast and slow shutter speeds, for example.
The settings that can be stored and recalled using [Recall
shooting functions] are:
• exposure mode,
• shutter speed (modes S and M),
• aperture (modes A and M),
• exposure compensation,
• ISO sensitivity settings (ISO sensitivity and auto ISO sen‑
sitivity control),
• metering,
• white balance,
• AF‑area mode,
• focus tracking with lock‑on (blocked shot AF response
and subject motion), and
• AF‑ON.
38
Page 39

Saving Settings
l
Follow the steps below to choose a control and select the
settings recalled while the control is pressed.
Choose the control.
1
Select Custom Setting f3
[Custom controls], highlight the
desired control, and press J.
[Recall shooting functions] can
be assigned to any combina‑
tion of the Pv, Fn1, Fn2, and AF‑ON
buttons, the center of the sub‑selector, the AF‑ON but‑
ton for vertical shooting, and the lens focus function
buttons, but note that only one set of settings can be
recalled regardless of the number of buttons assigned.
Select [Recall shooting functions].
2
Highlight [Recall shooting
functions] and press 2.
Select settings.
3
Highlight settings and press W
(M) to select (M) or deselect (U).
Only selected items are saved
for later recall.
39
Page 40
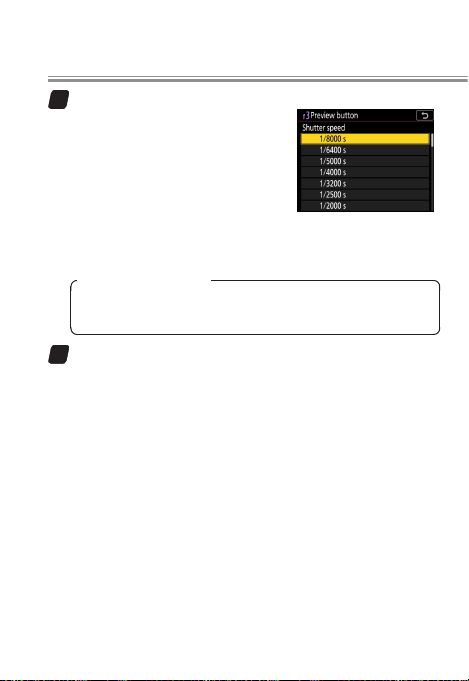
Adjust settings.
4
Highlight each of the selected set‑
tings in turn and press 2 to dis‑
play options, then highlight the
desired option and press J to se‑
lect. Note that [AF-ON] can only
be turned on (M) or o (U) and
that pressing 2 when [AF-ON] is
highlighted has no eect.
Saving Current Settings
To store current camera settings for later recall using the
selected button, select [Save current settings].
Save changes and exit.
5
Press J to save changes and exit once settings have
been adjusted to your satisfaction.
40
Page 41

Recalling Settings at the Touch of a Button
l
Recalling Settings
To recall the saved settings, press and hold the button you
selected in Step1. The settings previously in eect will be
restored when the button is released.
speed or aperture can be adjusted by rotating the main or
sub‑command dial while the button is pressed. If shutter
speed or aperture is included in the settings selected in
Step3, the new value will be saved and recalled the next
time the button is pressed. Note, however, that if an option
other than [O] is selected for Custom Setting b4 [Easy ex-
posure compensation], the command dials will instead be
assigned to exposure compensation, while in mode P the
main command dial is used for exible program. In addi‑
tion, aperture will not be restored if the saved value is not
supported by the current lens.
If [AF-ON] is enabled (M), the camera will focus while the
button is pressed.
Settings cannot be recalled while the self‑timer is counting
down or during live view, bracketing, movie recording, or
multiple‑exposure photography. In addition, if dynam‑
ic‑area AF or 3D‑tracking is chosen for [AF-area mode] in
Step4, the saved value will not be recalled while AF‑S is se‑
lected for AF mode.
: Depending on the exposure mode, shutter
41
Page 42

Suggested Uses
l
Here are some examples of situations in which [Recall
shooting functions] may come in handy.
Mixed Light and ShadeMixed Light and Shade
When shooting in locations with mixed light and shade, for
example during daylight matches or day games at a soccer
or baseball stadium, you can store settings for use in shade
and recall them instantly the moment your subject moves
from sunlight to shadow.
Normal lightingNormal lighting ShadeShade
Exposure modeExposure mode M
Shutter speedShutter speed ½s
ApertureAperture f/2.8
ISO sensitivityISO sensitivity 100 800
Auto ISO sensitivity Auto ISO sensitivity
controlcontrol
White balanceWhite balance Direct sunlight Shade
Off
42
Page 43
Recalling Settings at the Touch of a Button
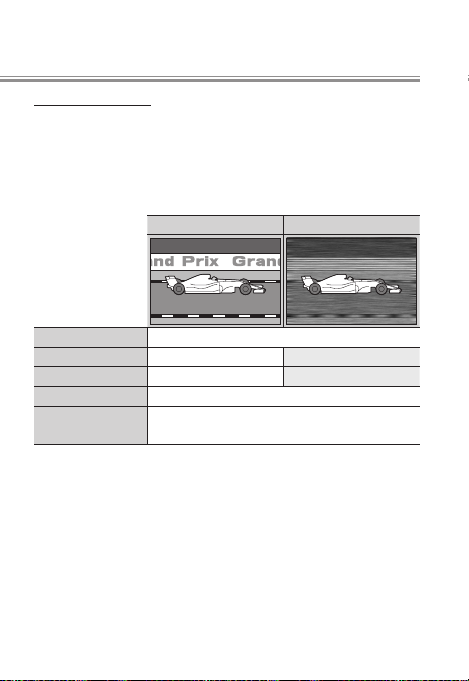
Slow/Fast ShutterSlow/Fast Shutter
When photographing events such as speed skating or
motor sports that require you to alternate between freez‑
ing motion and blurring backgrounds to suggest motion,
you can store settings with a slow shutter speed and recall
them as needed for panning shots.
Normal photographyNormal photography Panning shotsPanning shots
Exposure modeExposure mode M
Shutter speedShutter speed ½s ⁄s
ApertureAperture f/2.8 f/11
ISO sensitivityISO sensitivit y 200
Auto ISO sensitivity Auto ISO sensitivity
controlcontrol
Off
43
Page 44
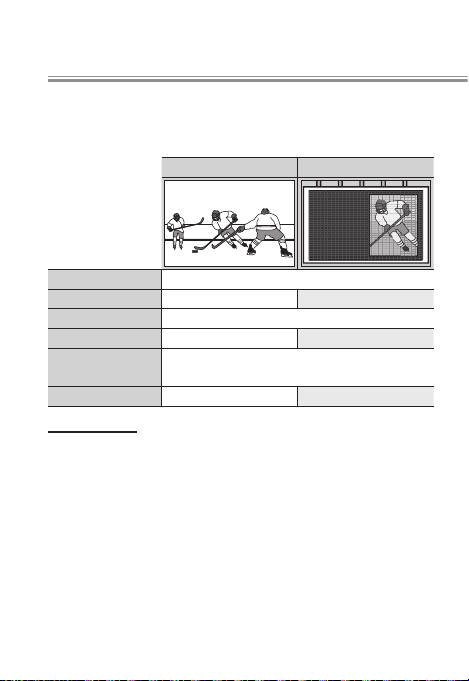
You may also nd it convenient to store slow shutter
speeds if you frequently alternate between shooting the
play and photographing the electronic scoreboard.
Normal playNormal play ScoreboardScoreboard
$%
3
3
727
Exposure modeExposure mode M
Shutter speedShutter speed ½s ⁄s
ApertureAperture f/2.8
ISO sensitivityISO sensitivit y 6400 100
Auto ISO sensitivity Auto ISO sensitivity
controlcontrol
White balanceWhite balance
v
Off
0 Direct sunlight
Manual/AutoManual/Auto
To allow for sudden changes in lighting conditions indoors
and out, you can choose mode M and adjust settings man‑
ually, and then when the lighting changes put the cam‑
era in charge by holding the button selected for [Recall
shooting functions] to switch temporarily to mode P, S, or
A and enable auto ISO sensitivity control.
44
Page 45

Recalling Settings at the Touch of a Button
Spur-of-the-Moment SilhouettesSpur-of-the-Moment Silhouettes
Switch from matrix to highlight‑weighted metering for
spur‑of‑the‑moment silhouettes when shooting backlit
subjects.
Normal photographyNormal photography SilhouettesSilhouettes
Exposure modeExposure mode M A
Shutter speedShutter speed ⁄s —
ApertureAperture f/2.8
ISO sensitivityISO sensitivit y 100
MeteringMetering Matrix metering
Switching LensesSwitching Lenses
If you nd yourself frequently switching lenses, you can
use [Recall shooting functions] to quickly recall settings
for the second lens.
Highlight-weighted
metering
45
Page 46

Recalling Settings at the Touch of a Button
“Recall Shooting Functions”
You cannot save or recall settings when using non-CPU lenses or the PC Micro-Nikkor 85 mm f/2.8D. Users of CPU lenses
equipped with aperture rings must lock the ring at minimum
aperture and will not be able to save or recall settings while
[Aperture ring] is selected for Custom Setting f6 [Customize
command dials]> [Aperture setting].
If desired, the [Assign remote (WR) Fn button] item in the setup menu can be used to assign [Recall shooting functions]
to the Fn button on optional wireless remote controllers.
46
Page 47

l
White Balance Lock
The default white balance setting (v) works well with
most light sources, but if it fails to produce consistent re‑
sults with a single, unchanging light source, you can lock
white balance using any of the methods below.
”Choose Color Temperature”
Although consistent results can be
achieved using a white balance op‑
tion specically adapted to the cur‑
rent light source, such as [Incandes-
cent] or [Direct sunlight], choosing
the color temperature directly gives
you a greater degree of control.
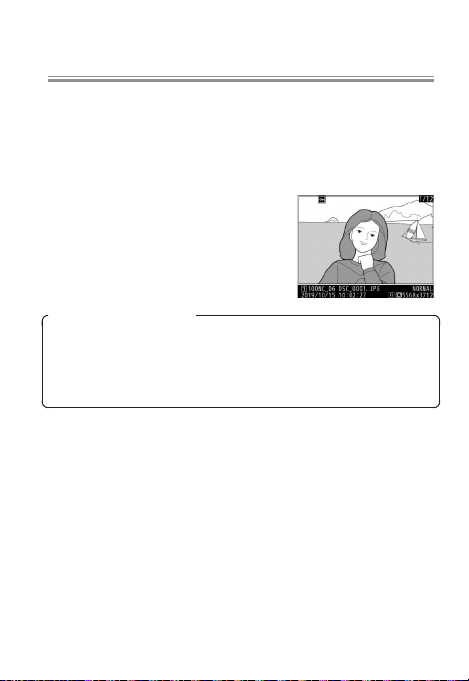
We recommend that you rst take
a test shot using [Auto] or [Natural
light auto]. You can then view the
color temperature selected by cam‑
era on the [Basic shooting data]
page of the playback photo info dis‑
play and use it as a reference when choosing a color tem‑
perature. If [Basic shooting data] is not displayed when
you page through photo info using 1 and 3, select [Playback display options] in the playback menu and place
checks (M) next to [Shooting data] and [Basic shooting
data].
47
Page 48

Preset Manual
l
Use preset manual to measure white balance directly from
your subject or light source.
Viewnder PhotographyViewnder Photography
While earlier cameras could only measure white balance
with a white or neutral gray reference object framed to ll
the viewnder, the D6 can measure white balance from a
much smaller area of the frame.
To measure white balance during
viewnder photography, select
[Preset manual] for white balance
and then press and hold the U
button until the D indicators in the top control panel and
viewnder and the L icon in the rear control panel start
to ash, showing that the camera is in direct measurement
mode.
The focus point will change to a
white balance target positioned in
the center of the frame as shown
and cannot be moved. After ad‑
justing lighting to your satisfaction,
aim the camera to place the white
balance target over the reference object and press the
shutter‑release button all the way down to measure white
balance. You can then press the U button to exit direct
measurement mode.
48
Page 49

White Balance Lock
Live ViewLive View
During live view, white balance can be measured from any
white or gray object in the frame (spot white balance).
To measure white balance during
live view, select [Preset manual] for
white balance and then press and
hold the U button until the L
indicator starts to ash in the shoot‑
ing display. While the icon is ash‑
ing, tap a white or gray object in the display to position
the white balance target (r) over the selected object and
measure white balance (to zoom in on the selected area,
press the X button). You can then press the U button
again to exit direct measurement mode.
Viewing White Balance PresetsViewing White Balance Presets
To view white balance presets d1–
d6, select [White balance]> [Preset
manual] in the photo or movie
shooting menu. The areas selected
for spot white balance in live view
are indicated by white balance tar‑
gets (r).
49
Page 50

Copying White Balance from Existing Pictures
l
For results consistent with earlier shots, copy white bal‑
ance for existing pictures to selected presets.
Select [White balance] > [Preset
manual] in the photo or movie
shooting menu, then highlight the
destination preset (d1–d6) and
press the center of the multi selec‑
tor.
Next, highlight [Select image] to
view the pictures on the memory
card. Highlight the source picture
and press J to copy white balance
from the source picture to the se‑
lected preset.
50
Page 51

White Balance Lock
l
Locking Auto White Balance
You can temporarily lock auto white balance when shoot‑
ing in [Auto] and [Natural light auto] modes, for example
to compensate for changes in lighting when your subject
passes in front of an LED billboard.
Without billboard,
white jersey
appears white.
Billboard gives
jersey a color cast.
Locking white
balance before
subject is lit by bill-
board eliminates
color cast.
51
Page 52

White Balance Lock
Assigning [AE/AWB lock (hold)] to a
control using Custom Setting f3 [Cus-
tom controls] lets you lock exposure
and white balance at the touch of a
button. White balance is locked at
the value for the last photo taken.
Auto white balance (AWB) lock applies only in [Auto] and
[Natural light auto] modes, and both exposure and AWB
lock end when the selected control is pressed a second
time or the standby timer expires.
Burst Photography
If [Auto] or [Natural light auto] is selected for white balance in release mode CH or CL or during burst photography in
mode Q, white balance will lock at the value metered for the
rst shot in each burst independent of whether auto white
balance has been locked via camera controls.
52
Page 53

Playback
53
Page 54

l
Viewing Dual‑Format Photos
When two memory cards are inserted, you can use the
[Role played by card in Slot2]> [RAW Slot1- JPEG Slot2]
and [JPEG Slot1- JPEG Slot2] options in the photo shoot‑
ing menu to record each shot in two dierent formats, with
each copy saved to a separate memory card (page page 3636).
The D6 oers new features for viewing dual‑format photos.
Choosing a Playback Slot
The [Dual-format recording PB
slot] item in the playback menu is
used to choose the slot from which
dual‑format photos are played back.
If you choose [Slot 2], for example,
the copy on the card in Slot 2 will
be displayed whenever a dual‑format photo is selected
during playback. If you are using Slot2 to store copies re‑
corded using [JPEG Slot1- JPEG Slot2], you will be able to
speedily upload the small copies without switching slots
each time.
54
Page 55

Viewing Copies
l
l
When a dual‑format photo is dis‑
played, you can view the other copy
by selecting [Jump to copy on other
card] in the i menu. When viewing
a small copy recorded to the card in
Slot2, you can jump instantly to the
full‑sized copy on the card in Slot1 and check focus, for ex‑
ample. When you resume playback after taking or editing
pictures, the camera will display the pictures on the card
selected for [Dual-format recording PB slot].
Deleting Dual‑Format Photos
When deleting a dual‑format pho‑
to, you have the option of deleting
only the current copy or both copies
simultaneously. Pressing the O (Q)
button when a dual‑format copy is
selected during playback displays a
conrmation dialog; to delete only the current copy, high‑
light [Selected image] and press O (Q) again, or highlight
[Same images on w and x] and press O (Q) to delete
both copies simultaneously.
55
Page 56
Viewing Dual-Format Photos
The [Delete images from both slots] item in the playback
menu can be used to choose the options displayed before
a dual‑format picture is deleted. Choose from:
• [Yes (conrmation required)]: Before deleting one copy,
you will be prompted whether to delete the other. You
can choose which of the two options ([Selected image]
or [Same images on w and x]) is highlighted by default.
• [Yes ]: The conrmation dialog oers a choice of [Ye s] (de‑
lete both copies, as per [Same images on w and x]) and
[Cancel] (exit without deleting either copy).
• [No]: The conrmation dialog oers a choice of [Ye s] (de‑
lete only the current copy, as per [Selected image]) and
[Cancel] (exit without deleting either copy).
Watch and learn!
More information on the [Dual-format recording PB slot]
item in the playback menu is available via the “Digitutor”
(Nikon digital camera tutorial) channel on YouTube.
D6 NPS #1, Smooth Image Transfer Using New D6 Func-
tions, Chapter ②: ‘Choose the slot from which Dual-for-
mat pictures are played back.’
56
Page 57

l
Marking Pictures
Marking pictures makes them easier to view and organize.
The D6 lets you quickly mark pictures with ick gestures.
Markings
The D6 supports the following three types of marking:
• Protection marking: Use the g (h/Q)
button or playback ick gestures
to protect pictures from accidental
deletion.
• Ratings: Rate pictures using [Rating]
in the i menu, playback ick ges‑
tures, or, if you have assigned [Rating] to either control using Custom
Setting f3 [Custom controls], the
Fn3 button or the Fn button for ver‑
tical shooting.
57
Page 58

• Upload marking: Mark pictures for
upload to a computer or smart de‑
vice using [Select to send to smart
device], [Select to send to computer], or [Select to send (wired
LAN/WT)] in the i menu. When
the camera is connected to a computer or ftp server via
Ethernet or a wireless transmitter, you can also mark pic‑
tures for upload using playback ick gestures, by holding
and pressing the center of the multi selector, or, if you
J
have assigned [Select to send (wired LAN/WT)] to the
Fn3 button using Custom Setting f3 [Custom controls],
by pressing the Fn3 button.
58
Page 59

Marking Pictures
l
Flick Gestures
Use Custom Setting f12 [Full-frame
playback icks]> [Flick up] or [Flick
down] to choose the operation per‑
formed by icking a nger up or
down over the display during full‑
frame playback:
• [Rating]: Assign pictures a preset rating. To choose the
rating, highlight [Flick up] or [Flick down] and press 2.
• [Select to send (wired LAN/WT)]: If the camera is current‑
ly connected to a computer or ftp server via Ethernet or a
wireless transmitter, the selected gesture can be used to
mark pictures for upload.
• [Protect]: Protect pictures.
• [Voice memo]: Record or play voice memos.
• [None]: Disable vertical ick gestures during full‑frame
playback.
When [Rating], [Select to send
(wired LAN/WT)], or [Protect] is
selected, you can ick once in the
chosen direction to add the select‑
ed marking and again in the same
direction to remove it.
59
Page 60

Marking Pictures
Combining Gestures
Two functions can be combined by assigning dierent roles
to the “ick up” and “ick down” gestures. Assigning [Protect]
to [Flick up] and [Select to send (wired LAN/WT)] to [Flick
down], for example, allows you to protect pictures and then
mark them for upload just by icking a nger up and then
down.
Watch and learn!
More information on Custom Setting f12 [Full-frame playback
icks] is available via the “Digitutor” (Nikon digital camera tu-
torial) channel on YouTube.
D6 NPS #1, Smooth Image Transfer Using New D6 Func-
tions, Chapter ③: ‘Assign “select to send” to the play-
back “Flick Up” gesture.’
60
Page 61

l
Filtering by Marking
Use [Filtered playback] in the i menu to display only pic‑
tures with selected markings.
Filtered Playback Criteria
To choose the criteria used to l‑
ter pictures for playback, select
[Filtered playback criteria] in the
playback or playback i menu, high‑
light the desired options, and press
2 to select (M) or deselect (U).
When ltered playback is enabled, only pictures that meet
all the selected criteria will be displayed. Choose from:
• [Protect]: Include protected pictures.
• [Rating]: Include pictures with ratings selected using
[Choose ratings].
• [Select to send (wired LAN/WT)]: Filter pictures by up‑
load status, selected using [Sent/unsent]. Choose [Sent
images] to include pictures previously uploaded to a
computer or ftp server via Ethernet or a WT‑6 wireless
transmitter, [Unsent images] to include pictures that
have been selected for upload but are as yet unsent. To
include all pictures with upload marking and exclude any
pictures that have not been marked for upload, choose
both options.
61
Page 62
Filtering by Marking
l
Enabling Filtered Playback
To enable ltered playback, select [Filtered playback] in
the i menu. The camera will display only pictures that
meet all the criteria selected for [Filtered playback crite-
ria].
A white border appears around the
display when ltered playback is
enabled. To end ltered playback,
select [Filtered playback] again.
“Sub‑Dial Frame Advance”
When [Rating] or [Protect] is selected for Custom Setting f6
[Customize command dials]> [Sub-dial frame advance],
you can jump between pictures with the selected marking by
rotating the sub-command dial during full-frame playback.
62
Page 63

l
Cropping Pictures
You can create cropped copies of selected pictures directly
on the camera.
Playback Zoom
During playback zoom, the [Quick crop] option in the
playback i menu can be used to quickly crop pictures to
the area visible in the monitor and save the result as a sep‑
arate image with an aspect ratio of 4∶3. With this method,
the selected crop can be easily ascertained in the monitor
as you work.
Zoom in and out using stretch and
pinch gestures or the X and W (M)
buttons and scroll using slide ges‑
tures or the multi selector. Once the
desired crop is displayed, press the i
button or tap the i icon in the dis‑
play to view the i menu, and then highlight [Quick crop]
and press J to save the cropped copy. Note that [Quick
crop] is not available when RGB histograms are displayed.
63
Page 64
Cropping Pictures
l
The Retouch Menu
The [Trim] item in the retouch menu gives you the option
of creating copies a variety of aspect ratios. You can even
apply landscape‑orientation crops to portrait‑orientation
pictures and vice versa.
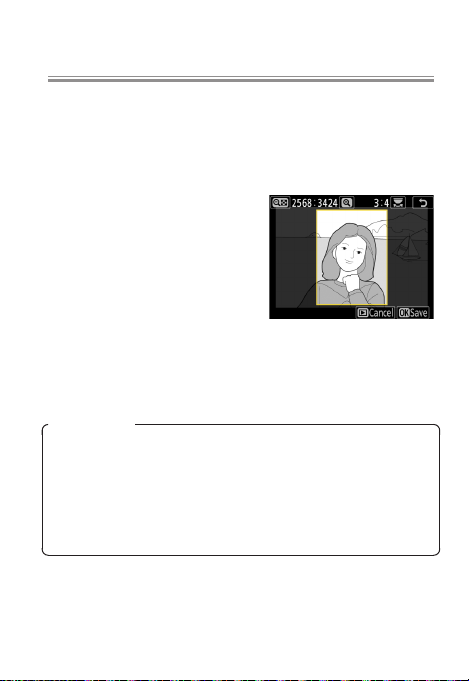
The crop is indicated by a yel‑
low frame. Size and position
the crop using the X and W
(M) buttons and multi selector
and rotate the main command
dial to choose the aspect ratio.
The dimensions of the cropped
copy, as determined by the crop size and aspect ratio, are
listed in the top left corner of the display. Press
the copy once the crop has been adjusted to your satis‑
faction.
Cropped Copies
Copies are saved to new les separate from the original picture. Copies created from NEF (RAW ) pictures are saved at
an image quality of [JPEG ne ★], while copies created from
JPEG pictures are the same quality as the original. Note that
depending on copy size, playback zoom may not be available
when cropped copies are displayed.
to save
J
64
Page 65

Networks
65
Page 66
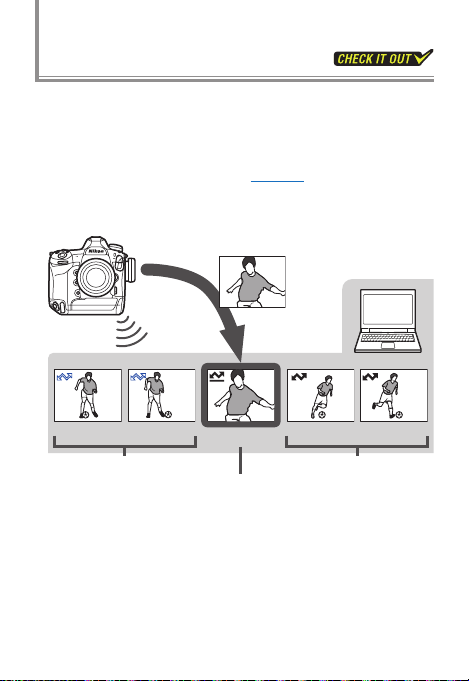
Priority Upload
When the camera is connected to a computer via built‑in
Wi‑Fi, Ethernet, or a WT‑6 wireless transmitter, auto upload
can be used to copy pictures to the computer in the order
taken. To upload a picture before auto upload is complete,
select the pictures manually (page page 5858). Pictures selected
for manual upload go to the head of the queue and are
uploaded at the rst available opportunity.
Manual upload
Auto
upload
101.jpg 102.jpg 103.jpg 104.jpg
Upload complete Awaiting upload
Manually selected picture
goes to head of queue
200.jpg
200.jpg
66
Page 67

Band Selection (WT‑6)
From D6 “C” rmware version 1.10, users can follow the
steps below to choose the band (2.4 or 5GHz) for the host
SSID when connecting to a wireless network via a WT‑6
wireless transmitter.
Choose a band.
1
In the setup menu, select
[Wired LAN/WT]> [Options]>
[Router frequency band] and
choose the desired band. Select
[2.4GHz] or [5GHz] to connect
only to networks operating on
the chosen band, [2.4GHz/5GHz] to connect to net‑
works operating on either band.
Create a new network prole.
2
Return to the setup menu and se‑
lect [Wired LAN/WT]> [Network
settings]> [Create prole].
Launch the connection wizard.
3
Select [Connection wizard].
67
Page 68

Choose a connection type.
4
Choose a connection type and
enter a name for the new prole.
Choose [Search for wireless network].
5
When prompted to choose
a connection method, select
[Search for wireless network].
The camera will search for net‑
works operating on the fre‑
quency or frequencies selected
for [Router frequency band] in
Step1. The frequency is shown
by an icon to the left of the net‑
work SSID. If [2.4GHz/5GHz] is
selected and the network oper‑
ates on both the 2.4 and 5GHz
bands, the camera will list the
SSID associated with the band
detected by the WT‑6.
68
Page 69

Follow the on-screen instructions.
6
Follow the on‑screen instruc‑
tions to complete the network
prole and connect to the se‑
lected network. The band for the
selected network appears in the
[Wired LAN/WT] display once a
connection is established.
Band Selection (WT-6)
69
Page 70

© 2020 Nikon Corporation
 Loading...