

Page 1
Professional
Setting Guide
—Sports AF Edition—
Revision 1.0
Page 2

Table of ContentsTable of Contents
Sports AF: Autofocus Basics............................................................................................................ 4
Autofocus Mode: AF‑C ................................................................................................................................. 4
AF‑Area Mode: 9‑Point Dynamic‑Area AF ............................................................................................... 4
Focus Tracking with Lock‑On ..................................................................................................................... 4
Blocked Shot AF Response: [2] ....................................................................................................................................4
Subject Motion: [Steady] ...............................................................................................................................................4
The Standby Timer ....................................................................................................................................... 5
AF-Area Mode .................................................................................................................................. 6
Custom Focus Groups .................................................................................................................................. 8
Sports AF: Custom Settings ............................................................................................................ 9
The D6 Versus the D5 ................................................................................................................................... 9
a1: AF‑C Priority Selection ........................................................................................................................ 10
a3: Focus Tracking with Lock‑On ............................................................................................................. 11
a4: Focus Points Used ................................................................................................................................ 11
a5: Store Points by Orientation................................................................................................................ 12
a6: AF Activation ........................................................................................................................................ 13
a7: Single‑Point AF Watch Area ............................................................................................................... 14
a12: Auto‑Area AF Starting Point ............................................................................................................ 14
a13: Focus Point Persistence .................................................................................................................... 15
a14: Limit AF‑Area Mode Selection ........................................................................................................ 17
a15: Autofocus Mode Restrictions .......................................................................................................... 17
a16: Focus Point Wrap‑Around ................................................................................................................ 17
Sports AF: Custom Controls .......................................................................................................... 18
Focus‑Related Control Assignments....................................................................................................... 18
Lens Focus Function Buttons ................................................................................................................... 19
AF Fine-Tuning ............................................................................................................................... 20
Manual Tuning ............................................................................................................................................ 20
Auto AF Fine‑Tuning .................................................................................................................................. 21
The Saved Values List ................................................................................................................................ 22
Focus Points ................................................................................................................................... 23
Cross Sensors .............................................................................................................................................. 23
Teleconverters ............................................................................................................................................ 24
2
Page 3

Table of Contents, Continued
Recommended AF Settings by Event ........................................................................................... 26
Overview: Settings by Event .................................................................................................................... 26
Soccer ........................................................................................................................................................... 27
Gymnastics .................................................................................................................................................. 27
Floor Exercises and Rhythmic Gymnastics ........................................................................................................... 27
Balance Beam .................................................................................................................................................................. 28
Vault ...................................................................................................................................................................................28
Rings and Horizontal and Uneven Bars ................................................................................................................. 28
Athletics ....................................................................................................................................................... 29
Sprints (Hand-Held, Single Runner, from the Front) ......................................................................................... 29
Hurdles .............................................................................................................................................................................. 30
Sprints and Hurdles: Remote Photography .........................................................................................................30
Marathons (from a Vehicle) ........................................................................................................................................ 30
Shot Put, Discus, and Hammer Throw (from the Front, at a Distance) ....................................................... 31
Javelin (from the Front, at a Distance) ................................................................................................................... 31
Long Jump and Triple Jump (Facing Oncoming Jumpers) ............................................................................. 31
High Jump ........................................................................................................................................................................ 32
Pole Vault .......................................................................................................................................................................... 32
Aquatics ....................................................................................................................................................... 33
Swimming ........................................................................................................................................................................ 33
Diving ................................................................................................................................................................................ 34
Artistic Swimming ......................................................................................................................................................... 34
Table Tennis ................................................................................................................................................. 35
BMX and Skateboarding ........................................................................................................................... 35
3
Page 4
Sports AF: Autofocus BasicsSports AF: Autofocus Basics
The following settings are suitable for most sports:
Autofoccus modeAutofoccus mode AF‑C
AF-area modeAF-area mode 9‑point dynamic‑area AF
Custom SettingsCustom Settings
a1 AF‑C priority selection [Release]
a3 Focus tracking with lock‑on
a15 Autofocus mode restrictions [AF ‑C]
c2 Standby timer [1 min]
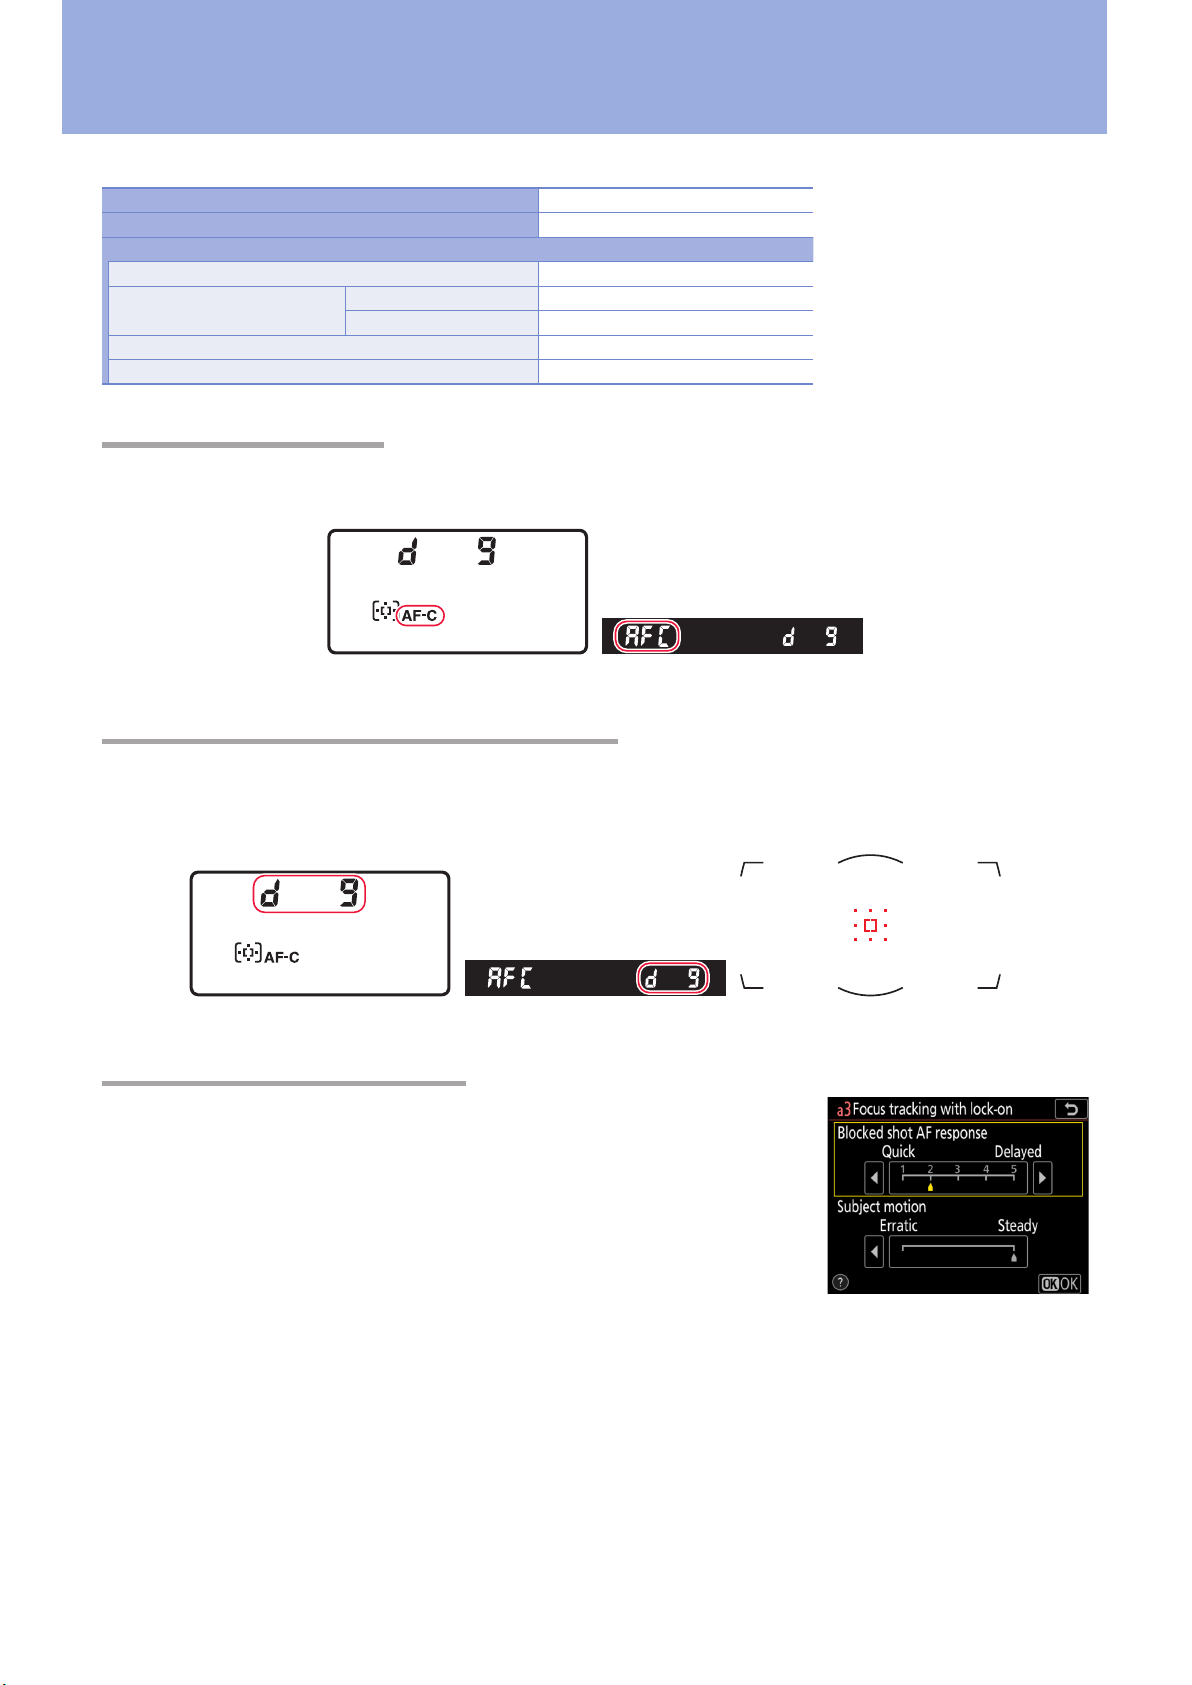
Autofocus Mode: AF‑CAutofocus Mode: AF‑C
The camera adjusts focus continuously while the AF‑ON button is pressed or the shutter-release button is pressed halfway. The following indicators are displayed while the AF-mode button is pressed.
Blocked shot AF response [2]
Subject motion [Steady]
Top control panel Viewnder
AF‑Area Mode: 9‑Point Dynamic‑Area AFAF‑Area Mode: 9‑Point Dynamic‑Area AF
If your subject briey leaves the selected focus point, the camera will focus based on information
from surrounding focus points. The following indicators are displayed while the AF-mode button is
pressed.
Top control panel Viewnder Focus-point display
Focus Tracking with Lock‑OnFocus Tracking with Lock‑On
Custom Setting a3 [Focus tracking with lock‑on] controls how autofocus responds to changes in the distance to the subject.
■ Blocked Shot AF Response: [2]
Increasing the speed with which the autofocus system reacts to blocked
shots ensures that focus responds quickly to frequent subject changes.
■ Subject Motion: [Steady]
[Steady] is suited to a wide variety of subjects.
4
Page 5
Sports AF: Autofocus Basics, Continued
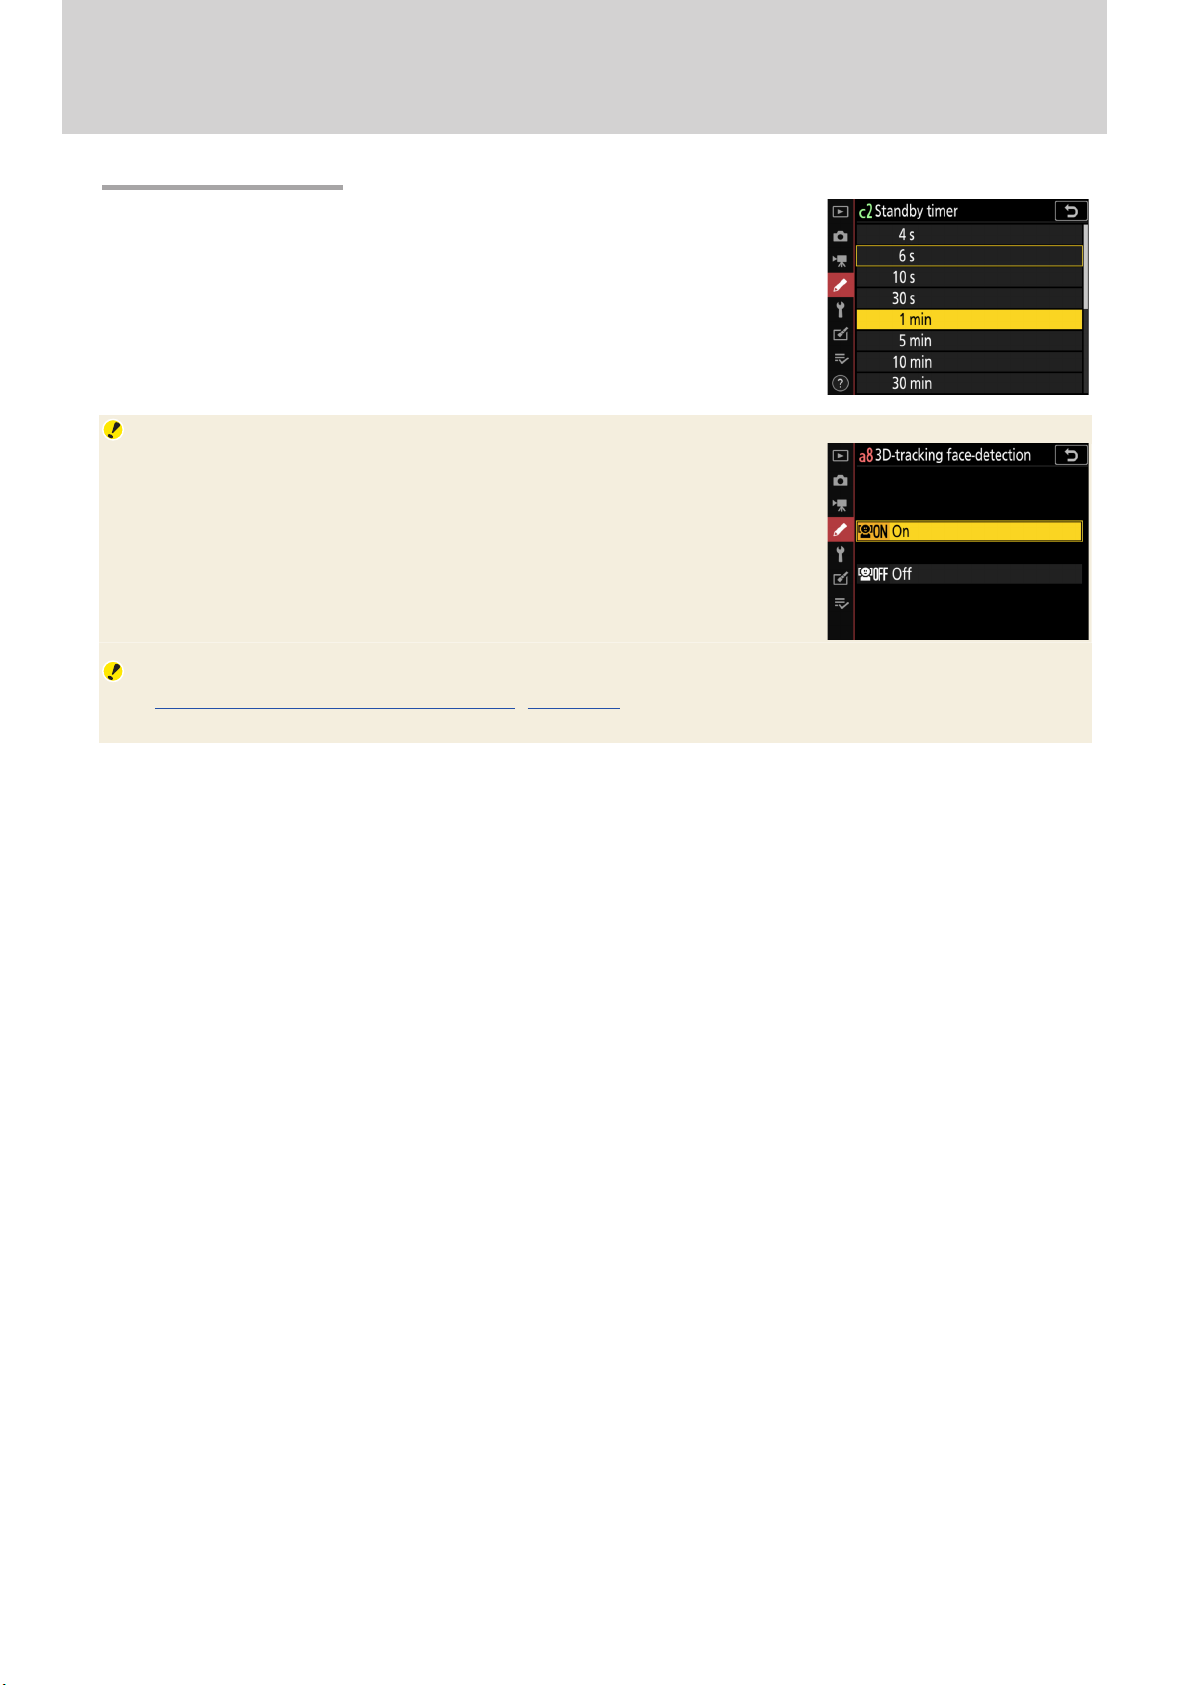
The Standby TimerThe Standby Timer
Choose long standby times to keep the timer active and avoid the delay in focusing that occurs when the timer is reactivated (note that this
increases the drain on the battery). If you’re at a soccer match and the
default six-second timer expires while you’re waiting for a player to line
up a corner kick, you may miss the golden moment following the kick.
In situations like these, we suggest setting Custom Setting c2 [Standby
timer] to a minute or more.
Face Detection
If you are shooting with 3D-tracking, group-area, or auto-area AF selected
for AF-area mode, you have the option of enabling face detection to allow
the camera to automatically detect and focus on faces. Face detection
for these modes can be enabled by selecting [On] for Custom Setting a8
[3D‑tracking face‑detection], a9 [Group‑area AF face detection], or
a11 [Auto‑area AF face detection].
Recommended Settings by Event
See “Recommended AF Settings by Event” (page 26) for the recommended AF settings for dierent
sporting events.
5
Page 6
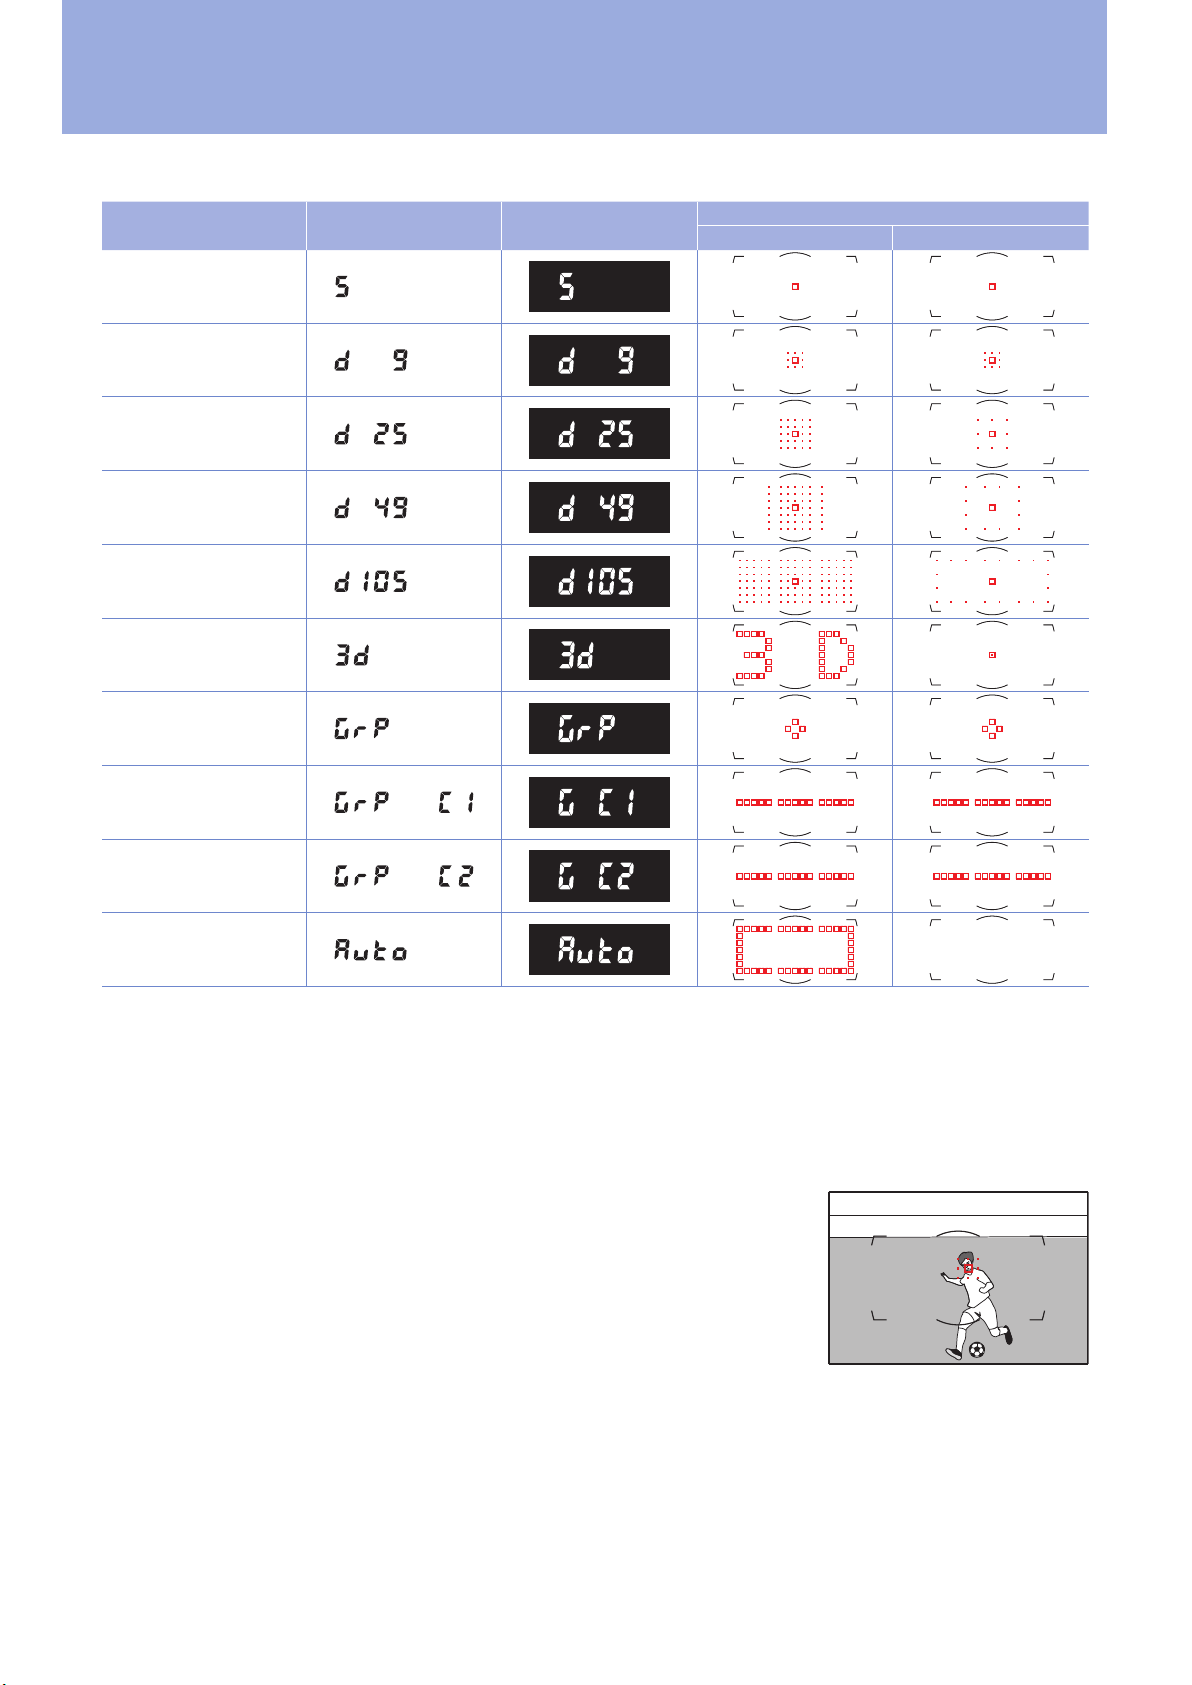
AF‑Area ModeAF‑Area Mode
Choose an AF-area mode according to your subject.
AF-area modeAF-area mode Top control panelTop control panel ViewnderViewnder
Single‑point AF
9‑point dynamic‑area AF
25‑point dynamic‑area AF
49‑point dynamic‑area AF
105‑point dynamic‑area AF
3D‑tracking
Focus-point displayFocus-point display
SelectionSelection ShootingShooting
Group‑area AF
Group‑area AF (C1)
Group‑area AF (C2)
Auto‑area AF
■ Single-Point AF
In single-point AF, the focus point is selected manually and the camera focuses on the subject in
the selected focus point only. Choose for subjects you can keep framed in the selected focus point.
To focus on subjects not framed precisely in the chosen point, select [Wide] for Custom Setting a7
[Single‑point AF watch area].
■ Dynamic-Area AF
In dynamic-area AF, the focus point is selected manually. The camera
focuses on the subject in the selected focus point when autofocus is initiated, but if the subject later briey leaves the selected point, the camera will focus based on information from surrounding points (during
shooting, the edges of the area surrounding the selected focus point
are shown by small dots, but all 9, 25, 49, or 105 focus points in the area
are used for focus). Choose for low-contrast subjects if the camera has
diculty focusing, or for active subjects that are hard to keep framed in a single point, and increase
the number of points if the subject is moving unpredictably or occupies a large area of the frame.
Choose a setting one level higher for subjects at the edge of the frame.
6
Page 7

AF-Area Mode, Continued
■ 3D-Tracking
In 3D-tracking, the initial focus point is selected manually. While the shutter-release button is pressed
halfway, the camera uses color information to track subjects that leave the selected focus point and
selects new focus points as required. Face detection can be enabled by selecting [On] for Custom
Setting a8 [3D‑tracking face‑detection].
■ Group-Area AF
You choose the focus point, and the camera gives priority to the point containing the subject closest
to the camera in an area that includes the selected point and surrounding focus points. The eective focus area is wider than that for single-point AF, reducing the risk of the camera focusing on the
background. Choose for subjects that are dicult to photograph using a single focus point. Face
detection can be enabled by selecting [On] for Custom Setting a9 [Group‑area AF face detection].
■ Group-Area AF (C1/C2)
As for group-area AF, except that the vertical and horizontal dimensions of each of the two custom
focus groups can be selected using the multi selector or Custom Setting a10 [Custom groupings
(C1/C2)] (page 8). Custom focus groups are recommended if the size and shape of the area used
for focus can be determined in advance with a fair degree of accuracy. Face detection can be enabled by selecting [On] for Custom Setting a9 [Group‑area AF face detection].
■ Auto-Area AF
The camera automatically detects the subject and selects the focus point. Face detection can be enabled by selecting [On] for Custom Setting a11 [Auto‑area AF face detection]. If you can predict the
position of your subject in the frame with some degree of condence, selecting [Enable] for Custom
Setting a12 [Auto‑area AF starting point] lets you choose the starting focus point when AF -C is selected for autofocus mode. The camera resumes normal auto-area AF after focusing on the subject
in the selected point (page 14).
7
Page 8
AF-Area Mode, Continued
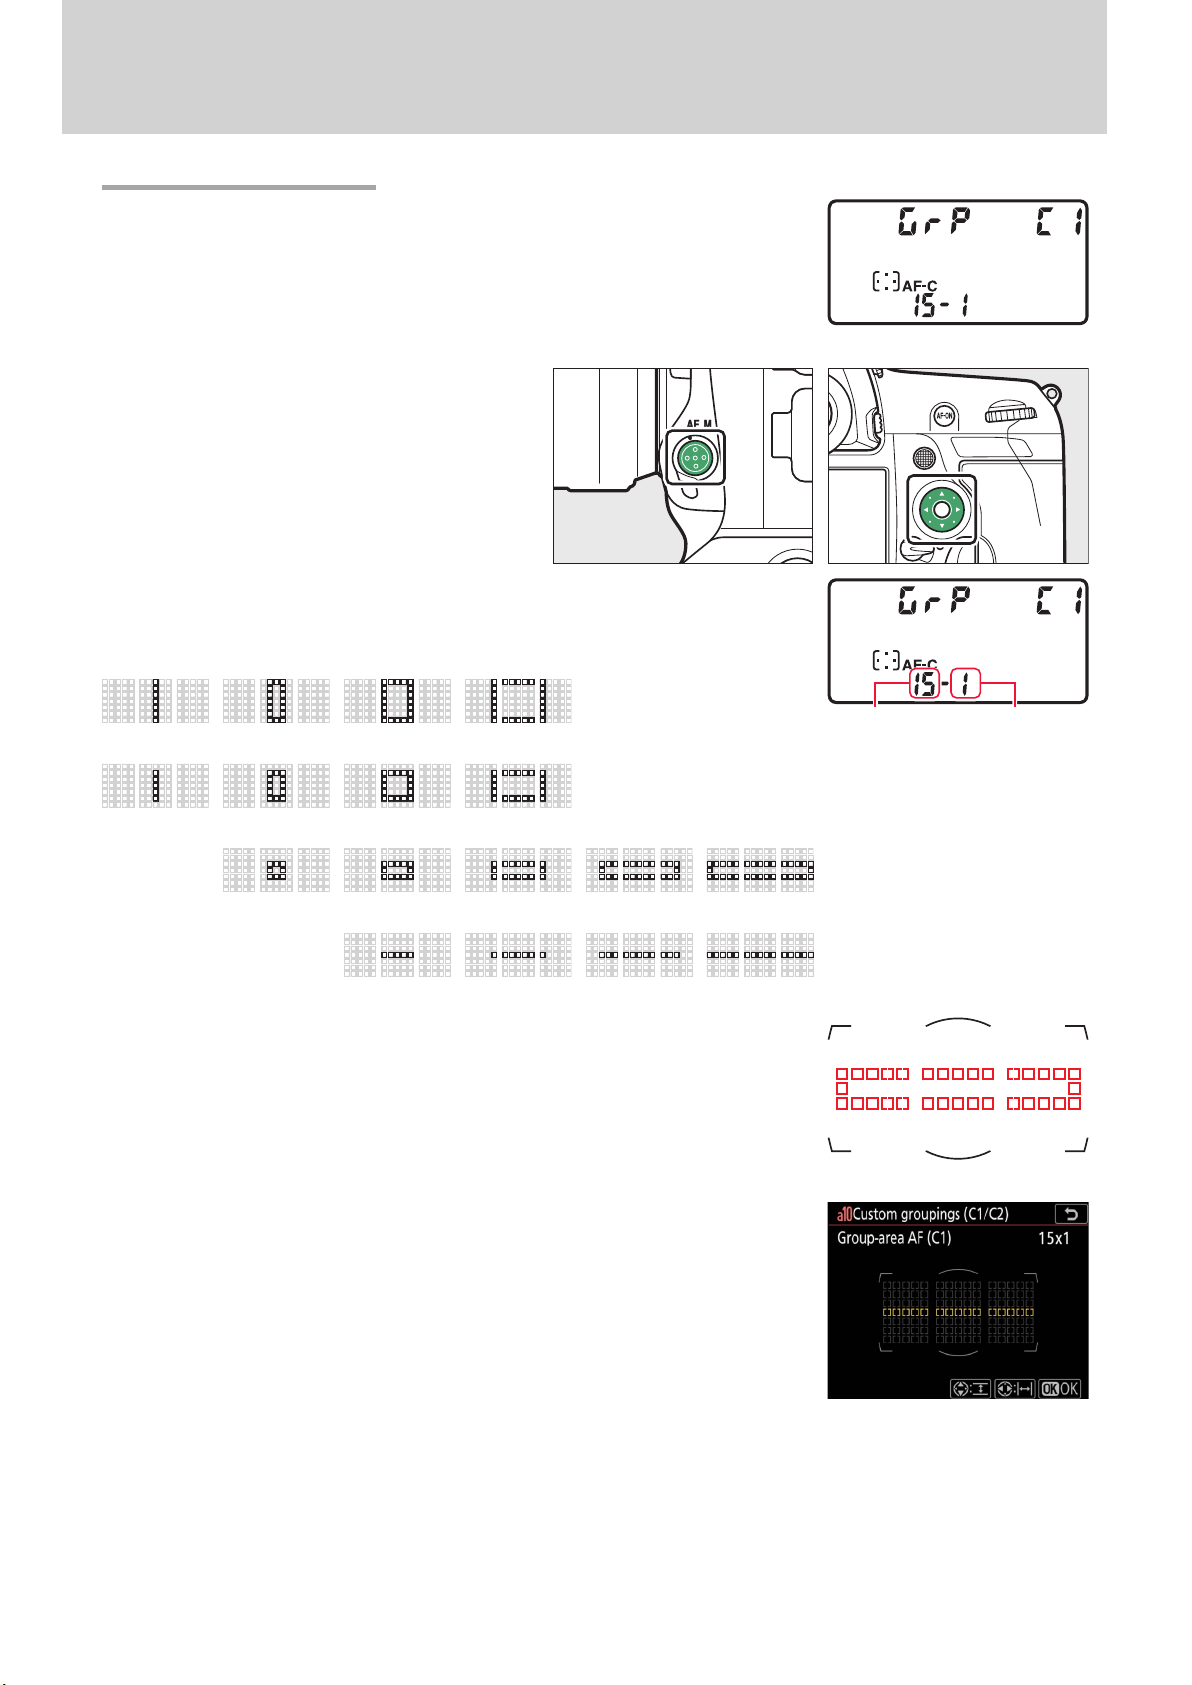
Custom Focus GroupsCustom Focus Groups
The vertical and horizontal dimensions of the custom focus groups for
group-area AF (C1) and group-area AF (C2) can be selected using the AFmode button and multi selector or via the Custom Settings menu.
■ The AF-Mode Button and Multi Selector
If a custom group-area AF option is currently
selected for AF-area mode, you can choose
the dimensions of the focus group by holding the AF-mode button and pressing the
multi selector.
Width can be adjusted by pressing 4 or 2 and height by pressing 1
or 3 until the desired values are shown in the top control panel. The
supported groupings are shown below.
1–7 3–7 5–7 7–7
1–5 3–5 5–5 7–5
3–3 5–3 7–3 11–3 15–3
5–1 7–1 11–1 15–1
Custom groups can also be previewed in the viewnder during selection.
■ The Custom Settings Menu
Custom focus groups can also be sized using Custom Setting a10 [Custom
groupings (C1/C2)]. Choose the desired custom mode, size the group
using the multi selector, and press J.
Width
Height
8
Page 9

Sports AF: Custom SettingsSports AF: Custom Settings
Focus-related settings are found in Custom Settings Group “a” [Autofocus].
The D6 Versus the D5The D6 Versus the D5
Users of the D5 should note the dierences between it and the D6 with respect to Custom Settings
Group “a” [Autofocus].
D6D6
a1 AF‑C priority selection
a2 AF‑S priority selection
a3 Focus tracking with lock‑on
a4 Focus points used
a5 Store points by orientation
a6 AF activation
a7 Single‑point AF watch area
a8 3D‑tracking face‑detection
a9 Group‑area AF face detection
a10 Custom groupings (C1/C2)
a11 Auto‑area AF face detection
a12 Auto‑area AF starting point
a13 Focus point persistence
a14 Limit AF‑area mode selection
a15 Autofocus mode restrictions
a16 Focus point wrap‑around
a17 Focus point options
a18 Manual focus ring in AF mode
The D6 features seven new Custom Settings:
a7 [Single‑point AF watch area] (page 14),
a9 [Group‑area AF face detection] (page 7),
a10 [Custom groupings (C1/C2)] (page 8),
a11 [Auto‑area AF face detection] (page 7),
a12 [Auto‑area AF starting point] (page 14),
a13 [Focus point persistence] (page 15), and
a18 [Manual focus ring in AF mode].
D5D5
a1 AF‑C priority selection
a2 AF‑S priority selection
a3 Focus tracking with lock‑on
a4 3D‑tracking face‑detection
a5 3D‑tracking watch area
a6 Number of focus points
a7 Store by orientation
a8 AF activation
a9 Limit AF‑area mode selection
a10 Autofocus mode restrictions
a11 Focus point wrap‑around
a12 Focus point options
The former a6 [Number of focus points] is now a4 [Focus points used], and the options available
have changed to reect the change in the number of focus points. The former a7 [Store by orien‑
tation] is now a5 [Store points by orientation], replacing the former a5 [3D‑tracking watch area],
which is no longer available.
9
Page 10
Sports AF: Custom Settings, Continued
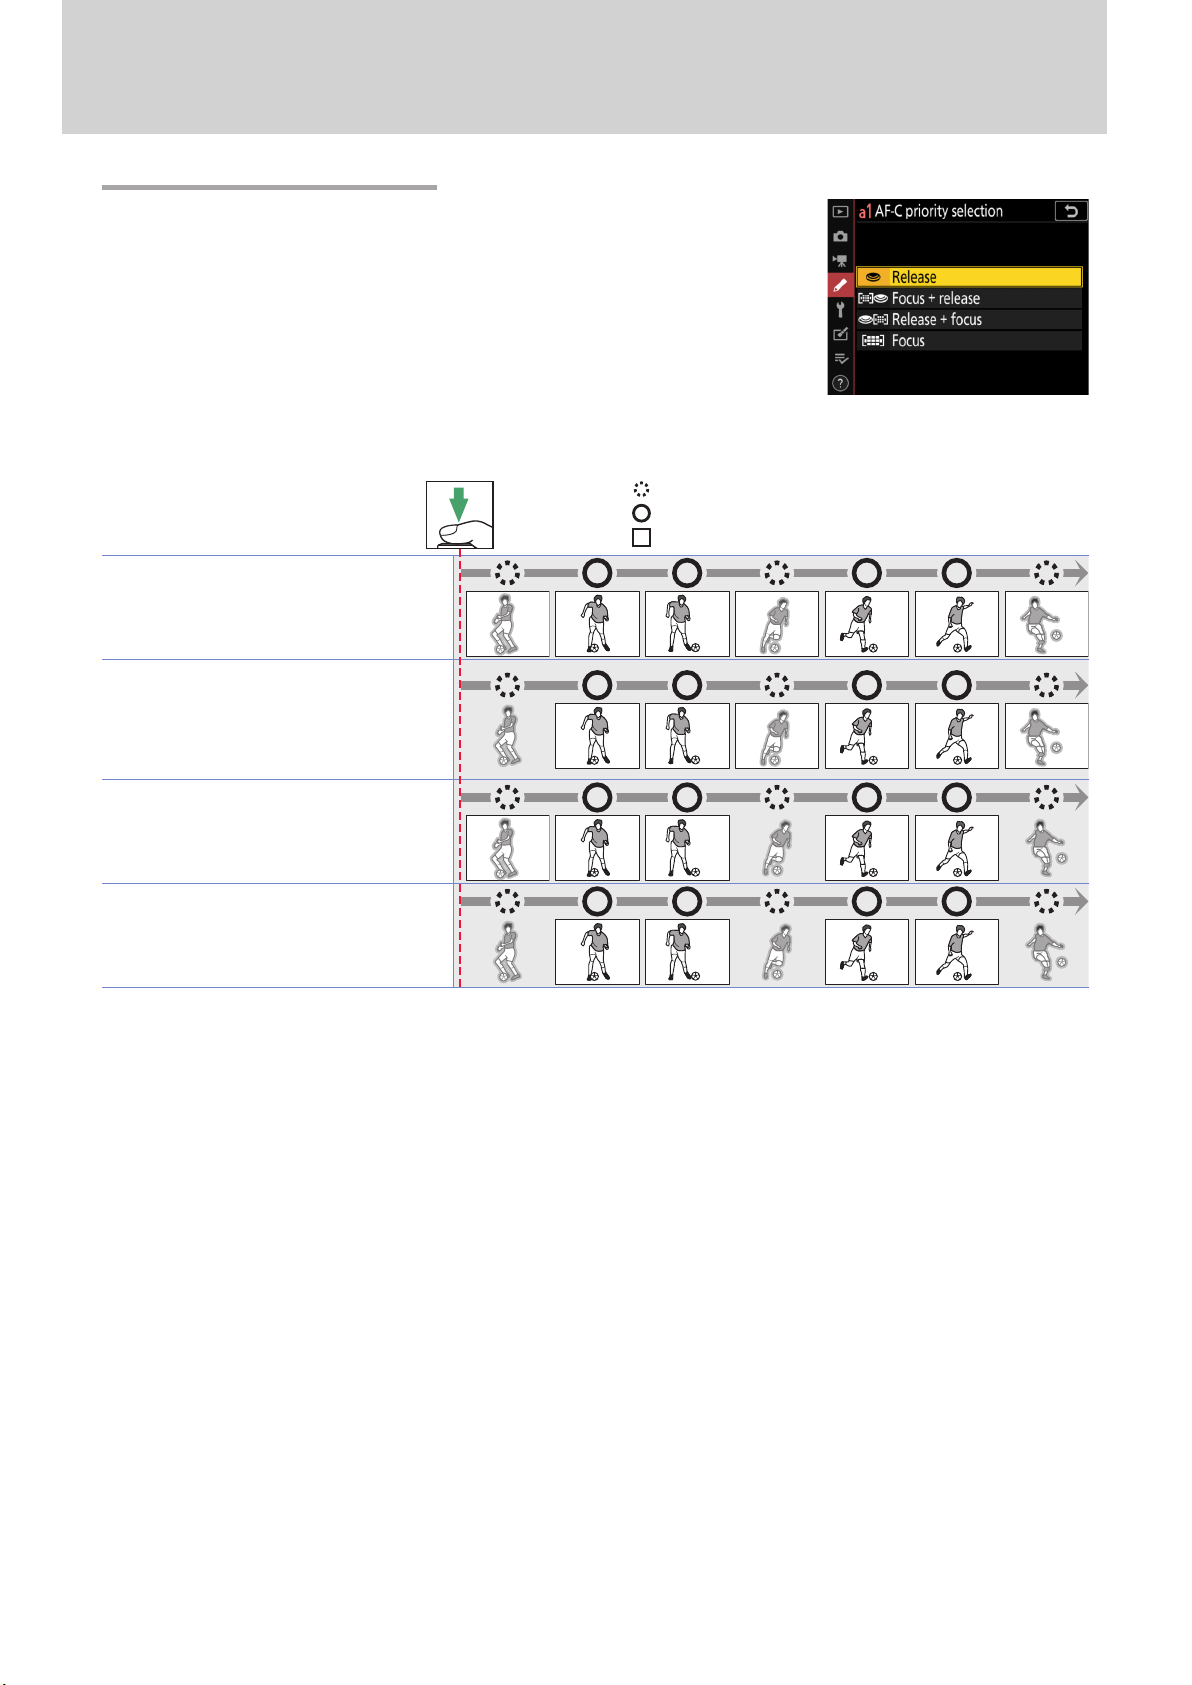
a1: AF‑C Priority Selectiona1: AF‑C Priority Selection
Custom Setting a1 [AF‑C priority selection] controls whether the camera gives priority to focus or shutter release.
Shutter-release
button pressed
all the way down
: Subject not in focus
: Subject in focus
: Photo taken (frame number shown in top left corner)
G Release: Pictures can be taken whether or
not the camera is in focus. Frame rates do not
slow during burst photography.
B Focus + release: In burst mode, priority is
given to focus for the first frame and to release
for later frames, ensuring that the first frame
is in focus and that no subsequent frames are
missed. Frame rates do not slow.
E Release + focus: In burst mode, priority is
given to release for the first frame and to focus
for later frames. Frame rates slow as needed to
allow the camera to focus.
F Focus: Pictures can only be taken when the
camera is in focus.
Note: Release timing not exactly as shown.
1 2 3 4 5 6 7
1 2 3 4 5 6
1 2 3 4 5
1 2 3 4
10
Page 11
Sports AF: Custom Settings, Continued
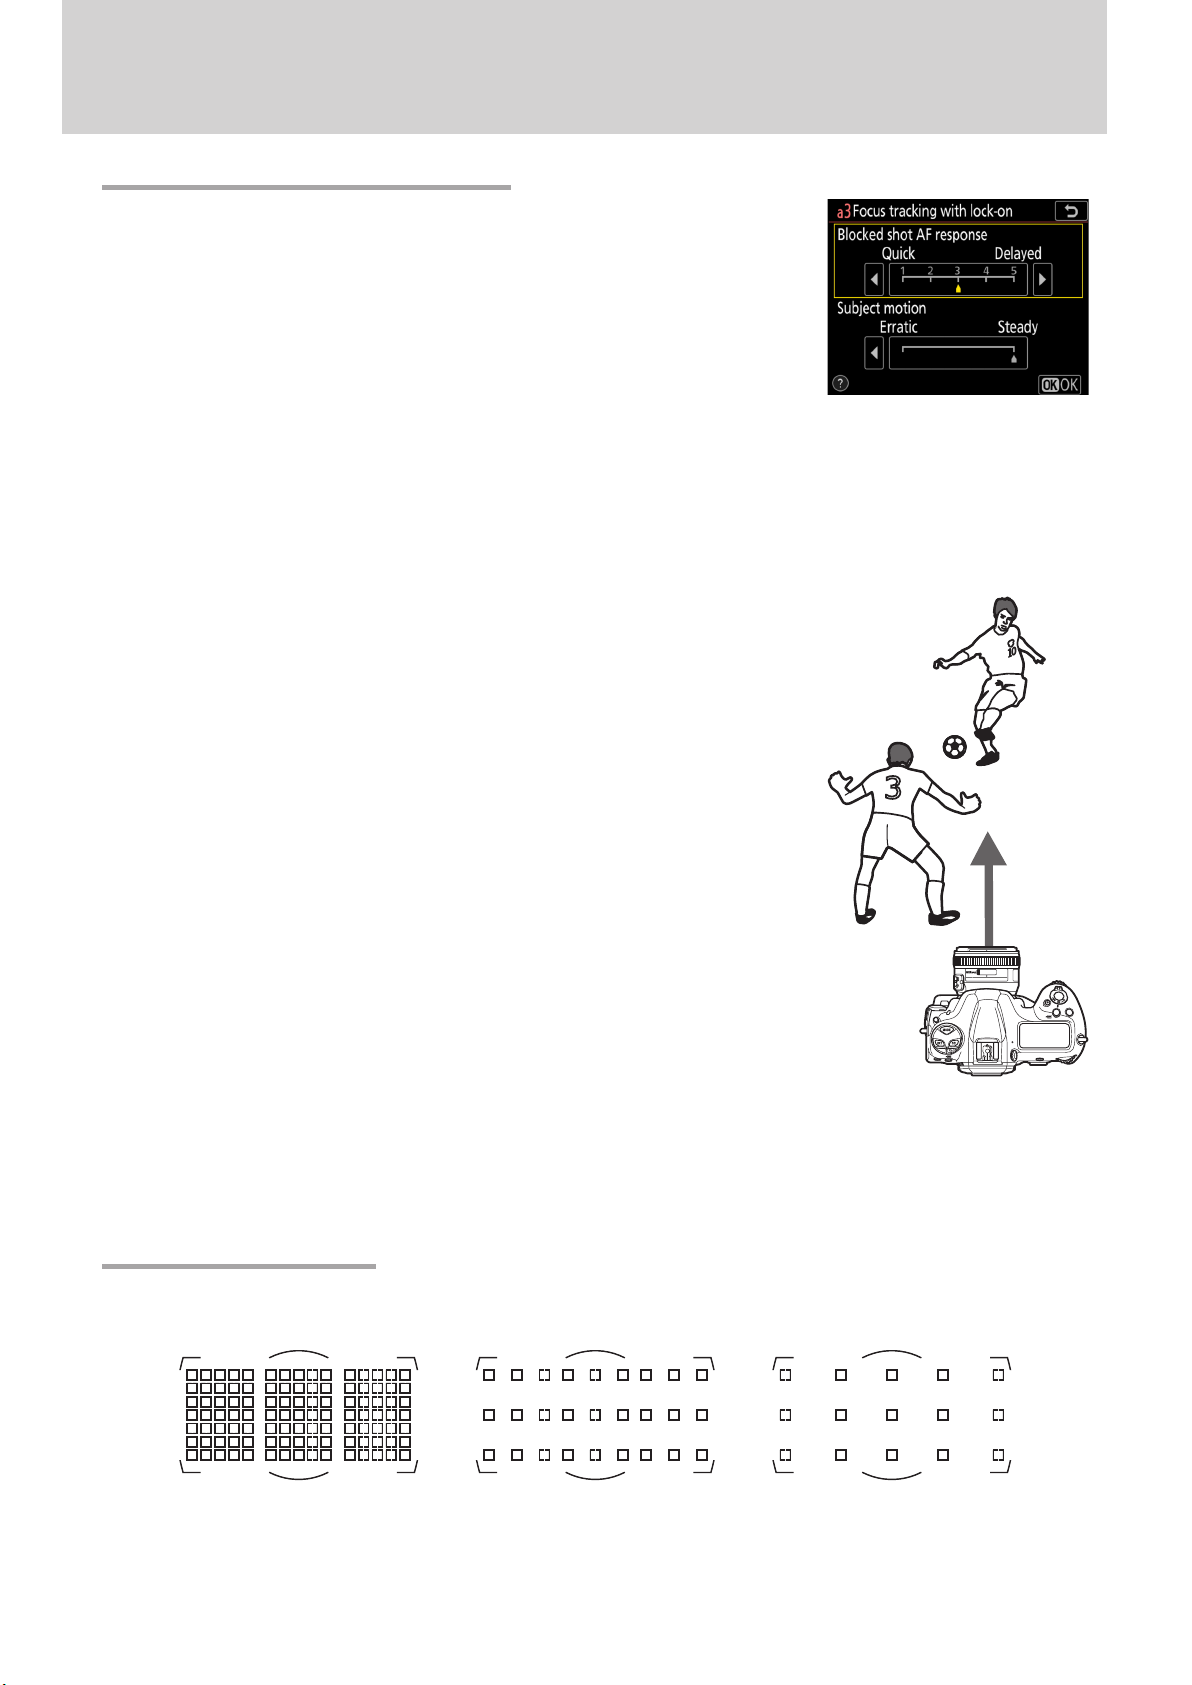
a3: Focus Tracking with Lock‑Ona3: Focus Tracking with Lock‑On
This menu contains two options: [Blocked Shot AF Response] and [Subject
motion].
■ Blocked Shot AF Response
If AF-C is selected for AF mode, focus tracking with lock-on will prevent the camera refocusing when
your subject is briey obscured by another object, ensuring that it will continue to track the main
subject once the obstacle has moved away. Choose the length of time before the camera refocuses
from [1(Quick)], [2], [3], [4], and [5 (Delayed)]. Lock-on applies only while the camera is focusing; to
focus at a new distance without waiting for lock-on to end, re-initiate autofocus.
The camera will track and focus on objects at the same distance as the
Main subject
main subject. High values (slow response) make the camera slow to refocus on obstacles when the shot is blocked. Select low values (quick
response) to quickly refocus on subjects passing in front of the camera
and for improved response when switching rapidly from one subject to
another.
Obstacle
■ Subject Motion
Choose how the camera tracks subjects in motion. Choose [Steady] for subjects approaching the
camera at a steady pace, like sprinters or race cars on a track, [Erratic] for long or triple jumpers and
other subjects prone to sudden stops and starts.
a4: Focus Points Useda4: Focus Points Used
Choose number of focus points available for manual focus-point selection from the options below.
Choosing [27 points] or [15 points] speeds focus-point selection.
105 points 27 points 15 points
Note that the groupings available when [Group‑area AF (C1)] or [Group‑area AF(C2)] is chosen for
AF-area mode vary with the dimensions of the group.
11
Page 12

Sports AF: Custom Settings, Continued
a5: Store Points by Orientationa5: Store Points by Orientation
This option lets you concentrate on shooting without having to worry
about focus-point selection. Choose whether the camera uses the same
focus point and AF-area mode in all orientations, or stores separate focus points and/or AF-area modes for use in “wide” (landscape) orientation, “tall” (portrait) orientation with the camera rotated 90° clockwise,
or “tall” orientation with the camera rotated 90° counterclockwise. The
options are [Focus point], [Focus point and AF‑area mode], and [O].
[Focus point]: Rotating the camera restores the
focus point last selected in the chosen orientation. If you select [O] after choosing this
option, the camera will select the center focus
point for all orientations.
[Focus point and AF-area mode]: Rotating the camera
restores the focus point and AF-area mode last
selected in the chosen orientation. In the example shown here, 9-point dynamic-area AF
is selected when the camera is in landscape
orientation, 3D-tracking when it is rotated 90°
counterclockwise, and group-area AF when it
is rotated 90° clockwise.
Camera rotated 90°
counterclockwise
Landscape (wide)
orientation
Camera rotated 90°
clockwise
12
If you select a group with a single row of focus
points (15× 1) for group-area AF (C1) when the
camera is in landscape orientation and groups
with a single column of focus points (1× 7) for
group-area AF (C2) when the camera is in portrait orientation, the camera will consistently
focus on subjects in a line across the frame.
Page 13

Sports AF: Custom Settings, Continued
[O ]: The same focus point and AF-area mode
will be used regardless of camera orientation.
a6: AF Activationa6: AF Activation
Choose [AF‑ON only] to split the functions of the AF‑ON button (or the
control to which [AF‑ON] has been assigned using Custom Setting f3
[Custom Controls]) and the shutter-release button so that the former
is used for focus while the latter is used only to release the shutter. Lift
your thumb from the AF‑ON button to lock focus and take more shots
at the current focus distance or prevent the camera refocusing when an
object passes between you and your subject.
Highlighting [AF‑ON only] and pressing 2 displays an [Out‑of‑focus
release] option; for sports photography, conrm that [Enable] is selected.
The Lens Focus Function Selector
When the lens focus function selector available with certain telephoto
lenses (page 19) is in the AF‑ON position, the lens focus function buttons
will perform the same function as the camera AF‑ON button.
13
Page 14

Sports AF: Custom Settings, Continued
a7: Single‑Point AF Watch Areaa7: Single‑Point AF Watch Area
If [Wide] is selected in single-point or dynamic-area AF AF-area mode,
the camera will use data from surrounding areas to locate subjects
slightly outside the selected focus point. Use for fast-moving, hard-toframe subjects.
a12: Auto‑Area AF Starting Pointa12: Auto‑Area AF Starting Point
Selecting [Enable] lets you use the multi selector to choose the starting
focus point when AF-C and auto-area AF are selected respectively for AF
mode and AF-area mode. The camera will resume normal auto-area AF
after focusing on the subject in the selected point.
By default, auto-area AF will automatically focus on the subject closest to the camera, and consequently when photographing subjects that appear briey at a xed location—for example, passing
the starting line or jumping o a ramp—you may nd that the camera fails to focus as desired. Enabling [Auto‑area AF starting point], framing the shot in advance, and choosing a focus point where
you anticipate your subject will appear ensures that focus will start from the selected point, helping
keep your shots in focus.
When [Disable] is selected, the
camera may focus on foreground
objects.
Selecting [Enable] lets you choose the focus point before shooting.
The focus operation will start from the selected point, helping ensure
your shots are in focus.
For more information on using [Auto‑area AF starting point], view the video at the link below.
YouTube | Digitutor
D6 NPS #2. Nimble Focusing Using the Auto‑area AF Starting Point Function
14
Page 15

Sports AF: Custom Settings, Continued
a13: Focus Point Persistencea13: Focus Point Persistence
If you have assigned [AF‑area mode] or [AF‑area mode+ AF ‑ON] to a
control using Custom Setting f3 [Custom controls], you can hold the
control to switch temporarily from the current AF-area mode to a second, pre-selected mode. Selecting [Auto] for Custom Setting a13 [Focus
point persistence] lets you do so without changing focus points.
■ Using Focus-Point Persistence: An Example
In this example, we will assign [AF‑area mode] to the Fn1 button and hold it to switch temporarily
from the current AF-area mode (auto-area AF in this case) to a second, pre-selected mode (here
9-point dynamic-area AF).
Enable focus‑point persistence.
1
Select [Auto] for Custom Setting a13 [Focus point persistence].
Select the default AF‑area mode.
2
For this example we will choose [Auto‑area AF] and an autofocus
mode of AF‑C.
Assign [AF-area mode] or [AF-area mode+ AF-ON] to a control.
3
Select Custom Setting f3 [Custom controls] and choose the desired
control and role (in this case, the Fn1 button and [AF‑area mode]).
To choose the AF-area mode activated while the button is pressed,
highlight [AF‑area mode] and press
[Dynamic‑area AF (9 points)] is selected.
. This example assumes that
2
15
Page 16

Sports AF: Custom Settings, Continued
Focus using the default AF‑area mode.
4
Press the shutter-release button halfway or press the AF‑ON button
to focus using the default AF-area mode. In the case of auto-area
AF, the camera will automatically detect the subject and choose the
focus area.
At the settings selected in this example, focus will track subject motion while the shutter-release button is pressed halfway or the AF‑ON
button is pressed.
Switch AF‑area modes.
5
Hold the selected control (the Fn1 button) to switch to the AF-area mode selected in Step 3 (9-point dynamic-area AF). Because we
selected [Auto] for Custom Setting a13 [Focus point persistence]
in Step1, the camera will focus on the subject in the current focus
point using 9-point dynamic-area AF.
Had we selected [O], the camera would not have maintained focus
on the subject in the point chosen by auto-area AF but would have
instead switched to a dierent focus point.
16
Page 17

Sports AF: Custom Settings, Continued
a14: Limit AF‑Area Mode Selectiona14: Limit AF‑Area Mode Selection
Limiting the choice of AF-area modes available during viewnder photography speeds AF-area mode selection and prevents your accidentally
selecting an undesired option. For example, you can limit the choice of
AF-area modes to single-point and 25-point dynamic-area AF by selecting only these options in the AF-area mode list. Note that [Single‑point
AF] cannot be deselected.
a15: Autofocus Mode Restrictionsa15: Autofocus Mode Restrictions
Limiting the choice of available autofocus modes prevents accidental
selection of an undesired option. For sports photography, you may nd
it convenient to choose [AF‑C] to stop you accidentally selecting AF‑S.
a16: Focus Point Wrap‑Arounda16: Focus Point Wrap‑Around
Select [Wrap] if you frequently switch between widely-separated focus
points.
Focus-point selection will “wrap around” from top to bottom, bottom to
top, left to right, and right to left so that, for example, pressing 2 when
a focus point on the right edge of the display is highlighted (q) selects
the corresponding focus point on the left edge of the display (w).
qw
17
Page 18

Sports AF: Custom ControlsSports AF: Custom Controls
Custom Setting f3 [Custom controls] can be used to assign dierent roles, including focus-related
functions, to camera controls such as the Fn buttons and the Pv button.
Focus‑Related Control AssignmentsFocus‑Related Control Assignments
Camera controls can be assigned the following focus-related functions:
Preset focus point Preset focus point
AA
xx AF-area mode AF-area mode
qq AF-area mode+ AF-ON AF-area mode+ AF-ON
AA AF-ON AF-ON
FF AF lock only AF lock only
BB AE/AF lock AE/AF lock
Select center focus point Select center focus point
KK
AF mode/AF-area mode AF mode/AF-area mode
zz
YY Same as multi selector Same as multi selector
xx Focus point selection Focus point selection
Legend:
= Pv button, vv= Fn1 button, xx= Fn2 button, ss= Fn button for vertical shooting, zz= Fn3 button,
00
= AF‑ON button, 77= sub‑selector, 88= sub‑selector center button, ll= AF‑ON button for vertical shooting,
VV
= multi selector for vertical shooting, 22= metering button+ command dials, nn= BKT button+ command dials,
mm
= movie‑record button, SS= lens Fn button
33
00 vv xx
✔ ✔ ✔ ✔
✔ ✔ ✔
✔ ✔ ✔
✔ ✔ ✔
✔ ✔ ✔
✔ ✔ ✔
— — — — — — —
✔ ✔ ✔ ✔
— — — — — —
— — — — — —
ss
zz VV
— — —
— —
— —
— —
— —
— —
— — — — — — — —
✔
✔
✔
✔
✔
77
—
—
—
—
—
✔
✔
ll mm 22 nn
88
— — — — —
✔
✔ ✔
✔ ✔
✔ ✔
✔ ✔
✔ ✔
✔
— —
— —
— — — —
— — — —
— — — —
— — — —
— — — —
— — — — —
— — —
✔
— — —
✔
33 SS
✔
These functions are described below.
A Preset focus point: Pressing the control selects a preset focus point. To choose the point, highlight
it and hold the control while pressing the AF-mode button; the focus point will ash when the operation is complete. If an option other than [O] is selected for Custom Setting a5 [Store points by
orientation], you can choose separate focus points for “wide” (landscape) orientation and each of
the two “tall” (portrait) orientations. Pressing 2 when [Preset focus point] is highlighted displays
a sub-menu where you can choose how the control behaves:
⁃ [Press to recall focus point]: Pressing the control selects the preset focus point.
⁃ [Hold to recall focus point]: The camera switches to the preset focus point only while the control is
pressed and restores the previously-selected point when the control is released.
x AF-area mode: Highlight this option and press
to select an AF-area mode. The selected mode will
2
take eect while the control is pressed; releasing the control restores the original AF-area mode.
q AF-area mode+ AF-ON: As for [AF‑area mode], except that pressing the control also initiates autofocus.
A AF-ON: The control performs the role normally performed by the AF‑ON button. Pressing the
control initiates autofocus.
F AF lock only: Focus locks while the control is pressed.
B AE/AF lock: Focus and exposure lock while the control is pressed.
K Select center focus point: Pressing the control selects the center focus point.
z AF mode/AF-area mode: The control performs the role normally performed by the AF-mode but-
ton. Hold the control and rotate the main command dial to choose the autofocus mode, the
sub-command dial to choose the AF-area mode.
Y Same as multi selector: This role can be assigned to the sub-selector or the multi selector for verti-
cal shooting, which then be pressed up, down, left, and right to mimic pressing 1, 3, 4, and 2
on the multi selector. The center of the multi selector for vertical shooting will also perform the
same role as the center of the multi selector. The role of the control during playback can be chosen
from [Scroll] and [Display next/previous frame] in the case of the sub-selector, or using [Photo
info/playback] in the case of the multi selector for vertical shooting. If [Info C/Playback D] is se-
lected, you can press the multi selector for vertical shooting up or down to display other pictures,
left or right to view photo info.
✔
✔
✔
✔
✔
✔
—
—
—
—
18
Page 19

Sports AF: Custom Controls, Continued
x Focus point selection: The control can be used to choose the focus point. If this role is assigned to
the multi selector for vertical shooting, the center of the control will perform the role currently
chosen for [Sub‑selector center].
Lens Focus Function ButtonsLens Focus Function Buttons
You can use [S Lens focus function buttons] to choose the role played
by the focus function buttons when the focus function selector on the
lens is set to AF‑L. For fast-moving sports, choose [AF‑area mode] to
enable rapid AF-area mode selection.
Focus function
buttons
Lenses with Focus Function Selectors
As of March, 2020, the following lenses are equipped with a focus function selector:
• AF-S NIKKOR 800 mm f/5.6E FL ED VR
• AF-S NIKKOR 600 mm f/4G ED VR
• AF-S NIKKOR 600 mm f/4E FL ED VR
• AF-S NIKKOR 500 mm f/4G ED VR
• AF-S NIKKOR 500 mm f/4E FL ED VR
• AF-S NIKKOR 500 mm f/5.6E PF ED VR
• AF-S NIKKOR 400 mm f/2.8G ED VR
• AF-S NIKKOR 400 mm f/2.8E FL ED VR
• AF-S NIKKOR 300 mm f/2.8G ED VR II
• AF-S NIKKOR 200 mm f/2G ED VR II
• AF-S NIKKOR 70–200 mm f/2.8E FL ED VR
• AF-S NIKKOR 120–300 mm f/2.8E FL ED SR VR
• AF-S NIKKOR 180–400 mm f/4E TC1.4 FL ED VR
• AF-S NIKKOR 200–400 mm f/4G ED VR II
19
Page 20

AF Fine‑TuningAF Fine‑Tuning
When a CPU lens is mounted on the camera, autofocus can be manually or (in live view) automatically ne-tuned to suit your preferences. In the case of zoom lenses, the camera can store two ne-tuning values for each lens: one for use when the lens is zoomed all the way out (WIDE) and another for
when it is zoomed all the way in (TELE).
AF Fine-Tuning
Use only as required. AF ne-tuning should be performed at the focus distance at which the lens is normally used; ne-tuning performed at short focus distances may be less eective with distant subjects
and vice versa. The saved values are applied only during viewnder photography and do not take eect
in live view.
Manual TuningManual Tuning
To ne-tune autofocus for the current lens, select [AF ne‑tuning options]> [Fine‑tune and save
lens] in the setup menu. Any previously-saved value for the current lens will be overwritten.
Select [Fine-tune and save lens].
1
In the setup menu, select [AF ne‑tun‑
ing options], then highlight [Fine‑tune
and save lens] and press
the AF ne-tuning dialog. The options
displayed vary with the type of lens.
to display
2
Zoom lenses Fixed focal-length (prime) lenses
Fine‑tune autofocus.
2
Press 4 or 2 to choose from values of +20 to −20, selecting low
values to move the focus point toward the camera and high values
to move it away. The value currently-selected is shown by g, the last
saved value for the lens by j. In the case of zoom lenses, you can
save two ne-tuning values: one for use when the lens is zoomed all
the way out (WIDE) and another for when it is zoomed all the way in
(TELE). Press 1 or 3 to access the desired option.
If desired, you can press W (M) to end manual tuning and proceed to Step3 of “Auto AF Fine-Tun-
ing” (page 21), where you can ne-tune autofocus automatically while previewing the results
in live view display.
Press J.
3
Press J to save the new value. To enable AF ne-tuning during shooting, select [On] for [AF
ne‑tuning options]> [AF ne‑tune on/o] in the setup menu.
20
Page 21

AF Fine-Tuning, Continued
Auto AF Fine‑TuningAuto AF Fine‑Tuning
To ne-tune autofocus automatically while previewing the results in live view:
Ready the camera.
1
Mount the camera on a tripod and aim it at a at, high-contrast subject parallel to the camera focal plane. Note that auto AF ne-tuning
works best at maximum aperture and may not function in dark surroundings.
Start live view.
2
Rotate the live view selector to C and press the a button.
Start auto AF fine‑tuning.
3
Press the AF-mode and movie-record
buttons and keep them pressed until
ne-tuning options are displayed.
Zoom lenses: If the current lens is a zoom
lens, you will be prompted to choose
two separate values, one for use when
the lens is zoomed all the way out (WIDE)
and another for when it is zoomed all the
way in (TELE). Highlight [WIDE] or [TELE]
and press J to display the ne-tuning
dialog with the center focus point selected. Before proceeding to Step4, rotate the zoom ring to
zoom all the way out (WIDE) or all the way in (TELE) according to the option selected.
Fixed focal-length (prime) lenses: If the current lens is a prime lens, the camera will display the ne-tuning dialog with the center focus point
selected.
Previously-Saved Values
If a saved value already exists for the current lens, you will be prompted to either overwrite the existing value or to save the new value under a dierent name.
21
Page 22

AF Fine-Tuning, Continued
Focus.
4
Press the shutter-release button halfway to focus, then zoom in on
the view through the lens to conrm that focus is accurate. Focus
can be adjusted manually if necessary.
Press J.
5
If ne-tuning is successful, the new AF ne-tuning value for the current lens will be added to the [List save values] list and [On] will
automatically be selected for [AF ne‑tune on/o], enabling AF
ne-tuning.
After completing AF ne-tuning for either the maximum angle or
maximum zoom, press the X button and choose the remaining zoom
position ([WIDE] or [TELE]). Repeat Steps 4 and 5 to complete auto
ne-tuning for the selected item.
Exit the fine‑tuning dialog.
6
Press J to exit the ne-tuning dialog.
The Saved Values ListThe Saved Values List
To view previously-saved ne-tuning values, select [AF ne‑tuning options] > [List
saved values] in the setup menu. The camera can store values for up to 40 lenses. To
help distinguish between multiple lenses
of the same type, each lens can be assigned
a unique identier—for example, the last
two digits of the lens serial number—by
highlighting the lens in the list, pressing 2,
and choosing the desired identier in the
[Choose lens number] dialog.
To delete a saved value when it is no longer needed, highlight the lens in the list and press O.
Saved values list Choose lens number dialog
22
Page 23

Focus PointsFocus Points
While normally a total of 105 focus points are available during viewnder photography, the number of cross sensors and the focus points available for autofocus and electronic rangending may vary according to
the lens or teleconverter attached.
Cross SensorsCross Sensors
The availability of cross-sensor focus points varies with the lens used. Cross sensors are used for the
focus points shown in green, while the remainder use line sensors.
LensLens Cross sensorsCross sensors
AF‑S and AF‑P lenses with maximum apertures (at maximum zoom, if applicable) of f/4 or faster,
excluding the lenses listed below.
105 cross sensors
• AF‑S DX Zoom‑Nikkor 12–24 mm f/4G IF‑ED
• AF‑S NIKKOR 500 mm f/4E FL ED VR
• AF‑S NIKKOR 600 mm f/4G ED VR
• AF‑S NIKKOR 600 mm f/4E FL ED VR
• AF‑S Nikkor 600 mm f/4D IF‑ED II
• AF‑S Nikkor 600 mm f/4D IF‑ED
91 cross sensors
• AF‑S NIKKOR 500 mm f/4G ED VR
• AF‑S Nikkor 500 mm f/4D IF‑ED II
• AF‑S Nikkor 500 mm f/4D IF‑ED
• AF‑S NIKKOR 200–400 mm f/4G ED VR II
• AF‑S VR Zoom‑Nikkor 200–400 mm f/4G IF‑ED
• AF‑S and AF‑P lenses with maximum apertures (at maximum zoom, if applicable) slower than f/4
• Non–AF‑S, non–AF‑P lenses
77 cross sensors
35 cross sensors
23
Page 24

Focus Points, Continued
TeleconvertersTeleconverters
The focus points available for autofocus and electronic rangending when an AF-S or AF-P teleconverter is attached are shown below. Cross sensors are used for the focus points shown in green,
while the remainder use line sensors. Note that at maximum combined apertures slower than f/5.6,
the camera may not be able to focus on dark or low-contrast subjects. Autofocus is not available
when teleconverters are used with AF-S VR Micro-Nikkor 105 mm f/2.8G IF-ED lenses.
TeleconverterTeleconverter Maximum aperture of lensMaximum aperture of lens
• TC‑14E, TC‑14EII, TC‑14EIII
• TC‑17EII
• TC‑20E, TC‑20EII, TC‑20EIII
f/2
**
Available focus pointsAvailable focus points
TC‑14E, TC‑14EII, TC‑14EIII f/2.8
• TC‑17EII
• TC‑20E, TC‑20EII, TC‑20EIII
TC‑14E, TC‑14EII, TC‑14EIII f/4
TC‑17EII f/4
TC‑800‑1.25EED f/5.6
TC‑20E, TC‑20EII, TC‑20EIII f/4
TC‑14E, TC‑14EII, TC‑14EIII f/5.6
* At maximum zoom, in the case of zoom lenses.
f/2.8
• 105 focus points • 105 cross sensors
• 105 focus points • 35 cross sensors
• 23 focus points • 9 cross sensors
• 15 focus points • 1 cross sensor
The following illustrations show the focus points available for autofocus and electronic rangending
when teleconverters are used in combination with lenses of dierent types.
AF-S NIKKOR 300 mm f/4E PF ED VR and AF-S NIKKOR 180–400 mm f/4E TC1.4 FL ED VR (built-in teleconverter disabled):
UsedUsed Available focus pointsAvailable focus points
UsedUsed Available focus pointsAvailable focus points
24
Alone
• 105 focus points • 105 cross sensors
With a TC‑14E,
TC‑14EII, or TC‑14EIII
• 105 focus points • 35 cross sensors
AF-S NIKKOR 400 mm f/2.8E FL ED VR, AF-S NIKKOR 70–200 mm f/2.8G ED VR II, and AF-S NIKKOR 120–300 mm f/2.8E FL ED SR VR:
UsedUsed Available focus pointsAvailable focus points
• Alone
• With a TC‑14E,
TC‑14EII, or
TC‑14EIII
• 105 focus points • 105 cross sensors
With a TC‑17EII
• 23 focus points • 9 cross sensors
With a TC‑20E,
TC‑20EII, or TC‑20EIII
• 15 focus points • 1 cross sensor
UsedUsed Available focus pointsAvailable focus points
• With a TC‑17EII
• With a TC‑20E,
TC‑20EII, or
TC‑20EIII
• 105 focus points • 35 cross sensors
Page 25

AF-S NIKKOR 500 mm f/4E FL ED VR and AF-S NIKKOR 600 mm f/4E FL ED VR:
UsedUsed Available focus pointsAvailable focus points
Focus Points, Continued
UsedUsed Available focus pointsAvailable focus points
Alone
• 105 focus points • 91 cross sensors
With a TC‑14E,
TC‑14EII, or TC‑14EIII
• 105 focus points • 35 cross sensors
AF-S NIKKOR 500 mm f/5.6E PF ED VR, AF-S NIKKOR 80–400 mm f/4.5–5.6G ED VR, AF-S NIKKOR 180–400 mm f/4E TC1.4 FL ED
With a TC‑17EII
• 23 focus points • 9 cross sensors
With a TC‑20E,
TC‑20EII, or TC‑20EIII
• 15 focus points • 1 cross sensor
VR (built-in teleconverter enabled), and AF-S NIKKOR 200–500 mm f/5.6E ED VR:
UsedUsed Available focus pointsAvailable focus points
Alone
• 105 focus points • 35 cross sensors
AF-S NIKKOR 200–400 mm f/4G ED VR II:
UsedUsed Available focus pointsAvailable focus points
• Alone
• With a TC‑14E,
TC‑14EII, or
TC‑14EIII
• 105 focus points • 35 cross sensors
With a TC‑14E,
TC‑14EII, or TC‑14EIII
With a TC‑17EII
UsedUsed Available focus pointsAvailable focus points
• 15 focus points • 1 cross sensor
UsedUsed Available focus pointsAvailable focus points
• 23 focus points • 9 cross sensors
With a TC‑20E,
TC‑20EII, or TC‑20EIII
• 15 focus points • 1 cross sensor
25
Page 26

Recommended AF Settings by EventRecommended AF Settings by Event
This section oers some advice on adjusting autofocus-related settings for dierent sporting events.
Overview: Settings by EventOverview: Settings by Event
The settings for dierent events are summarized in the table below. For all events listed, we recommend that you select an autofocus mode of AF‑C, choose [Release] for Custom Setting a1 [AF‑C
priority selection], and use Custom Setting a8 [3D‑tracking face‑detection], a9 [Group‑area AF
face detection], or a11 [Auto‑area AF face detection] to enable face detection in the AF-area modes
in which it is available.
Custom settingsCustom settings
a3a3
Blocked shot Blocked shot
EventEvent AF-area modeAF-area mode
Soccer (page27) 9‑point dynamic‑area AF 2
Floor exercises, rhythmic gymnastics (page27) Auto‑area AF
Gymnastics
Balance beam (page28)
Vault (page28) Auto‑area AF Erratic
Rings and horizontal and uneven bars (page28)
Sprints (hand‑held shots focusing on a single
runner approaching the camera, page29)
Hurdles (page30) Normal
Sprints and hurdles (remote‑control shots of mul‑
tiple runners approaching the camera, page30)
Athletics
Marathons (from a vehicle, page30) 9‑point dynamic‑area AF Focus point Normal
Shot put, discus, and hammer throw (from the
front, at a distance, page31)
Javelin (from the front, at a distance, page31) Group‑area AF (C1): 7× 7
Long jump and triple jump (facing oncoming
jumpers, page31)
High jump (page32) Group‑area AF (C1): 3× 5
Pole vault (page32) Auto‑area AF
Aquatics
Swimming (page33) 9‑point dynamic‑area AF 2
Diving (page34) 3D‑tracking
Artistic swimming (page34) 9‑point dynamic‑area AF Normal
Table tennis (page35) Group‑area AF (C1): 3× 7 4
BMX and skateboarding (page35) Auto‑area AF 3 Focus point Enable
Custom Settings: a3 [Focus tracking with lock‑on] (page 11); a5 [Store points by orientation] (page 12);
a7 [Single‑point AF watch area] (page 14); a12 [Auto‑area AF starting point] (page 14)
• Wide: group‑area AF (C1), 15× 3
• Tall: group‑area AF (C2), 7× 7
3D‑tracking
9‑point dynamic‑area AF Focus point
Group‑area AF (C1): 15× 3 — —
Group‑area AF 5
Auto‑area AF
AF responseAF response
Subject Subject
motionmotion
Steady
3
Steady
3 Erratic
3
Steady
a5a5 a7a7 a12a12
Focus point Normal
—
Focus point and
AF‑area mode
—
Wide
—
Normal
—‑
—
Enable
—
—
—
—
26
Page 27

Recommended AF Settings by Event, Continued
SoccerSoccer
Photographing soccer matches involves quick changes of focus and
subjects that may be briey obscured by foreground objects. The following autofocus settings are recommended:
Autofoccus modeAutofoccus mode AF‑C
AF-area modeAF-area mode 9‑point dynamic‑area AF
Custom SettingsCustom Settings
a1 AF‑C priority selection [Release]
a3 Focus tracking with lock‑on
a5 Store points by orientation [Focus point]
a7 Single‑point AF watch area [Normal]
Nine-point dynamic-area AF is recommended if you want to focus on a single athlete in a group of
players. Note that the option selected for Custom Setting a7 [Single‑point AF watch area] also applies during dynamic-area AF: if you choose [Wide], the camera will use data from surrounding areas
to locate subjects slightly outside the selected focus point, making it easier to focus on fast-moving
subjects (page 14).
Blocked shot AF response [2]
Subject motion [Steady]
GymnasticsGymnastics
This section lists some suggested settings for gymnastics events.
■ Floor Exercises and Rhythmic Gymnastics
Auto-area AF is recommended if composition is a priority,
but 49-point dynamic-area AF may be preferred if the background contains objects with regular, detailed patterns, as
otherwise photos may not be in focus even if the in-focus
indicator () is lit. To capture fast-moving subjects, choose
group-area AF or a dynamic-area AF option with a comparatively high number of focus points.
Autofoccus modeAutofoccus mode AF‑C
AF-area modeAF-area mode Auto‑area AF
Custom SettingsCustom Settings
a1 AF‑C priority selection [Release]
a3 Focus tracking with lock‑on
a11 Auto‑area AF face detection [On]
Select [Focus point and AF‑area mode] for Custom Setting a5 [Store points by orientation] to automatically switch focus points and AF-area modes as you rotate the camera (page 12). Choose [15
points] for Custom Setting a4 [Focus points used] to reduce the number of focus points for quicker
selection (page 11).
Blocked shot AF response [3]
Subject motion [Steady]
105 points 27 points 15 points
27
Page 28

Recommended AF Settings by Event, Continued
■ Balance Beam
To automatically switch focus points and AF-area modes as you rotate the camera
from “wide” to “tall” orientation, select [Focus point and AF‑area mode] for Custom Setting a5 [Store points by orientation] (page 12). Choosing group-area
AF (C1) with a 15× 3 focus-point group for wide-orientation shots and group-area
AF (C2) with a 7× 7 group for tall-orientation shots will help deliver accurate focus
in all orientations.
Autofoccus modeAutofoccus mode AF‑C
AF-area modeAF-area mode
Custom SettingsCustom Settings
a1 AF‑C priority selection [Release]
a3 Focus tracking with lock‑on
a5 Store points by orientation [Focus point and AF‑area mode]
a9 Group‑area AF face detection [On]
■ Vault
Blocked shot AF response [3]
Subject motion [Steady]
• Wide: Group‑area AF (C1), 15× 3
• Tall: Group‑area AF (C2), 7× 7
If you nd the subject hard to frame, selecting auto-area AF will allow you concentrate on composition while leaving the camera in charge of choosing the
focus point. If you nd that auto-area AF tends to focus on the vault, select
[Enable] for Custom Setting a12 [Auto‑area AF starting point] and choose a
focus point before shooting (page 14).
Autofoccus modeAutofoccus mode AF‑C
AF-area modeAF-area mode Auto‑area AF
Custom SettingsCustom Settings
a1 AF‑C priority selection [Release]
a3 Focus tracking with lock‑on
a11 Auto‑area AF face detection [On]
a12 Auto‑area AF starting point [Enable]
Blocked shot AF response [3]
Subject motion [Erratic]
If the camera is slow to refocus on the gymnast after focusing on the vault, choose a lower value for
Custom Setting a3 [Focus tracking with lock‑on]> [Blocked shot AF response].
■ Rings and Horizontal and Uneven Bars
3D-tracking is recommended for subjects that change posture and position frequently and often are near apparatus such as bars or rings.
Autofoccus modeAutofoccus mode AF‑C
AF-area modeAF-area mode 3D‑tracking
Custom SettingsCustom Settings
a1 AF‑C priority selection [Release]
a3 Focus tracking with lock‑on
a8 3D‑tracking face‑detection [On]
Blocked shot AF response [3]
Subject motion [Erratic]
28
Page 29

Recommended AF Settings by Event, Continued
AthleticsAthletics
You may nd these settings useful when photographing road-running or track-and-eld events.
■ Sprints (Hand-Held, Single Runner, from the Front)
Choose 9-point dynamic-area AF when photographing approaching
sprinters to help prevent the camera focusing on their hands, or cus-
tom group-area AF (C1 or C2) with a wide custom focus group (for example, 15× 3) to focus on the closest subject when runners are lined up
across the frame. Dynamic-area AF is recommended if the background
features complex repeating patterns, as otherwise the in-focus indicator
() may be displayed when the subject is not in focus.
Autofoccus modeAutofoccus mode AF‑C
AF-area modeAF-area mode 9‑point dynamic‑area AF
Custom SettingsCustom Settings
a1 AF‑C priority selection [Release]
a3 Focus tracking with lock‑on
a5 Store points by orientation [Focus point]
a7 Single‑point AF watch area [Wide]
Blocked shot AF response [3]
Subject motion [Steady]
When photographing runners after they have crossed the nish line, select [Focus point and AF‑area
mode] for Custom Setting a5 [Store points by orientation] to automatically switch focus points and
AF-area modes as you rotate the camera between “tall” (portrait) orientations and “wide” (landscape)
orientation (page 12).
Instant AF-Area Mode Selection
For exible AF-area mode selection when photographing approaching runners, select 9-point dynamic-area AF with the camera and assign
[Group‑area AF (C1)] to the focus function buttons using Custom Setting f3 [Custom controls]> [S Lens focus function buttons]> [AF‑area
mode] (page 19). You can then press a focus function button to select
the custom group-area AF option when your subject is far away and release the button to instantly switch to 9-point dynamic-area AF as the runners approach, all without taking your eye from the viewnder.
Group-area AF (C1)
(distant subject)
9-point dynamic-area AF
(runner approaching)
AF-area mode can also be assigned to the Pv, Fn1, Fn2, or AF‑ON button, to the center of the sub-selec-
tor, or to the AF‑ON button for vertical shooting (page 18).
29
Page 30

Recommended AF Settings by Event, Continued
■ Hurdles
The settings below let you refocus as needed if the camera focuses on
the hurdles in the foreground while the race is being run. When photographing hurdlers who have crossed the nish line, select [Focus point
and AF‑area mode] for Custom Setting a5 [Store points by orientation]
to automatically switch focus points and AF-area modes as you rotate
the camera between “tall” (portrait) orientations and “wide” (landscape)
orientation (page 12).
Autofoccus modeAutofoccus mode AF‑C
AF-area modeAF-area mode 9‑point dynamic‑area AF
Custom SettingsCustom Settings
a1 AF‑C priority selection [Release]
a3 Focus tracking with lock‑on
a5 Store points by orientation [Focus point]
a7 Single‑point AF watch area [Normal]
■ Sprints and Hurdles: Remote Photography
Blocked shot AF response [3]
Subject motion [Steady]
Choose custom group-area AF (C1 or C2) with a wide custom focus
group (for example, 15× 3) to focus on the closest subject when runners
are lined up across the frame.
Be sure the selected group does not contain hurdles or other obstructions.
Autofoccus modeAutofoccus mode AF‑C
AF-area modeAF-area mode Group‑area AF (C1), 15× 3
Custom SettingsCustom Settings
a1 AF‑C priority selection [Release]
a3 Focus tracking with lock‑on
a9 Group‑area AF face detection [On]
■ Marathons (from a Vehicle)
Blocked shot AF response [3]
Subject motion [Steady]
When shooting from a moving vehicle, choose 9-point dynamic-area AF
to keep specic runners in focus as they change position in the pack,
auto-area AF if you nd it hard to keep your subject in the focus point. If
your lens supports SPORT or ACTIVE vibration reduction, these options
can be used to reduce camera blur.
Autofoccus modeAutofoccus mode AF‑C
AF-area modeAF-area mode 9‑point dynamic‑area AF
Custom SettingsCustom Settings
a1 AF‑C priority selection [Release]
a3 Focus tracking with lock‑on
a5 Store points by orientation [Focus point]
a7 Single‑point AF watch area [Normal]
Blocked shot AF response [3]
Subject motion [Steady]
30
Page 31

Recommended AF Settings by Event, Continued
■ Shot Put, Discus, and Hammer Throw (from the Front, at a Distance)
Choose group-area AF for more reliable focus when photographing these events
from the front at long ranges.
Autofoccus modeAutofoccus mode AF‑C
AF-area modeAF-area mode Group‑area AF
Custom SettingsCustom Settings
a1 AF‑C priority selection [Release]
a3 Focus tracking with lock‑on
a9 Group‑area AF face detection [On]
■ Javelin (from the Front, at a Distance)
Blocked shot AF response [5]
Subject motion [Steady]
For long shots of javelin competitions, choose custom group-area AF (C1 or C2)
and select a focus group just big enough to cover the athlete’s upper body. This
helps the camera focus on faces instead of hands or foreground objects.
Autofoccus modeAutofoccus mode AF‑C
AF-area modeAF-area mode Group‑area AF (C1), 7× 7
Custom SettingsCustom Settings
a1 AF‑C priority selection [Release]
a3 Focus tracking with lock‑on
a9 Group‑area AF face detection [On]
Blocked shot AF response [3]
Subject motion [Erratic]
■ Long Jump and Triple Jump (Facing Oncoming Jumpers)
Auto-area AF is recommended for subjects that rapidly change posture and
position. Selecting [On] for Custom Setting a11 [Auto‑area AF face detection]
helps the camera focus on the athlete’s face, while selecting [Erratic] for Custom
Setting a3 [Focus tracking with lock‑on]> [Subject motion] helps the camera
focus when the subject slows abruptly.
Autofoccus modeAutofoccus mode AF‑C
AF-area modeAF-area mode Auto‑area AF
Custom SettingsCustom Settings
a1 AF‑C priority selection [Release]
a3 Focus tracking with lock‑on
a11 Auto‑area AF face detection [On]
Blocked shot AF response [3]
Subject motion [Erratic]
31
Page 32

Recommended AF Settings by Event, Continued
■ High Jump
To help the camera focus on faces of subjects that are undergoing rapid
changes of posture and position, choose custom group-area AF (C1 or
C2) and select a focus group just big enough to cover the athlete’s upper
body.
Autofoccus modeAutofoccus mode AF‑C
AF-area modeAF-area mode Group‑area AF (C1), 3× 5
Custom SettingsCustom Settings
a1 AF‑C priority selection [Release]
a3 Focus tracking with lock‑on
a9 Group‑area AF face detection [On]
■ Pole Vault
Blocked shot AF response [3]
Subject motion [Erratic]
Auto-area AF is recommended for subjects that rapidly change posture and
position. Selecting [On] for Custom Setting a11 [Auto‑area AF face detection]
helps the camera focus on the athlete’s face rather than on the pole or mat, while
selecting [Erratic] for Custom Setting a3 [Focus tracking with lock‑on]> [Sub‑
ject motion] helps the camera focus when the subject slows abruptly.
Autofoccus modeAutofoccus mode AF‑C
AF-area modeAF-area mode Auto‑area AF
Custom SettingsCustom Settings
a1 AF‑C priority selection [Release]
a3 Focus tracking with lock‑on
a11 Auto‑area AF face detection [On]
Blocked shot AF response [3]
Subject motion [Erratic]
32
Page 33

Recommended AF Settings by Event, Continued
AquaticsAquatics
Here are some settings you may nd helpful when photographing aquatic events.
■ Swimming
Choosing 9-point dynamic-area AF helps prevent the camera focusing
on splashes while letting you instantly refocus on the main subject as
needed. To quickly switch focus from one swimmer to another, choose
lower values for Custom Setting a3 [Focus tracking with lock‑on] >
[Blocked shot AF response].
Autofoccus modeAutofoccus mode AF‑C
AF-area modeAF-area mode 9‑point dynamic‑area AF
Custom SettingsCustom Settings
a1 AF‑C priority selection [Release]
a3 Focus tracking with lock‑on
a7 Single‑point AF watch area [Normal]
Instant AF-Area Mode Selection
For exible AF-area mode selection when photographing the start of a race,
select 9-point dynamic-area AF with the camera and assign [Group‑area
AF] to the focus function buttons using Custom Setting f3 [Custom con‑
trol]> [S Lens focus function buttons] > [AF‑area mode] (page 19).
You can then press a focus function button to select group-area AF when
your subject is diving from the starting block and release the button to
instantly switch to 9-point dynamic-area AF once the swimmer is in the
water, all without taking your eye from the viewnder.
Blocked shot AF response [2]
Subject motion [Steady]
Group-area AF
(distant subject diving)
9-point dynamic-area AF
(subject swimming)
AF-area mode can also be assigned to the Pv, Fn1, Fn2, or AF‑ON button, to the center of the sub-selec-
tor, or to the AF‑ON button for vertical shooting (page 18).
33
Page 34

Recommended AF Settings by Event, Continued
■ Diving
When photographing divers against low-contrast, undierentiated backgrounds, choose 3D-tracking, position the focus area over your subject
(for best results, choose the uniform or another area of the subject that
is a dierent color from the background), and press and hold the AF‑ON
button or keep the shutter-release button pressed halfway. The camera
will automatically track the diver, letting you concentrate on composition.
Autofoccus modeAutofoccus mode AF‑C
AF-area modeAF-area mode 3D‑tracking
Custom SettingsCustom Settings
a1 AF‑C priority selection [Release]
a3 Focus tracking with lock‑on
a8 3D‑tracking face‑detection [On]
Blocked shot AF response [3]
Subject motion [Steady]
When photographing divers against the stands, billboards,
and other high-contrast backgrounds, select 105-point dynamic-area AF.
Low-contrast
background
■ Artistic Swimming
For events such as artistic swimming (also known as synchronized swimming),
where your subjects change pose with dizzying speed and focus constantly switches from one subject to another, we recommend the ever-adaptable
9-point dynamic-area AF.
Autofoccus modeAutofoccus mode AF‑C
AF-area modeAF-area mode 9‑point dynamic‑area AF
Custom SettingsCustom Settings
a1 AF‑C priority selection [Release]
a3 Focus tracking with lock‑on
a7 Single‑point AF watch area [Normal]
Blocked shot AF response [3]
Subject motion [Steady]
High-contrast
background
34
Page 35

Recommended AF Settings by Event, Continued
Table TennisTable Tennis
Using custom group-area AF (C1 or C2) helps you frame shots with the
net in the foreground.
Autofoccus modeAutofoccus mode AF‑C
AF-area modeAF-area mode Group‑area AF (C1), 3× 7
Custom SettingsCustom Settings
a1 AF‑C priority selection [Release]
a3 Focus tracking with lock‑on
a9 Group‑area AF face detection [On]
Blocked shot AF response [4]
Subject motion [Steady]
BMX and SkateboardingBMX and Skateboarding
If you nd the subject hard to frame, selecting auto-area AF will allow
you concentrate on composition while leaving the camera in charge of
choosing the focus point. If you nd that auto-area AF tends to focus
on ramps or other foreground objects, select [Enable] for Custom Setting a12 [Auto‑area AF starting point] and choose a focus point before
shooting (page 14).
Autofoccus modeAutofoccus mode AF‑C
AF-area modeAF-area mode Auto‑area AF
Custom SettingsCustom Settings
a1 AF‑C priority selection [Release]
a3 Focus tracking with lock‑on
a5 Store points by orientation [Focus point]
a11 Auto‑area AF face detection [On]
a12 Auto‑area AF starting point [Enable]
Blocked shot AF response [3]
Subject motion [Steady]
35
Page 36

© 2020 Nikon Corporation
 Loading...