

Page 1

DIGITAL CAMERA
Reference Manual
En
• Read this manual thoroughly before using the camera.
• To ensure proper use of the camera, be sure to read
“For Your Safety” (page xiii).
• After reading this manual, keep it in a readily accessible
place for future reference.
Page 2

Your images. The world. Connected
D5600 Model Name: N1538
Welcome to SnapBridge — Nikon’s new family of services to enrich
your image experience. SnapBridge eliminates the barrier between
your camera and compatible smart device, through a combination
of Bluetooth® low energy (BLE) technology and a dedicated app. The
stories you capture with your Nikon camera and lenses are
automatically transferred to the device as they are taken. They can
even be uploaded effortlessly to cloud storage services, inviting
access across all your devices. You can share your excitement, when
and where you want.
Download the SnapBridge app to get started!
Take advantage of the wide-ranging
convenience by downloading the
SnapBridge app onto your smart device
now. Through a few simple steps, this app
connects your Nikon cameras with a
compatible iPhone®, iPad® and/or
iPod touch® or smart devices running on
the Android
is available free from the website
(http://snapbridge.nikon.com), Apple
App Store® and Google Play
For the latest information on SnapBridge, visit the Nikon website for your
area (0 xxi).
TM
operating system. The app
TM
.
Page 3
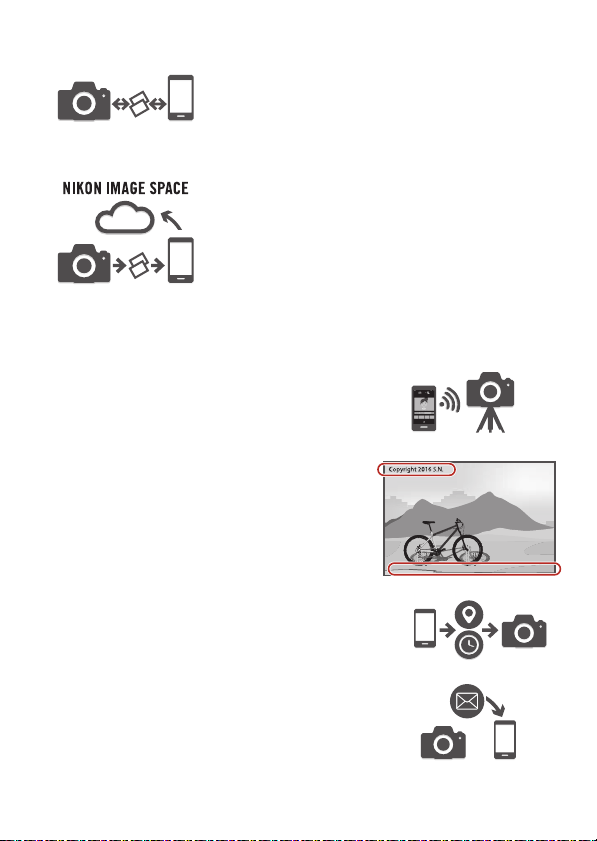
The exciting image experience that SnapBridge offers…
Automatic picture transfer from camera to smart
device thanks to the constant connection between
the two devices — making online photo sharing
easier than ever
Upload of photos and thumbnail images to the
NIKON IMAGE SPACE cloud service
A range of services that enriches your imaging life,
including:
• Camera remote control
• Imprinting up to two pieces of credit
information (e.g. copyright, comments,
text and logos) on pictures
Nikon D5600, AF-P DX NIKKOR 18–55mm f/3.5–5.6G VR
• Automatic update of camera’s date and
time info and location info
• Receive camera’s firmware updates
i
Page 4

To get the most from your camera, please be sure to read all
instructions thoroughly and keep them where they will be read
by all who use the product.
Symbols and Conventions
To make it easier to find the information you need, the following
symbols and conventions are used:
This icon marks cautions; information that should be
D
read before use to prevent damage to the camera.
This icon marks notes; information that should be read
A
before using the camera.
This icon marks references to other pages in this
0
manual.
Menu items, options, and messages displayed in the camera monitor are
shown in bold.
Camera Settings
The explanations in this manual assume that default settings are used.
Nikon Manual Viewer 2
Install the Nikon Manual Viewer 2 app on your smartphone or
tablet to view Nikon digital camera manuals, anytime,
anywhere. Nikon Manual Viewer 2 can be downloaded free of
charge from the App Store and Google Play. Download of the
app and any product manuals requires an Internet
connection, for which fees may be levied by your phone or
Internet service provider.
A For You r Safet y
Before using the camera for the first time, read the safety instructions
in “For Your Safety” (0 xiii–xvi).
ii
Page 5

Table of Contents
For Your Safety........................................................................... xiii
Notices........................................................................................ xvii
Bluetooth and Wi-Fi (Wireless LAN) ...................................... xxii
Introduction 1
Getting to Know the Camera...................................................... 1
The Camera Body .................................................................................. 1
The Mode Dial ........................................................................................ 4
The Viewfinder ....................................................................................... 5
The R (Info) Button.............................................................................. 6
The P Button ......................................................................................... 12
The Monitor ................................................................................. 13
Using the Touch Screen.................................................................... 15
Touch-Screen Photography ............................................................ 17
Viewing Pictures .................................................................................. 23
Using the Menus.................................................................................. 25
First Steps 26
Attach the Camera Strap .................................................................. 26
Charge the Battery.............................................................................. 26
Insert the Battery and a Memory Card......................................... 27
Open the Monitor ............................................................................... 29
Attach a Lens ........................................................................................ 30
Camera Setup ....................................................................................... 33
Focus the Viewfinder ......................................................................... 41
Tutorial 42
Camera Menus: An Overview ................................................... 42
The Battery Level and Number of Exposures Remaining ... 46
iii
Page 6

Basic Photography and Playback 47
“Point-and-Shoot” Modes (i and j)..................................... 47
Basic Playback ............................................................................. 56
Deleting Unwanted Photographs................................................. 57
Matching Settings to the Subject or Situation
(Scene Mode) 58
k Portrait........................................................................................ 59
l Landscape ................................................................................. 59
p Child ............................................................................................ 59
m Sports .......................................................................................... 60
n Close up...................................................................................... 60
o Night Portrait............................................................................ 60
r Night Landscape ..................................................................... 61
s Party/Indoor ............................................................................. 61
t Beach/Snow.............................................................................. 61
u Sunset ......................................................................................... 62
v Dusk/Dawn ............................................................................... 62
w Pet Portrait ................................................................................ 62
x Candlelight ................................................................................. 63
y Blossom ...................................................................................... 63
z Autumn Colors......................................................................... 63
0 Food.............................................................................................. 64
iv
Page 7

Special Effects 65
% Night Vision.............................................................................. 65
S Super Vivid ................................................................................ 66
T Pop ............................................................................................ 66
U Photo Illustration.................................................................... 66
' Toy Camera Effect .................................................................. 67
( Miniature Effect ...................................................................... 67
3 Selective Color ........................................................................ 67
1 Silhouette.................................................................................. 68
2 High Key .................................................................................... 68
3 Low Key...................................................................................... 68
Options Available in Live View ...................................................... 70
More on Photography 75
Choosing a Release Mode......................................................... 75
Continuous Shooting (Burst Mode)........................................ 76
Quiet Shutter Release................................................................ 78
Self-Timer Mode ......................................................................... 79
Focus............................................................................................. 82
Focus Mode .......................................................................................... 82
AF-Area Mode ...................................................................................... 87
Focus Lock............................................................................................. 93
Manual Focus ....................................................................................... 95
Image Quality and Size ............................................................. 98
Image Quality....................................................................................... 98
Image Size ........................................................................................... 100
Using the Built-in Flash ........................................................... 101
Auto Pop-up Modes......................................................................... 101
Manual Pop-up Modes ................................................................... 103
ISO Sensitivity ........................................................................... 107
Interval Timer Photography................................................... 109
Restoring Default Settings ..................................................... 115
v
Page 8

P, S, A, and M Modes 118
Shutter Speed and Aperture ................................................. 118
Mode P (Programmed Auto) ........................................................ 119
Mode S (Shutter-Priority Auto) .................................................... 121
Mode A (Aperture-Priority Auto)................................................. 122
Mode M (Manual).............................................................................. 123
Long Time-Exposures (M Mode Only) ....................................... 125
Exposure.................................................................................... 128
Metering.............................................................................................. 128
Autoexposure Lock.......................................................................... 130
Exposure Compensation ............................................................... 132
Flash Compensation ....................................................................... 134
Preserving Detail in Highlights and Shadows.................... 136
Active D-Lighting ............................................................................. 136
High Dynamic Range (HDR) ......................................................... 138
White Balance........................................................................... 140
Fine-Tuning White Balance .......................................................... 143
Preset Manual.................................................................................... 145
Bracketing................................................................................. 151
Picture Controls ....................................................................... 155
Selecting a Picture Control ........................................................... 155
Modifying Picture Controls........................................................... 157
Creating Custom Picture Controls ............................................. 161
vi
Page 9

Recording and Viewing Movies 164
Recording Movies .................................................................... 164
The P Button....................................................................................... 166
Movie Settings ................................................................................... 168
Time-Lapse Movies .................................................................. 171
Viewing Movies ........................................................................ 176
Editing Movies .......................................................................... 178
Trimming Movies.............................................................................. 178
Saving Selected Frames ................................................................. 182
Playback and Deletion 184
Full-Frame Playback ................................................................ 184
Thumbnail Playback ........................................................................ 185
Calendar Playback ............................................................................ 186
The P Button....................................................................................... 187
Photo Information ................................................................... 188
Taking a Closer Look: Playback Zoom.................................. 196
Protecting Photographs from Deletion ............................... 200
Rating Pictures.......................................................................... 201
Rating Individual Pictures.............................................................. 201
Rating Multiple Pictures ................................................................. 202
Selecting Photos for Upload .................................................. 203
Selecting Individual Photos .......................................................... 203
Selecting Multiple Photos ............................................................. 204
Deleting Photographs............................................................. 205
During Playback ................................................................................ 205
The Playback Menu.......................................................................... 206
Slide Shows ............................................................................... 208
Slide Show Options.......................................................................... 209
vii
Page 10

Connections 210
Installing ViewNX-i.................................................................. 210
Copying Pictures to the Computer ...................................... 211
Printing Photographs ............................................................. 214
Connecting the Printer................................................................... 214
Printing Pictures One at a Time................................................... 215
Printing Multiple Pictures.............................................................. 216
Viewing Pictures on TV........................................................... 218
Camera Menus 220
D The Playback Menu: Managing Images ................................ 220
Playback Menu Options................................................................. 220
Playback Folder ......................................................................... 221
Playback Display Options ...................................................... 221
Image Review............................................................................. 221
Auto Image Rotation ............................................................... 222
Rotate Tall.................................................................................... 222
C The Shooting Menu: Shooting Options ................................. 223
Shooting Menu Options ................................................................ 223
Reset Shooting Menu.............................................................. 225
Storage Folder ........................................................................... 225
File Naming................................................................................. 227
NEF (RAW) Recording.............................................................. 227
ISO Sensitivity Settings........................................................... 228
Color Space ................................................................................. 230
Long Exposure NR .................................................................... 230
High ISO NR................................................................................. 231
Vignette Control........................................................................ 231
Auto Distortion Control.......................................................... 232
Optical VR .................................................................................... 232
viii
Page 11

A Custom Settings: Fine-Tuning Camera Settings ........................ 233
Custom Settings................................................................................ 234
Reset Custom Settings ............................................................ 235
a: Autofocus ................................................................................... 235
a1: AF-C Priority Selection...................................................... 235
a2: Number of Focus Points................................................... 236
a3: Built-in AF-assist Illuminator .......................................... 237
a4: Rangefinder.......................................................................... 237
a5: Manual Focus Ring in AF Mode..................................... 238
b: Exposure..................................................................................... 239
b1: EV Steps for Exposure Cntrl............................................ 239
b2: ISO Display............................................................................ 239
c: Timers/AE Lock ......................................................................... 239
c1: Shutter-Release Button AE-L .......................................... 239
c2: Auto off Timers.................................................................... 240
c3: Self-Timer .............................................................................. 241
d: Shooting/Display..................................................................... 241
d1: Exposure Delay Mode....................................................... 241
d2: File Number Sequence..................................................... 242
d3: Viewfinder Grid Display ................................................... 243
d4: Date Stamp........................................................................... 243
d5: Reverse Indicators.............................................................. 245
e: Bracketing/Flash ...................................................................... 246
e1: Flash Cntrl for Built-in Flash/Optional Flash............. 246
e2: Auto Bracketing Set........................................................... 251
f: Controls........................................................................................ 252
f1: Assign Fn Button ................................................................. 252
f2: Assign AE-L/AF-L Button................................................... 254
f3: Assign Touch Fn................................................................... 255
f4: Reverse Dial Rotation......................................................... 256
ix
Page 12

B The Setup Menu: Camera Setup .............................................. 257
Setup Menu Options....................................................................... 257
Format Memory Card .............................................................. 259
Image Comment ....................................................................... 260
Copyright Information............................................................ 261
Time Zone and Date ................................................................ 262
Language..................................................................................... 262
Beep Options.............................................................................. 263
Touch Controls .......................................................................... 263
Monitor Brightness................................................................... 263
Info Display Format.................................................................. 264
Auto Info Display ...................................................................... 265
Info Display Auto Off ............................................................... 265
Image Dust Off Ref Photo ...................................................... 266
Flicker Reduction ...................................................................... 268
Slot Empty Release Lock......................................................... 268
Location Data............................................................................. 269
Remote Control ......................................................................... 270
Airplane Mode ........................................................................... 271
Connect to Smart Device....................................................... 271
Send to Smart Device (Auto) ................................................ 272
Wi-Fi............................................................................................... 272
Bluetooth..................................................................................... 273
Eye-Fi Upload ............................................................................. 274
Conformity Marking................................................................. 276
Firmware Version...................................................................... 276
x
Page 13

N The Retouch Menu: Creating Retouched Copies....................... 277
Retouch Menu Options .................................................................. 277
Creating Retouched Copies.......................................................... 278
NEF (RAW) Processing ............................................................. 280
Trim ................................................................................................ 282
Resize............................................................................................. 283
D-Lighting.................................................................................... 285
Quick Retouch ............................................................................ 286
Red-Eye Correction................................................................... 286
Straighten .................................................................................... 287
Distortion Control ..................................................................... 287
Perspective Control.................................................................. 288
Fisheye .......................................................................................... 288
Filter Effects................................................................................. 289
Monochrome.............................................................................. 290
Image Overlay ............................................................................ 291
Color Outline............................................................................... 293
Photo Illustration....................................................................... 294
Color Sketch ................................................................................ 294
Miniature Effect.......................................................................... 295
Selective Color............................................................................ 296
Painting......................................................................................... 298
Side-by-side Comparison ....................................................... 298
m Recent Settings/O My Menu ............................................. 300
Choosing a Menu.............................................................................. 300
m Recent Settings ............................................................................ 301
O My Menu......................................................................................... 301
xi
Page 14

Technical Notes 305
Compatible Lenses.................................................................. 305
Compatible CPU Lenses................................................................. 305
Compatible Non-CPU Lenses....................................................... 308
The Nikon Creative Lighting System (CLS) ......................... 315
Other Accessories .................................................................... 321
Attaching a Power Connector and AC Adapter .................... 325
Caring for the Camera ............................................................ 327
Storage................................................................................................. 327
Cleaning............................................................................................... 327
Image Sensor Cleaning .................................................................. 328
Caring for the Camera and Battery: Cautions .................... 333
Available Settings.................................................................... 338
Troubleshooting...................................................................... 340
Battery/Display.................................................................................. 340
Shooting (All Modes) ...................................................................... 341
Shooting (P, S, A, M)........................................................................... 345
Playback............................................................................................... 346
Bluetooth and Wi-Fi (Wireless Networks)................................ 348
Miscellaneous.................................................................................... 348
Error Messages......................................................................... 349
Specifications ........................................................................... 356
Lens Kits .................................................................................... 369
AF-P DX NIKKOR 18–55mm f/3.5–5.6G VR .............................. 369
AF-P DX NIKKOR 70–300mm f/4.5–6.3G ED VR and
AF-P DX NIKKOR 70–300mm f/4.5–6.3G ED....................... 375
AF-S DX NIKKOR 18–140mm f/3.5–5.6G ED VR ..................... 380
Memory Card Capacity ........................................................... 387
Battery Life................................................................................ 388
Index .......................................................................................... 390
xii
Page 15

For Your Safety
To prevent damage to property or injury to yourself or to others, read “For
Your Safety” in its entirety before using this product.
Keep these safety instructions where all those who use this product will read
them.
DANGER: Failure to observe the precautions marked with this icon carries a
high risk of death or severe injury.
WARNING: Failure to observe the precautions marked with this icon could
result in death or severe injury.
CAUTION: Failure to observe the precautions marked with this icon could
result in injury or property damage.
WAR NIN G
• Do not use while walking or operating a motor vehicle.
Failure to observe this precaution could result in accidents or other injury.
• Do not disassemble or modify this product. Do not touch internal parts
that become exposed as the result of a fall or other accident.
Failure to observe these precautions could result in electric shock or other
injury.
• Should you notice any abnormalities such as the product producing
smoke, heat, or unusual odors, immediately disconnect the battery or
power source.
Continued operation could result in fire, burns or other injury.
• Keep dry. Do not handle with wet hands. Do not handle the plug with
wet hands.
Failure to observe these precautions could result in fire or electric shock.
• Do not let your skin remain in prolonged contact with this product
while it is on or plugged in.
Failure to observe this precaution could result in low-temperature burns.
• Do not use this product in the presence of flammable dust or gas such
as propane, gasoline or aerosols.
Failure to observe this precaution could result in explosion or fire.
xiii
Page 16

• Do not directly view the sun or other bright light source through the
lens or camera.
Failure to observe this precaution could result in visual impairment.
• Do not aim the flash or AF-assist illuminator at the operator of a motor
vehicle.
Failure to observe this precaution could result in accidents.
• Keep this product out of reach of children.
Failure to observe this precaution could result in injury or product
malfunction. In addition, note that small par ts constitute a choking hazard.
Should a child swallow any part of this product, seek immediate medical
attention.
• Do not entangle, wrap or twist the straps around your neck.
Failure to observe this precaution could result in accidents.
• Do not use batteries, chargers, or AC adapters not specifically
designated for use with this product. When using batteries, chargers,
and AC adapters designated for use with this product, do not:
- Damage, modify, forcibly tug or bend the cords or cables, place them
under heavy objects, or expose them to heat or flame.
- Use travel converters or adapters designed to convert from one
voltage to another or with DC-to-AC inverters.
Failure to observe these precautions could result in fire or electric shock.
• Do not handle the plug when charging the product or using the AC
adapter during thunderstorms.
Failure to observe this precaution could result in electric shock.
• Do not handle with bare hands in lo cations exposed to extremely high
or low temperatures.
Failure to observe this precaution could result in burns, or frostbite.
CAUTION
• Do not leave the lens pointed at the sun or other strong light sources.
Light focused by the lens could cause fire or damage to product’s internal
parts. When shooting backlit subjects, keep the sun well out of the frame.
Sunlight focused into the camera when the sun is close to the frame could
cause fire.
xiv
Page 17

• Turn this product off when its use is prohibited. Disable wireless
features when the use of wireless equipment is prohibited.
The radio-frequency emissions produced by this product could interfere
with equipment onboard aircraft or in hospitals or other medical facilities.
• Remove the battery and disconnect the AC adapter if this product will
not be used for an extended period.
Failure to observe this precaution could result in fire or product
malfunction.
• Do not touch moving parts of the lens or other moving parts.
Failure to observe this precaution could result in injury.
• Do not fire the flash in contact with or in close proximity to the skin or
objects.
Failure to observe this precaution could result in burns or fire.
• Do not leave the product where it will be exposed to extremely high
temperatures, for an extended period such as in an enclosed
automobile or in direct sunlight.
Failure to observe this precaution could result in fire or product
malfunction.
DANGER (Batteries)
• Do not mishandle batteries.
Failure to observe the following precautions could result in the batteries
leaking, overheating, rupturing, or catching fire:
- Use only rechargeable batteries approved for use in this product.
- Do not expose batteries to flame or excessive heat.
- Do not disassemble.
- Do not short-circuit the terminals by touching them to necklaces,
hairpins, or other metal objects.
- Do not expose batteries or the products in which they are inserted to
powerful physical shocks.
• Do not attempt to recharge EN-EL14a rechargeable batteries using
chargers not specifically designated for this purpose.
Failure to observe this precaution could result in the batteries leaking,
overheating, rupturing, or catching fire.
• If battery liquid comes into contact with the eyes, rinse with plenty of
clean water and seek immediate medical attention.
Delaying action could result in eye injuries.
xv
Page 18

WARNING (B atteries)
• Keep batteries out of reach of children.
Should a child swallow a battery, seek immediate medical attention.
• Do not immerse batteries in water or expose to rain.
Failure to observe this precaution could result in fire or product
malfunction. Immediately dry the product with a towel or similar object
should it become wet.
• Discontinue use immediately should you notice any changes in the
batteries, such as discoloration or deformation. Cease charging
EN-EL14a rechargeable batteries if they do not charge in the specified
period of time.
Failure to observe these precautions could result in the batteries leaking,
overheating, rupturing, or catching fire.
• Prior to disposal, insulate battery terminals with tape.
Overheating, rupture, or fire may result should metal objects come into
contact with the terminals. Recycle or dispose of batteries in accord with
local regulations.
• If battery liquid comes into contact with a person's skin or clothing,
immediately rinse the affected area with plenty of clean water.
Failure to observe this precaution could result in skin irritation.
xvi
Page 19
Notices
• No part of the manuals included
with this product may be
reproduced, transmitted,
transcribed, stored in a retrieval
system, or translated into any
language in any form, by any means,
without Nikon’s prior written
permission.
• Nikon reserves the right to change
the appearance and specifications
of the hardware and software
described in these manuals at any
time and without prior notice.
Notice for Customers in Canada
CAN ICES-3 B / NMB-3 B
Notices for Customers in Europe
CAUTION: RISK OF EXPLOSION IF BATTERY IS REPLACED BY AN INCORRECT
TYPE. DISPOSE OF USED BATTERIES ACCORDING TO THE INSTRUCTIONS.
This symbol indicates that
electrical and electronic
equipment is to be
collected separately.
The following apply only
to users in European countries:
• This product is designated for
separate collection at an
appropriate collection point. Do not
dispose of as household waste.
• Separate collection and recycling
helps conserve natural resources
and prevent negative consequences
for human health and the
environment that might result from
incorrect disposal.
• For more information, contact the
retailer or the local authorities in
charge of waste management.
• Nikon will not be held liable for any
damages resulting from the use of
this product.
• While every effort has been made to
ensure that the information in these
manuals is accurate and complete,
we would appreciate it were you to
bring any errors or omissions to the
attention of the Nikon
representative in your area (address
provided separately).
This symbol on the battery
indicates that the battery
is to be collected
separately.
The following apply only to users in
European countries:
• All batteries, whether marked with
this symbol or not, are designated
for separate collection at an
appropriate collection point. Do not
dispose of as household waste.
• For more information, contact the
retailer or the local authorities in
charge of waste management.
xvii
Page 20

Notices for Customers in the U.S.A.
The Battery Charger
IMPORTANT SAFETY INSTRUCTIONS—SAVE THESE
INSTRUCTIONS
DANGER—TO REDUCE THE RISK OF FIRE OR ELECTRIC
SHOCK, CAREFULLY FOLLOW THESE INSTRUCTIONS
For connection to a supply not in the U.S.A., use an attachment plug adapter
of the proper configuration for the power outlet if needed. This power unit
is intended to be correctly oriented in a vertical or floor mount position.
Federal Communications Commission (FCC) Radio Frequ ency Interference Statement
This equipment has been tested and
found to comply with the limits for a
Class B digital device, pursuant to Part 15
of the FCC rules. These limits are
designed to provide reasonable
protection against harmful interference
in a residential installation. This
equipment generates, uses, and can
radiate radio frequency energy and, if
not installed and used in accordance
with the instructions, may cause harmful
interference to radio communications.
However, there is no guarantee that
interference will not occur in a particular
installation. If this equipment does
cause harmful interference to radio or
television reception, which can be
determined by turning the equipment
off and on, the user is encouraged to try
to correct the interference by one or
more of the following measures:
• Reorient or relocate the receiving
antenna.
• Increase the separation between the
equipment and receiver.
• Connect the equipment into an
outlet on a circuit different from that
to which the receiver is connected.
•
Consult the dealer or an experienced
radio/television technician for help.
xviii
CAUTIONS
Modifications
The FCC requires the user be notified
that any changes or modifications
made to this device that are not
expressly approved by Nikon
Corporation may void the user’s
authority to operate the equipment.
Interface Cables
Use the interface cables sold or
provided by Nikon for your
equipment. Using other interface
cables may exceed the limits of Class
B Part 15 of the FCC rules.
Notice for Customers in the State
of California
WARNING: Handling the cord on this
product may expose you to lead, a
chemical known to the State of
California to cause birth defects or
other reproductive harm. Wash hands
after handling.
Nikon Inc., 1300 Walt Whitman Road,
Melville, New York 11747-3064, U.S.A.
Tel.: 631-547-4200
D5600
Page 21

Notice Concerning Prohibition of Copying or Reproduction
Note that simply being in possession of material that has been digitally
copied or reproduced by means of a scanner, digital camera, or other device
may be punishable by law.
• Items prohibited by law from being copied
or reproduced
Do not copy or reproduce paper
money, coins, securities,
government bonds, or local
government bonds, even if such
copies or reproductions are
stamped “Sample.”
The copying or reproduction of
paper money, coins, or securities
which are circulated in a foreign
country is prohibited.
Unless the prior permission of the
government has been obtained, the
copying or reproduction of unused
postage stamps or post cards issued
by the government is prohibited.
The copying or reproduction of
stamps issued by the government
and of certified documents
stipulated by law is prohibited.
• Cautions on certain copies and
reproductions
The government has issued cautions
on copies or reproductions of
securities issued by private
companies (shares, bills, checks, gift
certificates, etc.), commuter passes,
or coupon tickets, except when a
minimum of necessary copies are to
be provided for business use by a
company. Also, do not copy or
reproduce passports issued by the
government, licenses issued by
public agencies and private groups,
ID cards, and tickets, such as passes
and meal coupons.
• Comply with copyright notices
Under copyright law, photographs
or recordings of copyrighted works
made with the camera can not be
used without the permission of the
copyright holder. Exceptions apply
to personal use, but note that even
personal use may be restricted in
the case of photographs or
recordings of exhibits or live
performances.
xix
Page 22

Disposing of Data Storage Devices
Please note that deleting images or formatting memory cards or other data
storage devices does not completely erase the original image data. Deleted
files can sometimes be recovered from discarded storage devices using
commercially available software, potentially resulting in the malicious use of
personal image data. Ensuring the privacy of such data is the user’s
responsibility.
Before discarding a data storage device or transferring ownership to another
person, erase all data using commercial deletion software, or format the
device and then completely refill it with images containing no private
information (for example, pictures of empty sky). Be sure to also replace any
pictures selected for pres et manual (0 149). Before discarding the camera or
transferring ownership to another person, you should also use the Wi-Fi >
Reset connection settings (0 272) option in the camera setup menu to
delete any personal network information. Care should be taken to avoid
injury when physically destroying data storage devices.
AVC Patent Portfolio License
THIS PRODUCT IS LICENSED UNDER THE AVC PATENT PORTFOLIO LICENSE FOR THE PERSONAL
AND NON-COMMERCIAL USE OF A CONSU MER TO (i) ENCODE VIDEO IN COMPLIANCE WITH
THE AVC STANDARD (“AVC VIDEO”) AND/OR (ii) DECODE AVC VIDEO THAT WAS ENCODED
BY A CONSUMER ENGAGED IN A PERSONAL AND NON-COMMERCIAL ACTIVITY AND/OR WAS
OBTAINED FROM A VIDEO PROVIDER LICENSED TO PROVIDE AVC VIDEO.
GRANTED OR SHALL BE IMPLIED FOR ANY OTHER USE.
OBTAINED FROM MPEG LA, L.L.C.
SEE http://www.mpegla.com
ADDITIONAL INFORMATION MAY BE
NO LICENSE IS
Use Only Nikon Brand Electronic Accessories
Nikon cameras are designed to the highest standards and include complex
electronic circuitry. Only Nikon brand electronic accessories (including
chargers, batteries, AC adapters, and flash accessories) certified by Nikon
specifically for use with this Nikon digital camera are engineered and proven
to operate within the operational and safety requirements of this electronic
circuitry.
The use of non-Nikon electronic accessories could damage
the camera and may void your Nikon warranty. The use of
third-party rechargeable Li-ion batteries not bearing the
Nikon holographic seal shown at right could interfere with
normal operation of the camera or result in the batteries overheating,
igniting, rupturing, or leaking.
For more information about Nikon brand accessories, contact a local
authorized Nikon dealer.
xx
Page 23

D Use Only Nikon Brand Accessories
Only Nikon brand accessories certified by Nikon specifically for use with
your Nikon digital camera are engineered and proven to operate within its
operational and safety requirements. THE USE OF NON-NIKON ACCESSORIES
COULD DAMAGE YOUR CAMERA AND MAY VOID YOUR NIK ON WARRANTY.
A Before Taking Important Pictures
Before taking pictures on important occasions (such as at weddings or
before taking the camera on a trip), take a test shot to ensure that the
camera is functioning normally. Nikon will not be held liable for damages
or lost profits that may result from product malfunction.
A Life-Long Learning
As part of Nikon’s “Life-Long Learning” commitment to ongoing product
support and education, continually-updated information is available online at the following sites:
• For users in the U.S.A.: http://www.nikonusa.com/
• For users in Europe and Africa: http://www.europe-nikon.com/support/
• For users in Asia, Oceania, and the Middle East: http://www.nikon-asia.com/
Visit these sites to keep up-to-date with the latest product information, tips,
answers to frequently-asked questions (FAQs), and general advice on digital
imaging and photography. Additional information may be available from
the Nikon representative in your area. See the following URL for contact
information: http://imaging.nikon.com/
xxi
Page 24

Bluetooth and Wi-Fi (Wireless LAN)
This product is controlled by the United States Export Administration
Regulations (EAR).
required for export to countries other than the following, which as of this
writing are subject to embargo or special controls: Cuba, Iran, North Korea,
Sudan, and Syria (list subject to change).
The use of wireless devices may be prohibited in some countries or regions.
Contact a Nikon-authorized service representative before using the wireless
features of this product outside the country of purchase.
Notice for Customers in the U.S.A. and Canada
This device complies with Part 15 of FCC Rules and Industry Canada licenceexempt RSS standard(s). Operation is subject to the following two conditions:
(1) this device may not cause inter ference, and (2) this device must accept any
interference, including interference that may cause undesired operation of
the device.
FCC WARNING
The FCC requires the user to be notified that any changes or modifications
made to this device that are not expressly approved by Nikon Corporation
may void the user’s authority to operate the equipment.
FCC Radio Frequency Interference Statement
Note: This equipment has been tested and found to comply with the limits for
a Class B digital device, pursuant to part 15 of the FCC Rules. These limits are
designed to provide reasonable protection against harmful interference in a
residential installation. This equipment generates, uses and can radiate radio
frequency energy and, if not installed and used in accordance with the
instructions, may cause harmful interference to radio communications.
However, there is no guarantee that interference will not occur in a particular
installation. If this equipment does cause harmful interference to radio or
television reception, which can be determined by turning the equipment off
and on, the user is encouraged to try to correct the interference by one or
more of the following measures:
• Reorient or relocate the receiving antenna.
• Increase the separation between the equipment and receiver.
• Connect the equipment into an outlet on a circuit different from that to
which the receiver is connected.
• Consult the dealer or an experienced radio/TV technician for help.
Co-location
This transmitter must not be co-located or operated in conjunction with any
other antenna or transmitter.
Nikon Inc., 1300 Walt Whitman Road, Melville, New York 11747-3064, U.S.A.
Tel.: 631-547-4200
xxii
The permission of the United States government is not
Page 25
FCC/IC RF Exposure Statement
The available scientific evidence does not show that any health problems are
associated with using low power wireless devices. There is no proof, however,
that these low power wireless devices are absolutely safe. Low power
wireless devices emit low levels of radio frequency energy (RF) in the
microwave range while being used. Whereas high levels of RF can produce
health effects (by heating tissue), exposure of low-level RF that does not
produce heating effects causes no known adverse health effects. Many
studies of low-level RF exposures have not found any biological effects. Some
studies have suggested that some biological effects might occur, but such
findings have not been confirmed by additional research. The D5600, which
is equipped with a LBEE5UW1FS (FCC ID:VPYLB1FS / IC ID:772C-LB1FS)
Wireless LAN Module, has been tested and found to comply with FCC/IC
radiation exposure limits set forth for an uncontrolled environment and
meets the FCC radio frequency (RF) Exposure Guidelines in Supplement C to
OET65 and RSS-102 of the IC radio frequency (RF) Exposure rules. Please refer
to the SAR test report that was uploaded to FCC website.
Notices for Customers in Europe
Hereby, Nikon Corporation, declares that the D5600 is in
compliance with the essential requirements and other relevant
provisions of Directive 1999/5/EC. The declaration of conformity
may be consulted at http://imaging.nikon.com/support/pdf/DoC_D5600.pdf
Notice for Customers in Singapore
Trade Name:
Model: D5600
This device complies with radio-frequency regulations. The content of
certification labels not affixed to the device is given below.
Complies w ith
IDA Standards
DA103423
xxiii
Page 26

Security
Although one of the benefits of this product is that it allows others to freely
connect for the wireless exchange of data anywhere within its range, the
following may occur if security is not enabled:
• Data theft: Malicious third-parties may intercept wireless transmissions to
steal user IDs, passwords, and other personal information.
• Unauthorized access: Unauthorized users may gain access to the network
and alter data or perform other malicious actions. Note that due to the
design of wireless networks, specialized attacks may allow unauthorized
access even when security is enabled.
• Unsecured networks: Connecting to open networks may result in
unauthorized access. Use secure networks only.
xxiv
Page 27
Introduction
Getting to Know the Camera
Take a few moments to familiarize yourself with camera controls
and displays. You may find it helpful to bookmark this section
and refer to it as you read through the rest of the manual.
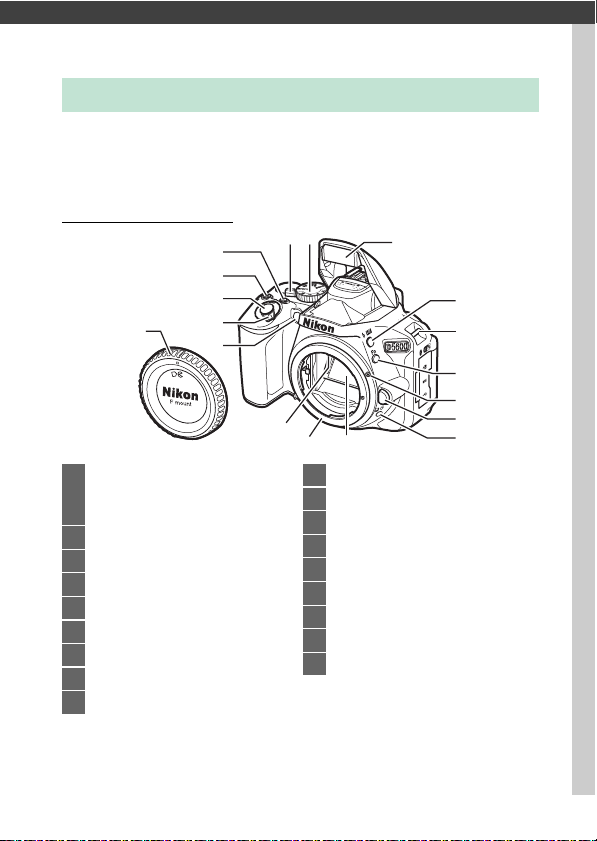
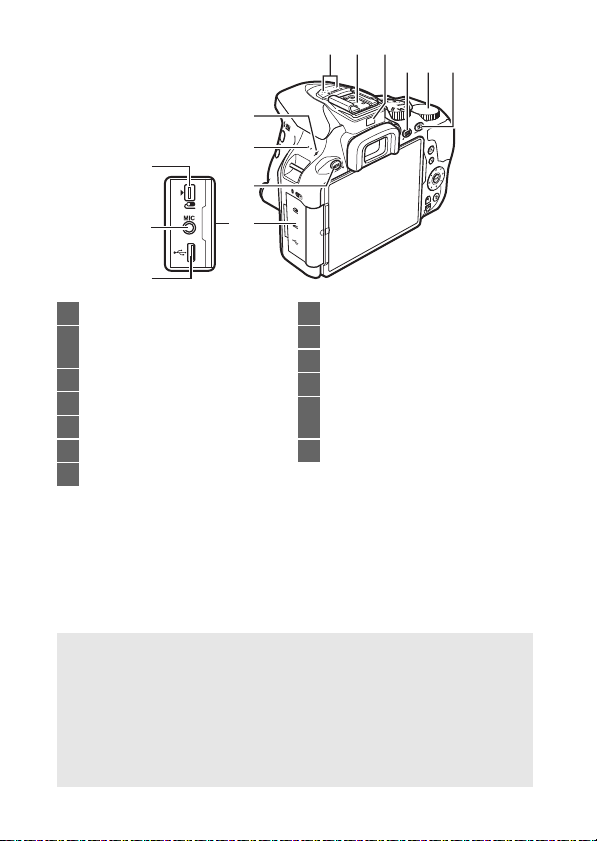
The Camera Body
5
4
3
18
2
1
17
1 AF-assist illuminator ........... 85, 237
Self-timer lamp.............................. 80
Red-eye reduction lamp..102, 104
2 Power switch............................33, 39
3
Shutter-release button
4 E/N button...............124, 132, 134
5 Movie-record button ................. 165
6 Live view switch ...................47, 164
7 Mode dial ...........................................4
8 Built-in flash .................................101
9 M/ Y button .............101, 103, 134
................. 52
67
10 Eyelets for camera strap.............. 26
11 Fn button ...................................... 252
12 Mounting mark ............................. 30
13 Lens release button...................... 31
14 I/E button.............. 75, 76, 78, 79
15 Mirror .............................................330
16 Lens mount ..............................30, 96
17 CPU contacts
18 Body cap ................................ 30, 323
8
9
10
11
12
13
1516
14
1Introduction
Page 28
28
20 2119
22 23 24
31
27
26
30
25
29
19 Stereo microphone .................... 169
20 Accessory shoe
(for optional flash units) ..........315
21 Eye sensor................................. 8, 265
22 R
(information) button
23 Command dial
24 A/L button .....94, 130, 200, 254
25 Connector cover
.......6, 9, 115
26 G button ..................42, 115, 220
27 Speaker
28 Focal plane mark (E)...................96
29 USB connector ................... 211, 214
30 Connector for external
microphone ...............................170
31 Accessory terminal..................... 324
D Close the Connector Cover
Close the connector cover when the connectors are not in use.
matter in the connectors can interfere with data transfer.
Forei gn
D The Speaker
Do not place the speaker in close proximity to magnetic devices.
Failure to observe this precaution could affect the data recorded on
the magnetic devices.
2 Introduction
Page 29
46
324733 34 35
36
37
38
39
40
48
49
50
45
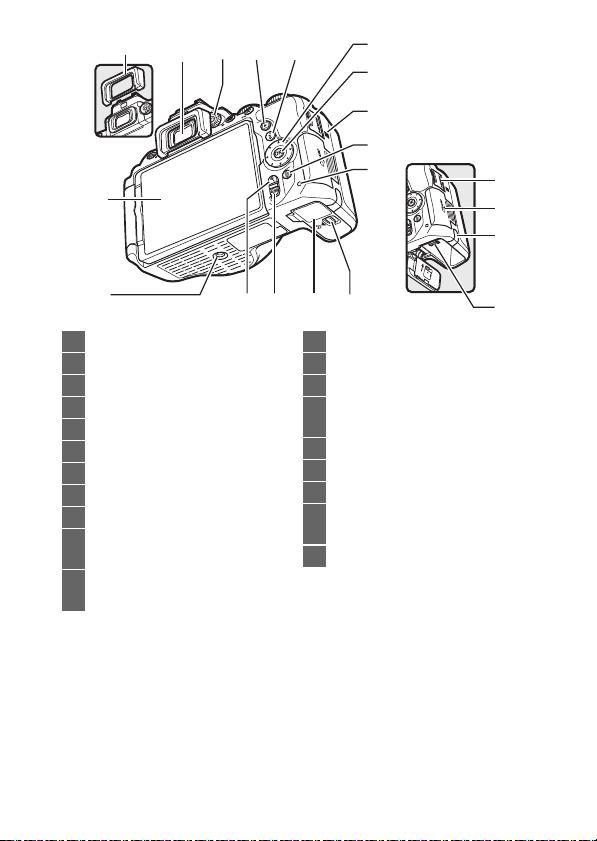
32 Viewfinder eyepiece.......... 5, 41, 80
33 Diopter adjustment control ....... 41
34 K button............................... 56, 184
35 P button........................ 12, 166, 187
36 Multi selector ....................33, 39, 43
37 J (OK) button..................33, 39, 43
38 N-Mark (NFC antenna)................. 34
39 O button ................................ 57, 205
40 Memory card access lamp.......... 51
41 Battery-chamber cover
latch .................................27, 28, 325
42 Battery-chamber cover
..........................................27, 28, 325
414244 43
43 W/Q button.................43, 185, 196
44 X button ..............................185, 196
45 Tripod so cket
46 Vari-angle monitor
....................13, 15, 47, 56, 184, 255
47 Rubber eyecup .............................. 80
48 HDMI connector cover .............. 218
49 Memory card slot cover ........27, 28
50 Power connector cover for
optional power connector ......325
51 Battery latch....................27, 28, 325
51
3Introduction
Page 30
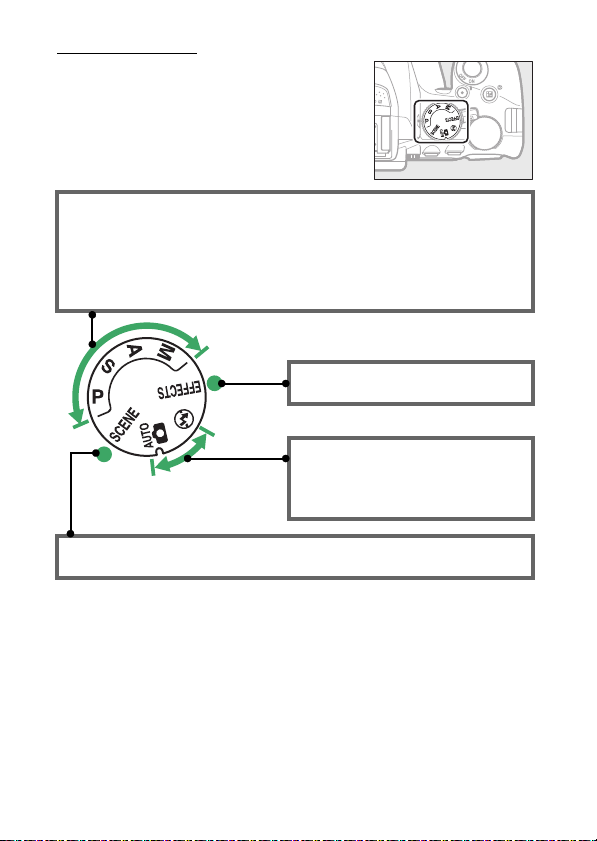
The Mode Dial
The camera offers a choice of the
following shooting modes.
P, S, A, and M Modes:
• P —Programmed auto (0 119)
• S —Shut ter-priority auto (0 121)
• A —Aperture- priority auto (0 122)
• M—Manual (0 123)
Scene Modes (0 58)
Special Effects Modes (0 65)
Auto Modes:
• i Auto (0 47)
• j Auto (flash off ) (0 47)
4 Introduction
Page 31

The Viewfinder
Note: Display shown with all indicators lit
for illustrative purposes.
12
3
4
5
6
1 Framing grid (displayed when On
is selected for Custom Setting d3,
Viewfinder grid display) ...243
2 Focus points ....................50, 90, 236
3 AF area brackets......................41, 49
4 Low battery warning ................... 46
5 Monochrome indicator (displayed
in % mode or when the
Monochrome Picture Con trol or
a Picture Control based on
Monochrome is
selected) ............................... 65, 155
6 “No memory card” indicator ...... 27
7 Focus indicator ........................50, 96
8 Autoexposure (AE) lock
indicator....................................... 130
9 Shutter speed .............................. 118
10 Aperture (f-number) .................. 118
11 Special effects mode
indicator......................................... 65
12 Bracketing indicator...................151
7
8
13 Number of exposures
remaining...................................... 46
Number of shots remaining before
memory buffer fills ..................... 77
White balance recording
indicator ...................................... 146
Exposure compensation
value............................................. 132
Flash compensation value........ 134
ISO sensitivity .....................107, 239
Capture mode indicator
14 “k” (appears when memory
remains for over 1000
exposures)..................................... 46
15 Flash-ready indicator ................... 54
16 Flexible program indicator....... 120
17 Exposure indicator ..................... 124
Exposure compensation
display.......................................... 132
Electronic rangefinder............... 237
18
Flash compensation indicator
19 Exposure compensation
indicator ...................................... 132
20 Auto ISO sensitivity indicator .. 228
21 Warning indicator....................... 349
11 12 1491710 1513
1816
19
2120
... 134
5Introduction
Page 32

The R (Info) Button
R button
2
1
7
6
8
5
3
4
Press the R button to view the information display or cycle
through display options.
❚❚ Viewfinder Photography
To view shutter speed, aperture, the
number of exposures remaining, AF-area
mode, and other shooting information in
the monitor, press the R button.
1 Shooting mode
i auto/
j auto (flash off).....................47
Scene modes ............................58
Special effects mode ..............65
P, S, A, and M modes............. 118
2 Shutter speed .............................. 118
Shutter-speed display ...... 121, 124
3 Autoexposure (AE) lock
indicator ...................................... 130
6 Introduction
4 Release mode .................................75
5 Help icon ...................................... 349
6 Aperture (f-number).................. 118
Aperture display ................ 122, 124
7 ISO sensitivity .............................. 107
ISO sensitivity display....... 107, 229
Auto ISO sensitivity
indicator ...................................... 229
8 z icon..............................................22
Page 33

19
20
21
22
24
23
91011 12 13 14 15 16 17 18
9 Satellite signal indicator............ 269
10 Wi-Fi connection indicator .......272
Eye-Fi connection indicator .....274
11 Bluetooth connection indicator
.......................................................273
Airplane mode............................. 271
12 Touch Fn assignment................. 255
13 Vignette control indicator ........231
14 Exposure delay mode ................241
15 Date stamp indicator .................243
16 Vibration reduction indicator
................................................ 32, 232
17 Flash control indicator...............246
Flash compensation indicator for
optional flash units ...................318
18 Battery indicator ........................... 46
19 Bracketing indicator...................151
Note: Display shown with all indicators lit for illustrative purposes.
20 AF-area mode indicator .............. 87
Focus point............................ 90, 236
21 Exposure indicator ..................... 124
Exposure compensation
indicator ...................................... 132
Bracketing progress
indicator ...................................... 154
22 ADL bracketing amount............ 152
23 Number of exposures
remaining...................................... 46
White balance recording
indicator ...................................... 146
Capture mode indicator
24 “k” (appears when memory
remains for over 1000
exposures)..................................... 46
7Introduction
Page 34

A Turning the Monitor Off
To clear shooting information from the monitor, press the R button or
press the shutter-release button halfway.
automatically if no operations are performed for about 8 seconds (for
information on choosing how long the monitor stays on, see Auto off
timers on page 240).
sensor or look through the viewfinder.
The monitor will also turn off if you cover the eye
The monitor will turn off
A Info Display Auto Off
The eye sensor will automatically turn the information display off if you
put your eye to the viewfinder while the standby timer is active.
display will turn on again when you remove your eye from the
viewfinder.
off using the Info display auto off option (0 265) in the setup menu.
Note, however, that regardless of the option selected the information
display will turn off when the standby timer expires.
If desired, you can prevent the information display turning
The
8 Introduction
Page 35

❚❚ Live View and Movie Mode
R button
To start live view, rotate the live view
switch during viewfinder photography
(0 47).
to cycle through display options as
shown below.
You can then press the R button
Show detailed photo
indicators
Show basic photo indicators
* A crop showing the area recorded is displayed during movie recording;
circled areas indicate the edges of the movie frame crop (the area
outside the movie frame crop is grayed out when movie indicators are
displayed).
*
Show movie indicators
Hide indicators
Framing grid
(0 164)
*
*
*
9Introduction
Page 36

The Live View Display
w
e
t
r
y
q
u
Item Description 0
Shooting mode
q
Manual movie settings
w
indicator
Time remaining
e
Wind noise reduction
r
Microphone sensitivity
t
Sound level
y
Focus point
u
The mode currently selected with
the mode dial.
Displayed when On is selected for
Manual movie settings in mode M.169
The amount of time remaining
before live view ends
automatically.
shooting will end in 30 s or less.
Displayed when On is selected for
Movie settings > Wind noise
reduction in the shooting menu.
Microphone sensitivity for movie
recording.
Sound level for audio recording.
Displayed in red if level is too high;
adjust microphone sensitivity
accordingly.
The current focus point.
display varies with the option
selected for AF-area mode (0 89).
Displayed if
The
47, 58,
65, 118
11
169
169
169
49
10 Introduction
Page 37

Item Description 0
!3
!2
!1
!0oi
Movie frame size
i
Focus mode The current focus mode. 83
o
AF-area mode The current AF-area mode. 89
!0
“No movie” icon
!1
Time remaining (movie
!2
mode)
Exposure indicator
!3
The frame size of movies recorded
in movie mode.
Indicates that movies can not be
recorded.
The recording time remaining in
movie mode.
Indicates whether the photograph
would be under- or over-exposed
at current settings (mode M only).
168
—
165
124
D The Count Down Display
A count down will be displayed 30 s before live view ends
automatically (0 10); the timer turns red 5 s before the auto off timer
expires (0 240) or if live view is about to end to protect the internal
circuits.
Depending on shooting conditions, the timer may appear
immediately when live view is selected.
automatically when the timer expires, regardless of the amount of
recording time available.
Movie recording will end
11Introduction
Page 38

The P Button
P button
Viewfinder photography
Live view
To change the settings at the bottom of
the information display, press the P
button, then highlight items using the
multi selector and press J to view
options for the highlighted item. You ca n
also change settings by pressing the P
button during live view.
• Image quality (0 98)
• Image size (0 100)
• Auto bracketing (0 151)
• HDR (high dynamic range) (0 138)
• Active D-Lighting (0 136)
• White balance (0 140)
• ISO sensitivity (0 107)
• Picture Control (0 155)
• Focus mode (0 82)
• AF-area mode (0 87)
• Metering (0 128)
• Flash mode (0 102, 104)
• Flash compensation (0 134)
• Exposure compensation (0 132)
12 Introduction
Page 39

The Monitor
The monitor can be angled and rotated as shown below.
180°
Normal use: Fold the monitor
against the camera face out.
monitor is normally used in this
position.
Low-angle shots: Tilt the monitor
up to take shots in live view w ith
the camera held low.
High-angle shots: Tilt the monitor
down to take shots in live view
with the camera held high.
Self-portraits: Use for self-portraits
in live view.
a mirror image of what will
appear in the final picture.
The monitor shows
The
90°
180°
13Introduction
Page 40

D Using the Monitor
Rotate the monitor gently within the limits shown.
Failure to observe these precautions could damage the camera or
monitor.
back face down against the camera body.
Do not lift or carry the camera by the monitor.
precaution could damage the camera.
To protect the monitor when the camera is not in use, fold it
Do not use force.
Failure to observe this
14 Introduction
Page 41

Using the Touch Screen
The touch-sensitive monitor supports the following operations:
Flick
Flick a finger a short distance left or right
across the monitor.
Slide
Slide a finger over the monitor.
Stretch/Pinch
Place two fingers on the monitor and
move them apart or pinch them together.
15Introduction
Page 42

D The Touch Screen
The touch screen responds to static electricity and may not respond
when covered with third-party protective films or when touched with
fingernails or gloved hands.
screen with sharp objects.
Do not use excessive force or touch the
D Using the Touch Screen
The touch screen may not respond as expected if you attempt to
operate it while leaving your palm or another finger resting on it in
second location.
too soft, your fingers are moved too quickly or too short a distance or
do not remain in contact with the screen, or if the movement of the
two fingers in a pinch or stretch is not correctly coordinated.
It may not recognize other gestures if your touch is
A Enabling or Disabling Touch Controls
Touch controls can be enabled or disabled using the Touch controls
option in the setup menu (0 263).
controls for shooting, playback, and menu navigation or Playback
only to enable touch controls for playback only.
Select Enable to enable touch
16 Introduction
Page 43

Touch-Screen Photography
Tap icons in the shooting display to adjust camera settings (note
that not all icons will respond to touch-screen operations).
During live view, you can also take photographs by tapping the
monitor.
❚❚ Viewfinder Photography
Use the touch screen to adjust settings in the information
display (0 6).
Scene/Effect Selection
In scene and special effects modes (0 58, 65), you can tap the
shooting mode icon to choose a scene or effect. Tap x or y to
view the different options and tap an icon to select and return to
the previous display.
Shutter Speed and Aperture
In modes S, A, and M, you can tap the w icon next to the shutter
speed or aperture displays to view x and y controls, which you
can tap to choose a new value. Tap 1 to exit when the operation
is complete.
17Introduction
Page 44

Shooting Options
To change camera settings (0 12), tap the z icon at the bottom
right corner of the display and then tap icons to display options
for the corresponding setting.
and return to the previous display.
If prompted to choose a value as shown
at right, edit the value by tapping u or v
and then tap the number or tap 0 to
select it and return to the previous
display.
To exit without changing settings, tap
2.
Tap the desired option to select it
18 Introduction
Page 45

❚❚ Live View Photography
Use the touch screen to take photographs and adjust settings.
Taking Photographs (Touch Shutter)
Touch your subject in the monitor to
Focus locks until you lift your
focus.
finger from the monitor to take the
photograph (note that the touch shutter
can not be used to focus when MF—
manual focus—is selected for focus mode). For more
information on touch focus, see page 83.
To disable the touch shutter, tap the
icon at right. The icon will change to
7, indicating that the shutter will no
longer be released when you lift your
finger from the monitor.
The touch shutter remains off (7) during movie recording, but
you can refocus at any time by touching your subject in the
monitor.
19Introduction
Page 46

D Taking Pictures Using Touch Shooting Options
The shutter-release button can be used to focus and take pictures even
when the 3 icon is displayed to show that touch shooting options are
active.
Use the shutter-release button to take photographs in
continuous shooting mode (0 76) and during movie recording.
shooting options can be used only to take pictures one at a time in
continuous shooting mode and can not be used to take photographs
during movie recording.
In self-timer mode (0 79), focus locks on the selected subject when
you touch the monitor and the timer starts when you lift your finger
from the screen.
after the timer starts; the delay and number of shots can be changed
using Custom Setting c3 (Self-timer, 0 241).
Number of shots is greater than 1, the camera will automatically take
pictures one after the other until the selected number of shots is
recorded.
At default settings, the shutter is released about 10 s
If the option selected for
Tou ch
20 Introduction
Page 47

Scene/Effect Selection
In scene and special effects modes (0 58, 65), you can tap the
shooting mode icon to choose a scene or effect.
view the different options and tap an icon to select and return to
the previous display.
Shutter Speed and Aperture
In modes S, A, and M, tapping the shutter speed or aperture
displays x and y controls, which you can tap to choose a new
value.
Tap 1 to exit when the operation is complete.
Tap x or y to
21Introduction
Page 48

Shooting Options
In live view, pressing the P button or tapping the z icon in the
monitor activates the information display (0 12, 166).
setting to view options and then tap the desired option to select
it and return to live view.
If prompted to choose a value as shown
at right, edit the value by tapping u or v
and then tap the number or tap 0 to
select it and return to the previous
display.
To exit without changing settings, tap
2.
Tap a
22 Introduction
Page 49

Viewing Pictures
The touch screen can be used for the following playback
operations (0 56, 184).
View other
images
Scroll
rapidly to
other
images
Zoom in
(photos
only)
Flick left or right to view other
images.
In full frame view, you can touch
the bottom of the display to
display a frame advance bar,
the n sli de you r fin ger left or ri ght
to scroll rapidly to other images.
Frame advance bar
Use stretch and pinch gestures to
zoom in and out and slide to
scroll (0 196).
23Introduction
Page 50

View
thumbnails
View movies
Guide
To “zoom out” to a thumbnail
view (0 185), use a pinch
gesture in full-frame playback.
Use pinch and stretch to choose
the number of images displayed
from 4, 12, or 80 frames.
Tap the on-screen guide to start
movie playback (movies are
indicated by a 1 icon). Tap the
display to pause or resume, or
tap 1 to exit to full-frame
playback (note that some of the
icons in the movie playback
display do not respond to touchscreen operations).
24 Introduction
Page 51

Using the Menus
The touch screen can be used for the following menu
operations.
Scroll Slide up or down to scroll.
Choose a
menu
Select
options/
adjust
settings
Tap a menu icon to choose a
menu.
Tap menu items to display
options and tap icons or sliders
to change. To exit without
changing settings, tap 1.
25Introduction
Page 52

First Steps
Battery charging
Charging complete
Attach the Camera Strap
Attach the strap securely to the two camera eyelets.
Charge the Battery
If a plug adapter is supplied, raise the wall plug and connect the
plug adapter as shown below at left, making sure the plug is fully
inserted. Insert the battery and plug the charger in. An
exhausted battery will fully charge in about an hour and
50 minutes.
D The Battery and Charger
Read and follow the warnings and cautions on pages xiii–xvi and 333–337
of this manual.
26 First Steps
Page 53

Insert the Battery and a Memory Card
Before inserting or removing the battery or memory cards,
confirm that power switch is in the OFF position. Insert the
battery as shown, using the battery to keep the orange battery
latch pressed to one side. The latch locks the battery in place
when the battery is fully inserted.
Battery latch
Holding the memory card in the orientation shown, slide it in
until it clicks into place.
A The Clock Battery
The camera clock is powered by an independent, rechargeable power
source, which is charged as necessary when the main battery is
installed.
month.
when the camera is turned on, the clock battery is exhausted and the
clock has been reset.
Three days of charging will power the clock for about a
If a message warning that the clock is not set is displayed
Set the clock to the correct time and date.
27First Steps
Page 54

❚❚ Removing the Battery and Memory Cards
16
GB
Removing the Battery
To remove the battery, turn the camera
off and open the battery-chamber cover.
Press the battery latch in the direction
shown by the arrow to release the
battery and then remove the battery by
hand.
Removing Memory Cards
After confirming that the memory card
access lamp is off, turn the camera off,
open the memory card slot cover, and
press the card in to eject it (q).
can then be removed by hand (w).
D Memory Cards
• Memory cards may be hot after use.
removing memory cards from the camera.
• Do not remove memory cards from the camera, turn the camera off,
or remove or disconnect the power source during formatting or while
data are being recorded, deleted, or copied to a computer.
observe these precautions could result in loss of data or in damage to
the camera or card.
• Do not touch the card terminals with your fingers or metal objects.
• Do not bend, drop, or subject to strong physical shocks.
• Do not apply force to the card casing.
precaution could damage the card.
• Do not expose to water, heat, high levels of humidity, or direct
sunlight.
• Do not format memory cards in a computer.
28 First Steps
The card
Observe due caution when
Failure to observe this
Failur e to
Page 55

Open the Monitor
Open the monitor as shown. Do not use force.
29First Steps
Page 56

Attach a Lens
Remove the camera
body cap
Remove the rear
lens cap
Mounting mark (lens)
Mounting mark (camera)
Align the mounting
marks
Rotate the lens as shown until it clicks into place.
Be careful to prevent dust from entering the camera when the
lens or body cap is removed. The lens generally used in this
manual for illustrative purposes is an AF-P DX NIKKOR 18–55mm
f/3.5–5.6G VR.
Be sure to remove the lens cap before taking pictures.
30 First Steps
Page 57

A Lenses with Retractable Lens Barrel Buttons
Retractable lens barrel button
Before using the camera, unlock and extend the lens.
retractable lens barrel button pressed (q), rotate the zoom ring as
shown (w).
Pictures can not be taken when the lens is
retracted; if an error message is displayed as
a result of the camera having been turned
on with the lens retracted, rotate the zoom
ring until the message is no longer
displayed.
Keeping the
A Detaching the Lens
Be sure the camera is off when removing or
exchanging lenses.
press and hold the lens release button (q)
while turning the lens clockwise (w).
removing the lens, replace the lens caps and
camera body cap.
To r emo ve the l ens,
After
A A-M, M/A-M, and A/M-M Switches
When using autofocus with a lens equipped
with an A-M mode switch, slide the switch to
A (if the lens has an M/A-M or A/M-M switch,
select M/A or A/M).
lenses that can be used with this camera, see
page 305.
For information on other
31First Steps
Page 58

A Vibration Reduction (VR)
Vibration reduction can be enabled by
selecting On for Optical VR in the shooting
menu (0 232), if the lens supports this
option, or by sliding the lens vibration
reduction switch to ON, if the lens is
equipped with a vibration reduction switch.
A vibration reduction indicator appears in
the information display when vibration
reduction is on.
A Retracting Lenses with Retractable Lens Barrel Buttons
To retract the lens when the camera is not in
use, press and hold the retractable lens
barrel button (q) and rotate the zoom ring
to the “L” (lock) position as shown (w).
Retract the lens before removing it from the
camera, and be careful not to press the
retractable lens barrel button when
attaching or removing the lens.
32 First Steps
Page 59

Camera Setup
1 Up
J button (select)
4 Left 2 Right
3 Down
Multi selector
Power switch
❚❚ Setup from a Smartphone or Tablet
Before proceeding, install the SnapBridge app as
described inside the front cover and enable
Bluetooth and Wi-Fi on your smartphone or tablet
(below, “smart device”).
and smart device displays may differ from those shown below.
Note that the actual camera
1 Turn the camera on.
A language-selection dialog will be
displayed.
Use the multi selector and J button to navigate the menus.
Press 1 and 3 to highlight a language and press J to select.
The language can be changed at any time using the
Language option in the setup menu.
33First Steps
Page 60

2 Press J when the dialog at right is
D5600
Connect to Camera
Camera name
displayed.
If you do not wish to use a smart
device to configure the camera, press
G (0 40).
3 Pair the camera and the smart
device.
• Android devices with NFC support: After
checking that NFC is enabled on the
smart device, touch the camera
H (N-Mark) to the NFC antenna on
the smart device to launch the
SnapBridge app. If the SnapBridge
download site is displayed,
download and install the app before repeating the above
steps.
• iOS devices and Android devices without
NFC support: Press the camera J
button. The camera will wait for a
connection; launch the SnapBridge
app on the smart device and follow
the on-screen instructions to tap the
name of the camera you want to pair
with.
34 First Steps
Page 61

4 Check the authentication code.
Camera
After confirming that the camera and
smart device display the same sixdigit authentication code, follow the
steps below to complete pairing (note
that the code may not be displayed in
some versions of iOS, but you should
follow the steps below even if the code is not displayed).
• On the camera, press J.
• On the smart device, tap PA IR (the name of the button varies
with the smart device).
5 Press J when the dialog at right is
displayed.
You have now established a constant
connection between the camera and
smart device. If the camera displays
Unable to connect., the display will
change after a short pause. Return to Step 3.
35First Steps
Page 62

6 Follow the on-screen instructions to complete the setup
process.
To record location data with photographs, select Ye s when
prompted and enable the location data features both in the
SnapBridge app and on the smart device itself (for more
information, see the documentation provided with the smart
device). You can also synchronize the camera clock to the
time reported by the smart device by selecting Ye s when
prompted and enabling synchronization in the SnapBridge
app. If you select No, set the camera clock from the menus as
described in Step 3 on page 40.
Setup is complete when the camera returns to the shooting
display. See page 37 for more information on using
SnapBridge.
36 First Steps
Page 63

A What SnapBridge Can Do for You
The SnapBridge app can be used for a variety of tasks once the camera
has been paired with your smart device.
features below, see SnapBridge online help.
Auto Upload
At default settings, JPEG photographs will automatically be uploaded
to the smart device as they are taken (auto upload is not available with
movies or with NEF/RAW images, and is automatically suspended
when the battery level drops to H).
the smart device close to the camera and launch the SnapBridge app.
Here are some tips for uploading pictures:
• Disabling auto upload: To disable auto upload, select Off for Send to
smart device (auto) in the camera setup menu (0 272).
• Uploading selected pictures: To upload pictures not previously sent using
auto upload, press the camera P button during playback and select
pictures using Select to send to smart device/deselect (0 203), or
select pictures using the Select to send to smart device option in
the camera playback menu (0 204).
connection is in effect between the camera and smart device,
pictures will be uploaded automatically even when the camera is off.
Upload is however automatically suspended when the battery level
drops to H.
• Resizing pictures for upload: Choose an upload size in the SnapBridge
app.
The default is 2 megapixels.
• Embedding photo info: Use the SnapBridge app to choose the
information you want imprinted on photographs copied to the smart
device.
Comments and copyright information can be entered in
advance from the camera setup menu.
entered in the SnapBridge app.
For more information on the
Before uploading pictures, place
Note that as long as a constant
You can also imprint text
37First Steps
Page 64

Tips f or Wire less Ne tworks
• Pairi ng: To pair the camera with a smart device (for example, with a
new device or if you did not opt to pair with a smart device during
setup), select Set for Connect to smart device in the camera setup
menu and follow the instructions on page 34, starting with Step 3.
The camera can be paired with up to five smart devices, but can
connect to only one at a time.
• Uploading pictures via Wi-Fi: A Wi-Fi connection is recommended for
movies and other large-volume uploads.
instructions in the SnapBridge app to switch to a Wi-Fi connection.
The Wi-Fi > Network settings item in the camera setup menu
contains Authentication/encryption and Password options.
default option for Authentication/encryption is WPA2-PSK-AES.
Other Features of the SnapBridge App
• Remote photography: The camera shutter can be released remote ly from
the smart device using the SnapBridge app.
before attempting to take pictures.
• Viewing pictures from the smar t device: Use the smart device to view and
download the pictures on the camera.
when the camera is off.
Follow the on-screen
Be sure the cam era is on
This option is available even
The
A Where the Use of Wireless Devices Is Prohibited
Where the use of wireless devices is prohibited, disable wireless
features in the camera setup menu by selecting Enable for Airplane
mode.
This will temporarily interrupt the constant connection with
the smart device, but the connection is automatically re-established
when airplane mode is disabled.
38 First Steps
Page 65

❚❚ Setup from the Camera Menus
1 Up
J button (select)
4 Left 2 Right
3 Down
Multi selector
Power switch
The camera clock can be set manually.
1 Turn the camera on.
A language-selection dialog will be
displayed.
Use the multi selector and J button to navigate the menus.
Press 1 and 3 to highlight a language and press J to select.
The language can be changed at any time using the
Language option in the setup menu.
39First Steps
Page 66

2 Press G when the dialog at right is
G button
displayed.
3 Set the camera clock.
Use the multi selector and J button to set the camera clock.
qw
Select time zone Select date format
er
40 First Steps
Select daylight saving time
option
The clock can be adjusted at any time using the Time zone
and date > Date and time option in the setup menu.
Set time and date (note that the
camera uses a 24-hour clock)
Page 67

Focus the Viewfinder
After removing the lens cap,
rotate the diopter adjustment
control until the AF area
brackets are in sharp focus.
When operating the control
with your eye to the
viewfinder, be careful not to
put your fingers or fingernails in your eye.
Viewfinder not in focus Viewfinder in focus
The camera is now ready for use. Proceed to page 47 for
information on taking photographs.
AF area
brackets
41First Steps
Page 68

Tutorial
G button
Current settings are shown by
icons.
Slider shows position in
current menu.
Menu options
Options in current menu.
Camera Menus: An Overview
Most shooting, playback, and setup
options can be accessed from the camera
menus. To view the menus, press the
G button.
Tabs
Choose from the following menus:
• D: Playback (0 220) • N: Retouch (0 277)
• C: Shooting (0 223) • m/O: Recent settings or My Menu
• A: Custom Setti ngs (0 233)
• B: Setup (0 257)
(defaults to Recent settings;
0 300)
42 Tutorial
Help icon (0 43)
Page 69

Using Camera Menus
2: Select highlighted item
or display sub-menu
1: Move cursor up
3: Move cursor down
J button: select
highlighted item
4: Cancel and return to
previous menu
W (Q) button
❚❚ Menu Controls
The multi selector and J button are used to navigate the
camera menus.
A The d (Help) Icon
If a d icon is displayed at the bottom left corner of the monitor, a
description of the currently selected option or menu can be displayed
by pressing the W (Q) button.
display.
Press W (Q) again to return to the menus.
Press 1 or 3 to scroll through the
43Tutorial
Page 70

❚❚ Navigating the Menus
G button
Follow the steps below to navigate the menus.
1 Display the menus.
Press the G button to
display the menus.
2 Highlight the icon for the
current menu.
Press 4 to highlight the
icon for the current menu.
3 Select a menu.
Press 1 or 3 to select the desired menu.
4 Position the cursor in the
selected menu.
Press 2 to position the
cursor in the selected
menu.
44 Tutorial
Page 71

5 Highlight a menu item.
Press 1 or 3 to highlight a
menu item.
6 Display options.
Press 2 to display options
for the selected menu item.
7 Highlight an option.
Press 1 or 3 to highlight
an option.
8 Select the highlighted item.
Press J to select the highlighted item. To e x it
without making a selection, press the G button.
Note the following:
• Menu items that are displayed in gray are not currently
available.
• While pressing 2 generally has the same effect as pressing J,
there are some cases in which selection can only be made by
pressing J.
• To exit the menus and return to shooting mode, press the
shutter-release button halfway (0 52).
45Tutorial
Page 72

The Battery Level and Number of
Battery level
R button Number of exposures
remaining
Exposures Remaining
Press the R button and check the battery level and number of
exposures remaining in the information display.
Battery Level
If the battery is low, a warning will also be displayed in the
viewfinder. If the information display does not appear when the
R button is pressed, the battery is exhausted and needs to be
recharged.
Information
display
L — Battery fully charged.
K — Battery partially discharged.
H d
H
(flashes)d(flashes)
Number of Exposures Remaining
Values over 1000 are shown in thousands, indicated by the letter
“k”.
Viewfinder Description
Low battery.
battery or prepare to charge battery.
Battery exhausted.
Ready fully-charged spare
Charge battery.
46 Tutorial
Page 73

Basic Photography and Playback
Mode dial
Live view switch
“Point-and-Shoot” Modes (i and j)
This section describes how to take
photographs in i and j modes. i and j are
automatic “point-and-shoot” modes in which
the majority of settings are controlled by the
camera in response to shooting conditions; the
only difference between the two is that the
flash will not fire in j mode.
1 Rotate the mode dial to i
or j.
Photographs can be framed in the
viewfinder or in the monitor (live
To start live view, rotate the live
view).
view switch.
Framing pictures in the
viewfinder
Framing pictures in the
monitor (live view)
47Basic Photography and Playback
Page 74

2 Ready the camera.
Viewfinder photography: When framing photographs in the
viewfinder, hold the handgrip in your right hand and cradle
the camera body or lens with your left. Bring your elbows in
against the sides of your chest.
Live view: When framing photographs in the monitor, hold the
handgrip in your right hand and cradle the lens with your left.
A Framing Photographs in Portrait (Tall) Orientation
When framing photographs in portrait (tall) orientation, hold the
camera as shown below.
Framing photographs in the
viewfinder
48 Basic Photography and Playback
Framing photographs in the
monitor
Page 75

AF area brackets
Focus point
Zoom in
Zoom out
Zoom ring
3 Frame the photograph.
Viewfinder photography: Frame a
photograph in the viewfinder with the
main subject in the AF area brackets.
Live view: At default settings, the
camera automatically detects faces
and selects the focus point.
is detected, the camera will focus on
subjects near the center of the frame.
A Using a Zoom Lens
Before focusing, rotate the zoom ring to
adjust the focal length and frame the
photograph. Use the zoom ring to zoom in
on the subject so that it fills a larger area of
the frame, or zoom out to increase the area
visible in the final photograph (select longer
focal lengths on the lens focal length scale to
zoom in, shorter focal lengths to zoom out).
If no face
49Basic Photography and Playback
Page 76

4 Press the shutter-release button halfway.
Focus point
In-focus indicator
Viewfinder photography: Press
the shutter-release button
halfway to focus (if the
subject is poorly lit, the
flash may pop up and the
AF-assist illuminator may
light). When the focus
operation is complete, a
beep will sound (a beep
may not sound if the subject is moving) and the active focus
point and in-focus indicator (I) will appear in the viewfinder.
In-focus indicator Description
I Subject in focus.
I (flashes)
Camera unable to focus using autofocus.
page 86.
Live view: The focus point flashes green
while the camera focuses.
If the
camera is able to focus, the focus
point will be displayed in green;
otherwise, the focus point will flash
red.
See
50 Basic Photography and Playback
Page 77

5 Shoot.
Memory card access
lamp
Smoothly press the
shutter-release button the
rest of the way down to
take the photograph. The
memory card access lamp
will light and the
photograph will be
displayed in the monitor
for a few seconds. Do not
eject the memory card or
remove or disconnect the
power source until the lamp
has gone out and recording
is complete.
Rotate the live view switch to exit live
view.
51Basic Photography and Playback
Page 78

A The Shutter-Release Button
The camera has a two-stage shutter-release button.
focuses when the shutter-release button is pressed halfway.
the photograph, press the shutter-release button the rest of the way
down.
The camera
To t ake
Focus: press halfway Shoot: press all the
Pressing the shutter-release button halfway also ends playback and
readies the camera for immediate use.
A Automatic Scene Selection (Scene Auto Selec tor)
If live view is selected in i or j mode, the
camera will automatically analyze the
subject and select the appropriate
shooting mode when the shutter-release
button is pressed halfway to focus using
autofocus. The selected mode is shown in
the monitor.
c Port rait Human portrait subjects
d Landscape Landscapes and cityscapes
e Close up Subjects close to the camera
f Night portrait
Z Auto
b Auto (flash off)
Portrait subjects framed against a dark
background
Subjects suited to i or j mode or that do not
fall into the categories listed above
52 Basic Photography and Playback
way down
Page 79

A The Standby Timer (Viewfinder Photography)
X button
Navigation window
The viewfinder display will turn off if no operations are
performed for about eight seconds, reducing the drain on
the battery.
reactivate the display.
standby timer expires automatically can be selected using
Custom Setting c2 (Auto off timers; 0 240).
Press the shutter-release button halfway to
Exposure meters off Exposure meters on
The length of time before the
A The Standby Timer (Live View)
The monitor will turn off if no operations are performed for about ten
minutes.
can be selected using Custom Setting c2 (Auto off timers; 0 240).
The length of time before the monitor turns off automatically
A Live View Zoom Preview
To magnify the view in the monitor up to about 8.3× for precise focus,
press the X button.
navigation window will appear in a gray frame at the bottom right
corner of the display.
frame not visible in the monitor, or press W (Q) to zoom out.
While the view through the lens is zoomed in, a
Use the multi selector to scroll to areas of the
53Basic Photography and Playback
Page 80

A The Built-in Flash
If additional lighting is required for correct
exposure in i mode, the built-in flash will
pop up automatically when the shutterrelease button is pressed halfway (0 101).
If the flash is raised, photographs can only
be taken when the flash-ready indicator (M)
is displayed.
not displayed, the flash is charging; remove
your finger briefly from the shutter-release
button and try again.
When the flash is not in use, return it to its
closed position by pressing it gently
downward till the latch clicks into place.
If the flash-ready indicator is
A Exposure
Depending on the scene, exposure may differ from that which would
be obtained when live view is not used.
54 Basic Photography and Playback
Page 81

D Shooting in Live View Mode
Although they will not appear in the final picture, jagged edges, color
fringing, moiré, and bright spots may appear in the monitor, while
bright regions or bands may appear in some areas with flashing signs
and other intermittent light sources or if the subject is briefly
illuminated by a strobe or other bright, momentary light source. In
addition, distortion may occur with moving subjects, particularly if the
camera is panned horizontally or an object moves horizontally at high
speed through the frame.
under fluorescent, mercury vapor, or sodium lamps can be reduced
using Flicker reduction (0 268), although they may still be visible in
the final photograph at some shutter speeds.
camera at the sun or other strong light sources.
precaution could result in damage to the camera’s internal circuitry.
Live view ends automatically when the monitor is closed (closing the
monitor does not end live view on televisions or other external
displays).
To prevent light entering via the viewfinder from appearing in the
photograph or interfering with exposure, we recommend that you
cover the viewfinder with your hand or other objects such as an
optional eyepiece cap before taking pictures without your eye to the
viewfinder (0 80).
Flicker and banding visible in the monitor
Avoid pointing the
Failure to observe this
A HDMI
When the camera is attached to an HDMI video device, the video
device will display the view through the lens.
HDMI-CEC, select Off for the HDMI > Device control option in the
setup menu (0 219) before shooting in live view.
If the device supports
55Basic Photography and Playback
Page 82

Basic Playback
K button
1 Press the K button.
A photograph will be displayed in the
monitor.
2 View additional pictures.
Additional pictures can be
displayed by pressing 4 or
2.
To end playback and return to shooting mode, press the
shutter-release button halfway.
56 Basic Photography and Playback
Page 83

Deleting Unwanted Photographs
K button
O button
To delete the photograph currently displayed in the monitor,
press the O button. Note that photographs can not be recovered
once deleted.
1 Display the photograph.
Display the photograph you wish to
delete.
2 Delete the photograph.
Press the O button. A confirmation
dialog will be displayed; press the O
button again to delete the image and
return to playback.
A Delete
The Delete option in the playback menu can be used to delete
multiple images (0 206).
57Basic Photography and Playback
Page 84

Matching Settings to the Subject or
+
Situation (Scene Mode)
The camera offers a choice of “scene” modes. Choosing a scene
mode automatically optimizes settings to suit the selected
scene, making creative photography as simple as selecting a
mode, framing a picture, and shooting as described on page 47.
The following scenes can be selected by rotating the mode dial
to h and rotating the command dial until the desired scene
appears in the monitor.
Mode dial Command dial Monitor
k Portrait
l Landscape
p Child
m Sports
n Close up
o Night Portrait
r Night Landscape
s Party/Indoor
58 Matching Settings to the Subject or Situation (Scene Mode)
t Beach/Snow
u Sunset
v Dusk/Dawn
w Pet Portrait
x Candlelight
y Blossom
z Autumn Colors
0 Food
Page 85

kPortrait
Use for portraits with soft, naturallooking skin tones. If the subject is
far from the background or a
telephoto lens is used, background
details will be softened to lend the
composition a sense of depth.
lLandscape
Use for vivid landscape shots in
daylight.
A
Note
The built-in flash and AF-assist illuminator turn off.
pChild
Use for snapshots of children.
Clothing and background details
are vividly rendered, while skin
tones remain soft and natural.
59Matching Settings to the Subject or Situation (Scene Mode)
Page 86

mSports
Fast shutter speeds freeze motion
for dynamic sports shots in which
the main subject stands out clearly.
A Note
The built-in flash and AF-assist illuminator turn off.
nClose up
Use for close-up shots of flowers,
insects, and other small objects (a
macro lens can be used to focus at
very close ranges).
oNight Portrait
Use for a natural balance between
the main subject and the
background in portraits taken
under low light.
60 Matching Settings to the Subject or Situation (Scene Mode)
Page 87

rNight Landscape
Reduce noise and unnatural colors
when photographing night
landscapes, including street
lighting and neon signs.
A Note
The built-in flash and AF-assist illuminator turn off.
sParty/Indoor
Capture the effects of indoor
background lighting. Use for
parties and other indoor scenes.
tBeach/Snow
Capture the brightness of sunlit
expanses of water, snow, or sand.
A Note
The built-in flash and AF-assist illuminator turn off.
61Matching Settings to the Subject or Situation (Scene Mode)
Page 88

uSunset
Preserves the deep hues seen in
sunsets and sunrises.
A Note
The built-in flash and AF-assist illuminator turn off.
vDusk/Dawn
Preserves the colors seen in the
weak natural light before dawn or
after sunset.
A Note
The built-in flash and AF-assist illuminator turn off.
wPet Portrait
Use for portraits of active pets.
A Note
The AF-assist illuminator turns off.
62 Matching Settings to the Subject or Situation (Scene Mode)
Page 89

xCandlelight
A Note
The built-in flash turns off.
yBlossom
A Note
The built-in flash turns off.
zAutumn Colors
For photographs taken by
candlelight.
Use for fields of flowers, orchards in
bloom, and other landscapes
featuring expanses of blossoms.
Captures the brilliant reds and
yellows in autumn leaves.
A Note
The built-in flash turns off.
63Matching Settings to the Subject or Situation (Scene Mode)
Page 90

0Food
Use for vivid photographs of food.
A Note
For flash photography, press the M (Y) button to raise the flash (0 103).
A Preventing Blur
Use a tripod to prevent blur caused by camera shake at slow shutter
speeds.
64 Matching Settings to the Subject or Situation (Scene Mode)
Page 91

Special Effects
+
Special effects can be used when taking photographs and
shooting movies.
The following effects can be selected by rotating the mode dial
to q and rotating the command dial until the desired option
appears in the monitor.
Mode dial Command dial Monitor
% Night Vision
S Super Vivid
T Pop
U Photo Illustration
' Toy Camera Effect
( Miniature Effect
3 Selective Color
1 Silhouette
2 High Key
3 Low Key
%Night Vision
Use under conditions of darkness to
record monochrome images at high
ISO sensitivities.
A Note
Autofocus is available in live view only; manual focus can be used if the
camera is unable to focus.
turn off.
The built-in flash and AF-assist illuminator
65Special Effects
Page 92

SSuper Vivid
Overall saturation and contrast are
increased for a more vibrant image.
T Pop
Overall saturation is increased for a
more lively image.
UPhoto Illustration
Sharpen outlines and simplify
coloring for a poster effect that can
be adjusted in live view (0 70).
A Note
Movies shot in this mode play back like a slide show made up of a series
of stills.
66 Special Effects
Page 93

'Toy Camera Effect
Create photos and movies that
appea r to have been s hot with a t oy
camera. The effect can be adjusted
in live view (0 71).
(Miniature Effect
Create photos that appear to be
pictures of dioramas. Works best
when shooting from a high vantage
point. Miniature effect movies play
back at high speed, compressing
about 45 minutes of footage shot at
1920 × 1080/30p into a movie that
plays back in about three minutes.
The effect can be adjusted in live
view (0 72).
A Note
Sound is not recorded with movies.
illuminator turn off.
3Selective Color
All colors other than the selected
colors are recorded in black and
white. The effect can be adjusted in
live view (0 73).
The built-in flash and AF-assist
A Note
The built-in flash turns off.
67Special Effects
Page 94

1Silhouette
A Note
The built-in flash turns off.
2High Key
A Note
The built-in flash turns off.
3Low Key
Silhouette subjects against bright
backgrounds.
Use with bright scenes to create
bright images that seem filled with
light.
Use with dark scenes to create dark,
low-key images with prominent
highlights.
A Note
The built-in flash turns off.
68 Special Effects
Page 95

A NEF (RAW)
NEF (RAW) recording is not available in %, S, T, U, ', (, and 3 modes.
Pictures taken when an NEF (RAW) or NEF (RAW)+JPEG option is
selected in these modes will be recorded as JPEG images.
created at settings of NEF (RAW)+JPEG will be recorded at the selected
JPEG quality, while images recorded at a setting of NEF (RAW) will be
recorded as fine-quality images.
JPEG images
A U and ( Modes
Autofocus is not available during movie recording.
refresh rate will drop, together with the frame rate for continuous
release modes; using autofocus during live view photography will
disrupt the preview.
The live view
A Preventing Blur
Use a tripod to prevent blur caused by camera shake at slow shutter
speeds.
69Special Effects
Page 96

Options Available in Live View
Live view switch
Settings for the selected effect are adjusted in the live view
display.
❚❚ U Photo Illustration
1 Select live view.
Rotate the live view switch. The view
through the lens will be displayed in
the monitor.
2 Adjust outline thickness.
Press J to display the options shown
at right.
outlines thicker or thinner.
Press 4 or 2 to make
3 Press J.
Press J to exit when settings are complete. To exit live view,
rotate the live view switch.
70 Special Effects
Page 97

❚❚ ' Toy Camera Effect
Live view switch
1 Select live view.
Rotate the live view switch. The view
through the lens will be displayed in
the monitor.
2 Adjust options.
Press J to display the options shown
at right. Press 1 or 3 to highlight
Vividness or Vignetting and press 4
or 2 to change. Adjust vividness to
make colors more or less saturated,
vignetting to control the amount of vignetting.
3 Press J.
Press J to exit when settings are complete. To exit live view,
rotate the live view switch.
71Special Effects
Page 98

❚❚ ( Minia ture Effect
Live view switch
1 Select live view.
Rotate the live view switch. The view
through the lens will be displayed in
the monitor.
2 Position the focus point.
Use the multi selector to position the
focus point in the area that will be in
focus and then press the shutterrelease button halfway to focus. To
temporarily clear miniature effect
options from the display and enlarge the view in the monitor
for precise focus, press X. Press W (Q) to restore the
miniature effect display.
3 Display options.
Press J to display miniature effect
options.
4 Adjust options.
Press 4 or 2 to choose the
orientation of the area that will be in
focus and press 1 or 3 to adjust its
width.
72 Special Effects
Page 99

5 Press J.
Live view switch
Selected color
❚❚ 3 Selec tive Color
1 Select live view.
2 Display options.
3 Select a color.
Press J to exit when settings are complete. To exit live view,
rotate the live view switch.
Rotate the live view switch. The view
through the lens will be displayed in
the monitor.
Press J to display selective color
options.
Frame an object in the white square in
the center of the display and press 1
to choose the color of the object as
one that will remain in the final image
(the camera may have difficulty
detecting unsaturated colors; choose
a saturated color). To zoom in on the center of the display for
more precise color selection, press X. Press W (Q) to zoom
out.
73Special Effects
Page 100

4 Choose the color range.
Color range
Press 1 or 3 to increase or decrease
the range of similar hues that will be
included in the final image. Choose
from values between 1 and 7; note
that higher values may include hues
from other colors.
5 Select additional colors.
To select additional colors, rotate the
command dial to highlight another of
the three color boxes at the top of the
display and repeat Steps 3 and 4 to
select another color. Repeat for a
third color if desired. To deselect the highlighted color, press
O (To remove all colors, press and hold O. A confirmation
dialog will be displayed; select Ye s ).
6 Press J.
Press J to exit when settings are complete. During shooting,
only objects of the selected hues will be recorded in color; all
others will be recorded in black-and-white. To exit live view,
rotate the live view switch.
74 Special Effects
 Loading...