

Nikon COOLPIX 56300, COOLPIX S6300 Quick Start Manual
Nikon
Quick Start Guide
Confirming
First Steps s
Shooting
Using ViewNX 2 16
Other
Functions 20
the
and
Package
Playback
Contents
3
11

Thank you for purchasing
the
Nikon
COOLPIX
56300 digital camera. This
guide
introduces
To ensure proper
provided in
For
more detailed information, please refer
located on
Reference
Should you need technical support,
the
procedures necessary for first
the
separate "For Your Safety"
the
included CD-ROM. For information on viewing
Manual,
use,
please read and
see
"Viewing
time
thoroughly
document
to
the
"Reference Manual CD"" described below.
we
offer a
use
understand
the
digital
number
of
this camera.
before using
Reference
of
options.
Internet
Please
• Search Nikon's continuously updated Knowledge Database for
•
• Download the latest versions
For customers in
For customers in Canada: he/p.nikon.ca (English), nikoncanada-fr.custhe/p.com
For
For
visit
the
Nikon support
Use
"Ask Nikon a Question"
receive e-mail notification for software or firmware updates.
the
United States: www.nikontechusa.com
customers in Mexico: nikon.com.mx/soporte
customers in
Brazil:
http://nikon.com.br
home
page, where you can:
to
receive a
of
Nikon software or firmware updates for your product, or register
prompt
reply from a Nikon professional advisor
the
latest technical
Telephone
Please
help
For customers in
For customers in Canada: 1-877-534-9910
For customers in Mexico: 001-888-565-5452
For customers in
call for technical
with
your digital camera needs.
the
Brazil:
support
United States: 1-800-N/KON-UX (1-800-645-6689)
0800-886-4566 (0800-88 NIKON)
and
other
product
assistance. Our professional advisers are standing by
the
information
the
camera.
Manual, which
the
camera's digital
support
to
your e-mail.
(Franc;ais)
is
information.
to
to
I
W Viewing the
The
Reference
Manual
11
Reference
can
be
Manual
viewed using Adobe
the Adobe website.
1 Start
2 Double-click
3 Double-click
the
computer
the
My Computer; Mac
the
Click a language and
An
Important Notice
Nikon
COOLPIX
and insert
COOLPIX
INDEX.pdf icon
digital camera
OS
X:
follow
the
56300
on
the
the
about
"Reference
CD
desktop).
to
display
links
to
is
designed to the highest standards and includes
complex electronic circuitry. Only Nikon
Charging
COOLPIX
the electronic circuitry
THE
YOUR
Genuine Nikon
USE
NIKON
AC
Adapters,
camera
OF
NON-NIKON
WARRANTY.
accessories
and
and
AC
adapters
are
engineered and tested to operate within the requirements
of
our
cameras.
ACCESSORIES
are
available through your Nikon-authorized dealer.
CD"
Manual
icon (Windows 7
the
view
the
CD':
language selection screen.
Reference
Accessories
accessories,
are
certified
MAY
DAMAGE
Reader,
/Windows
Manual.
such
by
Nikon specifically for your Nikon
YOUR
available for free download from
Vista:
in Computer; Windows
as
battery chargers, batteries,
XP:
in
of
CAMERA
AND
WILL
VOID
(1)~------
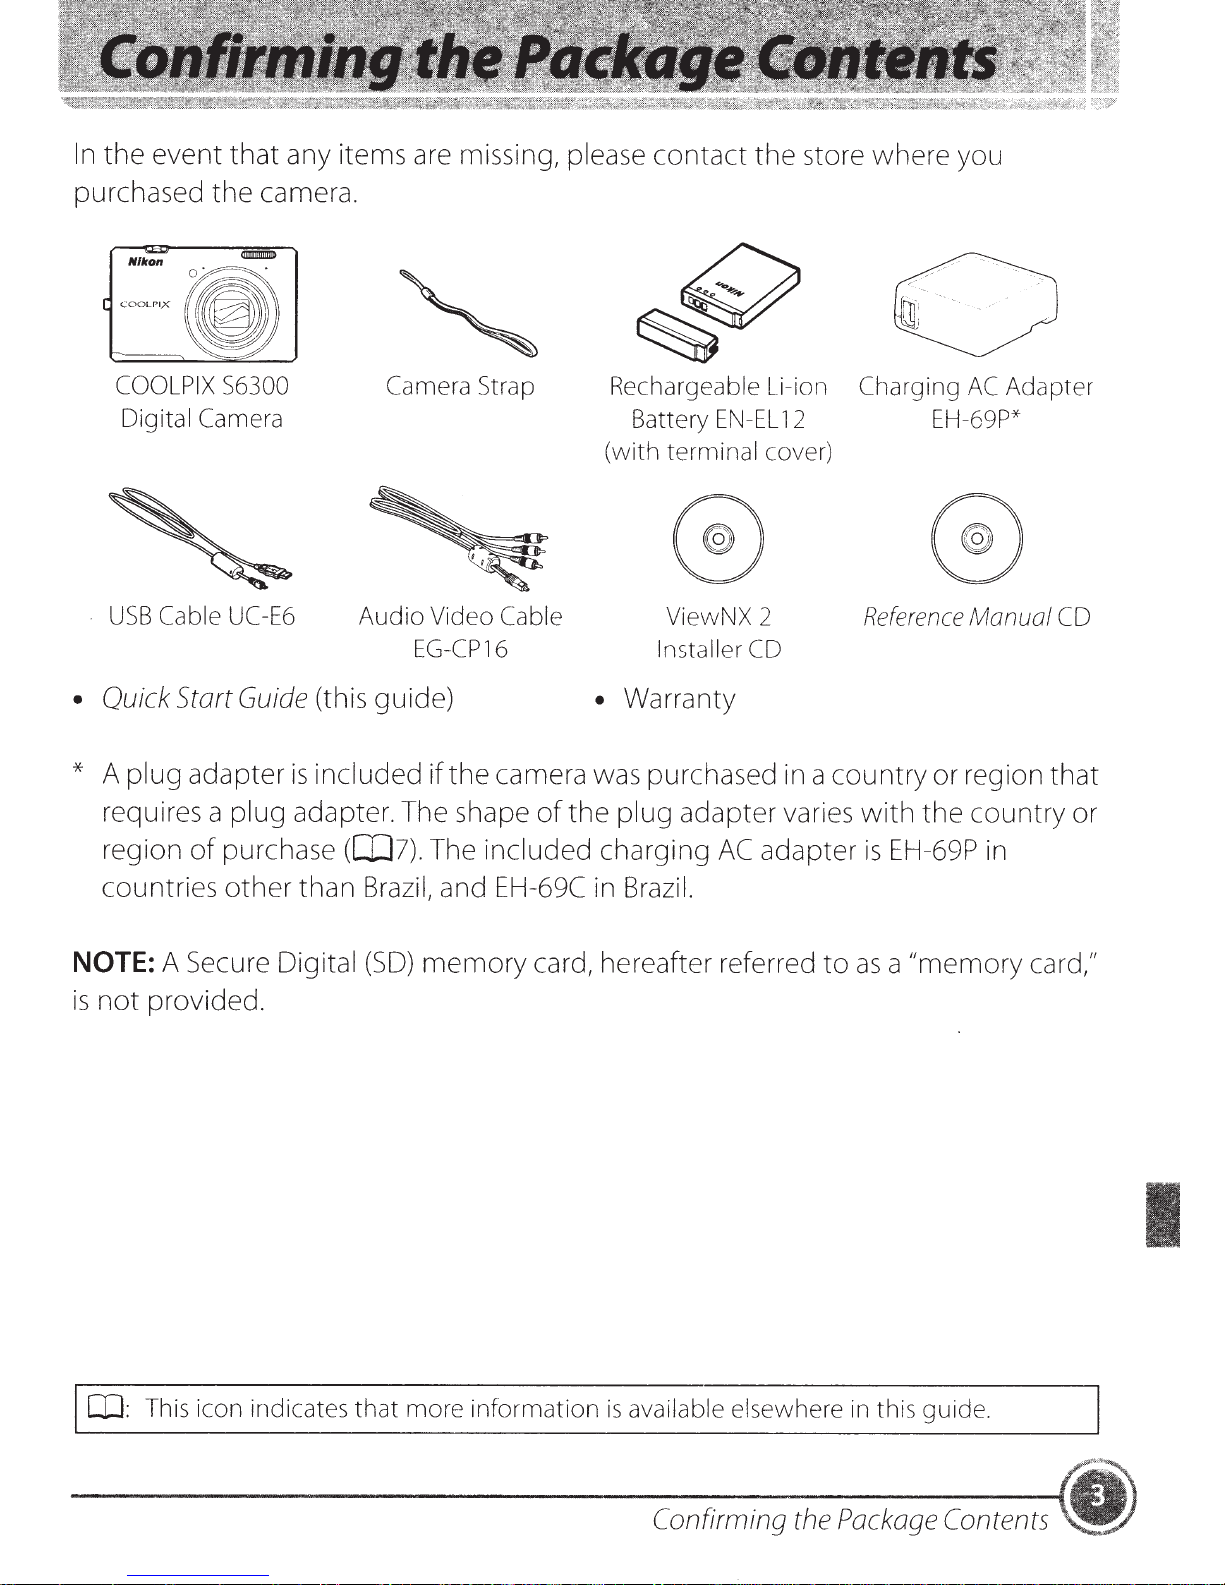
In
the
event
that
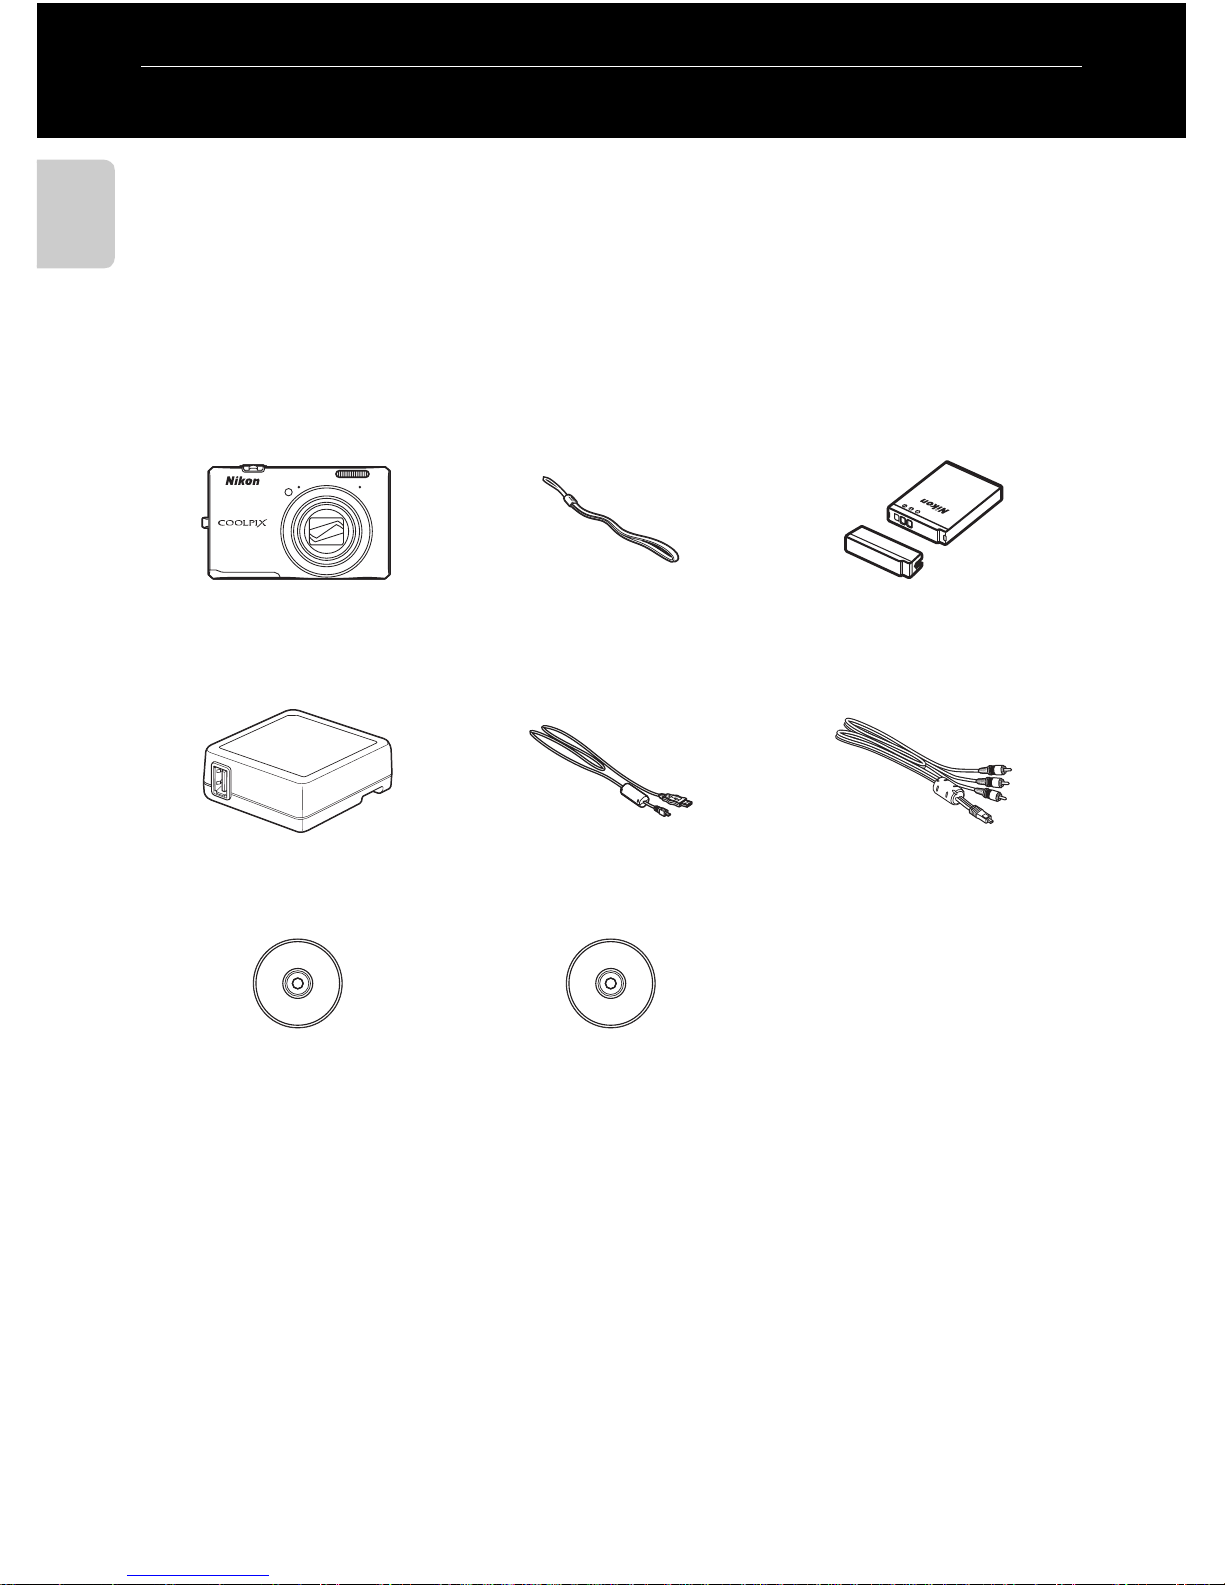
any items are missing, please
contact
the
store
where
you
purchased
COOLPIX
Digital Camera
USB
the
S6300
Cable
• Quick Start
camera.
UC
-E6
Guide
Camera Strap
Audio Video Cable
EG-CP16
(this guide)
Rechargeable Li-ion
Battery
(with terminal cover)
EN-EL
ViewNX 2
Installer
12
CD
• Warranty
Charging
EH-69P*
Reference
AC
Adapter
Manual
CD
* A
plug
requires a
region
countries
adapter
plug
of
purchase
other
is
included
adapter. The shape
(aJ7).
than
NOTE: A Secure Digital
is
not
provided.
if
the
camera was purchased in a
of
the
The
included
plug
charging
adapter
Brazil, and EH-69C in Brazil.
(SO)
memory
card, hereafter referred
AC
adapter
country
varies
to
or
region
with
the
is
EH-69P in
country
as a "memory
that
or
card,"
OJ:
This
icon indicates that more information
is
available elsewhere
Conft'rming
the
Package
in
this guide.
Contents
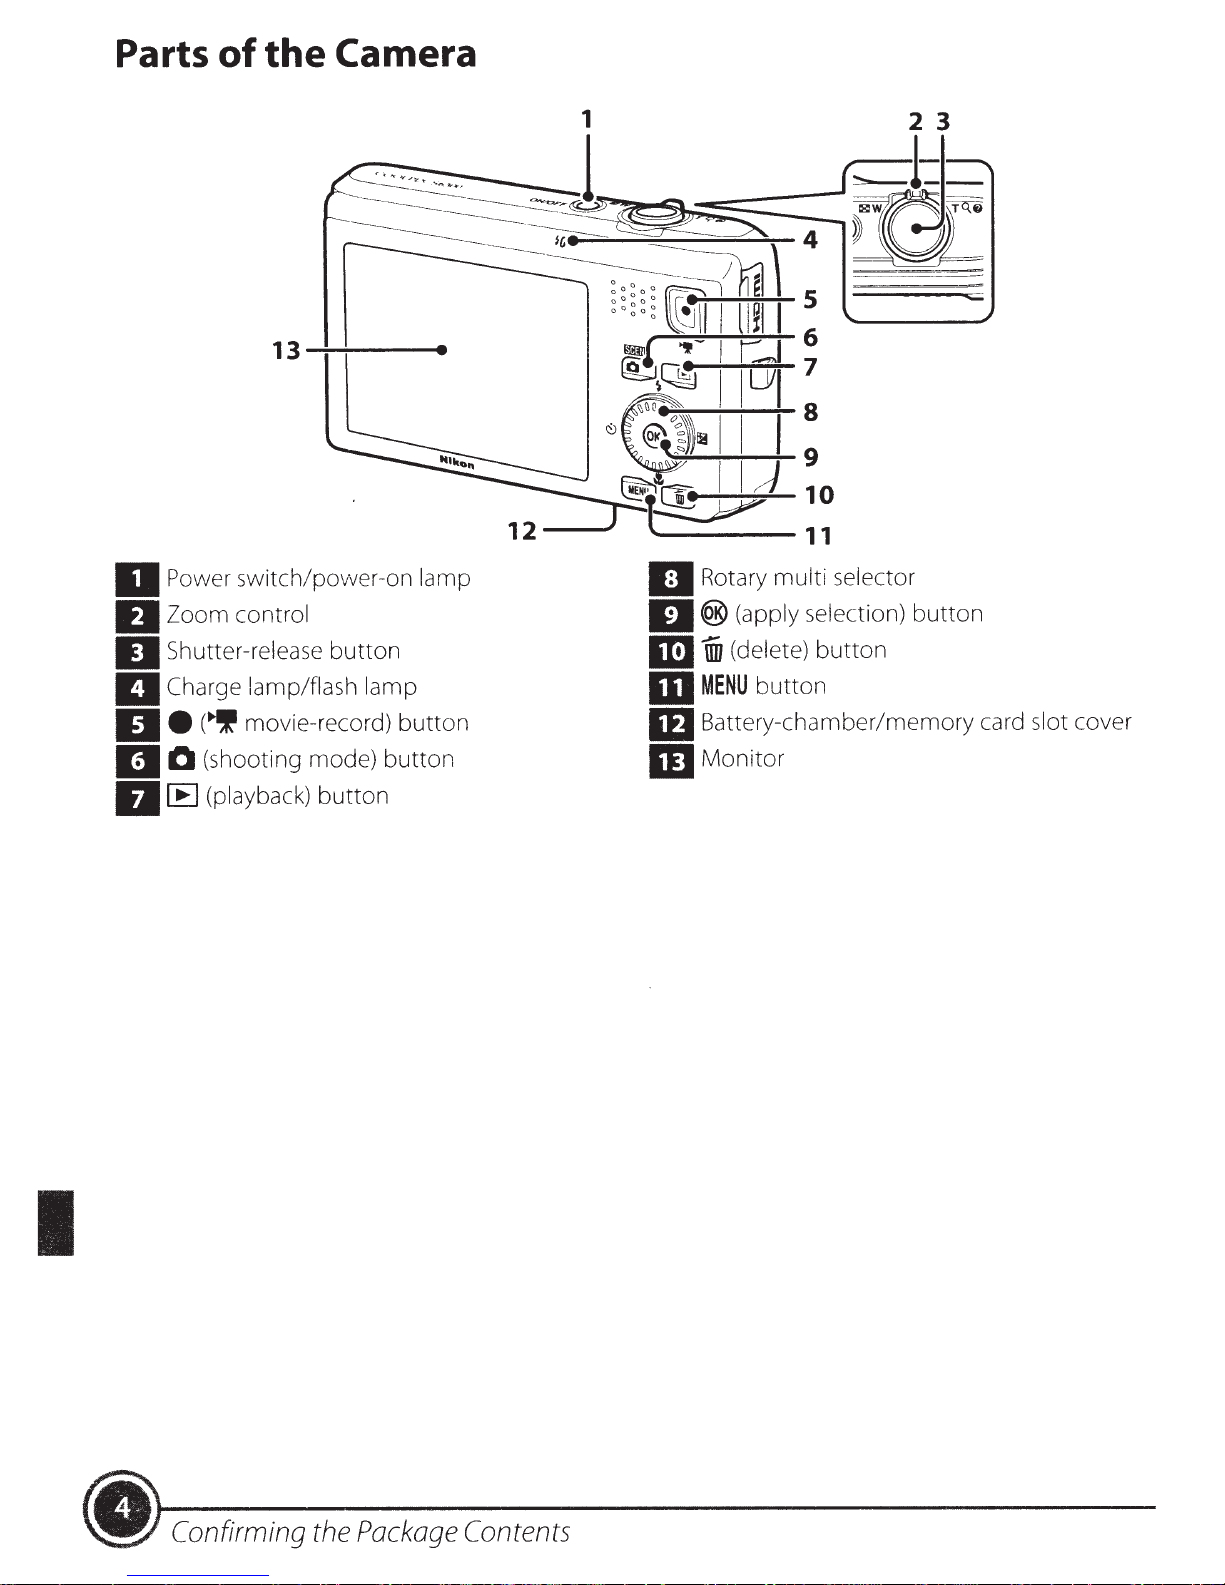
Parts
of
the
Camera
13
Power
IJ
Zoom
IJ
Shutter-release
IJ
Charge lamp/flash lamp
IJ
IJ•
0
II
IJIB
switch /
control
movie-record)
(~
(shooting mode)
(playback)
-:-+------e
er-on
povv
button
button
button
lamp
button
~..,;,;;-;.......
~~~~6
~~~7
~----~~s
-~~-+--.....:-9
~~-10
----11
Rota
IJ
II®
1m
m
ID
m
(apply selection)
(delete)
1iii
MENU
Battery-chamber/memory card
Monitor
s
multi selector
ry
button
button
button
slot
cover
I
Package
~
Confirming
the
Contents
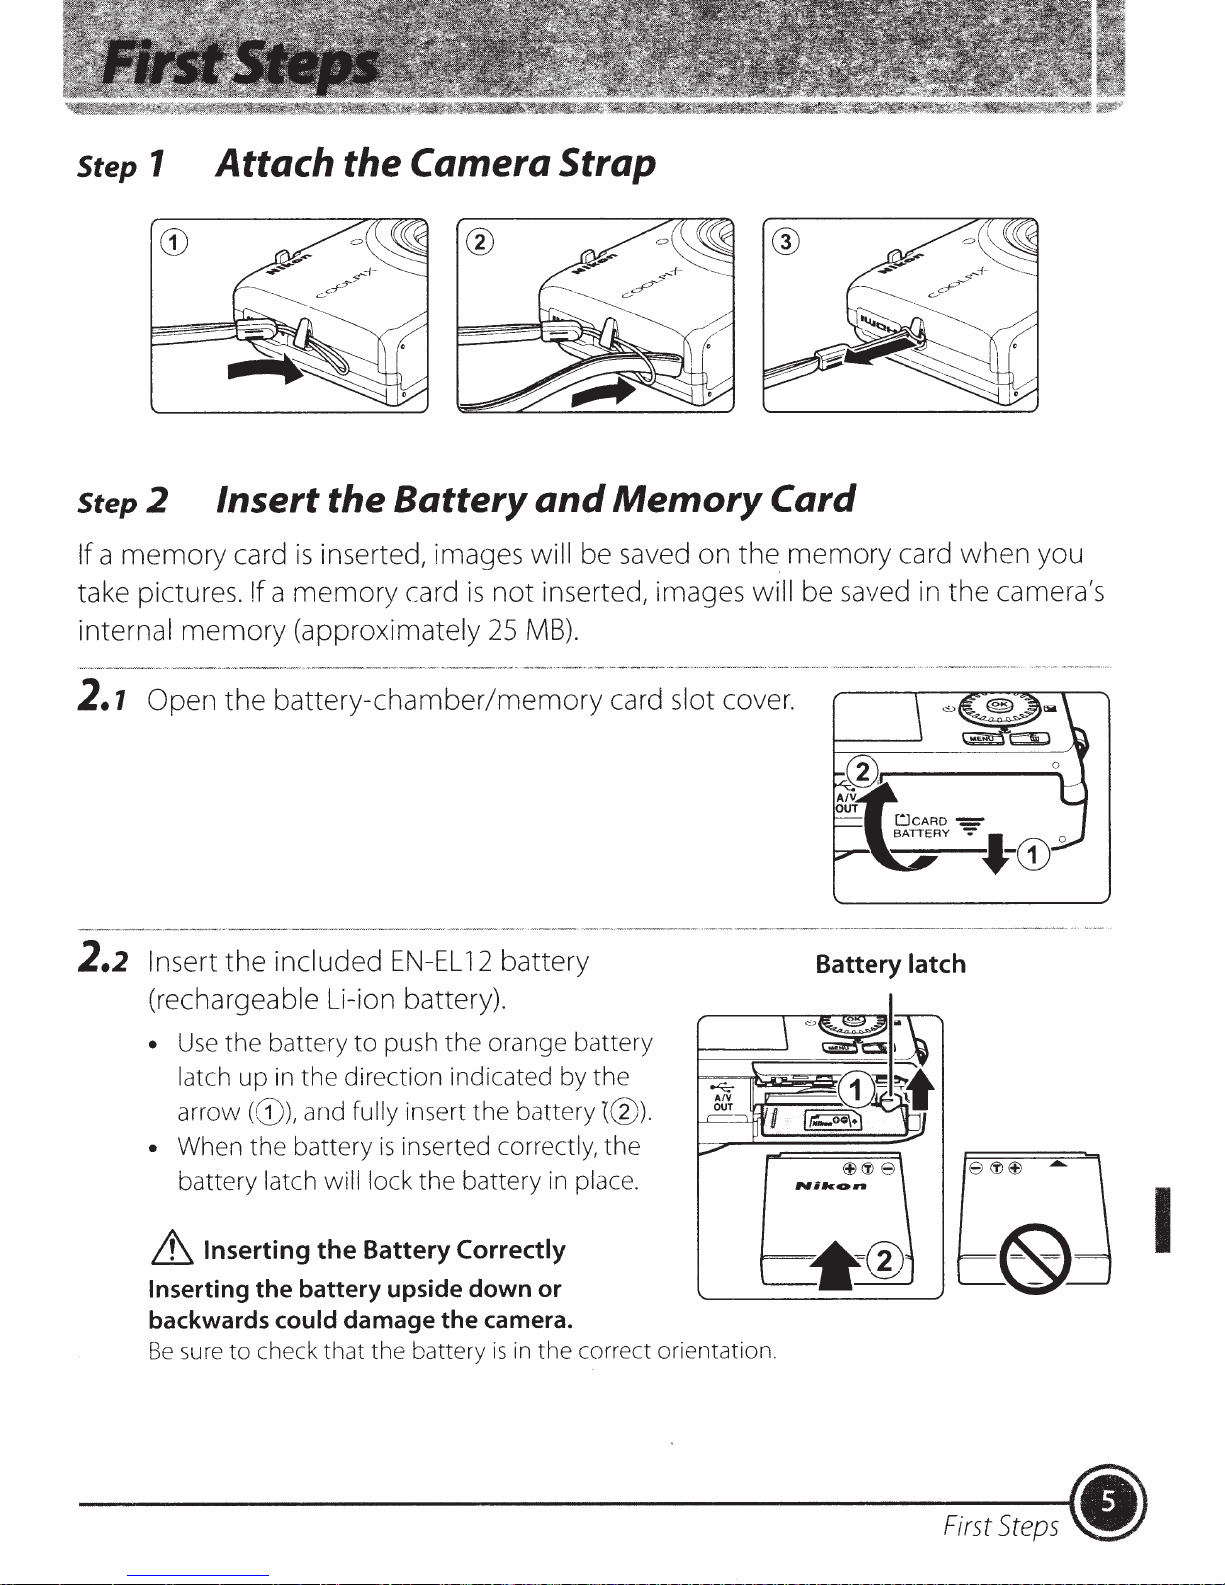
Step
1
Attach the Camera Strap
Step
If
take pictures.
internal
2.1
2.2
2
memory
a
Open
Insert
(rechargeable Li-ion battery).
•
Insert the Battery
memory
the
the
the
Use
latch
inserted, images
card
is
not
memory
!fa
(approximately 25MB).
battery-chamber/memory
included
battery
the
in
up
card
EN-EL
push
to
direction indicated by
is
battery
12
orange battery
the
and
will
inserted, irnages
Memory
be saved
card slot cover.
the
on
Card
memory
.
the
will
card
be saved in
Battery
latch
when
camera's
the
you
arrow
• When the battery
battery latch will lock
it
Inserting
backwards
sure
Be
(G)),
Battery Correctly
Inserting
the
to
the
battery upside down or
could
check that the battery
damage the camera.
inserted
is
insert
fully
and
the
battery~@).
the
correctly,
battery
in
is
the
the
place .
in
correct orientation.
g
p~~~~~~
~ttl
...
....k_
e
First
~
~
Steps
I
•
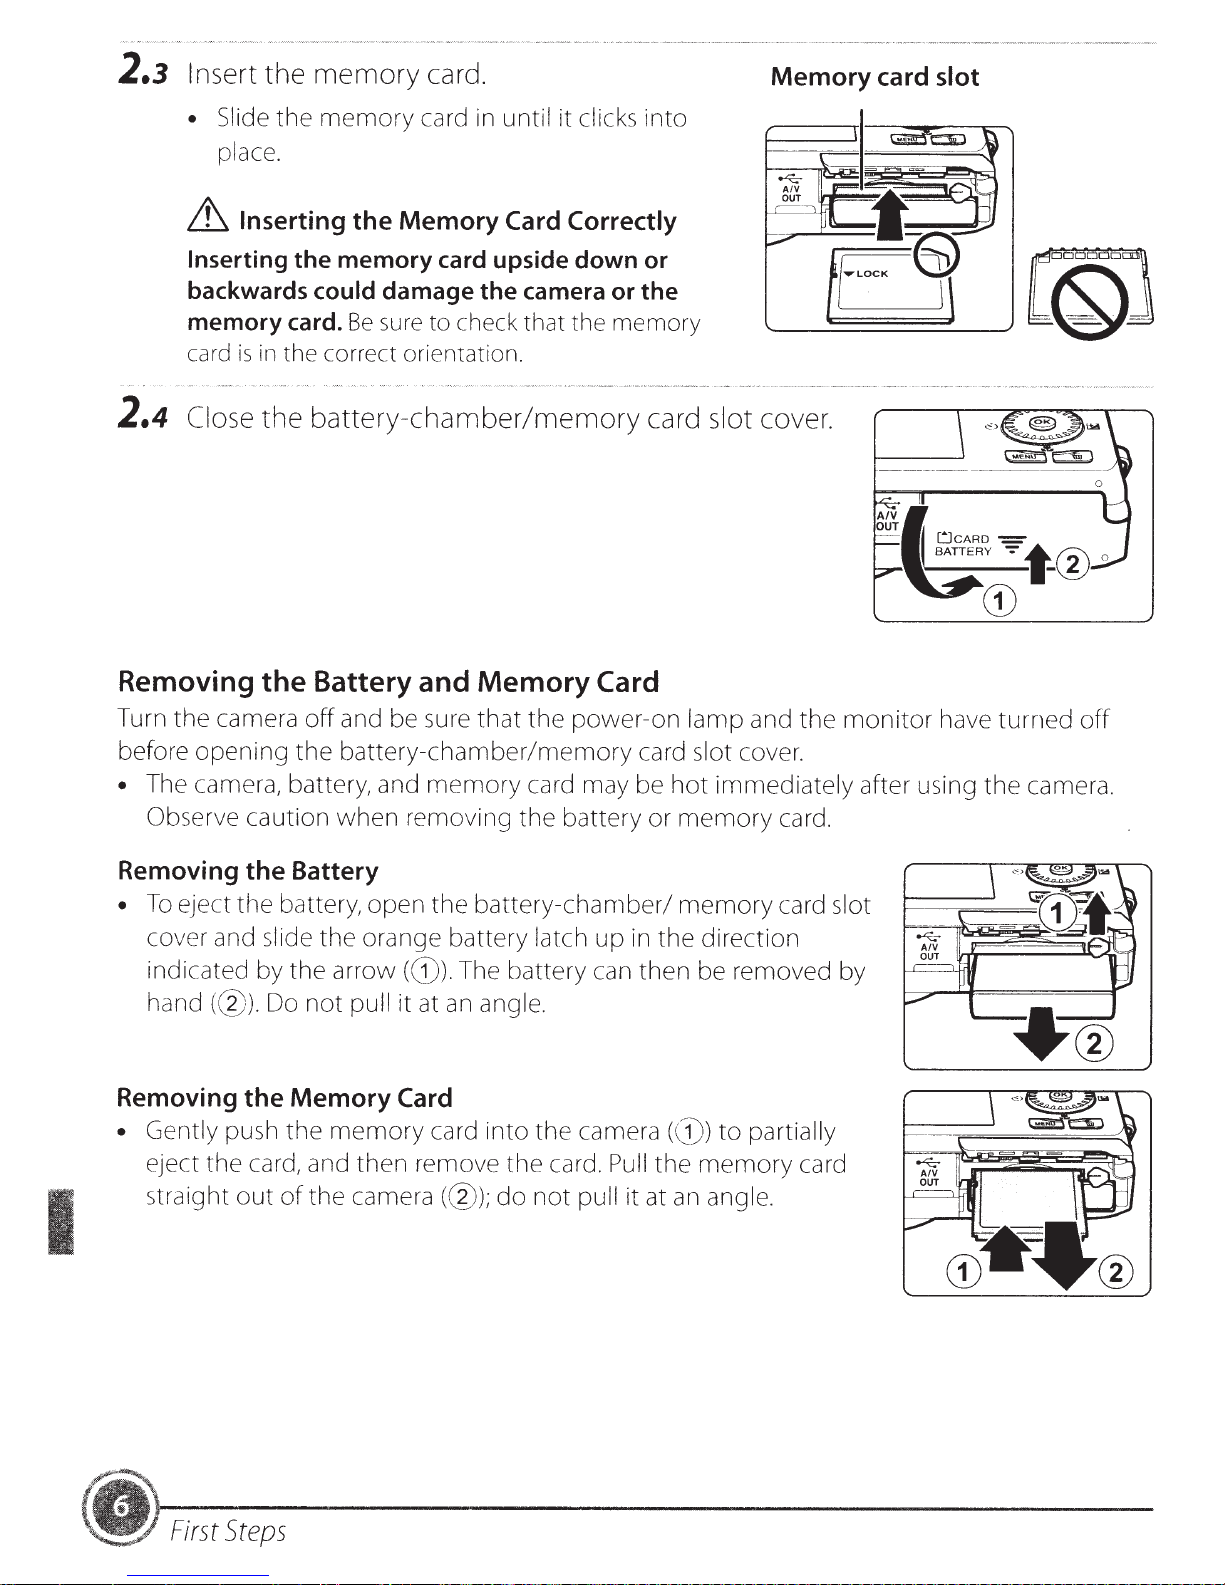
2.3
Insert
the
memory
card.
Memory
card slot
2.4
• Slide
~
Inserting
backwards could
memory card.
card
Close
the
place.
Inserting
is
in
the correct orientation.
the
memory
the
the memory card upside down or
Be
card in until it clicks
Memory
damage the camera or the
sure
to check that the memory
battery-chamber/memory
Removing the Battery and
Card Correctly
Memory
Card
into
card slot cover.
I
Turn the camera
before
•
Removing the Battery
•
Removing the
•
opening
The camera, battery, and
Observe
To
eject the battery, open the
cover and slide the orange battery latch
indicated by the arrow
hand
Gently push the
eject the card, and then remove the card.
straight
(@).Do
out
off
and be sure
the
battery-chamber/memory
caution when removing the battery or
(G)).
not
pull
it at
Memory
memory
of
the
Card
camera(@);
that
the
memory
The battery can then be removed by
an
card
card may be
battery-chamber/
angle.
into
do
power-on
the
camera((
not
pull
lamp and the
card slot cover.
hot
immediately after using the camera.
memory
memory
up
in the direction
}))
to
Pull
the
memory
it at
an
angle.
card.
card slot
partially
card
monitor
have
turned
off
First
Steps
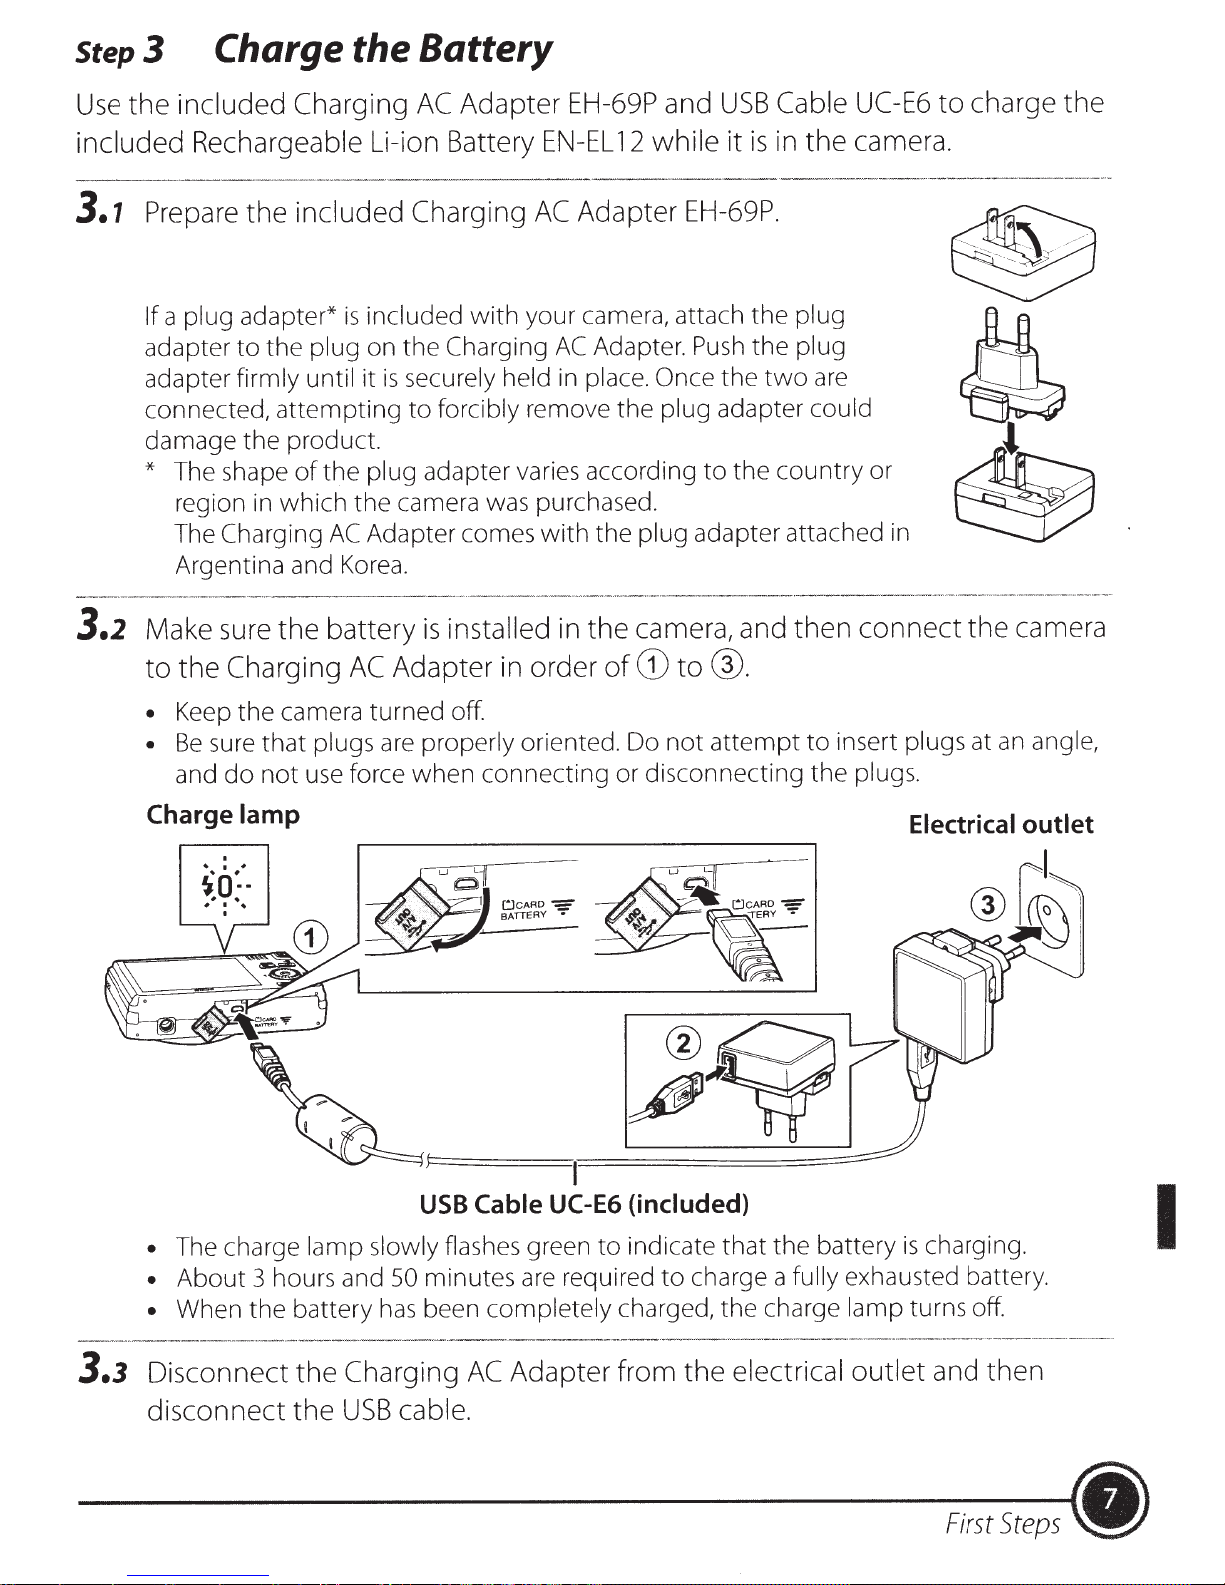
Step3
Charge the Battery
the
Use
included
---
3.1
3.2
Prepare
a
If
adapter
adapter
connected,
damage the product.
* The shape
The
Make sure
to
Adapter
included Charging
AC
Rechargeable Li-ion Battery
---·-
--
--------
the
plug adapter*
the plug on
to
firmly until
attempting
region in which the camera
Charging
Argentina and
the
Charging
the
.
included
included
is
is
it
plug adapter varies according
the
of
Adapter comes
AC
Korea.
battery
Adapter in order
AC
Charging
with
Charging
the
securely
forcibly remove the
to
was
installed in
is
EH-69P and
while
EN-EL
AC
your camera, attach
AC
held
purchased.
with
12
Adapter
Adapter.
place.
in
the
the
of
EH-69P.
Once
plug adapter could
plug
camera, and
to®.
G)
the
are
UC-E6
camera.
connect
Cable
USB
in
is
it
plug
the
the plug
Push
two
the
the country or
to
adapter attached
then
in
charge
to
the
the
camera
• Keep the camera turned off.
properly oriented. Do
plugs
that
sure
Be
•
use
not
do
and
Charge
• The charge
About
•
• When the battery
lamp Electrical outlet
I
~a:·.
~
.
~
• I
I
lamp slowly flashes green
3 hours and
are
force when connecting or disconnecting the
USB
minutes
50
been completely charged, the charge lamp turns off.
has
I
Cable UC-E6
to
required
are
attempt
not
(included)
charge a
to
that
indicate
insert
to
plugs.
the battery
exhausted battery.
fully
plugs
is
at
charging.
an
angle,
I
Charging
3.3
Disconnect
disconnect
the
the
USB
cable.
Adapter from
AC
electrical
the
outlet
and
First
then
Steps
•
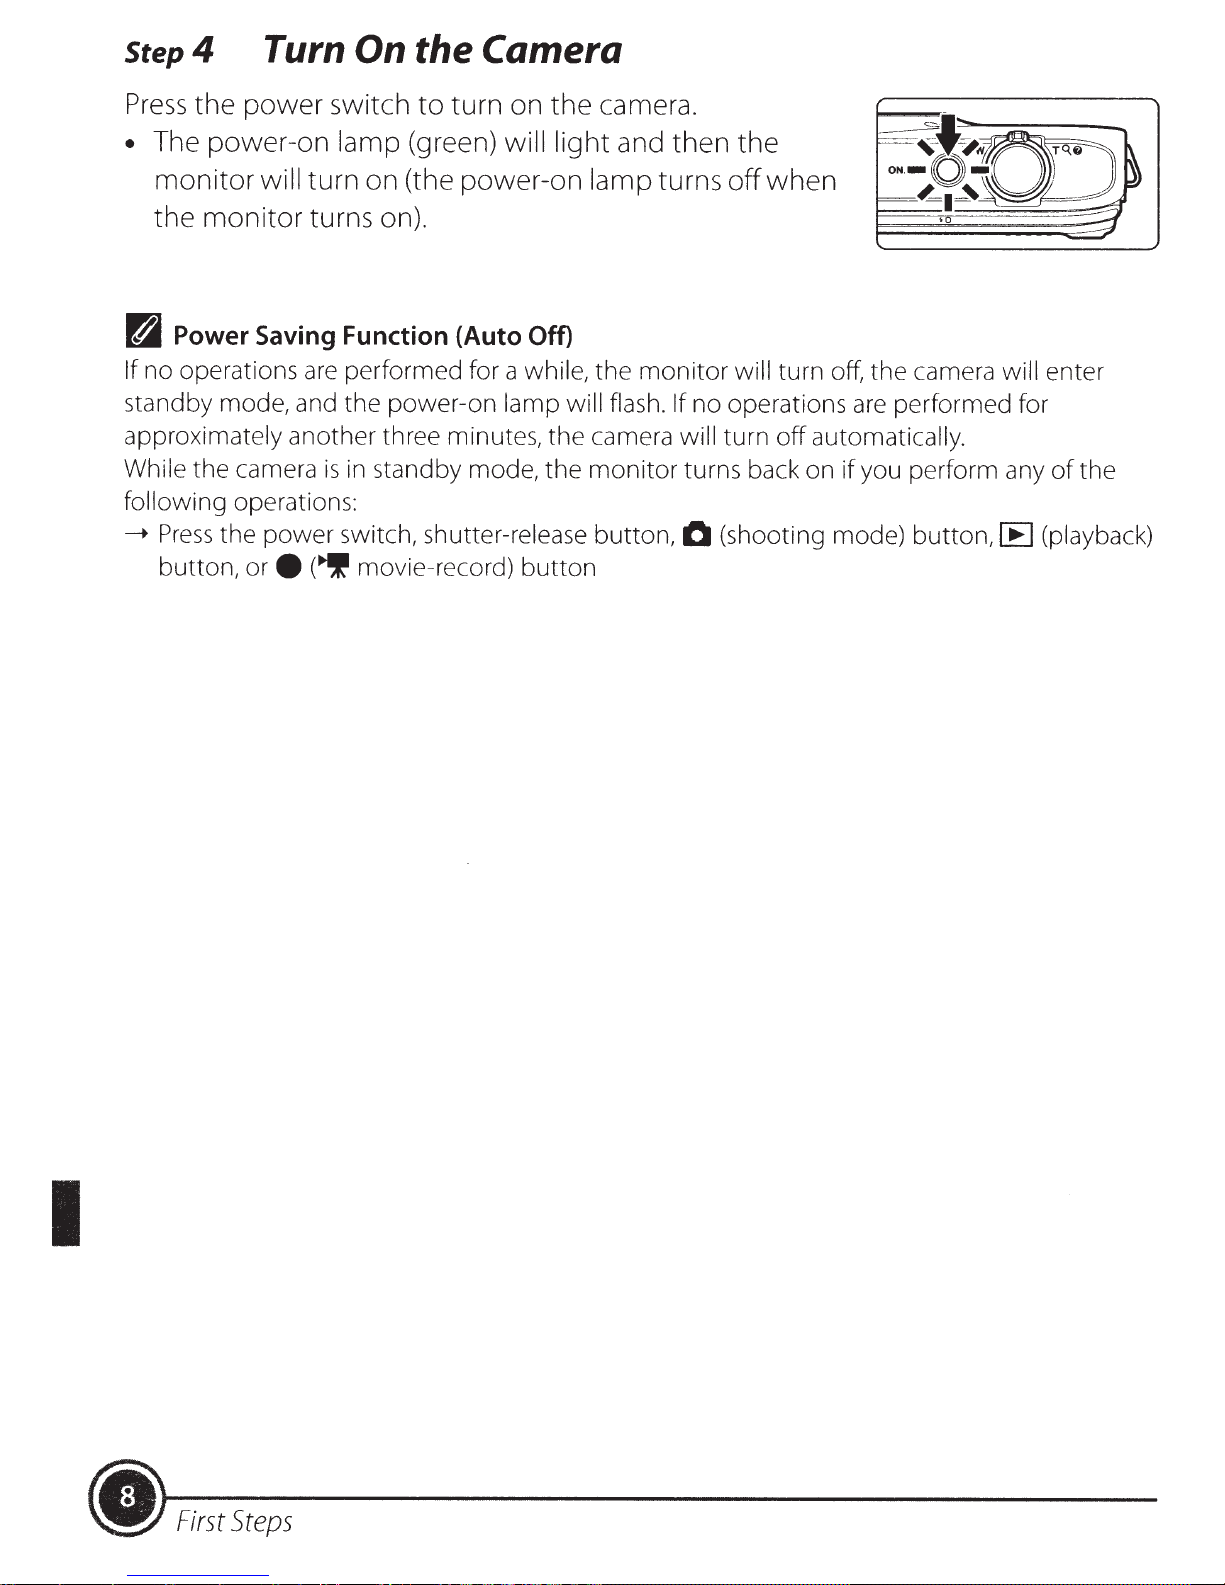
Step4
Turn
On the Camera
Press
•
d
If
standby mode, and the power-on
approximately
While the camera
following
__...
the power switch
The power-on
monitor
the
Power
no operations
Press
button, or
will
monitor
Saving Function (Auto Off)
another three minutes, the camera will turn
operations:
the power switch, shutter-release
e
to
turn on
lamp
turn on (the power-on lamp turns
turns on).
are
performed for a
is
in
(~
(green) will light
standby mode, the monitor turns back on
movie-record)
the
camera.
and then the
off
when
while,
lamp will flash. If no operations
button
the
monitor
button,
will turn off, the camera
off
automatically.
0
(shooting mode) button,
are
performed for
if
you perform any
lE
will
enter
of
(playback)
the
I
•
First
Steps
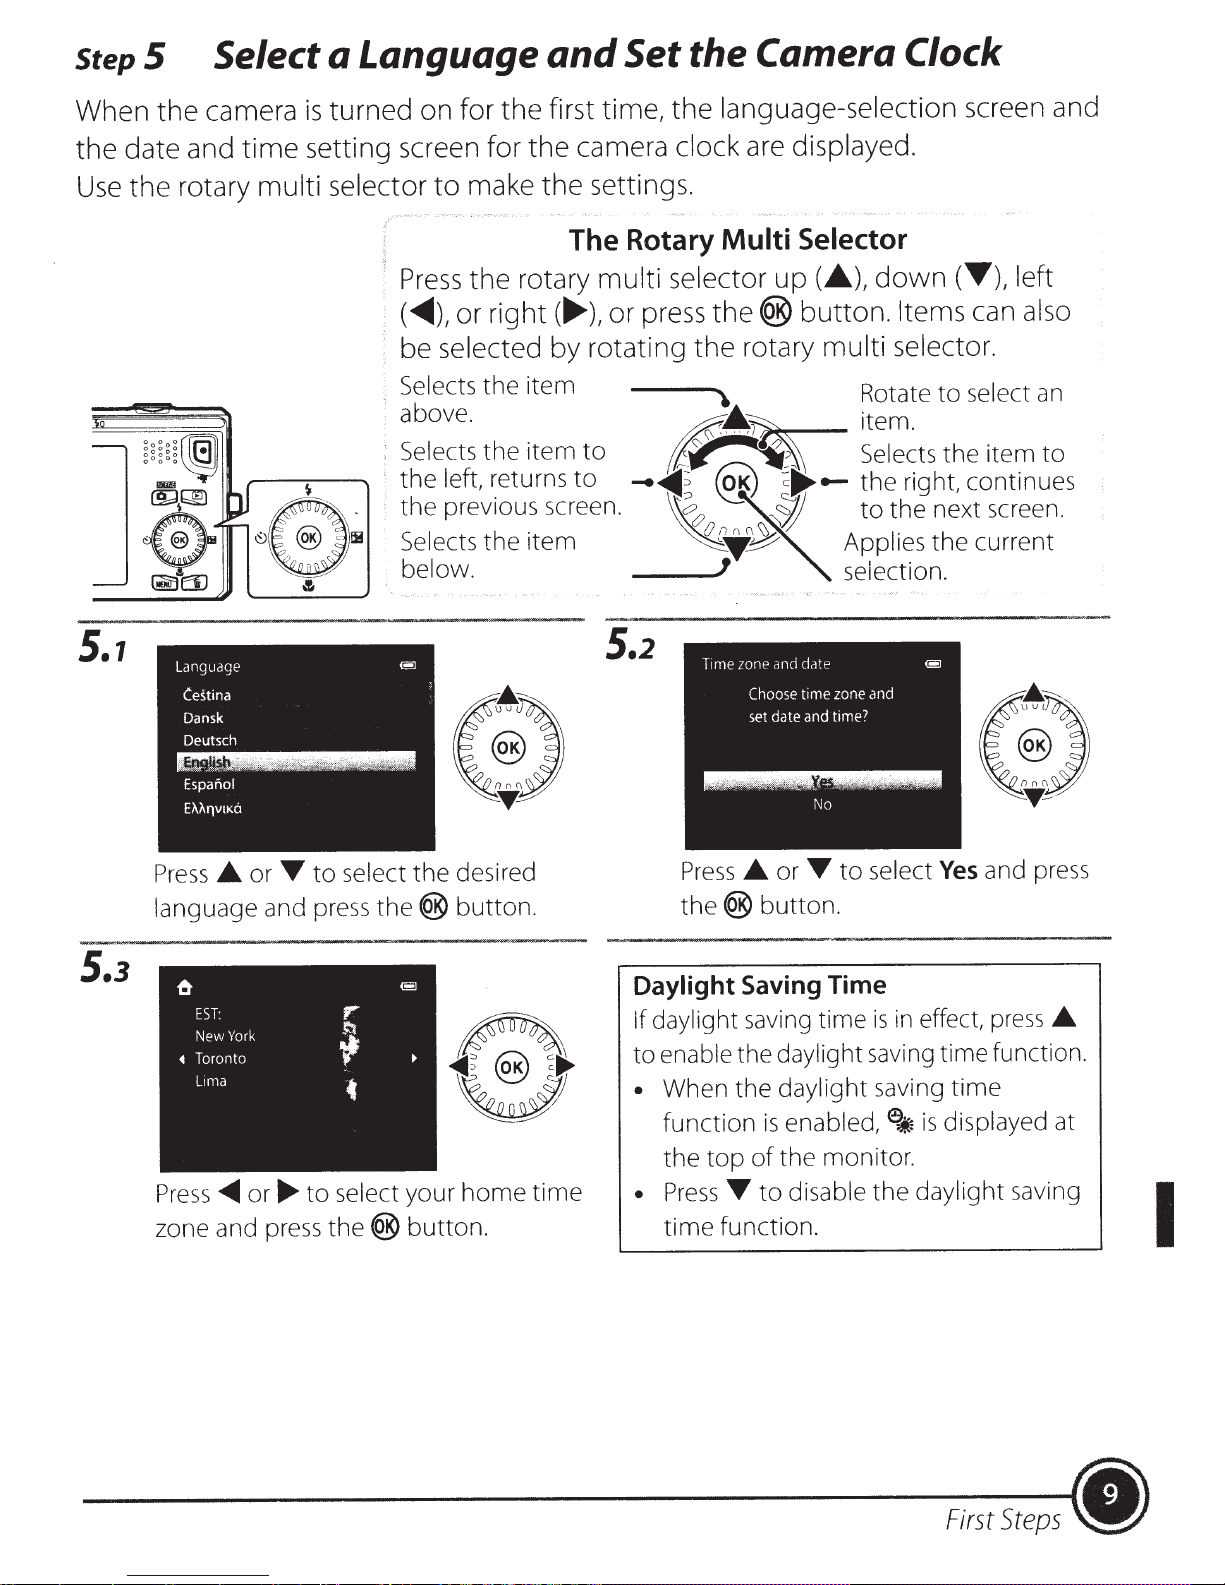
Step
5 Select a Language
and
Set the Camera Clock
When
date and
the
the
Use
-
-
5.1
the
rotary
camera
time
is
setting screen for
multi selector
,......-----;--....._
turned on for
make
to
Press
the rotary
(~),or
selected
be
Selects
above.
, Selects
the
the
Selects
below
the
the
left,
previou_s
the
.
language-selection
first time,
the
camera
the
settings .
the
The Rotary
multi
right(~),
or press
by rotating
item
to
item
returns
to
screen.
1tem
the
clock
Multi
selector
the(@
the
\ Rotate
:..__
d!{..,..~
~~~
~
::>
--111
n
~
Wo
0
~T~
'
5.2
screen and
are displayed.
Selector
up(£.),
button.
down
(Y),
Items
can
rotary multi selector.
select
to
item.
the
right, continues
next screen.
the
current
the
"''0
~--
~
!flJ
-
Selects
the
to
Applies
selection.
left
also
item
an
to
5.3
...
and press
York
or....,_
to
&
EST:
New
Toronto
•
Lima
• or
Press
language
Press_,...
zone and press
select
to
r
~
•
select
the®
the
the®
~
your
button.
desired
button
IZ~
~~
s
~
11!!1
~~l.
home
.
~~
time
Press
the®
Daylight Saving Time
If daylight
enable
to
When
•
function
the
Press
•
time
• or
saving
the
the
top
...
function.
...
button.
daylight
daylight
enabled,
is
the
of
disable
to
is
time
saving
saving
monitor
the
select
to
Yes
effect,
in
time
is
e;j;
.
daylight
and press
press
function.
time
displayed
saving
•
at
I
First
Steps
(.
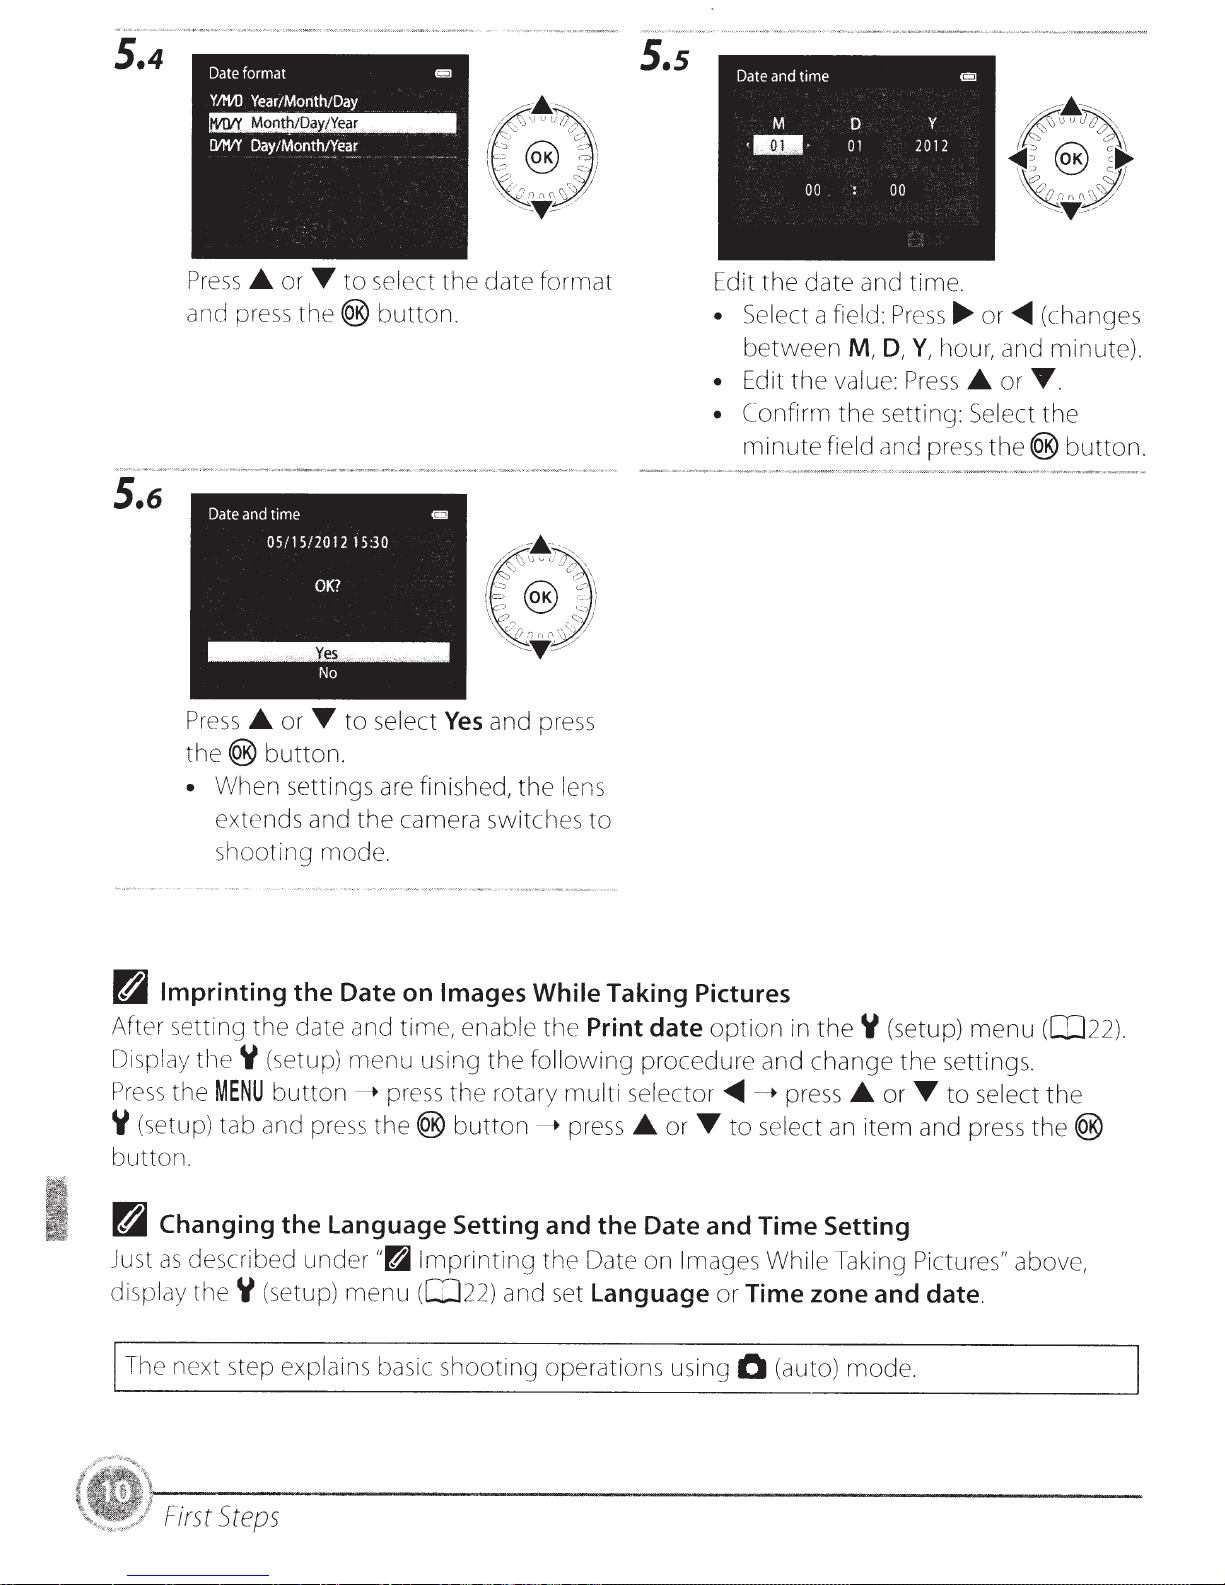
5.4
5.s
5.6
Press
and pre
Press
the@
•
_.
or
ss
_.
or
button.
When
extends and
shooting
T
to
select
th
e @
button
T
to
select
settings are finished,
the
mode.
the
date fo
.
Yes
and press
camera switches
the
rmat
lens
to
Edit
the
• Select
be
tween
• Edit
• C
the
onfirm
minute
date
a
field:
value:
the
field
and
M,
D,
setting:
and pre
time
Pr
ess
....
Y,
hour, and
Press_.
.
or~
or
Select
ss
the@
(changes
minut
T.
the
button.
e).
n
Imprinting
After setting the date and time,
Di
splay
theY
Pr
e
ss
the
MENU
Y
(s
etup
)
tab
button.
n
Changing the Language Setting and the Date and Time Setting
Just
as
described
display
Th
theY
e next step
First
Steps
the Date on Images While Taking Pictures
(setup)
button---..
and
(
se
explains
menu
press
pr
ess
the@
under"~
tup)
menu
basic
enabl e
using
Imprinting
(02
the
butt
sh
the
rotary
2)
o
oting
o
n___..
and set
th
e
Print date
following
multi
press_.
th
e Date
procedure
selector~---..
or
on
Images While
Language
operations using
option
T
to
or
in
theY
and
change
press_.
select
an
item
Taking
Time zone and date.
0
(auto)
mod
(setup)
the
settings.
or
T
and press
Pi
ctures"
e.
menu
to
select
([02
the
the@
above,
2
).
Step
1
Check the
Battery
Level
Exposures Remaining
and
the
Number
of
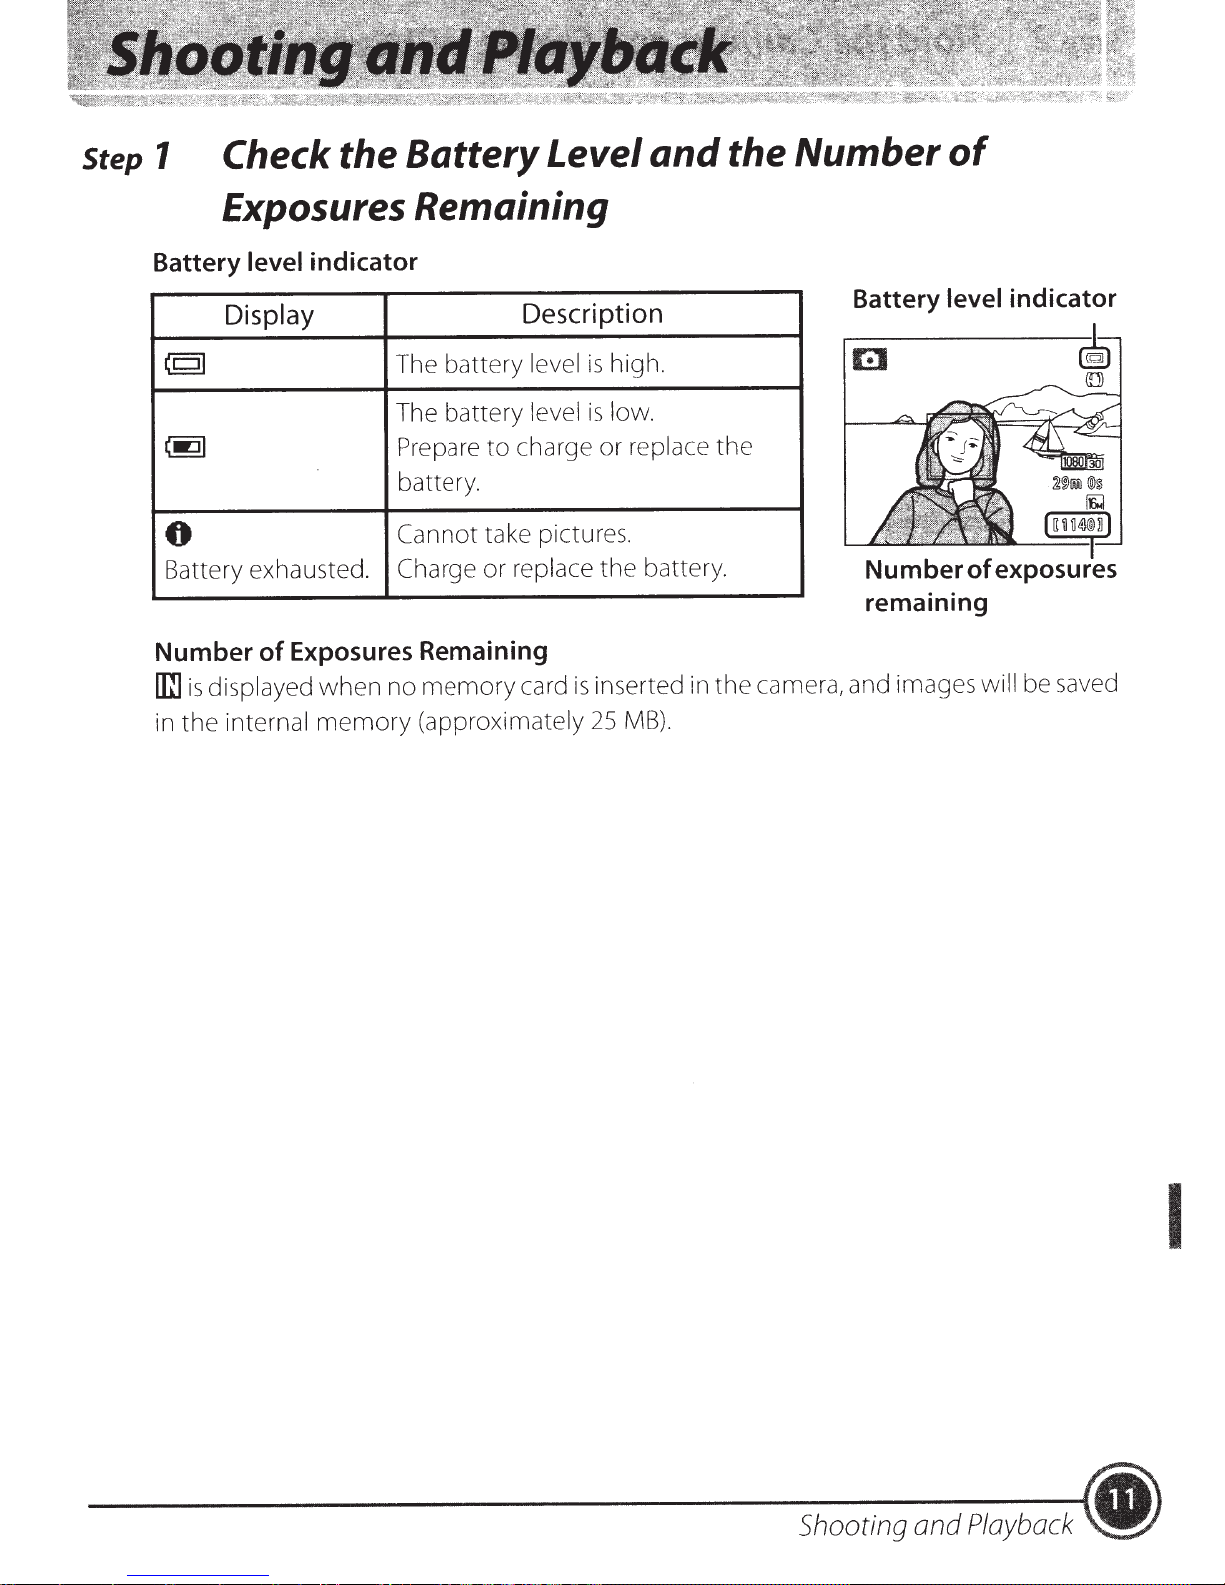
Battery
level
indicator
Display
(CJI
(.:JI
6
Battery exhausted.
Exposures Remaining
Number
is
rrn
the
in
of
displayed
internal
when
memory
battery
The
battery
The
Prepare
battery
Cannot
Charge
memory
no
(approximately
to
.
take pictures.
replace
or
Description
high.
is
level
low.
is
level
replace
charge
card
or
the
inserted in
is
MB).
25
the
battery.
the
Battery
remaining
camera, and images will be saved
level
indicator
Shooting and
Playback
I
•
Step2
Hold the Camera
and
Frame a Picture
2.1
2.2
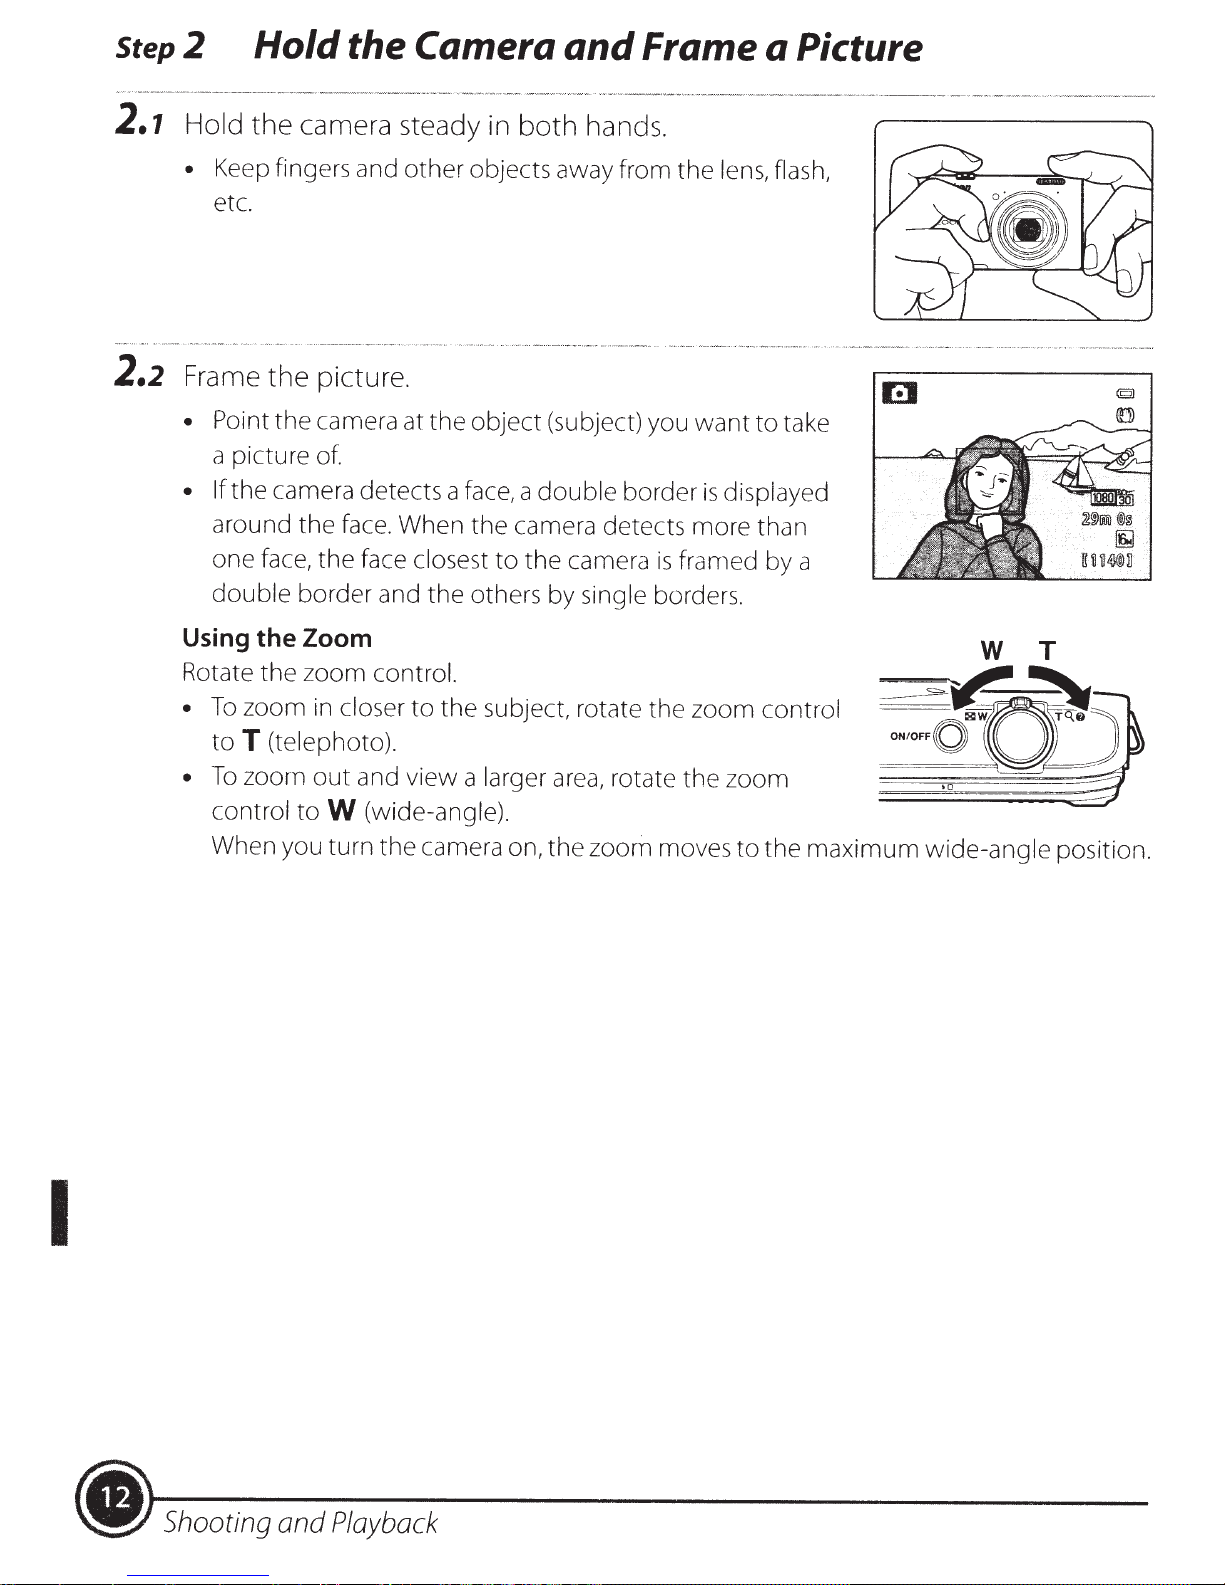
Hold
•
Frame
• Point
• If
Using
Rotate the zoom
the
camera steady in
Keep fingers and
etc.
the
picture.
the
camera at
a picture
the camera detects a
around the
one face,
double
of.
the
border and
the
Zoom
face.
other
When
face closest
control.
objects away from the
the
object
face,
the
the
others by single borders.
both
a
camera detects more than
to
the
hands.
(subject) you
double
border
camera
is
lens, flash,
want
framed by a
to
is
displayed
take
I
•
To
zoom
toT
•
To
zoom
control
When you turn the camera on,
in
closer
(telephoto).
out
and view a
to
W
(wide-angle).
to
the
subject, rotate the zoom
larger
area,
rotate the
the
zoom moves
zoom
to
control
the
maximum wide-angle
position.
<I)
Shooting and
Playback
Step3
Focus
and
Shoot
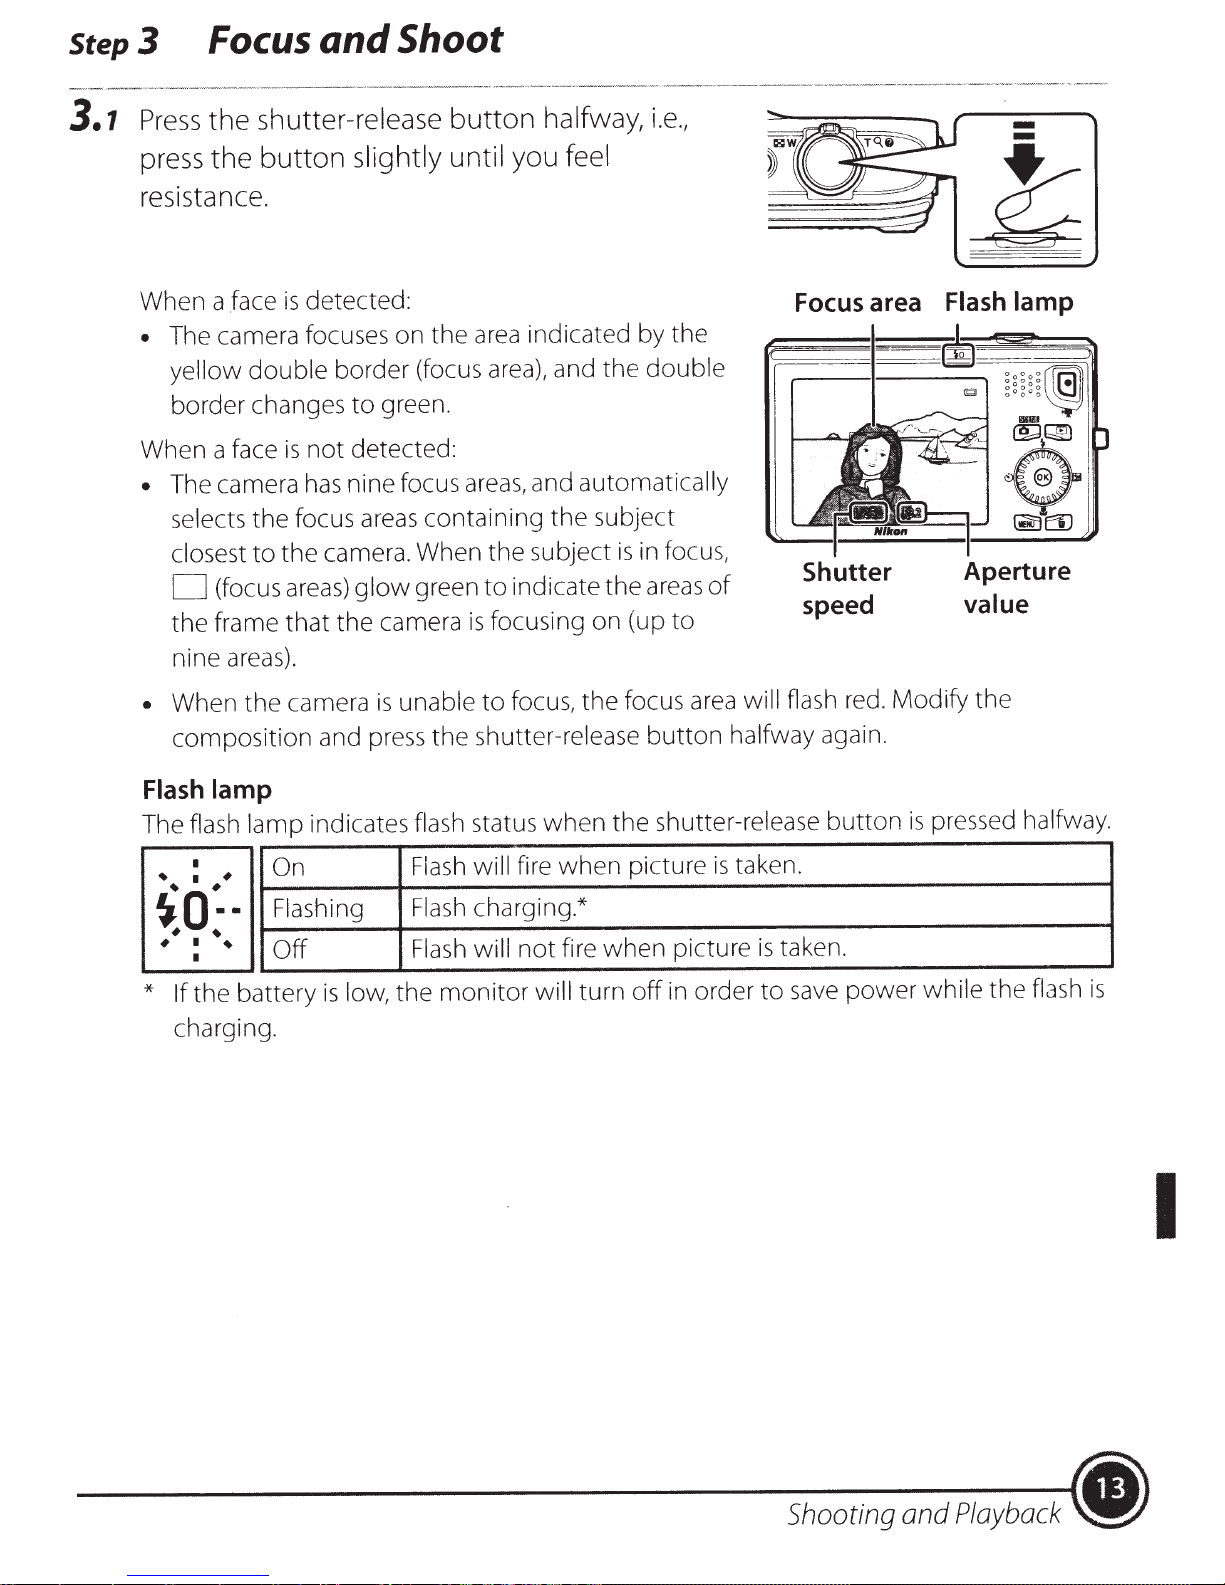
3.1
shutter-release
Press
press
the
the
button
slightly until you feel
resistance.
detected:
When a face
The camera focuses on
•
yellow
border changes
When a face
The camera
•
selects
closest
(focus
D
frame
the
nine areas).
• When
composition
is
double
is
has
focus areas
the
the
to
areas)
that
camera
the
border
to
detected
not
nine focus
camera. When
glow
the
and press
button
area
the
(focus area), and
green.
:
areas,
containing
the
green
camera
unable
is
to
focusing on (up
is
to
shutter-release
the
halfway,
indicated by the
automatically
and
the
subject
indicate
focus,
the
i.e.,
double
the
subject
in focus,
is
areas
the
focus
button
of
to
will flash red.
area
halfway again.
Focus area
Shutter
speed
Modify
-
-
1;:
Flash lamp
Aperture
value
the
Flash lamp
lamp
flash
The
I
I
~
~o:.
~
~
I
~
I
the
If
*
charging.
On
~
Flashing
~
Off
battery
indicates flash
Flash
Flash
Flash
monitor
the
low,
is
fire
not
will
when
when
fire
turn
status
will
charging.*
will
shutter-release
the
picture
in order
off
picture
when
taken.
is
taken.
is
save
to
button
power
pressed halfway.
is
flash
while
the
is
I
Shooting and
Playback
•
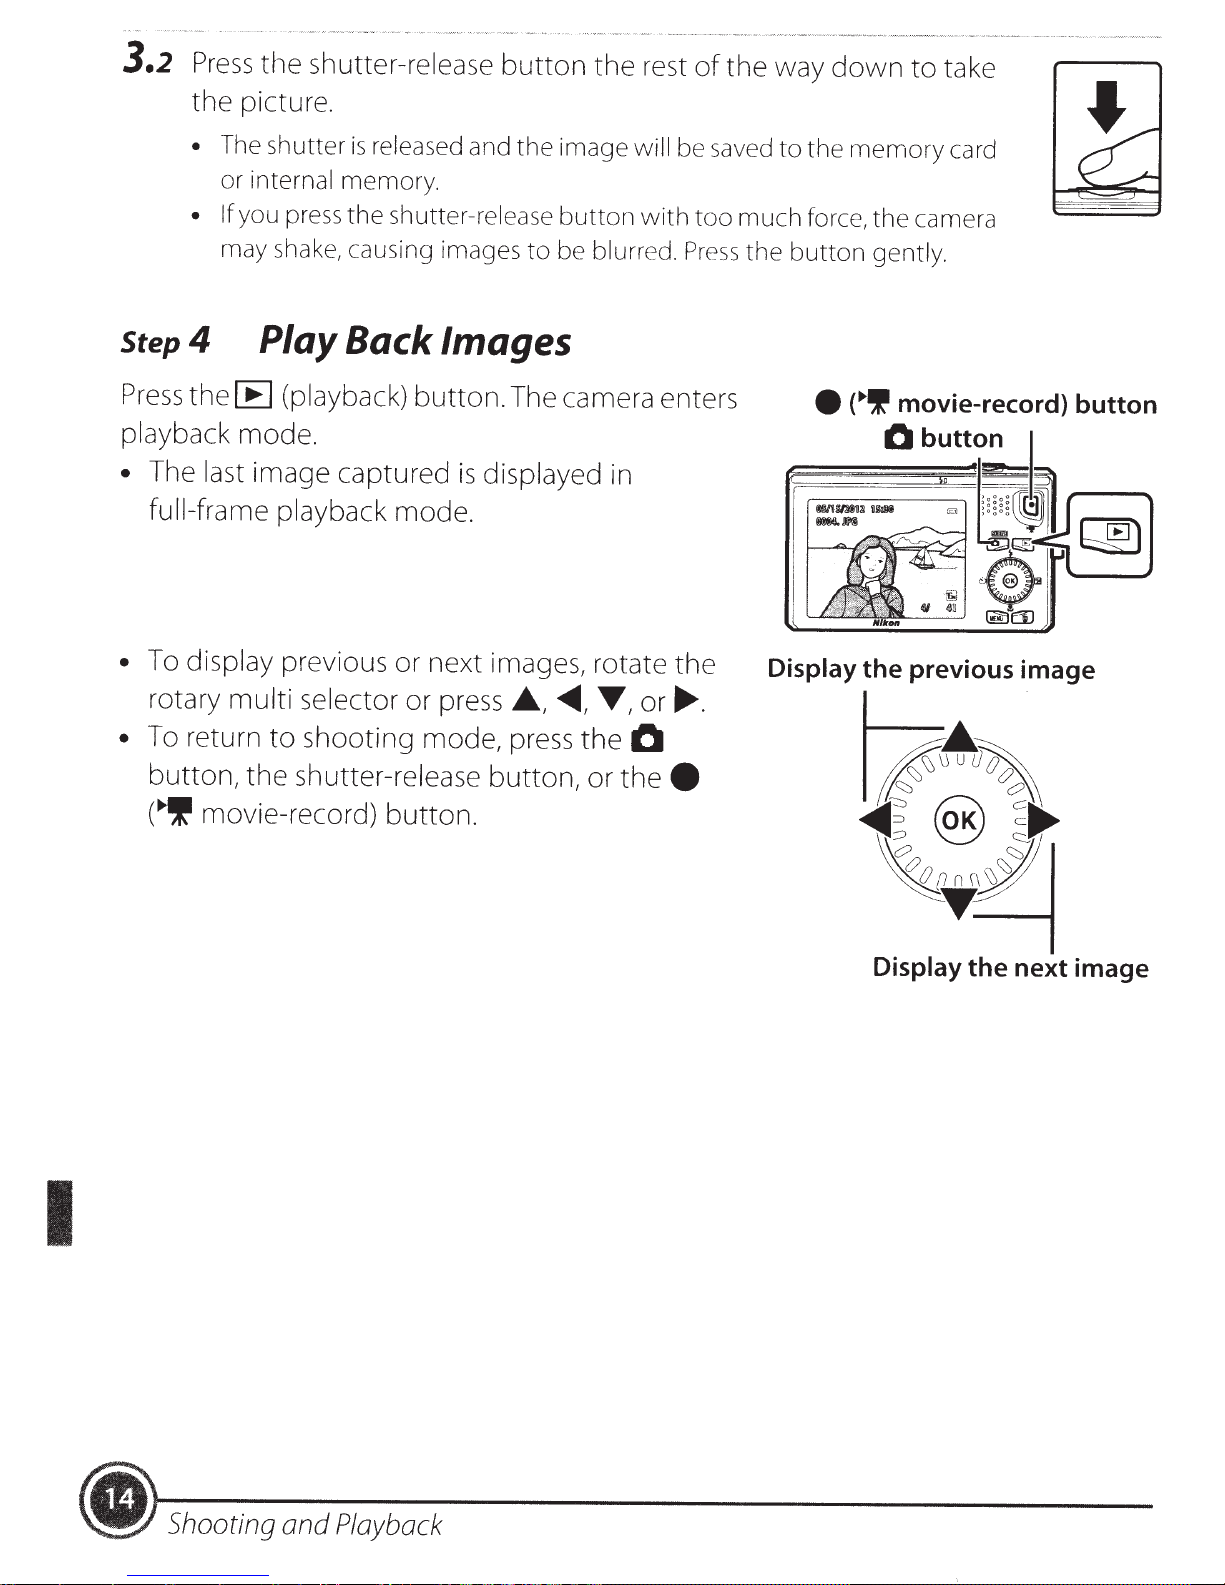
3.2
Press
the
the
shutter-release
picture.
button
the
rest
of
the
way
down
to
take
• The shutter
or internal memory.
• If
you press
may shake, causing images
Step
Press
playback
• The
•
4
the
full-frame playback
To
display previous or next images, rotate
rotary
Play Back Images
[E]
(playback)
mode.
last
image captured
multi
selector
is
released and
the
shutter-release
button.
mode.
or
press
the
image will be saved
button
to
be blurred .
The camera enters
is
displayed
A,
in
<01111111,
~,or~-
with
the
too
Press
to
the
memory
much
the
force,
button
e
("'"
the
gently.
0
Display the previous image
card
camera
movie-record) button
button
I
•
To return
button,
(.,.!'
to
shooting
the
shutter-release
movie-record)
mode, press
button.
button,
the
or
0
thee
~~~
~~@
~.~
Display the next image
~
.)
Shooting and
Playback

Deleting Unwanted
Images
delete
To
press
When the
multi selector
press
When the confirmation
to
T
image that
• After pressing the
Erase selected images
to
• Deleted images cannot be restored.
without
StepS
Press
the image
(delete)
i
the
deletion
.A
the®
select
be
button.
Yes
displayed .
is
deleted. Select
deleting, select
Turn
power
the
currently displayed in the monitor,
button.
screen
T
or
and
switch
to
dialog
press
button,
1iil
All
Off
displayed,
is
select
the®
Current image
displayed,
is
press
select multiple
and
images
the confirmation dialog
in
No
the Camera
turn
to
press
button
.A
delete
to
camera off.
the
the rotary
press
delete
to
T
or
all
cancel
To
and
or
.A
the
select
to
images
images.
and
press
the®
button
.
Shooting and
Playback
I
. )
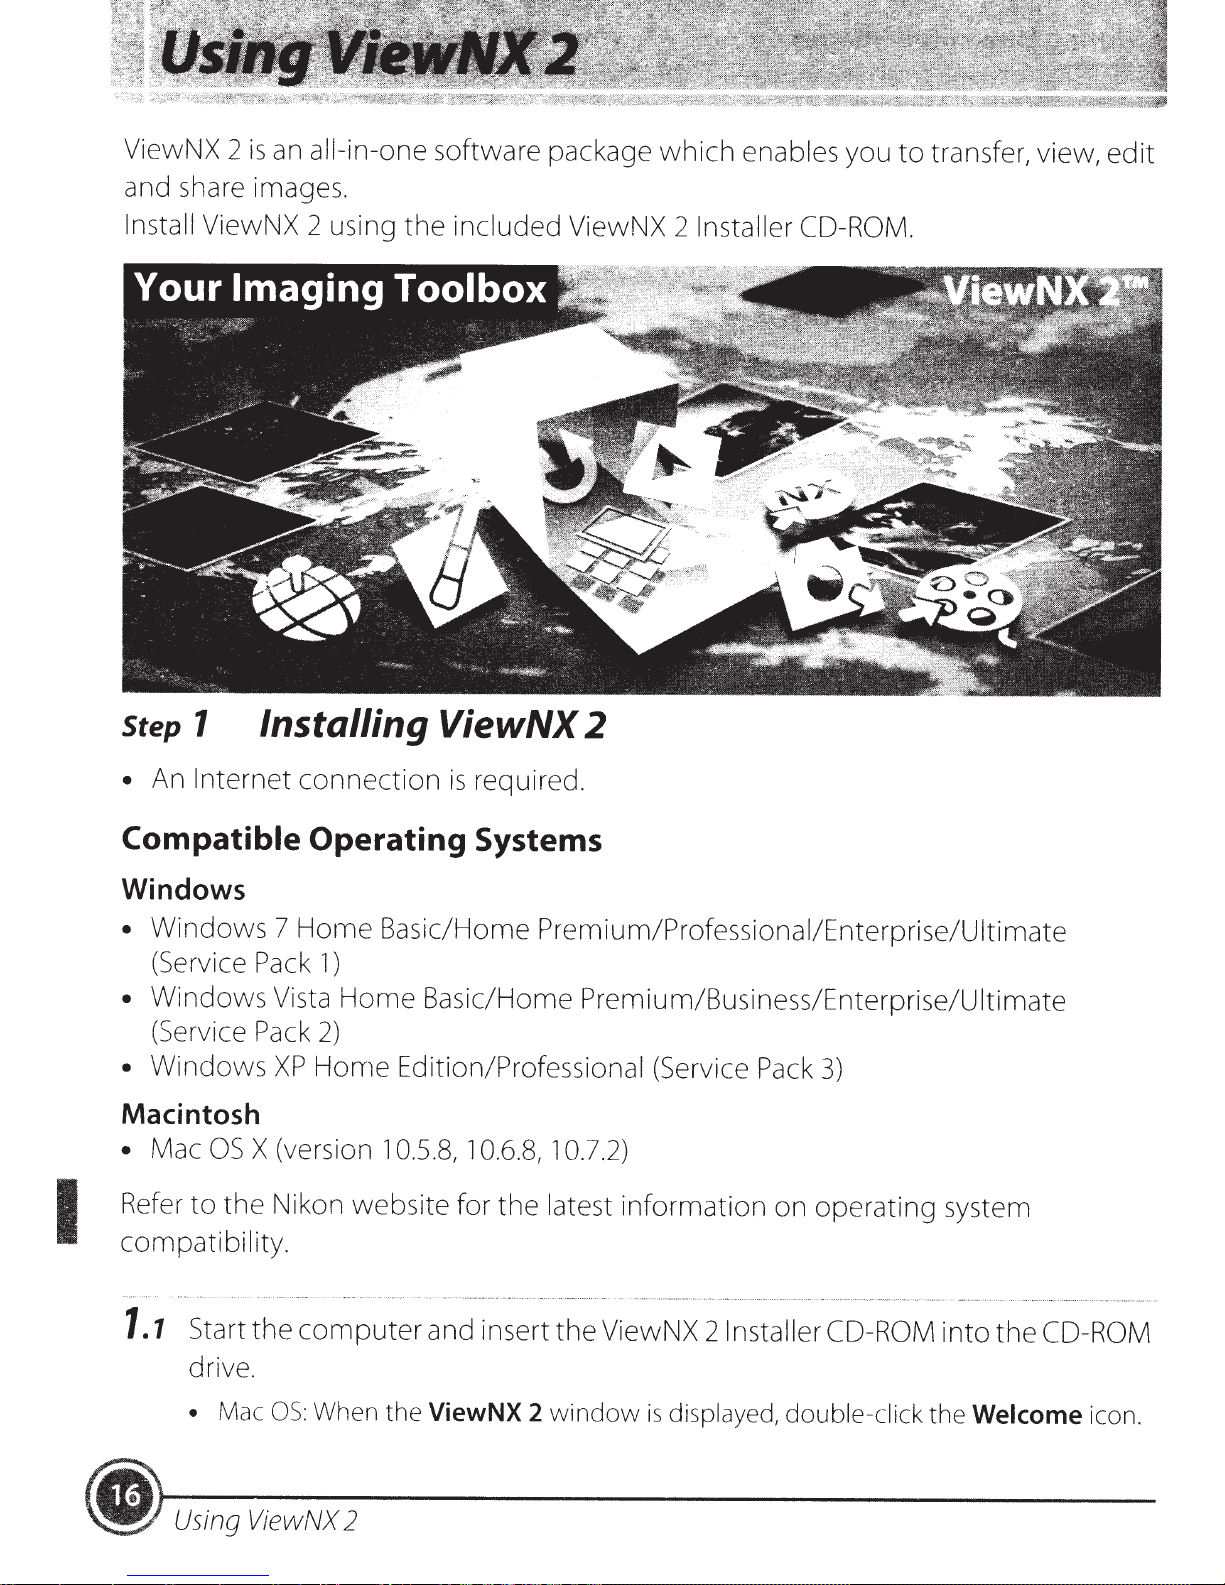
ViewNX 2
and share images.
is
an ail-in-one software package
which
enables
you
to
transfer, view,
edit
Install ViewNX 2 using
Step
• An
1
Internet
Installing ViewNX 2
connection
the
included
is
ViewNX 2 Installer CD-ROM.
required .
I
Compatible Operating Systems
Windows
•
Windows
(Service Pack
•
Windows
(Service Pack
•
Windovvs
Macintosh
• Mac
Refer
compatibility.
1.1
OS
to
Start
drive.
•
7
Vista
XP
X (version
the
Nikon
the
Mac
OS:
Horne
1)
2)
Horne Edition/Professional
computer
When the
Basic/Home
Home
website
Basic/Home
1
0.5.8,
and insert
ViewNX 2
1
0.6.8,
for
Premium/Professional/Enterprise/Ultimate
Premium/Business/Enterprise/Ultimate
1
0.7.2)
the
latest
the
window
(Service Pack
information
ViewNX 21nstaller CD-ROM
is
displayed, double-click
3)
on
operating
system
into
the
Welcome
the
CO-ROM
icon .
•
Using
ViewNX
2
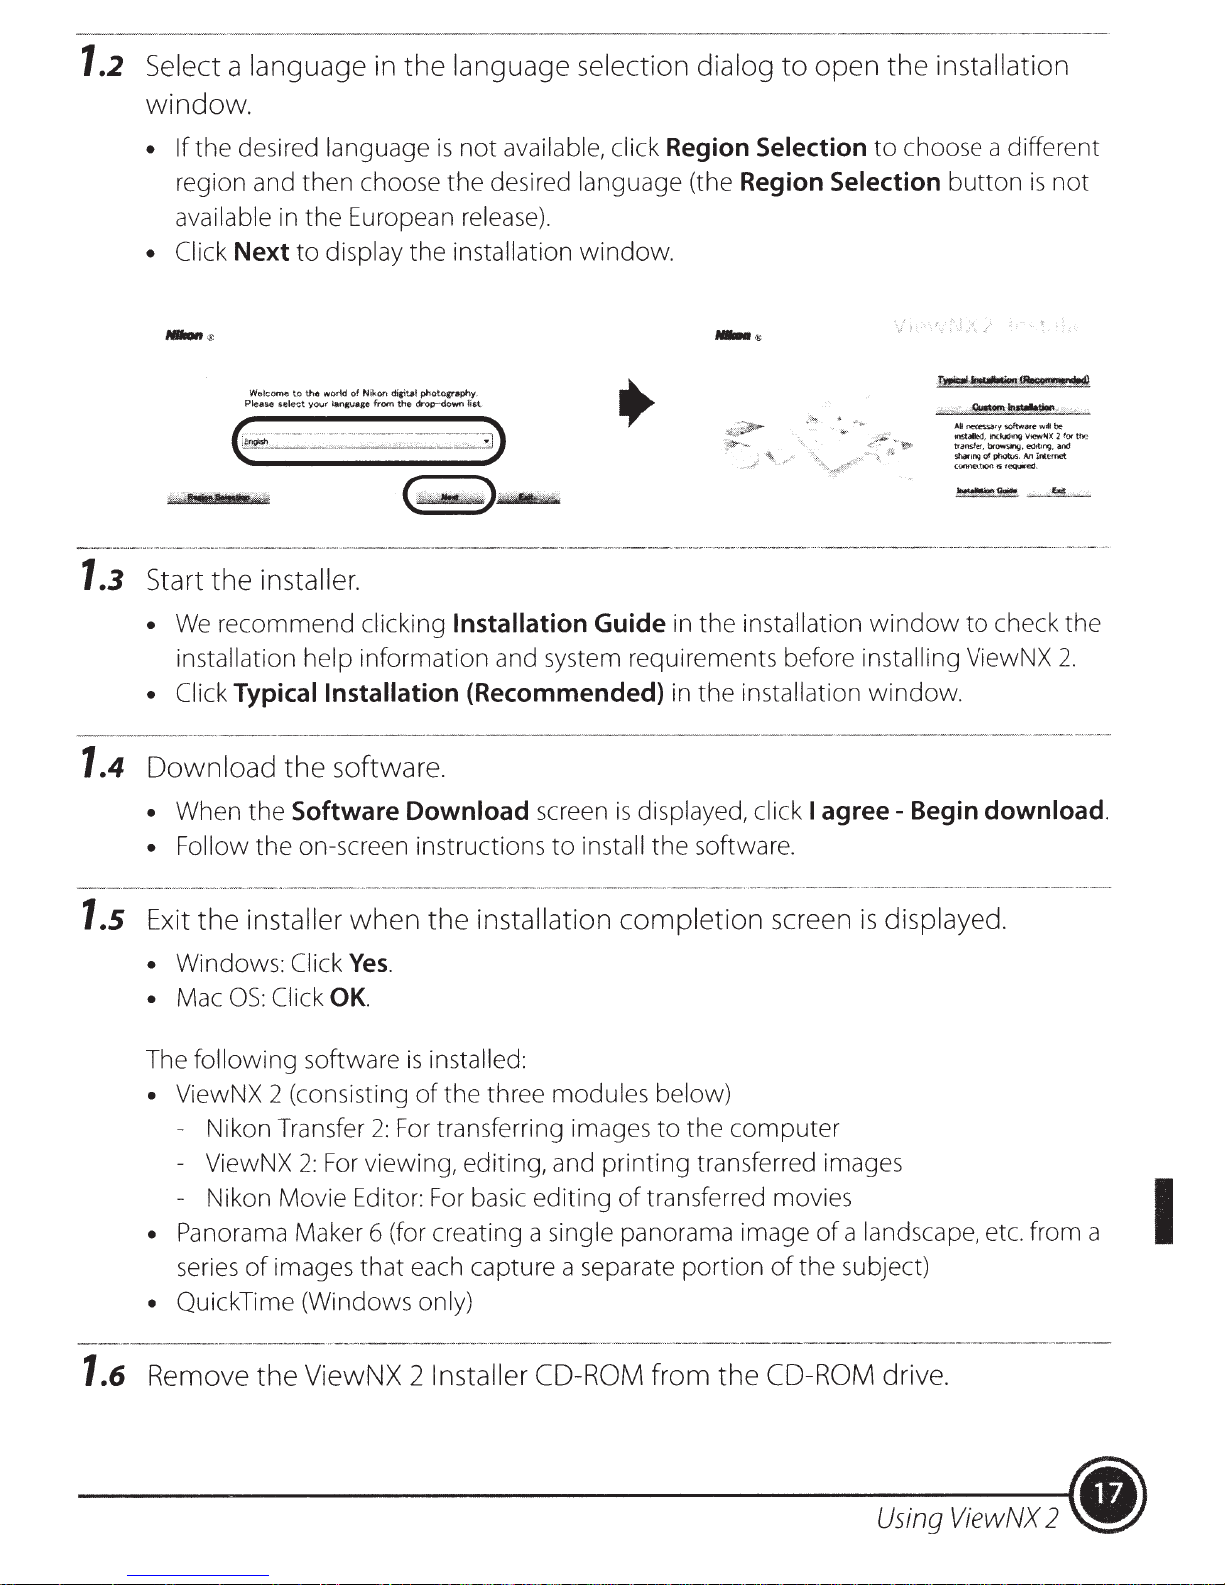
1.2
Select a language in
window.
• If
the
desired language
then
region and
choose
the
language selection dialog
is
not
available, click Region Selection
the
desired language (the Region Selection
to
open
the
installation
to
choose a different
button
is
not
1.3
1.4
available in
• Click
Start
•
the
We
recommend
installation
Next
Please select
the
European release).
to
display
Welcome to the world of Nikon digitel photogra,phy.
your'
tangvage from
the
the
drop-down list
installation
installer.
clicking Installation Guide in
help
information
window.
and system requirements before installing ViewNX
• Click Typical Installation (Recommended) in
Download
the
software.
the
installation
the
installation
window
window.
All
necessaJ)'
softwace
105talled,
inctuchnQ
transfer,
browsh;.J,
sham'lg
of
photos.
(Oflf'le(_tK)OI'Sfequir-ed.
to
check
wit!
be
V!CW~X
2
ed1t~ng.
aOO
An
lrtl-rnet
2.
fOf
thr~
the
1.s
1.6
• When
• Follow
Exit
• Windows: Click
• Mac
The
• ViewNX 2 (consisting
- Nikon Transfer
- ViewNX
- Nikon Movie Editor:
the
the
the
installer
OS:
Click
following
Software Download screen
on-screen instructions
when
the
installation
to
install
Yes.
OK.
software
2:
For
is
installed:
of
the
three modules below)
2:
For
transferring images
viewing, editing, and
For
basic
editing
is
displayed, click I
the
software.
completion
to
the
printing
of
transferred images
transferred movies I
screen
computer
• Panorama Maker 6 (for creating a single panorama image
series
images
that
each capture a separate
portion
of
of
• Quick Time (Windows only)
Remove
the
ViewNX 2 Installer CD-ROM from
the
CD-ROM drive.
agree-
of
a landscape, etc. from a
the
subject)
Begin download.
is
displayed.
Using
ViewNX
2 •

Step2
Transferring Images to the Computer
2.1
Choose
Choose one
•
Direct
inserted
Cable
To
memory
how
USB
UC
transfer images
images
of
the
connection:
in
the
camera.
-E6.
The camera automatically
card from
will
following
Connect
that
are saved in
the
camera before
be copied
methods:
Turn
the
the
to
the computer.
camera
camera
the
off
and ensure
to
the
computer
turns on.
camera's internal memory, remove
connecting
it
to
that
the
computer.
the
using
memory
the
supplied
card
the
is
USB
I
•
SO
card
slot:
If
your
inserted directly in
•
SO
card reader: Connect
suppliers)
If
a message
•
When using Windows 7
If
the
displayed,
select Nikon Transfer
1 Under
videos,
A program selection dialog
be displayed; select
using Nikon Transfer 2
to
the
computer
is
displayed
dialog shown at
follow
Import
click
the
pictures and
Change
OK.
2 Double-click
If
the
memory
Transfer 2
to
start. Wait
Import
card contains a
computer
the
slot.
a card reader
prompting
right
steps
until
below
2.
program.
Import
and
File.
Nikon Transfer 2 starts.
is
equipped
and insert
you
is
to
will
File
click
large
number
with
an
SD
card
slot,
the
card can be
(available
the
memory
to
choose a program, select Nikon Transfer
of
separately
card.
images, it may take a
from
third-party
while
for Nikon
2.
~
Connecting
The
connection
hub
.
•
Using
ViewNX
the
may
USB
not
be recognized
2
Cable
if
the
camera
is
connected
to
the
computer
via
a
USB
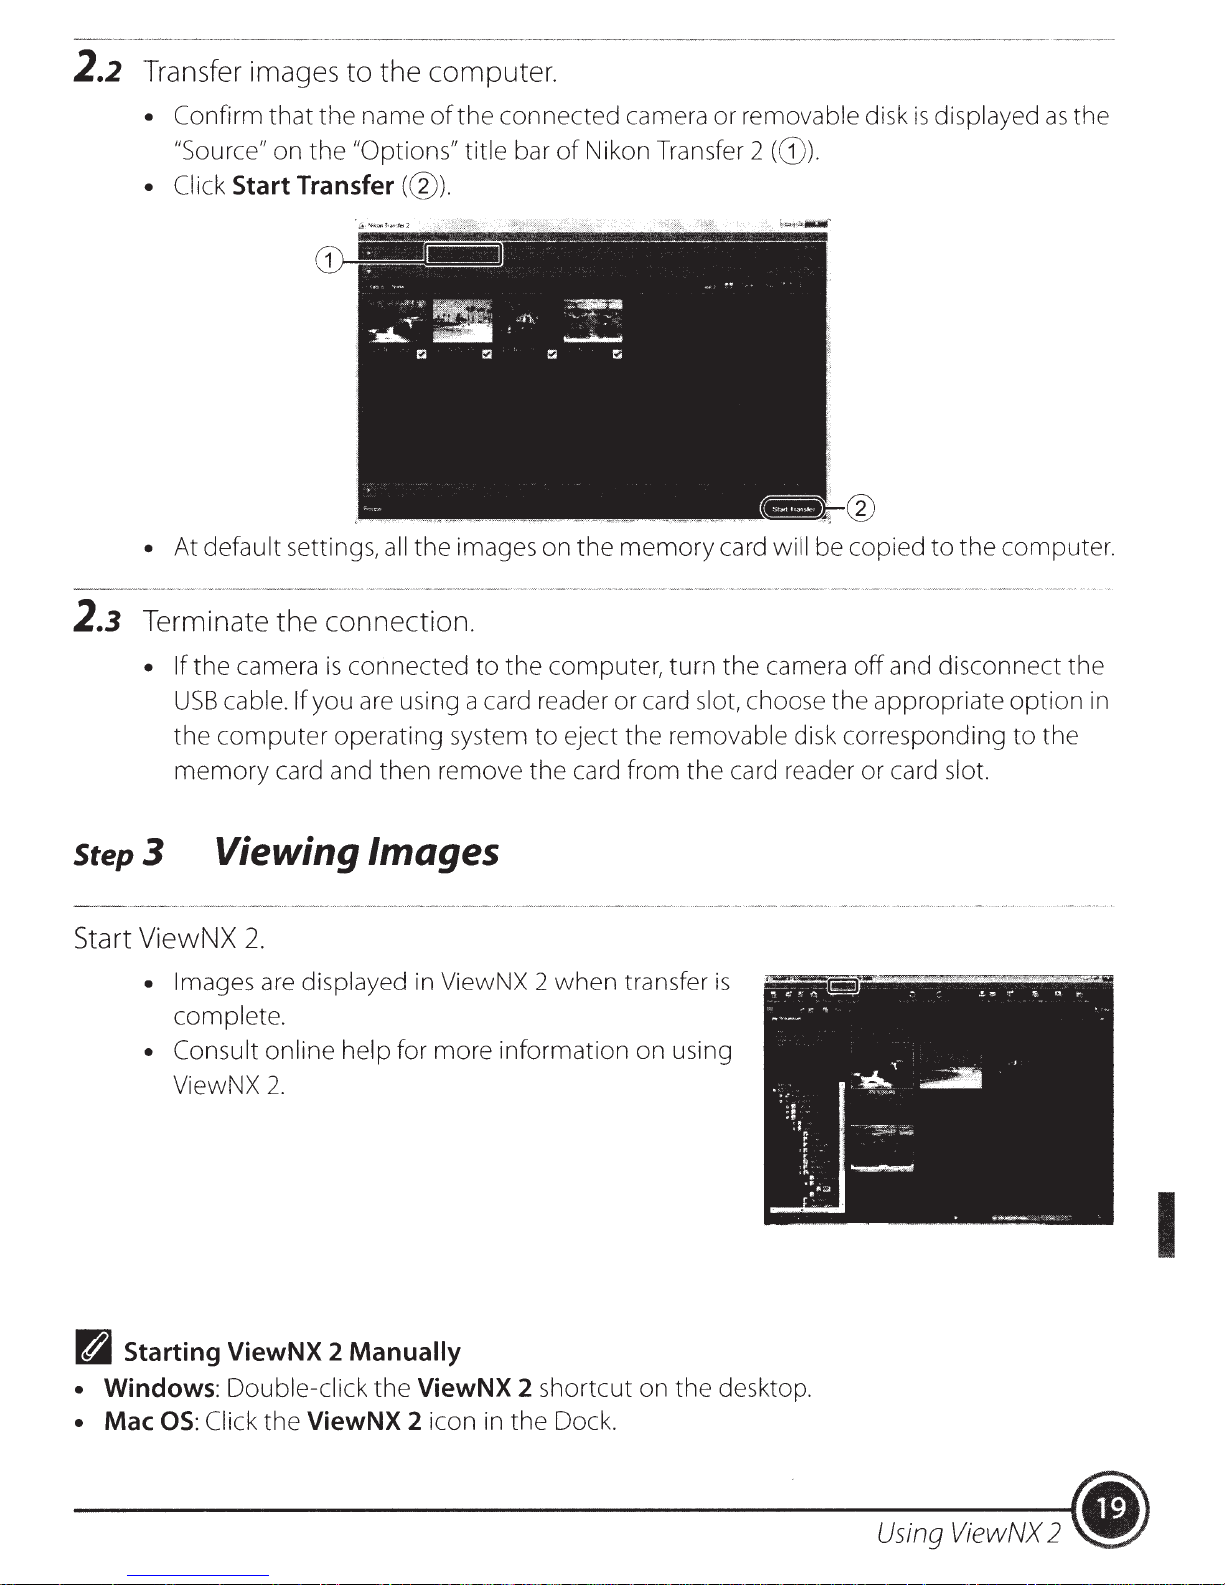
2.2
Transfer images
to
the
computer.
2.3
• Confirm
"Source" on
• Click Start Transfer(@).
• At default settings,
Terminate
• If
the
that
the
camera
the name
the
"Options" title bar
all
of
the
connection.
is
connected
the
connected camera or removable disk
of
Nikon Transfer 2 (G)).
images on
to
the
the
memory
computer,
card will be copied
turn
the
camera
is
displayed
to
the
computer.
off
and disconnect the
as
the
USB
cable. If you
the
computer
memory
Step3
Viewing Images
Start ViewNX
• Images
complete.
• Consult online help for more information on using
ViewNX
are
using a card reader or card slot, choose
operating system
card and then remove
2.
are
displayed in ViewNX 2
2.
the
appropriate
to
eject
the
when
the
removable disk corresponding
card from the card reader or card slot.
transfer
is
option
to
the
in
I
n Starting ViewNX 2 Manually
• Windows:
• Mac
OS:
Double-click
Click
the
ViewNX 2 icon
the
ViewNX 2 shortcut on
in
the
Dock.
the
desktop.
Using
ViewNX
2 •
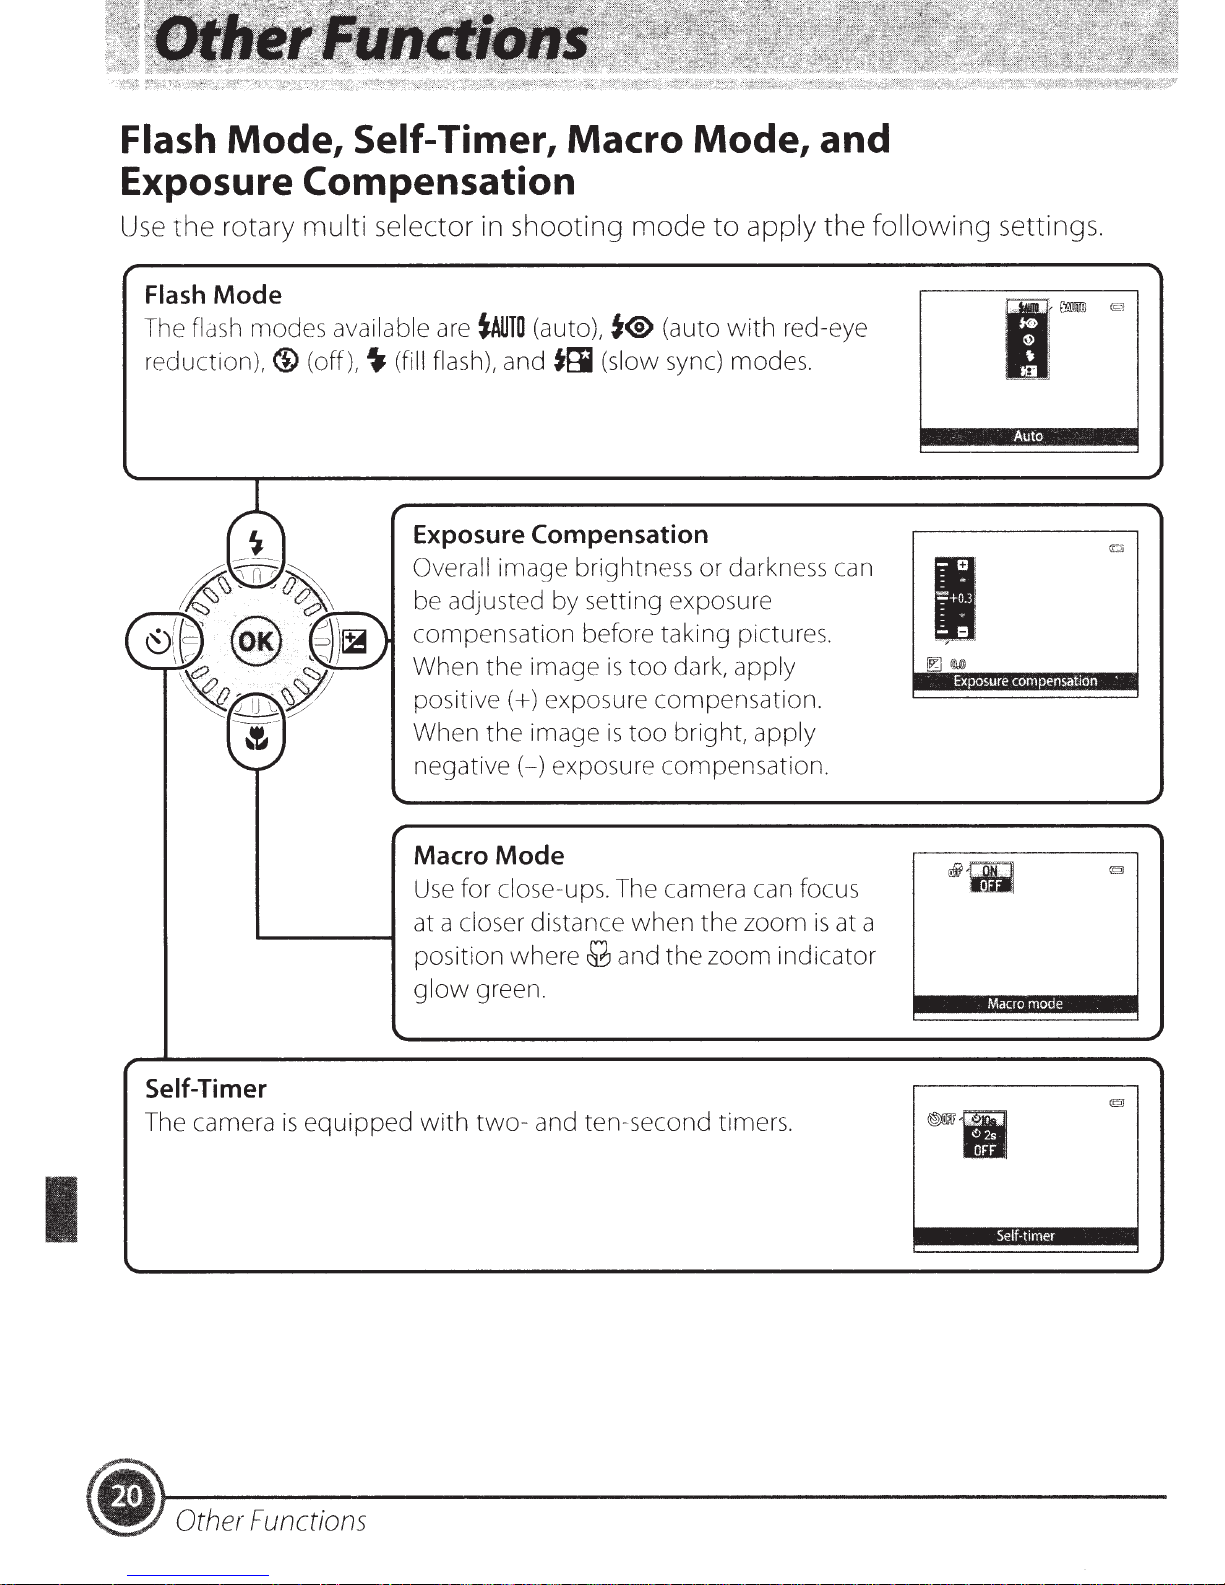
Flash
Mode,
Self-Timer, Macro
Exposure Compensation
Use
the
rotary
multi
selector in shooting
Mode,
mode
to
apply
and
the
following
settings.
Flash
The flash modes available are
reduction),®
Mode
(off),~
(fill flash), and
Exposure Compensation
Overall
be adjusted by setting exposure
compensation
When
positive(+)
When
negative(-)
Macro
Use
at a closer distance
position
glow
tAUTO
(auto), t® (auto
tti
(slow sync) modes.
image
the
the
Mode
for close-ups. The camera can focus
where
green.
brightness
before taking pictures.
image
exposure
image
is
too
is
too
exposure
when
M and
compensation.
compensation.
the
with
or
darkness can
dark,
apply
bright,
the
zoom
zoom
apply
red-eye
is
at a
indicator
I
Exposure
Auto
compensatJon
Macro
mode
'
Self-Timer
is
The camera
equipped
I
• Other
Functions
with
two-
and ten-second timers.
Self-t1mer
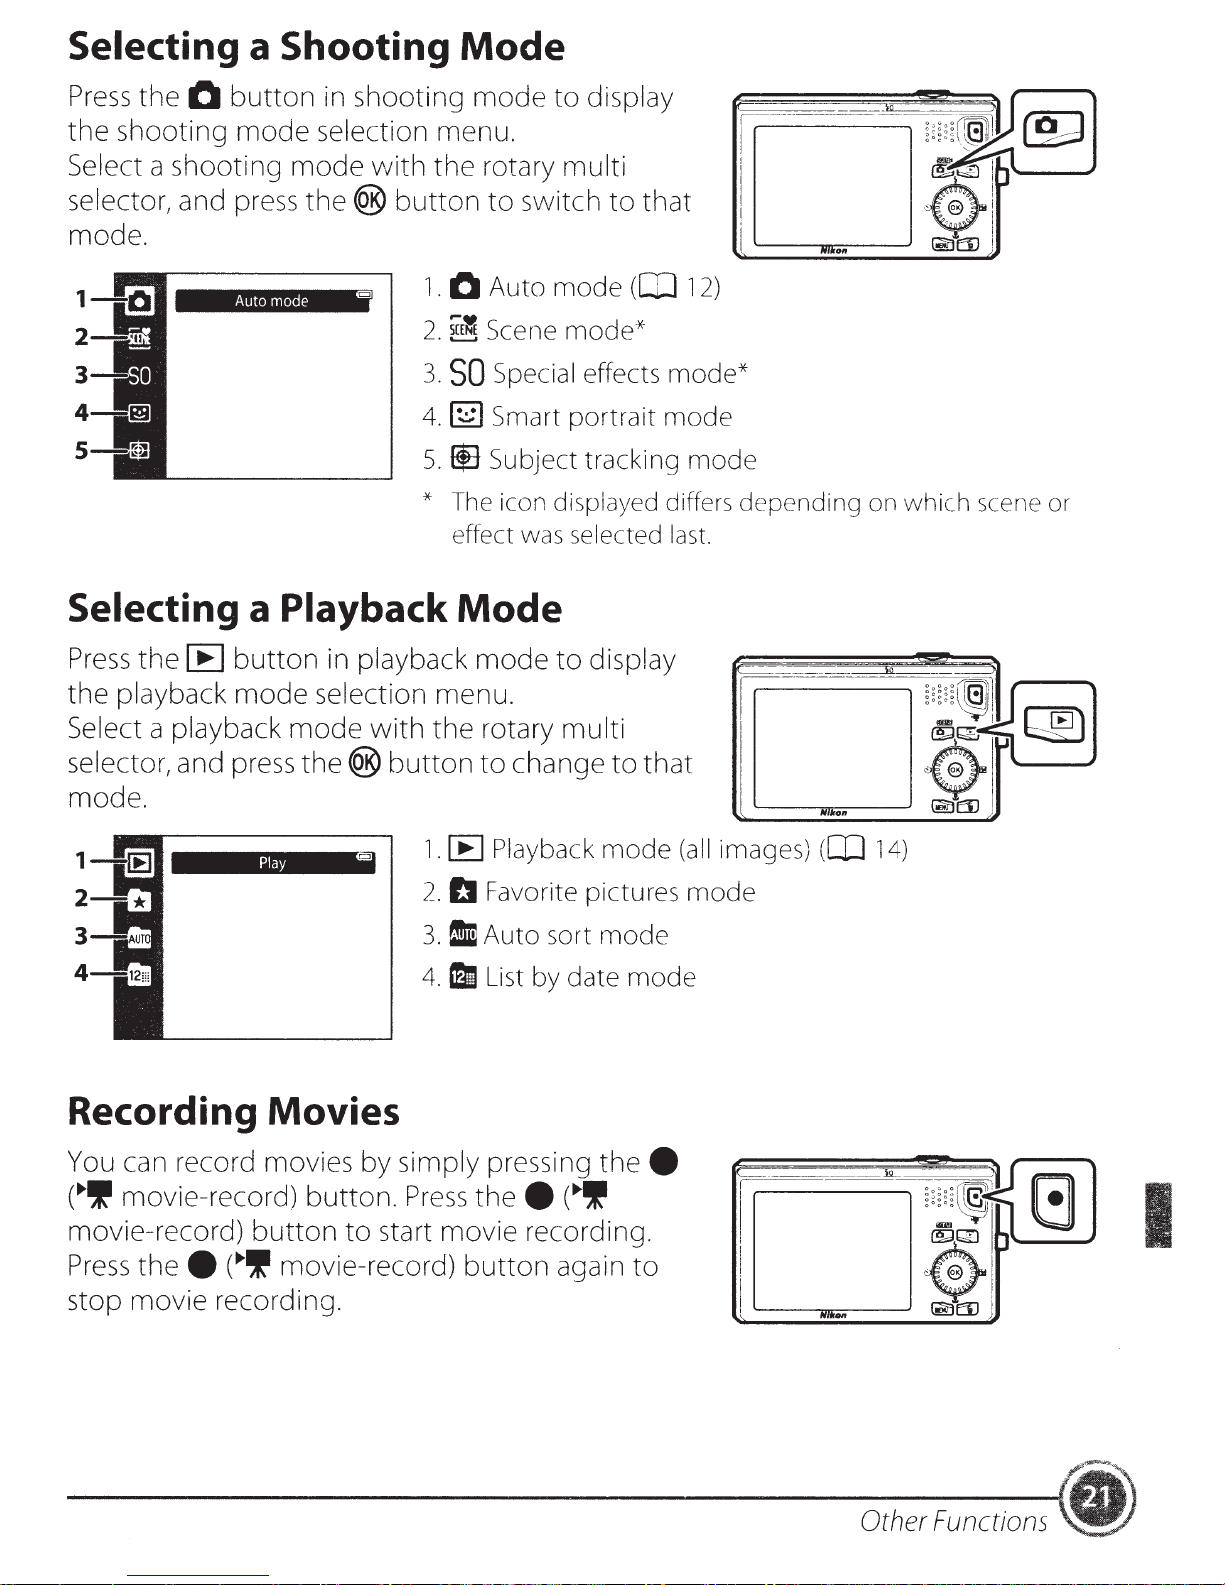
Selecting a Shooting
Mode
Press
the
Select a shooting
selector, and press
the
0
shooting
button
mode
mode
in shooting
selection menu.
vvith
the(@
the
button
mode.
Auto mode s
1.
2.
3.
4.1~1
s.f!j
* The icon displayed differs
Selecting a Playback
Press
the
[E)
button
in playback
mode
rotary
to
0
Auto
,....~
~
Scene
SO
Special effects
Smart
Subject tracking
effect was selected last.
to
display
multi
switch
mode
mode*
portrait
to
(OJ
that
1
mode*
mode
mode
Mode
mode
to
display
2)
depending
on
which
scene or
the
playback
Select a playback
selector, and press
mode
mode
selection menu.
with
the(@
the
button
rotary
to
change
multi
mode.
1.
Play
[E) Playback
2.
b Favorite pictures
3. D Auto
4.
miD
List by
sort
date
Recording Movies
You can record movies by simply pressing
(~!I
movie-record)
movie-record)
Press
thee
(~!I
button.
button
to
start movie recording.
movie-record)
Press
thee
button
(~!I
again
to
that
mode
mode
mode
thee
to
(all images)
mode
(OJ
14)
stop movie recording.
Other Functions
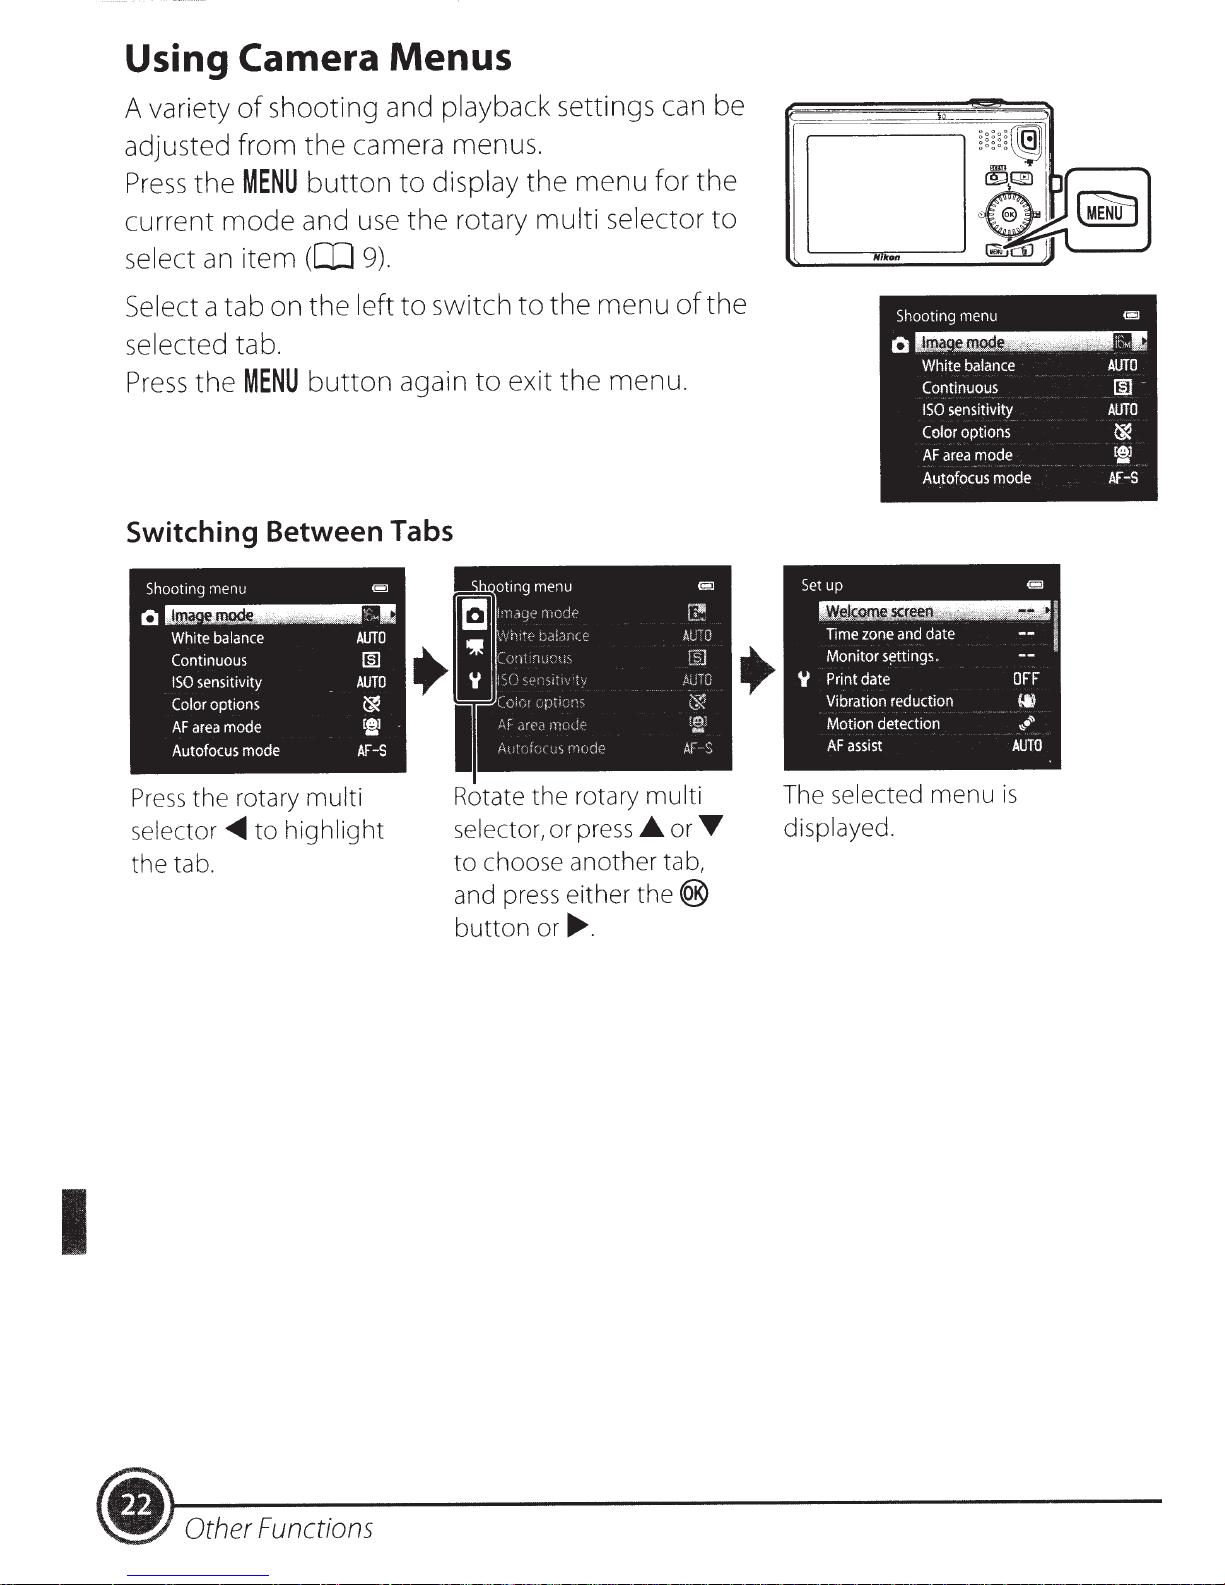
Using
A variety
adjusted from
Press
Camera Menus
shooting and playback settings can be
of
MENU
the
camera menus.
the
display
button
to
the
menu
for
the
current
select
Select a tab on
selected tab.
Press
Switching Between Tabs
Pre
selec
the tab.
mode
an
the
the rotary
ss
.....
tor
item
and
([IJ
the
MENU
button
multi
highlight
to
9).
left
switch
to
again
the
use
the
the
rotary
press
or
selector
menu
menu
the®
.
rotary
to
Rotate
selector,
to
and press either
button
multi
to
exit
the
choose another tab,
or~
of
multi
or
.A.
.
to
the
T
The selected
displayed.
menu
is
I
~
Other
Functions
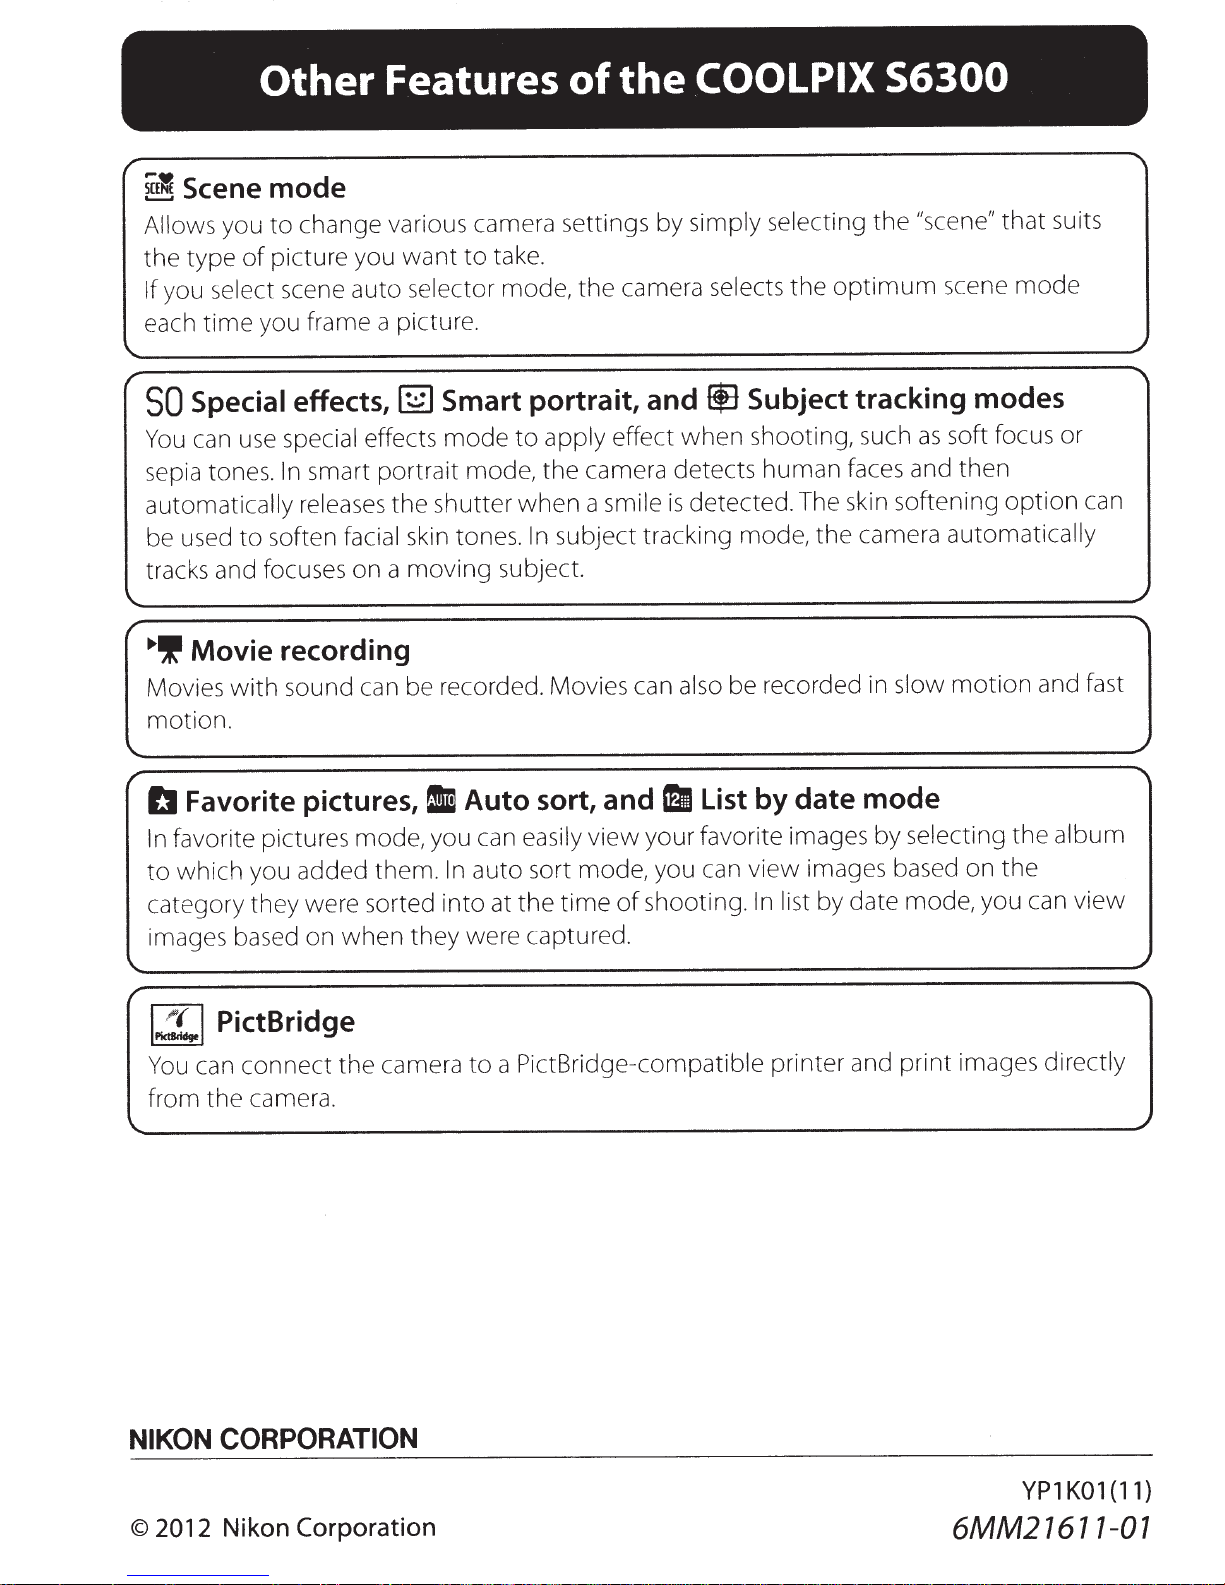
Other
r
~Scene
Allows you
type
the
you select scene auto selector mode,
If
time
each
mode
change various camera settings by simply selecting
to
picture you
of
you frame a picture.
Features
want
to
take.
the
of
camera selects
the
COOL PIX
optimum
the
56300
"scene"
the
scene
that
mode
suits
Special
SO
can use special effects
You
sepia tones .
automatically releases
be used
tracks and focuses on a
Movie recording
.,.Ill
Movies
motion.
with
effects,
smart portrait mode,
In
soften facial skin tones.
to
sound can be recorded. Movies can also be recorded in slow
Smart portrait, and
~
apply effect
mode
shutter
the
moving
to
camera detects
the
when
subject.
a smile
subject tracking mode,
In
® Subject tracking modes
soft focus or
when
detected. The skin softening
is
shooting, such
human
faces and then
camera automatically
the
as
motion
option
and fast
can
1~1
You
from
NIKON
2012
©
PictBridge
can
the
connect
camera.
the
CORPORATION
Nikon
Corporation
camera
a PictBridge-compatible printer and
to
images directly
print
YPl
6MM21617-01
K01(11)
Nikon
Cher
client Nikon,
Nous vous remercions d'avoir choisi un appareil
rapide
multilingue
com
mencer r
Le CD-
ROM
PDF
No us avons es
cl
ien
ts
de
disposer d'un e
Votre appareil
b
es
o
in
d'assistan
E
st
im
ado
cli
graci
as
por
elegir
Esta gufa
El
CD-
Cr
eemo
multi
Su
conta
Prezado
Ob rigado por escolher a Nikon.
Esse
0 CDConstatamos
em idiomas
S
ua
entre
contie
ROM
adjunt
s
que
lingufsticas de nuestros clientes.
ca
mara Nikon le permitira disfrutar de
cto
con
cl
i
ente
guia
contem
ROM
incluso contem
ca
mera Nikon pr
em
con
sous forme
apidemen
inclus
con
tie
tim
e
pho
to
Nikon vous fera profiter des plaisirs de
ce,
n'hesit
ente
de N
ik
on:
un
pr
od
ne
inf
orm
o contiene un Manual de referenc
es
ta
so
luci6n
el
servicio de
N
ik
on:
in
forma~oes
que
essa
so
va
riado
s.
opo
tato co
mo
imprimee
t
a
utiliser
nt
un Manuel
que
ce
tt
e
documenta
ez
pas
ucto Niko
ac
ion basica para
es
respetuosa con
so
porte
Nes
basicas para
um
Manual
l
u~ao
eco
rcionara a
s
uport
e tecnico Nikon
vot
re
so
lution
tion
a
contacter
n.
En
tecnico
te pacote,
logicament
vo
ce
Ce
gu
appa re
de
reference detaille
re
spec
multilingu
votre supp
es
te
que
Ia fotografla
de
que
de
Referencia
va
ri
os
photo
Nikon. Vous trouverez dans
ide
cont
1ent
des informations
il
photo
Nikon.
(dans plusieurs langues) enregis
tueu
se
de
l'
environn
e.
Ia
photographi
ort
technique
paquete
el
Nik
voce
e correta
anos
enco
ntrara una
pueda empezar a utili
ia
detalla
do
me
dio
ambiente
durante
on
de
encont
voce
possa
detalhado
de
no
se
u pais. Obrigadol
a
su
pais. iGraciasl
rara
um
come~ar
tambem
ap
re
c
ia
~ao
de
ement
G
za
(en varios idiomas)
y
al
mi s
nos.
En
Guia
rapid
(em va
vai
ao enco
do
mund
repondait
e penda
Nik
on
loca
ui
a
de
ini cio rapido
r rapidame
mo
tiempo
caso
de
necesitar
de
inicio rapido impresso em vari
amente
ri
os idiomas), salvo
ntro
o da
Ia
bolte
un Guide de
base
qui
vous
tr
e
egalement
nt
de
longue
l.
Merci
I
impr
nte
su camara Nikon.
guardado
tam
bien
soport
a usar a
das necessidad
fot
og
rafia.
sua
como
Se
dema
rrage
permettront
so
us
forme
aux besoins de n
s annees. Si
esa
en
como
un arch ivo
satisface l
e tecnico, p6ngase en
camera Nikon.
arquivo
es
dos nossos
preci
sa
de
de
vous avez
va
ri
os idiomas.
as
necesidades
os
idiomas.
PDF.
r
de
assistencia,
fichier
PDF.
clientes
os
NIKON CORPORATION
©
2012
Nikon Corporation
llllllllllllllllllllllllllllllllllllllll
Y-VG0692231 F00090
Printed
6MM2164N-O 1
in
YP1
China
K01(4N)
DIGITAL CAMERA
Reference Manual
En

Trademark Information
• Microsoft, Windows and Windows Vista are either registered trademarks or trademarks
of Microsoft Corporation in the United States and/or other countries.
• Macintosh, Mac OS, and QuickTime are trademarks of Apple Inc., registered in the U.S.
and other countries. The iFrame logo and the iFrame symbol are trademarks of Apple
Inc.
• Adobe and Acrobat are registered trademarks of Adobe Systems Inc.
• SDXC, SDHC and SD Logos are trademarks of SD-3C, LLC.
• PictBridge is a trademark.
• HDMI, logo and High-Definition Multimedia Interface are trademarks or
registered trademarks of HDMI Licensing LLC.
• All other trade names mentioned in this manual or the other documentation provided
with your Nikon product are trademarks or registered trademarks of their respective
holders.
AVC Patent Portfolio License
This product is licensed under the AVC Patent Portfolio License for the personal and noncommercial use of a consumer to (i) encode video in compliance with the AVC standard
(“AVC video”) and/or (ii) decode AVC video that was encoded by a consumer engaged in
a personal and non-commercial activity and/or was obtained from a video provider
licensed to provide AVC video. No license is granted or shall be implied for any other use.
Additional information may be obtained from MPEG LA, L.L.C.
See
http://www.mpegla.com
.

i
Introduction
Parts of the Camera and Basic Operations
The Basics of Shooting and Playback
Shooting Features
Playback Features
Recording and Playing Back Movies
General Camera Setup
Reference Section
Technical Notes and Index
ii
Introduction
Introduction
Read This First
Thank you for purchasing the Nikon COOLPIX S6300 digital camera. Before using
the camera, please read the information in “For Your Safety” (Avi) and familiarize
yourself with the information provided in this manual. After reading, please keep
this manual handy and refer to it to enhance your enjoyment of your new camera.
Confirming the Package Contents
In the event that any items are missing, please contact the store where you
purchased the camera.
• Warranty
* A plug adapter is included if the camera was purchased in a country or region that requires
a plug adapter. The shape of the plug adapter varies with the country or region of purchase
(A18).
NOTE: A memory card is not included with the camera.
COOLPIX S6300
Digital Camera
Camera Strap Rechargeable Li-ion Battery
EN-EL12
(with terminal cover)
Charging AC Adapter
EH-69P*
USB Cable UC-E6 Audio Video Cable EG-CP16
ViewNX 2 Installer CD Reference Manual CD

iii
Read This First
Introduction
About This Manual
If you want to start using the camera right away, see “The Basics of Shooting and
Playback” (A15).
To learn about the parts of the camera and basic operations, see “Parts of the
Camera and Basic Operations” (A1).
Oth
er Information
• Symbols and Conventions
To make it easier to find the information you need, the following symbols and
conventions are used in this manual:
• SD and SDHC/SDXC memory cards are referred to as “memory cards” in this
manual.
• The setting at the time of purchase is referred to as the “default setting.”
• The names of menu items displayed in the camera monitor, and the names of
buttons or messages displayed on a computer monitor appear in bold.
• In this manual, images are sometimes omitted from monitor display samples so
that monitor indicators can be more clearly shown.
• Illustrations and monitor content shown in this manual may differ from the
actual product.
Symbol Description
B
This icon indicates cautions and information that should be read before
using the camera.
C
This icon indicates notes and information that should be read before using
the camera.
A/E/F
These icons indicate other pages containing relevant information;
E: “Reference Section”, F: “Technical Notes and Index.”

iv
Read This First
Introduction
Information and Precautions
Life-Long Learning
As part of Nikon’s “Life-Long Learning” commitment to ongoing product support and education,
continually updated information is available online at the following sites:
• For users in the U.S.A.: http://www.nikonusa.com/
• For users in Europe and Africa: http://www.europe-nikon.com/support/
• For users in Asia, Oceania, and the Middle East: http://www.nikon-asia.com/
Visit these sites to keep up-to-date with the latest product information, tips, answers to frequently
asked questions (FAQs), and general advice on digital imaging and photography. Additional
information may be available from the Nikon representative in your area. Visit the site below for
contact information:
http://imaging.nikon.com/
Use Only Nikon Brand Electronic Accessories
Nikon COOLPIX cameras are designed to the highest standards and include complex electronic
circuitry. Only Nikon brand electronic accessories (including battery chargers, batteries, Charging AC
adapters, and AC adapters) certified by Nikon specifically for use with this Nikon digital camera are
engineered and proven to operate within the operational and safety requirements of this electronic
circuitry.
THE USE OF NON-NIKON ELECTRONIC ACCESSORIES COULD DAMAGE THE CAMERA AND MAY
VOID YOUR
NIKON WARRANTY.
The use of third-party rechargeable Li-ion batteries not bearing the Nikon holographic seal could
interfere with normal operation of the camera or result in the batteries overheating, igniting,
rupturing, or leaking.
For more information about Nikon brand accessories, contact a local authorized Nikon dealer.
Before Taking Important Pictures
Before taking pictures on important occasions (such as at weddings or before taking the camera on
a trip), take a test shot to ensure that the camera is functioning normally. Nikon will not be held liable
for damages or lost profits that may result from product malfunction.
About the Manuals
• No part of the manuals included with this product may be reproduced, transmitted, transcribed,
stored in a retrieval system, or translated into any language in any form, by any means, without
Nikon’s prior written permission.
• Nikon reserves the right to change the specifications of the hardware and software described in
these manuals at any time and without prior notice.
• Nikon will not be held liable for any damages resulting from the use of this product.
Holographic seal: Identifies this
device as an authentic Nikon product.
 Loading...