

Nikon COOLPIX 3200, COOLPIX 4100, COOLPIX 2200 quick start guide
DIGITAL CAMERA
Shoot pp. 2 - 10
Take pictures for any occasion
– just point and shoot!
En
Review pg. 11
View your pictures at a touch
of a button.
Transfer pp. 12 - 29
Copy pictures to your computers
quickly and easily using PictureProject.
For information on installing PictureProject,
see pages 13-22.
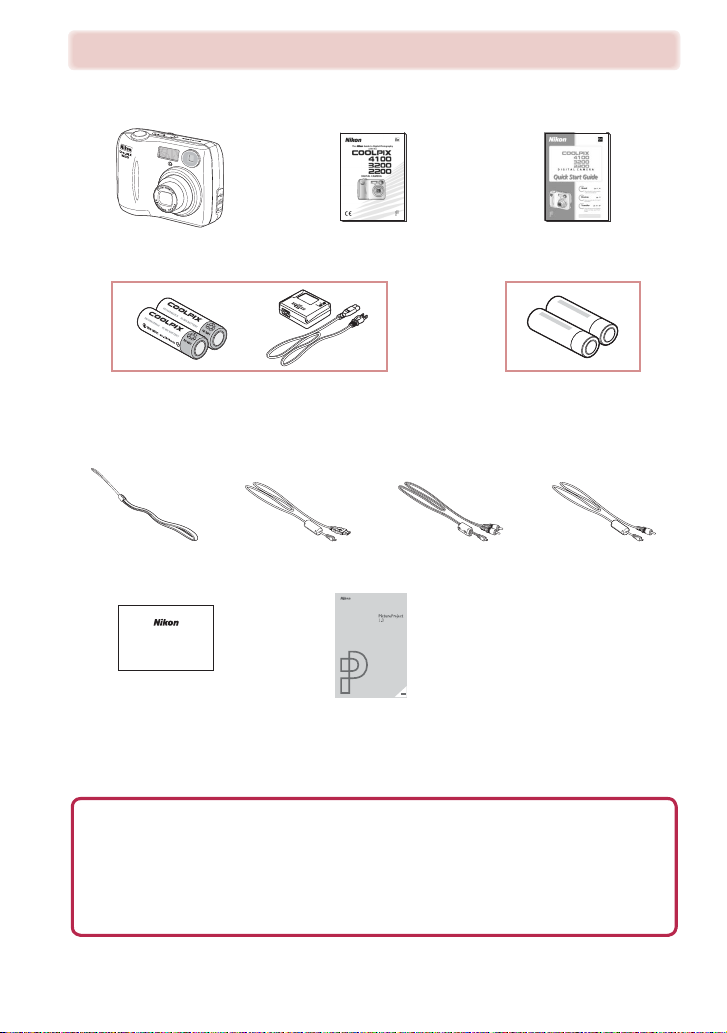
Check the package contents
Check that you have all the items listed below.
E4100/E3200/E2200
digital camera
Guide to Digital
Photography with the
E4100/E3200/E2200
* *
Quick Start Guide
(this guide)
or
Rechargeable
EN-MH1 batteries (×2)
• Also available as option
• Select the appropriate battery type in the
setup menu. (P.5)
Camera strap USB interface cable Audio/Video cable
Warranty
Warran ty
* Two LR6 (AA) alkaline batteries or two rechargeable Nikon EN-MH1 NiMH batteries with charger are
provided with this camera. The type of batteries provided depends on the area, country or region
where the camera was purchased.
• This guide will abbreviate the COOLPIX4100, COOLPIX3200 and COOLPIX2200 product names to
E4100, E3200 and E2200 respectively.
Use Only Nikon Brand Electronic Accessories
Your Nikon COOLPIX digital camera is designed to the highest standards and includes complex electronic circuitry. Only Nikon brand electronic accessories (including AC adapters) certified by Nikon
specifically for use with your Nikon digital camera are engineered and proven to operate within the
operational and safety requirements of this electronic circuitry.
HE USE OF NON-NIKON ELECTRONIC ACCESSORIES COULD DAMAGE YOUR CAMERA AND MAY VOID YOUR NIKON WARRANTY.
T
For more information about Nikon brand accessories, contact your local authorized Nikon dealer.
MH-71 battery charger
with power cable
LR6 (AA) alkaline batteries (×2)
(E4100/E3200 only)
PictureProject
•PictureProject Installer CD
•PictureProject Reference
Manual CD
Video cable
(E2200 only)
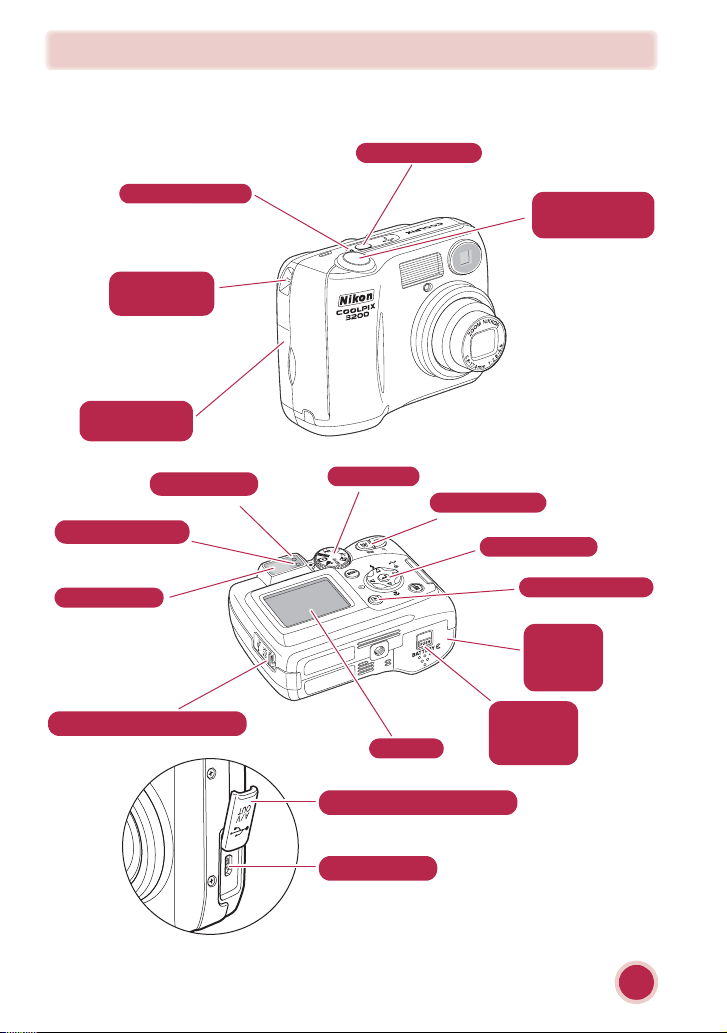
Parts of the Camera
The principle camera parts are listed below. See the Nikon Guide to Digital Photography with the E4100/E3200/E2200 for more information.
Power switch
Power-on lamp
Eyelet for
camera strap
Memory card
slot cover
Red (!!!!) lamp
Green (AF) lamp
Viewfinder
Interface connector cover
Mode dial
Monitor
Shutter-release
button
Zoom buttons
Multi selector
xxxx (play) button
Batterychamber
cover
Batterychamber
cover latch
Interface connector cover
USB connector
Parts of the Camera
1
Take Pictures
*If the package contains alkaline batteries, skip step 1 and go straight to step 2.
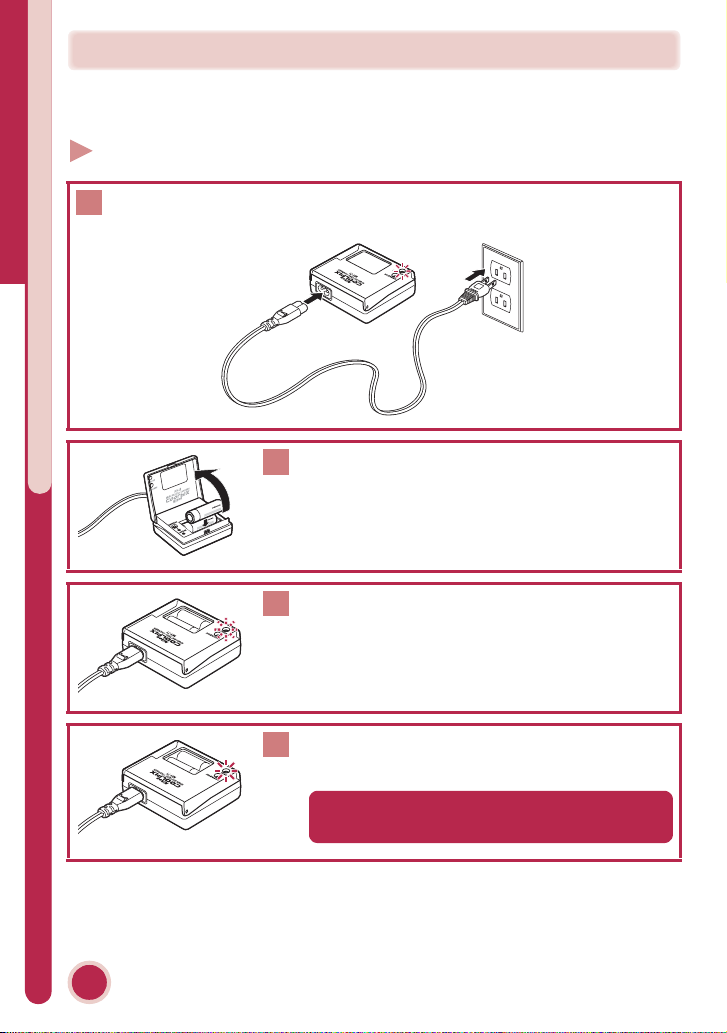
Step 1 Charge the batteries
Connect the power cable to the MH-71 battery charger c and insert the
1
wall plug into a power outlet d. The CHARGE lamp will light e.
Charge the batteries
e
c
Insert a pair of EN-MH1 batteries as indicated on
2
the charger.
The CHARGE lamp will start to blink.
3
d
2
Take Pictures
Charging is complete when the CHARGE lamp
4
stops blinking.
An exhausted battery can be fully recharged in
about two hours.
To improve battery performance, select the type of battery currently inserted in
the camera in the setup menu. The default setting is alkaline battery. When any
other type of battery is used, change the setting. For more information, see the
Nikon Guide to Digital Photography with the E4100/E3200/E2200 (P. 96).
Replacing Batteries
Turn the camera off and make sure that the power-on lamp has gone out before remov-
Important
ing or inserting batteries.
Read Battery Warnings
Read and follow all warnings and instructions supplied by the battery manufacturer.
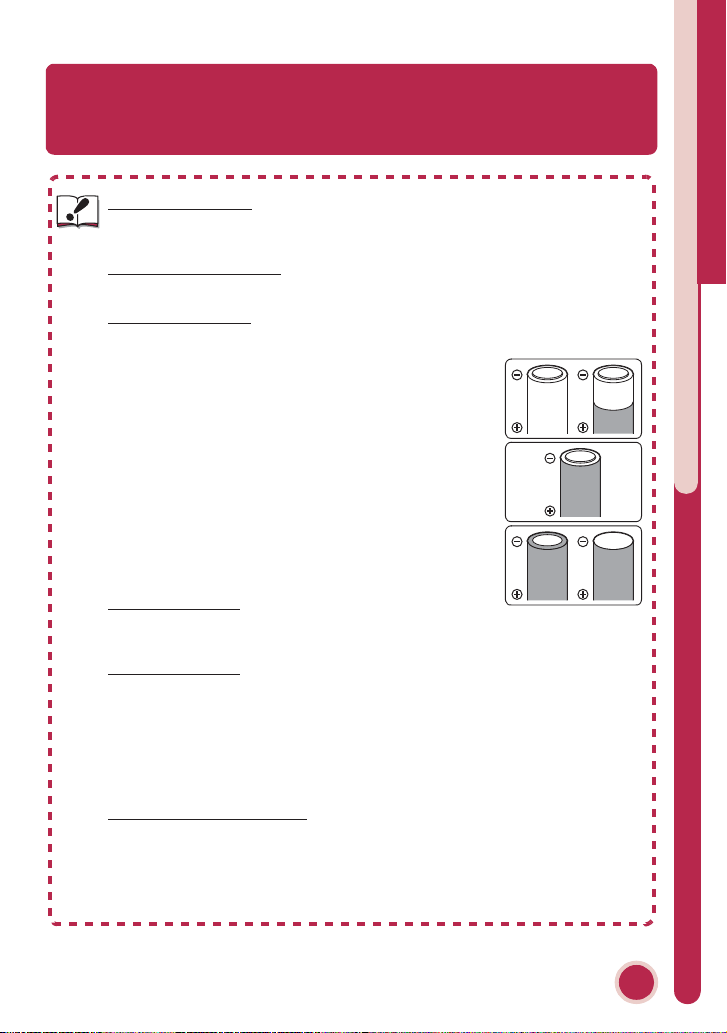
Damaged Batteries
The following batteries can not be used:
• Batteries with peeling or damaged insulation. Using batteries
with damaged insulation could result in leakage, overheating,
or rupture. Note that due to manufacturing defects even new
batteries may have faulty insulation.
• Batteries with insulation that covers only the sides of the battery and not the area around the negative terminal.
• Batteries with a flat negative terminal. Do not use such batteries even if the insulation adequately covers the area around the
negative terminal.
Alkaline Batteries
Performance of alkaline batteries may vary greatly depending on the manufacturer. Choose
a reliable brand.
EN-MH1 Batteries
Using an MH-71 battery charger, charge EN-MH1 batteries before first use. Charge each
pair of batteries at the same time - do not charge batteries one at a time or mix batteries
with different charges. Note that EN-MH1 batteries may discharge quickly immediately after purchase or after the batteries have been left unused for an extended period. This is normal, and the batteries will retain a charge for longer periods after being used and recharged
several times. For more information on charging batteries, see the documentation provided
with the MH-71.
Alternative Power Sources
• The camera can also be used with two ZR6 (AA) nickel-manganese batteries, two FR6/L91
(AA) lithium batteries or one CRV3 lithium battery.
• To power the camera continuously for extended periods, use an EH-62B AC adapter. Do
not, under any circumstances, use another make or model of AC adapter. Failure
to observe this precaution could result in overheating or in damage to the camera.
Charge the batteries
Take Pictures
3
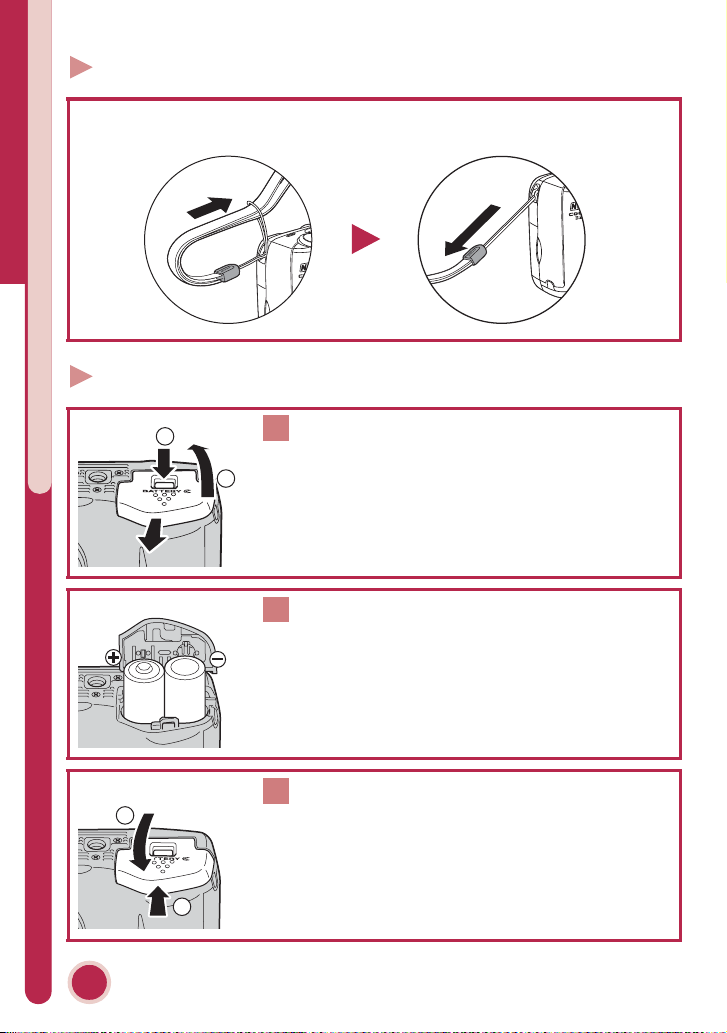
Step 2 Attach the camera strap
Attach the camera strap securely to the eyelet on the camera body as shown
below.
Step 3 Insert the batteries
Open the battery-chamber cover
1
Attach the camera strap/Insert the batteries
1
Pressing the battery-chamber latch (c), slide the
2
cover out and flip it open (d).
Insert the batteries
2
Insert the batteries as shown in the label inside the
battery chamber.
4
1
2
Take Pictures
Close the battery-chamber cover
3
Close the battery-chamber cover (c) and slide it in
until it latches (d). Be sure that the battery-chamber cover is properly latched.
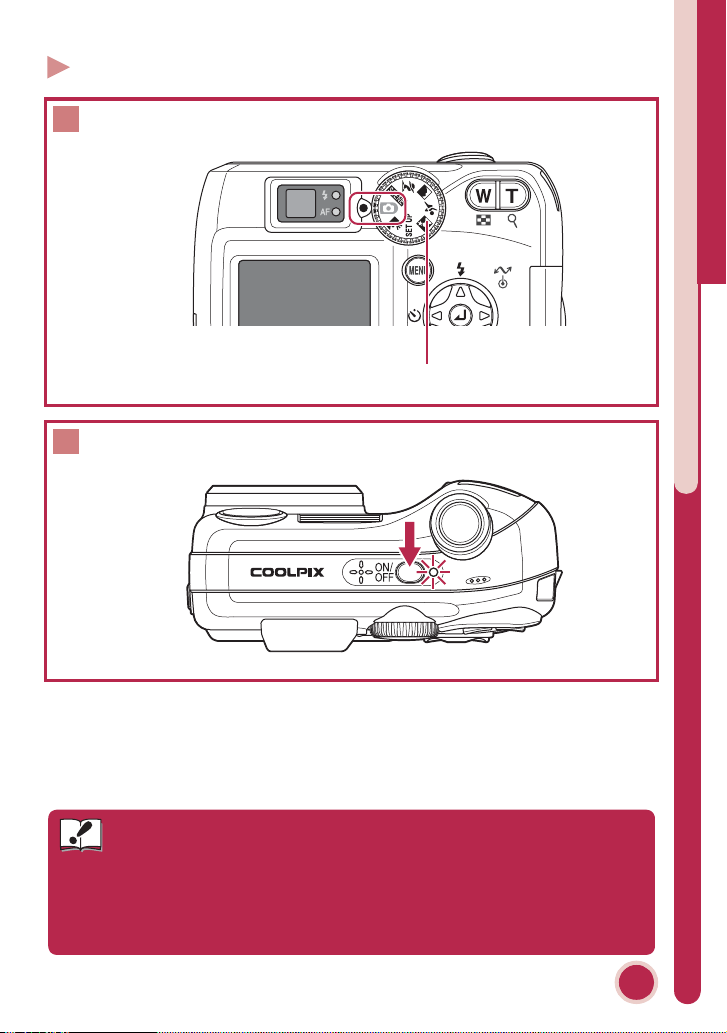
Step 4 Turn the camera on
Rotate the mode dial to PPPP
1
Turn the camera on
2
Mode dial
Turn the camera on
Set the battery type
• When using EN-MH1 batteries, the appropriate setting must be
Important
selected in the battery type option. Set the battery type after setting the
time and date. For more information, see the Nikon Guide to Digital
Photography with the E4100/E3200/E2200 (P. 82 and 96).
• With E4100, the type of the included batteries is set to the default.
Take Pictures
5
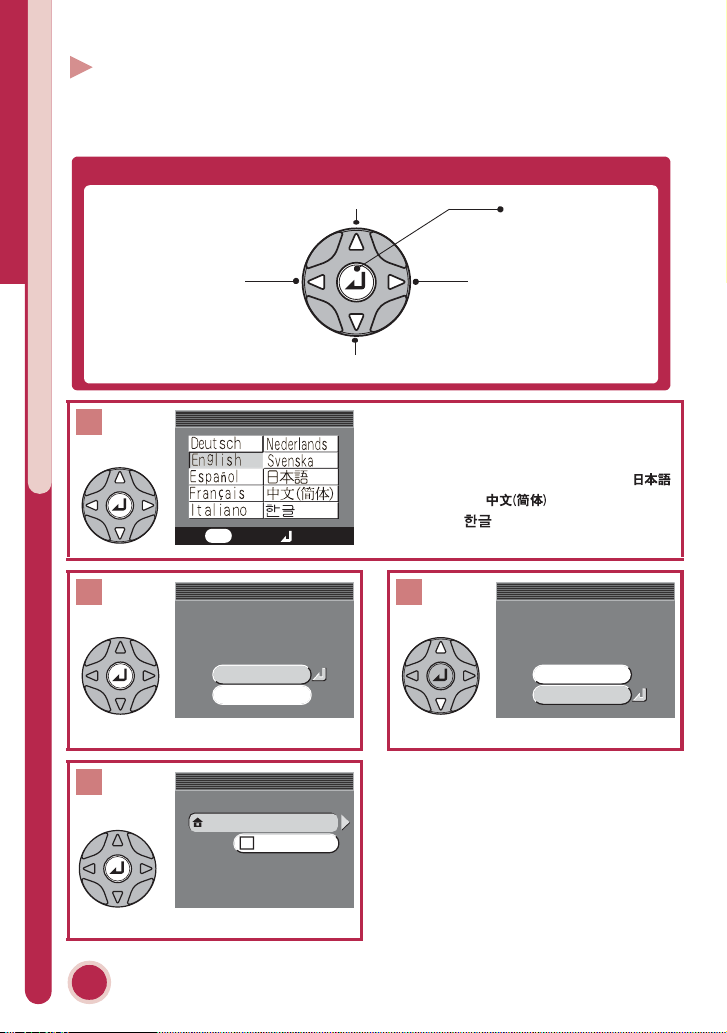
Step 5 Choose a language and set the clock
LANG UAGE
DATE
Set time and date?
2004 . 01. 01 00 : 00
TIME ZONE
DATE
Set time and date?
The first time the camera is turned on, a language-selection dialog will be displayed
in the monitor. Follow the steps below to choose a language and set the time and
date.
The multi selector is used to navigate through the camera menus.
Move cursor up
Press center (a)
to make selection
Cancel and return
to previous menu,
or move cursor left
1
Choose a language and set the clock
2
Confirmation dialog displayed.
4
TIME ZONE menu displayed.
Take Pictures
6
Move cursor down
LANGUAGE
LANGUAGE
MENU
Set time and date?
Set time and date?
TIME ZONE
TIME ZONE
2004. 01. 01 00 : 00
2004. 01. 01 00 : 00
London, Casablanca
Set
Cancel
DATE
DATE
No
Yes
:DaylightSaving
†
Display sub-menu,
move cursor right,
or make selection.
Highlight
Español
Italiano
(Dutch),
Deutsch
(Spanish),
(German),
Français
, (Italian),
Svenska
(Swedish),
English
(French),
Nederlands
(Japanese), (Simplified Chinese), or (Korean) and press
DATE
3
DATE
Set time and date?
Set time and date?
No
Yes
Highlight Yes.
To turn daylight saving time on or
†
off, press multi selector down to
highlight DaylightSaving and
press center of multi selector. When
DaylightSaving is checked, time
will automatically be advanced one
hour. To return to Step 4, press
multi selector up to highlight current time zone.
a
,
.

5
HOME TIME ZONE
HOME TIME ZONE
HOME TIME ZONE
Back
Set
MENU
a
DATE
DATE
DATE
HOME TIME ZONE
HOME TIME ZONE
HOME TIME ZONE
Back
Set
MENU
a
DATE
6
London, Casablanc
Display map of world time zones.
7
DATE
DATE
D M Y
01
00 00
200401
Display DATE menu.
9
Select Month. Repeat steps - to
edit
M
onth, Year, hour, and minute.
11
DATE
DATE
D M Y
05
00 00
DATE
DATE
M D Y
08
13 00
200408
8 9
200405
London, Casablanc
Select home time zone.
8
DATE
DATE
D M Y
05
00 00
200401
Edit Day (order of Day, Month, and
Year may differ in some areas).
10
Highlight D M Y.
12
Choose a language and set the clock
Choose order in which Day, Month,
and Year will be displayed.
Exit to shooting mode.
Take Pictures
7
Step 6 Take pictures
19
Storing Pictures
Pictures will be stored in the camera's internal memory (capacity: about 14.5MB)
unless a Secure Digital (SD) memory card is inserted in the camera, in which case
pictures will be stored on the card. For information on inserting a memory card,
see the Nikon Guide to Digital Photography with the E4100/E3200/E2200 (P.10).
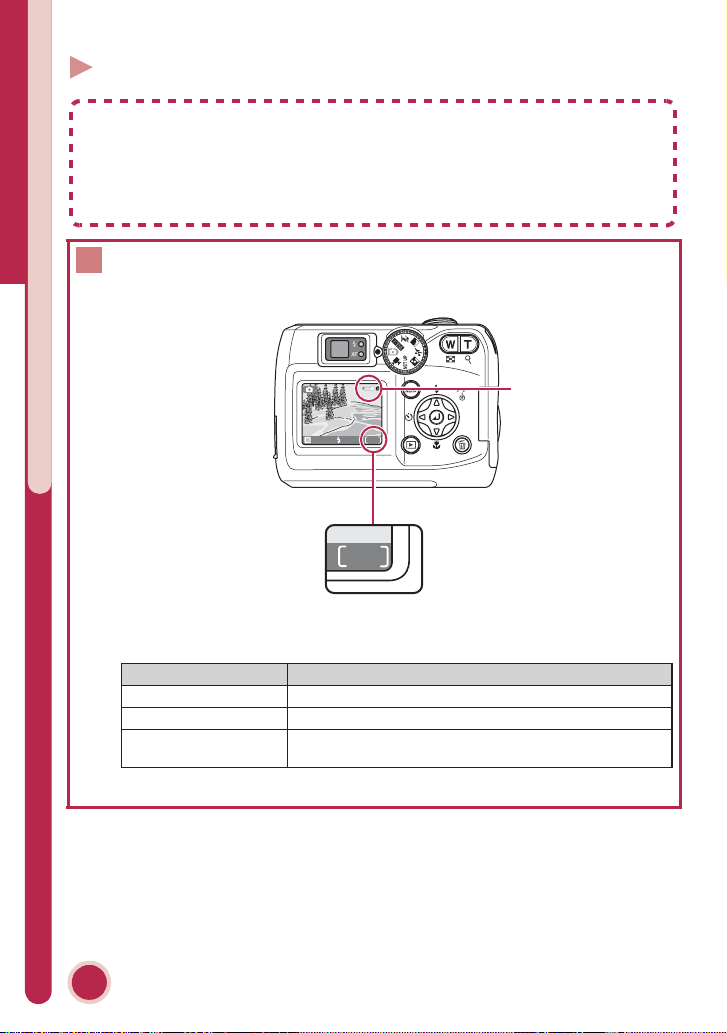
Check indicators in the monitor.
1
Battery level indicator
AUTO
19
Take pictures
Number of exposures
remaining
The battery level is shown in the monitor as follows:
BATTERY EXHAUSTED
Take Pictures
8
Display Description
NO ICON Battery fully charged.
X Low battery.
WARNING ! !
Batteries exhausted. Replace with new or fully charged batteries
 Loading...