

Page 1

READ ME
FIRST!
FAST TRACK—E300
A Quick-Start Guide to Installing and
Using Your COOLPIX 300
Contents
Checklist — Before you begin .....................2
Using the COOLPIX 300................................. 4
GETTING TO KNOW YOUR COOLPIX 300 ............ 4
SWITCHING THE CAMERA ON AND OFF ............. 6
FIRST STEPS .............................................................. 9
PLAYBACK ............................................................ 13
SLIDESHOW .......................................................... 16
CONNECTION TO EXTERNAL DEVICES............... 19
SETUP MENUS REFERENCE GUIDE ....................... 21
Nikon View
SYSTEM REQUIREMENTS AND INSTALLATION...... 25
ESTABLISHING COMMUNICATIONS WITH THE
CAMERA ........................................................ 28
THE BROWSER ...................................................... 30
PREFERENCES ....................................................... 32
...................................................25
FAST TRACK
6ME 41115
Page 2

Checklist — Before you begin
To enjoy the full potential of your COOLPIX 300 either as a stand-alone unit
or with a computer you will need the following items.
1. An AC adaptor or batteries
An AC adaptor is supplied as an accessory and
can be purchased separately. Unauthorized
adaptors may damage the camera and will
invalidate the warranty.
Use alkaline type batteries and ensure that they
are inserted correctly. Do not mix battery types or
put old and new batteries together. Always
observe the manufacturer’s warnings.
2. The stylus The COOLPIX 300 makes use of a touch-
sensitive LCD display panel for controlling the
camera settings and playback. A stylus is
supplied with the camera for use with the touch
panel. The panel will respond to gentle pressure
from the stylus and may be damaged by excessive
force.
2
Checklist—Before you begin
Throughout this manual, use of the touch panel is
indicated by the stylus shown below. The number
indicates the sequence of operations when more
than one touch is required.
2
Page 3

3. A serial or SCSI cable
You may connect the COOLPIX 300 to a
computer through the either the SCSI or serial
interfaces. The serial interface is slower than
SCSI, but is a simpler connection. The camera is
supplied with serial cables for PC and Macintosh.
If using the serial connection make sure that you
use the correct cable. If your PC or Mac has more
than one serial port, the Nikon View software will
allow you to chose the correct port for input.
If you wish to use SCSI and do not own a
Macintosh, your will require a SCSI adaptor card
for your PC. A SCSI cable kit for the COOLPIX
300 is available as an accessory and can be
purchased separately.
The COOLPIX 300 SCSI cable kit includes a
SCSI-1 type connector cable and an adaptors for
use with Macintosh and SCSI-2 type connectors.
4. AV cables The COOLPIX 300 has audio and video outputs
for video recording or live playback of pictures
and sounds through a TV.
The COOLPIX 300 is supplied with an AV lead
for this purpose.
3
Checklist—Before you begin
Page 4
Using the COOLPIX 300
GETTING TO KNOW YOUR COOLPIX 300
Although convenient and portable, the COOLPIX 300 is a complex opto/
electronic device and care should be taken to avoid subjecting the camera to
mechanical shock, extremes of temperature and both aqueous and solventbased fluids.
The unit can become quite warm in use and should not be used in areas where
there is danger of fire or explosion though the presence of flammable gas.
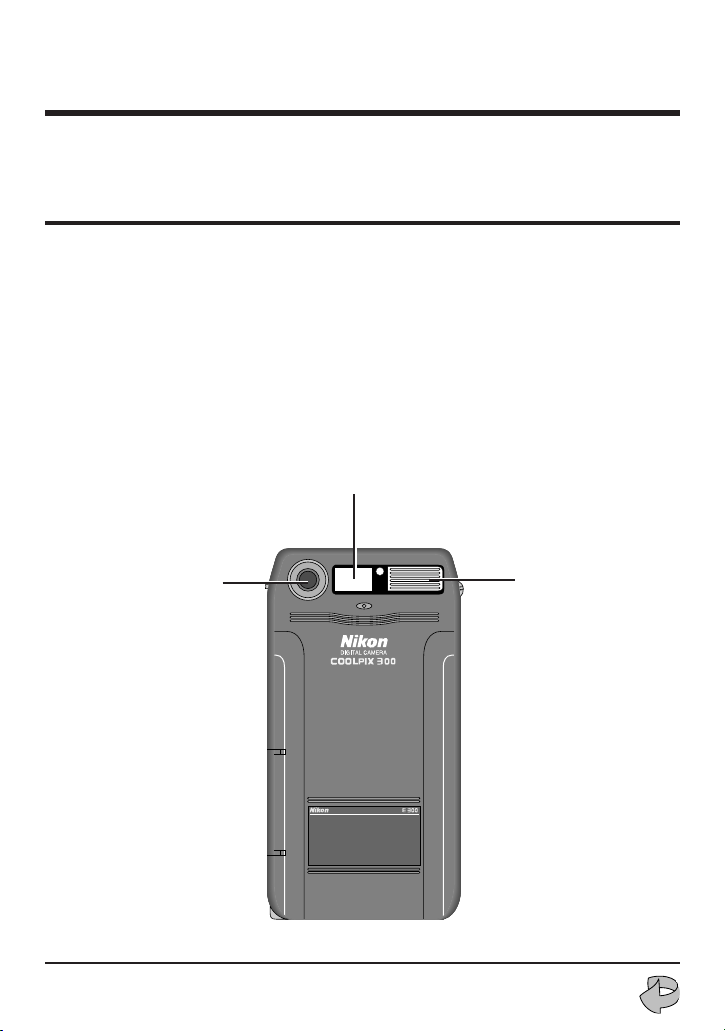
The main parts of the camera are shown below:
Viewfinder
Objective lens
4
Using the COOLPIX 300 : Getting to Know Your COOLPIX 300
Flash
Page 5
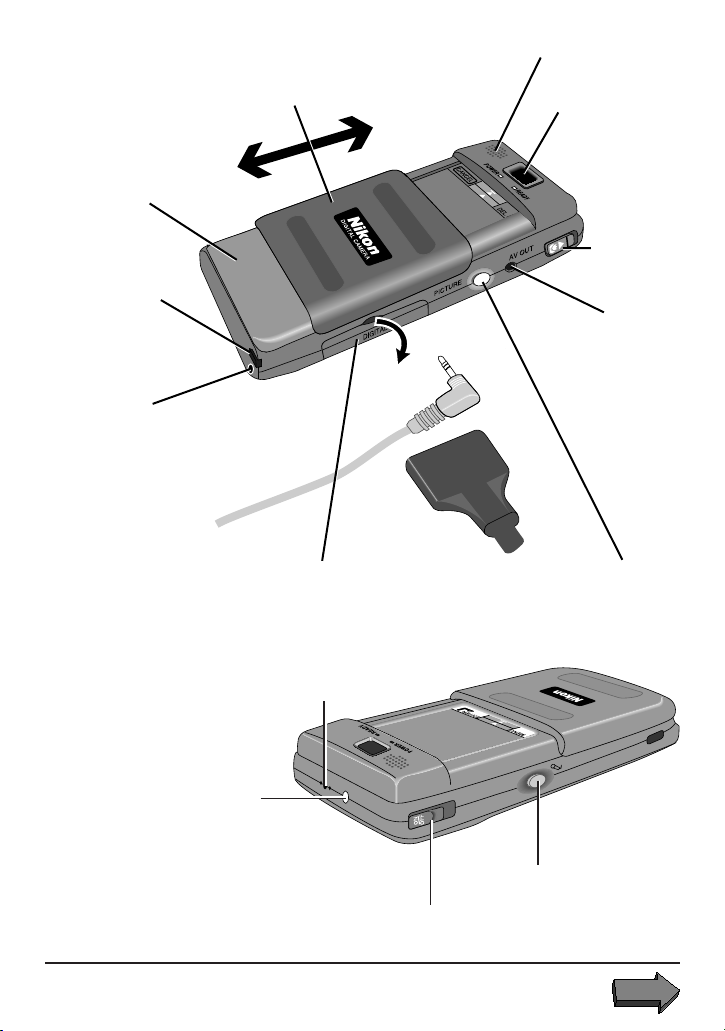
Slide-off
battery cover
Removable
stylus for
touch panel
Sliding cover for touch panel
(incorporates display on/off switch)
Built-in speaker
Viewfinder
Macro on/
off slide
switch
A/V output
AC power
adaptor input
Audio recording
indicator
Computer connectors
(under cover)
Microphone
(recessed)
Power on/off
slide switch
Serial
or
SCSI
Shutter button
Audio record
button
5
Using the COOLPIX 300 : Getting to Know Your COOLPIX 300
Page 6
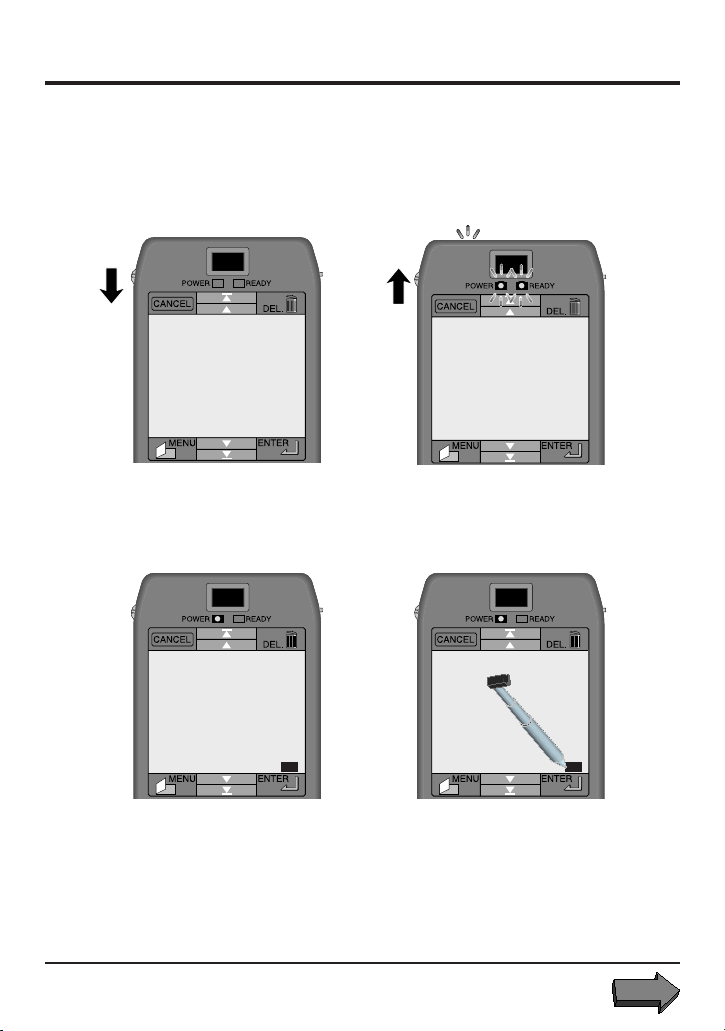
SWITCHING THE CAMERA ON AND OFF
Turning the Camera on
POWER ON
On/Off
switch
(hold) (release)
HELLO
12
FRI JAN 3.1997
22:10:32
BATTERY POWER 100%
REMAINING MEMORY 100%
PICTURES 66 COUNT
SOUNDS 1017 SEC
PICTURES 49 SET
+SOUNDS
OK
FRI JAN 3.1997
22:10:32
BATTERY POWER 100%
REMAINING MEMORY 100%
PICTURES 66 COUNT
SOUNDS 1017 SEC
PICTURES 49 SET
+SOUNDS
OK
34
(Camera goes to sleep after 30s
to save power. Hold on/off
switch down and release again
to power off.)
6
Using the COOLPIX 300 : Switching the Camera on and Off
Page 7
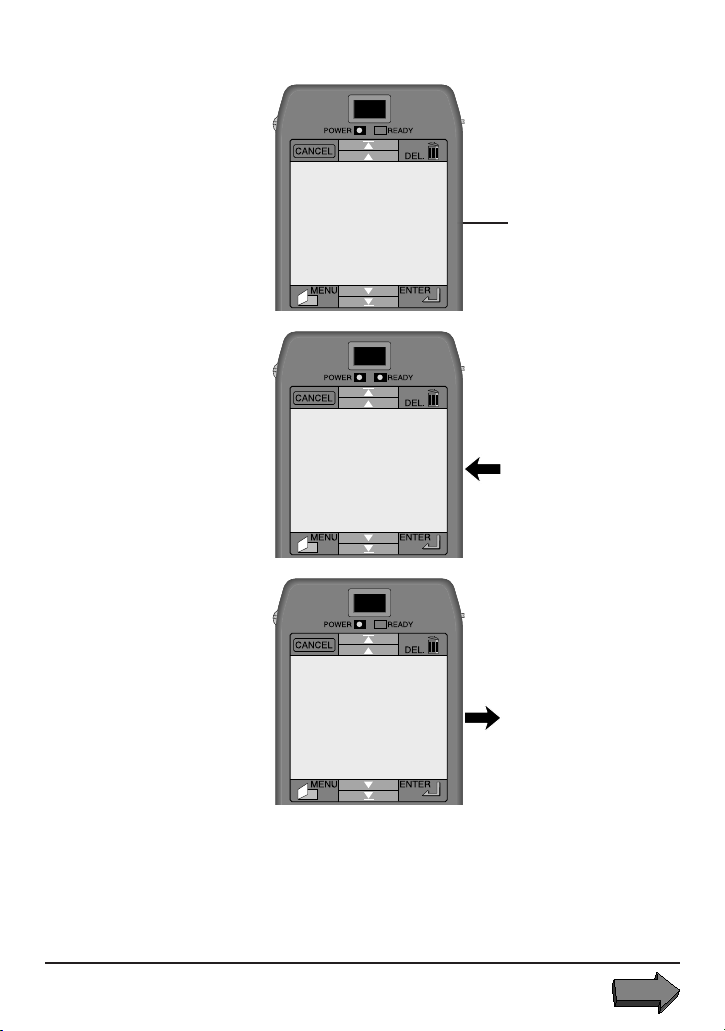
WAKING FROM SLEEP MODE
1
2
3
Shutter
Half-press
7
Using the COOLPIX 300 : Switching the Camera on and Off
Release
(Camera powers off
automatically after 2
minutes if on battery
power.)
Page 8
BATTERY AND MEMORY CHECK
1
MENU
2
SLIDE SHOW
RECORDING
PLAY BACK
SET UP
STATUS
FRI JAN 3.1997
22:10:32
BATTERY POWER 100%
REMAINING MEMORY 100%
PICTURES 66 COUNT
SOUNDS 1017 SEC
PICTURES 49 SET
+SOUNDS
OK
8
Using the COOLPIX 300 : Switching the Camera on and Off
3
Page 9
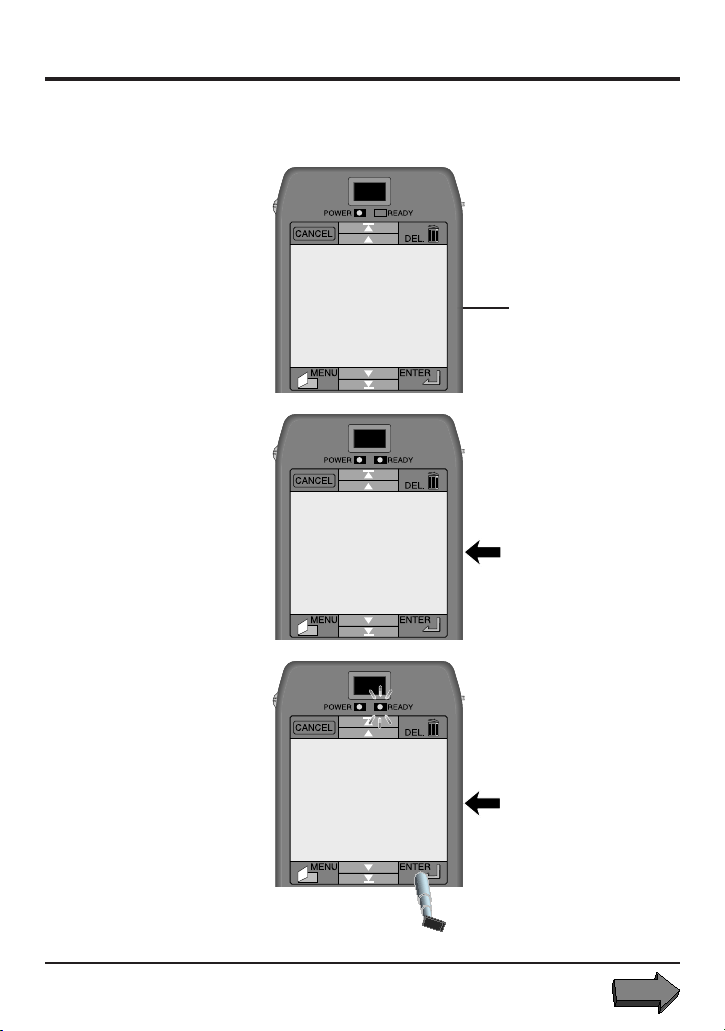
FIRST STEPS
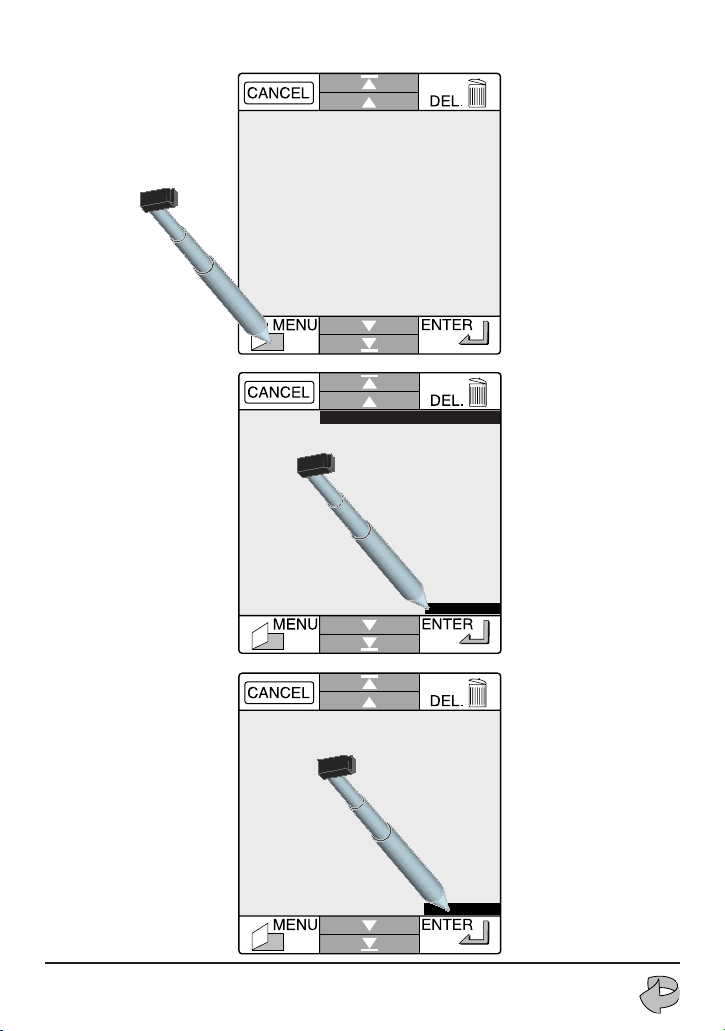
TAKE A PICTURE and WRITE A MEMO
1
Standby
2
Ready
Shutter
Half-press
3
Take
9
Using the COOLPIX 300 : First Steps
Full-press…
…or just use the stylus!
Page 10
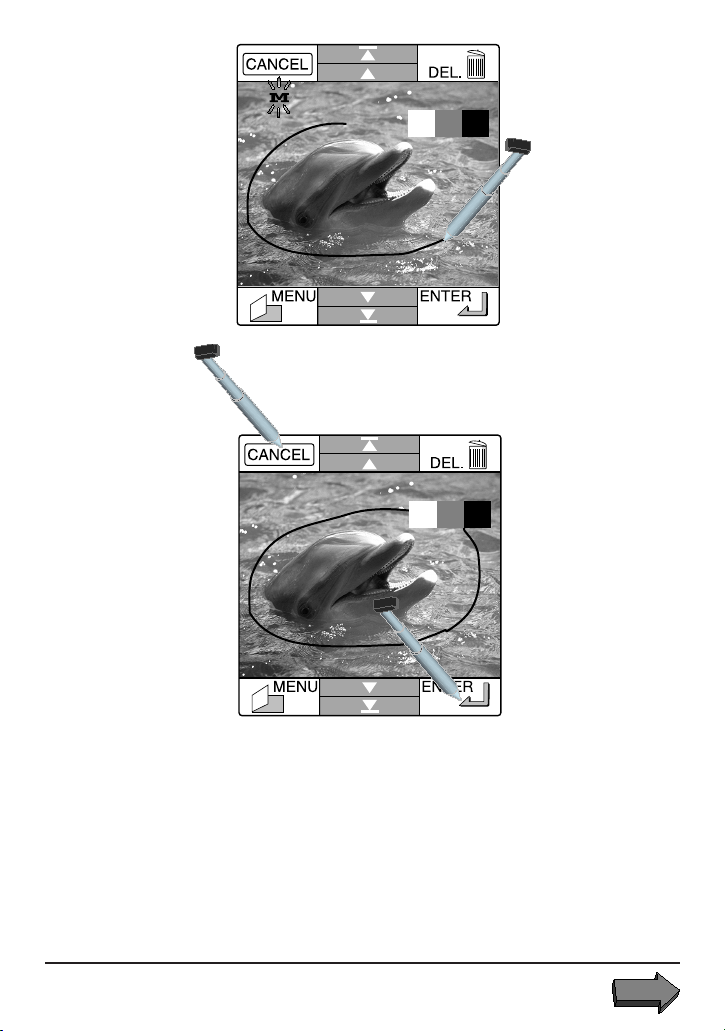
4
Write
Memo
2
5
Cancel or
keep Memo
1
2
10
Using the COOLPIX 300 : First Steps
Page 11

RECORD SOUND
1
Standby
Record
button
2
Recording
Press
Check sound recording mode! (See “Quick Menu Access” on the following
page and sound mode setup menu on page 22.)
Mode 1 — sound is recorded automatically as a picture is taken
Mode 2 — sound is recorded while record button is pressed and held
Mode 3 — sound recording begins when record button is pressed, ceases
when record button is pressed a second time
11
Using the COOLPIX 300 : First Steps
Page 12

QUICK MENU ACCESS (CHANGING CAMERA SETUP)
[ 66]
[ 66]
Select
flash mode
1
[ 66]
Select sound
recording mode
Set self-timer
2
Select
shooting mode
Select image
quality
34
[ 66]
For more information on the setup menus, see pages 22–23.
12
Using the COOLPIX 300 : First Steps
Page 13

PLAYBACK
SELECTING PICTURES, SOUND AND MEMOS
2
MENU
RECORDING
1
3
PLAY BACK
SLIDE SHOW
SET UP
STATUS
6.25.1997
3 9:18
4 14:06 [ 12]
7. 1.1997
5 12:47
6 17:59
7 20:14 [ 0]
LCD SPEAKER DISP ALL
Record
time stamp
Item
number
5 12:47
Memo indication
13
Using the COOLPIX 300 : Playback
■
4
■
■
Picture thumbnail
■
Audio indication
[ 0]
[ 10]
[ 0]
[ 10]
Picture and memo
Sound recording only
Picture, memo and
sound
Note! Pictures, sounds
and memos may be
selected and deselected individually.
Audio duration
Page 14

ADDING SOUNDS AND MEMOS TO PICTURES
6
Sound
7
Done
(Return to playback window)
Memo
5
6
14
Using the COOLPIX 300 : Playback
Page 15

FINDING MORE AND DELETING ITEMS
6.25.1997
3 9:18
4 14:06 [ 12]
7. 1.1997
5 12:47
6 17:59
7 20:14 [ 0]
LCD SPEAKER DISP ALL
■
■
■
OR
6.25.1997
3 9:18
4 14:06 [ 12]
7. 1.1997
5 12:47
6 17:59
7 20:14 [ 0]
LCD SPEAKER DISP ALL
■
■
■
[ 0]
[ 10]
[ 0]
Previous Page
▲ Previous Item
[ 0]
[ 10]
[ 0]
▼ Next Item
Next Page
Note! Pictures, sound and memos may be selected and de-selected
individually for deletion.
15
Using the COOLPIX 300 : Playback
Page 16

SLIDESHOW
PLAYBACK
First item in show,
picture 2 and
memo, on screen
for 10 seconds
Third item in
show, picture 3
and sound, on
screen for 6
seconds.
MENU
RECORDING
PLAY BACK
SLIDE SHOW
SET UP
STATUS
1 [ 2]
2 [ 5] [ 8]
3 [ 3]
4 [ 0]
REPEAT [ 3] CYCLE
DEF
■
[ 10]
[ 6]
Second item in
show, sound 5,
plays for 8 seconds.
Fourth item in
show, end
Show plays
through 3 times
when ENTER is
pressed.
Memo Indication/Selector
Position in show
1 [ 2]
Item number
Picture thumbnail Selector
16
Using the COOLPIX 300 : Slideshow
■
[ 10]
Audio Indication/
Selector
Display time
Over…
Page 17

ADDING AN ITEM
1 [ 2]
2 [ 5] [ 8]
3 [ 3]
4 [ 0]
REPEAT [ 3] CYCLE
DEF
■
[ 10]
[ 6]
Select the last item Choose the new item number
DESELECTING AND RESELECTING AN ITEM
1 [ 2]
2 [ 5] [ 8]
3 [ 3]
4 [ 0]
■
[ 10]
[ 6]
1 [ 2]
2 [ 5] [ 8]
3 [ 3]
4 [ 0]
REPEAT [ 3] CYCLE
DEF
■
[ 10]
[ 6]
REPEAT [ 3] CYCLE
DEF
Touch any individual element to
deselect or reselect
17
Using the COOLPIX 300 : Slideshow
Page 18

DELETING AN ITEM
1 [ 2]
2 [ 5] [ 8]
3 [ 3]
4 [ 0]
REPEAT [ 3] CYCLE
DEF
■
[ 10]
[ 6]
1 [ 2]
2 [ 5] [ 8]
3 [ 0]
REPEAT [ 3] CYCLE
DEF
■
[ 10]
Select an item Delete
Note: Deselecting or deleting an item from the slide show does not remove it
from the camera’s memory.
Insertion of an item is not possible: new items must be added at the end of the
show.
18
Using the COOLPIX 300 : Slideshow
Page 19

CONNECTION TO EXTERNAL DEVICES
Serial
or
Note: SCSI cable
and adaptors sold
separately
Mac PC TV
SCSI
A/V Output
Serial or
printer port
On-board SCSI
Use cable adaptor
19
Using the COOLPIX 300 : Connection to External Devices
Serial port COM1
(PC, 9-way D)
SCSI Card
Use adaptor for SCSI-2
or 25-way connector
Audio In
(White)
Video In
(Yellow)
Page 20

1
2
MENU
RECORDING
PLAY BACK
SLIDE SHOW
SET UP
MENU SETUP
SHOOTING MODE
SPEED LIGHT
IMAGE QUALITY
SOUND MODE
SELF TIMER
STATUS
1/2
CHOOSING INTERFACE SETTINGS
Choose SCSI ID or serial port speed.
SCSI IDs 0 and 7 are usually reserved
for adaptor and hard disk. ID 3 may
be used by a CD-ROM drive.
Should you experience problems with
serial communications, choose a
lower port speed.
Choose SCSI ID
4
MENU SETUP I/F
5
ID [6]
0 1 2 3
4 5 6 7
TERMINATOR ON OFF
« SCSI »
1/2
3
MENU SETUP
DATE
LCD PANEL
SPEAKER
INTERFACE
20
Using the COOLPIX 300 : Connection to External Devices
2/2
MENU SETUP I/F
7
DATA RATE 19200bps
9600bps
Choose Serial Port Speed
6
2/2
« SERIAL »
Page 21

SETUP MENUS REFERENCE GUIDE
NAVIGATING THE MENUS
1.Go to main menu
1
[ 66]
MENU SETUP SHOOT
MODE S
4a
4b
MODE C
2.Return to recording mode (2a) or
go to setup menu (2b)
2a
MENU
2b
RECORDING
PLAY BACK
SLIDE SHOW
SET UP
STATUS
a
3
MENU SETUP
SHOOTING MODE
3c
SPEED LIGHT
IMAGE QUALITY
SOUND MODE
SELF TIMER
3b
1/2
4.Make changes to settings and
return to main menu (4a or MENU
key) or setup menu (4b or ENTER
key)
21
Using the COOLPIX 300 : Setup Menus Reference Guide
3.Return to main menu (3a or MENU
key), choose menu item (3b), or
go to second page of menu (3c)
Page 22

ITEMS AVAILABLE FROM FIRST PAGE OF SETUP MENU
MENU SETUP SHOOT
MODE S
MODE C
MENU SETUP LIGHT
AUTO
ON
OFF
RED EYE ON OFF
MENU SETUP IMAGE
FINE
NORMAL
MENU SETUP SOUND
ON OFF
MODE 1
MODE 2
MODE 3
SHOOTING MODE
MODE S—one shot
MODE C—multi-shot
SPEED LIGHT—flash settings
AUTO—ON—OFF—flash may be set to
auto, forced on or off
RED EYE ON/OFF—red-eye reduction
may be set to on or off
IMAGE QUALITY—memory size
FINE—66 images
NORMAL—132 images
SOUND MODE
OFF—no sound is recorded
ON, MODE 1—sound is recorded
automatically as a picture is taken
ON, MODE 2—sound is recorded
while record button is pressed
and held
ON, MODE 3—sound recording
begins when record button is
pressed, ceases when record
button is pressed again
22
Using the COOLPIX 300 : Setup Menus Reference Guide
Page 23

MENU SETUP TIMER
SELF TIMER
Self timer delay is 10 seconds
ON OFF
ITEMS AVAILABLE FROM SECOND PAGE OF SETUP MENU
MENU SETUP DATE
M-D-Y D-M-Y
DATE [MAR][ 1]’[97]
TIME [ 0]:[00]:[00]
MENU SETUP LCD
LANGUAGE E G
F J
BRIGHTNESS [5]
MENU SETUP SPEAK
ALERT ON OFF
VOLUME [2]
DATE
Date, time and display format can be
selected
LCD
Brightness of touch panel can be
adjusted and language selected from
English, German, French, and
Japanese
SPEAKER
The buzzer can be set to on or off
and the volume of the camera’s
speaker adjusted
23
Using the COOLPIX 300 : Setup Menus Reference Guide
Page 24

INTERFACE MENUS (ACCESSED FROM SECOND PAGE OF SETUP MENU)
MENU SETUP I/F
« SCSI »
ID [6]
0 1 2 3
4 5 6 7
TERMINATOR ON OFF
1/2
INTERFACE—SCSI
Select an unused SCSI ID (0 and
7 are usually assigned to the
CPU and hard disk, while on a
Macintosh ID 3 may be assigned
to the CD-ROM drive). Termination should normally be on as the
COOLPIX 300 will be the last
device in the SCSI chain.
MENU SETUP I/F
« SERIAL »
DATA RATE 19200bps
9600bps
INTERFACE—SERIAL
Select a data transfer rate for the
serial port. Use a slower rate if
you experience difficulties
downloading data from your
camera.
2/2
COOLPIX 300
CPU SCSI
device
24
Using the COOLPIX 300 : Setup Menus Reference Guide
SCSI
device
Page 25

Nikon View
SYSTEM REQUIREMENTS AND INSTALLATION
Now that you have learned how to use your COOLPIX
300, you will probably want to download your
information onto your computer. The Nikon View
program allows you to browse through the images
and pictures on the camera, viewing, renaming and
sorting them.
You may then download them into your computer for
use in presentations and publications with other
software.
Nikon View uses standard installer programs for the
Mac and PC. To install, locate the installer icon and
launch it, following the on-screen instructions
carefully.
Clicking the Acquire
button in
View
downloads selected
items from the
camera to the
computer.
Nikon
’s browser
25
Nikon View
: System Requirements and Installation
Page 26

Where to find the installer
PC
The installer is the program “WELCOME.EXE” in the root directory of the
Nikon View CD (if you are running Windows 95, this program will start
automatically when the CD is inserted in the drive).
Macintosh
Insert the Nikon View CD in the CD-ROM drive and double-click one of the
three Nikon View Installer icons to install Nikon View in the language of your
choice (“E” for English, “F” for French, or “G” for German).
26
Nikon View
: System Requirements and Installation
Page 27

System Requirements
PC
• IBM or compatible 386 or better
• Windows 95 or 3.1x (if Win32s has not already been installed under
Windows 3.1x, the Nikon View installer will install it automatically)
• Disk space for Nikon View and images/sounds from camera
• 8 Mbyte free RAM
• Color monitor size 640x480 in 16.7 million colors recommended
• Free serial port or SCSI interface
Mac OS
• Power PC or 040 Macintosh or compatible
• System 7.1 or later
• 8Mbyte free RAM
• Color monitor size 640x480 minimum (16.7 million colors recommended)
Note: The Nikon View software may be launched from other programs as a
sub-application. On the Mac it appears as a Photoshop Plugin. On the PC it
is a 32-bit TWAIN source.
The Nikon View Icon
27
Nikon View
: System Requirements and Installation
Page 28

ESTABLISHING COMMUNICATIONS WITH THE CAMERA
Make sure that you know whether your camera is connected to the serial or
SCSI port of your computer!
When Nikon View is launched for the first time, the following message will
appear.
Select Yes if the camera is connected to your computer’s SCSI port.
Select Yes if the camera is connected to your computer’s serial port COM1.
Select No to choose other serial ports.
This message appears if there is a problem with the interface connections or
allocation of your SCSI or serial port resources.
28
Nikon View
: Establishing Communications with the Camera
Page 29

Alternatively, the camera may not be set up correctly. Check the setup
menus.
MENU SETUP I/F
« SCSI »
ID [6]
0 1 2 3
4 5 6 7
TERMINATOR ON OFF
SCSI setup Serial port setup
1/2 MENU SETUP I/F
« SERIAL »
DATA RATE 19200bps
9600bps
2/2
New to SCSI?
SCSI (Small Computer Systems Interface) is a method of connecting peripheral devices (such as scanners, digital cameras, and hard disks) to a computer
in a daisy chain topology . Up to eight devices can be connected
together, but one of these is always the SCSI controller. So that the controller
can distinguish between devices, each one must be set to a different ID
number, usually via a switch or software selection menu (as above). The
controller is usually set to ID 7, and if fitted, addresses 0 and 3 will normally
be assigned to a hard disk and CD-ROM drive, respectively. The first and
last devices in the chain always require termination. Termination (which may
be set by switches, by physically adding components, or, as above, through
software) ensures that the SCSI bus is in optimal condition and is essential for
reliable operation.
If you have installed a SCSI card in your computer, please enure that it (or
alternatively, any CD-ROM or hard disk that may be connected to it inside
your computer) is correctly terminated. It is always necessary to follow the
manufacturer’s instructions to ensure successful installation. Note that SCSI
devices cannot be connected whilst the computer is powered on. Always turn
the computer off before connecting or disconnecting SCSI devices.
29
Nikon View
: Establishing Communications with the Camera
Page 30

THE BROWSER
The browser windows for Mac and PC offer the same functions and are very
similar in layout.
PC Browser, thumbnail view
Thumbnail view
showing name,
information
button, sound
and memo on/off
Comms active window
Flip and rotate
selected images
30
Nikon View
: The Browser
PreferencesExit browser
Page 31

Mac Browser, list view
Download items from the
camera to the computer
Take a picture
from the
computer!
Browser options:
By list or
thumbnail
List sort options:
By Date/Time or
Name
Ascending or
Descending
31
Nikon View
List view showing name, date,
information button, sound and memo
on/off
: The Browser
Page 32

PREFERENCES
Using the Preferences menus you can customize Nikon View to suit your
particular requirements.
Choose between high quality
(more space required) and high
compression ratio (less quality)
Choose between
Force off—no flash
Force on—always use flash
Auto—automatic operation
according to lighting conditions
Force on/Auto with Red Eye
Reduction
Record sound automatically when
taking a picture (corresponds to
the Mode 1 setting on the camera)
The image overlay mixer
controls the balance between
picture (image) and memo
The scratch disk is the hard
disk on your system that is
used to store temporary data
32
Nikon View
: Preferences
 Loading...