

Page 1
%N
5SERS-ANUAL
Page 2

Notices
© 2006 Nik Software, Inc. All rights reserved. No part of this manual may be
reproduced, transmitted, transcribed, stored in a retrieval system, or translated
into any language in any form, by any means, without Nik Software, Inc.’s prior
written permission.
Nikon reserves the right to change the specifications of the hardware and software
described in these manuals at any time and without any prior notice.
Neither Nik Software, Inc. nor Nikon will be held liable for any damages resulting
from the use of this product.
Licensed under one or more US Pats. 7,016,549; 6,836,572; 6,728,421; 6,865,300;
7,031,547; and other patents pending.
© 2006 NIKON CORPORATION
© 2006 Nik Software, Inc.
All rights reserved.
Trademark Information
U Point is a trademark of Nik Software, Inc. Macintosh and Mac OS are trademarks
of Apple Computer, Inc. Microsoft and Windows are registered trademarks of
Microsoft Corporation. Pentium and Celeron are trademarks of Intel Corporation.
Adobe and Photoshop are registered trademarks of Adobe Systems Inc. All other
trade names mentioned in this manual or in the other documentation provided
with your Nikon product are trademarks or registered trade marks of their respective holders.
Page 3

i
i
Table of Contents
Table of Contents
Introduction ................................................. 1
RAW File Format Benefi ts ..................................2
Camera Relationship ..........................................3
System Requirements &
Installation
System Requirements .........................................5
Installation ..........................................................5
U Point™ Technology ............................... 9
The Capture NX Interface .....................13
Getting Started ......................................... 17
Opening Capture NX ........................................ 17
Welcome Screen ...............................................18
Browsing and Opening Images .......................19
Window Functionality Within Capture NX .....20
Exiting Capture NX ........................................... 20
File Format Differences ....................................21
How to Print .....................................................23
Batch Processing ...............................................23
The Browser ............................................... 29
Folder Menu .....................................................31
Label Menu .......................................................32
Sort Menu .........................................................33
Batch Menu ......................................................34
File Directory ............................................. 37
Camera Settings ....................................... 39
IPTC ............................................................... 41
The Edit List ............................................... 43
Base Adjustments Step ..................................... 44
.................................................. 5
Camera Adjustments ........................................45
RAW Adjustments ............................................50
Lens Adjustments .............................................52
Light & Color Adjustments ................................ 54
Detail Adjustments ...........................................57
Enhancement Steps ..........................................59
Show/Hide Triangle ...........................................60
Apply Step Checkbox .......................................60
Apply Enhancement Checkbox .........................60
Link Icon ........................................................... 60
Adjust & Filter Pull-Down Menu ........................61
Opacity Mixer ...................................................61
Selection Notifi cation Area ...............................64
Feather Control ................................................64
Versions Menu ..................................................65
Automatically Generated Versions ....................65
Manually Generated Versions ...........................65
Batch Menu .....................................................66
New Step Button ..............................................66
Working with Enhancements ..........................66
Editing Steps and Enhancements ......................66
Deleting Steps and Enhancements ....................67
Copying and Pasting Steps and Enhancements
........................................................................ 67
Linking Enhancements ......................................68
Swapping Enhancements .................................. 69
Toolbar F2 - View Tools .......................... 71
Direct Select Tool .............................................71
Hand Tool ........................................................71
Zoom Tool ........................................................ 72
Toolbar F3 - Edit ....................................... 75
Rotate ...............................................................75
Straighten .........................................................75
Chapter 1 Table of Contents
Page 4

ii
ii
Crop ................................................................... 77
Toolbar F4 – Black, White, and
Table of Contents
Neutral Control Points
Chapter 1 Table of Contents
Black Control Point ..........................................81
White Control Point .........................................82
Neutral Control Point ....................................... 82
........................... 81
Toolbar F5 – U Point Technologybased Tools
Color Control Point ..........................................85
Red-Eye Control Point ......................................86
................................................ 85
Toolbar F6 - Selection Tools .................. 89
Selection Brush .................................................89
Lasso & Marquee Tools ....................................92
Selection Gradient ............................................ 93
Fill / Remove Tools ............................................ 94
The Bird’s Eye ............................................97
Photo Info .................................................. 99
Histogram .........................................................99
Watch Points ................................................... 101
The Image Window ............................... 105
The Color Picker ..................................... 109
File Menu .................................................. 113
Open Image… ................................................113
Open With... ...................................................113
Open Folder in Browser .................................113
Open Recent ...................................................114
Save .................................................................114
Save As.... ........................................................115
Revert ..............................................................116
Close ................................................................116
Print Setup… ..................................................116
Print… .............................................................117
Exit ..................................................................122
Edit Menu ................................................. 125
Undo ...............................................................125
Redo ................................................................125
Cut ...................................................................125
Copy ................................................................ 125
Paste ................................................................126
Duplicate ......................................................... 126
Delete .............................................................. 126
Select All ......................................................... 126
Flip ................................................................... 127
Rotate .............................................................127
Size / Resolution .............................................127
Change the Output Size (DPI) .........................127
Change the File Size (Image Size) ....................128
Fit Photo .........................................................128
Preferences ..................................................... 128
General ..........................................................129
Color Management ........................................130
Levels & Grid ..................................................131
Cache Settings ...............................................133
Adjust Menu ............................................ 137
Light ................................................................137
Levels & Curves ..............................................137
Contrast / Brightness ......................................141
Auto Levels ..................................................... 142
D-Lighting ......................................................143
Color ............................................................... 145
LCH ................................................................145
Color Balance .................................................150
Color Booster .................................................151
Saturation / Warmth .......................................151
Focus ...............................................................152
Gaussian Blur .................................................152
High Pass ........................................................ 152
Unsharp Mask ................................................153
Correct ............................................................154
Color Aberration Control ................................154
Distortion Control ........................................... 155
Opacity Mixer .................................................155
Noise Reduction .............................................156
Auto Red-Eye ..................................................156
Page 5

Color Profi le ....................................................157
Apply Profi le ................................................... 157
Convert to Profi le ...........................................158
Control Points Menu ............................. 161
Color Control Points… ...................................161
Black Control Point ........................................163
White Control Point… ...................................165
Neutral Control Point… .................................167
Red-Eye Control Point… ................................171
Filter Menu ............................................... 173
Photo Effects… ...............................................173
Add Grain/Noise… .......................................... 177
Contrast: Color Range… ................................177
Colorize… .......................................................178
Black and White Conversion… ......................178
Batch Menu .............................................. 181
Run Batch Process… .......................................181
Copy Settings ..................................................181
Paste Settings .................................................181
Save Settings… ...............................................182
Load Settings ..................................................183
Batch Process Alert Box ..................................183
Processing Queue ......................................... 184
File Naming dialog ..........................................186
Batch Options .................................................187
Manage Settings Files .....................................187
Batch Process .................................................188
Watched Folder ..............................................190
View Menu ............................................... 195
Show All Control Points .................................195
Show Selection ...............................................195
Show Grid .......................................................196
Show Lost Highlights .....................................196
Show Lost Shadows ........................................197
Show Focus Area ............................................197
View at 100% ................................................. 198
Fit to Screen ....................................................198
Zoom In ...........................................................198
Zoom Out ........................................................ 198
Full Screen ....................................................... 198
Hide Palettes ................................................... 199
Compare .........................................................199
Compare in Browser .......................................199
Compare in Editor ..........................................200
Compare With Original ................................... 200
Window Menu ........................................ 203
Cascade ........................................................... 203
Tile ................................................................... 203
Reset Palette Location ...................................204
Bird’s Eye ......................................................... 204
Browser ...........................................................204
Camera Settings .............................................204
Color Picker ..................................................... 204
Edit List ...........................................................204
File Directory ..................................................204
IPTC Information ............................................204
Photo Info .......................................................204
Tool Bar ........................................................... 204
Help Menu ................................................ 207
Contents .......................................................... 207
Technical Support ........................................... 207
Show Welcome Screen ...................................207
About Capture NX .......................................... 208
Appendix: Short-cuts ........................... 211
Appendix: Supplied Color Profiles .. 214
Appendix:
Advisories & Additional Notices
...... 217
Index .......................................................... 227
iii
iii
Table of Contents
Chapter 1 Table of Contents
Page 6

iv
iv
Chapter 1 Table of Contents
Page 7

Introduction
Capture NX™ is a powerful editing and photographic processing application
designed specifically for digital photographers. Its simple, straight-forward user
interface makes image enhancement easy, and exclusive features based on
U Point™ photo editing technology provide a fully non-destructive workflow,
which takes the guess work out of editing.
1
1
Chapter 1 Introduction
Chapter 1 Introduction
Capture NX’s patented U Point technology gives the user a number of unique
tools, the most remarkable being the
Control Point, which is used to adjust
tone and color in an image. Control
Points allow you to work directly on the
image without the need for selections
or layers and to apply your enhancements globally or selectively, giving
you the power to increasingly refine
your enhancements in order to create
a natural-looking effect. Control Points
let you apply and undo enhancements
easily and quickly without compromising image integrity.
When you are ready to save and archive
your images, Capture NX enables you
to save your image in the NEF file
format, which saves your image file
without degrading your image.
Control Points are a unique editing
concept that gives the user a
completely different kind of control
over color and tone enhancement in
an image. A Control Point is placed
directly on the image and its value is
defined by the user. Each Control Point
operates together with the next, affecting the image progressively as more and
more Control Points are applied. Select
a Control Point to adjust color or to
control the White, Black, and Neutral
points. Because the enhancements you
make are maintained separately from
the original image data and without
regard for the original file format,
Capture NX enables you to make and
change image enhancements repeatedly without degrading the quality of
the image. Capture NX protects the
original data as well as your enhancements when you save your image as a
NEF file. With the NEF file format, you
can always open the image and the
enhancements, and close the image at
any time without ever degrading the
original image data.
Page 8
2
RAW File Format Benefits
Chapter 1 Introduction
Shooting RAW has a number of distinct
advantages over shooting and saving
processed files. The RAW format
records important archival information
about the conditions under which the
image was captured. This information
can be used by Capture NX to make
unique adjustments to enhance the
image. The following are some of the
camera settings and RAW adjustments
that can be applied within Capture NX:
Capture NX contains full support for
Nikon RAW NEF images and can be
used with any JPEG and TIFF (RGB or
LAB based) files.
With JPEG and TIFF files, you can begin
enhancing the files immediately by
selecting one of the enhancements
from the Menus.
• Color Mode (Page 45)
• White Balance (Page 46)
• Tone Compensation (Page 48)
• Saturation (Page 49)
• Sharpening (Page 49)
• Exposure Compensation
(Capture NX) (Page 50)
• Hue Adjustment (Page 50)
• Color Moiré Reduction (Page 51)
• Dust Off (page 51)
• Auto Color Aberration (page 52)
• Vignette Control (page 52)
Page 9
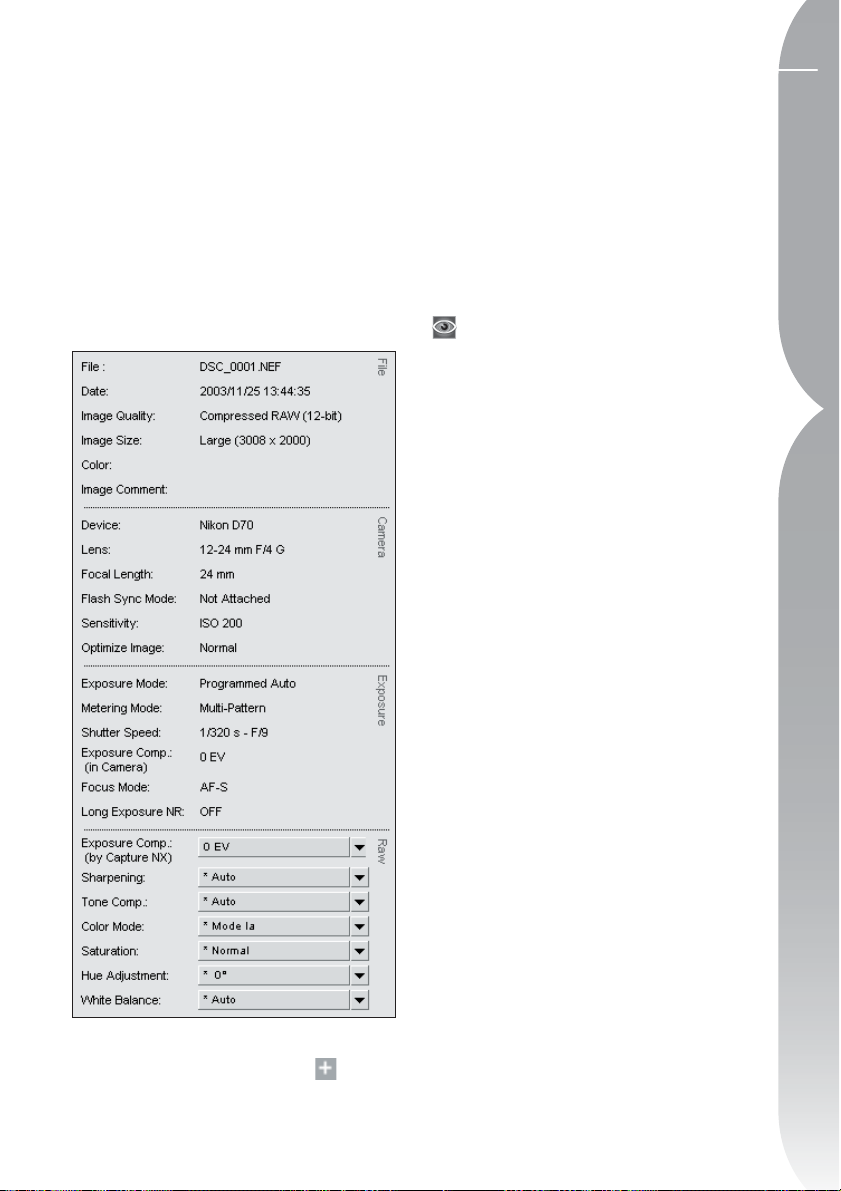
Camera Relationship
Capture NX was designed to support
all of the features of your Nikon
camera, allowing you to change many
of the settings that you applied to the
image in your camera. After opening a
RAW NEF file within Capture NX, you
can view the shooting, camera, and
exposure information of the file within
the Camera Settings Palette.
Settings that you can edit have a pulldown Menu, which gives you access to
the various controls for each of these
settings. Within the Camera Settings
Palette you are given access to a
number of adjustments that are unique
to RAW NEF files. These adjustments
can be located in the RAW section of
the Camera Settings Palette.
For more information regarding the
various controls provided within the
Camera Settings Palette, please see
page 39.
3
Chapter 1 Introduction
To display the contents of the Camera
Settings Palette, click on the
within the Camera Settings Palette.
button
Page 10

4
Page 11

5
System Requirements & Installation
System Requirements
Operating System
Windows XP Home Edition, Windows
XP Professional, Windows 2000
Professional
Mac OS X (version 10.3.9 or later)
Processor
WINDOWS
Pentium III 1GHz or better (Pentium 4
2GHz or better recommended)
MACINTOSH
G4, G5
RAM
256 MB minimum (1GB recommended)
Hard-disk space
200 MB required for installation
Monitor resolution
800 × 600 pixels (1024 x 768 or higher
recommended) with 16-bit color (High
Color/thousands of colors) with 24-bit
color (True Color/millions of colors)
recommended
Installation
To install Capture NX, place the Capture
NX setup CD into your computer’s
CD or DVD drive. Open the CD either
through the My Computer icon on your
desktop (Windows) or by double-clicking on the CD icon that appears on
your desktop (Mac OS).
Double-click on the Setup icon that
appears within the window that is
displayed to begin the setup wizard.
Please note: On Windows machines,
Microsoft .NET Framework version 1.1
will automatically be installed if not
already present on the computer. The
computer must be restarted when installation is complete.
Chapter 2 System Requirements & Installation
Once the setup wizard has installed
the files onto your computer, you will
be provided with options to setup your
color management preferences. The
color management settings provided
within the Setup Wizard enables you to
Page 12

6
set the default functionality for Capture
NX, and can be later changed within
the Preferences.
Chapter 2 System Requirements & Installation
You are provided with two options to
set the working color space:
Use the color space of the file to be
opened as the working color space
This option causes Capture NX to
always use the profile embedded in the
image that is opened as the working
color space.
Please note: If Capture NX cannot
determine the profile of the embedded image, the profile identified as the
Default RGB color space will be used as
the working space for that image.
Always use the default RGB color
space as the working color space
This option enables the option Use This
Instead of Embedded Profile
the Color Management section of the
Capture NX Preferences. This option
causes Capture NX to automatically
convert the image from the embedded
profile to the profile as defined in the
Default RGB space.
within
space of the file to be opened as
the working color space option is
selected.
After you have selected the color
management options to utilize for your
copy of Capture NX, you can complete
the installation process.
If prompted to supply a product key
when starting Capture NX, enter your
name and product key.
The product key may be found on the
CD-ROM case.
Do not lose this key. It
is required when installing or upgrading
this software and cannot be replaced if
lost.
Please note: Nikon cannot guaran-
tee the operation of Capture NX when
using other Nikon software at the same
time.
You are also provided with the ability to
select the profile to use as the Default
RGB space:
Default RGB Space
Use this option to set the RGB space
that is used for your images. This
profile is used when the
the default RGB color space as the
working color space
Always use
option is selected,
or if the image’s color space cannot be
determined when the Use the color
Page 13

789
Page 14

Page 15

U Point
A key feature in Capture NX is U Point technology. The controls powered by U
Point technology enable you to modify sections of a photo directly, without having
to go through the time-consuming process of making a mask required in other
software applications.
™
Technology
Chapter 3 U Point Technology
U Point technology powers Capture
NX’s series of Control Points: The Color
Control Point, the Black/White/Neutral
Control Points, and the Red-Eye Control
Point. These Control Points enable you
to create color and tonal enhancements
directly on the image, without first
making selections. You can also see the
effects of a Control Point immediately.
The Control Points powered by U Point
technology enable you to work with your
images without the need to perform a
complicated series of operations in a
particular order. Each Control Point works
together with other Control Points of the
same type. With every Control Point that
you apply to the image comes greater
control over specific objects in the image.
The more Color Control Points you apply,
for example, the greater control you have
over color in the image. The additional
Control Points ensure that the adjustments you make are being applied to the
current object only, and placing a Control
Point on an object with default settings
prevents other Control Points from affecting that object.
While the Black, White, and Neutral
Control Points were designed to control
the entire image globally, both the
Red-Eye and Color Control Points were
designed to control elements locally.
The Color Control Points work by
identifying an object based on a
number of criteria. When you place
your first Color Control Point, the
U Point technology identifies the
unique elements of the object on which
you place a Control Point, including its position, color, saturation, and
texture. By identifying these elements,
the Color Control Point can determine the boundaries of the object in
order to affect only that object and
objects with like elements. Through
a unique mixing function, the effects
of the Color Control Point are applied
throughout the image so as to create a
natural-looking, seamless result. On the
next page you will find a series of steps
showing the original image, the effect
of the Control Point, and the selection
of the Control Point.
Page 16
10
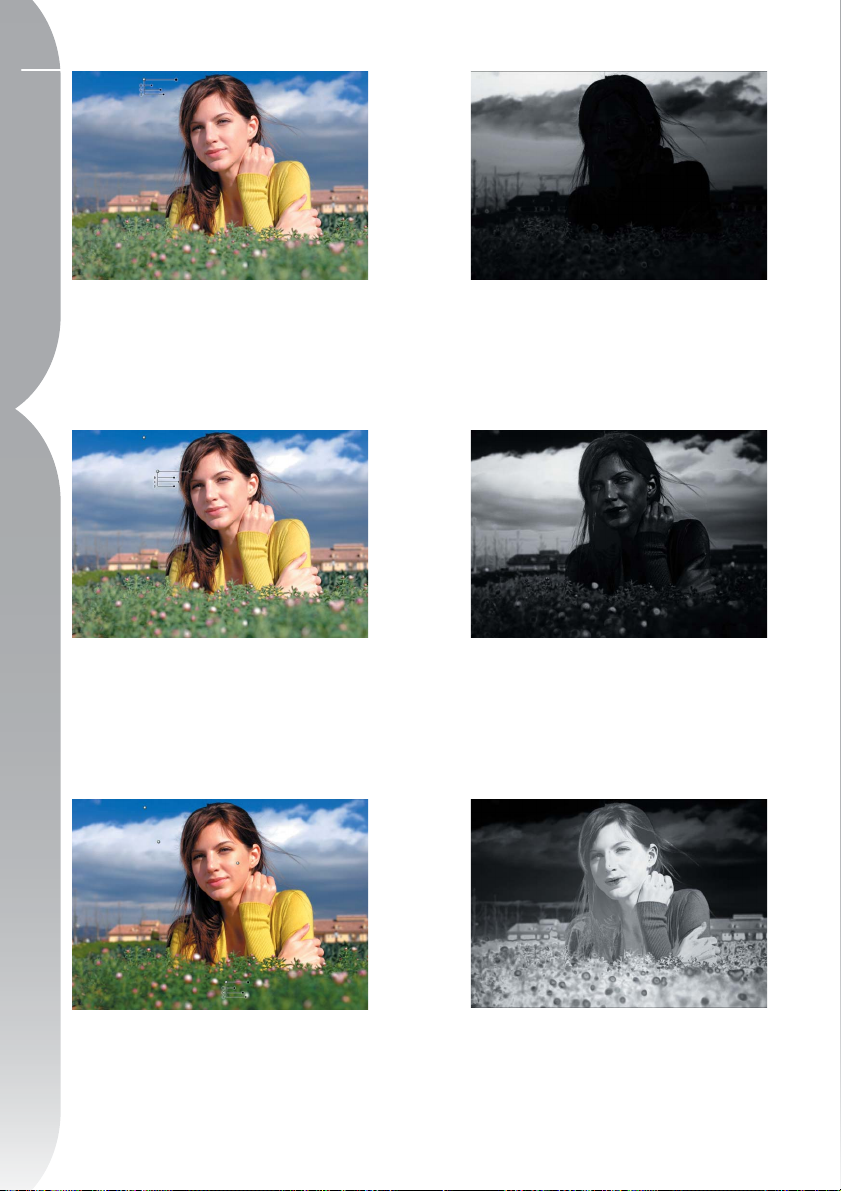
Chapter 3 U Point Technology
Step 1. A Color Control Point is placed on the sky
for greater darkness and saturation. Although this
Control Point mainly affects the sky, some of the
clouds are affected as well.
Step 2. Next, a Color Control Point is placed to
identify the clouds in the image. This new Control
Point applies only to tones in the clouds, not the sky,
and prevents the first Control Point from affecting
the clouds.
Step 1. Selection
Step 2. Selection
Step 3. Finally, Control Points are added for skin
tones and foliage. A Control Point added to the
model’s face brightens and increases the vibrancy of
the skin. Another added to the foliage darkens the
leaves and draws attention to the model.
Step 3. Selection
Page 17
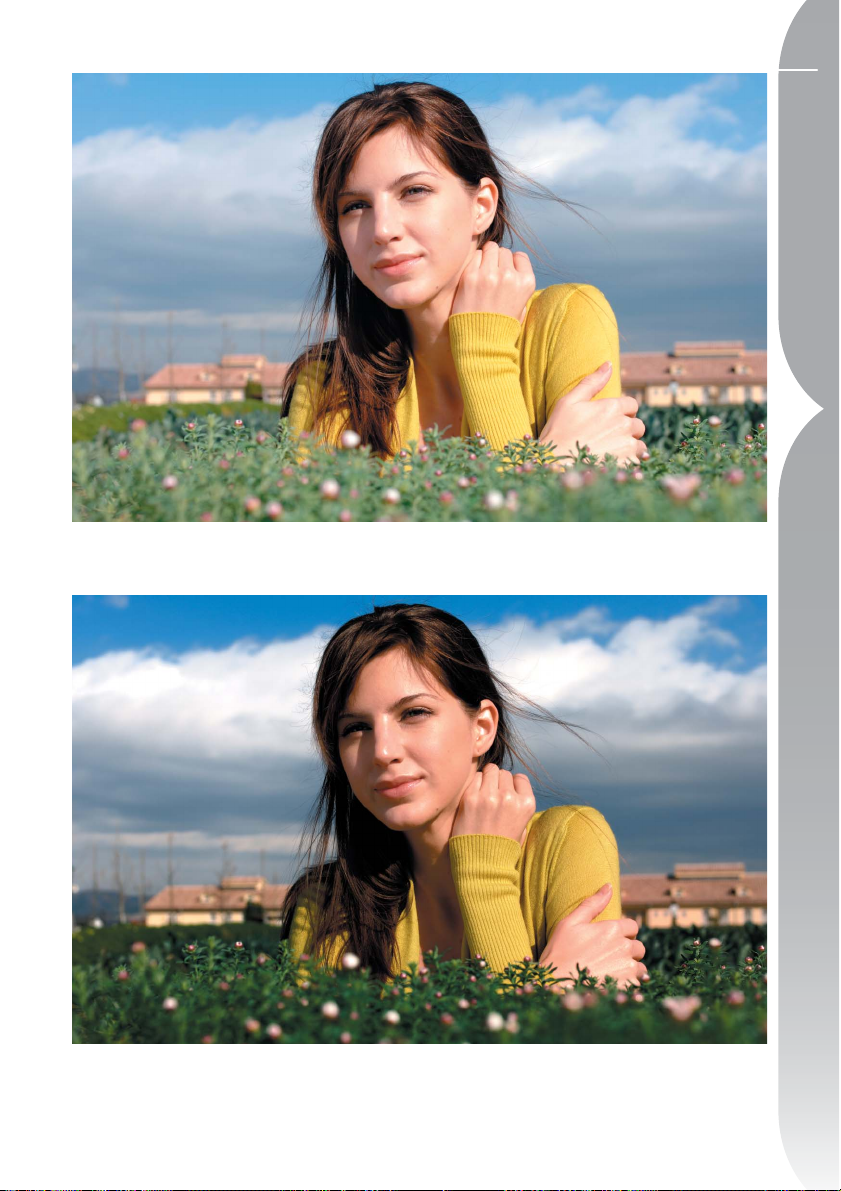
Before
11
Chapter 3 U Point Technology
After
Page 18
12
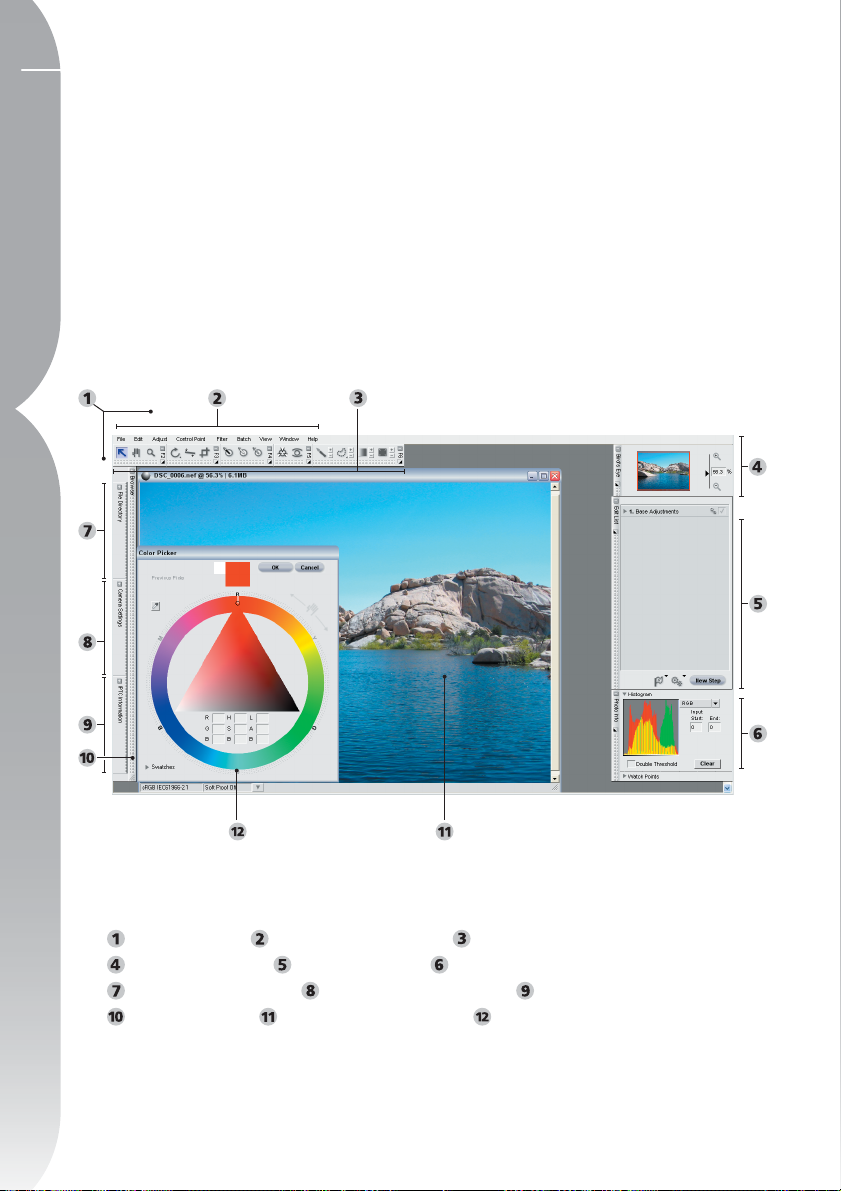
The Capture NX Interface
Editor ( Page 13 ) Menu Bar ( Page 113-208 ) Toolbar ( Page 71-94 )
Bird’s Eye ( Page 97 ) Edit List ( Page 43 ) Photo Info ( Page 99 )
File Directory ( Page 37 ) Camera Settings ( Page 39 ) IPTC ( Page 41 )
Browser ( Page 29 ) Image Window ( Page 105 ) Color Picker ( Page 109 )
Page 19
The Capture NX Interface
Capture NX’s interface was designed to put all of the important tools for enhancing
a digital photograph right at your fingertips. This section contains a brief overview
of each of the main elements that make up the Capture NX interface.
13
13
Chapter 4 The Capture NX Interface
Chapter 4 The Capture NX Interface
Editor
The main window of Capture NX, the
Editor, is the window you see when
you are editing images outside of the
Browser. Within the Editor you can
open and close images as well as access
each of the different control palettes.
Menu Bar
The Menu Bar provides access to nearly
all of the features and enhancements
within Capture NX.
chapters 20 through 28 for information on the features located within each
Menu.
Please see
Toolbar
The Toolbar is made up of five smaller
Toolbars, each containing tools that
provide similar controls. You can use
these tools to perform various edits,
from zooming to rotating the image to
applying enhancements selectively.
Please see pages 71-94 for more
information on each of the individual
Toolbars.
Bird’s Eye
The Bird’s Eye Palette shows either a
portion of the image that is visible
in the active image window or the
position of the area displayed within
the Light Table mode of the Browser.
The portion of the image or the
Browser visible in the active image
window is indicated by a red outline
within the Bird’s Eye Palette.
more information on the Bird’s Eye
Palette, please see page 97.
For
Edit List
The Edit List is the master control list
for the features and enhancements of
Capture NX. Anything that affects your
image will have an entry within the
Edit List. Every entry can be removed,
altered, or duplicated from this list.
The Edit List automatically organizes
each entry by Steps. This provides you
with the ability to turn on or off one
or more steps at any time to monitor
the effect of that step on your image.
You can selectively apply steps with the
selective tools found in the Toolbar, you
Page 20
14
can place multiple enhancements within
one step by linking enhancements, and
you can create batch processes based
on the contents of the steps. You can
Chapter 4 The Capture NX Interface
also manually create new steps using
the New Step button.
The Edit List also contains a special
step called the Base Adjustments step.
The Base Adjustments step contains all
of the enhancements unique to RAW
images, as well as enhancements that
can be used to prepare your images.
For more information regarding the
Edit List and all of its uses and features,
please see page 43.
Photo Info
The Photo Info Palette displays the
information you choose to display next
to your image to help you determine
the optimal settings you want to use
for each enhancement. The Photo Info
Palette contains a live histogram, a
graphic interactive display that reflects
the statistical makeup of the image.
Additionally, through the use of Watch
Points, you can monitor the effects
of the changes you make to the color
values in the image.
page 99 for more information regarding
the Photo Info Palette.
Please go to
File Directory
The File Directory provides you with an
easy-to-access Palette which displays
the contents of an entire folder in
the Browser.
for a complete description of the File
Directory Palette.
Please see page 37
Camera Settings
By opening the Camera Settings
Palette, you can see all of the cameragenerated data for the current image,
from information regarding the camera
that created the image to exposure
information. Additionally, the Camera
Settings Palette enables you to edit
a number of settings which were set
within the camera for RAW NEF image
files.
the Camera Settings Palette, please see
page 39.
For a complete description of
IPTC
The IPTC Palette provides you with a
place that you can view, add, or modify
information for your images, such as
the caption, keywords, categories, and
copyright information.
page 41 for more information on the
IPTC Palette.
Please see
Browser
Capture NX’s Browser enables you to
browse, sort, and organize your images,
as well as to rotate or apply batch
processes to multiple images simultaneously. Images can be opened from
the Browser into the Editor to provide
additional control.
29 for information on the Browser.
Please see page
Image Window
An Image Window displays an image
within Capture NX, along with important information and controls for that
image.
information regarding the features and
functionality of an Image Window.
Please see page 105 for
Page 21

151617
Page 22

Page 23
Getting Started
Opening Capture NX
Capture NX can be opened by selecting Capture NX from the Start Menu within
Windows or by double-clicking on the application icon in the Applications folder
within the Mac OS.
Chapter 5 Getting Started
Welcome Screen
Open Recent Image Open Recent Browser New Drag an Image Here (Mac Only)
Don’t Show Again
Page 24

18
Windows OS:
Click on the Start button at the bottom
of your screen and select either All
Chapter 5 Getting Started
Programs (Windows XP) or Programs
(all other Windows versions). Navigate
to the Capture NX folder and select
Capture NX to launch the application.
Mac OS:
Double-click on the Macintosh HD
icon on your desktop and navigate to
the Applications folder. Double-click
on the Capture NX folder and then
double-click on the Capture NX application icon to launch the application.
Alternatively, if you have selected to
add Capture NX to your dock, simply
click on the Capture NX icon within the
dock to launch the application.
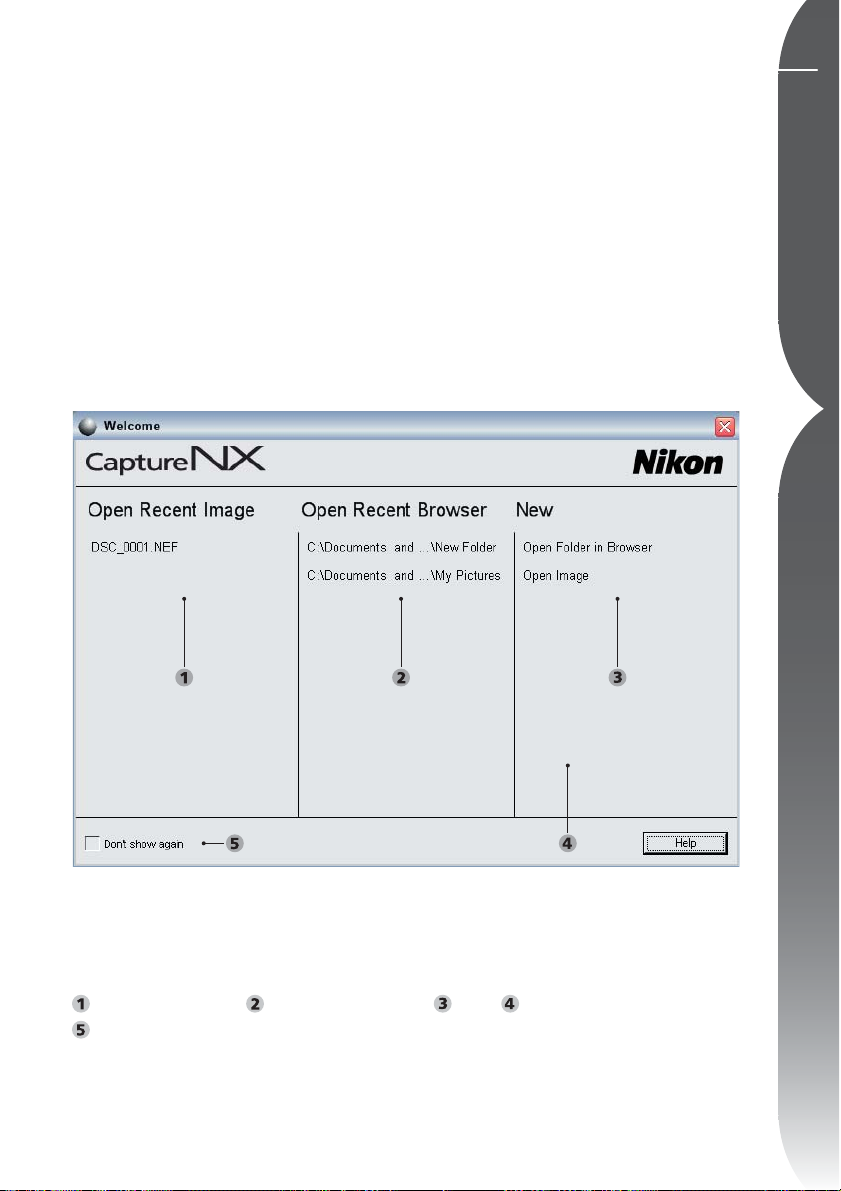
Welcome Screen
Upon launching, Capture NX will
display the Welcome Screen, which
lists the last files and folders that you
accessed, and give you the option
to open an image or a folder in the
Browser.
Open Recent Image
This section contains a list of the most
recent images that were opened within
Capture NX. The last image edited can
be found at the top of the list, with the
remaining images you have edited listed
in chronological steps. Double-click
on any of these images to open them
immediately within the Editor.
Open Recent Browser
This section contains a list of the
most recent folders viewed within the
Browser, with the most recent folder
displayed at the top. Other recently
browsed folders are displayed beneath
that folder in chronological order.
Double-click on one of the displayed
folders to open that folder immediately
within the Browser.
New
This section enables you to browse
for an image or folder to open within
Capture NX. Click on the Open Image
button to display an Open Image
window. Click on the Open Folder
button within the Browser to display
a folder browser window, which will
enable you to browse for a folder to
display within Capture NX’s Browser.
Drag an Image Here Section
The Mac OS version of Capture NX
contains an empty area within the
Welcome Screen labeled “Drag an
image here to open it.” Dragging an
image into this space from the Mac OS
Finder opens that image immediately
within Capture NX. In the Windows OS
you can drag an image into any part of
the Capture NX window to open it.
Don’t Show Again
Select this checkbox to prevent the
Welcome Screen from appearing when
Capture NX is launched. You can
navigate to the Help Menu at any time,
open the Welcome Screen, and uncheck
the Don’t Show Again box in order to
display the Welcome Screen whenever
Capture NX is launched.
Page 25
Browsing and Opening Images
Capture NX provides you with a number
of ways of locating and opening images
in order to enhance them: you can
use Capture NX’s Browser, you can
navigate through your hard disk to
locate a file with Open Image, or you
can use PictureProject to send one or
more images directly to Capture NX to
enhance.
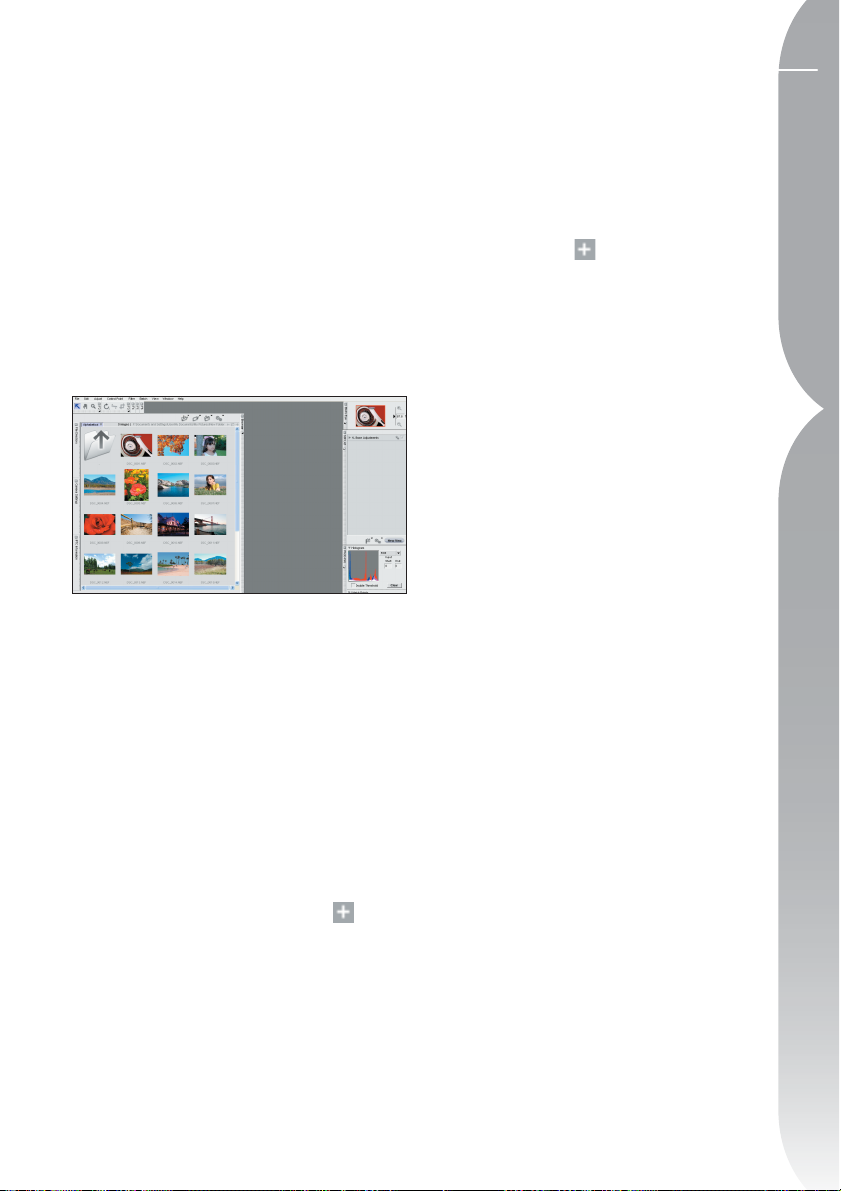
Using the Browser
Capture NX contains an enhanced
browser that provides you with
advanced labeling, sorting, and editing
functions. You can use the Browser to
rotate or apply batch processes directly
to one or more thumbnails, or you can
view multiple images and select the
best image from the thumbnails to open
directly within Capture NX’s Editor.
To view the Browser, click on the
button of the Browser located at the top
of the Browser frame. The Browser will
by default display the contents of the My
Pictures folder (Windows) or the Pictures
(Mac OS) folder.
displayed within the Browser. Once you
have found the image you want to edit,
double-click on that image.
If you would like to navigate to a different window other than the My Pictures
(Windows) or the Pictures folder (Mac
OS), click on the
File Directory frame. This will cause the
File Directory Palette to become visible.
Within the File Directory Palette you
are provided with a full directory list,
enabling you to navigate to any folder
on your hard drive.
button within the
Using Open Image
By selecting Open Image from the
File Menu, you can navigate to any
folder on your hard drive and open
a single photo. By default, Capture
NX will display the My Pictures folder
(Windows) or the Pictures folder (Mac
OS).
Using PictureProject
PictureProject (Version 1.6.4 and later)
supports opening one or more images
directly within Capture NX.
Begin by highlighting one or more
images within the current view of
PictureProject and clicking on the Edit
in Capture NX button. This will cause all
of the images you highlighted to open
within the Editor of Capture NX.
19
Chapter 5 Getting Started
You can then navigate within this folder
by double-clicking on any of the folders
Page 26
20
Window Functionality Within Capture NX
Each window within Capture NX
Chapter 5 Getting Started
provides you with a number of different
controls for that window.
Minimize / Maximize Button
Minimize/Maximize
button
Docking button
Grip Edge
Resize Control
This button either expands or collapses a
window. In some situations, the window
cannot be collapsed until the operation
within the window has been completed.
Docking Button
This button is visible only when the
window has been expanded. This
button enables you to undock the
window, allowing that window to
float freely on your desktop. This can
be handy if you utilize two monitors
and you want to place the window on
the second monitor, or if you want to
bring one of the Toolbars closer to your
image. By clicking on this button again,
you can re-dock the window to its
default location.
Grip Edge
This edge provides you with an area to
grab and reposition the window. If the
window is currently docked, clicking and
dragging the window with this edge
will automatically undock the window
and allow you to reposition the window
anywhere on your screen. To re-dock the
window to its normal location, simply
click on the
button.
Resize Control
This part of the window enables you to
resize the window to suit your needs.
Simply click here and drag to change
the window’s size. Some windows have
a maximum and minimum size, which
may prevent them from becoming
larger or smaller than that maximum or
minimum size.
Exiting Capture NX
To close the Capture NX window and
exit Capture NX, select Exit from the
File Menu (Windows) or select Exit
from the Capture NX Menu (Mac OS).
If there are any unsaved images open,
a warning message will remind you
to save those images. If there are any
images that are currently awaiting
batch processing, a message will remind
you that you have unprocessed images
in the Processing Queue.
Page 27
File Format Differences
Capture NX supports three different file
formats that can be used to save any
edited image file: the NEF format, the
TIFF format, and the JPEG format.
NEF
The NEF, or Nikon Electronic image
Format, was designed to act as the
archive file for your images. The NEF file
format saves the complete contents of
the Edit List along with the full image
information from the original image,
and all changes made to the image are
stored separately within the file. The
NEF format maintains the high level of
quality of the original file without any
loss in image quality while maintaining
a relatively small image size. NEF format
images remain nearly the same size as
the original image file, regardless of
the number of enhancements that are
applied within the image.
Capture NX utilizes a new cache system
with NEF files that helps increase the
speed of opening NEF images that were
previously edited within Capture NX.
This cache system creates a cache file
whenever an NEF image is saved which
Capture NX can use the next time that
image is opened. By utilizing the cache
system, Capture NX can utilize cache
file data to reduce the amount of data
that needs to be processed, thereby
greatly increasing the speed of opening
NEF images.
information on the cache system.
Please note: Previous versions of
Nikon Capture and PictureProject are
Please see page 133 for
not able to display enhancements that
are unique to Capture NX within NEF
files. If you would like to share your
NEF files with someone who does not
have a copy of Capture NX, it is recommended that you save a copy of your
image into the TIFF or JPEG file format
to ensure that all of the enhancements
that you have made are available.
NEF image files are generated by all
Nikon Digital SLR cameras as well as a
number of COOLPIX cameras. Some of
the Digital SLR cameras offer you the
ability to create an uncompressed NEF
image file. These uncompressed NEF
image files can later be compressed
within Capture NX, if you choose, to
save additional hard disk space.
Please note: Compressed NEF files
cannot be saved in Capture NX as
uncompressed NEF image files.
RAW FILE SUPPORT
Capture NX provides RAW support to
the entire line of Nikon digital cameras
that produce NEF RAW files. Supported
cameras include:
COOLPIX 5000 D1
COOLPIX 5400 D1X
COOLPIX 5700 D1H
COOLPIX 8400 D2X
COOLPIX 8700 D2X
COOLPIX 8800 D2H
D50 D2H
D70S D70
D200 D100
S
S
21
Chapter 5 Getting Started
Page 28
22
TIFF
The TIFF file format is commonly used
as a standard for high-quality image
Chapter 5 Getting Started
reproduction. Saving your image to this
format will result in a file that contains
the final state of your image as you see it
on your monitor, with full image quality.
Once an image is saved to the TIFF
format and closed, you will not be able
to access the contents of the Edit List to
make any adjustments to the enhancements that were applied to the image.
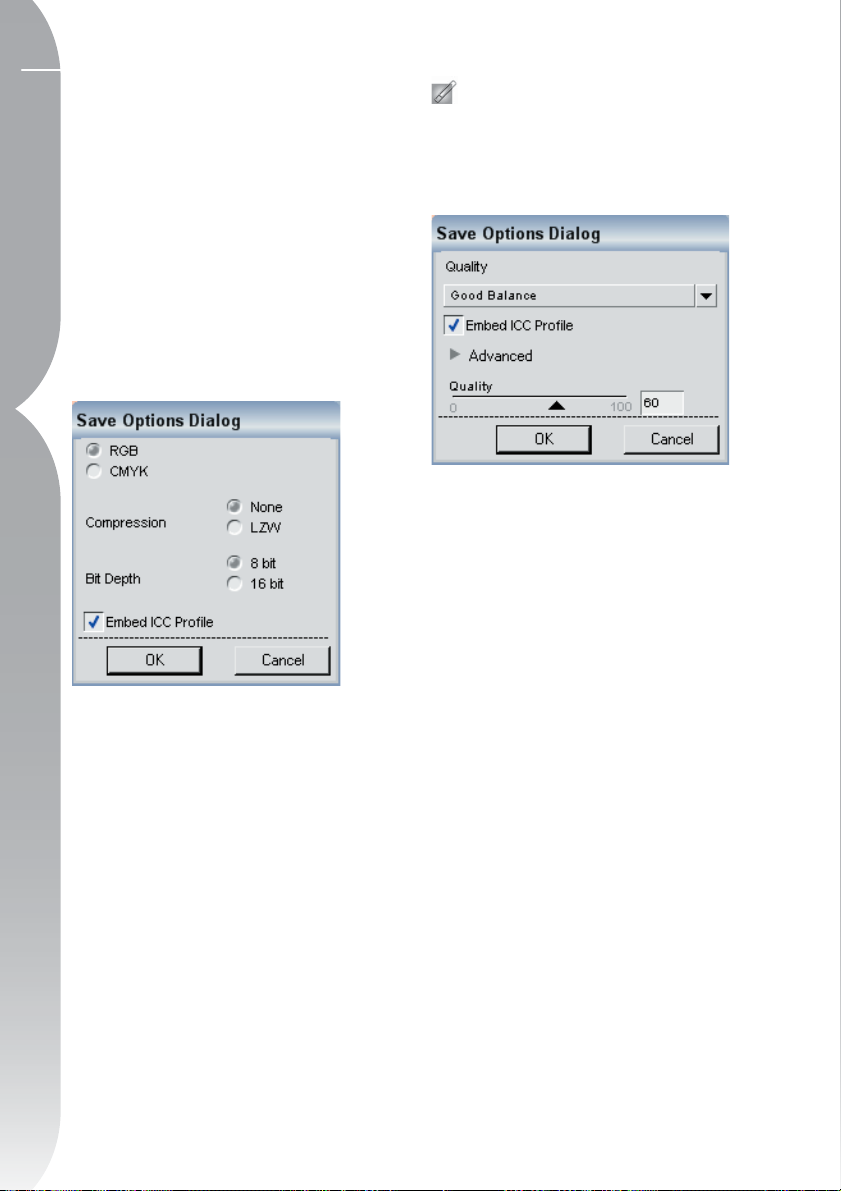
The TIFF file format provides you with
the choice to compress the image using
a lossless compression, the choice to
save the file as a 16-bit or an 8-bit
image (RGB only), and the ability to
save the image with RGB or CMYK
data. The option to save the image as
a 16-bit file is only provided if original image was a RAW or 16-bit file.
Changing the image from 16-bit to 8bit will make the image file smaller, but
doing so may also reduce the level of
quality of the image. It is recommended
that you create an 8-bit copy of your
image for situations in which only 8-bit
files are compatible.
Please Note: TIFF saved with CMYK
data can only be saved with 8-bits per
channel of color information.
JPEG
One of the most widely used file
formats, the JPEG file format enables
you to save a greater number of images
using the same amount of hard disk
space as the other file formats. To
create such a small file size, a form
of compression is used that irreversibly affects the quality of the image.
Because of this compression, it is
recommended that you only use the
JPEG file format for images that will
be distributed electronically, or when a
small image file is required.
Page 29
How to Print
Printing is very easy in Capture NX. You
can select Print from the File Menu at
any time to print the current image, or
you can select multiple images from
within the Browser to create a Print
Package. Print Packages are essentially
a collection of images printed at the
same time, often with more than one
image appearing on the same page.
Print Packages make the most out of
your printer and paper, enabling you
to create proof sheets so that you can
review and select images based on
the output, rather than the computer
monitor.
Batch Processing
Batch Processing is the automatic application of one or more enhancements to
a series of images. Typically a photographer will use a batch process to apply a
predefined series of adjustments to several
images at once. Capture NX supports a
number of batch processing methods. You
can run a traditional Batch Process, selecting a folder of images and a Settings File
to apply to those images, you can copy
and paste your enhancements from one
image to another, or you can select multiple images in the Browser and apply a
Settings File or paste some enhancements
directly to those images. One method
of applying a batch process is to create
a Settings File that contains a series of
enhancements to apply to your image.
Creating a Settings File
23
Chapter 5 Getting Started
Once you have selected Print from the
File Menu, you can identify how to
color manage your prints and whether
or not you want to create a Print
Package.
tion of the various settings within the
Capture NX Print dialog, please see
page 117.
For a complete descrip-
Settings Files consist of a series of
instructions that Capture NX can use
to enhance one or more images in
the future. Settings Files are created
by identifying enhancements that
you want to save from the current
image. Later, when you apply the new
Settings File to an image or group of
images, Capture NX will apply the same
enhancements with the same settings
Page 30
24
to those images, just as if you had
applied them to each image individually. Settings Files are often used to
apply a unique series of enhancements
Chapter 5 Getting Started
that can work for a wide variety of
images, such as applying a black and
white conversion to be used as a basis
for an additional enhancement, or
adding a warm sepia-tone to the image.
To create a Settings File, open an
image, either by using the Open Image
command or by double-clicking on an
image in the Browser.
Make whatever enhancements and
adjustments that are necessary to the
image. Once you have completed the
adjustments to the image, you can start
creating the Settings File.
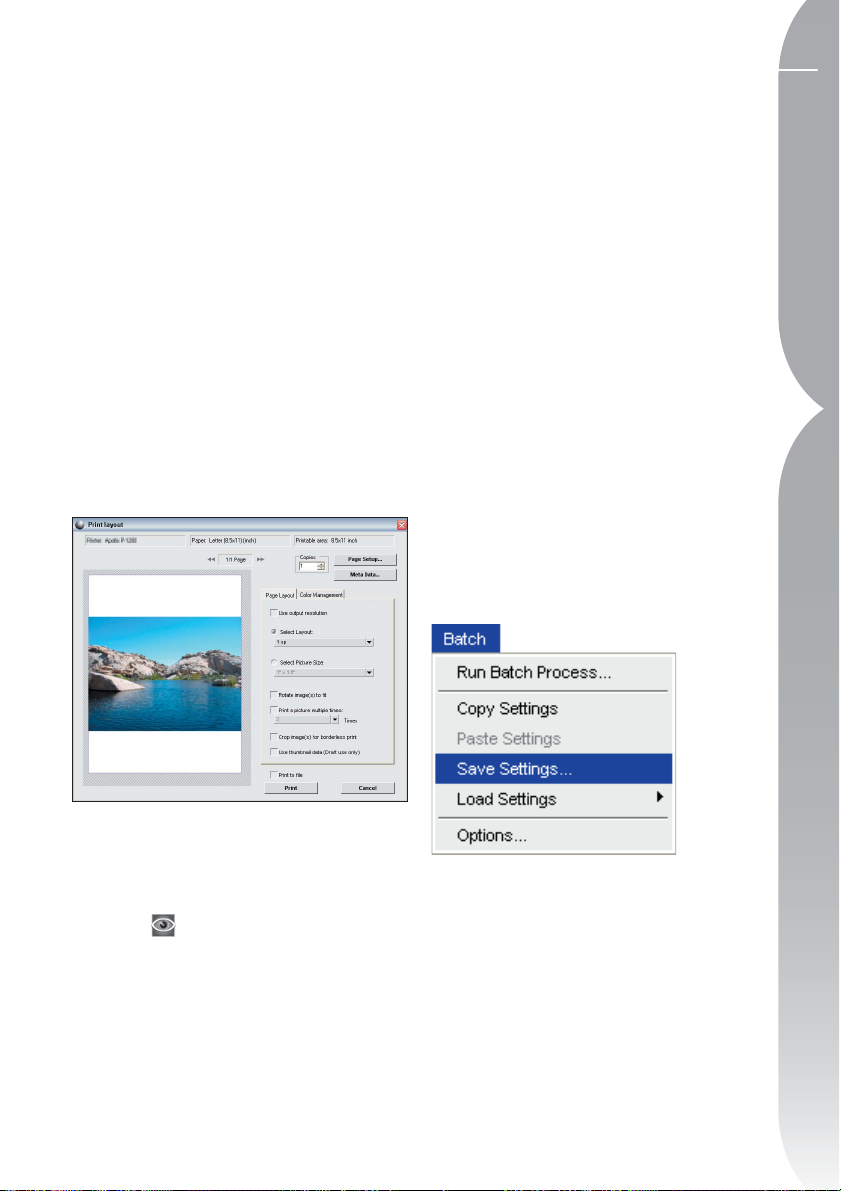
Navigate to the Batch Menu and select
Save Settings. This will call up the Save
Settings dialog window, which includes
a representation of the Edit List from
the current image, complete with the
image settings. Simply check off the
different steps from this image that you
want to save into the Settings File. Once
you have selected all of the enhancements and steps that you would like to
apply to additional images, enter a name
for the Settings File. While it is recommended that you leave the Settings File
in the default folder location, since this
will make it easy to locate when you are
ready to apply a batch process, you are
given the option to select a different
location to place the Settings File.
For more information regarding the Save
Settings command, please see page 182.
How to Apply a Batch
Process With a Settings File
Once you have created a Settings File,
you can begin applying the enhancements from within that Settings File
to any image, either within the editor,
within the Browser, or even to a folder
on your computer.
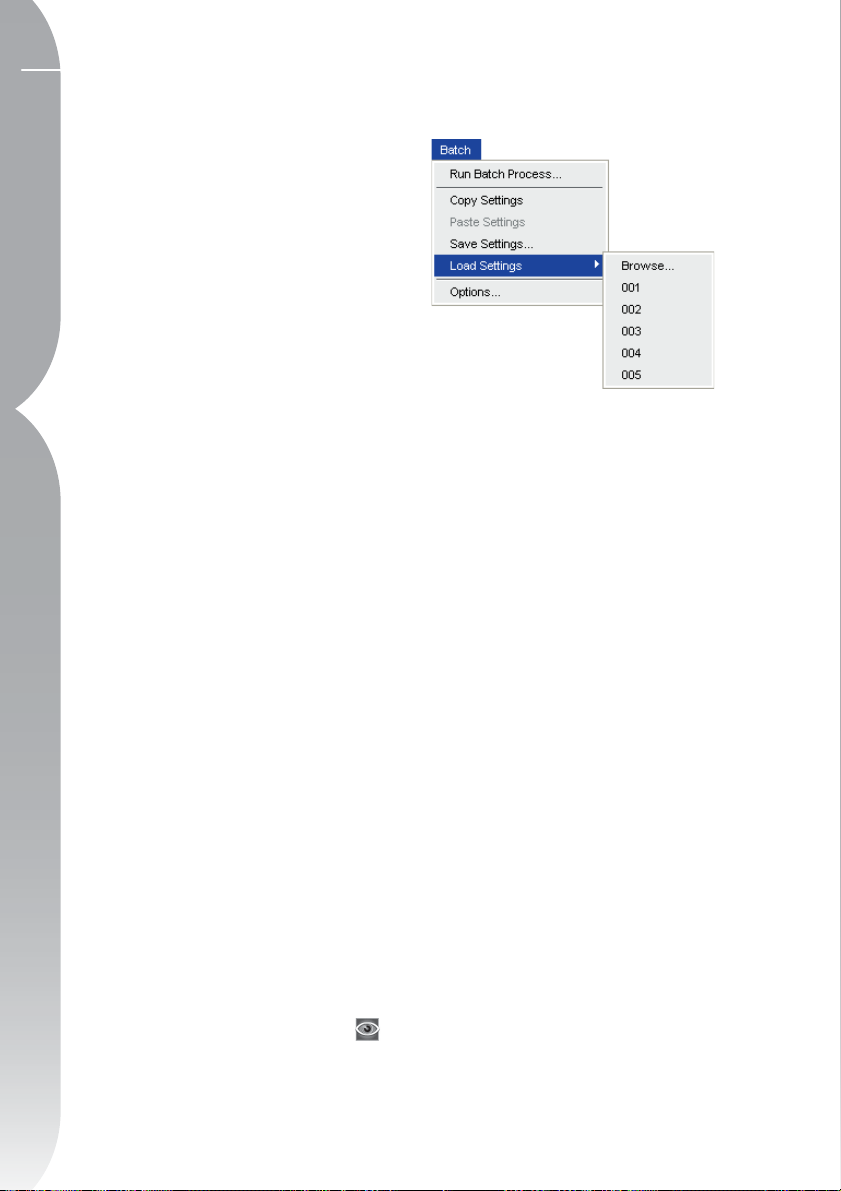
To apply a batch process in the Editor or
Browser, navigate to the Load Settings
section of the Batch Menu and locate
the Settings File that you want to apply.
By selecting the Settings File from this
location, you will apply those settings
either to the current image in the
editor or to the selected files within the
Browser.
If you are applying a Settings File
to multiple images in the Browser,
the thumbnails for the images will
automatically become updated and
a small icon will appear next to each
selected image, indicating that it needs
to be processed. A Processing Queue
window will also appear, enabling you
to begin the batch process. Click on
the Start button to begin processing
the images with the default settings. By
default, the batch process will save the
Page 31

images with the NEF file format with
the same name and in the same folder
as the original image.
You are provided with the option within
the Processing Queue of selecting a
different file format, destination folder,
and file name.
on the Processing Queue, please see
page 184.
For more information
How to Apply a Batch
Process by Copying and
Pasting Enhancements
While Settings Files are very useful if
you have a series of enhancements
that can be applied to a large number
of images, there may be instances
where you may want to apply a series
of enhancements to a small batch
of images. By first enhancing one of
the images from the series, you can
copy and paste the enhancements to
any number of images without going
through the process of creating a
Settings File.
of the range of images in the batch.
Perform whatever enhancements
you think appropriate to the image,
navigate to the Batch Menu, and select
Copy Settings. By default, Capture
NX will copy all of the enhancements
that are applied to the representative
image. If you would like to copy only
individual enhancements, simply click
on an enhancement within the Edit List
to highlight it prior to selecting Copy
Settings. If you would like to highlight
and select more than one enhancement, hold the Ctrl (Windows) or
Command (Mac OS) keys while selecting enhancements from the Edit List.
This will select multiple enhancements
to be copied once you select the Copy
Settings option.
After you have copied the desired
settings, locate the images to which
you want to apply the enhancements.
You can either select a different image
that you have opened within the Editor,
or you can select one or more images
from within the Browser. Navigate again
to the Batch Menu and select Paste
Enhancements. This will apply all of the
enhancements that you have selected
and copied into the target images. It is
important to note that all of the new
enhancements will be applied in the
same order that they were applied in
the representative image, but they will
be applied after any enhancements
that already existed within the target
images.
25
Chapter 5 Getting Started
To begin the copy and paste method,
open an image that is representative
Page 32

26
How to Apply a Batch
Process in the Browser
In addition to being able to apply batch
Chapter 5 Getting Started
processes within the Editor or using
the Batch Process feature, Capture NX
offers you the ability to apply a batch
process directly within the Browser.
Begin by selecting and highlighting
any number of images from within the
Browser. Next, select the Settings file
you wish to apply to those images by
navigating to Load menu within the
Batch menu. After you have selected
the Settings File to apply from the
Batch menu, the Processing Queue
window will appear, enabling you to
start the batch process at any point.
Once you select the Start button within
the Processing Queue, Capture NX will
process each of the images that you
selected to enhance using the default
saving settings. This saves the images
using the NEF file format in the same
folder location with the same file name.
If you would like to change these
settings, click on the
the Processing Queue to display the
full set of controls provided within the
Processing Queue.
button within
You are provided the option within the
Processing Queue of selecting a different file format, a different destination
folder, and a different file name.
For more information on the
Processing Queue, please see page 184.
Page 33

27
Page 34

28
Page 35

29
The Browser
Capture NX contains a very powerful browser that enables you to browse, sort,
and organize your images, as well as to rotate or apply batch processes to multiple
images simultaneously.
Chapter 6 The Browser
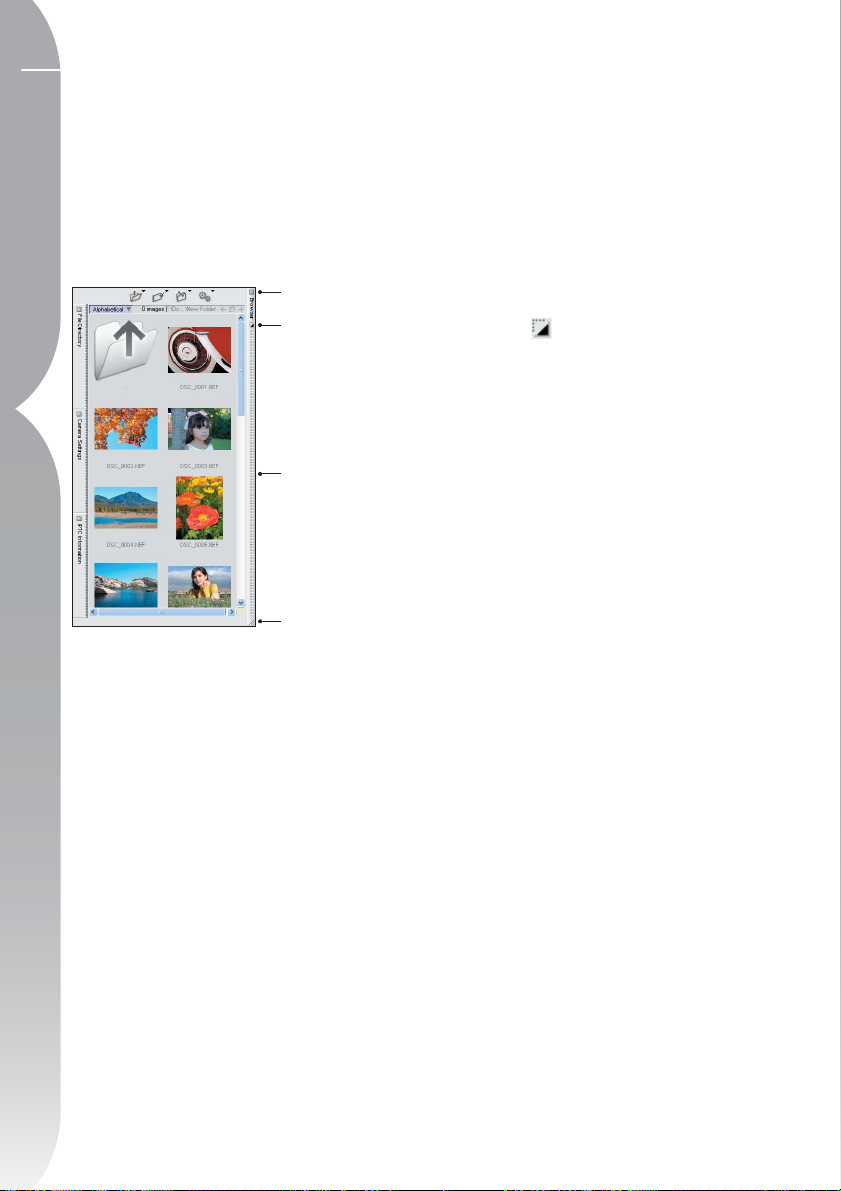
The Browser
Inverse Sort Button (Page 30) Folder Menu (Page 31) Label Menu (Page 32)
Sort Menu (Page 34) Batch Menu (Page 34)
You can access the Browser in two
different ways:
1. By clicking on the button on the
docked Browser bar.
2. By selecting the Open Folder in
Browser selection from the File Menu.
Once the Browser is open, you can
navigate to different folders in a number
of ways: by double-clicking on a folder
icon within the Browser window, by
using the File Directory Palette or by
using the Open command within the
Folder Menu of the Browser.
Page 36

30
Please see page 37 for more information regarding the File Directory
feature.
Chapter 6 The Browser
Use the Direct Select Tool to select and
move images within the Browser. Use
the Hand Tool to pan throughout the
Browser. The Zoom Tool enables you
to zoom in and out of the Browser,
increasing and decreasing the size of
the thumbnails. Additionally, while you
have selected the Zoom Tool, rolling
over an image will cause a larger
version of that image to become visible.
the current folder.
Folder Back
This button navigates to the last folder
that you opened within the Browser.
This button is not accessible when
viewing the first folder of that editing
session.
Folder Open
This button opens a list of previously
viewed folders. You can then select
one of the folders that you previously
viewed to quickly navigate to that
folder.
Folder Forward
This button navigates back to the last
folder that you viewed before using the
Folder Back button. This button is not
accessible until you use the Folder Back
button once.
Within the Browser, you are able to
control the location of the current
window that you are viewing as well
as four Menus that contain controls
designed to work specifically within the
Browser.
Under the four folder buttons are
commands that control the location of
Inverse Sort Button
This button reverses the order of the
images displayed within the Browser.
You can invert the sort direction at any
time, including after using any of the
sort options such as the Alphabetical,
Date, or Label sorting methods.
By right-clicking (Windows) or
control-clicking (Mac OS), you are
provided with additional controls for
your images within a contextual Menu.
Opening this Menu on an image within
the Browser, you can:
Open an image or group of images.
Compare images either in the
Browser or in the Editor.
Please see
Page 37

page 199 for additional information
regarding comparing.
Label your images. Please see
page 32 for additional information on
labeling images.
Rename your images using the same
rename functionality found in the
Batch process.
for additional information regarding
renaming images.
Copy, Paste, and Load settings to
apply in a batch process.
page 181 for information regarding
batch processes.
Please see page 185
Please see
Folder Menu
The Folder Menu within the Browser
contains different controls for the view
of the current folder.
Open
Select this option to open a folder
browser dialog that enables you to
locate a folder to display within the
Browser.
Open in Split Window
Select this option to open a folder
browser dialog that enables you
to locate a folder to display in an
additional browser window that
becomes available next to the current
folder. By opening two different folders,
you can quickly sort images from one
location into another.
31
Chapter 6 The Browser
New Folder
This option creates a new unnamed
folder inside the current folder that you
are viewing within the Browser window.
Page 38

32
View
The View sub-Menu enables you to
choose from different methods to view
Chapter 6 The Browser
the contents of the current folder.
ROWS
The Rows view is the default view
for the Browser. This view causes the
images to become displayed in a row
format; resizing the Browser will cause
the images to become resorted.
LIGHT TABLE
the Light Table view. The Bird’s Eye
Palette is accessible within this view to
see your current location in relation to
the images on the Light Table.
DETAILS
This view places important information about each image in a column
and enables you to sort by each of the
columns.
Label Menu
The Light Table view simulates a light
table; resizing the Browser will not
resort the images. You can navigate
both horizontally and vertically through
The Label Menu within the Browser
contains tools to assist you with labeling your images, which is important
when it comes time to sort and archive
your images.
Available Labels
Capture NX by default has four labels
available within the Label Menu:
Unlabeled, Good, Bad, and Maybe.
You can personalize and use up to nine
labels, plus Unlabeled. Each label has
a preset number which indicates the
color, shortcut, and icon that is used
for that particular label. The shortcut
Page 39

is essentially the number of the label.
For example, you can set an image
to Unlabeled with the shortcut of 0.
To remove an image’s label, simply
highlight it and press the 0 key on your
keyboard.
Customize Label Names
Sort Menu
The Sort Menu within the Browser
enables you to change the arrangement
of your images within the Browser. You
may at any time rearrange the images
manually by clicking and dragging an
image to the desired location.
Alphabetical
Choose this sort method to arrange
the images alphabetically, based on the
file’s name.
Date
Choose this sort method to arrange the
images chronologically, based on the
creation of the image.
33
Chapter 6 The Browser
The Customize Label Names command
will open the Customize Label Names
dialog. In this dialog you can identify
the names of up to nine individualized labels. If you do not want to use a
label, simply delete the text within the
associated box, and that label will be
removed from the Label Menu.
By Labels
This sub-menu contains the current
available labels and enables you to
choose to display only images labeled
with one of those available labels. By
selecting any of the options within
this Menu, you will switch the view to
the Sort By Labels view, which shows
a list of all of the possible labels with
a Show/Hide Triangle next to the label
name. Clicking on the
expand that label area and show you all
of the images with that label. To switch
back to the normal view, select one
of the other sorting methods, such as
Alphabetical or Date.
button will
Page 40

34
Batch Menu
Chapter 6 The Browser
The Batch Menu within the Browser
contains a duplication of the contents
of the Batch Menu from the Menu Bar
and enables you to quickly access and
apply batch processes to your images.
For more information regarding the
Batch functionalities of Capture NX,
please see page 181.
Page 41

35
Page 42

36
Page 43

37
File Directory
The File Directory displays the files on your hard disk in the same manner as the
Operating System, within the Capture NX window, offering file copying and file
moving functions. Double-clicking on any folder from within the File Directory will
open that folder within the Browser.
Chapter 7 File Directory
Page 44

38
Page 45

39
Camera Settings
The Camera Settings Palette contains a list of all of the pertinent information
regarding the current image. Within this Palette, you can see information regarding the camera, the time and date the image was shot, the exposure data, as
well as the settings made within the camera that affected the current image. Any
editable settings are accessible with a pull-down Menu, which you can use to
change the settings that you set within your camera.
When working with images within the
Browser, you can view the image information for the currently selected image
within the Camera Settings Palette.
When working with images within
the Editor, you can access and change
settings on the image directly within
the Camera Settings palette.
Chapter 8 Camera Settings
Page 46

40
Page 47
41
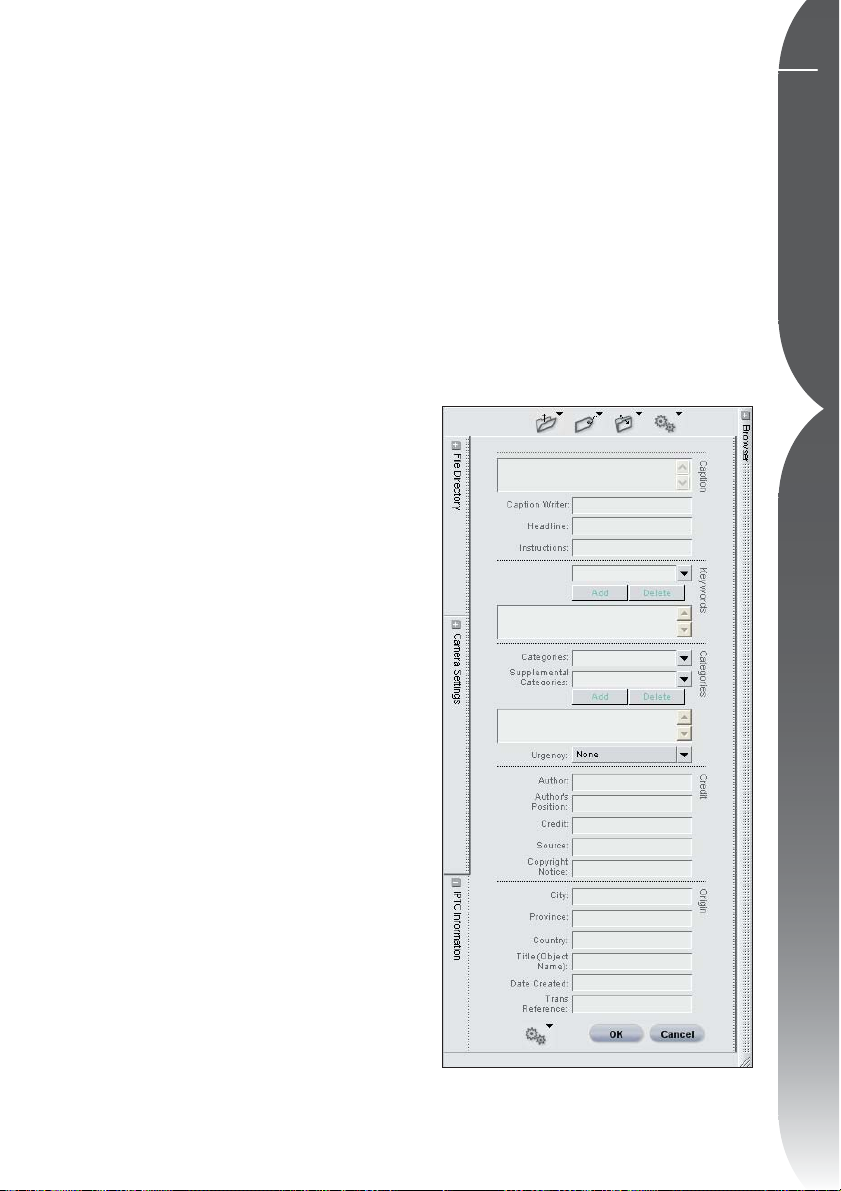
IPTC
The IPTC Palette contains a standardized list of text fields that can be used to
indicate the copyright and usage requirements of your images. The contents
of the IPTC Palette, named after the committee that created the standard, the
International Press Telecommunications Council, was originally designed to simplify
and clarify information needed when sharing photographs with different publications.
These fields enable you to add important information by attaching labels
such as Caption, Keywords, Categories,
Credit, and Origin to the image. For
more information about IPTC and how
it is used, please visit the following web
page:
http://www.iptc.org/
You can view and change the contents
of the different IPTC fields on images
both within the Browser as well as
within the editor. When working in the
Browser, you can also select multiple
images and modify the contents of the
IPTC fields of those images directly.
Chapter 9 IPTC
Once you are finished adding or editing
the IPTC information, simply click OK.
Page 48

42
Page 49

The Edit List
The Edit List is the central location for all of the controls provided within Capture
NX. The Edit List stores all of the enhancements that have been applied to your
image in chronological order. The Edit List can be used as a history that allows you
to go back and modify any of the adjustments that you have previously made to
your images.
43
Chapter 10 The Edit List
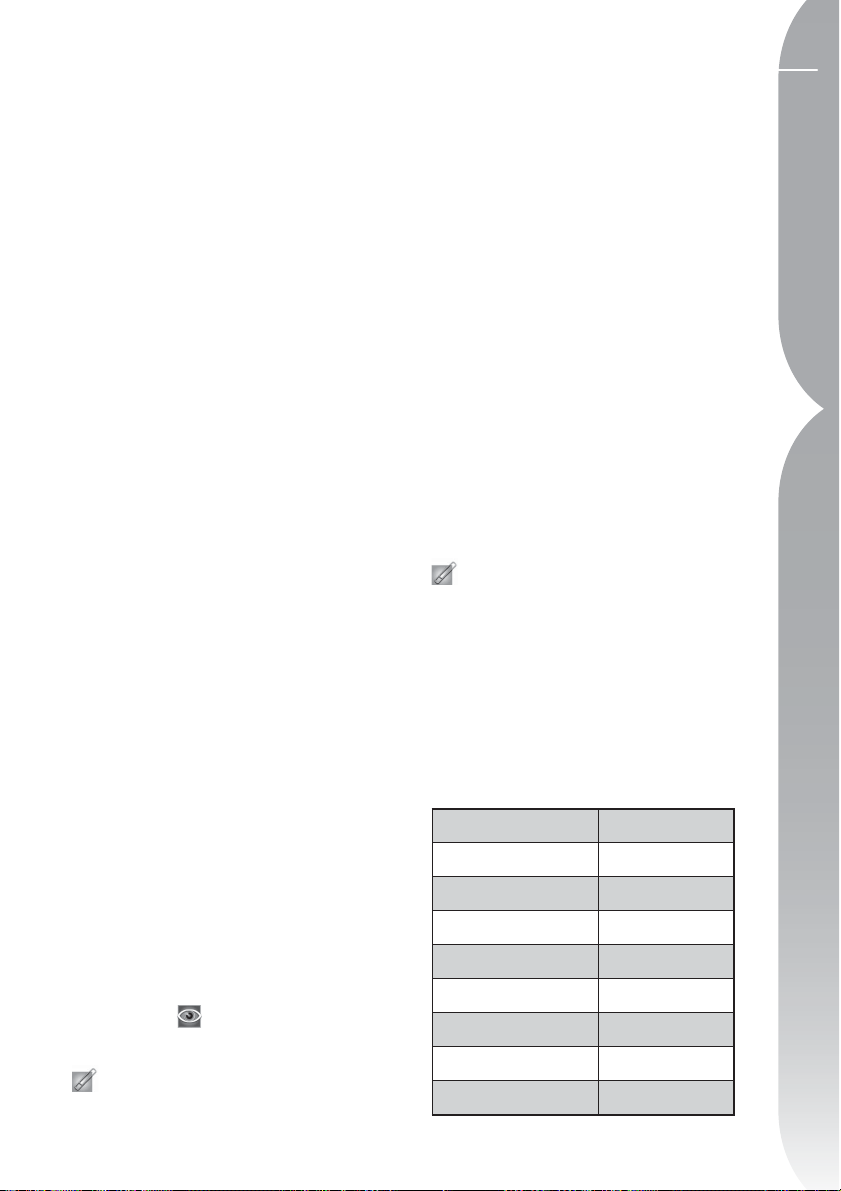
The Edit List
Base Adjustments (Page 44) Enhancement Steps (Page 59) Versions Menu (Page 65)
Batch Menu (Page 66) New Step Button (Page 66)
Page 50

44
Every enhancement that you apply to
your images within Capture NX will be
recorded within the Edit List. The Edit
Chapter 10 The Edit List
List contains the following sections:
• Base Adjustments Step
• Enhancement Steps
• Versions Menu
• Batch Menu
• New Step Button
The Edit List is saved with all of the
adjustments intact when you save the
file as a NEF file.
The Edit List also acts as the basis for
batch processing your images.
the Batch sections later in this chapter
and on page 181 to learn more about
how to use the Edit List to create batch
processes.
See
Apply Checkbox next to the last step
that you want to reapply. Capture
NX will automatically apply all of the
steps between the step you have just
modified and the last step that you
checked. You can then, of course,
check or uncheck any steps or enhancements that you wish.
Base Adjustments Step
The Base Adjustments step contains
RAW specific enhancements as well
as enhancements that can be applied
to JPEG and TIFF images. The Base
Adjustments step can be expanded and
collapsed at any time by clicking on the
next to the Base Adjustments step in
the Edit List.
Since the Edit List shows a chronological description of the enhancements
that have been applied to your image,
you can use the Edit List to return to
any previous enhancement and adjust
the settings. To do this, either doubleclick on the step or enhancement that
you want to modify, or single-click on
the
next to that step or enhancement to display the contents. Once
you have displayed the contents of
an enhancement, you can modify the
settings that were applied. By modifying a previous step, you will temporarily disable all of the steps that occur
after the current step you are modifying. Once you have completed any
modification to that step, click on the
Show/Hide Triangle Apply Checkbox
The Base Adjustments step is broken
up into five sub-categories. Each of the
five sub-categories can be expanded
and collapsed at any time by clicking on
the
next to each of the sub-catego-
ries within the Base Adjustments step.
• Camera Adjustments (Available with
RAW images only)
• RAW Adjustments (Available with
RAW images only)
• Lens Adjustments (Available for all
images)
• Light & Color Adjustments
Page 51

(Available for all images)
• Detail Adjustments
(Available for all images)
When you open an NEF file that
was generated with a camera, both
the Camera Adjustments and RAW
Adjustments options are available to
you. Within these two options, you are
able to adjust the settings that were set
within your camera, as well as modify
enhancements that are available only
for RAW files.
Each enhancement within the Base
Adjustments contains a Show/Hide
Triangle and an Apply Checkbox.
Show/Hide Triangle
The Show/Hide Triangle shows and
hides the contents of that specific
enhancement’s dialog window. Click
on the
states.
Apply Checkbox
The Apply Checkbox enables you to
turn on and off a specific enhancement.
This checkbox is automatically checked
once any adjustments are made to
the enhancement. To turn a specific
enhancement off, simply uncheck the
Apply Checkbox.
Camera Adjustments
The contents of the Camera Adjustments
section of the Base Adjustments step can
be applied only to a RAW NEF image file.
The Camera Adjustments section will be
presented automatically if the image is
a RAW NEF image. Tools that apply only
to toggle between these two
to RAW images do not appear in the
menus. Tools specific to RAW images are
available in the Base Adjustments Step.
Please note: Any feature applied
within the Camera Adjustments is
applied to the entire image and cannot
be adjusted using any of the Selective
Tools.
COLOR MODE
The Color Mode feature enables you
to choose between the same Color
Modes as those that you can set in your
camera. By allowing you fine control
over chroma, brightness, and color
gamut, the Color Mode feature creates
a subtle look for your image, comparable to the distinct differences apparent
in the variety of film stock available to
photographers.
To change the Color Mode, click on the
button for Color Mode and choose
one of the options from the pull-down
Menu. The default value will be the
value that you originally set in your
camera. After changing the parameter
for this feature, an * will be displayed
next to the value originally set within
your camera.
Click OK to accept and apply the new
Color Mode, or click Cancel to keep the
original Color Mode set in your camera.
To revert to the original setting at
any point, simply uncheck the Apply
Checkbox next to Color Mode.
RAW ONLY
45
Chapter 10 The Edit List
Page 52

46
WHITE BALANCE
The White Balance feature is designed
to enable you to change the white
Chapter 10 The Edit List
balance that was set within your
image. Changing the white balance
enables you to not only correct the
white balance setting that was originally chosen, but also to alter the white
balance in order to introduce a cold or
warm cast into the image.
To change the white balance, click on
the
button for White Balance to
display the White Balance dialog. Within
the White Balance dialog, you can either
select a color temperature for the white
balance, or you can set a gray point
from within the image.
Set Color Temperature Mode
RAW ONLY
New White Balance
This pull-down Menu provides you with
a number of controls for setting a new
white balance value.
Recorded Value
Selecting this value will set the white
balance to the setting recorded by the
camera.
Calculate Automatically
When you select this value, Capture NX
will determine the best white balance
setting to provide neutral colors
throughout the image.
Incandescent
Select this value if the lighting in your
photograph’s scene was provided by an
incandescent or tungsten light source.
You can further modify the setting with
the Fine Adjustment Slider.
Fine Adjustment Slider
This slider enables you to shift the
selected color temperature by + or 50 Mired.
In this mode, you can allow Capture
NX to automatically calculate the white
balance, or you can set the white
balance manually by using one of the
available presets.
Camera White Balance
This displays the white balance set by the
camera when the image was captured.
Daylight
Select this value if the lighting in your
photograph’s scene was provided by the
sun. You can further modify this setting
with the Daylight sub-menu and the
Fine Adjustment Slider.
Daylight Sub-Menu
This sub-menu enables you to
choose from three different daylight
situations.
Direct Sunlight
This option sets the color
temperature to 5,200K and is suited
for photographs taken in direct
Page 53

sunlight.
Cloudy
This option sets the color
temperature to 6,000K and is suited
for photographs taken under overcast
skies.
Shade
This option sets the color
temperature to 8,000K and is suited
for photographs taken in open
shade.
Daylight (6,500K)
Fine Adjustment Slider
This slider enables you to shift the
selected color temperature by + or 50 Mired.
Flash
Select this option if your image was
shot using a Nikon Speedlight as the
light source. You can further modify this
setting with the Fine Adjustment Slider.
47
Chapter 10 The Edit List
Fine Adjustment slider
This slider enables you to shift the
selected color temperature by + or 50 Mired.
Standard Fluorescent and High
Color Rendering Fluorescent
Select either of these values if your
image was shot under fluorescent lighting, based on the type of fluorescent
light bulb that was used. If you are
unsure of which type of light bulb was
used, experiment with the different
settings until the image appears natural
to you. You can further modify these
settings with the Fluorescent sub-menu
and the Fine Adjustment Slider.
Fluorescent sub-menu
This sub-menu enables you to
choose between the most
commonly available fluorescent
light bulb temperatures.
Warm White (3,000K)
3,700K
Cool White (4,200K)
5,000K
Fine Adjustment Slider
This slider enables you to shift the
color temperature from 4277K to
7479K.
Set Gray Point
In this mode you can identify an object
within your photograph that was
neutral gray in the scene and base
the white balance off that object, or
you can take an average of a section
of your photograph and calculate the
white balance off that section.
Use Single Point
By selecting this option and clicking
start, you will be able to identify a single
point that should be neutral gray. This is
Page 54

48
best used on an image that contains a
Gray card illuminated by the main light
source.
Chapter 10 The Edit List
To choose a point, select Use Single Point
and click Start. The cursor will change
to an eyedropper when moved over the
active image. Click a neutral gray point
to set the white balance. You will notice
that the Red and Blue sliders may have
moved, and that these changes may
have also been reflected in the small
graph. You can further modify the white
balance settings by moving the Red and
Blue sliders manually. The Red slider
enables you to shift the image’s white
balance from cyan to red, adjusting the
gain for the Red Channel. The Blue slider
enables you to shift the image’s white
balance from yellow to blue, adjusting
the gain for the Blue Channel. Click on
the reset button at any time to return
the values to the default settings.
Use Marquee Sample
By selecting this option and clicking start, you will be able to draw a
marquee on the image to identify a
section for Capture NX to use as the
basis for setting the white balance.
Use this option when the scene was
illuminated by a number of different
light sources. Select a section that was
illuminated by the light source you
want to set the white balance to.
To choose a section, select Use
Marquee Sample and click Start. The
cursor will change to an area-selection
eyedropper when moved over the active
image; drag to select an area. White
balance will be set to the average for
the selected area.
You will notice that the Red and Blue
sliders may have moved, which may
have also been reflected in the small
graph. You can further modify the white
balance settings by moving the Red and
Blue sliders manually. The Red slider
enables you to shift the image’s white
balance from cyan to red, adjusting the
gain for the Red Channel. The Blue slider
enables you to shift the image’s white
balance from yellow to blue, adjusting
the gain for the Blue Channel. Click on
the reset button at any time to reset the
values to the default settings.
Click OK to accept the new white
balance, or click Cancel to retain the
white balance set in your camera.
To revert to the original white balance
setting at any point, simply uncheck the
Apply Checkbox next to White Balance.
TONE COMPENSATION
The Tone Compensation feature enables
you to adjust the image contrast that
was set in the camera.
To change the tone compensation, click on the
Compensation and select one of the
options from the pull-down Menu.
button for Tone
RAW ONLY
Page 55

Choose from the following list:
• Unchanged – This will revert to the
contrast set in the camera.
• Low Contrast
• Unchanged – This will revert to the
saturation set in the camera.
• Moderate
• Normal
49
Chapter 10 The Edit List
• Medium Low
• Normal
• Medium High
• High Contrast
• User Defined Custom Curve – This
will set the contrast to a user-defined
custom curve. (Not available with
COOLPIX-series cameras.)
Click OK to accept the new setting,
or click Cancel to retain the Tone
Compensation set in your camera.
To revert to the original Tone
Compensation setting at any point,
simply uncheck the Apply Checkbox
next to Tone Compensation.
SATURATION
RAW ONLY
• Enhanced
SHARPENING
RAW ONLY
The Sharpening feature enables you to
adjust the amount of sharpening that
was set in the camera.
To change the sharpening, click on the
button for Sharpening and select
one of the options from the
pull-down Menu. Choose from the
following list:
• Unchanged – This will revert to the
sharpening set in the camera.
The Saturation feature enables you to
adjust the saturation that was set in the
camera.
To change the saturation, click on the
button for Saturation and select
one of the options from the pull-down
Menu. Choose from the following list:
• None
• Low
• Medium Low
• Medium
• Medium High
• High
Click OK to accept the new sharpening
Page 56

50
settings, or click Cancel to retain the
sharpening set in your camera.
To revert to the original sharpening
Chapter 10 The Edit List
setting at any point, simply uncheck the
Apply Checkbox next to Sharpening.
Please note: As the D1 does not
record image-sharpening settings in
image files, selecting Unchanged is
equivalent to selecting None when
working with images recorded with the
D1.
RAW Adjustments
The contents of the RAW Adjustments
section of the Base Adjustments step
can only be applied to a RAW NEF
image file. This section will be displayed
automatically if the image is a RAW NEF
image. Tools that apply only to RAW
images do not appear in the menus.
Tools specific to RAW images are available in the Base Adjustments Step.
Please note: Any feature applied
within the RAW Adjustments is applied
to the entire image and cannot be
adjusted using any of the Selective
Tools.
EXPOSURE COMPENSATION
RAW ONLY
The Exposure Compensation feature
emulates increasing or decreasing
exposure in the camera.
To change the Exposure Compensation,
click on the
Compensation and move the slider. This
feature enables you to choose from –2
to +2EV.
button for Exposure
Click OK to accept the Exposure
Compensation effect, or click Cancel
to prevent the Exposure Compensation
effect from changing your image.
If you would like to remove the
Exposure Compensation effect
at any time, simply uncheck the
Apply Checkbox next to Exposure
Compensation.
Please note: The Exposure
Compensation feature is very useful
for improving images that were not
correctly exposed; however, if your
image contains overexposed areas
(with lost detail in the highlights) or
underexposed areas (with lost detail in
the shadows), you will not be able to
recover detail using this feature.
HUE ADJUSTMENT
The Hue Adjustment feature enables
you to alter the hue of your entire
image from (–9° to +9°) without affecting brightness or saturation. Skin tones
will become increasingly yellow as this
value is raised above 0°. Values below
0° produce redder skin tones.
To change the Hue Adjustment, click on
the
button in the Hue Adjustment
and move the slider. After changing the
parameter for this feature, an * will be
displayed next to the value originally set
within your camera.
Click OK to accept the new setting,
or click Cancel to retain the Hue
Adjustment as set in your camera.
To revert to the original Hue
Adjustment setting at any point, simply
RAW ONLY
Page 57

uncheck the Apply Checkbox next to
Hue Adjustment.
COLOR MOIRÉ REDUCTION
The Color Moiré Reduction feature
enables you to apply a noise reduction
process available only on RAW images.
To apply Color Moiré Reduction, click
on the
options from the pull-down Menu. This
process can reduce color moiré artifacts
(color interference caused by regular
overlapping patterns). You can control
the strength of this feature from Off, to
Low, Medium, or High.
Click OK to accept the Color Moiré
Reduction effect, or click Cancel to
prevent the Color Moiré Reduction
effect from changing your image.
If you would like to remove the Color
Moiré Reduction effect at any time,
simply uncheck the Apply Checkbox
next to Color Moiré Reduction.
can be found in the Adjust Menu on
page 156.
button and select one of the
Additional noise reduction features
RAW ONLY
and minimized.
Please note: The position as well as
amount of dust on the low-pass filter
may change. It is recommended that
you take reference images regularly and
use a reference image that was taken
within one day of the photograph you
wish to treat.
To apply Dust Off, click on the
for Dust Off to display the Dust Off
dialog window. Click on the Change
button to locate a Dust Off reference
photo to apply to the current image.
For certain cameras that create Dust
Off reference photos with the .NDF
extension (such as the D2H and D2X),
Capture NX will attempt to identify
a reference photo located within the
same folder as the current image.
If Capture NX locates a Dust Off
reference photo in the current folder,
you will be presented with the option
of using that photo for the Dust Off
process.
button
51
Chapter 10 The Edit List
DUST OFF
The Dust Off feature can reduce
artifacts in the image created by dust
which was present on the low pass
filter, located behind the camera’s lens.
Because these dust particles create
artifacts at consistent locations on the
sensor, the Dust Off feature can register
their location on the sensor in a reference image. The noise in subsequent
images are compared to that profile
RAW ONLY
• If you select Yes, Capture NX will
apply the Dust Off effect using that
reference photo.
• If you select No, you will be
presented with a folder search window
to enable you to locate on your
computer’s hard drive a folder that
contains a Dust Off reference photo.
If Capture NX locates more than
Page 58

52
one Dust Off reference photo within
the same folder, you will be presented
with an options dialog to select which
Chapter 10 The Edit List
image to use. It is recommended that
you select the image that was taken as
close to the time of the current image
as possible.
If Capture NX does not locate a
Dust Off reference photo within the
same folder as the current image, you
will be presented with a folder search
window to enable you to locate on
your computer’s hard drive a folder that
contains a Dust Off reference photo.
last three locations that was selected
within the Location pull-down Menu.
Once you have located the correct Dust
Off reference photo, click OK to apply
the Dust Off effect to your image.
If you would like to remove the Dust
Off effect at any time, simply uncheck
the Apply Checkbox next to Dust Off.
Please note: If a large amount of dust
is detected in the current image, Capture
NX Editor will display a warning stating
that the results of Image Dust Off cannot
be guaranteed. Click Yes to proceed.
If Capture NX locates more than one
Dust Off reference photo within the same
folder, you will be presented with an
options dialog to select which image to
use. It is recommended that you select
the image that was taken as close to the
time of the current image as possible.
For all other cameras, you will be
presented with a folder search window
to enable you to locate on your
computer’s hard
drive a folder that
contains a Dust
Off reference
photo.
• If Capture NX
locates more than
one Dust Off reference photo within the
same folder, you will be presented with
an options dialog to select which image
to use. It is recommended that you select
the image that was taken as close to the
time of the current image as possible.
AUTO COLOR ABERRATION
RAW ONLY
The Auto Color Aberration feature enables
you to automatically reduce color aberrations (colored fringes or halos) that appear
within your images. This feature is turned
on by default, automatically reducing
color aberrations in RAW images. If you
would like to remove the Auto Color
Aberration effect at any time, uncheck
the Apply Check box next to Auto Color
Aberration within the RAW Adjustments
section of the Base Adjustments step.
Please note: This option is not avail-
able with multiple exposures or images
created with image overlay (D2X only).
Lens Adjustments
The contents of the Lens Adjustments
section of the Base Adjustments step
are available with RAW images or when
the image was shot with the AF DX
10.5 mm f2.8G Nikkor fisheye lens.
Alternatively, you may select one of the
Page 59

VIGNETTE CONTROL
RAW ONLY
The Vignette Control feature is used
to correct for loss of marginal lumination, a phenomenon associated with
camera lenses that causes a drop in
brightness at the edges of a photograph. Vignette Control is most effective when performed on images taken
at maximum aperture. If the picture
in the active image window is a RAW
image taken with a lens equipped to
transmit distance information (a type
G or D lens) mounted on a camera that
can record this information, Capture NX
will use the lens information recorded
with the image to automatically select
an optimal value for Vignette Control.
When this lens information is not available, the Vignette Control effect will be
based on default lens characteristics. To
determine whether a given combination
of lens and camera will record distance
information, see the table below.
Any other
Ty pe of
Lens
Distance
Information
Not
Recorded
Distance
Information
Not
Recorded
Distance
Information
Not
Recorded
Distance
Information
Not
Recorded
Camera
D50, D70, D70S,
D100, D2H,
D2HS, D2X,
D2XS, D200
D1X/D1H
(fi rmware
version 1.10 or
later)
D1X/D1H
(fi rmware
version 1.01 or
earlier)
D1
Type G or
D lens
Distance
Information
Recorded
Distance
Information
Recorded
Distance
Information
Not
Recorded
Distance
Information
Not
Recorded
To apply the Vignette Control feature to
your image, click on the
button next to
Vignette Control to display the Vignette
Control dialog window.
Drag the Intensity slider to the right to
brighten the edges of the currently active
photo, or drag the Intensity slider to the
left to darken the edges of the photo.
If the image was taken under any situation in which the Distance Information
was not recorded, please take care
when adjusting the Vignette Control
settings so as to not over apply the
Vignette Control effect.
Once you have created the desired
effect with the Vignette Control
feature, click OK to apply the Vignette
Control effect to your image.
If you would like to remove the
Vignette Control effect at any time,
simply uncheck the Apply Checkbox
next to Vignette Control.
FISHEYE LENS
The Fisheye Lens feature enables you to
modify an image taken with a compatible fisheye lens to make that image
appear to have been taken with a wideangle rectilinear lens. This feature is only
compatible with images taken with an AF
DX 10.5 mm f2.8G Nikkor fisheye lens.
53
Chapter 10 The Edit List
Page 60
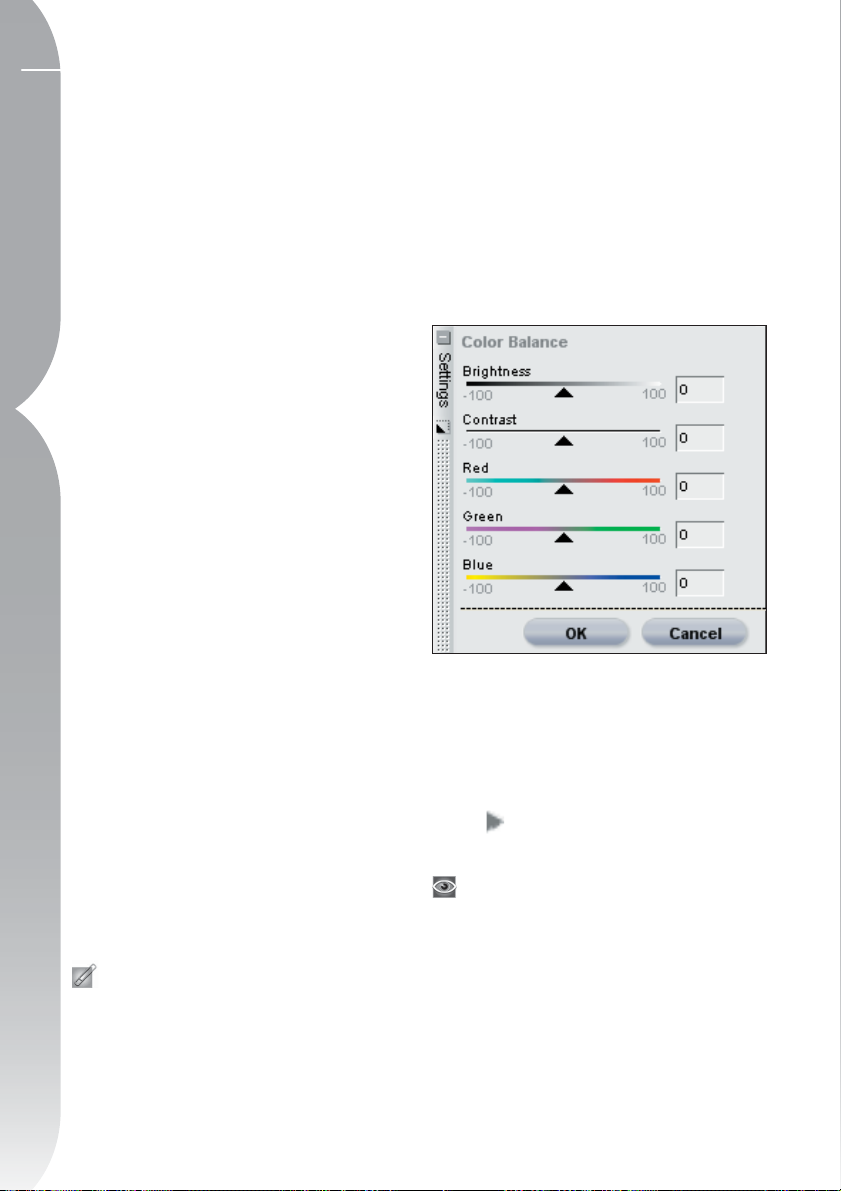
54
Include Areas Where There is No
Image Data
By default, the Include Areas Where
Chapter 10 The Edit List
There is No Image Data option will be
turned off, cropping off any area where
image information is not present.
Turn the Include Areas Where There is
No Image Data option on to display the
full image, including areas where there
is no image data. This shows you the
full image after the fisheye-to-rectilinear transformation. You will notice that
parts of the image have been curved to
transform the image into a rectilinear
image. Due to the process employed by
the fisheye-to-rectilinear transformation, there is more information along
the longest side of the image.
Some areas of the image will not
contain any image information due to
the transformation process.
The features located within the Light
& Color Adjustments Section are also
provided under the Menus, as well as in
the Adjust & Filter pull-down Menu of
Enhancement Steps of the Edit List. You
can selectively apply these features by
accessing them from either the Menus or
from the Adjust & Filter pull-down Menu.
COLOR BALANCE
Once you are satisfied with the resulting effect from the Fisheye Lens
feature, click OK. You can cancel this
feature at any time by clicking on the
Cancel button.
Light & Color Adjustments
The contents of the Light & Color
Adjustments section of the Base
Adjustments step can be applied to any
image, either NEF, JPEG, or TIFF format.
Please note: Any feature applied
within the Light & Color Adjustments is
applied to the entire image and cannot be
adjusted using any of the Selective Tools.
The Color Balance feature provides you
with simple controls for adjusting the
overall brightness, contrast, and color
balance of the entire image.
To apply the Color Balance feature, click
on the
display the Color Balance dialog.
features of the Color Balance Tool,
please see page 150.
Once you have achieved the desired
effect, click on the OK button to accept
the Color Balance effect for your image.
Click on the Cancel button if you
would like to prevent the Color Balance
feature from affecting your image.
button next to Color Balance to
For a complete explanation of the
Page 61

If you would like to remove the Color
Balance effect at any time, simply
uncheck the Apply Checkbox next to
Color Balance.
COLOR BOOSTER
The Color Booster enables you to
optimally adjust the saturation, or vividness, of colors. Use the Color Booster
to increase the saturation of colors of
the active image.
To apply this feature, click on the
button next to Color Booster to display
the Color Booster dialog.
For a complete explanation of the
features of the Color Booster Tool,
please see page 151.
Once you have achieved the desired
effect, click on the OK button to accept
the Color Booster effect for your image.
Click on the Cancel button if you
would like to prevent the Color Booster
feature from affecting your image.
If you would like to remove the Color
Booster effect at any time, simply uncheck
the Apply Checkbox next to Color Booster.
D-LIGHTING
D-Lighting reveals details in shadows
and highlights, correcting for underexposure, backlighting, or insufficient flash,
without harming the properly exposed
areas or introducing unwanted artifacts.
D-Lighting can also help reveal detail in
overexposed areas in brightly lit scenes.
To apply D-Lighting, click on the
button next to D-Lighting to display the
D-Lighting dialog.
For a complete explanation of the
features of the D-Lighting feature,
please see page 143.
Once you are satisfied with the results
of the D-Lighting feature, click on the
OK button. If you want to cancel the
D-Lighting feature, click on the Cancel
button.
If you would like to remove the
D-Lighting effect at any time, uncheck
the Apply Checkbox next to D-Lighting.
55
Chapter 10 The Edit List
Page 62

56
LCH
Chapter 10 The Edit List
LEVELS & CURVES
The LCH Editor controls the Luminosity,
Chroma, and Hue of the active image
using individual editor dialogs. The
LCH Editor enables you to individually
control the Luminosity of the colors of
the entire image.
To use the LCH Editor, click on the
button next to LCH, which will display
the LCH dialog.
For a complete explanation of the
features of the LCH Editor, please see
page 145.
Once you are satisfied with the results
of the LCH feature, click on the OK
button. If you want to cancel the LCH
feature, click on the Cancel button.
If you would like to remove the LCH
effect at any time, uncheck the Apply
Checkbox next to LCH.
The Levels & Curves feature combines two
of the most often used tonal enhancing
features into one easy-to-use editor. The
Levels & Curves feature enables you to
adjust contrast, tone (brightness) levels,
and color balance to make maximum use
of the tone range and color gamut offered
by a particular output device, such as a
printer or monitor.
The Levels & Curves feature provides
you with controls to make tonal adjustments to specific portions of the active
image’s tone range. These adjustments
can be applied to the entire image or
to specific color channels, making it
possible to enhance the image while
preserving detail.
To use the Levels & Curves Editor to
enhance the tonal values of your image,
click on the
Curves. This will provide you with the
Levels & Curves dialog.
button next to Levels &
Page 63

For a complete explanation of the
features of the Levels & Curves tool,
please see page 137.
Once you are satisfied with the results of
the Levels & Curves Editor, click on the OK
button. If you want to cancel the Levels &
Curves Editor, click on the Cancel button.
If you would like to remove the Levels &
Curves effect at any time, uncheck the
Apply Checkbox next to Levels & Curves.
PHOTO EFFECTS
The Photo Effects feature enables you
to take creative control of your image.
With this tool, you can covert an image
to a Black and White, Sepia, or Tinted
image. The Photo Effects feature also
allows you to control the tonality of the
image, to enhance dark tones, and to
control the color balance.
Once you are satisfied with the results
of the Photo Effects feature, click on
the OK button. If you want to cancel
the Photo Effects feature, click on the
Cancel button.
If you would like to remove the changes
from the Photo Effects at any time,
uncheck the Apply Checkbox next to
Photo Effects.
Detail Adjustments
Any of the features in the Detail
Adjustments section of the Base
Adjustments step can be applied to any
image, NEF, JPEG, or TIFF format.
Please note: Any feature that is
applied within the Detail Adjustments is
applied to the entire image and cannot be
adjusted using any of the Selective Tools.
The features located within the Detail
Adjustments section are also provided
under the Menus as well as in the
Adjust & Filter pull-down Menu of
Enhancement Steps of the Edit List. You
can selectively apply these features by
accessing them from either the Menus
or the Adjust & Filter pull-down Menu.
57
Chapter 10 The Edit List
To use the Photo Effects feature, click
on the
This will provide you with the Photo
Effects dialog.
Photo Effects feature, please see page 173.
button next to Photo Effects.
For a complete explanation of the
Page 64
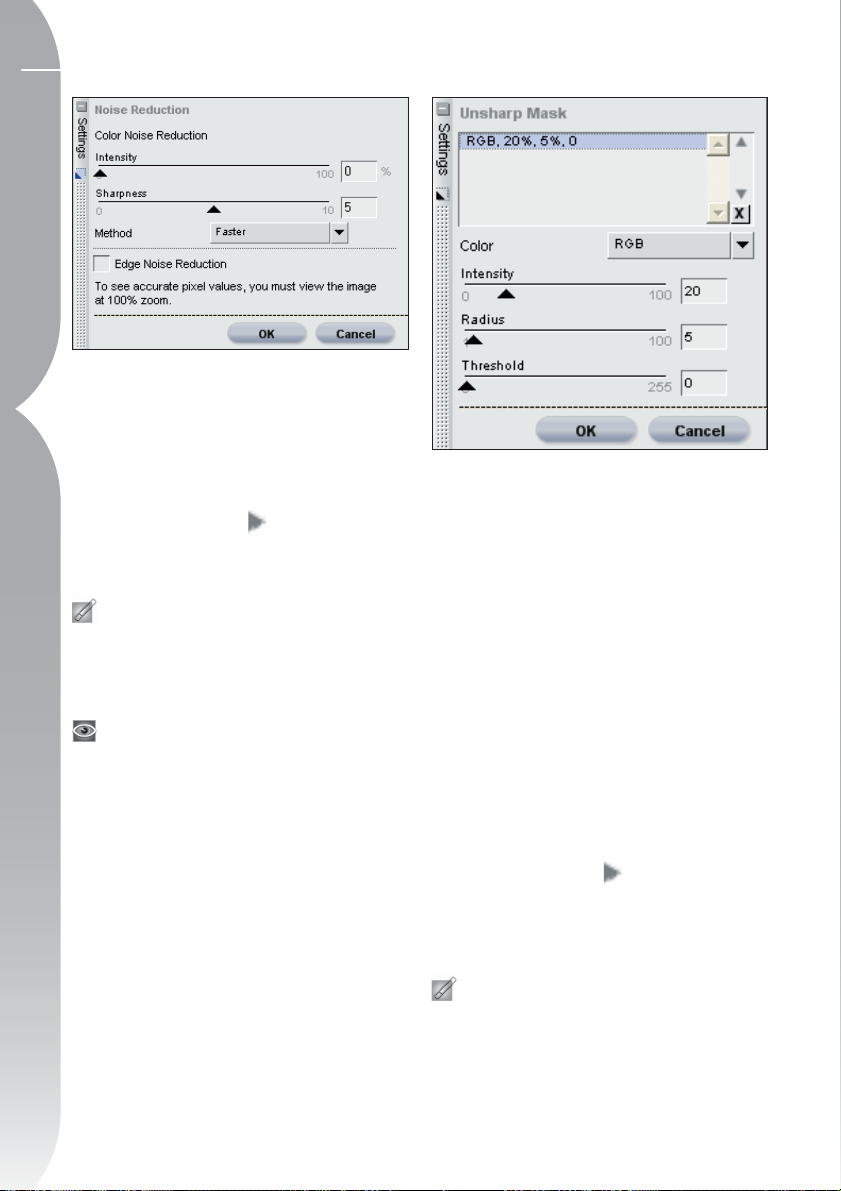
58
NOISE REDUCTION
Chapter 10 The Edit List
The Noise Reduction feature enables
you to reduce the effects of digital
noise that sometimes appears in images
taken with digital cameras.
To begin using the Noise Reduction
feature, click on the
Noise Reduction. This will display the
Noise Reduction dialog.
Please note: It is recommended that
you zoom your image to 100% while
determining the amount of noise reduction to apply to your image.
For a complete explanation of the
features of the Noise Reduction feature,
please see page 156.
Once you are satisfied with the results
of the Noise Reduction feature, click on
the OK button. If you want to cancel
the Noise Reduction feature, simply
click on the Cancel button.
If you would like to remove the Noise
Reduction effect at any time, simply
uncheck the Apply Checkbox next to
Noise Reduction.
button next to
UNSHARP MASK
The Unsharp Mask feature increases the
apparent sharpness of your image by
enhancing the edges of objects in your
image. Unsharp Mask works by increasing the contrast of edges throughout
your image. This feature provides you
with controls over Intensity, Radius
(halo width), and Threshold. One of the
unique features of the Unsharp Mask
Tool from Capture NX is that it always
applies its sharpening to the luminosity of the image, which prevents any
unwanted color shifts from occurring
within your image.
To begin using the Unsharp Mask
feature, click on the
Unsharp Mask. This will bring up the
Unsharp Mask dialog, enabling you to
begin adjusting the different settings.
Please note: It is recommended
that you zoom your image to 100%
while determining the amount of sharpening to apply to your image.
button next to
Page 65

For a complete explanation of the
Unsharp Mask feature, please see page
153.
Once you are satisfied with the results
of the Unsharp Mask feature, click on
the OK button. If you want to cancel
the feature, click on the Cancel button.
If you would like to remove the Unsharp
Mask effect at any time, uncheck the
Apply Checkbox next to Unsharp Mask.
CROPPING & RESIZING
The Cropping & Resizing feature
appears within the Detail Adjustments
section of the Base Adjustments step
whenever the current image has been
cropped or resized in a previous version
of Capture or within PictureProject. If
you would prefer to disable the crop
and resizing applied within previous versions of Capture or within
PictureProject, simply uncheck the
Apply Checkbox for this item.
STRAIGHTENING
The Straightening feature appears
whenever the current image has been
straightened in a previous version of
Capture or within PictureProject. If you
would prefer to disable any straightening applied within previous versions of
Capture or within PictureProject, simply
uncheck the Apply Checkbox for this
item.
Enhancement Steps
Apply Step
Checkbox On
Apply
Enhancement
Checkbox On
Show/Hide
Triangle
Apply Step
Checkbox Off
Link Icon
Apply
Enhancement
Checkbox Off
Enhancement Steps can either be
automatically created by Capture NX
or manually started using the New
Step button.
Read more about this
feature on page 66. Enhancement Steps
include all steps that occur after the
Base Adjustments step and have slightly
different functionality.
There are two significant differences
between the Base Adjustment Steps
and the Enhancement Steps:
Enhancement Steps only contain the
enhancement that you identify, either
from the Menus or through the Adjust
& Filter pull-down Menu that can
be present in Enhancement Steps. A
second distinction is that Enhancement
Steps can be selectively applied using
any of the Selective tools from the
toolbar.
Read more about the
Selection Tools on Page 89.
59
Chapter 10 The Edit List
In addition, any of the items located
within the Enhancement steps can be
Page 66

60
copied, pasted, removed, or added to a
batch process by clicking and highlighting the enhancement.
Chapter 10 The Edit List
section Working with Enhancements
on page 66 for additional information
regarding copying, pasting, or removing
enhancements.
to read the section on batching on
page 181 for information about adding
those features to a batch process.
You can use any of three methods to
create a new Enhancement step: you
can select an editing feature from
the Menus; you can select one of the
Control Point Tools (if none of that
Control Point type has already been
applied within the current step); or you
can click on the New Step button. Each
step contains the following items:
Please see the
You may also want
Show/Hide Triangle
The Show/Hide Triangle shows or hides the
contents of that specific enhancement’s
dialog window. Click on the
toggle between these two.
button to
Apply Enhancement
Checkbox
The Apply Enhancement Checkbox
enables you to turn on and off
the effect of enhancements within
the current step. This checkbox
is automatically checked once an
enhancement is applied within the step.
To turn a specific enhancement off,
simply uncheck the Apply Enhancement
Checkbox.
Link Icon
The Link Icon indicates if the current
step contains linked enhancements.
Read more about linking enhancements
on page 68.
Apply Step Checkbox
The Apply Step Checkbox enables
you to turn on and off a specific
step, thereby turning off all of the
effects of that step. This checkbox is
automatically checked when a step is
first created. To turn a specific step
off, simply uncheck the Apply Step
Checkbox.
Page 67

Adjust & Filter
Pull-Down Menu
Any feature from either the Adjust
Menu or the Filter Menu that is added
to a step will appear within an Adjust
& Filter pull-down Menu. Additionally,
new steps created with the New Step
button will contain an empty Adjust
& Filter pull-down Menu. You can use
this Menu to gain access to any of the
enhancements that are available within
the Adjust or Filter Menus instead
of navigating to the actual Adjust or
Filter Menus.
Additionally, you can use this Menu to
perform a Swap Enhancement function.
Please refer to page 69 for more
information about this function.
Opacity Mixer
The Opacity Mixer provides you with
the ability to blend either the current
enhancement or all Control Points
of the same type with the rest of the
image.
The Opacity Mixer option becomes available as soon as you add any features
from the Adjust, Control Point, or
Filter Menus. Click on the
next to the Opacity Mixer entry located
directly beneath the feature that you
wish to blend differently. This will display
the Opacity Mixer dialog.
Within the Opacity Mixer Dialog you
can adjust the opacity and channels
that the current enhancement will
affect, and you can blend the enhancement in different ways with the effects
from the previous steps.
CHANNELS
Start by selecting the Channels you
wish to apply the current enhancement to. The available options are All,
Luminance and Chrominance, and RGB.
button
61
Chapter 10 The Edit List
Page 68

62
All
Selecting this from the Channels
pull-down Menu applies the current
Chapter 10 The Edit List
enhancement to all of the channels of
the image.
When this option is selected in the
Channels pull-down Menu, you are
provided with an Opacity slider to alter
the effect of the enhancement.
Opacity
Use this slider to control the entire
opacity of the current effect. Move the
slider to the left to reduce the opacity
of the effect if the effect is too strong
for your taste.
Luminance and Chrominance
The Luminance and Chrominance option
enables you to control the amount
of the current effect on either the
Luminance (lightness) or Chrominance
(color) portions of your image.
When this option is set within the
Channels pull-down Menu, you are
provided with two sliders:
Opacity (Luminance Channel)
Use this slider to control the amount
of the current effect on the Luminance
portion of the image. Move this slider
to the left to reduce the amount of the
current effect on the luminance aspect
of the image. This can be done to
ensure that the current enhancement is
being applied only to the color aspects
of the image.
Opacity (Chrominance Channel)
Use this slider to control the amount of
the current effect on the Chrominance
portion of the image. Move this slider
to the left to reduce the amount of
the current effect on the chrominance
aspect of the image. Reduce this slider
to 0% to apply the current enhancement to the Luminance portions of the
image so that no effect on the color is
being made.
RGB
Selecting this option from the Channels
pull-down Menu provides you with the
ability to control the current enhancement’s effect on the Red, Green, and
Blue channels separately using individual sliders:
Opacity (Red Channel)
This slider controls the amount of the
current effect on the Red channel of
the image. You can move this slider to
the left to prevent the current effect
from being applied to the Red channel,
or you can reduce the other two sliders
to ensure the current effect is being
applied to the Red channel only.
Opacity (Green Channel)
This slider controls the amount of the
current effect on the Green channel
of the image. You can move this slider
to the left to prevent the current
effect from being applied to the Green
channel, or you can reduce the other
two sliders to ensure the current effect is
being applied to the Green channel only.
Page 69

Opacity (Blue Channel)
This slider controls the amount of the
current effect on the Blue channel of
the image. You can move this slider to
the left to prevent the current effect
from being applied to the Blue channel,
or you can reduce the other two sliders
to ensure the current effect is being
applied to the Blue channel only.
BLENDING MODE
You can also select different blending
modes from the Blending Mode pulldown Menu that are available for all of
the different Channels options.
Blending Mode Result
The Normal blending mode is the default blending mode for applying
Normal
Lighten
Screen
Overlay
Multiply
Darken
enhancements. When all channels for the enhancement are applied at
100%, the result is considered a normal enhancement.
The Lighten blending mode is achieved by applying the effects of the
Lighten enhancement only if those elements are lighter than the corresponding area in the original image. That is, only areas that are brighter
due to the enhancement will be applied to the image.
The Screen blending mode is achieved by increasing the pixel values of the
resulting image with the pixel values of original image. The resulting image is
always brighter than the original image prior to the enhancement.
The Overlay blending mode is achieved by either adding or subtracting the
pixel values of the resulting image from the original image. Capture NX
determines whether to add or subtract based on the value of the resulting
image. Values above 128 make the final image brighter in the corresponding area; values below 128 make the final image darker in the corresponding area, while the value of 128 does not change the final image.
The Multiply blending mode is achieved by subtracting the pixel values of
the resulting image from the pixel values of the original image. The resulting image is always darker than the original image prior to the enhancement.
The Darken blending mode is achieved by applying the effects of the
Darken enhancement only if those elements are darker than the corresponding area in the original image. That is, only areas that are darker due
to the enhancement will be applied to the image.
63
Chapter 10 The Edit List
The Blending Mode determines how the
image created by the current enhancement blends with the image prior to that
enhancement. Using blending modes
provides you with an advanced way
of applying the current enhancement
to your image. The different blending
modes available are Normal, Lighten,
Page 70

64
Screen, Overlay, Multiply, and Darken.
Once you have selected the channel,
the Blending Mode, and Opacity, click
Chapter 10 The Edit List
OK to accept the Opacity Mixer’s effect.
Click Cancel to prevent the Opacity
Mixer from affecting the image.
If you would like to remove the Opacity
Mixer’s effect from the enhancement
at any time, simply uncheck the Apply
Checkbox next to the Opacity Mixer for
that enhancement.
Selection Notification Area
The Selection Notification Area is
displayed in all Enhancement steps, that
is, all non-Base Adjustment Steps. This
area indicates whether the current step
is being applied to the entire image, as
indicated with the All Selected message,
or only to selected areas of the image,
as indicated by one of the other selection messages. If the message Partially
Selected is displayed, the current step
has been selectively applied using one
of the selection tools. If the message
Nothing Selected is displayed, the
current step is not affecting the image
at all.
Feather Control
The Feather Control option is presented
whenever a selection has been made
on the image. This feature enables you
to soften the edges of selections that
have already been made using one of
the selection tools. By softening the
edges of the selection, you can reduce
any visible artifacts created during the
selection process.
To use the Feather Control feature,
click on the
Feather Control within the Selection
Notification area. This will display the
Feather Control dialog and enable you
to modify the amount of feather to
apply to the current step’s selections.
Increase the Feather Amount slider until
the desired result is achieved. The higher
the setting within the Feather Amount
slider the more gradual the transitions
will be from the areas in the current step
to other areas in the image.
Click on the OK button to accept the
Feather Control’s effect, or click on the
Cancel button to remove the effect.
button next to
You can at any point view where the
current step is being applied to the
image by selecting the Show Selection
option from the View Menu.
At any point after selecting OK, you can
remove the Feather Control effect by
unchecking the Apply Checkbox next
to Feather Control within the Selection
Notification Area.
Page 71
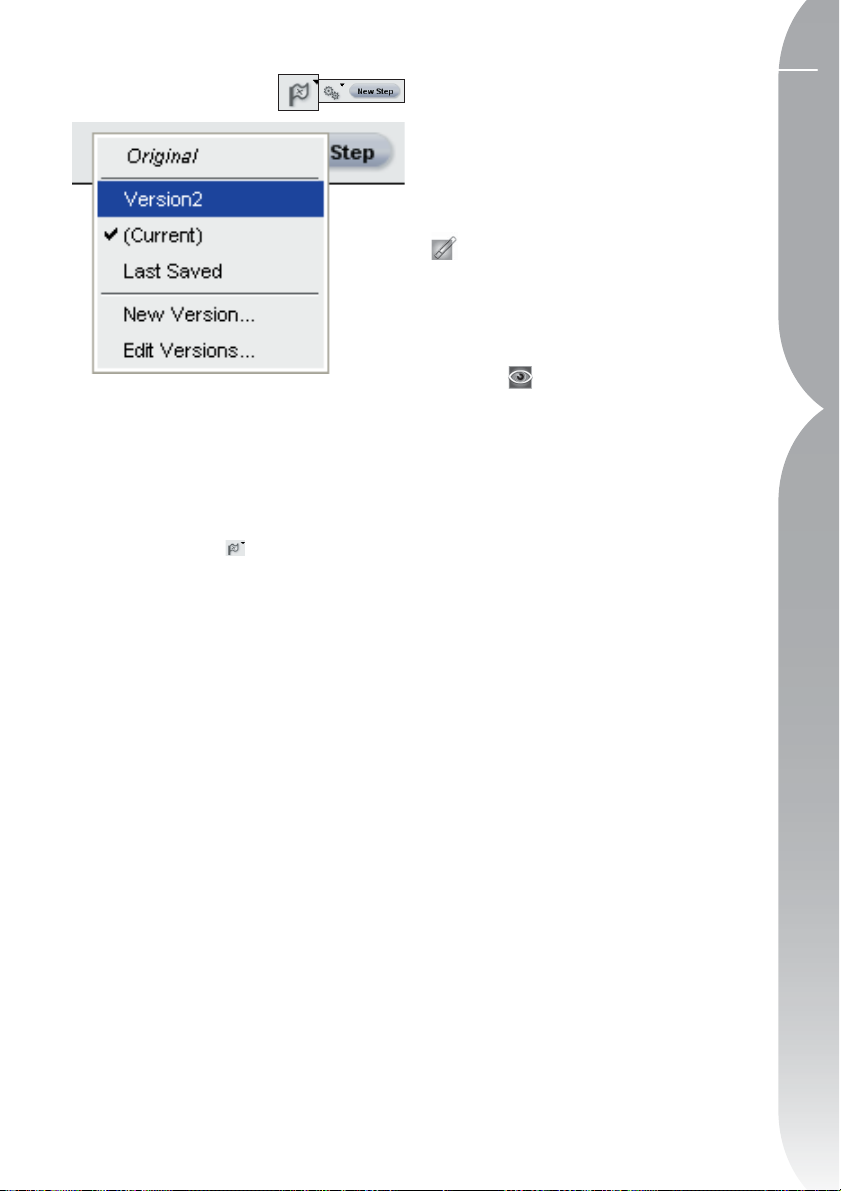
Versions Menu
Versions represent an advanced way
of working with and maintaining a
number of different versions of the
same image within one image file. Two
different types of versions are available,
and access to these versions is provided
by clicking on the
Edit List.
Automatically Generated
Versions
The first type of versions are created
automatically. Capture NX will create
three different automatic versions that
provide you with control over reviewing
different states of the current image.
ORIGINAL
This version is always present within the
Versions Palette for all open images.
The Original version provides you with a
quick way of reverting your image to its
original state prior to any changes that
were made within Capture NX. With
NEF files, the original version will revert
to the original file prior to any adjustments made within previous Capture
NX, Capture, or PictureProject sessions.
button within the
LAST SAVED
This version becomes available within
the Versions Palette as soon as the
image is saved. This version provides
you with the ability to revert to the last
saved step within the versions.
Please note: Selecting this option
from the Versions Palette will retain all
of the changes made since the last save,
while selecting Revert from the File Menu
will remove all changes made since the
last save.
more information on the Revert feature.
Please see page 116 for
(CURRENT)
This version is temporarily available
whenever changes have been made after
a save and you switch to a different
version. This version makes it possible
to switch to any other state and then
return to where you left off. It also
enables you to toggle quickly from
one state to another, returning to your
current position to review the difference.
Manually Generated Versions
Capture NX also enables you to create
versions manually. These manually generated versions save the current state of the
Edit List, including all changes made, so
that you can create more than one version
of the same image within the same file.
Due to the non-destructive nature of
Capture NX, you are able to create an
unlimited number of versions, to switch
from one version to the next, and to save
those versions for future use, all without
destroying the relationship between pixels.
65
Chapter 10 The Edit List
Page 72

66
NEW VERSION . . .
Chapter 10 The Edit List
To create a version, click on the button
and select New Version from the pop-up
Menu. Enter a name for the new version,
and then click OK. The new version will be
available within the Versions Menu and will
represent the state of the current edit list of
the current image.
EDIT VERSIONS
You can also edit the available versions
which enables you to rename or delete
the versions from the current list.
Simply select the Edit Versions options
from the Versions pop-up Menu to view
the Edit Versions dialog.
Highlight the version you would like to
alter, and then select either the Rename
or Delete button.
. . .
series of enhancements. This is especially
helpful if you would like to start a new
step to quickly paint in a selection with
one of the selection tools.
Please note: Capture NX will
automatically create new steps for you;
however, the New Step Button can be
useful in certain situations.
Working with Enhancements
The Edit List provides you with many
ways of working with enhancements.
Within the Edit List you can edit, delete,
copy, paste, link, or swap enhancements.
Editing Steps and
Enhancements
To Edit a Step or Enhancement, first
expand the desired step by clicking on
the
button next to the step.
Batch Menu
The Batch Menu within the Edit List
provides you with a duplication of the
controls found within the main Batch
Menu.
a full description on how to use Batch
functionality within Capture NX.
Please refer to page 181 for
New Step Button
Clicking on the New Step Button will
create a new, empty Enhancement step
within the Edit List. Click on this button
if you want to manually generate a new
step within the Edit List to start a new
Page 73

This will display the contents of that
step, including the enhancements that
were applied within the step. Either
double-click on the enhancement or
click on the
enhancement that you want to modify.
All steps and enhancements that have
been applied after the one that you are
modifying will be temporarily disabled,
and Capture NX will display either the
controls for the enhancement that you
are modifying, or that enhancement’s
dialog window.
Simply modify the enhancement in
the same manner that you added the
enhancement previously. You can then
reapply all of the steps and enhancements that were added after the
enhancement that you just modified by
clicking on the Apply Checkbox for the
last step that you want to reapply.
button next to the
Deleting Steps and
Enhancements
If at any time you would like to
completely remove an entire step or
any enhancements within a step, simply
click on that step or enhancement to
highlight it. Then select Delete from the
Edit Menu or press the Delete key on
your keyboard. Your image will then be
updated to reflect this change.
Copying and Pasting Steps
and Enhancements
Entire Steps and Enhancements can be
copied from one image and then pasted
to another, or they may even be pasted
again within the same image. You must
first select and copy the desired step or
enhancement to the clipboard.
To do this, first click and highlight the step
or enhancement that you wish to copy.
Hint: To copy more than one step
at a time, hold the Control (Windows)
or Command (Mac OS) and click to
highlight multiple steps or enhancements. You may also select a range
of steps or enhancements by clicking
on the first step or enhancement in
the range that you want to copy, and
then while holding the Shift key down,
selecting the last step or enhancement
in the range that you want to copy.
Once that step or enhancement has been
highlighted, select the Copy Settings
option from the Batch Menu (either the
Batch Menu from the main window, or
the Batch Menu within the Edit List).
You are now ready to paste the step or
enhancement. Unless you are applying
the copied step or enhancement to the
current image, navigate to the image
that you want to paste the enhancement to and select Paste Settings from
67
Chapter 10 The Edit List
Page 74

68
the Batch Menu (either the Batch
Menu from the main window or the
Batch Menu within the Edit List).
Chapter 10 The Edit List
The copied step or enhancement will be
placed after any current enhancements
in the Edit List have been applied.
You may also copy and paste the Base
Adjustments step. Due to the unique
nature of the Base Adjustments step,
any single image cannot have more
than one Base Adjustments step, nor
can it have more than one of any of the
adjustments located within the Base
Adjustments step. When you copy and
paste the Base Adjustments step, the
contents of Base Adjustments step that
already resides within the target image
will be replaced by the contents of
the Base Adjustments from the source
image. To prevent the entire Base
Adjustments step from being overwritten, select the individual enhancements
from within the Base Adjustments step
to copy and paste.
Please note: You may link any
number of enhancements together within
the same step, but please note that the
greater the number of enhancements
that are applied within the same step, the
slower Capture NX may be in displaying
the results of any adjustments.
Step 1. Apply an enhancement to your image.
Step 2. Holding the shift key down, navigate to the Adjust
or Filter menu from the Menu Bar and select the enhancement you want to link to the current step.
Linking Enhancements
Linking enhancements within the Edit
List enables you to apply the selective
controls that are used within one step
to more than one enhancement. By
default, each enhancement is applied to
a separate step. By linking two or more
enhancements together in the same
step, each of those enhancements can
benefit from the same selective controls
that were applied to that step.
To link enhancements, simply hold down
the Shift key while selecting another
enhancement from the main Menus.
Step 3. The new enhancement will be linked to the current
step, providing you with two separate enhancements within
the same step.
Page 75

Swapping Enhancements
Any of the enhancements from the
Adjust and Filter Menus may be
swapped or substituted for any of the
other items located within the Adjust or
Filter Menu at any time.
To swap an enhancement that has already
been applied for another enhancement,
click on the Adjust and Filter pull-down
Menu. The current enhancement will be
displayed at the top, and contents of
both the Adjust and Filter Menus will be
displayed beneath the current enhancement. Select another enhancement from
the Menu and the current enhancement
will be replaced with the new enhancement.
This is especially useful if you have
made a selection, applied an enhancement to a step, and then you want to
see how a different enhancement will
affect the image within the area identified by your selection.
Step 1. Click on the Adjust & Filter pull-down menu for the
enhancement that you want to swap.
Step 2. Select the new enhancement that you want to
apply from the list of enhancements provided to you.
Step 3. The new enhancement that you have selected will
now be displayed in the Edit List.
69
Chapter 10 The Edit List
For example, after selecting the sky in
an image and selecting the Levels &
Curves adjustment, you may want to
switch the Levels & Curves adjustment
for the Color Balance feature. This
saves you time by allowing you to reuse
a selection even if the enhancement did
not produce the desired result.
Page 76

70
Page 77

Toolbar F2 - View Tools
These tools enable you to control and change the view of your images. This
Toolbar can be viewed and hidden quickly by using the shortcut ‘F2’.
The following object types can be
selected:
• Control Points
• Images in the Browser
• Steps in the Edit List
71
Chapter 11 Toolbar F2 - View Tools
Direct Select Tool
The Direct Select Tool enables you to
select many of the different objects
within Capture NX.
• Multiple objects can be selected by
holding down the Ctrl (Windows) or
Command (Mac) key when selecting
additional objects.
• A range of objects can be selected
by clicking on the first object of the
desired range and then holding down
the Shift key and clicking on the last
object of the desired range.
• Control Points can be selected by
clicking and drawing a bounding box
within an image window, enabling you
to select all Control Points that appear
within that bounding box.
Please note: Only one type of
object can be selected at a time.
Shortcut : A key
Hand Tool
The Hand Tool enables you to move
within an image or Browser window.
Select this tool when viewing an image
or Browser window that contains more
information than is displayed within
the current window. Click and drag to
reposition the contents of the window.
Double-click on this tool in order
to zoom the current image so that the
entire image fits into the space available.
Shortcut : H key
Te mporarily switch to the Hand Tool
when any other tool is active by pressing the Spacebar.
Page 78

72
Zoom Tool
The Zoom Tool enables you to zoom
into and out of an image or Browser
Chapter 11 Toolbar F2 - View Tools
window. Select this tool and click on
the image to zoom into the image. Hold
the Alt (Windows) or Option (Mac OS)
key and click to zoom out.
Double-click on the icon in order
to zoom the current image to 100%.
Shortcut : Z key
Zoom-in when any other tool is
active:
Ctrl + Spacebar keys (Windows)
Command + Spacebar keys (Mac OS)
Zoom-out when any other tool is
active:
Ctrl + Alt + Spacebar keys (Windows)
Command + Option + Spacebar keys
(Mac OS)
Page 79

737475
Page 80

Page 81

Toolbar F3 - Edit
This Toolbar contains tools that can be used to do very coarse adjustments to your
images. This Toolbar can be viewed or hidden quickly by using the shortcut ‘F3’.
Multiple images can be rotated simultaneously by selecting multiple images in the
Browser and then clicking on this button.
Rotating an image will cause a step to
be created within the Edit List, enabling
you to remove the rotation at any point
Rotate
The Rotate Tool enables you to rotate
your image 90 degrees clockwise or
counter-clockwise. Click on this button
to rotate your image 90 degrees clockwise. Hold the Alt (Windows) or Option
(Mac OS) key down and click on this
button to rotate your image 90 degrees
counter-clockwise. To reverse the direction from rotating 90 degrees clockwise
to rotating 90 degrees counter-clockwise, click and hold on this icon to
change the rotational direction.
in the future. When you save your
image as a NEF file format, you can
remove the rotation after the image has
been saved and closed.
Shortcut:
Rotate the image 90 degrees to the
right:
Ctrl + R (Windows)
Command + R (Mac OS)
Rotate the image 90 degrees to the
left:
Ctrl + Shift + R (Windows)
Command + Shift + R (Mac OS)
Chapter 12 Toolbar F3 - Edit
Straighten
Select this button to have the
Straighten dialog appear. Within the
Straighten dialog, you can rotate an
image incrementally clockwise or
counter-clockwise, or you can trace a
line that should be either horizontal or
Page 82

76
vertical and allow the Straighten Tool
to automatically straighten your image.
The Straighten Tool is not accessible
Chapter 12 Toolbar F3 - Edit
while working within the Browser.
Once the Straighten dialog appears,
you can identify a reference line in the
image by tracing a horizontal line or a
vertical line in the image, or you can
enter a numerical rotation amount,
which will straighten the image by
degrees. To trace a horizontal or a
vertical line, simply click anywhere on
your image and drag as long as the
Straighten dialog remains visible. You
will be provided with one anchor at
the point at which you begin to trace
the line and a second where you finish
those numbers into the Straighten
dialog. Positive numbers will rotate
the image clockwise, while negative
numbers will cause the image to rotate
counter-clockwise.
Within the Straighten dialog, you can
select whether or not to display the full
image data. By default, Capture NX
will automatically crop the image using
the same aspect ratio to hide all areas
of the image where there is no image
information. These areas that lack image
information are created when the image
is rotated, and are represented by pure
white pixels. Check this box in order to
show all areas without image data.
Straightening an image will cause a step
to be added to the Edit List, enabling
you to remove or alter the straighten
effect at any point in the future. If you
save the file as an NEF file, you can
remove or alter the straighten effect
at any point, even after the image has
been saved and closed.
tracing the line. You can further refine
the rotation amount by clicking on
either anchor point to re-adjust the
trace. Alternatively, if you know how
many degrees to rotate, simply enter
Page 83

Crop
The Crop Tool enables you to remove
areas from the margins of your image or
to change the aspect ratio of your image.
The Crop Tool is not accessible while
working within the Browser.
After selecting this tool, draw a
rectangle by clicking on one corner
and dragging across your image. This
rectangle represents the area of the
image that will be kept after cropping
your image. To adjust that area, click on
any of the eight anchor points and drag
the rectangle to fit the area you wish
to save. To remove the area outside the
rectangle, double-click anywhere inside
the rectangle or press Enter. To cancel
the crop, click once outside of the crop,
or click the Esc key.
Cropping an image will cause a step
to be added to the Edit List, enabling
you to remove the cropping effect at
any point in the future. When saving as
a NEF file format, you can remove the
cropping effect at any point, even after
the image has been saved and closed.
Crop Options Dialog
At any point in the editing process
you can bring up the Crop Options to
change how the Crop Tool performs. To
bring up the Crop options, double-click
on the
Control (Mac OS) click anywhere within
the image after selecting the Crop Tool.
CROP METHOD
Free Crop
This crop method enables you to freely
draw a cropping rectangle.
Fixed Aspect Ratio
This method enables you to select
from one of the predetermined Aspect
Ratios or a custom ratio in order to limit
the crop tool according to ratio you
selected.
icon or right (Windows) or
77
Chapter 12 Toolbar F3 - Edit
Shortcut : C key
Page 84

78
Show Crop Grid
Chapter 12 Toolbar F3 - Edit
By checking the Show Crop Grid
Checkbox, a grid of nine equally-sized
rectangles will be superimposed over
the image within the crop rectangle.
The Crop Grid is designed to assist you
in cropping the image.
You can also choose to temporarily
superimpose this grid onto your image
by holding down the Alt key (Windows)
or the Option key (Mac OS) while you
are in the crop mode. Based on the
photographic “rule of thirds,” the Crop
Grid helps guide your cropping so that
the main points of interest lie close to
the points where the four lines intersect. It also draws your attention to the
natural horizontal or vertical lines in
the image, such as a horizon or a large
building, which often benefit from
being placed close to one of the four
lines.
Page 85

79
Page 86

80
80
Chapter 13
Page 87

Toolbar F4 – Black, White, and Neutral Control Points
This Toolbar contains the Black, White, and Neutral Control Points, which provide
a new and exciting way of correcting the tonal range and color of your images.
All three of these Control Points enable you to identify and control the tonal value
and color of the image and provide you the ability to adjust, move, and remove
their effects at any point in the future. This Toolbar can be quickly viewed and
hidden by using the shortcut ‘F4’.
image and are used to set one end
of the dynamic range of the image.
The Double-Threshold function within
the Photo Info’s Histogram section is
designed specifically to help you locate
the darkest and lightest sections of
Black Control Point
The Black Control Point enables you to
place a Control Point directly on your
image, and to cause that targeted color
to not only become black, but also to
neutralize the dark tones of your image.
The Black Control Point is not accessible
while working within the Browser.
your image.
more information on how to use the
Double-Threshold function. A Black
Control Point is often used in conjunction with a White Control Point.
Please see page 100 for
81
81
Chapter 13 Toolbar F4 – Black, White, and Neutral Control Points
Chapter 13 Toolbar F4 – Black, White, and Neutral Control Points
Black points are normally set on what
should be the darkest point of the
Black Point
Handle
For additional information regarding the Black Control Point, please see
page 163.
Page 88

82
White Control Point
The White Control Point enables you
to place a Control Point directly onto
Chapter 13 Toolbar F4 – Black, White, and Neutral Control Points
your image, causing the targeted color
to become white, which is the first step
in removing a color cast from the light
tones in your image. The White Control
Point is not accessible while working
within the Browser.
White points are normally set on what
should be the lightest point of the
image and are used to establish one
end of the dynamic range of the image.
The Double-Threshold function within
the Photo Info’s Histogram section is
designed specifically to help you locate
the darkest and the lightest sections of
your image.
more information on how to use the
Double-Threshold function. A White
Control Point is often used in conjunction with a Black Control Point.
For additional information regarding
White Control Points, please see page
165.
Please see page 100 for
Neutral Control Point
Neutral Control Points enable you to
correct a color cast in your photograph
by forcing the targeted color to become
a defined color or to become neutral.
The Neutral Control Point is not accessible while working within the Browser.
In its default operation, the Neutral
Control Point will change the color
values in the targeted color so that the
red, green, and blue values for that
color are equal. By equalizing the red,
green, and blue values for a specific
color, that color becomes neutral, or
lacks saturation. Desaturating can be
helpful if the image contains a neutral
point of reference, a gray card, for
example. By selecting an object that
is established as neutral, Capture NX
is able to calculate the difference
between that object and the color
that is currently representing that
object. The Neutral Control Point will
remove the difference in color from
the targeted object, as well as from
the entire image. This results in a color
change that affects the entire image.
Page 89

Please note: In its default state, the
Neutral Control Point will not affect the
luminosity of your image; it will only
affect the relationship of colors in your
image.
For additional information regarding
the functionality of a Neutral Control
Point, please see page 167.
83
Chapter 13 Toolbar F4 – Black, White, and Neutral Control Points
Page 90

84
Page 91

85
Toolbar F5 – U Point technology-based Tools
This Toolbar contains U Point technology-based tools that enable you to quickly
enhance colors and details in your image. This Toolbar can be viewed and hidden
easily by using the shortcut ‘F5’.
Color Control Point
The Color Control Point represents a
unique way of adjusting the color and
light in an image. Each Color Control Point
enables you to perform advanced color
changes in a selective fashion without the
need to create selections or masks. The
Color Control Point is not accessible while
working within the Browser.
Each Color Control Point that is placed
on an object in your image identifies
the characteristics of the color as well
as the level of detail of that object,
enabling you to make adjustments to
the color of that object. With the use of
the size slider, you are able to increase
the reach or scale of the current
Control Point so that it affects similar
colors of objects which are farther away
from the Color Control Point. Each new
Control Point works together with the
other Control Points to affect more and
more specific objects. Using additional
Control Points ensures that the adjustments that you make are being applied
to the current object only. Placing a
Control Point on an object with default
Chapter 14 Toolbar F5 – U Point technology-based Tools
Page 92
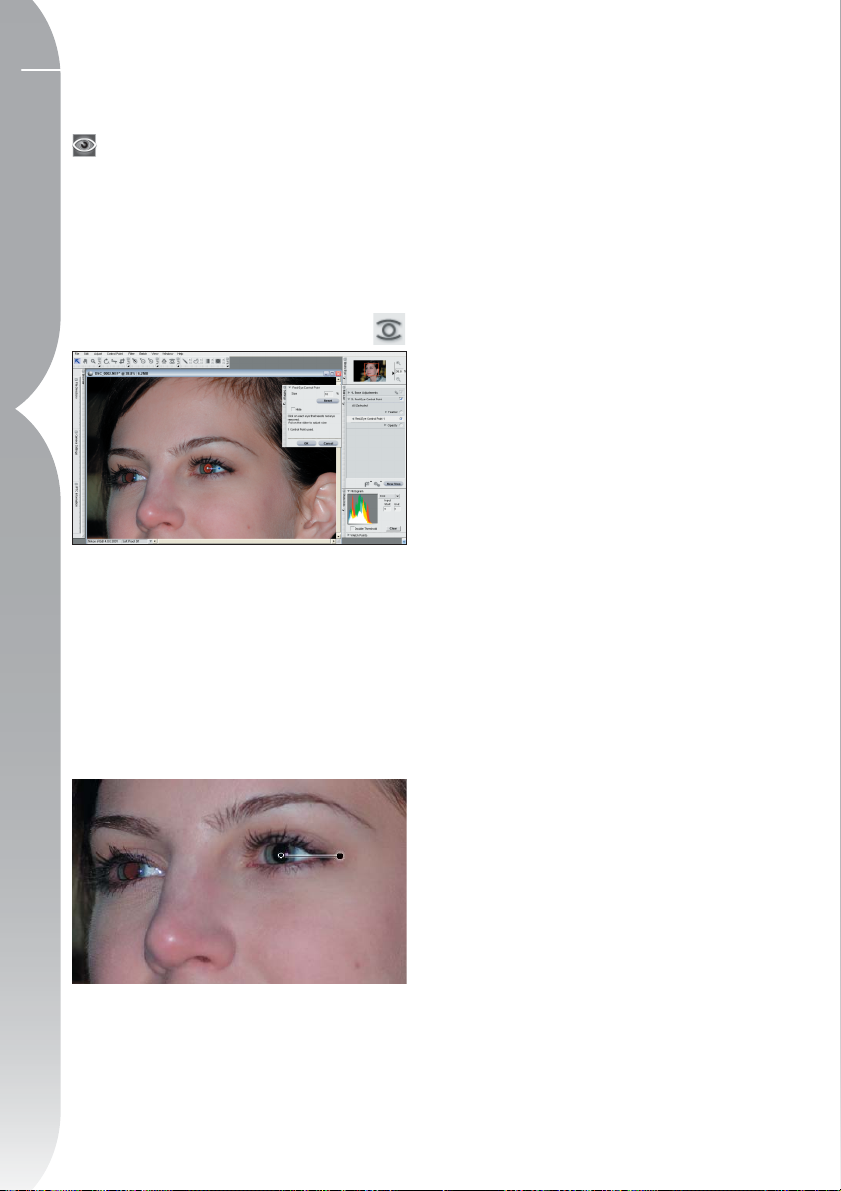
86
settings prevents other Control Points
from affecting that object.
For a complete description on the
Chapter 14 Toolbar F5 – U Point technology-based Tools
functionality of the Color Control Point,
please see page 161.
Shortcut:
Ctrl + Shift + A (Windows)
Command + Shift + A (Mac OS)
Red-Eye Control Point
The Red-Eye Control Point enables you
to manually remove the red-eye effect
sometimes caused by flash photography. Simply select the Red-Eye Control
Point and place it on an eye that has
red-eye. The Red-Eye Control Point is
not accessible while working within the
Browser.
Control the Red-Eye Control Point’s
effect by increasing or decreasing the
Size slider.
The Hide option completely removes
the effect of the Red-Eye Control Point
temporarily, enabling you to see the
before and after effect of the Color
Control Point on your image. You can
quickly access the Hide option on the
Red-Eye Control Point by right-clicking
(Windows) or control-clicking (Mac OS)
and selecting Hide.
Page 93

878889
Page 94

Page 95

Toolbar F6 - Selection Tools
This Toolbar contains various selection tools that can be used to selectively apply
any of the enhancements available within Capture NX. This Toolbar can be viewed
and hidden easily by using the shortcut ‘F6’. These tools are not accessible while
working within the Browser.
you are painting. You can toggle to
this tool with the + key after selecting the Brush Tool from the Toolbar, or
you can temporarily toggle to this tool
Selection Brush
The Selection Brush enables you to
selectively paint in or paint out the
enhancements found in the current
step. The Selection Brush Tool is not
accessible while working within the
Browser.
Select the Selection Brush and then
select either the Plus Brush or the
Minus Brush options to control where
the enhancements in the current step
are applied.
by holding down the Alt (Windows) or
Option (Mac OS) key while the Minus
Brush is selected.
Original Image
Chapter 15 Toolbar F6 - Selection Tools
Selecting the Plus Brush enables you
to add the current step’s enhancements to the image. If the current step
has already been applied to the entire
image (as indicated within the Edit
List’s Selection Notification Area as
All Selected), selecting the Plus Brush
and then painting will immediately
remove the current step’s effect from
the image and apply it only to the area
Final image
Page 96

90
Chapter 15 Toolbar F6 - Selection Tools
Step 1. The Brightness / Contrast enhancement is
applied to the image and then using the Plus Brush, it
is painted only onto the flower.
Step 1. Selection
Step 2. Next, the Minus Brush is used to remove some
of the effect that was applied to the background.
Selecting the Minus Brush enables you
to remove the current step’s enhancements selectively. You can toggle to
this tool with the - key after selecting
the Brush Tool from the Toolbar, or
you can temporarily toggle to this tool
by holding down the Alt (Windows)
or Option (Mac OS) key while the Plus
Brush is selected.
Hint: You may also select this
tool prior to making any enhancements, that is, in a new Enhancement
Step that contains no other enhancements. The Colorize enhancement will
automatically become available and
you can paint in the Colorize enhancement on your image. By switching the
Colorize enhancement to any other
enhancement within the Edit List you
can first paint in where you want to
apply an enhancement. Then, using
the Adjust & Filter pull-down Menu,
you can select the enhancement that
you want to use instead of the Colorize
enhancement for the area you had just
indicated by painting. For more information on Swapping Enhancements
within the Edit List,
please see page
69.
Shortcut: B key
Step 2. Selection
Page 97

Brush Options Dialog
The Brush Options dialog can be
accessed either by double-clicking on
the
icon, or right (Windows) or
Control (Mac OS) clicking anywhere
in the image once the brush has been
selected.
SIZE
Changing this slider increases or
decreases the size of the brush.
Shortcut:
Decrease brush size: [
Increase brush size: ]
Increase this value and the brush will
either add more of the current step’s
enhancements to the image when using
the Plus Brush or it will remove more of
the current step’s enhancements from
the image when using the Minus Brush.
PRESSURE CONTROLS
This pull-down Menu enables you to control
the different brush elements using a pressuresensitive input device, such as a Pen Tablet.
Size – This option controls the size
of the brush when you are using a
pressure-sensitive input device.
Opacity – This option controls the
opacity of the brush when you are
using a pressure-sensitive input device.
Size + Opacity – This option controls
both the size and the opacity simultaneously when you are using a pressuresensitive input device.
None – This option ensures that
neither the Size nor the Opacity are
affected when using a pressure-sensitive input device.
91
Chapter 15 Toolbar F6 - Selection Tools
BRUSH HARDNESS
Changing this slider affects the shape
of the brush, ranging from a soft-edged
brush to a hard-edged brush.
Shortcut:
Decrease brush hardness: Shift + [
Increase brush hardness: Shift + ]
OPACITY
Changing this slider affects the opacity
of the brush strokes that are applied.
Page 98

92
Lasso & Marquee Tools
Lasso tool
Chapter 15 Toolbar F6 - Selection Tools
Polygon Lasso
The Lasso & Marquee tools enable you
to create a selection on your images
that will limit where an enhancement
affects your image. The selection
created by the Lasso & Marquee tools
can also limit where any of the other
selection tools are applied. The Lasso &
Marquee Tools are not accessible while
working within the Browser.
There are four Lasso & Marquee tools.
You can select among these four tools
by holding the mouse down on the
button in the Toolbar and selecting
from the tools that appear.
tool
Rectangle
Marquee tool
Oval
Marquee tool
Hold down the Alt (Windows) or Option
(Mac OS) key while drawing the selection to draw the selection from the
center instead of the corner.
The Oval Marquee Tool enables you to
draw a round selection.
Hold down the Shift key after you begin
drawing the selection to constrain the
selection to a circle.
Hold down the Alt (Windows) or Option
(Mac OS) key while drawing the selection to draw the selection from the
center instead of the corner.
After selecting which Lasso & Marquee
Tool to use, you can choose to make
the tool either a Plus or Minus Tool by
clicking on the
or icons. You
can temporarily switch to the opposite
tool by pressing the Alt (Windows) or
Option (Mac OS) key.
The Lasso Tool is the default tool and
enables you to freely draw a selection
on the image.
The Polygon Lasso Tool enables you to
draw a selection with straight edges by
connecting straight lines. Anchor points
are created at each of the connections,
and these anchor points can be moved
to alter the selection.
Please note: Any additional selections
made will remove these anchor points.
The Rectangle Marquee Tool enables
you to draw a square selection.
Hold down the Shift key after you begin
drawing the selection to constrain the
selection to a square.
Once you have made a selection using
one of the Lasso & Marquee tools, you
can use one of the other selection tools
to add or remove the current enhancement while limiting to the area created
by the Lasso & Marquee tool.
To completely deselect, double-click
anywhere within the image.
Shortcut: L key
Page 99

Lasso & Marquee
Options Dialog
The Lasso & Marquee Options can
be accessed either by double-clicking on the tool in the Toolbar, or right
(Windows) or Control (Mac OS) clicking
on the image after selecting one of the
Lasso & Marquee tools.
To apply a gradient, begin by clicking
and dragging a line on your image.
The spot at which you first click will
define the start of the gradient; the
spot at which you let go of the mouse
will define the end of the gradient. The
distance between the two spots will
define how quickly the gradient will
transition, and the difference in the
vertical and horizontal displacements
will define the angle.
Once the gradient has been drawn, you
can click and drag either of the two
end points to modify the gradient’s
effect.
93
Chapter 15 Toolbar F6 - Selection Tools
EDGE SOFTNESS
The Edge Softness option enables you
to soften the edge of the selection that
is being made by the Lasso & Marquee
tools.
Selection Gradient
The Selection Gradient Tool enables you
to gradually blend between applying
and removing the current step’s effect
on your image. The Selection Gradient
Tool is not accessible while working
within the Browser.
Begin by selecting either the Plus or
Minus Gradient with the
icon. You can temporarily switch to
the opposite tool by pressing the Alt
(Windows) or Option (Mac OS) key.
Using a Plus Gradient will add to any
previously applied selections, while
using a Minus Gradient will subtract
from any previously applied selections.
or
You can apply multiple gradients to an
image; however, as soon as you add
an additional gradient, the previous
gradient’s anchor points will no longer
be accessible.
Shortcut: G key
Gradient Options Dialog
The Gradient Options can be accessed
by either double-clicking on the
in the Toolbar, or right (Windows) or
Control (Mac OS) click anywhere on the
image after selecting the Gradient Tool.
GRADIENT RANGE
This slider enables you to preset the
value of the gradient. The values repre-
icon
Page 100

94
sent the percent of opacity, and allow
you to set the maximum, the minimum,
and the midpoint values of the gradi-
Chapter 15 Toolbar F6 - Selection Tools
ent. By moving the midpoint, you can
force transition of the gradient to shift
quickly on one side of the midpoint and
more gradually on the opposite side. To
reset this to default, simply remove any
values from these boxes.
Fill / Remove Tools
The Fill / Remove Tools enable you to
either fill or remove the current effect,
either in the entire image or an area
within a selection. The Fill / Remove
Tools are not accessible while working
within the Browser.
To fill the current step’s effect into the
image or selection, simply click on the
icon. To remove the current step’s
effect from the entire image or selection, click on the
icon.
and then clicking on either the Fill or
Remove buttons, the effect will not be
completely filled or cleared from the
image. This enables you to remove or
add the effect from the current step to
a lesser degree.
Fill / Remove Options Dialog
The Fill / Clear Options can be accessed
by double-clicking on the
Toolbar.
OPACITY
Changing the Opacity slider lets you
control whether or not the Fill or
Remove Tool will completely fill or
clear the effect from the current step.
When using a value lower than 100%
icon in the
 Loading...