

Page 1

Camera Control Pro Reference Manual
Overview
This section describes the structure of this manual, outlines Camera Control Pro’s
main functions, and gives the system requirements and installation instructions.
Using Camera Control Pro
This section describes how to use Camera Control Pro.
Appendices
This section lists preferences and describes how to uninstall the software.
Important Information on the Product Key
The product key may be found on the CD-ROM case. Do not lose this key. It is required
when installing or upgrading this software and can not be replaced if lost.
xxxxx–xxx–xxxx–xxxx–xxxx–xxxx
Product key
SB6E01(B1)
6MS522B1--
Page 2

Overview
Overview
Using Camera Control Pro Appendices
Introduction 3
About This Manual 6
System Requirements
Windows 7
Macintosh 8
Installing Camera Control Pro 9
Windows 10
Macintosh 15
Getting Started
Starting and Exiting Camera Control Pro 20
Getting Help 26
Software Updates 27
Click a page number to view.
Return to fi r s t page
2
Page 3

Overview
Using Camera Control Pro Appendices
Introduction 1/3
This man u al has been written to help you take advantage of the many features included
in Camera Control Pro. Be sure to read this manual thoroughly, and to keep it handy when
using Camera Control Pro.
Conventions
This manual assumes basic knowledge of cameras and Windows or Finder operations. Refer to the
documentation provided with your computer or camera for more information. Where the Windows
and Macintosh versions of the program use diff ering commands, the Windows menu name is listed
fi rst, followed by the Macintosh menu name in square brackets. Where multiple menu items or folders
are selected in sequence, the menu items are separated by a “>”.
Throughout this manual, Windows XP Professional and Windows XP Home Edition are referred to as
“Windows XP.” Windows 2000 Professional is referred to as “Windows 2000.” D1, D1X, and D1H cameras
are referred to as “D1-series cameras,” D2Xs, D2X, D2Hs, and D2H cameras as “D2-series cameras.”
Illustrations
This manual is for use with both Windows and Macintosh. While the majority of the illustrations
come from Windows XP, save where otherwise noted the operations described are the same in
other operating systems. Depending on the operating system used, the dialogs and menus may
diff er from slightly from those shown here. Some illustrations are composites.
Printing This Manual
To print this manual, select Print from the File menu in Adobe Reader. This manual is A5 size, allowing facing pages to be printed on a single sheet of A4 paper (to print facing pages, start printing
from an even-numbered page).
Installing/Uninstalling Camera Control Pro
Use an account with administrator privileges to install or uninstall Camera Control Pro under
Windows XP, Windows 2000, and Mac OS X.
Return to fi r s t page
3
Page 4

Overview
Using Camera Control Pro Appendices
Introduction 2/3
Camera Control Pro
Changes made to settings in the Camera Control Pro window only apply to pho to graphs taken after
the changes are made, not to photographs that have already been taken. Camera Control Pro can
not be used to modify existing photographs.
The controls in the Camera Control Pro window vary with the type of camera connected. More
information on camera settings may be found in the documentation provided with your camera.
Illustrations
Save where otherwise noted, the illustrations in this section show the dialogs displayed when the
D2Xs is connected.
Camera Control Pro for D100 Cameras (Macintosh)
Before using Camera Control Pro with a D100 digital camera under Mac OS X, confi rm that the
camera fi rmware is version 2.00 or later. Users of earlier versions will need to upgrade the camera
fi r m w a r e b e f o r e u s i n g C a mera Control Pro. Contact a Nikon-authorized service representative for
information on fi rmware upgrades.
Return to fi r s t page
4
Page 5

Overview
Customer Support
Using Camera Control Pro Appendices
Introduction 3/3
Customer Support
See
Customer Support for information on customer support.
Notices
• No part of the manuals included with this product may be reproduced, transmitted, transcribed,
stored in a retrieval system, or translated into any language in any form, by any means, without
Nikon’s prior written permission.
• Nikon reserves the right to change the specifi cations of the hardware and software described in
these manuals at any time and without prior notice.
• Nikon will not be held liable for any damages resulting from the use of this product.
• While every eff ort has been made to ensure that the information in these manuals is accurate and
complete, we would appreciate it were you to bring any errors or omissions to the attention of
the Nikon representative in your area (address provided separately).
Note
The copying or reproduction of copyrighted creative works such as books, music, paintings, woodcut prints, maps, drawings, movies, and photographs is governed by national and international
copyright laws. Do not use the camera for the purposes of making illegal copies or to infringe copyright laws. Do not use in venues where photography or recording is prohibited.
Trademark Information
Microsoft® and Windows® are registered trademarks of Microsoft Corporation. Adobe Reader and
Acrobat are registered trademarks of Adobe Systems, Inc. Pentium is a trademark of Intel Corporation. Macintosh®, Mac OS, and QuickTime are registered trademarks of Apple Computer, Inc. All
other trade names mentioned in this manual or the other documentation provided with your Nikon
product are trademarks or registered trademarks of their respective holders.
Return to fi r s t page
5
Page 6
Overview
“Edit
Camera Curves
“ dialog
Blue underlined text
Using Camera Control Pro Appendices
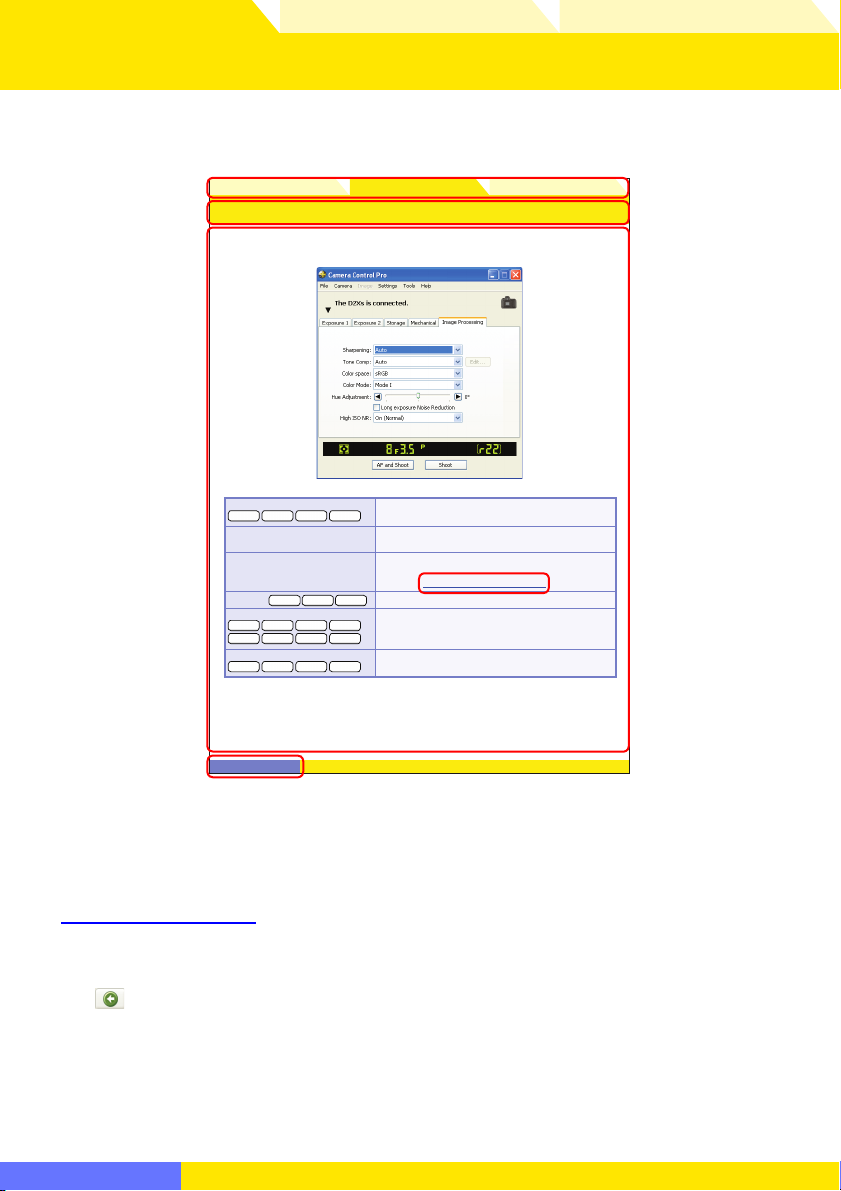
About This Manual
How to Use This Manual
The pages of this manual are structured as shown here:
Overview Appendices
Camera Controls 11/ 12
The Image Processing Tab
The following settings can be adjusted from the Image Pro cess ing tab :
Using Camera Control Pro
Image Optimize
D70sD200 D70
Sharpening
Tone Comp
D2X
Color space
Color Mode
D1X
D200 D50
Saturation
D200 D50D70D70s
Return to fi r st page
Click here to go to the beginning of each of the three chapters. The chapter you are
D2Xs
D1H D100
D2-series
D70s
D70
Choose the type of image optimization performed. See the
D50
cam era man u al for details.
Choose how much the camera sharp ens outlines. See the
camera manual for details.
Adjust contrast. See the cam era man u al for details. Selecting “Custom“ or “Custom 1–3 “ (D2Xs only) and clicking Edit
will display
“Edit
Choose a color space. See the cam era man u al for details.
D200
Choose a col or mode. See the camera manual for de tails.
With the D1, colors are op ti mized for the NTSC col or space,
regardless of the op tion chosen.
Adjust color saturation. See the camera manual for details.
Camera Curves
“ dialog.
56
currently viewing is displayed in a darker color.
Page title
Description
Blue underlined text indicates a link to another part of this manual or the World Wide
Web. Click the text to follow the link (note that a web browser and an Internet connection are required to link to the World Wide Web). To return to the previous topic, click
the button in Adobe Reader.
Click here to return to the fi rst page.
Return to fi r s t page
6
Page 7

Overview
www.europe-nikon.com/support
www.nikonusa.com
http://nikonimaging.com/
Using Camera Control Pro Appendices
System Requirements Windows
Before installing Camera Control Pro, be sure that your system meets the following requirements:
CPU 300 MHz Pentium or better recommended
OS Preinstalled versions of Windows XP Home Edition or Windows XP
Professional, Windows 2000 Professional
Hard-disk space 50 MB required for installation, with an additional 1 GB of free disk space
available when Camera Control Pro is running
RAM 256 MB (768 MB or more recommended)
Video resolution 800 × 600 pixels or more with 16-bit color (High Color/thousands of colors).
24-bit color (True Color/millions of colors) recommended.
Interface
Supported cameras D1-series, D2-series, D100, D200, D70S, D70, D50
Miscellaneous • CD-ROM drive required for installation
*
Connect the camera directly to the computer. The camera may not function as expected when
connected via a hub, extension cable, or keyboard.
†
See the website below for the latest information on boards that have been tested and approved
for use.
Check the support information at the website below for the latest on compatible cameras
and operating systems.
*
USB: Only built-in USB ports supported
IEEE 1394: OHCI-compliant IEEE 1394 interface board or card required
• Internet connection required for Nikon Message Center
†
Europe ,Africa:
Asia, Oceania, Middle East: www.nikon-asia.com
U.S. A.:
www.europe-nikon.com/support
www.nikon-asia.com
www.nikonusa.com
Additional information may be available from the Nikon representative in your area.
Visit
http://nikonimaging.com/ for contact information.
Return to fi r s t page
7
Page 8

Overview
www.europe-nikon.com/support
www.nikonusa.com
http://nikonimaging.com/
Using Camera Control Pro Appendices
System Requirements Macintosh
Before installing Camera Control Pro, be sure that your system meets the following requirements:
CPU PowerPC G3/G4/G5
OS Mac OS X version 10.3.9 or later
Hard-disk space 50 MB required for installation, with an additional 1 GB of free disk space
available when Camera Control Pro is running
RAM 256 MB (768 MB or more recommended)
Video resolution 800 × 600 pixels or more with 16-bit color (High Color/thousands of colors).
24-bit color (True Color/millions of colors) recommended.
Interface
Supported cameras D1-series, D2-series, D100, D200, D70S, D70, D50
Miscellaneous • CD-ROM drive required for installation
*
Operation not guaranteed on Intel-based Mac computers.
†
Connect the camera directly to the computer. The camera may not function as expected when
connected via a hub, extension cable, or keyboard.
†
USB: Only built-in USB ports supported
FireWire: Only built-in FireWire ports supported
• Internet connection required for Nikon Message Center
Check the support information at the website below for the latest on compatible cameras
and operating systems.
*
Europe ,Africa:
Asia, Oceania, Middle East: www.nikon-asia.com
U.S. A.:
www.europe-nikon.com/support
www.nikon-asia.com
www.nikonusa.com
Additional information may be available from the Nikon representative in your area.
Visit
http://nikonimaging.com/ for contact information.
Return to fi r s t page
8
Page 9

Overview
stem requirements
Using Camera Control Pro Appendices
Installing Camera Control Pro
Before installing Camera Control Pro:
• Confi rm that the computer satisfi es the sysy
• Exit any other applications that may be running, including anti-virus software.
Follow the links below to view installation instructions for your operating system:
Windows Macintosh
stem requirements for Camera Control Pro.
Existing Versions of Camera Control Pro
If an existing copy of Camera Control Pro is detected during installation, a notifi cation will be displayed. Follow the on-screen instructions.
Return to fi r s t page
9
Page 10
Overview
Uninstalling
Camera Control Pro
Using Camera Control Pro Appendices
Installing Camera Control Pro Windows 1/5
Use an account with administrator privileges when installing Camera Control Pro.
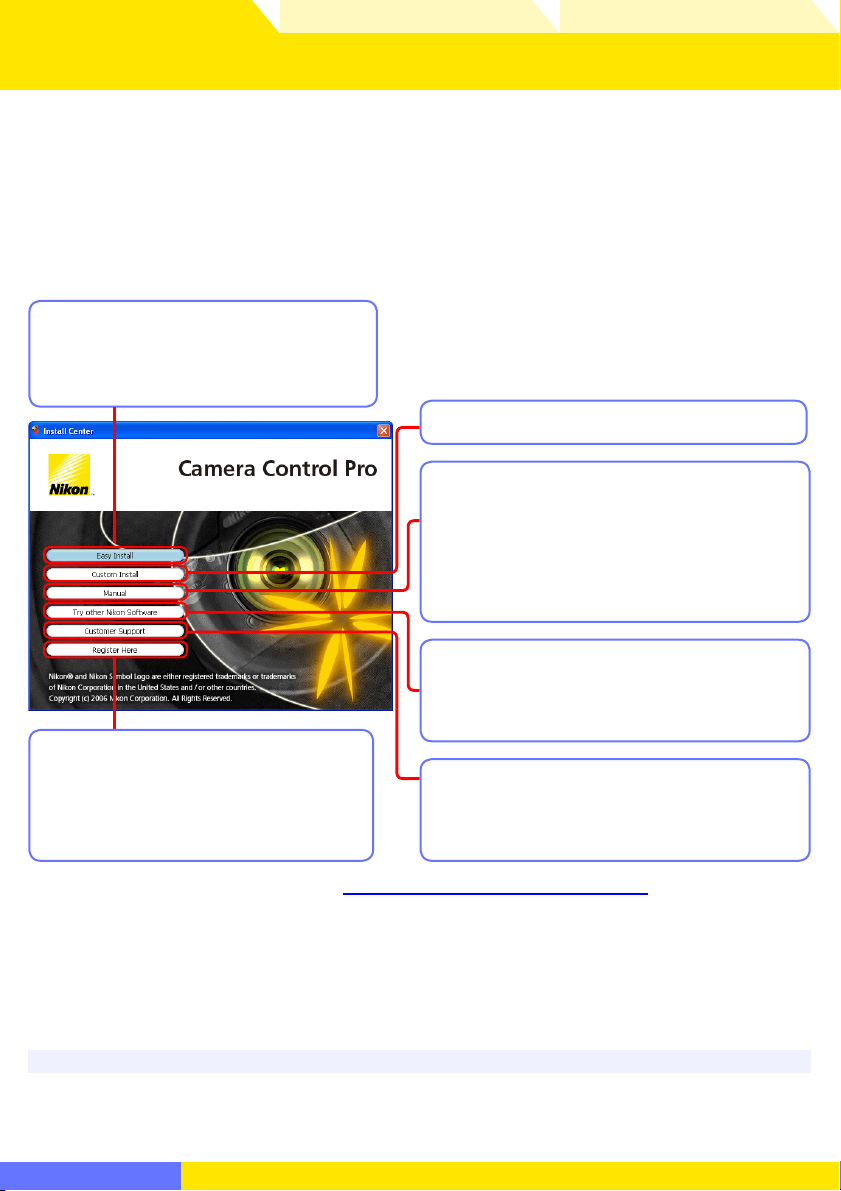
The “Install Center” window
Start the computer and insert the Camera Control Pro CD in a CD-ROM drive. The “Select
Region” dialog will be displayed; select a region and click Next. A language-selection dialog will be displayed; select a language and click Next to display the “Install Center” win-
dow.
Easy Install: Install the minimum
software needed to run Camera
Control Pro.
Custom Install: Install selected software.
Manual: Open the “Manuals” folder,
which contains software instruction manuals. Double-click INDEX.pdf to view a
region selection screen. This button is not
displayed in the trial version.
Try other Nikon Software: Download
trial versions of Nikon software (Internet
connection required).
Register Here: Register your Nikon
product on-line (Internet connection required). This button does not
appear in some regions.
To uninstall Camera Control Pro, see
If the “Select Region” dialog Is Not Displayed
To display the “Select Region” dialog, select My Computer from the Start menu (Windows XP) or
double-click the My Computer icon on the desktop (Windows 2000) and double-click the CD-ROM
(Camera Control Pro) icon in the My Computer window.
Uninstalling
Customer Support: View the ReadMe
fi l e o r v i s i t Nikon technical support websites (Internet connection required).
Camera Control Pro.
Return to fi r s t page
10
Page 11
Overview
Using Camera Control Pro Appendices
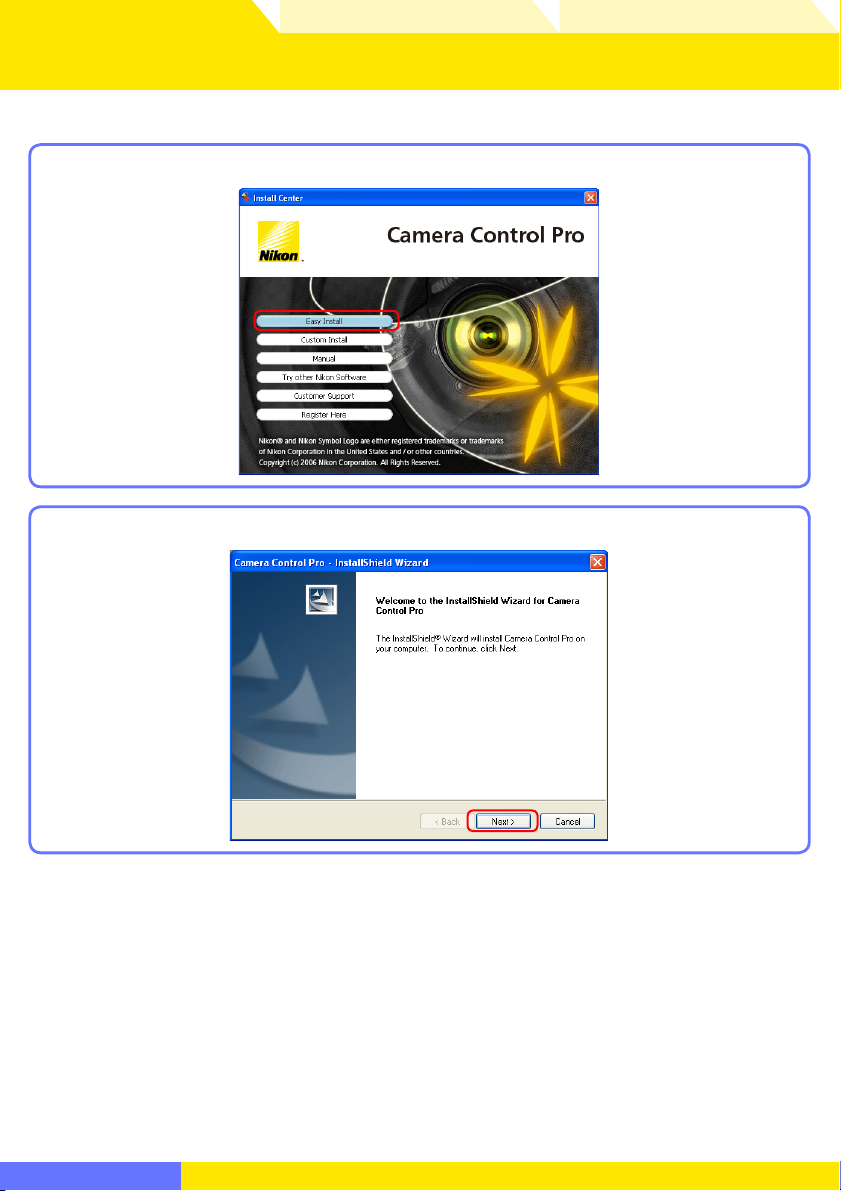
Installing Camera Control Pro Windows 2/5
Follow the steps below to install Camera Control Pro:
Click Easy Install.
1
Click Next.
2
Return to fi r s t page
11
Page 12
Overview
Using Camera Control Pro Appendices
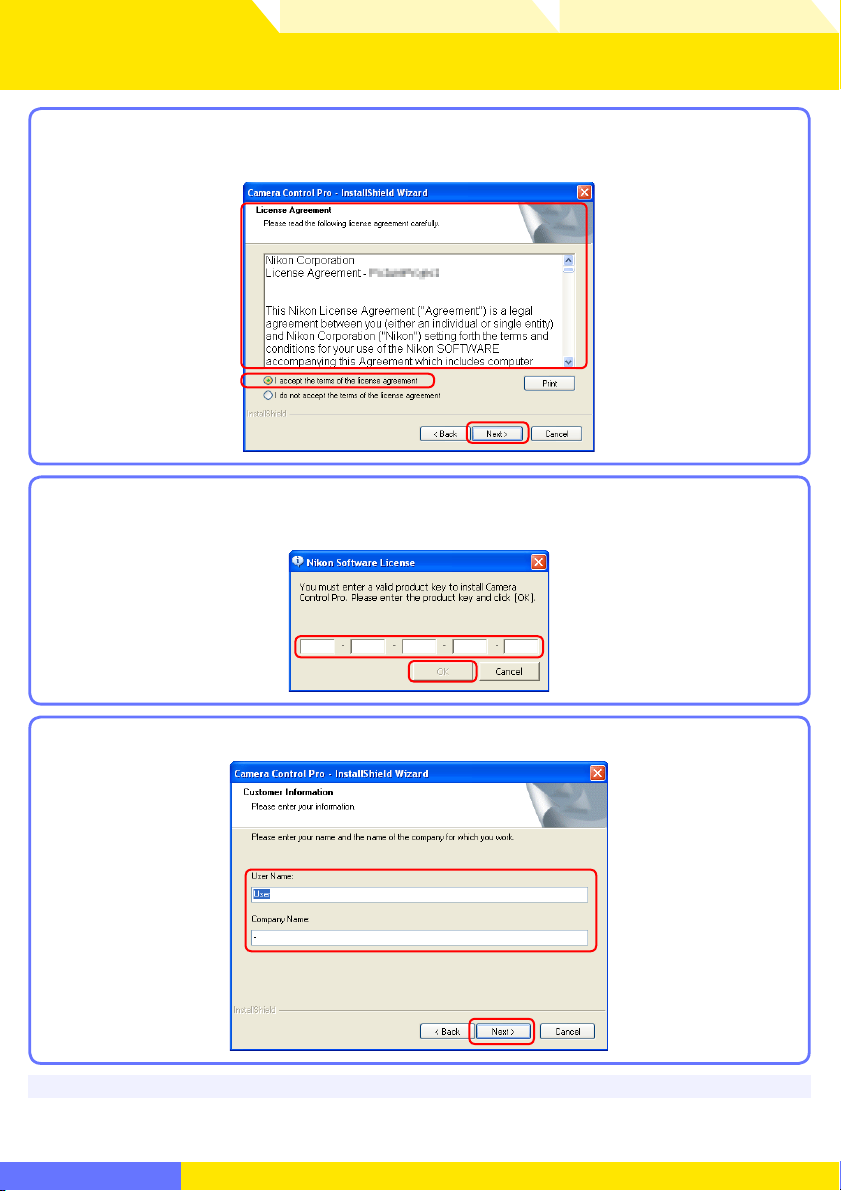
Installing Camera Control Pro Windows 3/5
After reading the license agreement (), select I accept the terms of the license
3
agreement () and click Next () to proceed with installation.
Enter the product key () found on the CD case and click OK (). The trial version
4
does not show this dialog.
Personalize your copy of Camera Control Pro () and click Next ().
5
Product Key
Do not lose this key. It is required when installing or upgrading this software and can not be replaced if lost.
Return to fi r s t page
12
Page 13
Overview
Using Camera Control Pro Appendices
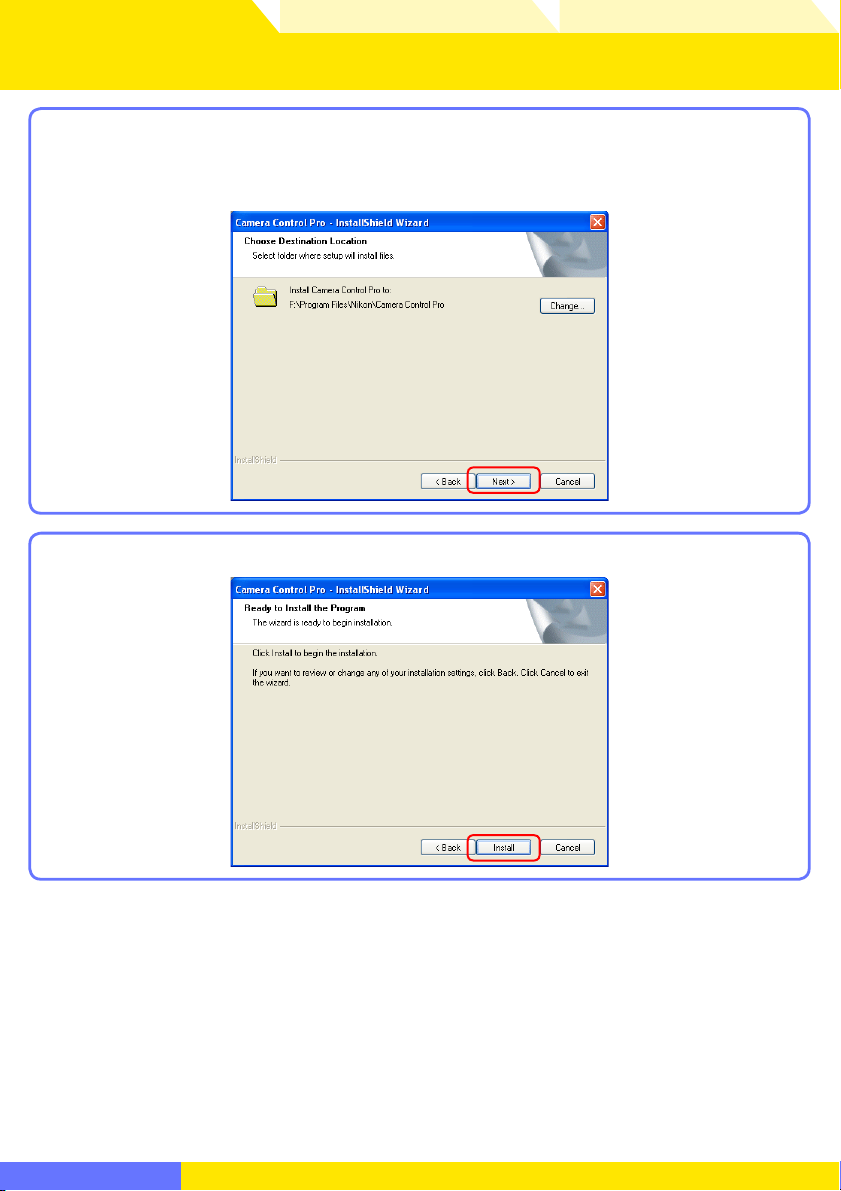
Installing Camera Control Pro Windows 4/5
The destination folder for Camera Control Pro will be displayed under “Install
6
Camera Control Pro to.” Click Next to install Camera Control Pro to this folder, or
click Change… to select another destination.
Click Install.
7
Return to fi r s t page
13
Page 14
Overview
Using Camera Control Pro Appendices
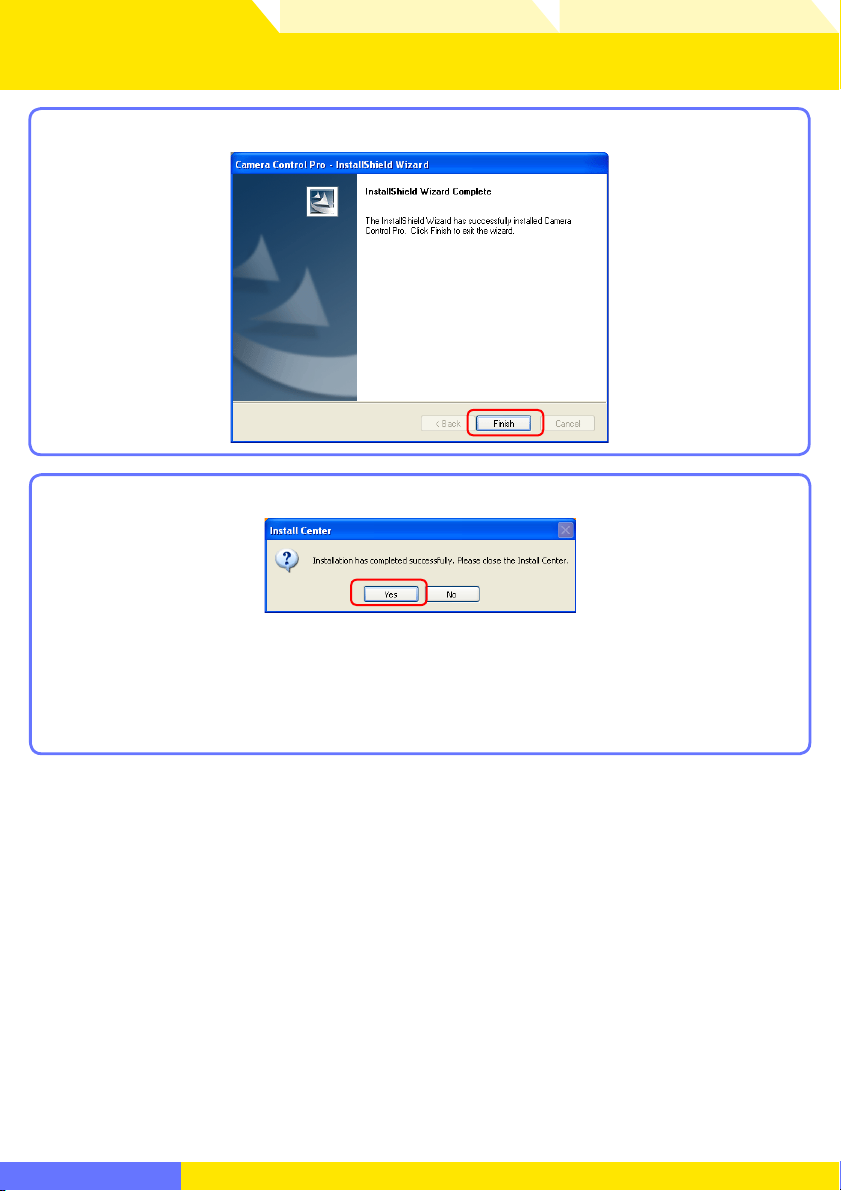
Installing Camera Control Pro Windows 5/5
Click Finish.
8
Click Ye s and remove the Camera Control Pro CD from the CD-ROM drive.
9
If a dialog is displayed directing you to restart the computer, follow the on-screen
instructions.
This completes installation of Camera Control Pro.
Return to fi r s t page
14
Page 15
Overview
Uninstalling
Camera Control Pro
Using Camera Control Pro Appendices
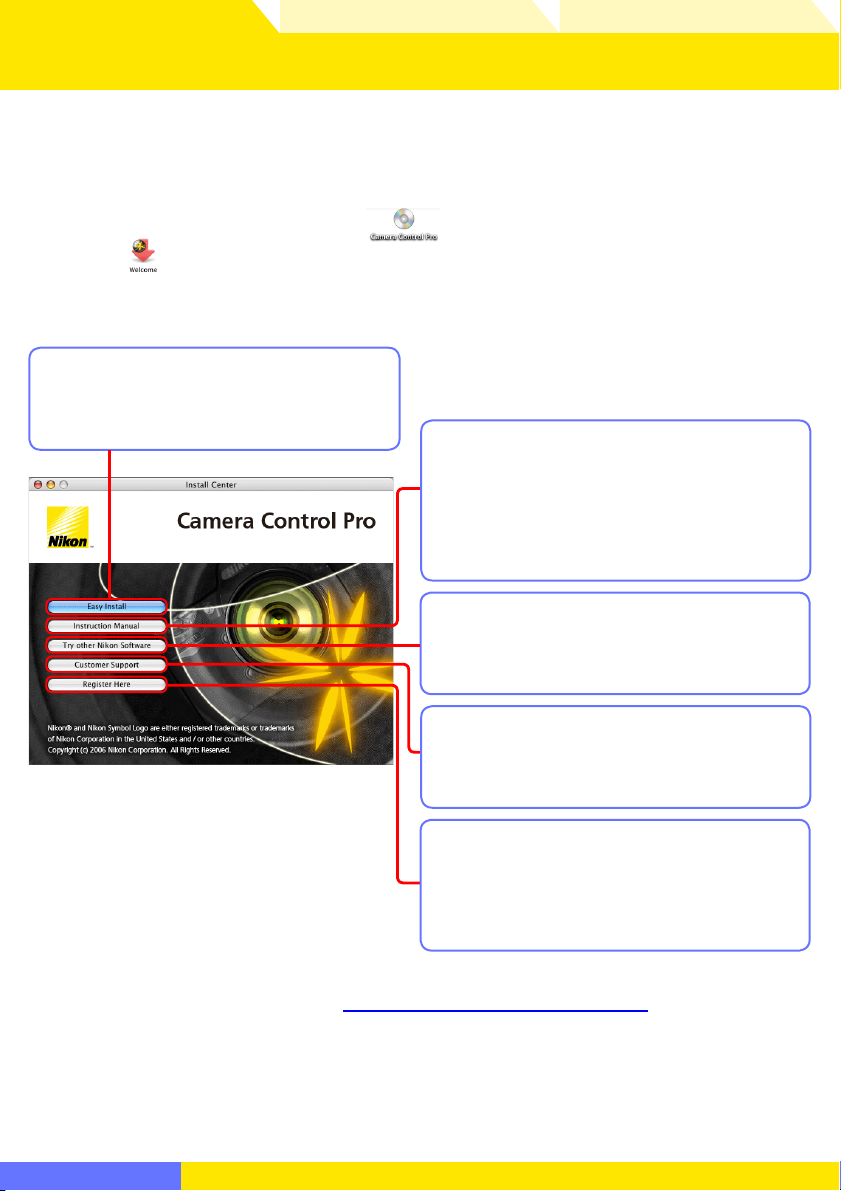
Installing Camera Control Pro Macintosh 1/5
Use an account with administrator privileges when installing Camera Control Pro.
The “Install Center” window
Start the computer and insert the Camera Control Pro CD in a CD-ROM drive. Double-click
the Camera Control Pro CD-ROM icon (
Welcome (
Next. A language-selection dialog will be displayed; select a language and click Next to
display the “Install Center” window.
Easy Install: Install the minimum software needed to run Camera Control
Pro.
) icon. The “Select Region” dialog will be displayed; select a region and click
) on the desktop and then double click the
Instruction Manual: Open the “Manuals”
folder, which contains software instruction manuals. Double-click INDEX.pdf
to view a region selection screen. This
button is not displayed in the trial version.
To uninstall Camera Control Pro, see
Return to fi r s t page
Try other Nikon Software: Download
trial versions of Nikon software (Internet
connection required).
Customer Support: View the ReadMe
fi l e o r v i s i t N i k o n technical support websites (Internet connection required).
Register Here: Register your Nikon
product on-line (Internet connection
required). This button does not appear in
some regions.
Uninstalling
Camera Control Pro.
15
Page 16
Overview
Using Camera Control Pro Appendices
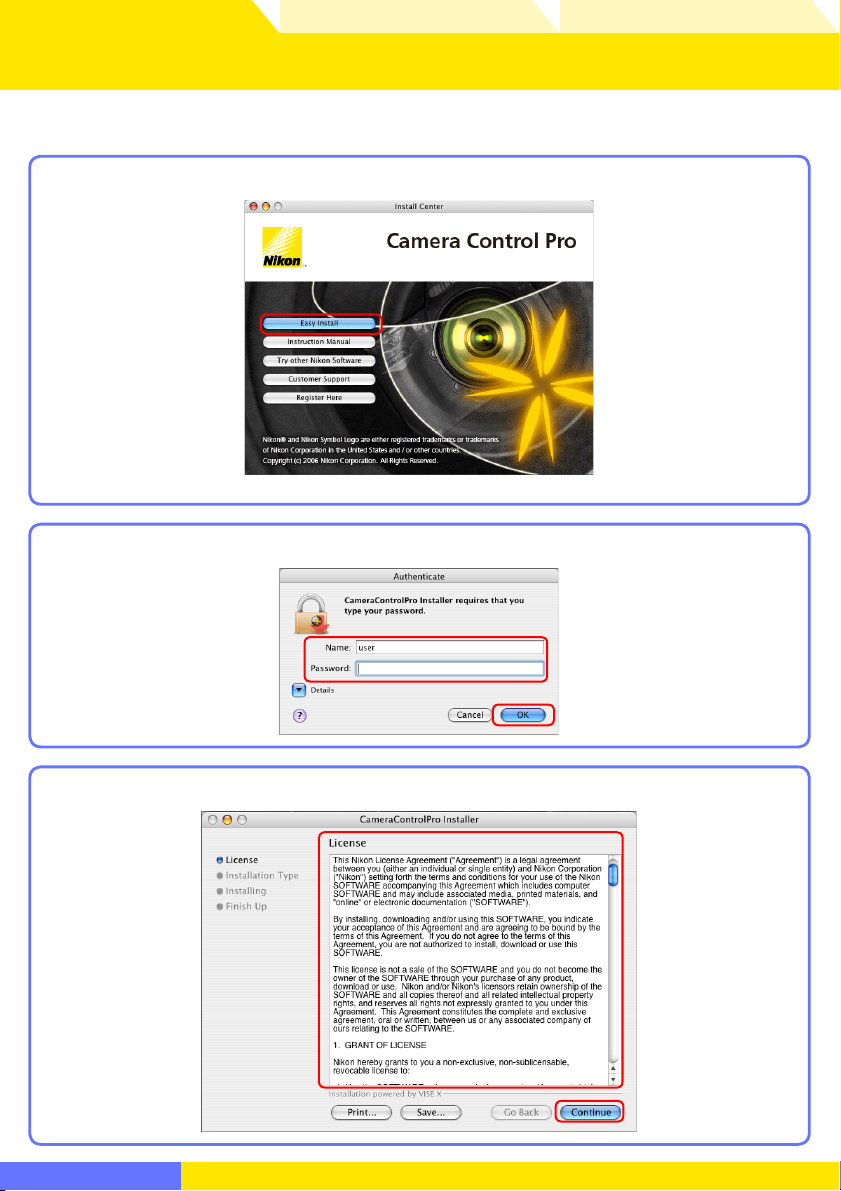
Installing Camera Control Pro Macintosh 2/5
Follow the steps below to install Camera Control Pro:
Click Easy Install.
1
Enter the administrator name and password () and click OK ().
2
After reading the license agreement (), click Continue ().
3
Return to fi r s t page
16
Page 17
Overview
Using Camera Control Pro Appendices
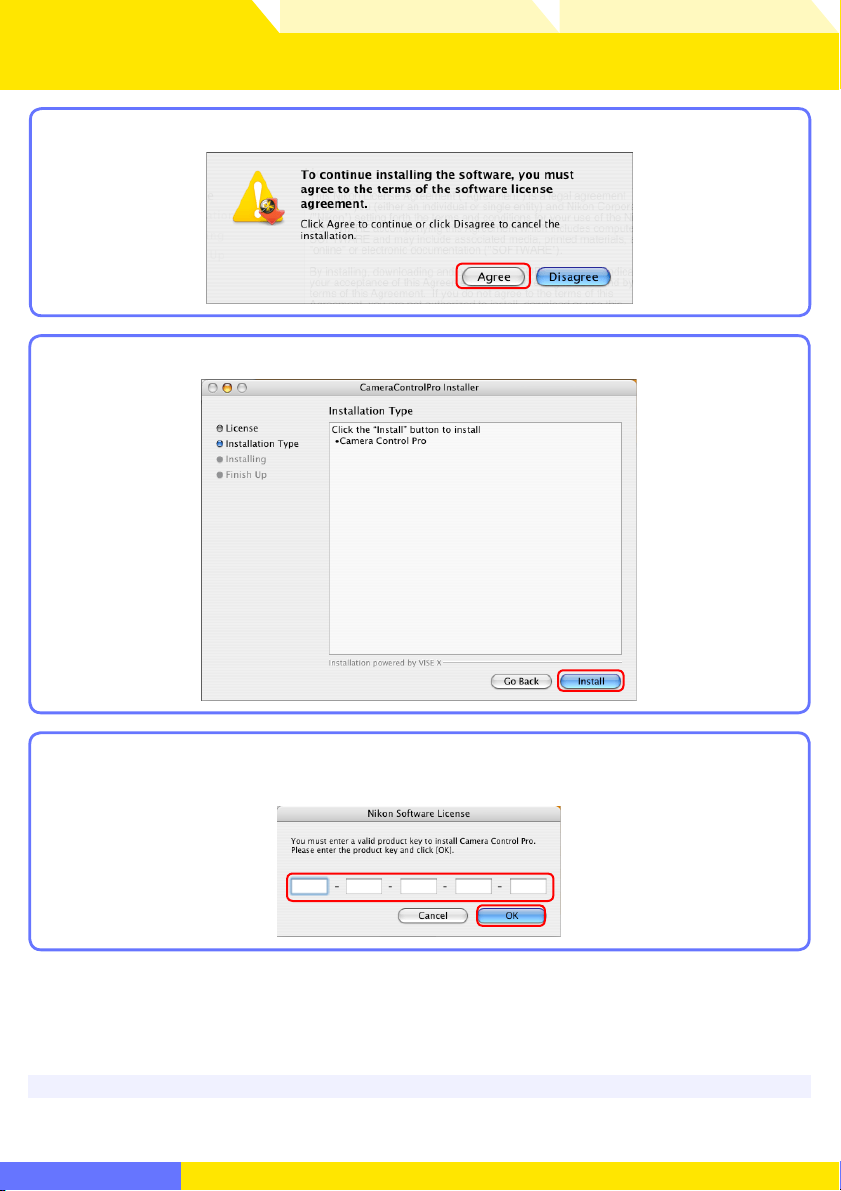
Installing Camera Control Pro Macintosh 3/5
Click Agree to accept the license agreement and proceed with installation.
4
Click Install.
5
Enter the product key () found on the CD case and click OK (). The trial version
6
does not show this dialog.
Product Key
Do not lose this key. It is required when installing or upgrading this software and can not be replaced if lost.
Return to fi r s t page
17
Page 18
Overview
Using Camera Control Pro Appendices
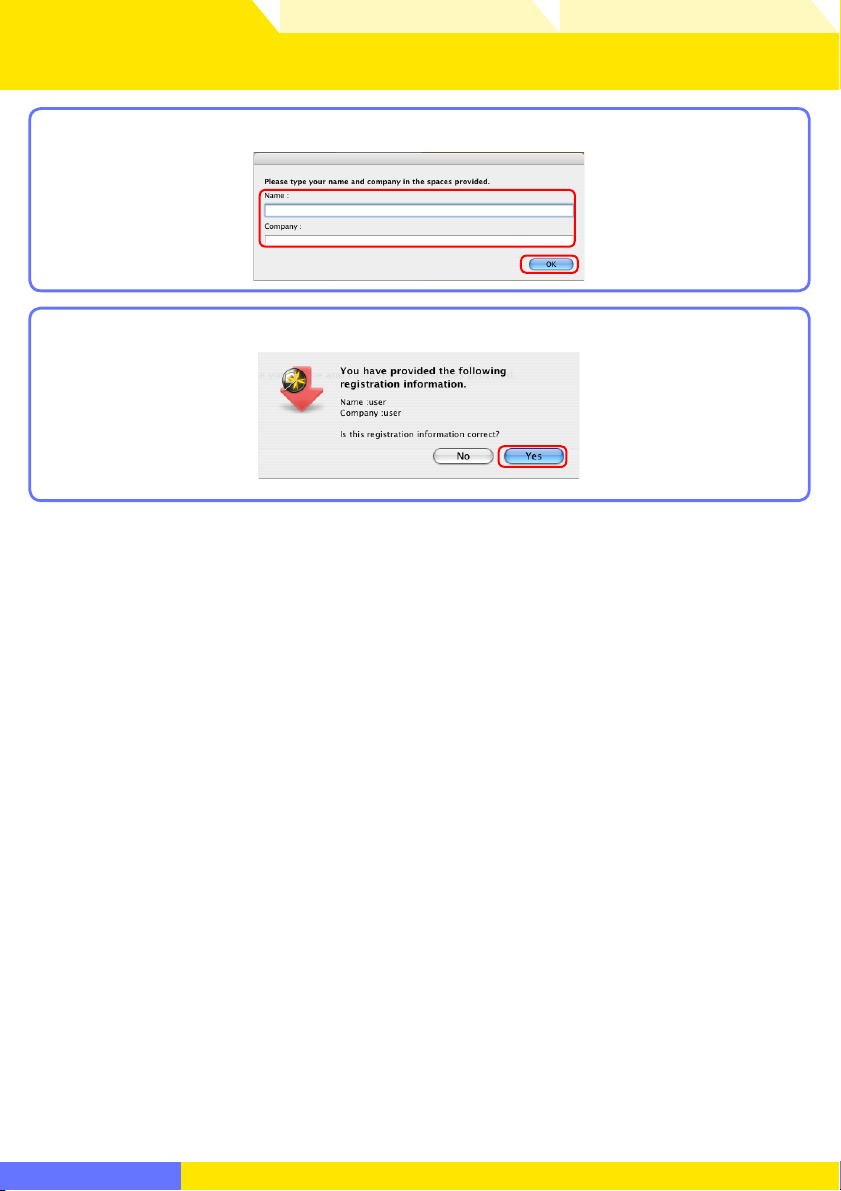
Installing Camera Control Pro Macintosh 4/5
Personalize your copy of Camera Control Pro () and click OK ().
7
Click Ye s.
8
Return to fi r s t page
18
Page 19
Overview
Using Camera Control Pro Appendices
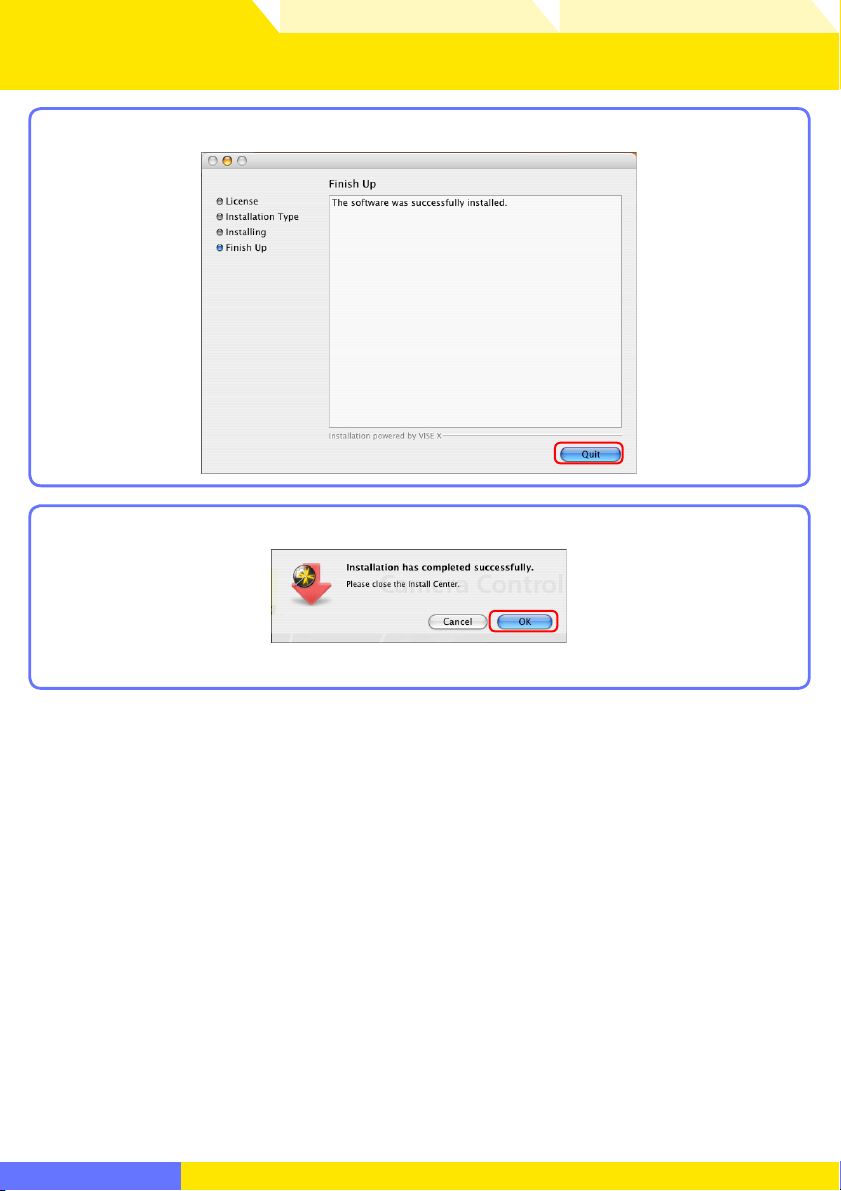
Installing Camera Control Pro Macintosh 5/5
Click Quit.
9
Click OK and remove the Camera Control Pro CD from the CD-ROM drive.
10
This completes installation of Camera Control Pro.
Return to fi r s t page
19
Page 20
Overview
Using Camera Control Pro Appendices
Starting and Exiting Camera Control Pro 1/6
Turn the c amera off and use the interface cable to connect the camera to the
1
computer as described in the camera manual. If you are using a D1-series camera,
choose “PC” as the operating mode. If you are using a D100, choose P, S, A, or M
mode. Users of D2-series cameras can select any mode other than M-
The D70S, D70, and D50 can be connected in any shooting mode.
Turn the c amera on. If PictureProject Transfer or Nikon Transfer starts, click the close
2
button.
UP (mirror up).
*
D50
D2-series
D200
D70S
Choose PTP.Windows 2000 Choose Mass Storage.
D70
D50
D2-series
USB
Users of the above cameras will need to ensure that the appropriate setting is chosen for USB
option in the camera setup menu before connecting the camera to a computer running Camera
Control Pro. Choose a USB setting ac cord ing to your com put er’s operating system:
Operating system
Windows XP Choose Mass Storage * or PTP.
Mac OS Choose PTP.
* Log on to an administrator account when using Camera Control Pro.
D100 D200
D70S
D70
D100
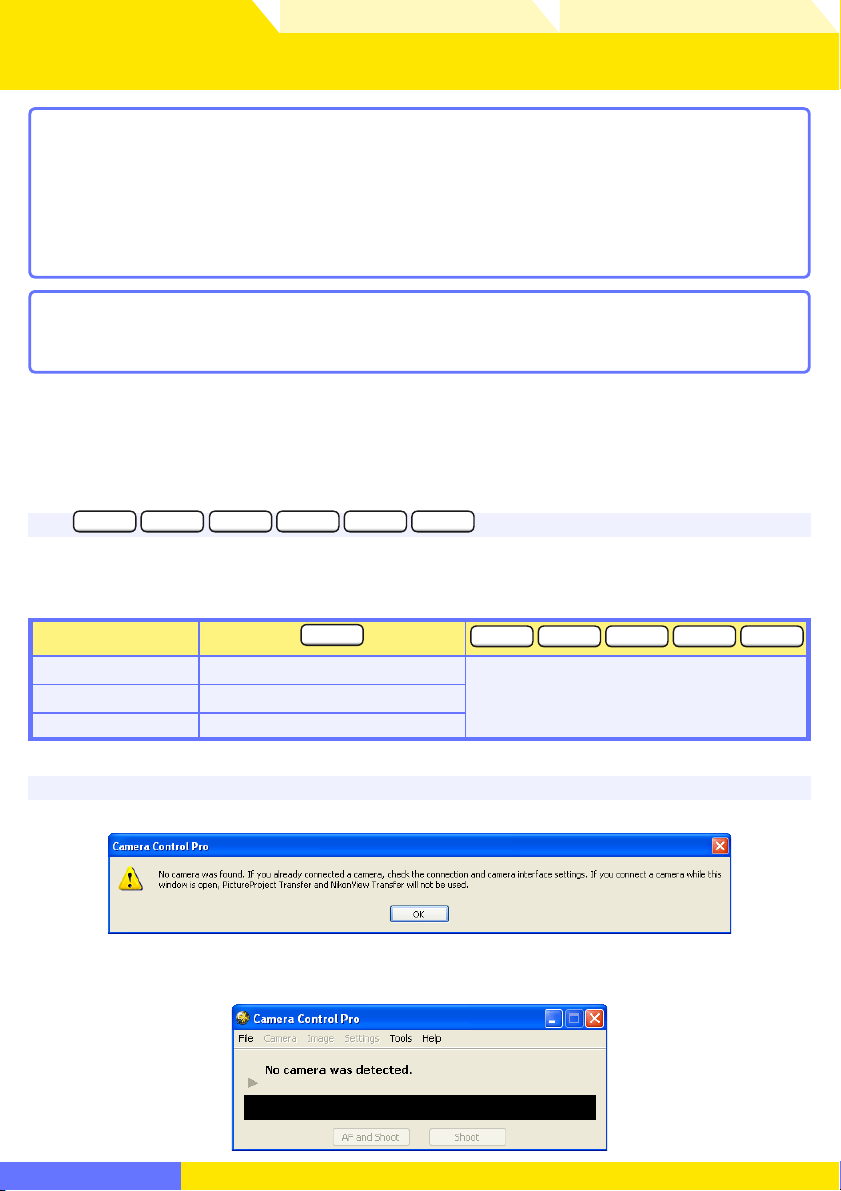
No Camera Connected
If no camera is connected when Camera Control Pro is launched, a warning will be displayed.
Click OK to close the warning and display the fol low ing window. Pref er enc es can be ad just ed using
the options in the menu bar. For information on connecting the camera, see the camera manual.
Return to fi r s t page
20
Page 21

Overview
product key
Using Camera Control Pro Appendices
Starting and Exiting Camera Control Pro 2/6
Start Camera Control Pro.
3
Windows
Method 1: Double-click the Camera Control Pro shortcut on the desktop.
Method 2: Click Start and select Camera Control Pro > Camera Control Pro from All
Programs (Windows XP) or Programs (Windows 2000).
Macintosh
Method 1: Click the Camera Control Pro icon in the Dock (if available).
Method 2: Open the “Nikon Software/Camera Control Pro” folder in the “Applications”
folder and double-click the Camera Control Pro icon.
Product Key
If prompted to supply a
Users of the trial version will see a dialog listing the time remaining in the thirty-day trial period; click
Tri al to use the trial version or Buy (if available) to visit a website where you can purchase a product
key. Be sure not to lose the key, as it may be required when re-installing or upgrading the product.
product key, enter the key found on the product packaging and click OK.
Return to fi r s t page
21
Page 22
Overview
Using Camera Control Pro Appendices
Starting and Exiting Camera Control Pro 3/6
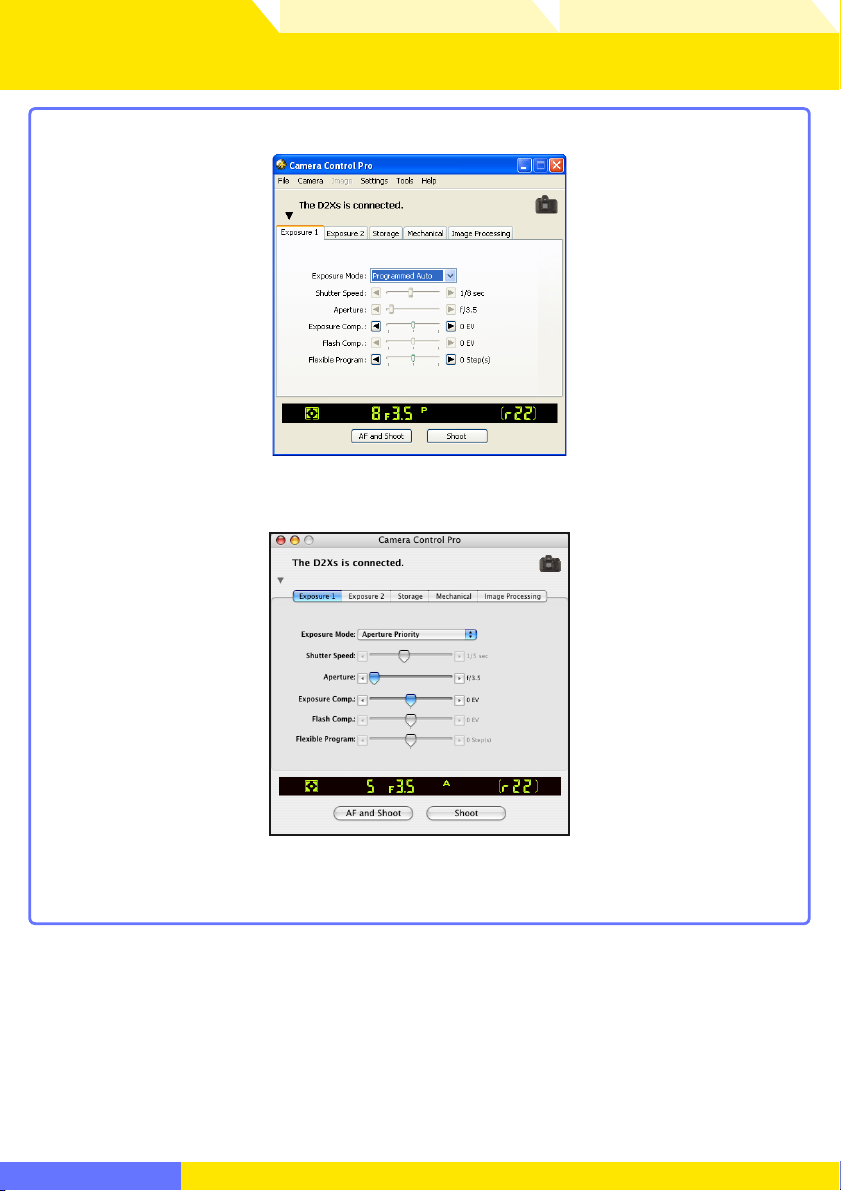
The Camera Control Pro window will be displayed.
4
Windows
Return to fi r s t page
Macintosh
22
Page 23
Overview
Using Camera Control Pro Appendices
Starting and Exiting Camera Control Pro 4/6
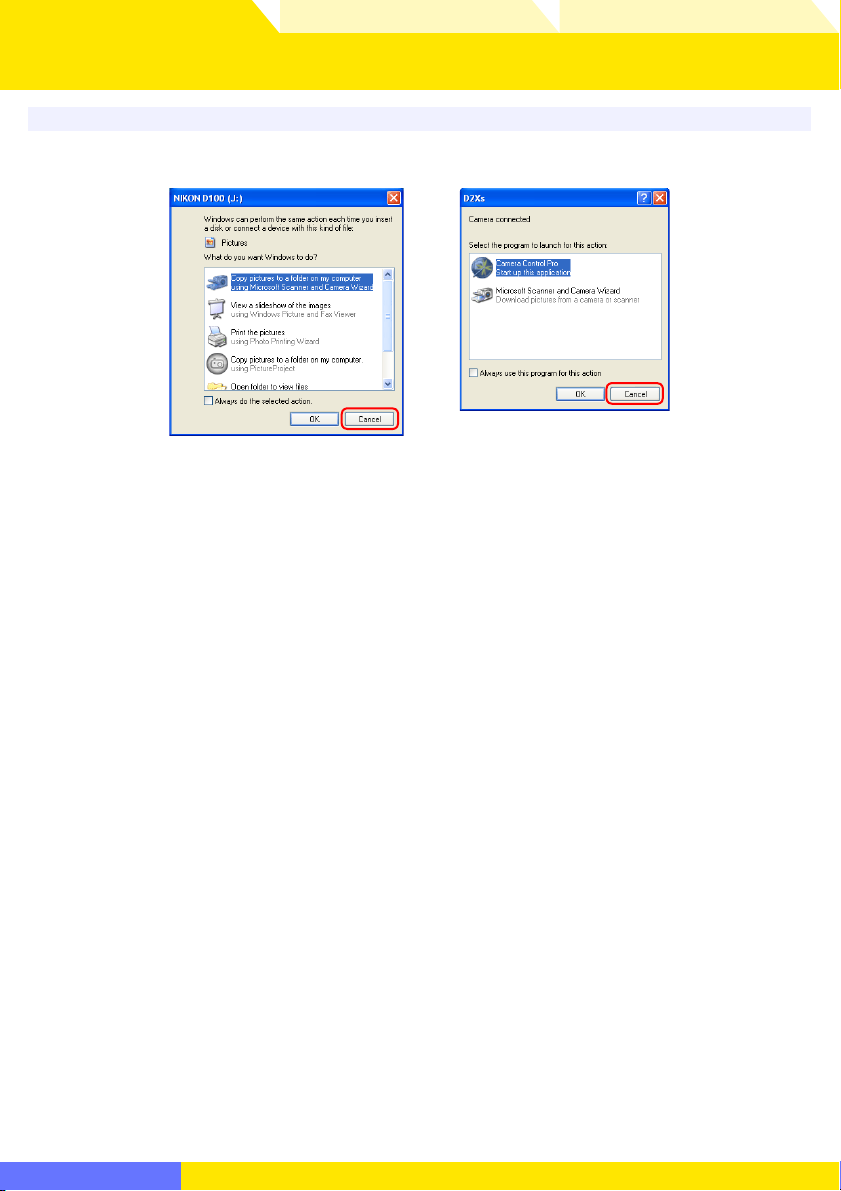
USB Connection to a Windows XP Computer
When a camera with USB interface is connected to a Windows XP computer, one of the following
dialogs may be displayed.
Mass Storage PTP
Select Cancel to close the dialog.
Return to fi r s t page
23
Page 24
Overview
Using Camera Control Pro Appendices
Starting and Exiting Camera Control Pro 5/6
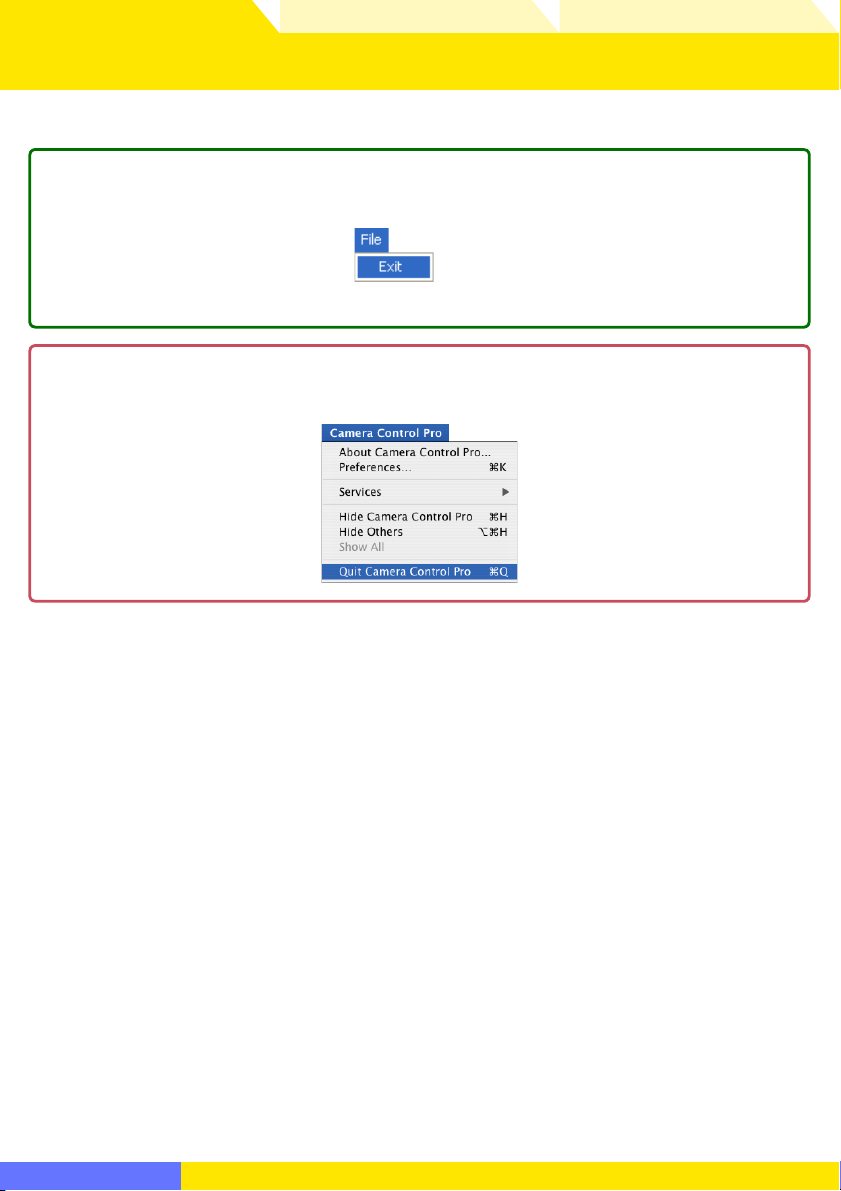
Exiting Camera Control Pro
Windows
Select Exit from the File menu.
Macintosh
Select Quit Camera Control Pro from the application menu.
Return to fi r s t page
24
Page 25
Overview
Using Camera Control Pro Appendices
Starting and Exiting Camera Control Pro 6/6
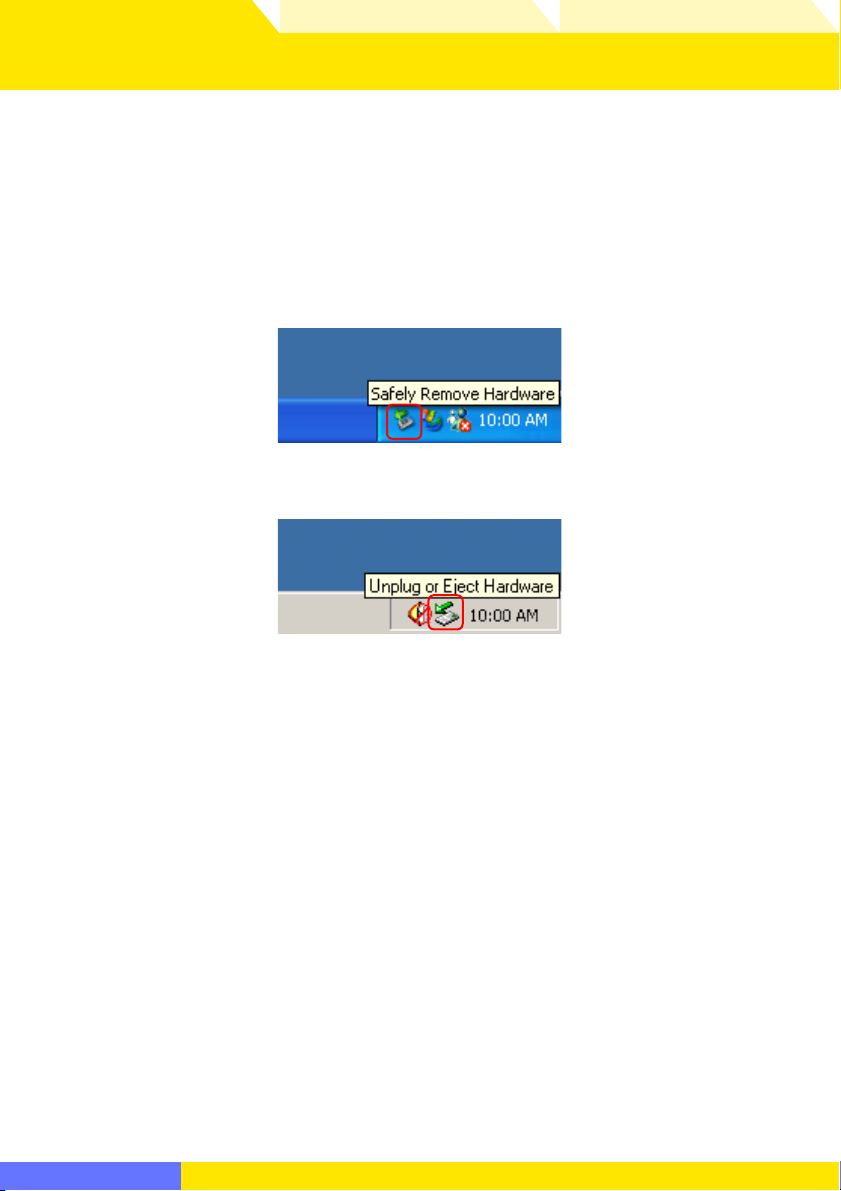
Disconnecting the Camera
To disconnect the camera:
• USB (PTP)/IEEE 1394 (FireWire): Turn the camera off and disconnect the interface cable.
• USB (Mass Storage): Remove the camera from the system as described below, then turn the
camera off and disconnect the USB cable.
Windows XP: Click the “Safely Remove Hardware” icon in the taskbar and select Safely
Remove USB Mass Storage Device from the menu that appears.
Windows 2000: Click the “Unplug or Eject Hardware” icon in the taskbar and select Stop
USB Mass Storage Device from the menu that appears.
Return to fi r s t page
25
Page 26

Overview
Using Camera Control Pro Appendices
Getting Help
To view help on Camera Control Pro, select Camera Control Pro Help from the Help
menu.
MacintoshWindows
Return to fi r s t page
26
Page 27

Overview
Using Camera Control Pro Appendices
Software Updates
Camera Control Pro is equipped with an automatic update function known as Nikon
Message Center. Nikon Message Center checks for updates to a variety of Nikon digital
products, including Camera Control Pro. If the computer is connected to the Internet, Nikon
Message Center will automatically check for updates when Camera Control Pro starts. You
can also check for updates by selecting Check for Software Updates… from the Help
menu. If an update is available, an update dialog will be displayed.
Downloading Updates
An Internet connection is required to download updates. The user bears all applicable fees charged
by the phone company or Internet service provider.
Dial-up Connections
When using a dial-up connection, be aware that the connection is not automatically terminated
when download is complete. Be sure to terminate the connection manually.
Privacy
Information provided by the user as part of this service will not be given to third parties without the
user’s permission.
Return to fi r s t page
27
Page 28

Overview Appendices
Using Camera Control Pro
Using Camera Control Pro
Screen Layout 29
Capturing Photographs to Disk 31
Viewing Captured Photographs 36
Time Lapse Photography 38
The Camera Control Pro Window 42
Camera Controls 46
Saving and Loading Camera Control Settings 58
The Camera Menu 59
Custom Settings 63
Return to fi r s t page
28
Page 29
Overview Appendices
Connection status
Camera
controls
Simulated LCD panel
Shoot buttons
Using Camera Control Pro
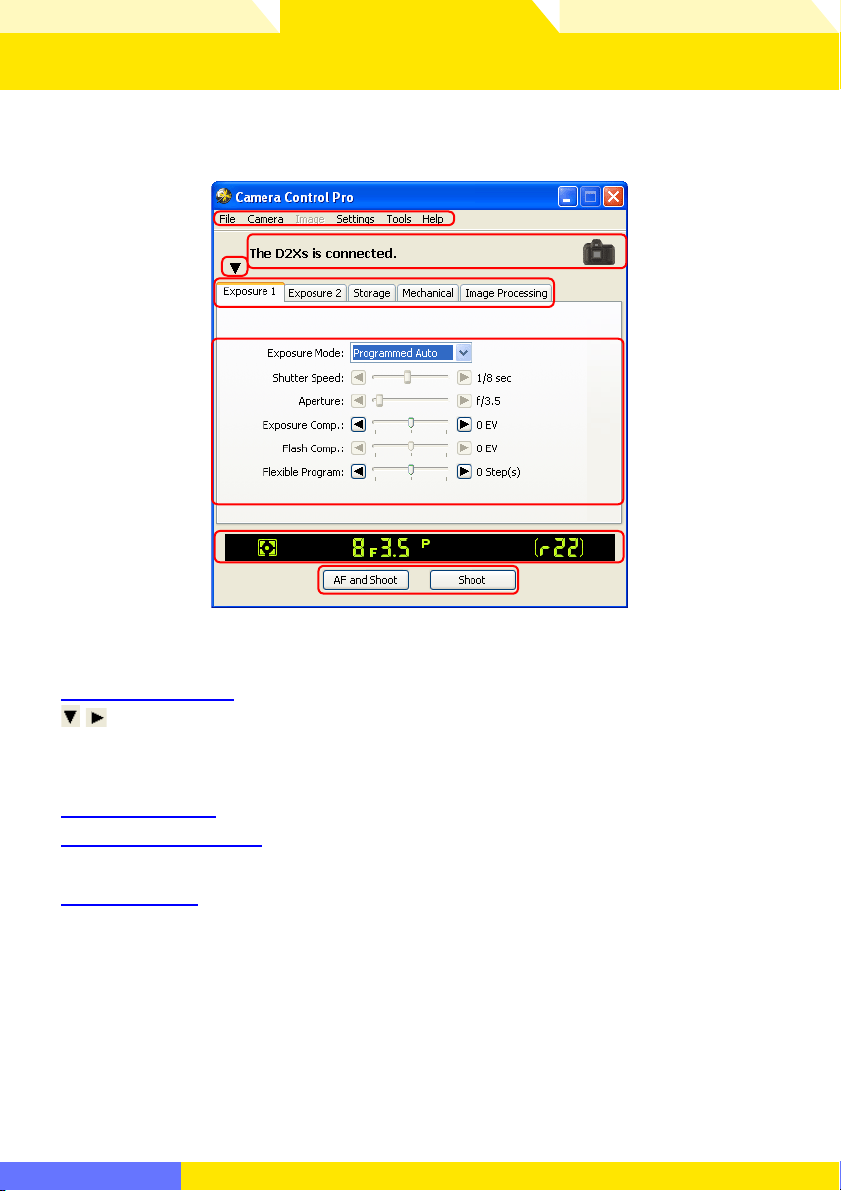
Screen Layout 1/2
Camera Control Pro screen layout is described below.
Windows
Menu bar
Connection status: Shows the status and name of any cameras connected.
/ : View or hide camera controls. Camera controls can also be displayed or hidden
by selecting Show/Hide Camera Control Panels in the To ol s menu.
Camera control tabs: Click to view the associated camera controls.
Camera
Simulated LCD panel: Performs the same function as the in for ma tion display in the
camera viewfi nder.
Shoot buttons: Click these buttons to take pictures.
controls
Return to fi r s t page
29
Page 30
Overview Appendices
Connection status
Camera
controls
Simulated LCD panel
Shoot buttons
Using Camera Control Pro
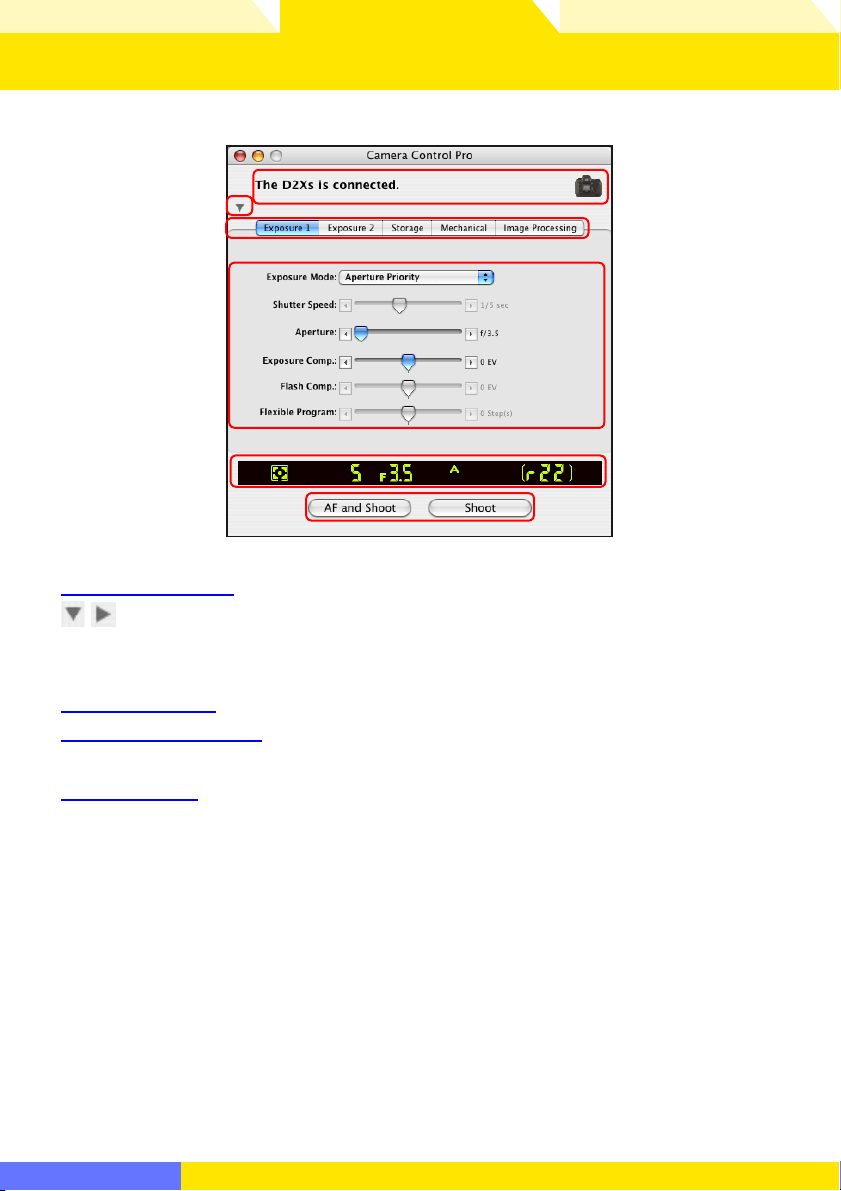
Screen Layout 2/2
Macintosh
Connection status: Shows the status and name of any cameras connected.
/ : View or hide camera controls. Camera controls can also be displayed or hidden
by selecting Show/Hide Camera Control Panels in the To ol s menu.
Camera control tabs: Click to view the associated camera controls.
Camera
Simulated LCD panel: Performs the same function as the in for ma tion display in the
camera viewfi nder.
Shoot buttons: Click these buttons to take pictures.
controls
Return to fi r s t page
30
Page 31
Overview Appendices
Using Camera Control Pro
Capturing Photographs to Disk 1/5
If Camera Control Pro is running when a D2-series, D200, D100, D70S, D70, or D50 camera is
con nect ed, or a D1-series cam era is con nect ed with the mode dial set to PC, pictures taken
with the camera will be stored on your computer hard disk, not the camera memory card.
Start Camera Control Pro.
1
Select Download Options… in the Tools menu to display download options.
2
Return to fi r s t page
31
Page 32

Overview Appendices
Step 3 continues on the next page
Using Camera Control Pro
Capturing Photographs to Disk 2/5
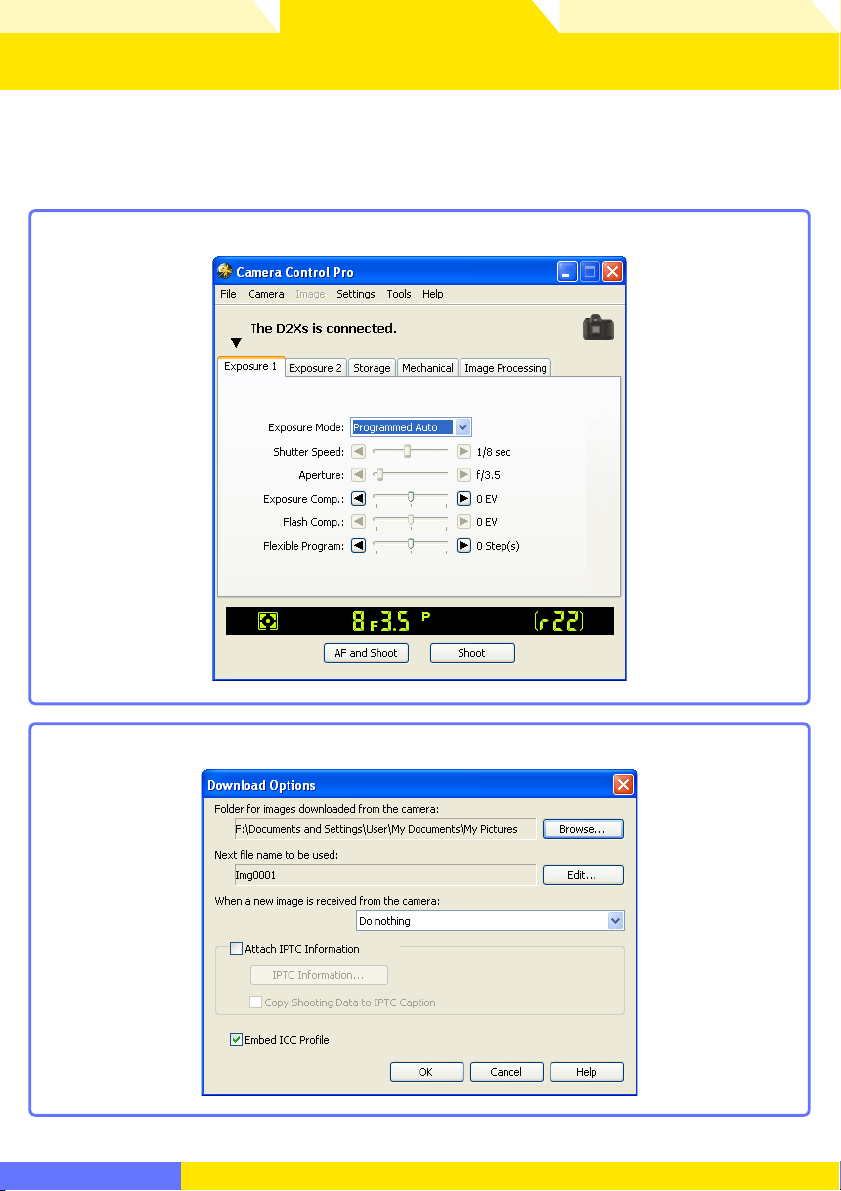
Adjust capture options:
3
Folder for images downloaded from the camera
Select the folder to which photographs will be down load ed as they are taken.
Next fi le name to be used
Shows how images download to the computer will be named. To change how
fi l e s a r e named, click Edit.... The dialog shown at below will be displayed. Using
the sample fi le name as a guide, enter a prefi x and suffi x and choose the starting
number and number of digits for automatic fi le numbering. You can also use the
shooting date and time in the fi le name.
Step 3 continues on the next page
File Naming Conventions
Windows: File names may not contain quotes or any of the following characters: “\” “/” “:” “*” “?” “<“ “>”
and “|”. Periods (“.”) may not appear at the beginning or the end of fi le names.
Macintosh: The maximum length for Macintosh fi le names is thirty-one characters. Colons (“:”) are
not allowed.
Return to fi r s t page
32
Page 33

Overview Appendices
viewer window
Step 3 continues on the next page
Using Camera Control Pro
Capturing Photographs to Disk 3/5
When a new image is received from camera
Choose the application that will be used to display captured photographs after
they are saved to disk.
• Do nothing: Photographs are not displayed after being saved to the computer
hard disk.
• Show it with viewer: Photographs are displayed in the
• Send it to Capture NX watched folder (available only if Capture NX is installed): Photographs are saved in the “watched” folder selected in Capture NX (available
separately; see the Capture NX manual for details). Capture NX will automatically
process the pictures according to the batch settings in Capture NX, approximating the “Live Batch” option in Nikon Capture Camera Control.
• Import it into PictureProject (available only if PictureProject is installed): PictureProject starts automatically and displays the captured images. See the PictureProject manual for details.
Attach IPTC Information
Check this option to add IPTC information to captured images and enable the Copy
Shooting Data to IPTC Caption option.
viewer window.
Step 3 continues on the next page
Image Authentication
The Attach IPTC Information and Embed ICC Profi le options do not apply to photo-
graphs taken with Image Authentication on. Image authentication information is not embedded in TIFF photographs when capturing images using the Camera Control Pro.
D2Xs
Return to fi r s t page
33
Page 34

Overview Appendices
Using Camera Control Pro
Capturing Photographs to Disk 4/5
IPTC Information…
Click ing this button displays a dialog where you can se lect the IPTC information, including key words and captions, that will be added to im ag es as they are cap tured.
Copy Shooting Data to IPTC Caption
Check this option to copy shooting data to the caption fi eld of images as they are
captured.
Embed ICC Profi le
Select this option to embed an ICC profi le according to the camera Color Space settings. The ICC profi le is embedded in JPEG and TIFF images as they are captured.
After adjusting the above options, click OK to exit the dialog and apply settings to
sub se quent photographs.
Choose whether to embed information on picture orientation in captured images
4
(note that these options are not available when On or Automatic is selected for
the auto image rotation option in the camera setup menu). Select an option once
to enable it, again to disable it.
Rotate all downloaded images by 90 degrees CCW
If this option is checked, pictures will be marked as being rotated 90 ° counterclockwise as they are saved.
Rotate all downloaded images by 90 degrees CW
If this option is checked, pictures will be marked as being rotated 90 ° clockwise as
they are saved.
Auto Image Rotation
If On or Automatic (the default setting) is selected for the auto image rotation option in the camera setup menu, D2-series, D200, D70S, D70, and D50 cameras will detect camera orientation and
automatically embed this information in photographs (note that in continuous mode, the orientation for the fi rst image in each burst applies to all images in the series, even if camera orientation is
changed during shooting). If Off is selected, camera orientation will not be recorded. Information
on picture orientation can be added during download as described in Step 4.
Image Authentication
The “Rotate all downloaded images…” options do not apply to photographs taken with
Image Authentication on. Image authentication information is not embedded in TIFF photographs when capturing images using the Camera Control Pro.
D2-series
D200
D2Xs
D70S
D70
D50
Return to fi r s t page
34
34
Page 35

Overview Appendices
Using Camera Control Pro
Capturing Photographs to Disk 5/5
Take pic tures using the camera shutter-release button or the AF and Shoot or
5
Shoot but tons in the Camera Control Pro window. The Status dialog shown below
will be displayed.
Close button
triangle
To display a histogram of the current image, click the triangle at the bottom of the
Status dialog.
If the Show highlights over option is checked, any areas of the preview image
with a bright ness over the value entered in the neighboring text box will be indicated by a fl ash ing border. To display histograms for the red (R), green (G), and blue
(B) chan nels, put a check in the corresponding box.
Click Close to close the Status dialog.
6
Return to fi r s t page
35
Page 36

Overview Appendices
When a new image is received from camera
Download Options” dialog
Using Camera Control Pro
Viewing Captured Photographs 1/ 2
If Show it with Viewer is selected for
the ““
Download Options” dialog, pictures will automatically be displayed in the “Viewer”
window after capture. The “Viewer” window can also be started by selecting Show Viewer
from the To ol s menu. The most recent image in the folder selected for Folder for images
downloaded from the camera in the “Download Options” dialog will be displayed.
When a new image is received from camera in
Close button
To close the “Viewer” window, click Close.
Return to fi r s t page
36
Page 37

Overview Appendices
Using Camera Control Pro
Viewing Captured Photographs 2/2
The “Viewer” window contains the following buttons :
Button Name Function
Previous image Go back one image.
Next image Display next image
Show focus area
Fit to screen Fit image to viewing area (maximum zoom ratio is 100%).
100% View image at 100%.
50% View image at 50%.
Delete Delete current image.
Display focus area used when taking picture. Focus area is displayed
in red.
Show Focus Area
Focus area display is only available with photographs taken with Nikon digital SLR cameras. It will
not be displayed in photographs taken with a non-CPU lens, manual focus, or when focus areas not
displayed in the viewfi nder.
Return to fi r s t page
37
Page 38

Overview Appendices
Using Camera Control Pro
Time Lapse Photography 1/4
Using Camera Control Pro, you can take a series of photographs automatically at a time
interval you select.
Select Time Lapse Photography… from the Camera menu. The Time Lapse
1
Pho tog ra phy dialog will be displayed.
Return to fi r s t page
38
Page 39

Overview Appendices
Using Camera Control Pro
Time Lapse Photography 2/4
Before shooting starts, adjust the following settings:
2
Autofocus before each shot
If this option is checked, the camera will perform an autofocus operation before
each shot. If the selected focus mode is AF-A (D50 only) or single-servo AF, an autofocus operation will be performed even when the check box is off .
Keep shooting until cancelled
If this option is checked, the camera will continue to take photographs until you
click Stop Shooting in the Time Lapse Photography dialog.
Auto bracketing
D2-series
Select this option to perform exposure, fl ash, or white
balance bracketing during shooting. To change brack-
eting options, click Set BKT.... The dialog shown at
right will be displayed.
AE/WB/Flash
Bracketing
Change Factor when
Exposure Mode
is set to Manual
D2-series
Bracketing Type /
Bracketing Step /
Bracketing Order /
Exposure Mode
D200
D200
Choose the type of bracketing
performed.
Choose how bracketing is performed in manual exposure
mode.
Choose the bracketing program, exposure or white balance increment, bracketing
order, and exposure mode.
Bracketing type and bracketing order are not available with
the D50.
D70S
D70 D50
D2 series/D200
Return to fi r s t page
D70S/D70/D50
39
Page 40

Overview Appendices
When a
new
image is received from camera
“Dow
nload Options” dia
log
for 15 minutes
Using Camera Control Pro
Time Lapse Photography 3/4
Use the Shots box to choose a number of shots from 2 to 9,999. This option is not
3
available when Keep shooting until cancelled is selected.
The delay between shots can be set to any value between 00:00:01 (one second)
4
and 99:59:59 (ninety-nine hours, fi fty-nine minutes, and fi fty-nine seconds).
Click Start. If Send it to Capture NX watched folder is selected for
5
new
image is received from camera in the
tographs will be saved to the “watched” folder selected in Capture NX (available
separately; see the Capture NX manual for details). Capture NX will automatically
process the pictures according to the batch settings in Capture NX, approximating
the “Live Batch” option in Nikon Capture Camera Control.
Time Interval Settings
If the delay is shorter than the time required to record each photograph, the actual interval be tween
photographs will be longer than that specifi ed in the Time Lapse Photography dialog.
“Dow
nload Options” dia
When a
log, pho-
Auto Off
When the camera is operated on battery power and
Camera Control Pro is running, keep camera awake” in the General tab of the Preferences dialog,
choose a delay of fi fteen minutes or less. When taking photographs at longer intervals, use an AC
adapter (available separately) to power the camera.
During Time-Lapse Photography
The camera can not be operated during time-lapse photography. No other operations can be performed until the Time Lapse Photography dialog is closed.
Return to fi r s t page
D1-series
for 15 minutes has been selected for “While
40
Page 41

Overview Appendices
Using Camera Control Pro
Time Lapse Photography 4/4
Follow the progress of time lapse photography in the progress dialog.
6
Click Stop Shooting to end time lapse photography at any time. If a number
of shots was specifi ed in the “Time Lapse Photography” dialog, shooting will end
when the specifi ed number of shots has been taken.
Once the spec i fi ed number of shots has been taken, the Stop Shooting button
7
will change to Shooting Complete. Click Shoot ing Com plete to exit the “Time
Lapse Pho tog ra phy” di a log.
Error Logs
If an error occurs during shooting, an error log will be displayed; click OK to close the log and return
to the Camera Control Pro window.
The Time Lapse Photography Dialog
If you make a mistake in entering settings in the Time Lapse Photography dialog, a warning will be
displayed. Return to the Time Lapse Photography dialog and adjust settings as directed.
Hard Disk Full
A warning will appear when space is no longer available on the destination disk for photographs
taken using time lapse photography. Use the information in the warning to reduce the number of
photographs or change the destination drive.
Return to fi r s t page
41
Page 42
Overview Appendices
Camera Controls
Using Camera Control Pro
The Camera Control Pro Window 1/4
The Camera Control Pro window shows current camera settings, which may be viewed by
clicking the fi ve page selection tabs. Camera settings can be altered using the controls in
each tab as in “
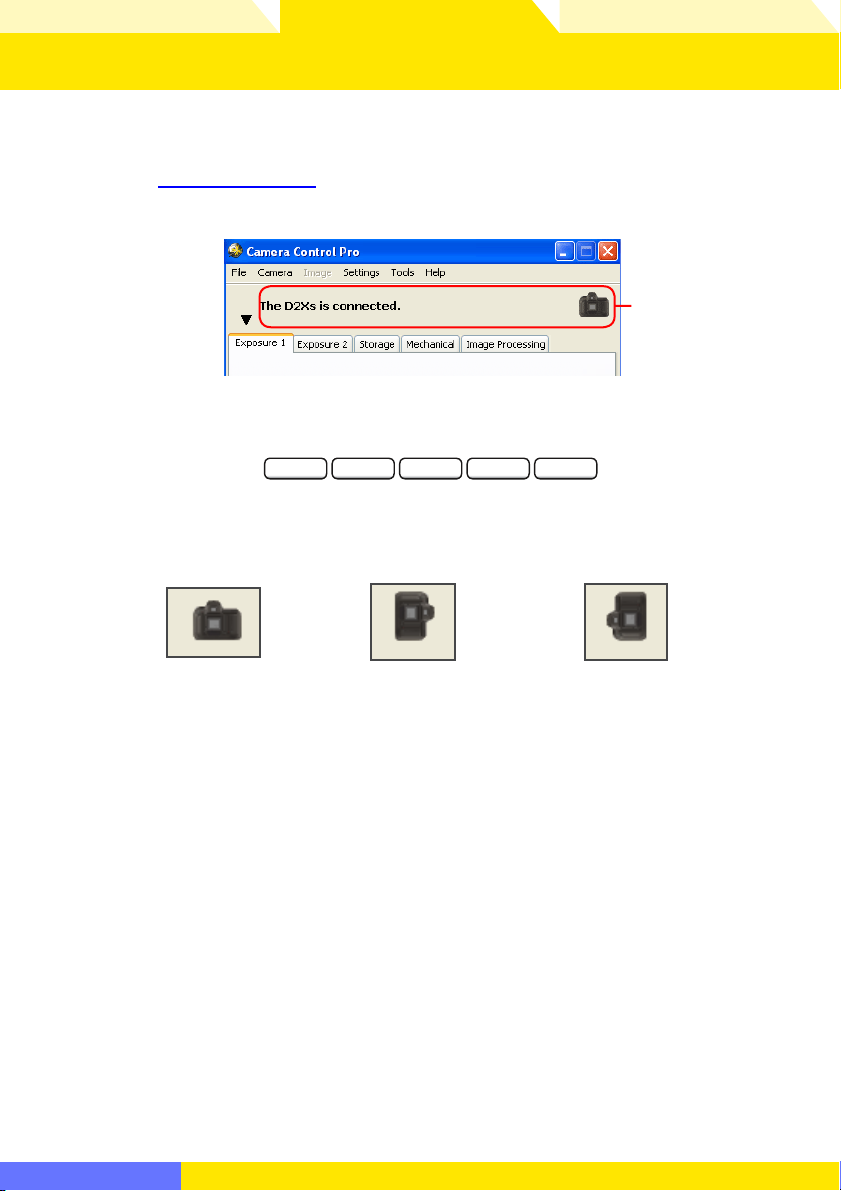
Connection Status
This area shows the following information about the camera currently connected:
Camera name
Camera orientation
If On or Automatic (the default setting) is selected for the auto image rotation option
in the camera setup menu, camera orientation will be indicated by an icon as shown
below. No icon will be displayed if Off is selected.
Camera Controls.” The other settings in this window are described below.
Connection status
D2-series
D200
D70S
D70 D50
Return to fi r s t page
Horizontal Rotated 90 ° counterclockwiseRotated 90 ° clock wise
42
Page 43

Overview Appendices
Using Camera Control Pro
The Camera Control Pro Window 2/4
The
Click this button to view or hide camera controls.
/
Button
Simulated LCD Panel
This panel shows the information displayed in the camera’s viewfi nder, with the ex cep tion
of camera errors. Clicking on an indicator in the panel opens the Camera Control Pro window to the tab that controls the selected option, where ad just ments can be made.
When a D2-series, D200, D70S, D70, or D50 camera is connected, the amount of memory
remaining in the camera memory buff er is displayed at the right edge of the simulated LCD
panel. This information is updated at regular intervals, but temporary discrepancies may
exist between the display and the actual amount of memory remaining in the buff er.
Return to fi r s t page
43
Page 44

Overview Appendices
Using Camera Control Pro
The Camera Control Pro Window 3/4
Shoot Buttons
Click either of these buttons to take a photograph at current settings. If a D2-series, D200,
D70S, D70, or D50 camera is connected, photos can be taken in continuous shooting mode;
in this case, the AF and Shoot and Shoot buttons will instead be labeled AF and Start
and Start. Continuous shooting with D1-series and D100 cameras can only be performed
with shutter-release button on the camera body; the shooting buttons in the “Camera Control Pro” dialog can only be used to take pictures one at a time.
AF and Shoot /
AF and Start
Shoot / Star t
When this button is clicked, the camera will perform an autofocus operation
and then re lease the shut ter to take a pho to graph.
Click this button to take a photograph. If the selected focus mode is AF-A (D50
only) or single-servo AF, an autofocus operation will be performed before the
shut ter is released.
The Function Dial
The D100 can only be used to take photographs when the function dial is set to P, S, A, or M . At other
settings, the shoot buttons in the “Camera Control Pro” dialog will be disabled and the simulated
LCD panel will not be displayed.
D100
Return to fi r s t page
44
Page 45

Overview Appendices
Enable controls on camera
body
Using Camera Control Pro
The Camera Control Pro Window 4/4
Camera Settings That Can Not Be Adjusted from Camera Control Pro
The following operations can only be performed using the controls on the camera body:
Operation Camera
Burst photography (continuous shooting mode)
Continuous servo autofocus All supported models
Pressing the shutter-release button halfway to check focus All supported models
Autofocus-only operation
Status not displayed
(use AF and Shoot to perform autofocus)
Manual aperture adjustment using the lens aperture ring
Reactivating the camera after it has entered sleep mode
Depth-of-fi eld previewAll supported models
Auto bracketing
Compression options for NEF (RAW) images
Operation assigned to FUNC. button
with Custom Setting f4
Remote (D70S, D70, and D50 only)
and self-timer mode selection
Focus mode selection using camera focus-mode selector All supported models
Metering
Exposure mode (can be adjusted if
Status displayed
body is selected when D70S, D70, or D50 is connected)
Enable controls on camera
Shooting mode
Shutter-speed lock
Aperture lock
Autoexposure lock All supported models
Speedlight fl ash-level compensation
M-up (mirror up) mode selection
Selection of second center focus area group (group dynamic-AF)
D1-series
All supported models
D1-series
D2-series
D70 D50
D1-series
D100
D2-series
D2-series
D100
D2-seriesD1-series
D1-series
D100
D100
D200
D200D2-series
D100
D70S
D50
D100
D2-seriesD1-series
D2-seriesD1-series
D2-seriesD1-series
D200
D200
D200
D70S
D70
Return to fi r s t page
45
Page 46
Overview Appendices
Enable controls on the camera body
Using Camera Control Pro
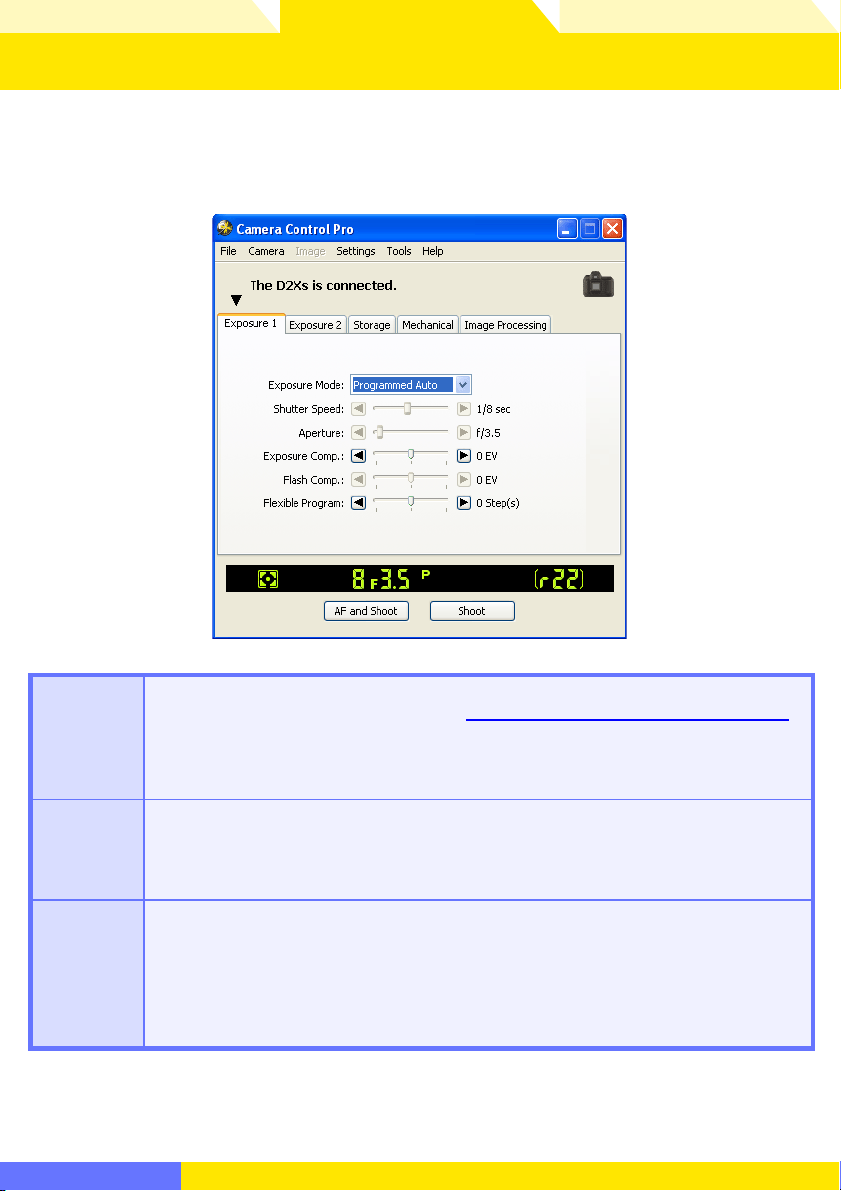
Camera Controls 1/12
Camera controls are described below using the D2Xs as an example:
The Exposure 1 Tab
The fol low ing settings can be adjusted from the Exposure 1 tab:
This menu can be used to set the exposure mode for D2- and D1-series and D200
Exposure
Mode
Shutter
Speed
Aperture
cameras. If a D100 is connected, or if
checked when a D70S, D70, or D50 is connected, it will show the current exposure
mode but the mode itself must be selected using the camera function dial. See the
camera manual for details.
Shutter speed can only be adjusted in Man u al and Speed Priority modes, when it
can be set to values between the max i mum and min i mum val ues supported by the
camera. Use high shut ter speeds to freeze mo tion, low shut ter speeds to suggest
mo tion by blur ring moving objects.
Aperture can only be adjusted in Manual and Aperture Pri or i ty modes, when it
can be set to values between maximum and min i mum ap er ture (small apertures
have high f-num bers, wide ap er tures low f-numbers; the ac tu al ap er tures available
depend on the lens used). Ap er ture can not be controlled from Camera Control Pro
when Custom Setting 22 has been set to allow aperture to be ad just ed manually
using the lens aperture ring (D1-series only).
Return to fi r s t page
Enable controls on the camera body is
46
Page 47

Overview Appendices
Using Camera Control Pro
Camera Controls 2/12
The Exposure 1 Tab
Exposure compensation is useful when shooting subjects containing
Exposure
Comp.
Flash Comp.
D100
D70
D200
D50
sharp lighting con trasts, or on other occasions when you want to modify
the exposure value determined by the cam era. Exposure compensation
is available in all exposure modes.
This option is used to adjust the level of the camera’s built-in Speed-
D70S
light.
Flexible
Program
Flexible program can only be used in Program Mode, when it allows
you to choose from pre de ter mined combinations of shutter speed and
aperture appropriate to current lighting conditions.
The Function Dial
The D100 can only be used to take photographs when the function dial is set to P, S, A, or M. At
other settings, the controls in the Exposure 1 tab will be disabled.
D100
Bulb
At a shutter speed of Bulb, the shutter remains open while the shutter release button is held down.
Use the camera shut ter-release button to take photos at this setting. Clicking either of the shoot
buttons will display an error message.
Return to fi r s t page
47
Page 48

Overview Appendices
“The Mechanical
Tab.”
Enable controls on the camera body
Using Camera Control Pro
Camera Controls 3/12
The Exposure 2 Tab
The following settings can be adjusted from the Exposure 2 tab.
The focus area can be selected using the arrow buttons; see the camera manual for
Focus Area
Metering
Mode
Flash Sync
Mode
details. For information on AF-area mode and focus mode, see
Tab .”
The metering mode can be selected from this menu (D2 series, D200, D70S, D70,
and D50 only). Metering mode defaults to the option selected with the camera. If a
D1-series or D100 camera is connected, or if
is checked when a D2-series or D200 camera is connected, the current metering
mode will be shown, but changes can only be made using camera controls. See
the camera manual for details.
This option controls the camera fl ash sync mode. See the camera manual for details.
Return to fi r s t page
“The Mechanical
Enable controls on the camera body
48
Page 49

Overview Appendices
Using Camera Control Pro
Camera Controls 4/12
The Exposure 2 Tab
Sensitivity (ISO equivalency) can be raised when taking photographs
Sensitivity
Auto
D2-series
D70S
D100
D70 D50
D200
White Balance
Fine Tune… /Set Te mp…
D1-series D2-series
D200
Comment
D70S D70
D2-series
D100
D200
in low light conditions. See the user’s manual provided with your
camera for details.
When this option is checked, the camera will adjust sensitivity (ISO
equivalency) au to mat i cal ly (ISO auto).
White balance is used to ensure that colors which appear white when
viewed directly are white in the fi nal photograph. It can also be used
to produce an intentionally unbalanced rendering of a scene. See
the camera manual for details.
Click Fine Tune … to make fi ne adjustments to white balance. If
Choose color temp. is selected (D2 series and D200 only), this button will be labeled Set temp…. Click this button to choose a color
temperature. Fine tuning is not available with preset white balance.
This fi eld lists the comments
for all white balance presets.
Clicking Edit… when Preset is
selected for white balance displays the dialog shown at right,
where the comments for each
of the white balance presets
can be edited.
Click OK to copy the comments to the camera. Comments can be
up to thirty-six characters long and contain letters, numbers, quotes,
apostrophes, spaces, and any of the following characters: “,” “.” “!” “?”
“#” “$” “%” “&” “(” “)” “[” “]” “{” “}” “*” “+” “-” “/” “:” “;” “<” “=” “>” “_” and
“@”.
Return to fi r s t page
49
Page 50

Overview Appendices
Using Camera Control Pro
Camera Controls 5/12
The Storage Tab
The following settings can be adjusted from the Stor age tab:
Data Format
JPEG Quality
JPEG Compression
D2X D2Xs
D200
Return to fi r s t page
D2Hs
The following data for mats are available: RAW (12-bit) + JPEG (8bit) (D2 series/D200/D70S/D70/D50 only), RAW (12-bit), TIFF-RGB
(8-bit) (D1 series/D2 series/D100 only), TIFF-YCbCr (8-bit) (D1 series
only), and JPEG (8-bit). This set ting determines pix el bit depth and
fi l e s i z e .
When data format is set to JPEG (8-bit), you can choose image quality
from Fine, Normal, and Ba sic. When RAW (12-bit) + JPEG (8-bit)
is selected with the D2 series and D200, image quality can be selected
from Fine, Normal, and Ba sic. When RAW (12-bit) + JPEG (8-bit) is
selected with the D70S, D70, or D50, image quality is fi xed at Basic.
Choose from Fixed size and Optimal quality. See the camera man-
ual for details.
50
Page 51

Overview Appendices
Using Camera Control Pro
Camera Controls 6/12
The Storage Tab
D1-series
Color
Image Size Choose image size. See the camera manual for details.
RAW Compression
D2-series
High-speed crop
D2Xs
D1X
D2X
D1H
Choose from Color and Black & White. Black & White is not
available when RAW is selected for Data Format.
Check this option to compress NEF (RAW) images taken at a
data for mat setting of RAW (12-bit) + JPEG (8-bit) (D2 series
D200
and D200 only) or RAW (12-bit).
Select this option to enable high-speed crop. See the camera
manual for details.
Return to fi r s t page
51
Page 52

Overview Appendices
Enable controls on the camera body
Enable controls on the camera body
Using Camera Control Pro
Camera Controls 7/12
The Mechanical Tab
The fol low ing settings can be ad just ed from the Me chan i cal tab:
Shoot ing Mode
Maximum Shots
D2-series
D70S
D50
D200
D70
Return to fi r s t page
Sets the shooting mode for D1-series cameras connected in PC mode to Single
or Continuous. Changes to this setting also apply to Custom Setting 30. The
shooting mode for the D70S, D70, and D50 can be selected from Single and
Continuous. Unless
connection status area, the shooting mode for D2-series and D200 cameras
can be selected from Single, Continuous low speed, and Continuous high
speed. If Continuous is selected for the D70S, D70, or D50 or if Continuous
low speed or Continuous high speed is selec ted for a D2-series or D200 cam-
era, the AF and Shoot and Shoot buttons will instead be labeled AF and Start
and Start. If
era is connected, the current shooting mode will be shown, but changes can
only be made using camera controls. See the camera manual for details.
Use the arrows to choose the maximum number of shots that can be taken in
a single burst in continuous mode, or enter a value directly in the text box. The
maximum permitted value varies with the current image-quality setting; the
value chosen should not, however, exceed the capacity of the camera memory
buff er as shown at the right edge of the LCD display. Values larger than the
capacity of the camera memory buff er will be shown in red. This setting only
applies when the camera is connected, and diff ers from the maximum selected
in the Custom Settings menu.
Enable controls on the camera body is checked or a D100 cam-
Enable controls on the camera body is checked in the
52
Page 53

Overview Appendices
Enable controls on the camera body
Using Camera Control Pro
Camera Controls 8/12
The Mechanical Tab
Select this option to perform exposure,
fl a s h , o r w h ite balance bracketing during shooting. To change bracketing options, click Set BKT. The dialog shown
at right will be displayed.
• AE/WB/Flash Bracketing: Choose
the type of bracketing performed.
• Change Factor when Exposure
Mode is set to Manual (D2 series/
Auto Bracketing
D2-series
D200
D50D70
D70S
D200 only): Choose how bracketing is
performed in manual exposure mode.
• Bracketing Type / Bracketing Step /
Bracketing Order / Exposure M ode:
Choose the bracketing program, exposure or white balance increment,
bracketing order, and exposure mode.
Bracketing type and bracketing order
are not available with the D50.
D2 series / D200
AF-Area Mode
Fo cus Mode
Return to fi r s t page
D70S/D70/ D50
Choose the AF-area mode. If
checked (D2 series/D200 only), the current AF-area mode will be shown,
but changes can only be made using camera controls. See the camera
manual for details.
The cur rent focus mode setting is displayed. Se e the cam era man u al for
details. This set ting can not be changed from Camera Control Pro.
Enable controls on the camera body is
53
Page 54
Overview Appendices
Using Camera Control Pro
Camera Controls 9/12
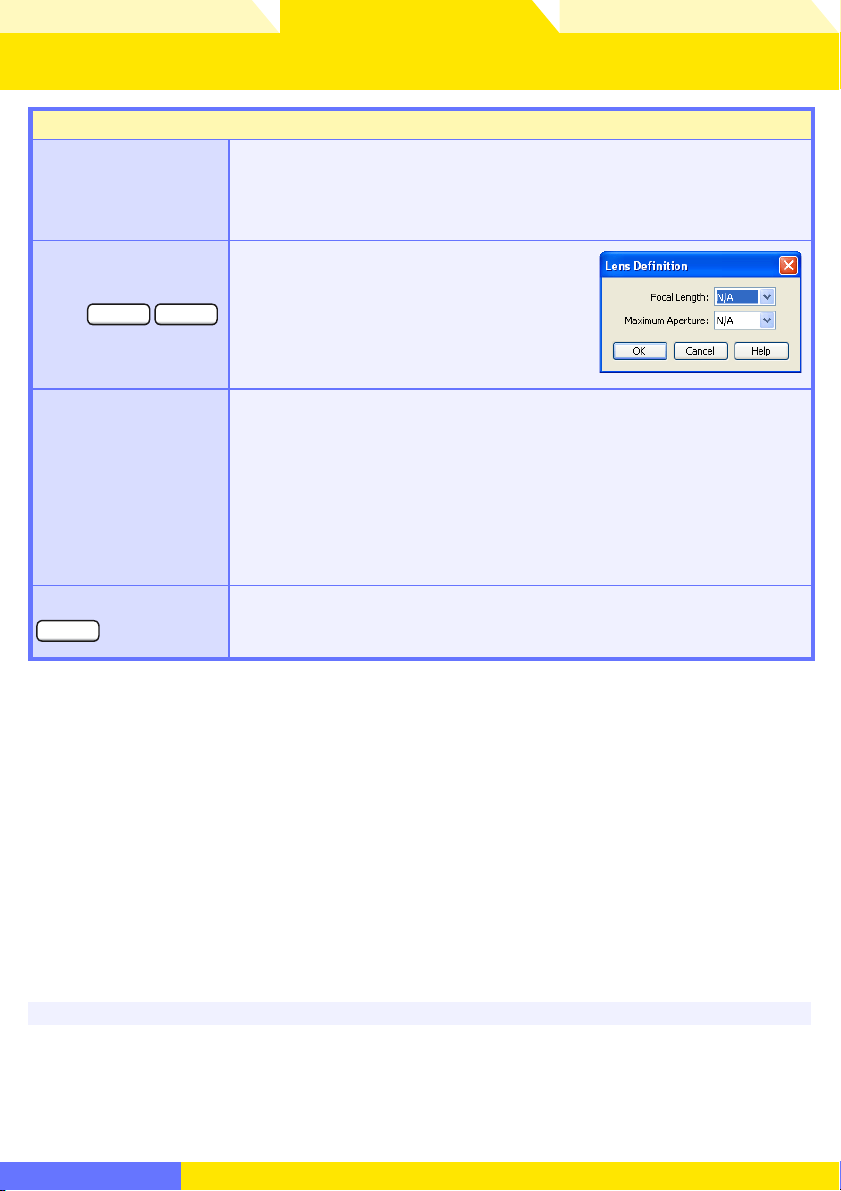
The Mechanical Tab
Displays the focal length and maximum ap er ture of the lens currently
Lens
D2-series
Edit…
Main Battery Level
Clock Battery Level
D1-series
D200
attached to the cam era. De pend ing on the lens type, some in for ma tion
may not be displayed. If the lens focal length or maximum aperture have
been specifi ed manually, an asterisk will appear next to these values.
This button is only available when a nonCPU lens is mounted on the camera. Clicking Edit… displays the dialog shown at
right, where the lens focal length and maximum aperture can be entered. Click OK to
copy the values to the camera.
Displays the level of the main camera battery. Green indicates that the
battery has enough charge for continued operation. Yellow indicates
that battery level is low; ready a fully charged spare battery pack. Red
indicates that the battery is exhausted, and that no further pho to graphs
can be taken until the battery pack has been replaced. You may not be
able to control the camera from Camera Control Pro when the battery is
exhausted. Replace with a fully charged spare battery pack or use an AC
adapter (available separately).
Displays the level of the camera clock battery. Should this display turn
yellow or red, have the clock battery replaced by an authorized Nikon
service representative (a fee is charged for this service).
Self-Timer and Remote Modes
When a D2-series, D200, D70S, D70, D50, or D100 camera is set to self-timer mode, or when the D70S,
D70 or D50 is set to delayed remote or quick-response remote mode, the Mechanical tab will show
a shooting mode of Single, and any photographs taken with the Camera Control Pro shoot but tons
will be taken in single-frame mode with no shutter-release delay. To take pictures in self-timer or
remote mode, use the shutter-release button on the camera.
Return to fi r s t page
54
Page 55

Overview Appendices
Enable controls on
the camera body
Using Camera Control Pro
Camera Controls 10/12
Continuous Mode
D2-series
D200
D70S
D70 D50
When a D2-series, D200, D70S, D70, or D50 camera is connected, the amount of memory remaining
in the camera memory buff er is displayed at the right edge of the simulated LCD panel. This information is updated at regular intervals, but temporary discrepancies may exist between the display
and the actual amount of memory remaining in the buff er.
Non-CPU Lenses
The following restrictions apply to Camera Control Pro when a non-CPU lens is mounted on the
camera (the operations listed can still be performed using the controls on the camera body; see the
camera manual for details):
D2-series
With lens data
Exposure
Mode
Shutter
Speed
Aperture
AF and
Shoot
Can be selected from Aperturepriority auto and Manual.
Can only be adjusted in manual exposure mode.
Shown with asterisk.
Can not be used.
Shoot Can be used.*
* If D100, D70S, D70, or D50 is connected and set to an exposure mode other than manual, a warning will be displayed.
D200
No lens
data
D1-series
D100
Can not be adjusted. Mode selected with camera
displayed. Photos
can only be taken
in mode M.
Aperture shown as “f/--”. Can not be adjusted.
D70S D70 D50
Can only be adjusted
if
Enable controls on
the camera body is
not checked. Otherwise
same as D100.
Return to fi r s t page
55
Page 56

Overview Appendices
“Edit
Camera Curves
“ dialog
Using Camera Control Pro
Camera Controls 11/ 12
The Image Processing Tab
The following settings can be adjusted from the Image Pro cess ing tab:
Image Optimize
D70SD200 D70
Sharpening
Tone Com p
Color space
D2X
Color Mode
D1H D100
D1X
D200 D50
D2-series
D70S
Saturation
D200 D50D70D70S
Return to fi r s t page
D2Xs
D70
D50
D200
Choose the type of image optimization performed. See the
cam era man u al for details.
Choose how much the camera sharp ens outlines. See the
camera manual for details.
Adjust contrast. See the cam era man u al for details. Selecting “Custom“ or “Custom 1–3 “ (D2Xs only) and clicking Edit
will display
“Edit
Camera Curves
“ dialog.
Choose a color space. See the cam era man u al for details.
Choose a col or mode. See the camera manual for de tails.
With the D1, colors are op ti mized for the NTSC col or space,
regardless of the op tion chosen.
Adjust color saturation. See the camera manual for details.
56
Page 57

Overview Appendices
Using Camera Control Pro
Camera Controls 12 / 12
The Image Processing Tab
Modify hue while leaving brightness and chro ma un af -
Hue Adjustment
D1H D100
D1X
D200 D50D70
D2-series
D70S
Long Exposure Noise Reduction
D2-series
D70
D50
D200D100
High ISO Noise Reduction
D2Xs
D2Hs
D70S
D200D2X
fect ed. Adjustments can be made in the range –9 ° to 9 °,
with 0 ° rep re sent ing the original hues as recorded by the
camera (in D1-series cam er as, –9 ° is equiv a lent to a camera
hue setting of 0, 0 ° to a setting of 3, and 9 ° to a setting of
6).
Select this option to reduce noise at slow shutter speeds.
See the camera manual for details.
Select On (Normal), On (Low)(D200 only) or On (High)
to reduce noise at high sensitivities. See the camera manual
for details.
Return to fi r s t page
57
Page 58
Overview Appendices
Using Camera Control Pro
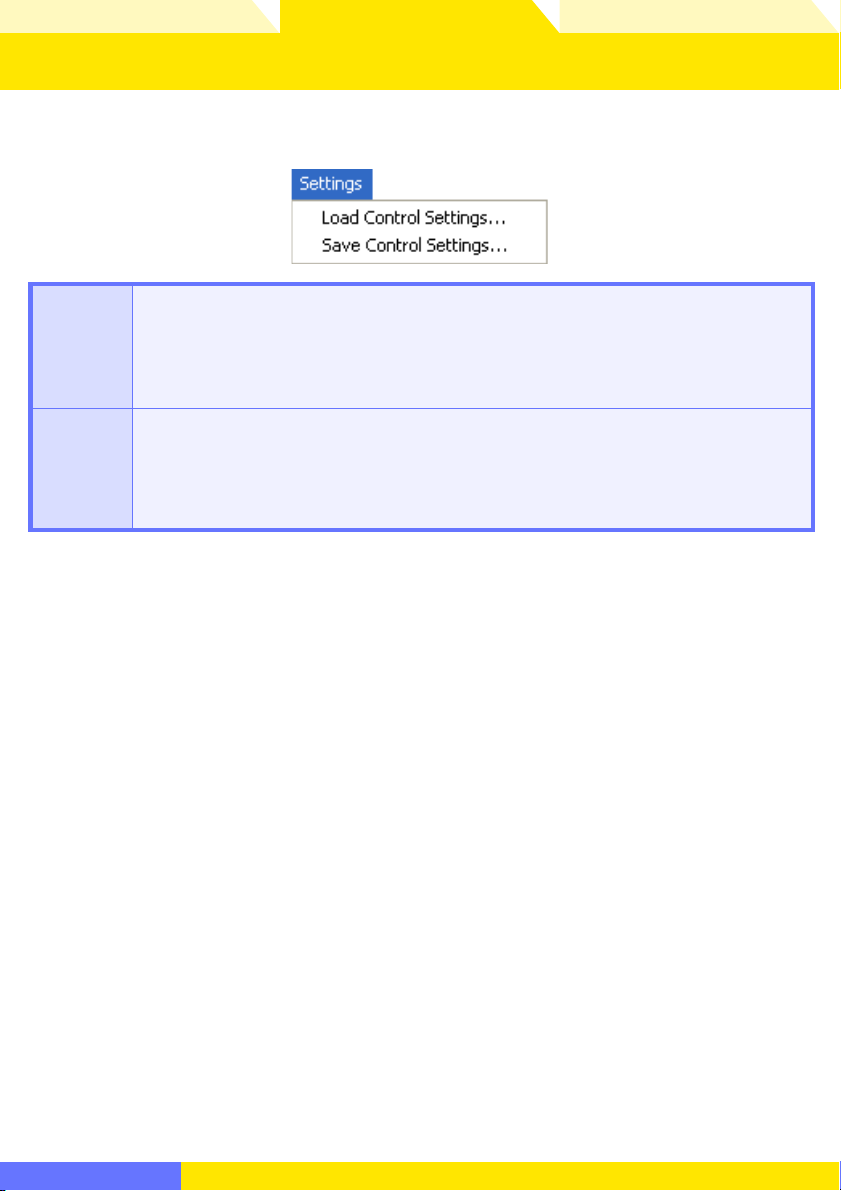
Saving and Loading Camera Control Settings
The Camera Control Pro option in the Set tings menu is used to save Camera Control Pro
set tings and to load and apply previously saved settings.
Select this item to load camera settings previously saved us ing Save Control Set-
Load Control
Settings…
Save Control
Settings…
tings… (see be low). A dialog will be dis played where you can navigate to the drive
(vol ume) and di rec to ry con tain ing the desired set tings fi le (only fi les with the extension “.ncc” will be dis played). The settings in the Cam era Con trol Pro window will
in stant ly re vert to the saved settings. Bracketing settings are not aff ected.
Select this item to save the settings in the Camera Control Pro window to a named
fi l e . T h e s e settings can later be recalled using Load Control Settings…. Choos ing
Save Control Settings… displays a di a log where you can choose a des ti na tion and
fi l e n a m e f o r c u r r ent camera settings. Camera Control Pro set tings are saved with the
ex ten sion “.ncc”. Note that bracketing settings are not saved.
Return to fi r s t page
58
Page 59

Overview Appendices
Custom Settings dialog
Using Camera Control Pro
The Camera Menu 1/4
The commands in the Camera menu are used to adjust the following camera settings:
Custom Settings…
Selecting this option opens the
ad just ed.
Set Date and Time…
Selecting this op tion opens the dialog shown at right, where you can
set the cam era’s clock calendar to the current date and time. To view
the cur rent time and date set tings, click Use Current Date/Time.
Click Set to set the clock cal en dar to the time and date shown.
Edit Camera Curves…
This op tion is used to create a custom tone com pen sa tion curve and down load it to the cam era,
where it applies when “Cus tom” is se lect ed for the camera tone compensation option.
Custom Settings dialog, where camera Custom Set tings can be
The controls in the Edit Camera Curves win dow are similar to those used to edit tone curves in
Adobe Photoshop and other imaging software, except in the following respects: (1) only the master channel, not individual RGB channels, may be edited; (2) there is a limit of 20 spline points; (3)
the midpoint may not be edited; (4) a user-defi ned sample image can be se lect ed by clicking
Sample Image… (the sample image must be a RAW image created with a D1-series, D2-series,
D100, D200, D70S, D70, or D50 camera). Any chang es to curves are refl ected in the sample image.
In the case of the D2Xs, up to three curves can be edited using the Select the Curve for Edit
menu. To copy the edited curve to the camera, click OK.
The upper left section of the Edit Camera Curves window contains Load… and Save… but tons.
By clicking the Load… button, previously stored curves, with less than 20 spline points, can be
selected via the “Open” dialog (if the selected fi le has more than 20 spline points, a warning will
be displayed, and no fi le will be loaded). The Curves settings fi les from Nikon Capture Editor can
also be selected. Look for fi les with the “.ntc” or “.ncv” ex ten sion.
The Save… button opens the “Save As” dialog, where you can save the current curve.
Return to fi r s t page
59
Page 60

Overview Appendices
Using Camera Control Pro
The Camera Menu 2/4
Fine-Tune White Balance…
D1-series
D2-series
D100
D200
D70S
Selecting this op tion displays the dialog shown at right, where
white bal ance can be fi ne-tuned be tween –3 and +3. The
value selected for Auto will be added to the white balance
setting the camera chooses for auto white balance. Click ing
Re set re turns all values to defaults. Click OK to ap ply the
cur rent set tings to the cam era, or click Cancel to dis card any
chang es and return to the Camera Control Pro win dow.
Set Color Temperature…
D2-series
D200
Selecting this op tion displays the dialog shown at right, where
color temperature can be chosen from a menu. The value
chosen takes eff ect whenever Choose color temp. is selected for white balance. Click OK to ap ply the cur rent set tings to
the cam era, or click Cancel to exit without saving changes.
Measure White Balance…
Use this op tion to measure preset white balance. If the cam era
cur rent ly con nect ed sup ports multiple values for preset white
bal ance, the set ting that will be used to store the mea sured
val ue can be cho sen from the pop-up menu at the top of the
dialog. Adjust camera set tings as de scribed in the sec tion on
preset white balance in the camera user’s man u al and click OK
to measure a value for white bal ance.
D70
D2Xs (dialogs for other cameras may
diff er)
Set Color Temperature…
D2-series
D200
The desired results may not be achieved with fl ash or fl uorescent lighting.
Choosing a Mode
D70S
D70
D50
The Measure White Balance… option is only available in P, S, A, and M modes.
Return to fi r s t page
60
Page 61
Overview Appendices
Using Camera Control Pro
The Camera Menu 3/4
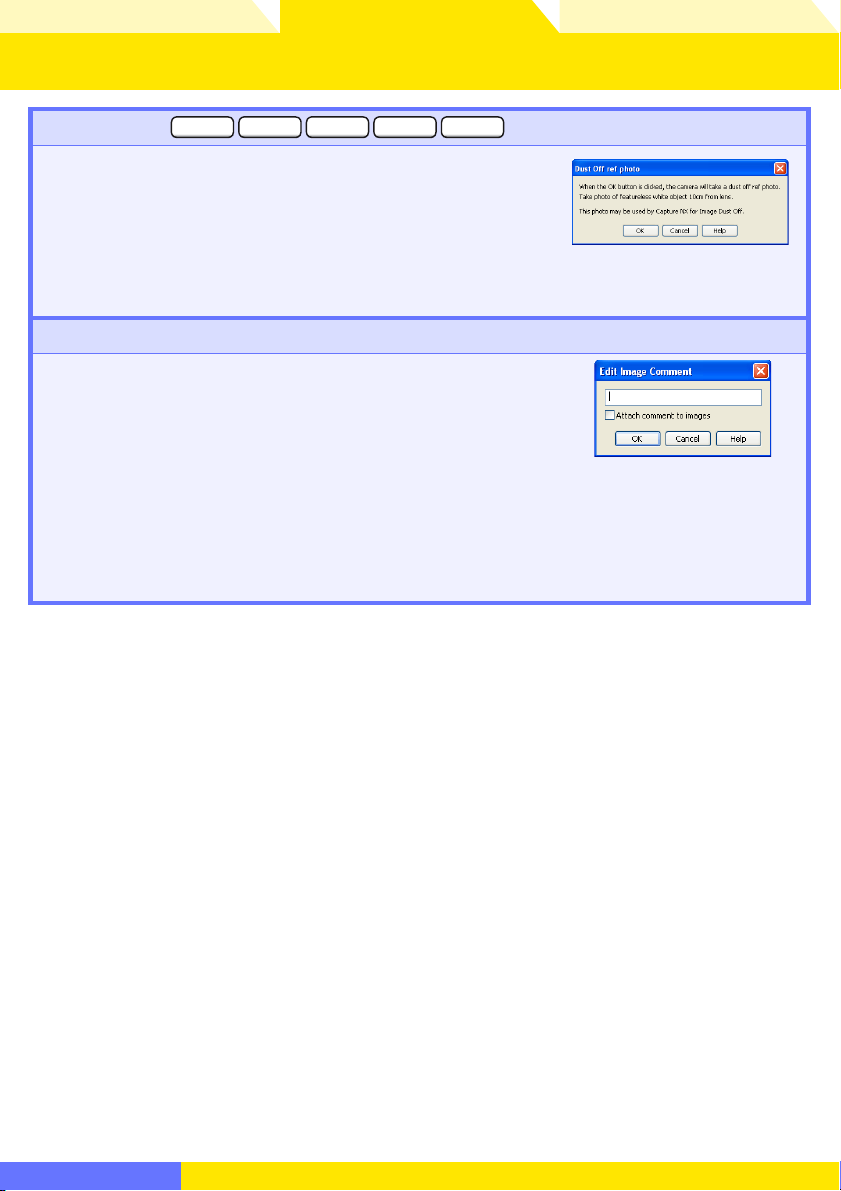
Dust Off Ref Photo
Choose this option to take a reference photo for the Image Dust
Off option in Capture NX (available separately) and other Nikon
software. The dialog shown at right will be displayed. With the
camera lens ten centimeters (four inches) from a featureless
white object, frame the object so that it fi lls the viewfi nder and
click OK to record an Image Dust Off reference photo. See the
camera manual for details.
Edit Image Comment…
Selecting this option displays the dialog shown at right, where
you can enter a com ment or title for subsequent pho to graphs.
If the camera cur rent ly con nect ed is in the D1-se ries, enter a title
of thir ty-eight char ac ters or less and click OK. The title will be
used for all sub se quent pho to graphs taken while the camera is
con nect ed. When a D2-series, D100, D200, D70S, D70, or D50
cam era is con nect ed, the title is stored in the cam era as an im age com ment of thirty-six char ac ters or less which is ap pend ed
to pho to graphs only when the Attach comment to images
box is checked.
D2-series
D200
D70S
D70
D50
D2Xs (dialogs for other cameras may
diff er)
Return to fi r s t page
61
Page 62
Overview Appendices
Auto B
racketing
Time Lapse Photography dialog
Using Camera Control Pro
The Camera Menu 4/4
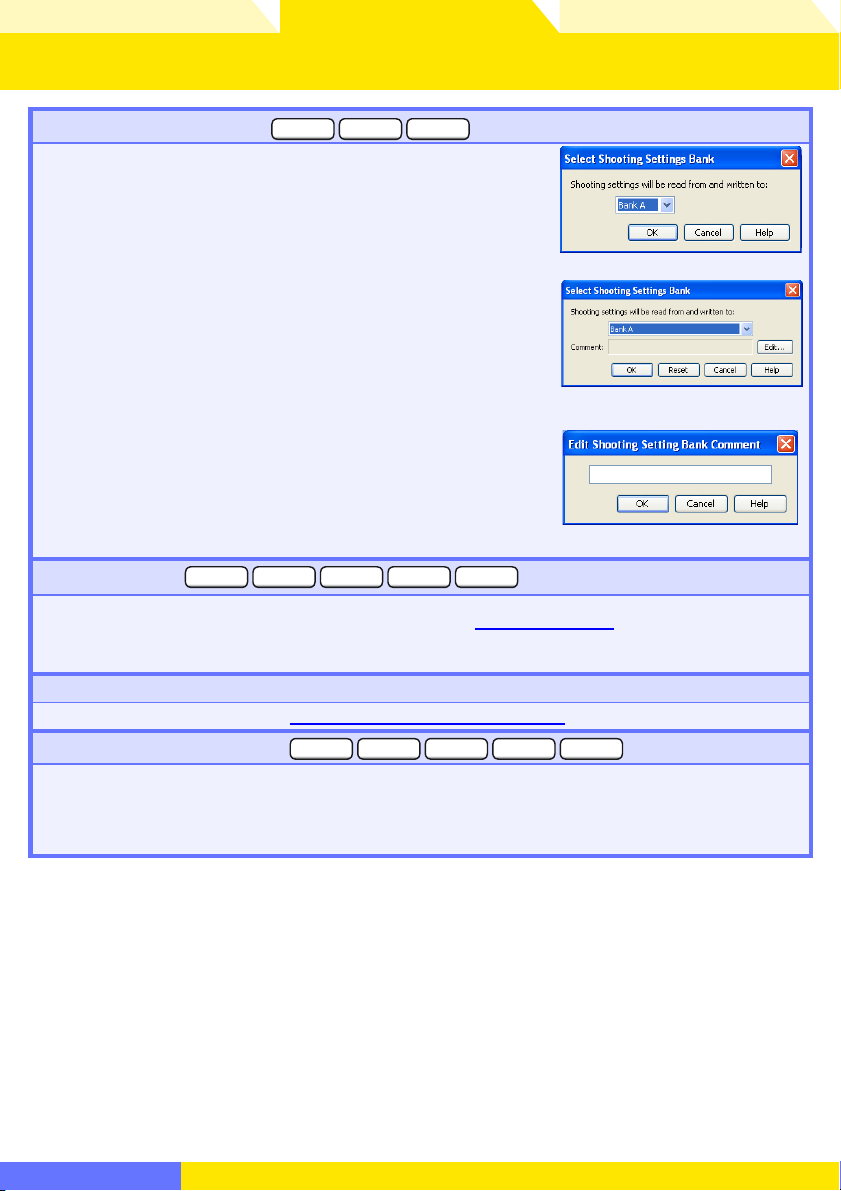
Select Shooting Set tings Bank…
D2-series
D200D100
Selecting this option dis plays the dialog shown at right, where
you can choose the shooting menu bank in which chang es to
settings will be stored while the camera is con trolled from Camera Control Pro. See the camera manual for details.
The D2 series and D200 allow a descriptive comment to be added to the name of each shooting menu bank. Clicking Edit…
displays the dialog shown at right, where the comments for each
bank can be edited. Click OK to copy the comments to the camera. Comments can be up to twenty characters long and contain
letters, numbers, quotes, apostrophes, spaces, and any of the following characters: “,” “.” “!” “?” “#” “$” “%” “&” “(” “)” “[” “]” “{” “}” “*” “+”
“-” “/” “:” “;” “<” “=” “>” “_” and “@”.
Set Bracketing Mode
D2-series
D200
D70S
D70
Selecting this option displays the BKT Mode dialog. See
D50
Auto B
racketing in the Mechanical panel
for details.
Time Lapse Photography…
Selecting this option opens the
Enable controls on the camera body
Time Lapse Photography dialog.
D2-series
D200
D70S
D70
D100
D2 series/D200
Edit Comment dialog
D50
Check this option to enable camera controls, allowing settings to be adjusted and photographs
taken directly from the camera. If this option is not checked, only the power switch and AF-area
mode selector can be used.
Return to fi r s t page
62
Page 63
Overview Appendices
Using Camera Control Pro
Custom Settings 1/5
Most of the custom settings stored in camera memory can be viewed and adjusted from
the Custom Settings window in Camera Control Pro. For more information on Cus tom Set tings, see the doc u men ta tion pro vid ed with your camera.
Select Cus tom Settings… from the Camera menu
1
The Custom Settings dialog for the current camera will be displayed.
Changes to Custom Settings
Changes made to settings in the Custom Settings dialog are stored in the camera, not on the computer hard disk. This means that changing settings in the Custom Settings dialog has the same
eff ect as chang ing Custom Settings using camera controls.
Return to fi r s t page
63
Page 64

Overview Appendices
Using Camera Control Pro
Custom Settings 2/5
Choose a Custom Settings bank (D1 series/D2 series/D100/D200 only)
2
Choose a Custom Settings bank (Custom Settings set) from the pop-up menu at
the top right corner or the Cus tom Settings dialog.
The banks available depend on the model of camera currently connected. When
the D1 or D100 is con nect ed, you have a choice of banks A or B; when a D2-series,
D1X, D1H, or D20 0 camera is con nect ed, banks A, B, C, or D can be selected.
Click OK
3
After making any changes to Custom Settings, click OK to save changes in the cam-
era Custom Settings bank and exit the Custom Settings dialog.
Return to fi r s t page
64
Page 65

Overview Appendices
Using Camera Control Pro
Custom Settings 3/5
Custom Settings
Custom Settings can not be saved to a separate fi le. Clicking the Reset button resets all Custom
Settings to their default values.
Settings That Can Not Be Adjusted from the Custom Settings Window
The Custom Settings listed below can not be adjusted in the Custom Settings window.
• Mirror lock-up for CCD cleaning (D1-series Custom Setting 8) /Cleaning mirror up (D100 setup
menu): can only be ad just ed from the camera
• RAW (NEF) image save (D1-series Custom Setting 28): if this option is set to “0” (off ) when Camera
Control Pro is started, a message will be displayed. Clicking OK in this dialog sets Custom Setting
28 to “1” (uncompressed RAW image save enabled). Custom Setting 28 can only be returned to “0”
from the camera.
• ISO Auto (D100 Custom Setting 3) /ISO Boost (D1-series Custom Setting 31): can be ad just ed from
the Exposure 2 tab of the Camera Control Pro window.
• PC Shooting Mode (D1-series Custom Setting 30): this option is adjusted from the Me chan i cal tab
of the Camera Control Pro window.
• Tone Compensation (D1-series Custom Setting 24) /Color Mode (D1X/D1H Custom Setting 32) /
Hue Ad just ment (D1X/D1H Custom Setting 33) /Noise Reduction (D100 Custom Setting 4): can be
adjusted from the Processing tab of the Camera Control Pro window.
Return to fi r s t page
65
Page 66

Overview Appendices
Using Camera Control Pro
Custom Settings 4/5
Custom Settings for D1-Series and D100 Cameras
Custom Settings for D1-series and D100 cameras are divided among three tabs: Page 1,
Page 2, and Page 3. See the camera manual for details.
Custom Settings for D70, D70S, and D50 Cameras
Custom Settings for the D70S, D70, and D50 are divided among three tabs: Basic, Advanced
1, and Advanced 2. See the camera manual for details.
Return to fi r s t page
66
Page 67

Overview Appendices
Using Camera Control Pro
Custom Settings 5/5
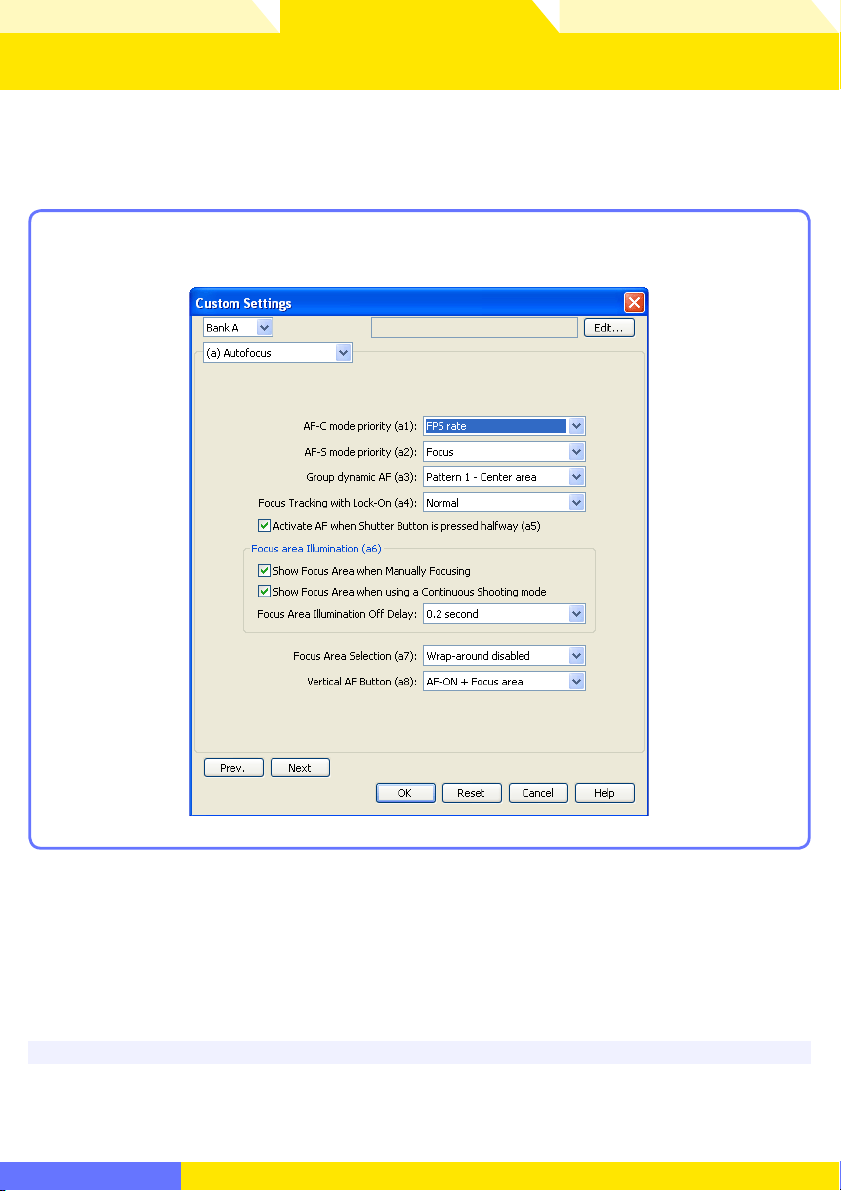
Custom Settings for D2-Series and D200 Cameras
Custom Settings in each bank are divided into six groups: autofocus, metering / exposure,
timers / autoexposure and autofocus lock, shooting / display, bracketing / fl ash, and controls.
The group can be chosen from the group menu or by clicking the Next and Prev. but-
tons.
Group menu
Prev./ Next
buttons
D2-series and D200 cameras allow a descriptive comment to
be added to the name of each Custom Settings bank. Clicking Edit… displays the dialog shown at right, where the comments for each bank can be edited. Click OK to copy the
comments to the camera. Comments can be up to twenty
characters long and contain letters, numbers, quotes, apostrophes, spaces, and any of the
following characters: “,” “.” “!” “?” “#” “$” “%” “&” “(” “)” “[” “]” “{” “}” “*” “+” “-” “/” “:” “;” “<” “=” “>”
“_” and “@”.
Return to fi r s t page
67
Page 68

Overview Using Camera Control Pro
Appendices
Camera Control Pro Preferences 69
The General Tab 70
The Color Management Tab Windows 71
The Color Management Tab Macintosh 74
Uninstalling Camera Control Pro
RGB Color Space Profi les 78
Device Registration 80
Customer Support 93
Appendices
Windows 76
Macintosh 77
Windows XP 81
Windows 2000 85
Return to fi r s t page
68
Page 69

Overview Using Camera Control Pro
General
Color Management
Appendices
Camera Control Pro Preferences 1/7
To view the Preferences (Options) dialog for Camera Control Pro, select Options… from the
Tool s menu (Windows) or select Preferences… from the application menu (Macintosh).
Windows Macintosh
The Pref er enc es dialog contains
General and
Color Management tabs.
Return to fi r s t page
69
Page 70

Overview Using Camera Control Pro
Appendices
Camera Control Pro Preferences 2/7
The General Ta b
The General tab contains the following items:
Choose how long the exposure meters remain on when the cam era is operated
on battery power. This set ting only takes eff ect when the camera is con nect ed and
While
Camera
Control Pro
is running,
keep camera
awake
Folder for
temporary
data /Volume
for temporary data
pow ered on with Camera Control Pro running, and takes pre ce dence over the auto
meter off option cho sen using camera Custom Set tings. Cameras powered by an
AC adapter and D2-series, D100, D200, D70S, D70, and D50 cameras will stay awake
indefi nitely, regardless of the setting chosen here.
Specify the folder or volume in which tem po rary data, such as image cache data,
will be stored. The default folder for Windows is the “TEMP” folder in the Windows
directory, while the default vol ume for the Macintosh is the start-up disk. To choose
a diff erent folder in the Windows version of the program, click the Browse… button
and navigate to the de sired location. In the Macintosh version, a new volume can be
chosen from the pop-up menu.
Return to fi r s t page
for 15 min utes (D1-series only): The exposure meters turn off automatically if no
operations are performed for 15 minutes.
Always: The exposure meters remain on indefi nitely. Note that this will increase
the drain on the battery.
70
Page 71

Overview Using Camera Control Pro
Appendices
Camera Control Pro Preferences 3/7
The Color Management Tab (Windows)
The Color Management tab is where you spec i fy the color management profi les used for
displaying im ag es on your monitor, ed it ing and saving RGB images, and saving and printing
CMYK images.
Change Display
Profi le
Default RGB
color space
Return to fi r s t page
To c ho os e a dis pl ay profi le, click Change Display Profi le…. The Windows “Display
Properties” dialog will be displayed; open the Settings tab and click Advanced…
to open the display adapter properties dialog. To select a display profi le, open the
Color Management tab and click Add.
The output color-space profi le used when work ing with RGB images is displayed
here. Click Browse… to choose a new default RGB profi le. If Use this instead
of an em bed ded profi le when opening fi les is checked, this RGB color space
profi le will be used for all images. If it is not checked, the profi le embedded in each
image will be used.
71
Page 72

Overview Using Camera Control Pro
Appendices
Camera Control Pro Preferences 4/7
The Color Management Tab (Windows)
Specifi es the printer profi le to be used when printing images from PictureProject.
Use profi le for printing : If this option is checked, you can choose a profi le for printing by clicking the Browse… but ton. The selected profi le will appear in the
adjacent text box. If this option is not checked, the default RGB color space will
be used.
Intent: If you have cho sen to use a printer profi le, the type of match ing to be
Printer profi le
CMYK separation profi le
per formed can be selected from Rel a tive and Per cep tu al. (De pend ing on the
pro fi le, chang ing the match ing meth od may produce no change in output. This
option is not sup port ed with some profi les; con sult the man u fac tur er for de tails.)
• Relative: Colors not in the gamut of the selected printer profi le will be printed
using the closest colors available. Other colors are not aff ected.
• Perceptual: If the image contains colors not in the gamut of the selected printer
profi le, all colors in the image will be compressed to fi t the gamut.
Lists the profi le used to convert RGB images to CMYK when saving images in CMYKTIFF for mat using PictureProject. To choose a diff er ent profi le, click the Browse…
button.
Return to fi r s t page
72
Page 73

Overview Using Camera Control Pro
RGB Color-Space Profi les
Appendices
Camera Control Pro Preferences 5/7
Multiple Displays
In a multiple display environment, choose a single profi le suited to all displays.
Default Display Profi le
The default Windows display profi le is “NKMonitor_win.icm.“ This profi le is equivalent to
sRGB.
Supported Color Profi les
Camera Control Pro supports only ICC (International Color Consortium) monitor and CMYK
pro fi les. Par tic u lar care should be exercised when choosing a CMYK profi le, as the profi le
supplied by the man u fac tur er of your output device may not be an ICC profi le.
RGB Color-Space Profi les” for a list of the RGB color-space profi les supplied with
See “
Camera Control Pro. The “NKCMYK.icm” CMYK profi le provided with Camera Control Pro is
a general-purpose, almost neutral profi le that is not based on a specifi c ink set, making it
suited for use where output conditions are not known.
The Color Management Tab
Changes to settings in the Color Management tab also apply to PictureProject. They are not
refl ected in Capture NX (available separately).
Return to fi r s t page
73
Page 74
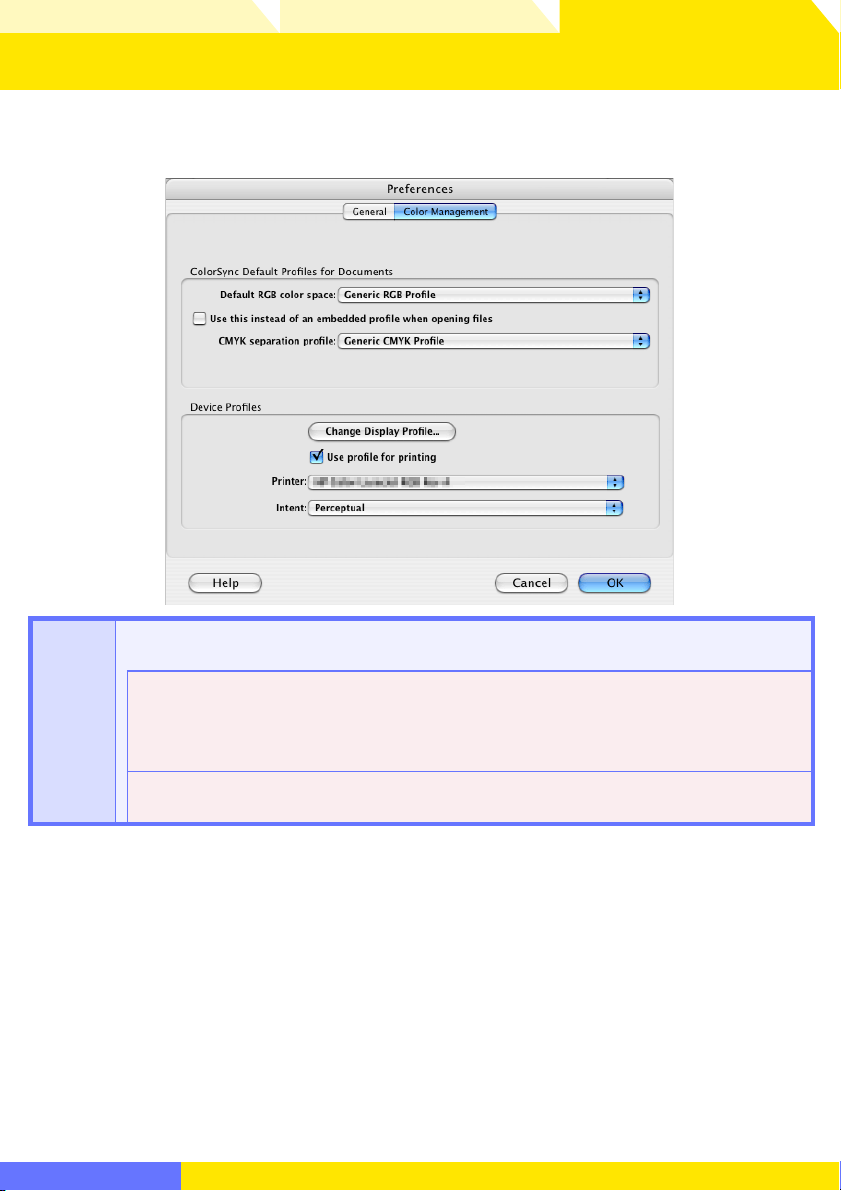
Overview Using Camera Control Pro
Appendices
Camera Control Pro Preferences 6/7
The Color Management Tab (Macintosh)
The Macintosh version displays the following options.
The default color-space profi les for editing and saving images are displayed in this
ColorSync
Default
Profi les
for Documents
area.
Default RGB color space: Choose the output color-space profi le used when working with
RGB images. If Use this instead of an embedded profi le when opening fi les is
checked, this RGB color space profi le will be used for all images. If it is not checked,
the profi le embedded in each image will be used.
CMYK separation profi le: Lists the profi le used to convert RGB images to CMYK when saving images in CMYK-TIFF format.
Return to fi r s t page
74
Page 75

Overview Using Camera Control Pro
RGB Color-Space Profi les
Appendices
Camera Control Pro Preferences 7/7
The Color Management Tab (Macintosh)
Lists the default color-space profi les for monitors and printers.
Change Display Profi le…: If this button is displayed, you can click it to open the Displays
section of the System Pref er enc es dialog. Open the Color panel (Mac OS X) to choose
a display profi le.
Use profi le for printing: If this option is checked, the profi le listed in the Printer text
box will be used when print ing images. Note that CMYK profi les can not be used in
Camera Control Pro; if a CMYK profi le is se lect ed, the status of the Use profi le for
Device
Profi les
printing check-box can not be changed. If Use profi le for printing is not selected,
images will be printed using the default RGB profi le.
Intent: If you have chosen to use a printer profi le, the type of matching to be performed can be selected from Rel a tive and Perceptual. (Depending on the profi le,
changing the match ing method may produce no change in output. This option is not
supported with some profi les; consult the manufacturer for details.)
• Relative: Colors not in the gamut of the selected printer profi le will be printed using
the closest colors available. Other colors are not aff ected.
• Perceptual: If the image contains colors not in the gamut of the selected printer profi l e , a l l colors in the image will be compressed to fi t the gamut.
Supported Color Profi les
Camera Control Pro supports only ICC (International Color Consortium) monitor and CMYK
pro fi les. Par tic u lar care should be exercised when choosing a CMYK profi le, as the profi le
supplied by the man u fac tur er of your output device may not be an ICC profi le.
See “
RGB Color-Space Profi les” for a list of the RGB color-space profi les supplied with
Camera Control Pro. The “Nikon CMYK 4.0.3000” CMYK profi le provided with Camera
Control Pro is a general-purpose, almost neutral profi le that is not based on a specifi c ink
set, making it suited for use where output conditions are not known.
The Color Management Tab
Changes to the display profi le apply system wide. Changes to other settings in the Color
Management tab are not refl ected in Capture NX (available separately) and PictureProject.
Multiple Displays
Camera Control Pro will identify and list the profi les for all monitors in an extended desktop
display, allowing you to choose a separate profi le for each monitor.
Return to fi r s t page
75
Page 76

Overview Using Camera Control Pro
Appendices
Uninstalling Camera Control Pro Windows
Use an account with administrator privileges to perform the uninstall.
Click Start and select Camera Control Pro > Camera Control Pro Uninstall
1
from the program list.
Click Ye s to begin removing Camera Control Pro and all of its components.
2
If the uninstaller encounters read-only fi les or components shared by another ap-
3
plication, a confi rmation dialog will be displayed. Read the information displayed
carefully before deciding what to do with the aff ected components.
Click Finish. Restart the computer if so directed.
4
Return to fi r s t page
76
Page 77

Overview Using Camera Control Pro
Appendices
Uninstalling Camera Control Pro Macintosh
Use an account with administrator privileges to perform the uninstall.
Open the “Applications : Nikon Software : Camera Control Pro” folder and double-
1
click the Camera Control Pro Uninstaller icon.
Enter the administrator name and password and click OK.
2
Click Ye s.
3
Click Quit to exit the uninstaller once Camera Control Pro has been removed.
4
Return to fi r s t page
77
Page 78

Overview Using Camera Control Pro
Appendices
RGB Color Space Profi les 1/ 2
Profi les with a Gamma Value of 1.8
Color
profi le
Apple
RGB
Color-
Match
RGB
Profi les with a Gamma Value of 2.2
Color
profi le
sRGB NKsRGB.icm
Bruce RGB NKBruce.icm
Windows Macintosh Description
This profi le is used in desk-top publishing applications and in
Nikon
NKApple.icm
NKCMatch.
icm
Windows Macintosh Description
Apple RGB
4.0.0.3000
Nikon Color-
Match RGB
4.0.0.3000
Nikon sRGB
4.0.0.3001
Nikon
Bruce RGB
4.0.0.3000
Adobe Photoshop versions 4.0 or earlier, and is the typical RGB
profi le for Macintosh monitors. The corresponding RGB setting in Adobe Photoshop is “Apple RGB.” This profi le is suitable
for working with images dis played on the Macintosh.
The ColorMatch profi le is native to Radius PressView monitors.
It has a wider gamut than Apple RGB, with a particularly wide
area devoted to the reproduction of blues. The cor re spond ing
RGB setting in Adobe Photoshop is “Color Match RGB.”
This RGB profi le is used in the majority of Windows monitors. It
closely resembles the RGB commonly used in color television,
and is also used in the digital television broadcasting sys tem
that is on its way to becoming the industry standard in the
United States of America. Software and hardware man u fac tur ers use it as a default color profi le and guarantee op er a tion
when it used. It is also on its way to becoming the standard
for images on the web. This profi le is suited to users who plan
to use their digital images “as is,” without editing or print ing them. It however suff ers from the drawback of a narrow
gamut with a limited area available for reproducing blues. The
corresponding RGB setting in Adobe Photoshop 5.0 and 5.5
is “sRGB,” the corresponding setting in Adobe Photoshop 6.0
“sRGB IWC61966-2.1.”
This color profi le attempts to expand on the ColorMatch RGB
gamut by defi ning the chro ma tic i ty for G as lying between the
values for G in the Adobe RGB and ColorMatch color-space
profi les. It was proposed by Bruce Fraser, who claims that it
includes most of the colors in the SWOP CMYK gamut. The R
and B used in the Bruce RGB and Adobe RGB color-space profi l e s m a t c h .
Return to fi r s t page
78
Page 79

Overview Using Camera Control Pro
Appendices
RGB Color Space Profi les 2/2
This is the color space for video defi ned by the National Televi-
NTSC
(1953)
Adobe
RGB
(1998 )
CIE RGB NKCIE.icm
Adobe
Wide RGB
NKNTSC.icm
NKAdobe.
icm
NKWide.icm
NTSC (1953)
4.0.0.3000
Nikon Adobe
RGB (1998)
4.0.0.3000
Nikon
CIE RGB
4.0.0.3000
Nikon
Adobe-
Wide RGB
4.0.0.3000
sion Standards Committee (NTSC) in 1953 and used in early
color televisions. This color space is also used in some Far-East
newspaper and printing organizations. The corresponding
RGB setting in Adobe Photoshop is “NTSC (1953).”
A color-space profi le defi ned in Adobe Photoshop 5.0. It has a
wider gamut than sRGB and includes the colors found in most
CMYK gamuts, making it suitable for users involved in desktop
publishing. The cor re spond ing RGB setting in Adobe Photoshop 5.0 is “SMPTE-240M,” the corresponding setting in Adobe
Photoshop 5.5 or later “Adobe RGB (1998).”
A video color-space profi le established by the Commission
Internationale de l’Éclairage (CIE). While it boasts a fairly wide
gamut, it suff ers from the drawback that the area devoted to
the reproduction of cyan is relatively small. The corresponding
RGB setting in Adobe Photoshop is “CIE RGB.”
This color-space profi le, designed by Adobe, incorporates most
of the visible colors. This however has the consequence that
most of the colors it can express can not be reproduced on
standard monitors and printers. The corresponding RGB setting in Adobe Photoshop 5.0 or later is “Adobe Wide RGB.”
Return to fi r s t page
79
Page 80

Overview Using Camera Control Pro
Appendices
Device Registration
If D1-series cameras are not recognized by the computer to which Camera Control Pro is
installed, the camera or IEEE 1394 (FireWire) board may not be correctly registered with the
Windows Device Manager. To check whether a device is registered with the Device Manager, click on the links below.
Windows XP
Profes sional/Home Edition
Windows 2000 Professional
Opening the Device Manager
Devices are registered with the Windows Device Manager. To open the Device Manager:
Windows XP: Select Control Panel from the Start menu to open the “Control Panel” window, then
click Performance and Maintenance icon to open the Performance and Maintenance control
panel. Click the System icon to open the System Properties window. Open the “Hardware tab”
and click Device Manager.
Windows 2000: Right-click the My Computer icon on the desktop and select Properties from the
menu that appears. In the “System Properties” dialog, open the “Hardware” tab and click the Device
Manager button.
Return to fi r s t page
80
Page 81

Overview Using Camera Control Pro
Open the Device Manager
Appendices
Device Registration Windows XP 1/4
Registering the IEEE 1394 Interface Board
Confi rm that the OHCI-compliant IEEE 1394 interface board or card has been correctly registered with the system.
Open the Device Manager. If the camera has been correctly registered with the
1
system, the controller for your camera should appear under “1394 Bus Controller.”
If “IEEE 1394 Bus host controllers” is not listed in the Device Manager, or if the IEEE
139 4 inter f ace b oard or card is listed as an unknown or miscellaneous device or is
preceded by a red or yellow warning icon, follow the instructions in the manual
provided with the board to ensure that the drivers are properly installed.
Install the driver for D1-series cameras from the Camera Control Pro CD, then con-
2
nect the camera to the computer using an IEEE 1394 cable and turn the camera on.
The camera will be registered automatically.
Logging On
Log on as the “Computer Administrator” when registering the camera.
Before Connecting the Camera
Be sure to install Camera Control Pro before connecting the camera to the computer.
Return to fi r s t page
81
Page 82
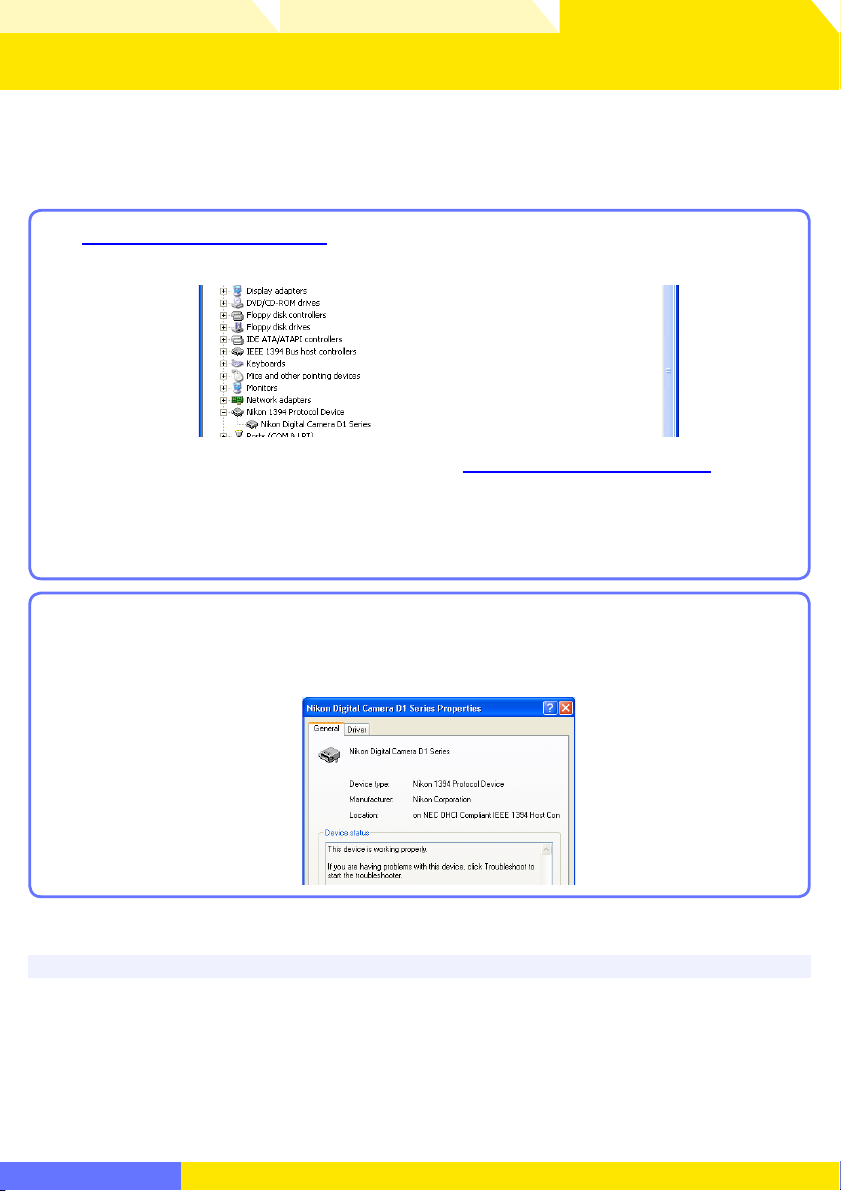
Overview Using Camera Control Pro
Open the Device Manager
reinstall the device drivers
Appendices
Device Registration Windows XP 2/4
Registering the Device Driver
Follow the instructions below to check that the camera has been correctly registered with
the system.
Open the Device Manager and confi rm that “Nikon 1394 Protocol Device” and the
1
camera is listed.
If the camera is listed under “Other devices,”
139 4 Proto col Device” is not listed in the Device Manager and the camera does not
appear under “Other devices,” disconnect the camera and restart the computer.
Reconnect the camera after the computer has restarted.
Double-click the listing for the camera that appears under “Other devices.” Click
2
the “General” tab and confi rm that “This device is working properly” appears under
“Device status.”
Trou bl eshooting
If “1394 Bus host Controller” is listed in the Device Manager but the entry for the Nikon D1 (D1X/D1H)
does not appear, check the following:
• Is the camera on?
• Is the battery fully charged? If you are using an AC adapter (available separately), is it properly
connected?
• Is the mode dial set to “PC”?
• Is the IEEE 1394 cable properly connected?
reinstall the device drivers. If “Nikon
Return to fi r s t page
82
Page 83

Overview Using Camera Control Pro
Appendices
Device Registration Windows XP 3/4
Reinstalling the Device Driver
If the camera is listed under “Other devices,” reinstall the device drivers as instructed below.
Double-click the listing for the camera that appears under “Other devices.”
1
Open the “General” tab and click Reinstall Driver….
2
Select No, not this time and click Next.
3
Return to fi r s t page
83
Page 84

Overview Using Camera Control Pro
Appendices
Device Registration Windows XP 4/4
Pressing the shift key to prevent the “Select Region” dialog from opening automati-
4
cally, insert the Camera Control Pro CD. Select Install the software automatically and click Next.
Click Finish.
5
Confi rm that “This device is working properly” appears under “Device status” in the
6
“General” tab of the camera “Properties” dialog.
Return to fi r s t page
84
Page 85

Overview Using Camera Control Pro
you will need to
update the
camera drivers
Open the Device Manager
Appendices
Device Registration Windows 2000 1/8
Registering the IEEE 1394 Interface Board
Confi rm that your OHCI-compliant IEEE 1394 interface board or card has been correctly
registered with the system.
Open the Device Manager. If the camera has been correctly registered with the
1
system, the controller for your camera should appear under “1394 Bus host Controller.”
If “1394 Bus host Controller” is not listed in the Device Manager, or if the IEEE 1394
interface board or card is listed as an unknown or miscellaneous device or is preceded by a red or yellow warning icon, follow the instructions in the manual provided with the board to ensure that the drivers are properly installed.
Install the driver for D1-series cameras from the Camera Control Pro CD, then con-
2
nect the camera to the computer using an IEEE 1394 cable and turn the camera on.
The camera will be registered automatically.
Logging On
Log on as the “Administrator” when registering the camera.
Updating Drivers for the D1
If you are already using the D1 with Nikon View DX or Nikon Capture,
camera drivers.
Before Connecting the Camera
Be sure to install Camera Control Pro before connecting the camera to the computer.
Return to fi r s t page
you will need to
update the
85
Page 86

Overview Using Camera Control Pro
Open the Device Manager
reinstall the device drivers
Appendices
Device Registration Windows 2000 2/8
Registering the Device Driver
Follow the instructions below to check that the camera has been correctly registered with
the system.
Open the Device Manager and confi rm that “Nikon 1394 Protocol Device” and the
1
camera are listed.
If the camera is listed under “Other devices,”
139 4 Proto col Device” is not listed in the Device Manager and the camera does not
appear under “Other devices,” disconnect the camera and restart the computer.
Reconnect the camera after the computer has restarted.
Double-click the listing for the camera that appears under “Other devices.” Click
2
the “General” tab and confi rm that “This device is working properly” appears under
“Device status.”
Trou bl eshooting
If “1394 Bus host Controller” is listed in the Device Manager but the entry for the Nikon D1 (D1X/D1H)
does not appear, check the following:
• Is the camera on?
• Is the battery fully charged? If you are using an AC adapter (available separately), is it properly
connected?
• Is the mode dial set to “PC”?
• Is the IEEE 1394 cable properly connected?
reinstall the device drivers. If “Nikon
Return to fi r s t page
86
Page 87
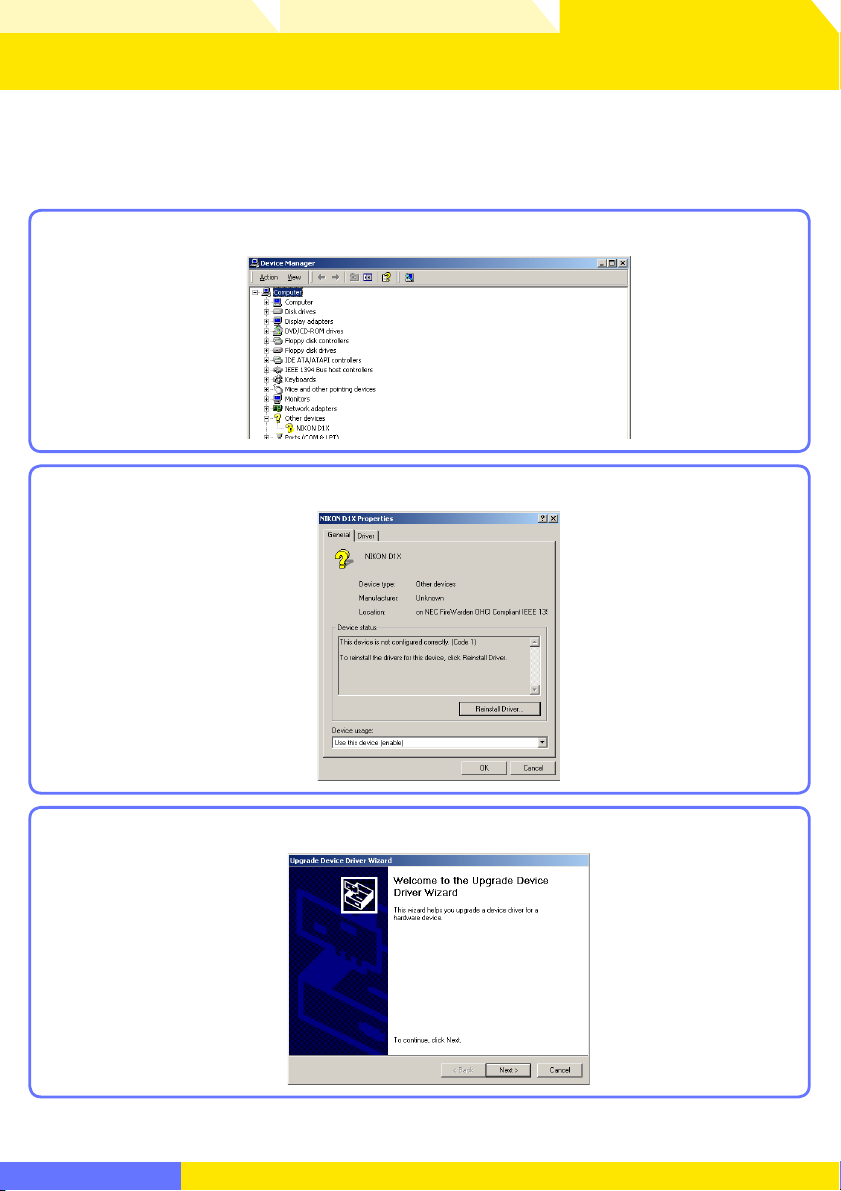
Overview Using Camera Control Pro
Appendices
Device Registration Windows 2000 3/8
Reinstalling the Device Driver
If the camera is listed under “Other devices,” reinstall the device drivers as instructed below.
Double-click the listing for the camera that appears under “Other devices.”
1
Open the “General” tab and click Reinstall Driver.
2
Click Next.
3
Return to fi r s t page
87
Page 88
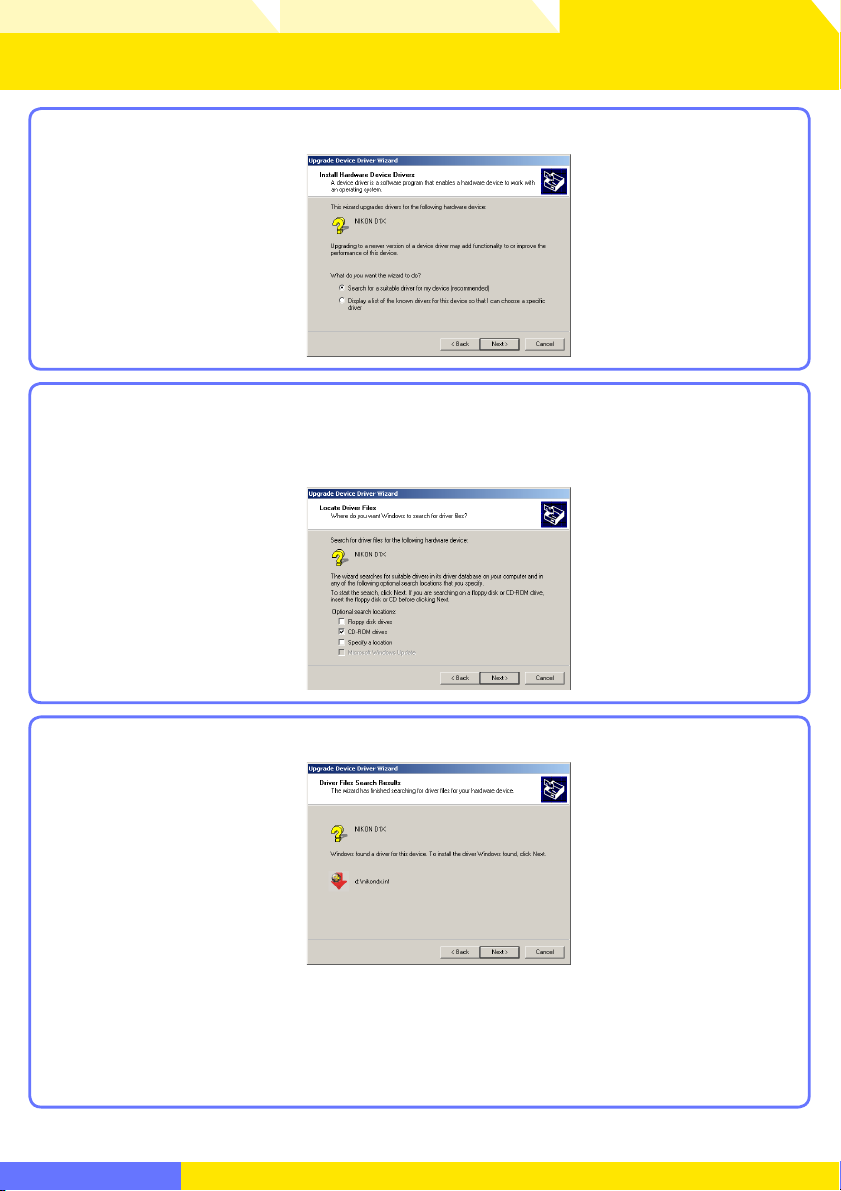
Overview Using Camera Control Pro
Appendices
Device Registration Windows 2000 4/8
Select the search option and click Next.
4
Pressing the shift key to prevent the “Select Region” dialog from opening, insert
5
the Camera Control Pro CD (if the “Select Region” dialog appears, click Quit). Select
CD-ROM drives and click Next.
Click Next.
6
If the message “Windows was unable to fi nd a suitable driver for this device” is displayed,
the CD was not correctly inserted or the correct search location was not selected. Click
Back to return to the dialog shown in Step 5 and confi rm that the search location is
correct.
Return to fi r s t page
88
Page 89

Overview Using Camera Control Pro
Appendices
Device Registration Windows 2000 5/8
Click Finish.
7
Confi rm that “This device is working properly" appears under "Device status” in the
8
“General” tab of the “Nikon Digital Camera D1 Series Properties” dialog.
Return to fi r s t page
89
Page 90
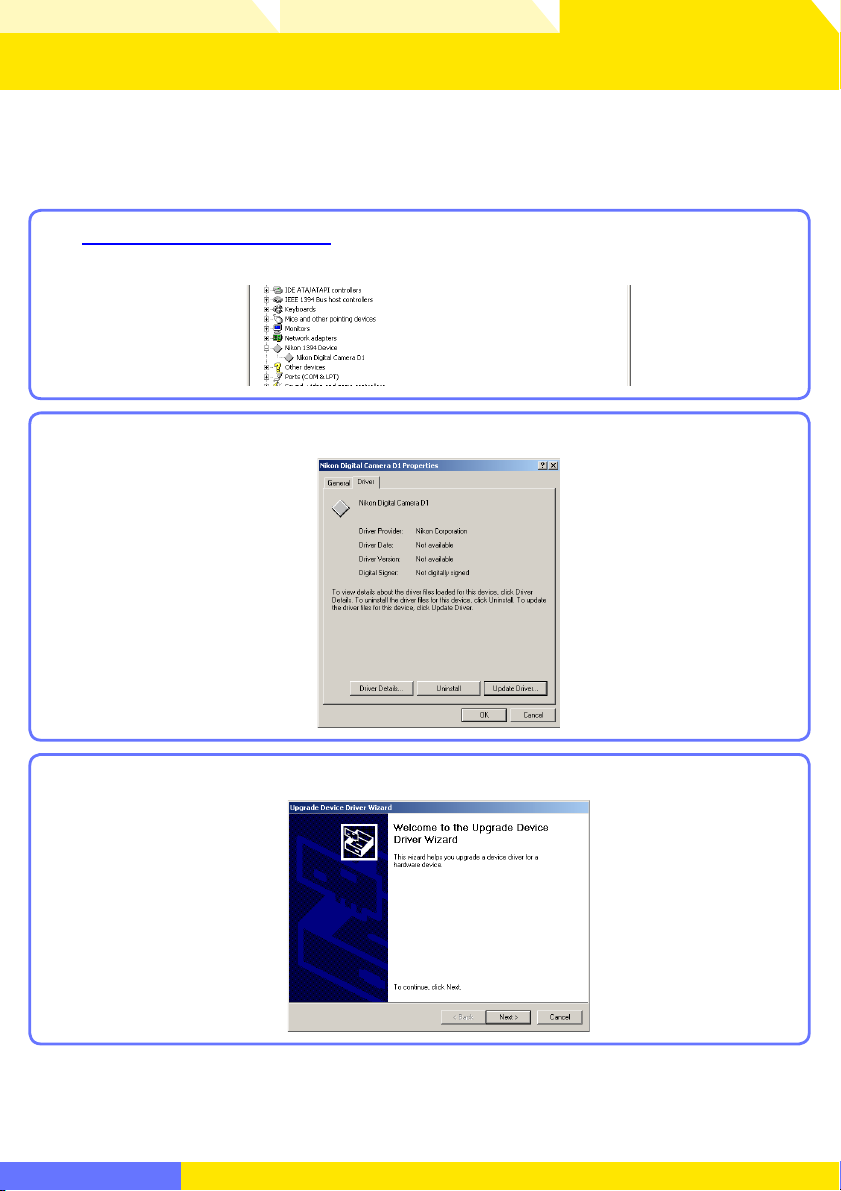
Overview Using Camera Control Pro
Open the Device Manager
Appendices
Device Registration Windows 2000 6/8
Updating the Device Driver
If you are already using the D1 with Nikon View DX or Nikon Capture, you will need to update the camera drivers.
Open the Device Manager. Expand the “Nikon 1394 Device” entry and double-
1
click Nikon Digital Camera D1.
Open the “Driver” tab and click Update Driver….
2
Click Next.
3
Return to fi r s t page
90
Page 91

Overview Using Camera Control Pro
Appendices
Device Registration Windows 2000 7/8
Select the search option and click Next.
4
Pressing the shift key to prevent the “Select Region” dialog from opening, insert
5
the Camera Control Pro CD (if the “Select Region” dialog appears, click Quit). Select
CD-ROM drives and click Next.
Select Install one of the other drivers and click Next.
6
Return to fi r s t page
91
Page 92
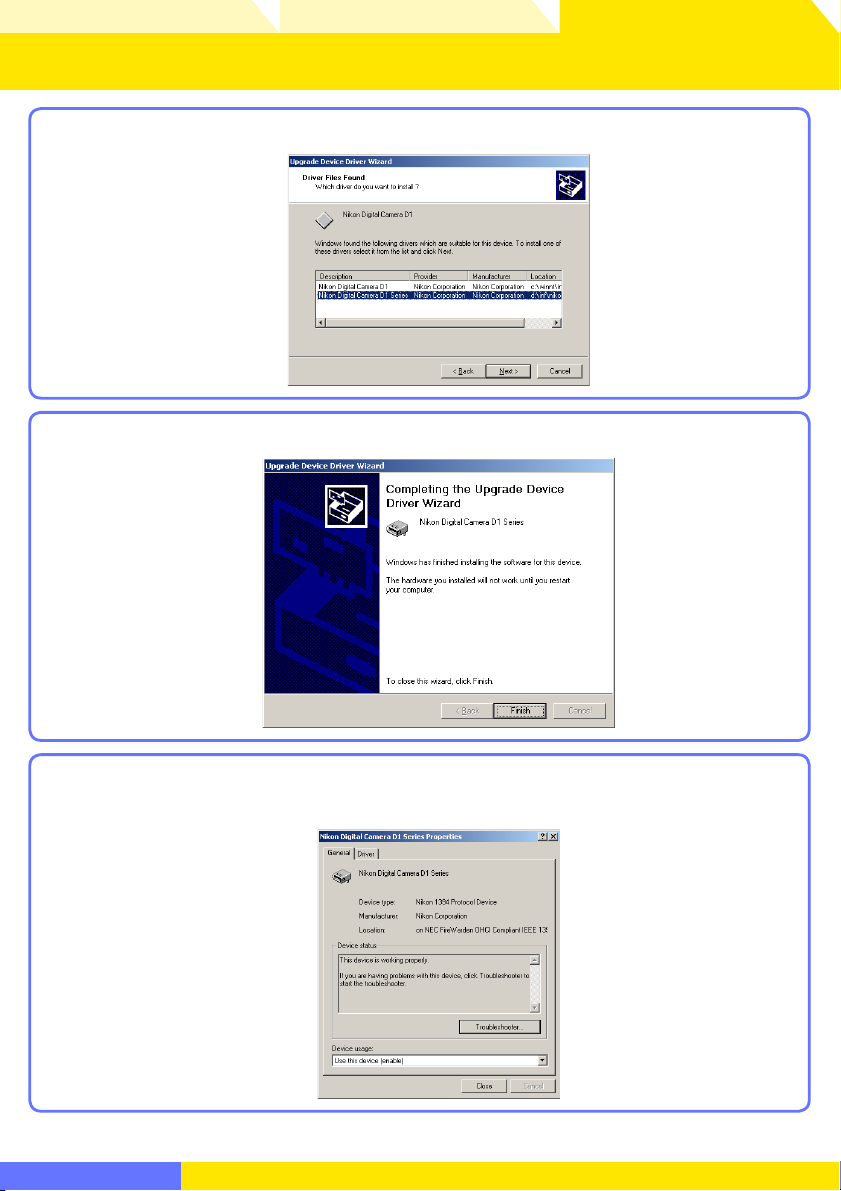
Overview Using Camera Control Pro
Appendices
Device Registration Windows 2000 8/8
Select Nikon Digital Camera D1 Series and click Next.
7
Click Finish.
8
Confi rm that “This device is working properly” appears under “Device status” in the
9
“General” tab of the “Nikon Digital Camera D1 Series Properties” dialog.
Return to fi r s t page
92
Page 93

Overview Using Camera Control Pro
Austria
Nikon GmbH
Modecenterstr. 14, A - 1030 Wien
Tel: +43-(0)900-150066
Phone line costs (# 0,45€/min)
Belgium
H. De Beukelaer & Co. N.V./S.A.
Boomsesteenweg 77, B-2630 Aartselaar
Tel: +32-(0)3-870-59-00 Fax: +32-(0)3-877-01-25
Czech Republic
Nikon SRO
Kodanska 46, 100 10 Praha 10
Tel: +420-267-154-560
Denmark
Nikon Nordic AB, dansk filial
Ørestads Boulevard 67, 1, DK-2300 København S
Tel: +45-32452000
Finland
Nikon Nordic AB Suomen toimisto
Ojahaanrinne 4, 01600 VANTAA
Tel: +358 9 5660 060
France
Nikon France S.A.S.
191, Rue du Marché Rollay, 94504 Champigny
Sur Marne Cedex
Tel: +33-(0)8-25-82-10-10
Germany
Nikon GmbH
Tiefenbroicher Weg 25, 40472 Düsseldorf
Tel: +49-(0)900-1225564
Phone line costs (# 0,24 €/min)
Greece
D. & J. Damkalidis S.A.
44 Zefyrou St. 17564
Tel: +30-210-9410888 Fax: +30-210-9427058
Hungary
Nikon Kft.
Budapest, Fóti út 56. 1047 Hungary
Tel: +36-1-232-13-71
Italy
Nital S.p.A.
Via Tabacchi 33, 10132 Torino
Tel: +39-199-12-41-72 Fax: +39-011-81-44-233
Netherlands
Inca Import B.V.
Rutherfordstraat 7, 2014 KA Haarlem
Tel: +31-(0)23-5101910 Fax: +31-(0)23-5243551
Norway
Nikon Nordic AB NUF
Martin Linges vei 17, 1367 Snarøya
Tel: +47-67-82-74-00
Poland
Nikon Polska Sp. z o.o.
ul. Post pu 14, 02-676 Warszawa
Tel: +48-22-6079400
Rep. of South Africa
Foto Distributors, Head Office
Nikon House, 516 Kyalami Boulevard,
Kyalami Business Park, Midrand 1685.
Tel: +27-(0)11-466-2500 Fax: +27-(0)11-466-3400
Russia
Nikon Europe BV, CIS Representative Office
Zubarev pereulok, d.15, k.1, office 541, 129164 Moscow
Tel: +7 (095) 733 91 70
Spain
Finicon S.A.
C/Ciencias, 81 Nave-8, Poligono Pedrosa
08908 L’Hospitalet de Llobregat, Barcelona
Tel: +34-(0)93-2649090 Fax: +34-(0)93-3363400
Sweden
Nikon Nordic AB
Anton Tamms väg 3, 194 22
Upplands Väsby
Tel: +46-(0)8-594-109-00
Switzerland
Nikon A.G.
Im Hanselmaa 10, CH-8132 Egg Zurich
Tel: +41-(0)848-277-000
United Kingdom
Nikon U.K. Ltd.
380 Richmond Road, Kingston, Surrey KT2 5PR
Tel: +44-(0)870-770-0231
AT
BE
CZ
DK
FI
FR
DE
GR
HU
NL
NO
ZA
PL
ES
RU
SE
CH
IT
GB
Appendices
Customer Support 1/2
Nikon User Support Information
If you are in need of technical assistance with the installation or operation of your Nikon
product(s), please do not hesitate to contact one of the following Nikon representatives.
When calling support, you will be asked to supply the serial and/or version number(s) of
your Nikon software. For effi cient communication, it is highly recommended that you have
your Nikon product in front of you.
Europe and Africa
Return to fi r s t page
93
Page 94

Overview Using Camera Control Pro
http://www.europe-nikon.com/support/
http://www.nikon.co.kr
http://www.nikon-asia.com
http://nikonimaging.com/global/
Australia
Maxwell Optical Industries Pty Ltd.
Unit F1, Lidcombe Business Park
3-29 Birnie Avenue, Lidcombe NSW 2141
Tel: +61-(0)2-8748-5200 Fax: +61-(0)2-8748-5220
Canada
Nikon Canada Inc.
1366 Aerowood Drive, Mississauga, Ontario L4W 1C1
Tel: +1-(0)905-625-9910 Fax: +1-(0)905-625-6446
China
Beijing Hua Xun Nikon Service Center
57, Xuanwumen Xidajie, Beijing 100803
Tel: +86-(0)10-6307-4142 Fax: +86-(0)10-6307-4122
Hong Kong
Nikon Hong Kong Ltd.
Suite 1001, 10F, Cityplaza One, 1111 King’s Road,
Taikoo Shing
Tel: +852-(0)2902-9000 Fax: +852-(0)2907-0378
India
Photo Vision
223, Okhla Industrial Estate Phase III,
Near Modi Flour Mill, New Delhi - 110 020
Tel: +91-(0)11-2692-8913 Fax: +91-(0)11-2692-9856
Indonesia
Pt Alta Nikindo
Kompleks Mangga Dua Square
Block H 1&2 Jl.Gunung Sahariraya, Jakarta Utara 10730
Tel: +62-(0)21-6231-2700 Fax: +62-(0)21-6231-2777
Israel
Hadar Photo Supply Agencies Ltd.
36 - 38 Achad Haam St., Tel-Aviv
P.O. Box 1686
Tel: +972-(0)3-5603947 Fax: +972-(0)3-5603905
Korea
Nikon Imaging Korea Co., Ltd.
12th Floor, Seoul Chamber Of Commerce &
Industry Building,
4-45, Namdaemoon-Ro, Jung-Ku, Seoul 100-743
Tel: +82-(0)2-6050-1800 Fax: +82-(0)2-6050-1801
Lebanon
Gulbenk Trading Co.
Hamra-Makdessi Street, Adhami Building,
5th Floor, Beirut
P. O. Box 113-6645
Tel: +961-(0)1-353742 Fax: +961-(0)1-347613
Malaysia
Nikon (Malaysia) Sdn. Bhd.
11th Floor, Block A Menara PKNS
No. 17, Jalan Yong Shook Lin 46050 Petaling Jaya
Selangor Darul Ehsan
Tel: +60-(0)3-7809 3688 Fax: +60-(0)3-7809 3600
New Zealand
T.A. Macalister Ltd.
65-73, Parnell Rise, Auckland
Tel: +64-(0)9-303-4334 Fax: +64-(0)9-309-6502
Philippines
Columbia Global Photo Sales Corporation
#129-135 Gregorio Roxas Street,
SFDM, Quezon city, 1117
Tel: +63-(0)2-363-8550 Fax: +63-(0)2-364-3334
Singapore
Nikon Singapore Pte. Ltd.
80 Anson Road #10-01/02 Fuji Xerox Towers
Singapore 079907
Tel: +65-6559-3618 Fax: +65-6559-3665
Taiwan
Lin Trading Co., Ltd.
8F, 272 Nangking Road, Sec. 3, Taipei 10566
Tel: +886-(0)2-2740-3366 Fax: +886-(0)2-2781-2525
Thailand
Niks (Thailand) Co., Ltd.
166 Silom Road 12, Bangkok 10500
Tel: +66-(0)2-235-2929-39 Fax: +66-(0)2-236-7240
Turkey
Teleoptik Ltd Sti
Ankara Caddesi Dedehan No. : 118-120,
Kat : 1-2, Sirkeci 34112, Istanbul
Tel: +90-(0)212-527-0789 Fax: +90-(0)212-520-6716
U. A. E.
Grand Stores, L.l.c
Saleh Bin Lahej Building, Mezzanine Floor,
Al Garhoud, Deira, Dubai
P. O. Box 2144
Tel: +971-(0)4-2823700 Fax: +971-(0)4-2828382
MY
LB
KR
NZ
PH
TR
AE
HK
CA
AU
IN
ID
CN
IL
SG
TW
TH
Appendices
Customer Support 2/2
Asia, Oceania, Middle-East and Canada
Asia Pacifi c A r e a
http://www.nikon-asia.com
Nikon Imaging Global Site
http://nikonimaging.com/global/
Please visit the web site appropriate for your area of purchase for downloads of updated software,
replacement manuals and technical support information:
Europe and Africa
http://www.europe-nikon.com/support/
Korea
http://www.nikon.co.kr
Return to fi r s t page
94
 Loading...