

Page 1

A
N
ikon COOLPIX995 Digital Camera
Nikon COOLPIX995 Digital Camera
Nikon COOLPIX995 Digital Camera User Manual
Display Conventions
Page 1 of 136
Here are some display conventions used in our
ll buttons and keys appear in a green color, like this:
{
Press the
{
Hold down the
Text that displays on the device's panel appears in a blue color, like this:
{
The message
{
YES?
ENTER
prompts you to confirm the procedure.
key.
FAST FWD
appears on the display.
STBY
online LiveManuals
button.
.
Before Using the Camera
For Your Safety
This section contains important safety information. Read this section in its entirety before using your COOLPIX995 or the
software provided with your camera.
Warnings and cautions
The symbols listed below are used in this guide and in other documentation to indicate warnings and cautions that should be
read before use.
This symbol is used to mark warnings that should be read before use to prevent possible injury.
This symbol indicates where caution should be exercised to avoid damaging your Nikon product.
Warnings
To prevent injury, observe the following warnings when using your Nikon product.
Viewing the sun or other strong light source through the Viewfinder could cause permanent visual impairment.
Should you notice smoke or an unusual smell coming from the equipment or from the AC adapter (available separately),
unplug the AC adapter and remove the battery immediately, taking care to avoid burns. Continued operation could result in
injury. After removing the battery, take the equipment to a Nikon-authorized service center for inspection.
Warning
Caution
Do not look at the sun through the Viewfinder
Turn off immediately in the event of malfunction
Page 2
N
ikon COOLPIX995 Digital Camera
Page 2 of 136
Do not use in the presence of flammable gas
Do not use electronic equipment in the presence of flammable gas, as this could result in explosion or fire.
Do not place camera strap around neck
Placing the camera strap around your neck could result in strangulation. Special care should be taken to avoid placing the
strap around the neck of an infant or child.
Do not disassemble
Touching the product's internal parts could result in injury. In the event of a malfunction, the product should be repaired only by
a qualified technician. Should the product break open as the result of a fall or other accident, remove the battery and/or AC
adapter and then take the product to a Nikon-authorized service center for inspection.
Observe proper precautions when handling the battery
The battery may leak or explode if improperly handled. Observe the following precautions when handling the battery for use in
this product:
z
Make sure the product is off before replacing the battery. If you are using the AC adapter, Make sure it is unplugged.
z
Use only the supplied rechargeable Nikon EN-EL1 lithium-ion battery or a 6V 2CR5 (DL245) lithium battery (available
separately).
z
When inserting the battery, do not attempt to insert it upside down or backwards.
z
Do not short-circuit or disassemble the battery.
z
Do not expose the battery to flame or to excessive heat.
z
Do not immerse in or expose to water.
z
Do not transport or store with metal objects such as necklaces or hairpins.
z
The battery is prone to leakage when fully discharged. To avoid damage to the product, be sure to remove the battery
when no charge remains.
z
When the battery is not in use, attach the terminal cover and store in a cool place.
z
Discontinue use immediately should you notice any changes in the battery, such as discoloration or deformation.
Use appropriate cables
When connecting cables to the input and output jacks, use only the cables provided or sold by Nikon for the purpose, to
maintain compliance with product regulations.
Keep out of reach of children
Particular care should be taken to prevent infants from putting the battery or other small parts into their mouths.
Do not walk while looking through the Viewfinder
Walking while looking through the camera's Viewfinder or color LCD monitor could result in a fall or other injury.
Removing memory cards
Memory cards may become hot during use. Observe due caution when removing memory cards from the camera.
CD-ROMs
The CD-ROMs on which the software and manuals are distributed should not be played back on audio CD equipment. Playing
CD-ROMs on an audio CD player could cause hearing loss or damage the equipment.
Page 3

A
N
ikon COOLPIX995 Digital Camera
Page 3 of 136
Using the flash close to your subject's eyes could cause temporary visual impairment.
When operating the
in your eye accidentally.
Cautions
Observe the following precautions to ensure that you continue to get the most from your Nikon product.
This product is not waterproof, and may malfunction if immersed in water or exposed to high levels of humidity.
camera thoroughly.
The proper procedure for cleaning the lens is described in Caring for Your Camera
Observe caution when operating the flash
When using the Viewfinder
DIOPTER ADJUSTMENT
Keep dry
Keep free of salt, sand, and dust
fter using your camera at the beach or seaside, wipe off any sand or salt with a lightly dampened cloth and then dry your
Do not touch the lens with your fingers
dial with your eye to the Viewfinder, care should be taken not to put your finger
of this document.
Handle the lens and all moving parts with care
Do not apply force to the lens or to the battery, card, or connector covers. These parts are especially susceptible to damage.
Do not unplug the product or remove the battery while the product is on
Do not unplug the product or remove the battery while the camera is on, or while images are being recorded or deleted from
memory. Forcibly cutting power to the product in these circumstances could result in loss of data or in damage to the internal
circuitry or memory. To prevent an accidental interruption of power, avoid carrying the product from one location to another
while the AC adapter is connected.
Do not drop
The product may malfunction if subjected to strong shocks or vibration. Attach the strap and lens
around your wrist when carrying the camera.
Keep away from strong magnetic fields
Do not use or store this device in the vicinity of equipment that produces strong electromagnetic radiation or magnetic fields.
The magnetic fields produced by equipment such as radio transmitters or household television sets could interfere with the
color monitor, damage data stored on the flash-memory card, or affect the product's internal circuitry.
Avoid sudden changes in temperature
Sudden changes in temperature, such as occur when entering or leaving a heated building on a cold day, can cause
condensation inside the device. To prevent condensation, place the device in its carrying case or a plastic bag before
exposing it to sudden changes in temperature.
-cap cord and keep the strap
Batteries
Page 4

N
ikon COOLPIX995 Digital Camera
Page 4 of 136
When you turn the device on, check the battery-level displayed in the control panel to determine whether the battery needs to
be replaced. The battery needs to be replaced when the battery-level indicator is flashing.
The battery-level indicator may briefly show (battery fully charged) after an exhausted battery is reinserted in the
camera.
On cold days, the capacity of the battery tends to decrease. When taking pictures outside in cold weather, keep a warm spare
battery on hand. Should the battery terminals become dirty, wipe them with a clean, dry cloth before use.
Memory cards
Observe the following precautions when handling CompactFlash ™ memory cards:
z
Turn the power off before inserting or removing memory cards. Inserting or removing cards with the power on could
render them unusable.
z
Insert memory cards as shown in Inserting CF Memory Card. Inserting cards upside down or backwards could damage
the camera or the card.
Notice for customers in Canada
Caution
This Class B digital apparatus meets all requirements of the Canadian Interference Causing Equipment Regulations.
Notice for customers in the U.S.A.
Statement
Federal Communications Commission (FCC) Radio Frequency Interference
This equipment has been tested and found to comply with the limits for a Class B digital device, pursuant to Part 15 of the
FCC rules.
These limits are designed to provide reasonable protection against harmful interference in a residential installation. This
equipment generates, uses, and can radiate radio frequency energy and, if not installed and used in accordance with the
instructions, may cause harmful interference to radio communications. However, there is no guarantee that interference will
not occur in a particular installation. If this equipment does cause harmful interference to radio or television reception, which
can be determined by turning the equipment off and on, the user is encouraged to try to correct the interference by one or
more of the following measures:
{
Reorient or relocate the receiving antenna.
{
Increase the separation between the equipment and receiver.
{
Connect the equipment into an outlet on a circuit different from that to which the receiver is connected.
{
Consult the dealer or an experienced radio/television technician for help.
Cautions
Modifications
The FCC requires the user to be notified that any changes or modifications made to this device that are not expressly
approved by Nikon Corporation may void the user's authority to operate the equipment.
Interface Cables
Use the interface cables sold or provided by Nikon for your equipment.
Using other interface cables may exceed the limits of Class B Part 15 of the FCC rules.
Nikon Inc.
1300 Walt Whitman Road, Melville, New York
11747-3064, U.S.A.
Page 5

A
N
ikon COOLPIX995 Digital Camera
Tel.: 631-547-4200
Page 5 of 136
Notice concerning prohibition of copying or reproduction
Note that simply being in possession of material that has been digitally copied or reproduced by means of a scanner, digital
camera or other device may be punishable by law.
Items prohibited by law from being copied or reproduced
Do not copy or reproduce paper money, coins or securities, government bonds, or local government bonds, even if such
copies or reproductions are stamped "Sample."
The copying or reproduction of paper money, coins, or securities which are circulated in a foreign country is prohibited.
Unless the prior permission of the government has been obtained, the copying or reproduction of unused postage stamps or
post cards issued by the government is prohibited.
The copying or reproduction of stamps issued by the government and of certified documents stipulated by law is prohibited.
Cautions on certain copies and reproductions
The government has issued cautions on copies or reproductions of securities issued by private companies (shares, bills,
checks, gift certificates, etc.), commuter passes, or coupon tickets, except when a minimum of necessary copies are to be
provided for business use by a company. Also, do not copy or reproduce passports issued by the government, licenses issued
by public agencies and private groups, ID cards, or tickets, such as passes and meal coupons.
Comply with copyright notices
The copying or reproduction of copyrighted creative works such as books, music, paintings, woodcut prints, maps, drawings,
movies and photographs is prohibited except when it is done for personal use at home or for similar restricted and noncommercial use.
Notices
Concerning the Manuals Provided with This Product
z
Reproduction, in whole or in part, of any of the manuals provided with your Nikon product requires prior permission
from Nikon.
z
The information contained in these manuals is subject to change without notice.
z
While Nikon has made every effort to produce perfect manuals, we appreciate any opportunity for improvement.
Should you find any mistakes, we would be grateful if you were to kindly let us know. The address of Nikon's
representative in your area is provided separately.
Disclaimer of Liability
z
Nikon does not accept liability for damages resulting from the use of this product.
A Note on Memory Cards
Your digital camera uses CompactFlash flash-memory cards to store photographs.
While any card conforming to CompactFlash specifications can be used, performance may vary depending on the make of
card. Nikon CompactFlash memory cards are recommended.
Trademark Information
pple, the Apple logo, Macintosh, and QuickTime are registered trademarks of Apple Computer, Inc. Finder, Macintosh PC
Exchange, Power Macintosh and PowerBook are trademarks of Apple Computer, Inc. IBM and IBM PC/AT are registered
trademarks of International Business Machines Corporation. PowerPC is a trademark of International Business Machines
Corporation, used under license. Microsoft is a registered trademark, and Windows, MS-Windows and Windows NT are
trademarks, of Microsoft Corporation. Internet Explorer is a product of Microsoft Corporation. Pentium and i486 are trademarks of Intel Corporation. Internet is a trademark of Digital Equipment Corporation. Netscape and Netscape Navigator are
registered trademarks of Netscape Communications Corporation. CompactFlash is a trademark of SanDisk Corporation.
Page 6

A
A
A
N
ikon COOLPIX995 Digital Camera
dobe and Acrobat are registered trademarks of Adobe Systems Inc. Zip is a registered trademark of Iomega Corporation in
the U.S. and other countries. All other trade names mentioned in this manual or the other documentation provided with your
Nikon product are trademarks or registered trademarks of their respective holders.
Page 6 of 136
Introduction
Thank you for purchasing the Nikon COOLPIX995 digital camera-a camera that is sure to make photography a bigger part of
your life. Get to know your COOLPIX995 digital camera, and be sure to read this manual thoroughly before using it. We
recommend that you keep this manual handy.
Fast Track Guide
In addition to taking first time users step-by-step through the process of setting up and using the camera, the printed Fast
Track Guide gives a quick overview of camera settings.
Take trial shots
Take trial shots before shooting at important occasions like weddings or graduations.
Have Nikon check your camera regularly
Nikon recommends that you have your camera serviced by an authorized dealer or service center at least once every two
years.
Using your camera correctly
The Nikon COOLPIX995's performance has been optimized for use with Nikon brand accessories. Accessories made by other
manufacturers may not meet Nikon's criteria for specifications, and nonconforming accessories could damage the
COOLPIX995's components. Nikon cannot guarantee the COOLPIX995's performance when it is used with other than Nikon
brand accessories.
Life-Long Learning
s part of Nikon's "Life-Long Learning" commitment to ongoing product support and education, continually-updated
information is available on-line at the following sites:
z
For users in the U.S.A.: http://www.nikonusa.com/
z
For users in Europe: http://www.nikon-euro.com/
z
For users in Asia, Oceania, the Middle East, and Africa: http://www.nikon-asia.com/
Visit these sites to keep up-to-date with the latest product information and general advice on digital imaging and photography.
For more information, please contact your nearest Nikon representative.
http://www.klt.co.jp/Nikon/Netwark/index.html
bout This Manual
This manual is organized in a progressive fashion from basic operations to more advanced operations so you get to know the
camera better and better as you operate it following the instructions.
Before Using the Camera This section includes information necessary before using this camera, such as
precautions for safe use, nomenclature, a quick guide, a menu guide, etc.
Preparation This section introduces necessary preparations such as installing the battery,
inserting the CF memory card and making various camera settings before
using the camera.
Useful Advice on COOLPIX
Camera Techniques
Simple Shooting and Playback This section explains some aspects of simple "Point and Shoot" photography
Detailed Operations This section includes detailed explanations of shooting, playback and deletion
This section introduces useful advice on COOLPIX camera techniques such as
how to hold the camera and how to press the
and simple playback operation.
of images.
SHUTTER RELEASE
button.
Page 7
A
N
ikon COOLPIX995 Digital Camera
dvanced Operations This section provides complete descriptions of advanced camera operations.
Using the Camera Menus This section gives detailed explanations of menu items in the Shooting and
Playback modes.
Connections This section describes connection to external devices such as TV sets or
personal computers.
Miscellaneous This section covers optional accessories, trouble-shooting and specifications.
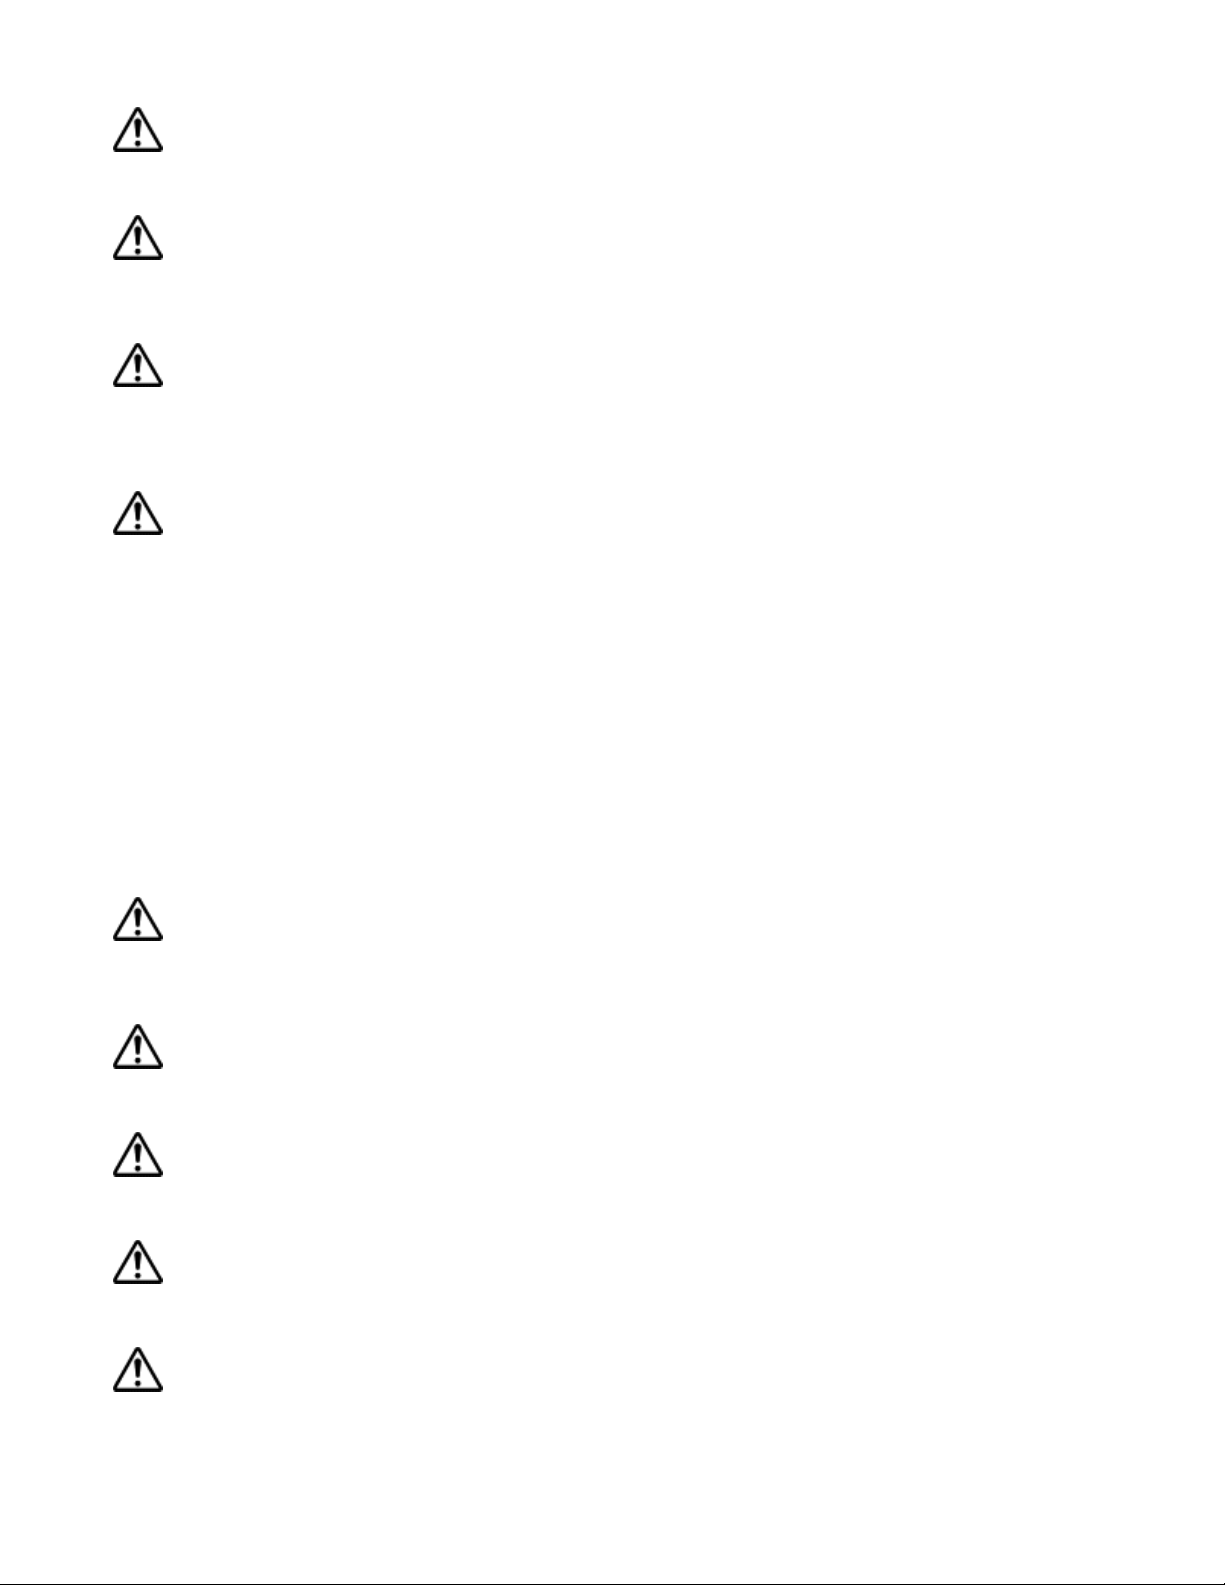
Nomenclature
Page 7 of 136
1. Viewfinder
2. Red-eye reduction/Self-timer lamp
3. Lens
4.
MONITOR
5.
QUICK
6.
MENU
7. Control panel
8.
MODE
9.
SHUTTER RELEASE
10.
MODE/FUNC
11.
EXPOSURE COMPENSATION/FUNC
12.
COMMAND
13. Video output connector
14. Zoom buttons
15. Memory card slot cover
16. Camera strap eyelets
17. Speedlight lock
18. Built-in Speedlight
19.
FOCUS MODE/MANUAL FOCUS /DELETE
20.
FLASH MODE/ SENSITIVITY / THUMBNAIL
21.
IMAGE QUALITY/ IMAGE SIZE
22. Monitor
23. Focus area /Multi selector
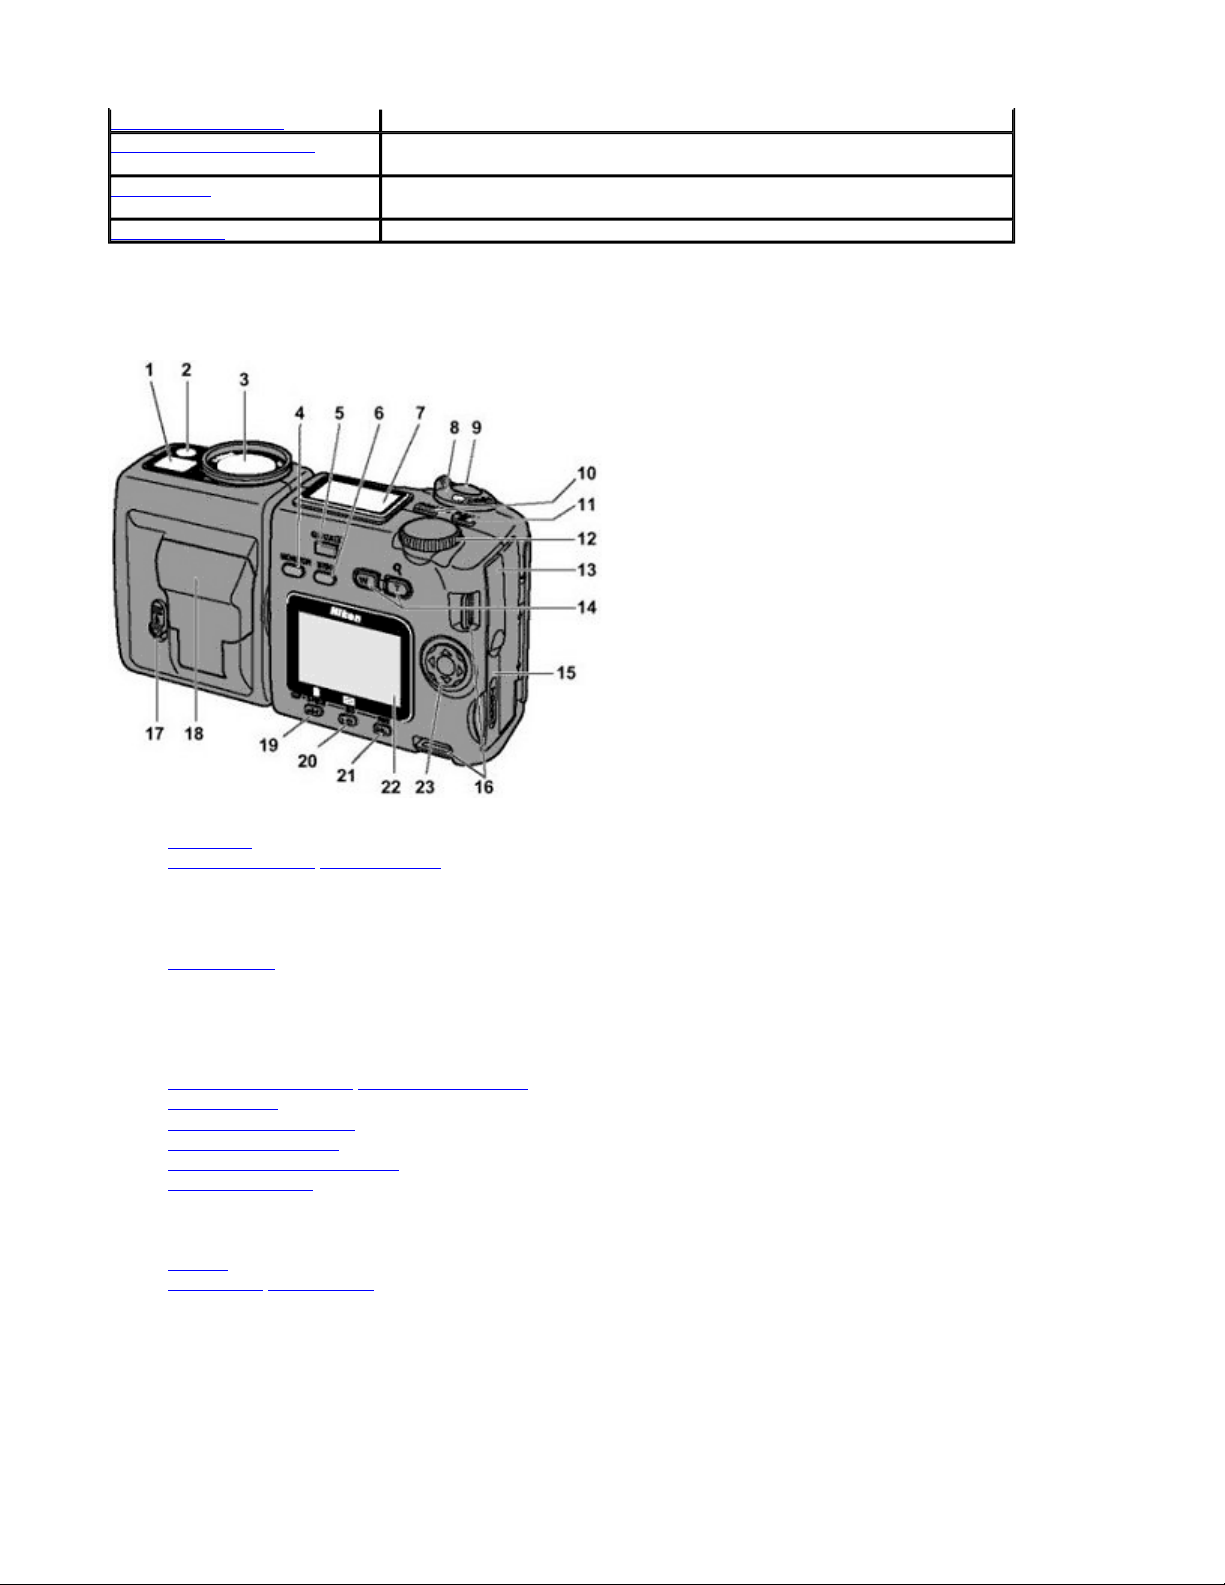
Inside memory card slot cover
button
review button
button
dial
button
(function) 1 button
dial
/USB connector cover
-release lever
(function) 2 button
button)
button
button
Page 8
N
ikon COOLPIX995 Digital Camera
Page 8 of 136
Inside video output connector/USB connector cover
Speedlight up
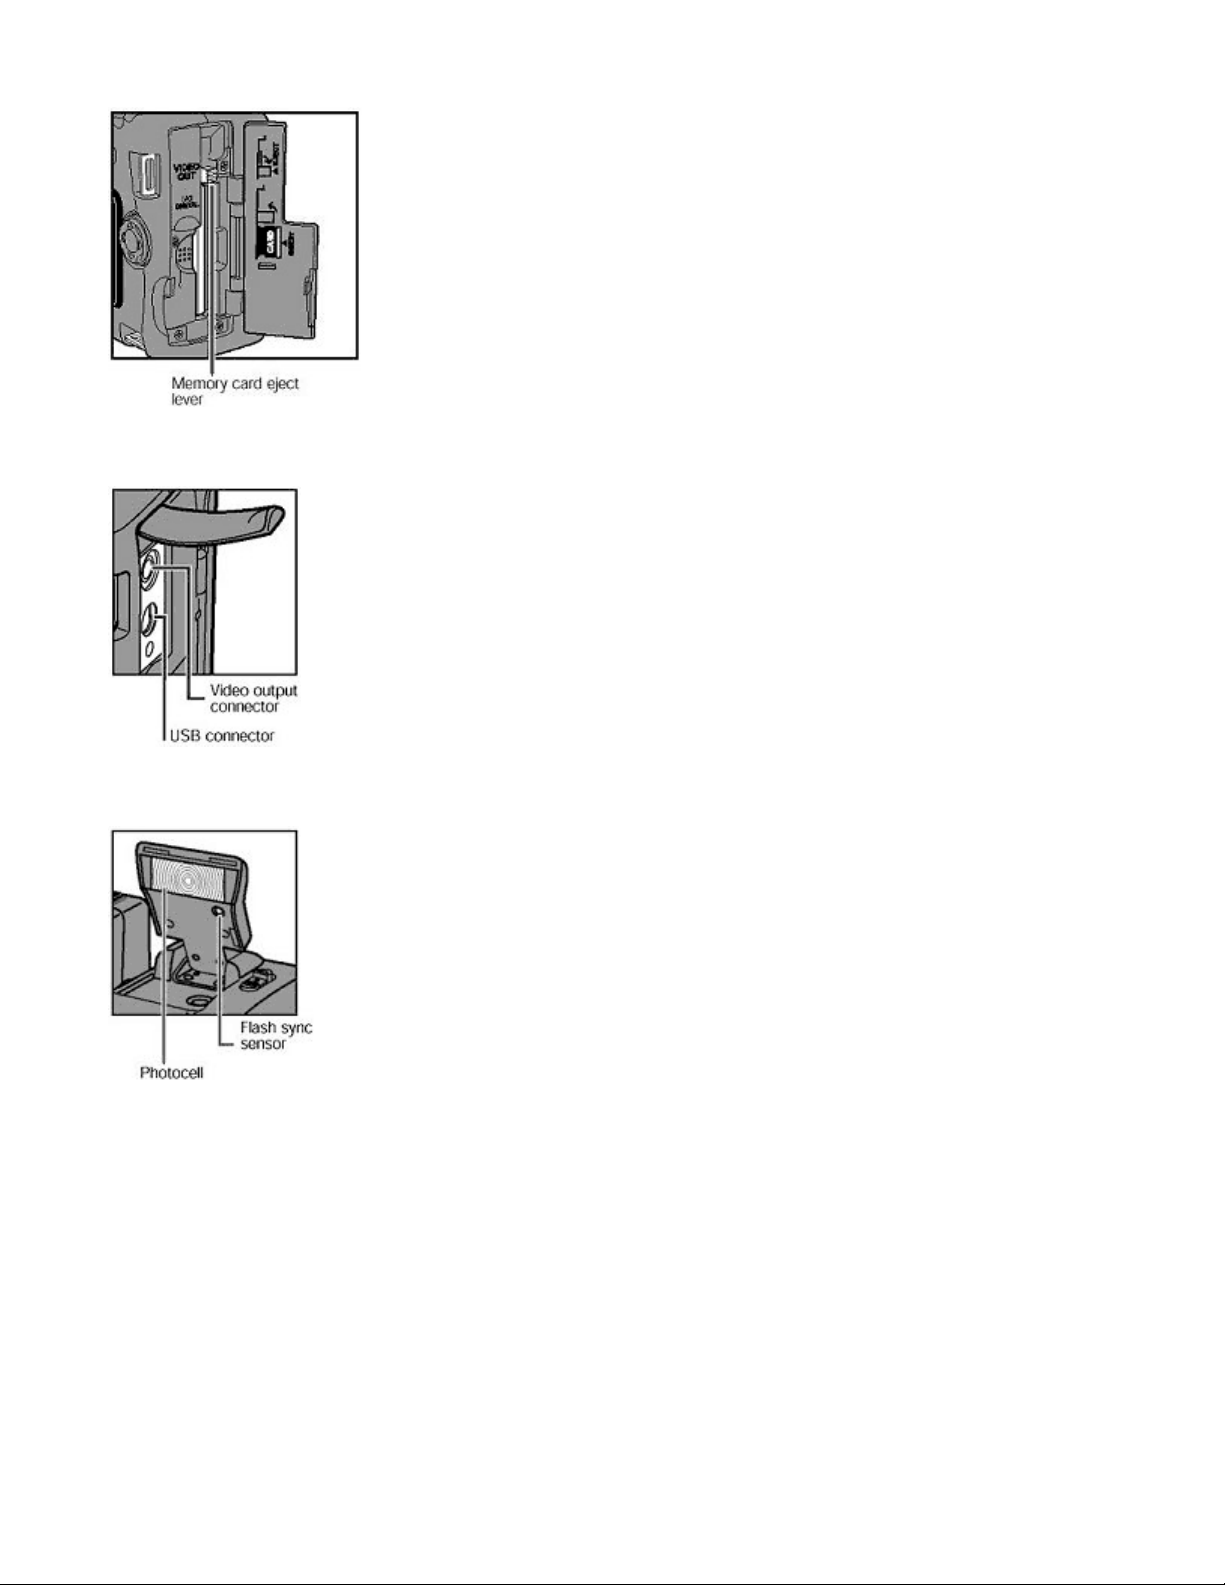
Page 9
N
ikon COOLPIX995 Digital Camera
1. DC-in connector cover
2. Sync terminal
3. Diopter adjustment dial
4. Viewfinder eyepiece
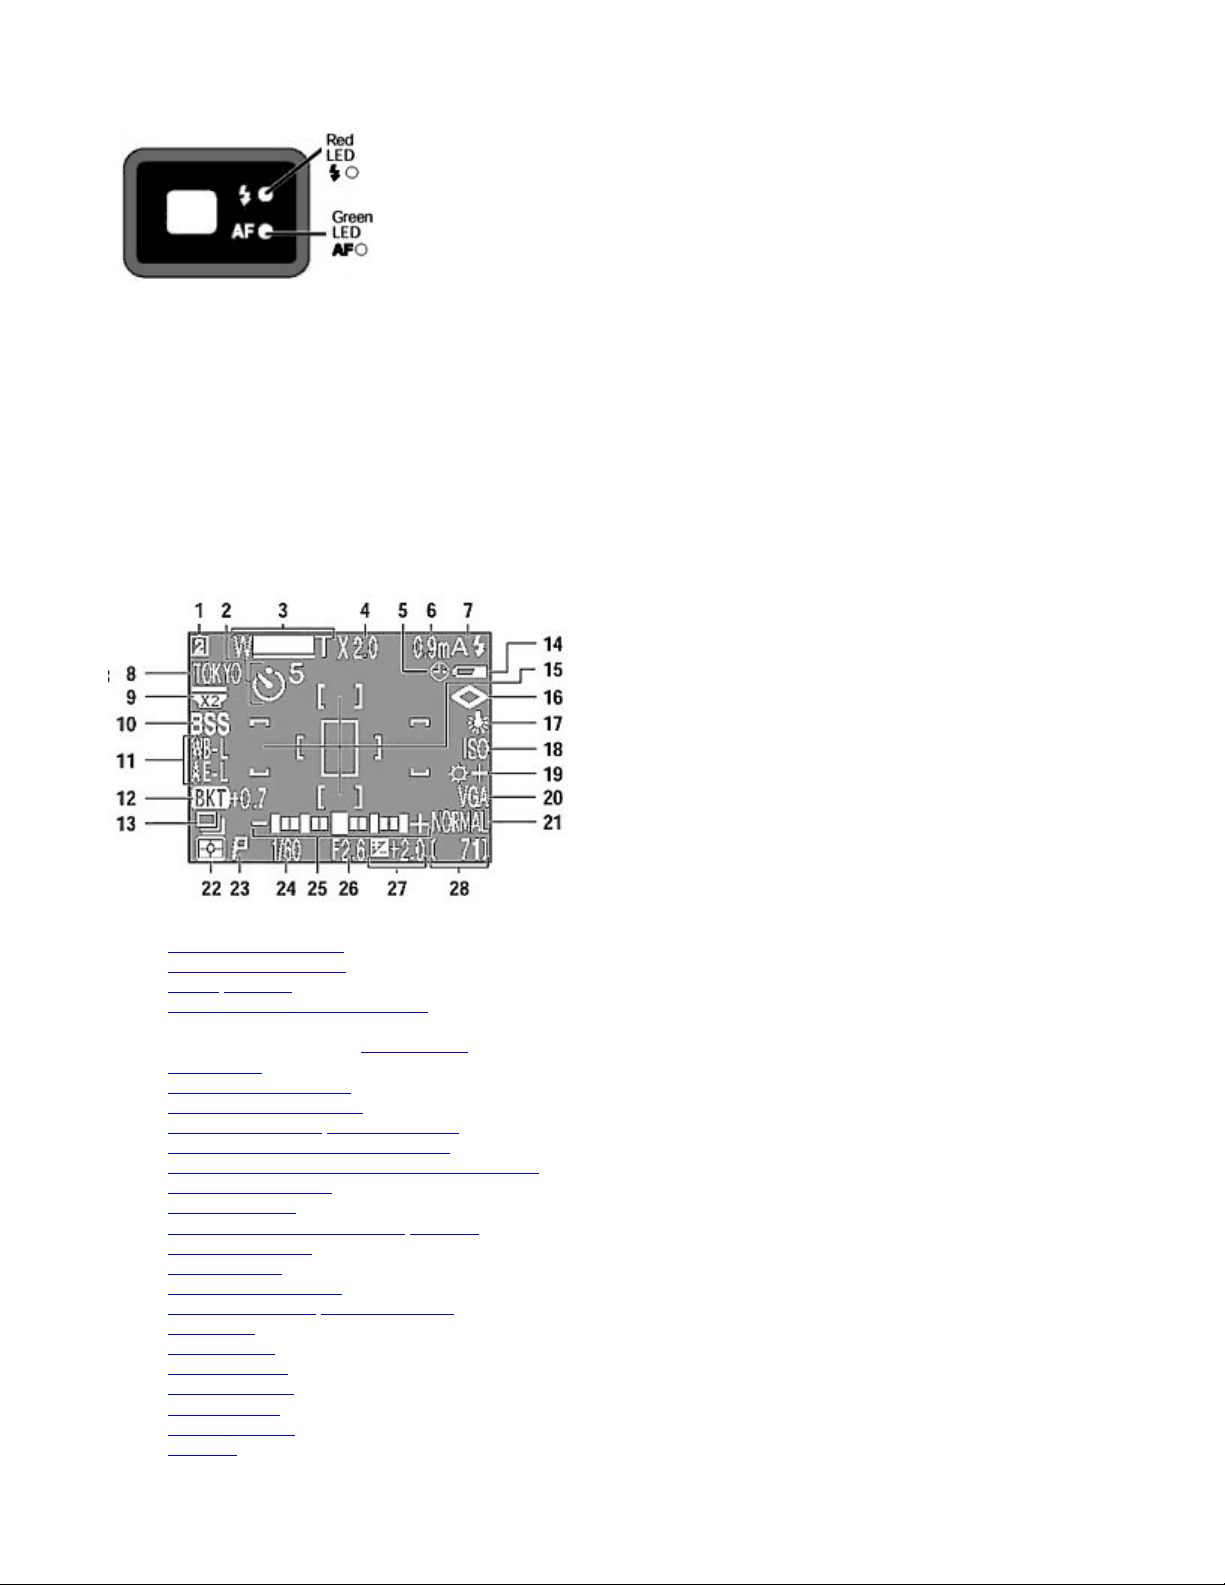
5. Red LED
6. Green LED
7. Swivel lock lever
8. Tripod socket
9. Battery chamber cover
10. Battery chamber cover latch
Page 9 of 136
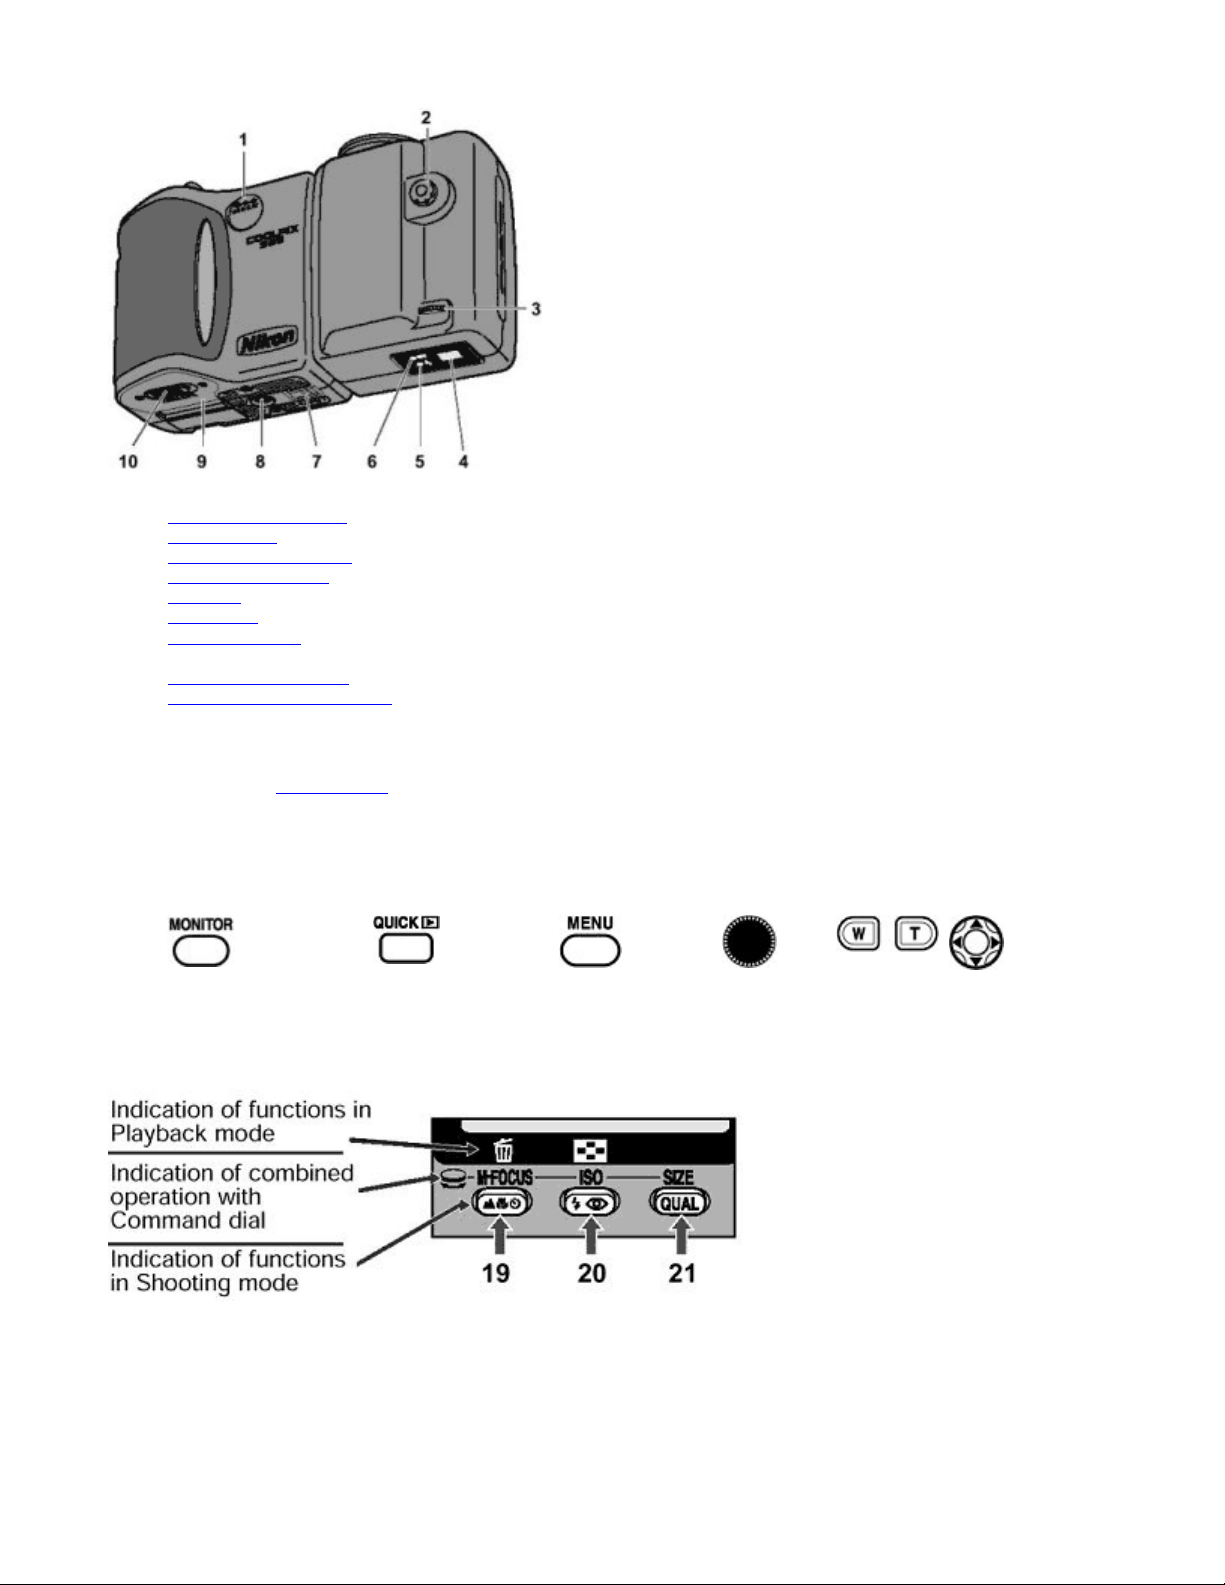
The following buttons have different functions in different modes:
Refer to the figure in Nomenclature
4 5 6 12 14 23
MONITOR
z
button
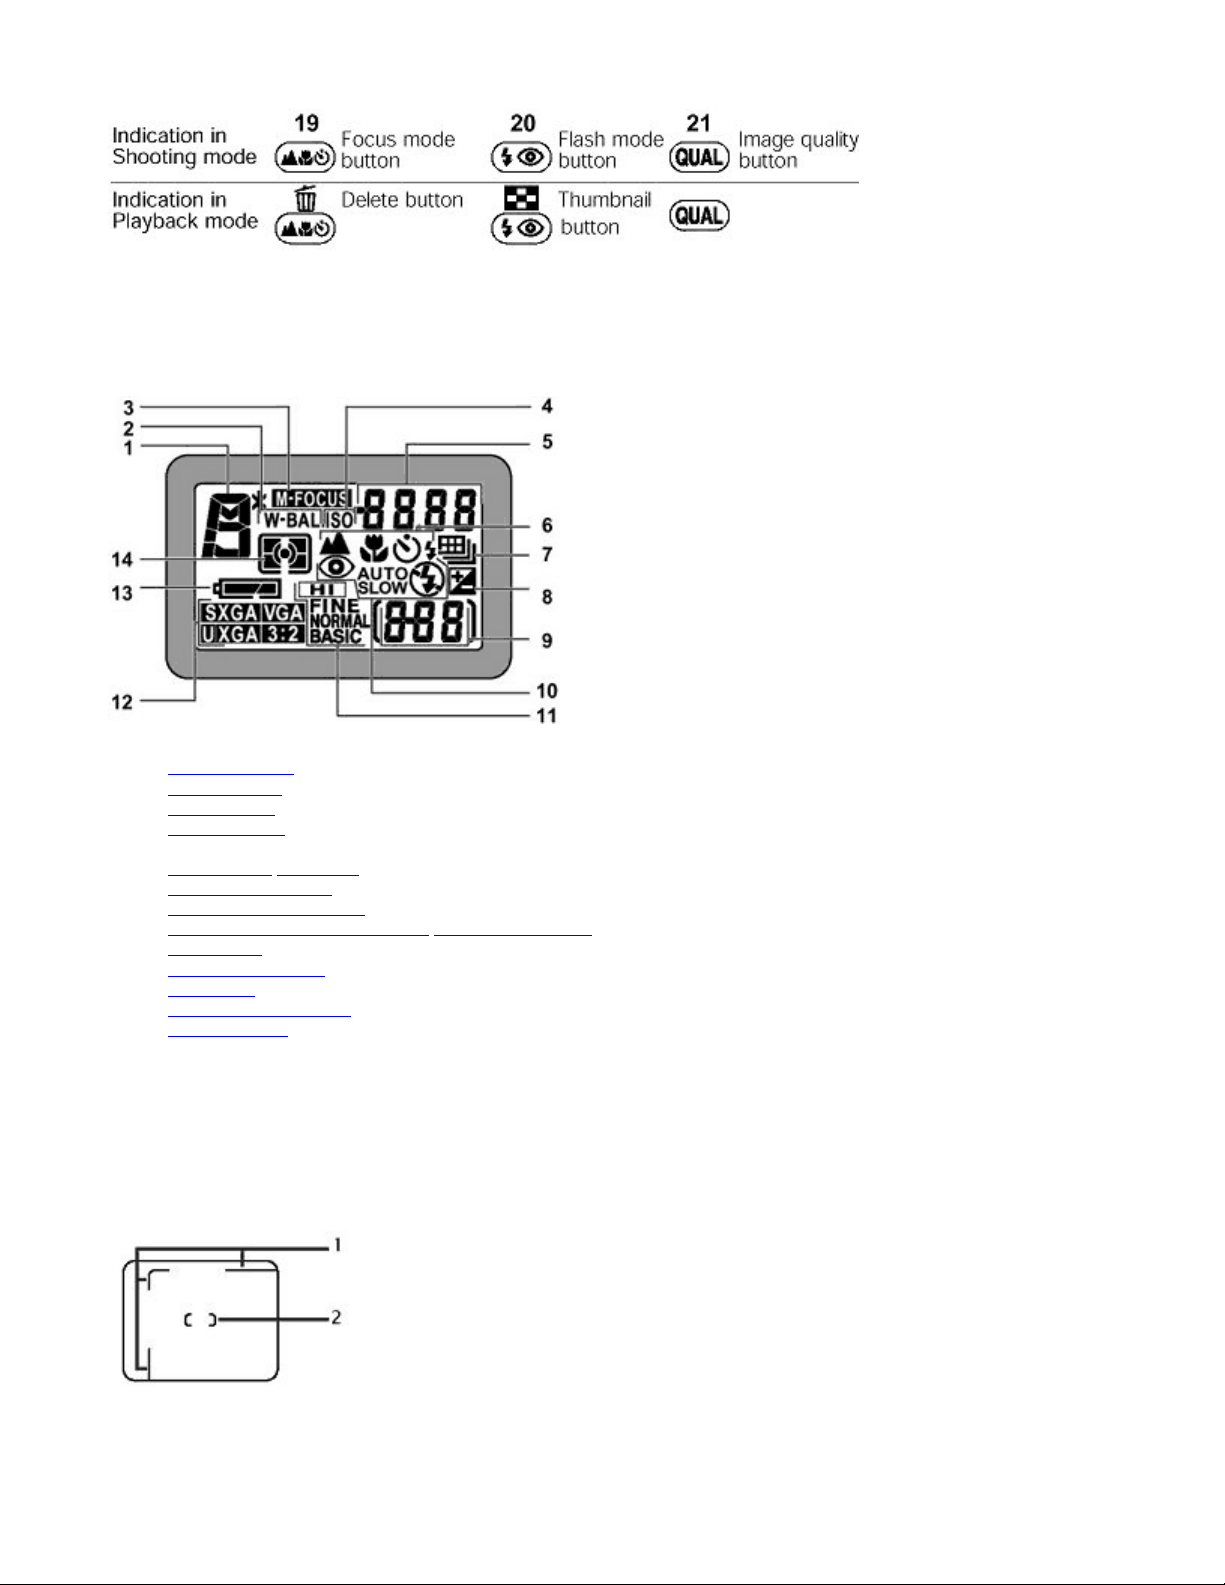
Functions of buttons 19, 20 and 21 differ in Shooting mode and Playback mode; these buttons are indicated as follows
in this manual.
QUICK
for the location of each button.
review button
MENU
button
COMMAND
Dial
Zoom
buttons
Multi
selector
Page 10
N
ikon COOLPIX995 Digital Camera
Control panel
(All indications are displayed in the illustration for easy reference.)
Page 10 of 136
1. Exposure mode
2. White balance
3. Manual focus
4. ISO/Sensitivity
5. Aperture/Shutter speed/Various numerical values*
6. Focus mode
7. Continuous shooting
8. Exposure Compensation
9. Number of exposures remaining / Exposure condition/Image transfer indication
10. Flash mode
11. Image quality mode
12. Image size
13. Battery status indicator
14. Metering mode
z
Displays numerical values such as shutter speed in Shutter-Priority Auto/Manual Exposure mode, aperture in AperturePriority Auto/Manual Exposure mode, Exposure Compensation value when Exposure Compensation is enabled, focus
distance when using Manual focus or sensitivity depending upon the functions used.
/ Self-timer
Viewfinder/LED
1. Parallax compensation marks for close-ups (macro)
2. Autofocus brackets
Page 11
N
ikon COOLPIX995 Digital Camera
Page 11 of 136
On:
Flashing (rapid):
Flashing (slow):
On:
Flashing (rapid):
(intermediate):
(slow):
(slow):
Monitor (in Shooting mode)
Flash ready
Flash recommended
Flash charging
In-focus (ready for shooting)
Focus cannot be achieved in
autofocus operation
Shooting photo
Digital Zoom
3 : 2 recording size
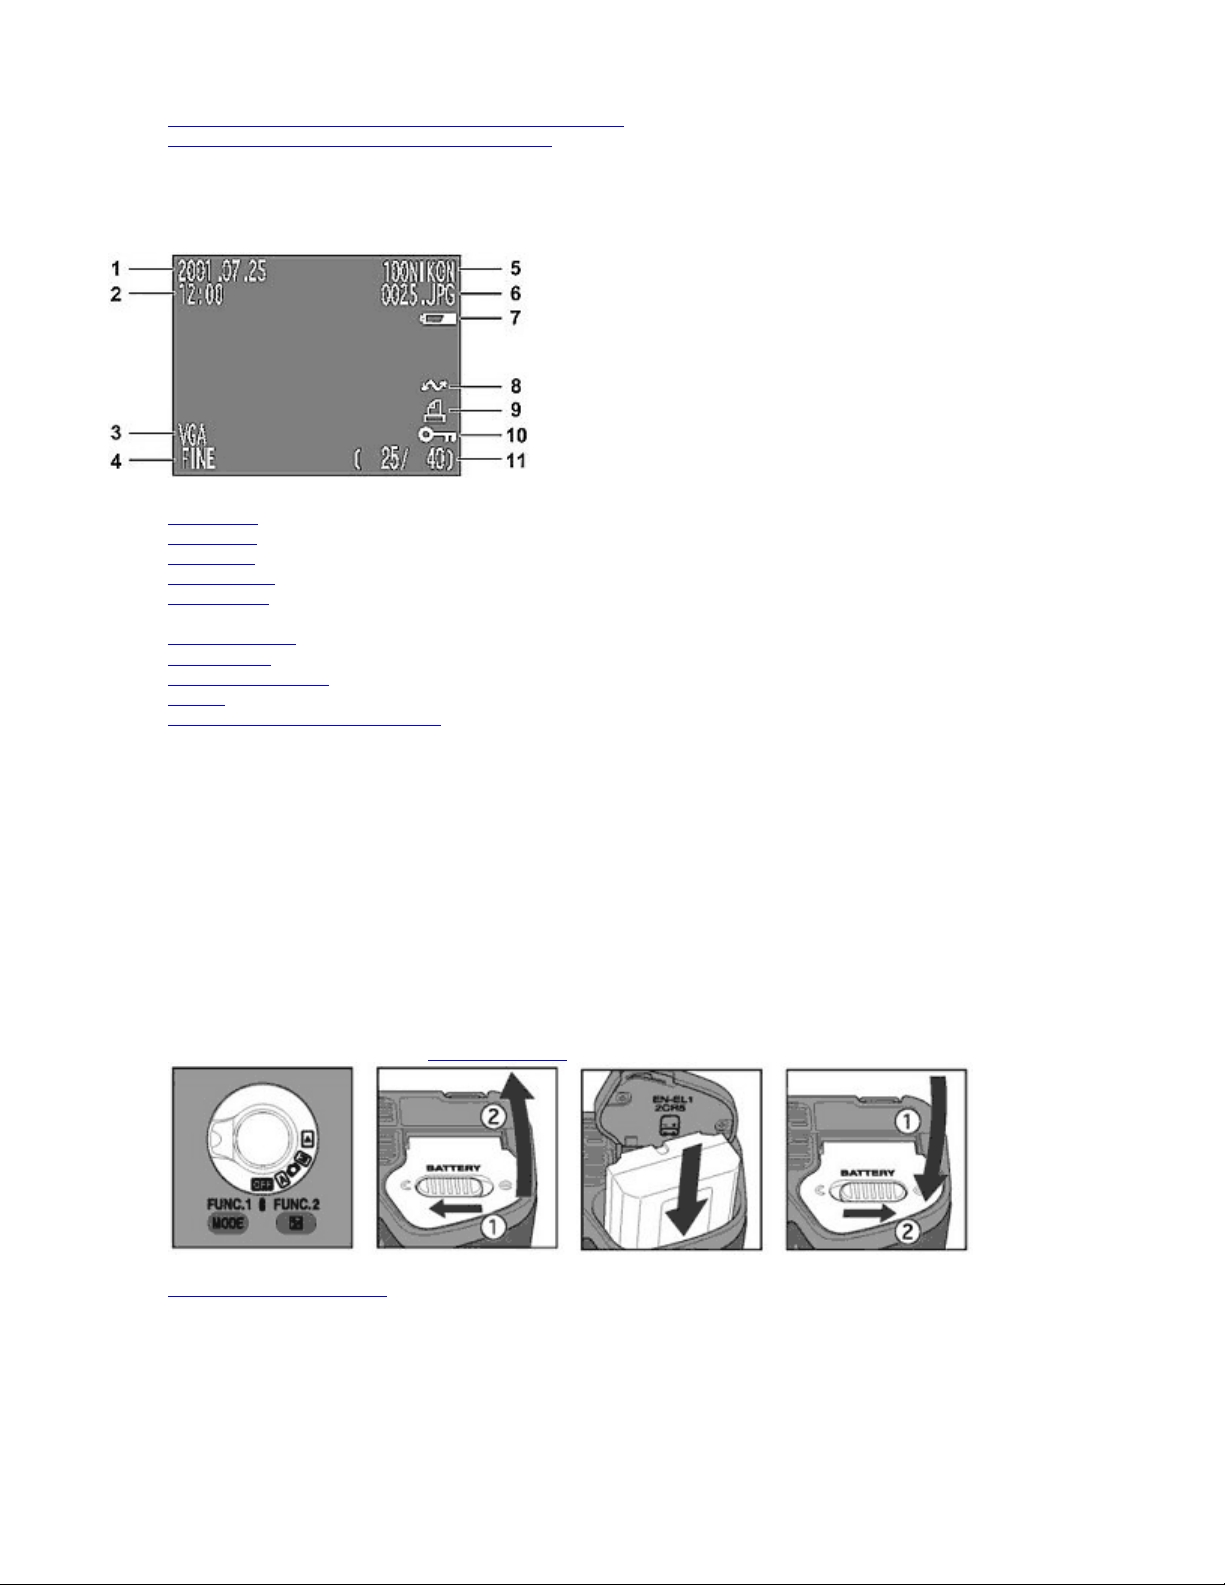
1. User Setup Number*1
2. Self
3. Zoom
4. Digital zoom magnification factor
5. Clock*2
6. Focus distance when in Manual focus
7. Flash mode
8. Current Folder name*3
9. Lens converter selection
10. Best Shot Selector /Noise Reduction
11. Exposure lock (Auto exposure lock /White balance lock)
12. Exposure bracketing/White balance bracketing
13. Continuous shooting
14. Battery power*4
15. Spot exposure metering area / AF area
16. Image sharpening
17. White balance
18. Sensitivity adjustment
19. Image adjustment
20. Image size
21. Image quality
22. Metering mode
23. Exposure mode
24. Shutter speed
25. Exposure meter
26. Aperture
-timer/Count down
/Ultra HS
/ Black-and-white
Page 12
N
ikon COOLPIX995 Digital Camera
27. Exposure Compensation/Exposure Compensation values
28. Number of exposures remaining /Movie duration
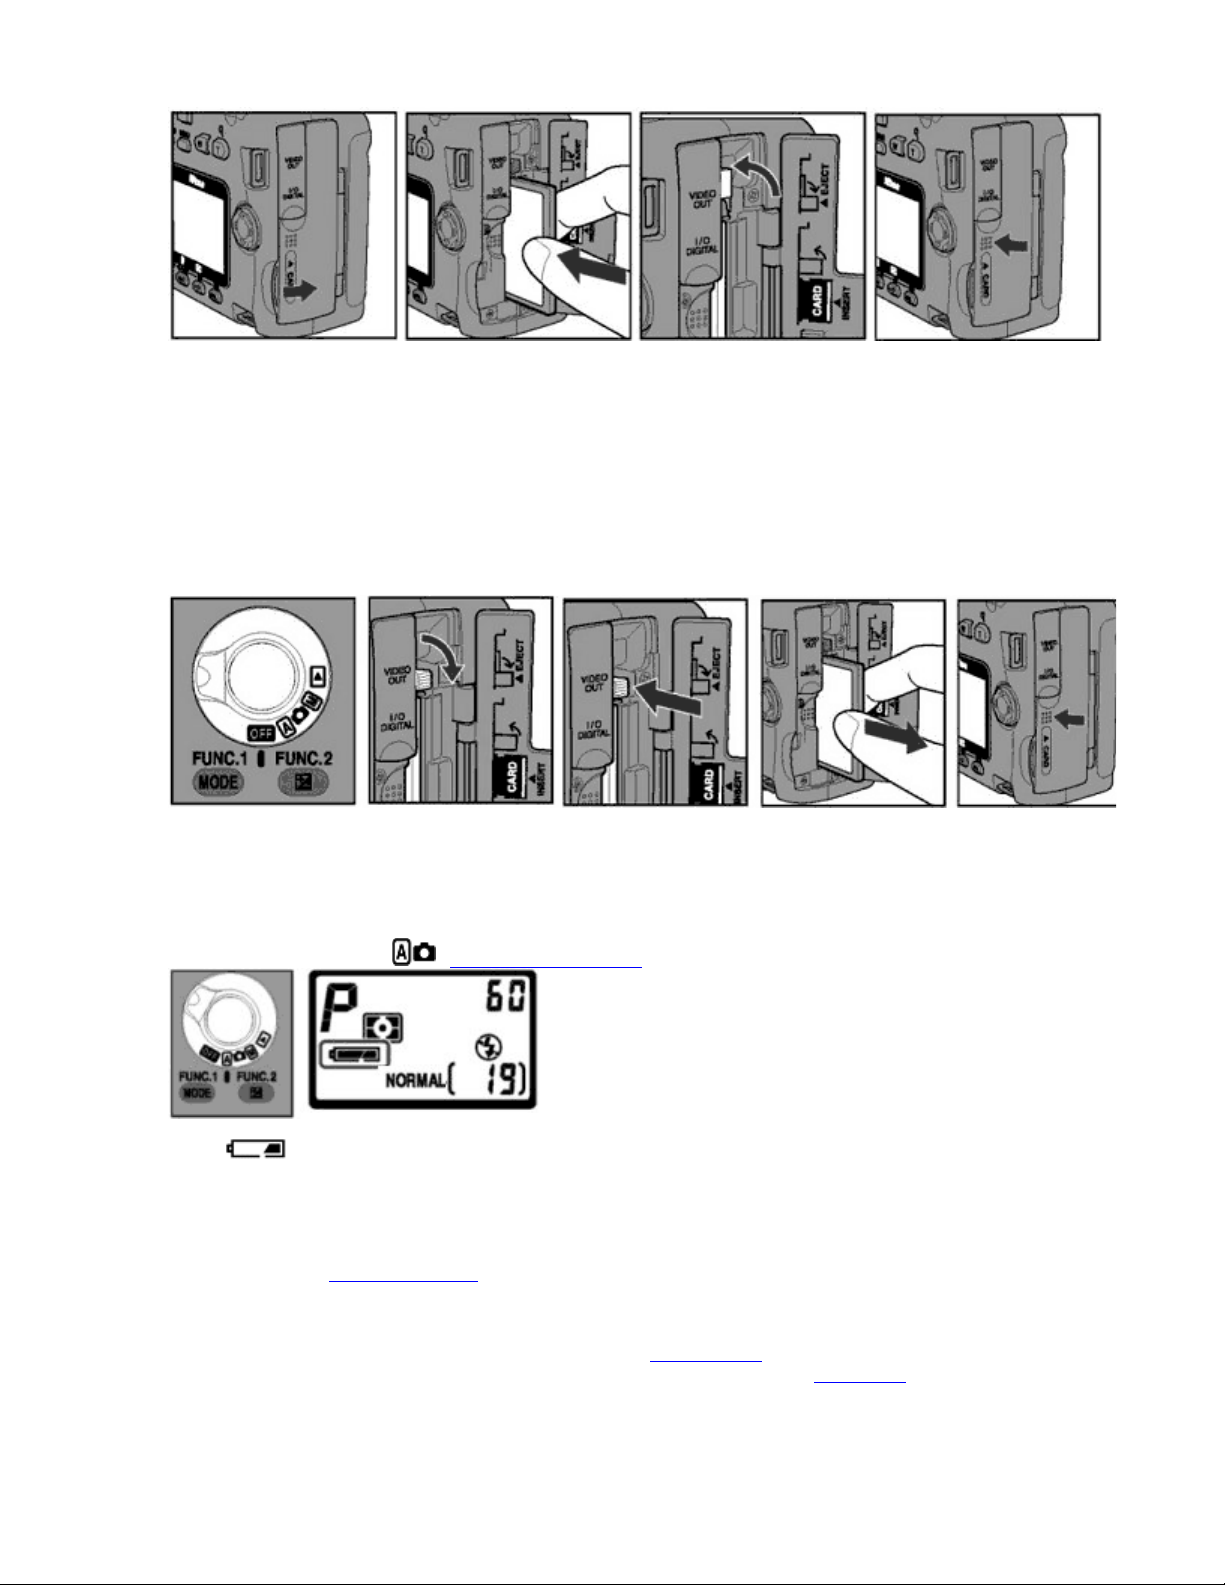
Monitor (in Playback mode)
Page 12 of 136
1. Image date
2. Image time
3. Image size
4. Image quality
5. Folder name
6. File number
7. Battery power*4
8. Auto transfer
9. Print
10. Protect
11. Frame number of displayed image
*1 Not displayed when User Setting Number 1 is set.
*2 Flashes when date/time setting is not set.
*3 Not displayed when folder name is set to NIKON.
*4 Not displayed when battery power is sufficient.
-order selection
Quick Guide
This section will rapidly guide you through the first steps, from setting up the camera to taking your first picture.
1.
Set the MODE dial to OFF and
insert the battery
.
2. Insert the CF memory card
.
Page 13
N
ikon COOLPIX995 Digital Camera
{
Gently insert the CF memory card until it is fully seated. The label on the memory card should face the front of
the camera and the edge with the holes has to mate with the connector inside the camera.
NOTE :
A new CF memory card should be formatted for use with the COOLPIX995 camera body. The CF memory card
supplied with the camera is already formatted.
Removing the CF memory card
Using a new CF memory card
Page 13 of 136
NOTE:
Make sure that the
3.
Set the MODE dial to and
When lights up or flashes, charge the supplied battery using the supplied battery charger.
Date/time setting
The date and time for your country or location should be set before use. The correct date and time at which each
picture is taken is then automatically recorded with the image and can be checked on the camera monitor or computer
(after transfer). See Setting Date/Time
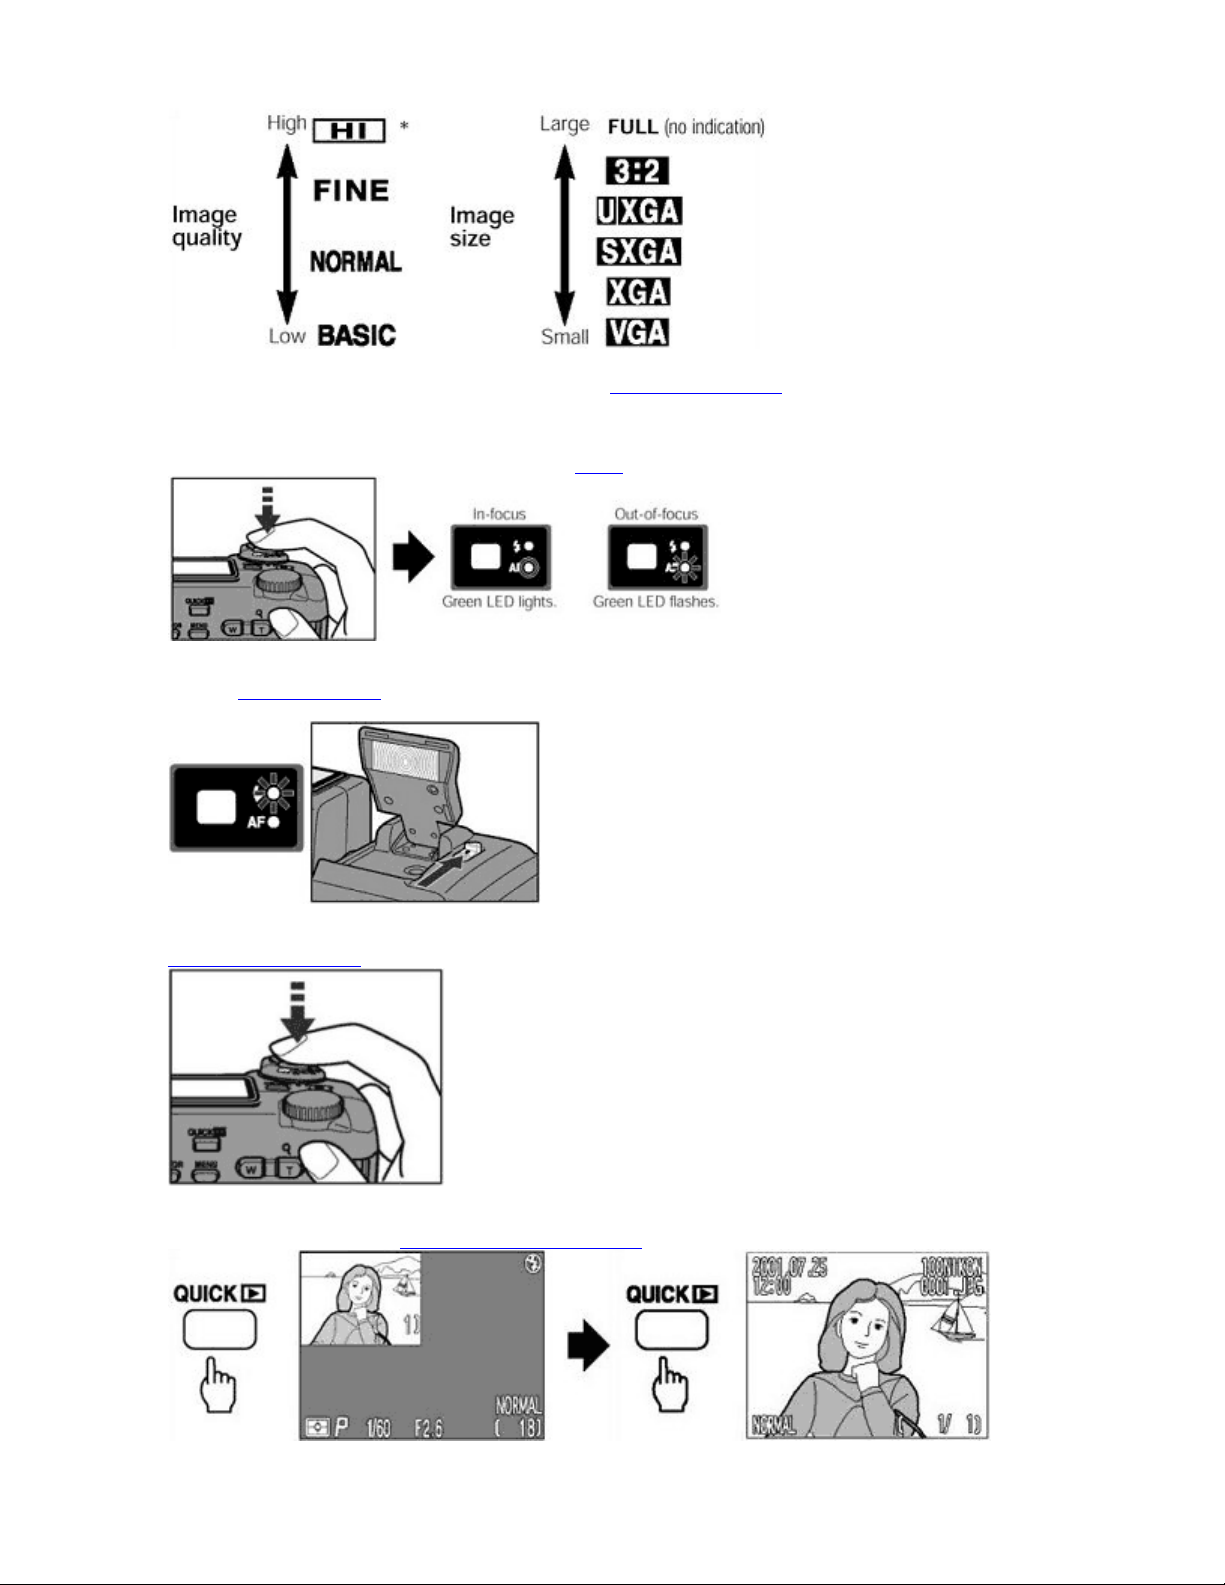
Image quality and Image size
Press the
COMMAND
Inserting/removing the CF memory card
dial is set to
MODE
check the battery power
button to choose between the four types of Image quality
QUAL
dial while pressing the
QUAL
.
OFF
.
button to select one of the six types of Image size
.
(compression ratio) and rotate the
.
Page 14
N
ikon COOLPIX995 Digital Camera
4.
Center the subject in the Monitor or Viewfinder and
{
Use the Zoom buttons to frame your subject in the Monitor or Viewfinder.
{
The W button zooms the camera out, reducing magnification and increasing the field of view. The T button
zooms the camera in.
5.
Press the SHUTTER RELEASE button lightly to
compose your picture
focus
on the subject by using autofocus.
.
Page 14 of 136
{
The Green LED lights when the subject is in focus and flashes rapidly when the camera cannot autofocus.
6.
Use the
the Red LED flashing rapidly when the SHUTTER RELEASE button is half-pressed.
7. Slowly and fully depress
8.
Press the QUICK button to
built
-in Speedlight
{
Slide the Speedlight lock-release lever to release the built-in Speedlight.
{
A single beep sound indicates that the shutter has been released.
if there is insufficient light to illuminate the subject. This condition is indicated by
the SHUTTER RELEASE button to take the picture.
check the picture immediately.
Page 15

N
ikon COOLPIX995 Digital Camera
{
Photographs stored on the CF memory card can be reviewed using the
to view the image in the top left corner of the Monitor.
{
Press the
{
Use the Zoom button to enlarge the image and use the Multi selector to scroll to hidden parts of the picture.
9.
Set the MODE dial to when you have finished taking photographs
Deleting images
You can delete the image in the Full-screen review mode. See step 6 of Basic Operation (Auto mode)
button again to see the image full screen.
QUICK
Menu Guide
Page 15 of 136
button. Press the
QUICK
QUICK
button
Menu Guide:
Press the Multi selector to switch between Shooting menu 1 and 2
Press
MENU
Shooting Menu 1
button to select.
Shooting Mode
WHITE BALANCE
Page 16

A
A
N
ikon COOLPIX995 Digital Camera
Select white balance in
accor-dance with
lighting conditions
Page 16 of 136
METERING
Select metering mode
CONTINUOUS
Select Shooting mode
BEST SHOT
SELECTOR
Turn best shot selection
on or off
IMAGE ADJUSTMENT
djust brightness or
contrast of image
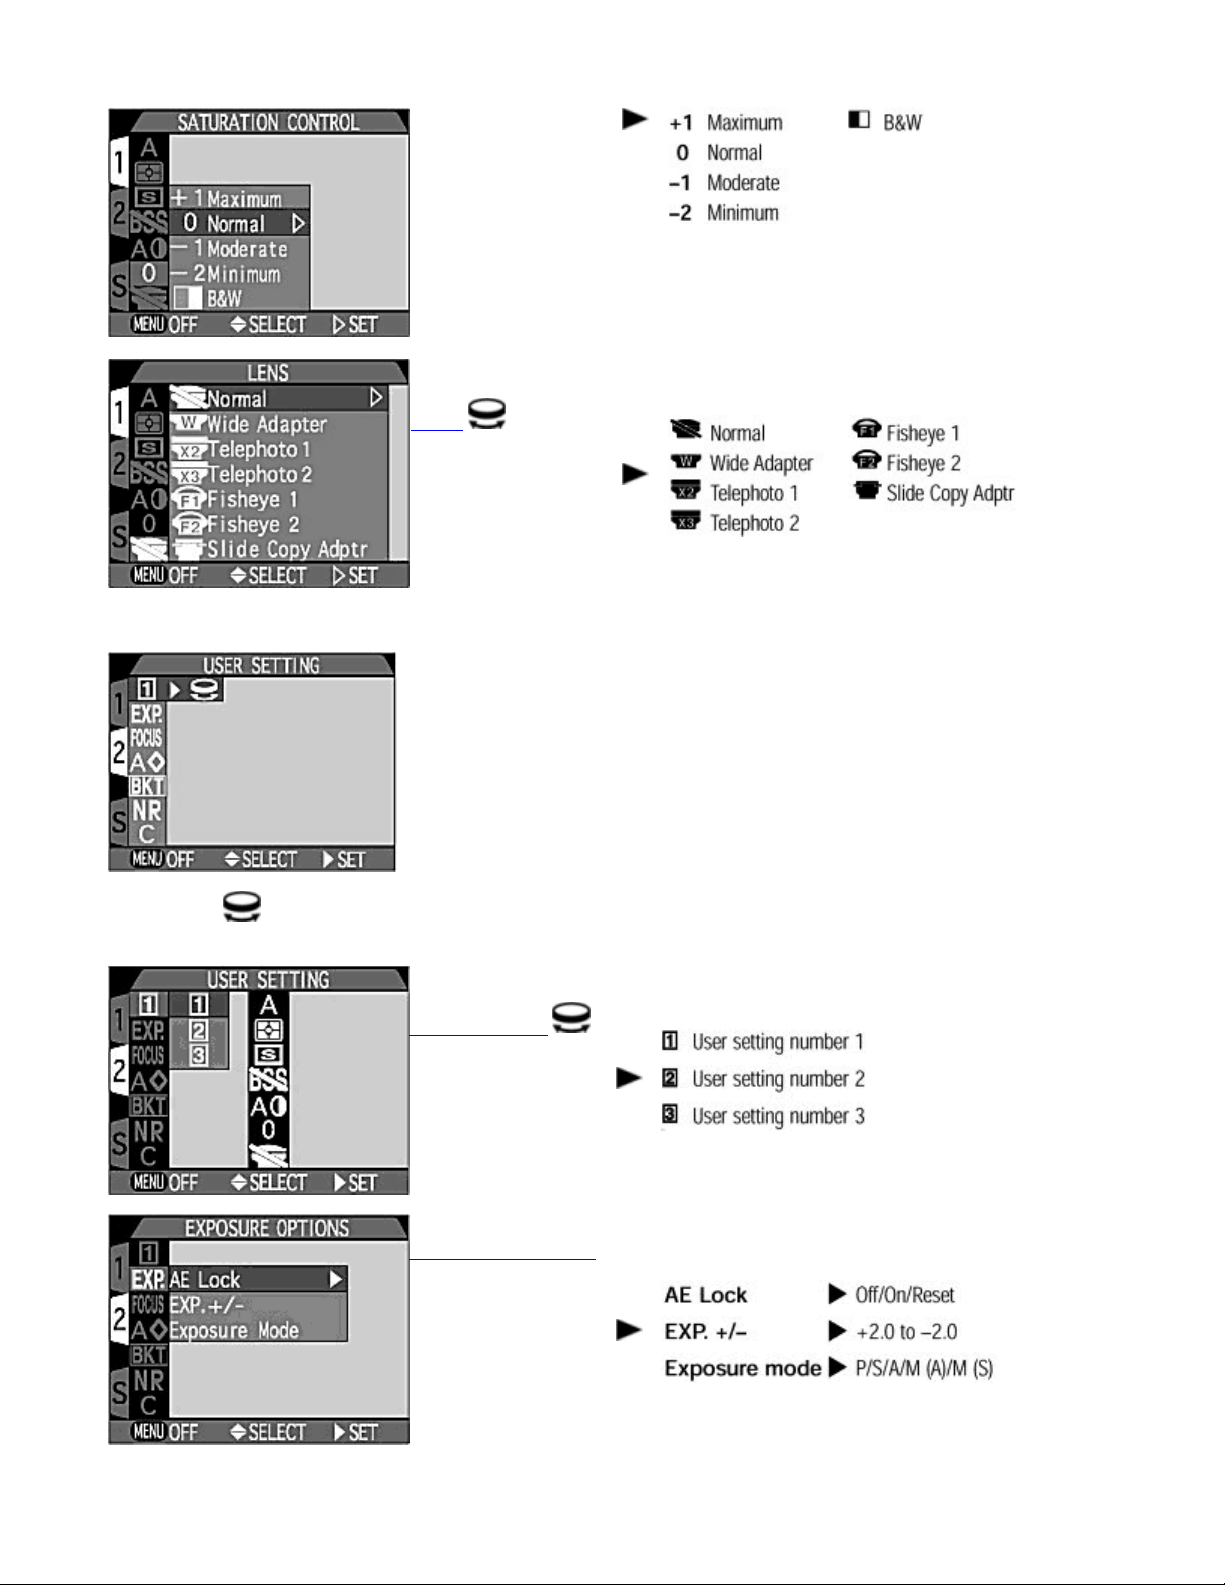
SATURATION
CONTROL
djust the saturation to
Page 17
N
ikon COOLPIX995 Digital Camera
Page 17 of 136
Shooting Menu 2
control the strength of
color, or to select black
and white photographs
LENS
Select type of optional
lens converter or Slide
Copy Adapter.
If the Symbol appears to the right of a menu item you can also select an option by rotating the
USER SETTING
Select User Setting
1/2/3
EXPOSURE OPTIONS
Turn AE Lock and Auto
Bracketing on or off,
set exposure
compensation
COMMAND
dial.
Page 18
A
N
ikon COOLPIX995 Digital Camera
Page 18 of 136
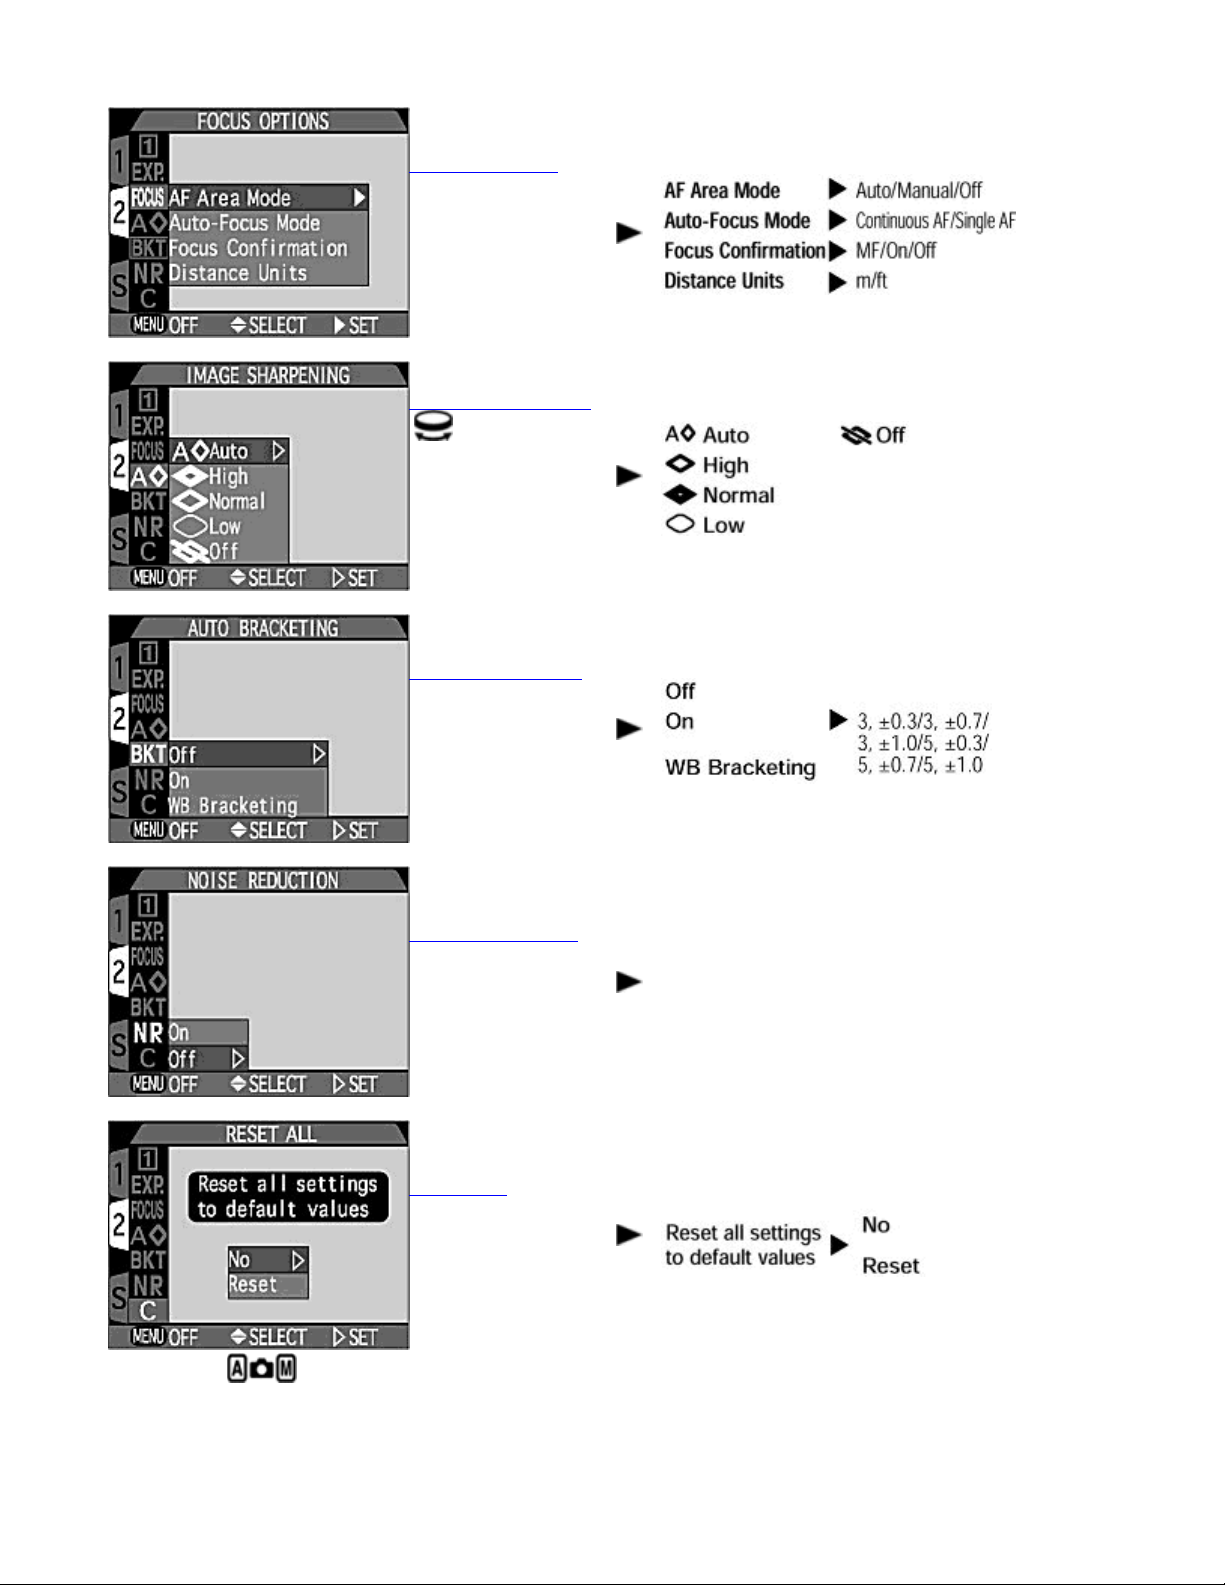
FOCUS OPTIONS
Select AF Area,
change Autofocus
mode, confirm focus or
change distance units
IMAGE SHARPENING
Select level of image
sharpening to be
performed
UTO BRACKETING
Set Auto Bracketing
(on or off) or White
Balance Bracketing
Menu Guide:
NOISE REDUCTION
Turn Noise Reduction
on or off
RESET ALL
Reset all settings to
default values
Shooting mode
Off
On
Page 19
A
N
ikon COOLPIX995 Digital Camera
Page 19 of 136
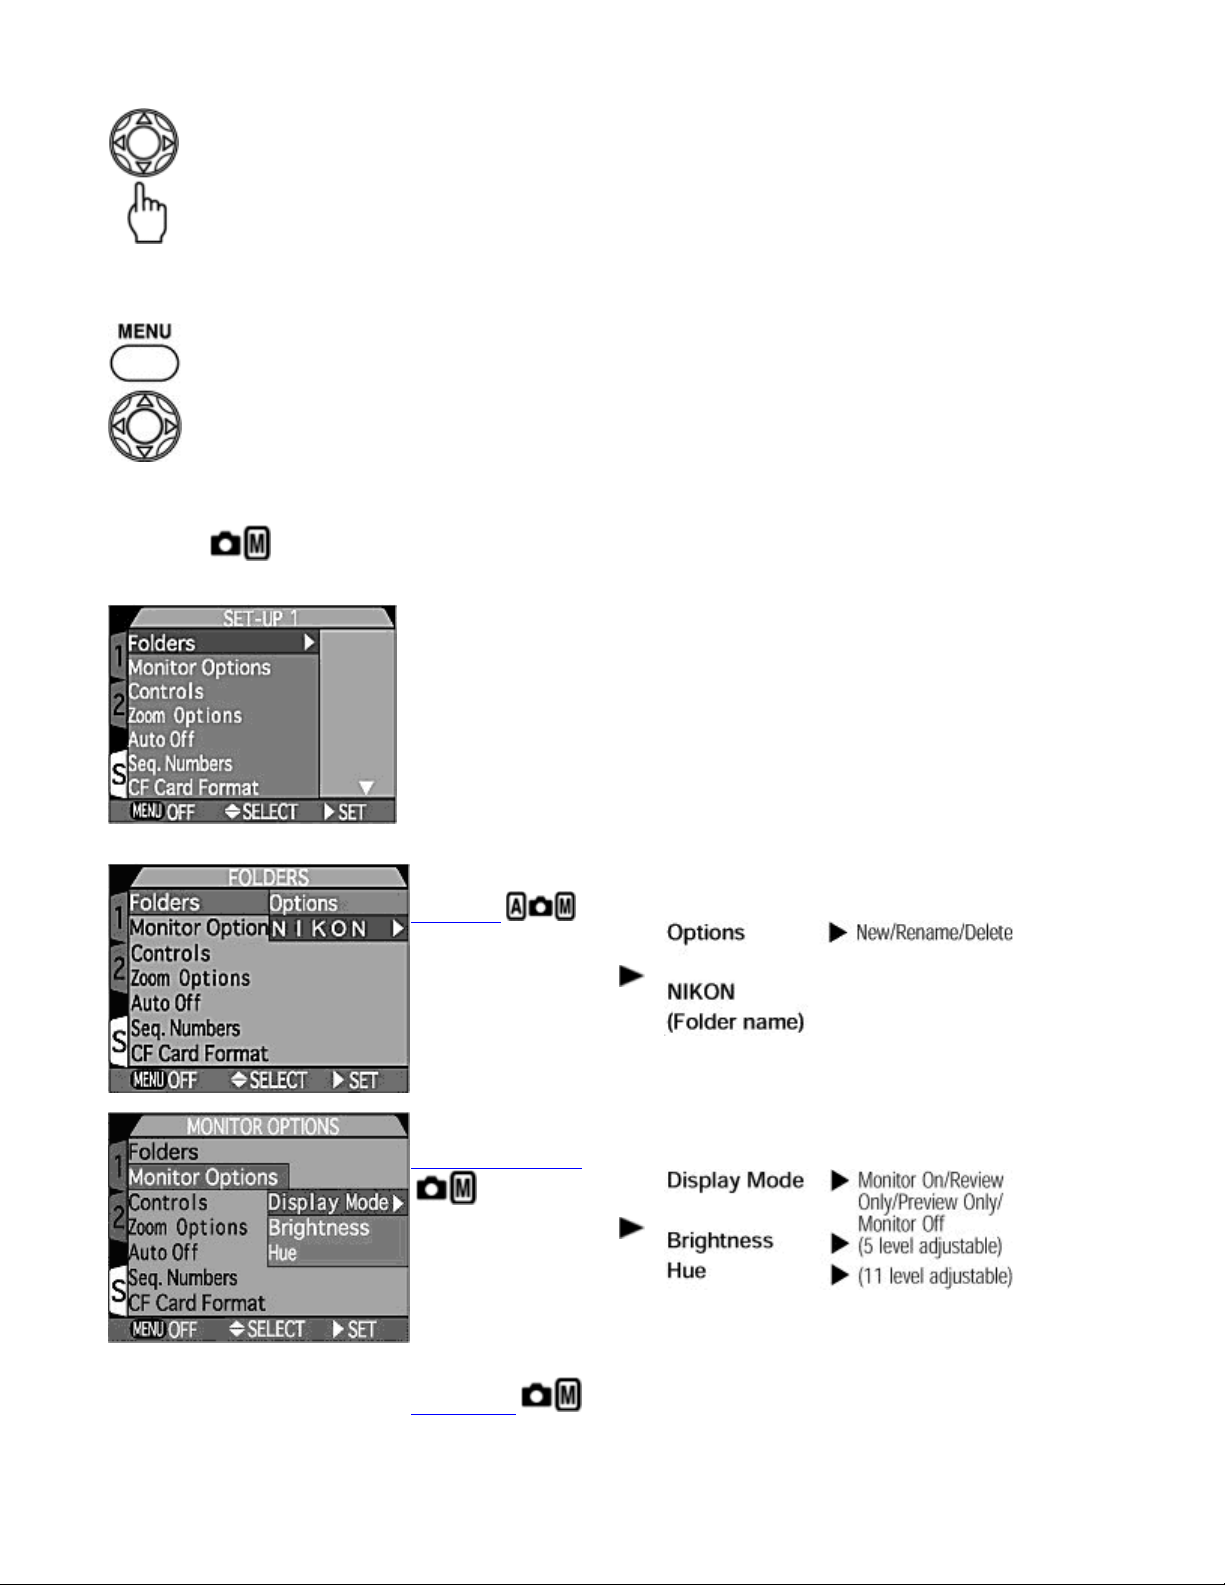
Press the Multi selector to switch between SET-UP menu 1 and 2.
Press
SET-UP 1
button and Multi selector to select.
MENU
( )
FOLDERS
Create new folders,
rename or delete
existing folders, choose
folder for recording
MONITOR OPTIONS
djust monitor
brightness and hue
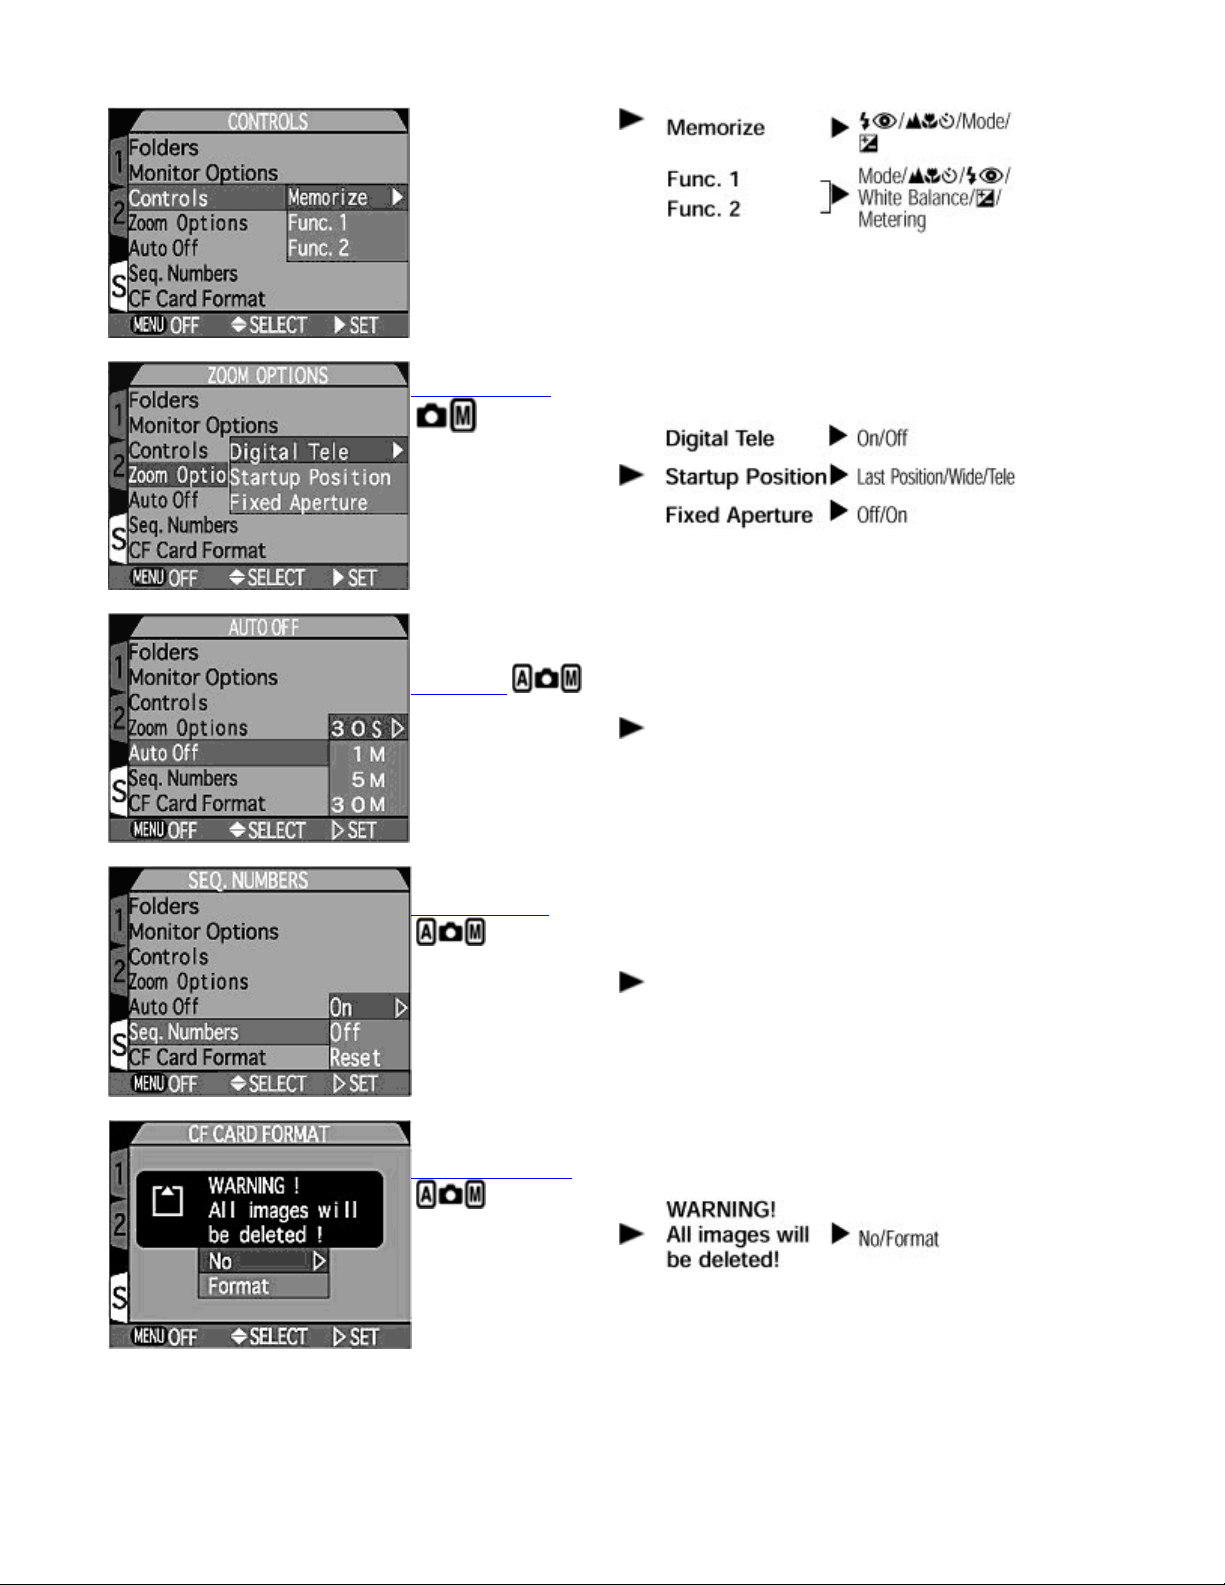
CONTROLS
Set camera to
"remember" settings in
Page 20
A
N
ikon COOLPIX995 Digital Camera
Page 20 of 136
effect when cam-era is
turned off; assign
functions to
FUNC. 2
ZOOM OPTIONS
Turn Digital Tele and
Fixed Aperture on or
off, set start-up position
UTO OFF
Set time delay for Auto
Power Off function
FUNC. 1
buttons
/
30 S
1 M
5 M
30 M
SEQ. NUMBERS
Reset Seq. Number
function; turn file
numbering on or off
CF CARD FORMAT
Format CF memory
card
On
Off
Reset
Page 21
Y
N
ikon COOLPIX995 Digital Camera
Page 21 of 136
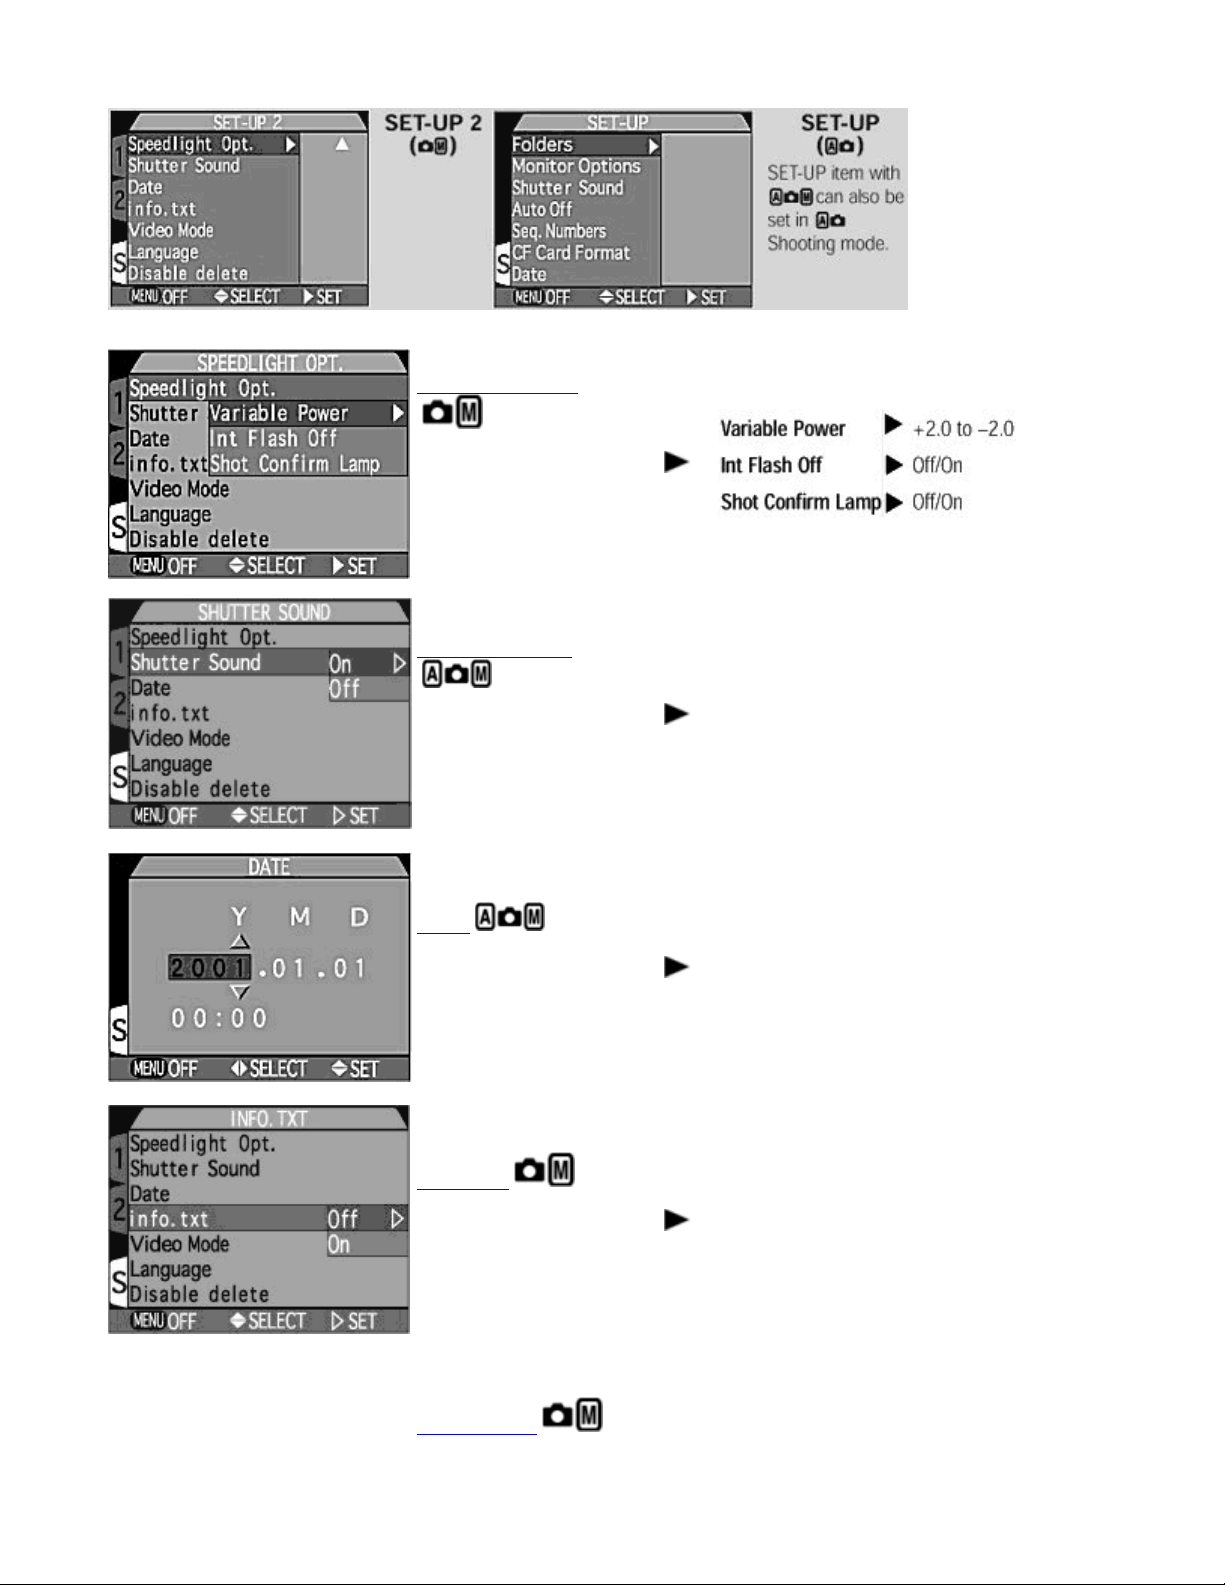
SPEEDLIGHT OPT.
Set flash output; turn
internal flash and shot
confirmation lamp on or off
SHUTTER SOUND
Turn camera sound on or
off
On
Off
DATE
Set camera's data and time
INFO. TXT
Turns recording of text
data on or off
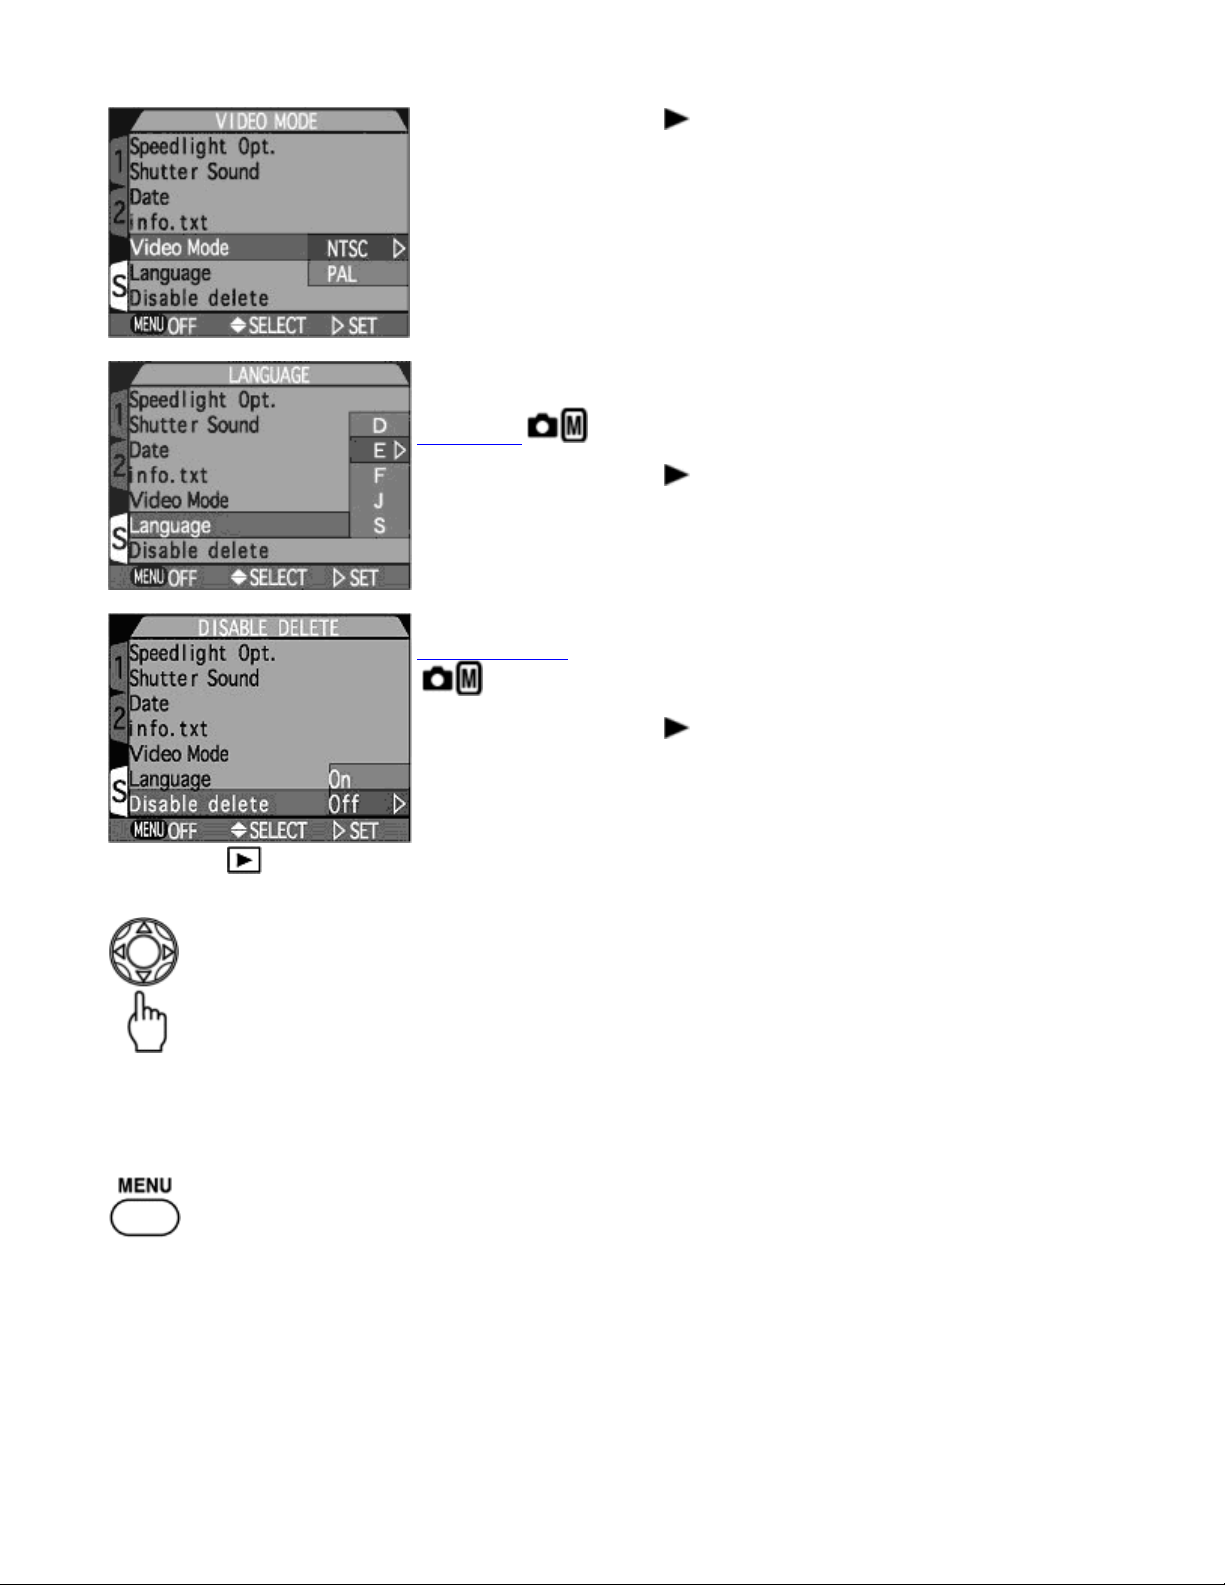
VIDEO MODE
Select video standard for
ear/Month/Day/Hour/Minute
Display order
Off
On
NTSC
Page 22
N
ikon COOLPIX995 Digital Camera
Page 22 of 136
your region for playback on
television screen
LANGUAGE
Select language for menu
and message display
DISABLE DELETE
Disable/enable deletion of
all image files at a single
command
PAL
D
E
F
J
S
On
Off
Menu Guide:
Press the Multi selector to switch between Playback menu and SET-UP menu.
Playback Menu
Press
MENU
button to select.
Playback Mode
Page 23
N
ikon COOLPIX995 Digital Camera
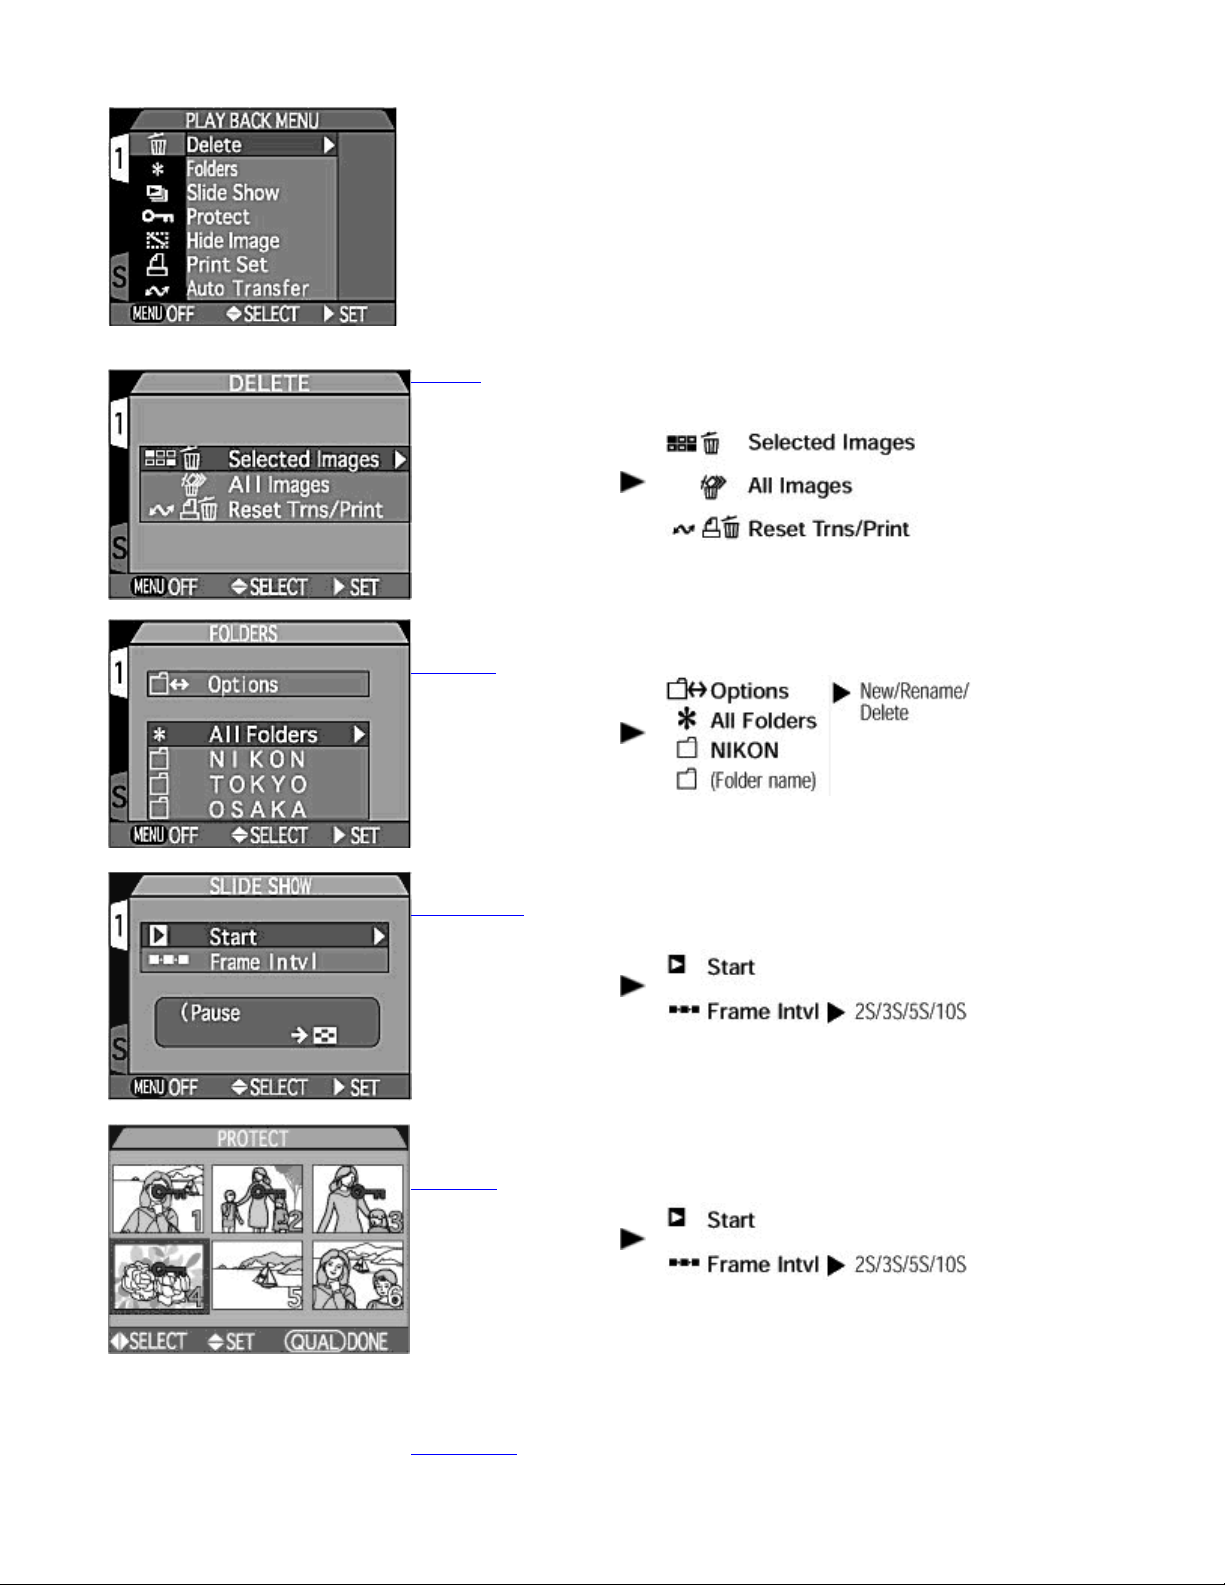
DELETE
Delete selected images
using thumbnail
display; delete all
images or the settings
of Auto
Transfer and Printorder files
Page 23 of 136
FOLDERS
Create new folders,
rename or delete
existing folders; choose
folder for recording
SLIDE SHOW
Start slide show of
images contained in
single folder; set frame
interval from 2s/3s/5s/
10s
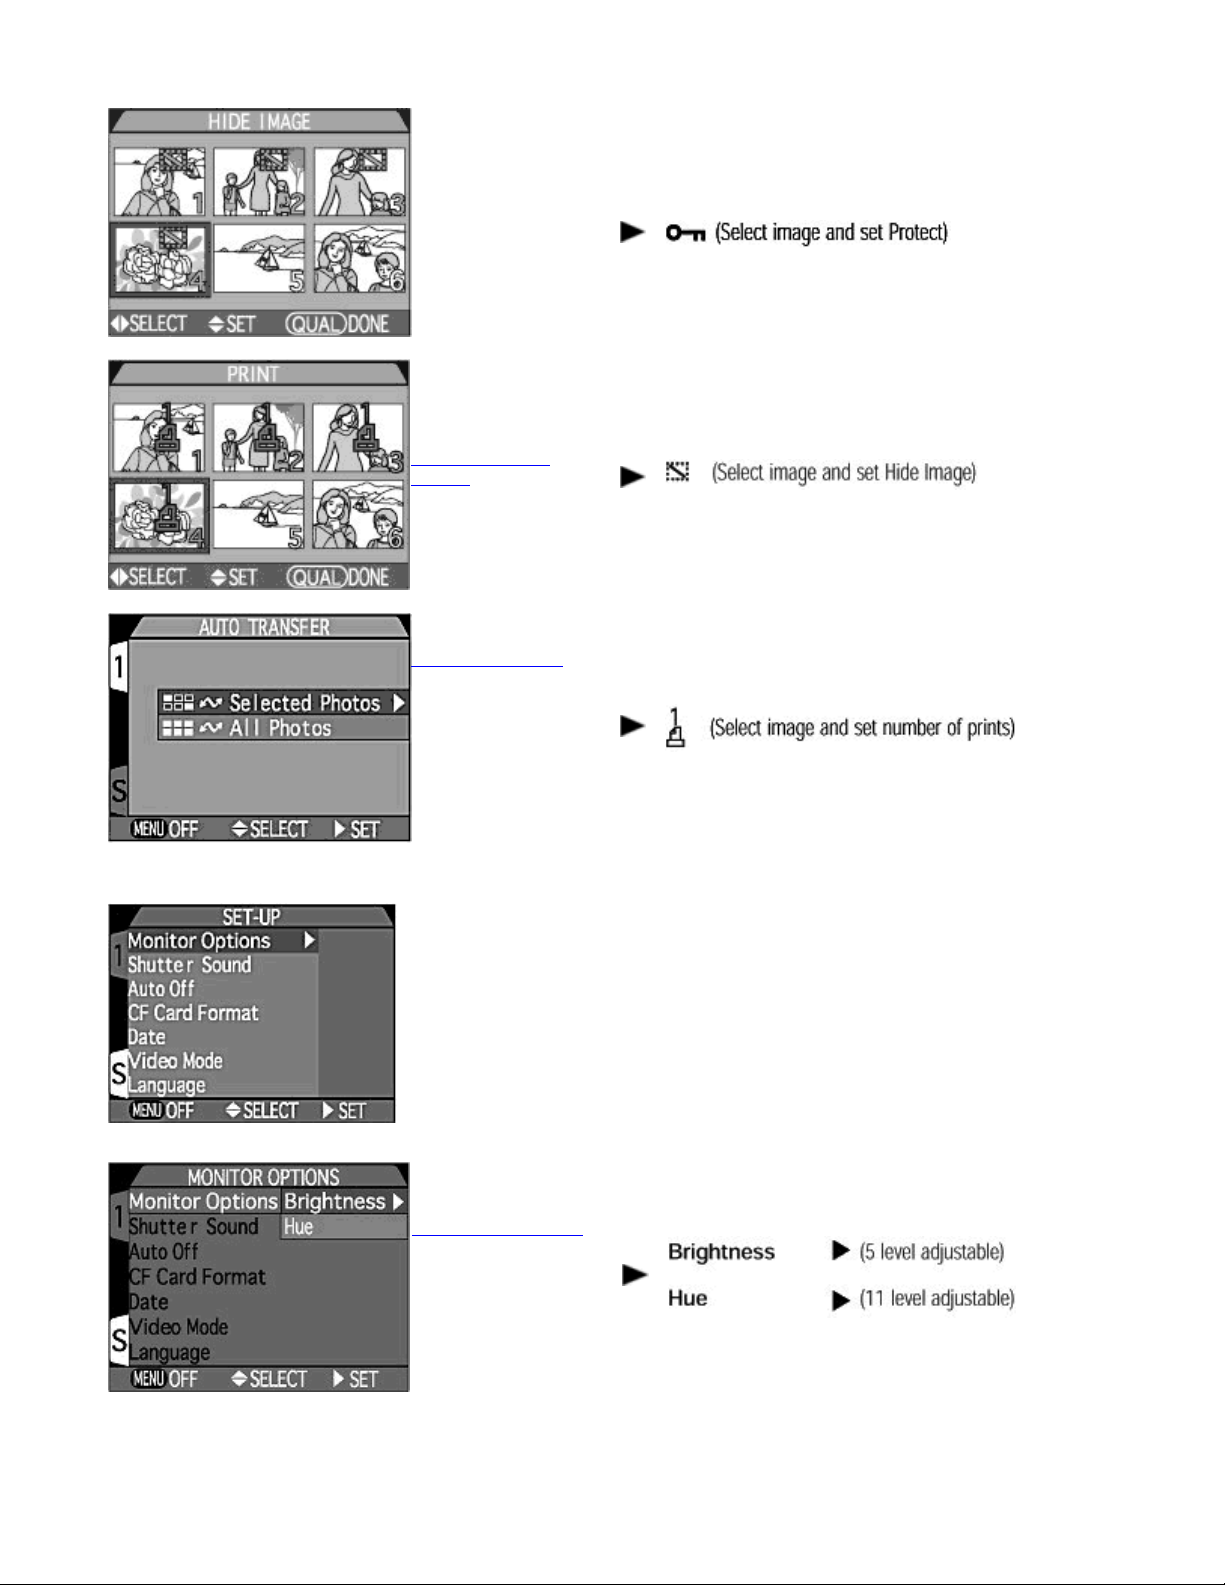
PROTECT
Protect selected
images using thumbnail
display
HIDE IMAGE
Page 24
A
A
A
N
ikon COOLPIX995 Digital Camera
Hide selected images
using thumbnail display
Page 24 of 136
SET-UP
PRINT SET
Select images for
printing using
thumbnail display
UTO TRANSFER
utomatically transfer
selected images or all
images to a connected
computer
MONITOR OPTIONS
djust monitor
brightness and hue
Page 25

A
Y
N
ikon COOLPIX995 Digital Camera
Page 25 of 136
SHUTTER SOUND
Turn camera sound on
or off
UTO OFF
Set time delay for Autooff function
CF CARD FORMAT
Format CF memory
card
On
Off
30 S
1 M
5 M
30 M
DATE
Set camera's data and
time
VIDEO MODE
Select video standard
for your region for
playback on television
screen
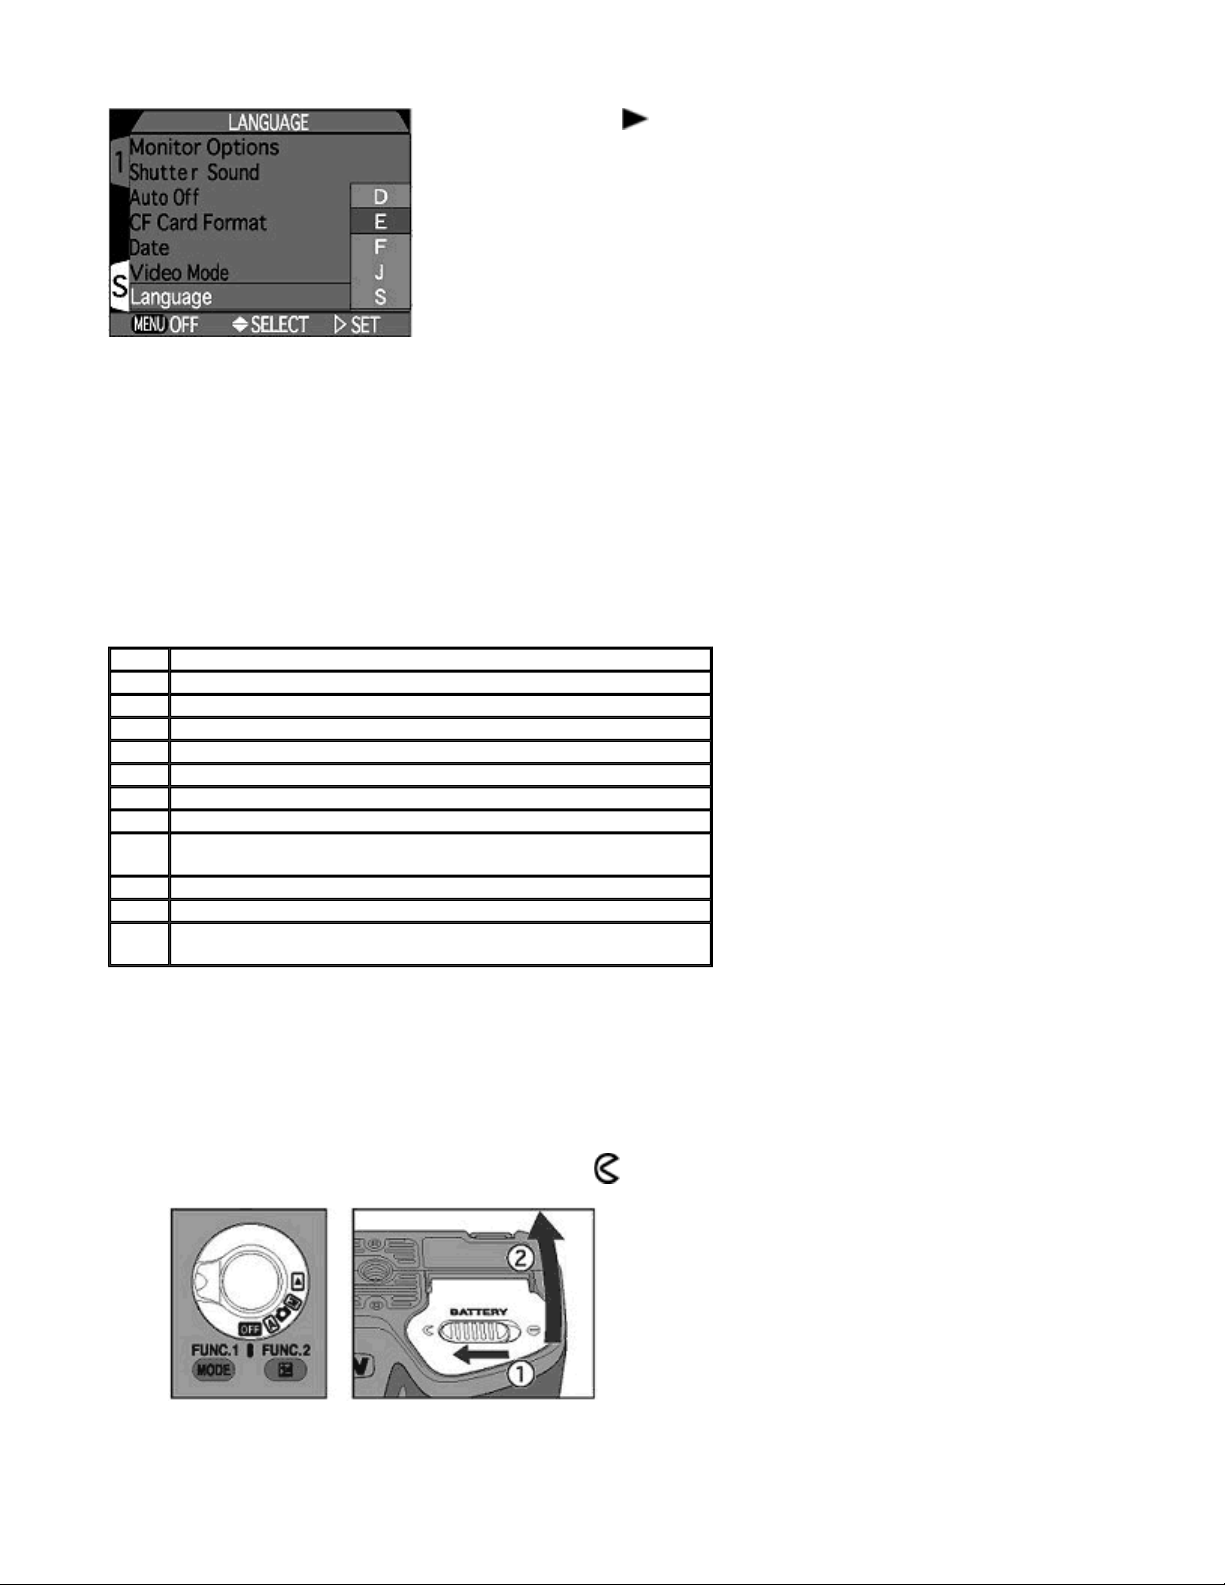
LANGUAGE
ear/Month/Day/Hour/Minute
Display order
NTSC
PAL
D
E
Page 26
N
ikon COOLPIX995 Digital Camera
Page 26 of 136
Select language for
menu and message
display
F
J
S
Preparation
Check List
This section introduces preparations necessary before using the camera.
Check list
Check that all the components listed below are included in the package. If any components are missing, contact the retailer
where you purchased your COOLPIX995.
10 Instruction manual for COOLPIX995
11 CD-ROM instruction manual for Nikon View 4
12
1 Nikon COOLPIX995 Digital Camera
2 Strap
3 Li-ion Rechargeable Battery
4 Battery Charger with AC power cord
5 Video Cable
6 CompactFlash ™ (CF) Memory Card
7 USB Cable for connection to computer.
8 Lens cap
Nikon View 4 CD-ROM (contains Nikon View 4and bundled
9
software)
"Open Me First!" Envelope - your path to AfterSales Support and
Service.
Installing Battery
The camera requires either the supplied Li-ion Rechargeable Battery or a 2CR5 (DL245) 6V lithium battery (available
separately). Make sure to check the battery power when a new battery is installed or before shooting.
1.
Turn the MODE
{
Slide the battery chamber cover latch toward to open the cover.
2.
Insert the battery with the ( + ) and ( - ) ends positioned as indicated inside the battery chamber, then firmly
close the cover.
dial
to OFF and open the battery chamber cover.
Page 27
N
ikon COOLPIX995 Digital Camera
Page 27 of 136
{
Slide the battery chamber cover latch toward to lock the cover.
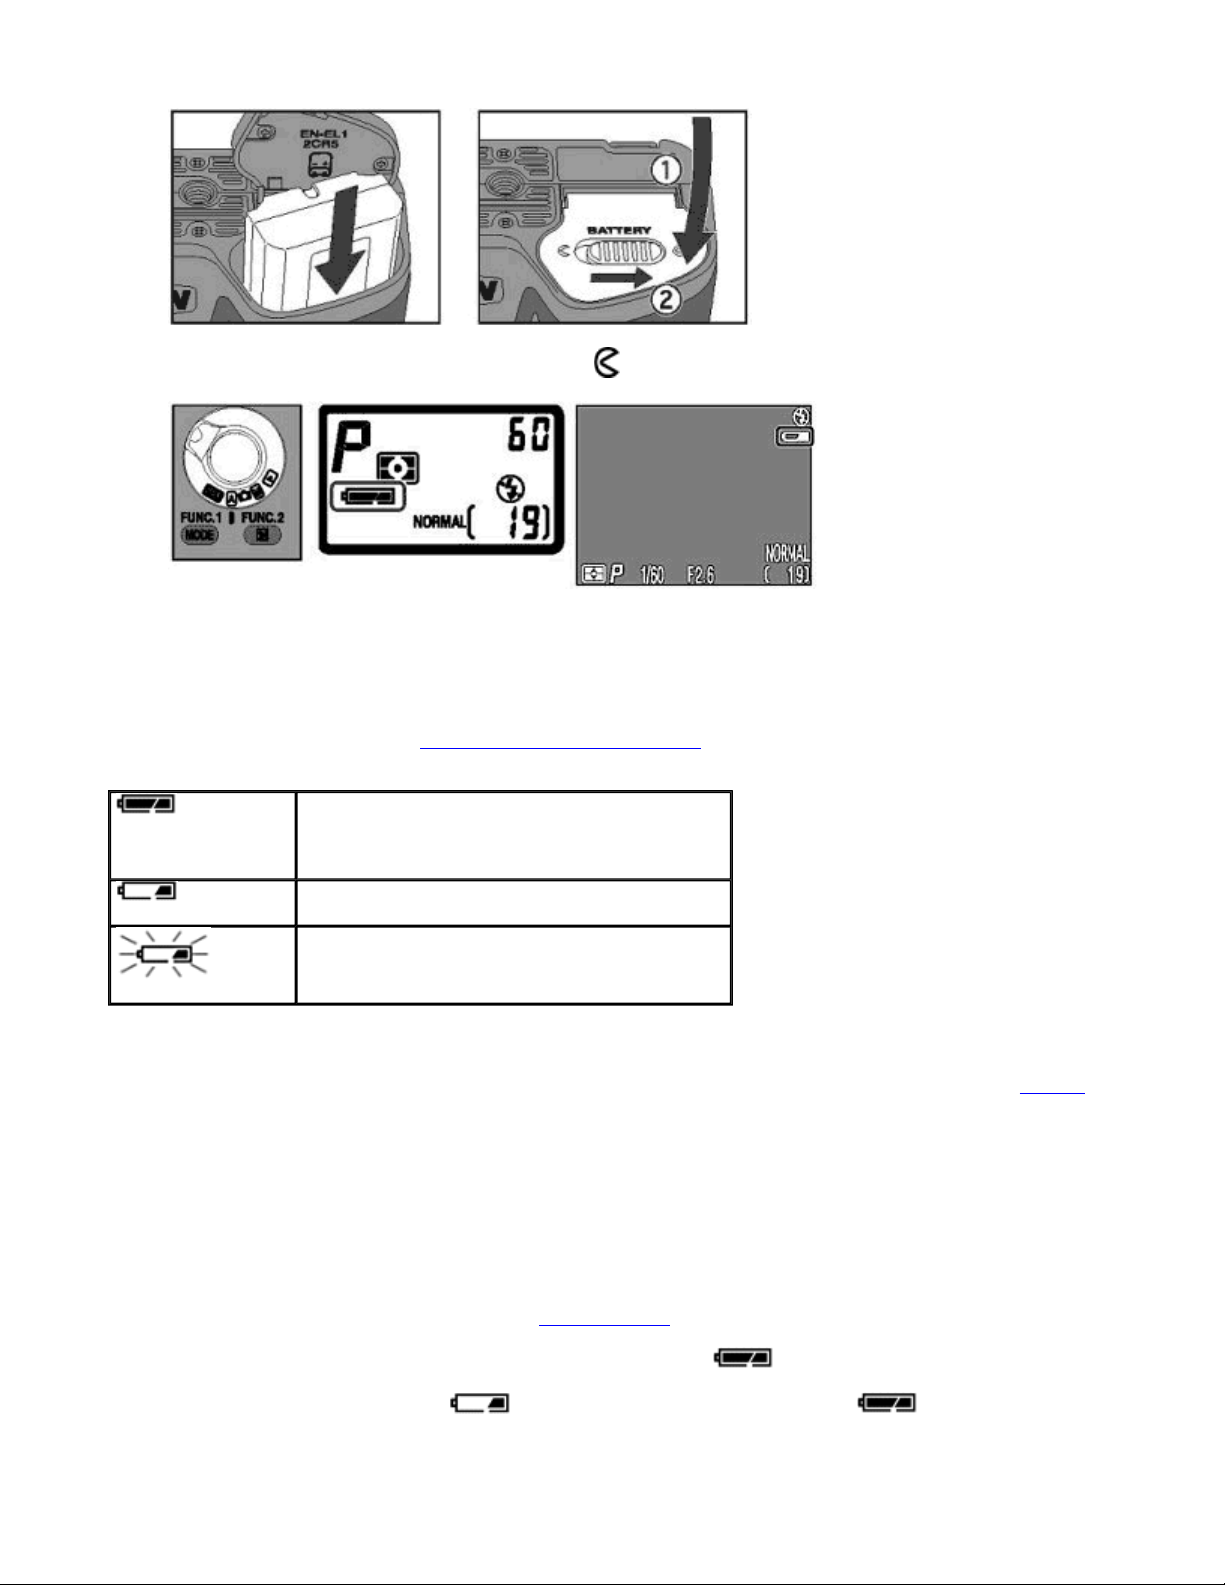
3.
Set the MODE dial to and check the battery power on the Control panel or Monitor.
z
Battery power indication only displayed in the Monitor when there is insufficient battery power.
Power sources
We recommend use of the supplied Li-ion Rechargeable Battery. This battery can be charged with the supplied battery
charger. Use of the optional accessory AC Adapter/Battery Charger EH
-21 is recommended if the camera is being used for
extended periods of time.
lights up
Sufficient battery power
(on Control panel only)
lights up
Battery power is low-please recharge or change
battery.
Battery is exhausted-recharge or change battery as
flashes
soon as possible.
z
All the camera functions are disabled when the battery is completely exhausted.
z
The CF memory card will retain images regardless of the condition of the camera battery.
z
Battery power can be conserved and the available number of shots per battery increased by turning off the Monitor and
using the Viewfinder.
Supplied Li-ion Rechargeable Battery
The supplied Li-ion Rechargeable Battery is not fully charged at shipment. We recommend that you charge the battery before
first use. Please see the instruction manual supplied with the charger for details.
Precautions on battery use and handling
z
Be sure to follow the warnings and cautions in For Your Safety when installing/handling the battery.
z
The battery cannot be replaced when a tripod or optional bracket is attached.
z
Due to the characteristics of the battery, the battery power indicator may briefly show when the exhausted
battery is reinstalled.
z
The flashing low battery indication does not change to full battery indication (steady) when the AC
Adapter is connected. To reset the indicator, turn the power off and then on again.
Page 28
N
ikon COOLPIX995 Digital Camera
Setting Date/Time
The date and time for your country or location should be set before use.
Page 28 of 136
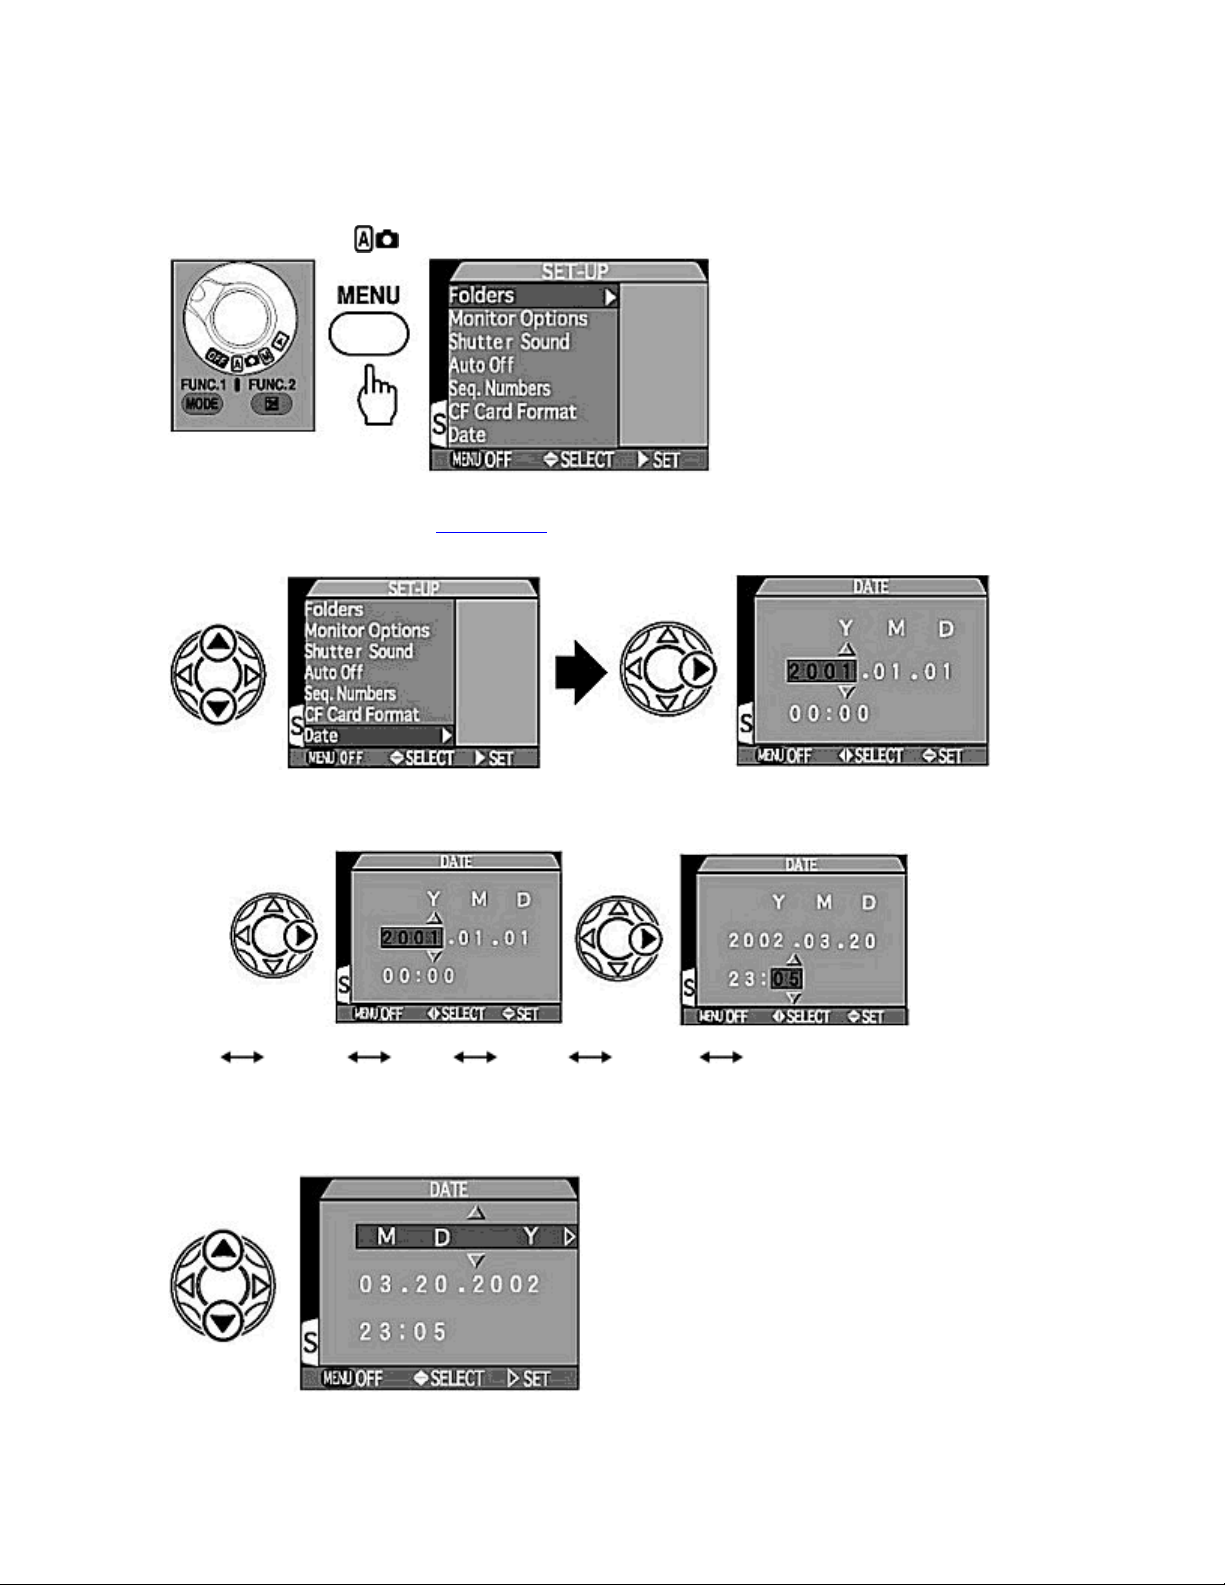
1.
Set the MODE dial to
2.
Select "Date" in the SET-UP menu.
{
Press UP /
year display flashes.
3.
Set year, month, day, hour and minute.
{
Pressing UP on the Multi selector increases the number and pressing
setting a number, pressing
DOWN
and press the MENU button to display the SET-UP menu.
on the Multi selector to highlight
moves the selection on.
RIGHT
Date
and press
to display date/time setting. The
RIGHT
decreases the number. After
DOWN
Year
{
4.
Set the date display order.
{
Month
The year display can be set between 1970 to 2037.
Press UP /
on the Multi selector to change the date display order as followings.
DOWN
Day
Hour
Minute
Date display sequence
Page 29

g
N
ikon COOLPIX995 Digital Camera
5.
Complete the date and time setting.
{
Press
When the date display order is set, the clock starts and the display returns to the SET-UP menu.
Printing image date/time with a photo
When date and time are set, image date and time are recorded with the image data (inside the image file) and can be
displayed when the image is played back
Backup battery of the clock
The clock-calendar is powered by a separate rechargeable battery, which is charged as necessary when the main battery is
installed. If the camera has been stored with the main battery removed for a long period of time, the clock may need to be
reset. Once the main battery has been reinserted, the clock battery will recharge in several hours, during which time the main
battery should be left in the camera.
on the Multi selector after selecting the desired date display order to complete date/time setting.
RIGHT
. The image date and time can be printed with the photo.
Page 29 of 136
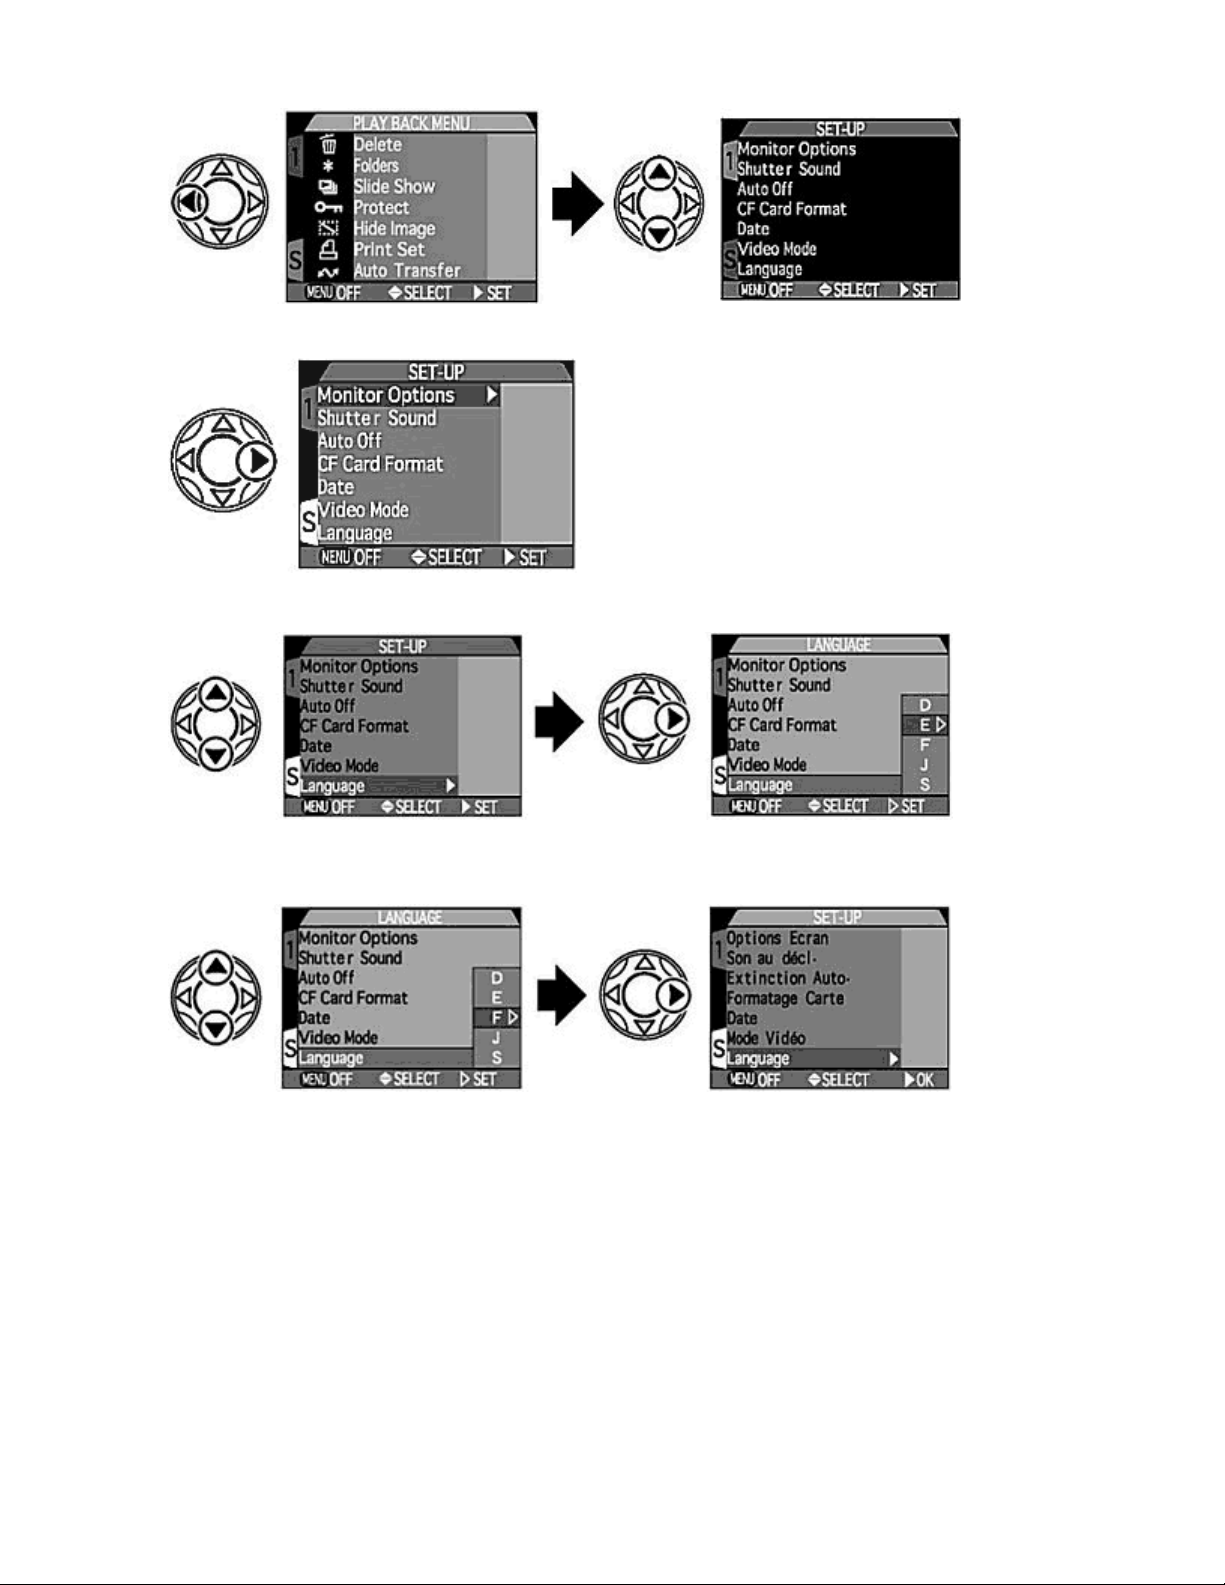
Selecting a Language
The language in which menus and messages are displayed can be selected using the
1. Turn the
mode.
2.
Press the MENU button so the Playback menu is displayed.
{
The appearance of the menu will vary depending on the language currently selected.
dial to . The
MODE
Language
can also be set using the SET-UP menu in the Shooting
Language
sub-menu.
3.
Press LEFT on the Multi selector to hi
hlight the tab on the left and press UP/DOWN to highlight the "S" tab.
Page 30
N
ikon COOLPIX995 Digital Camera
4.
Press RIGHT on the Multi selector to display the SET-UP menu.
Page 30 of 136
5.
Press UP/DOWN on the Multi selector to highlight the "Language" sub-menu and press RIGHT to select
"Language".
6.
Press UP/DOWN on the Multi selector to highlight "D", "E", "F", "J" or "S" and press RIGHT to select.
{
The languages available in the "Language" sub-menu are:
German (Deutsch)
D:
English
E:
French (Francais)
F:
Japanese
J:
Spanish (Espanol)
S:
When the Language is set, the display returns to the SET-UP menu.
Inserting CF Memory Card
The COOLPIX995 uses a CompactFlash ™ (CF) memory card to store images and movies.
Page 31

p
N
ikon COOLPIX995 Digital Camera
Use a Nikon CF memory cards or other recommended memory card. See Usable CF memory cards and the instruction
manual of the CF memory card for notes on using the card.
MODE
dial is set to
when inserting the CF memory
OFF
Inserting the CF Memory Card
1.
Turn the MODE dial to OFF, open the card slot cover, and gently insert the CF memory card until it is fully
seated. The label on the CF memory card should face the front of the camera and the edge with the holes has
to mate with the connector inside the camera.
NOTE :
Make sure that the
2.
Return the eject lever to its original position after fully inserting the CF memory card and make sure to
completely close the card slot cover.
Inserting the CF memory card
Page 31 of 136
Removing the Memory Card
1.
Turn the MODE dial to OFF, open the card slot cover, fold out the eject lever and press it in to release the CF
memory card.
NOTE:
{
Make sure that the
{
Note that the CF memory card may become warm during extended camera use.
2.
Gras
the CF memory card with your fingertips and pull gently to extract it. Then close the card slot cover.
Removing the CF memory card
MODE
dial is set to
when the CF memory card.
OFF
Page 32

N
ikon COOLPIX995 Digital Camera
Page 32 of 136
Formatting CF Memory Cards
CF memory cards must be formatted before being used with the COOLPIX995. Note that the CF memory card supplied with
your camera has already been formatted.
NOTE:
Note that when a CF memory card is formatted, the entire contents of the card are permanently deleted.
1. Insert the CF memory card into the COOLPIX995 .
2. Turn the
Formatting CF memory cards
dial to .
MODE
{
CF memory cards can also be formatted in or mode.
3.
Press the MENU button.
{
The SET-UP menu is displayed in the Monitor.
4.
Select "CF Card Format".
{
Press
UP /DOWN
on the Multi selector to highlight CF Card Format and select it by pressing
RIGHT
.
Page 33

A
N
ikon COOLPIX995 Digital Camera
5.
Select "Format".
{
Press UP/
started,
FORMATTING
on the Multi selector to highlight Format and select it by pressing
DOWN
is displayed and then the Monitor returns to the SET-UP menu.
RIGHT
Page 33 of 136
. Formatting is
6.
Press MENU button to complete the operation.
{
After formatting, confirm the available number of frames in the Control panel or Monitor.
Aborting format
It is possible to abort the Format selection by pressing the
with UP/
DOWN
NOTE:
Selecting Format by pressing
stopped. Formatting permanently deletes all the data recorded on the CF memory card. Do not remove the CF memory card
during formatting.
button to immediately exit the menu. Alternatively, select No
on the Multi selector and return to the SET-UP menu by pressing
Formatting
on the Multi selector starts formatting immediately. At this point formatting cannot be
RIGHT
MENU
LEFT/RIGHT
.
Strap and Lens Cap
ttaching strap
Page 34

N
ikon COOLPIX995 Digital Camera
Page 34 of 136
z
Attach the strap as illustrated.
Lens cap
z
Press the latch on the lens cap to attach/detach it.
z
Since the lens cap can easily be misplaced, we recommend attaching it to the strap with the supplied cord.
Useful Advice on COOLPIX Camera Techniques
Holding the Camera
To reduce blurring caused by camera shake, hold the camera steadily in both hands and press the
button slowly and gently. Photographs can be framed in the Monitor or the Viewfinder.
Check point
The lens section of this camera rotates so the subject can be seen easily on the Monitor and/or Viewfinder. Rotate the camera
so that it can be held securely.
Frame photographs in the Monitor
z
z
z
z
When you are using Macro close-up.
When you are using Digital zoom .
When you are using a lens converter .
When Image size is set to 3:2.
SHUTTER RELEASE
Page 35

N
ikon COOLPIX995 Digital Camera
z
When you want direct confirmation of camera settings or the view through the lens.
Page 35 of 136
Using the Swivel
z
The unique swivel design of the camera allows you to position the lens toward the subject while having the Monitor in a
convenient position for checking.
With the Monitor facing toward you, the lens section can be tilted 210° forwards and 90° backward. There is a Swivel
lock lever on the base of the camera which, when set, prevents the lens from tilting down if a heavy converter lens
accessory is fitted.
z
Note that bright objects such as lights may cause a vertical white line to appear in the Monitor. This is not a malfunction
and does not normally appear on the image.
Self-portrait pictures
For convenient framing of self portraits, when the lens is rotated to face backwards, the display will invert so that it appears the
correct way up.
Holding the Camera/Pressing the Shutter Release Button
Frame photographs in the Monitor
z
When you want to save power by turning the Monitor off.
z
When bright ambient lighting conditions make it difficult to see the display in the Monitor.
DIOPTER ADJUSTMENT dial
If the images in the Viewfinder appear blurred even when the subject is in focus, set the diopter adjustment for your particular
eyesight by rotating the
clearly.
NOTE :
z
z
z
z
Holding the camera
Make sure not to let your finger, hair, the strap, power cord of the AC Adapter or video cable get in front of the lens or
Speedlight.
Make sure not to get your finger or clothing caught in the rotating part of the camera or cover while shooting.
Do not look directly at the sun through the Viewfinder.
The rotating lens section should be rotated slowly and within its range. (Approx. 270 degrees)
DIOPTER ADJUSTMENT
dial so the autofocus target area frames in the Viewfinder can be seen
Page 36

N
ikon COOLPIX995 Digital Camera
Page 36 of 136
Pressing the SHUTTER RELEASE button
z
Lightly pressing the
and autofocus.
z
The focus is locked as long as the
down releases the shutter.
NOTE :
Pressing the
button slowly.
Pressing the SHUTTER RELEASE
SHUTTER RELEASE
SHUTTER RELEASE
button abruptly can result in picture blur. Make sure to press the
button and holding it halfway down activates the camera's exposure meter
SHUTTER RELEASE
button
Mode Dial and Multi Selector
button is kept lightly pressed. Pressing it fully all the way
SHUTTER RELEASE
Mode Dial
Use the
:
There are two modes for taking pictures:
:
dial to select the Shooting mode , or Playback mode .
MODE
Shooting mode
z
In " " (Auto mode), the camera controls the exposure and other settings for simple, easy operation.
z
In " " (Manual mode), camera settings such as exposure, white balance, image adjustment and sharpening
are under full manual control.
Playback mode
Page 37

A
N
ikon COOLPIX995 Digital Camera
Page 37 of 136
The Playback mode is for reviewing and managing your pictures. When the
reviewed, deleted, played back in a slide show, marked for printing (DPOF) or can be protected from accidental deletion.
Multi selector
When any camera menu is active, the Multi selector is used to move around the menus, making selections in both the
up/down and left/right directions. When in Shooting mode, pressing the Multi selector allows the desired AF area to be chosen.
Position Operation
Press UP /
item by highlighting it. Once an item has been
highlighted further selections can be made by
pressing
applicable, pressing UP /
desired setting.
Selecting focus area (in
The camera has five autofocus target areas which
can be activated in turn by using UP,
LEFT
or
RIGHT
RIGHT
to move vertically, selecting an
DOWN
to move right and then, if
to select the
DOWN
on the Multi selector.
mode)
DOWN
dial is set to , images can be
MODE
,
Simple Shooting and Playback
Point and Shoot
Having mastered simple point operation and studied the section "Useful Advice on COOLPIX Camera Techniques",
we recommend that you read this section which explains some aspects of simple "Point and Shoot" photography in
more detail.
Setting the
settings to ensure that the overall appearance of the picture is well balanced and correctly exposed.
z
Image size (resolution) Full (2048 x 1536 pixels)
Image quality (JPEG compression
ratio)
Focus mode Continuous AF*(camera continuously
Flash mode
Exposure Compensation None (0.0)
Monitor On*
* When the Monitor is off, Single AF (the camera only focuses when the shutter is half-pressed) is selected.
dial to (auto mode) automatically selects the most common exposure and image adjustment
MODE
Other functions that are also preset are described below.
Normal
focuses)
uto
Basic Operation (Auto Mode)
Page 38

N
ikon COOLPIX995 Digital Camera
Page 38 of 136
1.
Set the camera to Auto Mode (Set the MODE dial to
{
The camera beeps once when the power is turned on and standby operation starts. After a short pause, the
camera is ready and the Viewfinder image is displayed on the Monitor.
{
Individual function settings and the number of images that can be fitted on the CF memory card are displayed
in the Control panel and Monitor.
MONITOR button
Pressing the
MONITOR
button changes the display in the following order (example in mode):
).
2.
Compose your picture.
{
Aim the lens at the subject and compose the picture in the Monitor or Viewfinder.
1. Parallax compensation marks for close-ups (Macro)
2. Autofocus target area
{
When shooting in mode, the camera will use the subject in the center of the picture as the focus target.
NOTE :
When composing a picture using the image in the Viewfinder, the actual image recorded is shifted slightly (due to a
phenomenon known as parallax) compared to the image in the Viewfinder. Especially when shooting close-ups, the
effect of parallax becomes more pronounced and the edges of the image seen in the Viewfinder image may not be
included. Use of the Monitor is therefore recommended for close-up (Macro) shooting at distances of less than 90
cm/35 in. The parallax compensation marks in the Viewfinder indicate the compensation required when the subject to
camera distance is 60 cm/24 in.
Zoom button
{
Composing using image in Viewfinder.
Use the
ZOOM
button to frame your subject in the Monitor or Viewfinder.
Page 39

N
ikon COOLPIX995 Digital Camera
Page 39 of 136
{
To zoom out and see more in the Monitor or Viewfinder, press the W Zoom button. This sends the lens to the
wideangle position.
To zoom in and make the subject appear closer, press the T Zoom button.
{
When the lens has zoomed to the full telephoto position with the Monitor turned on, the Digital zoom then
allows a further magnification of up to 4x.
NOTE:
When using the Digital zoom, the image in the Viewfinder is different from the actual image recorded. Make sure to
check the image in the Monitor.
3.
Lightly press the SHUTTER RELEASE button and confirm the focus.
Digital zoom
NOTE:
When the Monitor is on, the camera continues to attempt to focus ( Continuous AF ). The shutter can be released
without focus being achieved. Check the focus status of the image in the Monitor before releasing the shutter.
Focus Lock
When the subject is in focus while you are lightly pressing the
Green LED lights up without flashing. When the main subject is not centered in the frame, focus on the subject, lock
focus, then recompose as you like while lightly pressing the
change the distance between the camera and subject when changing the composition.
4.
Gently depress the SHUTTER RELEASE button.
Continuous AF
SHUTTER RELEASE
SHUTTER RELEASE
button, the focus is locked and the
button. In Focus Lock, do not
Page 40

N
ikon COOLPIX995 Digital Camera
Page 40 of 136
{
The shutter is released when the
the picture is taken.
{
Immediately after a picture is taken, the Green LED flashes and ( Quick delete ) and (pause, ) are
briefly displayed in the Monitor after which the Monitor will return to normal and the next shot can be taken.
{
It is normally possible to take a picture when the shot is still being displayed in the Monitor. Lightly pressing the
SHUTTER RELEASE
(Wait) is displayed. The number of shots that can be taken may vary, depending on the Image size and
Image quality
Image size Image quality Number of shots that can be taken
FULL NORMAL 4
VGA BASIC 77
is displayed on the Monitor while image is being recorded on the CF memory card.
NOTE :
The Green LED flashing at intermediate speed indicates that the image is being written to the CF memory card. Do not
remove the card, battery or AC Adapter until the Green LED has gone out, or image data may be damaged or not
recorded.
Built-in Speedlight
Use the built-in Speedlight if there is insufficient light to illuminate the subject. This condition is indicated by the Red
LED flashing rapidly when the
To use the Speedlight
1. Slide the Speedlight lock-release lever to release the built-in Speedlight.
Recording on CF Memory Cards
.
button resets the Monitor to normal display and subsequent shots are possible unless
SHUTTER RELEASE
SHUTTER RELEASE
button is half-pressed.
button is fully depressed, the camera beeps once and
2. Confirm the Red LED is steady, then gently depress the
with the built-in Speedlight.
SHUTTER RELEASE
button fully to take the picture
Page 41

N
ikon COOLPIX995 Digital Camera
Page 41 of 136
NOTE :
Note that the built-in Speedlight may become warm during extended Speedlight use.
5.
Press the QUICK button to check the image immediately after shooting
{
{
Check points:
{
{
6.
Press the DELETE button in Full-screen review mode and select "Yes" with the Multi selector to delete a single
image.
{
Using built-in Speedlight
Each press of the
Press the Multi selector to choose the image to be displayed. To display the previous image frame continue to
press
LEFT
When the oldest frame is reached, pressing
When the most recent frame is reached, pressing
Lightly pressing the
camera to normal Shooting mode and more shots can be taken.
Recorded images can be played back in Full-frame playback by rotating the
Using the Multi selector choose the image to be deleted. Pressing the
dialog. Select
QUICK
/ UP.
SHUTTER RELEASE
with the Multi selector. Pressing
Yes
button changes the display on the Monitor as follows:
/ UP changes the display to the most recent frame recorded.
LEFT
/
DOWN
button in either Quick review or Full-screen review resets the
RIGHT
changes the display to the oldest one.
RIGHT
MODE
deletes the image and
DELETE
dial to .
button displays a confirmation
is displayed.
DONE
Check point:
Recorded images can also be deleted in mode
7.
Set the MODE dial to when you have finished taking photographs.
Page 42

N
ikon COOLPIX995 Digital Camera
Page 42 of 136
Self-Timer Operation
The Self-timer delays the shutter release for 3 or 10 seconds after the
you to appear in your photograph. We recommend that you use a tripod or place the camera on a stable surface when using
the Self-timer.
1.
Press the FOCUS MODE button several times until
2.
Compose your picture, confirm focus and fully depress the SHUTTER RELEASE button.
SHUTTER RELEASE
appears in the Control panel and Monitor.
button has been pressed to allow
{
Pressing the
timer. (Press the
3-second timer after activation of the timer.) The Self-timer lamp pulses for 1 second before the shutter is
released and then lights steadily for the final 1 second. (The remaining time is visible as a count-down on the
Monitor.) In Shooting mode, Self-timer operation using Manual focus is possible.
{
To cancel Self-timer after activation of the timer, pause, then press the
disappears or else turn the power off.
Check point
Setting the Self-timer also activates Macro shooting mode, causing to be displayed.
SHUTTER RELEASE
button once activates a 10-second timer and twice activates a 3-second
SHUTTER RELEASE
button twice to pause the 10 second Self-timer and once to pause the
FOCUS MODE
button so
Simple Playback Operations
Set the
Monitor. Multiple reduced size images can be viewed at once (Thumbnail Playback) or reviewed for deletion.
Full-Frame Playback
dial to to set the camera to Playback mode. In Playback mode, recorded images are visible on the
MODE
(See Playback
)
Page 43

N
ikon COOLPIX995 Digital Camera
Page 43 of 136
1.
Set the MODE dial to
{
The most recent photograph is displayed in the Monitor. Press the Multi selector to select the image to display.
2.
Press and hold the T Zoom button to see the image in closer detail. Press the W button to return to the original
view. Use the Multi selector to see the hidden parts of the zoomed image.
Thumbnail Playback
1.
Press the THUMBNAIL button once to display nine Thumbnail images, or twice to display four Thumbnail
images. The Thumbnail image can be selected with the Multi selector and displayed Full-frame.
.
(See Thumbnail Playback
)
Deleting Photographs in Full-Frame Playback
1.
Press the DELETE button in Full-frame playback.
{
The delete confirmation dialog is displayed. You can delete an image after confirming with the confirmation
dialog.
(See Deleting photographs)
Other Functions
By connecting the camera to your TV set or a personal computer, you can view, edit or print out images taken with the
COOLPIX995.
Connect COOLPIX995 to a TV Set
Page 44

N
ikon COOLPIX995 Digital Camera
By connecting the COOLPIX995 to a TV set, you can view your still pictures and movies on the television.
Connect the camera's video output terminal and the TV's video input terminal with the provided video cable.
z
To connect the COOLPIX995 to a TV set, see Connecting to a Television or VCR .
Page 44 of 136
Connect COOLPIX995 to a Computer
By connecting the COOLPIX995 to a computer, you can download image data to your computer.
You can connect your camera directly to your computer via the supplied UC-E1 Universal Serial Bus (USB) cable. Nikon View
4 allows you to transfer, enlarge, save or print out images that have been downloaded to your computer.
To connect the camera to the computer you will need the supplied USB cable and Nikon View 4 CD-ROM.
z
For details of operation, refer to the CD-ROM instruction manual for Nikon View 4.
z
To connect the COOLPIX995 to a computer, see Connecting to a Computer
Detailed Operations
Overview
This section describes detailed operations in , or mode.
z
Setting Image Quality and Size
z
How Much Space is Left on My CF Memory Card-Confirming the Number of Exposures Remaining
z
Selecting the Focus Mode
z
Digital Zoom
z
Setting the Exposure mode
z
Setting the Exposure Compensation Value
z
Adjusting Sensitivity
z
Playback
z
Deleting Photographs
Setting Image Quality and Size
Page 45

App
N
ikon COOLPIX995 Digital Camera
In both or mode, one of the most important options for your pictures is the combination of Image quality
setting (image compression ratio) and Image size setting that you select. There are four available Image quality settings and
six Image size settings.
Page 45 of 136
Image quality
To reduce memory requirements, images are compressed using JPEG compression. At higher compression ratios, the block
pattern becomes more visible and there may be noticeable loss of detail. The actual effect depends on the size of the image
when reproduced on a monitor or printer and on the type of subject.
To set the Image quality, press the QUAL (Image quality) button repeatedly until the desired Image quality setting is
displayed.
Setting Compression ratio File format
HI
FINE
NORMAL
BASIC
Check point
The selected Image quality and size settings remain in the camera's memory even when the power is turned off.
No compression TIFF Best-quality image, with no compression.
Use when quality or authenticity is of
paramount importance. (Available in
or 3:2 size in mode only.)
Approx. 1/4 JPEG Quality virtually identical to uncompressed
HI mode: for use where Image quality is
important, for example when the image will
be cropped and enlarged.
Approx. 1/8 JPEG For use in most general situations where the
image will not be significantly enlarged.
Approx. 1/16 JPEG For situations such as sending image data
via E-mail where small file size is more
important than Image quality.
lication
FULL
Image size
The Image size setting determines the maximum size at which the image can be printed. If the print size is too large, the
individual pixels will be visible to the naked eye, giving the image a rough, uneven appearance. As a rule of thumb, for printing,
about 200 pixels per inch are required. For display on a computer monitor, about 80 pixels per inch are recommended.
Rotate the COMMAND dial while pressing the QUAL button until the desired Image size is displayed.
Page 46

App
V
N
ikon COOLPIX995 Digital Camera
Setting Size (pixels)
(no indication)
Full
UXGA
SXGA
XGA
VGA
3:2
Setting Size (pixels) Print size at 200dpi resolution
Full
UXGA
SXGA
XGA
GA
3:2
2048 x 1536 For high quality prints of up to A4 without additional (no
indication) treatment.
1600 x 1200 For printing at about A5 or large photo album size.
1280 x 960 For smaller postcard-sized prints.
1024 x 768 For display on a 17-inch computer monitor or small prints,
for example, to be included in a report.
640 x 480 For output on a 13-inch monitor, sending image data via E-
mail, or posting a picture on an Internet homepage.
2048 x 1360 This format gives an aspect ratio which is of identical
proportions to 35mm film. When
bottom of the Monitor are cropped and the image frame
becomes
2048 x 1536 Approx. 26 x 20 cm (10.2 x 7.9 in.)
1600 x 1200 Approx. 20 x 15 cm (7.9 x 5.9 in.)
1280 x 960 Approx. 16 x 12 cm (6.3 x 4.7 in.)
1024 x 768 Approx. 13 x 10 cm (5.1 x 3.9 in.)
640 x 480 Approx. 8 x 6 cm (3.1 x 2.4 in.)
2048 x 1360 Approx. 26 x 17 cm (10.2 x 6.7 in.)
. The Green LED pulses slowly.
3:2
lication
3:2
Page 46 of 136
is selected, the top and
CF Memory Card
How Much Space is Left on my CF Memory Card-Confirming the Number of Exposures Remaining
Shooting Mode
The total number of images that can be saved on a CF memory card depends on the amount of space left in the CF memory
card being used, and on the selected Image quality and size.
To confirm the number of exposures remaining, check the Control panel and Monitor.
z
The counter showing the number of exposures remaining decrements until 0 is displayed after which no further space
is available. At this point, a warning indication
z
The approximate number of images that can be recorded is as follows. Memory card: 16MB [64MB] (Note that the
numbers will vary significantly with the composition of the pictures due to the way that JPEG compression works.)
OUT OF MEMORY
is displayed in the Monitor.
Image quality/Image size HI FINE NORMAL BASIC
Page 47

V
N
ikon COOLPIX995 Digital Camera
Page 47 of 136
NOTE :
z
From time to time the number may not count down when shots are taken or deleted, particularly if the Image size is
small.
z
Even when 0 is shown, selecting another Image quality or size may enable more shots to be taken as there may be
enough space for one or more images of a smaller size or higher compression ratio. By the same token, changing the
Image quality or size may cause the frame counter to drop to "0".
z
No more shots can be taken when the image file names and folder numbers reach the maximum number (image file
name: DSCN9999.gif, folder number: 999). To continue, change the memory card or delete all of the image data on the
card. Note that with the setting
the memory card, so when a file with a high file name number is left in the memory, the maximum number,
DSCN9999.gif, will soon be reached and no more shots can be taken even if more memory is available on the card.
(no indication)
FULL
UXGA
SXGA
XGA
GA
3:2
The number of exposures remaining
Seq. Numbers On
1 [6] 10 [40] 19 [78] 37 [151]
Not available 16 [65] 31 [126] 59 [236]
Not available 24 [100] 47 [190] 86 [347]
Not available 37 [151] 69 [278] 121 [488]
Not available 86 [347] 144 [578] 229 [918]
1 [7] 11 [45] 22 [88] 42 [169]
, file names are assigned with the next highest number remaining in
Selecting the Focus Mode
In or mode, three Focus modes and the Self-timer can be activated in turn by repeated presses of the
FOCUS MODE
Manual focus and alters the manual focus
Press the FOCUS MODE button repeatedly until the indication for the desired Focus mode or Self-timer is shown.
(Note that an indication is not displayed in the Autofocus mode.)
button. In mode, rotating the
distance.
COMMAND
dial while pressing the
FOCUS MODE
button initiates
Focus mode Indication Characteristics
Autofocus mode
Infinity mode
Macro Close-up mode
The easiest Focus mode, normal autofocus operation is suitable
No indication
mode indication for almost any shooting situation including
snapshots or portraits. Focus range is 30 cm (11.8 in.) to infinity.
Select this mode to focus on distant subjects such as landscapes or
buildings. The lens automatically moves to a position suitable for
infinity focus and locks in position.
selected.
Select this mode when shooting close-ups of subjects such as
flowers or insects. Focus distance is approx. 2cm (in middle Zoom
position) to infinity. In the middle Zoom position, in the
Monitor is displayed in yellow to assist with optimum lens setting.
Note that vignetting may occur when using with Speedlight
illumination within the 70 cm (27.6 in.) focus distance.
Use this mode when you want to be in the photograph. The shutter
is released 10 sec. after pressing the
Flash Cancel
SHUTTER RELEASE
is automatically
button
Page 48

A
A
A
A
A
N
ikon COOLPIX995 Digital Camera
once or 3 sec. after pressing the button twice. The Self-timer lamp
pulses until 1 sec. before
V lamp lights steadily for the final 1 sec. The remaining time is
Self-timer
Controls
In mode, the selected Focus mode can be set to remain in memory even when the power is turned off; this setting
can be changed with the
Check points
z
The Autofocus mode is selected when the power is turned on.
z
Selecting the Self-timer enables Macro Close-up mode and is also displayed.
Memorize
setting.
visible as a count-down on the Monitor.
z
To cancel the Self-timer after initiation, pause the timer and
then press the
or turn the power off.
SHUTTER RELEASE
FOCUS MODE
button so disappears,
and the Self-timer
Page 48 of 136
Autofocus options
There are several advanced options that may be employed when setting up the
noticed when the Monitor is on or off in
Monitor AF mode Characteristics
On*1
Off Single AF
* In mode, the autofocus system when the Monitor is on can be changed to (Single AF) in the Focus Options > Auto-
Focus Mode sub-menu in Shooting menu.
Continuous AF
Autofocus
or
Macro Close-up
utofocus operation is activated continuously regardless of the
operation of the
on when the
Lock , ) and the Green LED lights as confirmation of successful
focus.
utofocus operation is activated only when the
RELEASE
Green LED lights and focus is locked as long as the
RELEASE
conserved since the Monitor is not always on.
SHUTTER RELEASE
SHUTTER RELEASE
button is lightly pressed. Once focus is achieved, the
button is kept lightly pressed. Battery power can be
mode.
Autofocus
button is lightly pressed ( Focus
. In particular, a difference will be
button. The focus is locked
SHUTTER
SHUTTER
Autofocus target area selection
utofocus target area varies according to Shooting mode.
Shooting mode Characteristics
Focus is targeted on the center AF area. Place the main subject in the center
F area.
ll five AF areas in the Monitor are used when focusing. Normally, AUTO mode,
where the camera automatically focuses using all five AF areas, is activated. In
MANUAL mode, you can select just one of the AF areas, and when Autofocus is
Off, only the center AF area
is activated.
Digital Zoom
With the Monitor turned on,
subject can be magnified by up to 4X.
Keep pressing the T Zoom button for more than 2 sec. after the Zoom has reached the highest telephoto position. The
Digital zoom function activates automatically and the image in the Monitor is zoomed by up to 4.0X. The Digital zoom
Digital zoom
electronically magnifies the center of the picture so that it fills the entire image. The
Page 49

N
ikon COOLPIX995 Digital Camera
Page 49 of 136
magnification factor is displayed in the Monitor and the Green LED pulses slowly.
Canceling Digital zoom
z
Pressing the W button during
telephoto position of the optical Zoom.
z
Digital zoom
Check points
z
z
The AF area remains at the center during Digital zoom even when another AF area is selected in the Focus Options >
AF Area Mode sub-menu (without Off setting).
Metering mode in
Digital zoom
can also be canceled by turning camera power off.
Digital zoom
is same as Center-Weighted Metering.
lowers magnification and cancels Digital zoom after reaching the highest
NOTE :
z
Resolution of the image deteriorates as you zoom in with the Digital zoom function.
z
Digital zoom
z
The
from the Viewfinder image. Make sure to confirm the image in the Monitor.
Digital zoom
Digital zoom
cannot be used in
function zooms into the middle part of the image in the Monitor and the actual recording area differs
Image quality,
HI
Multi-shot 16 , Ultra HS , Movie
or
Black and White
mode.
Setting the Exposure Mode
Shooting Mode
To create a variety of photographic treatments, various Exposure modes can be selected to achieve a desired effect. Four
Exposure modes can be selected in Shooting mode.
Rotate the COMMAND dial while pressing the COMMAND MODE button so the desired Exposure mode is displayed.
NOTE :
At slow shutter speed
Page 50

N
ikon COOLPIX995 Digital Camera
The shutter speed indication in the Monitor appears in yellow when the shutter speed is slower than 1/4 sec. Noise may
appear in the dark part of the frame in this case. This noise in the form randomly spaced bright-colored pixels can be reduced
with the Noise Reduction mode
Controls
The selected Exposure mode is retained when the power is turned off; however, it can be set to become Programmed Auto
when the power is turned on, by using the
z
Controls setting:
z
Controls setting:
.
Memorize
FUNC. 1
Memorize
setting.
Page 50 of 136
Various settings can be selected with the
NOTE :
When you want to shoot with a fast shutter speed, try shooting under as bright a condition as possible so that the aperture is
stopped-down.
Exposure mode Display Shooting situation
Programmed Auto
Shutter-Priority Auto
Aperture-Priority Auto
P : Programmed Auto
The camera automatically controls exposure-correct shutter speed (1 to 1/2300 sec.) and aperture combination- by
determining the brightness of the subject. Programmed Auto Exposure mode is automatically set in mode.
Flexible Program (only in and with Monitor on)
By rotating the
speed and aperture while maintaining correct exposure. With this function, you can shoot in Programmed Auto as though
shooting in Shutter-Priority Auto or Aperture-Priority Auto. * appears when Flexible Program is set. To cancel the Flexible
Program, rotate the
Selecting fast shutter speed
P
S
A
Manual
COMMAND
COMMAND
M
dial in Programmed Auto and with the Monitor on, you can change the combination of shutter
dial until * disappears, change the Exposure mode or set the
EXPOSURE MODE
Camera controls shutter speed and aperture automatically,
while allowing you to choose other settings such as Flexible
Program, Exposure Compensation
You set desired shutter speed and the camera selects the
correct aperture. Select a fast shutter speed for fast-moving
subjects such as shooting an athlete, or a slow shutter
speed to emphasize the motion effect.
You set desired aperture and the camera selects the correct
shutter speed. Lets you determine depth of the in-focus
area, so you can choose whether near or far subjects are in
sharp focus when shooting landscapes, or whether the
background is to be blurred as in a portrait.
Shutter speed and aperture are set manually. Suitable
when you want full control over exposure, to create your
own unique photographic effects.
button.
or Auto Bracketing .
MODE
dial to other than
.
Page 51

play
N
ikon COOLPIX995 Digital Camera
S : Shutter-Priority Auto
Enables you to manually set the desired shutter speed (8-1/2000 sec.) in 1 EV steps; the camera automatically selects the
proper aperture to provide correct exposure.
z
Turning the COMMAND dial after setting Shutter-Priority Auto Exposure mode changes the shutter speed as
follows:
NOTE :
When the subject is too dark or too bright (beyond the control range of the camera) and the
lightly pressed, the selected shutter speed display pulses. To avoid motion blur or incorrect exposure, change the shutter
speed setting.
A : Aperture-Priority Auto
This mode enables you to choose the camera aperture (lens' minimum to maximum in 1/3 steps) manually. The camera
automatically selects an appropriate shutter speed (8 to 1/2300 sec.) to ensure correct exposure.
z
Turning the COMMAND dial after setting Aperture-Priority Auto Exposure mode changes the aperture in 1/3
steps.
Control range of the camera
SHUTTER RELEASE
Page 51 of 136
button is
NOTE :
When the subject is too dark or too bright (beyond the control range of the camera) and the
lightly pressed, the selected aperture display pulses. If this occurs, change the aperture setting to avoid incorrect exposure.
M : Manual
Enables you to set both shutter speed (8 sec. - 1/2000 sec. in 1 EV steps, plus long time exposure "
and aperture (lens' minimum to maximum in 1/3 steps) manually.
1.
Control range of the camera
Set the Exposure mode to M, then take your finger off the MODE button. The aperture and shutter speed are
dis
ed alternately in the Control panel as the MODE button is pressed repeatedly.
SHUTTER RELEASE
BULB
button is
" up to 60 sec.)
Page 52

N
ikon COOLPIX995 Digital Camera
{
The aperture and shutter speed are highlighted in green in the Monitor.
2.
Confirm the Exposure condition in the Control panel or Exposure meter display in the Monitor and set the
aperture and shutter speed by rotating the COMMAND dial.
{
The difference between the selected exposure and the exposure measured by the camera is displayed in the
Exposure condition and the Exposure meter display (except in long time exposure).
Page 52 of 136
Check point
If the shutter speed is displayed in red when 1/2000 sec. shutter speed is selected, stop-down aperture while
confirming exposure on the Exposure meter in the Monitor.
Exposure status Conrol panel Monitor
Correct exposure
1 EV under
2 EV over
Page 53

N
ikon COOLPIX995 Digital Camera
Page 53 of 136
Long time (BULB) exposure (up to 60 sec.)
1. Set the Exposure mode to M, and place the camera on a tripod or secure position, then rotate the
dial to set the shutter speed indication to
2. Pressing the
SHUTTER RELEASE
can only be set when
BULB
The Speedlight is canceled if
During long-time exposure, selecting Noise Reduction On can reduce noise in the form randomly
spaced bright-colored pixels in the recorded image.
(next after 8 sec.) to enable long time (
bu 1b
button once opens the shutter up to 60 sec.
mode is selected in the Continuous
Single
exposure is set.
BULB
Setting the Flash Mode
Shooting Mode
Four Flash modes are available for use in various flash shooting situations.
Condition in which Flash mode can be set
COMMAND
) exposure.
BULB
Shooting menu.
Flash mode can only be set when the built-in Speedlight is raised. The Flash Cancel indication displayed in the Control
panel and Monitor when the built-in Speedlight is stowed.
1.
1. Slide the Speedlight release lever to release the built-in Speedlight.
NOTE:
The Speedlight does not fire with Infinity focus, in Continuous Shooting mode (other than
Selector mode, Lens mode or Int Flash Off mode even when the built-in Speedlight is released.
2.
Press the FLASH MODE button repeatedly until the desired Flash mode appears.
If flash does not fire
mode), in Best Shot
Single
Page 54

N
ikon COOLPIX995 Digital Camera
* No indication is shown in the Monitor when AUTO Flash mode is selected.
{
If the Red LED is pulsing slowly when the
fully charged and the shutter cannot be released. Wait until the Speedlight is fully charged and release the
shutter again.
Setting Indication Characteristics
AUTO flash
AUTO flash with
Red-eye
reduction
Anytime flash
SLOW sync
NOTE:
SLOW Sync Flash
z
Avoid camera shake since a slow shutter speed is often selected.
z
The shutter speed indication in the Monitor appears in yellow when the shutter speed is slower than 1/4 sec. Noise
may appear in the dark part of the frame in this case. This noise in the form randomly spaced bright-colored pixels can
be reduced with the Noise Reduction
Reduces the "Red-eye effect" of flash photography. The Red-
Speedlight automatically fires when the subject is dark and
the built-in Speedlight is released. Speedlight does not fire if
the subject is adequately illuminated even when the built-in
Speedlight is released.
eye reduction lamp lights before the main flash.
Select this mode to fire the Speedlight regardless of the
subject's brightness. Speedlight can also be effective in
daylight when light is coming from behind the subject.
Both your main subject and background can be recorded
naturally in twilight or nighttime. The shutter stays open for
the same time as if Speedlight was not being used to
illuminate the background. The Speedlight fires to give a
clear defined foreground or subject image.
setting.
SHUTTER RELEASE
Page 54 of 136
button is lightly pressed, the Speedlight is not
Check points
z
z
z
Controls
In mode, the selected Flash mode can be set to remain in the memory even when the power is turned off; this
setting can be changed with the
In mode, AUTO flash mode is automatically selected when the built-in Speedlight is released. The previously
set Flash mode is selected in mode.
Vignetting may occur with speedlight illumination where the subject to camera distance is less than 70 cm (27.6 in.).
The Flash output of other Speedlights connected to the sync terminal is synchronized with the built-in Speedlight.
Memorize
setting.
Setting the Exposure Compensation Value
Shooting Mode
Exposure Compensation can be employed to deliberately offset the exposure from the measured value. Twelve Exposure
Page 55

A
N
ikon COOLPIX995 Digital Camera
Compensations from -2EV to +2EV in 1/3 steps can be set for various shooting purposes or situations.
Rotate the COMMAND dial while pressing the EXPOSURE COMPENSATION button until the desired compensation
value is displayed.
Page 55 of 136
z
The Exposure Compensation mark in the Control panel and Exposure Compensation mark and compensation value in
the Monitor are both displayed.
Selectable Exposure Compensation values
Canceling Exposure Compensation
Set the compensation value to 0.0. In mode, turn the power off.
Check point
Exposure Compensation can also be selected from the Exposure Options > EXP. +/
Controls
z
z
In , the selected Exposure Compensation value can be set to remain in memory even when the power is
turned off; this setting can be changed with the
Other functions can be set to be selected with the
Exposure Compensation cannot be set with the
Memorize
EXPOSURE COMPENSATION
EXPOSURE COMPENSATION
setting.
- menu.
button with FUNC. 2. In this case,
button.
djusting Sensitivity
Shooting Mode
Sensitivity increases the use that the camera makes of available light, allowing faster shutter speeds to be employed. However
as sensitivity is increased, the picture may become noisy. Standard sensitivity is equivalent to film ISO 100. The camera will
automatically increase sensitivity in low levels of ambient lighting if set to AUTO. The sensitivity can be increased manually
from the standard value to allow faster shutter speeds in low light.
Set the MODE dial to
desired sensitivity value is displayed.
, then rotate the COMMAND dial while pressing the SENSITIVITY button until the
Page 56

N
ikon COOLPIX995 Digital Camera
Setting Shooting sensitivity
100
200
400
800
AUTO
Standard sensitivity (equivalent to ISO 100)
z
Recommended except for shooting in dark conditions or with fast-moving
subjects.
Equivalent to ISO 200
Equivalent to ISO 400
Equivalent to ISO 800 Note that the recorded image is rather noisy (800 is displayed in
red in the Monitor).
Set standard sensitivity under normal situations. If the brightness is low, sensitivity is
automatically increased. In Shutter-Priority Auto or Manual Exposure mode, only
standard sensitivity is selected
Page 56 of 136
z
When
conditions, the ISO sensitivity indication is displayed in the Control panel and
Monitor.
Canceling sensitivity setting
Select
NOTE :
z
z
z
to cancel the sensitivity setting.
AUTO
Sensitivity Setting
Manual adjustment of Sensitivity is only possible in mode. When the
Sensitivity is set, the setting temporarily is canceled and the camera automatically selects
dial is set to again, the previously adjusted Sensitivity returns.
When the Sensitivity is set to ISO 200, 400 or 800, or Sensitivity is automatically increased in dark conditions with
, a noisier image compared to standard Sensitivity may be recorded.
AUTO
In normal shooting situations,
as when you want to avoid effects of camera shake by using a fast shutter speed. When using
recommended that you turn off the Image Sharpening
is selected and sensitivity is automatically adjusted in dark
AUTO
or lower Sensitivity setting is recommended. Use the
400
in Shooting menu.
dial is set to after
MODE
AUTO
setting in a situation such
800
800
setting. If the
Sensitivity, it is
MODE
Playback
Playback Mode
Playback
Playback mode is used for reviewing pictures that are saved on the CF memory card, starting with the most recent first.
1.
Set the MODE dial to
Page 57

p
p
N
ikon COOLPIX995 Digital Camera
{
After a short pause, during which time the (Wait) symbol appears on the Monitor, the most recent photograph is
displayed in full-frame with information such as the folder name, file name (number and type), date and time of
recording, Image size, Image quality mode and frame number.
2.
To view the previous or next photograph, press on the Multi selector. Playback Operation
Previous
hotograph
Check points
The message
file.
Deleting photographs/setting other Playback modes
Deleting photographs/setting other Playback modes
CARD CONTAINS NO IMAGES
Next
hotograph
Selecting a photograph-Rapid Scroll
To scroll rapidly between photographs, simply press and hold the
Multi selector. The frame count will increment or decrement
depending on the scroll direction. Release the Multi selector to
view the selected frame.
is displayed on the Monitor if the CF memory card contains no image
Page 57 of 136
Deleting photographs
Thumbnail Playback
Taking a closer look: Zooming in
Changing display on the Monitor
Display additional photo information
Taking a closer look: zooming in
You can see more detail in the image by zooming into the desired area of the image.
Page 58

N
ikon COOLPIX995 Digital Camera
Page 58 of 136
1.
Set the MODE dial to
2.
Press and hold the T Zoom button to see the image in closer detail.
{
The amount of Zoom increases each time the T button is pressed, up to a maximum magnification of 6.0X.
(The Zoom icon and magnification factor are displayed in the upper left corner on the Monitor.)
Operations for Zooming
.
Zooms photograph in. Each time the T button is pressed, Zoom increases up to a
maximum of 6.0X.
Cancels Zoom. Cancels Zoom returning the display to Full-frame playback.
Scrolls the image. Scrolls the image to reveal off-screen areas.
NOTE :
{
Before displaying another image, cancel Zoom.
{
It takes more time to zoom in an image that has been recorded with the
{
Images recorded in
Ultra HS
or
setting cannot be zoomed in.
Movie
Image quality setting.
HI
Thumbnail playback
Up to nine Thumbnail images can be displayed on the Monitor. The Thumbnail images can be viewed a page at a time and it
is possible at any time to select one Thumbnail for Full-frame playback or deleting.
1.
Set the MODE dial to
2.
Press the THUMBNAIL
images.
{
If there are fewer than nine or four recorded images, they are displayed from the top left.
{
An image that has been displayed in Full-frame playback is highlighted by a yellow frame.
.
button
once to display nine Thumbnail images, or twice to display four Thumbnail
Thumbnail Playback-how it works
Select another image. Press the Multi selector to highlight the desired image.
Page 59

N
ikon COOLPIX995 Digital Camera
z
Thumbnails are displayed four or nine to a page.
When the last or (first) image is reached, pressing
the Multi Selector flips the display to the next (or
previous) page.
Page 59 of 136
Flip pages. To flip rapidly from page to page, rotate the
in the desired direction.
Deleting Photographs
By pressing the
The Delete
DELETE
selection in the Playback menu enables the deletion of all or selected photographs.
Deleting individual photographs
1.
Set the MODE dial to
{
The most recent photograph is displayed on the Monitor.
2.
Display the photograph to be deleted using the Multi selector.
button in Full-frame playback or Thumbnail Playback you can delete individual images.
.
COMMAND
dial
3.
Press the DELETE button.
{
The Delete confirmation dialog is displayed. The photograph to be deleted is shown at the upper left in the
dialog display.
4.
Press UP/DOWN on the Multi selector to highlight Yes, then press RIGHT
{
The delete operation is confirmed with a dialog, after which the next photograph is displayed.
{
To cancel delete, press
return to Full-frame playback without deleting the photograph.
on the Multi selector or select No by pressing UP/
LEFT
Deleting individual photographs in thumbnail playback
1.
Highlight the image to be deleted using the Multi selector. The selected image is marked with a yellow
highlight.
.
DOWN
, then press
RIGHT
to
Page 60

A
A
ping
N
ikon COOLPIX995 Digital Camera
Page 60 of 136
2.
To delete the currently selected Thumbnail, press the DELETE button
3.
Press UP/DOWN on the Multi selector to highlight Yes , then press RIGHT
{
The delete operation is confirmed with a dialog, then the Monitor returns to the Thumbnail display.
.
.
Advanced Operation
Overview
This section provides complete descriptions of advanced camera operations. Manual Focus
utofocus Lock/Auto Exposure Lock
Shooting mode
If the subject is outside of the Autofocus area, a feature called Autofocus lock can be used to maintain focus on the subject.
utofocus is locked by half pressing the shutter with the subject in the focus target area. At the same time, exposure for the
main subject is memorized by the camera (Auto exposure lock). This function is convenient when the exposure should be
defined by the subject.
1.
Center the main subject between the Autofocus brackets and lightly press the SHUTTER RELEASE button
2.
Kee
.
the SHUTTER RELEASE button lightly pressed, recompose and shoot.
Page 61

N
ikon COOLPIX995 Digital Camera
Page 61 of 136
{
The Green LED lights when a subject is in focus, and focus and exposure are locked.
Do not change the distance to the subject after the focus is locked.
Check points
z
The purpose of Auto exposure lock is to fix the exposure precisely on the subject. The Center-Weighted or Spot
Metering modes are most suited for this purpose. For setting metering, see Metering
z
When shooting with the Autofocus lock, we recommend manually setting the focus target area to the center (in
mode).
.
Manual Focus
Shooting Mode
When the
convenient to ensure accurate focus when the shooting distance is known or in situations where Autofocus may not work as
expected.
To select Manual Focus rotate the COMMAND dial while pressing the FOCUS MODE button. M-FOCUS indication
appears in the Control panel as confirmation. Keeping the FOCUS MODE button pressed, rotate the COMMAND dial
again to display the shooting distance both on the Control panel and Monitor.
dial is set to , the camera-to-subject distance can be set manually by using Manual focus. This is
MODE
z
The shooting distance can be set in 49 steps from 0.02 m (0.06 ft.) to 10 m (30 ft.), plus infinity.
z
To confirm the chosen shooting distance in the Control panel, lightly press the
To Cancel Manual Focus mode
Manual Focus mode is canceled by pressing the
Focus mode then returns to the last mode before Manual focus was set.
NOTE:
Manual Focus
FOCUS MODE
button. The
SHUTTER RELEASE
button.
Page 62

A
A
N
ikon COOLPIX995 Digital Camera
z
When setting the Self-timer and the Manual Focus mode at the same time, set the Self-timer first.
z
When zooming with the shooting distance set less than 0.3 m (1.0 ft.), focus is not possible in some zooming ranges.
In this case, the shooting distance display in the Monitor lights in red as a warning.
z
Displayed distance and the actual focus distance differ when an accessory lens converter is used. Advanced Operation
Page 62 of 136
Situations Where Autofocus May not Work as Expected
utofocus does not perform well under the conditions listed below. You can Autofocus as detailed below.
1.
No subject detail for Autofocus system.
{
Very dark subjects.
{
Scenes with a pronounced difference in brightness (such as a subject in the shade with the sun in the
background).
{
Low-contrast scenes (such as a subject whose clothing is the same color as a wall or other background).
In these instances, the following alternative focus method is suggested.
Focus on a different subject located at the same distance and that has the same brightness but high contrast, use
Autofocus lock
2.
Conflicting or confusing subject detail.
{
{
In these instances, the following alternative focus method is suggested.
Focus on a different subject located at the same distance and that has the same brightness, use Autofocus lock
recompose and shoot.
NOTE:
When you lock focus, make sure to mentally check the exposure as Auto exposure is locked at the same time.
Focus lock
, then recompose and shoot.
Scenes with subjects located at different distances from the camera.
Fast-moving subjects
, then
Recording Movie/Movie Playback
Shooting Mode
Movie can be recorded for a maximum of approx. 40 seconds. Each frame has NORMAL Image quality and is of QVGA
Image size (320 x 240 pixels). The recorded Movie image can be played back on the Monitor.
/Playback Mode
Movie shooting mode
1.
2.
3.
"Continuous" > "Movie"
Select
Fully depress the SHUTTER RELEASE button to start recording your movie.
Fully depress the SHUTTER RELEASE button again to stop recording.
{
If you forget to fully depress the
/Playback Mode
in the Shooting menu in mode.
SHUTTER RELEASE
button to end the movie, the camera will automatically
Page 63

A
N
ikon COOLPIX995 Digital Camera
stop the operation after 40 seconds.
{
The camera records movies at 15 frames per second in QVGA size (320 x 240 pixels). The file is recorded in
QuickTime format (DOS file extension ".MOV").
Movie playback mode
Page 63 of 136
Press QUAL button to play back the movie.
z
After completing the playback, the final frame is displayed for one second, and then returns to the still image of the first
frame.
Operation in movie playback mode
When the first frame is displayed as a still image
Start movie
While movie is in progress
Pause movie The movie stops and a still image of the
fter completing the playback, the final
frame is displayed for one second, and then
returns to the still image of the first frame.
frame when the button was pressed is
displayed.
While the movie is paused (still image display except the first
frame)
Resume movie Resume Movie Playback from the displayed still
image
(While a frame in the middle is
Display previous frame Display the previous frame of the movie
Display the next frame of the movie
displayed) Display next frame
(While the last frame is displayed)
End movie Playback
The first frame is displayed after ending movie
Playback
Quick Delete/Holding the Image in the Display
Shooting Mode
When taking photographs with the Monitor on, it is possible to immediately cancel the image being recorded and to extend the
display of a wanted image after the shutter is released.
Quick delete
Page 64

N
ikon COOLPIX995 Digital Camera
Page 64 of 136
Press the FOCUS MODE button while an image is being recorded and
z
When the
on the Multi selector and press
Check point
When Disable delete
pressed. The dialog
FOCUS MODE
in the Shooting SET-UP menu is
CANNOT DELETE FILE
button is pressed, the confirmation dialog appears. Select
to cancel recording of the image data to the CF memory card.
RIGHT
, the is not displayed when the
appears in the Monitor and the image cannot be deleted.
On
Holding the image on the display
Press the FLASH MODE button while an image is being recorded and
is displayed on the Monitor.
by pressing the UP/
Yes
FOCUS MODE
is displayed on the Monitor.
DOWN
button is
z
The mark is displayed on the Monitor and the image is held for 20 seconds after which the image is saved to
the memory card and the display returns to the normal shooting display.
z
The displayed image can also be saved as any time by pressing the
is displayed. To cancel, press the
delete the image.
DELETE
button. The delete confirmation dialog appears, from which is it possible to
FLASH MODE
button while the indication
Quick Review Mode/Full-Screen Review Mode
Shooting Mode
Quick review mode/Full-screen review mode is set by pressing the
These two review modes enable you to quickly review and confirm the image without having to turn the
to .
z
The display in the Monitor changes as follows each time the
Shooting mode .
review button in Shooting mode .
QUICK
button is pressed when the
QUICK
MODE
MODE
dial from
dial is set to
Page 65

N
ikon COOLPIX995 Digital Camera
Page 65 of 136
Quick review mode
Press the QUICK button in a Shooting mode
z
In Quick review mode, a small image of the most recent shot is displayed in the top left corner of the Monitor. Pressing
the Multi selector scrolls through the saved images on the CF memory card. It is possible to take further photos at any
time.
z
When there are no recorded images available, the Monitor displays the message
returns to the Shooting mode display.
Various operations in quick review mode
z
In Quick review mode, the
EXPOSURE COMPENSATION
z
Previously set Shooting mode conditions (Exposure value, Autofocus, White balance [Auto]) are memorized in Quick
review mode.
FOCUS MODE
button and
button,
ZOOM
FLASH MODE
buttons remain active.
to set the camera to Quick review mode.
CARD CONTAINS NO IMAGES
button (when the built-in Speedlight is raised),
and
Completing the quick review mode
z
The following operations end the Quick review mode and return the camera to Shooting mode.
{
Lightly pressing the
{
Pressing the
{
Setting the
{
When the camera's power is turned off automatically by the Auto Power-off function
MODE
SHUTTER RELEASE
button
MENU
dial to another position
button
Full-screen review mode
Press the QUICK button in the Quick review mode to set the camera to Full-Screen Review mode.
z
When the
This sets the camera in a temporary Playback mode so that the normal playback functions of Zoom, Delete and
button is pressed in the Quick review mode, the small image is enlarged and displayed full-screen.
QUICK
Page 66

play
A
N
ikon COOLPIX995 Digital Camera
Thumbnail playback are possible.
Completing the full-screen review mode
z
The following operations end the Full-screen review mode and return the camera to Shooting mode.
{
Pressing the
{
Lightly pressing the
{
Pressing the
{
Setting the
{
When the camera's power is turned off automatically by the Auto Power-off function
MODE
button
QUICK
SHUTTER RELEASE
button
MENU
dial to another position
button
Viewing Additional Picture Information
Page 66 of 136
Rotating the COMMAND dial changes the display to the following five screens while a picture is displayed on the
Monitor in any Full-frame playback mode.
1. Basic display
2. Detailed information display 1
3. Detailed information display 2
4. Histogram display
5. Focus confirmation display
1.
{
The contents of the image information displayed are as follows.
Basic display screen
Display Description
100 Nikon Folder name
0025.gif File number (the last 4 numbers and file type)
Battery indication (displayed only when battery power is insufficient)
Protect icon (displayed on the protected image)
25/40 Frame number/total number of frames visible in current folder
2001. 07. 25 Date when the picture was taken
12:00 Time when the picture was taken
VGA Image size (UXGA, SXGA, XGA, VGA, 3:2, QVGA)
FINE Image quality (HI, FINE, NORMAL, BASIC)
2.
Detailed information dis
Print-order selection icon (displayed on the print-ordered image)
uto transfer icon (displayed on the image in the Auto transfer setting)
1
Page 67

A
A
N
ikon COOLPIX995 Digital Camera
Page 67 of 136
Display Description
CAMERA : E995 Camera type
FIRM VER : E995 V 1.0 Firmware version (displayed only on images shot with COOLPIX995)
METERING : MATRIX Metering system
MODE : P Exposure mode
SHUTTER : 1/60 Shutter speed
PERTURE : f2.6
EXP +/- : 0.0 Exposure Compensation
FOCAL LENGTH : f8.2mm Focal length
FOCUS : AF Focus mode (distance setting information when in Manual focus)
3.
Detailed information display 2
Display Description
SPEEDLIGHT : ON Flash status
IMG ADJUST : AUTO Image adjustment
SENSITIVITY : AUTO Sensitivity (ISO equivalency)
WHITEBAL : AUTO White balance
SATURATION : +1 Saturation control
SHARPNESS : AUTO Image sharpening
DIGITAL TELE : X1.00 Digital zoom ratio
CONVERTER : OFF Lens converter status
FILE SIZE : 713KB File size (kilobytes)
4.
Histogram display
perture
Display Description
Thumbnail image Highlighted part of image flashes in black/white to show over-exposed areas
Page 68

N
ikon COOLPIX995 Digital Camera
Histogram Show histogram of displayed image
Shooting
information
{
The Histogram display shows the distribution of tones in the image: the horizontal axis ranges from black (left)
to white (right), while the vertical axis shows the number of pixels of each brightness in the image. A properly
exposed image will extend close to the ends of the histogram and should not have a large value at the
extremes of the tone range.
5.
Focus confirmation display
Shooting information of displayed image (file number and type, metering
system, shutter speed, aperture, Exposure Compensation, sensitivity)
Page 68 of 136
Display Description
Focus confirmation image Portions of image in focus are sharply outlined
Shooting information Shooting information of displayed image (file number and type, focal
length, shutter speed, aperture, Focus mode [distance setting
information in Manual focus], selected AF area, Noise Reduction)
Sync Terminal
External Nikon Speedlights can be accommodated by using the optional Multi-Flash Bracket Unit SK-E900.
1.
Remove the Sync terminal cover and connect the camera plug of the multiple flash adapter.
{
The following Nikon optional Speedlights can be used: SB-28DX, SB-28, SB-26, SB-25, SB-24, SB-22s and
SB-22. Please contact an authorized Nikon dealer or service center about using other Nikon Speedlights.
{
In Macro close-up mode, it is recommend that you take trial shots and confirm that the image in the Monitor is
correctly exposed.
{
Set the Zoom-head position wider than 28mm. The Power Zoom function of Speedlights does not function
when attached to the COOLPIX995. Please set the Zoom-head position manually.
{
The AF assist illuminator of the Speedlight does not illuminate.
{
For the basic functions and operations of Multi-Flash Bracket Unit SK-E900 and optional Speedlights, please
refer to the instruction manuals supplied with each accessory.
Check point
With the Speedlight Opt. > Int Flash Off
that it does not fire, and to fire the external Speedlight only.
NOTE:
Use only Nikon Speedlights. Other units may damage the camera's electrical circuitry due to incompatible voltage
requirements, electric contact alignment or switching phase.
NOTE:
When using an optional Speedlight, make sure to raise the built-in Speedlight to operational position (even if the
setting is set on the built-in Speedlight) to ensure that the flash sync sensor is activated.
Flash Units Made by Manufacturers other than Nikon
Activating an Optional Speedlight
in Shooting SET-UP menu , it is possible to set the built-in Speedlight so
Using the Camera Menus
Int Flash Off
Page 69

A
N
ikon COOLPIX995 Digital Camera
Overview
Page 69 of 136
This section describes the menus used to manage the more advanced features available on the COOLPIX995.
Separate menus are available for each mode:
Menu Function Mode
Shooting
SET-UP
Playback
The Menus share a common operation method, making it easy for you to learn and remember how to navigate around
the menus and make selections quickly and confidently.
dvanced Shooting options(e.g., White Balance, Metering, Continuous )
Basic camera setup (e.g., formatting CF memory cards, setting
date/time ). SET-UP menus for the and modes are
accessible from the Shooting
options available depend on the operation mode
Playback options
and Playback menus respectively. The
Setting Shooting Menus
Shooting Mode
In Shooting mode, the Shooting menu provides access to a range of camera setting adjustments, such as the White
balance, Saturation control and Noise reduction.
The Shooting menu contains two pages of advanced shooting options:
SHOOTING MENU 1
A
0
WHITE BALANCE
METERING
CONTINUOUS
BEST SHOT SELECTOR
IMAGE ADJUSTMENT
SATURATION CONTROL
Page 70
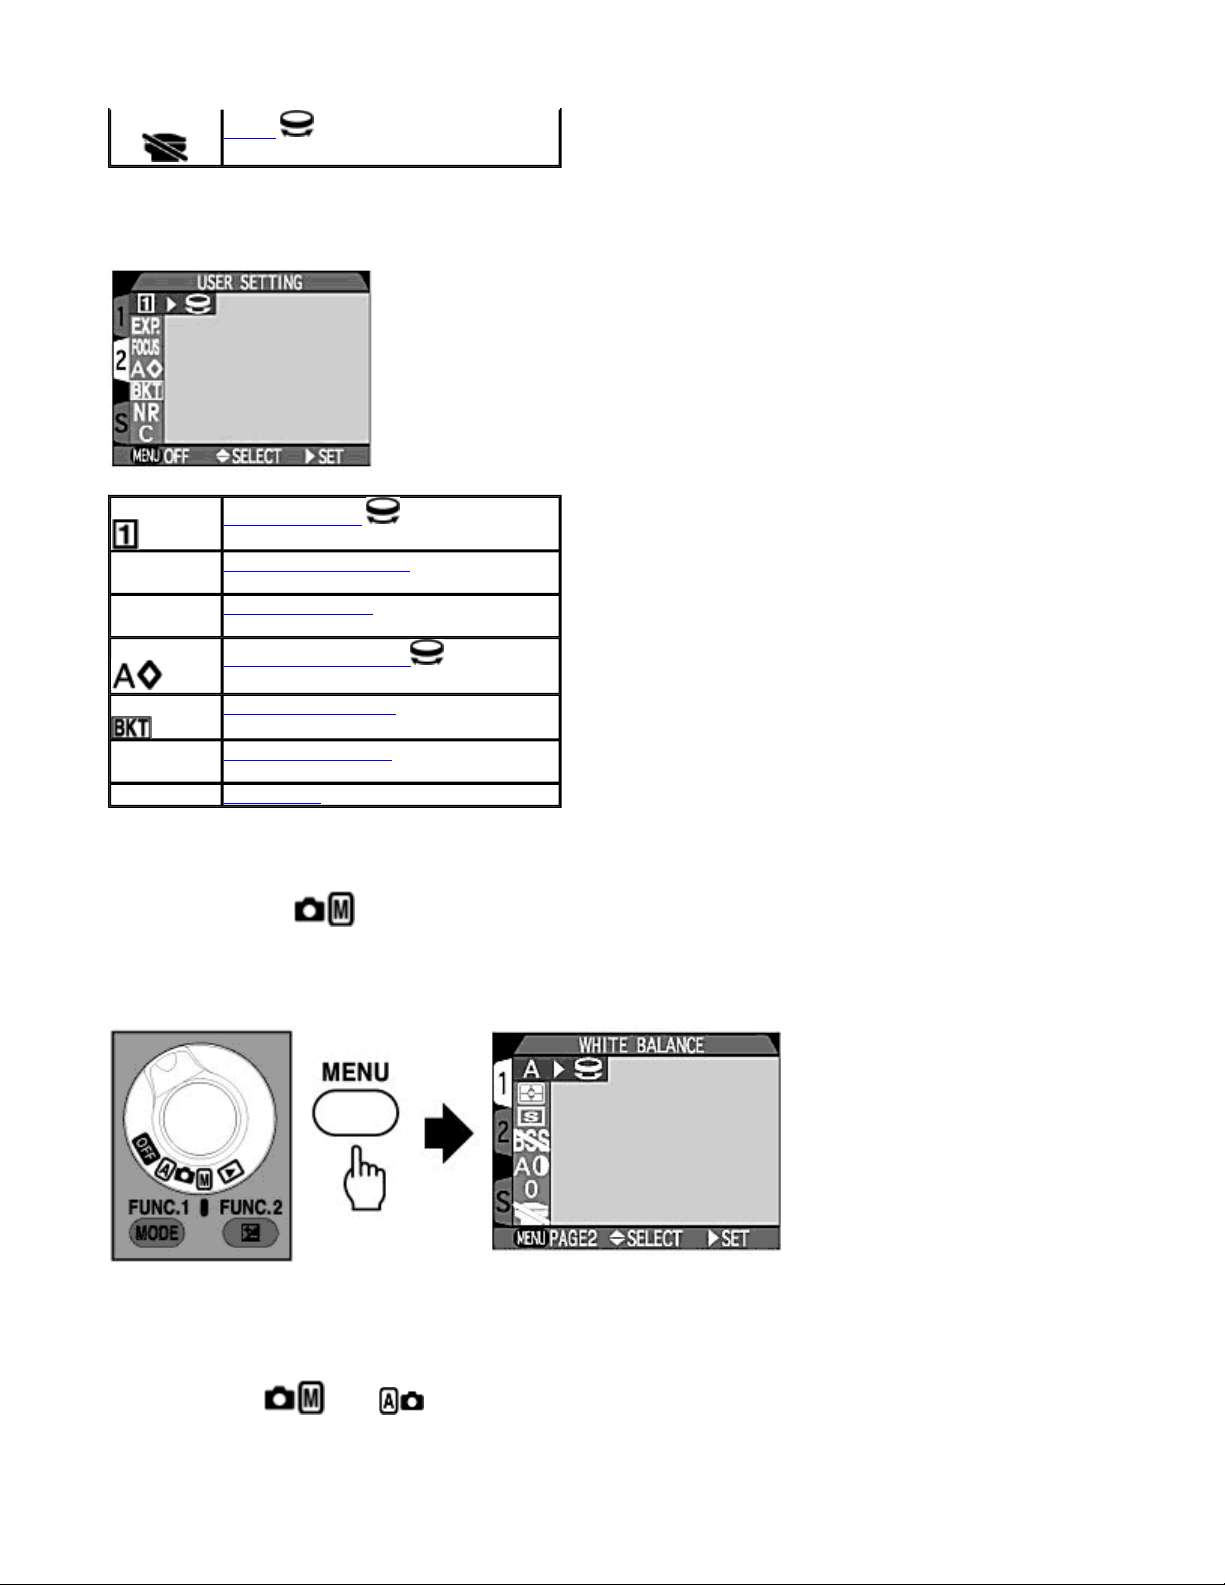
A
N
ikon COOLPIX995 Digital Camera
LENS
SHOOTING MENU 2
EXP.
FOCUS
NR
C
USER SETTING
EXPOSURE OPTIONS
FOCUS OPTIONS
IMAGE SHARPENING
UTO BRACKETING
NOISE REDUCTION
RESET ALL
Page 70 of 136
Displaying the shooting menu
Set the MODE dial to
z
The desired menu item can be selected with the Multi selector.
z
To go back one step, press
z
Changes to settings apply as soon as the selection is made.
NOTE :
MENU and return to Shooting mode for as long as the shutter is lightly pressed.
In the and Shooting modes, pressing the
and press the MENU button to display the Shooting menu on the Monitor.
LEFT
on the Multi selector.
SHUTTER
button will cause the camera to quit the
Page 71

p
N
ikon COOLPIX995 Digital Camera
Choosing from the shooting menu
Page 71 of 136
(example: Focus Mode)
1.
Select the Shooting menu item.
{
Press UP/
options for the selected item.
2.
Select the option for the selected item.
{
Press UP/
option.
on the Multi selector to highlight the desired menu item, then press
DOWN
to highlight the desired option, then press
DOWN
to display further options for the selected
RIGHT
RIGHT
to display the
3.
Set the option.
{
Press UP/
menu.
4.
Complete the setting by pressing the MENU button.
{
The Monitor then returns to Shooting mode.
to highlight the option, then press
DOWN
RIGHT
to confirm. The Monitor then returns to the Shooting
Check
oints: Moving from page to page
Page 72

N
ikon COOLPIX995 Digital Camera
z
In the Shooting mode, two menu pages follow each other so that when you reach the end of page 1,page 2
then appears. The number tab for the active page is highlighted in white. To move to the SET-UP page, press
the Multi selector to turn the white tab orange. Then press UP/
2 and Set Up. Select the S tab with UP/
z
In the Shooting mode, if MENU PAGE 2 is displayed in the lower left corner of the menu screen, pressing the
button will display the second page of the menu. Pressing the
MENU
clears the menu from the Monitor.
to display SET-UP 1 and press
DOWN
Page 72 of 136
on the Multi selector to move between pages 1,
DOWN
MENU
button
.
RIGHT
when MENU OFF
LEFT
is displayed
on
Using the COMMAND Dial to Make a Selection
If the symbol (
COMMAND
1.
2.
dial instead of using the Multi selector.
Select the menu item with the Multi selector.
Rotate the COMMAND dial to display the icon for the desired option.
COMMAND
dial) appears to the right of a menu item, you can select an option quickly by rotating the
{
Complete the setting by pressing the
.
2
button twice in
MENU
SHOOTING MENU 1
or once in
SHOOTING MENU
White balance
Human vision compensates for variations in the color of normal ambient lighting so that we see white and gray objects as
neutral. Film cameras cannot compensate for such changes in lighting (called the color temperature) except by the choice of
film, or in some cases by using filters. Digital cameras attempt to mimic humans by measuring the color temperature and
compensating automatically. This is known as White Balance. The White Balance may be preset to one of a number of fixed
values and can also be measured manually.
Page 73

N
ikon COOLPIX995 Digital Camera
Page 73 of 136
z
The
White Balance
*1 You can make additional fine adjustments to the
rotating the
make the image bluish. Press
*2 You can select
rotating the
COMMAND
COMMAND
icon is displayed on the Monitor when a White Balance setting other than Auto is selected.
dial. A negative adjustment tends to make the image reddish while a positive adjustment tends to
on the Multi selector to set the adjustment.
RIGHT
or
FL1 , FL2
dial.
for different types of fluorescent light, such as warm daylight, neutral etc., by
FL3
White Balance through
a range of -3 to +3 (in single steps) by
Page 74

N
ikon COOLPIX995 Digital Camera
Selection Light source
FL1
FL2
FL3
-- Preset White Balance --
In certain lighting, you may find that you can obtain a more accurate color balance by measuring the color temperature of the
light manually. The
from which the camera calculates the color temperature. The camera then automatically recalibrates the white balance
according to the result.
White (W)
Daylight white (Neutral, N)
Daylight (D)
Preset White Balance
function allows you to photograph a neutral object (usually a piece of gray card)
Page 74 of 136
z
When White Bal Preset is selected, the camera will Zoom in and the preset white-balance menu will appear on the
Monitor.
Cancel
Select Cancel to abort the Preset White Balance setting, and then press the
balance to its most recent setting. The lens also returns to its previous position.
Measure
To measure the color temperature, select Measure and then place a flat neutral object such as a piece of gray card in the
same lighting as the intended subject. Then press
the color temperature and the recalibrates the white balance.
NOTE:
When you select
Measure
on the Multi selector to return the white
RIGHT
RIGHT
, the camera will beep and zoom out, but no photograph will be taken.
on the Multi selector to take a sample image. The camera measures
Metering
The METERING menu offers a choice of four metering methods. Choose the best metering method for your composition
and lighting conditions.
Page 75

A
A
N
ikon COOLPIX995 Digital Camera
Page 75 of 136
Spot
CenterWeighted
Spot AF
Area
weighted
* Metering method is automatically set to Center-Weighted when Digital zoom is activated
Area
Matrix
Metering system Characteristic Shooting situations
Matrix
Spot
Center-
Spot AF
Good for most situations.
Best when you want to set the exposure based on a
small area of the picture, (e.g. a subject surrounded by
a dark background).
useful compromise between Spot and Matrix. Useful
when the lighting on the subject is to be used to define
the exposure, but extends over a larger area.
Set Spot AF Area Metering when you want the
exposure measurement to be defined by the selected
F area target.
Determines the exposure measurement by
dividing up the image into 256 separate elements
and creating an appropriate exposure calculation
according to the particular balance of subject and
background.
The camera measures light in an area in the
center of the frame occupying roughly 1/32 of the
total Monitor area, indicated by the square in
center of the Monitor.
Exposure is calculated based on the central 1/4 of
the entire frame contributing 80 percent of the
exposure calculation. When you use the Digital
zoom, Center-Weighted Metering is automatically
selected.
Spot AF Area Metering can be selected when the
autofocus mode in FOCUS OPTIONS > AF Area
Mode in Shooting Mode is set to Auto or Manual.
: Automatically shifts the Spot Metering area
Auto
to one of five focus areas.
Manual
five focus areas in the AF Area selected.
Off
: Spot Metering area is shifted to one of
: Matrix Metering is automatically selected.
Recommended for use in most
situations.
Best used when the subject is backlit
or there is a pronounced contrast in the
frame such that exposure should be
based on a just a small area of the
frame.
Useful when you want to base the
exposure measurement on the center
of the frame.
Useful when you want to base the
exposure on a small area within the
frame without changing the
composition since the metering area
shifts with the AF Area.
When the Monitor is off, the metering area does
not shift to the AF target area and remains fixed in
the center AF Area.
z
When you set the Metering mode, the Metering indications are displayed on the Control panel and on the Monitor.
Page 76

)
N
ikon COOLPIX995 Digital Camera
Page 76 of 136
Continuous
The COOLPIX995 is capable of taking shots singly or in a continuous sequence at a number of different frame rates and
resolutions.
Options Description Selectable
Single
Continuous
Multi-shot 16
VGA Sequence
Ultra HS
Records a single frame each time
you press the
RELEASE
Record image continuously for as
long as the
button is kept fully depressed
until the memory buffer becomes
full.
When you press the
RELEASE
consecutive images are recorded
and combined into a single image
collage.
Records images continuously at
high-speed for as long as the
SHUTTER RELEASE
kept fully depressed. Because
the images are small compared
to the buffer capacity, you can
continue to record image until the
CF memory card is full.
When you press the
RELEASE
images are recorded at approx.
30fps. The images are stored in a
unique new folder designated
SHUTTER
button fully.
SHUTTER RELEASE
button fully, 16
button fully, 70
SHUTTER
button is
SHUTTER
Image Size
All Image Size All Image quality
All Image Size Other than HI Approx. 1.5fps*
FULL (2048 x
1536)
VGA (640 x
480)
QVGA (320 x
240)
Selectable
Image Quality
mode
mode
Other than HI --
NORMAL Approx. 2fps*
NORMAL Approx. 30fps
Shooting
speed (in
NORMAL
--
in FULL
Page 77

A
A
N
ikon COOLPIX995 Digital Camera
"N__" created every time an
Ultra HS
ll 70 images are saved in this
folder.
Records a movie up to approx.
* The shooting speed varies with the memory available in the camera.
z
Once shooting has commenced, the Autofocus mode, exposure value and white balance settings in the Continuous,
Multi-shot 16, VGA Sequence and Ultra HS modes are fixed at their initial values
NOTE :
fter shooting a sequence, do not remove the CF memory card from the camera until all the pictures have been saved. In
Ultra HS
which takes longer. The indication is displayed while the camera is saving images to the CF Memory.
or
z
The Continuous menu settings (other than Single) are indicated by an icon on the Control panel and on the Monitor.
Movie
CF memory card
mode, images are first recorded in the camera's buffer memory and then saved on the CF memory card,
Movie
40 sec. in length when you press
the
fully. To interrupt movie
recording, press the
RELEASE
sequence Is recorded.
SHUTTER RELEASE
SHUTTER
button fully again.
button
QVGA (320 x
240)
NORMAL Approx. 15fps
Page 77 of 136
Page 78

N
ikon COOLPIX995 Digital Camera
Page 78 of 136
Check point
The progress of continuous shooting is indicated on the Monitor in Ultra HS mode. Shooting can be interrupted by releasing
your finger from the
SHUTTER RELEASE
button.
Ultra HS and Movie mode
z
To playback images recorded in Ultra HS mode, set the
starts with "N__" in which
menu), the
z
When you take a self portrait with the camera lens swiveled to point backwards, the image displayed on the Monitor
Folders
Ultra HS
setting is reset to
sequences are stored. Note that when you set the camera (from the Reset All
All Folders
during shooting and the image displayed during playback both appear upside down.
z
To use
Ultra HS
or
mode, the Monitor must be turned on. Single frame shooting is automatically selected when
Movie
the Monitor is off.
z
The
Best Shot Selector
z
The
Best Shot Selector, Auto Bracketing
,
Auto Bracketing
NOTE:
Speedlight
z
When a
Continuous
mode (other than
Single
Speedlight is raised. It is recommended that you close the Speedlight since underexposure may occur.
z
Multiple flash (operation with more than one Speedlight ) can be used in
VGA Sequence
modes (with the optional multiple flash bracket SK-E900 , etc.). In multiple flash shooting, be sure to
set the built-in Speedlight to the up position since the flash sync sensor does not operate when the built-in Speedlight
is stowed.
Best shot selector
The
Best Shot Selector
outcome of the photograph, such as the following:
z
The camera is zoomed in or you are using an optional teleconverter lens attachment.
z
you are using Macro Close-up
z
the subject is dark and the shutter speed is slow
function is most effective in situations where inadvertent camera movement may affect the
Folders
setting to
All Folders
or to one of the folders that
.
and
Confirmation functions are set to off in Movie mode.
Focus
functions are set to off in Ultra HS mode.
) is selected, the built-in Speedlight does not fire even when the
Single
,
Continuous
,
Multi-shot 16
and
Page 79

N
ikon COOLPIX995 Digital Camera
Page 79 of 136
BSS On
BSS On
NOTE :
z
z
z
Best Shot Selector off
Off
Best Shot Selector on
Off
Best Shot Selector
The
Best Shot Selector
Continuous , Multi-shot 16 , VGA Sequence , Ultra HS
Even when raised, the built-in Speedlight does not fire when the
The
Best Shot Selector
shoot a fast-moving subject or if the composition is changed during continuous shooting.
Best Shot Selector is off and the regular Shooting mode is used.
Holding down the
continuously. The recorded images are stored in the camera's buffer memory
BSS On and the most sharply focused image is automatically selected after the
sequence is complete. The selected image is then stored on the CF memory
card. Autofocus, exposure and white balance settings are determined by the
settings for the first frame.
SHUTTER RELEASE
cannot be set to
function may not be effective in recording the most sharply focused image when it is used to
On
button fully records up to 10 images
in the following situations: When
or Movie
. When the Image Quality mode is set to
Best Shot Selector
Continuous
is on.
mode is set to
HI
.
is
On
, the
Best Shot Selector
indication is displayed on the Monitor.
When the
Best Shot Selector
Image adjustment
When you take a photograph, the camera automatically compensates for optical brightness and contrast before recording
the photograph on the CF memory card. The
Image Adjustment
menu gives you control over this image compensation.
Page 80

N
ikon COOLPIX995 Digital Camera
Option Description
The camera automatically adjusts the contrast and brightness of the
Normal
Auto
More Contrast
Less Contrast
Lighten Image
Darken Image
image according to shooting conditions.
The camera performs same standard brightness and contrast
adjustment for all images. This setting is recommended for images
that will later be retouched on a computer.
The image is processed to emphasize the difference between light
and dark areas. This is useful when shooting landscapes and foggy or
cloudy scenes.
The image is processed to reduce the difference between light and
dark areas. This is useful in conditions where the light is very bright
with strong shadows cast on the subject.
Increases the brightness of mid-tones in the image without affecting
detail in the highlights and shadows. This setting can be used on
images that appear too dark when displayed or printed.
Decreases the brightness of mid-tones in the image without affecting
detail in the highlights or shadows. This setting can be used on
images that appear too bright when displayed or printed.
Page 80 of 136
z
The
Image Adjustment
is set.
indication is displayed on the Monitor when an
Image Adjustment
Saturation control
Adjust the Saturation to control the intensity of color in the picture. In this mode, you can specify a
image.
other than
(black-and-white)
B&W
Auto
or
Normal
Page 81

N
ikon COOLPIX995 Digital Camera
Page 81 of 136
+1 Maximum
0 Normal
-1 Moderate
-2 Minimum
B&W
Option Description
+1 Maximum
0 Normal
-1 Moderate
-2 Minimum
B&W
Sets the saturation level to +1.
Sets the saturation level to normal.
Sets the saturation level to -1.
Sets the saturation level to -2.
Sets image to black-and-white.
Increases the color saturation of the image. Suitable for direct printing
where a photo-print effect is required.
Sets the saturation control level to normal. Saturation can be
decreased to normal to -1 (moderate) or -2 (minimum). Suitable for
images intended for subsequent retouching or manipulation on a
computer.
Images are recorded as monochrome data and the display on the
Monitor also changes to black-and-white. The size of the image file is
the same as for the color image but the resolution is higher.
z
The
(black-and-white) indication is displayed on the Monitor when
B&W
is selected.
B&W
Lens
Optional lens converters for wideangle, telephoto and fisheye photography can be used with the COOLPIX995. A Slide
Copy Adapter is also available. Each of these converter is adapted to a particular combination of settings, such as the Focus
mode, Zoom position and Metering method.
Page 82

N
ikon COOLPIX995 Digital Camera
Page 82 of 136
*1 The built-in Speedlight is set to Flash Cancel. Only an optional external Speedlight can be fired.
*2 The Focal length is fixed to infinity, the metering system to Center-Weighted and the range of selectable apertures is
limited.
*3 The Self-timer can be set.
*4 Both the built-in Speedlight and any optional external Speedlight are set to
*5 Less contrast is set for
made.
Swivel Lock
The Swivel Lock function, prevents the lens section of the camera from being unintentionally swiveled beyond the horizontal
position by the weight of an optional lens converter.
Slide the Swivel Lock lever in the direction of the arrow to activate the Swivel Lock function and lock the lens section of the
camera so that it cannot be rotated more than 90° forward (vertical position).
-- Slide Copy Adapter --
Select Slide Copy Adptr when the camera is attached to a Slide Copy Adapter to copy a 35mm type color slide film or check
the images on negative film.
Image Adjustment
and compensation of +0.7 EV is set. This can be changed after the setting is
Flash Cancel
.
Page 83

N
ikon COOLPIX995 Digital Camera
Page 83 of 136
Positive
Inverse Color
Inverse color mode
z
Bright lighting is required in
insufficient, the image on the Monitor appears too bright. If the image is affected by noise (interference), set the Image
Sharpening to
z
Inverse Color
the type or manufacturer of the film being used. To obtain high-quality images, use of a film scanner such as the Nikon
COOLSCAN is recommended.
NOTE :
z
z
Lens setting
The built-in Speedlight does not fire when the Lens settings is set to
Flash Cancel indication is displayed on the Control panel and Monitor.
Refer to the instruction manual for the optional lens converter or Slide Copy Adapter for details.
Setting for color slide film
Setting for negative film
Inverse Color
or
Off
mode is only intended for checking negative film, and Image quality varies significantly depending on
Low
.
mode when checking negative film on a Slide Copy Adapter. If the lighting is
Fisheye 1 , Fisheye 2
or
Slide Copy Adptr
. The
The
When
Monitor.
When
Monitor.
setting indication is displayed on the Monitor when a
Lens
Fisheye 1
Slide Copy Adptr
is selected, the Infinity and Center-Weighted Metering indications are also displayed on the
is selected, the
Macro
and
setting other than Normal is selected.
Lens
Less Contrast
indications are also displayed on the
User setting
The camera can "memorize" up to three combinations of settings, including White Balance, Metering, Continuous, Best
Page 84

N
ikon COOLPIX995 Digital Camera
Shot Selector, Image Adjustment, Saturation Control, Lens and Image Sharpening. These settings can be recalled as desired,
allowing you to create separate combinations of settings for different shooting conditions and then recall them later at a touch.
1.
Select User Setting. The User Setting number and the icons for the menu items are displayed.
{
By default, any changes made to settings are automatically saved as User Setting1.
{
Settings that have not been changed from the default values are shown in white. Settings that differ from the
defaults are shown in orange.
2.
To store the desired settings in User Setting 2 or 3, highlight 2 or 3 by pressing UP/DOWN on the Multi
selector and then press LEFT / RIGHT to select. Then, set the desired menu item from the Shooting menu.
{
The icon for the selected menu item is displayed in orange.
{
When menu item option is changed in each User Setting number, the new setting is stored in memory.
Page 84 of 136
{
The User Setting number is displayed in the upper left corner of the Monitor when User Setting 2 or 3 is
selected.
Exposure options
In certain cases, you may want to modify the exposure setting as metered by the camera so as to intentionally over- or
underexpose the image. This is known as exposure compensation. Alternatively, you may wish to maintain the same exposure
over a number of different images, for example when you are taking pictures that must be composited or displayed together.
Page 85

N
ikon COOLPIX995 Digital Camera
Page 85 of 136
z
AE-L
choose
AE Lock
to record a number of shots with the same aperture, shutter speed, sensitivity and white balance settings.
(Auto Exposure Lock) and
Reset
AE Lock
EXP. +/Exposure mode
-- AE Lock --
Use the
This is useful in situations such as when you want to join or retouch images on a computer.
Setting Exposure Lock
Setting Exposure Compensation
Setting Exposure mode
, these icons will turn yellow to indicate that exposure will be reset with the next shot.
(White Balance Lock) are displayed on the Monitor when
WB-L
AE Lock
is set. If you
Off
On
Reset
-- Exposure Compensation --
Exposure metering can be offset to allow manual compensation for more creative control of your pictures. Twelve settings are
available for Exposure Compensation, from -2EV to +2EV in 1/3-EV steps.
Off Exposure Lock is canceled and normal exposure control is resumed.
Exposure control (aperture, shutter speed, sensitivity and white balance) are locked
to the settings for the first image recorded after On setting.
z
The flash is canceled. Do not release the built-in Speedlight.
Locked exposure control is reset and the exposure control (the aperture, shutter
speed, sensitivity and white balance settings) will be locked to the settings for the first
image recorded after resetting.
Page 86

N
ikon COOLPIX995 Digital Camera
Page 86 of 136
z
The Exposure Compensation indication is displayed on the Control panel and both and the compensation
value are shown on the Monitor when the Exposure Compensation is set.
Check point
The flash output level is also adjusted when the Speedlight is used. To adjust only the flash output level and leave the
exposure metering as determined by the camera, select Speedlight Opt. > Variable Power
-- Exposure mode --
The Exposure mode can be selected by pressing the Multi selector instead of using the
dial. This option cannot be selected if MODE is assigned to either the
Shooting SET-UP menu. See Setting the Exposure mode for the characteristics of the Exposure modes and details on using
them.
in the Shooting SET-UP menu.
button and the
MODE
FUNC. 2
button in the Controls
FUNC. 1
or
COMMAND
setting in the
Check point
Set the shutter speed in the S exposure mode or the aperture in the A exposure mode by rotating the
described in Setting the Exposure mode
the shutter speed by rotating the
. However, in M exposure mode, set
COMMAND
dial.
to select the aperture and
M (A)
Focus options
You can use the
Confirmation
or change the
Focus Options
menu to select the
Distance Units
.
AF Area Mode
, change the
Auto-Focus Mode
COMMAND
, select
Focus
M (S)
dial as
to select
Page 87

A
A
N
ikon COOLPIX995 Digital Camera
AF Area Mode
Auto-Focus Mode
Focus Confirmation
Distance Units
-- AF Area Mode --
Focus using the five AF Areas on the Monitor.
Setting AF Area mode selection
Sets the autofocus mode
Sets the focus confirmation selection
Sets the units used for distance display
z
When
selected in
Mode
selector UP ,
LEFT
select the AF Area.
AF Area
DOWN
RIGHT
is
to
Manual
, press the Multi
or
Page 87 of 136
,
ll five AF Areas ae used to focus the image. The camera will automatically select the AF Area
Auto
Manual
Off
NOTE :
and
Auto
when the Monitor is off or the Digital zoom is activated.
-- Auto-Focus Mode --
The camera Auto-Focus can operate in two modes: Continuous AF and Single AF.
for the subject closest to the camera. This function minimizes the chance of out-of-focus
pictures. The automatically selected AF Area is identified by the indicator that glows red on the
Monitor when the
Focusing is targeted on one of five AF Areas selected on the Monitor. Press UP/
LEFT/RIGHT
indicated in red on the Monitor. This is useful in situations where the aim is to focus precisely on
a single AF Area with a relatively stable subject.
Only the center AF Area is used for focusing. This is useful in Autofocus Lock/Auto Exposure
Lock operation.
AF Area selection
Manual
settings can only be selected when the Monitor is turned on.
SHUTTER RELEASE
on the Multi selector to select the desired AF Area. The selected AF Area is
button is pressed lightly.
AF Area Mode
DOWN/
is automatically set to
Off
Continuous AF
s long as the monitor is turned on, Autofocus is enabled continuously regardless of
whether the shutter is being pressed or not. The Focus is locked when the
RELEASE
selected until you turn it on again.
button is pressed lightly. If the Monitor is turned off,
Single AF
SHUTTER
is automatically
Page 88

A
N
ikon COOLPIX995 Digital Camera
Page 88 of 136
Single AF
-- Focus Confirmation --
This function allows you to check the Focus visually on the Monitor.
MF
On
Off Focus Confirmation
Check point
The outline of the focused image emphasized in Focus Confirmation mode is displayed only on the Monitor. It does not affect
the recorded image.
-- Distance Units --
You can change the distance used on the Control panel and on the Monitor in
In
emphasized in the Monitor as an aid to focus.
In all Focusing modes, the outline of the in-focus area of the image is emphasized on
the Monitor.
utofocus is only enabled when the
regardless of the Monitor status.
(Manual Focus) mode, the outline of the in-focus area of the image is
MF
is canceled.
SHUTTER RELEASE
button is pressed lightly,
Manual Focus
mode.
m
ft
Meters
feet
Image sharpening
The camera can emphasize the details and borders of objects, making the picture appear sharper and bolder.
Page 89

N
ikon COOLPIX995 Digital Camera
Normal
Low
NOTE :
The Image sharpening setting does not affect the monitor display during shooting or the video output data.
The camera automatically sharpens the image for optional
Auto
results.
The same standard sharpness is set for all images.
The image is processed to increase the sharpness effect
High
above the normal level, giving the edges of objects more
emphasis and making details more distinct.
The images processed to decreasesharpness below the
normal level, making edges less distinct.
No sharpening.
Off
Image Sharpening setting
Page 89 of 136
z
The Image Sharpening indication is displayed on the Monitor when
High
,
Normal
or
Low
is set.
Auto bracketing
In situations where it might be difficult to obtain a proper exposure, Auto Bracketing lets you shoot the same subject at three or
five different exposures. In WB Bracketing, the white balance is bracketed in three shots.
Page 90

f
A
A
p
N
ikon COOLPIX995 Digital Camera
Bracketing is off.
Of
On
WB Bracketing
Bracketing Characteristics
Off
On
WB Bracketing
uto Bracketing is set.
White Balance Bracketing is set.
Bracketing is canceled and normal exposure control is
used.
uto Bracketing is performed with the selected number
of bracketing shots and with a compensated EV value
offset from the automatically metered exposure. The
Shutter speed is bracketed in P , R or M Exposure
modes and the aperture is bracketed in S Exposure
mode.
The White Balance is bracketed when you press the
SHUTTER RELEASE
up of one with the selected white balance, a reddish
image and a bluish image.
button fully giving 3 shots made
Page 90 of 136
z
The time required to save bracketed images to
the CF memory card is three times that required
for a normally recorded image.
-- On --
Each time you press the
values to under exposed EV values. When you shoot a high-contrast image, the image with the desired exposure can be
selected from the set of bracketed shots.
Number of shots,
com
ensated EV value
3, _0.3 +0.3, 0, -0.3
3, _0.7 +0.7, 0, -0.7
3, _1.0 +1.0, 0, -1.0
5, _0.3 +0.7, +0.3, 0, -0.3, -0.7
SHUTTER RELEASE
button, either three or five shots are taken ranging form over exposed EV
Bracketing order
Page 91

N
ikon COOLPIX995 Digital Camera
5, _0.7 +1.3, +0.7, 0, -0.7, -1.3
5, _1.0 +2.0, +1.0, 0, -1.0, -2.0
Check point
To perform Auto Bracketing or White Balance Bracketing in Continuous
RELEASE
after which the sequence stops automatically.
z
button fully. A selected number of consecutive shots are taken (up to three shots with
The Exposure Compensation indication flashes on the Control panel and along with the compensated EV
value for the next shot are displayed on the Monitor when the bracketing is set.
or
VGA Sequence
Page 91 of 136
mode, hold down the
FULL, 3 : 2
and
SHUTTER
mode),
Fine
-- WB Bracketing --
White balance is bracketed when you press the
the selected white balance, one reddish image and one bluish image.
z
When you select White Balance Bracketing, the (White Balance Bracketing indication) appears on the
Monitor.
SHUTTER RELEASE
button fully, giving three shots made up of one shot with
NOTE :
z
z
Auto Bracketing and White Balance Bracketing
Bracketing cannot be set in
mode.
White balance bracketing cannot be set in Continuous mode other than
mode or
Noise Reduction
Noise reduction
Multi-shot 16 , Ultra HS
mode.
, Movie , Best Shot Selector , AE Lock or
Single , Best Shot Selector
Noise Reduction
mode,
AE Lock
Page 92

Y
A
A
A
A
A
A
A
A
N
ikon COOLPIX995 Digital Camera
When the camera is set for long time exposures, noise in the form randomly spaced bright-colored pixels will appear. The
longer the exposure, the more this effect is apparent. The Noise Reduction setting can be used to minimize this effect.
Page 92 of 136
On
Off
NOTE :
When the Noise Reduction function is on, the time taken to save a picture to the CF memory card is approximately doubled.
The effect of noise on the recorded image is minimized.
Noise reduction is canceled and normal exposure control is
used.
Time taken to save an image to the CF memory card
Reset all
The Reset all setting allows you to restore settings in all Shooting modes , and Playback to their
default values.
No
When you perform
Exit menu without changing the settings.
Restore the settings to their default values.
es
Reset All
Shooting menu
White Balance
Metering
Continuous
Best Shot Selector
Image Adjustment
Saturation Control
, the camera settings are reset to the defaults shown below:
uto*1
Matrix
Single
Off
uto
Normal
Focus Options:
F Area Mode
uto Auto-Focus Mode
Focus Confirmation
Distance Unit
Image Sharpening
uto Bracketing Off
Continuous
MF
Not cleared
uto
F
uto
Page 93

A
A
A
N
ikon COOLPIX995 Digital Camera
Page 93 of 136
Lens
User Setting
Exposure options:
E Lock Off
Exposure Compensation
Exposure Mode
*1 Fine-tuned values are also reset.
*2 Only the selected User Setting number is reset.
Shooting SET-UP items
Folders
Monitor Options:
Display Mode
Brightness
Hue
Shutter Sound
Controls
Memorize
Func.1, 2
Speedlight Options
Variable Power
Int Flash Off
Shot Confirm Lamp
*Restores settings for all controls.
Playback Menu items
Folders
Playback SET-UP item
Video Mode: Not cleared
Functions set for each control
Functions set for each control (not on the Monitor) are not reset and remain in memory.
ll Folders Frame interval 3 S
Normal
Not cleared*2
Off
0
Not cleared
NIKON
On
3
6
On
Cleared*
Not cleared
On
Off
Off
Noise Reduction Off
info. txt
uto Off
Seq. Numbers Not cleared
Date Not cleared
Video Mode
Language
Zoom Options
Digital Tele
Startup Position
Fixed Aperture
Off
30 S
Not cleared
Not cleared
On
Last Position
Off
Setting Shooting SET-UP Menus
Page 94

A
N
ikon COOLPIX995 Digital Camera
Page 94 of 136
Shooting Mode
The SET-UP menu allows you to select various settings for basic camera setup before shooting, such as Monitor,
Zoom and Speedlight options, etc.
Displaying the SET-UP menu
In
Set the MODE dial to
z
You can use the Multi selector to choose the desired menu item.
Folders
Monitor Options
Shutter Sound
uto Off
Seq. Numbers
CF Card Format
Date
mode
and press the MENU button to display the SET-UP menu on the Monitor.
In
1. Set the
2.
mode
Multi selector to select the Tab (S, 1 or 2).
{
Select the S tab with UP/DOWN to display SET-UP 1 and press RIGHT
{
dial
MODE
Pressing
SET-UP 1
once to enable selection of the SET-UP items.
RIGHT
to
in Shooting menu display turns the tab at the left of the display orange.
LEFT
appears at the top of the display when you press
and press the MENU button to display the Shooting menu. Use LEFT on the
.
UP /DOWN
SET-UP 1 SET-UP 1
to select the "
" tab at the left. Press
S
Page 95

p
A
N
ikon COOLPIX995 Digital Camera
Page 95 of 136
Folders
Monitor Options
Controls
Zoom Options
uto Off
Seq. Numbers
CF Card Format
3.
Press UP/DOWN to display SET-UP 2 at the top of the screen.
{
The 14 SET-UP items are divided into two displays. Press UP/
and display
Speedlight Opt.
Shutter Sound
Date
info. txt
Video Mode
Language
Disable delete
SETUP 2
.
on the Multi selector to move the cursor
DOWN
Choosing from the SET-UP menus (example: zoom options)
1.
Select the SET-UP menu item.
{
Press UP/
selected item.
2.
Select the o
tion for the selected item.
on the Multi selector to highlight the desired item and press
DOWN
to display options for the
RIGHT
Page 96

N
ikon COOLPIX995 Digital Camera
{
Press UP/
to highlight the option and press
DOWN
to display the detailed option menu.
RIGHT
Page 96 of 136
3.
Set the option and complete the setting by pressing the MENU button
{
Press UP/
MENU
The Shooting SET-UP Items (in
DOWN
button to complete the setting. The Monitor returns to the Shooting Mode.
on the Multi selector to highlight the option and press
mode)
.
to set the option. Press the
RIGHT
Folders
You can use this option to select new folders to help you organize your pictures on the camera for shooting and image
playback. This feature allows you to create, rename and delete folders.
Options
NIKON
(Folder name) Selects the newly created folder.
-- Opti>ons --
Press UP/DOWN on the Multi selector to select Options and then press RIGHT to display the Options Menu.
z
The
NIKON
Options for folder setup.
Selects NIKON folder.
folder is automatically created. Newly created folders are displayed below the
NIKON
folder.
Page 97

N
ikon COOLPIX995 Digital Camera
Page 97 of 136
New
Rename
Delete
[New]
Creates a new folder on the CF memory card.
1.
Select "New" in the Options menu and press RIGHT on the Multi selector. NIKON is displayed first.
2.
Press LEFT/RIGHT to highlight letter to be changed and press UP/DOWN to edit selected letter. Repeat the
procedure to create new five-letter folder name. Press RIGHT to create new folder. The Monitor returns to the
SET-UP menu.
Creates a new folder.
Renames a folder.
Deletes a folder.
3.
Press the MENU button to complete the setting.
{
Folder name is shown on the Monitor when a folder other than NIKON is selected.
[Rename]
Use this option to rename folder (other than the NIKON folder).
Page 98

p
N
ikon COOLPIX995 Digital Camera
Page 98 of 136
1.
Select the "Rename" option and press RIGHT on the Multi selector to display the folder list.
2.
Press UP/DOWN to select the folder to be renamed and press RIGHT to display the name.
3.
Press LEFT/RIGHT/UP/ DOWN to edit the name as described in the
existing folder. The Monitor returns to the SET-UP menu.
step 2 of New
. Press RIGHT to rename
4.
Press the MENU button to complete the setting.
[Delete]
This option enables you to delete folders (other than the
1.
Select "Delete" in O
tions and press RIGHT on the Multi selector to display the folder list.
NIKON
folder).
Page 99

N
ikon COOLPIX995 Digital Camera
2.
Press UP/DOWN to select the folder to be deleted and press RIGHT to display the confirmation dialog box.
Page 99 of 136
3.
Press UP/DOWN to select Yes and then press RIGHT to delete selected folder. The Monitor returns to the SETUP menu. Press the MENU button to complete the setting.
NOTE :
The
NIKON
If the selected folder contains hidden or protected images, the folder will not be deleted. Any images it contains that are neither
hidden or protected will, however, be deleted.
-- Selecting a folder --
Once additional folders have been created, you can select the folder that will be used for playback or to store
photographs in
folder, which will also be used for playback.
Deleting folders
folder cannot be deleted.
and
mode. Until a new folder is selected, all subsequent images will be stored in this
Page 100

g
A
r
A
r
N
ikon COOLPIX995 Digital Camera
z
Folder name shown in the Monitor (no folder name is displayed when
Monitor options
folder is selected).
NIKON
Page 100 of 136
Use the
and hue.
Display Mode
mode only)
Brightness
Hue
-- Display Mode
Use this mode to set the Monitor operation mode. It can be set to On or
images are displayed after shooting or displayed continuously in on the Monitor.
Monitor Options
(in
(in mode only) --
sub-menu to specify when the Monitor will automatically turn on and to adjust the Monitor brightness
Turns the Monitor and Preview mode On/Off
djusts the brightness of the Monito
djusts the hue of the Monito
, and you can also specify details such as whether
Off
Monitor On
Review Only
Preview Only
Monitor Off
-- Bri
htness --
When the
In mode, the Monitor is normally Off but the recorded image is
displayed after you release the shutter.
In mode, the Monitor is normally On but the recorded image is not
displayed after you release the shutter.
When the
this setting, the Monitor must be turned On by pressing the
dial is set to , the Monitor turns On.
MODE
dial is set to , the Monitor turns Off. Before changing
MODE
MENU
button.
 Loading...