

Page 1
Nikon Nuvisll0 i
Instruction
Manual
Manual
de
instrucciones
(Pages
2-39)
(Paginas
40-77)
Page 2
Foreword
Th
ank you for pur
sure
to
Be
close
Your
• E
• 3
•
Accidental
•
Convenient
a
2
read this instruc
at hand until
new
Nik
on
xtremely sim
different
print
double
Advanced
date/time
came
ple "
types
Photo
chas
ing the
you
are
ra
employs
drop-in
" fi
on
the
exposures
and
title
System symb
Nikon Nuvis
tion
manu
al
familiar with
the
Advanced
lm loading
same
roll of film
prevention
printing
ol
is a trademark
11
Oi
camera
thoroughly bef
the new
system outlined
Photo
System
of
alllX240
.
ore use,
(IX2
40
products
and keep
below
System)
and
it
.
features:
Take
some
Befo
re t
to
take
yo
urs
elf
its featur
trial
shots.
aking important
a f
ew trial shots first
with
the
camera
es.
pictures, be
to
familiarize
and
all
of
sure
Page 3
WARNING:
for
safe
handling
of
the
camera
Camera
•
• Do
•
• Do
body
Do not
disassemble
as
it
houses
can
cause
not
touch inside
flash if
damaged, as
ci
rcuitry
which
Do
not look
source directly
it m
ay
damage
sun
directly through
permanent
not
carry
on a tripod,
a fall.
or
modify
high-voltage circuitry whi
electric
shocks
metal
it
can
cause electr
at
the
sun
through
your retina
damage.
the
came
to
avoid
the lens
injury
eye
the
.
portions
houses
high-voltage
ic
or
a strong light
the viewfinder,
. L
ooki
may
ra
when
mounted
resulting
camera,
ch
of
the
shocks
ng
at
the
resu
from
as
lt
.
in
•
If
you
im
media
the
camera. Let
aking
t
Built-in
Do
not fire
as
it
may cau
Battery
• Do
not
Do
not
the
battery:
resulting
detect
smoke
tely
stop operation
it
to
your
flash
the flas
se
throw
shor
t ci
this
in injury.
around
the
camera
local Nikon
h cl
ose
batteries into
rcu
it, di
may
cause
to
sassemble
visual injury.
used
the
camera,
and
cool
dealer.
peop
le's
it
to
explode,
turn OFF
befo
re
eyes
,
the
fire.
or
heat
•
Keep
battery
out
of
someone
call a doctor immediately.
N
ikon can
malfunctions
Nuvis
his
t
accidentally
not
11
Oi
in
manual.
childr
be held responsible
caused
by
ways
not
spec
en's
reach
swallows a battery,
usi
ng t
. If
for
he
ifi
ed
in
3
Page 4
Contents
Foreword.
WARNING
Conten
ts
Camera
parts
Getting
ready
Attaching
Installing
Turning
the
Checking
Setting
date
Data recordi
Se
tting
titles
Title recor
L
oading
the
Basic
operation
Hold
ing
the
Shutter
release
Selecting
4
Zooming ........
.....
..................
for
safe
................
..........
handling
of
the
.......................................................................
.............................................
to
take
the
strap
the
battery..
camera
battery
and
ng
......
ding
film...
camera
a pr
int
pictures ......
.......................................
..... ................
ON/O
FF.....
power
........................ ......
time
................
function
........
funct
ion
..............
....
.................
....
...
.........
..........
......
.....
properly. ....................
operati
on
.....
..
type
.....................
:....................
..............................
------------------------
....
............ .
camera
........................................... 3 Shooting
..................
...
............................
..
........
.......
........
.............
.. ....
...
.....................................
...........
....
....
..........................
. .
......................
...
........
...
........
...
..............................
...
....................................
...............
....
..
.
..
..
...............
....
..................
............
.............
....
..........
.....
......
....
.................
....
......
....
....
........
...
.
....
.................
..
..............
...........
..
.....
.................
.. 2 Viewfinder
..
....
10
.......
11
12
......
15
..
...
16
19
.. ..
19 For safe
20
.......
21
22
.4
H
5
Removing
8 To r
8
Advanced
. 8
Red-eye
. 9
Self-timer
9
Infinity
Fl
Remote
Sp
indications
........................
...............................................
ow
to
use
focus lock
................
the film ...............
ewi
nd the
film
in
mid-roll
reduction mode
operation
focus
ash
photography
Auto
flash
Flash
cancel
Anytime
flash mode
Slow
sync
control
handling
Camera
Notes
on batteries
ecifications
operation
...............................................................
mode
flash
care
............
.............................................
..................
........................................
...............................................
mode
.........
........
mode
....................
photography
of
the
camera
tips ...............
...
..................................................
-------------------
...
..
......................
.......................................
............
.......
........................
....
....
........................................
....
.............
.................
..........
..
....
......... ...
......
...........
.....................
(optional)
................
....
. .
..
.....................
..................
.........................................
.
.......
..
..............................................
..
.
......
......
........
....
.......
....
....
.............
.................
....
................
.
.....
.... ..
......
..........
..................
.............................
.....................
....
....
..................
............ 34
........
....
................
........... .....
..
.............
....
.........................
....
....
.....
..
....
......
...
..
..
.30
.34
.36
.38
-
23
24
25
26
27
28
28
29
31
32
32
33
36
37
Page 5
Camera
1
2
3
4
parts
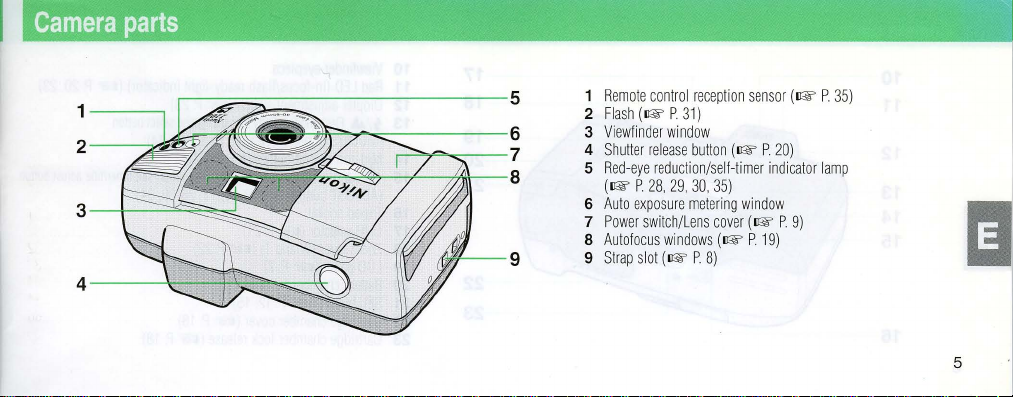
1
Remote
control
reception
sensor
(1&
P.
5
6
7
8
9
Flash
(1&
2
Viewfinder
3
Shutter rel
4
Red-eye
5
(1&
Auto
6
7
Power
Autofocus windows
8
Strap slot
9
P.
window
ease
reduction/self-timer
p.
28, 29, 30,
exposure
switch/Lens
(1&
31)
button
35)
metering
cove
(1& P
P.
8)
(1&
window
r (1& P
P.
indicator
19)
35)
20)
lamp
9)
5
Page 6
parts
Viewfinder
10
11
12
17
18
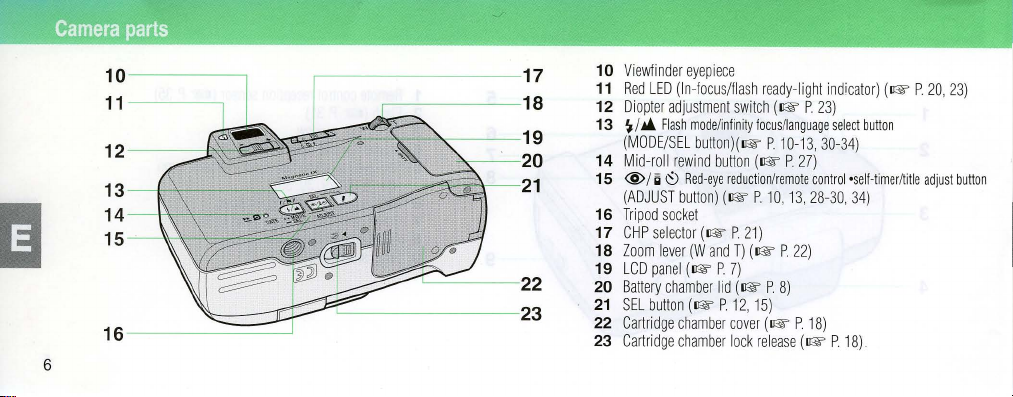
10
Red
11
Diopter
12
'1/ ....
13
(MODE/SEL
Mid-roll
14
@ /
15
(ADJUST button)
16 T
CHP
15
22
23
16
6
17
18
19
20
21
22
23
Zoom
L
Battery
SEL
Cartridge
Cartridge
eyepiece
LED (In-focus/flash
adjustment
F
lash
mode/infinity
button)(1IE P 10-13,
rewind
~
Red-eye
socket
lever
(Wand
(lIE P
chamber
(lIE P
chamber
chamber
button
(lIE P
lid
ripod
CD
button
Ii
selector
panel
ready-light
switch
(lIE P
22)
8)
(lIE P
release
27)
(lIE
23)
control'self-timer/titie
28-30,34)
18)
focus/language
(lIE P
reduction/remote
(lIE P 10,13,
21)
T) (lIE P
7)
(lIE P
12, 15)
cover
lock
indicator)
select
button
30-34)
P.
18)
(lIE P
20,23)
adjust button
Page 7
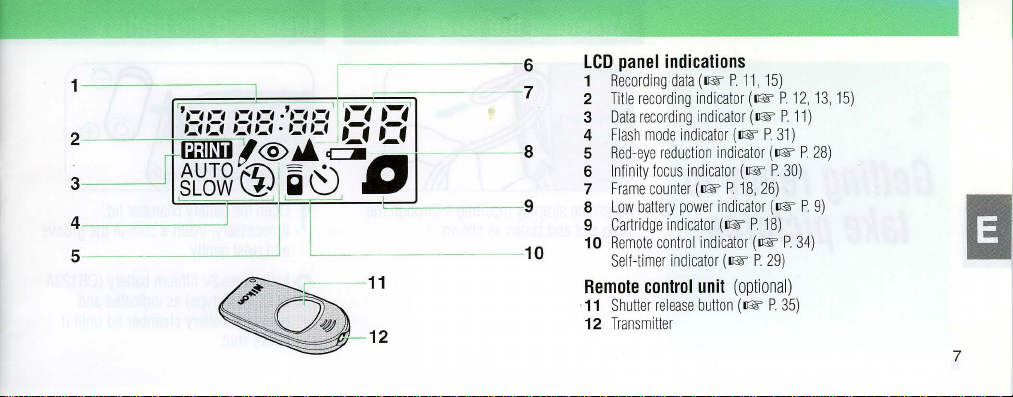
LCD
panel
1
Recordi~g
2
Title reco
3
Data
recording
4
Flash
5
6
7 Fr
8
9
10
Remote
11
12
mode
Red-eye
reduction
Infinity focus
ame
counter
Low
battery
Cartridge
Remote
control
Self-timer indicator
control
Shutter
release
Transmitter
indications
data
(1& P
rding
indicator
indic
ator
indicator
(1& P
indicator
indicator
(1& P
power
indicator
indicator
(1&
indica
tor
(1& P
unit
(optional)
button
(1& P
11,15)
(1&
(1& P 1
(1& P
(1& P
18, 26)
P.
18)
(1& P
29)
P.
12, 13, 15)
1)
31)
30)
(1& P
34)
35)
28)
9)
7
Page 8
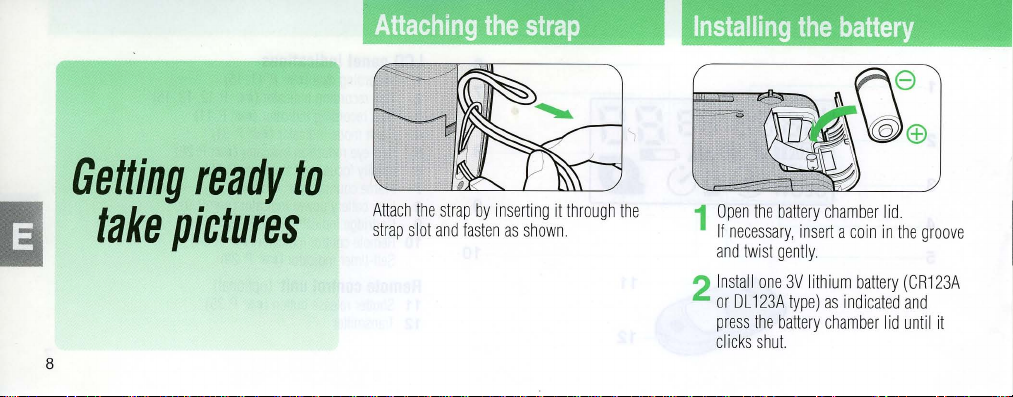
Attaching
the
------
strap
Getting
take
8
pictures
ready
to
Attach
strap
slot
the
strap
and
by
inserting
fasten
as
shown.
it
through
the
1
Open
If
and
2
Install
or
press
clicks shut
the
battery
necessary,
twist
gently
one
3V
DL
123A
type)
the
battery
chamber
insert a co
lithium
as
indicated
chamber lid
lid.
in in
battery
the
groove
(CR123A
and
until
it
Page 9
Important!
Note
that
setting
To
the
came
Pullout
DD D DD
to
preserve
the
panel when
Remember
(For
Note:
turn
•
the
set
date
ra
tab
appears
battery
the
date
and
time,
battery
OFF
when
to
remove
is
replaced
and
see
power, be
not
in
the
.
time.
page 10.)
in
use
battery
LCD
sure
to
.
easily.
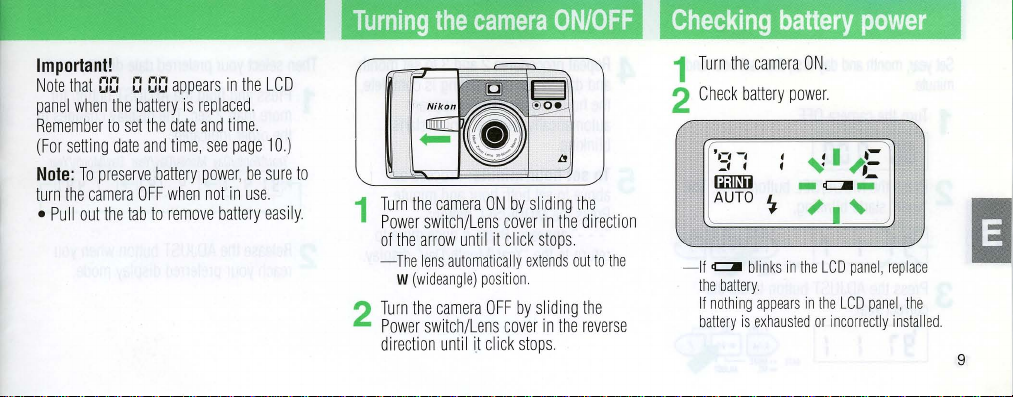
Turning
1 T
2
urn
the
P
ower
of
the
-The
W
(wideangle)
Turn
the
P
ower swit
di
rection
the
camera
switch/Lens
arrow
lens
camera
until
camera
ON
by
cover
unt
il
it
click
automatically
position
OFF
i.t
cover
click
by sliding
stops
ch/Lens
ON/OFF
sliding
the
in
the
direction
stops
extends
out
.
the
in
the
reverse
to
the
Checking
1
Turn
2
Check
-I
f
ClIII
the
If
nothing
battery
the
battery
blinks
battery
is
battery
camera
appears
exhausted
ON.
power.
in
the
LCD
in
the
or
power
panel,
LCD
panel,
incorrectly
rep
lace
the
installed.
9
Page 10
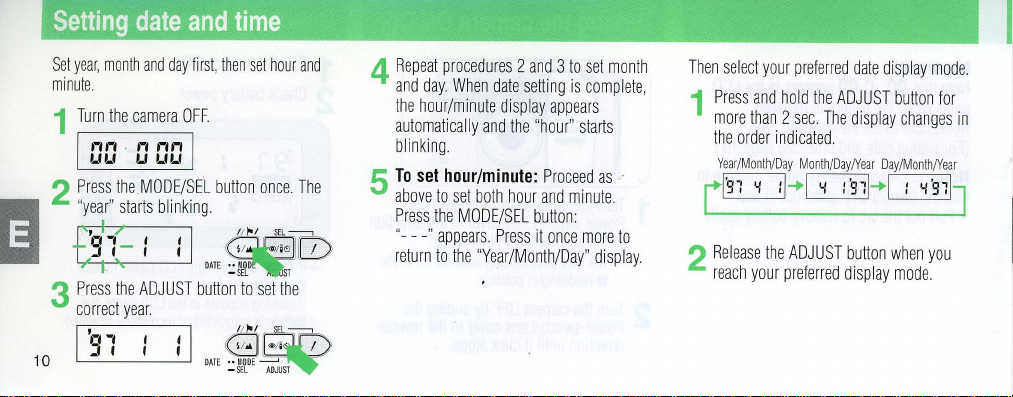
Setting
Set
year, month
minute.
1 T
urn
.
-,.-,
W
1-,
2
Press
"
year" starts blinking
3
Press
c
orrect
I
'Sl
10
the
camera
..
the
the
year.
date
and
day
OFF.
-,
.-,.-
,
1-, W 1-,
MODE
/SEL
ADJUST
: I
and
fi
rst, then
button
DATE ··MOD
button
time
set
once.
IISEL~
\ 1
..
-
sa
to
set
hour
i'''J
ST
the
and
The
lI.i.,)!
.
4
Repeat
and
day.
the
hour/minute display
automatically
blinking
5
To
set
above
to
Press
the
"-- -"
appears.
return
to
procedures 2 and 3 to
When
date
setting
appears
and
the
.
hour/minute:
set
both
MODE/SEL button
the
"hour"
Proceed
hour
and
minute.
Press
it
once
"Year/Month/Day"
set
month
is
complete
starts
as
more
display.
..
to
--------------------
I
Then sel
ect your
,
1
Press
mo
the
Year/Month/Day
rr~:11
2
Release
reach
preferred
and
hold
re
than 2 sec. The
order
indicated.
'1
:1
...
the
ADJUST
your
preferred
the
ADJUST
Mont
h/D
ay/Yea
1
'1
:'911-+1 : 'i'91
button
display
date
display
display
r D
ay/Month/Year
when
mode
button
for
changes
you
mode.
J
I
.
in
Page 11
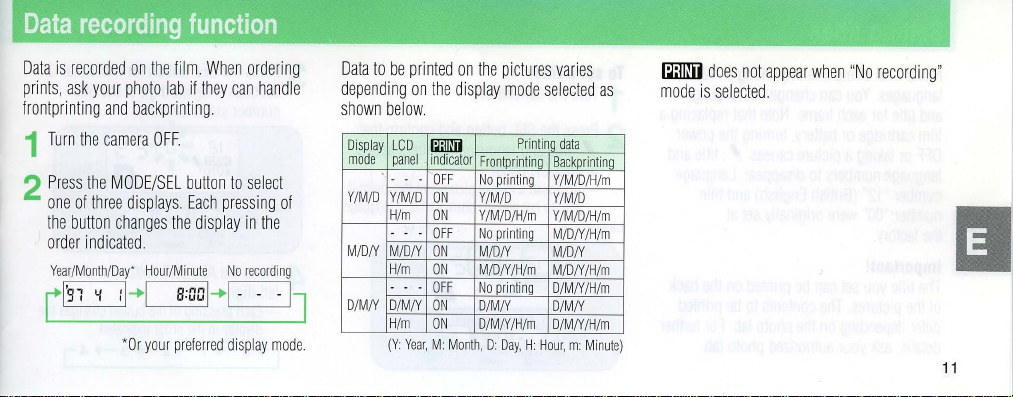
Data
recording
Data
is
recorded
prints,
ask
your
frontprinting
1
Turn
the
2
Pr
ess
the
one
of
three
the button
order
indicated.
Year/Month/Day"
rl
'91
y :1
on
the
photo
and
backprinting
came
ra
OFF.
MODE/S
displays. Each
changes
Hour/Minute
-.1 8:001-.
'
Or
your
function
film.
When
lab
if
they
can
EL
button
to
pressing
the
display
No
1- - -IJ
preferred
display mode.
ordering
handle
select
of
in
the
recording
Data
to
be
printed
depending
shown
Display
mode panel indicator
Y/M/D
M/D/Y
D/MIY
on
below.
LCD
- - -
Y/M/D
H/m
- - -
M/D/Y
H/m
- - -
D
/MIY
H/m
(Y:
Year,
the
~
OFF
ON
ON
OFF
ON
ON
OFF
ON
ON
M:
Month
on
the pictures
display
Frontprinting
No
printing
Y/M/D
Y/M/D/H
No
printing
M/D/Y
M/D/Y/H/m
No
printing
D
/MIY
D/M
IY/
, D: Day,
mode
Printing
/m
H/m
H: Hour, m:
varies
selected
data
Backprinting
Y/M/D/H/m
Y/M/D
Y/M/D/H
/m
M/DIY/H/m
M/D/Y
M/DIY/H/m
D/MIY/H
/m
D/M
IY
D/MIY/H/m
Minu
as
te)
~
mode
does
is
selected.
not
appear
when "No recor
ding
"
11
Page 12
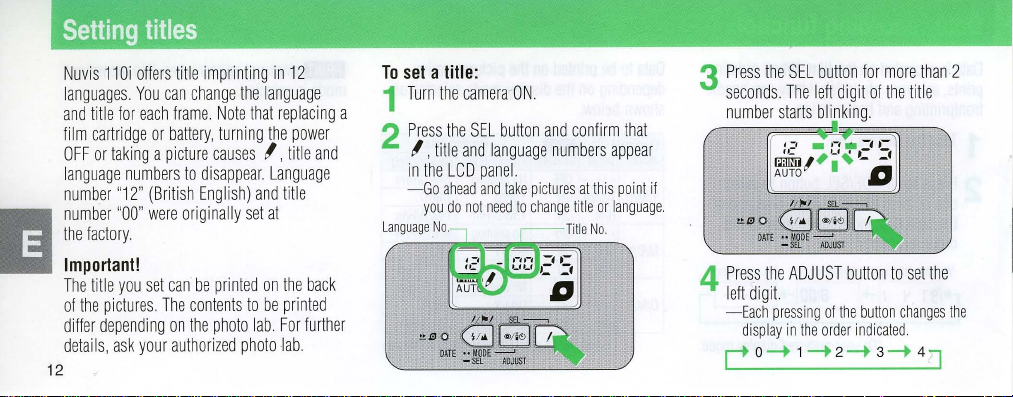
Nuvis
11
Oi
offers
anguages.
l
and
lm
fi
OFF
language
numbe
You
title for
cartridge
or taking a picture caus
numbers
r "12"
number "00" were
the
factory.
Important!
The title
you
of
the
pictures The
d
iff
er
depending
details,
ask
your
12
title
imprinting
can
change the
each frame.
or
battery
, t
to
disappear. Language
(British Eng
originally
set
can
be
contents
on
the photo la
authorized
Note tha
urning
es
lish)
set
printed
to
photo
in
12
language
t r
eplacing
the
power
I ,
ti
tle
and
title
at
on the
be
printed
b. For f
lab.
and
back
urth
er
a
To
set a title:
1
Turn
2 P
ress the S
I ,
in
the LCD
-Go
you
Language
!!:
the
came
EL
ti
tle
and
panel
ahead
and
do
not
need
No.
A~---'
s o
~'~
DA.TE
..
MODE
-
sa
ra ON.
button and
language
take
pictures
to
change title
.
.I
---l
ADJUST
confi
numb
at this
rm that
ers
appear
point
or language.
3
Pr
ess the S
EL
button
for
more
than
seconds. The left
numbe
r starts
if
>!eo
DATE
4
Pr
ess
the A
left
digit
-
Each
pressing
display
r 0
---+ 1 ---+ 2 ---+ 3 ---+
digit
bli
nking
A~--'
~~
••
MODE
---'
-
SEL
ADJUST
DJU
ST
button
of
the
in
the ord
er
of
the
.
I
to set
button
indicated.
title
the
changes
4 J
2
the
Page 13

5 P
6
re
ss
the
d
Pr
ri
- Each
r 0
MOD
igit
of the
title number
:E' -
~I
AU
TO I
ess
the ADJU
ght
digi
t.
press
ing
d
is
play in t
he
--+ 1--+ 2 --+ 3 --+
E/S
EL
button. The right
starts blink
!If
:
~
t;
~
-
IJ
ST
butt
on to set the
of the
button
order indicated
changes
.
...
--+
ing.
the
9J
7 T
ake
a pi
select
ed
ppear in the LCD
a
S
EL
or MODE/S
"
l1J
o~I"/I"1 1
DA
TE ••
cture after co
tit
le
and
language
panel
EL button.
ASEL
~
MODE
....o--.J
-
SEL
ADJUST
•
For
titles
attache
nfi
0
in
d "List
rming
number
by
pre
other
language, see
of
Imprinted
that
ssi
I ,
s
ng
the
the
User Title"
Titles
Title
No.
00
01
02
03
05
06
07
08
09
10
11
12
13
14
15
provided
for
Titles
Christmas
Birt
hday
Vacation
H
oneymoon
Wedding
Hanukkah
Graduation
Family
Party
Holiday
Anniversary
Fr
ien
ds
S
choo
l Ev
Tri
p
Love
You
I
Thank
You
American
ent
English
(language
Titte
Title
No
.
Seaso
16
17
H
Congratulatio
18
19
Merry Christmas
20
Fest
21
First
22
To
N
23
24
East
H
25
26
Reunio
27
Fat
M
28
29
M
30
B
s
n's Greetings
appy
Birthday
iva
l
day
ur
ew
Year's
er
appy
New Ye
n
her's Day
othe
r's D
emories
aptis
m
number
13)
ns
of
School
ar
ay
13
Page 14
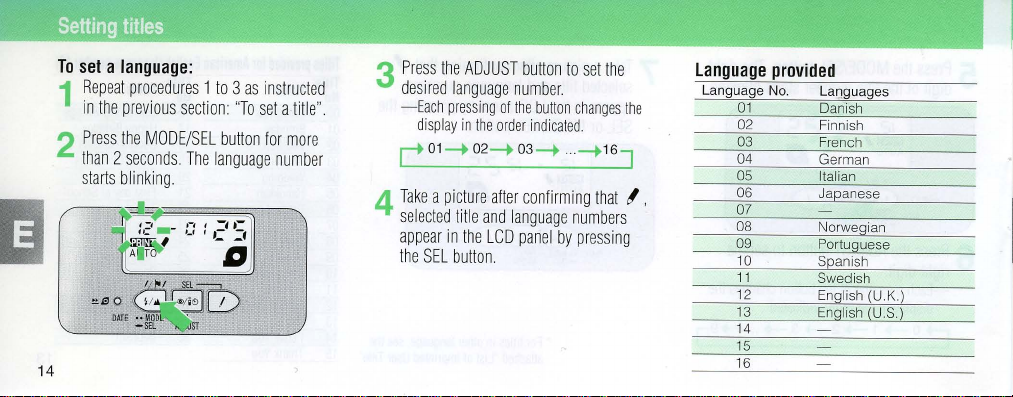
To
set a language:
1
Repeat procedu
in
the
prev
ious
2
Press the
MODE/SEL butt
than 2 seconds. The language
sta
rts
blinking
~
~d~
~~~~
,-, ,
..
jC
_ -'_' I
I~:/
~
2eoGl~0
DATE
••
MODI::
-
SEL
14
res
1 to 3
section
-, , -1.-
,-
-&I
•
uST
as instructed
"To
set a title".
on
for
more
numbe
~
-.
3
Pr
ess the
ADJUST
button
to
set
desi
red language number.
-Each
pressing
of
the
displ
ay
in the
r
r 01-+02-+03
4
Tak
e a
picture
selec
ted title
appear
in
the SEL
the LCD
button.
button
order
indicat
-+
after confirming th
and language
panel
changes
ed.
... -+16
numbers
by
pressing
the
at
the
J
I ,
language
Language No. Languages
provided
01
02
03 French
04 German
05
06
07
08
09 Portuguese
10
11 Swed
12
13
14
15
16
Danish
Finnish
Italian
Japanese
Norwegian
Spanish
is
h
English
(UK)
English (U.S.)
Page 15
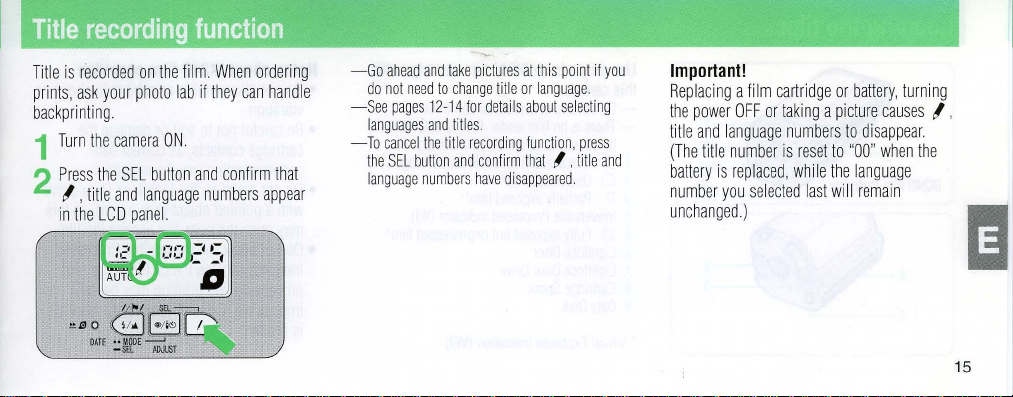
Title
recording
T
itle
is
recorded
prints,
ask
your
backprinting.
1 T
urn
the
2
Press
the
I ,
title
in
the
LCD
function
on
the film.
photo lab
camera
ON.
SEL button
and language
panel
and
When
if
they
can
confirm that
numbers
ordering
hand
le
appear
-Go
ahead
do
not
-See
pages
languages
-To
cancel
the
SEL
language
and
need
to
12-14
and
the
button
numbers
take
pictures
change title
for
details
titles.
title
recording
and
confirm
have
at
this
point
or
language
about sel
ecting
function, press
that
I ,
disappeared.
title
.
if
and
you
Important!
Replacing
the
ti
(T
battery
number
a film
powe
r OFF
tle
and language
he
title number
is
replaced,
you sel
unchanged)
cartridge
or
taking
numbers
is
reset
while
ected
or
battery, turning
a p
ictu
to
disappear
to
"00"
the language
last will
remain
re
causes
when
I ,
the
A~
,,-
e o
~~
DATE
..
- sa
MODE
---'
AOJUST
----'
[[!;l
15
Page 16
16
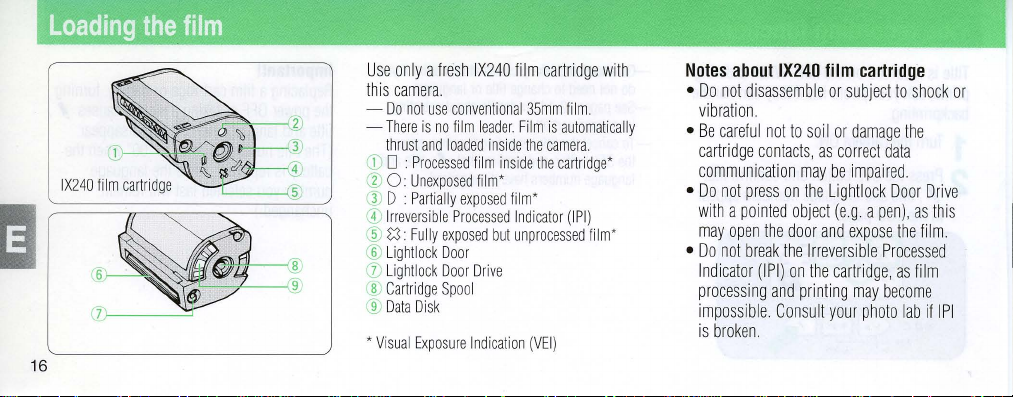
Use
only a fresh
th
is c
amera
- Do
not use
-
The
re
is
no
thrust
and loaded
.1 D : P
rocessed
2
0: Unexposed
3 D :
Part
Irreversible
Ful
Li
ghtlock Door
Ligh
tlock Door Drive
Cartridge
Data Disk
Visual
Exposure
ially
ly
4
~. ~:
S'
7
8
~
*
IX240 film
cartridge
.
conventional
film leader.
exposed
Processed Indicator (IPI
exposed
Spool
Film
inside the
film
inside
film*
film'
but
unproce
Indication
3Smm
camera.
the cart
(VEl)
fil
m.
is
automatical
ridge*
)
ssed fil
with
m*
Notes
about
IX240
film
cartridge
•
Do
not
disassemble
v
ib
ratio
ly
• Be
ca
cartridge
com
•
Do
not
n.
reful not
contacts,
muni
cat
press
with a pointed obj
may
open
the
not
break
• Do
In
dicator
(IPI)
processing
impossible
is broken
.
or
to
soil
or
as
correct
ion
may
be impaired
on
the
Lightlo
ect
(e.g a pen),
door and
the Irreversible
on
the
and
cartridge,
printing
Consult your
subject
to shock
damage the
data
ck
Door
expose the
Proce
as
may
become
photo
lab
Drive
as
this
film
ssed
film
if
or
.
IPI
Page 17
•
Do not
attempt to
Spool with a pOinted
screwdriver). This
alter the VEl, or
prevent proper
processing.
•
Do not
store
direct
sunlight, near
dirt
hot
or
humid
strong
the film cartri
or
dust
moldy
magnetic
- In
in a hot place.
-Around
-In
-Near
rotate
the
object (e.g. a
can
expose
heating
environments
devices
Cartridge
the film,
use
dge:
appliances
and/or
or
Processing
We recommend
a
photo
L
ab
and
lab
displaying the
Mark" sign
bringing
for
printing
your
film cartri
"Authorized Photo
processing
and
dge
printing.
to
Authorized
following
1 3 di
2
3
4
services
llerent pri
Date/time
Index
Prin
exposed
on
Negative
Your
negatives
cartridge for
For
further detai
pr,oto lab.
Photo
labs
nt types (C, H
and
title printing
ts
(small
the
roll
Return
in
are
easy
ls,
ask
offer
:
images
of film)
Cartridge
returned
storage.
your
authorized
the
or P-type).
of
each
frame
(NRIC)
inside
the
Authorized Pho
to
Lab
Mark
17
Page 18
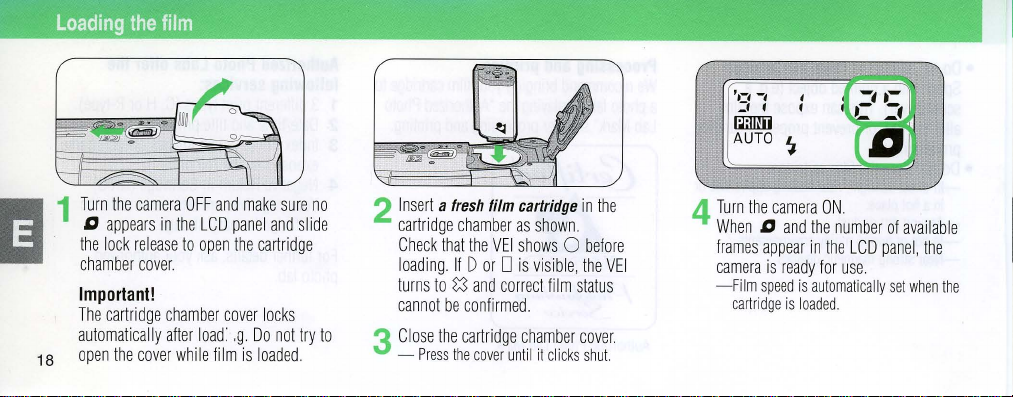
Loading
Turn
D
th
chamber
Important!
T
he cartrid
automatically aft
open the
18
the
the came
appears
e l
ock
film
ra
OFF
in the
LCD
release to
cover.
cover while fi
ope
ge
chamber cove
er
load
and
make sure
panel
n the
: ,g Do
lm is
and slid
car
tridg
r l
ocks
not try
loaded.
e
no
e
to
2 I
nsert
cartridge
Che
loading
turn
cannot
3
Close
-
a
fresh
ck
that
If D or D is
s to
S3
be
the cartridg
Press
the
----------------------
film
chamber
the
VEl
and
correct
conf
irmed.
e ch
cover
until
cartridge
as
in the
shown.
shows 0 before
visible,
the VEl
film statu
s
amber cover.
it
cl
icks
shut.
4
Tu
rn the camera
When
frames
came
- F
cartridge
D and
ra
ilm
appear
is
ready
speed
is
is
loaded.
ON.
the
number
in the L
CD
for
automatically
panel, th
use,
of
available
set
when
e
the
Page 19
Basic
operation
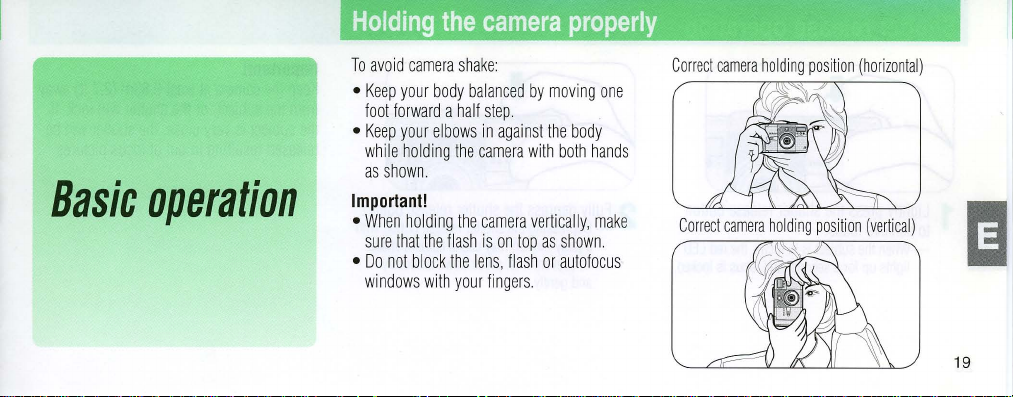
Holding
To
avo
id
camera
•
Keep
your
foot
•
Keep
wh
as
Important!
•
When holdi
sure
• Do not
windows
body
forward
your elbows
ile
holding
shown.
ng
tha
t the flash
block
with
the
camera
shake:
balanced
a ha
lf
step
in
against
the
camera
the
camera
is
on t
the lens,
your fingers.
by
the body
with
vertically,
op
as
flash or
properly
movi
ng
one
both
hands
make
show
n.
autofocus
Correct
camera
Correct
holding
camera
holding
'
0:::
position
position
,,\,
(horizontal)
(vertical)
19
Page 20
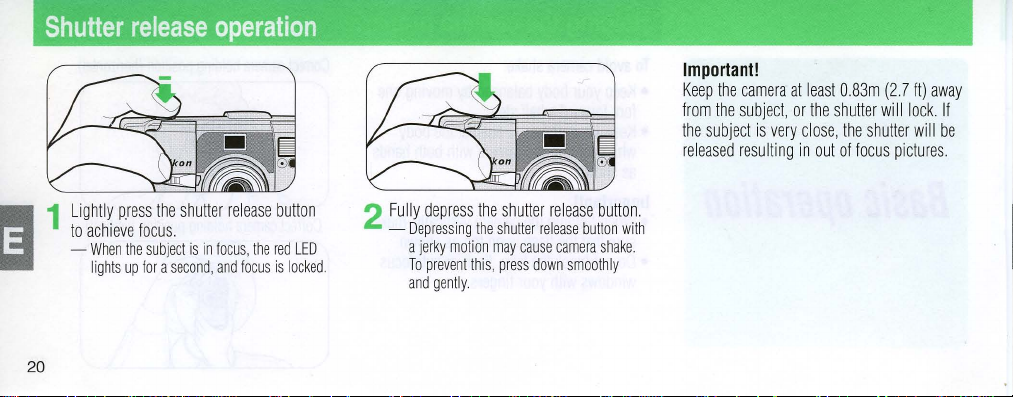
Shutter
Lightly
to
-
20
release
press
achieve
When
the
lights
up
the
shutter rel
focus
.
subject
is
in
for a second,
operation
ease
button
focus,
the
red
focus
LED
is
locked.
and
2
Fully
depress the shut
-
Depres
a
jerky
To
prevent
and
gently.
sing
the
motion
this,
shutter
may
cause
press
ter
rel
release
down
ease
button
camera
smoothly
button.
with
shake.
Important!
K
eep
the
camera
f
rom
the
subject,
the
subject
released resu
is
ve
lting
at
least O.83m
or
the shut
ry cl
ose, the shutt
in
out
ter will
of focus
(27
tt)
lock.
er
will be
pictures.
away
If
Page 21
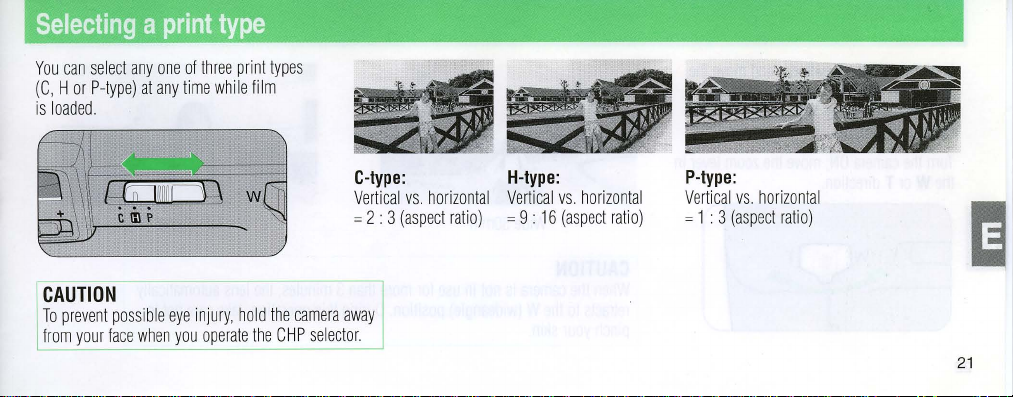
Selecting a print
You
can
select
anyone
of thr
(C
, H or
P-type)
at
any
time
is loaded.
CAUTION
To
prevent
possib
le
eye
injury,
from
your
face
when
you
operate
type
ee
print
while
film
hold
the CHP
types
the
came
C-type:
Vertica
= 2 • 3
ra
away
selector.
l
VS.
horizontal Ver
(aspect
ratio)
H-type:
tica
l
= 9 •
16
VS
.
horizontal
(aspect
ratio)
P-
type:
Vertical
= 1 • 3
VS.
horizontal
(aspect
ratio)
21
Page 22
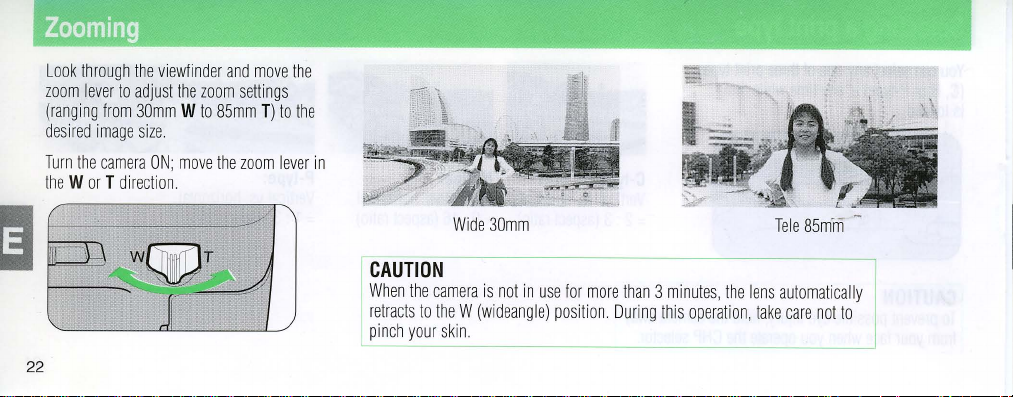
Look
through
the
zoom
lever
to
from
image
the
camera ON;
adjust
30mm W to
size.
(ranging
desired
Turn
the W or T direction.
22
viewfinder
the
zoom
8Smm
move
the
and
move
settings
zoom
T)
the
to
the
lever
in
I
CAUTION
When
the
camera
I
retracts
to
pinch
your
Wide
30mm
is
not
In
use
the W (wideangle)
skin.
position.
for
more
than 3 minutes,
During
this
operation, take
the
lens
automatically
care
not
to
-------'
Page 23
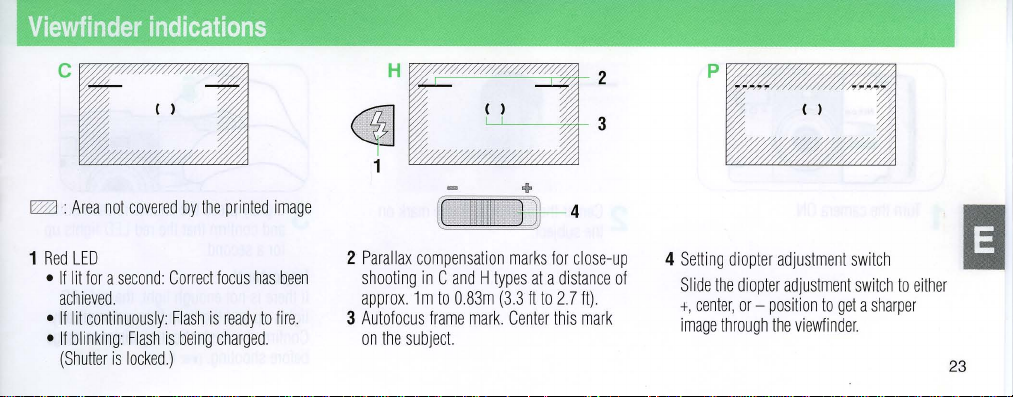
Viewfinder
indications
p
IWl :
1
Red
• If
•
• If
Area
LED
lit
achieved.
If
lit
blinking:
(Shutter
not
covered
by
for a second Cor
continuously: Flash
Fla
is
locked.)
sh
is
being
rect
the
focus
is
charged
printed
has
ready
to
imag
fire.
.
e
been
2
Parallax
shooting
approx
3
Autofocus
on the
[
!~11111
compensation
in C and H types
1 m
to
O.83m
frame
subject
mark.
'*'
+t-4
marks for close-up
at a distance
(33
It
to
2.7
It).
Center
this
mark
of
4
Setting
diopter adjustm
Slide the
diopter
+,
center, or -position
image
through
ent
adjustment
to
the view
find
switch
switch
to
get a sharper
er.
either
23
Page 24
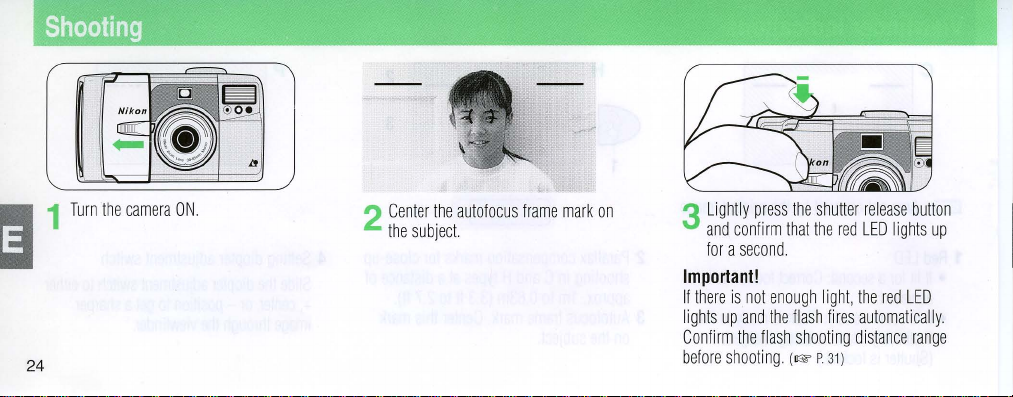
24
Turn
the
camera
ON.
2
Center the
the
subjec
autofocus
t
frame
mark
on
3 Li
ghtly
press
and con
firm
fo
r a
secon
Important!
If
there
is
not
l
ights
up and the
Confirm the
before
shooting.
the
that the
d.
enough
flash
flash
shooting
(1& P 31)
shutter
red
light,
fires
distance
release
button
LED
ligh
ts
the
red LED
automatically.
range
up
Page 25

4
Gent
all
the
ly
depress
way
the
shutter release
to
take a picture
How
to
use
focus
To
ensure
proper
focus
not
in
the
cente
r of
the
frame, use
button
.
1
Center
the autofocus
the
subject
when your
frame
lock
main
subjecl
focus
lock.
mark
on
is
~..
Lightly
2
-Make sure
second.
l
pressed
Important!
Be
distance
release
ong
sure
press
Focus
as
the
halfway.
not
to change
after
button
""
the
that
the
is
shutter
lightly
to
' ,
, ;
_I ~ ''''
shutter
release
red
LED
lights
locked
on
the
release
button
sUbject-to-camera
pressing
the
achieve
focus.
,;.
' .
....
::
.,,"'.
button
up
for
subject
is
shutte
as
.
a
;1
r
"""",
25
j
J'~
II!!I
iii
Page 26

26
How
3
Keeping
pressed,
fully
to
use
depress
focus
lock
the
shutter release
recompose
the
shutter release
the
button
scene.
lightly
Then
butto
n.
Special
T
he fol
lowing
to
focus
•
Subjects
autofocus
•
Dark
subjects with
• Gl
ossy
shiny
cars
•
Subjects
fl
ame,
fireworks;
•
Secondary
camera
In
the
above
on
another
and
follow
focusing
subjects
too
frame
light-reflecting sur
or
without
subjects
than
cases, use focus lock
subject
the
procedure
may
small
to
mark.
no
water.
solid
etc.)
are
the
main
equidistant
situations
be
fully
reflection.
content
closer
subject.
in
too difficult
cover
faces,
(ie
to
by
from
the
this
section.
the
such
candle
the
focusing
camera
as
Removing
At
the
end
of
the
rewinding
-The
film
film
automatically
frame
counter
is
completely
the
film
roll, the
counts
rewound.
film
starts
backwards
until
the
Page 27

To
rewind
You
can
the
roll.
rewind
the
the
film
midway
film
through
in
mid-roll
Important!
N
ote
that
if
you rew
ind
having
taken a sing
still usable. However if
been
taken,
the f
ilm
le pi
is
the film
cture, the
even
one picture
no
longer
without
film
is
usable.
has
Remove the fi
etter
"E"
is
l
lm
after
visible
confirming
in
the
LCD
that the
pane
l
Pr
ess the
mid
-ro
ll
rewi
dedicated
-When
rewind
appears
stud
in
the
on the
is
LCD
nd button
strap
completed, the
panel.
using the
letter "E"
27
Page 28

28
Advanced
operation
Red-eye
In
flash
photography, the
sometimes
"
red-eye
Important!
Red-eye
c
ancel
appear bright
" ef
fect, use
reduction
and inf
inity
redyction
subject's
red.
To
this
mode
.
does not work
focus
modes.
mode
eyes
may
reduce
the
with flash
..
.',.
1 T
2
-
~
~~
urn
the
came
Ii
~
bu
ane
press
confirm
inu
ously, then
ra ON and
tton
l.
the
that
@ /
the LCD p
Lightly
and
cont
shutter release
<
unt
il @ appears
shutter
the
red
fully
button
to
press
the
release
LED lights
depress
take
the
~, • ~-
in
button
up
the
picture.
Page 29

-The
red-eye
second
Important!
To
cancel the red-eye
the
@ /ii
from
canceled
• T
he
after
operation.
reduction
before
~
button
the
LCD
panel.
by
turning OFF the
red-eye-reduction
self-timer
lamp
the
operation
lights
shutter
is
released.
reduction
until @ disappears
This
mode
power
mode
or
remote
mode,
cannot
is
up
for
a
press
be
switch.
canceled
control
Use
the
self-timer when
yourself
in
the
of
remote
control
Important!
Place
the
camera
flat
surface.
picture,
range.
on a tripod
you
or
if
the
want
to
include
camera
or a secure
is
out
Press
appea
the
rs
@ /li
in
the LCD
~
button
panel.
until
@
Iii
~
II!I
iii
29
Page 30

-------
Self·timer
2
Each
changes the di
indicated.
L @
@ .
@
iii
~.
30
operation
pressing
of
the
splay
in
---.
@
iii
~
Red-eye
reduction
Remote
control/self-timer indicator
(lIE P
34)
self-timer
the
order
---.
canCel
indicator
button
(lIE P
Infinity
U
seful
scenes thr
canceled
]
28)
3
Compose
the shutt
-The
-To cancel
self-timer
sec,
then lights
shutter
power
the picture
er
release
indicator
is
released.
self-timer
switch
OFF.
and fully depress
button.
lamp
for 2 sec.
operation,
blinks
before
turn
up
for
the
the
8
1
2
for
shooting
ough glass.
in
this
Press the
appears
Fu
lly
depress the
focus
landscapes, or
mode.
'1
/ iii
button
in
the
LCD
shutter
Flash
until
panel
distant
is aut
omatical
@iIi
release
ly
button.
Page 31

--------------------
-------------------
Flash
With
the
camera
button
to
photography
turned
ON,
press
select
the
desired
flash mode
the
AUTO 'I :
Important!
Before
shoo
ting
with
subject
flash, make
is
withi
n f
lash
shoo
ra
nge.
Ref
er
to
the fol
lowing
(ISO
200)
w
(30m
m)
approx 0.83
(27
to
23.3
T
(85mm):
press
mode
approx 0.83
(2.7
to
9.5
ing
of
the
'1
in
the order indicated.
/
j,l
'1
/
j,l
.
E
ach
the
flash
It)
to
It)
button
ting
guide
to
7.
2.9m
sure
the
distance
1 m
chan
ges
Auto flash
@ ~ : I
® :
Fl
~
:
Anytime fla
~~J~ ~:
Auto flash with
nfinity
ash
(lIE P
focus
cancel
sh
32)
(lIE P
(lIE P
(lIE P
slow
30)
32)
33)
sync
(lIE P
34)
31
Page 32

The
default
is
ideal
camera sen
low
and autom
Auto
flash
whenever
Make
LCD
panel
32
for
you
sure
flash
mode,
general
photography: The
ses
when the
atically
mode
is
turn
the
that
AUTO
auto
flash
ava
ilable ligh
fires
the
flash.
automatically
camera
~
is displa
activated
ON.
yed
in
mode
t is
the
To
select
mode,
AUTO
'I
Auto
mode
simply
press
appears
in
the
when
the
LCD
in
'1/'"
panel
another
button
flash
unt
Use
the
flash
cancel
mode
to
achieve a natural
lighting
effect
in
portraits
and
night
scenes.
il
1
Press
the
'1/'"
button
in
the
LC 0 panel
until @ appears
Page 33

2
Lightly
press
and
confirm
for a second, then
shutter
release
Important!
Since
the
shutter
speeds
to
prevent
the
that
the
button
camera
in
camera
shutter
red
fully
depress
to
tends
this
mode,
shake.
release
LED
take
to
select
use a tripod
button
lights
the
the
picture.
slow
up
In
this
mode,
the
enabling
you
to
when
shooting a subject
background
1
Press
the
LCD
or
the
panel.
'1/;;'
flash
fires
every
achieve a fill-flash
against a bright
in
shadow.
button
until
'I
time
,
effect
appears
in
2
Lightly
and
confirm
fully
depress
to
take
press
the
picture.
the
that
the
shutter
the
red
shutter
release
LED
is
release
button
on,
then
button
33
Page 34

Slow
Use
subject
lig
ht
34
sync
this
mode
to cor
and
background
scenes
.
Important!
Since
the
camera sel
speeds
in this
avoid
camera
flash
mode
rectly
expose
in
night
and
ects
slow
shutter
mode, use a tripod
shake.
both
low
to
main
1
2
Press
in
the
Light
ly
and
confirm
fully
depress the
the
'1
/
Ai
LCD pane
press
the
that
button
l.
shutter
the
red
shutter
unt
il
~~J~
'I
appears
rel
ease
butto
LED
is
on, then
release button.
n
Remote
In
self-timer mode, this opti
gi
ves you
1 P
appears
-You
- To
ress
in this
or turn
control
control
the
@ /il
in the L
can
take
mode
cancel,
press
the
camera
over
~
CD pane
as
.
photography
onal device
shutter rel
many
the
OFF.
bu
tton un
pictures
@ /il
l.
ease.
til
as
~
button
@
you wish
il~
again
Page 35

(optional)
.
-Remote
-If
Important!
• Place
• R
•
not
in
use
the
reception
exposed
the
remote
In
this
case
the
emote
When
the
Do n
ot
control
to
control extends
replace the
will
be
more
direct
control
use
camera
battery
automatically
than
3 mi
sensor
on
sunlight
unit
will
the
self-timer mode instead.
on a tripod
is
exhausted,
battery
nutes.
the
camera
or
other
not
up
to
yourse
canceled
is
strong light
operate
properly.
or a secure
approx
it
can
lf
if
,
flat sur
Sm
(16.4
be
replaced
2
Compose
face.
It)
while
at
a Ni
facing
kon
service
the
the
picture
came
center.
ra .
3 Aim
came
r
elease
-The
2
the
remote
ra
and
button.
indicator
sec.
before
control
press
the shu
lamp lights
the
shutter
unit
at
the
tte
r
up
for
approx
is released.
II
35
Page 36

Camera
•
Turn
avoid
resulting
•
Avoid
hot
places
beach
• All
ow
continuous
heat
•
The
temperatures
the
camera
36
care
the
camera
accidental
battery
leaving
such
or
near a heater.
the
camera
flash
in
battery
camera
may
warm
tips
OFF
release
drain.
the
camera
as
the
to
firing
and
camera.
not
(below
.
when
of
interior
cool
off
Overuse
work
0 °C
not
in
use, to
the
shutter
in
excessively
of a car
after
generates
properly
or
32
OF)
and
, a
at
low
Keep
Do
not
drop
•
hard
precision
revent foreign
• P
the
and
dry cloth.
•
Use a blower
lens.
with
windows
•
Never
agents
or
surface
as
mechanism
camera. Immediately
dust
from
to
If
necessary,
lens
cleaner.
with a soft
use
thinner, benzene, or
hit
the
it
may
matter
the
camera
remove
use a cloth
Clean
camera
damage
.
from
wipe
with a soft,
dust
the
cloth.
against
the
getting
inside
salt,
sand
from
the
moistened
autofocus
other
active
a
•
Store
the
camera
prevent
mold.
chemicals
naphthalene.
desiccating
•
If
the
camera
take
it
out
and
fire
the
in a cool, dry
Do
not
as
camphor
We
recommend
ing
is
not
used
expose
storage.
for a long
times.
such
agent dur
regularly, release
flash a few
it
and
using
the
place
to
to
a
time,
shutter
Page 37

Notes
on
batteries
•
Battery
power
temperature
will
recover when
to
normal.
temperatures,
Be
sure
•
to
ones
or
carry
important
is
apt
drops
the
When
taking
keep
replace
spare
pictures.
to
weaken
below 0 °C
temperature
pictures
the
battery
batteries with
batteries
when
as the
(32
returns
at
warm
fresh
OF)
It
low
.
taking
For
Canada
This
digital
apparatus
(Class
B)
limits
from
digital
I
nterference
Department
does
for
radio
noise emi
apparatus
Regulations
of
set
out
of
Communications
not
exceed
in
the
the
Canadian
.
the
ssions
Radio
CAUTION:
A
characteristic
In
rare
cases, when
applied
to
the
camera
camera
may not
to
reset the
is
replaced,
the
battery
work
happens, remove
Remember
the bat
tery
every
time
of
electronic
strong
from
properly
the
battery
date
as
is
removed.
static
electricity
outside,
If
this
and
reinstall
and
time
settings
cameras
is
the
it.
when
are
erased
I!
Iii
37
Page 38

Type
Usable
Information
system
Print
lens
lens
Shutter
Focusing
38
·
'cations
of
camera
film
exchange
aspect
ratio
cover
IX240
(Advanced
shutter
camera
IX240
(Advanced
Magnetic
Information
C,
Hand
P-type
30mm
F/3.8-85mm
35mm
type); 5 elements
Open
and close
Programmed
Infrared-active
shutter
infinity;
locked
Shutter
0.83m
release
Max.
as
long
release
(
2.7
ft.);
electronic
magnification
Photo
System)
Photo
System)
Exchange
available
F/9.5
to
turn
the
shutter;
autofocus
button;
Range
as
shutter
button
locks
Infinity
focus locks
type
film
(Mag.
(375mm-1
in 5 groups
power
ON/OFF
also
system;
Activated
from
approx
approx.
release
button
when
the
autofocus
cartridge
IX)
system
06mm
serves
as
by
0.83m
0.11x
at
is
lightly pressed;
subject
at
infinity
AE
lens-
(167 x 30.2mm)
converted
to
diaphragm
blades
lightly
pressing
(27
ft.)
is
Focus
closer
to
is
than
85mm;
Viewfinder
Viewfinder
Exposure
Auto
exposure
Fifm
speed
Fifm
operation
Frame
counter
information
controf
range
setting
Porro
prism
real-image
approx.
more
than
0.5x
magnification
adjustment:
C/H/P-type image
parallax
ready-light/in-focus
focused;
Electronically
ISO
200
ISO
50, 100,
Drop-in
available; Film
inserting
after
each
rewind
Shown
75%
at
-1.0
to
+O.5DP
size
compensation
Lights
continuously:
controlled
EV8-15
at
200,
400, 800
loading
system;
is
automatically
cartridge; Film
shot;
Auto
function
available
in
the
LCD
pane
zoom
viewfinder;
for
H-type
approx.
(3
steps)
frame
marks
marks);
Autofocus
flash
program
and
Double
thrust
automatically
at
the
l;
Count-down
1600
printed
1.2x
(C-type
ready;
AE
Exposure Prevention
end
30mm,
indicator)-Lights
30mm, EV9.6-16
rewind
frame
coverage
image
area;
at
85mm;
and
H-type
frame;
Red
for a second:
Blinks:
flash
at
85mm
film
automafically
to
the
first
advances
by
of film
roll
typ
e
approx.
diopter
LED
subject
frame
one
; Mi
with
(flash
charging
set.
(DEP)
after
frame
d-roll
Page 39

Self-timer
Remote
option
al
Buill-in
flash
Red-eye
mode
control
accessory
reduction
Electronically
button;
Infrared
Automatically
wi
is
27 x 60 x 10
approx.
Four
flash
Fl
approx. 0.83-2.9m
release
Recycling time
Red-eye
10
wireless
thin app
available
13g
flash
and
ash
shoo
button
reduction
controlled;
sec.
durat
remote
canceled
rox.
Sm (16
for
approx.
mm (1.1 x 2.4 x 0.4
(0.5
oz)
modes
Slow
sync
ting
range:
is
locked
approx. 6 sec.
Activated
ion;
One
shot
control
after 3 min. if
ft.)
stra
ight in
10
years; Dim
available: Auto
flash; Guide
approx.
0.83-7.1m
(2.7-9
.5
ft.)
during
lamp
lights
up
by
depressing
operation;
; 2
sec. del
not
front
ensions
in.);
Weight
flash, Flash
number
at
8Smm
\lash
battery
for
approx
Cancelable
ay
shutter
used;
Effective
of
the
camera;
(Wx
(with
cancel,
17
(ISO
(2.7
-23.3
(ISO
200);
recharging;
. 1
sec.
shutter release
release;
range
Battery
HxD
):
approx.
battery)
:
Anytime
200
in
meter)
ft.) 30mm,
Shutter
before
flash
fires
is
;
Battery
life
Power sou
Data/tille
function
Dimensions
Weight (wl
Specifications
Specifications
rce
recording
thoul
(Wx
HxD
battery)
apply
and
design
when a fresh
Approx.
17
rolls
exposures
One
3V
lithium
Date
displaying
Year/Month/Day,
Day/Month
/Year or
Y
/M/D/H/m,
printing
(Y:
year, M month
cycle with
no
cl
ock
with
timing
source
is
the
languages
)
Approx.
121 x 67 x 47mm
Approx.
260g
battery
are
subject
to
of
2S-exposure
battery
in
the LCD
Hour/Minute, Month/Day/Year
No
M/D/Y, M/DIY/H/m,
AM/PM;
accuracy
same
as
(9.2
oz.)
is
used
change
film
with
(CR123NDL 123A)
panel with
five
record
ing; Da
te pri
D/M/Y, D/MIY/
, 0:
day, H hour,
leap
year adjustment
within
±90
the cam
at
without
sec. a month;
era
body
; I
(4.8 x 2.6
x 1
norma/temperature
notice.
flash
choices:
nting
m:
until
mprin
.9
in.)
for
half
,
: Y
/M/
H/m,
minute);
2030;
Power
ting of
(20°C
of
D,
or
Built-in
titles
or 68°
all
No
24-hour
in
12
F).
39
Page 40

Muchas
manual de
mana
Su
nueva
siguientes
•
Muy
• 3
diferentes tipos
Mecanismo
•
•
Conveniente
~
EI
productos
40
gracias
por
instrucciones ant
hasta
que
se
camara
Nikon
caracteristicas:
sencillo, solo
para
impresion
simbolo
del
IX240.
su compra de
haya
fam
utiliza
tiene qulf
de
impresion
evitar
una
doble
de
la
Sistema
fotografico
la
camara
es
de
utilizarla
iliari
zado
con
el
Sistema
fotografico
'I
·
colocar
la
pelfcula
en
un
mismo
exposicion
fecha/hora y titulo
de
adelantada
Nikon
por
primera
el
nuevo
avanzado
para
cargarla
rollo
de
pelicu
accidental
es
una
Nuvis
11
Oi.
Lea
vez, y guardelo
sistema
descrito a continuaci6n.
(Sistema
la
marca
/X240)
registrada
fnteg
en
de
ram
que
todos
un
tiene
ente
lugar
los
el
las
a
Haga
algunas
Antes
de
hacer
algunas
de
camara y todas
prueba
folos
de
fotograffas
para
familiarizarse
sus
caracteristicas.
prueba
importantes
con
haga
la
Page 41

Cuerpo
de
•
No
desarme
camara
ya
tension
que
•
No
toque
del
circuitos
producir
•
No mire
visor;
directamente
las
flash, si
de
descargas.
directamente
una
fuente
podrfa
objetivo
puede
permanentes.
la
camara
ni
haga
que
contiene
pueden
partes
se
averfa,
alta
de
luz
daiiarle
hacia
causar
modificaciones
circuitos
producir
metalicas
ya
que
tension
que
hacia
intensa
, a
la
retina.
el sol a
traves
lesiones
en
de
alta
descargas
del
interior
contiene
pueden
el
solo
hacia
traves
del
Mirar
del
oculares
la
•
No
transporte
un
trfpode,
cafda.
• Si. sale
Flash
No
persona
oculares.
humo
utilizarla
Espere a que
antes
de
local
.
incorporado
dispare
·;
podrfa
la
camara i nstalada
para
evitar
lesiones
de
la
inmediatamente y apaguela.
Ilevaria
el
camara, deje
se
haya
al
concesionario
flash
cerca
ocasionarle
enfriado
de los
sobre
en
de
10
suficiente
Nikon
ojos
lesiones
caso
de
de
una
Pila
•
No
tire
al
fuego
cortocircuite, desarme
podrfa
Mantenga
•
niiios.
una
pila,
medico.
Nik
on
no
funcionamiento
Nuvis
11
Oi
este
manual.
las
explotar y causar
la
pila
En
se
fuera
caso
de
acuda
inmediatamente a un
responsabiliza
provocado
de
formas
pi
las
usadas.
ni
calie
lesiones
del
alcance
ingestion
accidental
del
por
no
especificadas
nte
mal
el
uso
No
la
.
de los
de
pila;
de
la
en
II!I
IiiiI
41
Page 42

Prefacio
ADVERTENCIA:
I
ndice
Elem
entos
Preparacion
Colocacion
Colocaci6n
Conexion/desconexion
Verificacion
Ajuste
Fu
ncion
Seleccion
Funcion
Carga
de
Manejo
Modo
de
Funcionamiento
Selecc
42
ion
U
tilizacion del
...............................................................................................
para
un
manejo
seguro
de
la
camara
.......................................................................................................
de
la
camara...
....
para
de
la
correa
de
la
pila
de
la
de
carga
fecha y hora.......H
de
registro
de
titulos'H'
de
grabacion del
la
pelicula............H
basi
co
.....
sostener
la
del
del
tipo
de
zoom
..................................
tomar
fotogralfas
...................................... . ....................
de
la
camara
de
la
pila.
de
datos.
.. .
titu
lo
.. :.......
.......
camara
correctamente
boton
de disparo del o
impresion
...
H...........
.........
..H
...............
......
...................
H..................
H...
...
. . .
H .......
............................
..........................
.................
bturad
...
....
....
........................
... .
...................
. .
or
..........
........................
..........................
.....................
........
......
.... .......... .41
.
........
....
..........
...............
...
....
.......
.............
............. 54
..........
..........
............
H ..
.........
40
Indicaciones
T
oma
de
42
.43
.46
..46
..46
..
..47
.47 Enfoque a infinito
..48
..49
50
.53
.57
57
.58
.59
..
60
fotografias
Utiliz
acion
ion
de
reduccion
Modo
de
Modo
de
Modo
flash
Modo
flash
on
Consejos
Notas
sobre
del bloqueo
de
con
flash
cancelacion del
con
segura
Extracc
Rebobinado
Funciones
Modo
Funcionamiento
Fotografia
Fotografia
Utilizaci
Especificaciones
en
el
visor
..........
..
..
H..........
del
la pelicula ...........
de
la pelicula a mitad del
avanzadas
flashH
de
con
mando
para
las pil
enfoque.
.........................
de
ojos
del
automatico'H"
toda
........................
rojos.H........
autodisparador..
........H.
..........
flash
ocasion
sincronizacion
a d
istanc
de
la
camara...H
el
cuidado
de
as
.. ..
H.
... ...... .
. . .
.....
..... ...... .
H..............
rollo.
.....
.............
.............. .
...
..............
.................................
lenta
ia
(opcional)
la
camara
................ . ..
..................
. .
.
......H
.......................
..........................................
.........................
..... H .............
.. .. H.
....
. .
............
...
....
......
.......
.
.............
.................
.........................
.
...................... 69
.....................
...........................
.... . .......
..... 66
.
...........
..
....................
70
..
70
....
....
.....
.
.......
..............
.71
.72
.74
.74
.75
.76
61
62
63
64
65
66
67
68
72
Page 43

1
-----,
2
--
4
---
r--~-------------
"")
"
-\
tfW)
'----
5
9
1
Sensor
2 F
lash
3
Ventanilla
4
Boton
5
Indicador
(I&'
6
Ventanilla
7
Interruptor
8
Ventanillas
9
Argolla
de
recepcion
(I&'
pagina
del
de
disparo del
de
reduccion
paginas
66,67,68,73.)
del
principal/tapa
de
para
la
del
69)
visor
obturador
medidor
enfoq
ue automatico
correa
(I&'
mando a distancia
(I&'
de
ojos
de
exposicion
del
pagina 58.)
rojos/autodisparador
automatica
objetivo
(I&'
(I&'
pagina
46)
(I&'
pagina
pagina
pagina
47.)
57.)
73.)
43
Page 44

Elementos
10
11
12
16
44
17
18
22
23
10
Qcular
LED
rojo
11
(1&
paginas 58,61.)
Conmutador
12
Boton
13
(Bot6n
Boton
14
Boton de
15
autodisparador
(1&
paginas
Rosca
16
Selector
17
Palanca
18
Pantalla
19
Tapa
del
20
Boton
21
Tapa
del
22
Palanca
23
del
visor
(indicador
de
modo
MODE/SEL)
de
rebobinado a mitad
reduccion
para
CHP
del
de
compartimento
de
seleccion
compartimento
de
de
de
dioptrias
flash/enfoque a infinito
(1&
de
@/
ii ~ lajuste
48, 51,66-68,
tripode
(1&
pagina 59.)
zoom
(W y T)
cristalliquido
(SEL)
apertura
del
compartimento
enfocado/flash
(1&
pagina
listo)
61)
'1/
paginas
48-51,68-72)
del
rollo
ojos
de
del
'f1&
(1&
la
(1&
(1&
rojos/mando a distancia
del
titulo
pagina
pagina
(1&
paginas
(1&
del
cartucho
(Baton
60.)
45)
pagina
50,
72)
pila
cartucho
~
Iseleccion
pagina
ADJUST)
46)
53)
pagina
(1&
65)
•
56)
pagina
del
idiama
56.)
Page 45

1
---------,
Indicaciones
1
Registro
2
3 I
4
5
6
7
8
9
10
Unidad
11
12
de
Indicador
(~
Indicador
Indicador
Indicador
Contador
Indicador
Indicador
Indicador
Indicador del
Boton
Transmisor
de
paginas
ndicador
de
de
de reduccion
de
de
de
del
del
de
mando a distancia
de
disparo del
en
la
pantalla
datos
(~
de
del
flash
de
baja
(~
(~
obturador
paginas
del
datos
ojos
(I@"
grabacion
50, 51,53.)
registro
modo
enfoque a infinito
fotogramas
pila
cartucho
mando a distancia
autodisparador
de
cristal
49,53.)
tftulo
(~
(~
rojos
(~
paginas
pagina
pagina
(~
(~
(Opcional)
(~
liquido
pagina
pagina
(~
pagina
56
47.)
56.)
pagina
pagina
pagina
49.)
69.)
pagina
68
.)
,64
.)
72)
67.)
73.)
66.)
m
45
Page 46

Colocaci6n
de
la
correa
Colocaci6n
de
la
pila
Preparacitin
tomar
46
fotografias
para
Coloq
sujet
fig
ur
a.
ue la corr
ando
la tal como
ea
pasandola
se
por
la
argolla
puede apreciar
en
la
y
1 Ab
ra
la tapa del
Si
es
necesario, introduzca una
en
la
ran
2
Coloq
ue una pila
CR123A 0 DL 123A) tal co
haga
presion
compartimento
cier
re.
ura
y g
sobre
compartimen
ire suavemente.
de litio
de
la
tapa del
la pila
to
de 3 V
mo
hasta
de
la pila
mone
(tipo
se indi
que
da
ca
se
y
Page 47

Conexionldesconexion
de
la
camara
Verificacion
de
la
carga
de
la
pila
jlmportante!
Recuerde
aparece
pila
hora
fecha
Nota: Para
desconecte
es
•
Se
. (P
ara
y hora,
ta utili
Saque
mas
facilmente.
que
DD D DD
debe
ra ajustar
mas detal
conservar la
la cam
zando.
la lengUe
en
vea
la
la
pantalla
cuando
de
nuevo
les
sobre
pagina
carga
ara a OFF
ta para
sacar
de cri
se
cambia
la
el
48)
de
cuando
la
stallfquido
la
fec
ha y la
ajuste
de
la
pila,
no
se
la
baterfa
1
Conecte
la
principal/tapa del obj
fl
-EI objetivo
2
Desconecte
r
opuesto
camara
echa
has
ta
que
posicion W (gran
uptor principal/tapa
.Ia
hasta
deslizando
etivo
en
se
pare
con
sale
camara
que
un
automaticamente a su
angular)
.
deslizando
del
objetivo
se
pare
con
el int
erruptor
el
sentido
chasqui
el
en
un
chasquido.
de
do
inter-
el
sentido
la
1
2
-Si
I
fquido,
Si
I
fquido, la
es
Conec
Verif
ique la car
destella
no
aparece
ta
mal
te la
camara.
c:lIIII
camb
ie
la
nada
pila
se
instalada.
ga
de
la pel
• I -
~
-
c::::::.
en
la
pantalla
pila.
en
la
panta
hab
ra
agotado tot
fcula
,-
-
de cri
lla
de
al
stal
crista
l
mente
0
47
Page 48

Ajuste primero
ontinuacion, la
c
1
Apague con
2
Oprima
EI "ano" empieza a destellar.
3
Oprima
el
el
ano, mes y dia
hora y los minutos.
el
interruptor
00
000 .
una
vez
""hdJ]
C'
-, _ " I I
_II
f
~I
" .
el
boton
ano.
el
ADJUST
boton
DATE
y, a
principaL
MODE/SEL
Il
/,l
SEL~
..
l
i<>
:.:rEiD~ ~
liST
para
ajustar
.
iFf'
~
4
Repita
los
ajustar
el
automaticamente
minutos
5
Ajuste
procedimiento
hora y los
Oprima
Aparece "-para vol
"Afio/Mes/Dia"
procedimientos
el
mes y el
ajuste
de
, y
empieza a destellar
de
minutos
el
boton MODE/SEL
ver a la
2 y 3
dia.
Una vez
fecha,
aparece
la
indicacion
hora y minutos:
anterior
para
ajustar
.
-".
Oprima
una
vez
indicacion
.
para
terminado
de
hora
y
la "hora".
Siga
la
mas
continuacion, seleccione
A
indicacion
1
2
de
Mantenga
durante
mas
ira
cambiando
Aiio/Mes/Dia
r
sl
.,
'
l
Suelte
el
aparezca
deseado.
boton
el
fecha
que
oprimido
de 2 segundos.
en
el
Mes/Dia/
:1
....
1 .,
ADJUST
modo
de
el
modo
prefiera
.
el
boton
La
siguiente
Aii
o D
:·g,I ....
cuando
indicacion
de
ADJUST
indicacion
orden.
ia/Mes/Aiio
1 :
.,·gl
de
fecha
IJ
48
'g-:
-'-
I
"-
___
' I
,---' DATE
@
'W~'~
..
MODE
~
-SEL
ADJUST
Page 49

F.unci6n
Los
datos
Cuan
do
en
ellaborato
caras
1
Apague
2
Oprima
de
pida
la
de
quedan
que
rio
lotograffa
con
el
boton
seleccionar
indicaciones.
el
boton,
Ano
/Mes/Dia' Ho
'Sl
~
'0
el
la
orden.
orden
siguiente
rl
registro
registrados
Ie
revelen
si
pueden
el
inte
rruptor
MODE/SEL para
una
de
las
Cad a vez
indicacion
ras/Minutos
:1"'1
!Hml"'
en
que
en
la
las
lotos,
imprimir
principal
siguien
que
se
cambia
prefiera
de
datos
pelfcula
pregunte
en
ambas
tes
oprime
en
el
Sin
registro
l- - -IJ
que
aparezca.
L
os
datos a imprimir
del
modo
de
como
se
puede
Pantalia Indicado
1;
~OdO
de
indica
cion
de
CL
- - -
A/M/D A/M/D
H/m
- - -
M/D/A M/D/A
H/m
- - -
D/
M/A
D/M/A
H/m
-
(A:
Ano
en
indicacion
apreciar a con
1m\)
impresion
el
OFF Sin
ON
A/M/D A/M/D
ON
A/M/D/H/m
OFF
Sin
ON
M/D/A
ON
M/
OFF
Sin
ON
D/M/A
ON
D/M/A/H/m
, M
Mes, 0:
la imagen
dependen
seleccionado,
tin
uacion
Fecha a imprimir
en
impresion
impresion
impresion
H:
Horas, m:
impresion
el
reverso
A/M/D/H/m
A/M/D/H/m
M/D/A/H/m
M/D/A
M/D/A/H/m
D/M/A/H/m
D/M/A
D/M/A/H/m
anverso
D/A/H/m
Dla,
tal
.
en
Mlnutos)
No
aparece ~ cuando
modo "Sin
registr
o"
se se
lec
ciona
el
49
Page 50

S
50
La
Nuvis
110i
idiomas.
Se
puede
para
cad a totograffa.
de
pelicula 0 pila, se
principal 0 se
los
numero
numero
numeros
de
de
idioma
de
titulo
hace
jlmportante!
EI
titulo
programado
de
la
totograffa.
diterente
segun
Para
mas
detalles,
laboratorio
totogratico
permite
imprimir
cambiar
el
Si
se
cambia
desconecta
una
totograffa,
titulo e idioma
"12"
(ingles
"00" son
los
puede
imprimirse
EI
contenido
ellaboratorio
solicite
aclaraciones
autorizado.
tftulos
en
idioma y el
un
cartucho
el
interruptor
tanto I como
desaparecen
britanico) y el
ajustes
de
tabrica.
en
el
de
la
impresion
totogratico
utilizado.
en
12
titulo
EI
reverso
es
su
.
Para
1
2
Numero
programar
Conecte
Oprima
el bot
aparece
dioma
en
i
-Haga
las
no
necesita
del
idioma
i
un
la
camara.
on
SEL y contirme
I y
los
la
pantalla
fotos a partir
cambiar
tftulo.
numeros
de
cristallfquido
de
este
el
titulo
que
de
tftu
momento
0 el
idioma
lo e
3
Oprima
el
segundos.
numero
si
.
4
Presione
la cit
-Cada
rO~1~2~3~4J
La citra
del
:,=' - D
~/
AUTO
.ft.
d O
~HVI"·.jL!.
DATE"MODE~
-
SEL
el
ra
de
la
vez
que
visualizador
boton SEL
durante
mas
de
la
izquierda del
de
tftulo. empieza a destellar.
..
,=~
-
I
IJ
SEL~
~
ADJUST
~=I
-
ri~
ST
para
ajustar
# ~
bot6n ADJU
izquierda
oprima
el
boton
cambia
en
el
orden
indicado.
el
2
Page 51

5
Pre
sione
el
de
la
der
echa
empieza a destellar.
6
Presion
e el
la
citra
de
-Cada
vez
visualizador
r 0
---+ 1 ---+ 2 ---+ 3 ---+
boton
del
boton
la
derecha.
que
opr
en
el
MODE/SEL.
numero del
ADJUST
para
ima
el
bot6n
orden
indicado.
La citra
titu
lo
ajustar
camb
ia
...
---+
9J
7 H
aga
una totograffa
conti
rmar
que
nu
mer
os
de
de
cristal
Ifquido oprim
SEL 0 MODE/SEL
"
JD
oG
DATE
••
MODE
-
SEl
el
•
aparece
titu
lo e idio
ADJUST
Para
los
"
Usta
despues
titulos
de
Titulos
de
! y
los
ma
en
la
iendo
el
en
otros
idiomas, vea
Registrados
pantalla
boton
pelo Usuar
la
io"
Tfiulos
en
Numero
del
espanol
Titulo
titulo
00
Navidad
01
Cumpleanos
02
Vacaciones
03
Luna
de
04
Boda
05
06
Graduaci6n
07
Familia
08
Fiesta
09
Fiesta
10 Aniversario
11
Amigos
12
Acto
escolar
13
Viaje
14
Te
quiero
15
Gracias
miel
(Numero
de
Numero
dellilulo
16 Felices
17
18
19
20
21
22
23
24
25
26
27
28
29
30
idioma 10)
Titulo
Pascuas
Fel
iz
cumpleanos
Felicidades
Feliz
Navidad
Festival
Primer
dia
de
Tour
Ana
Nuevo
Pascua
de Res
urr
Feliz
Ana
Nuevo
Reencuenlro
Dia
del
Padre
Dia del
la
Madre
Recuerdos
Bautismo
coleg
eccion
io
51
Page 52

Para
programar
1
Repita los procedimientos
acuerdo a las instru
anterior: "Para
2
Oprima
el
mas
idioma
boton
de 2 segundos
empieza a destellar.
52
un idioma:
1 a 3
ccio
nes
programar un
MODE/S
EL
EI
nilmero
de
de
la
titul
o".
durante
del
seccion
3
Oprima
el
el
-Gada
r01~02~03
4 H
que
idioma
oprimiendo
boton ADJUST para programar
nilmero
de idi
vez
que
visualizador
aga
una
fotograffa
en
aparece
en
la
el
oma
oprima
el
el
orden
despues
I y l
os
pantalla
boton
deseado
.
boton
cambia
indi
cado
.
~
.
..
~16
de
nilmeros
de
cristallfquido
SEL.
el
J
confirmar
de
tftulo
e
Idiomas
seleccionables
N° de idioma Idiomas
01
02
03 frances
04 aleman
05 italiano
06
07
08
09 portugues
10
11
12
13
14
15
16
danes
finlandes
japones
noruego
espanol
sueco
ingles
ingles
(Rei no
(EE
Unido)
UU)
Page 53

ncion
de
grabacion
del
titulo
,
EI
titulo
queda
grabado
Cuando
haga
fotograffas, consul
fotografico
los
datos
1
Conec
Oprima
2
aparecen
idi
- H
un
sob
re
en
el atras.
te
la
camara.
el boton S
I , y l
oma
en
la pantalla de cristal
aga
una
fotograffa
necesita
cambiar
en
la pel
fcula.
pedido
de
impresion
te
con
su
labo
la
posibilidad de impri
EL y confir
os numer
os
en
este
momenta
el
tftulo 0 el
rat
orio
me que
de
titulo e
lfqui
idioma.
de
mir
do
si
no
-Vea
las
paginas
la
seleccion
-Para
cancelar
esione
pr
desaparecido
trtulo e idioma.
50-52
para
de idiomas y Htulos.
la
funcion
el
boton SEL y confirme
tanto I como
de
mas
detalles
grabacion
que
los
nilmeros
del
han
sob
tftulo
re
,
de
jlmportante!
EI
camb
io
un car
desconexion
hace
numeros
numero
cambia
seleccionado
del
una fotograffa
de
tit
de
titu
la pila
tucho
de
interruptor pri
, t
anto I como
ulo e idioma
lo
vuelve
pero
por ultimo
al
el
numero
se
pelfcula 0 pila
ncipa
l 0
los
desaparecen.
"00"
cuando
del idi
oma
mantendra.
si
se
, la
se
EI
53
Page 54

Carga
a
~----------
54
de
la
p'elfcula
Utilice
solo
cartuchos
nuevos
en
-
-
1 0 : Pe
2.
j D :
4
5
6
\..6 Puerla
7
8
9
--------
~
*Indicador visual
esta
No
ulilice
pelfcula
No
hay
guia
carga
aulomalicamenle
lfcula
0:
Peli
cula
Pe
lfcula
Indicador
de
83:
Pelfcula
procesar*
hermelica a la
Mando
de
de
la
del
dalos
Carrele
Disco
de pel
camara.
convencional
de
pelicula
denlro
procesada
no
expuesla*
parcialmenle
procesado
lolalmenle
luz
puerla
hermelica
carlucho
de
exposicion (VEl
fcula IX240
de
La
pelicula
de
la
denlro
del carlucho*
expuesla*
irreversible
expuesla
pero
)
35
mm.
enlra y se
camara.
(I
PI)
sin
Notas
sabre
los
cartuchos
IX240
•
No
desarme los
a
golpes 0 vibraciones.
•
No
ensuc
cartucho. Podrfa
comunicacion
•
No
haga
hermetica a la
(por ejemp
puerta
y la pelfcula qu
• No
rompa
irreversib
podrfa
ser
las fotograffas.
cartuchos
ie 0
dane
los
contactos
resultar
de
luz
lo un
datos.
sobre
el
con
un
bolfgrafo);
mando
objeto
presion
edarfa vel
el indicador
le (
IPI) del
de
cartucho,
imposible procesar e imprim
Si ellPI
esta roto
con ellaboratorio fotografico
de
pelfcula
ni
l
os
exponga
del
afectada
la
de
la
puntiagudo
podrfa
abrirse
ada.
procesado
ya
que
consulte
mas cer
puerta
la
ir
cano.
Page 55

•
No
trate
de
hacer
cartucho
ejemplo
pelfcula,
utilizacion
•
No
guarde
un
lugar:
-Expuesto a los rayos del
cale
faccion 0 en
- Su
cio 0 con polvo
-Cal
iente 0 hOm
-Cerca
magneticos
girar
con
un
objeto
un
destornillador) Podrfa
modificar
de
0 un
procesado
el
cartucho
apa
rat
intensos
el VEl 0
un
edo
os
que
el
carrete del
puntiagudo
impedir
correctos.
de
pelicula
sol,
lugar
cal
ient
con moho
generen
(por
velar
la
una
en
e.
campos
Procesado e impresion
Recomendamos Ilevar
un laboratorio f
a
laborator
io
procesado e impresion.
fotog
el cartu
otog
rafi
co
rafi
co
autorizado" para
-5
Servicio de
Fotoacabado
Certificado
Marca
de
labora
torio
fotografico
cho
de pel
fcu
con
la "Marca
su
Servicio
Fotogriifico
Ac;t:{~~,~D.
Certificado
autorizado
la
de
los
laboratorios
ofrecen
los
siguientes
1 3
diferentes
mismo
2 I
3
4
Para
fotografico
rollo
mpresion
Fotografias fndice
de
cada
fotograma
pelfcula)
Devolucion del
Sus negativos
para
facilitar
mas
detalles, consulte
autorizado
fotograficos
autorizados
servicios:
tipos
de
impresion
de pel
fcula
(tipo
de
la fecha/hora y titulo
(pequenas
expuesto
negativo
se
devuelven
su almacenamiento.
mas
C, HoP)
imagenes
en
en
el
cartucho
en
con
ellaboratorio
cercano.
el
en
un
el
rollo
(NRIC)
cartucho
de
55
Page 56

Carga
de
fa
pelicula
D
1
56
Desconecte
aparece D en
liquido
para
cart
jlmportante!
La
tra
el
cartucho.
pelfcula
la
, a
continuacion
abrir
la
tapa
ucho.
tapa
del
compartimento
ba
automaticamente
No t
todavia
camar
a y
verifique
la
pantalla
mueva
del
compartimiento
despues de carg
rate
de
abrir
cargada
de
cristal
el
del
cartucho
la tapa
que
no
seguro
del
se
ar
con
la
Coloque
2
nuevo
en
Verifique
carga
a
p
Gierre
3
-
un
en
la
figura
que
r.
Si
~
y no
elicula
esta bien
la
tapa
Haga presion
cartucho
el
compartimento,
.
el
aparece
podra
del
de
VEl
indica 0 antes
DoD
confirmarse
cargada.
compartimento
sobre
la
tapa
pelicula
como
el
VEl
camb
que
del
cartucho.
hasta
que
se
la
cierre.
de
ia
ve
Conecte
4
Cu
ando
cristallfquido
fotografias
camara
-La sen
automaticamente
la
camara.
aparecen
D y
que
esta
I i
sta
sibilid
ad
en
la
el
nOmero
pueden
para
usar.
de
la
pelfcula
al
cargar
pantalla de
de
tomarse, la
se
ajusta
el
cartucho.
Page 57

Manejo
basico
Modo
Para
•
•
jlmportante!
•
•
de
evitar
que
Mantenga
adelantando
Mantenga
cuerpo y sujete
manos, como
Cuando
confirme
como
No
de
el
los
sostenga
que
en
la
tape
el
objetivo,
enfoque
figura
auto
sostener
se
mueva
la
camara:
cuerpo
bien
pie
med
io
apretados
la
camara
ve
en
la
la
camara
flash este
el
flas
h 0
con los
equilibrado
paso
con
figura
hacia
un
codos
se
el
matico
la
camara
contra
el
ambas
vertical mente,
arriba
,
las
ventanillas
dedos.
correctamente
Forma
correcta
de
sujetar
la
camara
~
Forma
correcta
de
sujetar
la
camara
'
~
(horizontal)
(vertical)
57
Page 58

Funcionamiento
1 O
pr
58
ima ligeramente
del obturador
-
Cuando
el
enciende
y
se
bloquea
para
objeto
el LED
el
el bot
enfocar.
queda
rojo
enfoque
del
on
enfocado, se
durante
.
boton
de disparo
un
segundo
de
disparo
2
-
del
Oprima com
di
spa
ro
del
No
10
oprima
ya
que
pod
evitar
esto, oprima
obturador
pletamen
te el bot
obturador.
con
un
movimiento brusco
ria
moverse
la
el
boton
on
de
camara.
Para
suavemente.
jlmportante!
M
antenga
la camara a
objeto
como mfni
obturador
o
cerca, las
btur
ador
no fun
cuan
fotograffas
mo
ciona
do el
0,83 m (2,7
de 10 con
ra. Si
se abri
obje
to
esta
se verf
an
pies) del
trar
io el
era el
demasiado
desenfocadas.
Page 59

--------------------
------------------
Seleccion
Se
puede
de
impresi6n
momento,
cargada en
I
PRECAUCION
I
Para
evitar
cuando
del
seleccionar
(tipo
siempre
la
camara.
lesiones
accione
el sel
tipo
una
C,
HoP)
que
haya
oculares,
ector
de
una
CHP.
de
impresion
las
tres tipos
en
cualquier
pelfcu
la
sujete
la
camara
Tipo
Relaci6n
horizontal
alejada
C:
vertica
~
de
la
2.
cara
3.
l a
Tipo
H:
Relaci6n
vertical
horizontal
9.
16.
Tipo
P:
a
Relaci6n
vertical
horizontal
1 •
a
3.
59
Page 60

Utilizaci6n
del
zoom
Mire a traves del
del
zoom
(desde
W a
obtener
el
Conecte
la
se
ntido
W 0
60
para
ajustar
30
mm
tamano
camara
T.
visor
hasta
de
,
mueva
y
mueva
la
posicion
T a
imagen
la pal
la
palanca
del
zoom
85
mm)
para
deseado.
anca
en
el
Gran
angular
PRECAUCION
Si
no
se
utiliza
la
automaticamente
este
movimiento
piel
quede
camara
a la
se
puede
atrapada.
30
mm
durante
posicion
producir
mas
de 3 minutos, el
de W (gran
angular)
repentinamente y esto
objetivo
Tenga
T
eleobjetivo
se
siempre
puede
hacer
85
ret rae
presente
que
su
mm
que
Page 61

Indicaciones
en
el
visor
~
•
Area
1
LED
•
Cuando
EI
•
Cuando
esta
Cuando
•
flash. (EI obtur
que
rojo
se
en~iende
enfoque
es
se
enciende y luce
listo
para
destella
no
aparece
correcto.
el
disparo
Se
ador no
en
la
durante
fijo.
.
esta
cargando
funciona.)
fotograffa
un
segundo.
EI
flash
el
H
~
CifJ
1
2
Marcas
de
acercamientos
di
stancia
de apr
a
2,7
pies).
3
Marca
de
zona
Centre
el
sujeto
( )
-+
[
compensacion
en
de
I
UIII
los
ox
1 m a
enfoque
en
esta
8J--
de
mod
os
0,83 m (3,3 pies
marca
~
2
3
4
paralaje
C y
H.
automatico.
.
para
P
4
Conmutacion
dioptrfas
Deslice
el
dioptrfas a la
obtener
imagenes
del
interruptor
interruptor
posicion
mas
de
ajuste
t,
centro
nftidas
de
por
ajuste
de
0 -
el
de
II
para
visor.
61
Page 62

Toma
1
62
de
Encienda
fotografias
con
el
interruptor
principal
2
Centre
el
sujeto
en
la
marca
de
zona
.
enfoque
automatico.
de
3
Oprima
ligeramente
del
obturador y confirme
el LED
rojo
jlmportante!
Si
no
hay
suficiente
y
el
flash
destel
que
el
sujeto
de
esta
tomar
antes
el
boton
de
que
durante
un
segundo
luz, el LED
la
automaticamente.
dentro del
la
fotograffa.
rojo
alcance
(1lE
disparo
se
enciende
se
enciende
Confirme
del flash
pagina
69.)
Page 63

4
Oprima
obturador
comple
para
tamente
tomar
una
el
boton
/otograffa
del
Para
que
no
este
del
en/oque.
1
Centre
en/oque
el
sujeto
en
el
centro
el
sujeto
automatico.
quede
del
marco,
en
bien
en/ocado
la
marca
utilice
de
aunque
el
bloqueo
zona
de
2
Oprima
del
obturador.
-Confirme
durante
permanecera
mientras
de
disparo
jlmportante!
No
cambie
cama
ra
ligeramente
obturador
ligeramente
un
despues
que
se
segundo.
bloqueado
se
mantenga
del
obturador
la
distancia
el
boton
para
en/ocar.
el
enciende
de
haber
boton
el
EI
enfoque
en
oprimido
hasta
del
oprimido
de
disparo
de
disparo
LED
rajo
el
sujeto
el
bot6n
la
mitad.
sujeto a la
del
63
Page 64

Utilizaci6n
3
Mantenga
obturador
componga
pensada
completamente
64
del
bloqueo
el
boton
de
escena
el
boton
disparo
oprimido,
tal
como
de
ligeramente
la
. A
continuacion, oprima
del
enfoqu
del
la
tenia
disparo
Extraccion
Cuando
Condiciones
Los
siguientes
de
enfocar:
•
Objetos
la
marca
•
Objetos
•
Superficies
tales
•
Objetos
fuegos
•
Cuando
estan
.
objeto
En
estoscasos,
despues
este a la
los
demas
de
objetos
demasiado
de
lona
de
oscuros
que
brillantes
como
coches
no
solidos
artificiales, etc.)
hay
objetos
mas
cerca
uti lice
enfocar
distancia
proced
de
imi
otro
entos
principal.
de
misma
enfoque
pueden
encerados 0 agua.
(Ia ll
el
especiales
ser
muy
pequefios
la
para
enfoque
automatico.
absorben
secundarios
objeto 0 sujeto
que
reflejan
ama
de
camara
bloqueo
de
la
camara
de
esta
la
una
que
del
seccion.
diffciles
IUl.
la
que
el
enfoque
, y
Ilenar
IUl,
vela,
que
siga
se
empieza a rebobinarse
'.-~
-4
.:
..
~
AUTO
-La
lectura
retrocediendo
completamente
Ilega
~
del
de
la
al
final
del
rollo
automalicamente
I
.-
~
,
I
•
iii
contador
de
que
la
fotogramas
pelicu
hasta
rebobinada.
pelfcula
de
pelicula,
esta
.
.IL
.-
.-
-
~
va
la
esta
Page 65

Rebobinado
de
la
peifcula a mitad
del
roilo
Saque
la
aparece
Ifquido
pelfcula
la
letra
despues
"E"
en
de
la
pantalla
verificar que
de
cristal
Se
puede
esta a la
Oprima
rollo
utilizando
correa.
-Cuando
aparece
rebobinar
mitad
del
el
boton
la
la
pelfcula
la
let
ra
"E"
la
pelfcula
rollo.
de
rebobinado
espiga
se
ha
rebobinado
en
la
pantalla
cuando
en
especial
completamente
de
cristall
todavfa
medio
en
la
iqu
ido
del
jlmportante!
T
enga
en
pelfcula
podra
embargo
sola
esta
cuenta
sin
haber
seguir
utilizando
si
se
fotograffa, ya
pelfcula
que
ha
si
hecho
hecho
no
podra
se
rebobina
ninguna
la
pelfcula.
aunque
sea
volver a utilizar
la
fotograffa
Sin
una
,
65
Page 66

66
Funciones
avanzadas
Modo
En la
de
U
"
jlmportante!
La
los
enfoque a infinito.
fotogralfa
la per
ti lice
este
ojos
rojos
reduccion
modos
de
reduccion
con
sona fotogr
modo para
"
de
ojos
de
cancelacion
flas
h, a
veces, los ojos
afiada
aparecen rojos.
evitar
raj
os
no
del
de
ese efecto
fun
ciona
flash y de
ojos
de
con
rojos
En
cienda
1
oprima
aparezca @ en
Ifquido
2
Oprima
del
obturador y verifique
enciende y queda fijo
con
el
interruptor pri
el
boton
@/ g
la
pantalla
ligeramente
el
~
hasta
boton
que
el
LED rojo,
ncipal
de cri
de
se
y
que
sta
l
disparo
a
Page 67

continuacion
boton
-La
durante
obturador.
jlmportante!
Para
rojos,
apague @ en
Este
camara
•
EI
queda cancelado
autodisparador 0 el
del
obturador
luz
de
reducci6n
un
segundo
cancelar
oprima
modo
no
con
el
modo
de
oprima
el
el
puede
interruptor
reduccion
com
pletamente
para
tomar
de
ojos
antes
de
modo
de
boton
la
reduccion
@/
pantalla
de
cancelarse
principal
de
cuando
mando a distancia.
el
la
fotograffa
rajos
se
enciende
dispararse
de
il
~
hasta
que
cristallfquido
apagando
ojos
rojos
se
uti I iza
el
el
ojos
se
la
Ulilice
el
autodisparador
tambien
en
la
este
fuera
del
jlmportante!
Coloque
la
una superficie
camara
si
fotograffa
, 0
alcance
del
sobre
plana y firme.
desea
salir
cuando
la
camara
mando a distancia.
un
trfpode 0 sobre
1
Oprima
aparezca
cristal Ifquido
el
boton
@ g
~
@
en
/a
la
~
hasta
pantalla
que
de
67
Page 68

Funcionamiento
2
Cada
vez
que
autodisparador, la
el
siguiente
@:
@ g
~:
68
se
orden
Indi
cadar
de
(1&
pagina
Manda a distancia/indicadar
autadisparadar
del
autodisparador
oprime
el
boton
indicacion
.
reduccion
66)
(1&
cambia
de
ajas
pagina
del
72)
del
rajas
en
3
Componga
completamente
obturador.
-
La luz indicadora
durante 8 seg y luce fija
segundas
-
Para
cancelar
apague
principa
la
fotograffa y oprima
el
boton
del
autadisparadar
antes
de
dispararse· el
la f
uncion
la
cama
ra
can
l.
el
de disparo del
duran
de
interruptar
destella
te 2
abturadar.
autadisparo
Enfoque a infinito
Es
util
para
fotografiar
distantes a traves
automaticamente
.
1
Oprima
el
@lil
2
en
Oprima
completamente
disparo
del
,
paisajes 0 escenas
de
un
cristal.
cancelado
boton
'II lil
la
pantalla
de
obturador.
EI
flash
queda
en
este
modo.
hasta
que
el
boton
aparezca
de
cristallfquido
Page 69

Fotografla
con
flash
----------------------
-------------------
Con
la
camara
'I
I ~ para sel
deseado.
encendida,
eccionar
el
oprima
modo
el
boton
de flash
jlmporlanle!
Antes
de
tomar
verif
ique
que
lcance del
a
(para
w
Cada
modo
r
T
ISO
(30
(85
vez
AUTO ~ --.
flash.
200).
mm):
mm): aprox
que
de
flash
una
fotografia
el
objeto
esta
Consulte
aprox 0,83 a 7,
(2,7 a 23
,3
0,83 a 2,9
(2,7 a 9,5
pies)
se
oprime
Q) ~ --.
en
el
el
cambia
con
flash
dentro del
la
siguiente
1 m
pies)
m
boton 'II ~ el
siguiente
Q)
--.
orden
'1
--.
,
guia
.
~~J~
AUTO
(i) ~ :
~~J£ ~:
'I
J
'I :
Flash aut
En
foq
(i)
:
Cancelacion
~
: F
lash
(IIW
F
lash
lenta
omatico
ue a infinito
del flash
de
toda
ocasion
pagina
71)
automatico
(IIW
pagina
(IIW
pagina
(IIW
pagina
(IIW
pagina
con
sincronizacion
72)
70)
68)
70.)
69
Page 70

EI
modo
de
flash
automatico,
general:
luz y dispara
EI
modo
ideal
La
camara
automaticamente
del
flash
automaticamente
Asegurese
pantalla
70
de
que
de cristalliquido.
normal
es
el
para
fotograffa
detecta
que
automatico
al
encender
apaiece
AUTO
modo
en
hay
poca
el
flash.
se
activa
la
camara.
~
en
la
P
ara vol
estaba
oprima
A
UTO
~
ver
al
modo
utilizando
el
bot6n
en
la
pantalla
automatico
el
flash
~/
..
hasta
de
cristallfquido.
en
cuando
algOn
que
aparezca
otro
se
modo
,
Modo
de
Utilice
el
modo
que
la
fotograffa
luz
natural, en
nocturnas.
1
Oprima
el
~
en
la
cancelacion
de
cancelaci6n
aparezca
los
ret rat
bot6n
~
/
pantalla
de
can
un
as y en
..
hasta
cristallfqu
del
del
efecto
las
que
ido
flash
flash
para
de
escenas
aparezca
Page 71

2
Oprima
ligeramente
del
obturador y verifique
el
LED
rojo
continuacion
boton
de
la
fotograffa.
jlmportante!
En
este
modo,
a
seleccionar
obturacion
evitar
que
durante
oprima
disparo
la
una
lenta.
la
camara
el
boton
de
que
se
un
segundo;
completamente
del
obturador
camara
siempre
velocidad
Utilice
un
se
mueva.
de
trfpode
disparo
enciende
a
el
para
tomar
tiende
para
Modo
En
este
modo,
toma
una
fotografia, para
un
efecto
de
sujeto
contra
1
Oprima
~
en
la
flash
el
flash
flash
de
un
fonda
el
boton
pantal
la
de
toda
destella
cada
que
pueda
relle
no
al
fotografiar
bril
lante 0 en
~/.IIl
hasta
de
cristallfquido.
ocasion
vez
que
se
obtenerse
un
sombra.
que
aparezca
2
Oprima
ligeramente
del
obturador y verifique
enciende
oprima
completamente
disparo
del
fotografia
el
el
LED
rojo; a continuacion
obturador
para
boton
que
el
boton
tomar
de
disparo
se
de
la
71
Page 72

Modo
Uti I ice
tanto
escenas
jlmporlanle!
En
a
obturacion
72
evitar
flash
con
este
modo
para
exponer
el
suje
to
principal como
nocturnas 0 con poca
este
modo, la
seleccio
que
camara
nar
una
velocidad
lenta.
Utilice
la camara
sincronizacion
correctamente
el
fonda
en las
IU
l.
siemp
re
tiende
de
un
trfpode
se
mueva.
para
lenta
1
Oprima
el
~~J~
'I
en
2
Oprima ligerament
del
obturador y verifique
el
LED
rojo; a continuacion
comple
tamente
boton
la
pantalla
'I
I
~
e el
el
boton
de
hasta
que
aparezca
cristallfquido
boton
de
disparo
que
se
enciende
oprima
del obt
urador.
Fotografia
En
el
modo
opcional permite
.
1
Oprima
aparezca
cristallfquido.
-En
fotograffas
de
autodisparo,
controlar
el
boto
@ ii ~
este
modo
como
con
mando
este dis
el
obturador.
n @ /ii ~ has
en
la
pantalla
se
pueden
tamar
se
desee
.
a
positivo
ta
que
de
tantas
Page 73

distancia
-Para
@ /
-EI
automaticamente
3
-Si
recibiendo
la
correctamente.
autodisparo.
(opcional)
cancelar, oprima
Il
tl
a
mando
a distancia
minutos.
el
sensor de
los
unidad
de
jlmportante!
•
Instale
la cam
man
do a distan
• EI
hacia
la camara.
•
Cuando
se
iNo
cambie
nuevamente
apague
la
camara.
se
cancelara
si
no
10 util
iza
recepcion
en
rayos
mando a distancia
En
ese
ara
agote
la pila
la
del
sol u otra luz
caso, utilice
sobre
un tr[pode 0 sobre una
cia
tiene
un alca
la
pila, debera
usted
mismo
el baton
durante
cama
ra
no fun
cionara
el
modo
nce
acudir a un
l
mas
esta
intensa
de
de
de
,
aprox.
cen
2
Componga
superficie
5 m (16,4
tro
de ser
la
fotograffa
plana y firme
pies)
cuando
vic
io
Nikon.
.
apunta
.
directamen
te
3
Apunte
distancia
bo
-La
------------
con
la
hacia
ton
de
disparo del obt
luz indicadora
aprox. 2 seg
obturador.
unidad
del
la
mand
camara y oprima
urador.
se
enciende
antes
de
dispararse
--------
dur
o a
el
ante
el
73
Page 74

Utilizacion
segura
de
la
camara
Consejos
•
Apague
para
evitar
boton
de
consuma
• No
deje
calor
excesivo,
de
un
coche
la cal
efaccion,
•
Espere a que
de
utilizar repetidamente
intensivo
baterfa y en
74
para
la
camara
oprim
disparo
la
pila
la
camara
al
la
sin
pausas
la
el
cuidado
cuan
do
ir
accidental mente
del obtu
en
un lugar
par
ejemplo
sol,
en
la
playa 0 cerca
camara
se
el
genera
camara,
de
la
camara
no
la uti I
ice
el
rador y que
expuesto
en
el
interior
enfrfe
despues
flash, EI
uso
calor
en
la
se
a
de
• La
camara
correctamente a bajas
de
•
No
contra
danarse
•
Evite
interior
in
ar
suave y seco,
puede
O°C
03n)
Pr
dejar
caer
la
una
superficie
su
mecanismo
que ent
ren
de
la
cama
mediatamente
ena 0 polvo,
en
camara
los
no funcionar
temperaturas
oteja
la
contra
ni
golpearla
dura
ya
de
precision,
materias
extranas
ra,
Limpie
depositos
la
camara,
que
de
con
(men
el
frfo,
podrfa
en
sal,
un
os
el
pano
• U
se
un
goma
para
fuera
necesario,
con
un Ifquido
Limpie
con
un
• No
utilice dil
otros
Ifquidos
•
Guarde
seco
para
los
lugares
qufmicos
Se
recomienda
absorbente
pincel
neumatico 0 una
soplar
el
polvo
utilice
un
de limpieza
las
ventanas
de
panG
la
camara
evitar
donde
tales
de
suave,
uyentes
enfoque
de
agresivos,
pintura, bencina
en
un lugar
que
se
forme
haya
productos
como alcanfor y naftalina,
guardarla
humedad,
del
panG
de
junto
objetivos,
fresco,
moho,
pera
de
objetivo,
Si
empapado
automatico
u
y
Evite
con
un
Page 75

•
Si
no
utiliza
tiempo,
saque
el
obturador y haga
varias
veces
la
camara
la
de
.
durante
vez
en
cuando,
destellar
mucho
el
fla
dispare
sh
Notas
sobre
las
pilas
• La
carga
de
la pila
se
temperatura
(32'F).
La pila
temperatura
n
orma
l.
Cuando tome
t
emperatura, mantenga
•
Cambie
la
siempre
que to
acontecimiento importante.
pi
pilas
mar fotograffa
debilita
desciende
suba nuevamen
la
se
recuperara
por otra
de
repuesto
s de
por
fotograffas a baja
cuando
debajo
de
cuando
te al val
la
pila cal
iente.
nueva 0 lIeve
cuando
tenga
un
or
la
D'C
la
PRECAUCION:
Una
caracterfstica
electronicas
A
veces, aunque
camara
electricidad
no
funcionar
desmonte
Recuerde
fe
cha
y la
todos
los
q
ue
se
sac a la
raramen
recibe
una
estatica
correctamente. En
la
baterfa y vuelva a instalar.
que
tie
ne
hora
cuando
ajustes
baterfa
de
las
camaras
te, c
uando
fuerte
descarga
del
exterior,
esta
este
que vol
ver
a aj
ustar
insta
le la
quedan borrados
.
baterfa
la
de
puede
caso
,
la
ya
cad a vez
75
Page 76

Especificaciones
Tipo
de
camara
Pelicula
Que
utilizarse
Sistema
de
Relacion
(vertical a horizontal)
Objetivo
Tapa
Obturador
EnfoQue
puede
de
intercambio
informacion
de
aspecto
del
objetivo
76
Camara
enfoque
el
objetivo
Cartucho
(16,7 x 30,2
Sistema
Existen
30
mm
convertidos a tipo
Se
abre y cierra y conecta 0 desconecta
Obturador
de
diafragma
Sistema
al
oprimir
aprox.
O,
11x a 85
mantiene
traba
el
0,83
m
enfoque
de
tipo
IX240
automatico y exposicion
de
de
los
F/3,8 -85
de
0,83
ligeramen
boton
(2,7
en
(Sistema
peticula
IX240
mm)
intercambio
de
tipos
C,
H Y P
mm
35
mm); 5 lentes
electronico
programado;
enfoque
automatico
ligeramente
m
(2,7
pies) a infinito;
mm;
EI
enfoque
te
oprimido
del
obturador
pies). Se
bloquea
el
infinito.
(Sistema
informacion
F/9,5
el
boton
queda
cuando
Fotografico
automatica,
Fotografico
magnetico
(37,5
mm -106
en 5 grupos
tambien
por
infrarrojos
del
obturador;
Aumento
bloqueado
el
boton
el
objeto
en
infinito
de
Adelantada)
con
el
interruptor
actOa
activo;
Alcance
maximo
mientras
del
obturador;
esta a menos
cuando
obturador
Avanzado)
(Mag.
IX)
mm
principal
como
laminas
Se
de
de
aprox.
se
Se
se
utiliza
con
en
activa
de
el
Visor
Informacion
Control
de
la
Alcance
de
automatica
Ajuste
de
sensibilidad
de
la
pelicula
Funciones
de
de
pelicula
en
el
visor
exposicion
la
exposicion
control
Visor
con
zoom
que
sale
de
30
mm,
DP
(3
niveles)
de
imagen
marcas
de
LED
enciende
durante
de
exposicion
200;
EV8-15 a 30
para
de
carga
exposiciones
al
colocar
auto
para
fotografiada
area
aprox
tomada
compensacion
rojo (Iuz
flash
peliculas
mediante
un
matico
imagen
la
superficie
0,5
x a
a
+0,5
Marcas
tienen
automatico;
-
Se
continuamente:
Programa
ISO
Automatico
Sistema
dobles
fotograma
automaticamente
Rebobinado
rebobinar a mitad
imagenes
impresa
1,2x a 85
de flash
un
segundo:
cargado;
automatica
mm,
(DEP);
el
cartucho;
fotograma
al
del
rollo
reales
es
de
aprox.
del
tipo
mm;
Ajuste
en
los
tipos
C/H/P
de
paralaje);
cargado/indicador
Objeto
Destella:
se
con
EV9,6-16 a 85
ISO
50,
100,
simple
inserci6n;
La
pelicula
La
pelicula
despues
final
del
rollo
por
prisma
mas
H;
Aumento
de
(los
Zona
enfocado;
esta
control
mm
200, 400,
avanza
de
cada toma;
de
peticula;
porro;
del
75%
de
aprox.
dioptrias: -1,0
tipos
C Y H
de
enloque
de
enfocado)
luce
cargando
el
electronico
800 Y 1600
Prevencion
al
primer
avanza
Se
la
para
flash
de
puede
Page 77

Contador
de
lotogramas
Autodisparador
Accesorio
opcionat
para
el
mando
a
distanc
ia
Flash
incorporado
Modo
de
reduccion
de
oj
os
rojos
Aparece
en
la
pantalla
de
cristal
Conlrolado
electronicamente.
disparo
del
obturador; Dura
Mando a distancia inalambrico
disparo del
obturador 2 segundos;
despu8s
de 3 minulos
pies)
en
linea
10
mm
Existen
del
lenla;
flash
2,9 m (2,7-9,5
trabado
La
antes
recta
anos; Dimensiones
(1,1 x 2,4 x 0,4
cuatro
modos
flash;
Flash
en
Numero
de
aprox. 0,83-7,1 m (2,7 -23,3
pies) a 85
durante
de
reduccion
del
destello
la
luz
Se
10
sin
usar;
desde
delante
(An. x AI. x Pro!.): aprox.
pulg); i Peso
del
flash:
cada
fotografia y Flash
guia
17
(ISO
mm
carga
del
flash;
de
ojos
rajos
del
flash
liquido;
Tipo
activa
al
oprimir
seg; Funciona
por
infrarrojos; Retardo
Se
cancela
Alcance
efectivo
de
la
camara;
(con
pila):
aprax.13 g (0,5
Flash
automatico,
con
200
en
metros);
pies) a 30
(ISO
200); Bot6n
Tiempo
de
se
enciende
durante
cuenta
sustractiva
el
boton
de
una
vez;
Cancelable
de
aulomaticamente
aprox.
5 m
pila
dura
27 x 60 x 10
oz)
Cancelacion
Alcance
del
aprox. 0,83-
del
obturador
de 6 seg
aprox. 1 seg.
(16
unos
La
sincronizacion
mm,
reciclado
Vida
util
de
la
pila
Fuente
de
alimentacion
Funcion
de
de
Dimensiones
(An. x AI. x Pro!.)
Peso
Las
grabacion
la
lecha/titulo
(sin
pila)
especificaciones
son
Especilicaciones y diseno
Aprox.
17
rollos
de
pelicula
de
25
mitad
de
las
Una
La
formas:
Sin
M/D/NH/m, D/M/A, D/M/NH/m 0 Sin
M:
AM/PM;
incorporado
fuente
12
Aprox.
Aprox.
para
exposiciones
pila
de
litio
de
fecha
grabar;
Mes,
de
idi
omas
121 x 67 x 47
260 g (9,2
una
3 V
aparece
en
ano/mes/dia, hora/minutos,
la
Fecha a imprimir:
D:
Dia, H Horas,
ajuste
de
ano
con
una
precision
alimentacion
mm (4,8 x
oz.)
pi/a
nueva
uti/izada a temperatura
sujetos a modilicaci6n
fotogramas
(CR123NDL
pantal
la
de
cristalliquido
NM/D, A/MID/H/m, M/D/A
m:
Minutos);
bisiesto
hasla
de
±90
de
la
camara; Impresion
2,6 x 1,9
sin
previo
aviso.
con
123A)
de
mes/dia/ano,
impression
cicio
de
24
el
ano
2030;
seg
por
mes; Utiliza
de
pulg.)
normal
(20
flash
en
la
cinco
dia/mes/ano
,
(A:
Ano,
horas
sin
Reloj
la
titulos
en
"C 0 6S"
Fj.
0
77
Page 78

78
Page 79

79
Page 80
No
reproduction
articles
or
reviews), may
Queda
prohibida
en
articulos 0 revistas
in
any
form
of
be
made
la
reproduccion
especializadas), sin
this
manual, in
without
written
total 0 parcial
la
whole
or
in
authorization
de
este
folleto
autorizacion
part
(except
from NIKON
(salvo
esc
rita
de
NIKON
en
for
10
brief
quotation
in
CORPORATION.
que
se
CORPORATION.
critica
refiere a citas
l
breves
Nikon
NIKON
FUJI BLDG
HIYODA-KU, TOKYO 100, JAPAN
C
PHONE:
FAX:
CORPORATION
.,
2-3, MARUNOUCHI 3-CHOME,
81
-3-3214-53
81-3-3201-5856
11
TELEX:
NI
KON J22601
 Loading...