

Page 1

V. 004
MANUALE
ISTRUZIONI
A3
CENTRALE
ELETTRONICA PER
COMANDO
2 MOTORI (PREDISPOSTO PER LA
REGOLAZIONE
LINEARE DI COPPIA
AR)
A3F
CENTRALE
ELETTRONICA PER
COMANDO
2 MOTORI
CON FRIZIONE
ELETTRICA
GB
INSTRUCTIONS
MANUAL
A3
UNIT FOR
CONTROLLING 2
MOTORS (SET FOR
LINEAR TORQUE
ADJUSTMENT AR)
A3F
UNIT FOR
CONTROLLING 2
MOTORS WITH
ELECTRIC CLUTCH
F
LIVRET
D’INSTRUCTIONS
A3
ARMOIRE
ELECTRONIQUE
POUR LA
COMMANDE DE 2
MOTEURS (PREVUE
POUR LA REGLAGE
LINEAIRE DE
COUPLE AR)
A3F
ARMOIRE
ELECTRONIQUE
POUR LA
COMMANDE DE 2
MOTEURS AVEC
EMBRAYAGE
ELECTRIQUE
D
ANLEITUNGSHEFT
A3
ELEKTRONISCHE
STEUERZENTRALE
FÜR DIE
STEUERUNG
VON 2 MOTOREN
(VORGESEHEN
FÜR DIE LINEARE
DREHMOMENTRE-
GULIERUNG AR)
A3F
ELEKTRONISCHE
STEUERZENTRALE
FÜR DIE
STEUERUNG
VON 2 MOTOREN
MIT
ELEKTROKUPPLUNG
EI
MANUAL DE
INSTRUCCIONES
A3
CENTRAL
ELECTRÓNICA
PARA EL MANDO
DE 2 MOTORES
(PREDISPUESTO
PARA LA
REGULACIÓN
LINEAL DE PAR AR)
A3F
CENTRAL
ELECTRÓNICA
PARA EL MANDO
DE 2 MOTORES
CON EMBRAGUE
ELÉCTRICO
QUESTO LIBRETTO È DESTINATO SOLO ALL'INSTALLATORE.
L'installazione dovrà essere effettuata solamente da personale professionalmente qualificato in conformità a quanto previsto dalla
legge n° 46 del 5 marzo 1990 e successive modifiche ed integrazioni e nel pieno rispetto delle norme UNI 8612.
Page 2
Italiano
SWITCH 1: Off Chiusura automatica inserita
SWITCH 1: On Chiusura automatica disinserita
SWITCH 2: Off Tempo preavviso disinserito
SWITCH 2: On Tempo preavviso inserito
SWITCH 3: Off Pausa temporanea disinserita
SWITCH 3: On Pausa temporanea inserita
SWITCH 4: Off Tempo pausa con dispositivo di sicurezza
disinserito
SWITCH 4: On Abilitazione tempo pausa con dispositivo di
sicurezza inserito
SWITCH 5: Off Luce cortesia inserita
SWITCH 5: On Lampeggiante inserito
SWITCH 6: Off
SWITCH 7: Off
SWITCH 8: Off
SWITCH 6: On
SWITCH 7: Off
SWITCH 8: Off
Funzionamento passo passo standard
}
(apre-chiude-apre)
Funzionamento passo passo modo 2
}
(apre-pausa -chiude-apre)
Fig. 1
SWITCH 6: On
SWITCH 7: On
SWITCH 8: Off
SWITCH 6: Off
SWITCH 7: Off
SWITCH 8: On
SWITCH 9: Off Spia cancello aperto senza finecorsa
SWITCH 9: On Spia cancello aperto con finecorsa
SWITCH 10: Off Alt temporaneo inserito
SWITCH 10: On Alt temporaneo disinserito
SWITCH 11: Off Colpo d'ariete disinserito
SWITCH 11: On Colpo d'ariete inserito
SWITCH 12: Off Ritardo 1° motore in apertura disinserito
SWITCH 12: On Ritardo 1° motore in apertura inserito
Funzionamento passo passo modo 3
}
(apre-stop-chiude-apre)
Funzionamento condominiale
}
NB.: 1) su tutte le centrali A3 con regolazione di coppia è previsto uno spunto di forza di circa 1 sec. Per poter vincere l’inerzia in
qualsiasi moto del cancello.
2) qualora l’installazione necessiti di un elettroblocco collegarlo ai morsetti 3 - 4 (in parallelo al lampaggiante).
2
Page 3

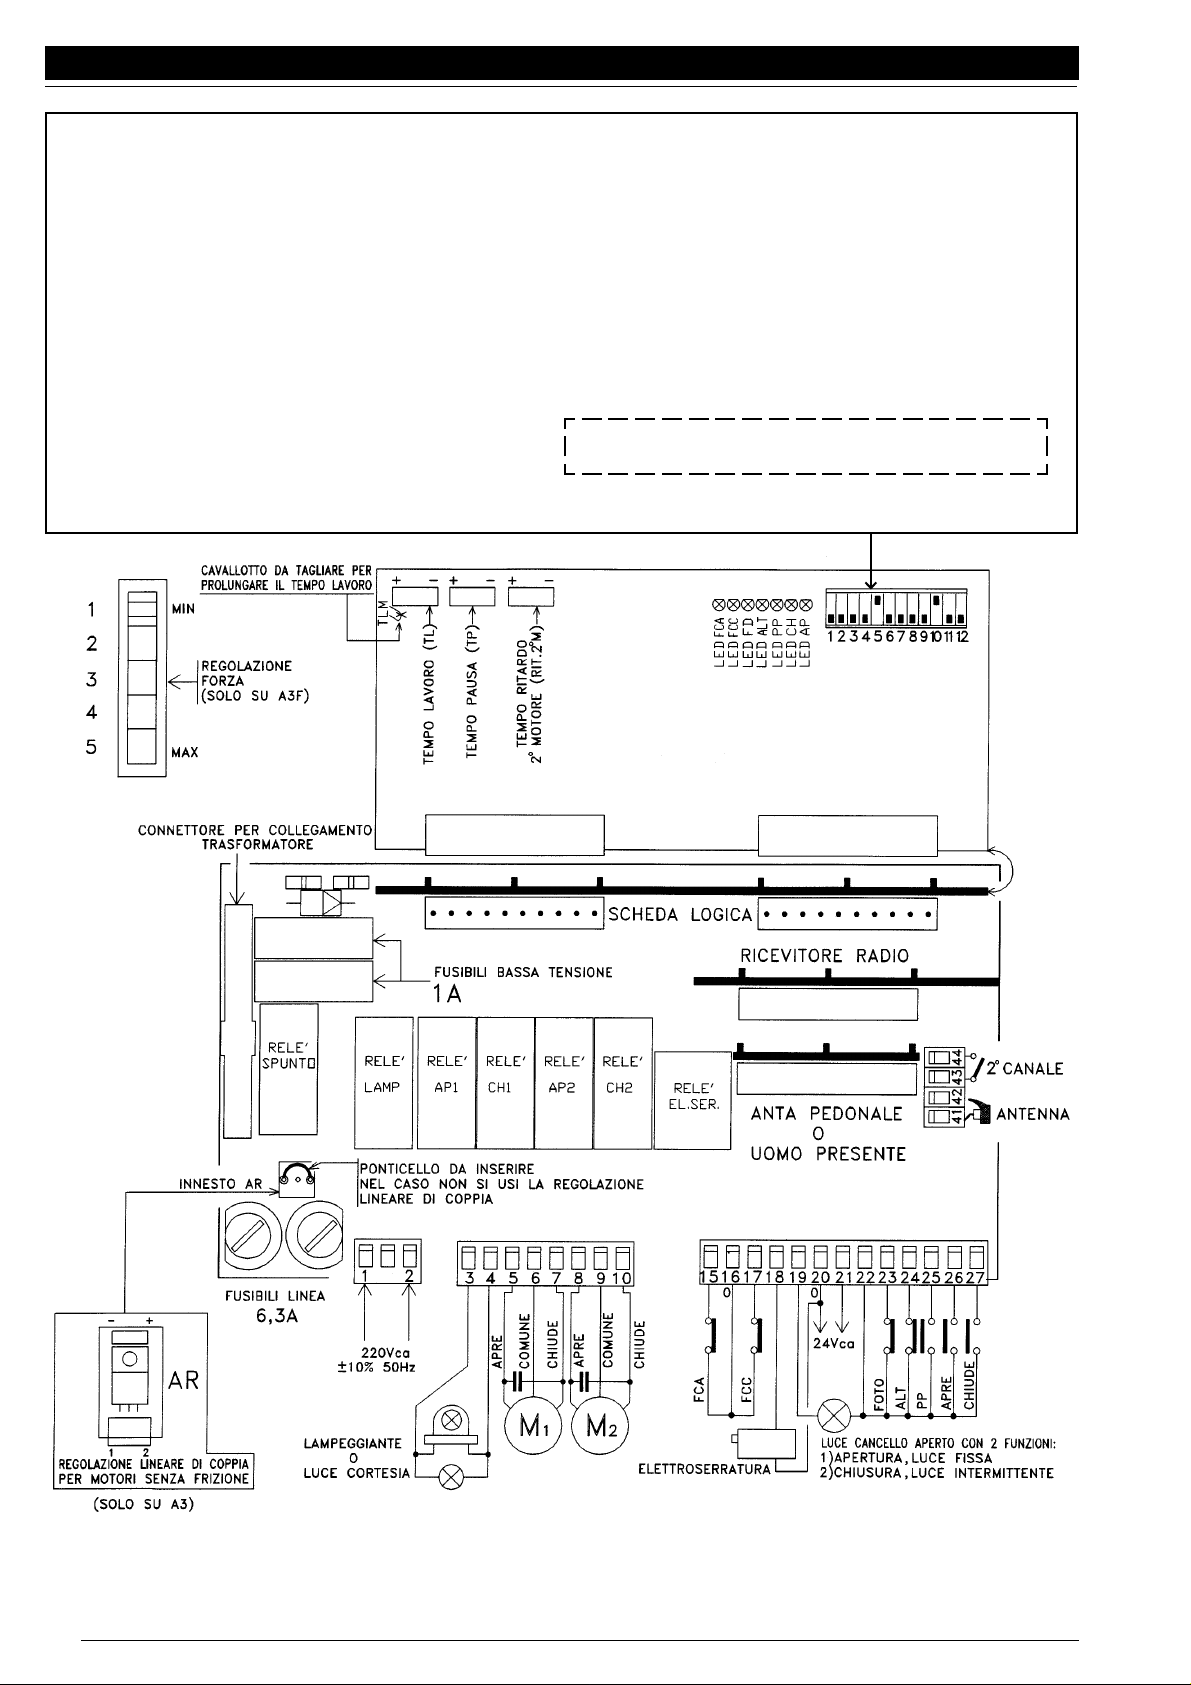
A: DESCRIZIONE MORSETTIERA:
A1 morsetti 1- 2 • Ingresso linea 220 V.c.a. Protetto con fusi-
A2 morsetti 3 - 4 • Uscita lampeggiante o luce cortesia
A3 morsetti 5 - 6 - 7 • Uscita 1° motore al morsetto n. 6 comune
A4 morsetti 8 - 9 - 10 • Uscita 2° motore al morsetto n. 9 comune
A5 morsetto 15 • Ingresso fine corsa apre (FCA)contatto NC
A6 morsetto 16 (0 V.) • Ingresso comune per fine corsa apre (FCA)
A7 morsetto 17
A8 morsetto 18 • Uscita comando elettroserratura 12V
A9 morsetto 19 • Uscita luce spia cancello aperto.
A10 morsetti 20 (0 V.)-21(24V) • Uscita 24V.c.a. max. 1A per dispositivi di
A11 morsetto 22 • Ingresso comune per i pulsanti alt, passo
A12 morsetto 23 • Ingresso dispositivi di sicurezza (FOTO)
A13 morsetto 24 • Ingresso pulsante di alt (ALT) contatto NC
A14 morsetto 25 • Ingresso pulsante di passo passo (PP)
A15 morsetto 26 • Ingresso pulsante apre (AP) contatto NA
A16 morsetto 27 • Ingresso pulsante chiude (CH) contatto NA
B: DESCRIZIONE MORSETTIERA ANTENNA
B1 morsetto 41 • Centrale antenna
B2 morsetto 42 • Calza antenna
B3 morsetto 43 • Uscita 2° canale radio
B4 morsetto 44 • Uscita 2° canale radio
Nota: morsettiera interamente estraibile per facilitare l'installazione della centrale.
Mentre si effettuano i collegamenti, o si innestano le varie schede la centrale
A3 non deve essere alimentata. Se i contatti o pulsanti NC non vengono usati
ponticellare i corrispondenti morsetti.
ISTRUZIONE PER L' INSTALLAZIONE
A) Una volta effettuati i collegamenti come precedentemente elencato, ed aver
installato tutti i dispositivi di sicurezza e segnalazione che le normative UNI 8612
prevedono, alimentare la centrale A3 controllando le tensioni, ed accertarsi che non
vi siano ne ronzii né eccitazioni anomale.
Verificare che i Led di ALT/FOTO/FCA/FCC siano accesi, controllando che i Led si
spengano all'intervento dei singoli ingressi. Se i Led dovessero essere spenti
controllare i rispettivi collegamenti sugli ingressi.
B) I dispositivi di sicurezza devono essere perfettamente allineati per il corretto
funzionamento della centrale A3.
C) Se si desidera effettuare una regolazione di coppia sul motore è necessario nella
versione A3 inserire nell'apposito connettore la scheda AR, se questo dispositivo non
viene utilizzato accertarsi che vi sia inserito sul connettore il cavalotto mentre per la
versione A3F effettuare la regolazione agendo sulle 5 posizioni del commuttatore
vedi FIG. 1.
D) Premere il pulsante apre visualizzando il comando con il rispettivo Led ed
accertarsi dell'esatto movimento di apertura. Se ciò non fosse invertire le fasi/e dei/
l motori/e. Se l'automazione necessita dei fine corsa, verificare l'esatto funzionamento degli stessi, ed eventualmente scambiare il fine corsa apre (FCA) con il fine corsa
chiude (FCC).
E) Effettuare la regolazione per il tempo lavoro TL per il tempo chiusura 2 motore T2M
e se richiesta, la regolazione della pausa TP vedi fig. 1.
F) Inserire nell'apposito connettore il ricevitore radio, controllando il funzionamento
del radiocomando e di tutte le sicurezze e circuiti di comando.
FUNZIONAMENTO STANDARD
Con il dip swich predisposto come da fig. 1, al primo impulso di passo passo o
radiocomando, la centrale A3 fa come prima manovra, "apre" preceduta da un
impulso di sblocco all'elettroserratura, se installata: questa manovra viene interrotta
o dal fine corsa apre, se installato (FCA), o dal termine del tempo lavoro, oppure dal
pulsante di alt. Per tutto il periodo di questa manovra il lampeggiante e la spia cancello
aperto sono in funzione. Allo stop o fine manovra il lampeggiante si spegne e la spia
di cancello aperto rimane accesa. Al termine del tempo pausa si ha la manovra di
chiusura, quindi l'accensione del lampeggiante. La fine di questa manovra viene
interrotta o dal fine corsa chioude (FCC) se installato o dal pulsante di alt, o dal
termine del tempo lavoro. Alla fine di questa manovra il lampeggiante e la spia
cancello aperto si spengono. Se nella manovra chiude intervengono i dispositivi di
sicurezza si ha l'inversione della manovra.
FUNZIONI PROGRAMMABILI
• SWICH 1: esclusione chiusura automatica
• SWICH 1: off chiusura automatica inserita
La manovra "chiude" viene effettuata automaticamente dopo il tempo pausa impostato.
• SWICH 1: on chiusura automatica disinserita.
Dopo la manovra apre la centrale A3 rimane in pausa fino a che non viene dato un
altro impulso.
• SWICH 2: abilitazione tempo preavviso.
bili contro i corto circuiti o fulmini e scaricatore per sovratensioni.
1° motore
2° motore
e fine corsa chiude (FCC)
• Ingresso fine corsa chiude (FCC) contatto NC
protezione e sicurezza protetta con fusibile.
passo, apre, chiude. Per dispositivi di
sicurezza e la luce di cancello aperto
contatto NC
contatto NA
Italiano
• SWICH 2: off tempo preavviso disinserito.
• SWICH 2: on tempo preavviso inserito.
Prima di iniziare il ciclo di apertura o chiusura il lampeggiante si accende con 4"
secondi in anticipo.
• SWICH 3: abilitazione pausa temporanea.
• SWICH 3: off pausa temporanea disinserita.
Nella manovra di chiusura l'intervento delle fotocellule provoca l'inversione del moto
in apertura. Nella manovra di apertura l'intervento delle fotocellule non viene
considerato.
• SWICH 3: on pausa temporanea inserita.
Nella manovra di chiusura l'ntervento delle fotocellule provoca una pausa temporanea del moto; quando il raggio delle fotocellule risulta libero, si effettua l'inversione
del moto provocando l'apertura. Nella manovra di apertura l'intervento delle fotocellule
provoca una pausa temporanea del moto; qualora il raggio delle fotocellule risulti
libero la manovra di apertura continuerà fino alla pausa.
• SWICH 4: abilitazione tempo pausa con dispositivi di sicurezza.
• SWICH 4: off funzionamento standard
• SWICH 4: on tempo pausa inserito con dispositivi di sicurezza.
Ogni volta che il raggio della fotocellule viene interrotto durante la pausa impostato
viene ripristinato iniziando un nuovo conteggio del tempo. Questa particolare
funzione può essere adottata dove l'utilizzo dell'automazione risulti molto frequente.
(Es; condomini, luoghi pubblici, parcheggi, ecc.).
• SWICH 5: abilitazione luce di cortesia o lampeggiante.
• SWICH 5: off luce cortesia inserita.
Questa condizione permette di collegare, sugli stessi morsetti (3/4) del lampeggiante, la luce di cortesia che rimane attivata durante la fine di una qualsiasi manovra per
altri 20" circa.
• SWICH 5: on lampeggiante inserito.
Si ha l'accensione del lampeggiante solo per il tempo della manovra di apertura e di
chiusura.
• SWICH 6: off - SWICH 7: off - SWICH 8: off: funzionamento passo - passo
standard al primo impulso di passo passo o radio si ha l'apertura, al secondo impulso
si ha la chiusura al terzo impulso l'apertura (1° APRE - 2° CHIUDE - 3° APRE)
• SWICH 6: on - SWICH 7: off - SWICH 8: off: funzionamento passo - passo
modo 2 al primo impulso di passo passo o radio si ha l' apertura,al secondo impulso
si ha la pausa, al terzo impulso la chiusura al quarto l'apertura (1° APRE - 2° PAUSA
3° CHIUDE - 4° APRE).
• SWICH 6: on - SWICH 7: on - SWICH 8: off: funzionamento passo - passo modo
3 al primo impulso di passo passo o radio si ha l'apertura, al secondo impulso si ha
lo stop al terzo impulso la chiusura al quarto l'apertura (1° APRE - 2° STOP 3° CHIUDE - 4° APRE)
• SWICH 6: off - SWICH 7: off - SWICH 8 on: funzionamento condominiale.
Dopo aver dato il primo impulso di passo passo, durante la manovra di apertura non
può avvenire nessun cambiamento del moto: il moto può essere variato solo in fase
di pausa o chiusura. Ciò consente di poter evitare che più comandi successivi,
radiotrasmessi in fase di apertura da una distanza superiore a quella visibile,
pongano fine al ciclo di lavoro appena iniziato.
• SWICH 9: off spia cancello aperto senza fine corsa qualora l'impianto fosse
sprovvisto di fine corsa usare questa configurazione.
• SWICH 9: on spia cancello aperto con fine corsa.
Qualora l'impianto necessita del fine corsa usare questa configurazione.
• SWICH 10: abilitazione alt temporaneo
• SWICH 10: off alt temporaneo inserito.
Nella manovra di apertura si può effettuare con il pulsante di alt un fermo temporaneo
del movimento, dando così inizio al tempo di pausa, al termine del quale si effettua
la manovra di chiusura. Nella manovra di chiusura con il pulsante di alt si ha un fermo
del movimento, fino a quando non viene dato un altro impulso di passo passo.
• SWICH 10: on funzionamento standard
• SWICH 11: abilitazione colpo d'ariete.
• SWICH 11: off funzionamento standard
• SWICH 11: on colpo d'ariete inserito.
La manovra di apertura viene preceduta da un impulso di chiusura per liberare
l'elettroserratura. Questa funzione utile quando le condizioni ambientali sono piuttosto severe (d'inverno, con neve ghiaccio ecc.) Il colpo d'ariete non viene eseguito
nel caso in cui il tempo preavviso sia inserito.
SWICH 12: abilitazione ritardo 1° motore in apertura.
SWICH 12: off funzionamento standard
SWICH 12: on ritardo 1° motore in apertura inserito.
Nella manovra di apertura il 1° motore è ritardato 2/3" questa particolare funzione
trova impiego nei casi in cui si utilizzi l'elettroserratura o dove esistano ante con
spessori notevoli.
CARATTERISTICHE TECNICHE
- ALIMENTAZIONE : 220 V.c.a. +/-10% 50Hz
- TEMPERATURA ESERCIZIO : -20°C + 70°C
- POTENZA MAX MOTORE : 1/2Hp Monofase
- POTENZA MAX LUCE CANCELLO : 5W 24V
- CORRENTE MAX USCITA 24V : 1A
- TEMPO LAVORO : 8" A 42" sec. (maggiorabile da 8 a 118 sec.)
- TEMPO PAUSA : 2" A 60" sec.
- TEMPO RITARDO 2 MOTORE : 0 A 20" sec.
-
TEMPO SFASAMENTO IN APERTURA
- DIMENSIONI CONTENITORE : 280 x 220 x 110 mm.
La NICE spa si riserva il diritto di apportare modifiche in qualsiasi momento e
senza preavviso alcuno.
!
Per versione A3/1 - A3F/1 - non usare
: 0 A 2" sec.
3
Page 4
English
SWITCH 1: Off Automatic closing on
SWITCH 1: On Automatic closing off
SWITCH 2: Off Warning time off
SWITCH 2: On Warning time on
SWITCH 3: Off Temporary pause off
SWITCH 3: On Temporary pause on
SWITCH 4: Off Pause time with safety device off
SWITCH 4: On Enable pause time with safety device on
SWITCH 5: Off Courtesy light on
SWITCH 5: On Flashing ligth on
SWITCH 6: Off
SWITCH 7: Off
SWITCH 8: Off
SWITCH 6: On
SWITCH 7: Off
SWITCH 8: Off
Standard pass-by-pass operation
}
(open - close - open)
Mode 2 pass-by-pass operation
}
(open - pause - close - open)
Fig. 1
SWITCH 6: On
SWITCH 7: On
SWITCH 8: Off
SWITCH 6: Off
SWITCH 7: Off
SWITCH 8: On
SWITCH 9: Off Gate open without limit switc warning light
SWITCH 9: On Gate open with limit switch warning lite
SWITCH 10: Off Temporary stop on
SWITCH 10: On Temporary stop off
SWITCH 11: Off Water hammer off
SWITCH 11: On Water hammer on
SWITCH 12: Off 1st motor opening delay off
SWITCH 12: On 1st motor opening delay on
Mode 3 pass-by-pass operation
}
(open - stop - close - open)
Shared property operation
}
NB.: 1) on all A3 units with torque regulation a force thrust of about 1 sec is envisaged in order to overcome inertia in any movement
of the gate.
2) If the installation needs an electro-block, connect it to terminal 3 - 4 (parallel to the flashing light).
4
Page 5

English
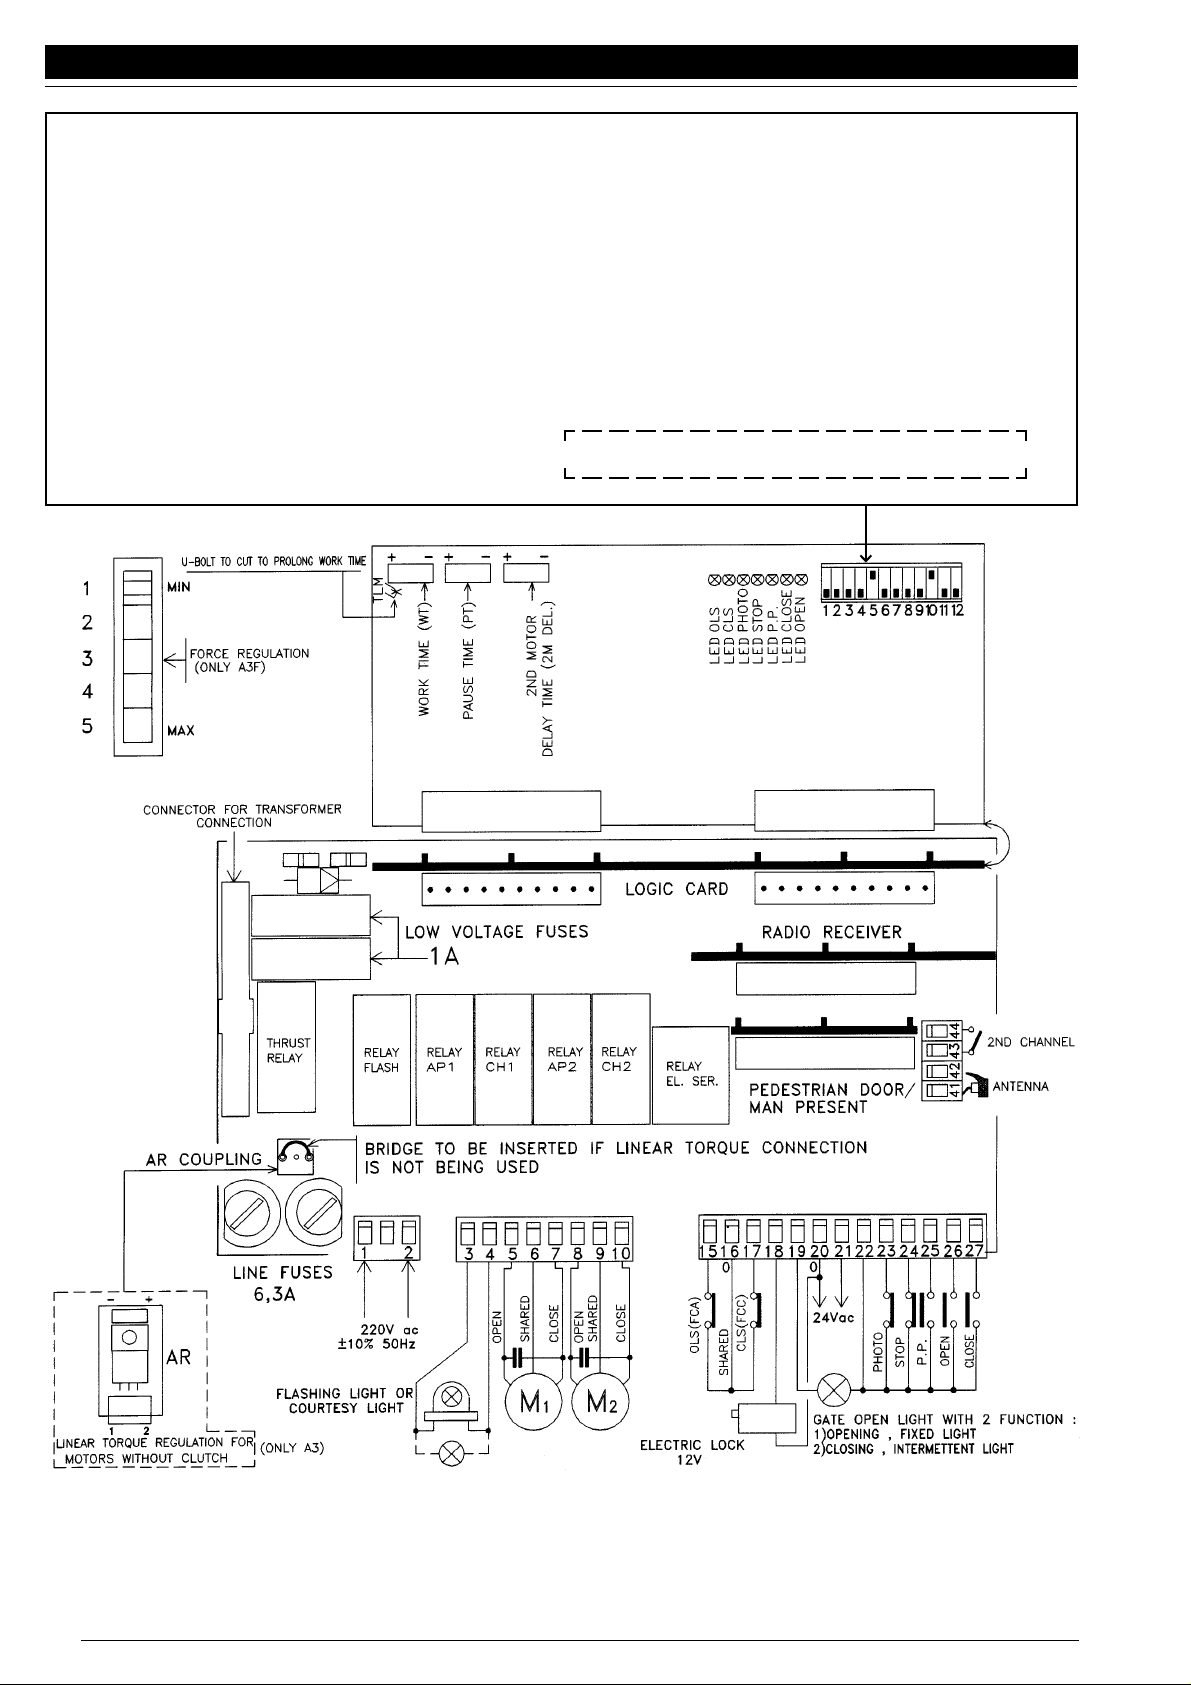
A: TERMINAL BOARD DESCRIPTION
A1 Terminals 1- 2 • Line input 220 V ac protected with fuses to
guard against short circuits and overload
dischargers
A2 Terminals 3 - 4 • Flashing ligth or courtesy light output
A3 Terminals 5 - 6 - 7 • 1st motor output terminal 6 is common
for 1st motor
A4 Terminals 8 - 9 - 10 • 2nd motor output terminal 9 is common
for 2nd motor
A5 Terminal 15 • Opening limit switch input (OLS)
N.C. contact
A6 Terminal 16 (0v) • Common input for opening limit switch
(OLS) and closing limit switch (CLS)
N.C. contact
A7 Terminal 17 • Closing limit switch input (CLS)
N.C. contact
A8 Terminal 18 • 12V electric lock control output.
A9 Terminal 19 • Open gate pilot light output.
A10 Terminals 20 (0V)-21(24V)• 24 V ac output, max. 1A for safety
devices protected with fuse
A11 Terminal 22 • Common input for STOP, step-by-step,
open & close buttons for safety devices
and open gate light
A12 Terminal 23 • Safety device input (FHOTO) N.C. contact
A13 Terminal 24 • Stop button input (STOP) N.C. contact
A14 Terminal 25 • Step-by-step button input (PP)
N.A. contact
A15 Terminal 26 • Open button input (OPEN) N.A. contact
A16 Terminal 27 • Close button input (CLOSE) N.A. contact
B: ANTENNA TERMINAL BOARD DESCRIPTION
B1 Terminal 41 • Antenna unit
B2 Terminal 42 • Antenna sock
B3 Terminal 43 • 2nd radio channel output
B4 Terminal 44 • 2nd radio channel output
NOTE: Terminal board can be completely removed to make it easier to install the unit.
While securing connections and coupling the various cards, the A3 units must
not be on. If the N.C. controls or buttons are not used, join the jumpers on their
related terminals.
INSTALLATION INSTRUCTIONS
A) After completing connections as outlined above and installing all safety and
warning devices that UNI 8612 standard requires, switch on the A3 unit checking the
right voltage and make sure that there is no humming or irregular excitations.
Make sure that the STOP/PHOTO/OLS/CLS LED's are on the LED's switch off when
one of the single input is enabled. If the LED's are off, check their respective
connections at the inputs.
B) Safety devices must be perfectly aligned to ensure efficient operation of the A3
units.
C) If you with to regulate the motor torque, in the A3 version you need to plug in the
AR card in the connector provided. If this device is not used, make sure that the jumper
is fitted on the connector whereas for the A3F version, regulate by setting the 5
positions on the switch, see fig. 1.
D) Press the open button displaying the control with ist related LED and make sure
of the exact opening movements. If this is not so, reserve the phases of the motor(s).
If automation requires some limit switches, make sure they are working properly and
necessary, swap the opening limit switch (OLS) and closing limit switch (CLS).
E) Set the operating time WT for motor 2 closing time T2M and, if required, set the
pause PT. See fig. 1.
F) Insert the radio receiver provided, in the connector and check the radio control and
all safety devices and control circuits are working properly.
STANDARD OPERATION
• SWICH 2: off warning time is disabled.
• SWICH 2: on warning time is enabled.
Before starting the opening or closing cycle, the flashing light switches on 4 seconds
early.
• SWICH 3: enables temporary pause.
• SWICH 3: off temporary pause is disabled.
While closing the gate, enabling of the photocell reverses opening motion. While
opening the gate thephotocell enabling is ignored.
• SWICH 3: on temporary pause is enabled.
While closing the gate, enabling of the photocell causes a temporary pause in motion,
when the range of the photocells is vacant, motion is reversed causing the gate to
open. While opening the gate, enabling of the photocell causes a temporary pause
in motion, if the photocell rance is vacant, the opening operation will continue until it
is paused.
• SWICH 4: enables temporary pause with safety devices.
• SWICH 4: off standard operation.
• SWICH 4: on- temporary pause with safety devices is enabled.
Every time the photocell range is interrupted during pause, the set pause time is reset
and restart timing. This particular function can be adopted where automation is used
very frequently (e.g. apartment blocks, public property, car parks etc).
• SWICH 5: enables courtesy or flashing ligh.
• SWICH 5: off courtesy light is enabled
This conditions allows you to connect the courtesy light, thet remains on during the
end of any operation for approx. another 20 sec., to the same terminals (3/4) as the
flashing light.
• SWICH 5: on flashing light is enabled.
The flashing light is switch on only while the gate is opened or closed.
• SWICH 6: off - SWICH 7: off - SWICH 8: off: standard step-by-step operation.
When the first step-by-step or radio pulse is sent, the gate is opened, upon the
second pulse the gate is closed and upon the third pulse, the gate is opened (1st
OPEN, 2nd CLOSE, 3rd OPEN).
• SWICH 6: on - SWICH 7: off - SWICH 8: off: mode 2 step-by-step operation.
When the first step-by-step or radio pulse is sent, the gate is opened, pause at the
second pulse, upon the third pulse the gate is closed and upon the fourth, the gate
is opened (1st OPEN, 2nd PAUSE 3rdCLOSE, 4th OPEN).
• SWICH 6: on - SWICH 7: on - SWICH 8: off: mode 3 step-by-step operation.
When the first step-by-step or radio pulse is sent, the gate is opened, upon the
second pulse motion is stopped, upon the third pulse, the gate is closed and upon the
fourth, the gate is opened (1st OPEN, 2nd STOP 3rdCLOSE, 4th OPEN).
• SWICH 6: off - SWICH 7: off - SWICH 8: on: apartment block operation.
After sending the first step-by-step pulse, motion cannot be reversed during the
opening operation. Motion can only be varied in the pause or closing stages. This
allows you to stop several consecutive commands transmitted during the opening
stage from farther away than the visible range from ending the operating cycle that
has just begun.
• SWICH 9: off open gate pilot light without limit switches. If the system is not
fitted with limit switches, use this configuration.
• SWICH 9: on open gate pilot light with limit switches.
If the system requires limit switches, use this configuration.
• SWICH 10: enables temporary stop
• SWICH 10: off temporary stop is enabled.
In the opening stage, movement can be temporarily stopped with the button, thus
starting the pause stage, after which the gate is closed. When closing the gate, the
stop button stops movement until another step-by-step pulse is sent.
• SWICH 10: on standard operation.
• SWICH 11: enables water hammer.
• SWICH 11: off standard operation.
• SWICH 11: on water hammer is enabled.
The opening stage is preceded by a closing pulse to release the electric lock. This
function is useful when environmental conditions are somewhat harsh (winter, in
snow, ice etc.) A water hammer is not induced if the warning time is enabled.
•SWICH 12: enables 1st motor delay in opening.
•SWICH 12: off Standard operation.
•SWICH 12: on 1st motor delay in opening is enabled.
In the opening stage, the 1st motor is delayed 2/3 sec. This particular function is
applied if the electric lock is used or where there are very thick doors.
With the dip switch pre-set as in fig. 1 to first step-by-step pulse or radio control, the
A3 unit opens as its firts operation preceded by an electric lock release pulse, if
installed. This operation is interrupted by the opening limit switch, if installed (OLS),
the operational timeout, or stop pulse. Throughout this operation the flashing light and
pilot light are operational.When the operation is stopped is completed, the flashing
light switches off and the open gate pilot ligth remains on. After the pause time has
elapsed, the gate is closed and then the flashing light is switched on. The end of this
operation is interrupted by the closing limit switch (CLS), if installed, the stop button
or the end of operating time. At the end of this operation, the flashing light and open
gate pilot light are switched off.
PROGRAMMABLE FUNCTIONS
• SWICH 1: disables automatic closing.
• SWICH 1: off automatic closing is enabled.
The gate is automatically closed after the set pause time.
• SWICH 1: on automatic closing is disabled.
After opening the gate, the A3 unit remains paused until another pulse is given.
• SWICH 2: enables warning time.
TECHNICAL SPECIFICATIONS
- PAWER SUPPLY : 220 Vac ± 10% 50Hz
- OPERATING TEMPERATURE : -20°C to + 70°C
- MAX.: MOTOR RATING : 1/2 HP single phase
- MAX.: GATE LIGHT RATING : 5W 24V
- MAX.: 24V. OUTPUT CURRENT : 1A
- OPERATING TIME : 8 to 42 sec.
- PAUSE TIME : 2 to 20 sec.
- 2nd MOTOR DELAY : 0 to 20 sec.
- OPENING PHASE SHIFT TIME : 0 to 2 sec.
- BOX DIMENSIONS : 280 x 220 x 110 mm.
NICE spa reserves the right to make modifications at any time without prior
notice.
!
For A3/1 end A3F/1 versions do not use
(can be increased from 8 to 118 sec.)
5
Page 6

Français
SWITCH 1: Off Avec vermeture automatique
SWITCH 1: On Sans fermeture automatique
SWITCH 2: Off Sans temp de preavis
SWITCH 2: On Avec le temps de préavis
SWITCH 3: Off Fonction teleinversion a la fermeture
SWITCH 3: On Stop a l'ouverture et fermeture s'il y'a
obstacle aux photocellules et dispositifs de
securite
SWITCH 4: Off Sans reprise du temps de pause en cas de
teleinversion
SWITCH 4: On Avec reprise du temps de paese a chaque
teleinversion
SWITCH 5: Off Lumiere de courtoise active
SWITCH 5: On Clignotant actice
SWITCH 6: Off
SWITCH 7: Off
SWITCH 8: Off
SWITCH 6: On
SWITCH 7: Off
SWITCH 8: Off
Fonctionnement pas a pas standard
}
(ouvre - ferme - ouvre)
Fonctionnement pas a pas mode 2
}
(ouvre - pause -ferme - ouvre)
Fig. 1
SWITCH 6: On
SWITCH 7: On
SWITCH 8: Off
SWITCH 6: Off
SWITCH 7: Off
SWITCH 8: On
SWITCH 9: Off lumiere porte ouverte sans fin de course
SWITCH 9: On Lumiere porte ouverte avec utilisation
des
SWITCH 10: Off Fermè sans fonction demi-ouverture
SWITCH 10: On Fonction demi-ouverture avec fontion
stop et reprise du cycle normal apres
temps de pause
SWITCH 11: Off Sans coup de belier
SWITCH 11: On Sans coup de belier
SWITCH 12: Off Sans retard 1 moteur a l'ouverture
SWITCH 12: On Avec retard 1 moteur a l'ouverture.
Fonctionnement pas a pas mode 3
}
(ouvre - stop - ferme - ouvre)
Fonctionnement usage collectif
}
sur temps de travail
fin de course (es.: coullisant)
NB.: 1) sur toutes les centrales A3 avec reglage de couple on a prevu un decollage de force d'environ 1 seconde pour pouvoir vaincre
l'inertie dans n'importe quel mouvement de la grille.
2) si l'installation a besoin d'un verrouillage electrique le conecter aux bornes 3 - 4 (en parallele avec le clignotant).
6
Page 7

A: DESCRIPTION BORNIER
A1 bornes 1- 2 • Alimentation 220 V. c.a. protégè par le
A2 bornes 3 - 4 • Sortie clignotant et lumiere de courtoisie
A3 bornes 5 - 6 - 7 • Sortie moeur 1 borne 6 commun du moteur 1
A4 bornes 8 - 9 - 10 • Sortie moeur 2 borne 9 commun du moteur 2
A5 borne 15 • Entrée fin de course ouverture FCO (FCA)
A6 borne 16 (0 V.) • Entrée commun des fins de course ouver-
A7 borne 17 • Entrée fin de course fermeture (FCF) (FCO)
A8 borne 18 • Sortie electroserrure 12V
A9 borne 19 • Sortie lumiére porte ovverte
A10 bornes 20 (0 V.) -21(24V.) • Sortie 24V.c.a. max 1A protégé par le fusible
A11 borne 22 • Entrée comun de la commande pas a pas
A12 borne 23 • Entrée sécurité contact NF
A13 borne 24 • Entrée fonction stop contact NF
A14 borne 25 • Entrée fonction pas a pas et toutes
A15 borne 26 • Entrée touche "ouvre" (OUVRE) contact NO
A16 borne 27 • Entrée touche "ferme" (FERME) contact NO
B: DESCRIPTION BORNEIR ANTENNE
B1 borne 41 • Ame de l'antenne seulement en cas
B2 borne 42 • Masse de l'antenne
B3 borne 43 • Sortie contact sec. 2° canal
B4 borne 44 • Sortie contact sec. 2° canal
Nota: le bornier est entiérement debrochable pour faciliter le raccordement de
l'armoire.
Si vous devez effectuer un raccordement ou un reglage quelconque sur
l'armoire A3, elle ne doit absoulement pas être alimentée. Si vous n'utilisez
pas: la fonction stop, n'oubliez pas de faire le pont entre les bornes 22-24, la
fonction photocellule faire le pont entre les bornes 22-23. De meme la fonction
fin de course faire le pont entre les borne 15-16-17.
INSTRUCTIONS D'INSTALLATION
A) Aprés avoir effectuer le raccordement electrique suivant la notice ci-dessus et
aprés installation de tous les dispositifs de securite et de signalation suivant les
normes actuelles. Alimenter l'armoire A3, controler l'alimentation et controler qu'il
n'yait, pasde bruits anormaux ou de fonctions anormales. Verifier que les leds
deSTOP/FOTO/FCO/FCF soient allumés, controler a chaque fonction que le led
correspondant s'allume, si le led reste éteint, verifier le raccordement correspondant.
B) Les photocellules de securite doivent etre parfaitement alignées pour le bon
fonctionnement de l'armoire A3.
C) Dans le cas de moteur necessitant une régulation de couple, il est necessaire de
rajouter a la place du pont existant,le régulateur AR sur le connecteur. Si vous
n'utilisez pas le régulateur, assurez-vous bien que le point soit bien en place sur son
connecteur. Pour la version A3F,effectuer le réglage en agissant sur les 5 positions
du commutateur (voir fig. 1).
D) Donner une impulsion sur la fonction ouvre. Visualiser la commande par le led
correspondant et s'assurer que le mouvement du portail soit bien dans le sens de
l'ouverture. Si votre installation a si ce la n'est pas le cas inverser les fils ouverture
et fermeture du moteur au bornier necessitée l'installation de fin de course, vérifier
le bon fonctionnement de ceux-ci, si non inverser le fin de course ouverture (FCF)
avec le fin de course fermeture (FCO).
E) Effectuer le reglage du temps de travail par le trimer TL, pour le retard a la
fermeture du 2 moter, regler le trimer T2M , pour le temps de pause en cas de
fermeture automatique, le trimer TP, (voir fig. 1).
F) Embrocher sur le connecteur approprié le recépteur radio et controler son bon
fonctionnement.
FONCTIONNEMENT STANDARD
Avec le dip swich positionné comme sur la fig. 1. ala 1° impulsion par le travers de
la radiocommande, vous obtenez d'abord la manoeuvre d'ouverture précedée de
l'alimentation de l'électroserrure si vous l'avez installé. La manouvre ouverture peut
etre stoppée, soit par les fins de course suivant utilisation (FCO), soit par la fin du
reglage du temps de travail (TL), ou par la fonction stop. Pendant toute la période de
temps d'ouverture, le clignotant et la lampe porte ouverte sont allumés. A la fonction
stop ou fin de la manoeuvre, le clignotant s'éteint et la lampe porte ouverte reste
allumés. A la fin du temps de pause, nous avons la fonction férmeture avec a nouveau
la mise en fonction du clignotant. La manoeuvre fermeture peut etre stoppée, soit
par les fins de course fermeture suivant utilisation (FCF), soit par le reglage du temps
de travail (TL), ou par la fonction stop. A la fin de cette manoeuvr, le clignotant et la
lampe porte ouverte s'eteignent. Si pendant la manoeuvre de férmeture, un obstacle
intervient sur les securités (ex. photocellule, barre palpeuse) nous obtenons l'inversion
de la manoeuvre.
PROGRAMME DES FONCTIONS
• SWICH 1: fonction férmeture automatique
• SWICH 1: off férmeture automatique. La manoeuvre fermeture se fait
automatiquement aprés le temps de pause.
• SWICH 1: on exclusion férmeture automatique. Dans cette position, il est
necessaire de donner une inpulsion pour la férmeture du portail.
• SWICH 2: temps de préavis.
• SWICH 2: off exclusion du temps de préavis.
• SWICH 2: on avec le temps de préavis.
Le clinotant s'allume 5 secondes avant la mise sous tension des moteurs.
fusible fuse 2. Voir fig. 1
contact NF
ture (FCO) (FCA) et fermeture (FCF) (FCC)
contact NF
fuse 1. Voir fig. 1.
pour les dispositif de sécurité
(Photocéllule-Palpeur), portail ouvert et
lumiére de courtoisie
commandes exterieures (ex: recepteur
extériéur - parlophone - contact sel. et
boutons pourssoirs) contact NO
d'utilisation d'un recepteur embrochable
Français
• SWICH 3: Fonction téléinversion.
• SWICH 3: off pendant la manoeuvre de férmeture, tout obstacle intervenant
sur les sécurités (photocéllule, barre palpeuse) provoque la reouverture des battants.
Cette fonction n'intervient pas pendant l'ouverture.
• SWICH 3: on pendant la manoeuvre de fermeture, tout obstacle intervenant
sur les sécurités (photocéllule, barre palpeuse) provoque une pause des moteurs,
tout le temps de l'obstacle. A la disparition de l'obstacle, la téléinvention des moteurs
se réalise. A l'ouverture,tout obstacle provoque la pause des moteurs. A la disparition
de l'obstacle, les moteurs poursuivent leur manoeuvre d'ouverture jusqu'a la fin de
la fonction.
• SWICH 4: fonction de temps de pause en paralléle des
• SWICH 4: off fonction standard
• SWICH 4: on mise en fonction des sécurité en paralléle du temps de pause.
A chaque fois qu'il y'a obstacle ou fonction des photocellules a la férmeture, le temps
de pause repart a zero. Cette fonction est particulierement utilisée dans les cas de
fonctionnement intensif, evitant les reovvertures intempestives a chaque passage
devant les securites, pendant la fermeture cette fonction permet la reprise du temps
de pause a chaque téleinversion.
• SWICH 5: fonction lumiere de courtoise ou clignotant.
• SWICH 5: off fonction lumiere de courtoise.
Cette situation permet de raccorder, aux mêmes bornes (3/4) que le clignotant,
l'eclairage de fonctionnement qui reste activé encore pendant environ 20" à la fin de
n'importe quelle manoeuvre.
• SWICH 5: on fonction clignotant.
On a l'allumage du clignotant juste le temps de la manoeuvre d'ouverture et de
fermeture.
• SWICH 6: off
• SWICH 7: off fonctionnement pas à pas standard
• SWICH 8: off
A la première impulsion de pas à pas ou radio commande, on a l'ouverture; à la
deuxième impulsion on a la fermeture, à la troisieme impulsion l'ouverture (1re
OUVRE 2e FERME 3e OUVRE).
• SWICH 6: on
• SWICH 7: off fonctionnement pas à pas mode 2
• SWICH 8: off
A la première impulsion de pas à pas ou radio commande, on a l'ouverture; à la
deuxième impulsion on a la pause, à la troisieme impulsionla fermeture, à la
quatrième l'ouverture (1re OUVRE 2e STOP 3e FERME 4e OUVRE).
• SWICH 6: on
• SWICH 7: on fonctionnement pas à pas mode 3
• SWICH 8: off
A la première impulsion de pas à pas ou radio commande, on a l'ouverture; à la
deuxième impulsion on a le stop, à la troisieme impulsionla fermeture, à la quatrième
l'ouverture (1re OUVRE 2e STOP 3e FERME 4e OUVRE).
• SWICH 6: off
• SWICH 7: off fonctionnement usage en collectivité
• SWICH 8: on
Après avoir la premiere impulsion de pas à pas, durant la manoeuvre d'ouverture il
ne peut y avoir aucun changement du mouvement; le mouvement peut être modifié
seulement en phase ou de fermeture. Cela permet d'éviter que plusieurs commandes
successives, provenant de la radiocommande en phase d'ouverture d'une distance
supérieure à la distance visible mettent fin au cycle de travail à peine commencé.
• SWICH 9: off lumiere porte ouverte sans fin de course sur temps de travail.
Si l'installation n'est pas munie de fin de course, untiliser cette configuration.
• SWICH 9: on lumiere porte ouverte avec utilisation des fins de course.
Si l'installation a besoin du fin de course, untiliser cette configuration (ex.:coullisant).
• SWICH 10: fonction passage pietons
• SWICH 10: on fonction standard
• SWICH 10: off nous obtenons la fonction passage pietons.
Avec cette fonction, pendant la manoeuvre d'ouverture, nous pouvons effectuer par
la fonction stop un arret du mouvement ouverture (en fonction automatique), la
logique redonnera, aprés le temps de pause préreglé l'ordre de fermeture. Pendant
la manoeuvre de fermeture avec la fonction stop, nous obtenons l'ârret du mouvement.
Il sera nécessaire d'utiliser la fonction pas à pas pour obtenir une nouvelle manoeuvre.
• SWICH 11: fonction coup de belier
• SWICH 11: off fonction standard
• SWICH 11: on fonction coup de belier
Dans cette position, les moteurs donnent une impulsion a la fermeture avant
l'ouverture, ceci permettant de liberar la serrure en cas de gel ou d'ouverture difficile.
Le coup de belier ne peut etre utilisé dans le cas ou la fonction temps de préavis a
déjà été optée.
SWICH 12: fonction retard 1° moteur a l'ouverture
SWICH 12: off fonction standard
SWICH 12: on fonction retard 1° moteur a l'ouverture dans cette position, le 1°
moteur est retarde a l'ouverture de 2 a 3 secondes. Ceci permet de bien liberer
l'electroeserrure.
NOTA: l'installation et l'utilisation de l'armoire A3 devrà etre faite rigoureusement
dans le respect des normes de securité en viguer. Le constructeur ne pourra
etre tenu responsable pour toute installation non conforme.
CARACTERISTIQUES TECNIQUES
- TENSION : 220 V.c.a. +/-10%
- TEMPERATURE DE FONCTIONNEMENT : -20°C + 70°C
- PUISSANCE MOTEUR MAX : 1/2Hp Monophase
- PUISSANCE LUMIERE PORTE OUVERTE : 5W 24V
- SORTIE COURANT MAX : 24 V 1A
- TEMPS DE TRAVAIL : 8" A 42" sec.
- TEMPS DE PAUSE : 2" A 60" sec.
- TEMPS DE RETARD 2° MOTEUR : 0 A 20" sec.
- TEMPS DE RETARD A L'OUVERTURE : 0 A 2" sec.
- DIMENSION ARMOIRE : 280 x 220 x 110 mm.
La societé NICE se reserve le droit d'apporter toutes modifications a tout
moment sans aucun préavis.
!
fonction de sécurité.
(augmentable de 8 a 118 sec.)
Pour les versions A3/1 et A3F/1 n'utilisez pas
7
Page 8

Deutsch
SWITCH 1: Off Automatische Schlißung aktiviert
SWITCH 1: On Automatische Schlißung deaktiviert
SWITCH 2: Off Ankündigungszeit deaktiviert
SWITCH 2: On Ankündigungszeit aktiviert
SWITCH 3: Off Einstwelige Pause deaktiviert
SWITCH 3: On Einstwelige Pause aktiviert
SWITCH 4: Off Pausenzeit mit deaktiviert
Sicherheitsvorrichtung
SWITCH 4: On Aktivierung der pausenzeit mit aktiviert
er Sicherheitsvorrichtung
SWITCH 5: Off Beleuchtung aktiviert
SWITCH 5: On Blinklicht aktiviert
SWITCH 6: Off
SWITCH 7: Off
SWITCH 8: Off
SWITCH 6: On
SWITCH 7: Off
SWITCH 8: Off
Standard schrittfunktion
}
(Öffnet - Schließt - Öffnet)
Schrittfunktion modus 2
}
(Öffnet - Pause - Schließt - Öffnet)
Fig. 1
SWITCH 6: On
SWITCH 7: On
SWITCH 8: Off
SWITCH 6: Off
SWITCH 7: Off
SWITCH 8: On
SWITCH 9: Off Kontrolleuchte Tor offen ohne
SWITCH 9: On Kontrolleuchte Tor offen mit Endschalter
SWITCH 10: Off Einstweiliger Halt aktivier
SWITCH 10: On Einstweiliger Halt deaktiviert
SWITCH 11: Off Druckstoß deaktiviert
SWITCH 11: On Druckstoß aktiviert
SWITCH 12: Off Verzögerun 1. motor in Öffnung
SWITCH 12: On Verzögerun 1. motor in Öffnung aktiviert.
Schrittfunktion modus 3
}
(Öffnet - Stop - Schließt - Öffnet)
Wohnblockfunktion
}
Endschalter
deaktiviert
NB.: 1) An allen Zentralen A3 mit Drehmomentregulierung ist eine Kraftanlauf von ca: 1 Sek. vorgesen, um die Schwungkraft bei jeder
Bewegung des Tores überwinden zu können.
2) Sollte bei der Installation eine Elektrosperre erforderlicht sein, mub diese mit den Klemmen 3-4 verbunden werden (parallel zum
Blinklicht).
8
Page 9

A: BESCHREIBUNG KLEMMENBRETT:
A1 Klemmen 1- 2 • Netzeingang 220 V Ws abgesichert mit
A2 Klemmen 3 - 4 • Ausgang Blinker oder Beleuchtung
A3 Klemmen 5 - 6 - 7 • Ausgang 1. Motor zur Klemme Nr. 6
A4 Klemmen 8 - 9 - 10 • Ausgang 2. Motor zur Klemme Nr. 9
A5 Klemme 15 • Eingang Öffnungsendschalter (FCA)
A6 Klemme 16 (0v) • Gemeinsamer Eingang für Öffnungs - ends-
A7 Klemme 17 • Eingang Schließendschalter (FCC)
A8 Klemme 18 • Ausgang Elektrosperre - Steuerung 12V
A9 Klemme 19 • Ausgang Kontrollicht Tor offen
A10 Klemmen 20 (0V)-21(24v) • Ausgang 24 Ws max. 1A Für Schutz- und
A11 Klemme 22 • Gemeinsamer Eingang für die Knöpfe Halt,
A12 Klemme 23 • Eingang Sicherheitsvorrichtungen (Photo)
A13 Klemme 24 • Eingang Halt-Knopf (Halt)
A14 Klemme 25 • Eingang Schittfunktionsknopt (PP)
A15 Klemme 26 • Eingang Öffnungs-Knopf (AP) Arbeitskontakt
A16 Klemme 27 • Eingang Schließ-Knopf (CH) Arbeitskontakt
B: BESCHREIBUNG ANTENNENKLEMMENBRET
B1 Klemme 41 • Steuerzentrale Antenne
B2 Klemme 42 • Antennenbeflechtung
B3 Klemme 43 • Ausgang 2, Funkkanal
B4 Klemme 44 • Ausgang 2, Funkkanal
ANMERKUNG: Das Klemmenbrett ist vollständig herausziehbar, um die Installation
der Zentrale zu erleichtern.
Während die Verbindungen vorgenommen, bzw. die verschiedenen Karten
eingesteckt werden, darf die Zentrale A3 nicht mit Strom versorgt werden.
Wenn die Ruhekontakte oder-knöpfe nicht verwendet werden,
Überbrückungsklemmen zwischen den betroffenen Klemmen anbringen.
INSTALLATIONSANLEITUNG
A) Nachdem die Anschlüsse wie oben aufgeführt, und alle von der Vorschrift UNI
8612 vorgesehenen sicherheits-und Signalvorrichtungen installiert wurden, wird die
Zentrale A3 mit Strom versorgt. Die Spannungen kontrollieren und sicherstellen, daß
kein Brummen und keine anomale Erregungen auftreten. Überprüfen, ob die LedAnzeigen HALT/PHOTO/FCA/FCC aufleuchten und kontrollieren, ob sie bei Eingreifen
der einzelnen Eingänge erlöschen. Falls die LED- Anzeigen nicht aufleuchten,
müssen die entsprechenden Anschlüsse an den Eingängen überprüft werden.
B) Für einen korrekten Betrieb der Zentrale A3 müssen die Sicherheitsvorrichtungen
perfekt ausgerichtet sein.
C) Falls eine Drehmomentregulierung am Motor vorgenommen werden soll, muß bei
der Ausführung A3 die AR-Karte in den entsprechenden Verbinder gesteckt werden;
falls diese Vorrichtung nicht verwendet wird,muß man sicherstellen, daß am Verbinder
die Überbrückungsklemme eingesetzt ist, während bei der Auführung A3F die
Regulierung durch Verstellen der 5 Stellungen des Umschalters durchgeführt wird
(siehe Abb. 1).
D) Den Öffnungsknospf drücken, die Steuerung mit dem entsprechenden LED
anzeigen und die korrekte Öffnungsbewegung kontrollieren. Sollte diese nicht
korrekt sein, muß bzw. müssen die Phase (n) des Motores bzw. der Motore geändert
werden. Falls die Automatisierung Endschalter erfordert, muß die
Funktionstüchtigkeit derselben überprüft, und eventuell der Öffnungsendschalter
(FCA) mit dem Schließendschalter (FCC) ausgetauscht werden.
E) Die Einstellung der Arbeitszeit TL, der Schließzeit 2 Motor T2'M und gegebenenfalls
der Pausenzeit TP vornehmen, siehe Abb. 1.
STANDARDBETRIEB
Mit dem wie auf Abb.1 dargestellt eingestellten dip switch führt die Zentrale A3 beim
ersten Schritt-oder Funksteuerungsimpuls als ersten Arbeitsgang das "Öffnen"
durch; falls ein Elektroschloß installiert ist, wird an dieses vorher ein Freigabe-Impuls
gesendet. Dieser Arbeitsgang wird entweder vom Öffnungsendschalter; oder bei
Ablauf der Arbeitszeit, oder vom Haltknopf unterbrochen.Für die ganze Dauer dieser
Arbeitsgangs bleiben das Blinklicht und die Tor-Kontrolleuchte in Funktion. Bei
Stoppen oder Vorgangsende erlischt das Blinklicht und die Kontrolleuchte "Tor
offen" bleibt eingeschaltet, Am Ende der Pausezeit wird das Schließmanöver
durchgeführt, folglich wird das Blinklicht wieder eingeschaltet. Das Ende dieses
Arbeitsgangs wird entweder vom Schließendschalter (FCC), falls installiert, oder
vom Haltknopf, oder bei Ablauf der Arbeitszeit unterbrochen Am Ende des Vorgangs
erlöschen sowohl das Blinklicht als auch die Kontrolleuchte "Tor offen". Wenn beim
Schließvorgang die Sicherheitsvorrichtungen ausgelöst werden, erfolgt die Umkehrung
des Vorgangs.
PROGRAMMIERBARE FUNKTIONEN
SWICH 1: Ausschluß der automatischen Schließung
Schmelzsicherungen gegen Kurzschlüsse
oder Blitze und Überspannungsableiter.
gemeinsam 1. Motor
gemeinsam 2. Motor
Ruhekontakt
chalter (FCA) und Schließendschalter (FCC)
Ruhekontakt
Sicherheitsvorrichtungen mit
Schmelzsicherung abgesichert
Schrittfunktion, öffnet, schließt. Für die
Sicherheitsvorrichtungen und das Licht
"Tor offen".
Ruhekontakt
Ruhekontakt
Arbeitskontakt
Deutsch
SWICH 1: off Automatische Schließung aktiviert
Der Schließvorgang wird nach einer vorher eingegebenen Pausezeit automatisch
durchgeführt.
SWICH 1: on Automatische Schließung deaktiviert.
Nach dem Öffnungsvorgang bleibt die Zentrale A3 solange in Pausestellung bis ein
anderer Impuls abgegeben wird.
SWICH 2: Aktivlerung Vorankündigungszeit.
SWICH 2: off Vorankündigungszeit deaktiviert.
SWICH 2: on Vorankündigungszeit aktiviert
Das Blinklicht leuchtet 4 Sekunden vor Beginn des Öffnungs-bzw. Schließzyklus'auf.
SWICH 3: Aktivierung einstweilige Pause
SWICH 3: off einstweilige Pause deaktiviert
Bei den Schließvorgängen löst das Einschreiten der Photozellen eine Umkehrung
der Öffnungsbewegung aus. Bei den Öffnungsvorgängen bleibt das Einschreiten
der Photozellen unbeachtet.
SWICH 3: on einstweilige Pause aktiviert.
Bei den Schließvorgängen löst das Einschreiten der Photozellen ein einsweiliges
Aussetzen der Bewegung aus; wenn der Lichtstrahl der Photozellen frei ist, erfolgt
die Umkehrung der Bewegung und somit die Öffnung. Bei den Öffnungsvorgängen
löst das Einschreiten der Photozellen ein einstweiliges Ausetzen der Bewegung aus;
wenn der Lichtstrahl der Photozellen frei ist, wird die Öffnungsbewegung bis zur
Pause fortgesetzt.
SWICH 4: Aktivierung der Pausenzeit mit Sicherheitsvorrichtungen.
SWICH 4: off Standardbetrieb
SWICH 4: on Pausenzeit mit Sicherheitsvorrichtungen aktiviert.
Jedesmal, wenn der Lichtstrahl der Photozellen während der Pause unterbrochen
wird, wird die eingestellte Pausenzeit rückgestellt und beginnt, die Zeit wieder von
vorne zu zählen. Diese Spezial funktion kann überall dort zur Anwendungs kommen,
wo die Automatisierung sehr häufig benutzt wird (z.B. Wohnhäuser, öffentliche
Einrichtungen, Parkplätze usw.).
SWICH 5: Aktivierung der Beleuchtung oder des Blinklichts
SWICH 5: off Beleuchtung aktiviert
Diese kondition gestattet, an denselben klemmen(3/4) des Blinklichts die Beleuchtung
anzuschließen, die am Ende jedes Vorgangs für ca. weitere 20 Sekunden eingeschaltet
bleibt.
SWICH 5: on Blinklicht aktiviert.
Das Blinklicht leuchtet nur während der Öffnung und Schließung auf.
SWICH 6 off - SWICH 7 off - SWICH 8 off: Standard - Schrittfunktion beim ersten
Schritt-oder Funkimpuls erfolgt die Öffnung, beim zweiten Impuls erfolgt die
Schließung und beim dritten Impuls die Öffnung (1 öffnet - 2 schließt - 3 öffnet).
SWICH 6 on - SWICH 7 off - SWICH 8 off: Schrittfunktion Modus 2 beim ersten
Schritt-oder Funkimpuls erfolgt die Öffnung, beim zweiten Impuls die Pause,beim
dritten Impuls die Schließung und beim vierten Impuls die Öffnung (1 öffnet - 2 Pause
-3 schließt - 4 öffnet).
SWICH 6 on - SWICH 7 on - SWICH 8 off: Schrittfunktion Modus 3 beim ersten
Schritt-oder Funkimpuls erfolgt die Öffnung, beim zweiten Impuls wird gestoppt,
beim dritten Impuls erfolgt die Schließung und beim vierten Impuls die Öffnung (1
öffnet - 2 stoppt -3 schließt - 4 öffnet).
SWICH 6 off - SWICH 7 off - SWICH 8 on: Wohnblockfunktion
Nach Abgabe des ersten Schrittimpulses kann während des Öffnungsvorganges
keine Bewegunsgänderung erfolgen; die Bewegung kann nur während der Pause
oder wahrend des Schließvorganges geändert werden. Dadurch kann verhindert
werden, daß mehrere aufeinanderfolgende Steuerungen, die während der Öffnung
von einer Entfernung, die größer als die Sichtweite ist, gefunkt werden, den gerade
begonnenen Arbeitszyklus beenden.
SWICH 9 off: Kontrolleuchte "Tor offen" ohne Endschalter. Falls die Anlage
ohne Endschalter ist, muß diese Konfiguration verwendet werden.
SWICH 9 on: Kontrolleuchte "Tor offen" mit Endschalter.
Falls die Anlage Endschalter erfordert, muß diese Konfiguration verwendet werden.
SWICH 10: Aktivierung einstweiliger Halt
SWICH 10: off einstweiliger Halt aktiviert
Bei der Öffnung kann mit dem Halt-Knopf ein einstweiliges Anhalten der Bewegung
erzielt werden, wodurch eine Pausenzeit beginnt, nach deren Ablauf der
Schließvorgang erfolgt. Beim Schließvorgang wird die Bewegung bei Betätigen des
Halt-Knopfes angehalten bis ein weiterer Schrittimpuls gegeben wird.
SWICH 10: on Standardbetrieb
SWICH 11: Aktivierung Druckstoß
SWICH 11: off Standardbetrieb
SWICH 11: on Druckstoß aktiviert
Vor dem Öffnungsvorgang wird zur Freigabe des Elektroschloßes ein Schließimpuls
abgegeben. Diese Funktion ist nützlich, wenn die Witterungsverhältnisse besonders
ungünsting sind (im Winter, mit Schnee, Eis usw). Der Druckstoß wird nicht
ausgefürt wenn die Vorankündigungszeit aktiviert ist.
SWICH 12: Aktivierung Verzögerung 1. Motor in Öffnung
SWICH 12: off Standardbetrieb
SWICH 12: on Verzögerung 1. Motor in Öffnung aktiviert
Beim Öffnungsvorgang wird der 1. Motor um 2-3 Sekunden verzögert. Diese
besondere Funktion findet in den Fällen Anwendung, in denen das Elektroschloß
benutzt wird, oder wo Türen mit beträchtlicher Stärke vorhanden sind.
TECHNISCHE EINGENSCHAFTEN
- STROMVERSORGUNG : 220 Ws ±10% 50Hz
- BETRIEBSTEMPERATUR : -20°C bis + 70°C
- MAX. MOTORLEISTUNG : 1/2PS Einphasig
- MAX. LEISTUNG TORLICHT : 5W 24V
- MAX. STROMSTARKE 24V-AUSGANG : 1A
- ARBEITSZEIT : 8" Sek. bis 42" Sek.
- PAUSENZEIT : 2" Sek. bis 60" Sek.
- VERZÖGERUNGSZEIT 2 MOTOR : 0 bis 20" Sek.
- PHASENVERSCHIEBUNGSZEIT BEI ÖFFNUNG : 0 bis 2" Sek.
- ABMESSUNGEN DES BEHÄLTERS : 280 x 220 x 110 mm.
Die Fa. NICE spa behält sich das Recht vor, jederzeit und ohne vorherige
Benachrichtigung Änderungen vorzunehmen.
!
Nicht für die ausführung A3/1 und A3F/1 verwenden
(erhöhbar vor 8 bis 118 Sek.)
9
Page 10

Español
SWITCH 1: Off Cierre automático activado
SWITCH 1: On Cierre automático desactivado
SWITCH 2: Off Tiempo aviso previo desactivado
SWITCH 2: On Tiempo aviso previo activado
SWITCH 3: Off Pausa temporal desactivada
SWITCH 3: On Pausa temporal activada
SWITCH 4: Off Tiempo pausa con dispositivo de seguridad
desactivado
SWITCH 4: On Habilitación tiempo pausa con dispositivo de
seguridad activado
SWITCH 5: Off Luz de cortesía activada
SWITCH 5: On Luz intermitente activada
SWITCH 6: Off
SWITCH 7: Off Funcionamiento paso-paso estándar
SWITCH 8: Off (abre-cierra-abre)
SWITCH 6: On
SWITCH 7: Off Funcionamiento paso-paso modo 2
SWITCH 8: Off (abre-pausa-cierra-abre)
}
}
Fig. 1
SWITCH 6: On
SWITCH 7: On Funcionamiento paso-paso modo 3
SWITCH 8: Off (abre-stop-cierra-abre)
SWITCH 6: Off
SWITCH 7: Off Funcionamiento colectivo
SWITCH 8: On
SWITCH 9: Off Indicador cancela abierta sin fin de carrera
SWITCH 9: On Indicador cancela abierta con fin de carrera
SWITCH 10: Off Alto temporal activado
SWITCH 10: On Alto temporal desactivado
SWITCH 11: Off Golpe de ariete desactivado
SWITCH 11: On Golpe de ariete activado
SWITCH 12: Off Retardo 1˚ motor en apertura desactivado
SWITCH 12: On Retardo 1˚ motor en apertura activado
}
}
NOTA: 1) en todas las centrales A3 con regulación de par está previsto un punto de fuerza de aproximadamente 1 seg. para poder superar la inercia en cualquier
movimiento de la cancela.
2) en el caso de que la instalación necesite un electro-bloqueo, conectarlo a los bornes 3 - 4 (en paralelo con la luz intermitente).
10
Page 11

Español
A: DESCRIPCIÓN CAJA DE BORNES:
A1 bornes 1 - 2 • Entrada línea 220 V.c.a. Protegido con fusibles
A2 bornes 3 - 4 • Salida intermitente o luz cortesia.
A3 bornes 5 - 6 - 7 • Salida 1˚ motor al borne n. 6 común 1˚ motor
A4 bornes 8 - 9 - 10 • Salida 2˚ motor al borne n. 9 común 2˚ motor
A5 borne 15 • Entrada fin de carrera abre (FCA) contacto NC
A6 borne 16 (0 V.) • Entrada común para fin de carrera abre (FCA)
A7 borne 17 •Entrada fin de carrera cierra (FCC) contacto NC
A8 borne 18 •Salida mando electrocerradura 12V
A9 borne 19 •Salida luz indicador cancela abierta.
A10 bornes 20 (0V)-21(24V) • Salida 24 V.c.a. máx 1A para dispositivos de
A 11 borne 22 •Entrada común para los pulsadores alto, paso
A12 borne 23 •Entrada dispositivos de seguridad (FOTO)
A13 borne 24 •Entrada pulsador de alto (ALT) contacto NC
A14 borne 25 • Entrada pulsador de paso paso (PP) contacto NA
A15 borne 26 •Entrada pulsador abre (AP) contacto NA
A16 borne 27 •Entrada pulsador cierra (CH) contacto NA
B: DESCRIPCIÓN CAJA DE BORNES ANTENA
B1 borne 41 •Central antena
B2 borne 42 •Funda antena
B3 borne 43 •Salida 2˚ canal radio
B4 borne 44 •Salida 2˚ canal radio
Nota: La caja de bornes es totalmente extraíble para facilitar la instalación de la
central.
Mientras se efectúan las conexiones, o se acoplan las distintas tarjetas, la central A3
no tiene que estar alimentada. Si los contactos o pulsadores NC no son utilizados
conectar en puente los correspondientes terminales.
INSTRUCCIÓN PARA LA INSTALACIÓN
A) Una vez efectuadas las conexiones como se ha explicado anteriormente, y de
haber instalado todos los dispositivos de seguridad y señalización que las normas
UNI 8612 prevén, alimentar la central A3 controlando las tensiones, y comprobar que
no haya ruidos ni excitaciones anómalas.
Comprobar que los Led de ALT/FOTO/FCA/FCC estén encendidos, controlando que
los Led se apaguen al intervenir cada uno de los accesos. Si los Led permanecieran
apagados, controlar las respectivas conexiones en los accesos.
B) Los dispositivos de seguridad tienen que estar perfectamente alineados para el
correcto funcionamiento de la central A3.
C) Si se desea efectuar una regulación de par en el motor, es necesario en la versión
A3 introducir en el respectivo conector la tarjeta AR, si este dispositivo no es
utilizado, comprobar que en el conector se encuentre introducido el hierro en U,
mientras que en la versión A3F efectuar la regulación interviniendo en las 5
posiciones del conmutador, véase FIG. 1.
D) Apretar el pulsador “abre” visualizando el mando con el respectivo Led y verificar
el exacto movimiento de apertura. Si así no fuera, invertir las fases/e de los motores
/motor. Si la automación necesita los fin de carrera, comprobar el exacto
funcionamiento de los mismos y, eventualmente, intercambiar el fin de carrera “abre”
(FCA) con el fin de carrera “cierra” (FCC).
E) Efectuar la regulación para el tiempo de trabajo TL, para el tiempo de cierre 2
motor T2M y, si requerida, la regulación de la pausa TP, véase fig. 1.
F) Introducir en el respectivo conector el receptor radio, controlando el funcionamiento
del radiomando y de todas las seguridades y circuitos de mando.
FUNCIONAMIENTO ESTÁNDAR
Con el dip swicht predispuesto como en la fig. 1, al primer impulso de paso paso o
radiomando, la central A3 hace como primera maniobra “abre”, precedida por un
impulso de desbloqueo en la electrocerradura, si se encuentra instalada: esta
maniobra es interrumpida o por el fin de carrera, si está instalado (FCA), o por el final
del tiempo de trabajo, o bien por el pulsador de stop. Durante todo el período de esta
maniobra el intermitente y el indicador luminoso de cancela abierta permanecen en
función. Al llegar al stop o al final de maniobra, el intermitente se apaga y el indicador
luminoso de cancela abierta permanece encendida. Al finalizar el tiempo de pausa
se produce la maniobra de cierre, por lo tanto se enciende el intermitente.
El final de esta maniobra es interrumpido por el fin de carrera “cierra” (FCC) si está
instalado o por el pulsador de stop, o por el final del tiempo de trabajo. Al final de esta
maniobra el intermitente y el indicador luminoso de cancela abierta se apagan. Si en
la maniobra “cierra” intervienen los dispositivos de seguridad se obtiene la inversión
de la maniobra.
FUNCIONES PROGRAMABLES
- SWICH 1: exclusión cierre automático
- SWICH 1: off cierre automático activado
La maniobra “cierra” es efectuada automáticamente una vez transcurrido el tiempo
de pausa fijado.
- SWICH 1: on cierre automático desactivado
Después de la maniobra “abre” la central A3 permanece en pausa hasta que sea dará
un nuevo impulso.
- SWICH 2: habilitación tiempo aviso previo.
- SWICH 2: off tiempo aviso previo desactivado.
- SWICH 2: on tiempo aviso previo activado.
contra los cortocircuitos o los rayos y
descargador para sobretensiones.
y fin de carrera cierra (FCC)
protección y seguridad protegida con fusible.
paso, abre, cierra. Para los dispositivos de
seguridad y la luz de cancela abierta.
contacto NC
Antes de empezar el ciclo de apertura o cierre la luz intermitente se enciende con 4"
segundos de adelanto
• SWICH 3: habilitación pausa temporal.
• SWICH 3: off pausa temporal desactivada.
En la maniobra de cierre la intervención de las fotocélulas provoca la inversión del
movimiento en apertura. En la maniobra de apertura la intervención de las fotocélulas
no está considerada.
• SWICH 3: on pausa temporal activada.
En la maniobra de cierre la intervención de las fotocélulas provoca una pausa
temporal del movimiento en apertura; cuando el rayo de las fotocélulas quede libre,
se efectúa la inversión del movimiento que provoca la apertura. En la maniobra de
apertura la intervención de las fotocélulas provoca una pausa temporal del movimiento;
cuando el rayo de las fotocélulas quede libre, la maniobra de apertura continuará
hasta la pausa.
• SWICH 4: habilitación tiempo pausa con dispositivos de seguridad.
• SWICH 4: off funcionamiento estándar
• SWICH 4: on tiempo pausa activado con dispositivos de seguridad.
Cada vez que el rayo de la fotocélula es interrumpido durante la pausa fijada, es
restablecido comenzando un nuevo cómputo del tiempo. Esta particular función
puede ser adoptada cuando la utilización de la automación resulte muy frecuente.
(Ej. en viviendas colectivas, lugares públicos, aparcamientos, etc.).
• SWICH 5: habilitación luz de cortesía o intermitente.
• SWICH 5: off luz de cortesía activada.
Esta condición permite conectar en los mismos terminales (3/4) del intermitente, la
luz de cortesía que permanece activada durante el final de cualquier maniobra
durante otros 20" aproximadamente.
• SWICH 5: on intermitente activado.
Se obtiene el encendido del intermitente sólo durante el tiempo de la maniobra de
apertura o de cierre.
• SWICH 6: off - SWICH 7 off - SWICH 8 off: funcionamiento paso-paso estándar;
al primer impulso de paso paso o radio se provoca la apertura, al segundo impulso
se provoca el cierre, al tercer impulso la apertura (1˚ ABRE 2˚ CIERRA 3˚ ABRE)
• SWICH 6: on - SWICH 7 off - SWICH 8 off: funcionamiento paso-paso modo 2;
al primer impulso de paso paso o radio se provoca la apertura, al segundo impulso
se provoca la pausa, al tercer impulso el cierre, al cuarto la apertura (1˚ ABRE -2˚
PAUSA - 3˚ CIERRA - 4˚ ABRE).
• SWICH 6: on - SWICH 7 on - SWICH 8 off: funcionamiento paso-paso modo 3;
al primer impulso de paso paso o radio se provoca la apertura, al segundo impulso
se provoca el alto, al tercer impulso el cierre, al cuarto la apertura (1˚ ABRE -2˚ STOP
- 3˚ CIERRA - 4˚ ABRE).
• SWICH 6: off- SWICH 7 off - SWICH 8 on: funcionamiento colectivo.
Después de haber dado el primer impulso de paso-paso, durante la maniobra de
apertura no puede producirse ningún cambio del movimiento: el movimiento puede
ser variado únicamente en fase de pausa o cierre. Esto permite el poder evitar que
varios mandos sucesivos, radiotransmitidos en fase de apertura desde una distancia
superior a la visible, hagan finalizar el ciclo de trabajo recién comenzado.
• SWICH 9: off indicador cancela abierta sin fin de carrera. Si la instalación
no está equipada con fin de carrera, utilizar esta configuración.
• SWICH 9: on indicador cancela abierta con fin de carrera.
Si la instalación necesita de fin de carrera utilizar esta configuración.
• SWICH 10: habilitación alto temporal.
• SWICH 10: off alto temporal activado.
En la maniobra de apertura se puede efectuar con el pulsador de stop una parada
temporal del movimiento, dando comienzo así al tiempo de pausa, al finalizar el cual
se efectúa la maniobra de cierre. En la maniobra de cierre con el pulsador de stop
se produce una parada del movimiento hasta que se da un nuevo impulso de pasopaso.
• SWICH 10: on funcionamiento estándar
• SWICH 11: habilitación golpe de ariete.
• SWICH 11: off funcionamiento estándar.
• SWICH 11: on golpe de ariete activado.
La maniobra de apertura es precedida por un impulso de cierre para liberar la
electrocerradura. Esta función, útil cuando las condiciones del tiempo son más bien
rígidas (en invierno, con nieve, hielo, etc.) el golpe de ariete no es efectuado en
caso de que el tiempo de aviso previo esté activado.
• SWICH 12: habilitación retardo 1˚ motor en apertura.
• SWICH 12: off funcionamiento estándar
• SWICH 12: on retardo 1˚ motor en apertura activado.
En la maniobra de apertura el primer motor está retardado 2/3" esta función
particular se emplea cuando se utilice la electrocerradura o cuando existan hojas
de espesor considerable.
CARACTERÍSTICAS TÉCNICAS
ALIMENTACIÓN : 220 V.c.a. +/-10% 50hZ
TEMPERATURA DE EJERCICIO : -20˚C +70˚C
POTENCIA MÁX MOTOR : 1/2 Hp Monofásico
POTENCIA MÁX LUZ CANCELA : 5W 24V
CORRIENTE MÁX SALIDA 24V : 1A
TIEMPO TRABAJO : 8" a 42" seg. (aumentable de 8 a 118 seg.)
TIEMPO PAUSA : 2" a 60" seg.
TIEMPO RETARDO 2° MOTOR : 0 a 20" seg.
TIEMPO DESFASE EN APERTURA : 0 a 2" seg.
DIMENSIONES CONTENEDOR : 280 X 220 X 110 mm.
La firma NICE se reserva el derecho de aportar modificaciones en cualquier
momento que lo considere oportuno, sin previo aviso.
!
En las versiones A3/1 - A3F/1 no usar
11
Page 12

I
Istruzioni per il montaggio della centrale MINDY. Instructions for assembly of the MINDY control unit.
F
Instructions pour le montage de l’unité MINDY. Anweisungen für die Montage der Steuerzentrale MINDY.
E
Instrucciones para el montaje de la central MINDY.
GB
D
I
Inserire le due viti negli appositi fori superiori facendole scorrere sulla guida,
come fig. Aavvitandole parzialmente. Ruotare di 180° la centrale e ripetere la
stessa operazione con le altre 2 viti.
Fissare a parete la centrale.
Insert the two screws in the upper holes provided, sliding them on the guide as
GB
in fig. A and partly screwing them in. Turn the control unit through 180° and
perform the same operation with the other 2 screws.
Fix the control unit on to the wall.
Introduire les deux vis dans les trous supérieurs en les faisant coulisser sur la
F
glissière, comme l’indique la Fig. A, en les vissant partiellement. Tourner l’unité
sur 180° et répêter mème opération avec les 2 aufres vis.
Fixer l’unité au mur.
Die zwei Schrauben in ihre obenen Löcher einfügen und wie in Abb. A gezeigt
auf der Führung gleiten lassen, dann teilweise anschrauben. Die Zentrale um
D
180° drehen und das gleiche mit den zwei anderen Schrauben ausführen.
Die Zentrale an der Wand befestigen.
Introduzca los dos tornillos en los respactivos agujeros superiores haciéndolos
deslizar sobre la guia como muestra la Fig. A, atornillándolos parcialmente,
E
gire 180° la central y repita la misma operación con los otros dos tornillos.
Fije la central a la pared.
I
Inserire il coperchio dalla parte desiderata (con apertura a destra o sinistra), premere con forza in
corrispondenza delle frecce.
A
B
C
Fix the cover on the desiderd part (with opening on the right or left), press firmly on the
GB
arrows.
Placer le couvercle dans la position voulue (avec l’ouverture à droite ou à gauche), appuyer
F
fortement au niveau des flèches.
Den Deckel wie gewünscht aufsetzen (mit Rechts-oder Linksöffnung). Kräftig drücken, wo
D
die Pfeile vorhanden sind.
E
Introduzca la tapa en la parte deseada (con apertura a derecha o izquierda), apriete con fuerza en
correspondencia de las flechas.
Per togliere il coperchio premere con un cacciavite sul punto di incastro e
I
contemporaneamente spingere verso l’alto.
To remove the cover, press with a screwdriver on the join and push upwards at the same time.
GB
Pour enlever le couvercle, appuyer avec un tournevis sur le point d’encastrement et en même
F
temps pousser vers le haut.
Zum Abnehmen des Deckels mit einem Schraubenzieherauf den Einspannpunkt A drücken und
D
gleichzeitig nach oben schieben.
Para quitar la tapa apriete con un destornillador en el punto de encastre y
E
contemporáneamente empuje hacla arriba.
D
carta riciclata 100% recycled paper 100% papier recycle 100% 100% Altpapier 100% papel reciclado
NICE SPA - Via Pezza Alta, 13 - Z.I. di Rustignè
31046 ODERZO - TV - ITALY
Tel. 0422 853838 - Fax 0422 853585
http://www.niceforyou.com - email: info@niceforyou.com
A termine di legge ci riserviamo la proprietà di questo manuale con divieto di riprodurlo o di renderlo comunque noto a terzi o a ditte concorrenti senza nostra autorizzazione.
CENTRO STAMPA - Oderzo (TV)
ISTA34858
 Loading...