

Page 1
WNDR4500 User Guide
A Guide for Using
• ReadySHARE Printer
• ReadySHARE Access
• Desktop NETGEAR Genie
• Time Machine
with your WNDR4500 Router
Page 2

©2012 NETGEAR, Inc. All rights reserved.
Technical Support
Thank you for selecting NETGEAR products.
Locate the serial number on the label of your product and use it to register
your product at http://www.NETGEAR.com/register. Registration is required
before you can use the telephone support service. Registration at the
NETGEAR website is strongly recommended.
Go to http://support.netgear.com for product updates and Web support.
For complete DoC, visit the NETGEAR EU Declarations of Conformity
website at:
http://kb.netgear.com/app/answers/detail/a_id/11621
Trademarks
NETGEAR, the NETGEAR logo, and Connect with Innovation are
trademarks or registered trademarks of NETGEAR, Inc.and/or its
subsidiaries in the United States and/or other countries. Other brand and
product names are registered trademarks or trademarks of their respective
holders.
Statement of Conditions
In the interest of improving internal design, operational function, and/or
reliability, NETGEAR reserves the right to make changes to the products
described in this document without notice. NETGEAR does not assume
any liability that may occur due to the use or application of the product(s) or
circuit layout(s) described herein.
Page 3

ReadySHARE Printer
ReadySHARE Printer lets you connect a USB printer to the router’s
USB port, and access it wirelessly.
To set up ReadySHARE Printer:
Step 1: Connect the USB printer to the router’s USB port with a
USB printer cable.
Step 2: Install the USB printer driver software on each computer
that will share the printer. If you do not have the printer driver,
contact the printer manufacturer to find and download the most
recent printer driver software.
3
Page 4
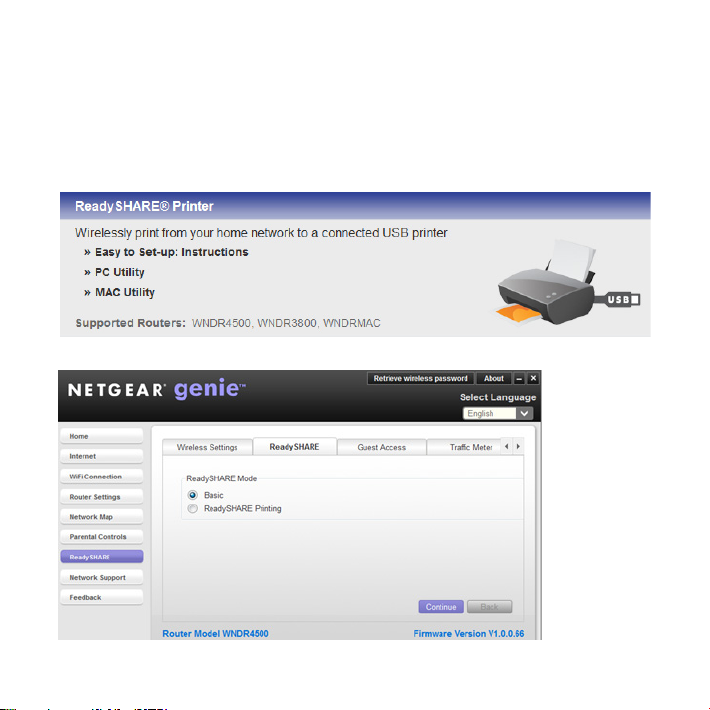
Step 3: On each computer that will share the printer, download the
NETGEAR USB Control Center utility. The NETGEAR USB utility
has a Mac version and a Windows version, which you can access in
two different ways:
• From the ReadySHARE Printer area of this URL:
www.netgear.com/readyshare
• From the ReadySHARE tab of the Desktop NETGEAR Genie.
4
Page 5
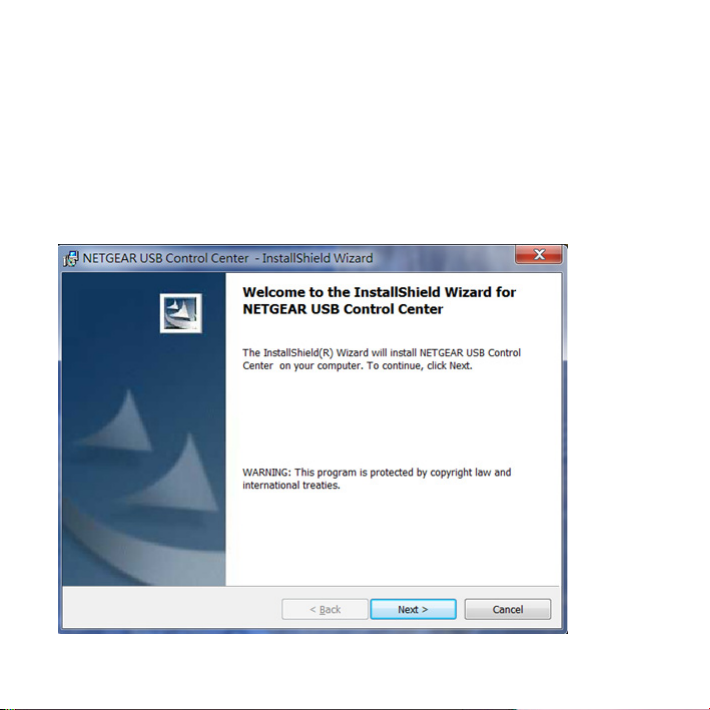
NOTE:
• You must install this utility before you can use the
ReadySHARE Printer feature.
• For the ReadySHARE Printer feature to work, this utility must
be run in the background.
Step 4: Follow the instructions to install the NETGEAR USB
Control Center utility.
5
Page 6

Step 5: After you have installed the utility, select the language.
Step 6: If this is the first time you are accessing the utility, you are
asked to select the printer and click the Connect button.
6
Page 7

Once the connection is established, the status changes to Manually
connected by xxx..
Step 7: Click the Disconnect button at any time to release the
connection. The status then changes to Available.
Once the Connect button has been clicked once on all computers in
the network, the utility on each of them automatically handles the
printing queue and handling. The status of the printer should
appear as Available on all of the computers.
7
Page 8

NOTE:
• When the status is Available, you can use the USB printer.
• When the status is Manually connected by xxx, only the xxx
computer can use the printer. Other network devices must wait
until the xxx computer has released the connection, or until the
connection times out (the default time-out value is 30 seconds).
• You can set the value for the default time-out time from the
Tools > Configuration screen.
8
Page 9

• The USB Control Center utility must be running for the
computer to be able to print to the USB printer attached to the
router. If you exit the utility, printing does not work.
• Some firewall software, such as Comodo, blocks the
ReadySHARE Print utility from accessing the USB printer. If
you do not see the printer in the utility, you can disable the
firewall temporarily to allow the utility to work.
Step 8: If your printer supports scanning, make sure that the printer is
in the Available state, and click the Network Scanner button. This
activates the Scanner window so you can use the printer for scanning.
For more detailed information about ReadySHARE Printer, see the
User Manual by clicking the Documentation link in the router
management interface or on the WNDR4500 product page on the
Support website http://support.netgear.com).
Page 10

ReadySHARE Access
Once you have set up your router or gateway, you can connect
most common USB storage devices and share the contents with
other users (both wired and wireless) on your network. (If your USB
device requires special drivers, it will not be compatible.).
You can access your USB device as follows:
• On Windows systems, use any of these methods:
- Select Start > Run and enter \\readyshare in the dialog
box. Click OK.
- Open Explorer or Safari and enter \\readyshare in the
address bar.
- Open My Network Places and enter \\readyshare in the
address bar.
Page 11

• On Mac systems, do this:
1. Select Go > Connect to Server.
2. Enter smb://readyshare as the Server Address.
3. Click Connect.
The readyshareconnect.exe file (for Windows) is available to
download here:
http://www.netgear.com/readyshare
NOTE: If your USB device requires a power supply, you must use it
when connecting your USB device to a NETGEAR router or
gateway. It may take up to 2 minutes before the USB drive is ready
for sharing after it is connected to the router.
Page 12

Desktop NETGEAR Genie
The Desktop NETGEAR Genie is your home network dashboard. It
lets you easily view, manage, and control your entire home network,
and helps you fix common network problems.
Internet
STATUS GOOD
Network Map
Number of devices 16
WiFi Connection
STATUS Connected
Parental Controls
Click here
Visit the NETGEAR Genie web page at:
http://www.netgear.com/genie
12
Router Settings
Click here
ReadySHARE
Click here
Page 13

From the NETGEAR Genie web page, you can download Windows
or Mac versions of the Genie, as well as learn more about the
Genie by reading the online Desktop NETGEAR Genie User
Manual.
The Genie dashboard screen (shown on page 12) displays when
you launch the NETGEAR Genie.
• Internet. Monitor and repair Internet connectivity issues, for
both wired and wireless connections.
• WiFi Connection. View or change the wireless settings for
your router.
• Router Settings. Log in to your router to view or change its
settings.
• Network map. View network devices connected to your
network.
• Parental Controls. Manage parental controls to protect
devices in your network from inappropriate contents.
• ReadySHARE. If you connected a USB storage device or
printer to the USB port on the router, then you can access its
contents.
• Support. The Support FAQs are available on the PC without an
Internet connection. You can get answers to common router
issues here. Some simple network tools are available to help
you debug the network as well.
For more information, visit http://www.netgear.com/genie.
13
Page 14

Time Machine
Time Machine works on Mac computers only, and automatically
backs up everything on your computer to a USB hard drive
connected to it. Here is how it works:
Note: If you are already using Time
Machine software with your
USB hard drive, you can skip
Steps 1 through 3 and go to
Step 4.
Step 1: Physically connect the USB hard drive to your PC.
Step 2: Format your USB hard drive.
Step 3: Open the Disk Utility and format your drive.
Step 4: You can now use Time Machine wirelessly by connecting
the USB hard drive to your WNDR3800 router.
Step 5: From your MAC Desktop, open Macintosh HD.
Step 6: Click the Connect As button. In the pop-up window, select
Registered User, and enter admin as the user name and
password as the password. Click Connect.
Page 15

Step 7: After connecting successfully, you can list your connected
devices. Note that you see one extra device, called admin,
whenever you log in as admin.
Step 8: Click the Use for Backup button to complete your
selection.
Step 9: Enter the password (password), and the backup begins.
15
Page 16

NETGEAR, Inc.
350 East Plumeria Drive
San Jose, CA 95134 USA
July 2012
 Loading...