

Page 1
NETGEAR, Inc.
350 East Plumeria Drive
San Jose, CA 95134 USA
August 2014
Trademarks
NETGEAR, the NETGEAR logo, and Connect with Innovation are trademarks
and/or registered trademarks of NETGEAR, Inc. and/or its subsidiaries in the
United States and/or other countries. Information is subject to change without
notice. © NETGEAR, Inc. All rights reserved.
Compliance
For the current EU Declaration of Conformity, visit
http://support.netgear.com/app/answers/detail/a_id/11621/.
For regulatory compliance information, visit
http://www.netgear.com/about/regulatory/.
See the regulatory compliance document before connecting the power supply.
N900 Wireless Dual Band
Gigabit Router
Model WNDR4500v2
Installation Guide
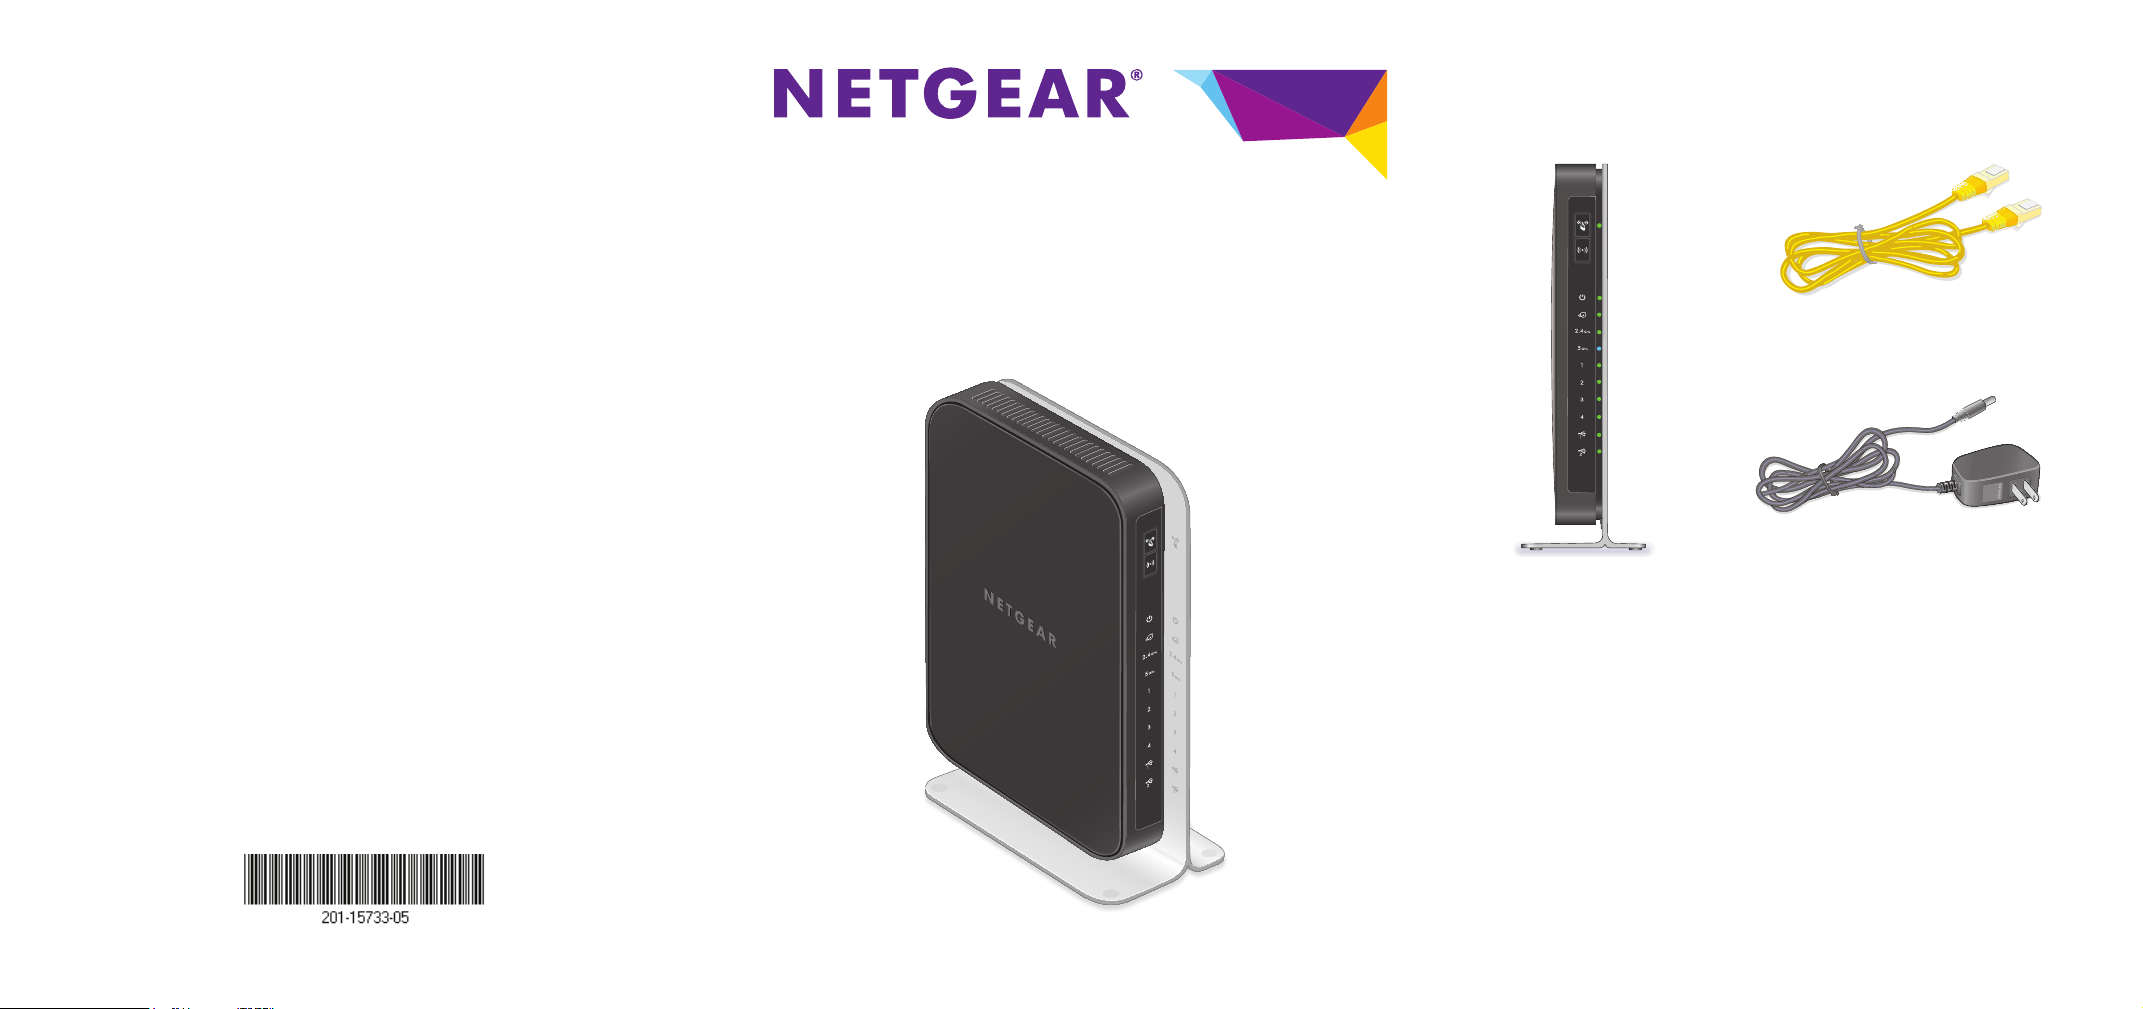
Package Contents
The box contains the following items.
Power adapter
N900 Wireless Router
Ethernet cable
(with stand attached)
Page 2
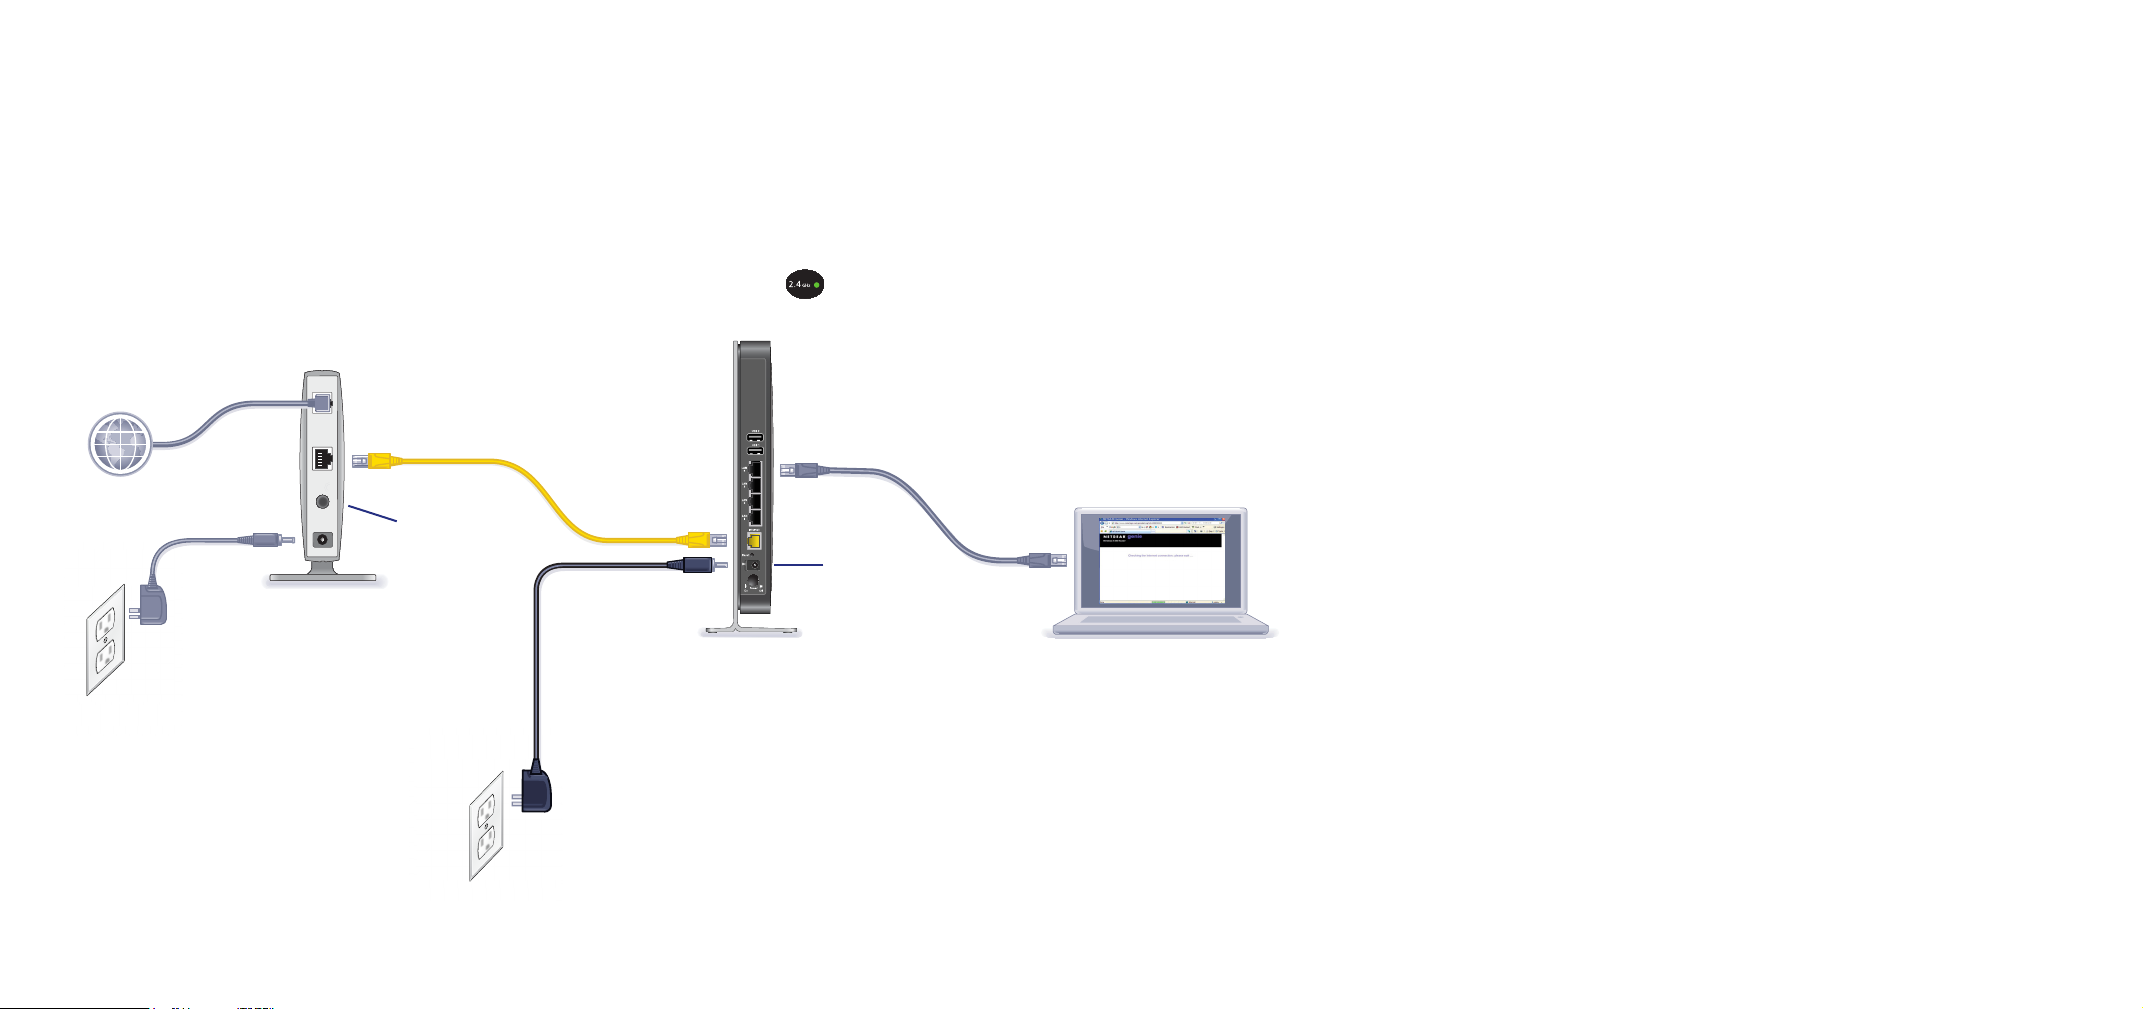
You can use this diagram to cable and connect your router or follow the detailed instructions in this booklet.
1. Prepare your modem.
4. Connect a computer.
3. Power on the router.2. Connect your modem.
Power On/Off
Power On/Off
You can use an Ethernet cable or
connect wirelessly
.
5. Launch a browser.
NETGEAR genie displays.
If you do not see genie, type
www.routerlogin.net. Type
admin for the user name and
password as the password.
Support
Thank you for purchasing this NETGEAR product.
After installing your device, locate the serial number on the label of
your product and use it to register your product at
https://my.netgear.com.
You must register your product before you can use NETGEAR
telephone support. NETGEAR recommends registering your product
through the NETGEAR website.
For product updates and web support, visit
http://support.netgear.com.
NETGEAR recommends that you use only the official NETGEAR
support resources.
You can get the user manual online at
http://downloadcenter.netgear.com or through a link in the product’s
user interface.
Note: You can get the user manual online at http://downloadcenter.netgear.com or through a link in the product’s user interface.
Unplug your modem’s power. If it has a
battery backup, remove the battery.
Plug in your modem. Put the battery back
in. Then cable the modem to the router
Internet port.
DSL or cable
Internet
Modem
Wait for the 2.4 GHz LED
to turn green.
Router
Page 3

Contents
Getting to Know Your Router. . . . . . . . . . . . . . . . . . . . . . . . . . . . . . 2
Install Your Router . . . . . . . . . . . . . . . . . . . . . . . . . . . . . . . . . . . . . . 5
1. Prepare your modem. . . . . . . . . . . . . . . . . . . . . . . . . . . . . . . 5
2. Connect your modem. . . . . . . . . . . . . . . . . . . . . . . . . . . . . . . 5
3. Power on the router. . . . . . . . . . . . . . . . . . . . . . . . . . . . . . . . 6
4. Connect a computer.. . . . . . . . . . . . . . . . . . . . . . . . . . . . . . . 7
5. Open a browser. . . . . . . . . . . . . . . . . . . . . . . . . . . . . . . . . . . 7
Preset Wireless Security . . . . . . . . . . . . . . . . . . . . . . . . . . . . . . . . . 8
Wireless Network Settings. . . . . . . . . . . . . . . . . . . . . . . . . . . . . . . . 9
Join the Wireless Network . . . . . . . . . . . . . . . . . . . . . . . . . . . . . . . 10
WPS Method . . . . . . . . . . . . . . . . . . . . . . . . . . . . . . . . . . . . . . 10
Manual Method . . . . . . . . . . . . . . . . . . . . . . . . . . . . . . . . . . . . 10
Access the Router to Make More Changes . . . . . . . . . . . . . . . . . . 11
Change Your Password . . . . . . . . . . . . . . . . . . . . . . . . . . . . . 12
Retrieve Your Password . . . . . . . . . . . . . . . . . . . . . . . . . . . . . 12
Troubleshooting . . . . . . . . . . . . . . . . . . . . . . . . . . . . . . . . . . . . . . . 13
ReadySHARE Access . . . . . . . . . . . . . . . . . . . . . . . . . . . . . . . . . . 14
ReadySHARE Printer . . . . . . . . . . . . . . . . . . . . . . . . . . . . . . . . . . . 15
Time Machine . . . . . . . . . . . . . . . . . . . . . . . . . . . . . . . . . . . . . . . . . 16
TiVo . . . . . . . . . . . . . . . . . . . . . . . . . . . . . . . . . . . . . . . . . . . . . . . . 16
NETGEAR genie App . . . . . . . . . . . . . . . . . . . . . . . . . . . . . . . . . . . 17
NETGEAR genie Mobile App . . . . . . . . . . . . . . . . . . . . . . . . . 18
1
Page 4

Getting to Know Your Router
Most connectors are on the rear panel.
USB ports
LAN ports 1–4
WAN
(Internet)
port
The following figure shows the front panel.
Reset
Power connector
Power On/Off
WPS button
WPS LED
WiFi On/Off button
Power LED
Internet LED
2.4 GHz LED
5 GHz LED
Ethernet (LAN) LEDS
USB LEDs
2
Page 5

The router has two buttons and several LEDs on the front.
• WPS button. Use WPS to add a wireless computer or device to
the network.
• WiFi On/Off button. Turn the wireless radios on and off.
Table 1. LEDs
LED Description
WPS • Solid green. Wireless security (such as, WEP,
Power/Test • Solid amber. The router is starting up after being
Internet • Solid green. An IP address has been received.
2.4 GHz
WPA-PSK, or WPA2-PSK) is enabled on the
router.
• Blinking green. The router is performing WPS
activities. This LED continuously blinks if the
router is in the WPS PIN auto lockdown state.
• Off. All wireless radios are disabled, and there is
no WPS activity.
powered on.
• Solid green. The power is on, and the router is
ready.
• Blinking amber. A firmware update is in progress.
• Blinking green. The firmware is corrupt.
• Switching between green and amber. The
router is in AP Bridge mode.
• Off. Power is not supplied to the router.
The router is ready to transmit data.
• Solid amber. The IP address has not been
acquired.
• Off. No Ethernet cable is connected between the
router and the modem.
• Solid green. The wireless radio is operating.
• Blinking. The router is in WPS mode.
• Off. The wireless radio is off.
3
Page 6

Table 1. LEDs (continued)
LED Description
5 GHz
LAN ports 1–4
USB
1 and USB 2 • Solid green. The router has accepted the USB
• Solid blue. The wireless radio is operating.
• Blinking. The router is in WPS mode.
• Off. The wireless radios is off.
• Solid green. The LAN port has detected a
1,000 Mbps link with an attached device.
• Solid amber. The LAN port detected a
10/100 Mbps link with an attached device.
• Off. No link is detected on this port.
device. The USB device is ready to be used.
• Blinking green. The USB device is in use.
• Off. No USB device is connected, or the Safely
Remove Hardware button has been clicked, and it
is now safe to remove the attached USB device.
4
Page 7
Install Your Router
Make sure that your Internet service is active before you install the
router. Follow steps 1 through 5.
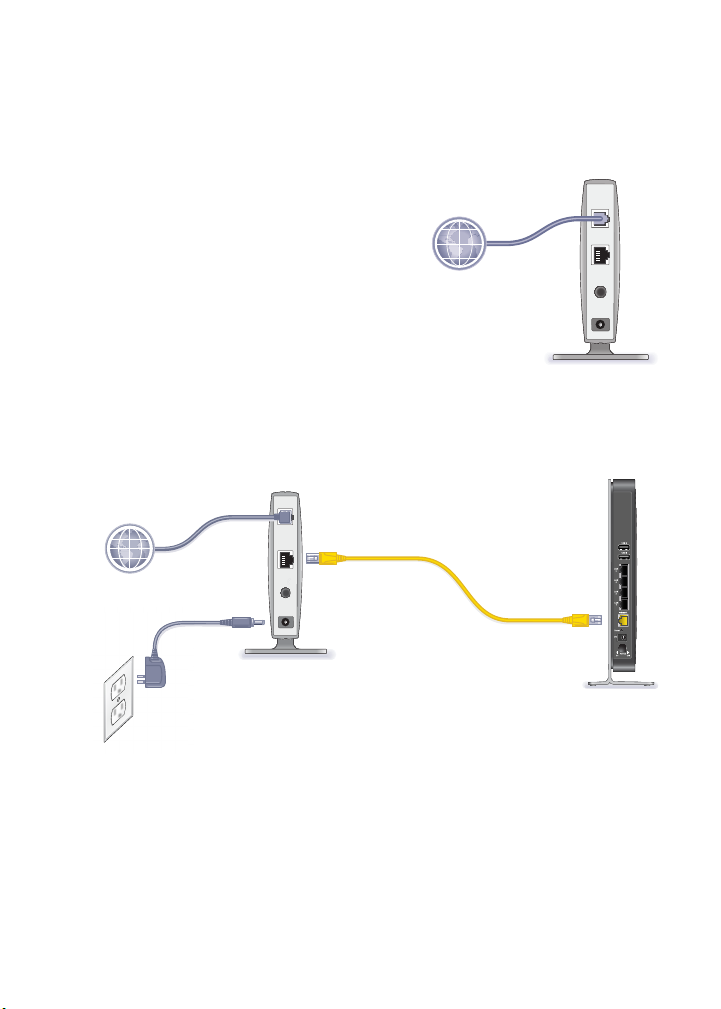
1. Prepare your modem.
a. Unplug the power to the
modem.
b. If the modem has a battery
backup, remove its batteries.
c. If your modem was already
connected to another router,
disconnect the cable between
your modem and that router.
d. Check that your modem is
turned off and cabled only to
the wall jack for your Internet service.
2. Connect your modem.
DSL or cable
Internet
Modem
Modem
Router
a. Plug in and turn on your modem. (Replace the batteries if you
removed them previously.)
b. With the yellow Ethernet cable that came with the router,
connect your modem to the Internet port of your router.
5
Page 8

3. Power on the router.
Modem
Power
On/Off
button
a. Connect the power adapter to the router and the power cord.
b. Plug the power cord into an outlet.
c. Before going to Step 4, wait for the 2.4 GHz LED on the
front panel of the router to turn green.
If none of the LEDs on the front panel are lit, press the Power
On/Off button on the rear panel of the router.
Router
6
Page 9

4. Connect a computer.
Router
You can use an Ethernet cable (not included) or connect
wirelessly.
• Use the Ethernet cable to connect your computer to an
Ethernet port on your router.
• Or connect wirelessly by using the preset wireless security
settings on the label on the product label.
5. Open a browser.
NETGEAR genie displays and guides you through the
installation.
If genie does not display, close and reopen the browser and type
http://www.routerlogin.net in the address bar, or see
Troubleshooting on page 13.
7
Page 10

Preset Wireless Security
7WFFFF
F
C
fgj
k
This product has a unique WiFi network name (SSID) and network
key (password). The default SSID and network key (password) are
uniquely generated for every device, like a serial number, to protect
and maximize your wireless security. This information is on the
product label.
NETGEAR recommends that you do not change the preset SSID or
password. If you do change the settings, the security SSID and
password on the product label no longer apply.
SN: 2PU1157WFFFFF
MAC: 123456789ABC
SSID: NETGEARXX
Password: asdfgjkllopqwerti345fsdk
789AB
EARXX
asd
kllopqwerti345fsd
8
Page 11

Wireless Network Settings
For easy reference, record here the default preset wireless settings
that are printed on the label.
WiFi network name (SSID):
Network key (Password):
If you change the default settings, record them here for easy
reference, and then store this booklet in a safe place:
WiFi network name (SSID):
Network key (Password):
To retrieve or update your wireless password, type
www.routerlogin.net in a web browser and log in using the default
user name (admin) and password (password).
Select Wireless Settings to locate your wireless password.
9
Page 12

Join the Wireless Network
Use the WPS method or the manual method to join the wireless
network.
WPS Method
Wi-Fi Protected Setup (WPS) lets you connect to a secure WiFi
network without typing its password. Instead, you press a button or
enter a PIN. NETGEAR calls WPS Push 'N' Connect.
Some older WiFi equipment is not compatible with WPS. WPS works
only with WPA2 or WPA wireless security.
To use WPS to join the wireless network:
1. Press the WPS button on the side of the router.
2. Within two minutes, press the WPS button on your wireless
computer or device, or follow the WPS instructions that came with
the device.
The WPS process sets up your wireless computer with the
network password and connects you to the wireless network.
Manual Method
With the manual method, select the network that you want, and type
its password to connect.
To connect manually:
1. On your computer or wireless device, open the software that
manages your wireless connections. This software scans for all
wireless networks in your area.
2. Look for your network and select it.
The unique WiFi network name (SSID) and password are on the
router label. If you changed these settings, look for the network
name that you set up.
3. Enter the router password and click Connect.
10
Page 13

Access the Router to Make More
Changes
After you use NETGEAR genie to set up the router, you can log in to
the router to view or change its settings.
To log in to the router:
1. Launch a web browser from a computer or wireless device that
is connected to the router.
2. Type www.routerlogin.net in the browser address field. A login
screen displays:
admin
********
3. Enter admin for the user name and password for the password.
The router Basic Home screen displays:
See the user manual for more information about the router
screens.
11
Page 14

Change Your Password
To change the password for the router user name:
1. Log in to the router.
2. Select ADVANCED > Administration > Set Password.
The Set Password screen displays:
3. Type your old password, and type the new password twice.
NETGEAR recommends that you use the password recovery
feature when you change your password.
4. Select the Enable Password Recovery check box.
5. Click Apply.
6. You are prompted to answer questions.
Your responses are saved.
Retrieve Your Password
To use this feature, you must enable password recovery as described
in the previous section.
To use password recovery to retrieve a forgotten password:
1. Launch a web browser from a computer or wireless device that
is connected to the router.
2. Type www.routerlogin.net in the browser address field.
3. When the login screen displays, click Cancel.
You are prompted to enter your saved answers so that you can
log in to the router.
12
Page 15

Troubleshooting
If the browser does not display the web page:
• Restore the router to factory default settings. Use a paper clip to
press the Reset button for 5 seconds. Release the button when
you see that the Power LED is blinking amber. The router reboots
immediately.
• Make sure that the computer is connected to one of the four LAN
Ethernet ports or wirelessly connected to the router.
• Make sure that the router has full power, the Power LED is solid
green, and the Ethernet LED is either solid amber or solid green.
• Close and reopen the browser to make sure that the browser
does not cache the previous page.
• Type http://www.routerlogin.net.
• If the computer is set to a static or fixed IP address (this setting is
uncommon), change it to obtain an IP address automatically from
the router.
13
Page 16

ReadySHARE Access
After installation and setup, you can insert a USB storage device into
the USB port on the router and share the contents with other network
users. (If your USB device has special drivers, it is not compatible.)
Note: If your USB device requires a power supply, you must use it
when connecting your USB device to a NETGEAR router or gateway.
It might take up to 2 minutes before the USB drive is ready for sharing
after it is connected to the router.
To access your USB device from a Windows computer:
1. Select Start > Run.
2. Enter \\readyshare in the dialog box.
3. Click the OK button.
To access your USB device from a Mac:
1. Select Go > Connect to Server.
2. Enter smb://readyshare as the server address.
3. Click the Connect. button
14
Page 17

ReadySHARE Printer
ReadySHARE Printer lets you connect a USB printer to the router
USB port and access it wirelessly.
To set up ReadySHARE Printer:
1. Connect the USB printer to the router USB port with a USB
printer cable.
2. On each computer that will share the printer:
a. Install the current USB printer driver software (available from
the printer manufacturer).
b. Download and install the NETGEAR USB Control Center
utility (available in the ReadySHARE Printer area at
www.netgear.com/readyshare).
Note:
• You must install this utility before you can use the
ReadySHARE Printer feature.
• For the ReadySHARE Printer feature to work, this utility
must be run in the background.
c. Click the Easy to Set-up: Instructions link, and follow the
instructions.
15
Page 18

Time Machine
Time Machine works on Mac computers only, and automatically
backs up your computer to a USB hard drive connected to it.
To back up a Mac:
1. Visit http://www.netgear.com/readyshare.
2. In the Time Machine® Compatible area, click Easy to Set-up:
Instructions, and follow the instructions.
TiVo
You can play back photos and music using the Home Media Option
on your TiVo® (Series 2 and above). This feature is enabled by
default on your router.
To play back your photos and music:
1. On your TiVo, select TiVo Central.
2. Select the Music, Photos, & Showcases page.
16
Page 19

NETGEAR genie App
The genie app is your home network dashboard. It lets you easily
view, manage, and control your entire home network, and helps you
fix common network problems. You can use the genie app or the
genie mobile app.
Internet
STATUS GOOD
Network Map
Number of devices 16
WiFi Connection
STATUS Connected
Parental Controls
Click here
Router Settings
Click here
ReadySHARE
Click here
genie app
Visit the NETGEAR genie web page at www.netgear.com/genie.
The genie app provides these functions:
• Internet. Monitor and repair Internet connectivity issues for both
wired and wireless connections.
• WiFi Connection. View or change your router wireless settings.
• Router Settings. Log in to your router to view or change its
settings.
• Network map. View network devices connected to your network.
• Parental Controls. Manage Parental Controls to protect devices
in your network from inappropriate content.
• ReadySHARE. If you connected a USB storage device or printer
to the USB port on the router, you can access its contents.
• Support. Support FAQs are available on your computer without
an Internet connection. You can get answers to common router
issues here. Some simple network tools are available to help you
debug the network as well.
17
Page 20

NETGEAR genie Mobile App
To install the genie mobile app:
1. Use your mobile device to navigate to the Apple AppStore or
Google Play for Android and search for NETGEAR genie. You
can use the following QR codes to speed up this process:
Android AppiPad App iPhone App
2. Install the app on your iPad or phone.
3. Launch the app to display the dashboard screen.
To use this app, you need a
WiFi connection from your phone
or iPad to your NETGEAR home
network.
• Manage WiFi settings and guest
access for your home network.
• View a map of your network.
• Set up or manage Parental
Controls.
• Use Traffic Meter to check your
Internet usage.
• With My Media, play media on
devices on your network.
18
Page 21

19
Page 22

20
 Loading...