

Page 1
(not included)
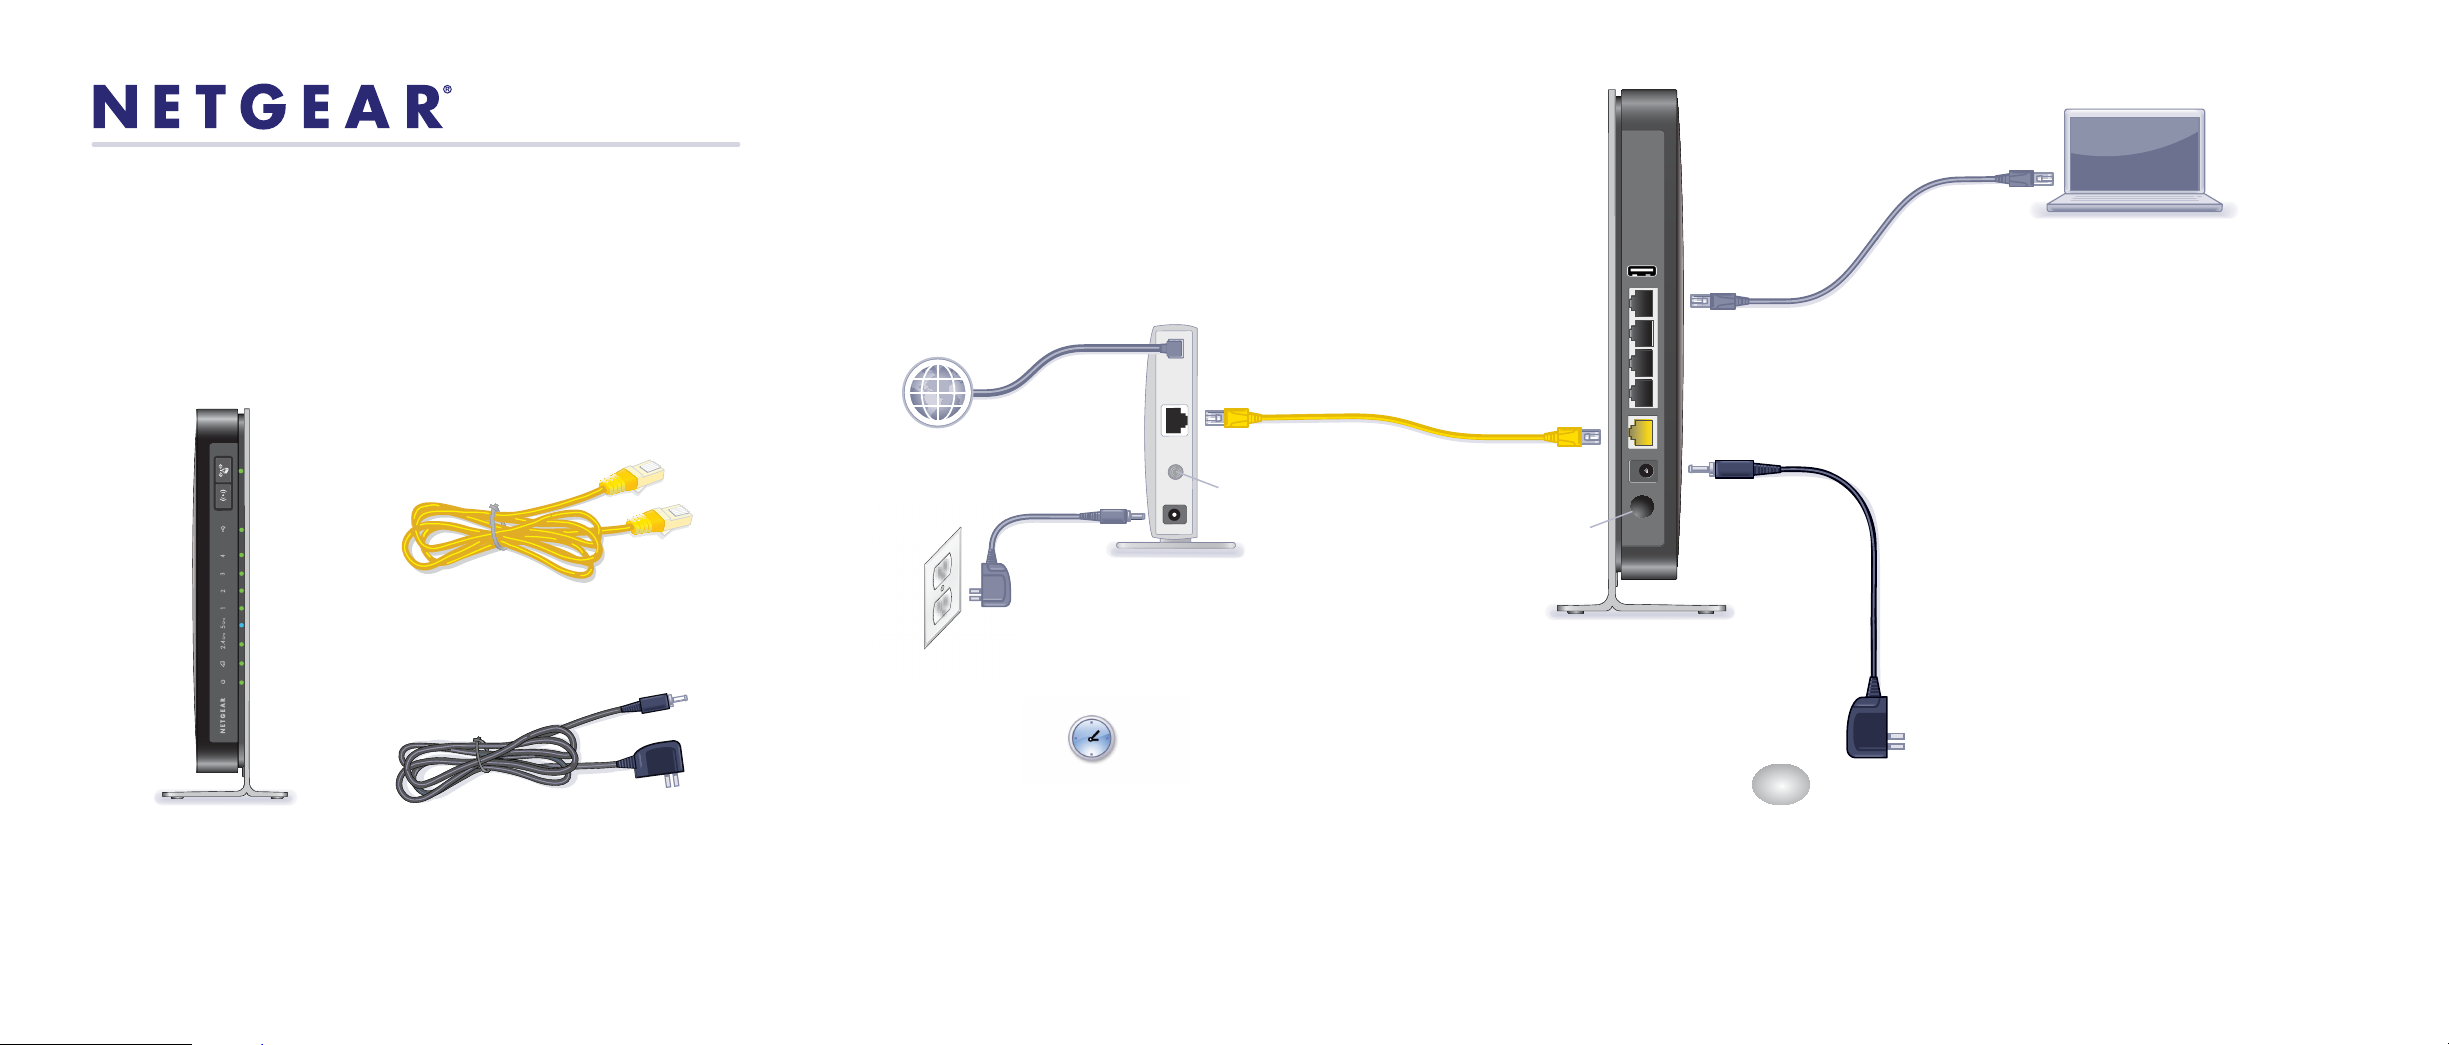
Power On/Off
Step 2:
Connect one end of the
yellow Ethernet cable
Step 3:
Plug in the power to
turn on your modem.
Step 6:
Open a browser.
Step 5:
Connect your computer
to the router
Use another Ethernet cable to
establish a wired connection
as shown in this diagram.
Optionally, connect wirelessly
by using the preset wireless
security settings, located on
the bottom label.
Step 4:
Connect the power adapter to the
router, then plug it into an outlet.
If none of the LEDs light, make sure
that the Power On/Off button is in the
on position (pushed in).
N600 Wireless Router
Laptop or desktop
computer
N600 Wireless Router
Package Contents
N600 Wireless Dual Band Gigabit Router
WNDR3700v4
Installation Guide
Step 1:
Unplug the power
to turn off your modem.
to your modem, and the
other end to the Internet
port on your router.
Wait approximately 2 minutes
until your modem turns on.
If your modem has
a battery backup,
first remove and reinsert
the battery before connecting
your modem to power.
Modem
DSL
or cable
Internet
Wait for the 2.4 GHz LED ( )
2.4
GHz
to light.
If the web page does not
display, close and re-open
the browser, then enter
in the address bar, or
check the “Troubleshooting”
section on the back of
this installation guide.
http://www.routerlogin.net
Power adapter
Ethernet cable
Power On/Off
Page 2
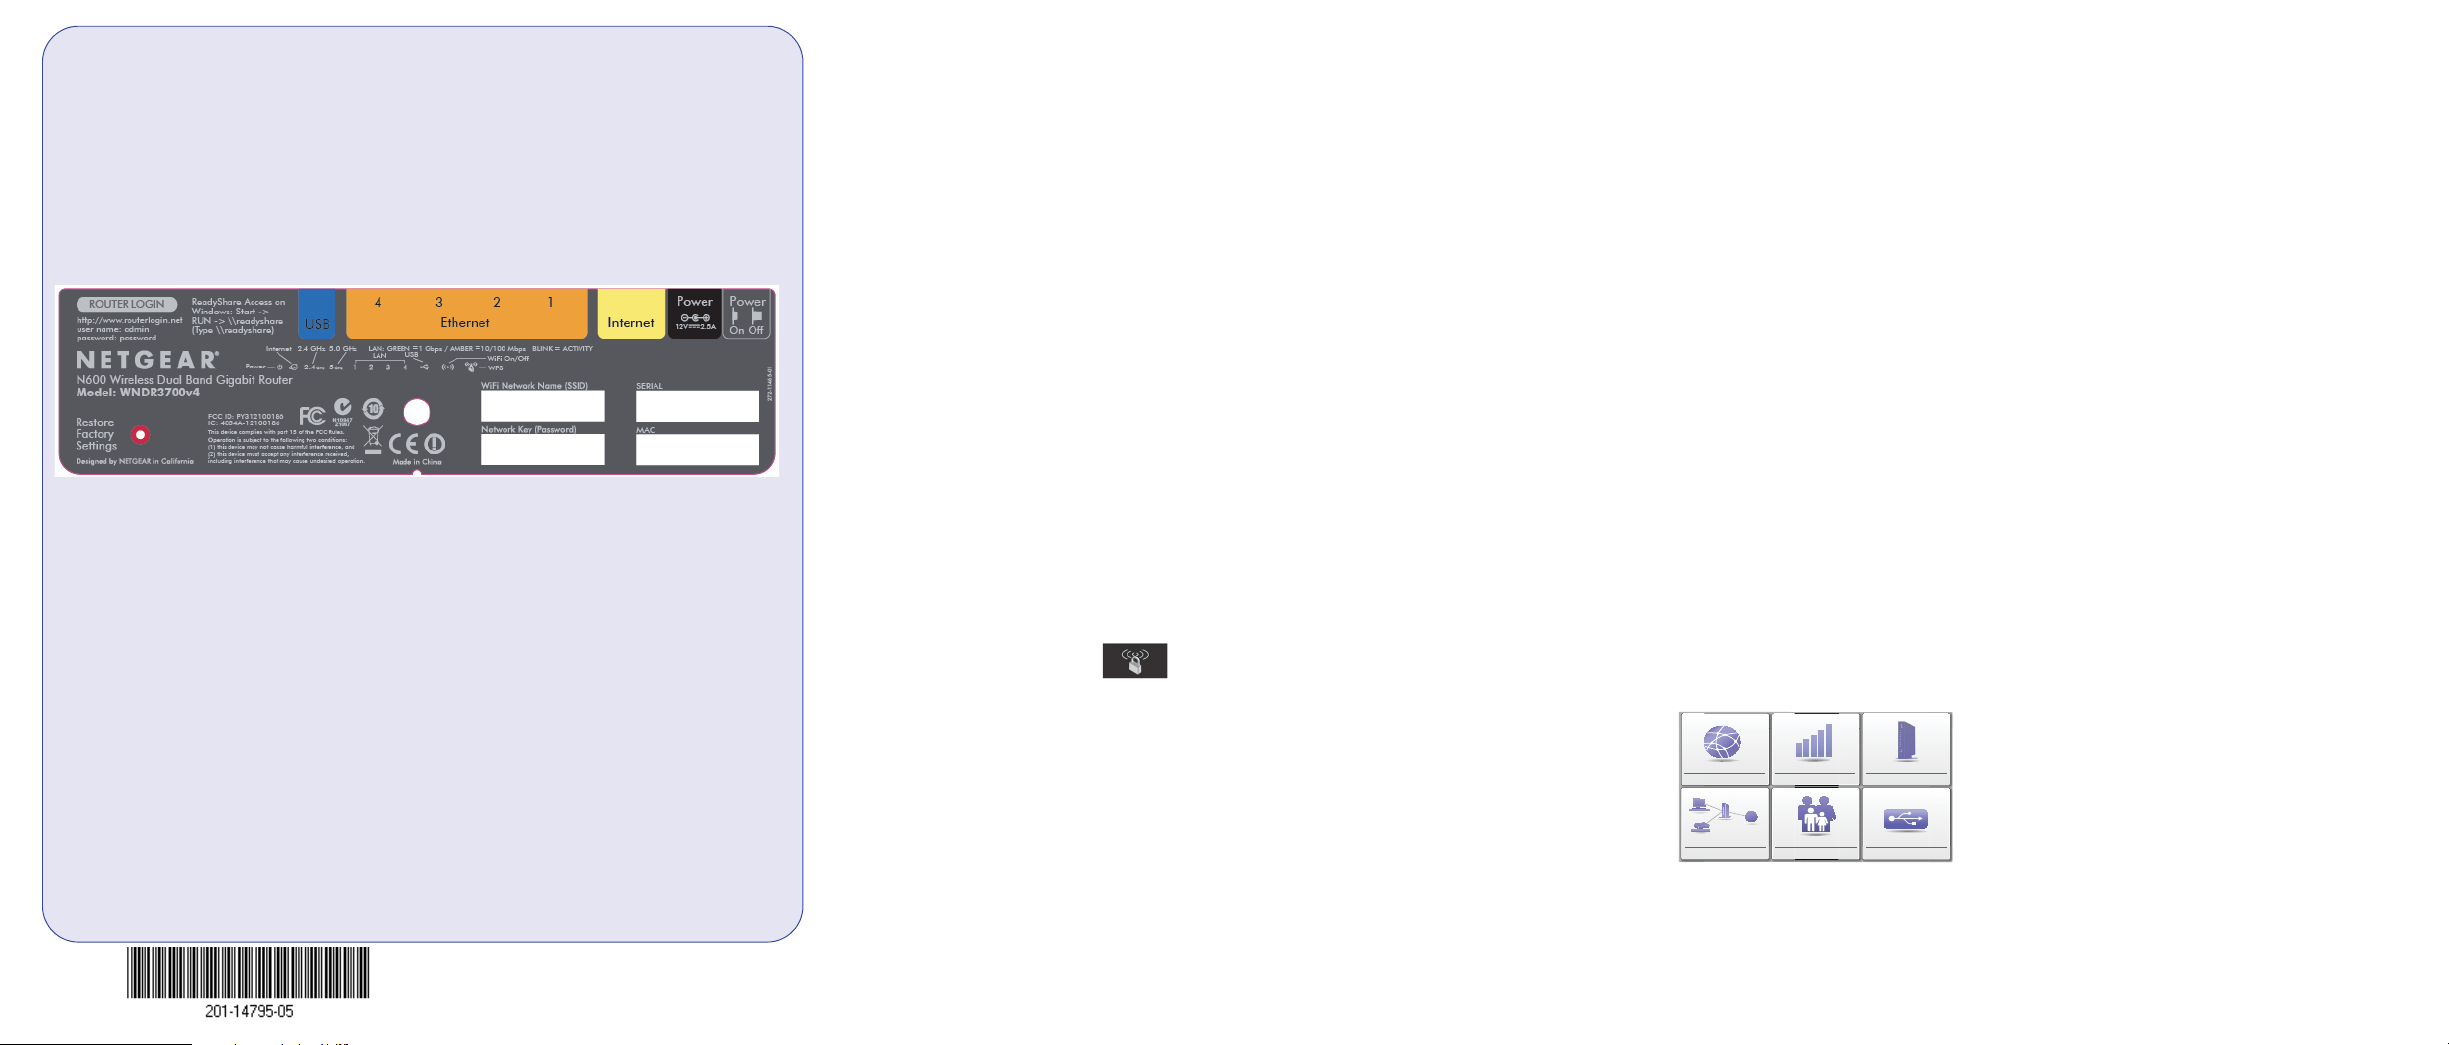
Preset Wireless Security
Internet
STATUS GOOD
Network Map
Number of devices 16
Parental Controls
WiFi Connection
STATUS Connected
Router Settings
Click here
ReadySHARE
Click here
Click here
Get the genie app.
Download the free genie app from
www.NETGEAR.com/genie.
Easily share media, files, and printers
on the network from your smartphone,
tablet, or laptop.
This product has a unique WiFi network name (SSID) and network key (password).
The default SSID and password are uniquely generated for every device (like a
serial number), to protect and maximize your wireless security. This information is on
the label on the bottom of the product.
NETGEAR recommends that you do not change the preset SSID or password. If you
do change the settings, the information on the bottom of the product does not apply.
Find the preset wireless settings on your router and record them here:
WiFi network name (SSID) ________________________________
Network key (password) __________________________________
If you change the preset wireless settings, record them here:
Wireless network name (SSID) _______________________________
Network key (password) _____________________________________
If necessary to retrieve or update your password, type
http://www.routerlogin.net in a web browser, and log in using the
default user name (admin) and password (password).
Select Wireless Settings to locate your wireless password.
Connect Wireless Devices to Your Router
Choose either the manual or Wi-Fi Protected Setup (WPS) method to add wireless
computers, and other devices to your wireless network.
Manual Method
1. Open the software utility that manages your wireless connections on the
wireless device that you want to connect to your router (iPhone, laptop,
computer, gaming device). This utility scans for all wireless networks in your
area.
2. Look for the preset NETGEAR wireless network name (SSID), and select it.
The SSID is on the product label on the bottom of the router.
Note: If you changed the name of your network during the setup process, look
for that network name.
3. Enter the preset password (or your custom password if you changed it), and
click Connect.
4. Repeat steps 1–3 to add other wireless devices.
WPS Method
If your wireless device supports WPS (Wi-Fi Protected Setup)—NETGEAR calls
this method Push 'N' Connect—you might be prompted to press the WPS button on
the router instead of entering a password. If you are prompted to press the WPS
button:
1. Press the WPS button on the router.
2. Within 2 minutes, press the WPS button on the client device, or follow the
WPS instructions that came with your wireless device to complete the WPS
process. The device is then connected to your router.
3. Repeat this process to add other WPS wireless devices.
Note: WPS does not support WEP security. If you try to connect a WEP client
to your network using WPS, it does not work.
Troubleshooting
The browser cannot display the web page.
• Make sure that the computer is connected to one of the four LAN Ethernet ports,
or wirelessly to the router.
• Make sure that the Wireless LED is lit.
• Close and reopen the browser to make sure that the browser does not cache the
previous page.
• Browse to http://www.routerlogin.net.
• If the computer is set to a static or fixed IP address (this setting is uncommon),
change it to obtain an IP address automatically from the router.
Support
Thank you for purchasing this NETGEAR product.
After installing your device, locate the serial number on the label of your product and
use it to register your product at https://my.netgear.com. You must register your
product before you can use NETGEAR telephone support. NETGEAR recommends
registering your product through the NETGEAR website. For product updates and
web support, visit http://support.netgear.com. NETGEAR recommends that you use
only the official NETGEAR support resources.
You can get the user manual online at http://downloadcenter.netgear.com or
through a link in the product’s user interface. For the current EU Declaration of
Conformity, visit http://support.netgear.com/app/answers/detail/a_id/11621/. For
regulatory compliance information, visit http://www.netgear.com/about/regulatory/.
See the regulatory compliance document before connecting the power supply.
August 2014
NETGEAR, the NETGEAR logo, and Connect with Innovation are trademarks and/or registered trademarks of
NETGEAR, Inc. and/or its subsidiaries in the United States and/or other countries. Information is subject to
change without notice. © NETGEAR, Inc. All rights reserved.
 Loading...