

)NSTALLATION'UIDE
54 Mbps Wireless USB Print Server with 4-Port Switch WGPS606
These setup instructions assume that you will connect to an access point or
wireless router.
Note: See the installation instructions for your operating system before attaching
the USB cable to the USB Adapter and your computer.
Estimated Completion Time: 20 minutes for each printer; 10 minutes for each
computer.
Remove the NETGEAR CD.
What’s on the CD?
• A setup wizard
• Software utilities you use for customizing your
print server
• The installation and reference guides
Note: Do not connect the Wireless USB Print Server until you are prompted to do
so by the wizard on the CD.
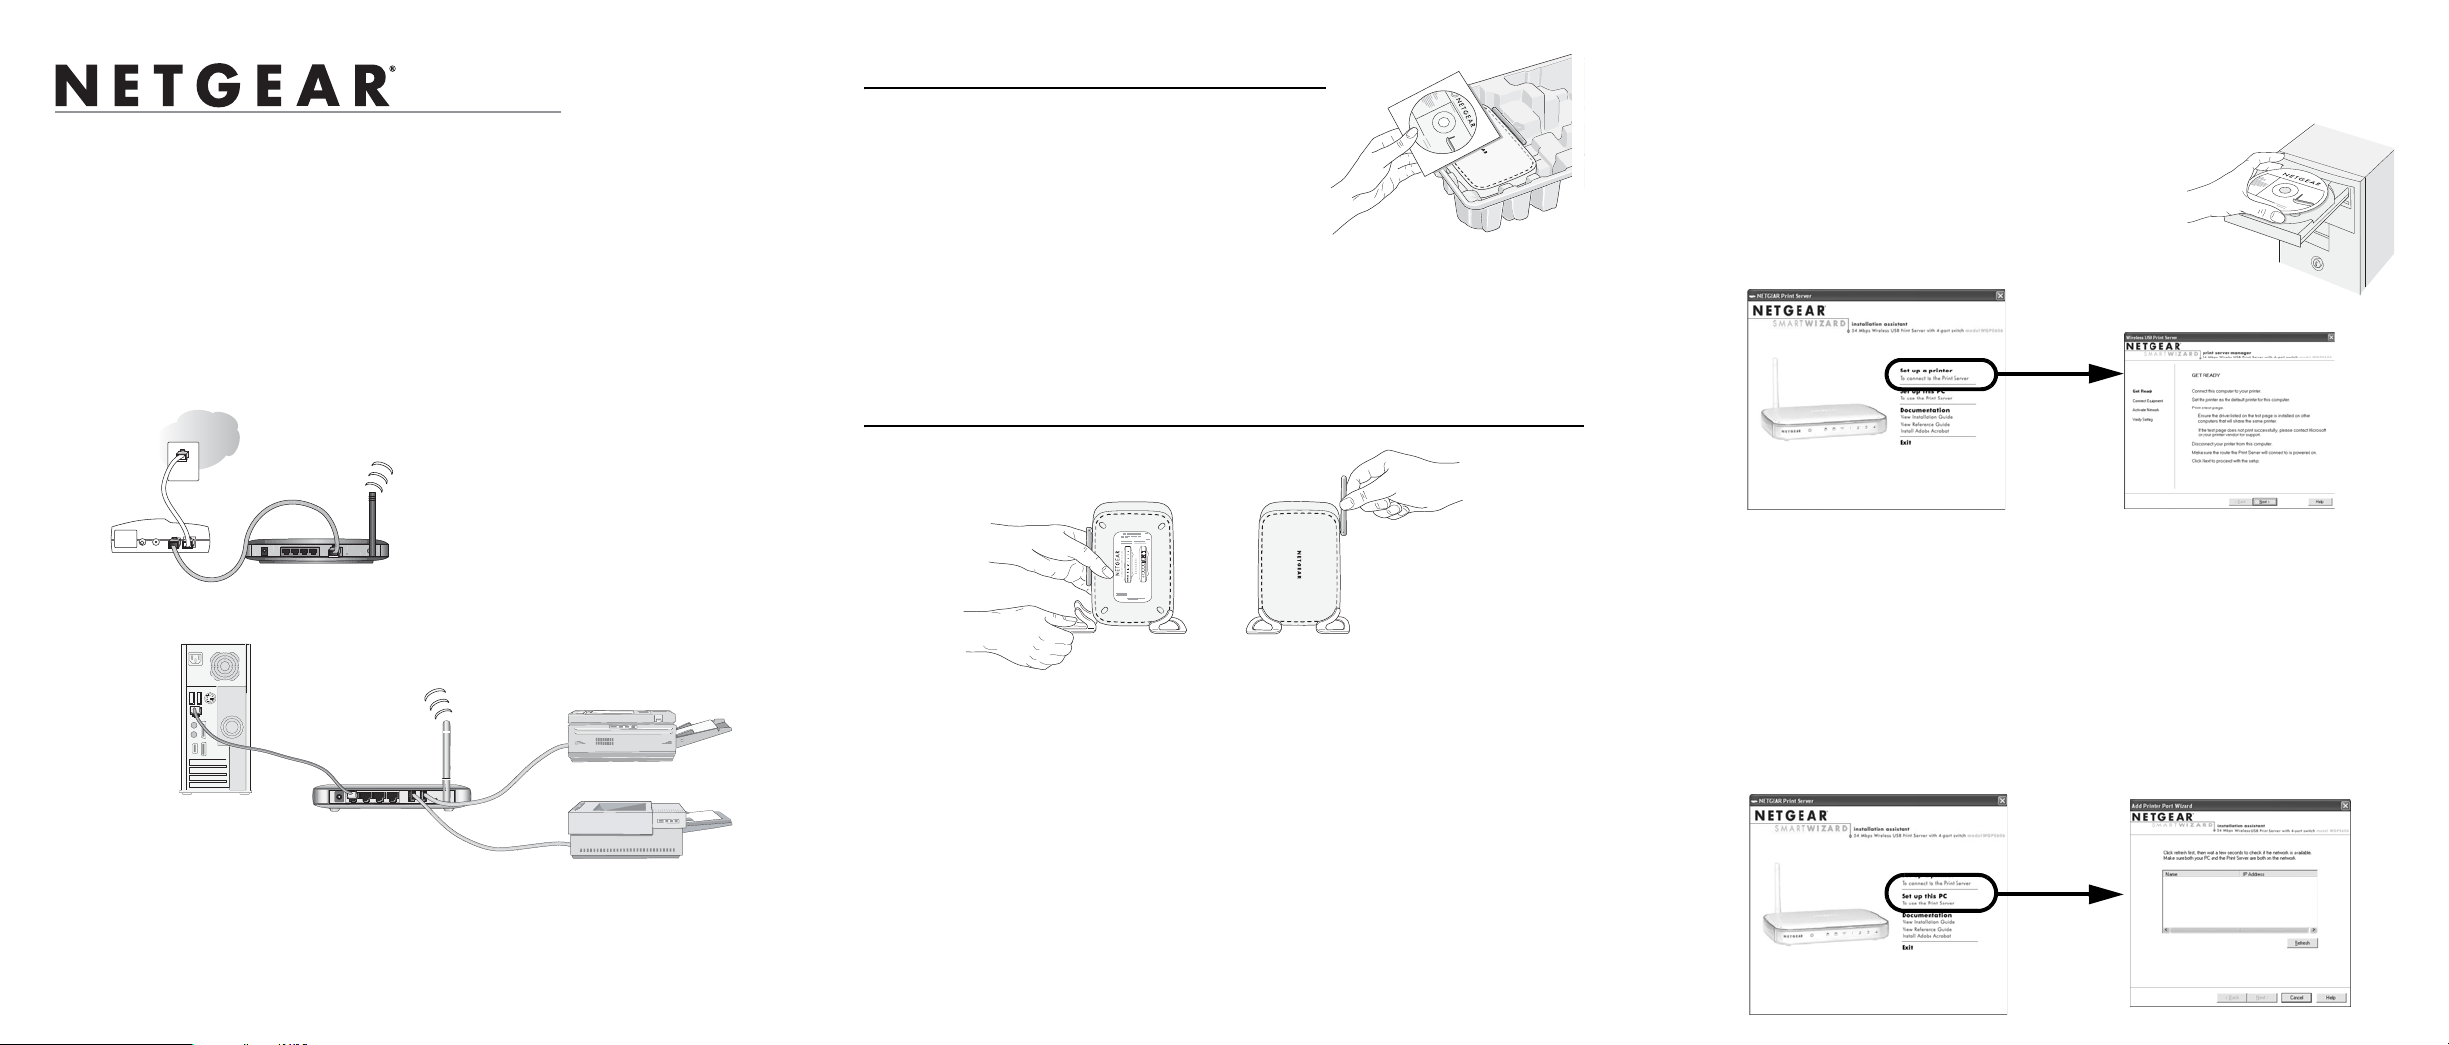
Set Up the Print Server First
1. INSERT THE NETGEAR CD.
If the wizard screen does not appear, double click
autorun.exe on the CD.
2. USE THE SMART WIZARD TO SET UP A PRINTER .
a. Click Set up a printer.
Overview
#ABLEOR$3,MODEM
$ESKTOP0#
When you finish the installation, your network will resemble this illustration.
7IRELESS2OUTER7'2
7'03
-BPS7IRELESS53"0RINT3ERVER
WITHPORT3WITCH
53"#ABLE
53"#ABLE
0RINTER!
0RINTER"
FAMILIARIZE YOURSELF WITH THE WIRELESS USB
PRINT SERVER.:
• Notice that the bottom label has information such as:
• Port and connector descriptions and locations
• Login defaults
• Status lights
• To stand the unit up, attach its feet.
• Set the antenna vertically for best side-to-side coverage or horizontally for best
top-to-bottom coverage.
The Smart Wizard installation assistant opens the print server manager wizard.
b. Follow the on-screen ins tructions, and click Next when you are ready to proceed.
c. Follow the step-by-step instructions to complete setting up the printer with the
wireless USB print server.
Now, Set Up a PC
1. USE THE SMART WIZARD TO SET UP A PC.
a. Click Set up this PC.

The Smart Wizard installation assistant opens the add printer port wizard.
b. Follow the on-screen instructions, and click Next when you are ready to proceed.
c. Follow the step-by-step instructions to complete setting up the PC to use the
printer you just set up on the wireless USB print server.
d. Verify connectivity to the printer.
Determining Placement
The operating distance or range of your wireless connection can vary significantly
based on the physical placement of the wireless USB print server.
Note: Failure to follow these guidelines can result in significant
performance degradation or inability to wirelessly connect.
For best results, place your wireless USB print server:
• In an elevated location such as a high shelf where the wirelessly connection to
the network has line-of-sight access (even if through walls).
• Away from sources of interference, such as computers, microwaves, and 2.4
GHz cordless phones.
• Away from large metal surfaces.
• Set the antenna vertically for best side-to-side coverage or horizontally for
best top-to-bottom coverage.
Troubleshooting Tips
Here are some tips for correcting simple problems you may have.
Make sure the printer is functional.
Connect your printer directly to your computer and verify that you can print from
your computer. If you cannot print from your computer when the printer is
directly connected to your computer, refer to your printer documentation for
assistance.
Once the wireless USB print server is connected, always restart
your network in this sequence:
1. Turn of f and unplug the modem, turn off the router, shut off the wireless USB
print server, turn off the printer, and shut down the computer.
2. Plug in and turn on the modem. Wait about 2 minutes.
3. Turn on the router. Wait about 1 minute.
4. Turn on the wireless USB print server and printer.
5. Turn on the computer.
Make sure the cables are plugged in.
For each powered on computer or printer connected to the wireless USB print
server, the corresponding LAN or printer status light will be lit. The label on the
bottom of the wireless USB print server identifies these port and status light
locations. If the wireless feature is turned off the wireless status light will be off.
Verify the wireless settings.
The Wireless Network Name (SSID) and security settings of the router and
wireless USB print server must match exactly. For example, entering nETgear for
the SSID is not the same as entering NETGEAR.
Make sure the network settings of the computer are correct.
Both Ethernet cable and wirelessly connected computers must be configured to
obtain IP and DNS addresses automatically via DHCP.
Check the status lights to verify correct operation.
The Power light should turn solid green. If after 2 minutes it is not, reset the
wireless USB print server as described in the manual on the CD.
If after completing the setup, the Wireless light does not come on, log in to the
router and verify that the wireless feature is turned on.
I don’t have a working CD drive.
Switch to a different compute that has a working CD drive or download the full
manual from the Netgear web site, and follow the setup instructions it provides.
Technical Support
Thank you for selecting NETGEAR products.
After completing the Smart Wizard configuration assistant, locate the serial number on the
bottom label of your product and use it to register your product at
http://www.NETGEAR.com/register.
Registration on the web site or over the phone is required before you can use our
telephone support service. The phone numbers for worldwide regional customer support
centers are on the Warranty and Support Information card that came with your product.
Go to http://kbserver.netgear.com for product updates and web support.
© 2005 by NETGEAR, Inc. All rights reserved. NETGEAR is a registered trademark of NETGEAR, Inc. in the
United States and/or other countries. Other brand and product names are trademarks or registered trademarks of
their respective holders. Information is subject to change without notice.
February 2005
 Loading...