

Page 1
User's Guide
54 Mbps Wireless Access Point
WG602
Page 2
You can refer to the Support information card for the telephone number of customer support
in your area. You should keep the Support information card, along with the original packing
materials, and use the packing materials to repack the WG602 54 Mbps Wireless Access Point
if you need to return it for repair.
To qualify for product updates and product warranty registrations, we encourage you to register
on the NETGEAR’s web page at:
http://www.NETGEAR.com.
System Requirements
Before installing the WG602, your system should meet the following requirements:
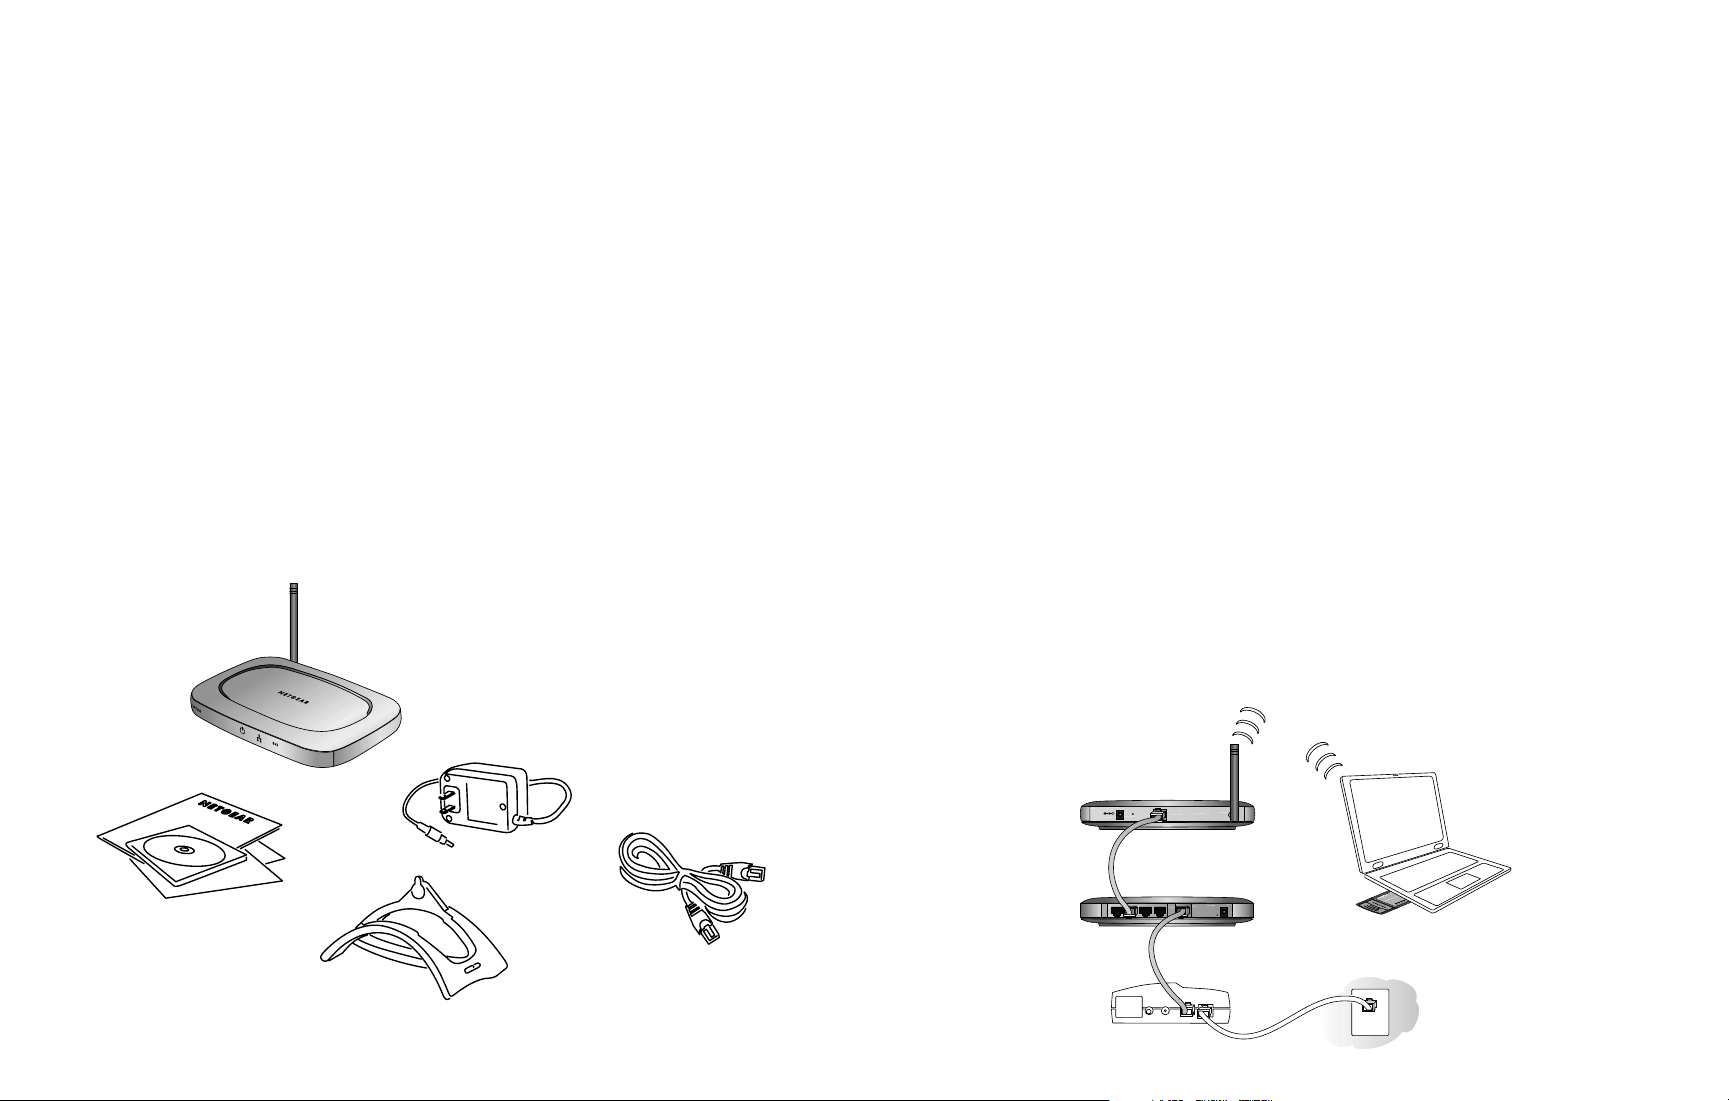
• A Cable/DSL Router with multiple 10/100 Mbps Ethernet Ports or a 10/100 Mbps Local
Area Network device such as a hub or switch.
Note: The WG602 will need to be connected to a router, switch, or hub as shown in the
picture below.
• A Category 5 UTP straight-through Ethernet cable with the RJ-45 connector (included in
this package or one similar to it).
• An A/C power outlet (100-240 V, 50-60 HZ).
• A Web browser for configuration, such as Microsoft®Internet Explorer 5.0 or above, or
Netscape Navigator®4.78 or a later version.
• One computer with TCP/IP protocol installed.
• Other 802.11b or 802.11g-compliant devices, such as the NETGEAR WAB501 Dual
Band Wireless PC Card or WG511 54 Mbps Wireless PC Card.
32-bit CardBus WG511
2
Introduction
Thank you for purchasing the NETGEAR WG602 54 Mbps Wireless Access Point. The
NETGEAR WG602 Wireless Access Point connects to all existing 802.11b wireless networks
and supports new clients based on the forthcoming ultra-fast 802.11g standard at 54 Mbps all
in the same 2.4 GHz radio frequency range.
Package Contents
This package should contain:
• WG602 Wireless Access Point
• Power adapter and cord (12VDC, 1.2A)
• NETGEAR’s WG602 Resource CD
• WG602 User's Guide
• Straight-through Category 5 Ethernet cable—5 feet (1.52 m)
• Support information card
• Warranty card
1
Model WG602 Resource CD,
User's guide, Support
information card,
Warranty card
WG602 54 Mbps Wireless
Stand
Access Point
Power adapter
Category 5
100 Mbps
Ethernet cable
+
12 VDC 1.2A
WG602 54 Mbps
Wireless Access Point
W
3
2
-
ire
b
i
t
C
les
a
r
d
s P
B
u
s
W
C
C
G
5
a
1
1
r
d
Cable/DSL
Router
WG511 54 Mbps
Wireless PC Card in a
Notebook computer
Cable or DSL modem
Page 3
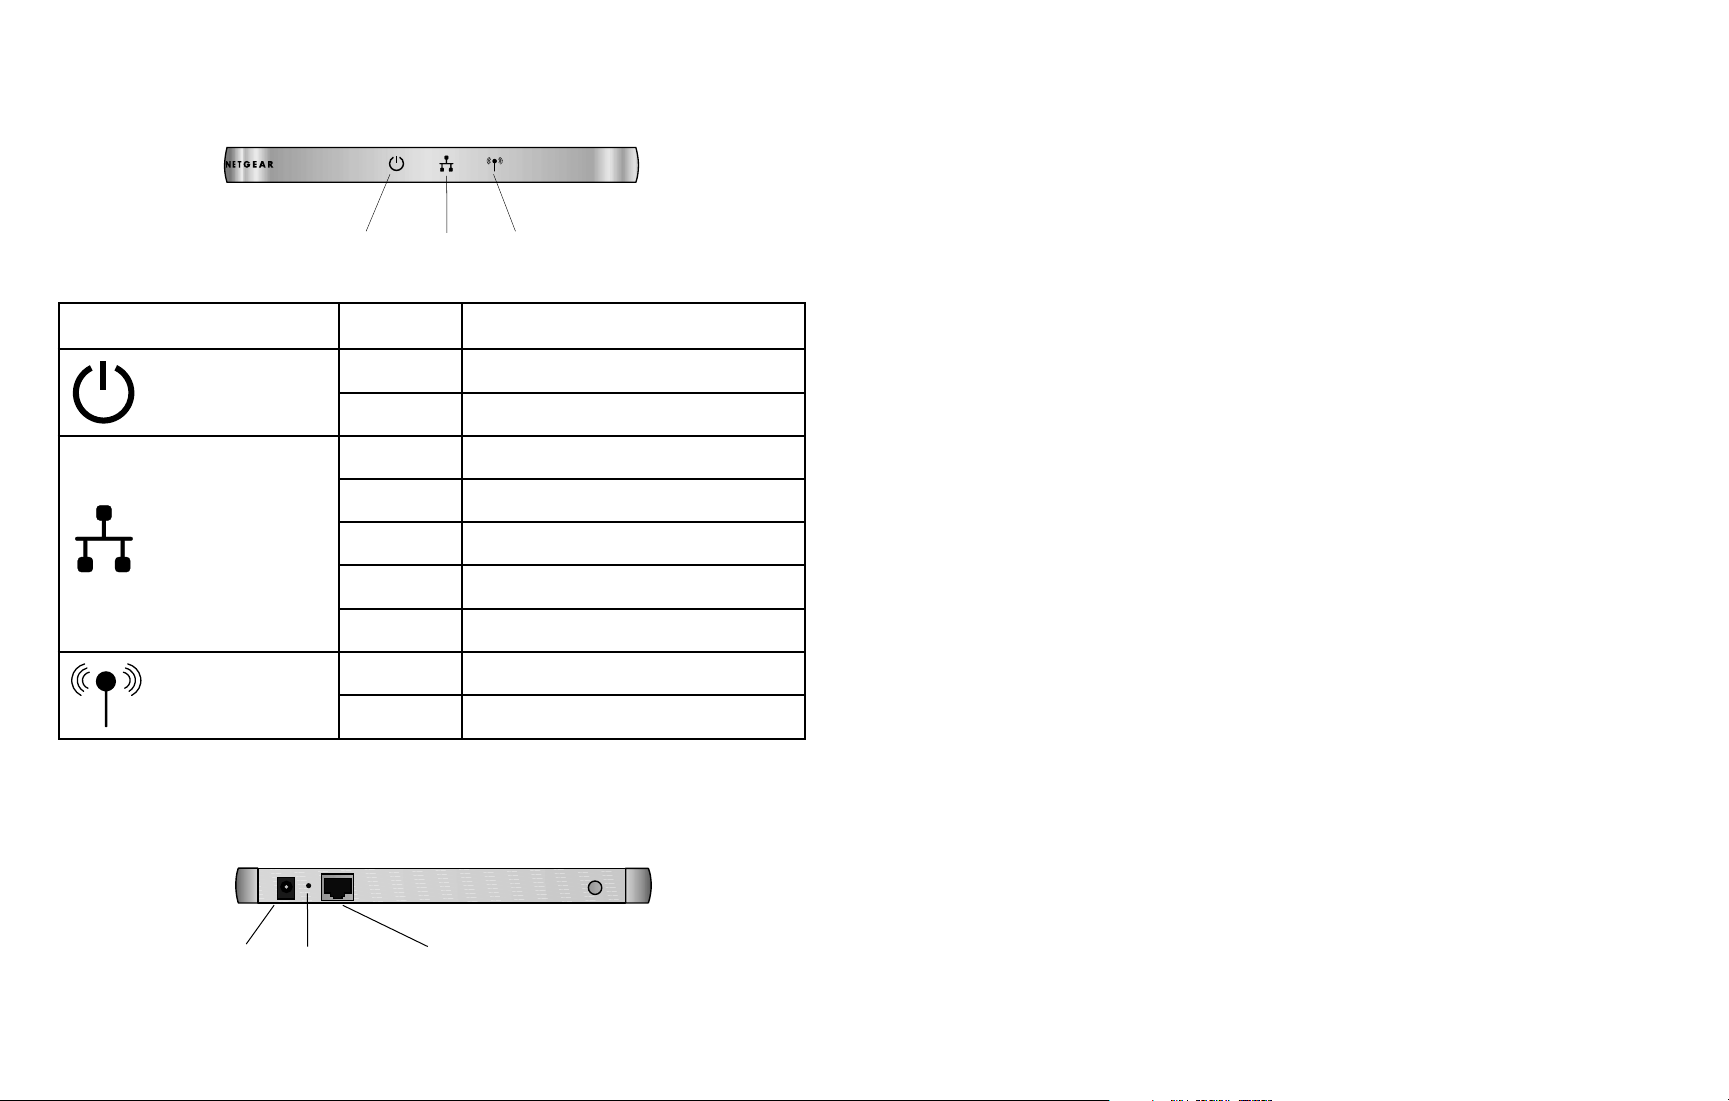
Power Socket
This socket connects to the WG602 power adapter.
Warning: Use only the power adapter that came with the WG602.
Reset and Restore to Factory Settings Button
The Reset and Restore to Factory Settings button located between the Ethernet RJ-45
connector and the Power socket reboots the WG602 or restores the WG602 to the factory
default settings. Press and hold the Restore to Factory Default button for 5 seconds to clear any
user-defined settings.
RJ-45 Ethernet Port
Use the WG602 Ethernet RJ-45 port to connect to an Ethernet LAN through a device such as
a hub, switch, or router.
Placement and Range Guidelines
Indoors, computers can connect over 802.11 wireless networks at a maximum range of 500 feet
(152.4 m) for 802.11b devices. However, the operating distance or range of your wireless
connection can vary significantly, based on the physical placement of the wireless access point.
For best results, identify a location for your wireless access point according to these guidelines:
• Away from potential sources of interference, such as PCs, large metal surfaces, microwaves,
and 2.4 GHz cordless phones.
• In an elevated location such as a high shelf that is near the center of the wireless coverage
area for all mobile devices.
Failure to follow these guidelines can result in significant performance degradation or inability
to wirelessly connect to the wireless access point.
Default Factory Settings
When you first receive your WG602, the default factory settings will automatically be set, as
shown in the chart on the next page.
You can restore these defaults with the Factory Default Settings button on the rear panel; see
WG602 Wireless Access Point Rear Panel on page 3.
WG602 Wireless Access Point Front Panel
The WG602 Wireless Access Point provides these status lights: Power, Ethernet, and Wireless.
This chart demonstrates the variety of LED indicator settings:
WG602 Wireless Access Point Rear Panel
4
3
Light Status Description
Power
Off No Powe r
On Power On
Ethernet
(Link/Activity)
Off Indicates no Ethernet link detected
Green On 100 Mbps Fast Ethernet link
Green Blink Data traffic on the 100 Mbps LAN
Amber On 10 Mbps Ethernet link
Amber Blink Data traffic on the 10 Mbps LAN
Wireless
(Link/Activity)
Off No wireless link
Green Blink Wireless Data traffic
Power
Ethernet Wireless
Power
Socket
Reset &
Restore Button
RJ-45 Ethernet
Port
Page 4

Install the WG602 54 Mbps Wireless Access Point
Please follow these steps to successfully install the WG602 Wireless Access Point.
Note: We suggest you first install the WG602 with the default settings. Optionally, you can
then customize your settings and enable encryption if it is required.
1. Position the WG602 Wireless Access Point.
Adjust your access point antenna to provide maximum signal strength for your wireless devices.
Note: If you are planning to mount your WG602 on a wall or in a remote location, we
suggest you configure and verify your WG602’s operations first.
2. Connect the Ethernet cable.
Use the category 5 Ethernet cable included in this package to connect the Ethernet port on
the rear panel of the WG602 Wireless Access Point to a LAN port on your cable/DSL
router or an Ethernet hub or switch.
Note on cabling requirements: The WG602 Wireless Access Point should connect to
your LAN via a twisted-pair Category 5 Ethernet cable with RJ-45 connectors.
3. Connect the power cable.
Connect the power cord of the WG602 power adapter to the 12V DC power socket on
the rear panel of the access point. Then, plug the power adapter into an A/C power outlet.
4. Configure the wireless adapter settings.
To access settings page of the WG602, you need to configure one of your 802.11b or
802.11g compliant wireless adapters to use the WG602 factory default settings as follows:
Wireless Network Name (SSID): NETGEAR
Network Mode: Infrastructure
WEP: Disabled or Off
5. Verify the installation was successful.
The Power light should be lit and the Ethernet Link light should be on. If the connection is
a 100 Mbps connection, the light is green. If it is a 10 Mbps connection, the light is
amber. The Ethernet connection light also flashes to indicate data is moving over the
Ethernet connection to the switch, router, or hub.
The Wireless Link light should be on and blinking. A fast blink indicates that the access
point is receiving or transmitting wireless data.
After you install the WG602 Access Point, you may customize any of the settings to better
meet your networking needs. Turn to Configuring your WG602 54 Mbps Wireless Access Point on
page 7 for more information.
Note: The characters are case sensitive. An access point always functions in infrastructure
mode. The SSID for any wireless device communicating with the access point must match the
SSID configured in the access point.
Installing the WG602 54 Mbps Wireless
Access Point
These are the basic instructions to successfully setup and configure your WG602 Wireless
Access Point. Estimated setup time is 10 to 15 minutes.
•
Install the WG602 Wireless Access Point.
• Configure the Access Point. Refer to Configuring your WG602 54 Mbps Wireless Access
Point on page 7.
6
5
Feature Default Factory Setttings
User Name admin
Password password
Access Point Name
netgearxxxxxx where xxxxxx are the last six digits of the
AP's MAC address
AP IP Address 192.168.0.227 of DHCP is disabled
AP Subnet Mask 255.255.255.0
Wireless Network Name (SSID) NETGEAR
11 g/b RF Channel 11
WEP Disabled
Authentication Type Open System
1
1
Page 5
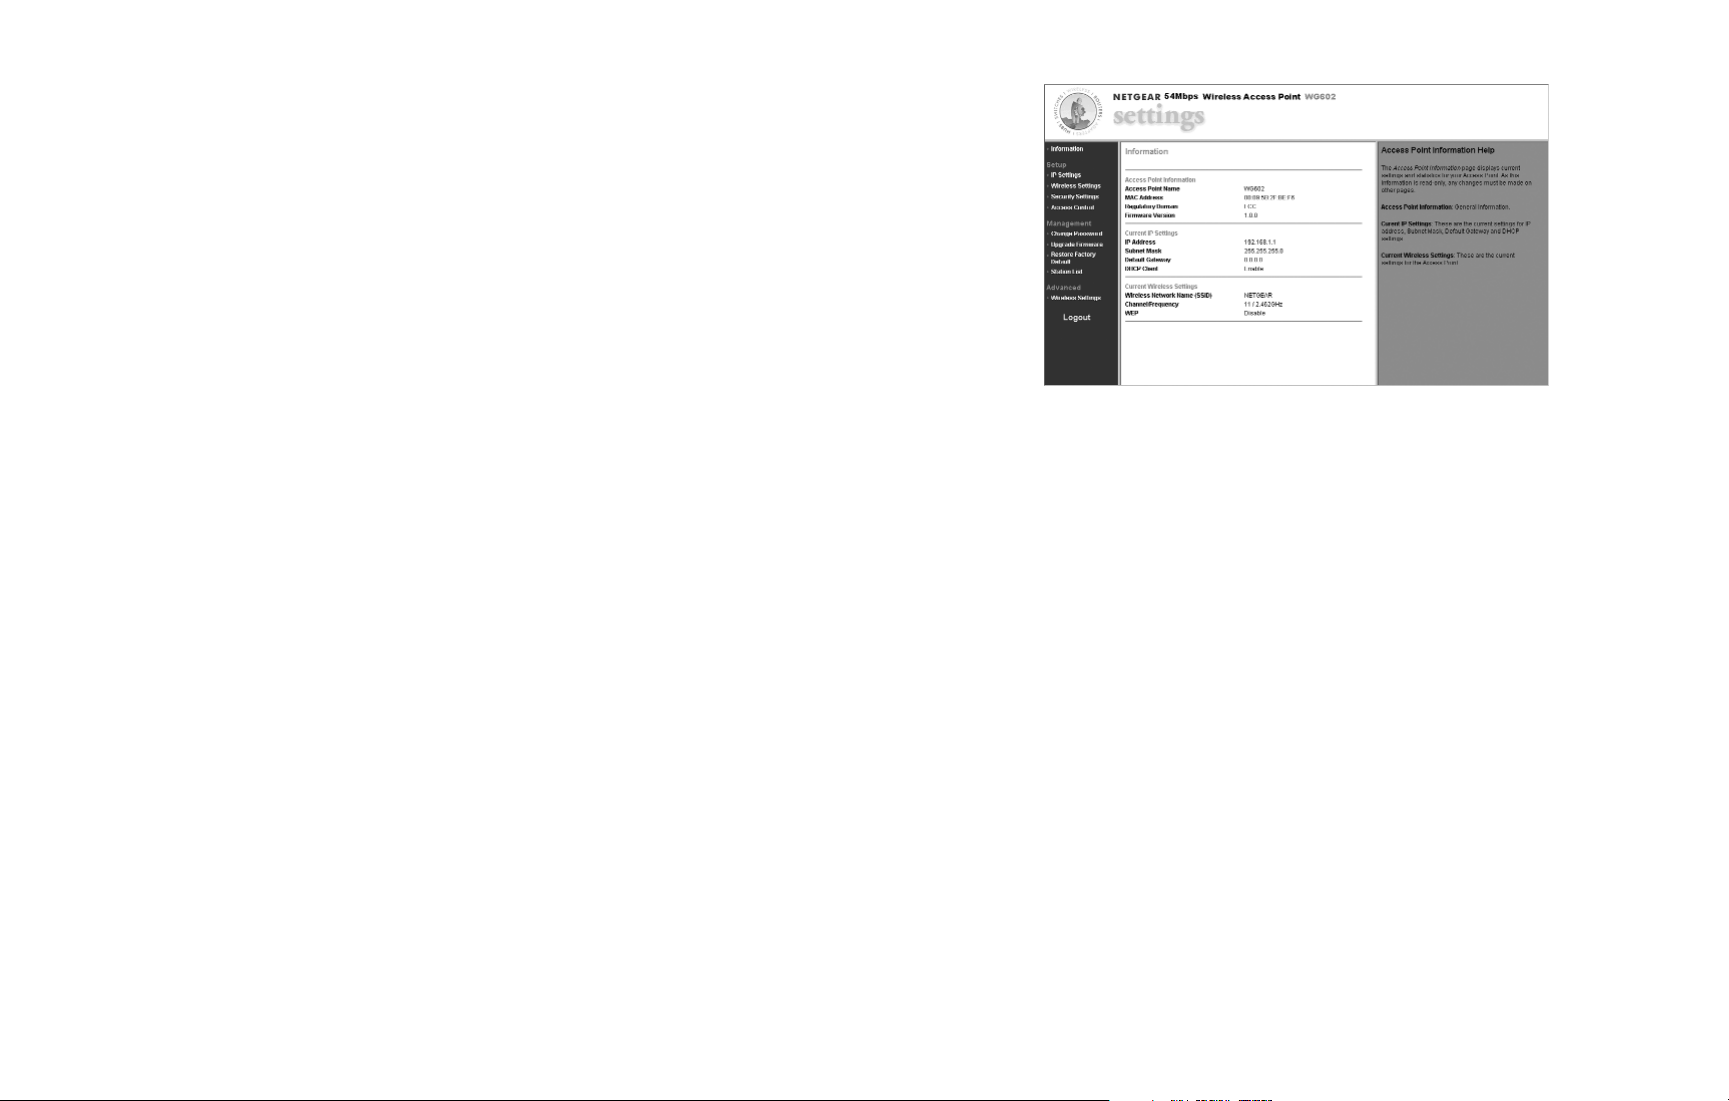
Note: There is no space required between “netgear” and the 6 digits of the access point name.
Once you have entered your access point name, your web browser should automatically
find the WG602 Access Point and display the WG602 home page, as shown above.
You may access the WG602 information page by specifying either the IP address or the
WG602 Access Point name.
For advanced users: To access the WG602 Web Server home page on the WG602 Access
Point, we suggest that you have a DHCP server on the Ethernet Network. If there is no
accessible DHCP server, the WG602 Access Point will default to the IP address of
192.168.0.227 with a subnet mask of 255.255.255.0. You will need to configure the IP
address of the computer to be within the same subnet for the initial configuration.
Please refer to Troubleshooting on page 22 if you cannot connect to the WG602 Web Server.
4. Click Setup options to configure the WG602 Access Point and proceed to the next
section, Login to the Access Point Setup.
6. Verify wireless connectivity to your network.
Using a computer with an 802.11b or 802.11g compliant wireless adapter, browse internet
or check file access on your network. If everything is functioning properly, then you have
successfully installed the WG602 Wireless Access Point.
Having problems? If you experience any difficulties while trying to install the WG602
Wireless Access Point, please refer to Troubleshooting on page 22 for more information.
Note about increasing security: Refer to Protecting Your Wireless Network on page 18 for
more information.
Want to customize configuration settings? For information on WG602 settings, see
Configuring your WG602 54 Mbps Wireless Access Point below.
Configuring Your WG602 54 Mbps
Wireless Access Point
The WG602 Wireless Access Point can be configured remotely from Microsoft Internet
Explorer browser version 5.0 or above, or Netscape Navigator web browser version 4.78 or
above on your computer.
1. Determine the name of your access point.
To find the name of your access point, refer to the labels on the bottom of the access
point. The access point name should be similar to this, netgear10d4b5.
2. Open your web browser. (For example, this may be Internet Explorer or Netscape
Navigator.)
3. At the top of the window, in the Address or Location box, type the name of your access
point and press enter. (You do not need to type the prefix “www” or “http://.”)
2
2
8
7
Page 6

Setup Options
IP Settings
Login to the Access Point Setup
To setup your access point, complete the following login steps:
1. Click the Setup options on the WG602 Information page.
2. The Enter Network Password window will be displayed, as shown above. Enter the
default user name “admin” with the default password password.
Note: Both the user name and password are case sensitive.
You may change the password at any time after this point by choosing the Change
Password option from the Management menu.
3. Click OK. The WG602 Setup window will be displayed.
Configure Basic Setup Parameters
To setup your access point, complete the following:
1. From the Access Point Setup menu, choose these options: IP Settings, Wireless Settings,
Security Settings, and Access Control.
2. Specify your configuration settings. When you are done, click the
Apply button for the
changes to take effect.
Note: Be sure to configure the wireless adapters in your network with the same wireless settings
you configure on the WG602.
For more information, please refer to the tables on the following pages for descriptions
of these items.
10
9
Configuration Description
Access Point Name
The unique name represents the access point. The default
Access Point Name is located on the bottom label of WG602.
You may modify the default name with a unique name up to
15 characters long.
Default: netgearxxxxxx, where xxxxxxx represents the last 6
digits of the WG602 MAC address.
IP Address
Specifies the IP address of the access point.
Default: 192.168.0.227
Subnet mask
Specifies the subnet mask of the access point.
Default: 255.255.255.0
Default gateway
Specifies the default gateway IP address.
Default: 0.0.0.0
DHCP Client
The access point will get the IP address, subnet mask and the
default gateway automatically from the DHCP server if the
DHCP is enabled.
Default: Enable
Page 7

Security Settings
Note: If the WG602 cannot locate a DHCP server upon powering up, it will default to the IP
address of 192.168.0.227. If you are not sure of the IP address of the WG602, restore the
default IP address by pressing the Restore to Factory Settings button located on the WG602
back panel for at least five seconds. The WG602 will pass the IP address from the DHCP
server to the associated station if the DHCP client is enabled.
Wireless Settings
12
Configuration Description
Authentication Type
Specifies the Authentication type used: Open System or Shared
Key. If “Shared Key” is selected, you need to enable the WEP
and enter at least one shared key.
Default: Open
WEP
Enable or Disable the Wired Equivalent Privacy.
Default: Disable
WEP Encryption
Specifies the WEP Encryption Key size: 64 bits (Minimum) or
128 bits (Stronger).
Passphrase
Instead of manually entering WEP keys in hex, you can type in
text to generate the four WEP keys automatically.
Default: N/A
If you choose to use passphrase to generate your WEP keys,
you need to click this button to generate the four WEP Keys
in Hex format.
Generate
Specifies the key value in hexadecimal format based on the
WEP Encryption option selected: 64 bits, or128 bits.
Default Key: 1
Key (1-4)
Configuration Description
Wireless Network Name
(SSID)
Enter a 32-character (maximum) service set ID in this field; the
characters are case sensitive. When in infrastructure mode, this
field defines the service set ID (SSID). The SSID assigned to the
wireless node is required to match the access point SSID in order
for the wireless node to communicate with the access point.
Default: NETGEAR
Channel/Frequency
Shows the current channel and frequency in use. The wireless
channel in use will be between 1 to 11 for US and Canada, 1
to 13 for Europe and Australia.
Default: 11
Data Rate
Shows the available transmit data rate of the wireless network.
The possible data rates supported are: 1, 2, 5.5, 6, 11, 12, 24,
36, 48 and 54 Mbps.
Default: Best
11
Page 8

Management Options
Change Password
1. To change the current password, choose the Password option from the AP Setup menu in
the WG602 Web Ser ver home page. The default password is "password."
2. Change your password. Click Apply for the new password to take effect.
Important Note: Be sure to write down your new password, otherwise you will not be able to
access the Access Point setup. You can restore the default password "password" by clicking on
Yes radio button and then clicking on the Apply button to restore to the default password.
Access Control List
The optional Access Control window lets you block or allow the network access privilege of the
specified stations through the WG602 Wireless Access Point. This provides an additional layer
of security. Follow these steps:
1. Choose the Access Control option from the AP Setup menu in the WG602 Web Server
home page. Click Allow or Block to enable MAC address filtering. Click Disable to
disable Access Control feature.
2. Enter the MAC address for each station to be managed, in the MAC Address field and
click Add.
3. When you are done, click the Apply button for the changes to take effect.
You may Add, Edit, or Delete the Access Control List entries.
14
13
Configuration Description
Current Password Specifies the current password in use.
New Password Specifies the new password to be used.
Repeat New Password Retype the intended new password.
Restore Default Password
Two radio buttons options: Yes or No
Default: No
Configuration Description
Access Control
Specifies the options of the MAC Access Control List: Disable,
Allow, or Block.
Default: Disable
MAC Address
Specifies the MAC address for the station to be included in the
Access Control List.
Device Name Specify the name to identify the device.
Access Control List
Displays the current MAC Address Control List entries. The
maximum number of MAC Address entries is 100.
Page 9

Restore Factory Default Settings
You may click on the Restore Factory Default Settingsbutton to revert to default factory settings.
Station List
The Station List window displays the assigned ID, MAC address, device name, and the
current state of the clients that are currently connected to the access point.
Reset Access Point
You can reset the Access Point by selecting this management option.
Advanced Options
Wireless Settings
To setup your advanced wireless LAN settings, complete the following:
1. Choose the Wireless Settings option from the Access Point Advances menu on the
WG602 Web Server home page.
2. Specify your wireless configuration settings. When you are done, click Apply for the
changes to take effect.
Note: Be sure to make the same configuration changes on the other wireless adapters in
your network.
Upgrade Firmware
The Firmware Upgrade menu options will display the Firmware Upgrade window so that you
may upgrade your latest WG602 firmware.
Before upgrading the WG602 firmware, make sure you have downloaded the latest firmware
from the NETGEAR support web site: http://www.netgear.com/support.
1. Enter the location of the WG602 firmware file name or click the Browse button to locate
the file on your local disk.
2. When you are done, click the Upgrade button and then the Reboot button for the
changes to take effect.
You may click the Upgrade button to perform the upgrade operation.
16
15
Configuration Description
File Name Specifies the WG602 firmware image file.
Browse
You may click on the Browse button to locate and select the
firmware image file residing on the system that's used for
configuring the access point.
Page 10

3. Choose your authentication method.
To set authentication for WG602 Wireless Access Point, select the
Open System or
Shared Key Authentication Type by selecting the radio button. All other devices using
this band must share this setting. Shared Key operation offers an increase in security over
an Open System operation.
4. Setup 802.11b/g WEP encryption security as needed.
For 802.11b/g, all four keys must have the same encryption level — 64-bit or 128-bit.
All devices in the network must have the same key values in for the selected encryption
key. The encryption key selected as the default determines the encryption level at which
the access point is transmitting.
For 64-bits encryption:
Hexadecimal: 10 hexadecimal digits in the range of "A-F", "a-f " and "0-9" (e.g.
11AA22BB33).
For 128-bits encryption:
Hexadecimal: 26 hexadecimal digits in the range of "A-F", "a-f " and "0-9" (e.g.
00112233445566778899AABBCC).
Passphrase:
You can enter a Passphrase to avoid manually entering WEP keys. It is case-sensitive.
5. When you are done, click the Apply button and then the Reboot button for the changes
to take effect.
Protecting Your Wireless Network
The absence of a physical connection between nodes makes wireless links vulnerable to
information theft. This chapter describes how to use the basic security features of the WG602
Wireless Access Point to protect your network.
Although your network traffic may already be encrypted, the security steps described here are
easy to perform.
Enabling Basic Wireless Access Security Features
There are several steps you can take to secure your wireless network:
• Change the factory default administrator password of the WG602.
• Place the WG602 in a location where it cannot be physically tampered with.
Security Configuration
To prevent unauthorized wireless stations from accessing data transmitted over the network, the
Security Settings screen of the Access Point Setup offers use of an authentication protocol as
well as data encryption, known as WEP (Wired Equivalent Privacy).
For a step-by-step treatment of security setup, see Enabling Basic Wireless Access Security Features
on page 18.
1. Use a browser to connect to the WG602.
2. Click Security Settings on the Access Point Setup menu and log in.
3
3
18
17
Configuration Description
RTS Thr eshold
Request to Send Threshold. The packet size that is used to
determine if it should use the CSMA/CD (Carrier Sense
Multiple Access with Collision Detection) mechanism or the
CSMA/CA mechanism for packet transmission. With the
CSMA/CD transmission mechanism, the transmitting station
sends out the actual packet as soon as it has waited for the silence
period. With the CSMA/CA transmission mechanism, the
transmitting station sends out an RTS packet to the receiving
station, and waits for the receiving station to send back a CTS
(Clear to Send) packet before sending the actual packet data.
Default: 2346
Fragmentation Length
This is the maximum packet size used for fragmentation.
Packets larger than the size programmed in this field will be
fragmented. The Fragment Threshold value must be larger
than the RTS Threshold value.
Default: 2346
Preamble Type
A long transmit preamble may provide a more reliable
connection or slightly longer range. A short transmit preamble
gives better performance.
Default: Long
DTIM
The Delivery Traffic Indication Message specifies the data
beacon rate between 1 and 16384.
Default: 1
Page 11

• Authentication: The authentication setting, Open System or Shared Key is
unrelated to encryption of transmissions. Choose Shared Key for more security.
Authentication Type (circle one): Open System or Shared Key
Note: If you select Shared Key, the other devices in the network will not connect
unless they are set to Shared Key as well.
•
Passphrase: By entering the text-based passphrase, it will automatically generate four
WEP keys in Hex.
Passphrase: _______________________________
•
WEP Encryption: See Security Configuration on page X for a description of these
differences.
WEP Encryption Keys:
Choose the WEP Encryption Key Size: 64 bits or 128 bits.
Circle one: 64 or 128 bits
Key 1: ___________________________________
Key 2: ___________________________________
Key 3: ___________________________________
Key 4: ___________________________________
2. Use the procedures described in the following sections to configure the WG602.
3. Store this information in a safe place.
Change the Wireless Network Name (SSID)
To change the wireless network name (SSID) settings, follow these steps:
1. From the Windows desktop, follow the instructions provided in Configuring your WG602
54 Mbps Wireless Access Point on page 7 to go to the Setup window.
2. To change the SSID, enter a new SSID.
Note: The characters are case sensitive. An access point always functions in infrastructure
mode. The SSID for any wireless device communicating with the access point must match
the SSID configured in the access point.
3. Click Apply or OK for the changes to take effect.
• Change the factory default Wireless Network Name (SSID) setting of the WG602.
• Enable Wired Equivalent Privacy (WEP) encryption of the wireless data communications.
• Restrict wireless access based on the MAC address to specific wireless adapters of known users.
Note: In addition to the WG602 wireless security features, you should also configure
appropriate LAN network security features, such as requiring a user name and password to
access the shared resources in your network.
Change the Default Password
Before you change the default password, be sure to record your new password. For detailed
information on how to change your password, refer to page 14. You may want to use the space
below to write down your new password.
Password: ______________________________
If necessary, you can re-set the WG602 access point to the factory default setting by pressing
the switch button on the rear panel (see Power on page 3).
Secure the Access Point
In order to increase the security of the access point, we recommend that you change the
WG602 default wireless network name (SSID) settings and enable the WEP settings.
Before you change the wireless network name (SSID) and WEP settings, please perform the
following steps:
1. For a new wireless network, use the provided form on the next page to fill in your
configuration parameters. For an existing wireless network, print or copy this form and fill
in the configuration parameters. The person who set up or is responsible for the network
will be able to provide this information.
• Wireless Network Name (SSID): The Service Set Identification (SSID) identifies the
wireless local area network. NETGEAR is the default WG602 SSID. However, you
may customize it by using up to 32 alphanumeric characters. NETGEAR
recommends that you write your customized SSID on the line below.
Note: The SSID in the wireless access point is the SSID you configure in the wireless
adapter card. For the access point and wireless nodes to communicate with each other,
all must be configured with the same SSID. Note that the SSID is case sensitive.
SSID: ______________________________
20
19
Page 12

Troubleshooting
Configure WEP Encryption
Follow these steps to configure WEP encryption.
1. From the Windows desktop, follow the instructions provided in Configuring your WG602
54 Mbps Wireless Access Point on page 7 to go to the Security window.
2. Authentication type may be set as Open System or Shared Key without affecting
encryption. Use Shared Key for added security.
3. Set the keys as you choose after reading Security Configuration on page 17. Other wireless
devices in your network must have compatible encryption configurations.
4. Click Apply for these changes to take effect.
Restrict Wireless Activity by MAC Address
Each device on ethernet and wireless LAN networks has a media access control (MAC) address,
which is a unique 48-bit number assigned to each device by the manufacturer.
A highly secure way of protecting unauthorized access to your wireless network is to restrict
access to only those devices whose MAC addresses you specify. To do so, you must configure
your wireless access point to recognize and accept communications from the MAC address of
only authorized wireless devices.
To check the MAC addresses of devices currently on your wireless network, go to the Access
Point information screen on page 8.
Follow these steps to restrict access to your WG602:
1. From the Windows desktop, follow the instructions given in Configuring your WG602 54
Mbps Wireless Access Point on page 7 to go to the Access Control screen.
2. Set the MAC addresses of the devices you wish to block or allow, then click Add.
22
21
Problem Cause Solution
I cannot
configure the
WG602 using
the Web Browser.
There is a possible
system problem or
you did not
specify the right
IP address or
access point name.
• Remove and then reconnect the power to the
WG602 Wireless Access Point.
• Make sure your computer and the WG602 Access
Point are in the same subnet if you don’t know
the IP address of the WG602.
• Make sure you have cleared the Web Browser’s
cache and enter the correct IP address or access
point name.
• Push the Restore to Default button on the back of
the WG602 to restore default settings.
I cannot
configure the
WG602 using
the Web Browser.
A DHCP server
is not accessible
by the access
point.
• The WG602 defaults to the IP address of
192.168.0.227 with a subnet mask of
255.255.255.0. Configure the IP address of your
PC to be within the same IP subnet (for example:
192.168.0.x).
No lights are lit on
the access point.
The access point
has no power.
• It takes a few seconds for the power light to be lit.
Wait a minute and check the power light status
on the access point.
• Make sure the power cord is properly connected
to the access point.
• Make sure the power adapter is properly
connected to a functioning power outlet. If in a
power strip, make sure it is powered on.
• Use the NETGEAR power adapter that was
supplied with your access point.
Page 13

CE Declaration of Conformity
For the following equipment:
54 Mbps Wireless Access Point
(Product Name)
WG602
(Model Designation)
is herewith confirmed to comply with the requirements set out in the Council Directive on the
Approximation of the Laws of the Member States related to Electromagnetic Compatibility
(89/336/EEC), Low-voltage Directive (73/23/EEC) and the Amendment Directive
(93/68/EEC). For the evaluation regarding the Directives, the following standards were applied:
ETS 300 328:1996-11+A1:1997-07
ETX 300 826: 1997-11
EN60950:1992+A1:1993+A3:1995+A4:1996+A11:1997
Déclaration de conformité CE
Il est certifié que l’équipement suivant :
54 Mbps Wireless Access Point
(nom du produit)
WG602
(deésignation du modele)
est conforme aux exigences définies par la Directive du Approximation of the Laws of the
Member States related to Electromagnetic Compatibility (89/336/EEC), Low-voltage Directive
(73/23/EEC) and the Amendment Directive (93/68/EEC). For the evaluation regarding the
Directives, the following standards were applied:
ETS 300 328:1996-11+A1:1997-07
ETX 300 826: 1997-11
EN60950:1992+A1:1993+A3:1995+A4:1996+A11:1997
!
0768
!
0768
Problem Cause Solution
The Ethernet light
doesn ’t light up.
The power light is
lit, the Ethernet
network cable is
attached to the
Ethernet port, but
the Ethernet light
isn ’t lit. There is a
possible hardware
connection
problem.
• The other side of the Ethernet cable is not
connected to a hub or switch, or the hub or
switch is not powered on. Make sure the cables
are inserted all the way – you should hear a click.
• The Ethernet cable is bad. Replace it with the one
that came with the access point.
• You have the wrong cable between the router and
the modem. Use the standard straight through or
the cable that came with the access point.
I cannot get onto
the Ethernet
network from the
wireless network.
You may not have
configured the
wireless
parameters of the
computers with
wireless adapters
to be the same as
the access point.
• Check the wireless configuration of the wireless
adapters and access point through its Web-based
interface from a computer connected to the
Ethernet network. The Wireless Network Name
(SSID), WEP and other settings need to be
exactly the same for all computers and devices on
the wireless network.
24
23
Page 14

Statement of Conditions
In the interest of improving internal design, operational function, and/or reliability, NETGEAR reserves the right to
make changes to the products described in this document without notice. NETGEAR does not assume any liability
that may occur due to the use or application of the product(s) or circuit layout(s) described herein.
Certificate of the Manufacturer/Importer
It is hereby certified that the Model WG602 54 Mbps Wireless Access Point has been suppressed in accordance with
the conditions set out in the BMPT- AmtsblVfg 243/1991 and Vfg 46/1992. The operation of some equipment (for
example, test transmitters) in accordance with the regulations may, however, be subject to certain restrictions. Please
refer to the notes in the operating instructions.
Federal Office for Telecommunications Approvals has been notified of the placing of this equipment on the market and
has been granted the right to test the series for compliance with the regulations.
VCCI Statement
This equipment is in the Class B category (information equipment to be used in a residential area or an adjacent area
thereto) and conforms to the standards set by the Voluntary Control Council for Interference by Data Processing
Equipment and Electronic Office Machines aimed at preventing radio interference in such residential areas. When used
near a radio or TV receiver, it may become the cause of radio interference. Read instructions for correct handling.
Federal Communications Commission (FCC) Compliance Notice:Radio Frequency
Notice
This device complies with part 15 of the FCC Rules. Operation is
subject to the following two conditions:
1. This device may not cause harmful interference.
2. This device must accept any interference received, including
interference that
may cause undesired operation.
Note: This equipment has been tested and found to comply with the limits for a Class B digital device, pursuant to
part 15 of the FCC Rules. These limits are designed to provide reasonable protection against harmful interference in a
residential installation. This equipment generates, uses, and can radiate radio frequency energy and, if not installed and
used in accordance with the instructions, may cause harmful interference to radio communications. However, there is
no guarantee that interference will not occur in a particular installation. If this equipment does cause harmful
interference to radio or television reception, which can be determined by turning the equipment off and on, the user is
encouraged to try to correct the interference by one or more of the following measures:
• Reorient or relocate the receiving antenna.
• Increase the separation between the equipment and the receiver.
• Connect the equipment into an outlet on a circuit different from that to which the receiver is connected.
• Consult the dealer or an experienced radio/TV technician for help.|
Modifications made to the product, unless expressly approved by NETGEAR, Inc., could void the user's authority to
operate the equipment.
Federal Communications Commission (FCC) Radiation Exposure Statement
This equipment complies with FCC radiation exposure limits set forth for an uncontrolled environment. In order to
avoid the possibility of exceeding the FCC radio frequency exposure limits, human proximity to the antenna shall not
be less than 20 cm (8 inches) during normal operation.
Canadian Department of Communications Radio Interference Regulations
This digital apparatus (Model MA401 Wireless PC Card) does not exceed the Class B limits for radio-noise emissions
from digital apparatus as set out in the Radio Interference Regulations of the Canadian Department
of Communications.
FCE-Konformitätserklärung
Für folgendes Gerät:
54 Mbps Wireless Access Point
(Produktname)
WG602
(Modellbezeichnung)
wird hiermit bestätigt, dass das Gerät den Anforderungen der Richtlinie zur Angleichung der
Rechtsvorschriften der Mitgliedstaaten in Bezug auf Elektromagnetische Verträglichkeit
(89/336/EEC), Niederspannung (73/23/EEC) und der abgeänderten Verordnung (93/68/EEC)
entspricht. Für die Bewertung der Richtlinien wurden folgende Standards angewandt:
ETS 300 328:1996-11+A1:1997-07
ETS 300 826:1997-11
EN 60950:1992+A1:1003+A3:1995+A4:1996+A11:1997
26
!
0768
25
Page 15

Technical Support
PLEASE REFER TO THE SUPPORT INFORMATION CARD THAT SHIPPED WITH
YOUR PRODUCT.
By registering your product at www.NETGEAR.com/register, we can provide you with faster
expert technical support and timely notices of product and software upgrades.
NETGEAR, INC.
Support Information
Phone: 1-888-NETGEAR (For US & Canada only)
See Support information card for other countries.
E-mail: support@NETGEAR.com
www.NETGEAR.com
February 2003
*U-10016-01*
U-10016-01
©2003 NETGEAR, Inc. NETGEAR, the Netgear logo, The Gear Guy and Everybody's Connecting are trademarks or
registered trademarks of Netgear, Inc. in the United States and/or other countries. Microsoft and Windows are
registered trademarks of Microsoft Corporation in the United States and/or other countries. Other brand and product
names are trademarks or registered trademarks of their respective holders. Information is subject to change without
notice. All rights reserved.
 Loading...