

Page 1
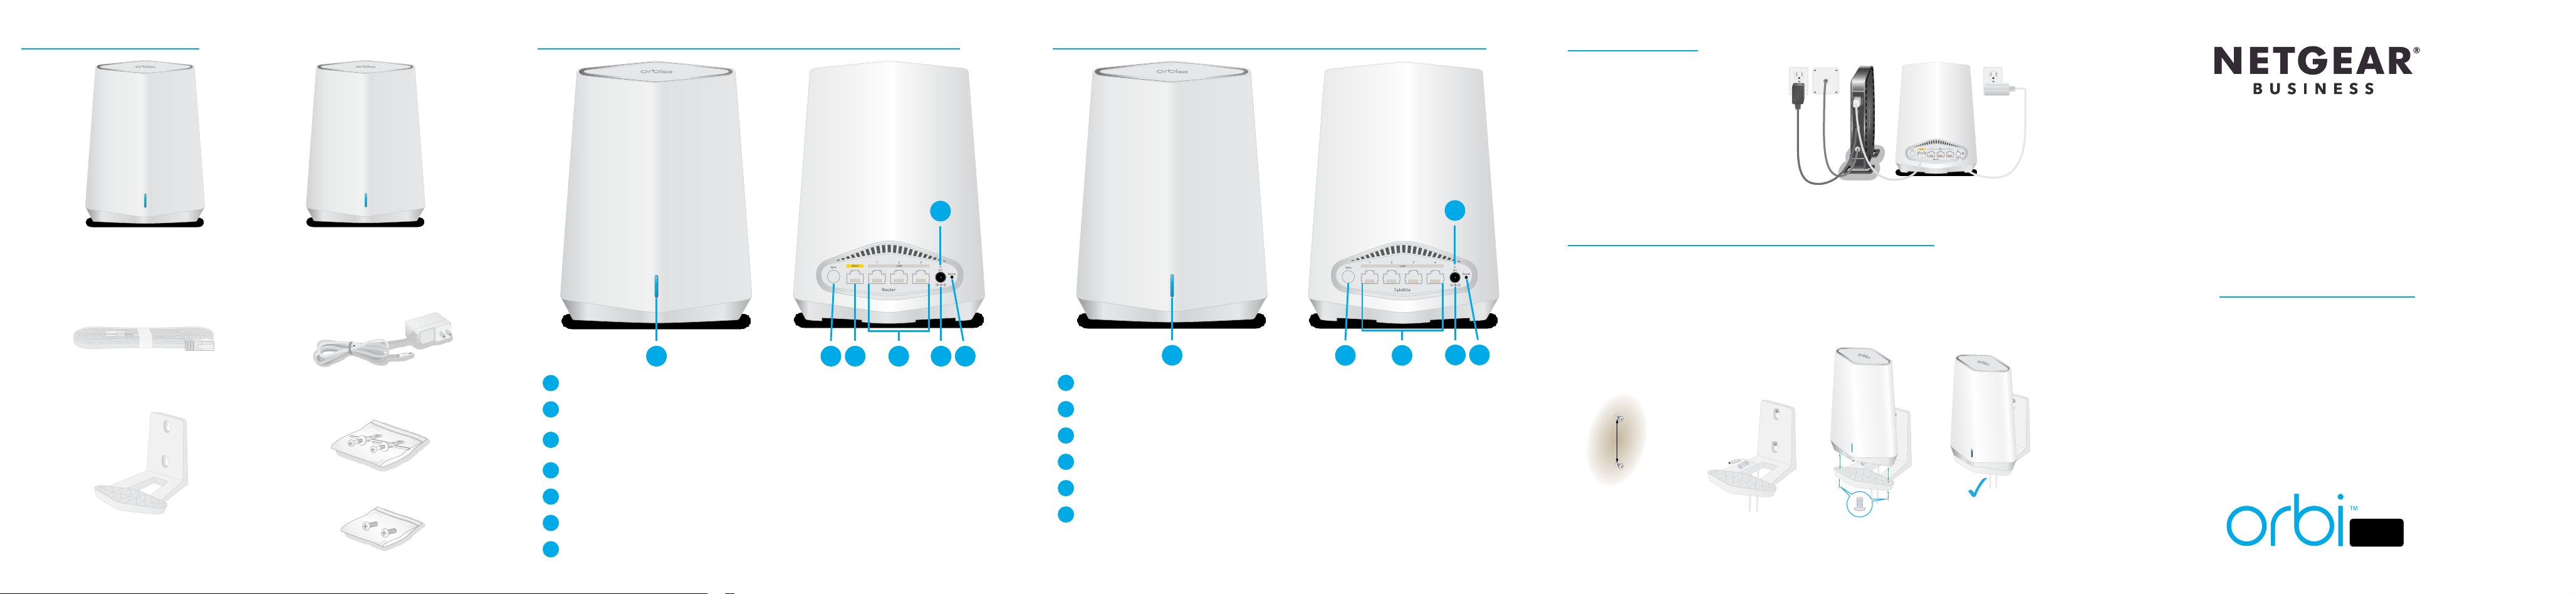
Package contents
Orbi Pro WiFi 6 Mini Router hardware overview
Orbi Pro WiFi 6 Mini Satellite hardware overview
Router setup
When setup is complete, the WAN port
on the Orbi Pro WiFi 6 Mini router is
connected with an Ethernet cable to a
modem or gateway, and the router is
connected to power.
Orbi Pro WiFi 6 Mini Router
(Model SXR30)
Note: Both devices are included in the SXK30, SXK30B3, SXK30B4, or
can be purchased
Ethernet cable
Note: Not included with the SXS30
Wall-mount bracket
separately.
Orbi Pro WiFi 6 Mini Satellite
(Model SXS30)
Power adapter
(varies by region)
Wall anchors
Screws
1 2 3 4 5 7
1
Bar LED
2
Sync button (also used for WPS connection)
WAN port that supports 1 Gigabit Ethernet. Use this port for your WAN
3
(Internet) connection.
4
LAN Ethernet ports 1–3
5
DC power connector
6
Power LED
7
Reset button
6
5
Wall-mount the Orbi Pro WiFi 6 Mini
IMPORTANT: You can install the wall mount vertically on a wall only. Do not install
the wall mount horizontally or on the ceiling.
Mark the wall where you want to insert the provided anchors and screws, which must be
2.5 in. (63 mm) apart. Insert the anchors and screws, leaving about 0.25 in. (6 mm) of each
screw protruding from the wall.
Quick Start
Orbi Pro WiFi 6 Mini
1
1
Bar LED
2
Sync button (also used for WPS connection)
3
LAN Ethernet ports 1–4
4
DC power connector
5
Power LED
6
Reset button
2 3
4 6
1
2.5 in. (63mm)
Note: When the screws are placed correctly, the holes at the back of the mounting bracket
t over the protruding screws, allowing you to slide the mounting bracket downward until
the tops of the slots are resting on the screws.
2
3
4
PRO
Page 2

Step 1: Connect the Orbi Pro WiFi 6 Mini router
The Orbi Pro WiFi 6 Mini router (model SXR30) can be used alone, or supports up to
four satellites. The back of the router has one yellow WAN port and three LAN ports. The
label on the router displays model SXR30, and the preset WiFi network name (SSID) and
password.
1. To set up a WiFi network with Internet, the router must connect to a modem or a
gateway that provides Internet.
• If you use a modem, unplug the modem, remove and then reinsert the backup
battery if it uses one, and plug the modem back in.
• If you use a gateway, we recommend that you turn off your gateway’s WiFi.
2. Use an Ethernet cable to connect your modem or gateway to the yellow WAN port on
the back of your Orbi Pro WiFi6 Mini router.
3. Connect the router to a power source.
The Power LED on the back of the router lights green.
4. When the bar LED on the front of the router lights solid white, the router’s preset WiFi
network is ready for setup.
The router’s bar LED turns off after about three minutes.
Step 2: Connect a satellite from a kit (optional)
If you purchased an Orbi Pro WiFi 6 Mini router with one or more satellites in a kit, the
satellites are already paired with the router. If you purchased an additional satellite
separately, see Step 4. Sync an add-on satellite to the router (optional).
1. Place the satellite approximately 10 ft. away from the router, facing the router, with a
direct line of sight.
2. Connect the satellite to a power source.
The Power LED on the back of the satellite lights green.
The Bar LED on the front of the satellite pulses white while booting up.
3. When the bar LED on the satellite lights blue, the connection between the router and
satellite is good.
If the bar LED lights amber or magenta, see Orbi Pro WiFi 6 Mini Satellite sync
information.
Step 3: Set up the WiFi network’s Internet connection
1. Connect your WiFi-enabled computer or mobile device to the router using a WiFi or
Ethernet connection:
• WiFi. Use the preset WiFi network name (SSID) and password on the router label
to connect to the Orbi WiFi network.
• Ethernet. Use an Ethernet cable to connect your computer to the router.
2. Launch a web browser and type orbilogin.com in the address eld.
If a security warning displays, see https://kb.netgear.com/000062980 for information
on how to dismiss the message.
3. The interactive Internet setup process starts. This process can take several minutes to
complete.
When you complete the process, your settings are applied, and the devices restart.
The router’s bar LED turns off when the setup completes. You can unplug and move the
satellite to the desired location.
Step 4. Sync an add-on satellite to the router (optional)
If you want to extend your WiFi coverage, you can purchase an Orbi Pro WiFi 6 Mini satellite
(model SXS30) separately.
To sync an add-on Orbi Pro WiFi 6 Mini satellite:
1. Place the satellite approximately 10 ft. away from the router, facing the router, with a
direct line of sight.
2. Connect the satellite to a power source.
The Power LED on the back of the satellite lights green.
After approximately two minutes, the satellite bar LED lights solid white.
3. Press the Sync button on the back of the satellite, and within two minutes, press the
Sync button on the back of the router.
The satellite bar LED pulses white.
4. When the bar LED on the satellite lights blue, the connection between the router and
satellite is good.
If the bar LED lights amber or magenta, see Orbi Pro WiFi 6 Mini Satellite sync
information.
Step 5. Place the satellite at the desired location (optional)
Place the satellite at the location where you want WiFi coverage. The satellite must be within
range of the router or another Orbi Pro satellite that is connected to the router. The router
supports a maximum of four satellites.
For information on optimal placement in home ofces see https://kb.netgear.com/31029, or
for business and commercial installations see https://kb.netgear.com/000045858/.
To place your Orbi Pro WiFi 6 Mini satellite:
1. Place the satellite in the desired location.
2. Connect the satellite to a power source, and conrm that the bar LED lights blue.
If the satellite bar LED lights amber, indicating that the connection is fair but not good,
consider moving the satellite closer to the router.
3. If adding more than one satellite, repeat steps 1 and 2 of this procedure.
4. (Optional) After you conrm that the satellite has a good connection to the router, the
devices can be mounted.
For more information, see Wall-mount the Orbi Pro WiFi 6 Mini.
Manage and monitor your Orbi Pro WiFi 6 network
To enable other Orbi Pro features, manage and monitor your Orbi Pro WiFi 6 network and
devices, you can log back in to the router web interface using the unique password that you
specied during setup, or if you want remote management and advanced services, Insight
Pro and Insight Premium subscribers can use the NETGEAR Insight cloud portal and app.
For more information on conguring your device through the router web interface, see the
Orbi Pro WiFi 6 user manual, which you can download by visiting netgear.com/support/
download.
NETGEAR Insight
Your Orbi Pro WiFi 6 device might come with 1-year Insight included. New users might also
be eligible for an Insight Premium 1-month trial subscription. Certain restrictions apply. For
more information, visit https://www.netgear.com/insight/.
Orbi Pro WiFi 6 Mini Satellite sync information
When the Orbi Pro WiFi 6 Mini satellite tries to sync with the router, the bar LED lights one
of the following colors for several minutes, and then turns off:
Blue
The connection between the router and satellite is good.
Amber
The connection between the router and satellite is fair. Consider moving the satellite
closer to the router.
Magenta
The satellite was unable to connect to the router. Move the satellite closer to the
router.
Troubleshooting
If the bar LED lights magenta and does not light white within a couple of minutes, resync
the router and satellite. First, press the Sync button on the back of the router, and within
two minutes, press the Sync buttton on the back of the satellite. The satellite’s bar LED lights
white, then lights blue to indicate a good connection, and then turns off.
Support and Community
Visit netgear.com/support to get your questions answered and access the latest
downloads.
You can also check out our NETGEAR Community for helpful advice at
community.netgear.com.
Regulatory and Legal
Si ce produit est vendu au Canada, vous pouvez accéder à ce document en
français canadien à
https://www.netgear.com/support/download/.
(If this product is sold in Canada, you can access this document in Canadian
French at
https://www.netgear.com/support/download/.)
For regulatory compliance information including the EU Declaration of Conformity,
visit
https://www.netgear.com/about/regulatory/.
See the regulatory compliance document before connecting the power supply.
For NETGEAR’s Privacy Policy, visit https://www.netgear.com/about/privacy-policy.
By using this device, you are agreeing to NETGEAR’s Terms and Conditions at
https://www.netgear.com/about/terms-and-conditions. If you do not agree, return
the device to your place of purchase within your return period.
May 2021
NETGEAR, Inc.
350 East Plumeria Drive
San Jose, CA 95134, USA
© NETGEAR, Inc., NETGEAR and the NETGEAR Logo are trademarks of NETGEAR, Inc. Any non-NETGEAR trademarks
are used for reference purposes only.
NETGEAR INTERNATIONAL LTD
Floor 1, Building 3
University Technology Centre
Curraheen Road, Cork,
T12EF21, Ireland
 Loading...