


Orbi WiFi System
User Manual
March 2017
202-11675-06
350 East Plumeria Drive
San Jose, CA 95134
USA

Orbi WiFi System
Support
Thank you for purchasing this NETGEAR product. You can visit www.netgear.com/support to register your product, get help,
access the latest downloads and user manuals, and join our community. We recommend that you use only official NETGEAR
support resources.
Conformity
For the current EU Declaration of Conformity, visit http://kb.netgear.com/app/answers/detail/a_id/11621.
Compliance
For regulatory compliance information, visit http://www.netgear.com/about/regulatory.
See the regulatory compliance document before connecting the power supply.
Trademarks
© NETGEAR, Inc., NETGEAR and the NETGEAR Logo are trademarks of NETGEAR, Inc. Any non-NETGEAR trademarks are
used for reference purposes only.
2

Contents
Chapter 1 Overview
Orbi Router and Satellite Models . . . . . . . . . . . . . . . . . . . . . . . . . . . . . . . . . . . . . . . 8
Orbi Router and Satellite Hardware Overviews . . . . . . . . . . . . . . . . . . . . . . . . . . . 9
Orbi Router Model RBR50 Hardware Overview . . . . . . . . . . . . . . . . . . . . . . . . 9
Orbi Satellite Model RBS50 Hardware Overview . . . . . . . . . . . . . . . . . . . . . . 10
Orbi Router Model RBR40 Hardware Overview . . . . . . . . . . . . . . . . . . . . . . . 11
Orbi Satellite Model RBS40 Hardware Overview . . . . . . . . . . . . . . . . . . . . . . 12
Orbi Wall Plug Satellite Model RBW30 Hardware Overview . . . . . . . . . . . . . 13
LED Behavior . . . . . . . . . . . . . . . . . . . . . . . . . . . . . . . . . . . . . . . . . . . . . . . . . . . . . . . 14
Orbi WiFi System LEDs. . . . . . . . . . . . . . . . . . . . . . . . . . . . . . . . . . . . . . . . . . . . . 14
Optional Orbi Add-On Satellite LEDs. . . . . . . . . . . . . . . . . . . . . . . . . . . . . . . . . 15
Connect Your Router. . . . . . . . . . . . . . . . . . . . . . . . . . . . . . . . . . . . . . . . . . . . . . . . . 15
Place Your Satellite . . . . . . . . . . . . . . . . . . . . . . . . . . . . . . . . . . . . . . . . . . . . . . . . . . 16
Sync Your Orbi Satellite . . . . . . . . . . . . . . . . . . . . . . . . . . . . . . . . . . . . . . . . . . . . . . 18
Sync a Satellite From an Orbi WiFi System . . . . . . . . . . . . . . . . . . . . . . . . . . . . 18
Sync an Add-On Satellite. . . . . . . . . . . . . . . . . . . . . . . . . . . . . . . . . . . . . . . . . . . 19
Log In to Your Router and Add Satellites to Your Network. . . . . . . . . . . . . . . 19
Download the NETGEAR Orbi App . . . . . . . . . . . . . . . . . . . . . . . . . . . . . . . . . . . . . 21
Chapter 2 Connect to the Network and Access the Router
Connect to the Network. . . . . . . . . . . . . . . . . . . . . . . . . . . . . . . . . . . . . . . . . . . . . . 23
Wired Connection . . . . . . . . . . . . . . . . . . . . . . . . . . . . . . . . . . . . . . . . . . . . . . . . . 23
WiFi Connection . . . . . . . . . . . . . . . . . . . . . . . . . . . . . . . . . . . . . . . . . . . . . . . . . . 23
WiFi Connection Using WPS . . . . . . . . . . . . . . . . . . . . . . . . . . . . . . . . . . . . . . . . 23
Labels . . . . . . . . . . . . . . . . . . . . . . . . . . . . . . . . . . . . . . . . . . . . . . . . . . . . . . . . . . . . . 24
Types of Logins . . . . . . . . . . . . . . . . . . . . . . . . . . . . . . . . . . . . . . . . . . . . . . . . . . . . . 24
Use a Web Browser to Access the Router . . . . . . . . . . . . . . . . . . . . . . . . . . . . . . . 25
Automatic Internet Setup . . . . . . . . . . . . . . . . . . . . . . . . . . . . . . . . . . . . . . . . . . 25
Log In to the Router . . . . . . . . . . . . . . . . . . . . . . . . . . . . . . . . . . . . . . . . . . . . . . . 26
Change the Language . . . . . . . . . . . . . . . . . . . . . . . . . . . . . . . . . . . . . . . . . . . . . . . . 27
Access the Orbi Router With NETGEAR genie App. . . . . . . . . . . . . . . . . . . . . . . . 27
Chapter 3 Specify Your Internet Settings
Use the Internet Setup Wizard . . . . . . . . . . . . . . . . . . . . . . . . . . . . . . . . . . . . . . . . 29
Manually Set Up the Internet Connection . . . . . . . . . . . . . . . . . . . . . . . . . . . . . . . 30
Specify an Internet Connection Without a Login. . . . . . . . . . . . . . . . . . . . . . . 30
Specify an Internet Connection That Uses a Login . . . . . . . . . . . . . . . . . . . . . 31
Specify IPv6 Internet Connections. . . . . . . . . . . . . . . . . . . . . . . . . . . . . . . . . . . . . 33
Requirements for Entering IPv6 Addresses . . . . . . . . . . . . . . . . . . . . . . . . . . . 34
3

Orbi WiFi System
Use Auto Detect for an IPv6 Internet Connection. . . . . . . . . . . . . . . . . . . . . . 34
Use Auto Config for an IPV6 Internet Connection. . . . . . . . . . . . . . . . . . . . . . 36
Set Up an IPv6 6rd Tunnel Internet Connection. . . . . . . . . . . . . . . . . . . . . . . . 37
Set Up an IPv6 6to4 Tunnel Internet Connection . . . . . . . . . . . . . . . . . . . . . . 39
Set Up an IPv6 Pass Through Internet Connection . . . . . . . . . . . . . . . . . . . . . 40
Set Up an IPv6 Fixed Internet Connection . . . . . . . . . . . . . . . . . . . . . . . . . . . . 41
Set Up an IPv6 DHCP Internet Connection. . . . . . . . . . . . . . . . . . . . . . . . . . . . 42
Set Up an IPv6 PPPoE Internet Connection . . . . . . . . . . . . . . . . . . . . . . . . . . . 44
Change the MTU Size . . . . . . . . . . . . . . . . . . . . . . . . . . . . . . . . . . . . . . . . . . . . . . . . 46
Chapter 4 Control Access to the Internet
Set Up Parental Controls . . . . . . . . . . . . . . . . . . . . . . . . . . . . . . . . . . . . . . . . . . . . . 49
Allow or Block Access to Your Network . . . . . . . . . . . . . . . . . . . . . . . . . . . . . . . . . 50
Use Keywords to Block Internet Sites . . . . . . . . . . . . . . . . . . . . . . . . . . . . . . . . . . 51
Delete Keywords . . . . . . . . . . . . . . . . . . . . . . . . . . . . . . . . . . . . . . . . . . . . . . . . . . 52
Avoid Blocking on a Trusted Computer . . . . . . . . . . . . . . . . . . . . . . . . . . . . . . . 53
Block Services From the Internet . . . . . . . . . . . . . . . . . . . . . . . . . . . . . . . . . . . . . . 54
Manage Network Access Control Lists. . . . . . . . . . . . . . . . . . . . . . . . . . . . . . . . . . 55
Schedule When to Block Internet Sites and Services. . . . . . . . . . . . . . . . . . . . . . 56
Set Up Security Event Email Notifications. . . . . . . . . . . . . . . . . . . . . . . . . . . . . . . 56
Chapter 5 Optimize Performance
WiFi Multimedia Quality of Service . . . . . . . . . . . . . . . . . . . . . . . . . . . . . . . . . . . . 60
Improve Network Connections With Universal Plug N Play . . . . . . . . . . . . . . . . 60
Chapter 6 Specify Network Settings
View or Change WAN Settings . . . . . . . . . . . . . . . . . . . . . . . . . . . . . . . . . . . . . . . . 63
Dynamic DNS . . . . . . . . . . . . . . . . . . . . . . . . . . . . . . . . . . . . . . . . . . . . . . . . . . . . . . . 64
Set Up a New Dynamic DNS Account . . . . . . . . . . . . . . . . . . . . . . . . . . . . . . . . 64
Specify a DNS Account That You Already Created . . . . . . . . . . . . . . . . . . . . . 65
Change the Dynamic DNS Settings . . . . . . . . . . . . . . . . . . . . . . . . . . . . . . . . . . 66
Set Up a Default DMZ Server . . . . . . . . . . . . . . . . . . . . . . . . . . . . . . . . . . . . . . . . . 67
Change the Router’s Device Name . . . . . . . . . . . . . . . . . . . . . . . . . . . . . . . . . . . . . 68
Change the LAN TCP/IP Settings . . . . . . . . . . . . . . . . . . . . . . . . . . . . . . . . . . . . . . 69
Specify the IP Addresses That the Router Assigns. . . . . . . . . . . . . . . . . . . . . . . . 70
Disable the DHCP Server Feature in the Router . . . . . . . . . . . . . . . . . . . . . . . . . . 71
Manage Reserved LAN IP Addresses . . . . . . . . . . . . . . . . . . . . . . . . . . . . . . . . . . . 72
Reserve an IP Address . . . . . . . . . . . . . . . . . . . . . . . . . . . . . . . . . . . . . . . . . . . . . 72
Edit a Reserved IP Address . . . . . . . . . . . . . . . . . . . . . . . . . . . . . . . . . . . . . . . . . 74
Delete a Reserved IP Address Entry. . . . . . . . . . . . . . . . . . . . . . . . . . . . . . . . . . 74
Custom Static Routes . . . . . . . . . . . . . . . . . . . . . . . . . . . . . . . . . . . . . . . . . . . . . . . . 75
Set Up a Static Route . . . . . . . . . . . . . . . . . . . . . . . . . . . . . . . . . . . . . . . . . . . . . . 76
Edit a Static Route. . . . . . . . . . . . . . . . . . . . . . . . . . . . . . . . . . . . . . . . . . . . . . . . . 77
Delete a Static Route . . . . . . . . . . . . . . . . . . . . . . . . . . . . . . . . . . . . . . . . . . . . . . 77
Specify Basic WiFi Settings . . . . . . . . . . . . . . . . . . . . . . . . . . . . . . . . . . . . . . . . . . . 78
Change the WiFi Password or Security Level . . . . . . . . . . . . . . . . . . . . . . . . . . 79
4

Orbi WiFi System
Set Up a Guest WiFi Network . . . . . . . . . . . . . . . . . . . . . . . . . . . . . . . . . . . . . . . . . 81
View or Change Advanced WiFi Settings . . . . . . . . . . . . . . . . . . . . . . . . . . . . . . . . 82
Use the Router as a WiFi Access Point . . . . . . . . . . . . . . . . . . . . . . . . . . . . . . . . . . 83
Generate a New Backhaul Password. . . . . . . . . . . . . . . . . . . . . . . . . . . . . . . . . . . . 84
Check Your Internet Bandwidth . . . . . . . . . . . . . . . . . . . . . . . . . . . . . . . . . . . . . . . 85
Set Up a WiFi Schedule . . . . . . . . . . . . . . . . . . . . . . . . . . . . . . . . . . . . . . . . . . . . . . . 85
Set Up a Bridge for a Port Group or VLAN Tag Group . . . . . . . . . . . . . . . . . . . . . 86
Set Up a Bridge for a Port Group . . . . . . . . . . . . . . . . . . . . . . . . . . . . . . . . . . . . 86
Set Up a Bridge for a VLAN Tag Group . . . . . . . . . . . . . . . . . . . . . . . . . . . . . . . 87
Set Up an IPTV Port to Lease an Intranet Port . . . . . . . . . . . . . . . . . . . . . . . . . 88
Enable British Telecom IGMP Proxy Support. . . . . . . . . . . . . . . . . . . . . . . . . . . . . 90
Chapter 7 Manage Your Network
Update the Router and Satellite Firmware. . . . . . . . . . . . . . . . . . . . . . . . . . . . . . . 92
Check for Firmware Updates. . . . . . . . . . . . . . . . . . . . . . . . . . . . . . . . . . . . . . . . 92
Manually Update Firmware . . . . . . . . . . . . . . . . . . . . . . . . . . . . . . . . . . . . . . . . . 92
Change the admin Password . . . . . . . . . . . . . . . . . . . . . . . . . . . . . . . . . . . . . . . . . . 94
Set Up Password Recovery . . . . . . . . . . . . . . . . . . . . . . . . . . . . . . . . . . . . . . . . . . . 95
Recover the admin Password. . . . . . . . . . . . . . . . . . . . . . . . . . . . . . . . . . . . . . . . . . 97
View Router Status . . . . . . . . . . . . . . . . . . . . . . . . . . . . . . . . . . . . . . . . . . . . . . . . . . 97
Display Internet Port Statistics . . . . . . . . . . . . . . . . . . . . . . . . . . . . . . . . . . . . . . 98
Check the Internet Connection Status. . . . . . . . . . . . . . . . . . . . . . . . . . . . . . . . 99
View Satellite Status . . . . . . . . . . . . . . . . . . . . . . . . . . . . . . . . . . . . . . . . . . . . . . . . 100
View and Manage Logs of Router Activity . . . . . . . . . . . . . . . . . . . . . . . . . . . . . 101
View Devices Connected to the Network . . . . . . . . . . . . . . . . . . . . . . . . . . . . . . 102
View Satellites Connected to the Network . . . . . . . . . . . . . . . . . . . . . . . . . . . . . 102
Monitor Internet Traffic . . . . . . . . . . . . . . . . . . . . . . . . . . . . . . . . . . . . . . . . . . . . . 103
Manage the Router Configuration File . . . . . . . . . . . . . . . . . . . . . . . . . . . . . . . . . 105
Back Up Settings . . . . . . . . . . . . . . . . . . . . . . . . . . . . . . . . . . . . . . . . . . . . . . . . . 105
Erase the Current Configuration Settings . . . . . . . . . . . . . . . . . . . . . . . . . . . . 105
Restore Configuration Settings. . . . . . . . . . . . . . . . . . . . . . . . . . . . . . . . . . . . . 106
Set Up Remote Management. . . . . . . . . . . . . . . . . . . . . . . . . . . . . . . . . . . . . . . . . 107
Use Remote Access . . . . . . . . . . . . . . . . . . . . . . . . . . . . . . . . . . . . . . . . . . . . . . . . . 108
Remotely Access Your Router Using the genie App . . . . . . . . . . . . . . . . . . . . . . 108
Chapter 8 Customize Internet Traffic Rules for Ports
Port Forwarding to a Local Server . . . . . . . . . . . . . . . . . . . . . . . . . . . . . . . . . . . . 111
Set Up Port Forwarding to a Local Server. . . . . . . . . . . . . . . . . . . . . . . . . . . . 111
Add a Custom Port Forwarding Service. . . . . . . . . . . . . . . . . . . . . . . . . . . . . . 112
Edit a Port Forwarding Service . . . . . . . . . . . . . . . . . . . . . . . . . . . . . . . . . . . . . 113
Delete a Port Forwarding Entry . . . . . . . . . . . . . . . . . . . . . . . . . . . . . . . . . . . . 114
Application Example: Make a Local Web Server Public . . . . . . . . . . . . . . . . . 114
How the Router Implements the Port Forwarding Rule . . . . . . . . . . . . . . . . 115
Port Triggering . . . . . . . . . . . . . . . . . . . . . . . . . . . . . . . . . . . . . . . . . . . . . . . . . . . . . 115
Add a Port Triggering Service . . . . . . . . . . . . . . . . . . . . . . . . . . . . . . . . . . . . . . 115
Enable Port Triggering . . . . . . . . . . . . . . . . . . . . . . . . . . . . . . . . . . . . . . . . . . . . 116
Application Example: Port Triggering for Internet Relay Chat . . . . . . . . . . . 117
5

Orbi WiFi System
Chapter 9 Use VPN to Access Your Network
Set Up a VPN Connection. . . . . . . . . . . . . . . . . . . . . . . . . . . . . . . . . . . . . . . . . . . . 120
Specify VPN Service in the Router . . . . . . . . . . . . . . . . . . . . . . . . . . . . . . . . . . . . 120
Install OpenVPN Software . . . . . . . . . . . . . . . . . . . . . . . . . . . . . . . . . . . . . . . . . . . 121
Install OpenVPN Software on Your Windows Computer. . . . . . . . . . . . . . . . 121
Install OpenVPN Software on Your Mac Computer . . . . . . . . . . . . . . . . . . . . 124
Install OpenVPN Software on an iOS Device . . . . . . . . . . . . . . . . . . . . . . . . . 124
Install OpenVPN Software on an Android Device. . . . . . . . . . . . . . . . . . . . . . 125
Use a VPN Tunnel on Your Windows Computer . . . . . . . . . . . . . . . . . . . . . . . . . 126
Use VPN to Access Your Internet Service at Home . . . . . . . . . . . . . . . . . . . . . . 127
Set Up VPN Client Internet Access in the Router . . . . . . . . . . . . . . . . . . . . . . 127
Block VPN Client Internet Access in the Router . . . . . . . . . . . . . . . . . . . . . . . . . 128
Use a VPN Tunnel to Access Your Internet Service at Home. . . . . . . . . . . . . . . 129
Chapter 10 Troubleshooting
Quick Tips . . . . . . . . . . . . . . . . . . . . . . . . . . . . . . . . . . . . . . . . . . . . . . . . . . . . . . . . . 131
Sequence to Restart Your Network . . . . . . . . . . . . . . . . . . . . . . . . . . . . . . . . . 131
WiFi Settings . . . . . . . . . . . . . . . . . . . . . . . . . . . . . . . . . . . . . . . . . . . . . . . . . . . . 131
Network Settings . . . . . . . . . . . . . . . . . . . . . . . . . . . . . . . . . . . . . . . . . . . . . . . . 131
The Router and Satellite Do Not Sync . . . . . . . . . . . . . . . . . . . . . . . . . . . . . . . . . 131
Cannot Log In to the Router . . . . . . . . . . . . . . . . . . . . . . . . . . . . . . . . . . . . . . . . . 132
Cannot Access the Internet . . . . . . . . . . . . . . . . . . . . . . . . . . . . . . . . . . . . . . . . . . 132
Troubleshoot Internet Browsing . . . . . . . . . . . . . . . . . . . . . . . . . . . . . . . . . . . . 133
Troubleshoot PPPoE . . . . . . . . . . . . . . . . . . . . . . . . . . . . . . . . . . . . . . . . . . . . . . 134
WiFi Connectivity . . . . . . . . . . . . . . . . . . . . . . . . . . . . . . . . . . . . . . . . . . . . . . . . 135
Troubleshoot Your Network Using the Ping Utility . . . . . . . . . . . . . . . . . . . . . . . 135
Test the LAN Path to Your Router. . . . . . . . . . . . . . . . . . . . . . . . . . . . . . . . . . . 135
Test the Path From Your Computer to a Remote Device. . . . . . . . . . . . . . . . 136
Appendix A Supplemental Information
Factory Settings for Orbi Routers. . . . . . . . . . . . . . . . . . . . . . . . . . . . . . . . . . . . . 139
Factory Settings for Orbi Router Model RBR50 . . . . . . . . . . . . . . . . . . . . . . 139
Factory Settings for Orbi Router Model RBR40 . . . . . . . . . . . . . . . . . . . . . . 140
Factory Settings for Orbi Satellites . . . . . . . . . . . . . . . . . . . . . . . . . . . . . . . . . . . 142
Factory Settings for Orbi Satellite Model RBS50 . . . . . . . . . . . . . . . . . . . . . 142
Factory Settings for Orbi Satellite Model RBS40 . . . . . . . . . . . . . . . . . . . . . 143
Factory Settings for Orbi Wall Plug Satellite Model RBW30 . . . . . . . . . . . . 145
Technical Specifications for Orbi Routers . . . . . . . . . . . . . . . . . . . . . . . . . . . . . . 146
Technical Specifications for Orbi Router Model RBR50 . . . . . . . . . . . . . . . . 146
Technical Specifications for Orbi Router Model RBR40 . . . . . . . . . . . . . . . . 147
Technical Specifications for Orbi Satellites . . . . . . . . . . . . . . . . . . . . . . . . . . . . . 148
Technical Specifications for Orbi Satellite Model RBS50 . . . . . . . . . . . . . . . 148
Technical Specifications for Orbi Router Model RBS40 . . . . . . . . . . . . . . . . 150
Technical Specifications for Orbi Wall Plug Satellite Model RBW30 . . . . . . 151
6

1. Overview
1
The Orbi™ WiFi System creates dedicated high-speed WiFi connections to your Internet
service. The Orbi router connects to your modem or gateway. The Orbi satellite extends the WiFi
signal throughout your home.
This chapter contains the following sections:
• Orbi Router and Satellite Models
• Orbi Router and Satellite Hardware Overviews
• LED Behavior
• Connect Your Router
• Place Your Satellite
• Sync Your Orbi Satellite
• Download the NETGEAR Orbi App
For more information about the topics covered in this manual, visit the support website at
support.netgear.com.
Note: This manual refers to all Orbi router models as the router and refers
to all Orbi satellite models (including the Orbi wall plug satellite) as
the satellite.
7
Orbi WiFi System
Orbi Router and Satellite Models
Different types of Orbi routers and satellites are available. To determine which Orbi model
you own, look on the router or satellite label for the model number. For more information
about what the label might look like, see Labels on page 24.
The following is a list of the Orbi routers and satellites that are available.
Orbi router model RBR50
Orbi router model RBR40
Orbi satellite model RBS50
Orbi Satellite model RBS40
Figure 1. Orbi models
Orbi wall plug satellite model RBW30
Overview
8
Orbi WiFi System
Orbi Router and Satellite Hardware Overviews
The following sections display the hardware features available for different Orbi routers and
satellites.
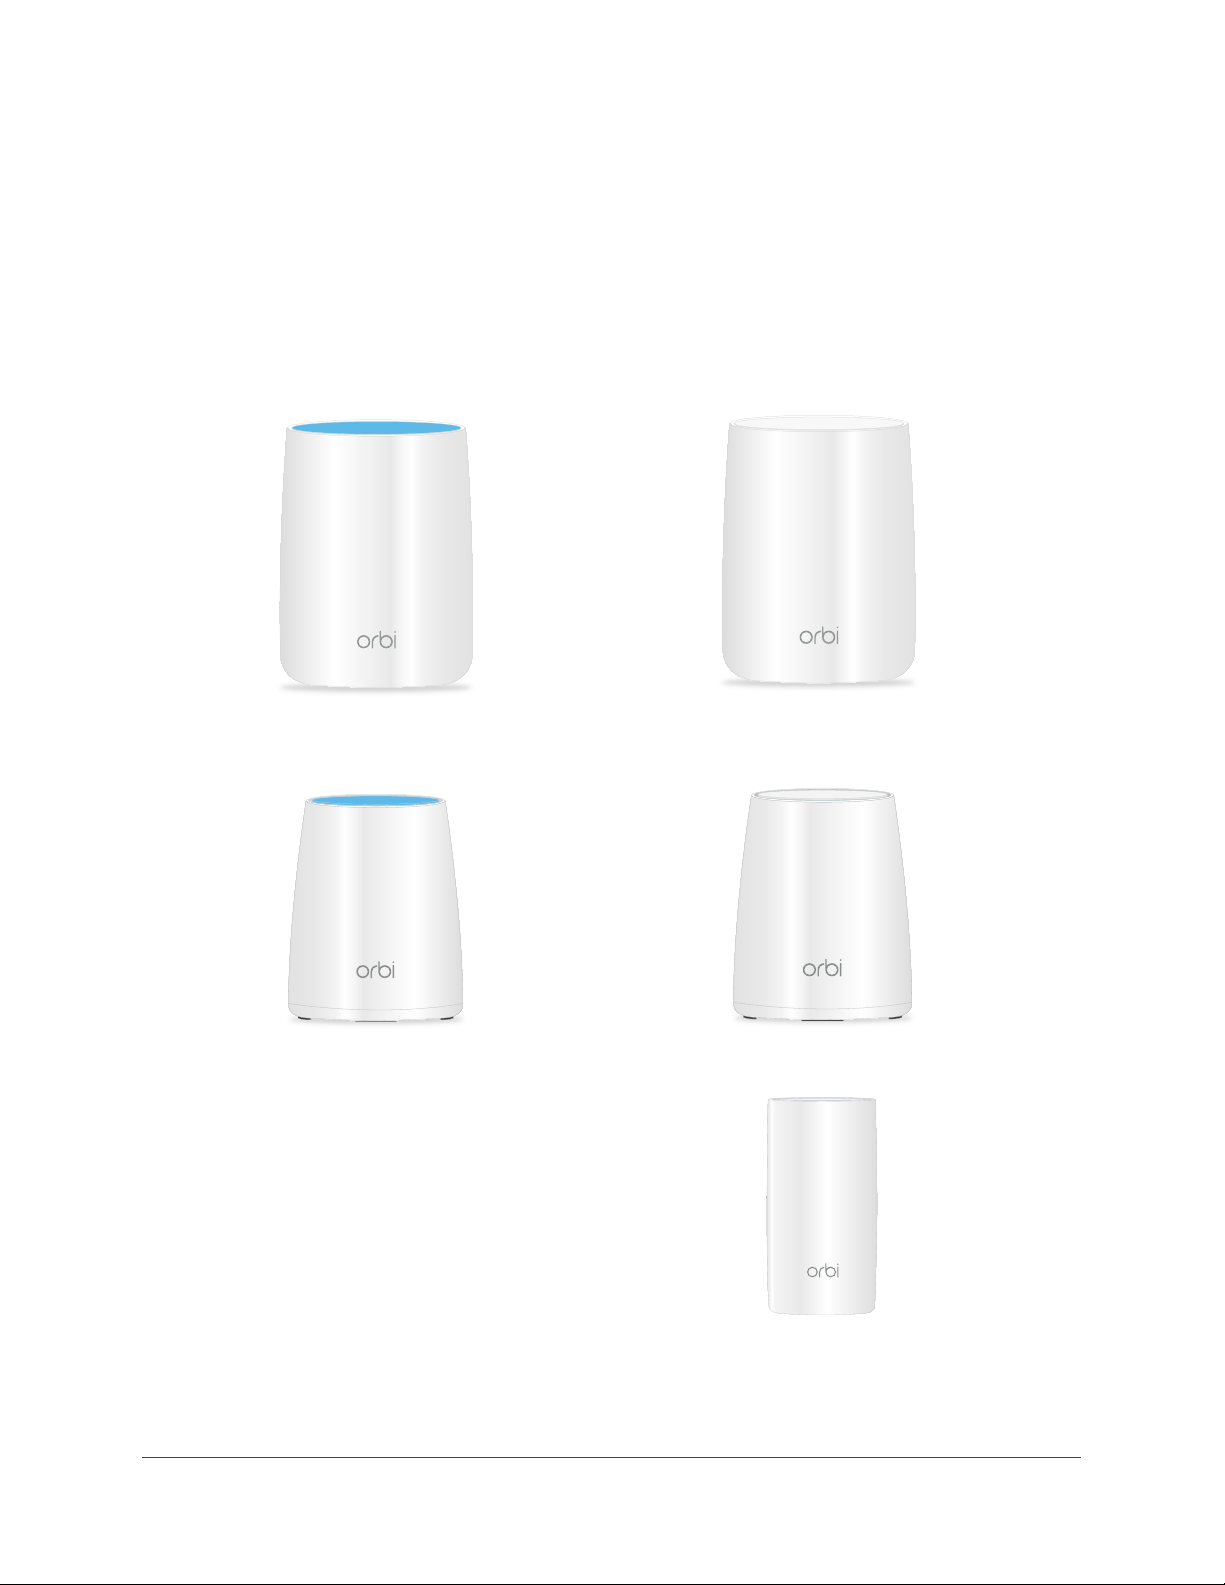
Orbi Router Model RBR50 Hardware Overview
1
6
2
Figure 2. Orbi router model RBR50, front and back views
1. Ring LED (not shown in image)
2. Sync button (also used for WPS connection)
3. Internet port
4. Ethernet ports
5. USB port
6. Power On/Off button and Power LED
7. DC Power connector
8. Reset button
8
5
734
Overview
9
Orbi WiFi System
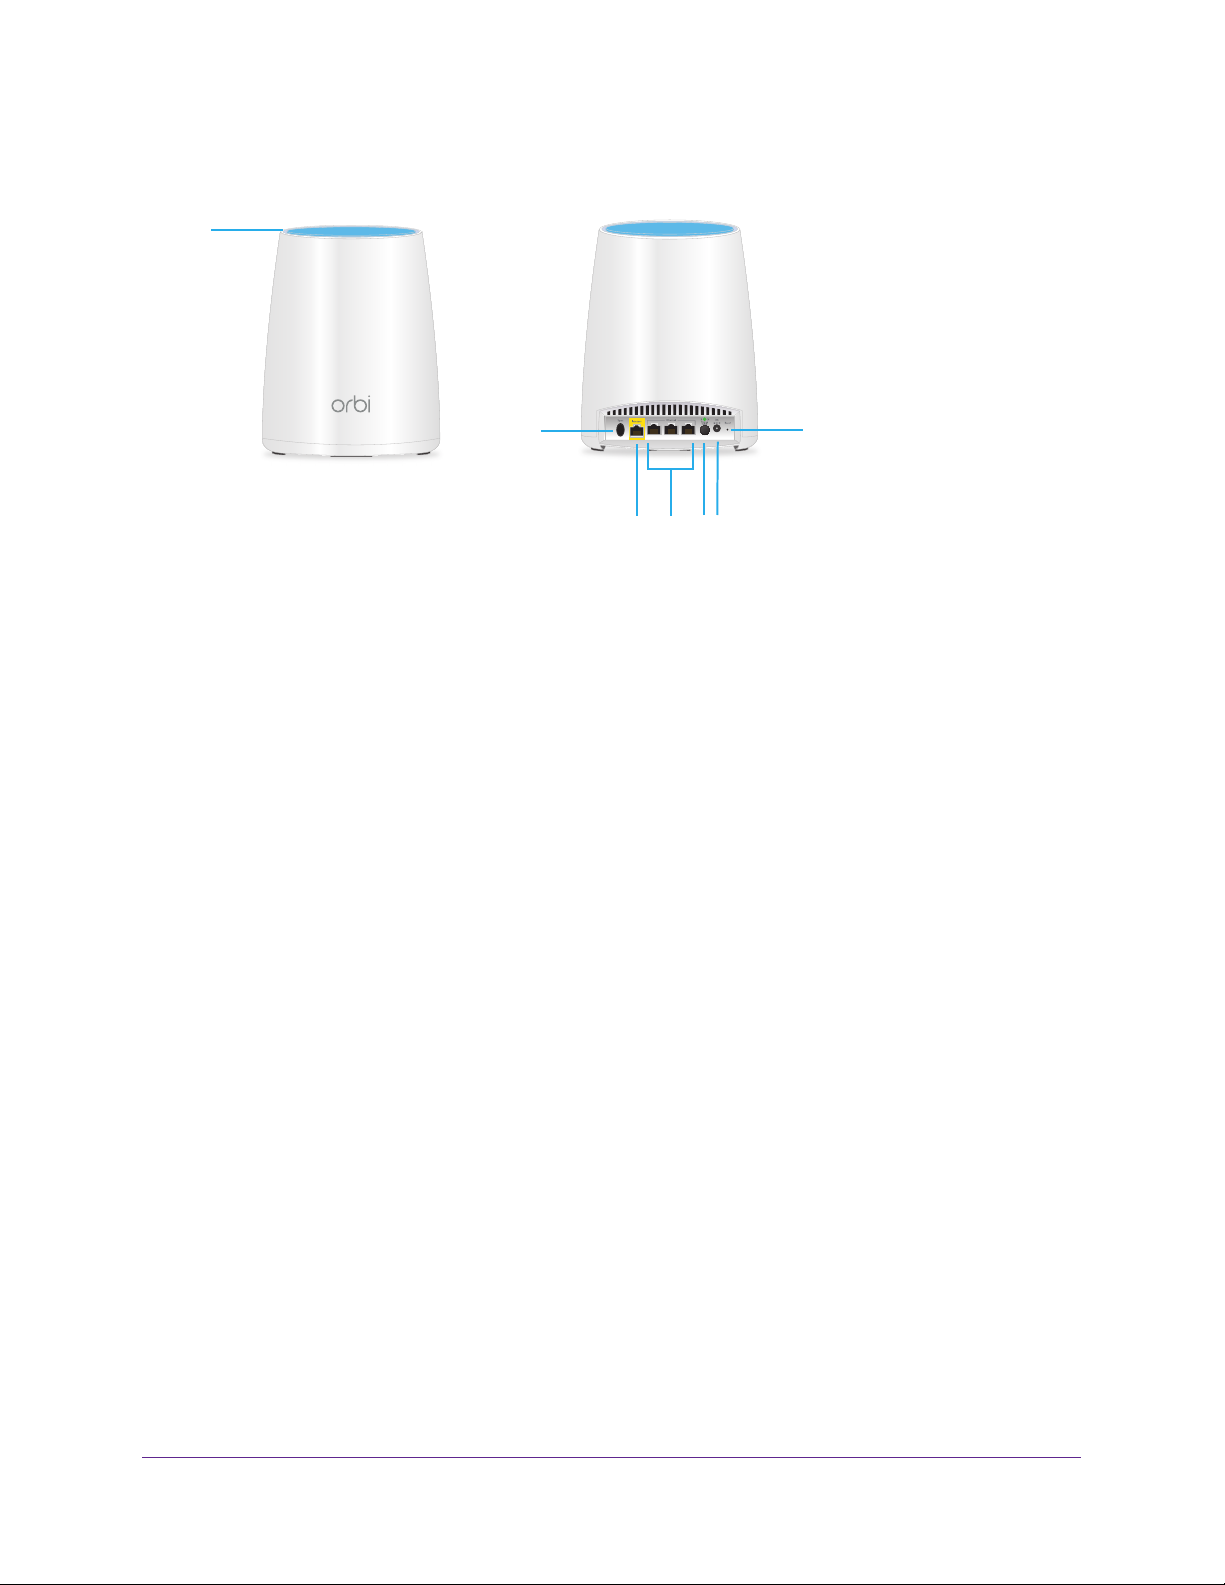
Orbi Satellite Model RBS50 Hardware Overview
1
5
2
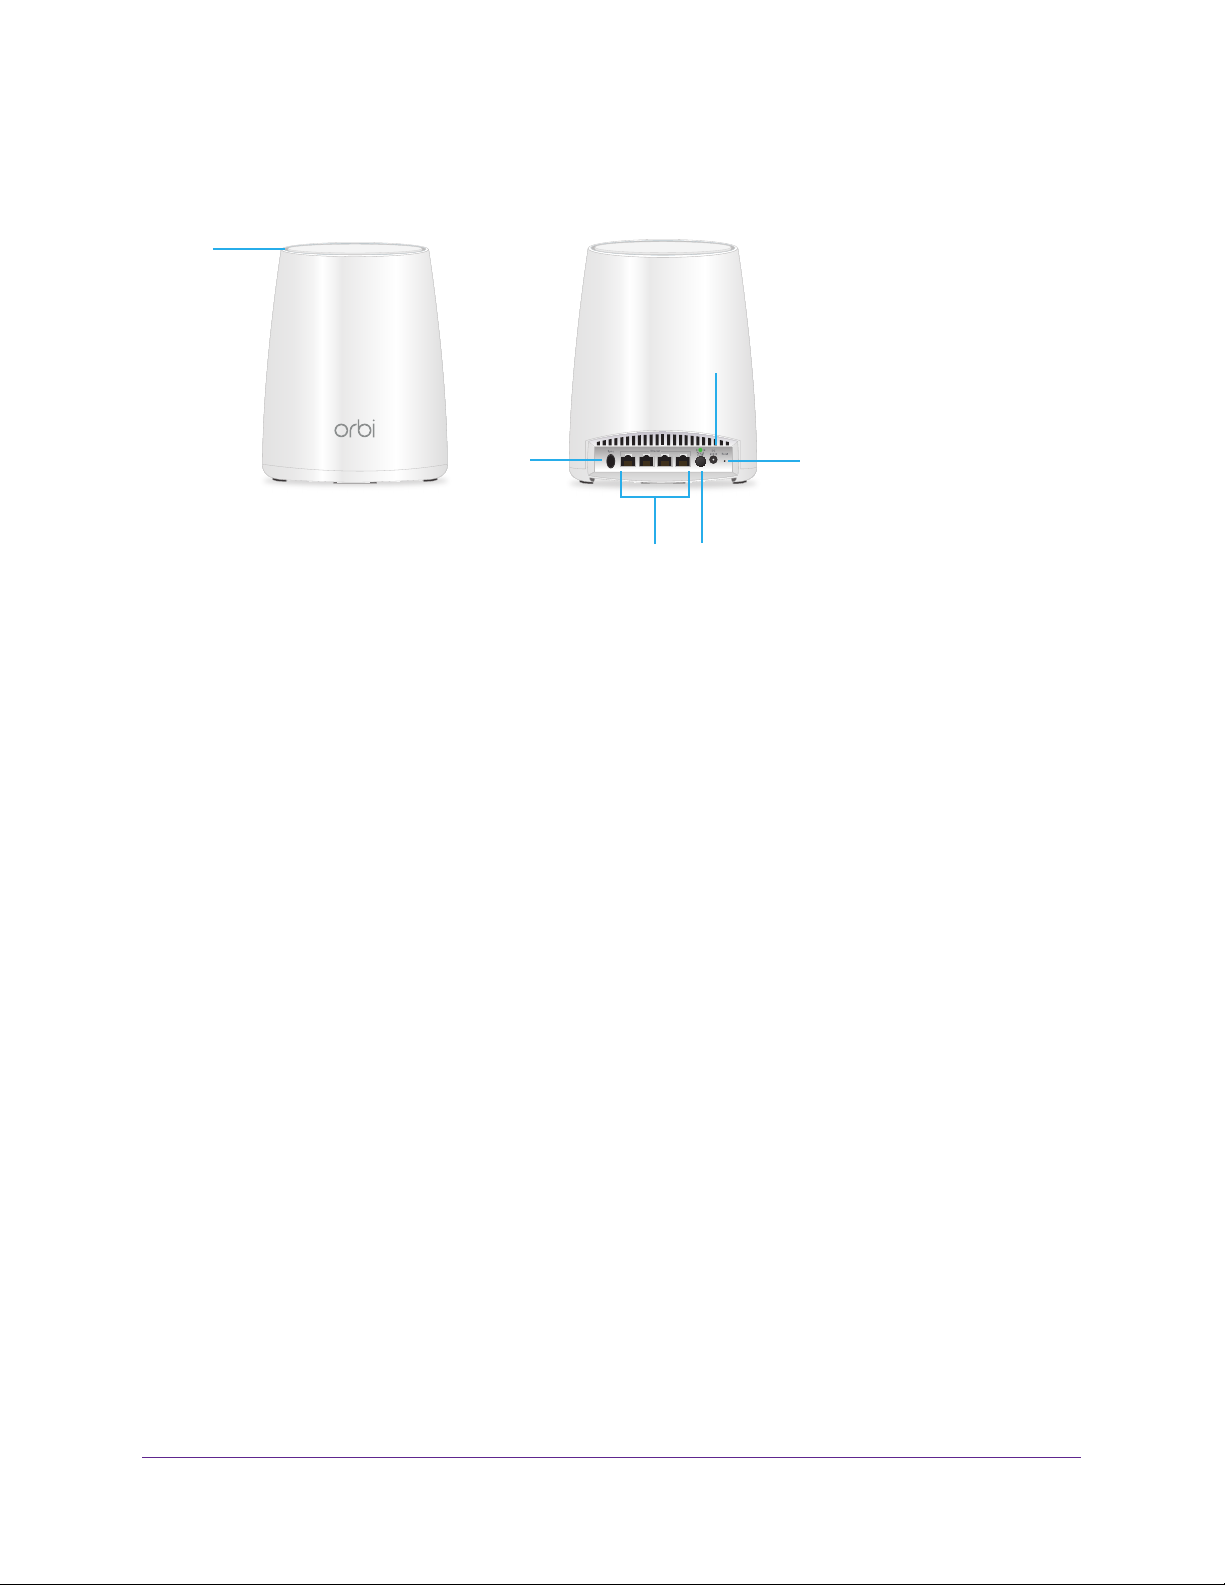
Figure 3. Orbi satellite model RBS50, front and back views
1. Ring LED (not shown in image)
2. Sync button (also used for WPS connection)
3. Ethernet ports
4. USB port
5. Power On/Off button and Power LED
6. DC Power connector
7. Reset button
7
463
Overview
10
Orbi WiFi System
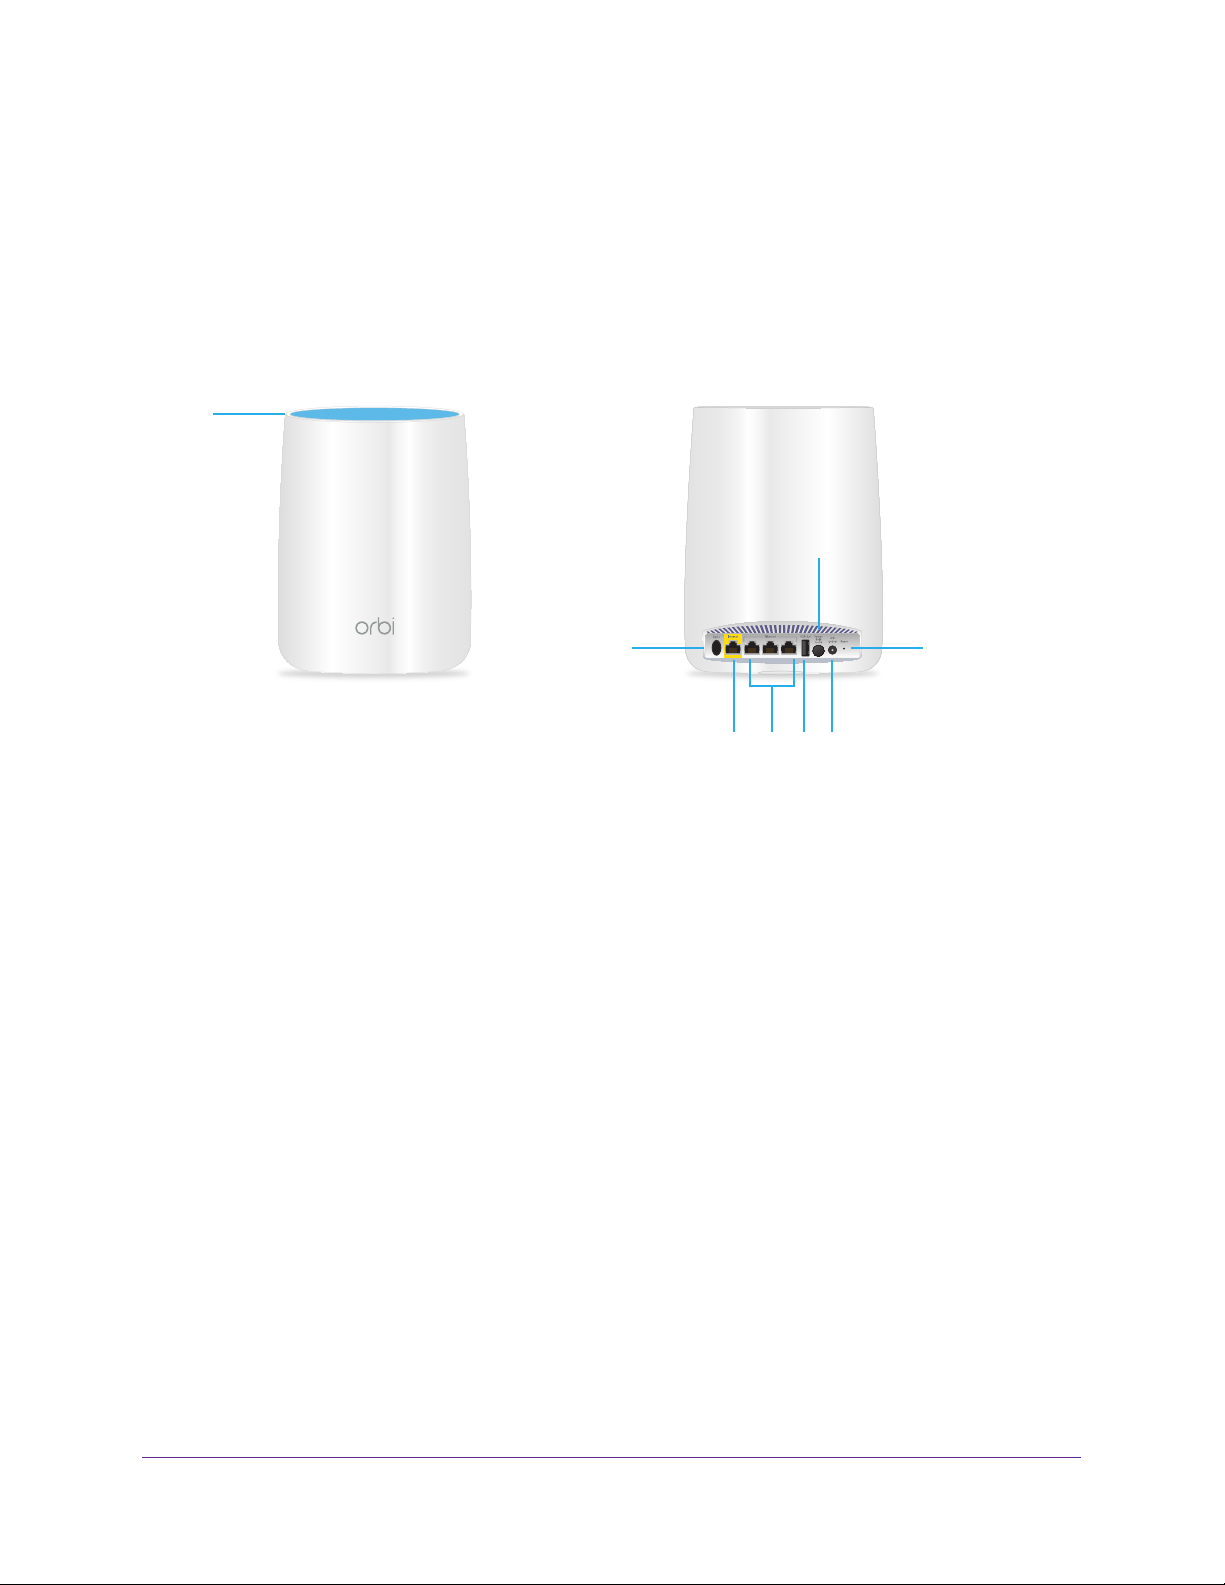
Orbi Router Model RBR40 Hardware Overview
1
2
34
5
Figure 4. Orbi router model RBR40, front and back views
1. Ring LED (not shown in image)
2. Sync button (also used for WPS connection)
3. Internet port
4. Ethernet ports
5. Power On/Off button and Power LED
6. DC Power connector
7. Reset button
7
6
Overview
11
Orbi WiFi System
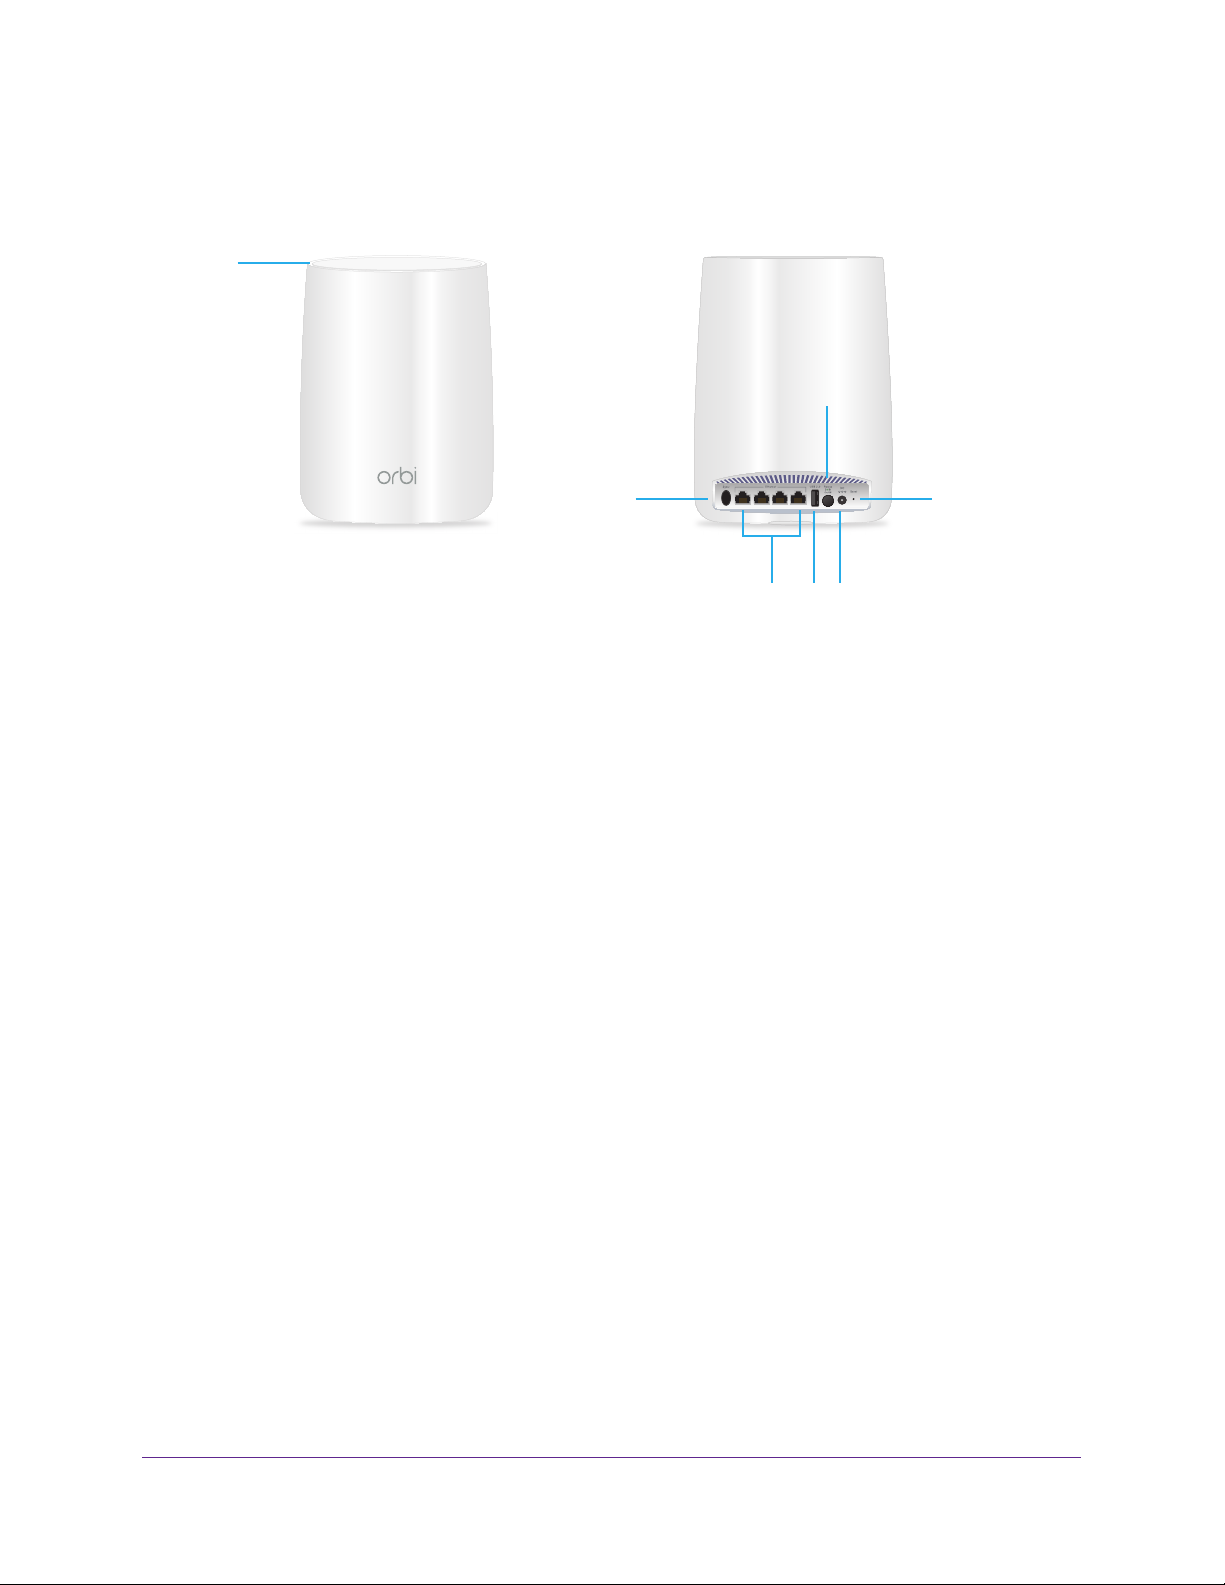
Orbi Satellite Model RBS40 Hardware Overview
1
5
2
4
3
Figure 5. Orbi satellite model RBS40, front and back views
1. Ring LED (not shown in image)
2. Sync button (also used for WPS connection)
3. Ethernet ports
4. Power On/Off button and Power LED
5. DC Power connector
6. Reset button
6
Overview
12
Orbi WiFi System
Orbi Wall Plug Satellite Model RBW30 Hardware Overview
1
2
3
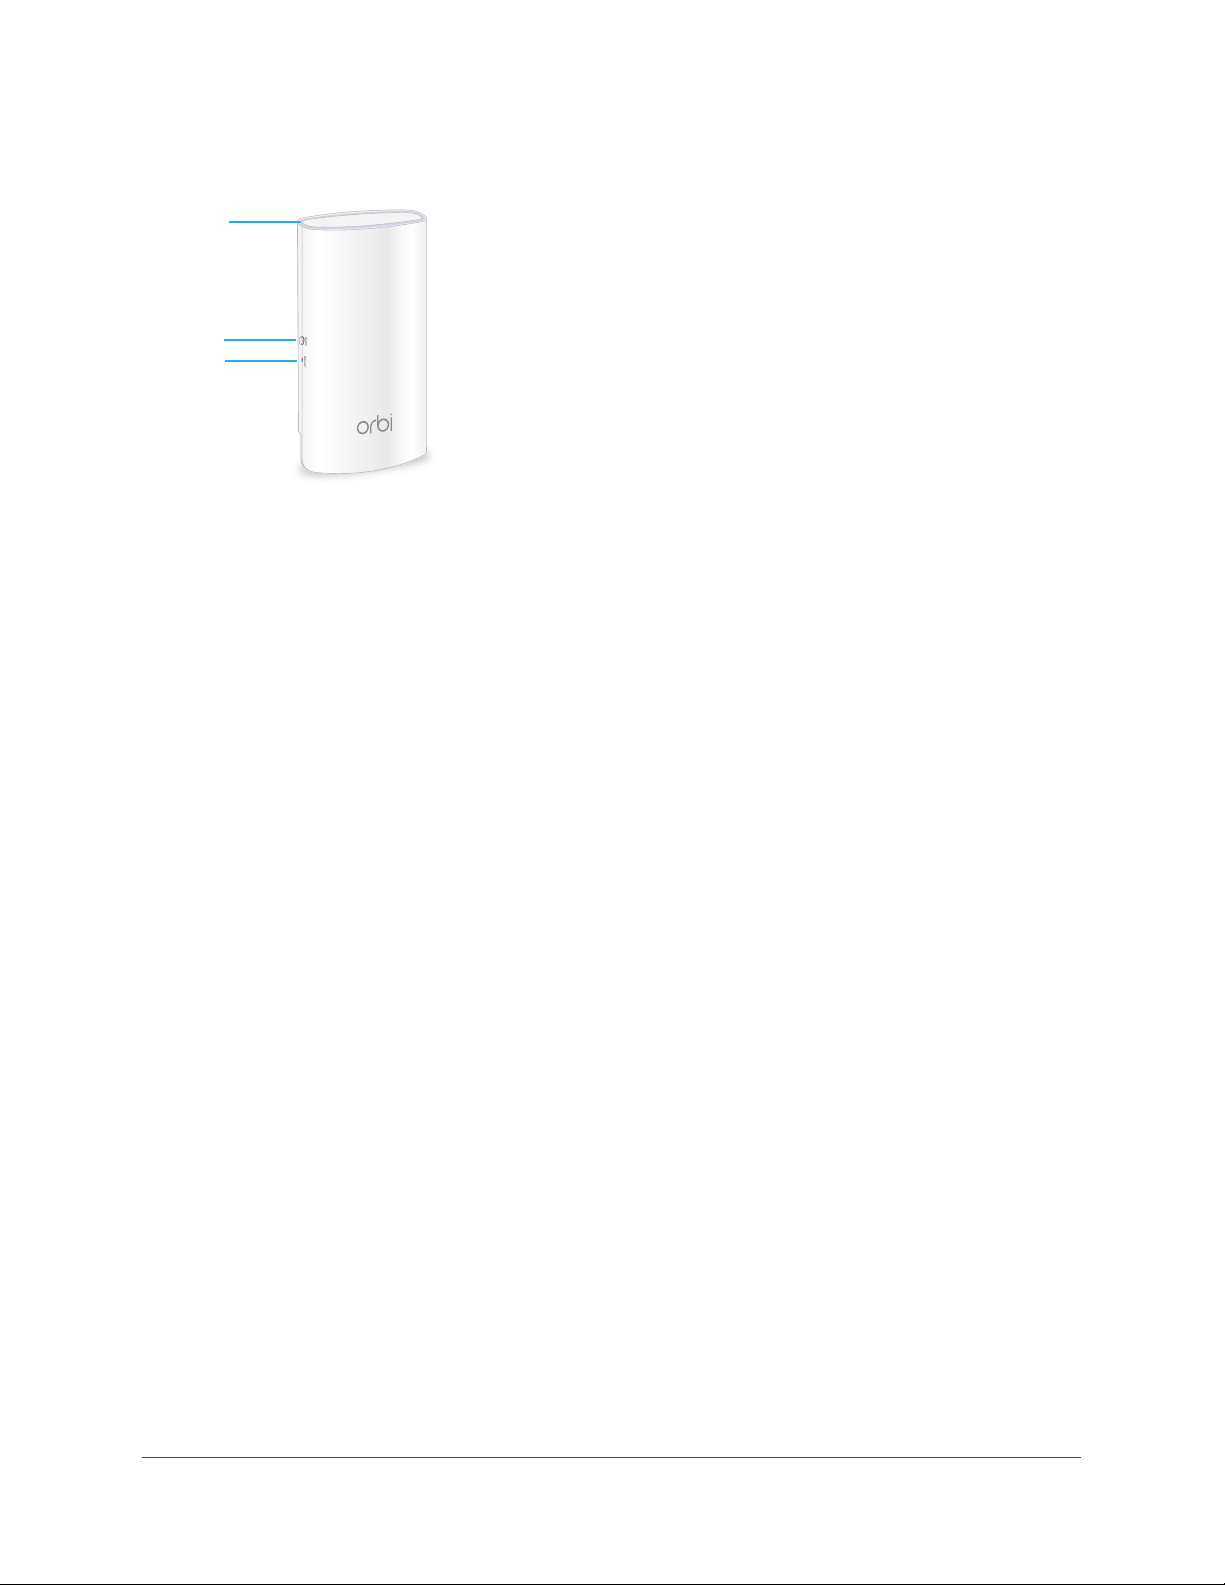
Figure 6. Orbi wall plug satellite model RBW30, front and back views
1. Ring LED (not shown in image)
2. Sync button (also used for WPS connection)
3. Reset button
Overview
13
Orbi WiFi System
LED Behavior
When you sync a satellite to the router, the LED behavior for a satellite that comes in a WiFi
system is different from the LED behavior for add-on satellites.
Orbi WiFi System LEDs
The following table describes the LED behavior for an Orbi router and Orbi satellites that are
purchased together and come in the same package.
Table 1. Orbi WiFi System router and satellite LED descriptions
LED LED Behavior
Power LED The Power LED is located above the Power On/Off button on the rear
panel. Note:
• Solid green. Power is on.
• Solid amber. The
• Blinking amber.
settings.
• Blinking red. The
• Off. Power is not supplied.
The wall plug satellite does not include a Power LED.
router or satellite is booting.
The router or satellite is resetting to factory default
firmware is corrupted.
Router ring LED The ring LED is located on the top.
• Pulsing white. The
button.
• Off. The
• Solid white.
• Solid magenta. The
Access the Internet on page 132.
Satellite ring LED This satellite is included when you buy an Orbi router. The ring LED is
located on the top.
• Pulsing white. The
• Blue for three minutes.
router is good.
• Amber for three minutes. The
the router is fair.
• Magenta.
Satellite Do Not Sync on page 131.
• Off.
router finished booting and is working normally.
The satellite failed to sync to the router. See The Router and
The satellite synced to the router and is working normally.
router is booting or someone pressed the Sync
The router is resetting to factory default settings.
router cannot connect to the Internet. See Cannot
satellite is booting.
The connection between the satellite and the
connection between the satellite and
Overview
14
Orbi WiFi System
Optional Orbi Add-On Satellite LEDs
You can purchase add-on Orbi satellites (sold separately) and add them to your Orbi
network.
Table 2. Orbi add-on satellite LED description
LED LED Behavior
Power LED The Power LED is located above the Power On/Off button on the rear
panel. Note:
• Solid green. Power is on.
• Solid amber. The
• Blinking amber.
• Blinking red. The
• Off. Power is not supplied.
Add-on satellite ring LED Optional add-on satellites are sold separately and can be added to your
Orbi network.
• Pulsing white. The
• Solid white.
button).
• Blue for three minutes. The
router is good.
• Amber for three minutes. The
the router is fair.
• Magenta.
IP address.
• Off.
The wall plug satellite does not include a Power LED.
satellite is rebooting.
The satellite is resetting to factory default settings.
firmware is corrupted.
The ring LED is located on the top.
satellite is booting.
The satellite is ready to sync to the router (press the Sync
connection between the satellite and the
connection between the satellite and
The satellite is not connected to the router or is not getting an
The satellite synced to the router and is working normally.
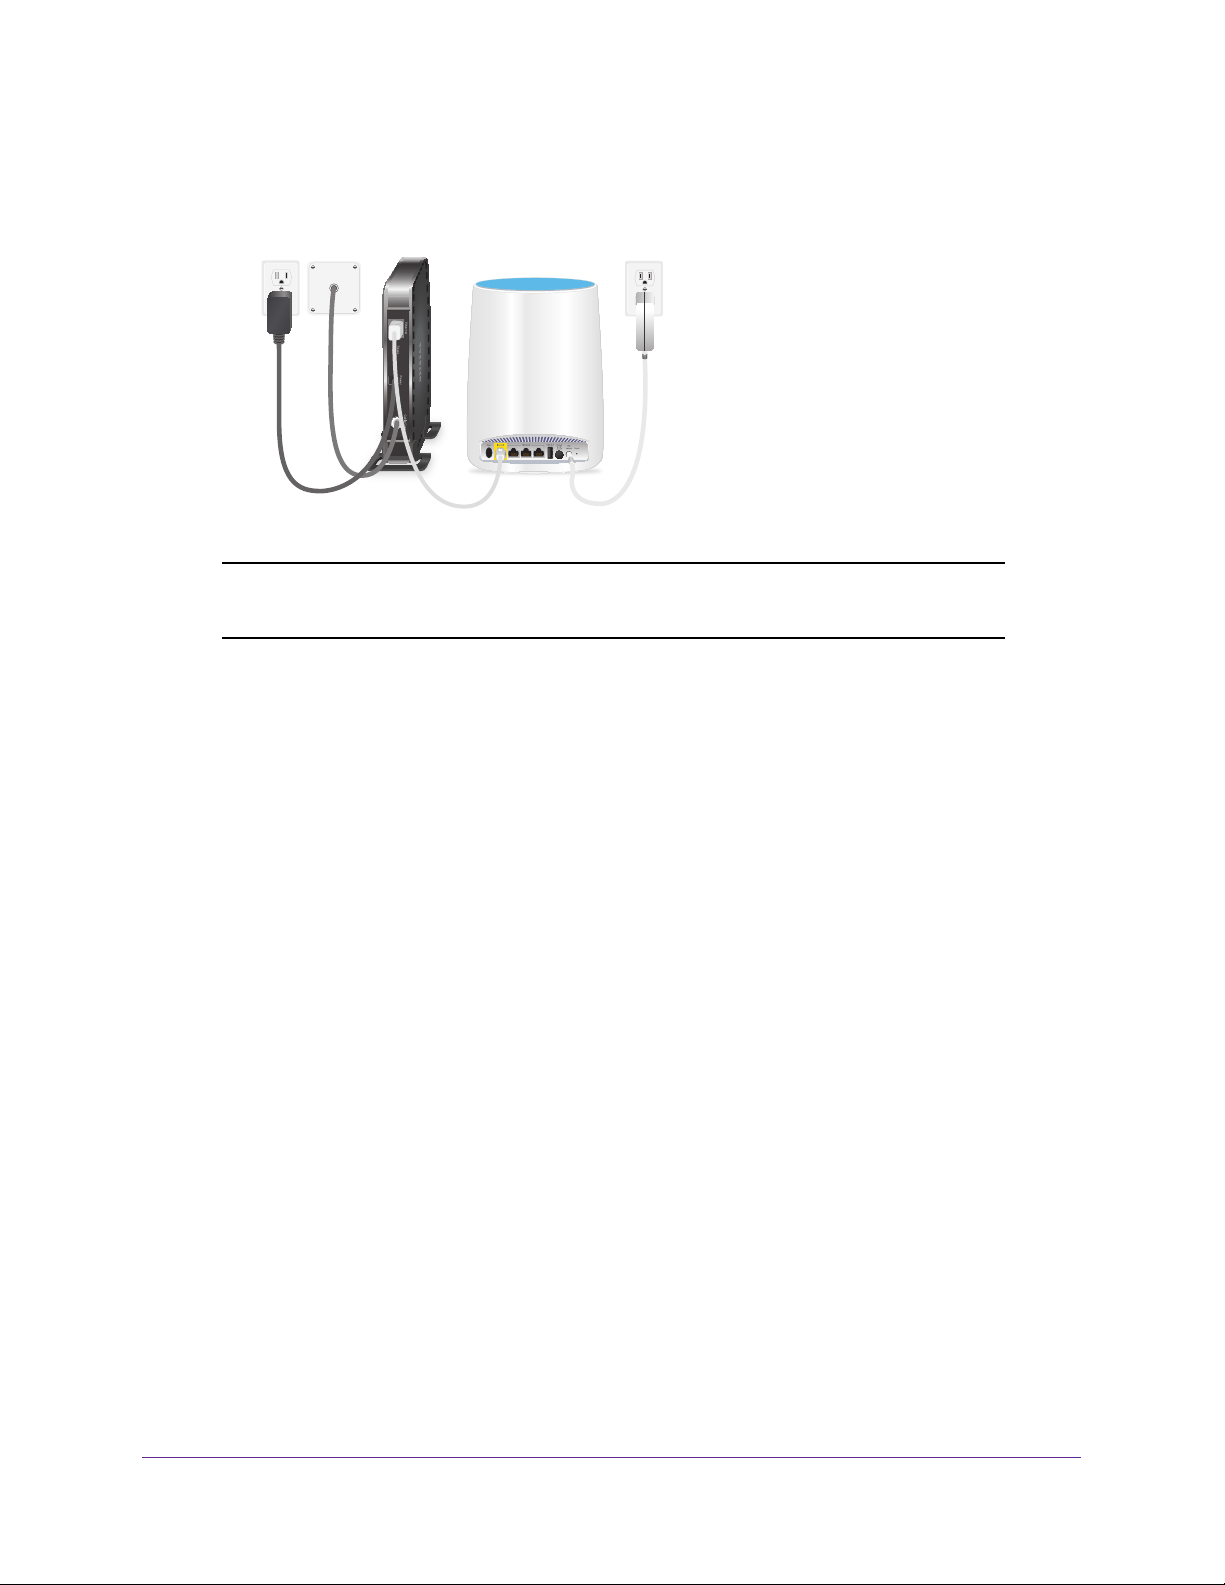
Connect Your Router
To cable your router:
1. Unplug your modem’
Internet service.
If your modem uses a battery backup, remove the battery.
2. Plug in and turn on your modem.
If your modem uses a battery backup, put the battery back in.
s power, leaving the modem connected to the wall jack for your
Overview
15
Orbi WiFi System
3. Connect your modem to the Internet port of your router with the yellow Ethernet cable that
came with your router.
Note: The router shown in this image is the Orbi router (model RBR50). The
same setup applies to all Orbi routers.
4. Connect the power adapter to your router and plug the power adapter into an outlet.
5. If the Power LED does not light, press the Power On/Off button on the rear panel of the
router
.
Place Your Satellite
If your satellite came with your Orbi WiFi System, the satellite attempts to sync with your
router. If you bought an add-on satellite, you must manually sync your satellite. For more
information, see Sync Your Orbi Satellite on page 18.
Note that your satellites must be within range of your router’s WiFi signal in order for it to sync
with the router
satellite.
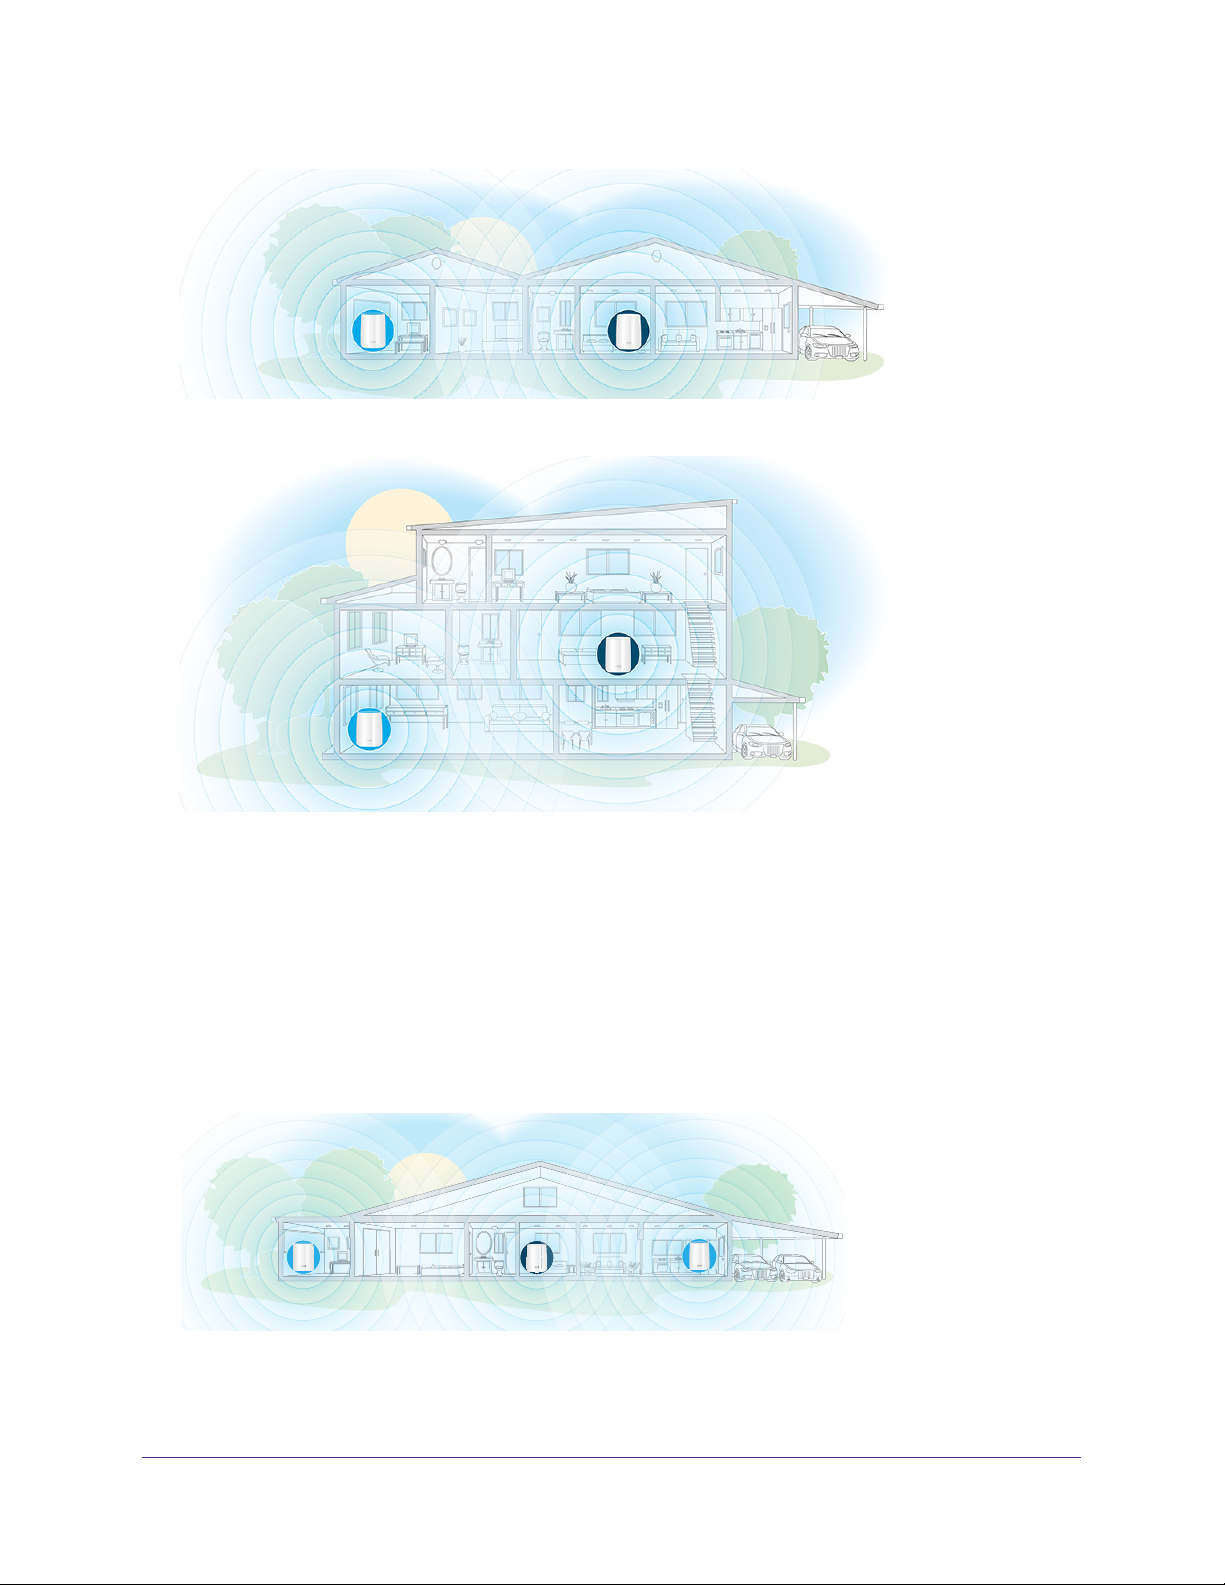
Examples of Placement for One Satellite
If you own one Orbi satellite, we recommend that you place your satellite in the middle of your
home. The router shown in the following images is the Orbi router model RBR50 and the
satellite shown in the images is the Orbi satellite model RBS50.
If you own an Orbi wall plug satellite model RBW30, you might need to place the satellite
closer to the router
satellite.
. Use each satellite’s ring LED to help you determine where to place your
. Use the satellite ring LED to determine the best placement for your
Overview
16
Orbi WiFi System
Satellite
Figure 7. Single-story house with one Orbi satellite
Satellite
Figure 8. Multilevel house with one Orbi satellite
Router
Router
Examples of Placement for Multiple Satellites
If you own more than one Orbi satellite, we recommend that you place your router in the
middle of your home with the satellites placed on opposite sides of your home. The router
shown in the following images is the Orbi router model RBR50 and the satellites shown in the
images are the Orbi satellites model RBS50.
If you own multiple Orbi wall plug satellites model RBW30, you might need to place the
satellites closer to the router
. Use the satellite ring LED to determine the best placement for
your satellites.
RouterSatellite
Figure 9. Single-story house with two Orbi satellites
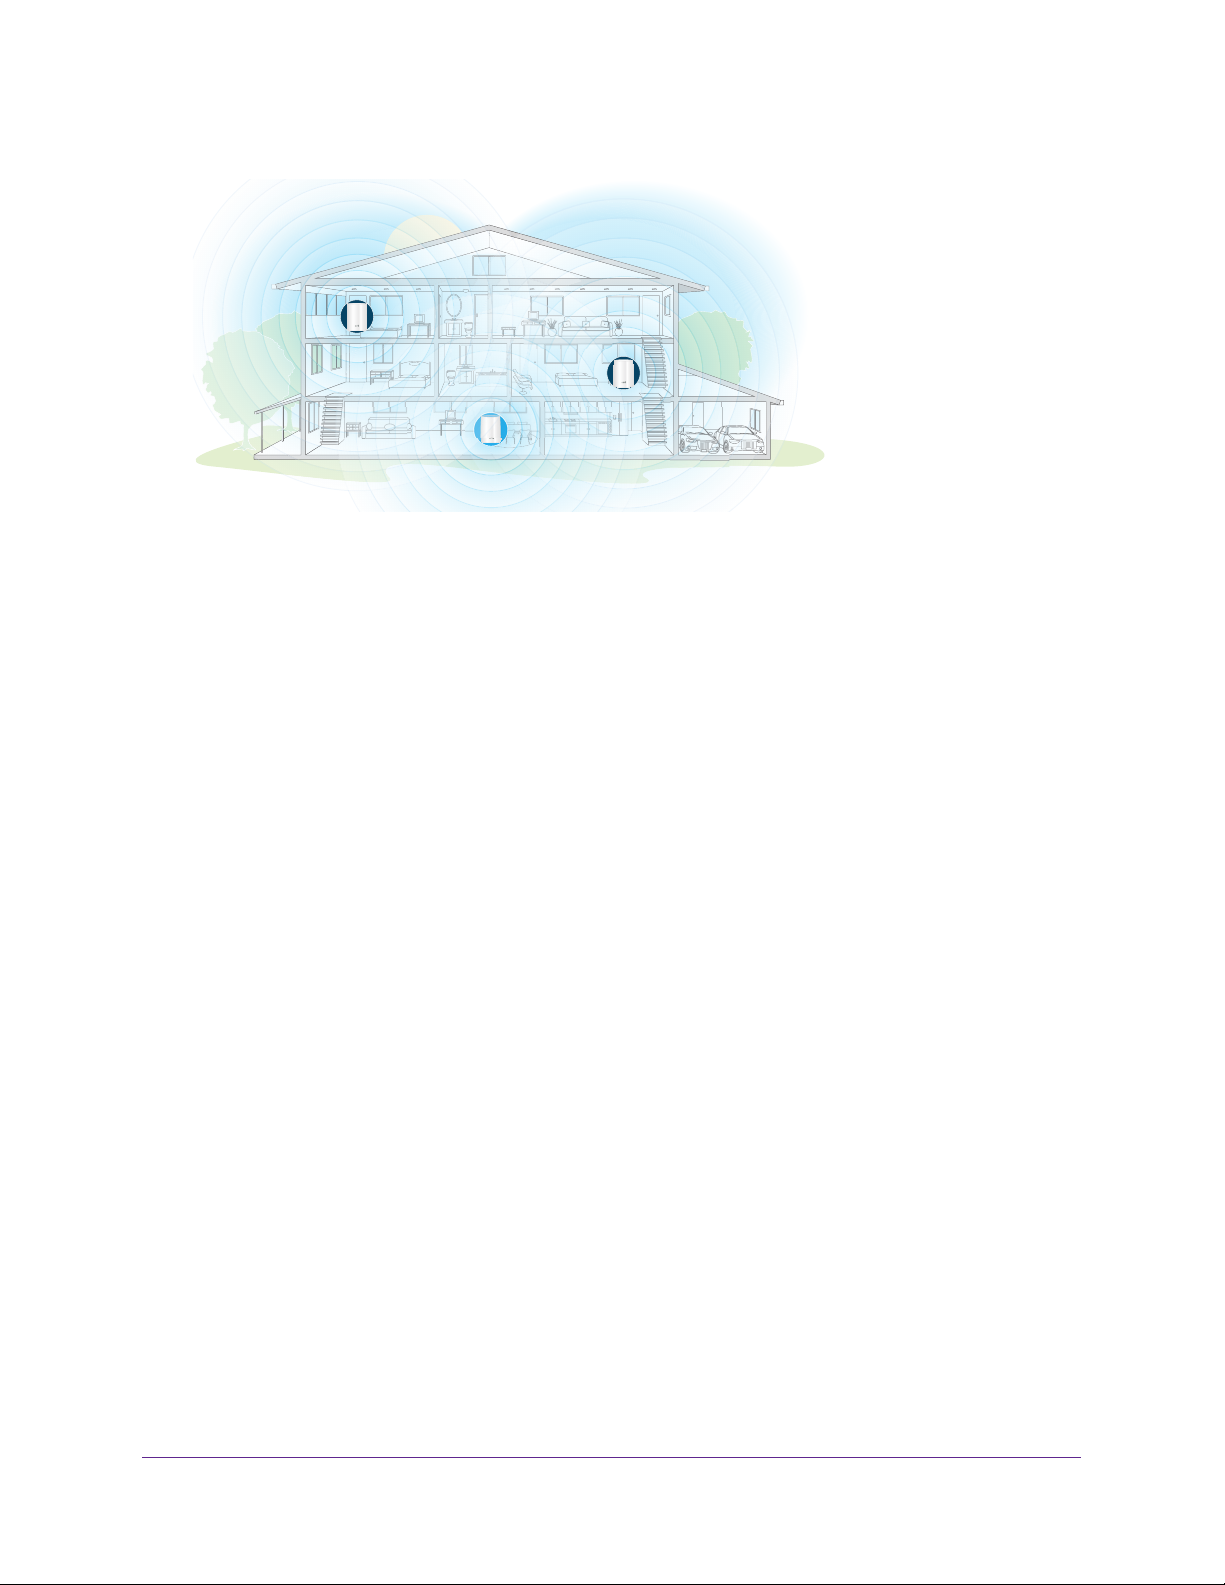
Satellite
If you have a multi-level house, place the satellites on different floors.
Overview
17
Orbi WiFi System
Satellite
Router
Figure 10. Multilevel house with two Orbi satellites
Sync Your Orbi Satellite
Satellite
The sync process for your satellite depends on whether your satellite came with your Orbi
WiFi System, or if your satellite is an add-on satellite.
Sync a Satellite From an Orbi WiFi System
The Orbi WiFi System includes an Orbi router and either one or two satellites. The satellite in
the WiFi system is preset to automatically find and sync to the WiFi signal from the Orbi
router in the same WiFi system.
To sync your satellite:
1. Place your satellite.
For more information, see Place Your Satellite on page 16.
2. Connect the satellite to a power source.
3. If the Power LED on the back of the satellite does not light, press the Power On/Off button.
The satellite ring LED pulses white. The satellite automatically finds the Orbi router’s WiFi
signal and attempts to sync to the Orbi router
The satellite ring LED lights one of the following colors for about three minutes and then
turns off:
• Blue. The Orbi router and satellite successfully synced, and the connection between
the router and satellite is good.
• Amber.
between the router and satellite is fair. Consider moving the Orbi satellite closer to the
Orbi router.
• Magenta.
The Orbi router and satellite successfully synced, and the connection
The Orbi router and satellite failed to sync.
.
Overview
18

Orbi WiFi System
4. If the satellite ring LED is magenta, move the satellite closer to the router and then sync the
satellite to the router:
a. Press the Sync button on the back of the router.
b. Within two minutes, press the Sync button on the back of the satellite.
The satellite attempts to sync to the Orbi router. The satellite ring LED lights blue, amber,
or magenta as described in Step 3 of this procedure and then turns off.
5. Repeat Steps 1–4 if your Orbi WiFi System came with a second satellite.
Sync an Add-On Satellite
If you already set up an Orbi router and satellite are adding an optional add-on satellite (sold
separately), follow these steps.
To sync your add-on satellite:
1. Place your satellite.
For more information, see Examples of Placement for Multiple Satellites on page 17.
2. Connect the satellite to a power source.
3. If the Power LED on the back of the satellite does not light, press the Power On/Off button.
4. Wait about two minutes for the satellite ring LED to light solid white.
5. Press the Sync button on the back of the satellite and within two minutes, press the Sync
button on the back of your Orbi router.
The satellite ring LED pulses white, then lights one of the following colors for about three
minutes, and then turns off:
• Blue. The Orbi router and satellite successfully synced, and the connection between
the router and satellite is good.
• Amber. The Orbi router and satellite successfully synced, and the connection
between the router and satellite is fair. Consider moving the Orbi satellite closer to the
Orbi router.
• Magenta. The Orbi router and satellite failed to sync. Move the satellite closer to the
router and try again.
Log In to Your Router and Add Satellites to Your Network
You can use the router web interface to add a satellite to your Orbi network.
To add a satellite to your Orbi network using the router web interface:
1. Launch a web browser from a computer or mobile device that is connected to your Orbi
network.
2. Enter orbilogin.com.
A login window opens.
Overview
19

Orbi WiFi System
3. Enter the router admin user name and password.
The user name is admin. The default password is password. The user name and
password are case-sensitive.
The BASIC Home page displays.
4. Select Add Orbi Satellite.
The Place Your Satellite page displays.
5. Follow the instructions about where to place your satellite in your house.
6. Connect the satellite to a power source.
7. If the Power LED on the back of the satellite does not light, press the Power On/Off button.
8. Click the NEXT button.
9. Wait about two minutes for the satellite’s ring LED to light solid white.
10. Press the Sync button on the satellite.
The satellite’s ring LED pulses white.
11. Click the SYNC button in the router web interface.
The router attempts to sync with the satellite.
The satellite’s ring LED lights one of the following colors for about three minutes and then
turns off:
• Blue. The Orbi router and satellite successfully synced, and the connection between
the router and satellite is good.
• Amber. The Orbi router and satellite successfully synced, and the connection
between the router and satellite is fair. Consider moving the Orbi satellite closer to the
Orbi router.
• Magenta. The Orbi router and satellite failed to sync. Move the satellite closer to the
router and try again.
Overview
20

Orbi WiFi System
Download the NETGEAR Orbi App
You can use the NETGEAR Orbi app to set up your Orbi network.
To find the app, scan a QR code or search for NETGEAR Orbi in the Apple App Store or
Google Play Store. Launch the NETGEAR Orbi app on your mobile device and follow the
prompts.
Overview
21

2. Connect to the Network and
Access the Router
This chapter contains the following sections:
• Connect to the Network
• Labels
• Types of Logins
• Use a Web Browser to Access the Router
• Change the Language
• Access the Orbi Router With NETGEAR genie App
2
22

Orbi WiFi System
Connect to the Network
You can connect to the Orbi network through a wired or WiFi connection. If you set up your
computer to use a static IP address, change the settings so that it uses Dynamic Host
Configuration Protocol (DHCP).
Wired Connection
You can connect your computer to the router using an Ethernet cable and join the router’s
local area network (LAN).
To connect your computer to the router with an Ethernet cable:
1. Make sure that the router is receiving power (its Power LED is lit).
2. Connect an Ethernet cable to an Ethernet port on your computer.
3. Connect the other end of the Ethernet cable to one of the router’s Ethernet ports.
Your computer connects to the local area network (LAN). A message might display on
your computer screen to notify you that an Ethernet cable is connected.
WiFi Connection
To find and select the WiFi network:
1. Make sure that the router or satellite is receiving power (its Power LED is lit).
2. On your WiFi-enabled computer or mobile device, find and select the WiFi network.
The WiFi network name is on the router label. The WiFi network name is the same for the
router and the satellite in the Orbi WiFi System.
Note: If you bought the router and the satellite separately, their default WiFi
network names are different.
3. Join the WiFi network and enter the WiFi password.
The password is on the router label.
Your WiFi-enabled computer or mobile device connects to the WiFi network.
WiFi Connection Using WPS
You can connect to the router’s WiFi network with Wi-Fi Protected Setup (WPS) or you can
find and select the WiFi network.
To use WPS to connect to the WiFi network:
1. Make sure that the router is receiving power (its Power LED is lit).
2. Check the WPS instructions for your computer or WiFi device.
3. Press the Sync button on the router.
Connect to the Network and Access the Router
23
Orbi WiFi System
4. Within two minutes, on your WiFi-enabled computer or mobile device, press its WPS button
or follow its instructions for WPS connections.
Your computer or mobile device connects to the WiFi network.
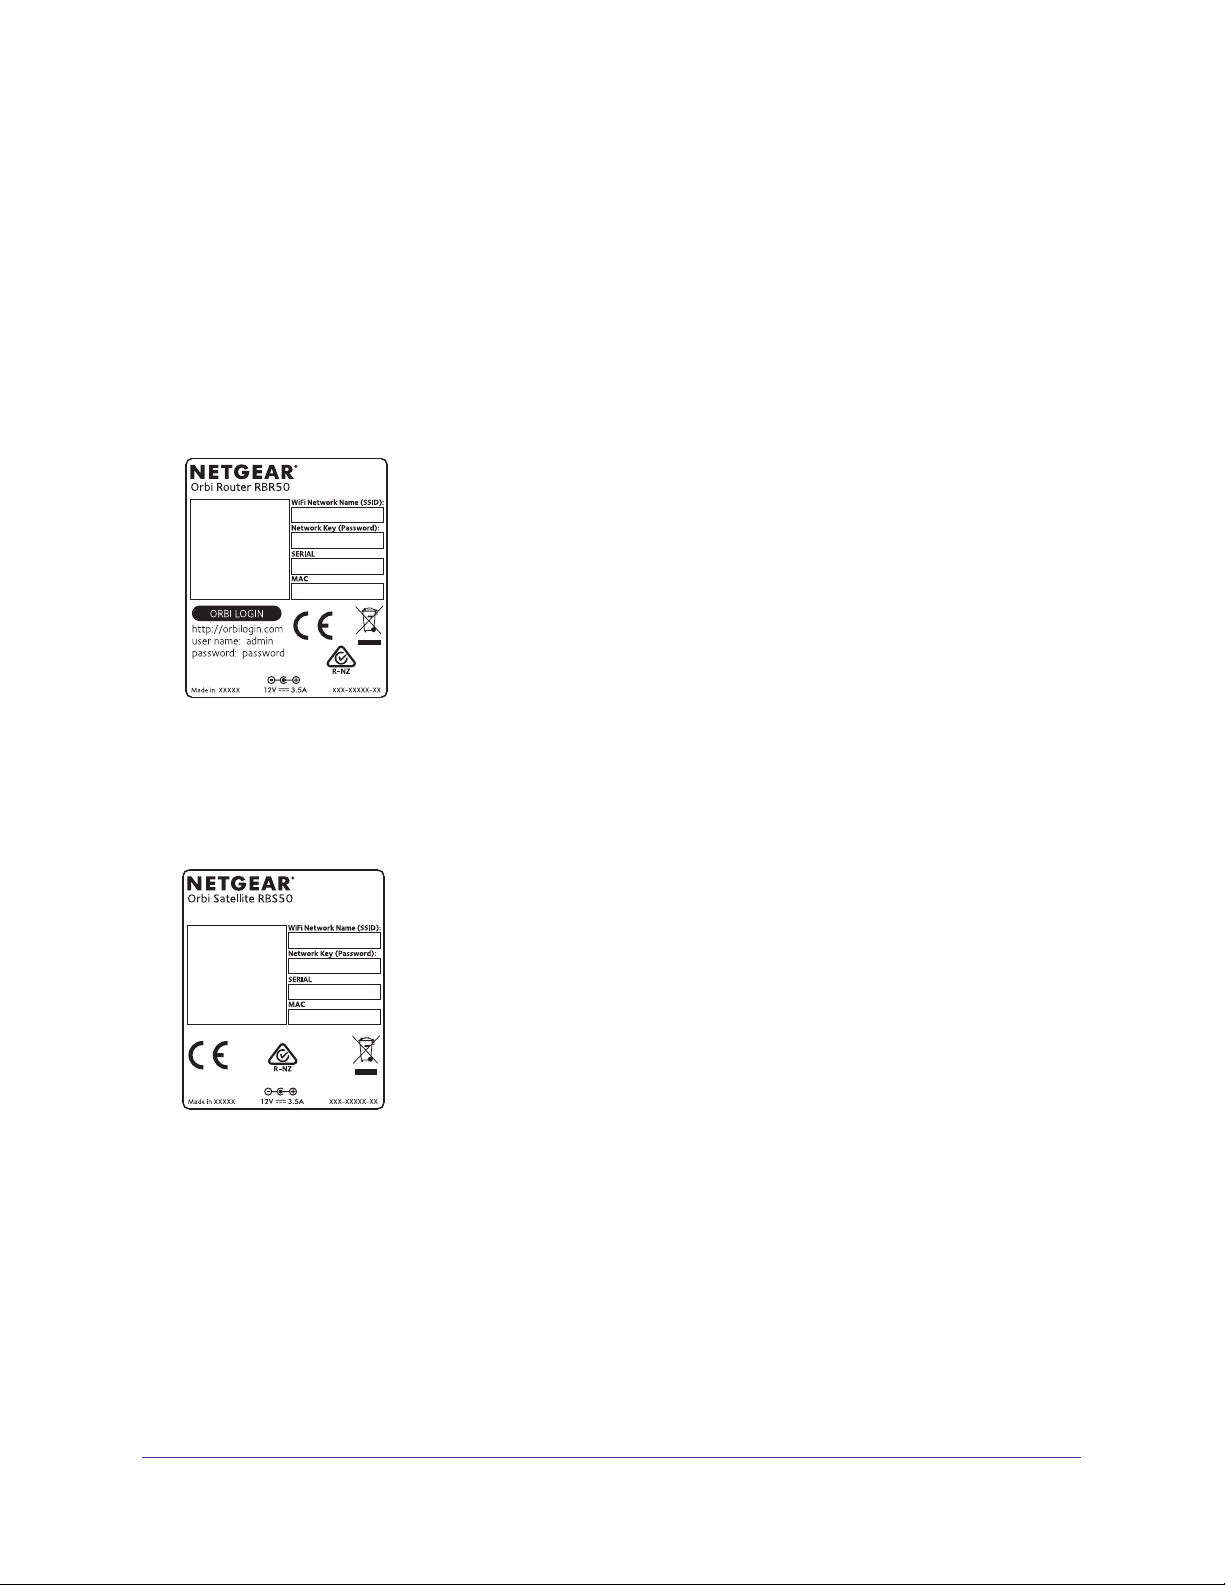
Labels
The router label shows the login information, the WiFi network name and password, the
router’s MAC address, and the router’s serial number.
router label might look like:
The following is an example of what the
Figure 11. Router label
The satellite label shows the WiFi network name and password, the satellite’s MAC address,
and the satellite’s serial number.
like:
Figure 12. Satellite label
The following is an example of what the satellite label might look
Types of Logins
Separate types of logins serve different purposes. It is important that you understand the
difference so that you know which login to use when.
Types of logins:
Connect to the Network and Access the Router
24

Orbi WiFi System
• Internet service login. The login that your Internet service provider (ISP) gave you logs
you in to your Internet service. Your service provider gave you this login information in a
letter or some other way. If you cannot find this login information, contact your service
provider.
• WiFi network key or password. Your router and satellite are preset with the same WiFi
network name (SSID) and password for WiFi access. This information is on the router
label and the satellite label.
• Router login. This logs you in to the router interface from a web browser as admin.
Use a Web Browser to Access the Router
When you connect to the network (either with WiFi or with an Ethernet cable), you can use a
web browser to access the router to view or change its settings. The first time you access the
router, the NETGEAR installation assistant automatically checks to see if your router can
connect to your Internet service.
Automatic Internet Setup
You can set up your router automatically, or you can use a web browser to access the router
and set up your router manually. Before you start the setup process, get your ISP information
and make sure that the computers and devices in the network use the settings described
here.
When your Internet service starts, your Internet service provider (ISP) typically gives you all
the information needed to connect to the Internet. For DSL service, you might need the
following information to set up your router:
• The ISP configuration information for your DSL account
• ISP login name and password
• Fixed or static IP address settings (special deployment by ISP; this setting is rare)
If you cannot locate this information, ask your ISP to provide it. When your Internet
connection is working, you no longer need to launch the ISP login program on your computer
to access the Internet. When you start an Internet application, your router automatically logs
you in.
Installation and basic setup takes about 15 minutes to complete.
To automatically set up your router:
1. Turn the router on by pressing the On/Off button.
2. Make sure that your WiFi-enabled computer or mobile device is connected to the router with
an Ethernet cable (wired) or wirelessly with the preset security settings listed on the label.
Note: If you want to change the router’s WiFi settings, use a wired connection
to avoid being disconnected when the new WiFi settings take effect.
3. Launch a web browser.
Connect to the Network and Access the Router
25

Orbi WiFi System
The page that displays depends on whether you accessed the router before:
• The first time that you set up the Internet connection for your router, the browser goes
to orbilogin.com, and the Orbi login page displays.
• If you already set up the Internet connection, enter orbilogin.com in the address field
for your browser to start the installation process.
4. Follow the onscreen instructions.
The router connects to the Internet.
5. If the browser does not display the web page, do the following:
• Make sure that the computer is connected to one of the four LAN Ethernet ports or
over WiFi to the router.
• Make sure that the router is receiving power, and that its Power LED is lit.
• Close and reopen the browser or clear the browser cache.
• Browse to orbilogin.com.
• If the computer is set to a static or fixed IP address (this setting is uncommon),
change it to obtain an IP address automatically from the router.
6. If the router does not connect to the Internet, do the following:
a. Review your settings.
Make sure that you selected the correct options and typed everything correctly.
b. Contact your ISP to verify that you are using the correct configuration information.
c. Read Chapter 10, Troubleshooting.
If problems persist, register your NETGEAR product and contact NETGEAR technical
support.
Log In to the Router
When you first connect to your router and launch a web browser, the browser automatically
displays the router’s web page. If you want to view or change settings for the router, you can
use a browser to log in to the router’s web page.
To log in to the router:
1. Launch a web browser from a computer or mobile device that is connected to your Orbi
network.
2. Enter orbilogin.com.
A login window opens.
3. Enter the router user name and password.
The user name is admin. The default password is password. The user name and
password are case-sensitive.
The BASIC Home page displays.
Connect to the Network and Access the Router
26

Orbi WiFi System
Change the Language
By default, the language is set as Auto.
To change the language:
1. Launch a web browser from a computer or mobile device that is connected to your Orbi
network.
2. Enter orbilogin.com.
A login window opens.
3. Enter the router user name and password.
The user name is admin. The default password is password. The user name and
password are case-sensitive.
The BASIC Home page displays.
4. In the upper right corner, select a language from the menu.
5. When prompted, click the OK button to confirm this change.
The page refreshes with the language that you selected.
Access the Orbi Router With NETGEAR genie App
The genie app is the easy dashboard for managing, monitoring, and repairing your home
network. The genie app can help you with the following:
• Automatically repair common WiFi network problems.
• Easily manage router features like Live Parental Controls, Internet traffic meter, speed
test, and more.
To use the genie app to access the router:
1. Visit the NETGEAR genie web page at NETGEAR.com/genie.
2. Follow the onscreen instructions to install the app on your smartphone, tablet, or computer.
3. Launch the genie app.
The genie app dashboard page displays.
Connect to the Network and Access the Router
27

3. Specify Your Internet Settings
3
Usually, the quickest way to set up the router to use your Internet connection is to allow Orbi to
detect the Internet connection when you first access the router with a web browser. You can also
customize or specify your Internet settings.
This chapter contains the following sections:
• Use the Internet Setup Wizard
• Manually Set Up the Internet Connection
• Specify IPv6 Internet Connections
• Change the MTU Size
28
Orbi WiFi System
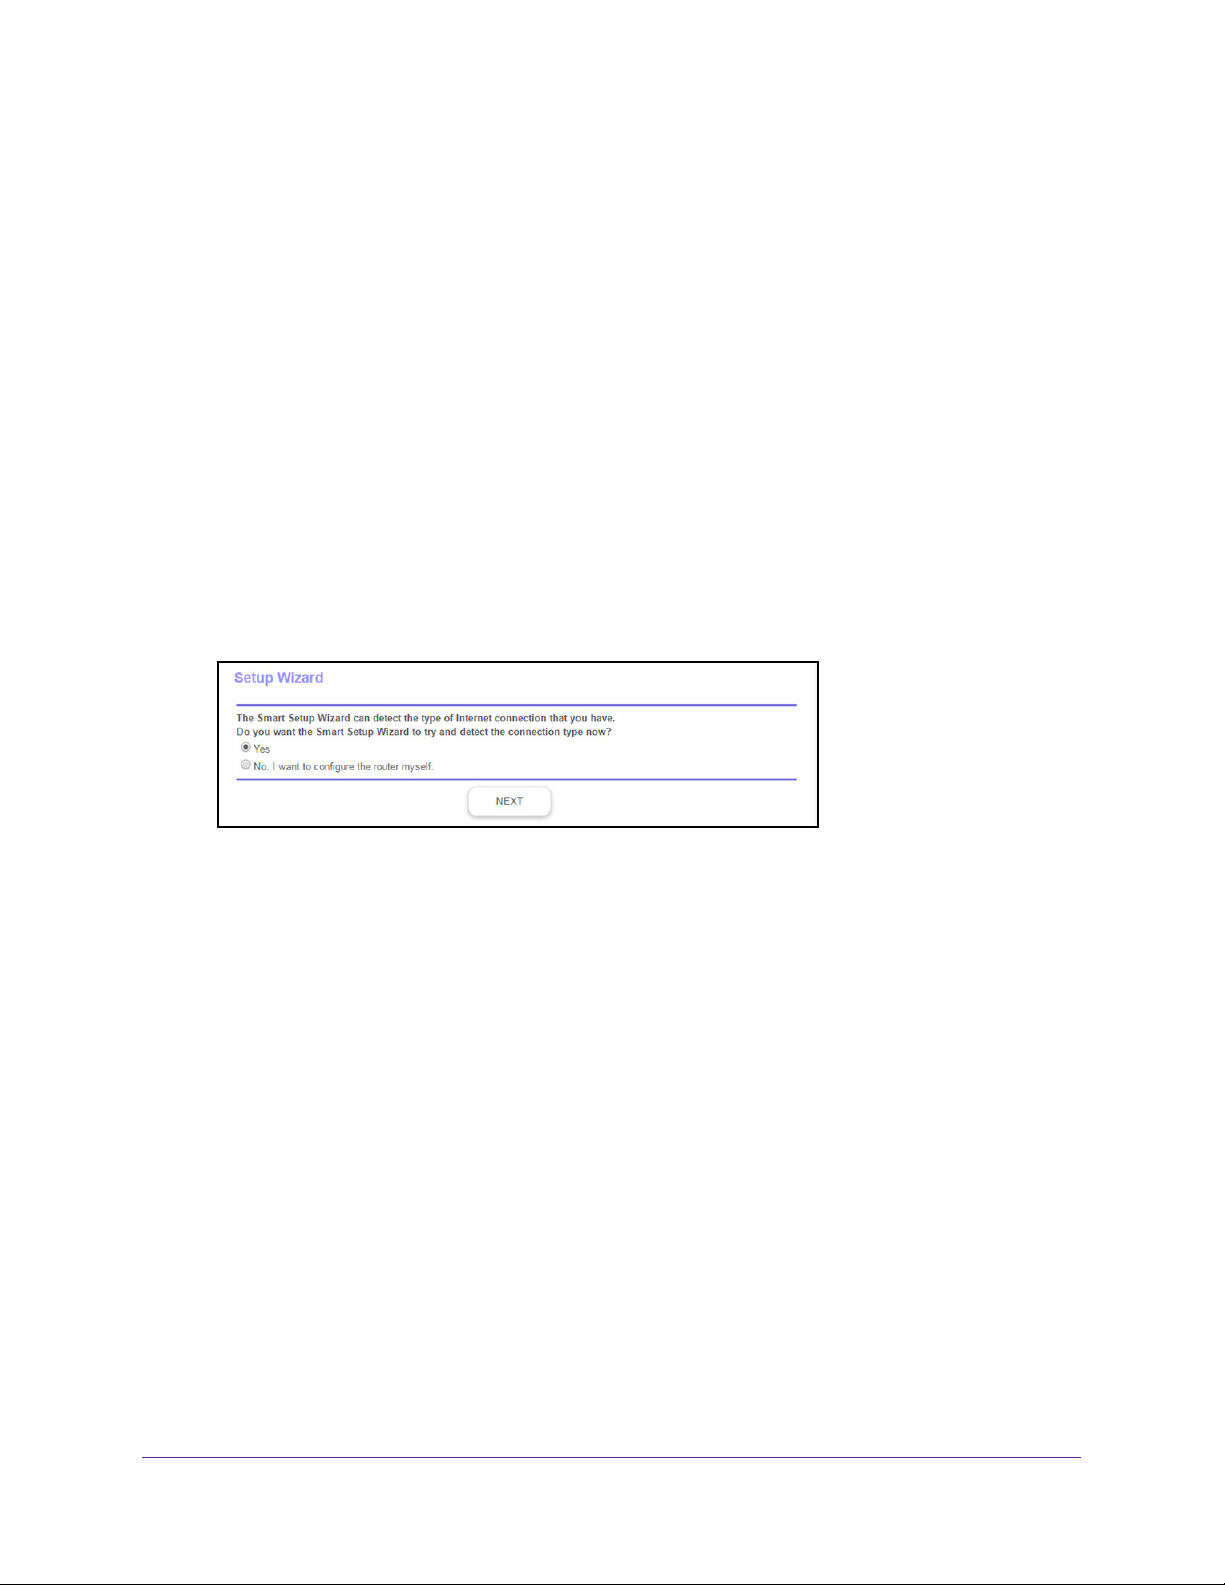
Use the Internet Setup Wizard
You can use the Setup Wizard to detect your Internet settings and automatically set up your
router.
To use the Setup Wizard:
1. Launch a web browser from a computer or mobile device that is connected to your Orbi
network.
2. Enter orbilogin.com.
A login window opens.
3. Enter the router user name and password.
The user name is admin.
password are case-sensitive.
The BASIC Home page displays.
4. Select ADV
5. Select the Yes radio button.
If you select No, you are taken to the Internet Setup page (see Manually Set Up the
Internet Connection on page 30).
6. Click the Next button.
The Setup Wizard searches your Internet connection for servers and protocols to
determine your ISP configuration and checks your operation mode.
ANCED > Setup Wizard.
The default password is password. The user name and
Specify Your Internet Settings
29

Orbi WiFi System
Manually Set Up the Internet Connection
You can view or change the router’s Internet connection settings.
Specify an Internet Connection Without a Login
To specify the Internet connection settings:
1. Launch a web browser from a computer or mobile device that is connected to your Orbi
network.
2. Enter orbilogin.com.
A login window opens.
3. Enter the router user name and password.
The user name is admin.
password are case-sensitive.
The BASIC Home page displays.
4. Select Internet.
The default password is password. The user name and
5. Leave the Does your Internet connection require a login No radio button selected.
6. If your Internet connection requires an account name or host name, type it in the Account
Name (If Required) field.
7. If your Internet connection requires a domain name, type it in the Domain Name (If
Required) field.
Specify Your Internet Settings
30

Orbi WiFi System
For the other sections in this page, the default settings usually work, but you can change
them.
8. Select an Internet IP Address radio button:
• Get Dynamically from ISP. Your ISP uses DHCP to assign your IP address. Your ISP
automatically assigns these addresses.
• Use Static IP Address. Enter the IP address, IP subnet mask, and the gateway IP
address that your ISP assigned. The gateway is the ISP router to which your router
connects.
9. Select a Domain Name Server (DNS) Address radio button:
• Get Automatically from ISP. Your ISP uses DHCP to assign your DNS servers. Your
ISP automatically assigns this address.
• Use These DNS Servers. If you know that your ISP requires specific servers, select
this option. Enter the IP address of your ISP’s primary DNS server. If a secondary
DNS server address is available, enter it also.
10. Select a Router MAC Address radio button:
• Use Default Address. Use the default MAC address.
• Use Computer MAC Address. The router captures and uses the MAC address of the
computer that you are now using. You must use the one computer that the ISP
allows.
• Use This MAC Address. Enter the MAC address that you want to use.
11. Click the Apply button.
Your settings are saved.
12. Click the Test button to test your Internet connection.
If the NETGEAR website does not display within one minute, see Chapter 10,
Troubleshooting.
Specify an Internet Connection That Uses a Login
To view or change the basic Internet setup:
1. Launch a web browser from a computer or mobile device that is connected to your Orbi
network.
2. Enter orbilogin.com.
A login window opens.
3. Enter the router user name and password.
The user name is admin. The default password is password. The user name and
password are case-sensitive.
The BASIC Home page displays.
Specify Your Internet Settings
31

4. Select Internet.
Orbi WiFi System
5. Select the Does your Internet connection require a login Yes radio button.
The page adjusts.
6. From the Internet Service Provider menu, select the encapsulation method:
The selections are PPPoE, PPTP, or L2TP.
7. In the Login field, enter the login name your ISP gave you.
This login name is often an email address.
8. In the Password field, type the password that you use to log in to your Internet service.
9. If your ISP requires a service name, type it in the Service Name (if Required) field.
10. From the Connection Mode menu, select Always
On, Dial on Demand, or Manually
Connect.
11. T
o change the number of minutes until the Internet login time out, in the Idle Timeout (In
minutes) field, type the number of minutes.
This is how long the router keeps the Internet connection active when no one on the
network is using the Internet connection.
A value of 0 (zero) means never log out.
12. Select an Internet IP Address radio button:
• Get Dynamically from ISP.
Your ISP uses DHCP to assign your IP address. Your ISP
automatically assigns these addresses.
• Use Static IP
Address. Enter the IP address, IP subnet mask, and gateway IP
address that your ISP assigned. The gateway is the ISP router to which your router
connects.
13. Select a Domain Name Server (DNS) radio button:
Specify Your Internet Settings
32

Orbi WiFi System
• Get Automatically from ISP. Your ISP uses DHCP to assign your DNS servers. Your
ISP automatically assigns this address.
• Use These DNS Servers. If you know that your ISP requires specific servers, select
this option. Enter the IP address of your ISP’s primary DNS server. If a secondary
DNS server address is available, enter it also.
14. Select a Router MAC Address radio button:
• Use Default Address. Use the default MAC address.
• Use Computer MAC Address. The router captures and uses the MAC address of the
computer that you are now using. You must use the one computer that the ISP
allows.
• Use This MAC Address. Enter the MAC address that you want to use.
15. Click the Apply button.
Your settings are saved.
16. Click the Test button to test your Internet connection.
If the NETGEAR website does not display within one minute, see Cannot Access the
Internet on page 132.
Specify IPv6 Internet Connections
You can set up an IPv6 Internet connection if genie does not detect it automatically.
To set up an IPv6 Internet connection:
1. Launch a web browser from a computer or mobile device that is connected to your Orbi
network.
2. Enter orbilogin.com.
A login window opens.
3. Enter the router user name and password.
The user name is admin. The default password is password. The user name and
password are case-sensitive.
The BASIC Home page displays.
4. Select ADVANCED > Advanced Setup > IPv6.
The IPv6 page displays.
5. From the Internet Connection Type menu, select the IPv6 connection type:
• If you are not sure, select Auto Detect so that the router detects the IPv6 type that is
in use.
• If your Internet connection does not use PPPoE, DHCP, or fixed, but is IPv6, select
Auto Config.
Specify Your Internet Settings
33

Orbi WiFi System
Your Internet service provider (ISP) can provide this information. For more information
about IPv6 Internet connection, see the following sections:
- Use Auto Detect for an IPv6 Internet Connection on page 34
- Use Auto Config for an IPV6 Internet Connection on page 36
- Set Up an IPv6 6rd Tunnel Internet Connection on page 37
- Set Up an IPv6 6to4 Tunnel Internet Connection on page 39
- Set Up an IPv6 Pass Through Internet Connection on page 40
- Set Up an IPv6 Fixed Internet Connection on page 41
- Set Up an IPv6 DHCP Internet Connection on page 42
- Set Up an IPv6 PPPoE Internet Connection on page 44
6. Click the Apply button.
Your settings are saved.
Requirements for Entering IPv6 Addresses
IPv6 addresses are denoted by eight groups of hexadecimal quartets that are separated by
colons. You can reduce any four-digit group of zeros within an IPv6 address to a single zero
or omit it. The following errors invalidate an IPv6 address:
• More than eight groups of hexadecimal quartets
• More than four hexadecimal characters in a quartet
• More than two colons in a row
Use Auto Detect for an IPv6 Internet Connection
To set up an IPv6 Internet connection through auto detection:
1. Launch a web browser from a computer or mobile device that is connected to your Orbi
network.
2. Enter orbilogin.com.
A login window opens.
3. Enter the router user name and password.
The user name is admin. The default password is password. The user name and
password are case-sensitive.
The BASIC Home page displays.
4. Select ADVANCED > Advanced Setup > IPv6.
The IPv6 page displays.
Specify Your Internet Settings
34

Orbi WiFi System
5. From the Internet Connection Type menu, select Auto Detect.
The router automatically detects the information in the following fields:
• Connection T
• Router
’s IPv6 Address on WAN. This field shows the IPv6 address that is acquired
ype. This field indicates the connection type that is detected.
for the router’s WAN (or Internet) interface. The number after the slash (/) is the
length of the prefix, which is also indicated by the underline (_) under the IPv6
address. If no address is acquired, the field displays Not Available.
• Router
’s IPv6 Address on LAN. This field shows the IPv6 address that is acquired
for the router’s LAN interface. The number after the slash (/) is the length of the prefix,
which is also indicated by the underline (_) under the IPv6 address. If no address is
acquired, the field displays Not Available.
6. Select
• Use DHCP Server.
an IP Address Assignment radio button:
This method passes more information to LAN devices, but some
IPv6 systems might not support the DHCv6 client function.
• Auto Config.
This is the default setting.
This setting specifies how the router assigns IPv6 addresses to the devices on your home
network (the LAN).
7. (Optional) Select the Use This Interface ID check box and specify the interface ID to be
used for the IPv6 address of the router’
s LAN interface.
If you do not specify an ID here, the router generates one automatically from its MAC
address.
8. Click the Apply button.
Your settings are saved.
Specify Your Internet Settings
35

Orbi WiFi System
Use Auto Config for an IPV6 Internet Connection
To set up an IPv6 Internet connection through auto configuration:
1. Launch a web browser from a computer or mobile device that is connected to your Orbi
network.
2. Enter orbilogin.com.
A login window opens.
3. Enter the router user name and password.
The user name is admin.
The default password is password. The user name and
password are case-sensitive.
The BASIC Home page displays.
4. Select ADV
ANCED > Advanced Setup > IPv6.
The IPv6 page displays.
5. From the Internet Connection T
ype menu, select Auto Config.
The router automatically detects the information in the following fields:
• Router
’s IPv6 Address on WAN. This field shows the IPv6 address that is acquired
for the router’s WAN (or Internet) interface. The number after the slash (/) is the length
of the prefix, which is also indicated by the underline (_) under the IPv6 address. If no
address is acquired, the field displays Not Available.
• Router
’s IPv6 Address on LAN. This field shows the IPv6 address that is acquired
for the router’s LAN interface. The number after the slash (/) is the length of the prefix,
which is also indicated by the underline (_) under the IPv6 address. If no address is
acquired, the field displays Not Available.
6. (Optional) In the DHCP User Class (If Required) field, enter a host name.
Specify Your Internet Settings
36

Orbi WiFi System
Most people can leave this field blank, but if your ISP gave you a specific host name,
enter it here.
7. (Optional) In the DHCP Domain Name (If Required) field, enter a domain name.
You can type the domain name of your IPv6 ISP. Do not enter the domain name for the
IPv4 ISP here. For example, if your ISP’s mail server is mail.xxx.yyy.zzz, type xxx.yyy.zzz
as the domain name. If your ISP provided a domain name, type it in this field. For
example, Earthlink Cable might require a host name of home, and Comcast sometimes
supplies a domain name.
8. Select an IP Address Assignment radio button:
• Use DHCP Server. This method passes more information to LAN devices, but some
IPv6 systems might not support the DHCv6 client function.
• Auto Config. This is the default setting.
9. (Optional) Select the Use This Interface ID check box and specify the interface ID that you
want to be used for the IPv6 address of the router’s LAN interface.
If you do not specify an ID here, the router generates one automatically from its MAC
address.
10. Click the Apply button.
Your settings are saved.
Set Up an IPv6 6rd Tunnel Internet Connection
The 6rd protocol makes it possible to deploy IPv6 to sites using a service provider’s IPv4
network. 6rd uses the service provider’s own IPv6 address prefix. This limits the operational
domain of 6rd to the service provider’s network and is under direct control of the service
provider. The IPv6 service provided is equivalent to native IPv6. The 6rd mechanism relies
on an algorithmic mapping between the IPv6 and IPv4 addresses that are assigned for use
within the service provider’s network. This mapping allows for automatic determination of
IPv4 tunnel endpoints from IPv6 prefixes, allowing stateless operation of 6rd.
With a 6rd Tunnel configuration, the router follows the RFC5969 standard, supporting two
ways to establish a 6rd tunnel IPv6 WAN connection:
• Auto Detect Mode. In IPv6 Auto Detect mode, when the router receives option 212 from
the DHCPv4 option, auto detect selects the IPv6 as 6rd Tunnel setting. The router uses
the 6rd option information to establish the 6rd connection.
• Manual Mode. Select 6rd. If the router receives option 212, the fields are automatically
completed. Otherwise, you must enter the 6rd settings.
To set up an IPv6 6rd Tunnel Internet connection:
1. Launch a web browser from a computer or mobile device that is connected to your Orbi
network.
2. Enter orbilogin.com.
A login window opens.
Specify Your Internet Settings
37

Orbi WiFi System
3. Enter the router user name and password.
The user name is admin.
The default password is password. The user name and
password are case-sensitive.
The BASIC Home page displays.
4. Select ADV
ANCED > Advanced Setup > IPv6.
The IPv6 page displays.
5. In the Internet Connection T
ype menu, select 6rd.
The router automatically detects the information in the following sections:
• 6rd (IPv6 Rapid Development) Configuration. The router detects the service
provider
’s IPv4 network and attempts to establish an IPv6 6rd Tunnel connection. If
the IPv4 network returns 6rd parameters to the router, the page adjusts to display the
correct settings in this section.
• Router
’s IPv6 Address on LAN. This field shows the IPv6 address that is acquired
for the router’s LAN interface. The number after the slash (/) is the length of the prefix,
which is also indicated by the underline (_) under the IPv6 address. If no address is
acquired, the field displays Not Available.
6. Select an IPv6 Domain Name Server (DNS)
• Get Automatically
from ISP. Your ISP uses DHCP to assign your DNS servers. Your
Address radio button:
ISP automatically assigns this address.
• Use These DNS Servers. If you know that your ISP requires specific servers, select
this option. Enter the IP address of your ISP’
s primary DNS server. If a secondary
DNS server address is available, enter it also.
7. Select an IP Address Assignment radio button:
• Use DHCP Server.
This method passes more information to LAN devices, but some
IPv6 systems might not support the DHCv6 client function.
• Auto Config.
This is the default setting.
This setting specifies how the router assigns IPv6 addresses to the devices on your home
network.
Specify Your Internet Settings
38

Orbi WiFi System
8. (Optional) Select the Use This Interface ID check box and specify the interface ID that you
want to be used for the IPv6 address of the router’s LAN interface.
If you do not specify an ID here, the router generates one automatically from its MAC
address.
9. Click the Apply button.
Your settings are saved.
Set Up an IPv6 6to4 Tunnel Internet Connection
The remote relay router is the router to which your router creates a 6to4 tunnel. Make sure
that the IPv4 Internet connection is working before you apply the 6to4 tunnel settings for the
IPv6 connection.
To set up an IPv6 Internet connection by using a 6to4 tunnel:
1. Launch a web browser from a computer or mobile device that is connected to your Orbi
network.
2. Enter orbilogin.com.
A login window opens.
3. Enter the router user name and password.
The user name is admin.
The default password is password. The user name and
password are case-sensitive.
The BASIC Home page displays.
4. Select ADV
ANCED > Advanced Setup > IPv6.
The IPv6 page displays.
5. From the Internet Connection T
ype menu, select 6to4 Tunnel.
Specify Your Internet Settings
39

Orbi WiFi System
The router automatically detects the information in the Router’s IPv6 Address on LAN
field. This field shows the IPv6 address that is acquired for the router’s LAN interface. The
number after the slash (/) is the length of the prefix, which is also indicated by the
underline (_) under the IPv6 address. If no address is acquired, the field displays Not
Available.
6. Select a Remote 6to4 Relay Router radio button:
• Auto. Your router uses any remote relay router that is available on the Internet. This
is the default setting.
• Static IP Address. Enter the static IPv4 address of the remote relay router. Your IPv6
ISP usually provides this address.
7. Select an IPv6 Domain Name Server (DNS Address) radio button:
• Get Automatically from ISP. Your ISP uses DHCP to assign your DNS servers. Your
ISP automatically assigns this address.
• Use These DNS Servers. If you know that your ISP requires specific servers, select
this option. Enter the IP address of your ISP’s primary DNS server. If a secondary
DNS server address is available, enter it also.
8. Select an IP Address Assignment radio button:
• Use DHCP Server. This method passes more information to LAN devices, but some
IPv6 systems might not support the DHCv6 client function.
• Auto Config. This is the default setting.
This setting specifies how the router assigns IPv6 addresses to the devices on your home
network.
9. (Optional) Select the Use This Interface ID check box and specify the interface ID that you
want to be used for the IPv6 address of the router’s LAN interface.
If you do not specify an ID here, the router generates one automatically from its MAC
address.
10. Click the Apply button.
Your settings are saved.
Set Up an IPv6 Pass Through Internet Connection
In pass-through mode, the router works as a Layer 2 Ethernet switch with two ports (LAN and
WAN Ethernet ports) for IPv6 packets. The router does not process any IPv6 header packets.
To set up a pass-through IPv6 Internet connection:
1. Launch a web browser from a computer or mobile device that is connected to your Orbi
network.
2. Enter orbilogin.com.
A login window opens.
3. Enter the router user name and password.
Specify Your Internet Settings
40

Orbi WiFi System
The user name is admin. The default password is password. The user name and
password are case-sensitive.
The BASIC Home page displays.
4. Select ADV
ANCED > Advanced Setup > IPv6.
The IPv6 page displays.
5. From the Internet Connection T
ype menu, select Pass Through.
The page adjusts, but no additional fields display.
6. Click the Apply button.
Your settings are saved.
Set Up an IPv6 Fixed Internet Connection
To set up a fixed IPv6 Internet connection:
1. Launch a web browser from a computer or mobile device that is connected to your Orbi
network.
2. Enter orbilogin.com.
A login window opens.
3. Enter the router user name and password.
The user name is admin.
password are case-sensitive.
The default password is password. The user name and
The BASIC Home page displays.
4. Select ADV
ANCED > Advanced Setup > IPv6.
The IPv6 page displays.
5. From the Internet Connection T
ype menu, select Fixed.
Specify Your Internet Settings
41

Orbi WiFi System
6. Configure the fixed IPv6 addresses for the WAN connection:
• IPv6 Address/Prefix Length. The IPv6 address and prefix length of the router WAN
interface.
• Default IPv6 Gateway. The IPv6 address of the default IPv6 gateway for the router’s
WAN interface.
• Primary DNS Server. The primary DNS server that resolves IPv6 domain name
records for the router.
• Secondary DNS Server. The secondary DNS server that resolves IPv6 domain
name records for the router.
Note: If you do not specify the DNS servers, the router uses the DNS servers
that are configured for the IPv4 Internet connection on the Internet
Setup page. (See
Manually Set Up the Internet Connection on
page 30.)
7. Select an IP Address Assignment radio button:
• Use DHCP Server. This method passes more information to LAN devices, but some
IPv6 systems might not support the DHCv6 client function.
• Auto Config. This is the default setting.
This setting specifies how the router assigns IPv6 addresses to the devices on your home
network.
8. In the IPv6 Address/Prefix Length fields, specify the static IPv6 address and prefix length
of the router’s LAN interface.
If you do not specify an ID here, the router generates one automatically from its MAC
address.
9. Click the Apply button.
Your settings are saved.
Set Up an IPv6 DHCP Internet Connection
To set up an IPv6 Internet connection with a DHCP server:
1. Launch a web browser from a computer or mobile device that is connected to your Orbi
network.
2. Enter orbilogin.com.
A login window opens.
3. Enter the router user name and password.
The user name is admin. The default password is password. The user name and
password are case-sensitive.
The BASIC Home page displays.
4. Select ADVANCED > Advanced Setup > IPv6.
Specify Your Internet Settings
42

The IPv6 page displays.
Orbi WiFi System
5. From the Internet Connection T
ype menu, select DHCP.
The router automatically detects the information in the following fields:
• Router
’s IPv6 Address on WAN. This field shows the IPv6 address that is acquired
for the router’s WAN (or Internet) interface. The number after the slash (/) is the
length of the prefix, which is also indicated by the underline (_) under the IPv6
address. If no address is acquired, the field displays Not Available.
• Router
’s IPv6 Address on LAN. This field shows the IPv6 address that is acquired
for the router’s LAN interface. The number after the slash (/) is the length of the prefix,
which is also indicated by the underline (_) under the IPv6 address. If no address is
acquired, the field displays Not Available.
6. Select an IPv6 Domain Name Server (DNS)
• Get Automatically
from ISP. Your ISP uses DHCP to assign your DNS servers. Your
Address radio button:
ISP automatically assigns this address.
• Use These DNS Servers. If you know that your ISP requires specific servers, select
this option. Enter the IP address of your ISP’
s primary DNS server. If a secondary
DNS server address is available, enter it also.
7. (Optional) In the User Class (If Required) field, enter a host name.
Most people can leave this field blank, but if your ISP gave you a specific host name,
enter it here.
8. (Optional) In the Domain Name (If Required) field, enter a domain name.
You can type the domain name of your IPv6 ISP. Do not enter the domain name for the
IPv4 ISP here. For example, if your ISP’
s mail server is mail.xxx.yyy.zzz, type xxx.yyy.zzz
as the domain name. If your ISP provided a domain name, type it in this field. For
example, Earthlink Cable might require a host name of home, and Comcast sometimes
supplies a domain name.
9. Select
an IP Address Assignment radio button:
Specify Your Internet Settings
43

Orbi WiFi System
• Use DHCP Server. This method passes more information to LAN devices, but some
IPv6 systems might not support the DHCv6 client function.
• Auto Config.
This is the default setting.
This setting specifies how the router assigns IPv6 addresses to the devices on your home
network (the LAN).
10. (Optional) Select the Use This Interface ID check box and specify the interface ID that you
want to be used for the IPv6 address of the router’
s LAN interface.
If you do not specify an ID here, the router generates one automatically from its MAC
address.
11. Click the Apply button.
Your settings are saved.
Set Up an IPv6 PPPoE Internet Connection
To set up a PPPoE IPv6 Internet connection:
1. Launch a web browser from a computer or mobile device that is connected to your Orbi
network.
2. Enter orbilogin.com.
A login window opens.
3. Enter the router user name and password.
The user name is admin.
The default password is password. The user name and
password are case-sensitive.
The BASIC Home page displays.
4. Select ADV
ANCED > Advanced Setup > IPv6.
The IPv6 page displays.
5. From the Internet Connection T
ype menu, select PPPoE.
Specify Your Internet Settings
44

Orbi WiFi System
The router automatically detects the information in the following fields:
• Router’s IPv6 Address on WAN. This field shows the IPv6 address that is acquired
for the router’s WAN (or Internet) interface. The number after the slash (/) is the
length of the prefix, which is also indicated by the underline (_) under the IPv6
address. If no address is acquired, the field displays Not Available.
• Router’s IPv6 Address on LAN. This field shows the IPv6 address that is acquired
for the router’s LAN interface. The number after the slash (/) is the length of the prefix,
which is also indicated by the underline (_) under the IPv6 address. If no address is
acquired, the field displays Not Available.
6. In the Login field, enter the login information for the ISP connection.
This is usually the name that you use in your email address. For example, if your main
mail account is JerAB@ISP.com, you would type JerAB in this field. Some ISPs (like
Mindspring, Earthlink, and T-DSL) require that you use your full email address when you
log in. If your ISP requires your full email address, type it in this field.
7. In the Password field, enter the password for the ISP connection.
8. In the Service Name field, enter a service name.
If your ISP did not provide a service name, leave this field blank.
Note: The default setting of the Connection Mode field is Always On to
provide a steady IPv6 connection. The router never terminates the
connection. If the connection is terminated, for example, when the
modem is turned off, the router attempts to reestablish the connection
immediately after the PPPoE connection becomes available again.
9. Select an IPv6 Domain Name Server (DNS) Address radio button:
• Get Automatically from ISP. Your ISP uses DHCP to assign your DNS servers. Your
ISP automatically assigns this address.
• Use These DNS Servers. If you know that your ISP requires specific servers, select
this option. Enter the IP address of your ISP’s primary DNS server. If a secondary
DNS server address is available, enter it also.
10. (Optional) Select the Use This Interface ID check box and specify the interface ID that you
want to be used for the IPv6 address of the router’s LAN interface.
If you do not specify an ID here, the router generates one automatically from its MAC
address.
11. Click the Apply button.
Your settings are saved.
Specify Your Internet Settings
45

Orbi WiFi System
Change the MTU Size
The maximum transmission unit (MTU) is the largest data packet a network device transmits.
When one network device communicates across the Internet with another, the data packets
travel through many devices along the way. If a device in the data path uses a lower MTU
setting than the other devices, the data packets must be split or “fragmented” to
accommodate the device with the smallest MTU.
The best MTU setting for NETGEAR equipment is often the default value. In some situations,
changing the value fixes one problem but causes another. Leave the MTU unchanged unless
one of these situations occurs:
• You experience problems connecting to your ISP or other Internet service, and the
technical support of either the ISP or NETGEAR recommends changing the MTU setting.
These web-based applications might require an MTU change:
- A secure website that does not open, or displays only part of a web page
- Yahoo email
- MSN portal
- America Online’s DSL service
• You use VPN and experience severe performance problems.
• You used a program to optimize MTU for performance reasons, and now you are
experiencing connectivity or performance problems.
Note: An incorrect MTU setting can cause Internet communication
problems. For example, you might not be able to access certain
websites, frames within websites, secure login pages, or FTP or POP
servers.
To change the MTU size:
1. Launch a web browser from a computer or mobile device that is connected to your Orbi
network.
2. Enter orbilogin.com.
A login window opens.
3. Enter the router user name and password.
The user name is admin. The default password is password. The user name and
password are case-sensitive.
The BASIC Home page displays.
4. Select ADVANCED > Setup > WAN Setup.
The WAN Setup page displays.
5. In the MTU Size field, enter a value from 64 to 1500.
Specify Your Internet Settings
46

Orbi WiFi System
6. Click the Apply button.
Your settings are saved.
If you suspect an MTU problem, a common solution is to change the MTU to 1400. If you are
willing to experiment, you can gradually reduce the MTU from the maximum value of 1500
until the problem goes away
applications.
Table 3. Common MTU sizes
MTU Application
1500 The largest Ethernet packet size. This setting is typical for connections that do not use
1492 Used in PPPoE environments.
1472 Maximum size to use for pinging. (Larger packets are fragmented.)
1468 Used in some DHCP environments.
PPPoE or VPN, and is the default value for NETGEAR routers, adapters, and switches.
. The following table describes common MTU sizes and
1460 Usable by AOL if you do not send or receive large email attachments, for example.
1436 Used in PPTP environments or with VPN.
1400 Maximum size for AOL DSL.
576 Typical value to connect to dial-up ISPs.
Specify Your Internet Settings
47

4. Control Access to the Internet
The router comes with a built-in firewall that helps protect your home network from unwanted
intrusions from the Internet.
This chapter includes the following sections:
• Set Up Parental Controls
• Allow or Block Access to Your Network
• Use Keywords to Block Internet Sites
• Block Services From the Internet
• Manage Network Access Control Lists
• Schedule When to Block Internet Sites and Services
• Set Up Security Event Email Notifications
4
48

Orbi WiFi System
Set Up Parental Controls
The first time that you select Parental Controls from the BASIC Home page, your browser
goes to the Parental Controls website. You can learn more about Parental Controls or
download the application.
After you set up and enable parental controls, you can change the web filtering level for each
device on the network through the network map page on the genie app.
To set up Parental Controls:
1. Launch a web browser from a computer or mobile device that is connected to your Orbi
network.
2. Enter orbilogin.com.
A login window opens.
3. Enter the router admin user name and password.
The user name is admin.
password are case-sensitive.
The BASIC Home page displays.
4. Select Parental Controls.
The Live Parental Controls website opens.
5. Click the button for the app or version that you want to download and use.
6. Follow the onscreen instructions to download and install the genie app.
7. Open the genie app and select Parental Controls.
After installation, Live Parental Controls automatically starts.
8. Click the Next button, read the note, and click the Next button again to proceed.
Because Live Parental Controls uses free OpenDNS accounts, you are prompted to log
in or create a free account.
The default password is password. The user name and
9. Select a radio button as follows:
• If you already own an OpenDNS account, leave the Ye
• If you do not own an OpenDNS account, select the No radio button.
Control Access to the Internet
49
s radio button selected.

Orbi WiFi System
If you are creating an account, the Create a free OpenDNS account page displays.
Do the following:
a. Complete the fields.
b. Click the Next button.
After you log on or create your account, the filtering level page displays.
10. Select a radio button for a filtering level and click the Next button.
The Setup is complete.
11. Click the T
The Status page displays. Parental Controls are now set up for the router.
12. T
o enable Parental Controls, click the Enable Live Parental Controls button.
ake me to the status page button.
Allow or Block Access to Your Network
You can use access control to block access to your network.
To set up access control:
1. Launch a web browser from a computer or mobile device that is connected to your Orbi
network.
2. Enter orbilogin.com.
A login window opens.
3. Enter the router admin user name and password.
The user name is admin.
password are case-sensitive.
The BASIC Home page displays.
The default password is password. The user name and
4. Select ADV
The Access Control page displays.
5. Select the T
ANCED > Security > Access Control.
urn on Access Control check box.
Control Access to the Internet
50

Orbi WiFi System
You must select this check box before you can specify an access rule and use the Allow
and Block buttons. When this check box is cleared, all devices are allowed to connect,
even if a device is in the blocked list.
6. Select an access rule:
• Allow all new devices to connect. With this setting, if you buy a new device, it can
access your network. You don’t need to enter its MAC address on this page. We
recommend that you leave this radio button selected.
• Block all new devices from connecting. With this setting, if you buy a new device,
before it can access your network, you must enter its MAC address for an Ethernet
connection and its MAC address for a WiFi connection in the allowed list.
The access rule does not affect previously blocked or allowed devices. It applies only to
devices joining your network in the future after you apply these settings.
7. To allow the computer or device you’re currently using to continue to access the network,
select the check box next to your computer or device, and click the Allow button.
8. To view a list of allowed or blocked devices that are not connected, click one of the following
links:
• View list of allowed devices not currently connected to the network
• View list of blocked devices not currently connected to the network
The list displays.
9. Click the Apply button.
Your settings are saved.
Use Keywords to Block Internet Sites
You can use keywords to block certain Internet sites from your network. You can use
blocking all the time or based on a schedule.
To block Internet sites:
1. Launch a web browser from a computer or mobile device that is connected to your Orbi
network.
2. Enter orbilogin.com.
A login window opens.
3. Enter the router admin user name and password.
The user name is admin. The default password is password. The user name and
password are case-sensitive.
The BASIC Home page displays.
Control Access to the Internet
51

Orbi WiFi System
4. Select ADVANCED > Security > Block Sites.
5. Select a keyword blocking option:
• Per Schedule.
Turn on keyword blocking according to a schedule that you set. (See
Schedule When to Block Internet Sites and Services on page 56.)
• Always.
6. In the T
Turn on keyword blocking all the time, independent of the Schedule page.
ype keyword or domain name here field, enter a keyword or domain that you want
to block.
For example:
• Specify XXX to block http://www
• Specify .com if you want to allow only sites with domain suf
• Enter a period (.) to block all Internet browsing access.
7. Click the Add Keyword button.
The keyword is added to the keyword list. The keyword list supports up to 32 entries.
8. Click the Apply button.
Keyword blocking takes effect.
Delete Keywords
To delete keywords from the list:
.badstuff.com/xxx.html.
fixes such as .edu or .gov.
1. Launch a web browser from a computer or mobile device that is connected to your Orbi
network.
2. Enter orbilogin.com.
A login window opens.
Control Access to the Internet
52

Orbi WiFi System
3. Enter the router admin user name and password.
The user name is admin. The default password is password. The user name and
password are case-sensitive.
The BASIC Home page displays.
4. Select ADVANCED > Security > Block Sites.
The Block Sites page displays.
5. Do one of the following:
• To delete a single word, select it and click the Delete Keyword button.
The keyword is removed from the list.
• To delete all keywords on the list, click the Clear List button.
All keywords are removed from the list.
6. Click the Apply button.
Your settings are saved.
Avoid Blocking on a Trusted Computer
You can exempt one trusted computer from blocking. The computer that you exempt must be
assigned a fixed IP address. You can use the reserved IP address feature to specify the IP
address. See
To specify a trusted computer:
1. Launch a web browser from a computer or mobile device that is connected to your Orbi
network.
2. Enter orbilogin.com.
A login window opens.
3. Enter the router admin user name and password.
The user name is admin. The default password is password. The user name and
password are case-sensitive.
The BASIC Home page displays.
4. Select ADVANCED > Security > Block Sites.
The Block Sites page displays.
5. Scroll down and select the Allow trusted IP address to visit blocked sites check box.
6. In the Trusted IP Address field, enter the IP address of the trusted computer.
7. Click the Apply button.
Manage Reserved LAN IP Addresses on page 72.
Your settings are saved.
Control Access to the Internet
53

Orbi WiFi System
Block Services From the Internet
You can block Internet services on your network based on the type of service. You can block
the services all the time or based on a schedule.
To block services:
1. Launch a web browser from a computer or mobile device that is connected to your Orbi
network.
2. Enter orbilogin.com.
A login window opens.
3. Enter the router admin user name and password.
The user name is admin.
password are case-sensitive.
The BASIC Home page displays.
4. Select
5. Specify when to block the services:
• To block the services all the time, select the Always radio button.
• T
6. Click the Add button.
ADVANCED > Security > Block Services.
o block the services based on a schedule, select the Per Schedule radio button.
For information about how to specify the schedule, see Schedule When to Block
Internet Sites and Services on page 56.
The default password is password. The user name and
7. To add a service that is in the Service Type list, select the application or service.
The settings for this service automatically display in the fields.
8. T
o add a service or application that is not the list, select User Defined.
a. If you know that the application uses either
protocol.
Otherwise, select TCP/UDP (both).
Control Access to the Internet
54
TCP or UDP, select the appropriate

Orbi WiFi System
b. Enter the starting port and ending port numbers.
• If the service uses a single port number, enter that number in both fields.
• To find out which port numbers the service or application uses, you can contact
the publisher of the application, ask user groups or newsgroups, or search on the
Internet.
9. To specify how to filter the services, select one of the following radio buttons:
• Only This IP Address. Block services for a single computer.
• IP Address Range. Block services for a range of computers with consecutive IP
addresses on your network.
• All lP Addresses. Block services for all computers on your network.
10. Click the Add button.
Your settings are saved.
Manage Network Access Control Lists
You can use access control to block or allow access to your network.
To manage devices that are allowed or blocked:
1. Launch a web browser from a computer or mobile device that is connected to your Orbi
network.
2. Enter orbilogin.com.
A login window opens.
3. Enter the router admin user name and password.
The user name is admin. The default password is password. The user name and
password are case-sensitive.
The BASIC Home page displays.
4. Select ADVANCED > Security > Access Control.
The Access Control page displays.
5. Select the Turn on Access Control check box.
6. Click the View list of allowed devices not currently connected to the network link.
The list displays.
7. Select the check box for a device.
8. Use the Add button, Edit button, and Remove from the list button as needed.
9. Click the Apply button.
Your settings are saved.
Control Access to the Internet
55

Orbi WiFi System
Schedule When to Block Internet Sites and Services
When you schedule blocking, the same schedule is used to block sites and to block services.
For information about how to specify what you want the router to block, see
Block Internet Sites on page 51 and Avoid Blocking on a Trusted Computer on page 53.
To schedule blocking:
1. Launch a web browser from a computer or mobile device that is connected to your Orbi
network.
2. Enter orbilogin.com.
A login window opens.
3. Enter the router admin user name and password.
The user name is admin. The default password is password. The user name and
password are case-sensitive.
The BASIC Home page displays.
Use Keywords to
4. Select ADVANCED > Security > Schedule.
5. Specify when to block keywords and services:
• Days to Block. Select the check box for each day that you want to block the
keywords or select the Every Day check box, which automatically selects the check
boxes for all days.
• Time of Day to Block. Select a start and end time in 24-hour format, or select All
Day for 24-hour blocking.
6. Select your time zone from the list.
7. If you live in a region that observes daylight saving time, select the Automatically adjust for
daylight savings time check box.
8. Click the Apply button.
Your settings are saved.
Set Up Security Event Email Notifications
The router can email you its logs of router activity. The log records router activity and security
events such as attempts to access blocked sites or services.
To set up email notifications:
1. Launch a web browser from a computer or mobile device that is connected to your Orbi
network.
2. Enter orbilogin.com.
A login window opens.
3. Enter the router admin user name and password.
Control Access to the Internet
56

Orbi WiFi System
The user name is admin. The default password is password. The user name and
password are case-sensitive.
The BASIC Home page displays.
4. Select ADV
ANCED > Security > E-mail.
5. Select the Turn Email Notification On check box.
6. In the Send to This E-mail
Address field, enter the email address to which logs and alerts
are sent.
This email address is also used for the From address. If this field is blank, log and alert
messages are not sent.
7. In the Y
our Outgoing Mail Server field, enter the name of your ISP outgoing (SMTP) mail
server (such as mail.myISP.com).
You might be able to find this information in the configuration window of your email
program. If you leave this field blank, log and alert messages are not sent.
8. In the Outgoing Mail Server Port Number field, enter your mail server
’s port number.
You might be able to find this information in the configuration window of your email
program.
9. If your outgoing email server requires authentication, select the My Mail Server requires
authentication check box and do the following:
a. In the User Name field, type the user name for the outgoing email server
b. In the Password field, type the password for the outgoing email server
10. T
o send alerts immediately, select the Send Alerts Immediately check box.
.
.
Email alerts are sent immediately when someone attempts to visit a blocked site.
11. T
o send logs based on a schedule, specify these settings:
• From Send logs according to this schedule menu, select the schedule type.
• From the Day menu, select the day.
• From the T
ime menu, select the time, and select the am or pm radio button.
Control Access to the Internet
57

Orbi WiFi System
12. Click the Apply button.
Your settings are saved.
Logs are sent automatically. If the log fills before the specified time, it is sent. After the log
is sent, it is cleared from the router memory. If the router cannot email the log and the log
buffer fills, the router overwrites the log.
Control Access to the Internet
58

5. Optimize Performance
This chapter contains the following sections:
• WiFi Multimedia Quality of Service
• Improve Network Connections With Universal Plug N Play
5
59

Orbi WiFi System
WiFi Multimedia Quality of Service
Wi-Fi Multimedia Quality of Service (WMM QoS) prioritizes WiFi voice and video traffic over
the WiFi link. WMM QoS is automatically enabled for the router.
WMM QoS prioritizes WiFi data packets from different applications based on four access
categories: voice, video, best effort, and background. For an application to receive the
benefits of WMM QoS, WMM must be enabled for both it and the client running that
application. Legacy applications that do not support WMM and applications that do not
require QoS are assigned to the best effort category, which receives a lower priority than
voice and video.
To disable WMM QoS:
1. Launch a web browser from a computer or mobile device that is connected to your Orbi
network.
2. Enter orbilogin.com.
A login window opens.
3. Enter the router admin user name and password.
The user name is admin. The default password is password. The user name and
password are case-sensitive.
The BASIC Home page displays.
4. Select ADVANCED > Setup > QoS Setup > WMM.
The WMM page displays.
5. Clear the Enable WMM (Wi-Fi multimedia) settings (2.4 GHz b/g/n) check box.
6. Clear the Enable WMM (Wi-Fi multimedia) settings (5 GHz a/n/ac) check box.
7. Click the Apply button.
Your settings are saved.
Improve Network Connections With Universal Plug N Play
Universal Plug N Play (UPnP) helps devices, such as Internet appliances and computers,
access the network and connect to other devices as needed. UPnP devices can
automatically discover the services from other registered UPnP devices on the network.
If you use applications such as multiplayer gaming, peer-to-peer connections, or real-time
communications such as instant messaging or remote assistance (a feature in Windows XP),
enable UPnP.
Optimize Performance
60

Orbi WiFi System
To enable Universal Plug and Play:
1. Launch a web browser from a computer or mobile device that is connected to your Orbi
network.
2. Enter orbilogin.com.
A login window opens.
3. Enter the router admin user name and password.
The user name is admin. The default password is password. The user name and
password are case-sensitive.
The BASIC Home page displays.
4. Select ADVANCED > Advanced Setup > UPnP.
The UPnP page displays.
5. Select the Turn UPnP On check box.
By default, this check box is selected. UPnP for automatic device configuration can be
enabled or disabled. If the Turn UPnP On check box is cleared, the router does not allow
any device to automatically control router resources, such as port forwarding.
6. Type the advertisement period in minutes.
The advertisement period specifies how often the router broadcasts its UPnP information.
This value can range from 1 to 1440 minutes. The default period is 30 minutes. Shorter
durations ensure that control points receive current device status at the expense of more
network traffic. Longer durations can compromise the freshness of the device status but
can significantly reduce network traffic.
7. Type the advertisement time to live in hops.
The time to live for the advertisement is measured in hops (steps) for each UPnP packet
sent. Hops are the steps a packet takes between routers. The number of hops can range
from 1 to 255. The default value for the advertisement time to live is 4 hops, which should
be fine for most home networks. If you notice that some devices are not being updated or
reached correctly, it might be necessary to increase this value.
8. Click the Apply button.
The UPnP Portmap Table displays the IP address of each UPnP device that is accessing
the router and which ports (internal and external) that device opened. The UPnP Portmap
Table also displays what type of port is open and whether that port is still active for each
IP address.
9. To refresh the information in the UPnP Portmap Table, click the Refresh button.
Optimize Performance
61

6. Specify Network Settings
This chapter includes the following sections:
• View or Change WAN Settings
• Set Up a Default DMZ Server
• Change the Router’s Device Name
• Change the LAN TCP/IP Settings
• Specify the IP Addresses That the Router Assigns
• Disable the DHCP Server Feature in the Router
• Manage Reserved LAN IP Addresses
• Custom Static Routes
• Specify Basic WiFi Settings
• Set Up a Guest WiFi Network
• View or Change Advanced WiFi Settings
• Use the Router as a WiFi Access Point
• Generate a New Backhaul Password
• Check Your Internet Bandwidth
• Set Up a WiFi Schedule
• Set Up a Bridge for a Port Group or VLAN Tag Group
• Enable British Telecom IGMP Proxy Support
6
62

Orbi WiFi System
View or Change WAN Settings
You can view or configure wide area network (WAN) settings for the Internet port. You can
set up a DMZ (demilitarized zone) server, change the maximum transmit unit (MTU) size, and
enable the router to respond to a ping to its WAN (Internet) port.
To view the WAN settings:
1. Launch a web browser from a computer or mobile device that is connected to your Orbi
network.
2. Enter orbilogin.com.
A login window opens.
3. Enter the router admin user name and password.
The user name is admin.
password are case-sensitive.
The BASIC Home page displays.
4. Select
5. View or change the following settings:
• Disable Port Scan and DoS Protection. DoS protection protects your LAN against
• Default DMZ Server.
• Respond to Ping on Internet Port. This
• Disable IGMP Proxying. IGMP proxying allows a computer on the local area network
• MTU Size (in bytes).
ADVANCED > Setup > WAN Setup.
denial of service attacks such as Syn flood, Smurf
others. Select this check box only in special circumstances.
games or videoconferencing, but it makes the firewall security less effective. See Set
Up a Default DMZ Server on page 67.
Use this feature only as a diagnostic tool or if you have a specific reason.
(LAN) to receive the multicast traf
need this feature, select this check box to disable it.
Ethernet networks is 1500 bytes, or 1492 bytes for PPPoE connections. Change the
The default password is password. The user name and
Attack, Ping of Death, and many
This feature is sometimes helpful when you are playing online
feature allows your router to be discovered.
fic it is interested in from the Internet. If you do not
The normal MTU (maximum transmit unit) value for most
Specify Network Settings
63

Orbi WiFi System
MTU only if you are sure that it is necessary for your ISP connection. See Change the
MTU Size on page 46.
• NAT Filtering. Network Address Translation (NAT) determines how the router
processes inbound traffic. Secured NAT protects computers on the LAN from attacks
from the Internet, but might prevent some Internet games, point-to-point applications,
or multimedia applications from working. Open NAT provides a much less secured
firewall, but allows almost all Internet applications to work.
6. Click the Apply button.
Your settings are saved.
Dynamic DNS
Internet service providers (ISPs) assign numbers called IP addresses to identify each
Internet account. Most ISPs use dynamically assigned IP addresses. This means that the IP
address can change at any time. You can use the IP address to access your network
remotely, but most people don’t know what their IP addresses are or when this number
changes.
To make it easier to connect, you can get a free account with a Dynamic DNS service that
lets you use a domain name to access your home network. To use this account, you must set
up the router to use Dynamic DNS. Then the router notifies the Dynamic DNS service
provider whenever its IP address changes. When you access your Dynamic DNS account,
the service finds the current IP address of your home network and automatically connects
you.
If your ISP assigns a private WAN IP address (such as 192.168.x.x or 10.x.x.x), the Dynamic
DNS service does not work because private addresses are not routed on the Internet.
Set Up a New Dynamic DNS Account
To set up Dynamic DNS and register for a free NETGEAR account:
1. Launch a web browser from a computer or mobile device that is connected to your Orbi
network.
2. Enter orbilogin.com.
A login window opens.
3. Enter the router admin user name and password.
The user name is admin. The default password is password. The user name and
password are case-sensitive.
The BASIC Home page displays.
4. Select ADVANCED > Advanced Settings > Dynamic DNS.
The Dynamic DNS page displays.
Specify Network Settings
64

Orbi WiFi System
5. Select the Use a Dynamic DNS Service check box.
6. In the Service Provider list, select NETGEAR.
7. Select the No radio button.
8. In the Host Name field, type the name that you want to use for your URL.
The host name is sometimes called the domain name. Your free URL includes the host
name that you specify
, and ends with mynetgear.com. For example, specify
MyName.mynetgear.com.
9. In the Email field, type the email address that you want to use for your account.
10. In the Password (6-32 characters) field, type the password for your account.
11. Click the Register button.
12. Follow the onscreen instructions to register for your NETGEAR Dynamic DNS service.
13. T
o check that Dynamic DNS is enabled in the router, click the Show Status button.
A message displays the Dynamic DNS status.
Specify a DNS Account That You Already Created
If you already own a Dynamic DNS account with NETGEAR, no-IP, or Dyn, you can set up
the router to use your account.
To set up Dynamic DNS if you already created an account:
1. Launch a web browser from a computer or mobile device that is connected to your Orbi
network.
2. Enter orbilogin.com.
A login window opens.
3. Enter the router admin user name and password.
The user name is admin.
The default password is password. The user name and
password are case-sensitive.
Specify Network Settings
65

The BASIC Home page displays.
Orbi WiFi System
4. Select ADV
ANCED > Advanced Settings > Dynamic DNS.
The Dynamic DNS page displays.
5. Select the Use a Dynamic DNS Service check box.
6. In the Service Provider list, select your provider.
7. Select the Ye
s radio button.
The page adjusts and displays to show the Status, Cancel, and Apply buttons.
8. In the Host Name field, type the host name (sometimes called the domain name) for your
account.
9. For a no-IP Dyn account, in the User Name field, enter the user name for your account.
10. For a NETGEAR account at no-IP
, in the Email field, type the email address for your
account.
11. In the Password (6-32 characters) field, type the password for your DDNS account.
12. Click the Apply button.
Your settings are saved.
13. T
o verify that your Dynamic DNS service is enabled in the router, click the Show Status
button.
A message displays the Dynamic DNS status.
Change the Dynamic DNS Settings
To change your settings:
1. Launch a web browser from a computer or mobile device that is connected to your Orbi
network.
2. Enter orbilogin.com.
A login window opens.
Specify Network Settings
66

Orbi WiFi System
3. Enter the router admin user name and password.
The user name is admin. The default password is password. The user name and
password are case-sensitive.
The BASIC Home page displays.
4. Select ADVANCED > Advanced Settings > Dynamic DNS.
The Dynamic DNS page displays.
5. Change your DDNS account settings as necessary.
6. Click the Apply button.
Your settings are saved.
Set Up a Default DMZ Server
The default DMZ server feature is helpful when you are using some online games and
videoconferencing applications that are incompatible with Network Address Translation
(NAT). The router is programmed to recognize some of these applications and to work
correctly with them, but other applications might not function well. In some cases, one local
computer can run the application correctly if the IP address for that computer is entered as
the default DMZ server.
WARNING:
DMZ servers pose a security risk. A computer designated as the
default DMZ server loses much of the protection of the firewall and
is exposed to exploits from the Internet. If compromised, the DMZ
server computer can be used to attack other computers on your
network.
The router usually detects and discards incoming traffic from the Internet that is not a
response to one of your local computers or a service that you configured in the Port
Forwarding/Port Triggering page. Instead of discarding this traffic, you can specify that the
router forwards the traffic to one computer on your network. This computer is called the
default DMZ server.
To set up a default DMZ server:
1. Launch a web browser from a computer or mobile device that is connected to your Orbi
network.
2. Enter orbilogin.com.
A login window opens.
3. Enter the router admin user name and password.
The user name is admin. The default password is password. The user name and
password are case-sensitive.
Specify Network Settings
67

The BASIC Home page displays.
Orbi WiFi System
4. Select ADV
The WAN Setup page displays.
5. Select the Default DMZ Server check box.
6. T
ype the IP address.
7. Click the Apply button.
Your settings are saved.
ANCED > Setup > WAN Setup.
Change the Router’s Device Name
The router’s device name is its model number. This device name displays in a file manager
when you browse your network.
To change the router’s device name:
1. Launch a web browser from a computer or mobile device that is connected to your Orbi
network.
2. Enter orbilogin.com.
A login window opens.
3. Enter the router admin user name and password.
The user name is admin.
password are case-sensitive.
The BASIC Home page displays.
4. Select ADV
5. In the Device Name field, type a new name.
6. Click the Apply button.
Your settings are saved.
ANCED > Setup > Device Name.
The default password is password. The user name and
Specify Network Settings
68

Orbi WiFi System
Change the LAN TCP/IP Settings
The router is preconfigured to use private IP addresses on the LAN side and to act as a
DHCP server. The router’s default LAN IP configuration is as follows:
• LAN IP address. 192.168.1.1
• Subnet mask. 255.255.255.0
These addresses are part of the designated private address range for use in private networks
and are suitable for most applications. If your network requires a dif
scheme, you can change these settings.
You might want to change these settings if you need a specific IP subnet that one or more
devices on the network uses, or if you use competing subnets with the same IP scheme.
To change the LAN TCP/IP settings:
1. Launch a web browser from a computer or mobile device that is connected to your Orbi
network.
2. Enter orbilogin.com.
ferent IP addressing
A login window opens.
3. Enter the router admin user name and password.
The user name is admin.
password are case-sensitive.
The BASIC Home page displays.
4. Select ADV
ANCED > Setup > LAN Setup.
The default password is password. The user name and
5. In the IP Address field, type the IP address.
6. In the IP Subnet Mask, type the subnet mask of the router.
The IP address and subnet mask identifies which addresses are local to a specific device
and which must be reached through a gateway or router.
Specify Network Settings
69

Orbi WiFi System
7. Change the RIP settings.
Router Information Protocol (RIP) allows a router to exchange routing information with
other routers.
a. Select the RIP direction:
- Both. The router broadcasts its routing table periodically and incorporates
information that it receives.
- Out Only. The router broadcasts its routing table periodically.
- In Only. The router incorporates the RIP information that it receives.
b. Select the RIP version:
- Disabled. This is the default setting.
- RIP-1. This format is universally supported. It is adequate for most networks,
unless you are using an unusual network setup.
- RIP-2. This format carries more information. Both RIP-2B and RIP-2M send the
routing data in RIP-2 format. RIP-2B uses subnet broadcasting. RIP-2M uses
multicasting.
8. Click the Apply button.
Your settings are saved.
If you changed the LAN IP address of the router, you are disconnected when this change
takes effect.
9. To reconnect, close your browser, relaunch it, and log in to the router.
Specify the IP Addresses That the Router Assigns
By default, the router acts as a Dynamic Host Configuration Protocol (DHCP) server. The
router assigns IP, DNS server, and default gateway addresses to all computers connected to
the LAN. The assigned default gateway address is the LAN address of the router.
These addresses must be part of the same IP address subnet as the router’s LAN IP
address. Using the default addressing scheme, define a range between 192.168.1.2 and
192.168.1.254, although you can save part of the range for devices with fixed addresses.
To specify the pool of IP addresses that the router assigns:
1. Launch a web browser from a computer or mobile device that is connected to your Orbi
network.
2. Enter orbilogin.com.
A login window opens.
3. Enter the router admin user name and password.
The user name is admin. The default password is password. The user name and
password are case-sensitive.
Specify Network Settings
70

The BASIC Home page displays.
Orbi WiFi System
4. Select ADV
5. Make sure that the Use Router as DHCP Server check box is selected.
6. Specify the range of IP addresses that the router assigns:
a. In the Starting IP
This IP address must be in the same subnet as the router.
b. In the Ending IP
addresses.
ANCED > Setup > LAN Setup.
Address field, type the lowest number in the range.
Address field, type the number at the end of the range of IP
This IP address must be in the same subnet as the router.
7. Click the Apply button.
Your settings are saved.
The router delivers the following parameters to any LAN device that requests DHCP:
• An IP address from the range that you defined
• Subnet mask
• Gateway IP address (the router’
• DNS server IP address (the router’
s LAN IP address)
s LAN IP address)
Disable the DHCP Server Feature in the Router
By default, the router acts as a DHCP server. The router assigns IP, DNS server, and default
gateway addresses to all computers connected to the LAN. The assigned default gateway
address is the LAN address of the router.
You can use another device on your network as the DHCP server, or specify the network
settings of all your computers.
Specify Network Settings
71

Orbi WiFi System
To disable the DHCP server feature in the router:
1. Launch a web browser from a computer or mobile device that is connected to your Orbi
network.
2. Enter orbilogin.com.
A login window opens.
3. Enter the router admin user name and password.
The user name is admin.
password are case-sensitive.
The BASIC Home page displays.
4. Select ADV
5. Clear the Use Router as DHCP Server check box.
6. Click the Apply button.
7. (Optional) If this service is disabled and no other DHCP server is on your network, set your
computer IP addresses manually so that they can access the router.
ANCED > Setup > LAN Setup.
The default password is password. The user name and
Manage Reserved LAN IP Addresses
When you specify a reserved IP address for a computer on the LAN, that computer always
receives the same IP address each time it accesses the router’s DHCP server. Assign
reserved IP addresses to computers or servers that require permanent IP settings.
Reserve an IP Address
To reserve an IP address:
1. Launch a web browser from a computer or mobile device that is connected to your Orbi
network.
Specify Network Settings
72

Orbi WiFi System
2. Enter orbilogin.com.
A login window opens.
3. Enter the router admin user name and password.
The user name is admin.
The default password is password. The user name and
password are case-sensitive.
The BASIC Home page displays.
4. Select ADV
ANCED > Setup > LAN Setup.
5. In the Address Reservation section of the page, click the Add button.
6. In the IP Address field, type the IP address to assign to the computer or server.
Choose an IP address from the router’s LAN subnet, such as 192.168.1.x.
7. T
ype the MAC address of the computer or server.
Tip: If the computer is already on your network, you can copy its MAC
address from the
Attached Devices page and paste it here.
8. Click the Apply button.
The reserved address is entered into the table.
The reserved address is not assigned until the next time the computer contacts the router’s
DHCP server
. Reboot the computer, or access its IP configuration and force a DHCP release
and renew.
Specify Network Settings
73

Orbi WiFi System
Edit a Reserved IP Address
To edit a reserved address entry:
1. Launch a web browser from a computer or mobile device that is connected to your Orbi
network.
2. Enter orbilogin.com.
A login window opens.
3. Enter the router admin user name and password.
The user name is admin.
password are case-sensitive.
The BASIC Home page displays.
4. Select ADV
5. Select the radio button next to the reserved address.
6. Click the Edit button.
ANCED > Setup > LAN Setup.
The default password is password. The user name and
The Address Reservation page displays.
7. Change the settings.
8. Click the Apply button.
Your settings are saved.
Delete a Reserved IP Address Entry
To delete a reserved address entry:
1. Launch a web browser from a computer or mobile device that is connected to your Orbi
network.
2. Enter orbilogin.com.
Specify Network Settings
74

Orbi WiFi System
A login window opens.
3. Enter the router admin user name and password.
The user name is admin.
password are case-sensitive.
The BASIC Home page displays.
4. Select ADV
5. Select the radio button next to the reserved address.
6. Click the Delete button.
ANCED > Setup > LAN Setup.
The default password is password. The user name and
The address is removed.
Custom Static Routes
Typically, you do not need to add static routes unless you use multiple routers or multiple IP
subnets on your network.
As an example of when a static route is needed, consider the following case:
• Y
our main Internet access is through a cable modem to an ISP.
• Y
our home network includes an ISDN router for connecting to the company where you
are employed. This router’s address on your LAN is 192.168.1.100.
• Y
our company’s network address is 134.177.0.0.
When you set up your router, two implicit static routes were created. A default route was
created with your ISP as the gateway
network for all 192.168.1.x addresses. With this configuration, if you try to access a device on
the 134.177.0.0 network, your router forwards your request to the ISP. The ISP forwards your
request to the company where you are employed, and the company firewall is likely to deny
the request.
, and a second static route was created to your local
Specify Network Settings
75

Orbi WiFi System
In this case you must define a static route, telling your router to access 134.177.0.0 through
the ISDN router at 192.168.1.100. Here is an example:
• The Destination IP Address and IP Subnet Mask fields specify that this static route
applies to all 134.177.x.x addresses.
• The Gateway IP
Address field specifies that all traffic for these addresses will be
forwarded to the ISDN router at 192.168.1.100.
• A metric value of 1 works because the ISDN router is on the LAN.
• The Private check box is selected only as a precautionary security measure in case RIP
is activated.
Set Up a Static Route
To set up a static route:
1. Launch a web browser from a computer or mobile device that is connected to your Orbi
network.
2. Enter orbilogin.com.
A login window opens.
3. Enter the router admin user name and password.
The user name is admin.
The default password is password. The user name and
password are case-sensitive.
The BASIC Home page displays.
4. Select ADV
ANCED > Advanced Setup > Static Routes.
The Static Routes page displays.
5. Click the Add button.
6. In the Route Name field, type a name for this static route (for identification purposes only.)
7. T
o limit access to the LAN only, select the Private check box.
If Private is selected, the static route is not reported in RIP.
8. Select the Active check box to make this route take ef
Specify Network Settings
76
fect.

Orbi WiFi System
9. Type the IP address of the final destination.
10. Type the IP subnet mask for this destination.
If the destination is a single host, type 255.255.255.255.
11. Type the gateway IP address.
This address must be on the same LAN segment as the router.
12. Type a number from 1 through 15 as the metric value.
This value represents the number of routers between your network and the destination.
Usually, a setting of 2 or 3 works, but if this is a direct connection, set it to 1.
13. Click the Apply button.
The static route is added.
Edit a Static Route
To edit a static route:
1. Launch a web browser from a computer or mobile device that is connected to your Orbi
network.
2. Enter orbilogin.com.
A login window opens.
3. Enter the router admin user name and password.
The user name is admin. The default password is password. The user name and
password are case-sensitive.
The BASIC Home page displays.
4. Select ADVANCED > Advanced Setup > Static Routes.
The Static Routes page displays.
5. In the table, select the radio button for the route.
6. Click the Edit button.
The Static Routes page adjusts.
7. Edit the route information.
8. Click the Apply button.
Your settings are saved.
Delete a Static Route
To delete a static route:
1. Launch a web browser from a computer or mobile device that is connected to your Orbi
network.
Specify Network Settings
77

Orbi WiFi System
2. Enter orbilogin.com.
A login window opens.
3. Enter the router admin user name and password.
The user name is admin. The default password is password. The user name and
password are case-sensitive.
The BASIC Home page displays.
4. Select ADVANCED > Advanced Setup > Static Routes.
The Static Routes page displays.
5. In the table, select the radio button for the route.
6. Click the Delete button.
The route is removed from the table.
Specify Basic WiFi Settings
The router and satellite come preset with the same WiFi network name (SSID) and the same
WiFi security. You can find the SSID and password on the router label and on the satellite
label. If you log in to the router and change the WiFi settings, the router automatically sends
the new settings to the satellite.
If you change your WiFi settings, make a note of the new settings and store it in a safe place
where you can easily find it.
If your computer or mobile device is using a WiFi connection when you change the network
name (SSID) or other WiFi security settings, you are disconnected when you click the Apply
button. To avoid this problem, use a computer with a wired connection to access the router.
To specify basic WiFi settings:
1. Launch a web browser from a computer or WiFi device that is connected to the network.
2. Enter http://www.routerlogin.net.
A login window opens.
3. Enter the router admin user name and password.
The user name is admin. The default password is password. The user name and
password are case-sensitive.
The BASIC Home page displays.
Specify Network Settings
78

Orbi WiFi System
4. Select Wireless.
5. To change the network name (SSID), type a new name in the Name (SSID) field.
The name can be up to 32 characters long and it is case-sensitive. The default SSID is
randomly generated and is on the router
write down the new name and keep it in a safe place.
o change the WiFi channel, select a number in the Channel list.
6. T
’s label. If you change the name, make sure to
In some regions, not all channels are available. Do not change the channel unless you
experience interference (shown by lost connections or slow data transfers). If this
happens, experiment with dif
When you use multiple access points, it is better if adjacent access points use different
channels to reduce interference.
access points is four channels (for example, use Channels 1 and 5, or 6 and 10).
7. Click the Apply button.
Your settings are saved. The router sends the new settings to the satellite.
If you are using a WiFi connection and you changed the SSID, you are disconnected from
the network.
8. Make sure that you can connect to the WiFi network with its new settings.
If you cannot connect using WiFi, check the following:
• Is your WiFi-enabled computer or mobile device connected to another WiFi network in
your area? Some WiFi devices automatically connect to the first open network without
WiFi security that they discover
• Is your computer or WiFi device trying to connect to your network with its old settings
(before you changed the settings)? If so, update the WiFi network selection in your
computer or WiFi device to match the current settings for your network.
ferent channels to see which is the best.
The recommended channel spacing between adjacent
.
Change the WiFi Password or Security Level
The router and satellite come preset with the same WiFi network name (SSID) and the same
WiFi security. You can find the SSID and password on the router label and on the satellite
label. If you log in to the router and change the WiFi settings, the router automatically sends
the new settings to the satellite. We recommend that you do not disable security.
Specify Network Settings
79

Orbi WiFi System
To change the WPA settings:
1. Launch a web browser from a computer or mobile device that is connected to your Orbi
network.
2. Enter orbilogin.com.
A login window opens.
3. Enter the router admin user name and password.
The user name is admin.
The default password is password. The user name and
password are case-sensitive.
The BASIC Home page displays.
4. Select W
ireless.
5. Under Security Options, select a WPA option:
• WP
• WP
A2-PSK [AES]
A-PSK [TKIP] + WPA2-PSK [AES]
The WPA2 option uses the newest standard for the strongest security, but some older
computers and WiFi devices cannot use WP
A2. If your network includes old computers
and WiFi devices, select the WPA-PSK [TKIP] + WPA2-PSK [AES] radio button.
The Password (Network Key) field displays.
6. In the Password (Network Key) field, enter the network key (password) that you want to
use.
It is a text string from 8 to 63 characters.
7. W
rite down the new password and keep it in a secure place for future reference.
8. Click the Apply button.
Your settings are saved.
Specify Network Settings
80

Orbi WiFi System
Set Up a Guest WiFi Network
To set up a guest WiFi network:
1. Launch a web browser from a computer or WiFi device that is connected to the network.
2. Enter orbilogin.com.
A login window opens.
3. Enter the router admin user name and password.
The user name is admin.
password are case-sensitive.
The BASIC Home page displays.
4. Select Guest Network.
5. Select the Enable Guest Network check box.
6. Leave the Enable SSID Broadcast check box selected.
Allowing the router to broadcast its WiFi network name (SSID) makes it easier to find your
network and connect to it. If you clear this check box, that creates a hidden network.
7. T
o change the network name, type a new name in the Guest Wireless Network Name
(SSID) field.
The default password is password. The user name and
The name can be up to 32 characters long and it is case-sensitive. If you change the
name, make sure to write down the new name and keep it in a safe place.
8. Select or clear the Allow guests to see each other and access my local network check
box.
To protect your privacy, this check box is cleared by default. That means your guests can
use your Internet connection but they cannot access computers or devices that are
connected to your Orbi network.
9. Select a security option.
The WPA2 options use the newest standard for the strongest security. WPA2 is the
default setting.
10. Click the Apply button.
Your settings are saved. The router sends the new settings to the satellite.
Specify Network Settings
81

Orbi WiFi System
View or Change Advanced WiFi Settings
To view or change advanced WiFi settings:
1. Launch a web browser from a computer or mobile device that is connected to your Orbi
network.
2. Enter orbilogin.com.
A login window opens.
3. Enter the router admin user name and password.
The user name is admin.
password are case-sensitive.
The BASIC Home page displays.
4. Select ADV
Note: The backhaul password is a security key that is used in WiFi
ANCED > Advanced Setup > Wireless Settings.
communication between the router and the satellite. For information
about generating a new backhaul password, see Generate a New
Backhaul Password on page 84.
The default password is password. The user name and
5. In the Region list, select your region.
In some locations, you cannot change this setting.
o control the SSID broadcast, select or clear the Enable SSID Broadcast check box.
6. T
When this check box is selected, the router broadcasts its network name (SSID) so that it
displays when you scan for local WiFi networks on your computer or WiFi device.
7. Click the Apply button.
Your settings are saved.
Specify Network Settings
82

Orbi WiFi System
Use the Router as a WiFi Access Point
You can set up the router to run as an access point (AP) on the same local network as
another router or gateway.
For example, you can use the Orbi router as a WiFi access point that connects to a gateway
or modem router that you already use for your Internet service. In this situation, you do not
need to change the settings for the gateway or modem router
To set up the Orbi router as an AP after you set up your Internet connection:
1. Use an Ethernet cable to connect the Internet port of this router to a LAN port on your
existing router or gateway
2. Launch a web browser from a computer or WiFi device that is connected to the network.
3. Enter orbilogin.com.
A login window opens.
4. Enter the router admin user name and password.
.
.
The user name is admin.
password are case-sensitive.
The BASIC Home page displays.
5. Select ADV
The Router/AP Mode page displays.
6. Select the AP Mode radio button.
ANCED > Advanced Setup > Router/AP Mode.
The default password is password. The user name and
7. Select the IP address setting:
• Get dynamically from existing router.
IP address to this router while this router is in AP mode.
• Enable fixed IP settings on this device (not recommended). Use this setting if you
want to manually assign a specific IP address to this router while it is in
Using this option effectively requires advanced network experience.
Specify Network Settings
The other router on the network assigns an
AP mode.
83

Orbi WiFi System
Note: To avoid interference with other routers or gateways in your network,
we recommend that you use different WiFi settings on each router. You
can also turn off the WiFi radio on the other router or gateway and use
the Orbi only for WiFi client access.
8. Click the Apply button.
The IP address of the router changes, and you are disconnected.
o reconnect, close and restart your browser and enter orbilogin.com.
9. T
Generate a New Backhaul Password
The backhaul password is a security key that is used in WiFi communication between the
router and the satellite. You can generate a new backhaul password. After you generate a
new backhaul password, you must use the Sync button to build a new backhaul connection
so that the router and satellite can communicate with each other using WiFi.
To generate a new backhaul password:
1. Launch a web browser from a computer or mobile device that is connected to your Orbi
network.
2. Enter orbilogin.com.
A login window opens.
3. Enter the router admin user name and password.
The user name is admin.
password are case-sensitive.
The BASIC Home page displays.
4. Select ADV
ANCED > Advanced Setup > Wireless Settings.
The default password is password. The user name and
5. In the Backhaul Password section, click the GENERATE button.
The router generates a new backhaul password.
Specify Network Settings
84

Orbi WiFi System
Check Your Internet Bandwidth
You can use Ookla Speedtest to detect your Internet bandwidth.
To check your Internet bandwidth using Speedtest:
1. Launch a web browser from a computer or mobile device that is connected to your Orbi
network.
2. Enter orbilogin.com.
A login window opens.
3. Enter the router admin user name and password.
The user name is admin. The default password is password. The user name and
password are case-sensitive.
The BASIC Home page displays.
4. Select ADVANCED > Setup > QoS Setup.
The Speedtest page displays.
5. Click the Take a Speedtest button.
Your Internet’s download and upload speeds display.
Set Up a WiFi Schedule
You can turn off the WiFi signal from your router at times when you do not need a WiFi
connection. For example, you might turn it off for the weekend if you leave town.
To set up the WiFi schedule:
1. Launch a web browser from a computer or mobile device that is connected to your Orbi
network.
2. Enter orbilogin.com.
A login window opens.
3. Enter the router admin user name and password.
The user name is admin. The default password is password. The user name and
password are case-sensitive.
The BASIC Home page displays.
4. Select ADVANCED > Advanced Setup > Wireless Settings.
The Advanced Wireless Settings page displays.
5. Click the Add a new period button.
The page adjusts.
Specify Network Settings
85

Orbi WiFi System
6. Use the menus, radio buttons, and check boxes to set up a period during which you want to
turn off the WiFi signal.
7. Click the Apply button.
The Advanced Wireless Settings page displays.
8. Select the Turn off wireless signal by schedule check box to activate the schedule.
9. Click the Apply button.
Your settings are saved.
Set Up a Bridge for a Port Group or VLAN Tag Group
This feature is available only in Singapore.
Some devices, such as an IPTV, cannot function behind the router’s Network Address
Translation (NAT) service or firewall. Based on what your Internet service provider (ISP)
requires, for the device to connect to the ISP’s network directly, you can enable the bridge
between the device and the router’s Internet port or add new VLAN tag groups to the bridge.
Note: If your ISP provides directions on how to set up a bridge for IPTV and
Internet service, follow those directions.
Set Up a Bridge for a Port Group
If the devices that are connected to the router’s Ethernet LAN port or WiFi network include an
IPTV device, your ISP might require you to set up a bridge for a port group for the router’s
Internet interface.
A bridge with a port group prevents packets that are sent between the IPTV device and the
router’s Internet port from being processed through the router’s Network Address Translation
(NAT) service.
To configure a port group and enable the bridge:
1. Launch a web browser from a computer or mobile device that is connected to your Orbi
network.
2. Enter orbilogin.com.
A login window opens.
3. Enter the router admin user name and password.
The user name is admin. The default password is password. The user name and
password are case-sensitive.
The BASIC Home page displays.
4. Select ADVANCED > Advanced Setup > VLAN/Bridge Settings.
Specify Network Settings
86

Orbi WiFi System
The VLAN / Bridge Settings page displays.
5. Select the Enable VLAN/Bridge Settings check box.
The page expands.
6. Select the By bridge group radio button.
The section expands.
7. Select a Wired Ports check box or a Wireless check box:
• If your device is connected to an Ethernet port on the router, select the Wired Ports
check box that corresponds to the Ethernet port on the router to which the device is
connected.
• If your device is connected to your router’s WiFi network, select the Wireless check
box that corresponds to the router’s WiFi network to which the device is connected.
Note: You must select at least one Wired Ports or Wireless check box. You
can select more than one check box.
8. Click the Apply button.
Your settings are saved.
Set Up a Bridge for a VLAN Tag Group
If the devices that are connected to the router’s Ethernet LAN ports or WiFi network include
an IPTV device, your ISP might require you to set up a bridge for a VLAN tag group for the
router’s Internet interface.
If you are subscribed to IPTV service, the router might require VLAN tags to distinguish
between the Internet traffic and the IPTV traffic. A bridge with a VLAN tag group prevents
packets that are sent between the IPTV device and the router’s Internet port from being
processed through the router’s Network Address Translation (NAT) service.
You can add VLAN tag groups to a bridge and assign VLAN IDs and priority values to each
VLAN tag group.
To add a VLAN tag group and enable the bridge:
1. Launch a web browser from a computer or mobile device that is connected to your Orbi
network.
2. Enter orbilogin.com.
A login window opens.
3. Enter the router admin user name and password.
The user name is admin. The default password is password. The user name and
password are case-sensitive.
Specify Network Settings
87

The BASIC Home page displays.
Orbi WiFi System
4. Select ADV
The VLAN / Bridge Settings page displays.
5. Select the Enable VLAN/Bridge Group check box.
The page expands.
6. Select the By VLAN tag group radio button.
The section expands.
7. Click the Add button.
The Add VLAN Rule page displays.
8. Specify the settings as described in the following table.
Field Description
Name
VLAN ID Enter a value from 1 to 4094.
Priority Enter a value from 0 to 7.
Select the check box for a wired LAN port or WiFi port.
ANCED > Advanced Setup > VLAN/Bridge Settings.
Enter a name for the VLAN tag group.
The name can be up to 10 characters.
If your device is connected to an Ethernet port on the router, select the LAN port check
box that corresponds to the Ethernet port on the router to which the device is
connected. If your device is connected to your router
check box that corresponds to the router’s WiFi network to which the device is
connected.
You must select at least one LAN port or WiFi port.You can select more than one port.
9. Click the Add button.
The VLAN tag group is added.
10. Click the Apply button.
Your settings are saved.
’s WiFi network, select the WiFi
Set Up an IPTV Port to Lease an Intranet Port
You can set up the router to create an Internet Protocol television (IPTV) port that can lease
an IP address from your IPTV service provider. Use this feature only if you subscribe to an
IPTV service and your IPTV service requires an intranet address.
Some IPTV ports cannot work behind Network Address Translation (NAT) because the IPTV
port requires an IP address within the Internet service provider
address).You can set up a bridge connection from the WAN to one of the LAN ports. When
IPTV is connected through WiFi, the home router also must support the bridging of the WAN
’s network (intranet
Specify Network Settings
88

Orbi WiFi System
port to the WiFi network name (SSID). The designated LAN port or WiFi name becomes an
IPTV port with direct access to the WAN without going through NAT.
To configure an IPTV port:
1. Launch a web browser from a computer or mobile device that is connected to your Orbi
network.
2. Enter orbilogin.com.
A login window opens.
3. Enter the router admin user name and password.
The user name is admin. The default password is password. The user name and
password are case-sensitive.
The BASIC Home page displays.
4. Select ADVANCED > Advanced Setup > VLAN/Bridge Settings.
The VLAN / Bridge Settings page displays.
5. Select the Enable VLAN/Bridge Group check box.
The page expands.
6. Select the By bridge group radio button.
The section expands.
7. Select a Wired Ports check box or a Wireless check box:
• If your device is connected to an Ethernet port on the router, select the Wired Ports
check box that corresponds to the Ethernet port on the router to which the device is
connected.
• If your device is connected to your router’s WiFi network, select the Wireless check
box that corresponds to the router’s WiFi network to which the device is connected.
Note: You must select at least one Wired Ports or Wireless check box. You
can select more than one check box.
8. Click the Apply button.
Your settings are saved.
Specify Network Settings
89

Orbi WiFi System
Enable British Telecom IGMP Proxy Support
You must use this feature only for British Telecom (BT) Internet Protocol television (IPTV)
service. It might also work with TalkTalk IPTV service.
To enable BT IGMP proxy support:
1. Launch a web browser from a computer or mobile device that is connected to your Orbi
network.
2. Enter orbilogin.com.
A login window opens.
3. Enter the router admin user name and password.
The user name is admin. The default password is password. The user name and
password are case-sensitive.
The BASIC Home page displays.
4. Select ADVANCED > Setup > WAN Setup.
The WAN Setup page displays.
5. Clear the Disable IGMP Proxying check box.
6. Select the Support British Telecom (BT) IGMP Proxying check box.
7. Click the Apply button.
Your settings are saved.
Specify Network Settings
90

7. Manage Your Network
This chapter describes the router settings for administering and maintaining your router and
home network.
The chapter includes the following sections:
• Update the Router and Satellite Firmware
• Change the admin Password
• Recover the admin Password
• View Router Status
• View Satellite Status
• View and Manage Logs of Router Activity
• View Devices Connected to the Network
• View Satellites Connected to the Network
• Monitor Internet Traffic
• Manage the Router Configuration File
• Set Up Remote Management
• Use Remote Access
• Remotely Access Your Router Using the genie App
7
91

Orbi WiFi System
Update the Router and Satellite Firmware
You can use the router web interface to check if new firmware is available and update your
router and satellite, or you can manually update the firmware for your router and satellite.
Check for Firmware Updates
To check for new firmware and update your router and satellite:
1. Launch a web browser from a computer or mobile device that is connected to your Orbi
network.
2. Enter orbilogin.com.
A login window opens.
3. Enter the router admin user name and password.
The user name is admin. The default password is password. The user name and
password are case-sensitive.
The BASIC Home page displays.
4. Select ADVANCED > Administration > Firmware Update.
The Firmware Update page displays.
5. Click the Check button.
The router checks if new firmware is available for the router and satellite.
6. If new firmware is available, click the Update All button.
The router locates and downloads the firmware for the router and satellite and begins the
update.
WARNING:
To avoid the risk of corrupting the firmware, do not interrupt the
upgrade. For example, do not close the browser, click a link, or load
a new page. Do not turn off the router or satellite.
When the upload is complete, your router and satellite restarts. The update process
typically takes about one minute. Read the new firmware release notes to find out if you
must reconfigure the router after updating.
Manually Update Firmware
If a satellite is connected to your router, you can log in to the router to manually upload the
firmware on your satellite.
Manage Your Network
92

Orbi WiFi System
WARNING:
We recommend that you always update the firmware on your
satellite first, and then update your router. Also, do not update the
firmware on your router and satellite at the same time.
To manually update the firmware on your Orbi router and satellite, follow these high
level steps:
1. Visit netgear.com/support and download the firmware for both your Orbi router and
satellite.
2. Update the firmware on your Orbi satellite.
For more information, see Manually Update Satellite Firmware on page 93.
3. Update the firmware on your Orbi router.
For more information, see Manually Update Router Firmware on page 94.
Manually Update Satellite Firmware
To manually update the firmware on your satellite:
4. Launch a web browser from a computer or mobile device that is connected to your Orbi
network.
5. Enter orbilogin.com.
A login window opens.
6. Enter the router admin user name and password.
The user name is admin. The default password is password. The user name and
password are case-sensitive.
The BASIC Home page displays.
7. Select ADVANCED > Administration > Firmware Update > Manual Update.
The Firmware Update page displays.
8. Select the check box next to your satellite’s model name.
9. Click the Update button.
The Orbi satellite Firmware Update window opens.
10. If the browser ask you for the admin password, enter the same password that you entered
for the router.
11. Click the BROWSE button.
12. Locate and select the satellite firmware file you downloaded.
The firmware file name ends in .img or .chk.
13. Click the UPLOAD button.
It takes a few minutes to complete the process.
Manage Your Network
93

Orbi WiFi System
14. After Orbi satellite finishes updating, select Status and double check the firmware version on
the Status page.
The firmware on your Orbi satellite is updated.
Manually Update Router Firmware
We recommend that you update your satellite’s firmware before updating the router’s
firmware.
To manually update the firmware on your router:
1. Launch a web browser from a computer or mobile device that is connected to your Orbi
network.
2. Enter orbilogin.com.
A login window opens.
3. Enter the router admin user name and password.
The user name is admin. The default password is password. The user name and
password are case-sensitive.
The BASIC Home page displays.
4. Select ADVANCED > Administration > Firmware Update > Manual Update.
The Firmware Update page displays.
5. Click the Browse button.
6. Locate and select the router firmware file you downloaded.
The firmware file name ends in .img.
7. Click the Upload button.
The firmware is updated.
Change the admin Password
This feature let you change the default password that is used to log in to the router with the
user name admin. This password is not the one that you use for WiFi access. The router label
shows your unique WiFi network name (SSID) and password for WiFi access.
Note: Be sure to change the password for the user name admin to a secure
password. The ideal password contains no dictionary words from any
language and contains uppercase and lowercase letters, numbers,
and symbols. It can be up to 30 characters.
Manage Your Network
94

Orbi WiFi System
To set the password for the user name admin:
1. Launch a web browser from a computer or mobile device that is connected to your Orbi
network.
2. Enter orbilogin.com.
A login window opens.
3. Enter the router admin user name and password.
The user name is admin.
password are case-sensitive.
The BASIC Home page displays.
4. Select ADV
5. Type the old password, and type the new password twice.
6. T
o be able to recover the password, select the Enable Password Recovery check box.
We recommend that you enable password recovery.
ANCED > Administration > Set Password.
The default password is password. The user name and
7. Click the Apply button.
Your settings are saved.
Set Up Password Recovery
We recommend that you enable password recovery if you change the password for the
router user name admin. Then you can recover the password if it is forgotten. This recovery
process is supported in Internet Explorer, Firefox, and Chrome browsers, but not in the Safari
browser.
To set up password recovery:
1. Launch a web browser from a computer or WiFi device that is connected to the network.
2. Enter http://www
A login window opens.
.routerlogin.net.
Manage Your Network
95

Orbi WiFi System
3. Enter the router admin user name and password.
The user name is admin.
The default password is password. The user name and
password are case-sensitive.
The BASIC Home page displays.
4. Select ADV
ANCED > Administration > Set Password.
5. Select the Enable Password Recovery check box.
6. Select two security questions and provide answers to them.
7. Click the Apply button.
Your settings are saved.
Manage Your Network
96

Orbi WiFi System
Recover the admin Password
We recommend that you enable password recovery if you change the password for the
router user name admin. Then you can recover the password if it is forgotten. This recovery
process is supported in Internet Explorer, Firefox, and Chrome browsers, but not in the Safari
browser.
To recover your password:
1. Launch a web browser from a computer or mobile device that is connected to your Orbi
network.
2. Enter orbilogin.com.
A login window opens.
3. Click the Cancel button.
If password recovery is enabled, you are prompted to answer two security questions.
4. Enter the saved answers to the security questions.
5. Enter the serial number of your router.
The serial number is on the router label.
6. Click the Continue button.
A window opens and displays your recovered password.
7. Click the Login again button.
A login window opens.
8. With your recovered password, log in to the router.
View Router Status
To view router status and usage information:
1. Launch a web browser from a computer or mobile device that is connected to your Orbi
network.
2. Enter orbilogin.com.
A login window opens.
3. Enter the router admin user name and password.
The user name is admin. The default password is password. The user name and
password are case-sensitive.
The BASIC Home page displays.
Manage Your Network
97

4. Click the ADVANCED tab.
Orbi WiFi System
Display Internet Port Statistics
To display Internet port statistics:
1. Launch a web browser from a computer or mobile device that is connected to your Orbi
network.
2. Enter orbilogin.com.
A login window opens.
3. Enter the router admin user name and password.
The user name is admin.
password are case-sensitive.
4. The BASIC Home page displays
5. Click the ADV
ANCED tab.
6. In the Internet Port pane, click the Show Statistics button.
The default password is password. The user name and
Manage Your Network
98

Orbi WiFi System
The following information displays:
• System Up Time. The time elapsed since the router was last restarted.
• Port. The statistics for the WAN (Internet) and LAN (Ethernet) ports. For each port,
the page displays the following information:
- Status. The link status of the port.
- TxPkts. The number of packets transmitted on this port since reset or manual clear.
- RxPkts. The number of packets received on this port since reset or manual clear.
- Collisions. The number of collisions on this port since reset or manual clear.
- Tx B/s. The current transmission (outbound) bandwidth used on the WAN and LAN
ports.
- Rx B/s. The current reception (inbound) bandwidth used on the WAN and LAN ports.
- Up Time. The time elapsed since this port acquired the link.
- Poll Interval. The interval at which the statistics are updated in this page.
7. To change the polling frequency, enter a time in seconds in the Poll Interval field and click
the Set Interval button.
8. To stop the polling entirely, click the Stop button.
Check the Internet Connection Status
To check the Internet connection status:
1. Launch a web browser from a computer or mobile device that is connected to your Orbi
network.
2. Enter orbilogin.com.
A login window opens.
3. Enter the router admin user name and password.
The user name is admin. The default password is password. The user name and
password are case-sensitive.
The BASIC Home page displays.
4. Click the ADVANCED tab.
5. In the Internet Port pane, click the Connection Status button.
Manage Your Network
99

The following information displays:
Orbi WiFi System
• IP Address.
• Subnet Mask.
• Default Gateway.
communicates with.
• DHCP Server.
that provides the TCP/IP configuration for all the computers that are connected to the
router.
• DNS Server.
translation of network names to IP addresses.
• Lease Obtained.
• Lease Expires.
6. T
o return the status of all items to 0, click the Release button.
7. T
o refresh the page, click the Renew button.
8. T
o exit the page, click the Close Window button.
The IP address that is assigned to the router.
The subnet mask that is assigned to the router.
The IP address for the default gateway that the router
The IP address for the Dynamic Host Configuration Protocol server
The IP address of the Domain Name Service server that provides
The date and time when the lease was obtained.
The date and time that the lease expires.
View Satellite Status
To view your satellite’s status, it must be connected to your network.
To view your satellite’s status:
1. Launch a web browser from a computer or mobile device that is connected to your Orbi
network.
2. Enter orbilogin.com.
A login window opens.
3. Enter the router admin user name and password.
The user name is admin.
password are case-sensitive.
The default password is password. The user name and
Manage Your Network
100
 Loading...