

Page 1
NTV550 Ultimate HD Media Player
User Manual
350 East Plumeria Drive
San Jose, CA 95134
USA
February 2011
202-10589-02
v1.0
Page 2

NTV550 Ultimate HD Media Player User Manual
© 2011 NETGEAR, Inc. All rights reserved.
No part of this publication may be reproduced, transmitted, transcribed, stored in a retrieval system, or translated
into any language in any form or by any means without the written permission of NETGEAR, Inc.
Technical Support
Thank you for choosing NETGEAR. To register your product, get the latest product updates, or get support online,
visit us at http://support.netgear.com.
Phone (US & Canada only): 1-888-NETGEAR
Phone (Other Countries): See http://support.netgear.com/app/answers/detail/a_id/984.
Trademarks
NETGEAR, the NETGEAR logo, ReadyNAS, ProSafe, Smart Wizard, Auto Uplink, X-RAID2, and NeoTV are
trademarks or registered trademarks of NETGEAR, Inc. Microsoft, Windows, Windows NT, and Vista are
registered trademarks of Microsoft Corporation. Other brand and product names are registered trademarks or
trademarks of their respective holders.
DTS
Manufactured under license under US Patent numbers: 5,451,942; 5,956,674; 5,974,380; 5,978,762; 6,487,535
and other US and world patents issued and pending. DTS and the Symbol are registered trademarks, and DTS 2.0
+ Digital OUT and the DTS logos are trademarks of DTS, Inc. Product includes software. Copyright DTS, Inc. All
Rights Reserved.
Dolby Digital
Dolby and the double-D symbol are trademarks of Dolby Laboratories. Manufactured under license from Dolby
Laboratories.
Copy Protection Technology
This item incorporates copy protection technology that is protected by U.S. patents and other intellectual property
rights of Rovi Corporation. Reverse engineering and disassembly are prohibited.
Statement of Conditions
To improve internal design, operational function, and/or reliability, NETGEAR reserves the right to make changes
to the products described in this document without notice. NETGEAR does not assume any liability that may occur
due to the use, or application of, the product(s) or circuit layout(s) described herein.
2 |
Page 3

Contents
Chapter 1 Getting Started
Chapter 2 Browsing and Organizing Media
Front and Rear View. . . . . . . . . . . . . . . . . . . . . . . . . . . . . . . . . . . . . . . . . . .7
Cabling the Ultimate HD Media Player. . . . . . . . . . . . . . . . . . . . . . . . . . . . .8
Tips. . . . . . . . . . . . . . . . . . . . . . . . . . . . . . . . . . . . . . . . . . . . . . . . . . . . . .8
Attaching the Stand . . . . . . . . . . . . . . . . . . . . . . . . . . . . . . . . . . . . . . . . . . .9
Remote Control . . . . . . . . . . . . . . . . . . . . . . . . . . . . . . . . . . . . . . . . . . . . .10
Navigating with the Remote Control. . . . . . . . . . . . . . . . . . . . . . . . . . . .12
Popup Menus . . . . . . . . . . . . . . . . . . . . . . . . . . . . . . . . . . . . . . . . . . . . .12
Using the Onscreen Keyboard . . . . . . . . . . . . . . . . . . . . . . . . . . . . . . . .13
Remote Control Buttons and Shortcuts in the Menus . . . . . . . . . . . . . .13
Media on Your Portable Media Player (USB Device). . . . . . . . . . . . . . . . .14
Protected Media Files. . . . . . . . . . . . . . . . . . . . . . . . . . . . . . . . . . . . . . . . .15
Browsing with Live Folder or the Media Library . . . . . . . . . . . . . . . . . . . . .15
Browsing the Media Library . . . . . . . . . . . . . . . . . . . . . . . . . . . . . . . . . .15
Live Folder Browsing . . . . . . . . . . . . . . . . . . . . . . . . . . . . . . . . . . . . . . .16
Tips for Browsing and Searching . . . . . . . . . . . . . . . . . . . . . . . . . . . . . .16
Browse Folders. . . . . . . . . . . . . . . . . . . . . . . . . . . . . . . . . . . . . . . . . . . .17
Cover Art . . . . . . . . . . . . . . . . . . . . . . . . . . . . . . . . . . . . . . . . . . . . . . . . . .18
Finding Media on Your Network. . . . . . . . . . . . . . . . . . . . . . . . . . . . . . . . .18
Parental Controls . . . . . . . . . . . . . . . . . . . . . . . . . . . . . . . . . . . . . . . . . . . .19
Chapter 3 Playing Media
Watching Videos. . . . . . . . . . . . . . . . . . . . . . . . . . . . . . . . . . . . . . . . . . . . .20
Popup Menus during Video Playback. . . . . . . . . . . . . . . . . . . . . . . . . . . . .21
Video Media Bar. . . . . . . . . . . . . . . . . . . . . . . . . . . . . . . . . . . . . . . . . . .21
Video Aspect Ratio. . . . . . . . . . . . . . . . . . . . . . . . . . . . . . . . . . . . . . . . .22
TV Mode and Display Settings. . . . . . . . . . . . . . . . . . . . . . . . . . . . . . . .22
Subtitles . . . . . . . . . . . . . . . . . . . . . . . . . . . . . . . . . . . . . . . . . . . . . . . . .23
Audio Track . . . . . . . . . . . . . . . . . . . . . . . . . . . . . . . . . . . . . . . . . . . . . .23
Time Seek . . . . . . . . . . . . . . . . . . . . . . . . . . . . . . . . . . . . . . . . . . . . . . .24
Resuming Video Playback . . . . . . . . . . . . . . . . . . . . . . . . . . . . . . . . . . .24
Listening to Music. . . . . . . . . . . . . . . . . . . . . . . . . . . . . . . . . . . . . . . . . . . .24
Music Media Bar and Playlists . . . . . . . . . . . . . . . . . . . . . . . . . . . . . . . .25
Gapless Playback. . . . . . . . . . . . . . . . . . . . . . . . . . . . . . . . . . . . . . . . . .26
Viewing Photos. . . . . . . . . . . . . . . . . . . . . . . . . . . . . . . . . . . . . . . . . . . . . .27
Adjusting the Photo Display . . . . . . . . . . . . . . . . . . . . . . . . . . . . . . . . . .28
Photo and Slideshow Media Bar . . . . . . . . . . . . . . . . . . . . . . . . . . . . . .28
Contents | 3
Page 4

NTV550 Ultimate HD Media Player User Manual
Photo Aspect Ratio. . . . . . . . . . . . . . . . . . . . . . . . . . . . . . . . . . . . . . . . .28
Slideshow Options Menu . . . . . . . . . . . . . . . . . . . . . . . . . . . . . . . . . . . .28
Playing Internet Media . . . . . . . . . . . . . . . . . . . . . . . . . . . . . . . . . . . . . . . .29
Viewing YouTube Content . . . . . . . . . . . . . . . . . . . . . . . . . . . . . . . . . . .29
RadioTime . . . . . . . . . . . . . . . . . . . . . . . . . . . . . . . . . . . . . . . . . . . . . . .30
RadioIO/Shoutcast . . . . . . . . . . . . . . . . . . . . . . . . . . . . . . . . . . . . . . . . .31
Internet News Channels. . . . . . . . . . . . . . . . . . . . . . . . . . . . . . . . . . . . .32
Internet Weather. . . . . . . . . . . . . . . . . . . . . . . . . . . . . . . . . . . . . . . . . . .33
Using More than One Ultimate HD Media Player. . . . . . . . . . . . . . . . . . . .33
Chapter 4 Settings
Settings Menu . . . . . . . . . . . . . . . . . . . . . . . . . . . . . . . . . . . . . . . . . . . . . .34
Setup Wizard . . . . . . . . . . . . . . . . . . . . . . . . . . . . . . . . . . . . . . . . . . . . .35
Audio/Video . . . . . . . . . . . . . . . . . . . . . . . . . . . . . . . . . . . . . . . . . . . . . .36
Media Locations . . . . . . . . . . . . . . . . . . . . . . . . . . . . . . . . . . . . . . . . . . .38
Media Sources . . . . . . . . . . . . . . . . . . . . . . . . . . . . . . . . . . . . . . . . . . . .39
Parental Controls . . . . . . . . . . . . . . . . . . . . . . . . . . . . . . . . . . . . . . . . . .39
User Interface. . . . . . . . . . . . . . . . . . . . . . . . . . . . . . . . . . . . . . . . . . . . .41
Network . . . . . . . . . . . . . . . . . . . . . . . . . . . . . . . . . . . . . . . . . . . . . . . . .42
System Menu . . . . . . . . . . . . . . . . . . . . . . . . . . . . . . . . . . . . . . . . . . . . . . .43
Updating the Firmware. . . . . . . . . . . . . . . . . . . . . . . . . . . . . . . . . . . . . .44
Manage Files . . . . . . . . . . . . . . . . . . . . . . . . . . . . . . . . . . . . . . . . . . . . .44
Advanced Settings . . . . . . . . . . . . . . . . . . . . . . . . . . . . . . . . . . . . . . . . .45
System Information. . . . . . . . . . . . . . . . . . . . . . . . . . . . . . . . . . . . . . . . .46
Chapter 5 Using Your PC with the NTV550
Controlling the Ultimate HD Media Player from a Windows PC. . . . . . . . .47
Installing the Resource CD Software on a Windows PC . . . . . . . . . . . . . .48
Using the Configuration Wizard to Share Media . . . . . . . . . . . . . . . . . . . .49
Using the NeoTV Software on Your PC. . . . . . . . . . . . . . . . . . . . . . . . . . .51
Remote Control Your Ultimate HD Media Player . . . . . . . . . . . . . . . . . .52
EnablingWin7 File Sharing. . . . . . . . . . . . . . . . . . . . . . . . . . . . . . . . . . . . .52
File Sharing with Win7 Password Protection . . . . . . . . . . . . . . . . . . . . .52
File Sharing without Win7 Password Protection. . . . . . . . . . . . . . . . . . .54
Chapter 6 Troubleshooting
Troubleshooting Tips . . . . . . . . . . . . . . . . . . . . . . . . . . . . . . . . . . . . . . . . .57
Changing TV Mode, No Picture on the TV. . . . . . . . . . . . . . . . . . . . . . . . .58
Power Off and Standby Mode . . . . . . . . . . . . . . . . . . . . . . . . . . . . . . . . . .58
Firewall Port Settings . . . . . . . . . . . . . . . . . . . . . . . . . . . . . . . . . . . . . . . . .58
Accessing Your Digital Media. . . . . . . . . . . . . . . . . . . . . . . . . . . . . . . . . . .59
Windows System Passwords . . . . . . . . . . . . . . . . . . . . . . . . . . . . . . . . .59
Macintosh OSX. . . . . . . . . . . . . . . . . . . . . . . . . . . . . . . . . . . . . . . . . . . .59
Linux. . . . . . . . . . . . . . . . . . . . . . . . . . . . . . . . . . . . . . . . . . . . . . . . . . . .59
Media Does Not Play (Windows XP) . . . . . . . . . . . . . . . . . . . . . . . . . . . . .60
Video Display is Jittery. . . . . . . . . . . . . . . . . . . . . . . . . . . . . . . . . . . . . . . .60
4 | Contents
Page 5

NTV550 Ultimate HD Media Player User Manual
Unable to Play Media . . . . . . . . . . . . . . . . . . . . . . . . . . . . . . . . . . . . . . . . .60
Error Messages . . . . . . . . . . . . . . . . . . . . . . . . . . . . . . . . . . . . . . . . . . . . .61
Network Connections . . . . . . . . . . . . . . . . . . . . . . . . . . . . . . . . . . . . . . . . .62
Ethernet Cabling. . . . . . . . . . . . . . . . . . . . . . . . . . . . . . . . . . . . . . . . . . .62
Troubleshooting a Wireless Network Connection. . . . . . . . . . . . . . . . . .62
IP Address . . . . . . . . . . . . . . . . . . . . . . . . . . . . . . . . . . . . . . . . . . . . . . .63
Connecting to a Server. . . . . . . . . . . . . . . . . . . . . . . . . . . . . . . . . . . . . .63
Using Ping . . . . . . . . . . . . . . . . . . . . . . . . . . . . . . . . . . . . . . . . . . . . . . .63
Recovering the NTV550 If It Does Not Start. . . . . . . . . . . . . . . . . . . . . . . .64
Appendix A Supplementary Information
Supported Digital Media File Formats . . . . . . . . . . . . . . . . . . . . . . . . . . . .65
Restoring Factory Default Settings. . . . . . . . . . . . . . . . . . . . . . . . . . . . . . .66
Technical Specifications. . . . . . . . . . . . . . . . . . . . . . . . . . . . . . . . . . . . . . .66
Appendix B Notification of Compliance
Index
Contents | 5
Page 6

1. Getting Started
Bring all your digital media to your TV. Play movies, music, and photo collections from PCs,
Macs, and storage devices on your home network. The NTV550 Ultimate HD Media Player
also provides easy access to files stored on your USB drives and SD cards.
• Play your digital movies in full high-definition 1080p and stunning Dolby Digital, or DTS
surround sound.
• The NTV550 Ultimate HD Media Player automatically scans your networked and local
devices, and organizes your movies, music, and photos.
• Or you can use live browsing for easy and fast access to your media collection.
• The NTV550 Ultimate HD Media Player is compatible with a wide range of media file
formats.
• The remote control has shortcuts for quick selection and ease of use. For instance, you
can directly access your networked and local devices, use on-the-fly language selection,
and display and customize subtitles.
For more information on the topics covered in this manual, visit the Support website at
http://support.netgear.com.
1
Chapter 1. Getting Started | 6
Page 7
NTV550 Ultimate HD Media Player User Manual
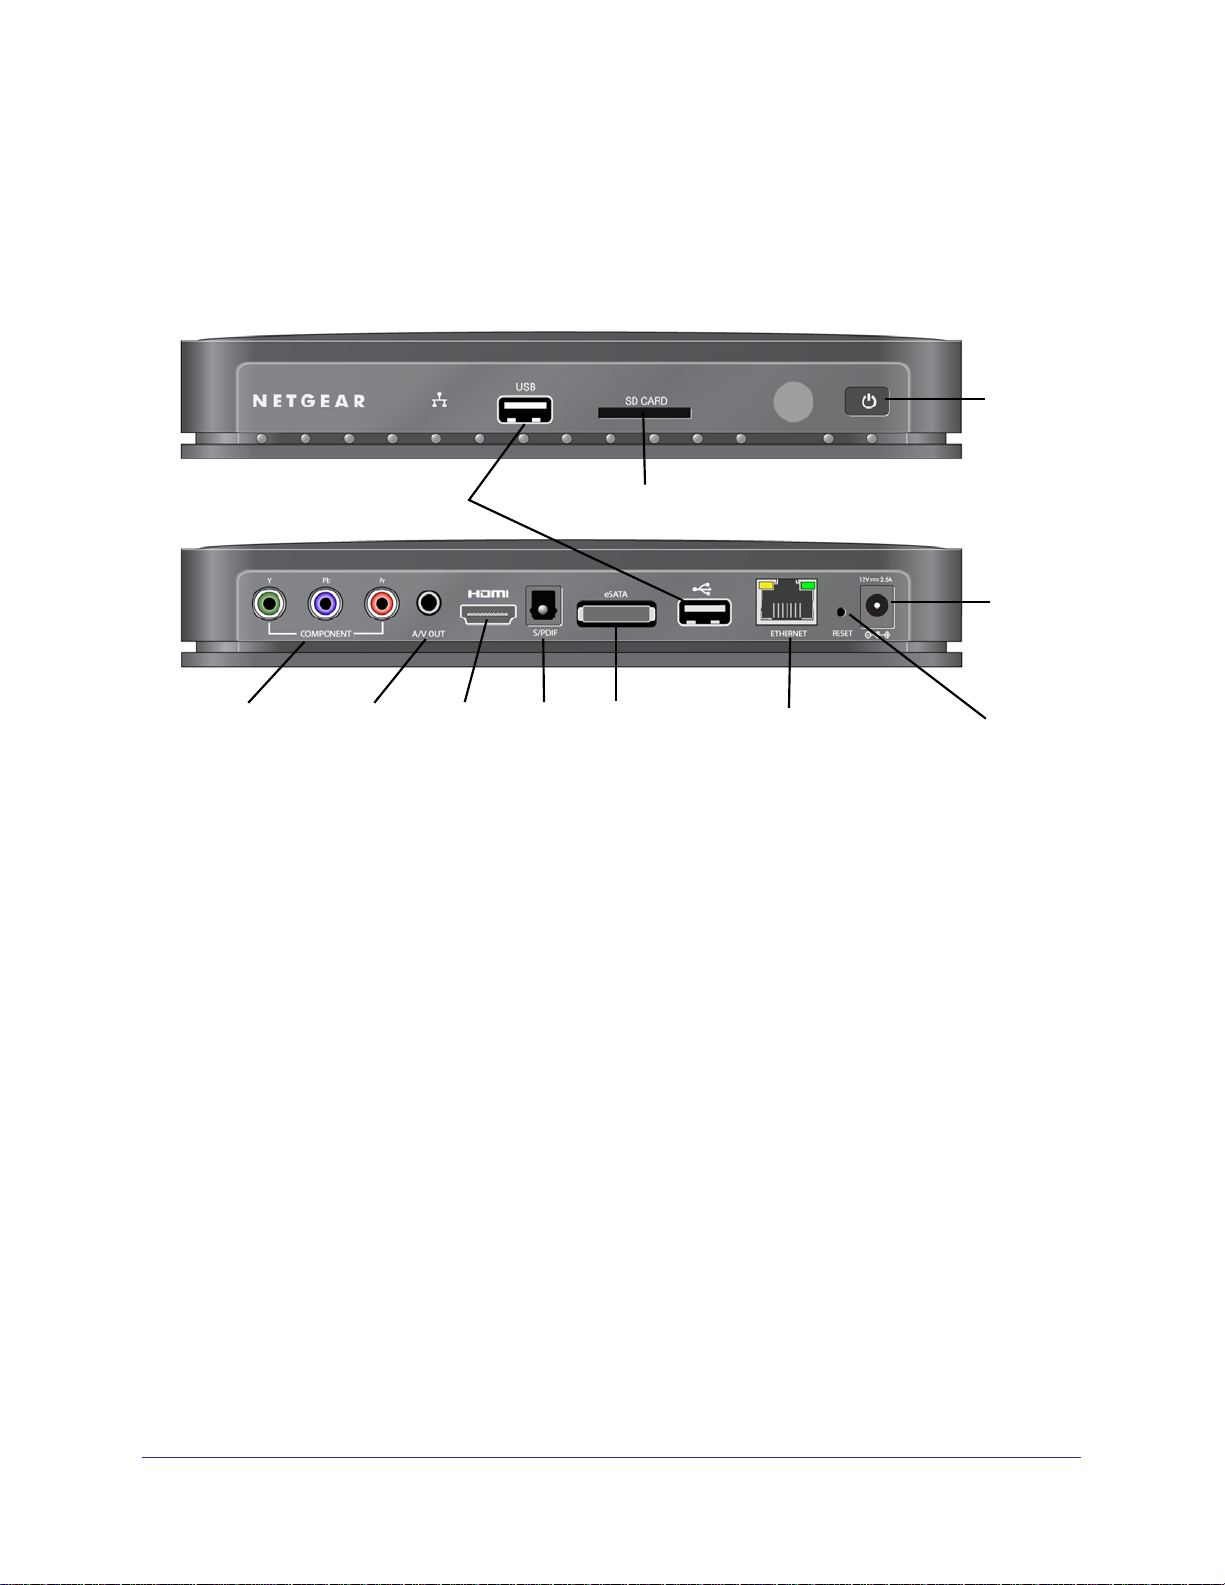
Front and Rear View
The Ultimate HD Media Player works with most televisions and a wide variety of audio
equipment. Not all compatible cables are included in the package. The following figure shows
front and rear views of the Ultimate HD Media Player:
On/Off
switch
USB
Component AV/Out HDMI S/PDIF Ethernet Reset
Figure 1. Front View and Rear View
SD Card
Power
eSATA
The following list describes the items shown in the previous figure.
• USB (2). Access your media from USB mass storage devices such as hard drives, media
players (including Windows- or Mac-formatted Apple iPods), and flash memory devices.
• SD Card slot. Insert your SD card to access media stored on it.
• On/Off button. Turn the Ultimate HD Media Player on and off.
• Component video. (Cable not included.) These ports support a component video
connection to a television.
• A/V Out. A/V cable, also called composite cable, is included. This is compatible with most
televisions in the United States.
• HDMI. (Cable not included.) If your television has a High-Definition Multimedia Interface
(HDMI) connector, you can use an HDMI cable for both the audio and video signal.
• S/PDIF optical. (Cable not included.)
• eSATA. Connect an external SATA device.
• Ethernet. Use this port to cable the Ultimate HD Media Player to your home router to
access the Internet and media stored on computers on your network. An Ethernet cable
is included.
• Reset. Reset the Ultimate HD Media Player to its factory settings. To reset, press and
hold the button down while the unit is powering up.
• Power. Use only the power cord in the package.
Chapter 1. Getting Started | 7
Page 8

NTV550 Ultimate HD Media Player User Manual
Cabling the Ultimate HD Media Player
The installation guide that came in the package explains how to install your product. Cabling
for a typical installation with an Ethernet network connection is shown in the following figure.
AV output
or
HDMI cable (not included)
NTV550
Ethernet cable
Figure 2. Ethernet connection
To connect wirelessly to your home router, you need the NETGEAR Universal Wi-Fi Internet
adapter WNCE2001 (sold separately). If you want to use a Powerline connection, you can
use the NETGEAR Home Theater Internet Connection Kit XAVB1004 (sold separately).
Router
Tips
• The quality of the picture display is related to the video format you use. If your television
supports multiple formats, choose the format that provides the best picture quality. HDMI
offers the best picture quality video. Component video provides the next best quality,
followed by composite video.
• Optimize the television display as necessary.
- If the display is not sharp, or you do not see a picture, aim the NETGEAR remote
control at the Ultimate HD Media Player, and press the TV Mode button. Then cycle
through the TV modes to get the best display.
- It can take 5 to 10 seconds for each TV mode change. In some modes you might not
see a picture on the TV. If you do not see a picture after four mode changes, check
the cable connections, and verify that the TV is on and set to the correct input.
- You might be able to enhance the picture quality by selecting from additional
high-definition video modes in the advanced settings.
- Use the TV Mode button to cycle between PAL (50 Hz, European) and NTSC (60 Hz,
United States) display modes.
8 | Chapter 1. Getting Started
Page 9
NTV550 Ultimate HD Media Player User Manual
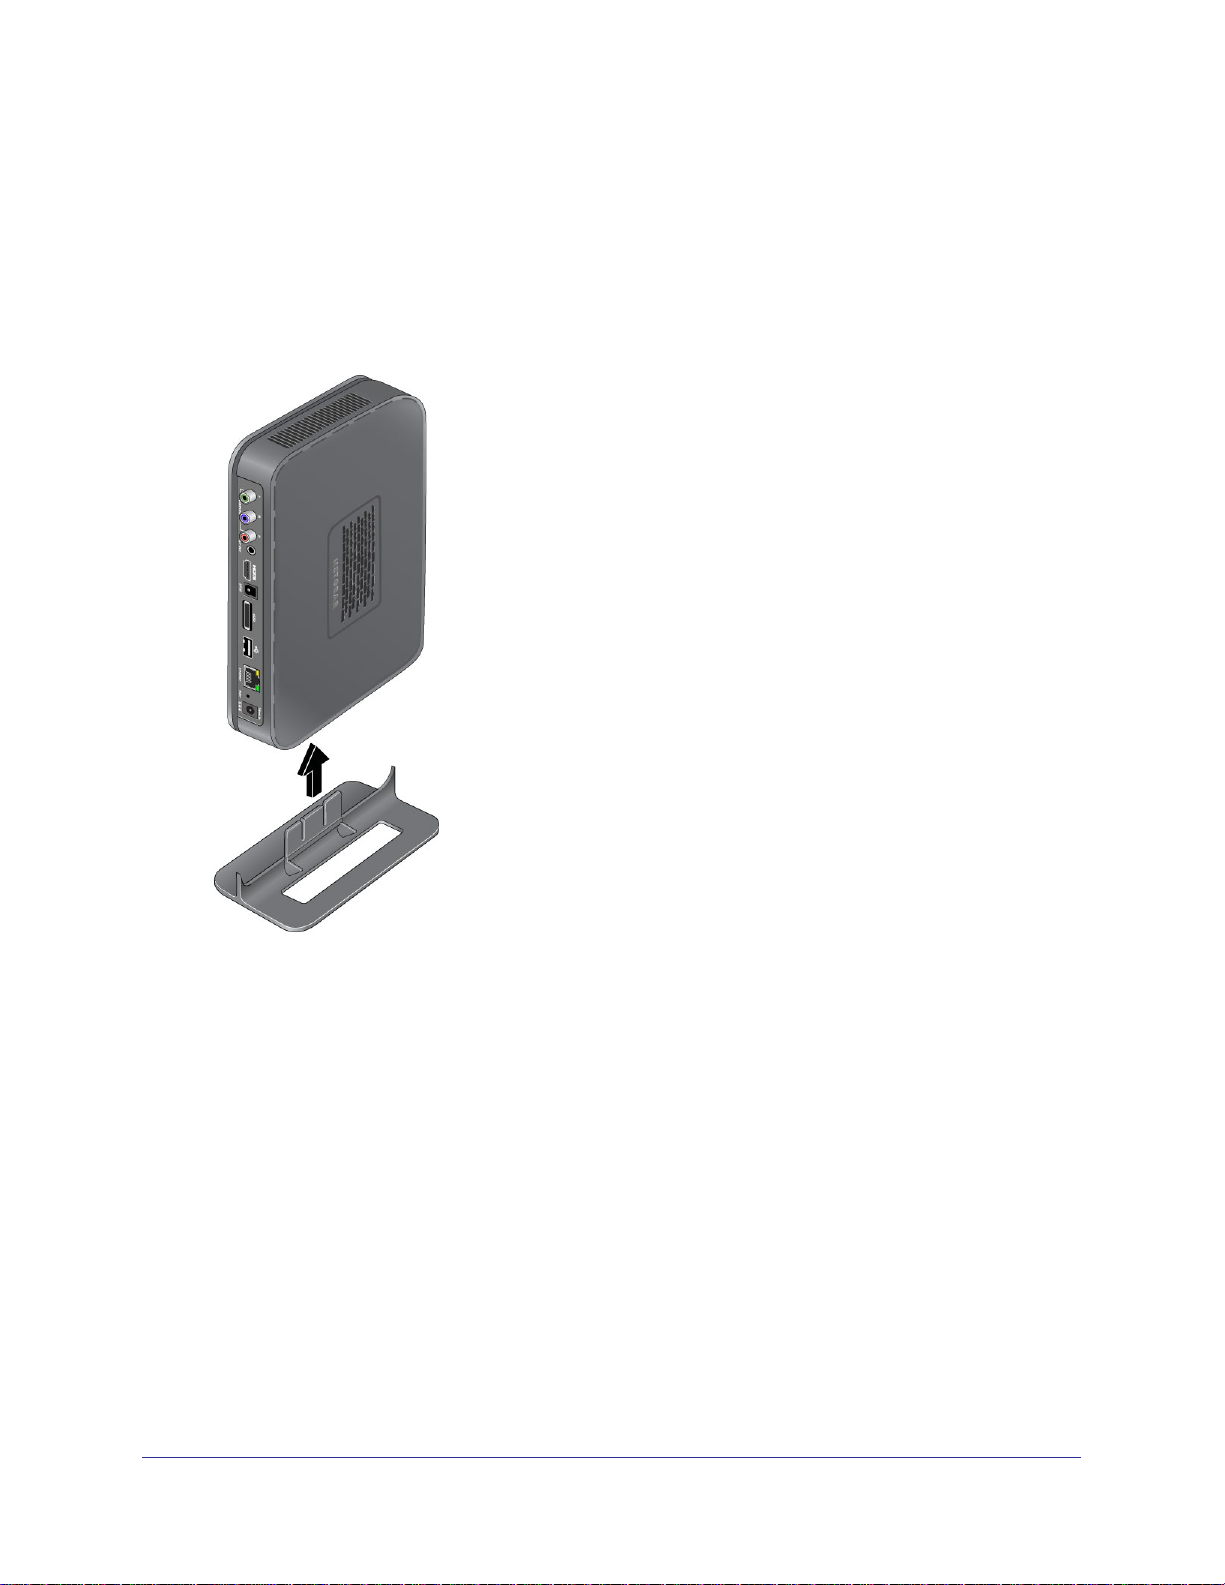
Attaching the Stand
If you want to place the HD media player in a vertical position, use the stand included in the
package.
1. Orient your HD media player vertically.
2. Insert the tabs of the stand into the slots on the bottom of your H
D media player as shown.
3. Place your HD media player in a suitable area for installation (near an AC power outlet and
accessible to the Ethernet cables for your wired computers).
4. To remove the stand, grasp it firmly and disconnect it from the H
D media player.
Chapter 1. Getting Started | 9
Page 10
NTV550 Ultimate HD Media Player User Manual
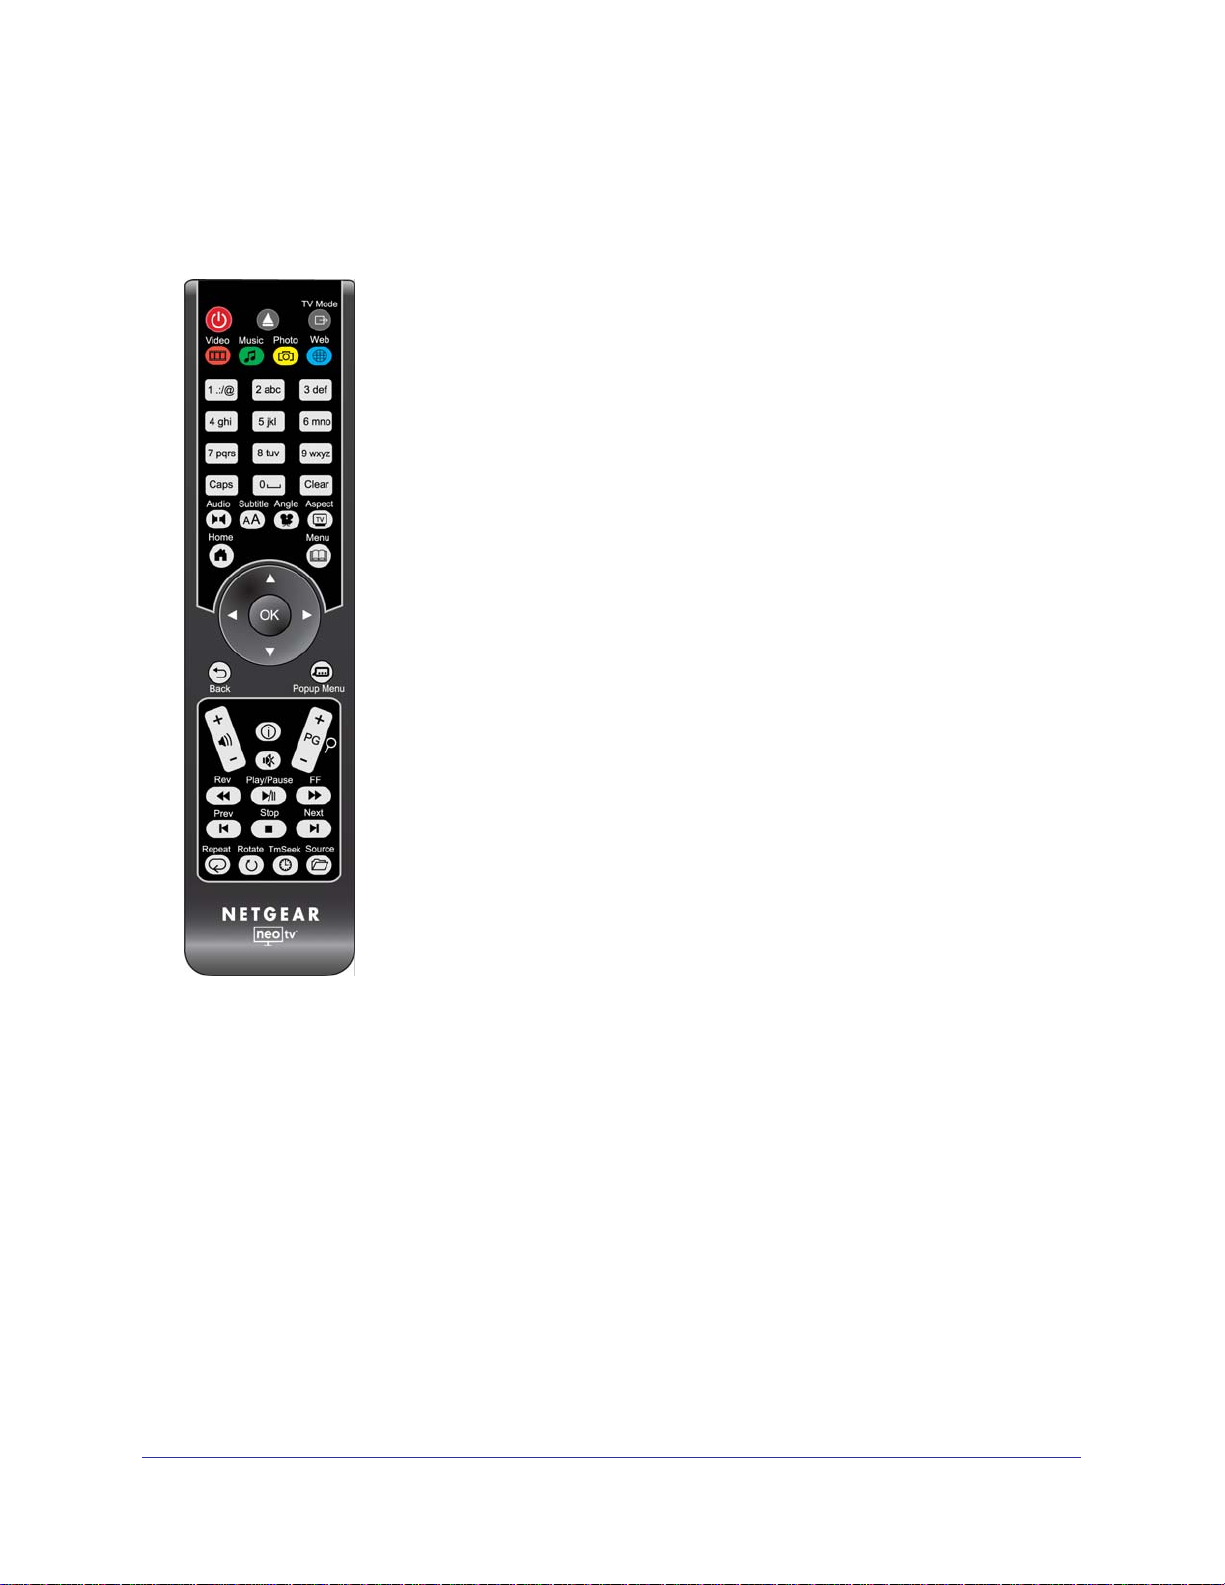
Remote Control
Use the remote control to operate your NTV550 Ultimate HD Media Player.
Figure 3. Remote control
10 | Chapter 1. Getting Started
Page 11
NTV550 Ultimate HD Media Player User Manual
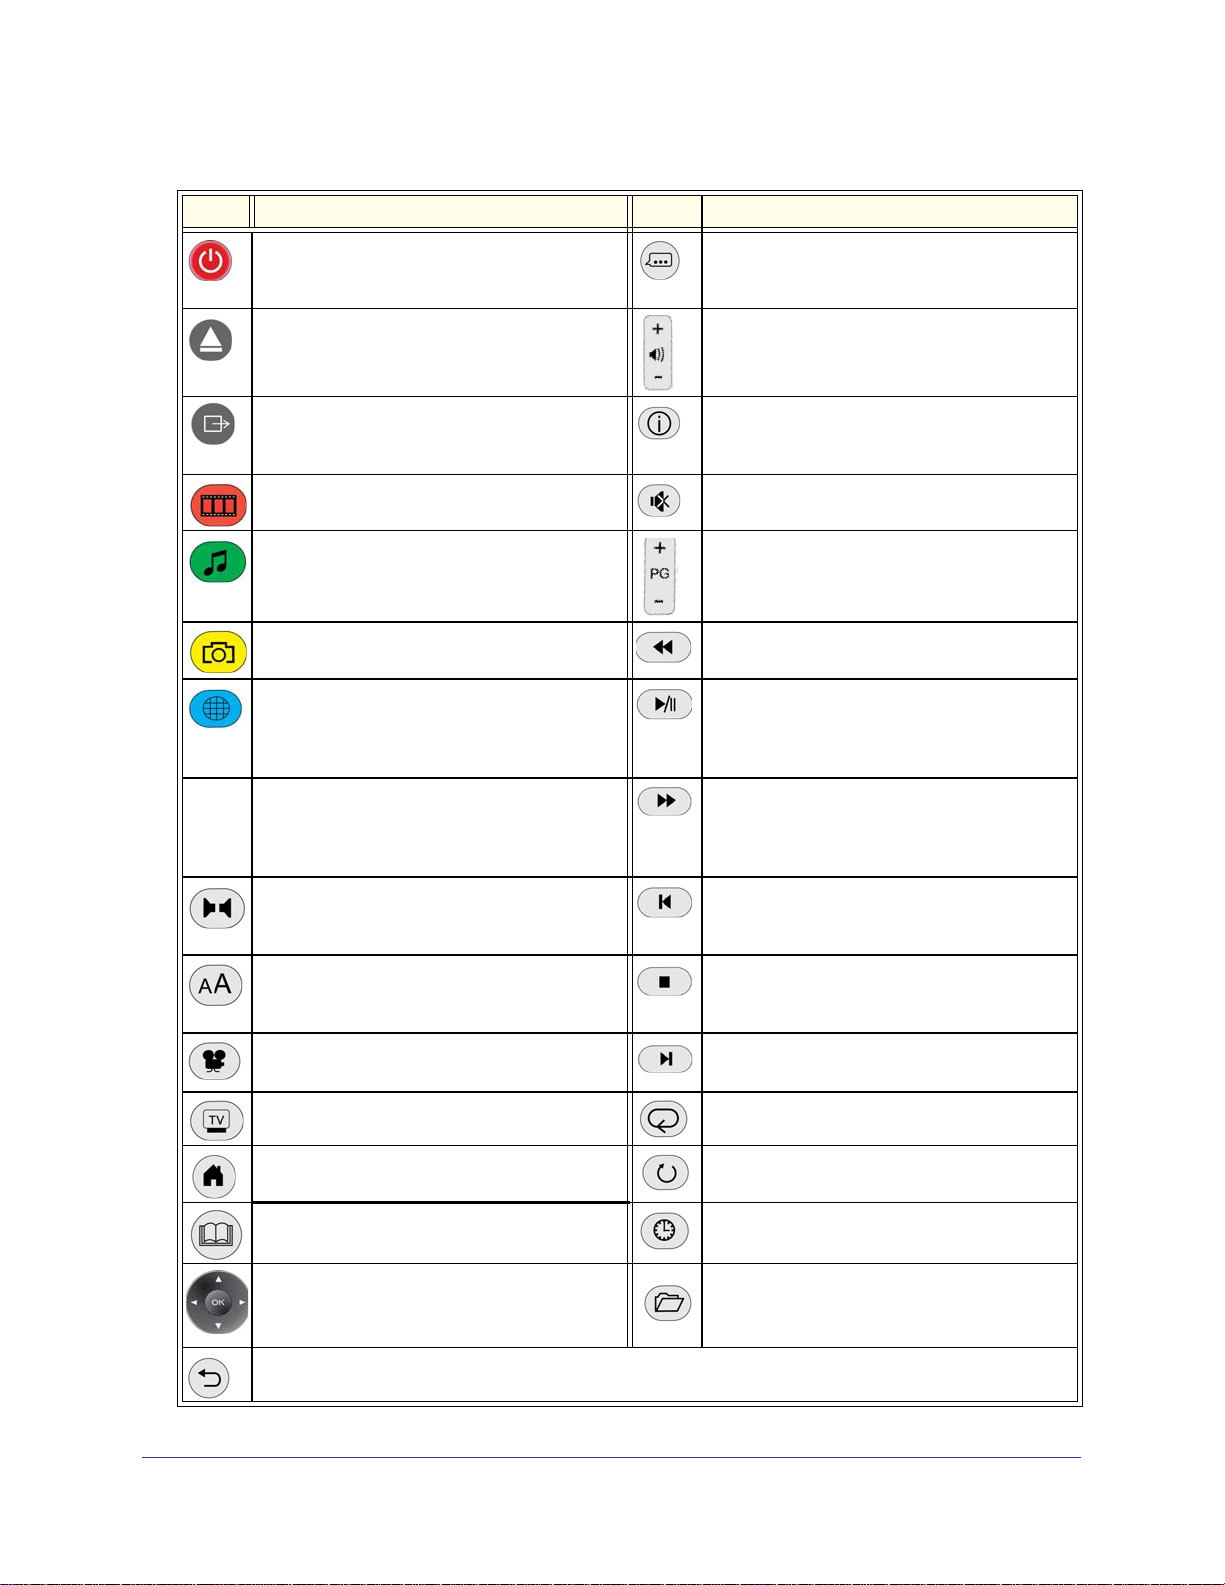
Table 1. Remote Control Buttons
Button Description Button Description
Power. Turn the device on and off. Popup menu. Display popup menus for media.
Show or hide the menu bar. Toggle between list
browsing and cover browsing.
0–9
Caps
Clear
Eject. Stops media playback and ejects the
media if played from an external attached drive.
TV Mode. From the main menu, go to the TV
mode screen. While playing a video, use the TV
Mode popup to temporarily change the mode.
Video. Display the Video menu. Mute. Mute the sound.
Music. Display the Music menu. Page up and down. This button can also scroll
Photo. Display the Photo menu. Reverse. Rewind to the start of the media that is
Web. Display the Internet media menu. Play/Pause. Play or pause media, or resume
Use 0–9 for alpha-numeric entry, searching, or to
skip in a video (0% to 90%). Caps toggles Caps
Lock or numbers on or off. Press Clear to to
clear text from a text entry field.
Audio. When playing music, show/hide the
music media bar. When playing videos, display
the Audio options to select the audio track.
Volume. Increase or decrease volume.
Information. Display media information.
and zoom videos and photos.
playing. If playing music, enter fast seek mode.
normal play from fast forward. In a menu, play
the selected item and queue the rest of the items
in the order shown on the screen.
Fast-forward. Fast-forward the media that is
playing. When playing music, enter fast seek
mode.
Previous. Go back to the previous item playing.
Within a menu, go to the first item in the list.
Subtitle. When playing a video, display Subtitle
options. When browsing media, toggle the sort
order.
Angle. Change the camera angle (if the media
supports this feature).
Aspect. Change the aspect ratio on the TV. Repeat. Repeat a track or media selection.
Home. Display the main menu. Rotate. Rotate a photo.
Menu. Toggle full screen during video or photo
playback. During video playback, show options.
• OK. Select a menu item, song, or video.
• Arrows. Navigate, or enter fast seek mode
when watching a video.
Go back to the previous screen.
Stop. Stop the media that is currently playing.
Next. Skip to the next item on the playlist.
Within a menu, go to the last item in the list.
Time Seek. When playing a video, skip ahead
by a set amount of time or to a chapter.
Source. Controls secondary audio/video (PIP
commentary).
Chapter 1. Getting Started | 11
Page 12
NTV550 Ultimate HD Media Player User Manual
Navigating with the Remote Control
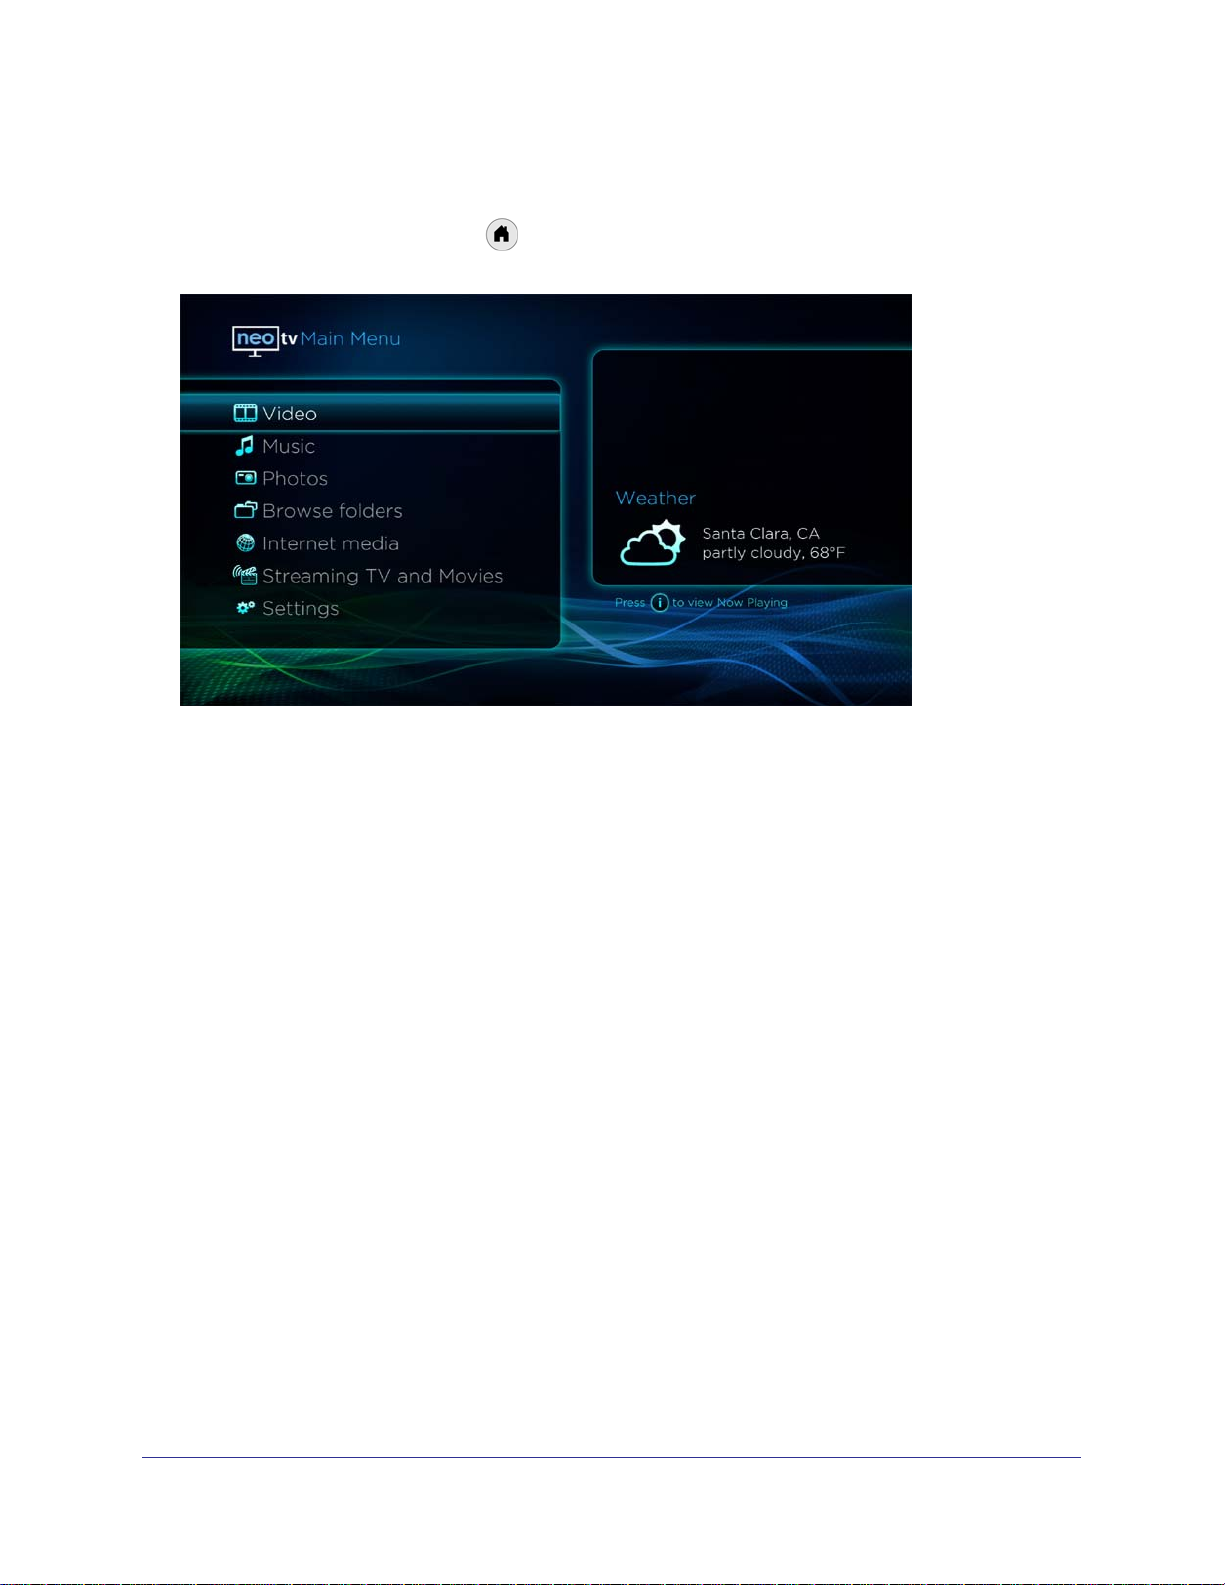
To go to the main menu, press Home on the remote control. The following screen
displays:
The main menu offers these selections:
• Video. Watch videos.
• Music. Listen to music.
• Photos. View photos.
• Browse folders. Look through your folders to locate the media that you want to view or
listen to.
• Internet media. Watch YouTube, listen to Internet Radio, view Flickr photos, watch RSS
videos, and access local weather and news.
• Streaming TV and Movies. This feature is coming soon.
• Settings. View or work with system functions.
These menu selections are described in the following chapters of this book.
Popup Menus
Popup displays are available only during media play.
• When playing videos you can use these features:
- Video Media bar. View elapsed time or a playlist.
- Time Seek. Go to a specific time or scene within a video.
- Audio. Select an audio track.
- Aspect. Change the aspect ratio only while watching the current video.
12 | Chapter 1. Getting Started
Page 13

NTV550 Ultimate HD Media Player User Manual
- TV Mode. Temporarily change the display mode while a video is playing. Use the
Appearance tab to change display appearance such as brightness.
- Subtitle. Select subtitle tracks and adjust the color, size, positioning, and timing of
subtitles.
• When listening to music you can display the Music media bar. You can use the media bar
to scroll down through queued-up tracks. You can jump to another track.
• When viewing photos, you can use the Photo media bar and Slideshow options to adjust
the display.
Using the Onscreen Keyboard
The onscreen keyboard is displayed when there is a field where you can type in information.
You can change the keyboard language by using the
available languages.
The onscreen keyboard includes all alphabetic and most punctuation and other symbols that
are found on a regular keyboard. While the onscreen keyboard is visible you can use the
following buttons on the remote control:
button to cycle through the
• Caps. Toggle between upper-case letters, lower-case letters, and symbols.
•
Menu. close the onscreen keyboard.
• 0–9. Enter letters and numbers. Press 2 to cycle between A, B, C, 2, and so on.
•
Back. Erase the last character entered.
• Clear. Erase all characters entered.
•
•
•
•
Next. Move the selector three keys to the right.
Previous. Move the selector three keys to the left.
Fast Forward. Move the selector to the rightmost key.
Rewind. Move the selector to the leftmost key.
Remote Control Buttons and Shortcuts in the Menus
• Next. Within a menu list, go to the end of the list.
•
• Page Up and Page Down. Page up or down within a list of items.
•
• 0 - 9. Narrow selections in media browsing. For instance, press 2 to cycle through A, B,
•
•
Previous. Within a menu list, go to the beginning of the list.
Source. Navigate to Main Menu > Browse folders.
C, and 2 to narrow the selection. Repeat to further narrow the selection.
Information. Access Now Playing (from the main menu only). From Now Playing,
press the left or right arrow key to view now playing information from other NTV550 or
Digital Entertainer devices on the network. Press Popup Menu to access more options,
including Follow Me, allowing media playback to be moved or copied to another NeoTV
device.
Aspect. Start the screen saver manually.
Chapter 1. Getting Started | 13
Page 14

2. Browsing and Organizing Media
The Ultimate HD Media Player can access media from CIFS (Windows file shares), Samba,
NFS, and DLNA/UPNP. NFS (available on most NAS type devices) typically offers the best
performance, followed by CIFS/SMB. Note that to access DVD media, or to play media with
associated external subtitles, use NFS/CIFS/Samba, not DLNA/UPNP.
For information about supported media file formats, see Supported Digital Media File
Formats on page 65.
CAUTION:
Displaying static images can cause burn-in on certain displays. Do not
display static images (such as menus, photos, or paused videos)
onscreen for long periods of time.
Media on Your Portable Media Player (USB Device)
2
You can connect up to two USB flash drives or a media player such as an iPod to a USB port
on the front or rear panel of the Ultimate HD Media Player. The Ultimate HD Media Player
plays files stored in Windows (FAT, FAT32, NTFS), Macintosh, or Linux disk formats. It does
not matter if you set up the media player on a PC or a Mac.
Note: Be sure to use USB 2.0 devices with your Ultimate HD Media
Player. The limited bandwidth of the older USB1.0 devices might
interfere with the performance of your playback.
To play media:
1. Connect your USB product to the USB port on the front or rear of the Ultimate HD
Media Player.
The Ultimate HD Media Player scans the media, and then the media files are available
for you to play.
2. Press Video, Music, or Photos on the remote control, and then select and play the media.
Chapter 2. Browsing and Organizing Media | 14
Page 15
NTV550 Ultimate HD Media Player User Manual
Protected Media Files
You can play most media files that are protected by digital rights management (DRM) on an
Ultimate HD Media Player by selecting the Enable UPnP media sharing check box in the
Configuration Wizard.
Browsing with Live Folder or the Media Library
The Ultimate HD Media Player has two main ways of browsing media:
• Browse the NTV550 media library by category.
• Browse by folder.
Browsing the Media Library
For fastest browsing, add shared media on your network to the NTV550 media library. You
can use the Configuration Wizard to do this, or select Settings > Media Locations > Scan.
The Ultimate HD Media Player scans these locations for media files from sources on your
network, whether they are on NAS devices, PCs, or attached storage, and aggregates the
files into a library. Then you can browse by name, genre, artist, date, cover art, and so on.
To browse the NTV550 media library, use the Video, Music, and Photos menu selections to
browse by categories. You do not need to think about where the media is actually located.
If you add new shared media on computers on your network, you can quickly add it to the
NTV550 media library by selecting Settings > Media Locations > Scan. The Ultimate HD
Media Player scans your selected media locations and updates the library. The library is also
updated to reflect media that has been removed. You can continue to browse the media
library and play media while scanning is ongoing.
Chapter 2. Browsing and Organizing Media | 15
Page 16

NTV550 Ultimate HD Media Player User Manual
Live Folder Browsing
Live Folder Browsing is like using Windows File Manager to browse your network to find a
file. When you browse by folder, you see new media on your network immediately. However,
you cannot use categories. Instead of using categories, you locate the media by navigating
the folders where it resides. Only the media locations that are also in your NTV550 media
library are listed.
The main reason to use Live Folder Browsing is if you added a new media files to shared
folders and don't want to take the time to do a scan before playing it (to add it to the media
library). You can use Live Folder Browsing to go directly to the file and play it.
To use Live Folder Browsing:
1. Select Browse Folders from the main menu, or from the Video, Music, and Photos
menus.
2. To see all network folders, press the Popup Menu button, or edit your media locations to
view more network folders.
3. To edit media locations, go to Settings > Media locations > Select media locations.
4. Press Play on a folder to play all the media in the folder.
For example, pressing Play on a folder containing .jpg files starts a slideshow from the
photos in the folder. If the folder contains one or more DVD files, then Play shows a menu
listing the available files. From the folder, press OK to choose which DVD to play.
Tips for Browsing and Searching
You can browse by the type of media that you want (such as videos), or you can browse by
folder. Here are some tips to help you quickly locate media files.
• You can combine categories to narrow your search. For example, you can browse by
genre and then by rating to get to R-rated action movies.
• Some audio or video files might be stored without information in some fields, such as
album or genre. If this is the case, these tracks are listed in a category called Unknown.
• You can enter letters contained in a title to quickly find a media file by name when
browsing. For example, enter EYE to find both Goldeneye and For your Eyes Only.
• When browsing on an iPod, note that iTunes uses an unusual file-naming convention to
store music files on the iPod. The Ultimate HD Media Player can display only the folder
names as they are saved on the iPod. To find the files, use other criteria such as artist or
genre.
• To enter letters, tap the number button to get the letters that you want. For example, tap 6
twice to change from M to N.
16 | Chapter 2. Browsing and Organizing Media
Page 17
NTV550 Ultimate HD Media Player User Manual
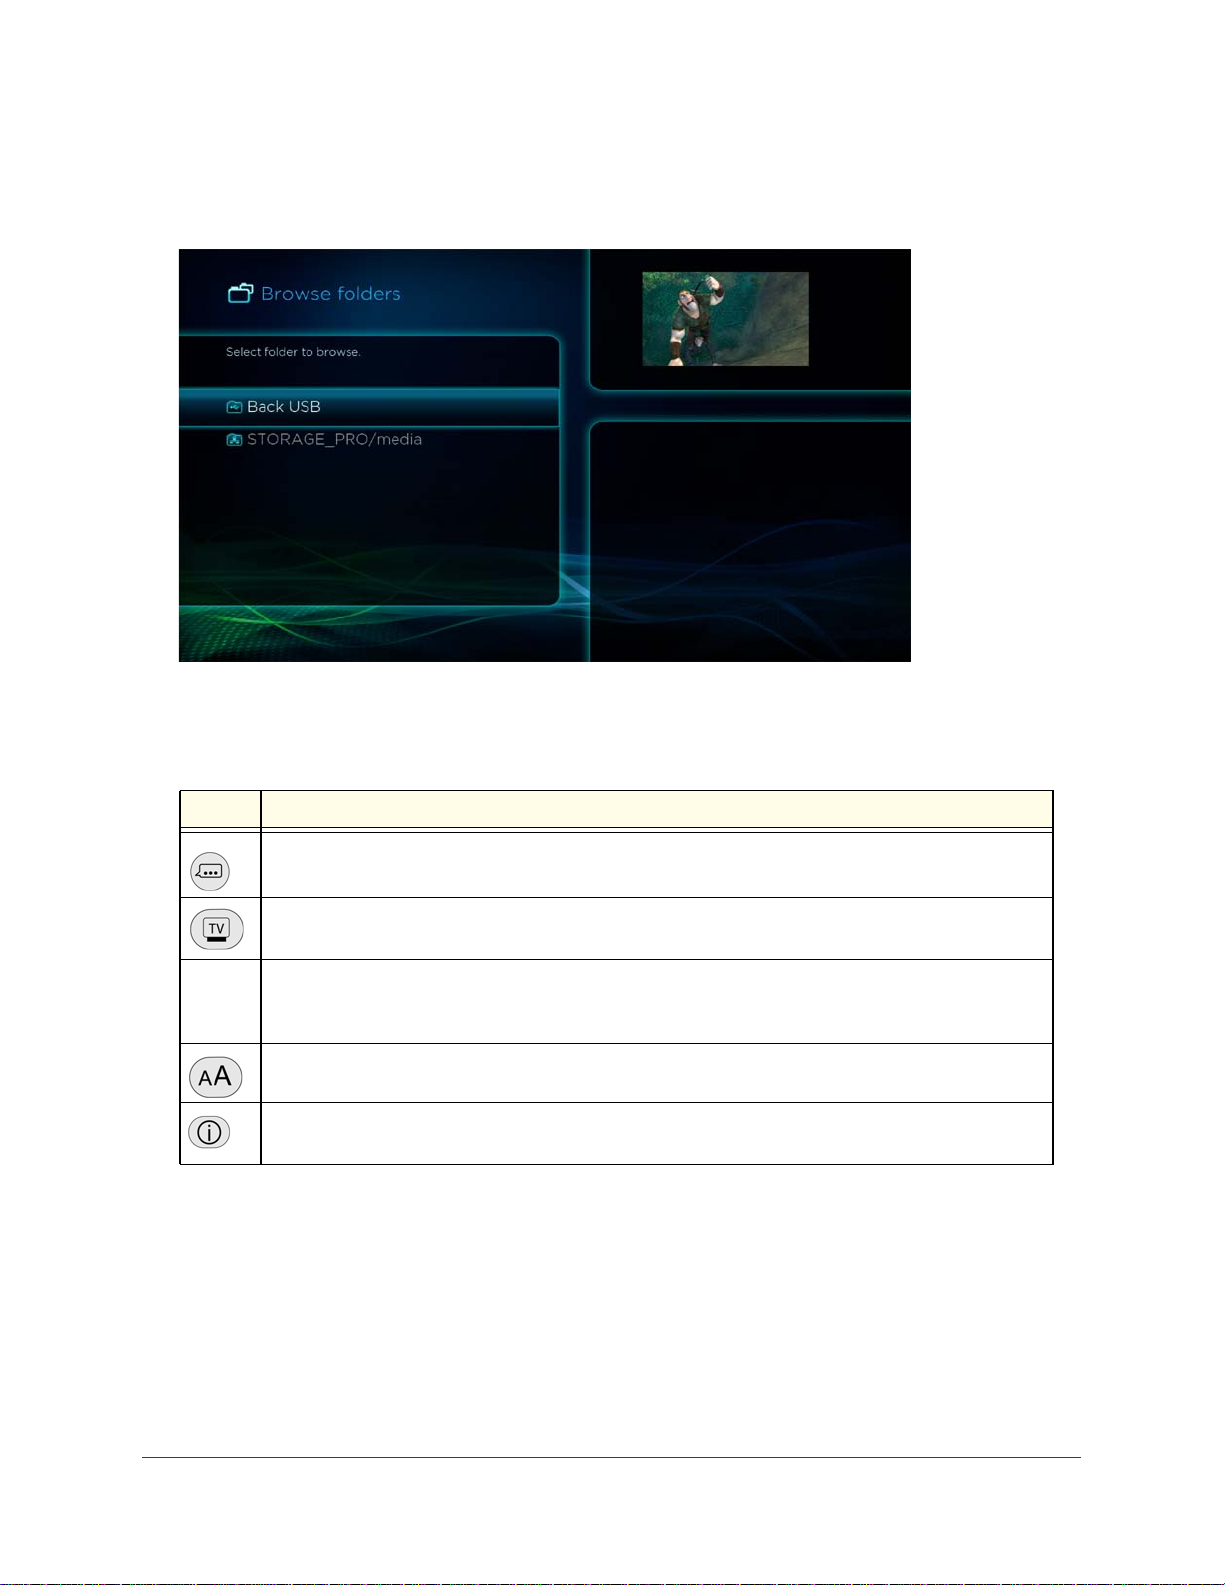
Browse Folders
Press Home and select Browse Folders, and the following screen displays:
Use this feature to locate media by location. You will see all kinds of media located within
each folder. For instance, you can see your music files, and your videos.
Table 1. Remote Control Buttons While Browsing Media
Button Description
Toggle between list view and cover view.
Within cover view, toggle between a single row of covers (“gallery view”) and a 10x3 screen of
covers (“poster view”).
0–9
Narrow the selected media (for example, press 2 to cycle A, B, C, 2). In cover view, what you type
is visible in the Search box at the upper right. In list view, what you type is visible above the list of
media.
Toggle between sorting alphabetically and by most recently accessed.
Show full screen details on the selected media, including metadata and MediaInfo details for video
and music, and EXIF details for photos.
Chapter 2. Browsing and Organizing Media | 17
Page 18

NTV550 Ultimate HD Media Player User Manual
Cover Art
The Ultimate HD Media Player can associate cover art, descriptions, and other media
metadata with videos. Spending a few minutes to tag your media results in a richer browsing
experience. You can tag media using the NETGEAR Tag Tool, or you can use other software
such as MyMovies. In general, tagging media means creating a .tag file with the same name
as the media, and that contains the media metadata and cover art. If you want only cover art,
you can add .jpg format covers to your videos by placing a .jpg file in the same folder as the
video, and giving it the same name as the video. If you have multiple videos in a folder and
you want them to use the same cover, add a file called folder.jpg in the folder.
When you browse media on the Ultimate HD Media Player, you can browse in list form or as
cover art.
Note: For the best cover art browsing results, make sure the image cache
is set to a fixed, fast location (either on an attached USB / eSATA
drive or SD card), or a fast network share. Set the Image Cache
location in Settings > Audio/Video > Playback Options.
When browsing video in cover view, only videos that have cover art are shown with covers.
Other videos are represented within the folders that contain them. You can add cover art at
any time as described earlier. Highlight the video that you have added the cover to, and the
new cover is loaded and cached.
When you are browsing music in cover view, one cover is shown for every album.
Finding Media on Your Network
The Ultimate HD Media Player can access media from CIFS (Windows file shares), Samba,
NFS, and DLNA/UPNP. NFS (available on most NAS type devices) typically offers the best
performance, followed by CIFS/SMB. Note that to access DVD media, or to play media with
associated external subtitles, use NFS, CIFS, or Samba, not DLNA or UPNP.
If your media is on a Windows PC, it is sometimes not sufficient to simply share the folder
containing the media. For best results or if you are having difficulty seeing your media from
the Ultimate HD Media Player, you should run the NeoTV Configuration Wizard for
Windows/Mac, which will locate your media on your PC and share the media folders so they
are accessible by the Ultimate HD Media Player.
To test the speed of your network connection from the Ultimate HD Media Player to your
media servers, use the Network Test option available in Settings > Network. Network Test
shows the average throughput for each network share that you have selected in Media
Locations. The most demanding media streams typically require at least 50 Mbps of network
throughput.
18 | Chapter 2. Browsing and Organizing Media
Page 19

NTV550 Ultimate HD Media Player User Manual
Parental Controls
The Ultimate HD Media Player supports a variety of parental controls. To activate parental
controls, select Settings > Parental controls, and set the supervisor PIN. (For set up
information, see
Once the PIN is set, the parental controls you can configure on this screen are active. Note
that the PIN is also required for accessing the settings.
• You can restrict access to media in the NTV550 library by MPAA rating (G, PG, PG-13,
and so on). You can use the Tag Tool to set the rating. Set the age rating permission in
Settings > Parental controls. Media that is disallowed by the age rating setting is not
shown when you are browsing. Note that media that is not tagged carries the rating NR
(not rated), which is the equivalent of the most restricted.
• You can restrict access to specific media share locations.
• You can restrict access to online media content.
When you are browsing media, if some media has been excluded due to parental controls,
you will see a message Press <Eject> to browse all media. This allows you to enter the
parental control PIN to access the media.
Parental Controls on page 39.)
Once the PIN has been entered, it unlocks restricted media for 1 hour.
Chapter 2. Browsing and Organizing Media | 19
Page 20
3. Playing Media
CAUTION:
Displaying static images can cause burn-in on certain displays. Do not
display static images (such as menus, photos, or paused videos)
onscreen for long periods of time.
Watching Videos
The Ultimate HD Media Player finds the video files on your computer’s hard disk, on other
computers, on external hard drives, or on other storage devices on the network. Downloaded
content from noncommercial sources might be of varying quality, and might not play back
correctly.
To watch a video:
3
1. Aim the remote control at the HD media player, and either press
Home, and select Video. The following screen displays:
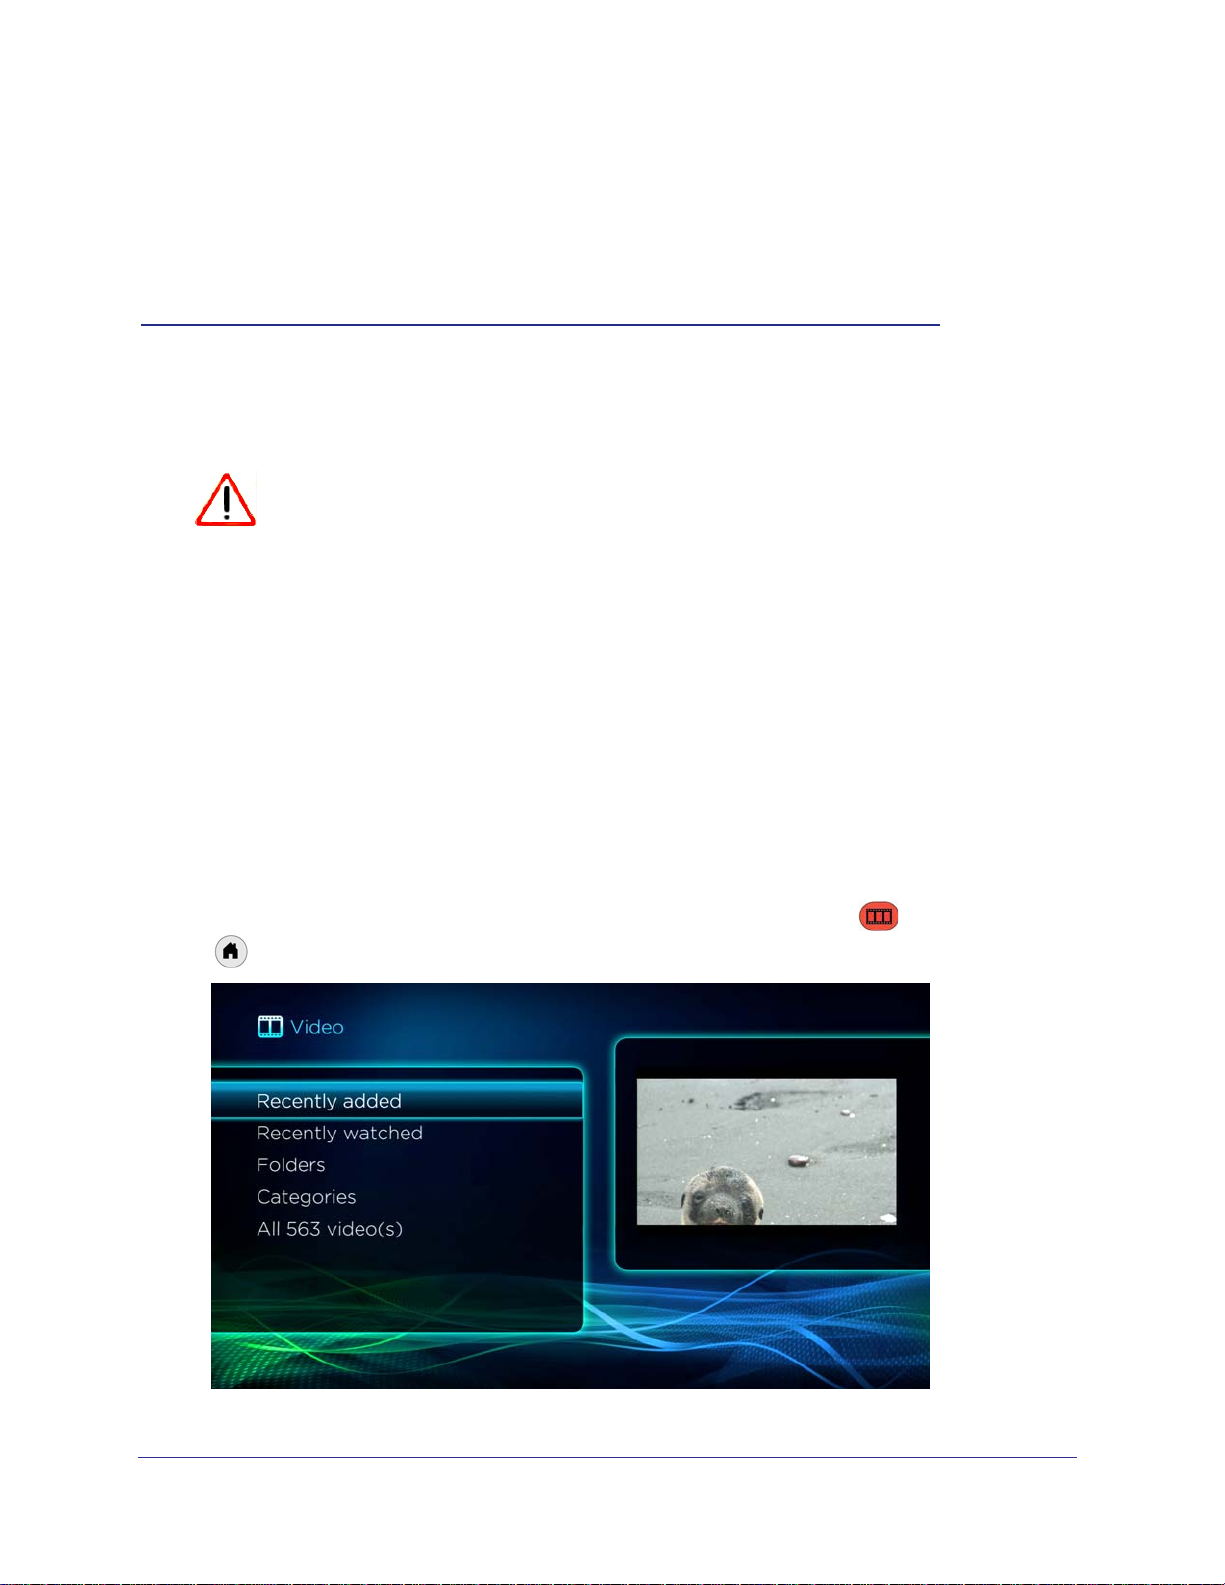
Chapter 3. Playing Media | 20
Video, or press
Page 21
NTV550 Ultimate HD Media Player User Manual
2. Browse videos based on your preference.
• Recently added. View the most recently added videos and select the one you want.
• Recently watched. View recently watched videos and select the one you want.
• Folders. Browse folders to locate the video you want to watch.
• Categories. View videos by categories.
• All video(s). View a list of all videos.
3. Select the video that you want to watch.
• OK plays the selected video.
• Play plays the selected video, and then plays the rest of the videos in the order
shown on the screen.
4. When the video is playing you can use the remote control buttons to customize viewing:
• The Page Up and Page Down buttons zoom the video in or out. Press
twice to restore the original size.
• Press 0–9 to skip to 10% - 90% of the video by elapsed time. Pressing 0 restarts the
video from the beginning.
• To display information about the video, press the i button on the remote control.
• Popup menus are described in the following section.
Home
5. If you want to add videos to a playlist, press the
Angle button.
Popup Menus during Video Playback
While a video is playing you can use the remote control buttons to open popup menus.
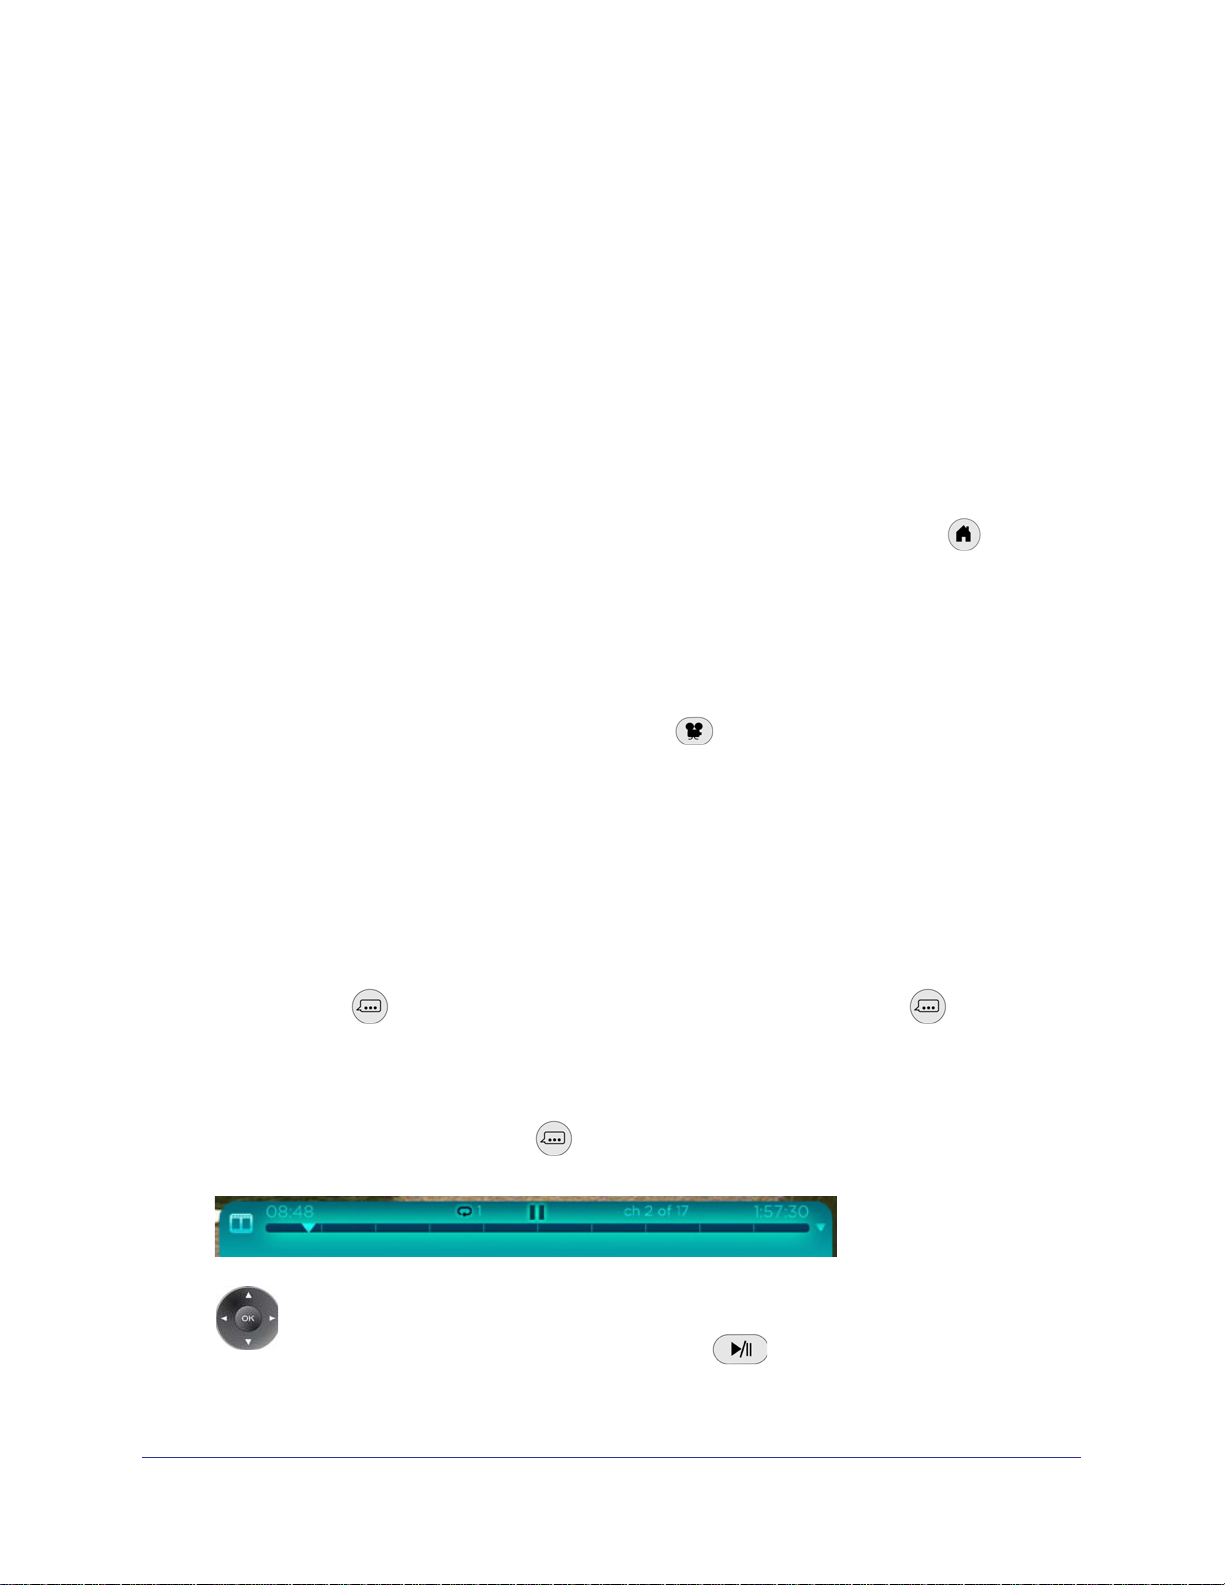
Video Media Bar
You can use the media bar for fast seek within a video or to access a playlist. To display the
media bar, press
the media bar.
The media bar has two views, elapsed time and playlist. On the remote control, use the up
and down arrows by the OK button to change between the elapsed time and playlist view.
• Elapsed time. When you press Popup Menu on the remote control, the elapsed
time view displays.
For fast seek mode, use the left and right arrows. The video is paused and you
can move the cursor to the place you want to resume watching. Press the left or
right arrow button again to go faster. Press
Popup Menu while you are watching a video. Press again to exit
Play to resume the video.
Chapter 3. Playing Media | 21
Page 22
NTV550 Ultimate HD Media Player User Manual
• Playlist. You can use the media bar to navigate the play list. Press the down arrow by the
OK button to display the playlist. When the media bar is in playlist view, navigate between
files in the playlist (the currently playing file is shown with a speaker icon). Press OK to
resume playback at the selected item.
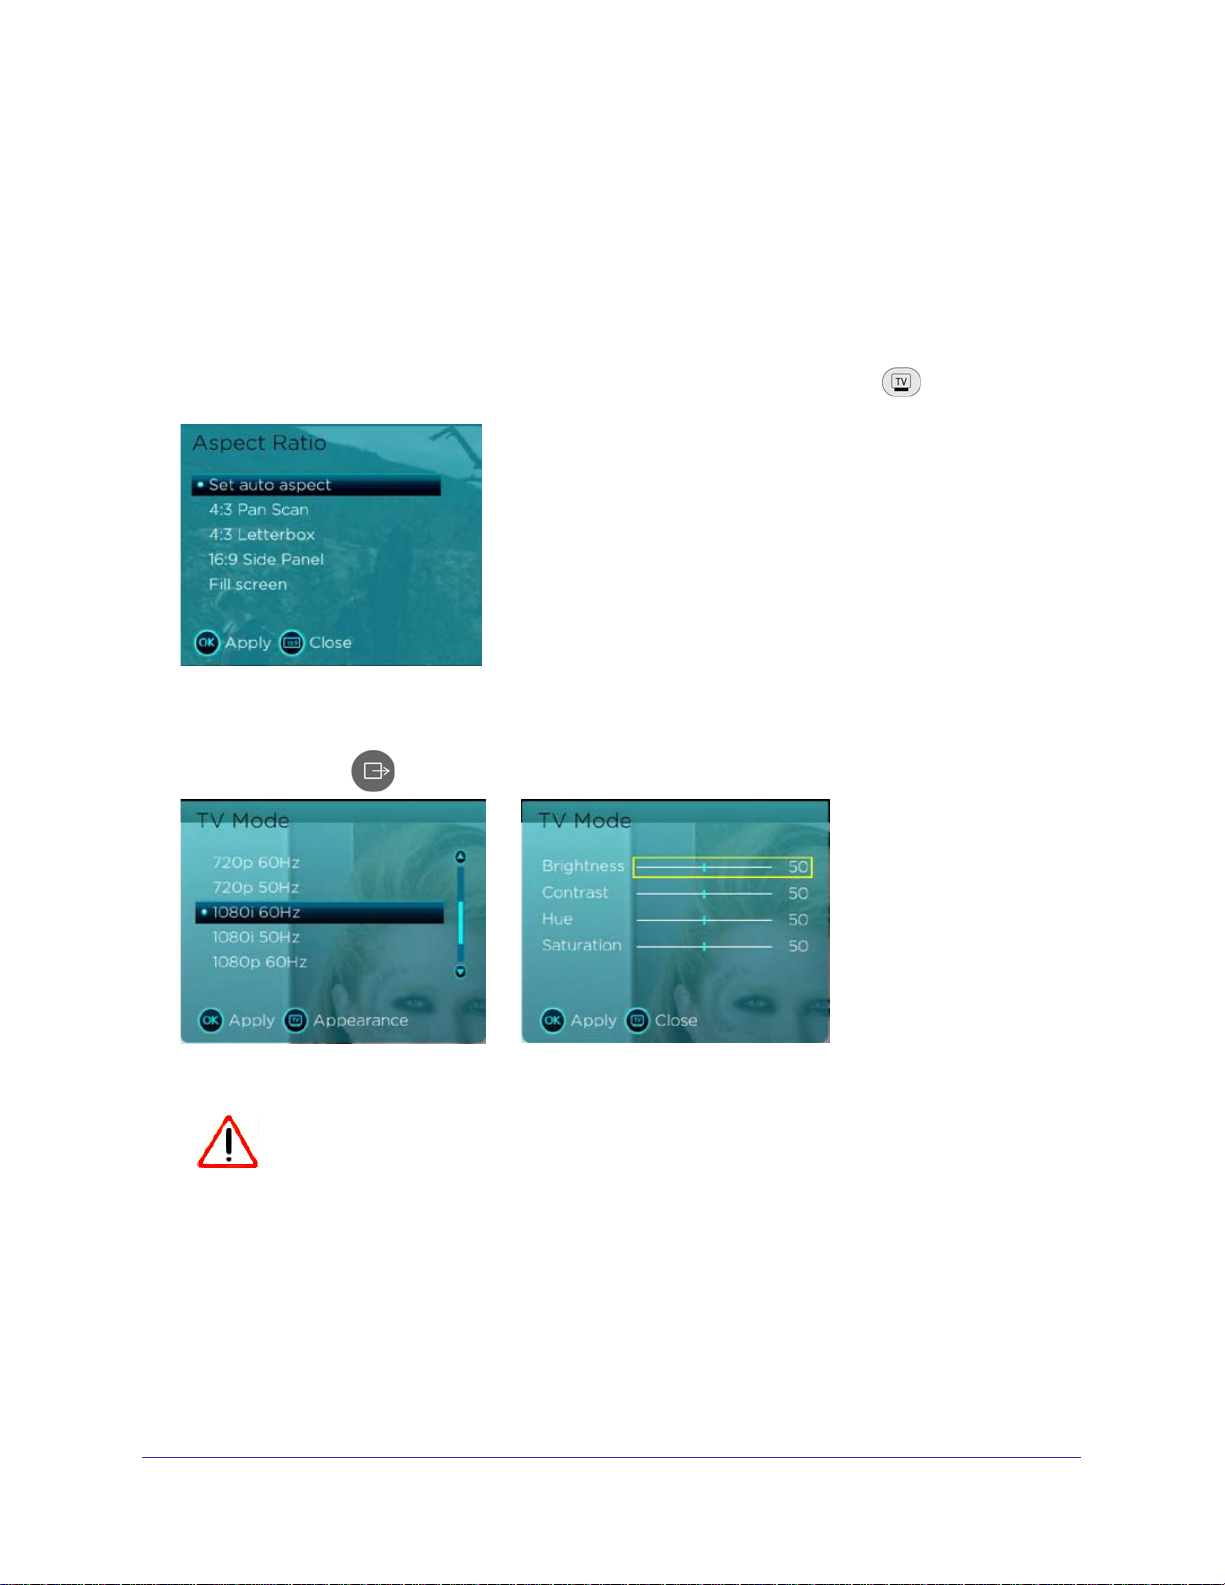
Video Aspect Ratio
To change the aspect ratio only while watching the current video, press Aspect. The
Aspect Ratio popup menu displays:
TV Mode and Display Settings
You can use the TV Mode button to display the TV Mode popup menu:
Use care when changing the TV mode.
CAUTION:
Selecting the wrong TV mode can cause a loss of picture.
For you to go to the TV Mode popup, a video has to be playing in full screen mode (not
picture-in-picture). You can change the TV mode setting or the appearance.
• TV Mode Setting. This advanced feature is especially useful for changing to a 50Hz
mode for smoothest playback of 25 fps (frames per second) video, to a 60 Hz mode for
30 fps video, or to 1080P24 mode for 24 fps video.
• Appearance. Change the display settings for brightness, contrast, hue, and saturation.
22 | Chapter 3. Playing Media
Page 23

NTV550 Ultimate HD Media Player User Manual
Subtitles
You can change the subtitle track or language, and adjust the color, size, positioning, and
timing of subtitles. The NTV550 supports a variety of subtitle formats, including external
subtitles (SUB/IDX, SRT, SUB, SMI), and embedded subtitles (DVD, PGS, and MKV).
To display or change subtitles for a movie, press
displays:
For movies with text subtitles, you can control the text color and the position of the subtitle.
While the subtitle popup is visible, press
Note: You can select the preferred subtitle language in Settings > Audio /
Video > Playback options.
Subtitle again to change the appearance.
Subtitle, and the Subtitle popup menu
Audio Track
Press Audio to select an audio track. The Audio popup menu displays:
Note that there might be a brief delay while the audio track is switched.
Chapter 3. Playing Media | 23
Page 24

NTV550 Ultimate HD Media Player User Manual
Time Seek
Press Time Seek to go to a specific time or scene within a video. The Time Seek popup
menu displays:
Resuming Video Playback
If you are watching a video and you exit, the Ultimate HD Media Player remembers where
you stopped the video. When browsing, videos that have been watched are indicated with a
half circle symbol next to the name of the video. Videos that have been completely watched
are shown with a full circle. In list view, the circle icon is shown to the left of the video title.
If you resume playback, you are asked if you want to resume or start from the beginning. If
you have watched less than 1 minute, the video is not considered to be partially watched.
Also, if you are almost at the end of the video (less than 5 minutes from the end) the video is
considered to be completely watched.
Listening to Music
1. Press Music on the remote control, or press Home, and then select Music.
The following screen displays:
24 | Chapter 3. Playing Media
Page 25

NTV550 Ultimate HD Media Player User Manual
2. Browse according to your preference:
• Recently added. Display the most recent songs at the top of the list.
• Artists. Display a list sorted by artist in alphabetical order.
• Genre. Display a list of songs sorted by genre.
• Playlist. Select and play a playlist. Playlists should include only songs on the same
server as the playlist itself, or the songs might not be identified correctly.
• Categories. View songs by category.
• Folders. Browse folders to locate the songs you want to listen to.
• All song(s). Display all songs..
3. Select the music that you want to listen to.
• To play only one song, press OK.
• To play an entire album or list of songs, highlight the first song, and press
The rest of the songs will be played in the order shown.
When you browse and select a song, it is added to the list of playing songs. If the screen
saver comes on (as specified in Settings > User Interface), it shows the album art and
artist and track of the current song.
Play.
4. You can select the next song while you are listening to a song. To go to a song you selected,
either press
reach the song you want to hear.
Tip: To save the list of playing songs, press i on the remote control, select
View Playlist, and then select Save.
There might be a difference between the time displayed when you are browsing a song
and the time displayed when you are listening to the song. The time embedded in the
song file is shown in the browser, while the actual length of the audio file (calculated by
the Ultimate HD Media Player) is shown in the Now Playing screen.
5. If you want to queue more media to play, press Angle to toggle the queue to playlist mode.
When queue to playlist is on, OK queues the selected media file to the end of the playlist.
Tip: While the Music media bar is shown, you can use
seek within the track.
Stop before you select the song, or press Next repeatedly until you
and to time
Music Media Bar and Playlists
the Ultimate HD Media Player supports playlists up to a maximum of 250 tracks. If you are
listening to music, you can toggle the queue to playlist mode. To view your queue, press i
Information. You can click the media bar Source button to edit your playlist. Three
horizontal bars show the songs on the playlist. To save your playlist, select Now Playing and
save the playlist.
Chapter 3. Playing Media | 25
Page 26

NTV550 Ultimate HD Media Player User Manual
You can use the media bar to access a playlist. To display the media bar, press Popup
Menu or
While the media bar is visible, the remote control buttons go to the media bar. Press
again to exit the media bar.
The media bar has two views, elapsed time and playlist. On the remote control, use the up
and down arrows by the OK button to change between the elapsed time and playlist view.
Audio while you are listening to music.
Media bar
• Elapsed time. When you press Popup Menu on the remote control, the elapsed
time view displays.
To use fast seek mode, use the left and right arrows. The song is paused, and you
can move the cursor to the place where you want to resume listening. Press the
left or right arrow button again to go faster. Press
the song.
• Playlist. You can use the media bar to navigate the play list. Down arrow shows the
playlist. When the media bar is in playlist view, navigate between files in the playlist (the
currently playing song is shown with a speaker icon). Press OK to resume playback at the
selected item.
(Play) to resume playing
Gapless Playback
With gapless playback, audio tracks are played without a pause between them. The Ultimate
HD Media Player plays music albums gaplessly if you press
tracks in order, either from the music category browse or live folder browse modes. If you
queue multiple albums, each album plays gaplessly with a delay between albums. Note that
there is a short delay when gapless playback starts while the album tracks are analyzed.
Also, all tracks in the album must use the same audio codec, and the metadata must indicate
that the tracks are from the same album. When an album is playing gaplessly, the elapsed
time and duration shown on the progress bar indicate times for the full album. The elapsed
time in the current track is shown in smaller text. To enable or disable gapless playback,
select Settings > Audio/Video > Audio. Gapless music playback is supported for MP3,
M4A, and FLAC media.
Play to play the album
26 | Chapter 3. Playing Media
Page 27

NTV550 Ultimate HD Media Player User Manual
Viewing Photos
The Ultimate HD Media Player finds the media files on an optional internal hard disk, on your
computer’s hard disk, on other computers, on external hard drives, or on other storage
devices on the network.
Tip: To play music while watching a photo slideshow, press
start playing a song or playlist. While the music is playing, press
Home, and then select the photos that you want to view with the
music in the background.
To view photos:
1. Press Photos on the remote control, or press Home, and then select Photos.
Music, and
2. Browse based on your preference:
• Recently added. Display the most recent photos at the top of the list.
• Year. Display photos by year.
• Camera. Display photos by camera.
• Categories. Browse photos by category.
• Folders. Browse folders to locate the photos you want to view.
• All photo(s). Display a list of all photos.
3. If you want to preview a selected photo, press OK to preview the photo full screen. During
preview you can rotate, zoom, or use the back and next buttons to go to the next or previous
photo. Press OK again to close the preview.
4. P
ress Play to start a slideshow from the currently selected photos in thumbnail or
preview mode. While you are viewing a slideshow or video, you can use the
picture-in-picture.
Chapter 3. Playing Media | 27
to go to
Page 28

NTV550 Ultimate HD Media Player User Manual
Adjusting the Photo Display
• Press Rotate to rotate the selected photo 90 degrees.
• To zoom in or out of a photo, press Page Up or Page Down. When the photo is zoomed
in, you can use the arrow keys by the OK button to pan the photo. In thumbnail view, you
can use the left and right arrow keys by the OK button to go to the previous or next photo.
Photo and Slideshow Media Bar
You can use the media bar to view the name of the current photo, resolution if known, and
repeat mode of the slide show. To display the media bar, press
are viewing a slideshow.
While the media bar is visible, the remote control buttons go to the media bar. Press
again to hide the media bar.
Popup Menu while you
Photo Aspect Ratio
To change the aspect ratio only while watching the current slideshow, press Aspect.
The Aspect Ratio popup menu displays:
Slideshow Options Menu
While you are watching a slideshow, press Menu to display the Slideshow Options
menu. You can change the type of transition effect, delay between transitions, fit to screen or
view full image.
28 | Chapter 3. Playing Media
Page 29

NTV550 Ultimate HD Media Player User Manual
Playing Internet Media
To go to the Internet Media screen, press Home, and then select Internet Media. The
Internet media screen offers these selections:
• YouTube video. View YouTube video as described in the following section.
• RadioTime. RadioTime presents a categorized list of Internet radio stations worldwide,
based on your location. See RadioTime on page 30.
• RadioIO/Shoutcast. Listen to Internet radio. See RadioIO/Shoutcast on page 31.
• Flickr photos. View photos stored at Flickr that you access over the Internet.
• Internet/News channels. Access and select Internet news channels. See Internet News
Channels on page 32.
• ReadyNAS Photos. View photos on a ReadyNAS device accessed over the Internet.
• Weather & maps. Access the Internet to view weather and maps. To receive local
weather you have to enter your zip code. You can enter your zip code during installation
or through local settings. See Internet Weather on page 33.
Viewing YouTube Content
You can use your Ultimate HD Media Player to view YouTube content and add items or
publishers to your favorites list. To do so, you need the Ultimate HD Media Player set up with
access to the Internet through your network.
To view YouTube videos:
1. Press
2. Select the option you want to use to retrieve YouTube content, and press OK.
• Most viewed. Go directly to the most viewed YouTube videos.
Home, and select Video > YouTube, or select Internet Media > YouTube.
Chapter 3. Playing Media | 29
Page 30

NTV550 Ultimate HD Media Player User Manual
• Top rated. Browse a list of top YouTube videos.
• Recently added. Displays your most recent YouTube favorites.
• Featured. View videos featured at YouTube.
• Search. Press Caps to display the onscreen keyboard, and then use the arrow
buttons on your remote control to enter a search term. Your last search tag is
displayed by default. Select OK on the onscreen keyboard to close the keyboard.
• Browse. Browse categories of videos, such as action or animals.
• My YouTube. Displays a list of your favorite videos.
The results of your search are displayed, with a preview of each item shown on the right
when an item in the list is selected.
3. Select the item you want to view, and press OK.
The Ultimate HD Media Player begins playing the YouTube item.
• Use the Zoom button to improve the picture quality when viewing YouTube content.
• When you have finished viewing the item, you can save this publisher or this item in
your favorites list for easy access in the future.
Customizing YouTube Video Playback
You can use the following buttons on the remote control to make adjustments while watching
videos:
• Fast forward, or press twice to skip to the next video.
•
• You can press Page Up and Page Down to zoom the video in or out. Press
•
Toggle the aspect ratio.
Home
twice to restore the original size.
Menu toggles to and from full screen mode.
RadioTime
RadioTime provides a categorized list of Internet radio stations based on your location. You
can search for programs by name or for content by key word. The screen contains these
selections:
• Local radio
• Music
• Talk
• Sports
• By Location,
• By Language
• Podcasts
• Search
30 | Chapter 3. Playing Media
Page 31

NTV550 Ultimate HD Media Player User Manual
RadioIO/Shoutcast
You can use your Ultimate HD Media Player to access and play Internet radio programming
and add items or publishers to your favorites list.
Note: Some Internet radio stations provide a low bit rate audio stream that
your amplifier or receiver might not support. Try connecting the
analog audio outputs of the Ultimate HD Media Player to the analog
inputs of your home audio amplifier or receiver, and switch the
device to that input when listening to a low bit rate Internet radio
station.
To access and play Internet radio programming:
1. Press
2. Select Internet Radio, and press OK.
- Browse station. You can browse by title, genre, or quality. Use the up or down
arrows and page up or down to scroll through the list. A preview of each item is shown
on the right when an item in the list is selected.
- Remove station. Remove an Internet radio station from the list.
- Add station. Add an Internet radio station to the list. You need to know the station’s
URL (Web address).
3. Select the item you want to play, and press OK.
The Ultimate HD Media Player begins playing that item.
When you have finished playing the item, you can save this station in your favorites list
for easy access in the future.
Tip: You can use the browser interface from the PC to add stations to the
Home, and select Music or select Internet Media.
favorites list.
Using the Remote Control When Playing Internet Radio
Only the Stop button is available when Internet radio is playing. Press the Stop
button to stop playing the Internet radio.
Chapter 3. Playing Media | 31
Page 32

NTV550 Ultimate HD Media Player User Manual
Internet News Channels
Internet Channels uses Really Simple Syndication (RSS) for accessing regularly updated
information such as news, podcasts, and blogs. Common sources are the major television
networks and wire services, as well as many Internet websites and portals.
Press
screen displays:
The Ultimate HD Media Player includes several common news feeds, and you can add your
own. To add your own list, select Add new RSS feed, and enter the URL (Web address) of
the RSS news feed as well as a descriptive title.
Home, and select Internet Media > Internet news channels. The following
You can locate the RSS feeds on your computer and use the Ultimate HD Media Player
browser interface to save the RSS feeds to view on your television.
32 | Chapter 3. Playing Media
Page 33

NTV550 Ultimate HD Media Player User Manual
Internet Weather
To view news and weather, you need the Ultimate HD Media Player set up with access to the
Internet through your network. To receive local weather, you have to enter your zip code. You
can enter your zip code during installation or using the Ultimate HD Media Player Settings
menu.
From the main menu, select Internet Media > Weather. The following screen displays:
Using More than One Ultimate HD Media Player
You can have multiple Ultimate HD Media Players on your home network. Features available
for this type of installation are:
• Room name. You can use the Setup Wizard to select a room name such as Living Room
for each Ultimate HD Media Player. See Settings Menu on page 34.
• Follow me. Move the programming from one room to another (press
Information, and select Follow me). The video starts from the beginning on the second
Ultimate HD Media Player. To have all Ultimate HD Media Players play the same music
simultaneously, select Everywhere; or add rooms one at a time.
• Send message. Send messages from one Ultimate HD Media Player to another (press
Home, Information, and select Send message).
• Monitor another Ultimate HD Media Player. To monitor what is playing in another room,
press
scroll between rooms.
Home, Information, and use the left and right remote control buttons to
Home,
Chapter 3. Playing Media | 33
Page 34

4. Settings
Settings Menu
Press Home, and select Settings. The Settings menu displays:
4
This screen offers the following selections:
• Setup wizard. Enter or change the settings for the Ultimate HD Media Player.
• Audio/Video. Display the audio/video settings. See Audio/Video on page 36.
• Media locations. View media locations that the Ultimate HD Media Player discovered.
See Media Locations on page 38.
• Parental controls and security. See Parental Controls on page 39.
• User interface. Select the language, and specify other details about the user interface.
• Network. Specify a wired LAN connection, standalone mode, or use a network test.
• System. System information is useful for troubleshooting network problems or accessing
information or settings needed for for technical support.
Chapter 4. Settings | 34
Page 35

NTV550 Ultimate HD Media Player User Manual
Setup Wizard
Press Home, and select Settings > Setup Wizard. The following screen displays:
The Setup Wizard steps you through a series of screens to set up your Ultimate HD Media
Player. You are prompted to enter the following information:
• Language. Select a language from the list.
• Verify sound. The Ultimate HD Media Player plays an audio tone to confirm that the
audio is working correctly.
• TV Mode. By default this is Auto. You can cycle through the TV modes to see which
works best with your TV.
• Select a room name. This question displays only if you have more than one Ultimate HD
Media Player in your home.
• Set your location. Enter your region, city, or zip code.
• Select media servers. This question displays only if you have a large number of shares.
If the Setup Wizard does not locate your media, you can select I don’t see media, which
offers you the choice to search again, add a manual share (specify where your media is
located), or go to the main menu.
Chapter 4. Settings | 35
Page 36

NTV550 Ultimate HD Media Player User Manual
Audio/Video
Press Home, and select Settings > Audio/Video. You can view or change the following
audio/video settings.
• Display. Access display settings as shown in the following section, Display .
• Audio. Access audio settings as shown in the section Audio on page 37.
• Playback options. Access settings associated with video playback and slideshow.
Display
Select Settings > Audio/Video > Display to go to the following screen:
View or change the settings to customize the display.
• Display type. Switch between North America (NTSC, 60 Hz) and Europe (PAL, 50 Hz)
display modes. The default is North America.
• Display mode. For a high-definition TV, select the appropriate resolution.
• Auto FPS. Automatically set the TV display mode to match the frames per second (FPS)
when playing videos.
• Aspect ratio. When set to Auto, the aspect ratio defaults to the same setting as the
content you are viewing.
36 | Chapter 4. Settings
Page 37

NTV550 Ultimate HD Media Player User Manual
Audio
Select Settings > Audio/Video > Audio to go to the following screen:
The following settings are available:
• Volume level lock. By default, this is set to not fixed.
- Not fixed. With this setting you can use the volume control buttons on the remote
control to change the NTV550 volume. The NTV550 starts up at the same volume
level as the last time it was used.
- Fixed. The volume level stays the same, and the volume buttons on the remote
control do not work. This setting is useful if you use the volume level of your home
theater and want the NTV550 to always use the same volume setting.
• DRC. Dynamic range compression. This limits the range of the volume.
• Gapless playback. When playing music, listen to tracks without pauses in between
them. This applies to MP3, M4A (iTunes), and flac audio tracks. For M2TS videos from
camcorders, view videos without gaps between them.
• Audio passthrough. You can choose to let your audio system handle the sound. HDMI
can use up to 7.1 channels of bitstream audio. If your receiver supports it you can use
S/PDIF optical up to 5.1.
• Reset defaults. Click Reset to return the audio settings to their factory default settings.
Chapter 4. Settings | 37
Page 38

NTV550 Ultimate HD Media Player User Manual
Media Locations
The Ultimate HD Media Player remembers where it has found media in shared folders on the
network. This lets the Ultimate HD Media Player find media faster.
Select Settings > Media Locations to display the following screen:
The following selections are available:
• Scan for media. Click Scan to scan for media files.
• Select media sources. Specify which shared folders the Ultimate HD Media Player
should check when it scans for media files. See Media Sources on page 39.
• File share discovery. Locate shared media files.
• Scan attached devices. Click Scan to scan attached devices for media files.
• Daily scan. This is disabled by default. You can set up a daily scan for media files at the
time you specify.
This option requires your computer to be on and the shared files available at the specified
time. If your computer is in sleep, standby, or any mode other than on, the scan will find
no shared files, and your library will contain no media. To avoid this, you can disable Daily
auto-scan, or leave the computer on, or enable the computer Wake on LAN feature so
that your computer is activated by the scan.
• Clear library. Clear the memory of where media files are located from the Ultimate HD
Media Player.
38 | Chapter 4. Settings
Page 39

NTV550 Ultimate HD Media Player User Manual
Media Sources
The Media Sources screen shows a list of media shares. You can select and deselect shares.
You can use this screen to:
• Rescan the network if you do not see your media shares.
• Add a server or share manually.
• Access share details to provide a password, edit the share location, or select what kind of
content to scan in the share (music, videos, photos, or a combination of these.)
• You can delete shares from the edit details screen.
Parental Controls
You can use parental controls to add a password to view sensitive content based the media
file rating or by location.
Select Settings > Parental controls and security. The following selections are available:
• Supervisor password. Specify the password that a viewer has to enter to watch
sensitive content after you set up parental controls.
• Parental control. Select the rating that you want to control from the drop-down list.
• Room access. Specify a password to enter when watching media by room.
• HTML Access. Restrict HTML access.
• Share restrictions. Restrict network shares.
You can block video files by rating, or block any files based on their location.
To block video files by rating:
Mark the files with a rating and then select a rating level on your Ultimate HD Media Player:
1. Use the NETGEAR Tag Tool application to tag video files with an MPAA or TV rating.
From the Windows Start menu, select All Programs > NETGEAR Digital Entertainer
for Windows > Tag Tool.
Note: Files without tags are considered “NR” or Not Rated, the most
sensitive and highest rating. Files restricted by rating do not have to
be in the same folder.
2. Change the supervisor password on your Ultimate HD Media Player:
a. Press
b. In the Supervisor password field, click Setup. Enter a new password, and press
OK.
Home and select Settings > Parental controls and security.
Chapter 4. Settings | 39
Page 40

NTV550 Ultimate HD Media Player User Manual
Be sure you pick a password that is easy to remember, or store it in a safe place.
Table 1. Remote Control Tips
Button In an Edit Field
Navigation arrows. Go to the previous or next field.
Left arrow erases 1 character.
Right arrow goes to the next field or button on a screen.
OK Edit the selected item.
0–9 Enter characters into the edit field.
3. Select Settings > Parental controls and security.
4. Select the standard entertainment industry ratings such as G, PG, NR, and so on.
You can access files with the selected rating or a lower rating (higher up on the menu),
but you cannot access files tagged with a higher rating. For example, if you select PG-13,
all files with a PG-13, PG, TVPG, or G rating are accessible at all times. However, files
with TV-14, R, NC17, TVMA, or NR (no rating set) are accessible only if you enter the
supervisor password.
Select the NR rating to allow access to all shared media files.
Note: To temporarily suspend parental controls for 20 minutes and display
blocked files, enter the supervisor password. To re-establish parental
controls, press the power button to turn the device off and back on.
To block files by location:
Choose the shared folders that require a supervisor password:
1. Place the files in a shared folder.
2. Press
Home on the remote and select Settings > Parental controls and security >
Share Restrictions.
3. Select the check boxes next to the shared folders that require a supervisor password.
Folders with a checked box can be accessed only with the supervisor password.
4. (Optional) Enter an additional password for each protected folder:
a. Press
Home, and select Settings > Media Locations and select which servers
to scan.
b. Highlight the shared folder that is password protected with parental controls.
c. Press
d. Select OK.
40 | Chapter 4. Settings
Menu and enter a user name and password.
Page 41

NTV550 Ultimate HD Media Player User Manual
User Interface
You can select a language, and you can customize the user interface. This affects the
appearance of the Ultimate HD Media Player menu displays on your television. Select
Settings > User Interface to display the following screen:
Make the changes that you want, and then press OK on the remote control. You can adjust
the following fields in this screen:
• Language. Select a language for the Ultimate HD Media Player menus.
• Skin selection. Select a skin from the drop-down list, or click Custom skin to create a
new skin. The skin image is limited to the background and font based on files picked up
during the scan.
• Menu wrap. When Menu wrap is turned on, if you scroll down past the last menu
selection, the scrolling automatically goes back to the first item on the list.
• Screen saver. You can set the interval after which a screen saver will protect your TV
from image burn-in. You can use the Image option to use a picture from your library as
your screensaver.
Chapter 4. Settings | 41
Page 42

NTV550 Ultimate HD Media Player User Manual
Network
The Network screen lets you specify a wired network connection, standalone operation, or
run a network test. Select Settings > Network to display the following screen:
You can select from three types of network connections to your Ultimate HD Media Player:
• Wired. You are using an Ethernet cable for a local area network (LAN) connection.
• Standalone. You do not want to access a network, only USB devices connected directly
to your Ultimate HD Media Player.
• Network test. Test the network performance.
Note: To connect the Ultimate HD Media Player wirelessly to your home
router, you need the NETGEAR Universal Wi-Fi Internet adapter
WNCE2001 (sold separately). If you want to use a Powerline
connection, you can use the NETGEAR Home Theater Internet
Connection Kit XAVB1004 (sold separately).
42 | Chapter 4. Settings
Page 43

NTV550 Ultimate HD Media Player User Manual
System Menu
Select Settings > System to display the following screen:
The following selections are available:
• Location, weather & time. Specify your location and time zone, and synchronize your
Ultimate HD Media Player to an Internet time server.
• Power management. The settings in this screen are Auto power off, Auto standby off,
and Remote power key (the
• Update. Update the firmware for the Ultimate HD Media Player either from a USB device
or over the Internet. See Updating the Firmware on page 44.
• Manage files. Copy files from one location to another.
• Advanced. Display the Advanced Settings screen as described in Advanced Settings on
page 45.
• System information. View system information. See System Information on page 46.
• Restore factory defaults. This resets all the options to the default values as of the last
installed firmware, and requires a system restart.
power button in the remote control).
Chapter 4. Settings | 43
Page 44

NTV550 Ultimate HD Media Player User Manual
Updating the Firmware
To update the firmware on your Ultimate HD Media Player, press Home, and select
Settings > Update.
CAUTION:
Your display might go black for several seconds while the updater starts.
Do not power off the unit during this process.
• To check for firmware updates for the Ultimate HD Media Player on the NETGEAR
website, select Update from the Internet, and follow the onscreen prompts.
• If the firmware file is located on a USB storage device, connect the device to the USB port
of your Ultimate HD Media Player, and select Specify a location. Uncompress the .zip
file, if necessary. The .img firmware file has to be on the top level (root) of the device. If
more than one file is on the device, you are prompted to select a file.
• When the update is complete, the Ultimate HD Media Player restarts.
WARNING!
Be sure that power to your Ultimate HD Media Player unit is not
interrupted during the firmware update process. Failure to
observe this precaution can permanently damage the unit.
Manage Files
This feature allows you to copy files from one location to another. Select Settings > Manage
Files to display the following screen:
Select the files that you want. Then specify the destination location for the copied files.
44 | Chapter 4. Settings
Page 45

NTV550 Ultimate HD Media Player User Manual
Advanced Settings
Select Settings > System > Advanced to display the following screen:
The following selections are available:
• SACK processing. SACK audio processing is used for debugging only.
• Clear ‘resume playback’. By default, the Ultimate HD Media Player remembers where
media was paused, and will resume playback at that location in the file. This feature
clears the setting from memory.
• System log. You can enable a system log here. Typically, this is used only for debugging.
• Restart. Shut down and restart the Ultimate HD Media Player.
Chapter 4. Settings | 45
Page 46

NTV550 Ultimate HD Media Player User Manual
System Information
System information is useful for troubleshooting network problems or providing information to
technical support. Select Settings > System > System Information to display the following
screen:
The System Information screen displays free memory, version information (kernel and
firmware), network information (LAN), IP address, MAC, broadcast information, and gateway.
• Free memory and Version information (Kernel and firmware currently running on your
NTV550).
• Network information (LAN).
- Room. The room name for the Ultimate HD Media Player. If you have more than one
unit, you can customize this to identify each unit in your network.
- NETBIOS. The NETBIOS version.
- IP address. The IP address for the NTV550.
- MAC. The unique MAC address for the NTV550. This is also on the product label.
• Nameserver. The IP address of the server on your network that resolves host names.
• Media library. Lists RAM size consumed by the media library, and the date and time of
the last media scan.
46 | Chapter 4. Settings
Page 47

5. Using Your PC with the NTV550
The Ultimate HD Media Player comes with a Resource CD with software you can install on your
PC. This software includes the Configuration Wizard and the NETGEAR NeoTV for Windows
application.
• Configuration Wizard. The Configuration Wizard helps you set up shared media on your
network so that the NTV550 Ultimate HD Media Player can access it. Although you can
use the Windows Sharing and Security option to share media folders, it is easier to use
the Configuration Wizard.
• NeoTV for Windows application. You can use this to manage your Ultimate HD Media
Player from your computer.
Controlling the Ultimate HD Media Player from a Windows PC
5
You can control the Ultimate HD Media Player from your PC using 2 methods:
• Open a Web browser and type the IP address of the NTV550. To find the IP address, on
the NTV550 TV menus, select Settings > System > System Info.
This provides a Web interface for using the Ultimate HD Media Player. You can also use
the interface to set up the Ultimate HD Media Player. Some operations (such as adding
your own RSS feeds) are easiest from the Web interface, since you can use the
keyboard of your PC instead of the on-screen keyboard of the Ultimate HD Media Player.
• If you install the NeoTV for Windows software, run the NeoTV for Windows application,
which creates an icon in the system tray. Click the icon and select Status to view which
media your Ultimate HD Media Player (or other NETGEAR Digital Entertainer devices) is
playing.
Chapter 5. Using Your PC with the NTV550 | 47
Page 48

NTV550 Ultimate HD Media Player User Manual
Installing the Resource CD Software on a Windows PC
1. Power on your computer, and log in as necessary.
2. Insert the Resource CD into the CD drive on the computer.
3. The Welcome screen displays.
If you do not see the Welcome screen, browse the files on your CD, and then click Setup.
4. Click Setup. You are prompted to check for updates:
5. You can check for software updates if you have an Internet connection. When you are ready
to install the software, click the Install from CD button.
48 | Chapter 5. Using Your PC with the NTV550
Page 49

NTV550 Ultimate HD Media Player User Manual
6. Follow the wizard steps to accept the license agreement and install the Setup Wizard and
the Configuration Wizard:
Now you can use the Configuration Wizard to set up your media so that it can be shared
with the Ultimate HD Media Player over your local area network.
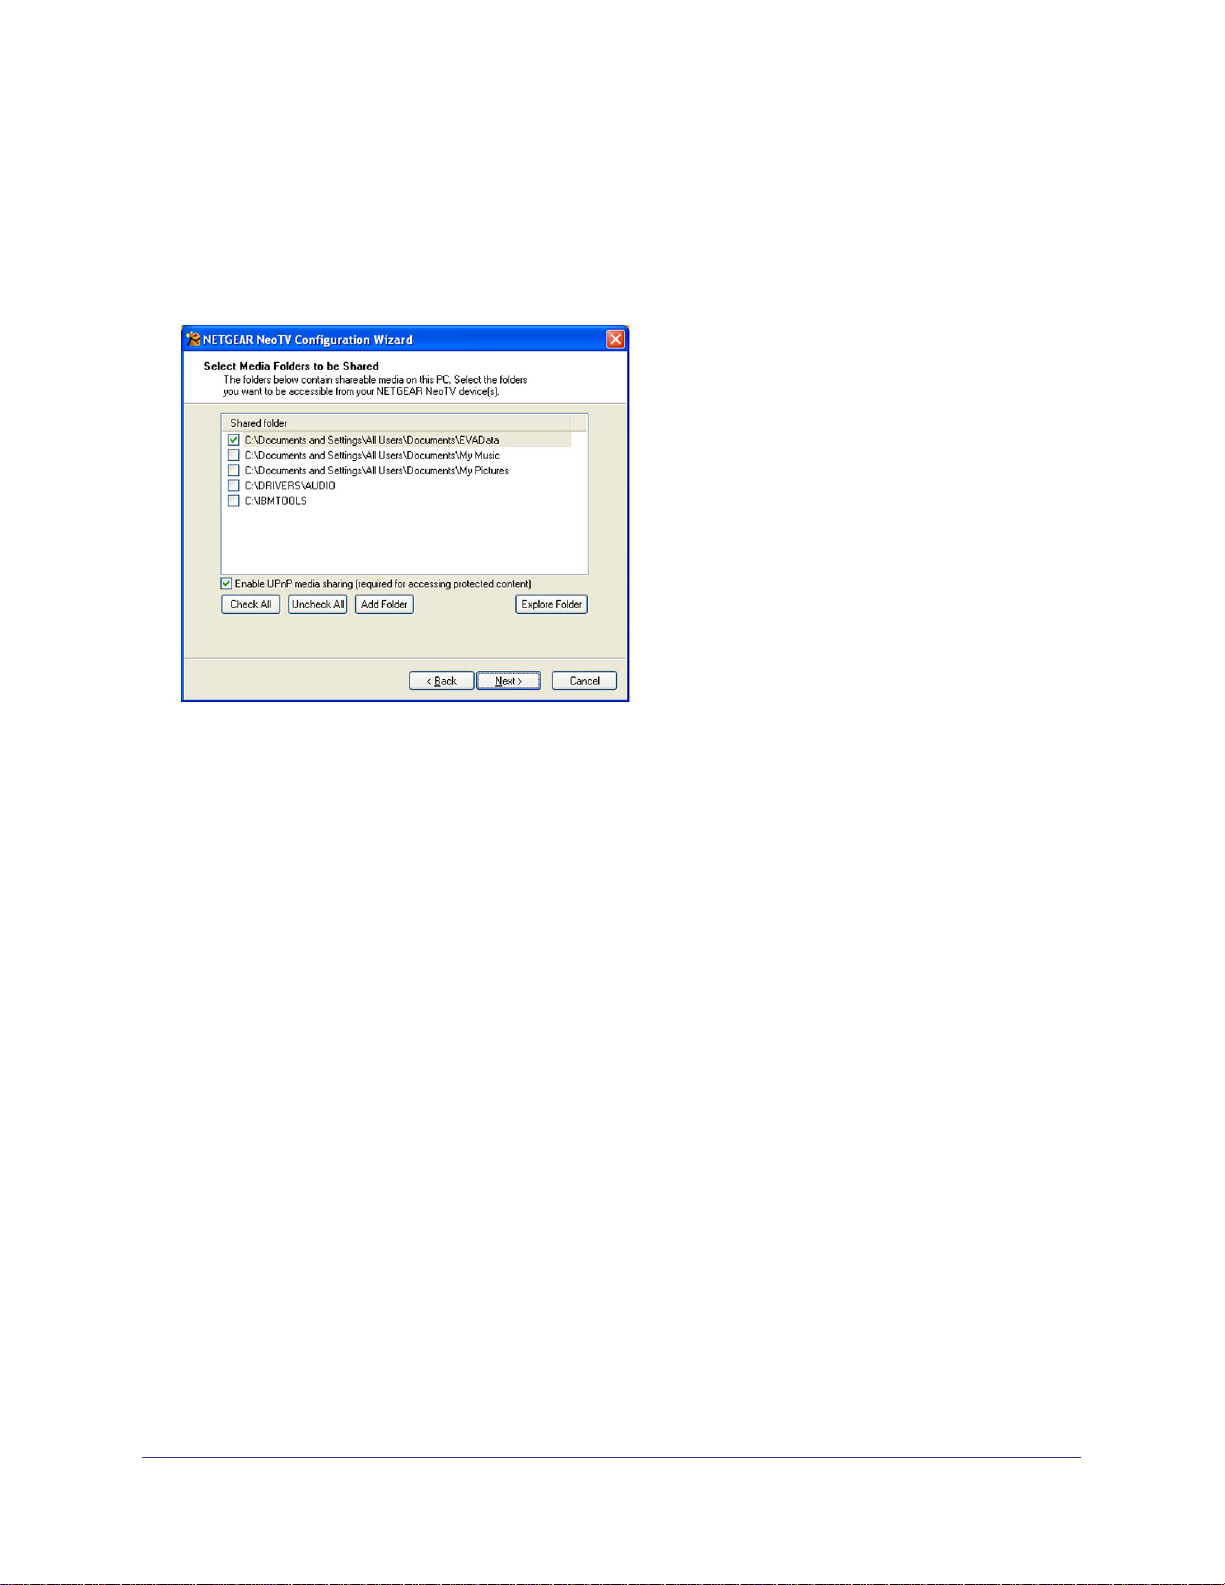
Using the Configuration Wizard to Share Media
Use the Configuration Wizard to specify shared access to media files on the PC where you
have them stored. The Ultimate HD Media Player performs a full scan of your network to find
the shared media. You can play a combination of shared media from your network and local
media on USB devices such as MP3 players that you connect directly to the Ultimate HD
Media Player.
To use the Configuration Wizard to share media:
1. On the Configuration Wizard Welcome screen, click Next.
The wizard prompts you to select media folders to be shared. This allows the Ultimate HD
Media Player to access these files.
Chapter 5. Using Your PC with the NTV550 | 49
Page 50

NTV550 Ultimate HD Media Player User Manual
2. Browse and select the folders that you want to use, and then click Next.
You can automatically create thumbnails, which makes it easier to browse your photos on
the Ultimate HD Media Player TV menus. If you do not want to do this, clear the check
box on this screen. Click Finish.
The Configuration Wizard locates the Ultimate HD Media Player on your network and
displays the following screen:
If the wizard is unable to connect to your Ultimate HD Media Player, disable any
third-party firewall or security software such as those from Symantec or McAfee.
3. When you see a message confirming that the configuration is done, go to your television.
Depending on the media files you have, the initial full scan might take some time to finish.
You are finished with the installation and can play media from your network on your Ultimate
HD Media Player.
50 | Chapter 5. Using Your PC with the NTV550
Page 51

NTV550 Ultimate HD Media Player User Manual
Using the NeoTV Software on Your PC
The NeoTV software makes it easy to set up your favorite Internet radio stations that are not
on the top 500 list, to add RSS news feeds, and to configure complex network settings. After
you have installed the software from the NETGEAR Resource CD, you can double-click the
task icon to display this screen:
You can use this screen to access the following features:
• Configure your NeoTVs. This takes you to the Configuration Wizard, which helps you
set up shared media files for the NTV550 to access.
• Get Status on NeoTVs.View the status for the NTV550 or other NETGEAR digital media
players on your network.
• Remote control your NeoTVs. Display a virtual remote control that lets you use the
Ultimate HD Media Player from your PC. See Remote Control Your Ultimate HD Media
Player on page 52.
• Modify Tag and Album Art information. Use the Tag Tool to specify which images
should be displayed for your album art. The Tag Tool works with these file formats: AVI,
WMV, MPG, MP1, MP2, MP3, MKV, FLAC, ISO, and IFO.
• Copy files to your NeoTVs. This feature works with NeoTV products that include a hard
disk.
• NETGEAR documentation. View NETGEAR documentation for your product such as
the NTV550 Ultimate HD Media Player Installation Guide and user manual (this
document).
• Check for Updates. Check to see if updates for your products are available. This is
similar to the update feature you can select from the Ultimate HD Media Player TV menu.
See Updating the Firmware on page 44.
Chapter 5. Using Your PC with the NTV550 | 51
Page 52

NTV550 Ultimate HD Media Player User Manual
Remote Control Your Ultimate HD Media Player
Select Remote control your NeoTVs to display this screen. To start playing something, click
a menu entry. For example, click Music to browse to the music you want to play, and then
select a song. When media playback starts, the following screen displays:
The buttons on this screen correspond to the Ultimate HD Media Player remote control. Click
them to send commands to the Ultimate HD Media Player. For example, click Volume Up to
increase the volume in the selected room.
EnablingWin7 File Sharing
You can use the Configuration Wizard to set up file sharing, or you can enable sharing in
Windows.
File Sharing with Win7 Password Protection
1. In Windows 7, navigate to Control Panel > User Accounts and Family Safety > User
Account > Manager Accounts.
In this example, dell is a user account, and it is password protected.
52 | Chapter 5. Using Your PC with the NTV550
Page 53

NTV550 Ultimate HD Media Player User Manual
2. Right-click the folder that you want to share and select Share with > Specific people.
The next screen displays:
3. Click Share to share this folder. The following screen displays:
4. click Yes to turn on network discovery and file sharing.
Chapter 5. Using Your PC with the NTV550 | 53
Page 54

NTV550 Ultimate HD Media Player User Manual
5. Go back to File Manager and it shows a screen similar to the following:
Now you can use the Ultimate HD Media Player to browse the folder that is shared. The
Ultimate HD Media Player asks you to enter a user name and password. In this example, dell
is the user name.
File Sharing without Win7 Password Protection
1. Right-click the folder that you want to share, and select Share with > Specific people.
54 | Chapter 5. Using Your PC with the NTV550
Page 55

NTV550 Ultimate HD Media Player User Manual
2. Select Everyone and add it to the share list.
3. Click Share, and a new window displays.
4. Click Yes to turn on network discovery and file sharing.
Now this folder is shared on your network. The File Manager shows which folder is
shared.
Chapter 5. Using Your PC with the NTV550 | 55
Page 56

NTV550 Ultimate HD Media Player User Manual
5. To turn off password-protected sharing, select Control Panel > Network and Internet >
Network and Sharing Center and click Change advanced sharing settings.
6. Select Turn off password protection sharing.
Now you can use Ultimate HD Media Player to access network shares without a password.
56 | Chapter 5. Using Your PC with the NTV550
Page 57

6. Troubleshooting
Troubleshooting Tips
Here are some tips for correcting simple problems that might prevent you from connecting to
the Ultimate HD Media Player. You can also see the online NETGEAR FAQs and support
forums for your product.
Table 1. Connecting to the Ultimate HD Media Player
Problem Solution
6
I turned on my Ultimate HD Media
Player for the first time, but I do not
see anything on the screen.
The Ultimate HD Media Player
does not respond to the remote
control.
Some files do not play, or they
cause the system to reset.
The Ultimate HD Media Player
does not find the server.
• Check all cables to make sure that they are connected correctly, and be
sure that you are using the correct input on your TV.
• Check that your TV's input selector (sometimes called TV/Video button) is
set to the correct input.
• If you still do not see anything, press
control to change the video mode. Make sure to pause for 3 seconds
between button presses to allow the Ultimate HD Media Player to change
video modes.
Check the LED on the front panel of the Ultimate HD Media Player to make
sure that the power is on.
Make sure that the television is turned on.
The LED on the remote control should flash when you push a button.
• If the LED does not flash, and the batteries are working, then the remote
might be faulty.
• If the LED does flash, reset the Ultimate HD Media Player.
The Ultimate HD Media Player might not support the audio or video format
used in the file. For information about what files are supported, see
Supported Digital Media File Formats on page 65.
• Make sure that the computer and the Ultimate HD Media Player are
connected to the same network and turned on.
• If you do not use DHCP on your network, you must set the IP address of
the Ultimate HD Media Player in the range of addresses on your network.
See IP Address on page 63.
• Use the Configuration Wizard to check the settings. On the Windows Start
menu, select All Programs > NETGEAR Digital Entertainer for
Windows > Configuration Wizard.
TV Mode on the remote
Chapter 6. Troubleshooting | 57
Page 58

NTV550 Ultimate HD Media Player User Manual
Table 1. Connecting to the Ultimate HD Media Player (Continued)
Problem Solution
Some files, songs, or videos are
not showing up even though
others are.
The server cannot be found in a
Windows domain.
Check the file permissions for those items, and make sure that they have
read access allowed for everyone.
If the PC where the Digital Entertainer for Windows software is running is a
member of a Windows domain:
1. Make sure that you are connected to the domain (either by being on the
same network, or by using a VPN connection), and then restart folder
sharing in Windows Media Connect.
2. If this is not possible, uninstall the Digital Entertainer for Windows
software, and reinstall it using a local user account. Then set up sharing
with the Digital Entertainer for Windows software while logged in with
this local user account.
Changing TV Mode, No Picture on the TV
If you turn on your TV and there is no picture (due to resolution not supported, or different
PAL/NTSC type), press
screen. (Press
• Press
Home first if you are not sure you are in the main menu.) Then:
TV Mode to cycle from PAL to NTSC (or vice versa) and wait 10 seconds.
• If there is still no picture, press
vice versa).
• Note that cycling PAL/NTSC resets the display mode to the monitor default, which in most
cases should result in a picture on the screen.
TV Mode from the main menu to go to the mode switching
TV Mode again to cycle back from NTSC to PAL (or
Power Off and Standby Mode
The Ultimate HD Media Player supports two modes of power off: standby and power off.
• Standby mode. The output ports are switched off and the unit is effectively idle, but you
can awaken it quickly by pressing Power.
• Power off mode. The unit is effectively off (drawing 0.1W), but you can still awaken it by
pressing Power. Powering on the unit from the full power off state takes significantly
longer (30 seconds compared to 1 second).
Firewall Port Settings
The built-in Windows firewall opens ports to communicate with the Ultimate HD Media Player.
For other firewalls, you might need to open these ports:
• TCP: 49156, 49157, 49158, 49159
• UDP: 49152, 49153, 49154, 49155
58 | Chapter 6. Troubleshooting
Page 59

NTV550 Ultimate HD Media Player User Manual
If you are using a Windows PC to share media content, allow access to the following ports:
139 TCP, 445 TCP, 137 UDP, and 138 UDP for file-sharing services.
If you are using Windows Media Connect to share media from Windows, configure your
desktop firewall to allow ports 10243 TCP and 10280–10284 UDP. If you are using the UPNP
Framework under Windows XP, configure your desktop firewall to allow port 1900 UDP and
2869 TCP. For more information see http://support.microsoft.com/kb/886257/.
Accessing Your Digital Media
The following sections provide some suggestions for accessing digital media with Windows,
Macintosh OSX, and Linux.
Windows System Passwords
If your system requires a password on startup, you need to use one of these access
methods:
• Recommended: Enable guest access on PCs that have a startup password. From the
Windows Start menu, select Settings > Control Panel > User Accounts, and enable
guest access.
• Manually enter passwords on your Ultimate HD Media Player.
• Remove the password from the main administrator account.
Macintosh OSX
Turn off the Macintosh firewall, and then select the sharing icon from system preferences.
1. Click Firewall, select Stop, and verify that Firewall off is displayed.
2. Select the sharing icon from system preferences, and select the Windows Sharing check
box. Make sure that Windows Sharing On is displayed.
Once the system is up and running, for better security you can configure your OSX firewall to
allow file access while blocking other network ports. For file sharing you must allow access
through TCP ports 139 and 445, and UDP ports 137 and 138.
Linux
You need to load and install a Samba server.
• On Redhat 9 systems, click the Red Hat button, and select
System Settings > Server Settings > Samba Server. Click Add in the dialog box that
displays.
• On other systems, you might need to install the Samba server (smbd) manually and
modify the samba configuration file (/etc/smb.conf on most systems; select the man smbd
check box). If Samba is not installed, see http://www.samba.org.
Chapter 6. Troubleshooting | 59
Page 60

NTV550 Ultimate HD Media Player User Manual
Media Does Not Play (Windows XP)
If the Ultimate HD Media Player cannot play media or music, check to see if the file is
protected. Windows Media Connect is required for Windows XP users to play protected files.
See the Microsoft documentation for these products.
If you use Windows Media Connect, place protected media files in one folder, and use
Windows Media Connect to share only that folder. Then use the Configuration Wizard to
share all other folders.
Video Display is Jittery
You can try changing the TV mode either with the Setup Wizard (press Home, and select
Settings > Setup Wizard) or by pressing the
Note that videos are encoded with different frame rates. If the frame rate of the video does
not match your TV display setting, then the video can appear jittery. This can happen if you
are using a 60 Hz TV to watch a video with a frame rate of 25 frames per second instead of
30 frames per second, or if you are using a 50 Hz TV to watch a video with a frame rate of 60
frames per second.
TV Mode button on the remote control.
The Auto FPS option (Settings > Audi/Video > Display) activates automatic video mode
switching to match the frame rate of the video being played.
Unable to Play Media
This section explains unable to play this media messages, and offers suggestions about what
to do if the HD media player displays this type of message.
• Unable to play this media. The media format is not supported, or the location is not
accessible.
The media format is not supported by the Ultimate HD Media Player, or the file could not
be opened or might no longer be available.
- Play a supported media file.
- Check the network connection.
- Verify the existence of the file.
- Verify the PC or server is powered on.
- Check the access permissions on the file and folder.
- Verify that the file format and encoding are supported. Go to
http://kbserver.netgear.com/products/neotv550.asp and select the NTV550; then
access the media formats link for file formats supported.
60 | Chapter 6. Troubleshooting
Page 61

NTV550 Ultimate HD Media Player User Manual
• Unable to play this media. The media could not be opened, or the location is not
accessible.
The file cannot be opened or might no longer be available.
- Check the network connection.
- Verify the existence of the file.
- Check the access permissions on the file and folder.
• Unable to play this media. The media is protected, and a license could not be obtained.
- The file is protected by Windows Media DRM, and the license for the file is expired, or
invalid, or was not granted.
- Verify that the file is playable from Windows Media Player.
• Unable to play this media. There are insufficient resources to open or play the media.
Restart the Ultimate HD Media Player. If the problem persists after restarting the Ultimate
HD Media Player, then the media dimensions or encoding is not supported.
Error Messages
The following table describes error messages and recommended actions when they occur.
Table 2. Error Messages
Message Description and Action
Network Performance Insufficient. The network throughput is not high enough to handle the file type specified,
such as playing high-definition video over a wireless network.
Unsupported video - may not play
correctly.
Unable to play this station. The format of the selected Internet radio station is not supported. The
Error loading picture. Photo format
is not supported.
Error loading picture. Photo does
not exist.
Error loading picture. Photo is too
large or has encoding errors.
The video is a DIVX 3 video. Some DIVX 3 videos do not play back correctly
on the Ultimate HD Media Player.
Ultimate HD Media Player supports only MP3 streaming audio formats for
Internet radio playback.
The photo is not a JPEG, TIFF, BMP or PNG, or the dimension, encoding, or
color space of the photo is not supported.
The file cannot be opened or might no longer be available.
• Check the network connection.
• Verify the existence of the file.
• Check the access permissions on the file and folder.
The dimensions of the photo are too large for it to be loaded, or the file is
invalid.
Error loading picture. Photo could
not be read.
The file exists, but an error occurred when it was accessed.
• Check the network connections.
• Check access permissions on the file and folder.
• Check that the photo is viewable on a PC.
Chapter 6. Troubleshooting | 61
Page 62

Table 2. Error Messages (Continued)
Message Description and Action
NTV550 Ultimate HD Media Player User Manual
Error loading picture. Access
denied reading the photo.
Subtitles not available. The external subtitles for a video do not exist or could not be loaded. The
• The file exists but does not allow read access to the Ultimate HD Media
Player.
• Check access permissions on the file and folder.
subtitles might be in an unsupported format. Supported subtitle formats are
SRT, SMI, SAMI, SUB, and TXT.
Network Connections
The following sections provide recommendations for how to troubleshoot network
connections.
Ethernet Cabling
The Ultimate HD Media Player should be cabled to a hub, switch, or router using a standard
Ethernet cable. If you connect to your network using Ethernet, the link LEDs on the back of
your Ultimate HD Media Player and on your hub or router should both be on. If they are not lit,
try the following:
• Make sure that the Ethernet cables are secure at the router and at the hub or workstation.
• Make sure that power is turned on to the connected hub or workstation.
• Make sure that you are using a standard Ethernet cable and not a cross-connect cable.
Troubleshooting a Wireless Network Connection
To connect wirelessly to your home router, you need the NETGEAR Universal Wi-Fi Internet
adapter WNCE2001 (sold separately).
If you are having trouble with a wireless connection, check the following items:
• If there is more than one network in your area, then you have to know your wireless
network name. The network name is also called the service set identifier (SSID).
• If your access point or router does not broadcast its SSID, then it is a hidden network, and
the Ultimate HD Media Player cannot detect it.
• The SSID and passwords keys are case-sensitive. For example, NETGEAR is not the
same as Netgear.
For detailed information about wireless networks, click the link to “Wireless Networking
Basics” listed in Appendix B.
62 | Chapter 6. Troubleshooting
Page 63

NTV550 Ultimate HD Media Player User Manual
IP Address
If the Ultimate HD Media Player does not receive a valid IP address, try the following:
1. Verify that a working DHCP server is on your network. Computers on the network should
get IP addresses in the correct range.
If the Ultimate HD Media Player is set to use DHCP and fails to obtain an IP address from
the server, it resorts to a default IP address of 127.0.0.1. You can use a static IP address
if there is a problem connecting to the DHCP server.
2. If you are using a wireless network, verify that the NTV550 is connected to the right network.
Connecting to a Server
If the Ultimate HD Media Player cannot find the correct server, try the following:
1. Verify that the Ultimate HD Media Player and the PC running the NETGEAR NeoTV for
Windows software are on the same subnet.
For example, you could use a subnet with IP addresses in the range of 192.168.0.x for
both the Ultimate HD Media Player and the PC, with a subnet mask of 255.255.255.0.
2. For Windows PCs, run the Configuration Wizard to verify that the NTV550 and the computer
can communicate. Double-click the task icon and select Configure your NeoTVs.
3. For other systems, try having the Ultimate HD Media Player look for the server again.
Press
Home, and select Settings > Servers and shared folders > Build network shares
list. If you do not see your media, check your network connections and router firewall
settings, and try to ping the IP of the Ultimate HD Media Player.
4. Try accessing the server from other Windows-based PCs. If these PCs can see the server,
the Ultimate HD Media Player will too.
Using Ping
1. From the Windows taskbar, click the Start button, and select Run.
2. In the field provided, type ping followed by the IP address of the Ultimate HD Media Player.
Displaying the IP address is described in
ping 192.168.0.2
3. Click OK. You should see a message like this one:
pinging <IP address> with 32 bytes of data
If the path is working, you see this message:
reply from < IP address >: bytes=32 time=NN ms TTL=xxx
IP Address on page 63. For example, type:
If the path is not working, you see this message:
request timed out
If you cannot ping the NTV550, your network might not be working correctly.
Chapter 6. Troubleshooting | 63
Page 64

NTV550 Ultimate HD Media Player User Manual
Recovering the NTV550 If It Does Not Start
You should not need to do this unless you are instructed to do so by NETGEAR technical
support.
If you power on the Ultimate HD Media Player and it does not start up and display the main
menu, try power cycling the unit. If it still does not start, then you might want to try changing
the TV mode on the unit. See
If you are fairly sure that the firmware on the unit has become corrupted (for example, if the
unit was starting up normally, and it is no longer starting), then you can repair the firmware as
follows.
1. With the unit unplugged, hold down the right front power button and plug in the unit. You
can release the button after 4-5 seconds.
This shows the Recovery menu on the screen.
2. From the Recovery menu, you can restore the firmware from the Internet to the latest
version, or you can install firmware from an attached USB device. (The Recovery menu
looks very similar to the Update application.)
Changing TV Mode, No Picture on the TV on page 58.
64 | Chapter 6. Troubleshooting
Page 65

A. Supplementary Information
Supported Digital Media File Formats
The following file formats are supported:
• Video codec formats.
- H.264 HP@L4.1
- VC1 MP@HL, AP@L3
- WMV
- MPEG-2 MP@HL
- MPEG-4 Part 2 ASP@L5 (Xvid)
- MPEG1/2/4 SD
- H.263
• Video container formats. AVI, Xvid, MOV, MP4, MPEG2 PS, MPEG2-TS, DVD
ISO/VOB/IFO, MKV, ASF, AVCHD, DivX, WMV, M4A, M2TS, MTS, MP1, MP2, MPG,
DVR-MS
A
• Audio formats.
- Dolby® Digital (AC3), Dolby® Digital Plus, Dolby TrueHD
- DTS 2.0+, DTS HD and DTS HD MA (passthru)
- MP3 up to 320 Kbps or variable bit rate (VBR)
- WMA8 and WMA9 up to 192 Kbps or variable bit rate (VBR)
- WMAPro, AAC, FLAC (to 5.1, 192Khz), PCM LPCM/WAV (to 5.1, 192Khz)
- Internet radio (streaming MP3, MMS)
- MKA
• Photo formats. JPEG, BMP, PNG, TIFF
• Subtitle formats. SRT, SMI, SSA, SUB, TXT, DVD, PGS
New formats are added regularly. For the most current list, visit the NETGEAR knowledge
base website at
Media formats.
http://kbserver.netgear.com/products/neotv550.asp, and select NTV550 >
Appendix A. Supplementary Information | 65
Page 66

NTV550 Ultimate HD Media Player User Manual
Restoring Factory Default Settings
There are three ways to restore factory default settings:
• Press
Home, and select Settings > Restore factory defaults.
• Use the Reset button on the back of the Ultimate HD Media Player. While the menu is
displayed on the TV (and you are not playing media), use a pen or paperclip to tap the
Reset button 3 times. The TV screen displays a message asking if you want to restore
default settings.
• Use the On/Off button on the front to power off the unit. Then power on the unit. Wait for
the LED to blink orange, then press and hold the Reset button. The LED starts blinking
blue signaling that factory defaults are being restored, and then the unit restarts.
The following table lists the default settings.
Feature Description
Language English
Video mode Standard definition NTSC
Room name NTV550
Network connection Wired LAN
Technical Specifications
Feature Description
Data and routing protocols TCP/IP, DHCP
Power adapter • North America: 120V, 60 Hz, input
• United Kingdom, Australia: 240V, 50 Hz, input
• Europe: 230V, 50 Hz, input
• Japan: 100V, 50/60 Hz, input
• Maximum input current NA: 0.24A; UK; AU: 0.15A; EU: 0.15A; JP: 0.27A
Physical specifications • Dimensions (H x W x D): 1.5 x 17 x 10 in. (38.1 x 431.8 x 254 mm)
• Weight: 4.4 lbs. (2.0 kg)
Environmental specifications • Operating temperature: 32º–104º F (0°–40° C)
• Operating humidity: 90% maximum relative humidity, noncondensing
Electromagnetic emissions FCC Part 15 Class B, VCCI Class B, EN 55 022 (CISPR 22), Class B C-Tick
N10947
Interface LAN: 10BASE-T or 100BASE-Tx, RJ-45
WLAN: 802.11/b/g/n
Frequency 2400–2483.5 MHz, 5150–5825MHz
66 | Appendix A. Supplementary Information
Page 67

B. Notification of Compliance
NETGEAR Wired Products
Regulatory Compliance Information
This section includes user requirements for operating this product in accordance with National
laws for usage of radio spectrum and operation of radio devices. Failure of the end-user to
comply with the applicable requirements may result in unlawful operation and adverse action
against the end-user by the applicable National regulatory authority.
This product's firmware limits operation to only the channels allowed in a particular Region or
Country. Therefore, all options described in this user's guide may not be available in your version
of the product.
FCC Requirements for Operation in the United States
FCC Information to User
This product does not contain any user serviceable components and is to be used with
approved antennas only. Any product changes or modifications will invalidate all applicable
regulatory certifications and approvals
This device complies with Part 15 of the FCC Rules. Operation is subject to the following two
conditions: (1) This device may not cause harmful interference, and (2) this device must
accept any interference received, including interference that may cause undesired operation.
B
FCC Guidelines for Human Exposure
This equipment complies with FCC radiation exposure limits set forth for an uncontrolled
environment. This equipment should be installed and operated with minimum distance of 20
cm between the radiator and your body.
This transmitter must not be co-located or operating in conjunction with any other antenna or
transmitter.
FCC Declaration Of Conformity
We, NETGEAR, Inc., 350 East Plumeria Drive, San Jose, CA 95134, declare under our sole
responsibility that the NTV550 Ultimate HD Media Player complies with Part 15 of FCC
Rules.
Operation is subject to the following two conditions:
• This device may not cause harmful interference, and
Appendix B. Notification of Compliance | 67
Page 68

NTV550 Ultimate HD Media Player User Manual
• This device must accept any interference received, including interference that may cause
undesired operation.
FCC Radio Frequency Interference Warnings & Instructions
This equipment has been tested and found to comply with the limits for a Class B digital
device, pursuant to Part 15 of the FCC Rules. These limits are designed to provide
reasonable protection against harmful interference in a residential installation. This
equipment uses and can radiate radio frequency energy and, if not installed and used in
accordance with the instructions, may cause harmful interference to radio communications.
However, there is no guarantee that interference will not occur in a particular installation.
If this equipment does cause harmful interference to radio or television reception, which can
be determined by turning the equipment off and on, the user is encouraged to try to correct
the interference by one or more of the following methods:
• Reorient or relocate the receiving antenna.
• Increase the separation between the equipment and the receiver.
• Connect the equipment into an electrical outlet on a circuit different from that which the
radio receiver is connected.
• Consult the dealer or an experienced radio/TV technician for help.
Modifications made to the product, unless expressly approved by NETGEAR, Inc., could void
the user's right to operate the equipment.
Canadian Department of Communications Radio Interference Regulations
This digital apparatus, NTV550 Ultimate HD Media Player, does not exceed the Class B limits for
radio-noise emissions from digital apparatus as set out in the Radio Interference Regulations of
the Canadian Department of Communications.
European Union
The NTV550 Ultimate HD Media Player complies with essential requirements of EU EMC
Directive 2004/108/EC and Low Voltage Directive 2006/95/EC as supported by applying the
following test methods and standards:
• EN55022: 2006 / A1: 2007
• EN55024: 1998 / A1: 2001 / A2 : 2003
• EN60950-1: 2005 2nd Edition
• EN 61000-3-2:2006
• EN 61000-3-3:1995 w/A1: 2001+A2: 2005
68 | Appendix B. Notification of Compliance
Page 69

Index
A
accessing media files 59
accessing media library 49
advanced settings 45
Audio/Video settings 36
AV output cable 8
B
Browse folders 17
browsing 14, 16
live folder 16
media library 15
C
cabling 8
compliance 67
Configuration Wizard 47, 49, 63
connecting
network connections 62
server 63
copying files 44
cover art 18
D
default settings 66
Digital Entertainer for Windows software
installing 48
troubleshooting 58, 63
E
error messages 61
Ethernet cable 8
Ethernet cable, troubleshooting 62
F
file formats, supported 65
files, copying 44
firewall port settings 58
firmware, updating 44
Follow me feature 33
G
gapless playback 26
H
HDMI cable 8
I
Internet channels 32
Internet media 29
Internet radio 31
Internet weather 33
IP address 63
iPod content 7, 14, 16
K
keyboard, onscreen 13
L
language, user interface settings 41
library, browsing 15
Linux 14, 59
live folder browsing 16
M
Macintosh 14, 59
Macintosh OSX 59
manage (copy) files 44
media
Internet 29
listening 24
protected media 15
media bar
music 25
video 21
media file formats 65
Index | 69
Page 70

NTV550 Ultimate HD Media Player User Manual
media files, accessing 59
media library
enabling access 49
media locations, settings 38
media on the network 18
media, browsing 14, 16
media, locating on the network 18
media, organizing 14
media, searching 16
media, sharing 49
music 24
gapless playback 26
remote control 25
music media bar 25
music playlists 25
N
navigating
from a Windows PC 47
with remote control 12
NeoTV application 47, 51
net shares, using the Configuration Wizard 49
network settings 42
network, finding media 18
O
On/Off switch 7
overview 6
P
parental controls 19, 40
parental controls, block by location 40
parental controls, block by rating 39
passwords, Windows system 59
PC, controlling the Ultimate HD Media Player 47, 52
photo play bar 28
photos 27
ping 63
playing
Internet media 29
trouble with media 60
playlist
music 25
Pop-up Menus 12
protected media 15
R
RadioIO 31
recovering the NTV550 64
remote control 10
navigating 12
playing music 25
with Internet radio 31
with YouTube video 30
remote control buttons 11
remote control menu shortcuts 13
Resource CD 48
room control 33
RSS news feeds 51
S
searching 16, 18
Send message feature 33
server, connecting to 63
settings
default 66
firewall port 58
Settings menu 34
Setup Wizard 35
Shoutcast 31
slideshow 28
specifications 66
standby mode 58
streaming TV 33
system information 46
system settings 43
system settings, advanced 45
T
Tag Tool, cover art 18
technical specifications 66
technical support 2
trademarks 2
troubleshooting
playing media 60
tips 57
wireless networks 62
troubleshooting, jittery video display 60
TV mode 11, 58
U
Ultimate HD Media Player 7
Ultimate HD Media Player, cabling 8
Ultimate HD Media Player, more than one 33
updating firmware 44
70 | Index
Page 71

NTV550 Ultimate HD Media Player User Manual
USB, playing media 14
V
video display, jittery 60
video media bar 21
videos 20
videos, resuming playback 24
W
weather 33
Windows sharing and security 47
Windows system passwords 59
wireless networks, troubleshooting 62
Y
YouTube video 29
YouTube video, remote control 30
Index | 71
 Loading...