

Page 1
NETGEAR Roku Player (NTV250)
Installation Guide
Page 2

©2010 NETGEAR, Inc. All rights reserved.
Technical Support
Thank you for selecting NETGEAR products.
Locate the serial number on the label of your product and use it to register
your product at http://www.NETGEAR.com/register. Registration is required
before you can use the telephone support service. Registration at the
NETGEAR website is strongly recommended.
Go to http://support.netgear.com for product updates and Web support.
For complete DoC please visit the NETGEAR EU Declarations of
Conformity website at: http://kb.netgear.com/app/answers/detail/a_id/
11621/
Trademarks
NETGEAR, the NETGEAR logo, ProSafe, Smart Wizard, and Auto Uplink
are trademarks or registered trademarks of NETGEAR, Inc. Microsoft,
Windows, Windows NT, and Vista are registered trademarks of Microsoft
Corporation. Other brand and product names are registered trademarks or
trademarks of their respective holders.
Statement of Conditions
In the interest of improving internal design, operational function, and/or
reliability, NETGEAR reserves the right to make changes to the products
described in this document without notice. NETGEAR does not assume
any liability that may occur due to the use or application of the product(s) or
circuit layout(s) described herein.
Page 3
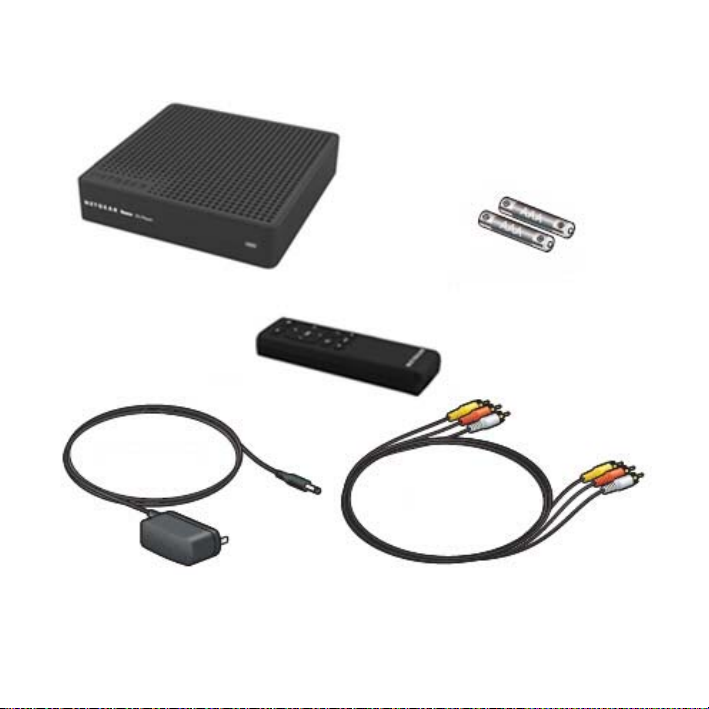
Package Contents
Remote control
NETGEAR Roku Player
Power adapter
2 AAA batteries
A/V cable
3
Page 4
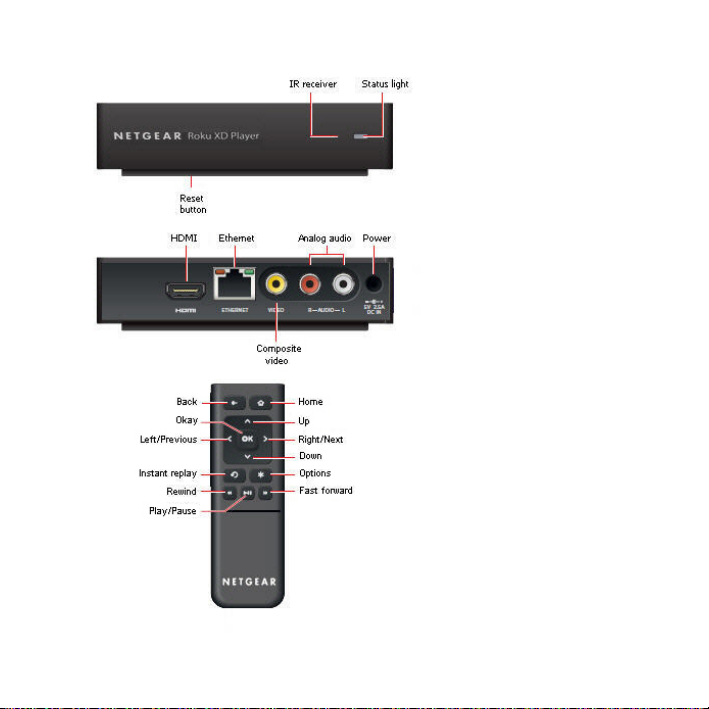
Your Player at a Glance
4
Page 5

1: Connect to the TV
TV
Choose the setup that matches the ports on your TV. For best
picture quality, use an HDMI connection (if available). Make
sure your TV is on and set to display the correct video input.
HDMI (preferred)
Connect an HDMI cable (sold separately) to the HDMI port on
your player and to the HDMI IN port on your TV.
NOTE: HDMI supports 5.1 surround sound ( if available). You
don’t need a separate audio cable.
5
Page 6

AV
TV
Connect the yellow connectors on the A/V cable (included) to
the VIDEO port on your player and the VIDEO IN (Composite)
port on your TV. Connect the red and white connectors to the R-
AUDIO-L ports on your player and the L/R AUDIO IN ports on
your TV.
6
Page 7

2: Power Up
Insert the batteries in the remote
Slide the bottom half of the remote downward to open the
remote. Insert two AAA batteries (included) in your remote.
Connect the power adapter to your player.
7
Page 8

3: Get Your Home Network Ready
Router
To use your player, you must connect it to your home network
with either a wireless or a wired connection. We recommend
using a router or wireless access point for your network, in
addition to your broadband modem. After you get your network
ready, Guided Setup helps you connect your player to your
network.
IMPORTANT: Don’t place
player. Placing objects on top of your player may interfere
with the wireless signal or cause the player to overheat.
If you’re using a Wired connection, use an Ethernet cable
(sold separately) to connect your player to your router.
anything on top of your Roku
8
Page 9

If you’re using a Wireless connection, place your player
Router
within range of your wireless network and avoid enclosing your
player in a cabinet. If you use a password, have it ready.
Tip: If you don’t receive a strong signal during
Guided Setup, try rotating your player or
moving it closer to your router.
9
Page 10

4: Complete Guided Setup
Tip: Point your remote
directly at your player.
On your TV:
• Use the remote to follow the onscreen instructions. Your
player may download software updates or restart during
setup.
• When Guided Setup prompts you to enter your Ro ku linking
code, use your computer to go to roku.com/link. Enter the
code that appears on your TV screen and then create a
Roku account, if you do not already have one.
• Once you complete setup, select a channel icon (such as
Netflix or Amazon Video On Demand) to view, or visit the
Roku Channel Store to add more channels (such as the
Pandora Internet radio channel).
• Some Roku partne rs may require you to activate your Roku
player to access their content. Just follow the onscreen
instructions when you launch a channel for the first time.
10
Page 11

5: Basic Remote Functions
NOTE: The button on the remote control is reserved for
future use.
11
Page 12

Technical Support
Thank you for selecting NETGEAR products.
After installing your device, locate the serial number on the
label of your product and use it to register your product at
www.NETGEAR.com/register.
can use our telephone support service. Registration via our
website is strongly recommended.
http://kbserver.netgear.com for product updates and Web
Go to
support
GPL may be included in this product; to view the GPL license
agreement go to
For complete DoC, please visit the NETGEAR EU Declarations of
Conformity web site at: http://kb.netgear.com/app/answers/
detail/a_id/11621
.
ftp://downloads.netgear.com/files/GPLnotice.pdf.
Registration is required before you
http://
12
Page 13

Page 14

NETGEAR, Inc.
350 East Plumeria Drive
San Jose, CA 95134 USA
August 2010
 Loading...