

Page 1
NMS300 Network Management System
User Manual
June 2013
202-11289-01
350 East Plumeria Drive
San Jose, CA 95134
USA
Page 2

NMS300 Network Management System
Support
Thank you for purchasing this NETGEAR product.
After installing your device, locate the serial number on the label of your product and use it to register your product
at https://my.netgear.com. You must register your product before you can use NETGEAR telephone support.
NETGEAR recommends registering your product through the NETGEAR website. For product updates, additional
documentation, and support, visit http://support.netgear.com.
Phone (US & Canada only): 1-888-NETGEAR.
Phone (Other Countries): Check the list of phone numbers at
http://support.netgear.com/general/contact/default.aspx.
Trademarks
NETGEAR, the NETGEAR logo, and Connect with Innovation are trademarks and/or registered trademarks of
NETGEAR, Inc. and/or its subsidiaries in the United States and/or other countries. Information is subject to change
without notice. © NETGEAR, Inc. All rights reserved.
Revision History
Publication Part Number Version Publish Date Comments
202-11289-01 v1.0 June 2013 First publication
2
Page 3

Contents
Chapter 1 Get to Know the NMS300 System
Chapter 2 Resource Management
Network Environment. . . . . . . . . . . . . . . . . . . . . . . . . . . . . . . . . . . . . . . . . .7
Device Groups . . . . . . . . . . . . . . . . . . . . . . . . . . . . . . . . . . . . . . . . . . . . .8
Types of Users . . . . . . . . . . . . . . . . . . . . . . . . . . . . . . . . . . . . . . . . . . . . .8
Device Discovery Preparation . . . . . . . . . . . . . . . . . . . . . . . . . . . . . . . . .8
Log In to the NMS300 System . . . . . . . . . . . . . . . . . . . . . . . . . . . . . . . . . . .9
Network Summary . . . . . . . . . . . . . . . . . . . . . . . . . . . . . . . . . . . . . . . . . . .11
Navigation Tabs and Buttons . . . . . . . . . . . . . . . . . . . . . . . . . . . . . . . . .12
Edit Your Account Information . . . . . . . . . . . . . . . . . . . . . . . . . . . . . . . .13
Change Your Password . . . . . . . . . . . . . . . . . . . . . . . . . . . . . . . . . . . . .15
Customize Your Network Summary . . . . . . . . . . . . . . . . . . . . . . . . . . . .16
Discover the Devices on Your Network . . . . . . . . . . . . . . . . . . . . . . . . . . .19
Quick Discovery . . . . . . . . . . . . . . . . . . . . . . . . . . . . . . . . . . . . . . . . . . .19
Add a Device Credential. . . . . . . . . . . . . . . . . . . . . . . . . . . . . . . . . . . . .21
Add a Discovery Profile . . . . . . . . . . . . . . . . . . . . . . . . . . . . . . . . . . . . .24
Execute a Discovery Procedure. . . . . . . . . . . . . . . . . . . . . . . . . . . . . . .27
Schedule a Discovery Procedure. . . . . . . . . . . . . . . . . . . . . . . . . . . . . .28
Examine the Devices on Your Network . . . . . . . . . . . . . . . . . . . . . . . . . . .30
View Device Information. . . . . . . . . . . . . . . . . . . . . . . . . . . . . . . . . . . . .30
Edit Device Information . . . . . . . . . . . . . . . . . . . . . . . . . . . . . . . . . . . . .31
Synchronize a Network Device. . . . . . . . . . . . . . . . . . . . . . . . . . . . . . . .32
Log In to a Device. . . . . . . . . . . . . . . . . . . . . . . . . . . . . . . . . . . . . . . . . .33
Ping, Perform a Traceroute, or Reboot a Network Device . . . . . . . . . . .34
Export the Device Inventory List. . . . . . . . . . . . . . . . . . . . . . . . . . . . . . .34
Specify Device Groups. . . . . . . . . . . . . . . . . . . . . . . . . . . . . . . . . . . . . . . .35
Add a Static Device Group. . . . . . . . . . . . . . . . . . . . . . . . . . . . . . . . . . .36
Add a Dynamic Device Group . . . . . . . . . . . . . . . . . . . . . . . . . . . . . . . .38
View the NMS300 Server Information . . . . . . . . . . . . . . . . . . . . . . . . . . . .40
Chapter 3 Performance Monitoring
Monitor the Top 10 Devices . . . . . . . . . . . . . . . . . . . . . . . . . . . . . . . . . . . .43
Configure the Monitor. . . . . . . . . . . . . . . . . . . . . . . . . . . . . . . . . . . . . . . . .45
Configure the Performance Monitor Settings . . . . . . . . . . . . . . . . . . . . .45
Configure the General Monitor Information . . . . . . . . . . . . . . . . . . . . . .46
View and Modify the Polling Interval. . . . . . . . . . . . . . . . . . . . . . . . . . . .48
View Device Details . . . . . . . . . . . . . . . . . . . . . . . . . . . . . . . . . . . . . . . . . .48
Manage the Network Dashboard . . . . . . . . . . . . . . . . . . . . . . . . . . . . . . . .51
3
Page 4

NMS300 Network Management System
Create Your Custom Dashboard Views . . . . . . . . . . . . . . . . . . . . . . . . .51
View Your Network Dashboards. . . . . . . . . . . . . . . . . . . . . . . . . . . . . . .56
Chapter 4 Configuration Management
Back Up Your Device Configurations. . . . . . . . . . . . . . . . . . . . . . . . . . . . .59
Add a Device Backup Profile . . . . . . . . . . . . . . . . . . . . . . . . . . . . . . . . .59
Execute a Backup Procedure. . . . . . . . . . . . . . . . . . . . . . . . . . . . . . . . .62
Schedule a Backup Procedure. . . . . . . . . . . . . . . . . . . . . . . . . . . . . . . .63
View the Execution Status of a Backup Job. . . . . . . . . . . . . . . . . . . . . .66
Restore Your Device Configurations . . . . . . . . . . . . . . . . . . . . . . . . . . . . .67
Restore the Configuration of a Single Device. . . . . . . . . . . . . . . . . . . . .67
Configure Several Identical Devices. . . . . . . . . . . . . . . . . . . . . . . . . . . .70
Import, Export, or Delete a Configuration File . . . . . . . . . . . . . . . . . . . .74
Promote a Configuration File . . . . . . . . . . . . . . . . . . . . . . . . . . . . . . . . .76
Edit a Configuration File. . . . . . . . . . . . . . . . . . . . . . . . . . . . . . . . . . . . .78
Compare Two Configuration Files . . . . . . . . . . . . . . . . . . . . . . . . . . . . .80
Schedule a Restore Procedure . . . . . . . . . . . . . . . . . . . . . . . . . . . . . . .81
Upgrade Your Device Firmware. . . . . . . . . . . . . . . . . . . . . . . . . . . . . . . . .82
Import, Export, or Delete a Firmware File. . . . . . . . . . . . . . . . . . . . . . . .83
Edit the Information of a Firmware File. . . . . . . . . . . . . . . . . . . . . . . . . .85
Execute a Firmware Upgrade. . . . . . . . . . . . . . . . . . . . . . . . . . . . . . . . .86
Schedule a Firmware Upgrade. . . . . . . . . . . . . . . . . . . . . . . . . . . . . . . .90
Chapter 5 Alarm Management
Manage the Current Alarms. . . . . . . . . . . . . . . . . . . . . . . . . . . . . . . . . . . .93
View the Alarm History. . . . . . . . . . . . . . . . . . . . . . . . . . . . . . . . . . . . . . . .94
Configure the Alarm Trigger Settings. . . . . . . . . . . . . . . . . . . . . . . . . . . . .95
Configure the Alarm Notification Profiles . . . . . . . . . . . . . . . . . . . . . . . . . .96
View the Network Events . . . . . . . . . . . . . . . . . . . . . . . . . . . . . . . . . . . . . .98
View the Device Traps . . . . . . . . . . . . . . . . . . . . . . . . . . . . . . . . . . . . . . . .99
View the Device System Logs . . . . . . . . . . . . . . . . . . . . . . . . . . . . . . . . .100
Customize the Alarm Colors. . . . . . . . . . . . . . . . . . . . . . . . . . . . . . . . . . .102
Chapter 6 Topology Views
Map Views . . . . . . . . . . . . . . . . . . . . . . . . . . . . . . . . . . . . . . . . . . . . . . . .104
View a Map. . . . . . . . . . . . . . . . . . . . . . . . . . . . . . . . . . . . . . . . . . . . . .104
Add a Submap . . . . . . . . . . . . . . . . . . . . . . . . . . . . . . . . . . . . . . . . . . .108
Add Devices to a Map . . . . . . . . . . . . . . . . . . . . . . . . . . . . . . . . . . . . . 111
Add a Link Between Devices . . . . . . . . . . . . . . . . . . . . . . . . . . . . . . . .113
Customize the Link Style Settings . . . . . . . . . . . . . . . . . . . . . . . . . . . .115
Network Topology . . . . . . . . . . . . . . . . . . . . . . . . . . . . . . . . . . . . . . . . . .118
Display a Network Topology View . . . . . . . . . . . . . . . . . . . . . . . . . . . .118
Add a Topology View . . . . . . . . . . . . . . . . . . . . . . . . . . . . . . . . . . . . . .123
Add a Link Between Devices . . . . . . . . . . . . . . . . . . . . . . . . . . . . . . . .124
Customize the Node and Link Style Settings . . . . . . . . . . . . . . . . . . . .127
4
Page 5

NMS300 Network Management System
Chapter 7 Report Generation
Manage the Report Templates. . . . . . . . . . . . . . . . . . . . . . . . . . . . . . . . .131
Manage Report Generation . . . . . . . . . . . . . . . . . . . . . . . . . . . . . . . . . . .135
Generate a One-Time Report Immediately. . . . . . . . . . . . . . . . . . . . . .136
Generate a Scheduled Report . . . . . . . . . . . . . . . . . . . . . . . . . . . . . . .137
View Saved Reports. . . . . . . . . . . . . . . . . . . . . . . . . . . . . . . . . . . . . . . . .140
Chapter 8 Job Management
Job Setup . . . . . . . . . . . . . . . . . . . . . . . . . . . . . . . . . . . . . . . . . . . . . . . . .143
Job Control. . . . . . . . . . . . . . . . . . . . . . . . . . . . . . . . . . . . . . . . . . . . . . . .143
Chapter 9 User Management
User Management . . . . . . . . . . . . . . . . . . . . . . . . . . . . . . . . . . . . . . . . . .147
Security Profiles . . . . . . . . . . . . . . . . . . . . . . . . . . . . . . . . . . . . . . . . . . . .148
Online Users. . . . . . . . . . . . . . . . . . . . . . . . . . . . . . . . . . . . . . . . . . . . . . .149
Chapter 10 Administration Panels
Get Started with the NMS300 System . . . . . . . . . . . . . . . . . . . . . . . . . . .151
Manage the System Settings . . . . . . . . . . . . . . . . . . . . . . . . . . . . . . . . . .152
Data Retention Period . . . . . . . . . . . . . . . . . . . . . . . . . . . . . . . . . . . . .153
Inventory Polling. . . . . . . . . . . . . . . . . . . . . . . . . . . . . . . . . . . . . . . . . .154
Idle Time Out . . . . . . . . . . . . . . . . . . . . . . . . . . . . . . . . . . . . . . . . . . . .155
Real-time Chart. . . . . . . . . . . . . . . . . . . . . . . . . . . . . . . . . . . . . . . . . . .156
Customize the NMS300 System Appearance . . . . . . . . . . . . . . . . . . . . .157
View the Network Device Inventory . . . . . . . . . . . . . . . . . . . . . . . . . . . . .159
Manage the Alarm Configuration . . . . . . . . . . . . . . . . . . . . . . . . . . . . . . .159
Manage the Monitor Configuration. . . . . . . . . . . . . . . . . . . . . . . . . . . . . .160
Manage the User Account Information. . . . . . . . . . . . . . . . . . . . . . . . . . .161
View the NMS300 Version Information. . . . . . . . . . . . . . . . . . . . . . . . . . .162
View the Audit Log . . . . . . . . . . . . . . . . . . . . . . . . . . . . . . . . . . . . . . . . . .163
Appendix A Technical Specifications
5
Page 6

1. Get to Know the NMS300 System
Streamline your network management tasks
1
The NETGEAR NMS300 system is a centralized and comprehensive management system that
allows IT administrators to discover, monitor, configure, and report on enterprise-class networks
with NETGEAR network devices.
For more information about the topics covered in this manual, visit the support website at
http://support.netgear.com.
Firmware updates with new features and bug fixes are made available from time to time on
downloadcenter.netgear.com. Some products can regularly check the site and download new
firmware, or you can check for and download new firmware manually. If the features or behavior
of your product does not match what is described in this guide, you might need to update your
firmware.
This chapter covers the following topics:
• Network Environment
• Log In to the NMS300 System
• Network Summary
6
Page 7
NMS300 Network Management System
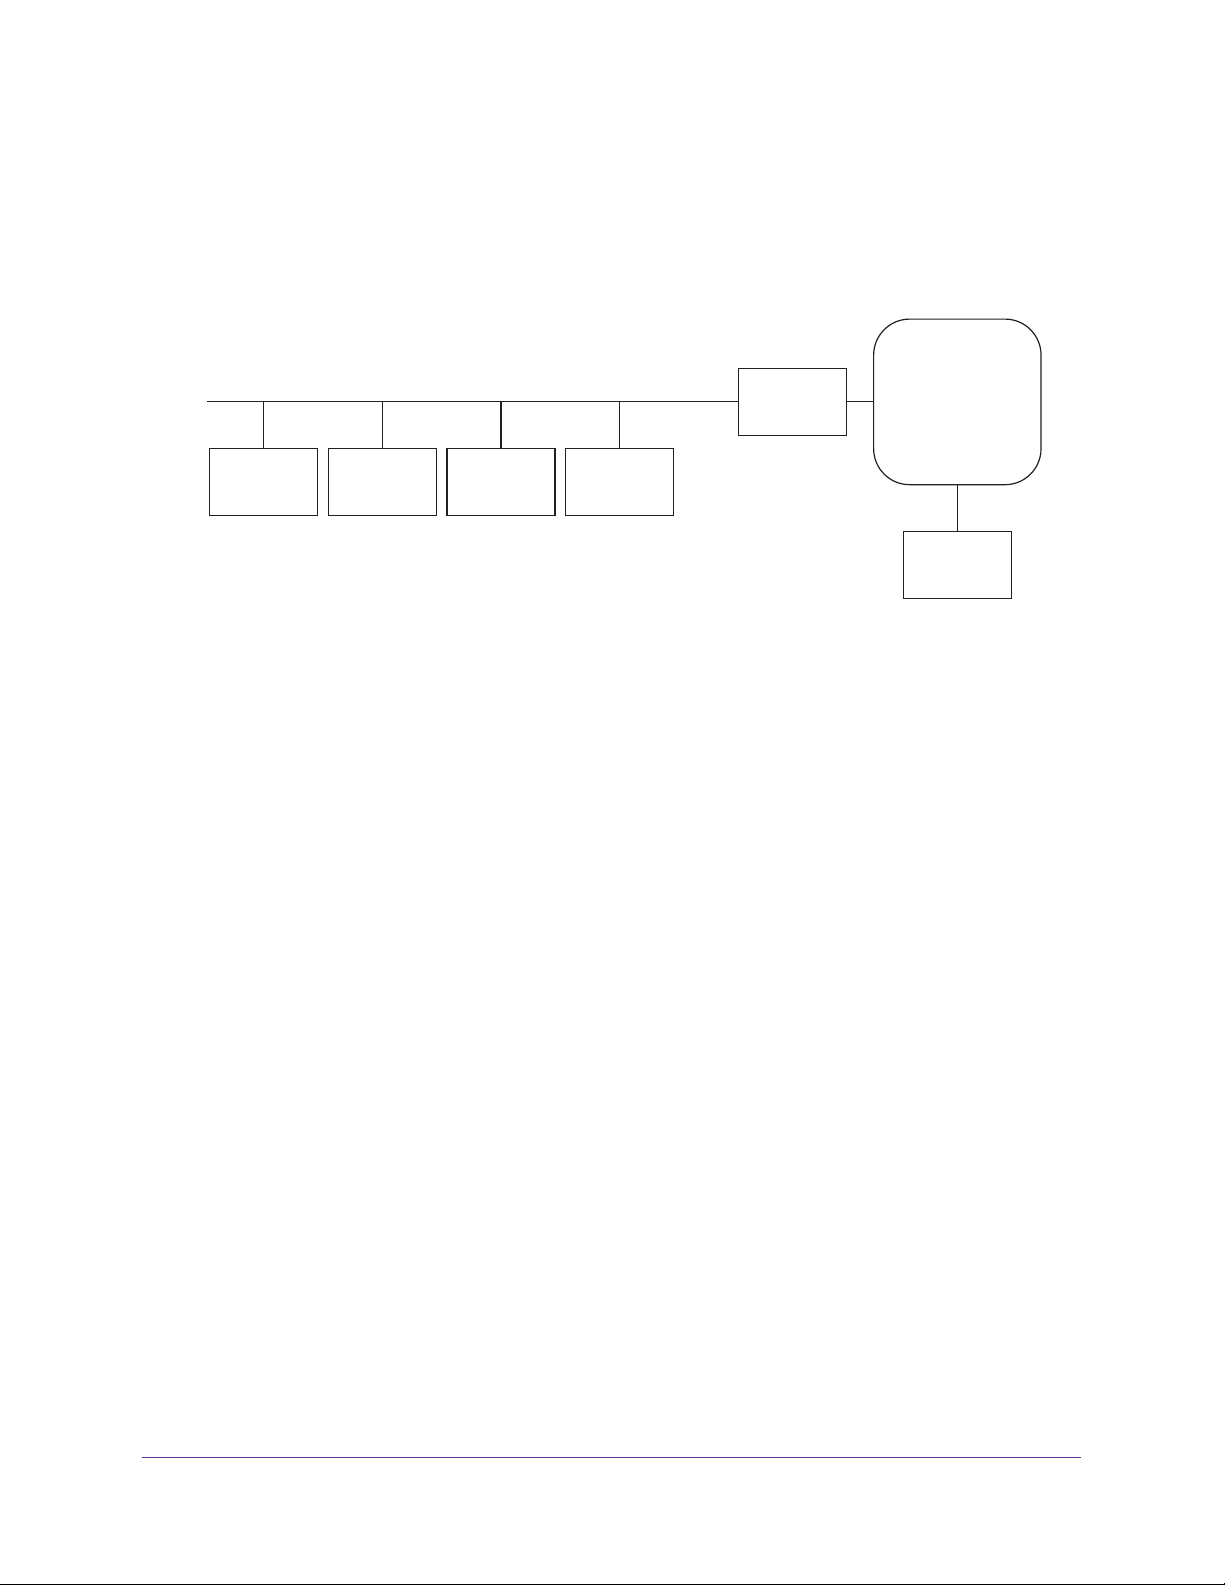
Network Environment
The NMS300 Network Management System software resides on the NMS300 server at a
static IP address on the local area network. The NMS300 software monitors the NETGEAR
and third-party devices on the network.
Local area network
Static IP
address
NMS300
server
Figure 1. The NMS300 Network Management System
Web
browser
NETGEAR
devices
Third-party
devices
Internet
gateway
Internet
Web
browser
You access the NMS300 software with a web browser. The IP address for a web browser
located outside the Internet gateway has to have permission to access the network.
The supported NETGEAR device types include the following:
• Switches (including managed and smart switches)
• NMS300 server (managed)
The NMS300 system can discover all third-party devices and display their nodes as up or
down.
More details are displayed for third-party devices that are SNMP devices, since the NMS300
system uses SNMP MIBs to gather health and status information.
The supported third-party
device types include the following:
• Routers
• VoIP gateways
• Hosts
• V
irtualization servers
Get to Know the NMS300 System
7
Page 8
NMS300 Network Management System
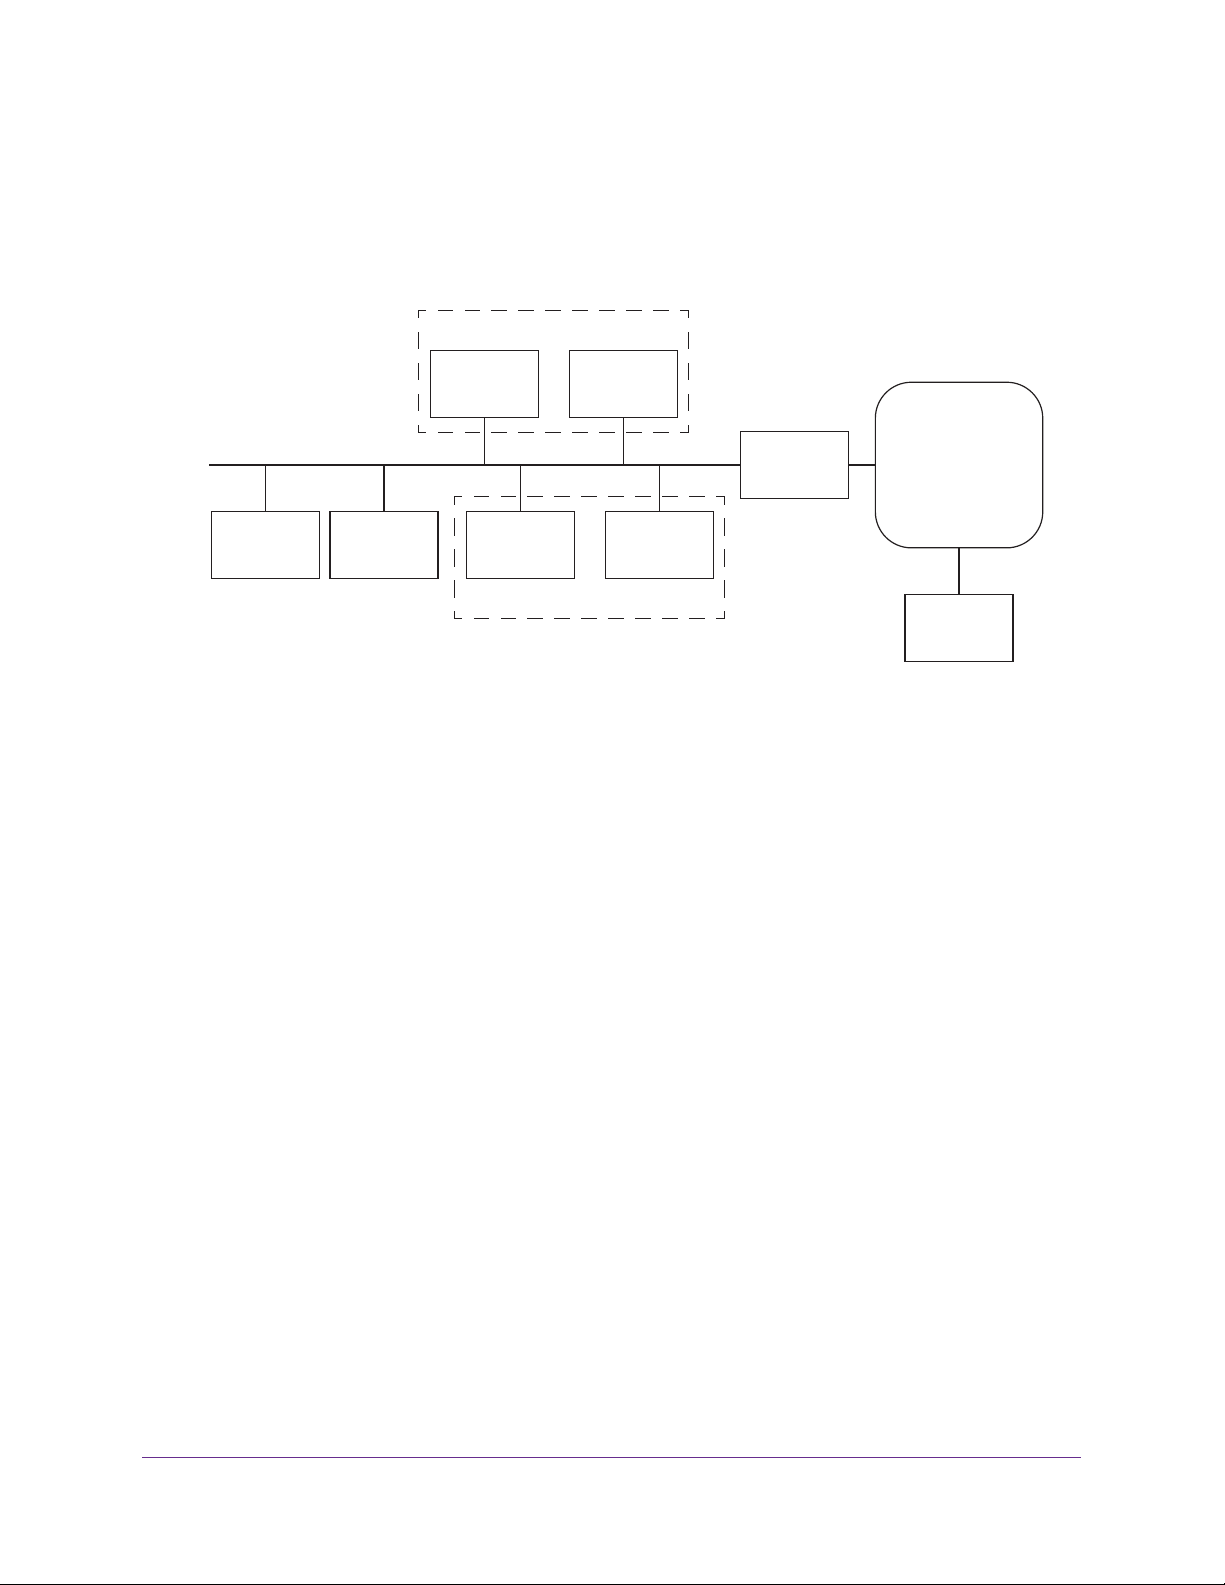
Device Groups
To simplify the management of networks with many devices, you can create device groups.
Group devices by vendor, location, device type, device model, and contact. Device groups
are optional.
Device group M
Local area network
Static IP
address
NMS300
server
Figure 2. Device groups
Web
browser
Network
device M1
Network
device N1
Device group N
Network
device Mm
Network
Device Nn
Internet
gateway
Internet
Web
browser
You can create two types of device groups:
• Static device groups. A static group is a fixed list of specific devices.
The list has to be
changed manually. For more information, see Add a Static Device Group on page 36.
• Dynamic device groups. A dynamic group is a dynamic list of devices that filter
selection criteria determine.
The list changes automatically as devices that meet the filter
criteria are added and removed from the network. For more information, see Add a
Dynamic Device Group on page 38.
Types of Users
The system includes the following default user security profiles:
• Observer. A user who can monitor and view enterprise network functions.
• Operator. A user who can manage the enterprise network functions, but cannot perform
administration-related functions.
• Admin
. A user with administration-related functions.
The admin user has the authority to
perform all NMS300 system functions, including the operator functions.
You can edit and delete these security profiles and you can define new security profiles. For
more information, see Security Profiles on page 148.
Device Discovery Preparation
To manage the devices on your network, you have to prepare them for the NMS300 system.
Get to Know the NMS300 System
8
Page 9

NMS300 Network Management System
To prepare the devices on your network:
1. Upgrade your devices to their latest released firmware.
To upgrade the firmware, use the user interface of the device.
Each device has to run the latest firmware before the NMS300 software can discover and
manage it. Once this one-time upgrade is done, future upgrades of device firmware can
be done centrally with the NMS300 software.
2. Create the correct credentials for your devices.
The NMS300 software uses a combination of SNMP, HTTP, and Telnet protocols to
interact with the devices on your network.
with the correct device credentials to authenticate successfully with the devices over
these protocols.
elnet and HTTP protocols. When the devices do not have the default password for
• T
the admin user, create two new credentials in the NMS300 system.
Create one credential for the Telnet protocol and another credential for the HTTP
protocol that contain either the admin user credential or the credential of another user
of the device with administrative privileges.
The NMS300 software has to be configured
• SNMP community strings. When the devices do not have the default SNMP
community strings, create a credential in the NMS300 system for the SNMP protocol
that contains the matching community strings.
For more information, see Add a Device Credential on page 21.
3. Make sure that each device on your network is configured to send SNMP traps to the IP
address of the NMS300 server
The NMS300 software listens for SNMP traps. The devices have to be configured to send
SNMP traps to the NMS300 software. Both SNMPv1 and SNMPv2 traps are supported.
.
Log In to the NMS300 System
The NMS300 software uses a browser server architecture. Administrators and other users
can access the NMS300 software from any supported browser.
Before you log in to the NMS300 software, check the following items:
• Make sure that the NMS300 software is installed on a machine with a static IP address.
• T
o prevent issues, clear your browser cache before you use the NMS300 software.
• The NMS300 software b
about managing more devices than this number, contact your NETGEAR sales team.
• For more information about this NMS300 software release, see the NMS300 Release
Notes.
y default allows you to manage up to 200 devices. For information
To prevent issues, clear your browser cache before you use the NMS300 software.
Get to Know the NMS300 System
9
Page 10

NMS300 Network Management System
To log in to the NMS300 system:
1. Open a browser and connect to the NMS300 software through the static IP address of
the server host.
o connect to the NMS300 software from the same machine where you installed the
• T
software, enter the URL
http://localhost:8080.
If you entered a different port number for the server during the NMS300 software
installation, replace 8080 in this URL with the port number that you provided during
installation.
• To connect to the NMS300 software from a remote machine, replace localhost
the IP address of the machine that runs the NMS300 software.
Once you are connected to the NMS300 software, the following screen displays:
2. Enter your user name and password.
When the NMS300 software is initially installed, the default administrator user name is
admin and the default administrator password is admin.
An administrator creates the user name and password for the other types of users.
3. Click the Sign In button.
The Network Summary screen displays. For more information, see Network Summary on
page 11.
with
Get to Know the NMS300 System
10
Page 11
NMS300 Network Management System
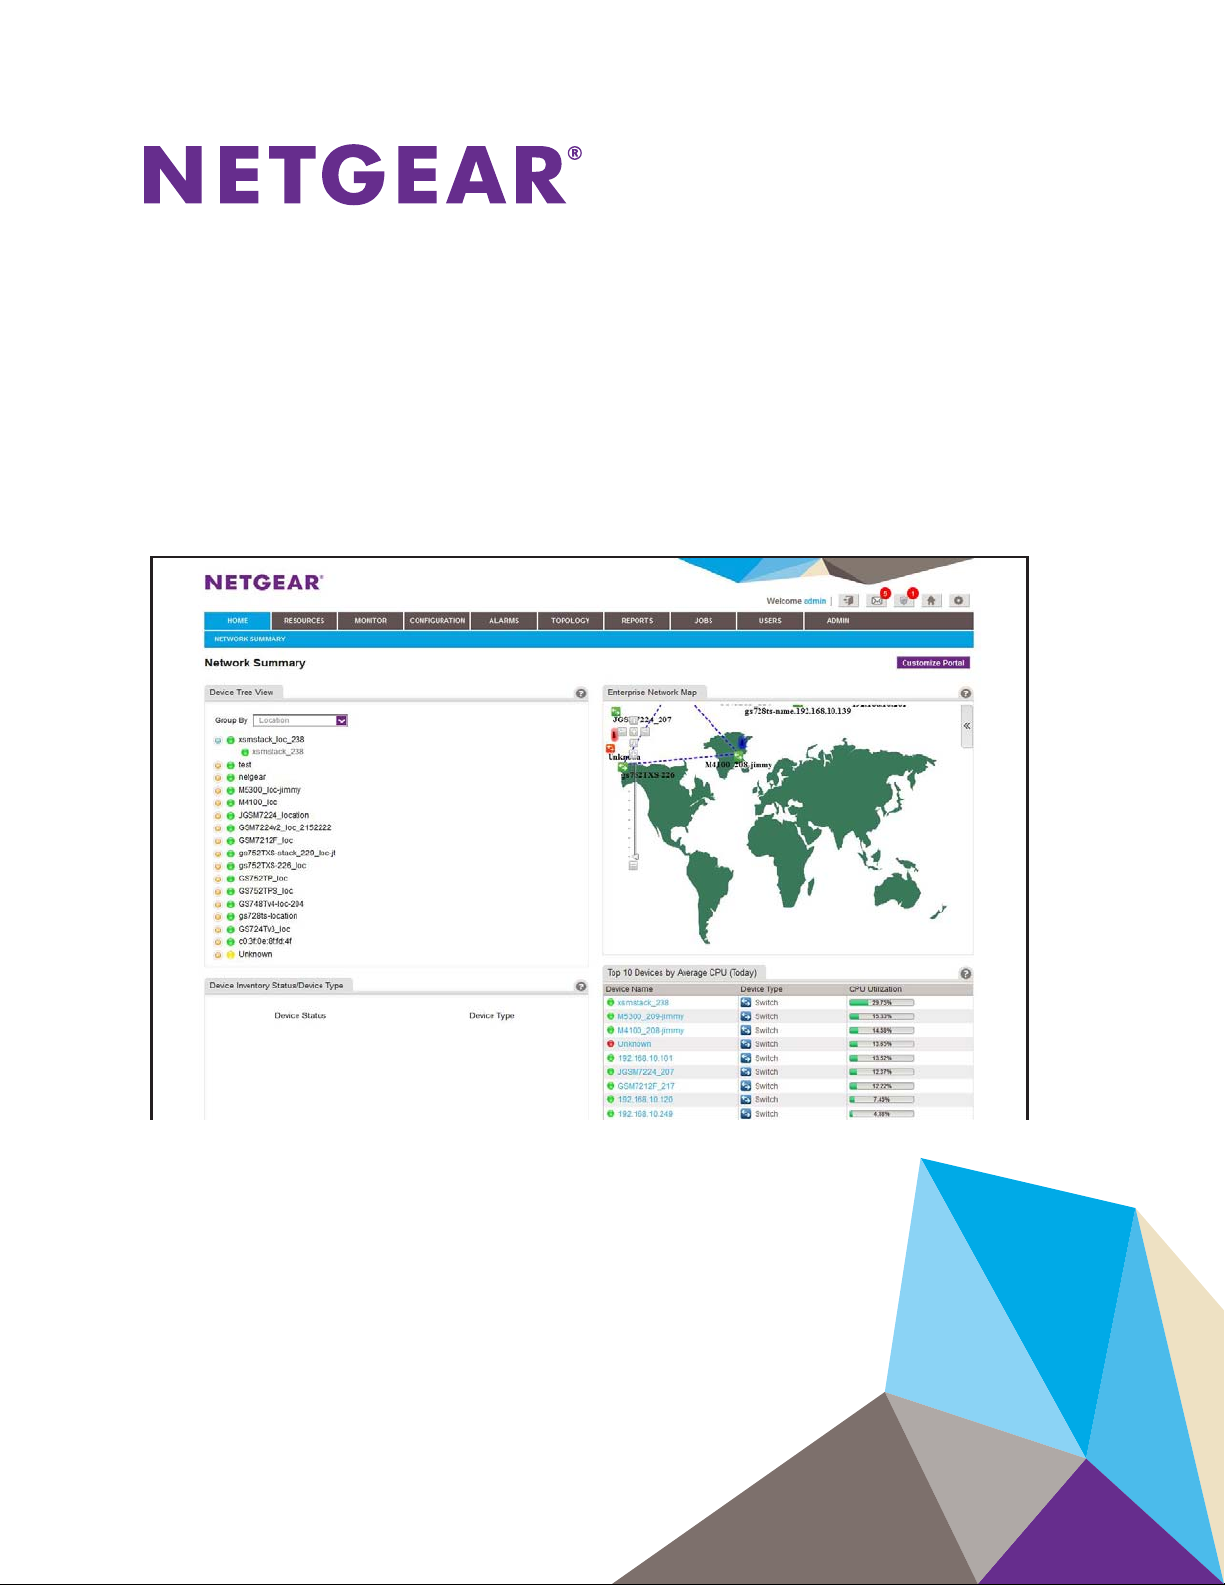
Network Summary
After you log in to the NMS300 system, a screen similar to the following displays:
Figure 3. The Network Summary screen
Before you can manage your network, you have to find the devices that are on your network
and you have to perform other administrative setup tasks. Administrators typically perform
these setup tasks and the tasks have to be done infrequently. For more information, see Get
Started with the NMS300 System on page 151.
All users can make the following changes to their NMS300 system account.
• Account information. For information about editing your account information, see Edit
Your Account Information on page 13.
• Password. For information about changing your password, see Change Your Password
on page 15.
• Network summary. For information about customizing your network summary, see
Customize
Your Network Summary on page 16.
Get to Know the NMS300 System
11
Page 12

NMS300 Network Management System
Navigation Tabs and Buttons
To navigate to the various network management task, use the tabs that are available at the
top of the NMS300 screens.
The NMS300 system organizes the tasks of network management into the following
categories:
• Resource management. Before you can manage your network, you have to find the
devices that are on your network and you have to perform other setup tasks. For more
information, see Resource Management on page 18.
• Performance monitoring. Y
statistics, real-time and historical information, and the device and interface dashboard.
You can also enable and disable the network performance monitor collection and set up
thresholds. For more information, see Performance Monitoring on page 42.
• Configuration management. Y
can also upgrade device firmware. For more information, see Configuration Management
on page 58.
• Alarm management. Y
and view current and previous alarms using various filter options. As an option, you can
receive these alarm notifications with email. For more information, see Alarm
Management on page 92.
• Topology views. You can create hierarchical maps and topological views of your
network. For more information, see
• Report generation. Y
templates, and you can view them at any time. For more information, see Report
Generation on page 130.
• Job management. Y
disable, and delete jobs. For more information, see Job Management on page 142.
• User management. Y
delete existing users. For more information, see User Management on page 146.
• Administration panels. Y
the administration dashboard. For more information, see Administration Panels on
page 150.
ou can generate reports from either built-in or customized report
ou can view job detail and status information. You can also enable,
ou can view the existing user list, create new users, and edit or
ou can view network summary information, performance
ou can back up and restore device configurations. You
ou can receive alarm notifications when conditions are suboptimal
Topology Views on page 103.
ou can change the NMS300 system and website settings with
Get to Know the NMS300 System
12
Page 13
NMS300 Network Management System
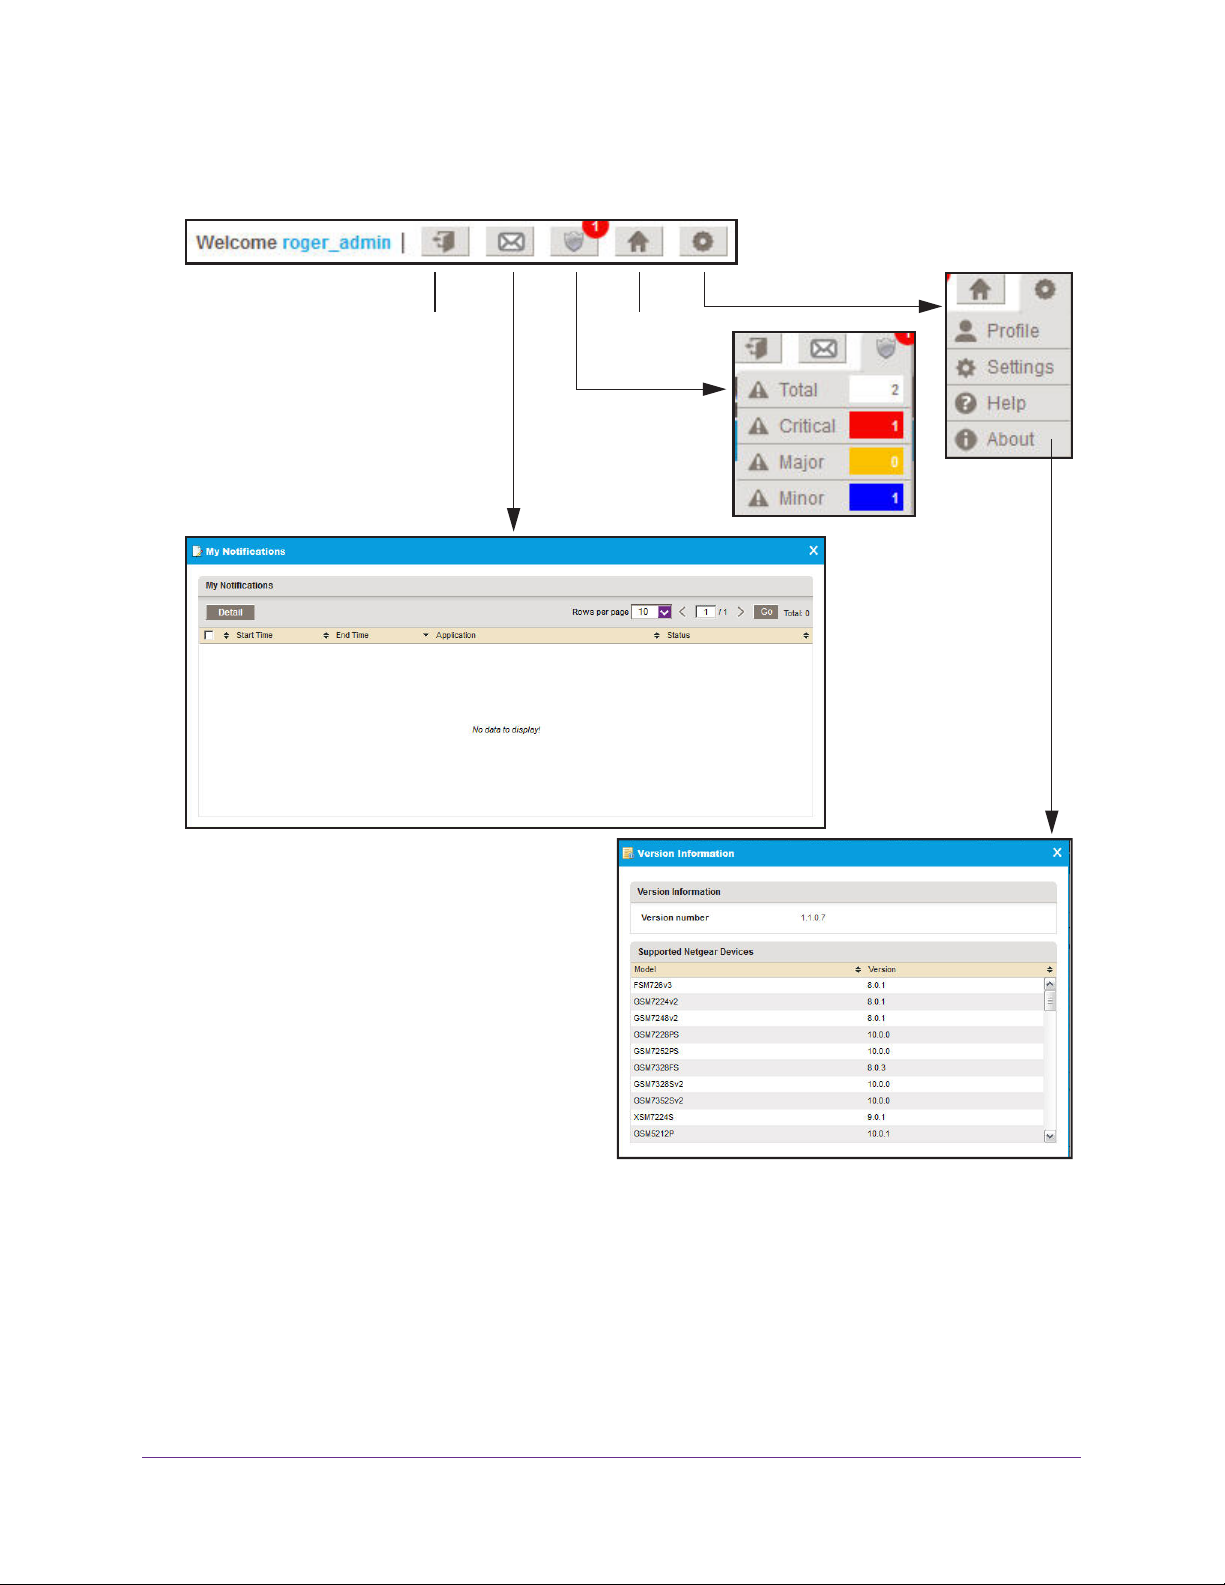
To navigate quickly to the various account management features, use the following buttons,
which are available at the top right of the NMS300 screens:
Help
Log out
My Notifications
Home
Alarms
Figure 4. Navigation buttons
Edit Your Account Information
Y ou can change your account information. Items you can change include your email address,
real name, and telephone number. You cannot change your user name.
Get to Know the NMS300 System
13
Page 14
NMS300 Network Management System
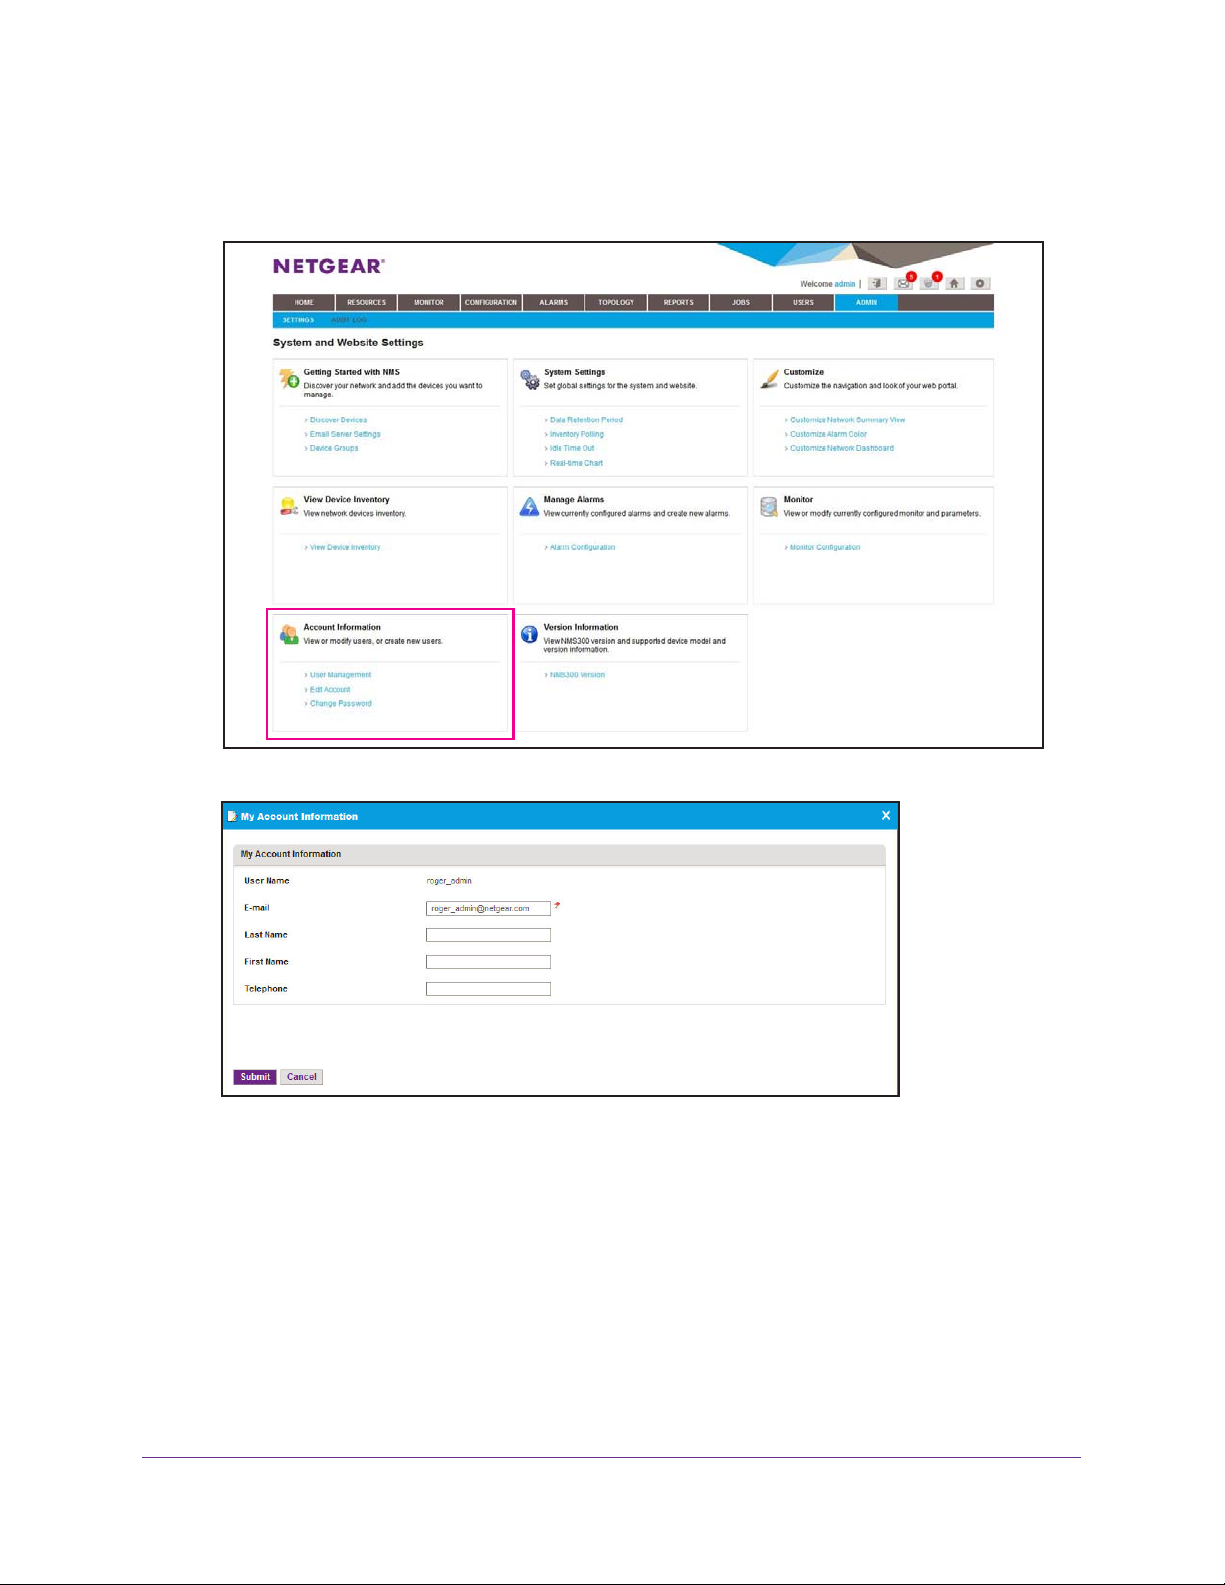
To change your account information:
1. Select ADMIN > SETTINGS.
2. Under Account Information, click Edit Account.
3. Enter you updated information.
4. Click the Submit button.
Your account information is updated.
Before you can receive email alerts, the email server settings have to be configured. For
more information, see Get Started with the NMS300 System on page 151.
Get to Know the NMS300 System
14
Page 15
NMS300 Network Management System
Change Your Password
When the NMS300 software is initially installed, the default administrator user name is admin
and the default administrator password is admin. An administrator creates the user name and
password for the other types of users.
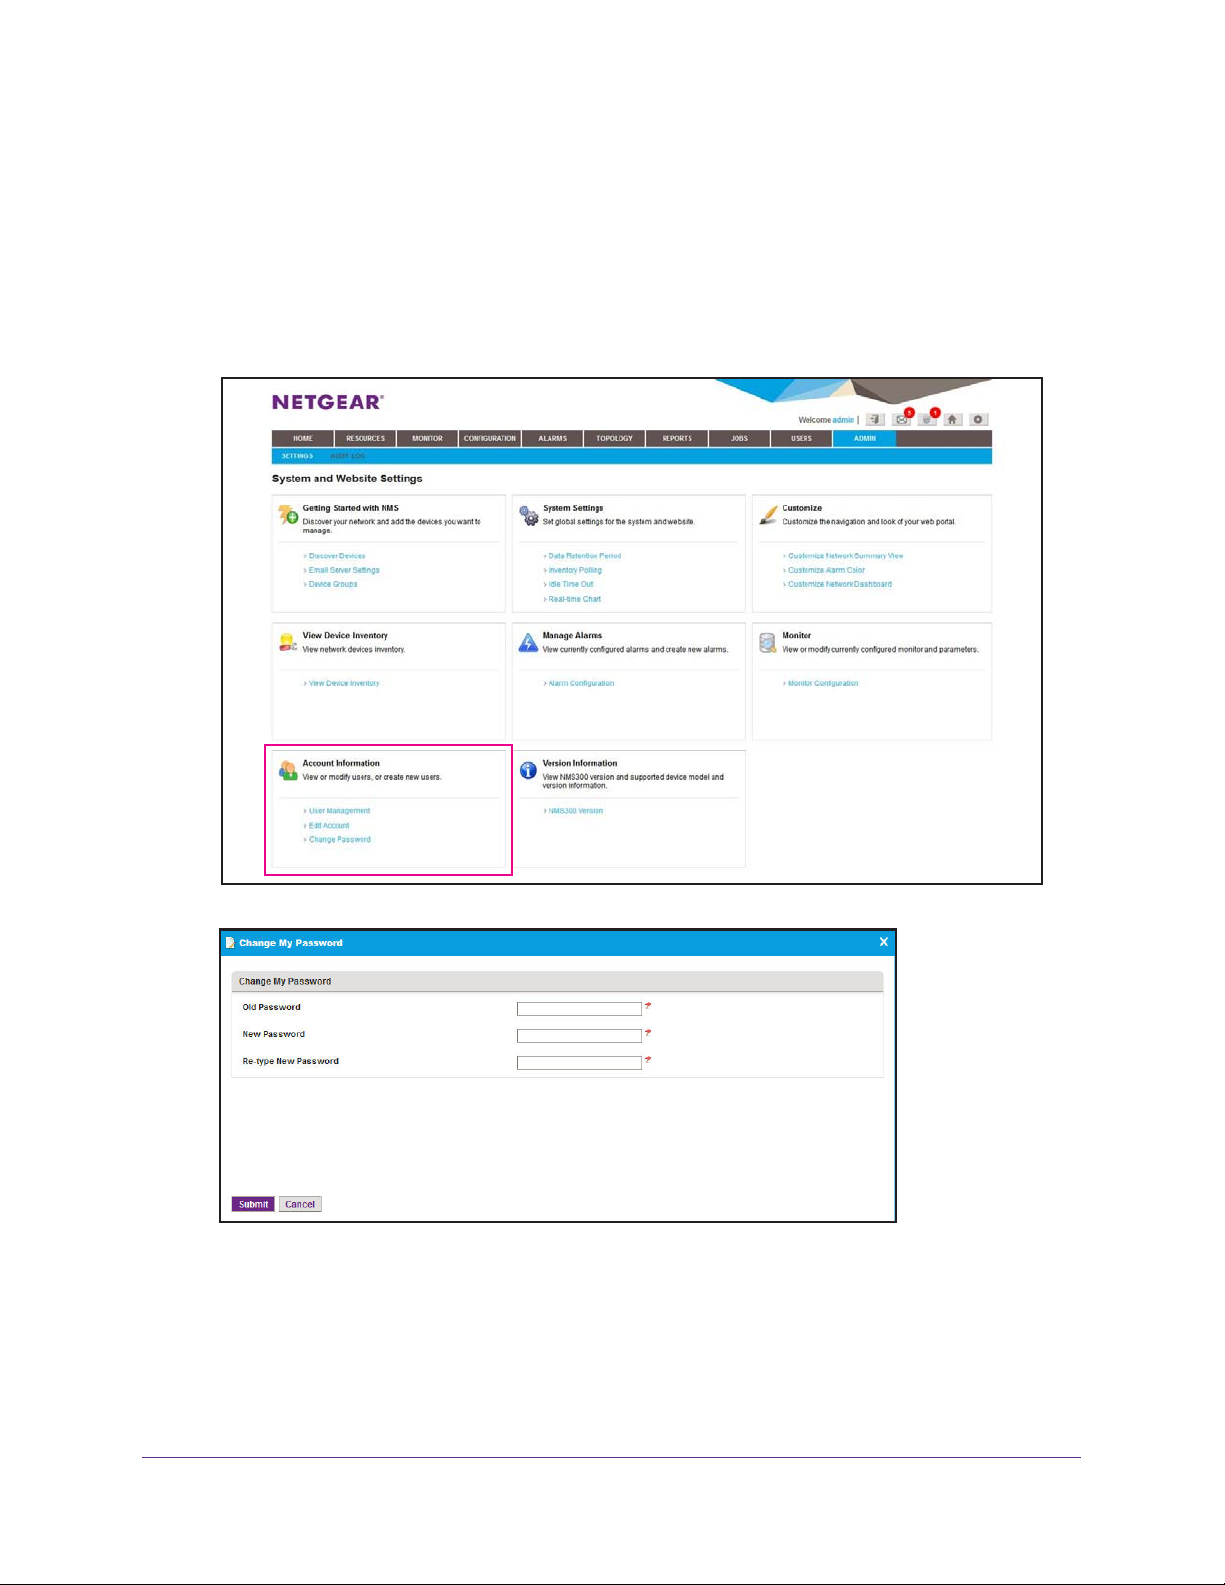
To change your password:
1. Select ADMIN > SETTINGS.
2. Under Account Information, click Change Password.
3. Enter your old and new passwords.
4. Click the Submit button.
Your password is updated.
Get to Know the NMS300 System
15
Page 16
NMS300 Network Management System
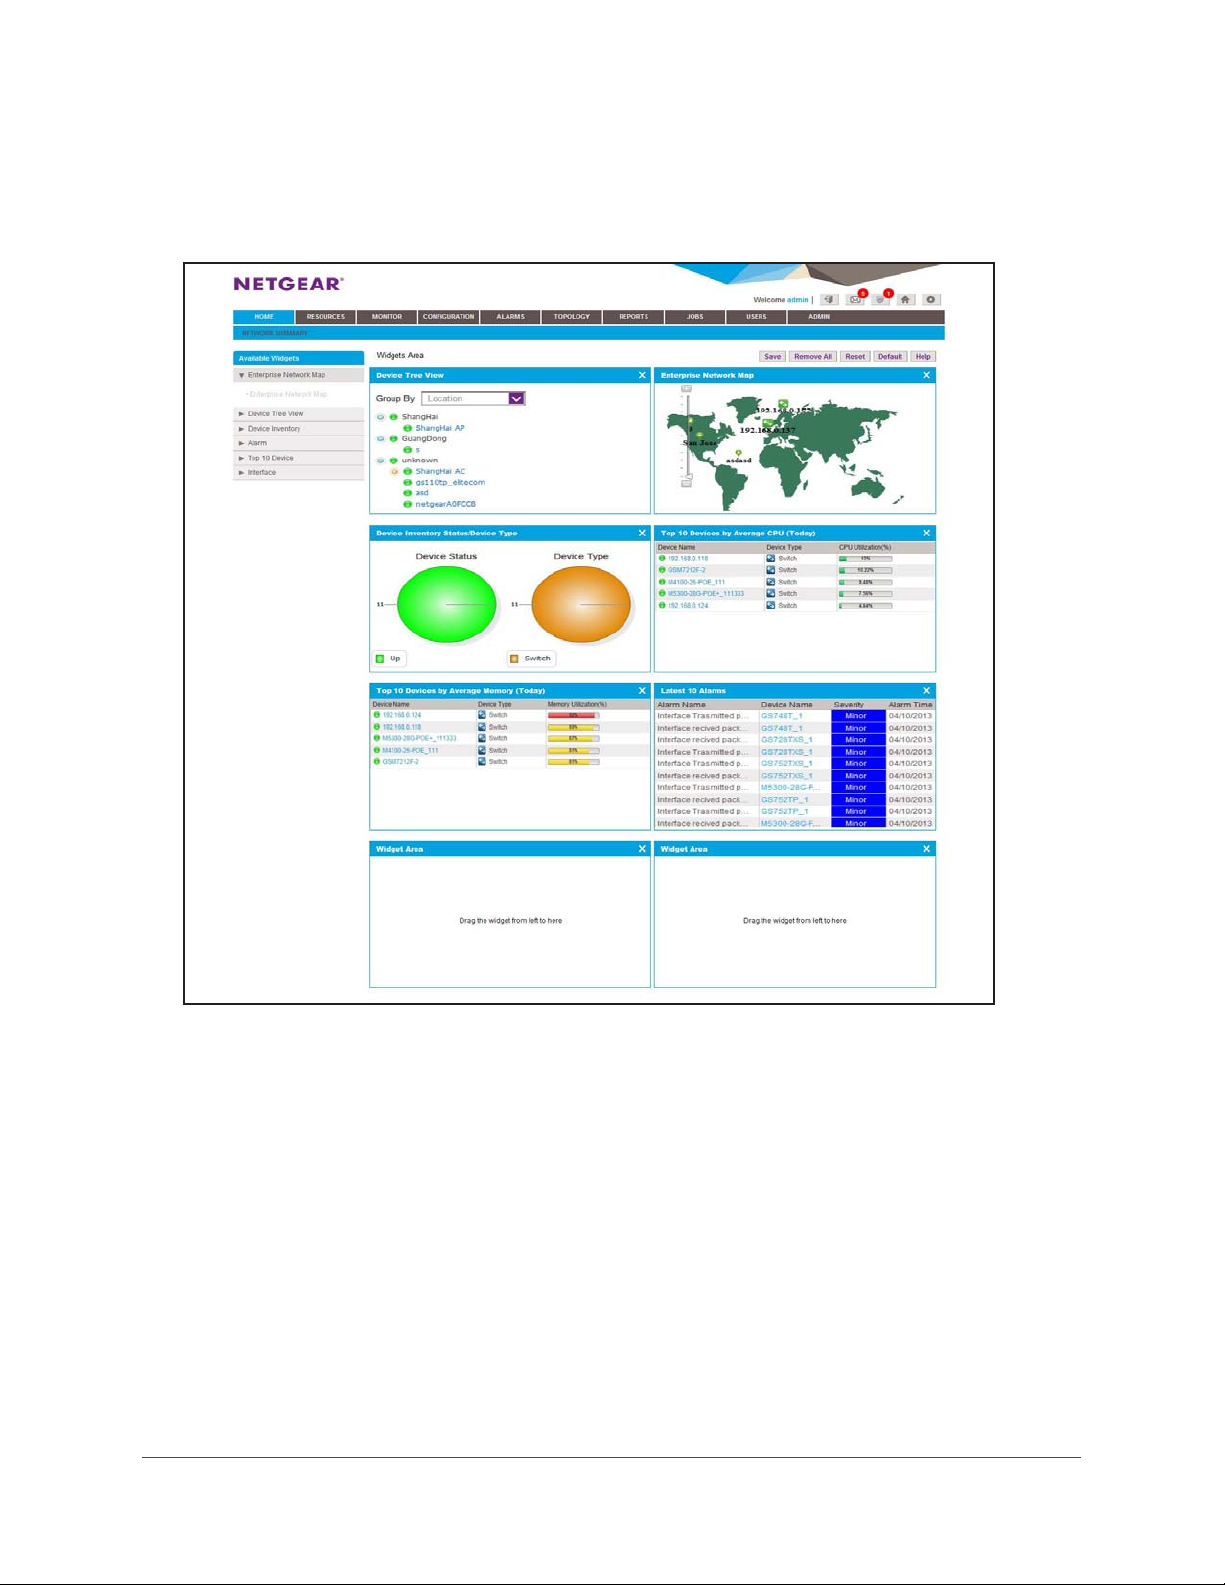
Customize Your Network Summary
Each NMS300 system user can customize the items that appear on the Network Summary
screen.
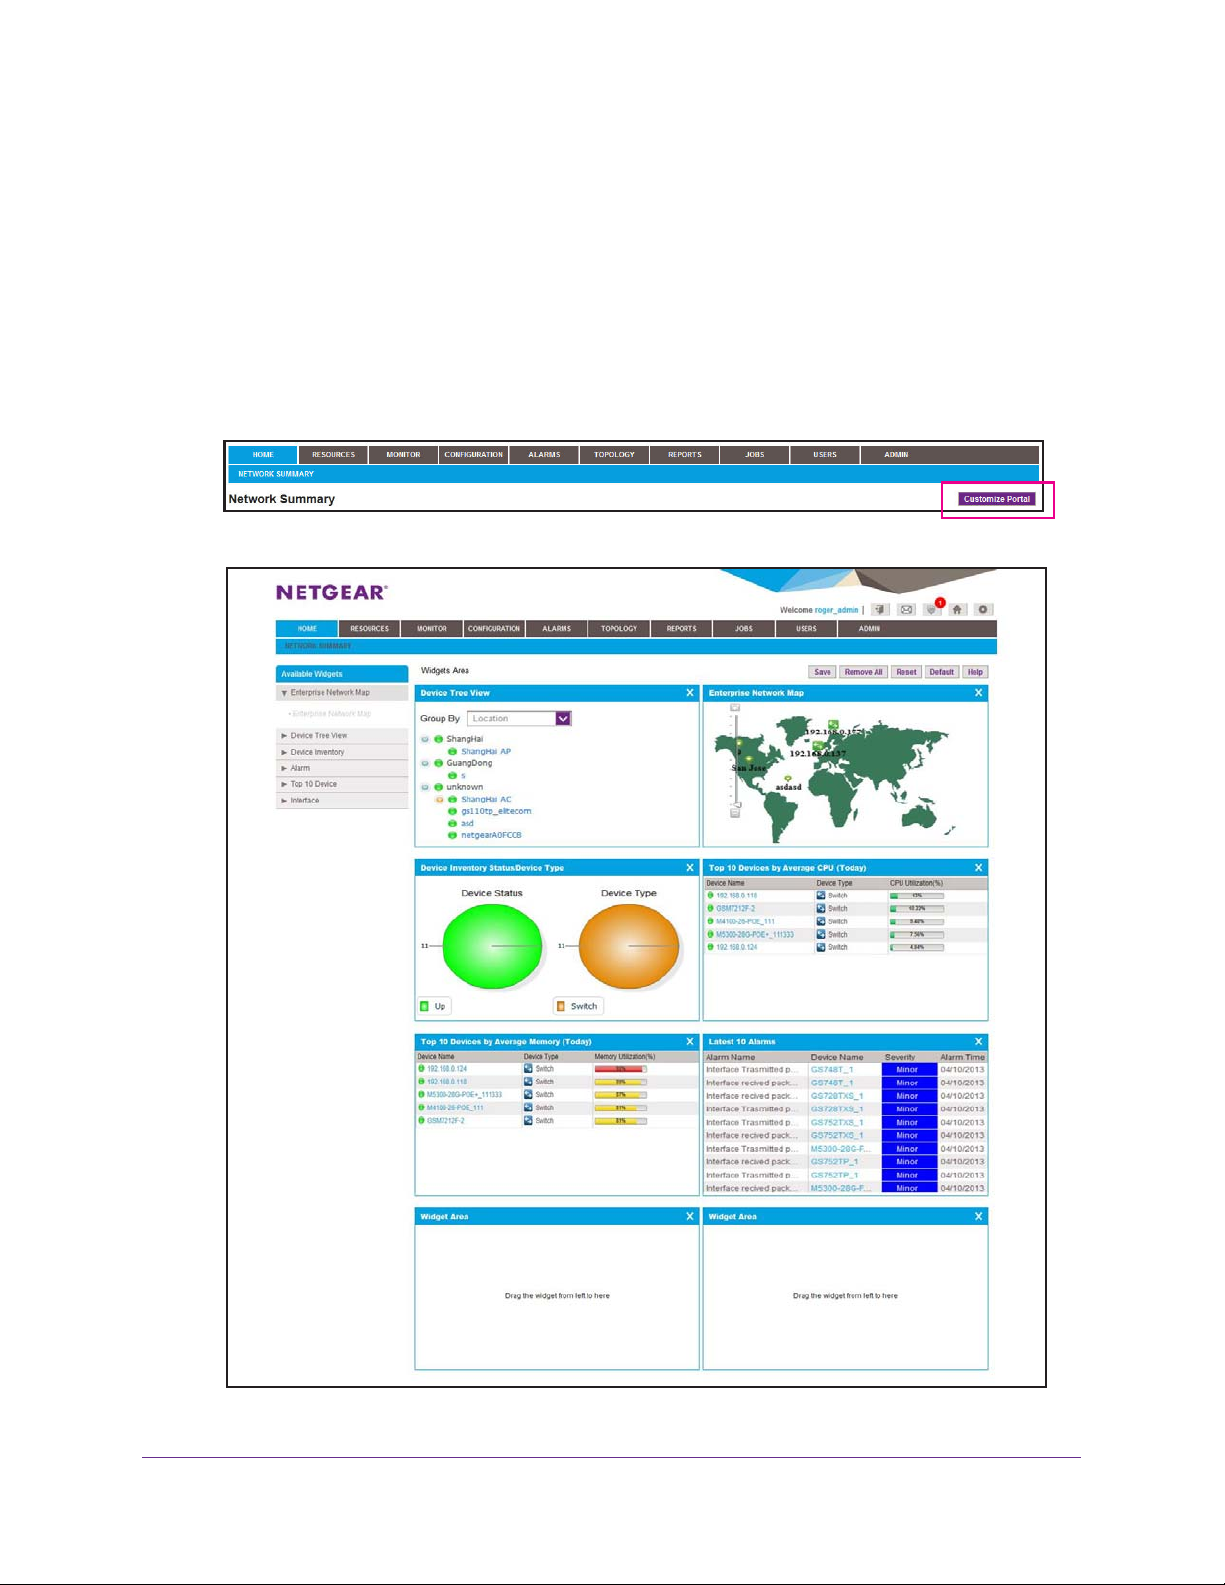
To customize the Network Summary screen for your account:
1. Select HOME > NETWORK SUMMARY.
The Network Summary screen displays.
2. Click the Customize Portal button.
A screen similar to the following displays:
Get to Know the NMS300 System
16
Page 17

NMS300 Network Management System
3. To add an available widget, drag the widget from the Available Widgets list to the Widget
Areas on the right.
When the cursor is in the target Widget Area, the Widget Area is green and you can drop
the widget.
4. Click the x (
) button on the top right corner to remove a pane.
5. To adjust the widget order, in the Widgets Area, click a widget title bar to drag it from one
place to the other
6. (Optional) T
.
o take other actions, click the Remove All, Reset, or Default button.
• Remove All. The Remove All button removes all of the widgets.
• Reset. The Reset button removes all unsaved changes.
• Default
7. Click the Save
. The Default button restores the factory default widgets.
button.
Your settings are saved for your account.
Get to Know the NMS300 System
17
Page 18

2. Resource Management
Find the devices on your network
2
Before you can manage your network, you have to find the devices that are on your network and
you have to perform other setup tasks. These setup tasks typically have to be done infrequently.
This chapter covers the following topics:
• Discover the Devices on Your Network
• Examine the Devices on Your Network
• Specify Device Groups
• View the NMS300 Server Information
18
Page 19
NMS300 Network Management System
Discover the Devices on Your Network
You have to discover the devices on your network before you can monitor and manage them.
• Regular discovery filters the devices on your network through a discovery profile.
• Quick discovery does not use a discovery profile.
Note: When your network contains more than 200 devices, contact your
NETGEAR sales team.
Quick Discovery
To find the NETGEAR devices on your network, use quick discovery.
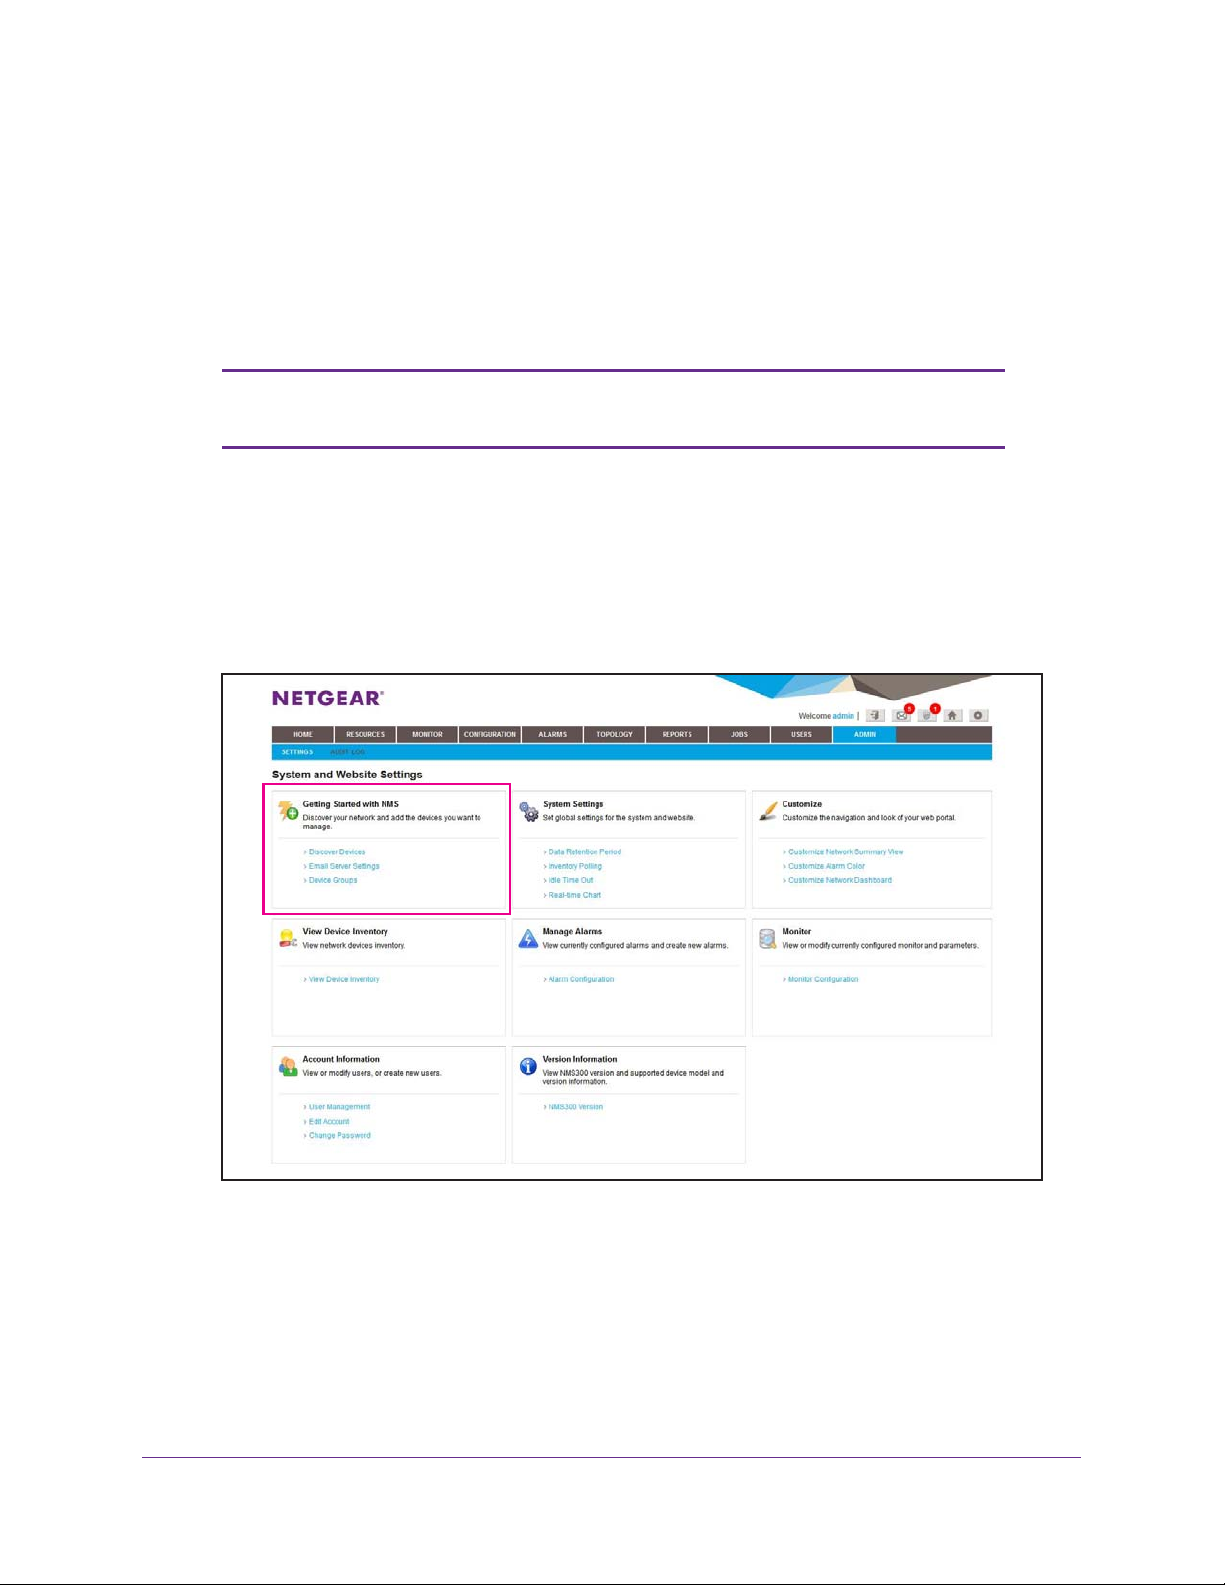
To discover the devices on your network:
1. Select ADMIN > SETTINGS.
Resource Management
19
Page 20
NMS300 Network Management System
2. Under Getting Started with NMS300, select Discover Devices.
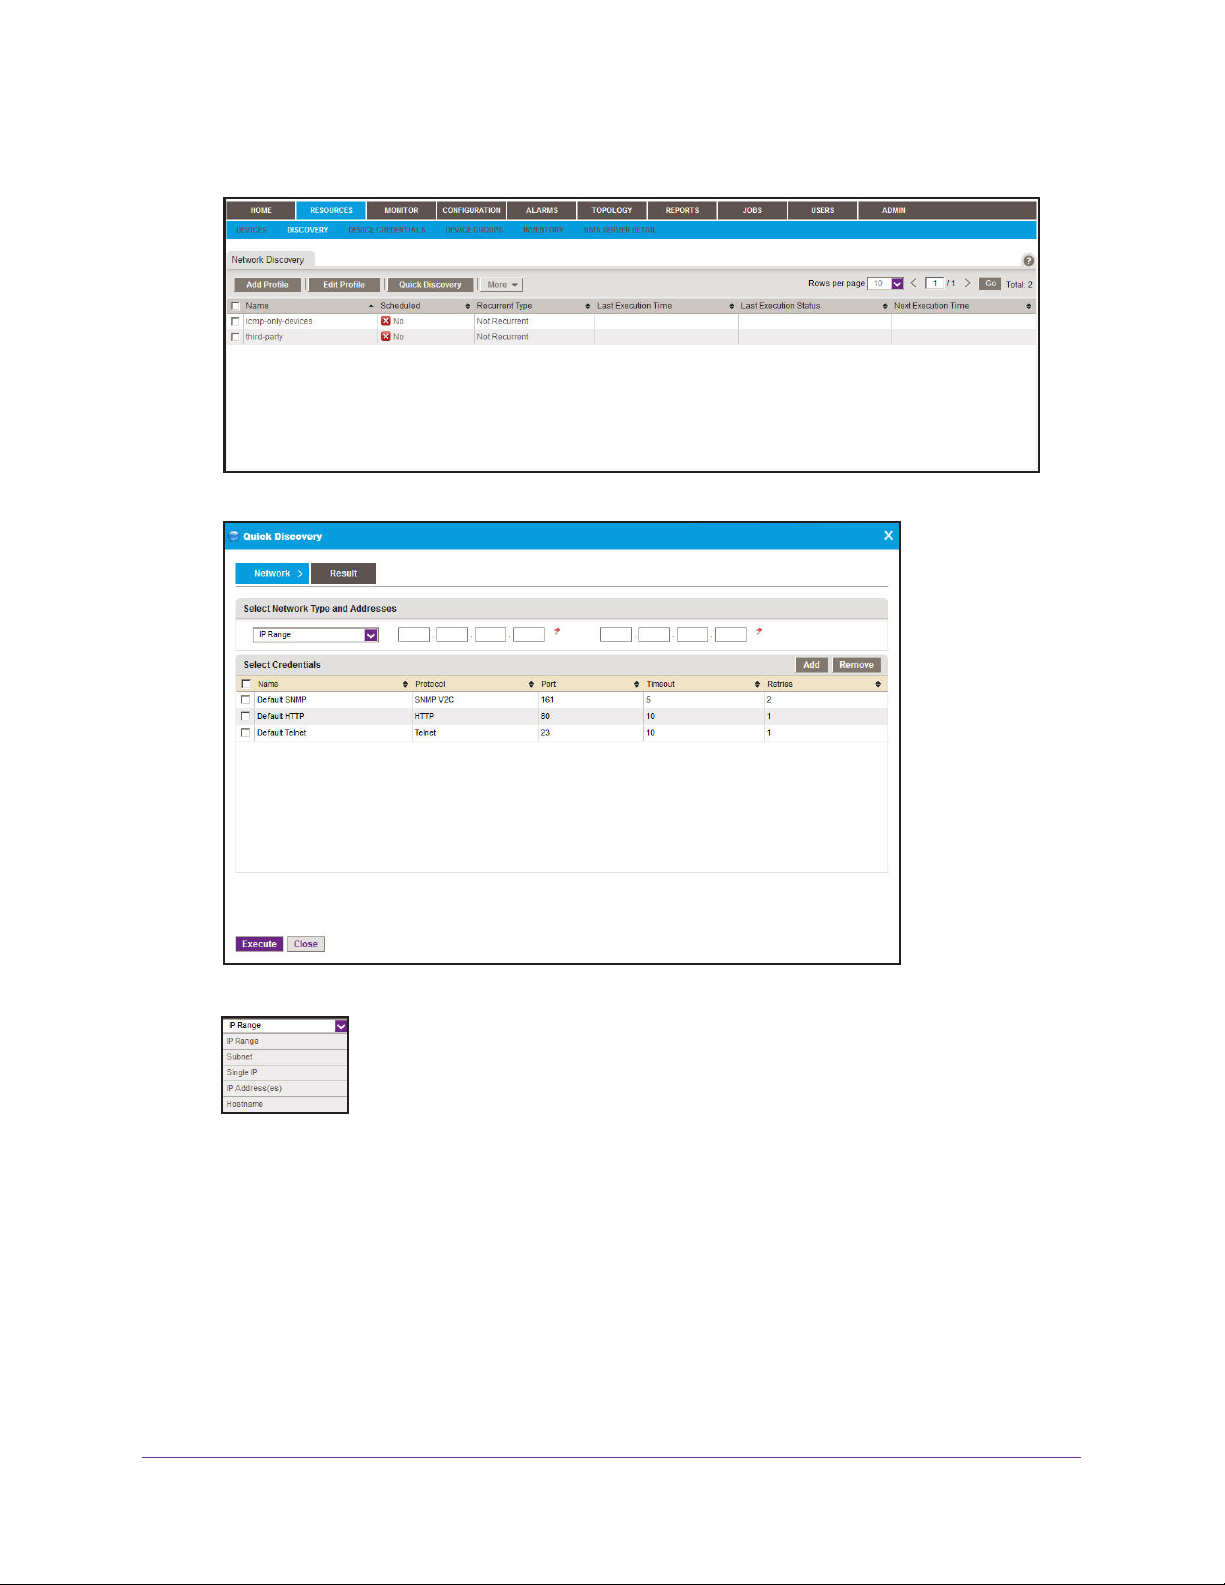
3. Click the Quick Discovery button.
4. Select the network type and addresses.
Depending on your network type selection, a different Quick Discovery screen might
display.
You can screen by IP address range, IP subnet address, a single IP address, a list of IP
addresses, or the device host name.
5. Enter the IP information for the discovery search.
6. Select the credentials that pertain to the devices on your network.
7. Click the Execute button.
Resource Management
20
Page 21
NMS300 Network Management System
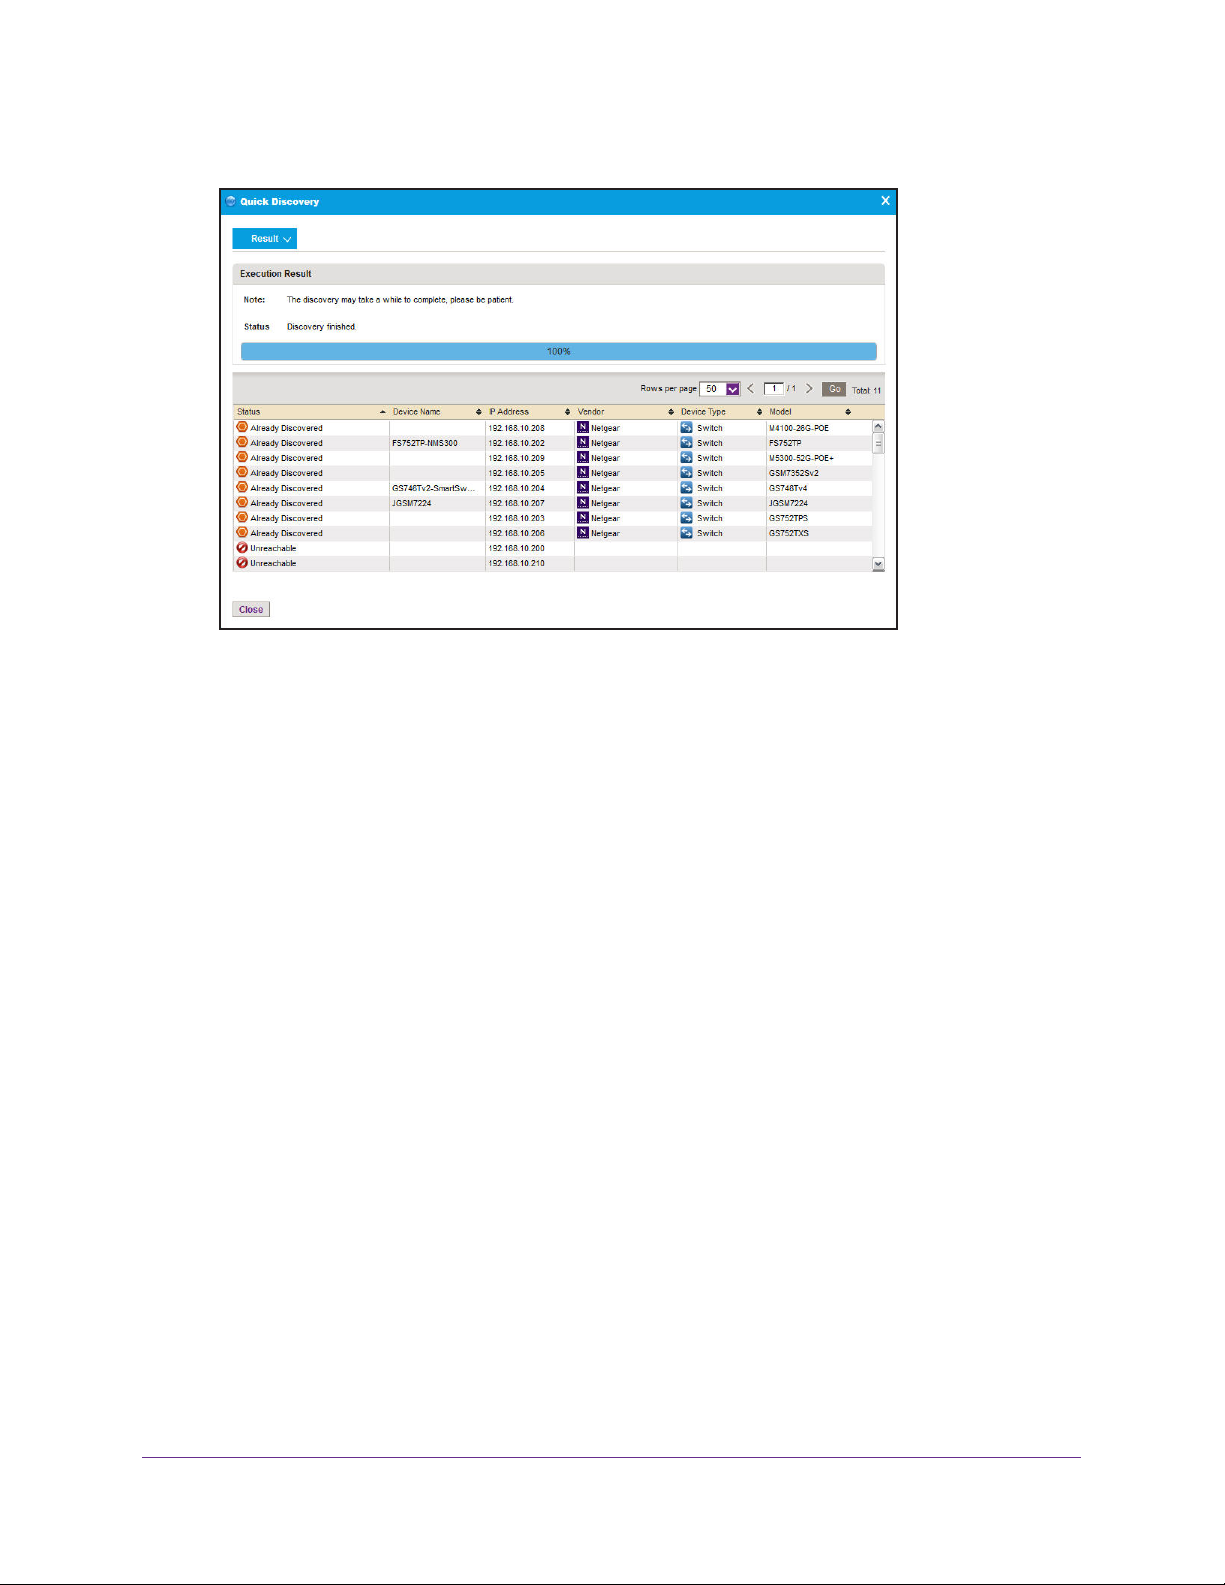
When quick discovery has completed, a screen similar to the following displays:
When a credential failure occurs, a common reason is that the device login information
has changed from its default. When you get a credential failure, add or edit the credential
and then run the discovery procedure again. For more information, see Add a Device
Credential on page 21.
8. Click the Close button.
The Quick Discovery screen closes.
You can view and modify the information for a particular device. For more information,
see View Device Information on page 30.
Add a Device Credential
Device credentials are the user names, passwords, and SNMP community strings required to
log in to a device and obtain the information the NMS300 system requires to discover and
manage the device. The user name and password are the same user information you use to
log in to the device to perform system configuration. You must configure the correct device
credentials for any device you want NMS300 system to manage.
• If the devices do not have the default admin user password, create two new credentials in
T
NMS300 software, one for
contain either the admin user credential or the credential of another user with
administrative privileges.
elnet and another for the HTTP protocol. These credentials
• If the devices do not have the default SNMP community strings, create a credential in the
NMS300 software for the SNMP protocol that contains the matching community strings.
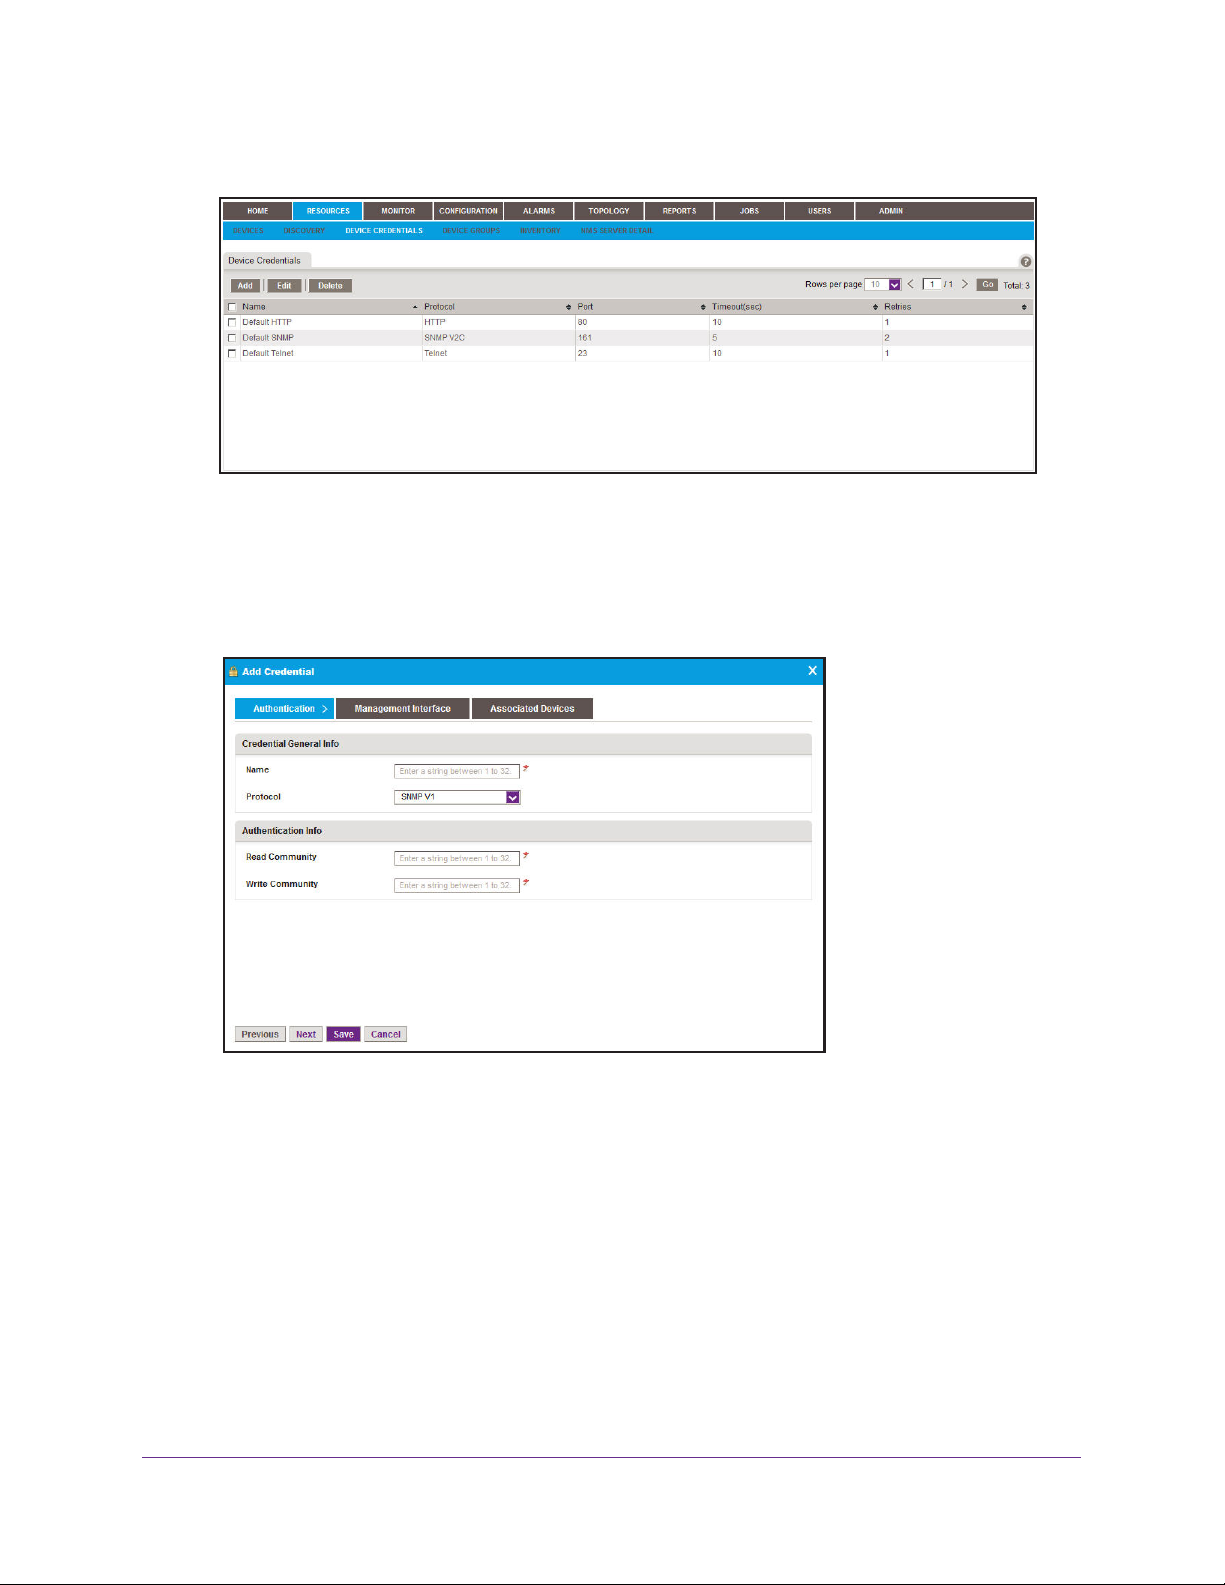
To add a device credential:
1. Select RESOURCES > DEVICE CREDENTIALS.
Resource Management
21
Page 22
NMS300 Network Management System
A screen similar to the following displays:
2. To edit an existing device credential, select the device credential you want to edit and click
the Edit button.
A The Edit Credential screen displays, which is similar in appearance to the Add
Credential screen. For more information, see step 3 on page 22.
3. Click the Add button.
4. On the Authentication screen, enter the requested information.
Depending on your protocol selection, a different Authentication screen might display.
Resource Management
22
Page 23
NMS300 Network Management System
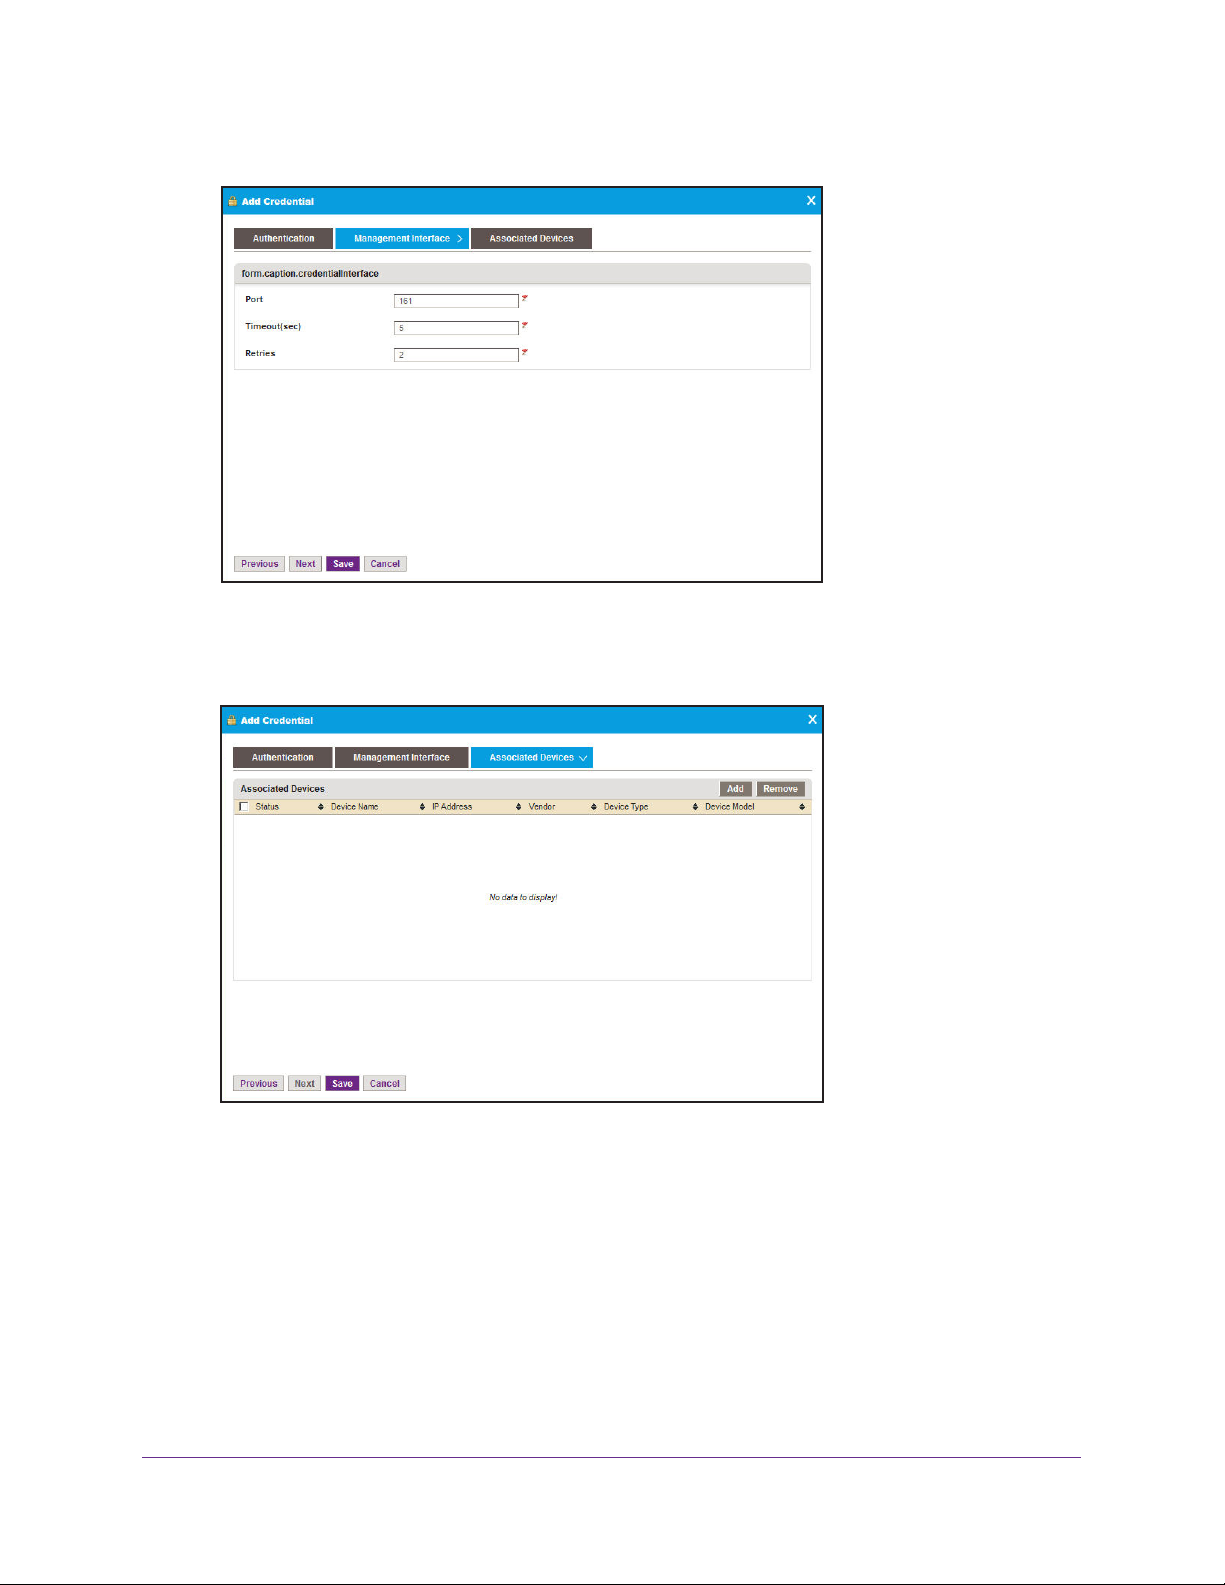
5. Click the Management Interface tab.
Depending on your previous selections, a different Management Interface screen might
display. Enter the requested information.
6. Click the Associated Devices tab.
7. (Optional) To remove devices from the device credential, select the devices you want to
remove and click the Remove button.
Resource Management
23
Page 24
NMS300 Network Management System
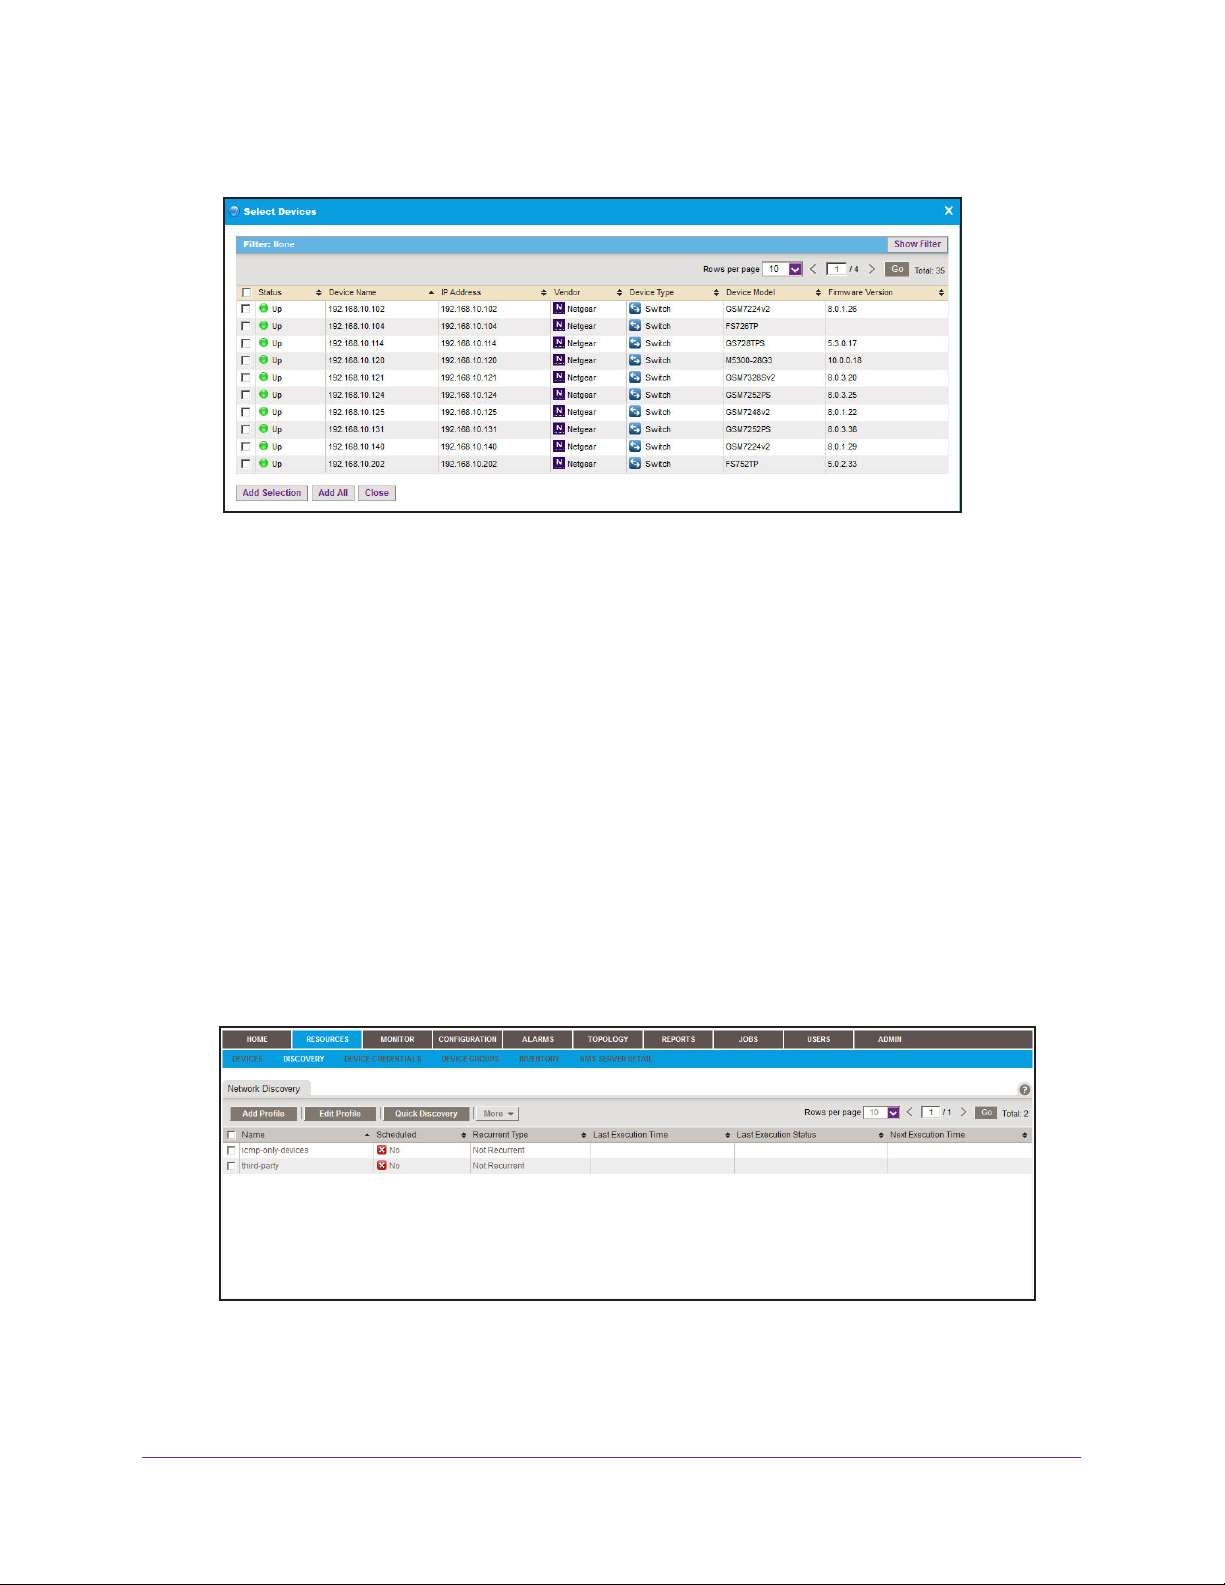
8. To add devices to the device credential, click the Add button.
9. To add one or more devices to the device credential, select the devices you want to add and
click the Add Selection button.
To add all devices to the device credential, click the Add All button.
The Select Devices screen closes and the selected devices are added to the Associated
Devices list.
10. Click the Save button.
The Add Credential screen closes and the new device credential displays in the Device
Credentials list.
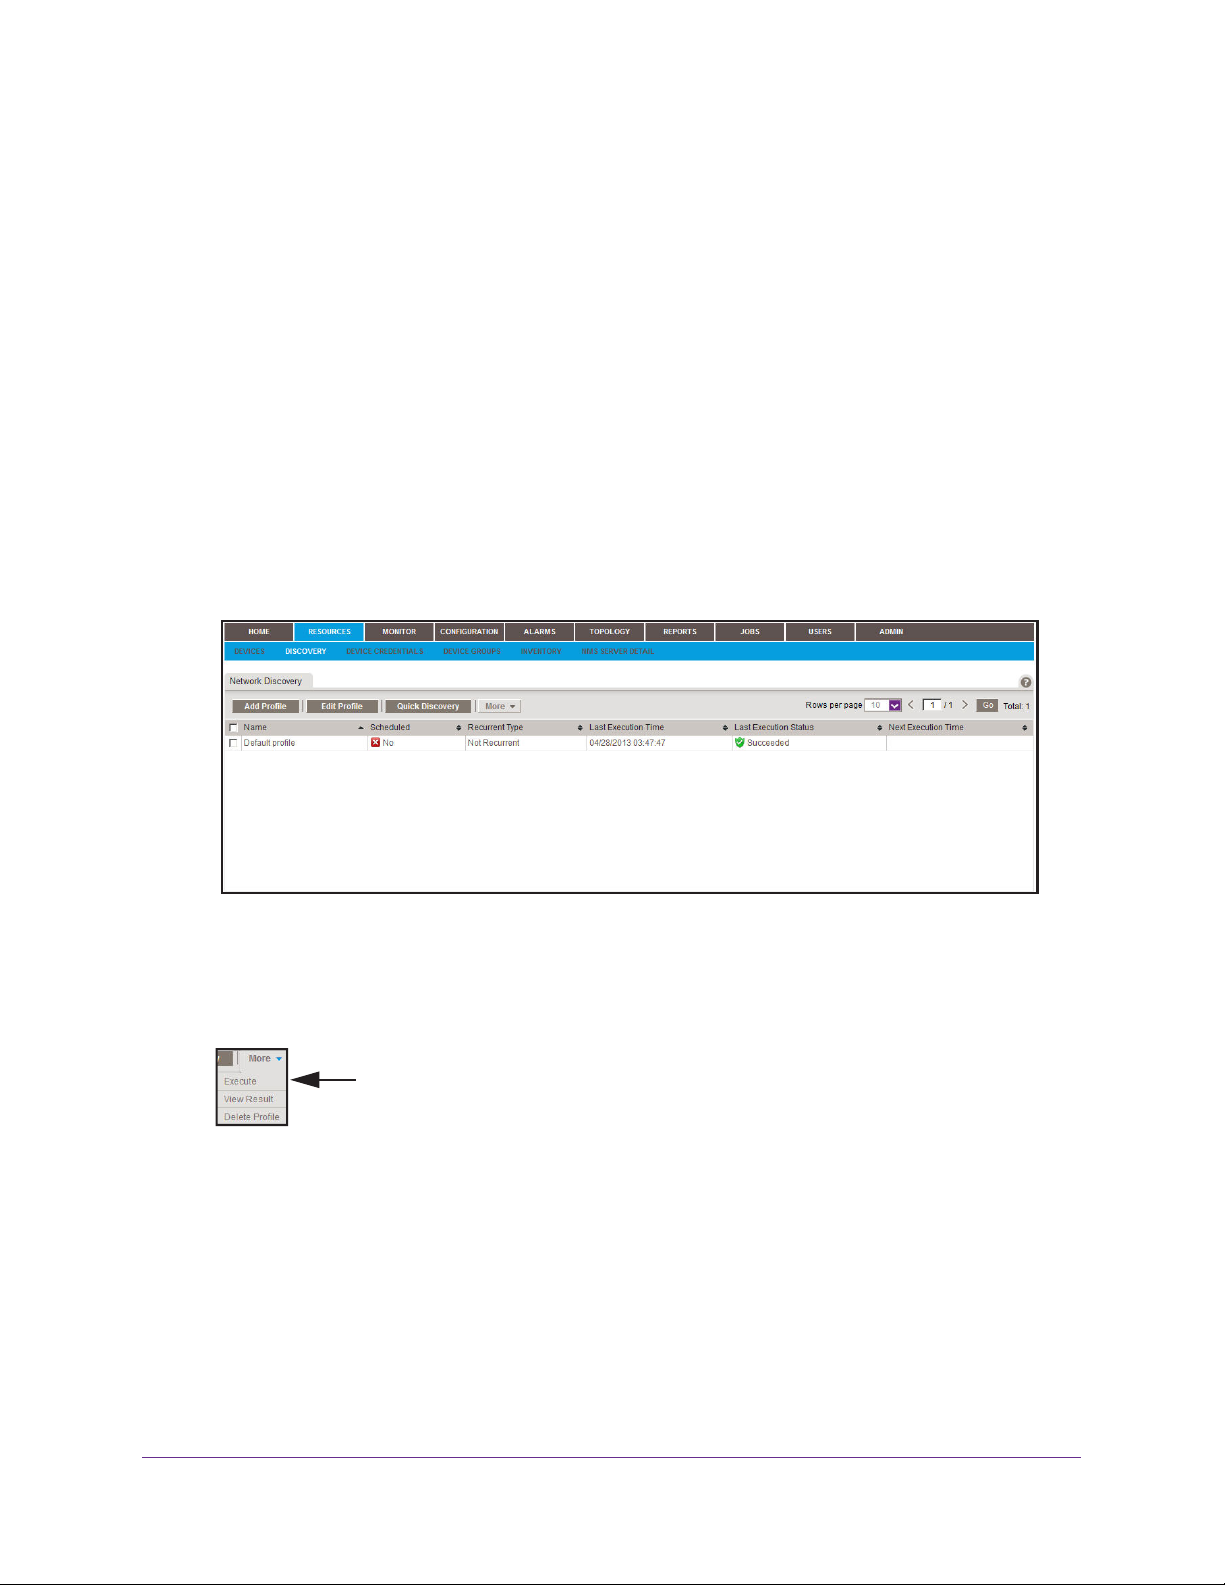
Add a Discovery Profile
A discovery profile filters the network device information that the NMS300 system can detect.
To add a discovery profile:
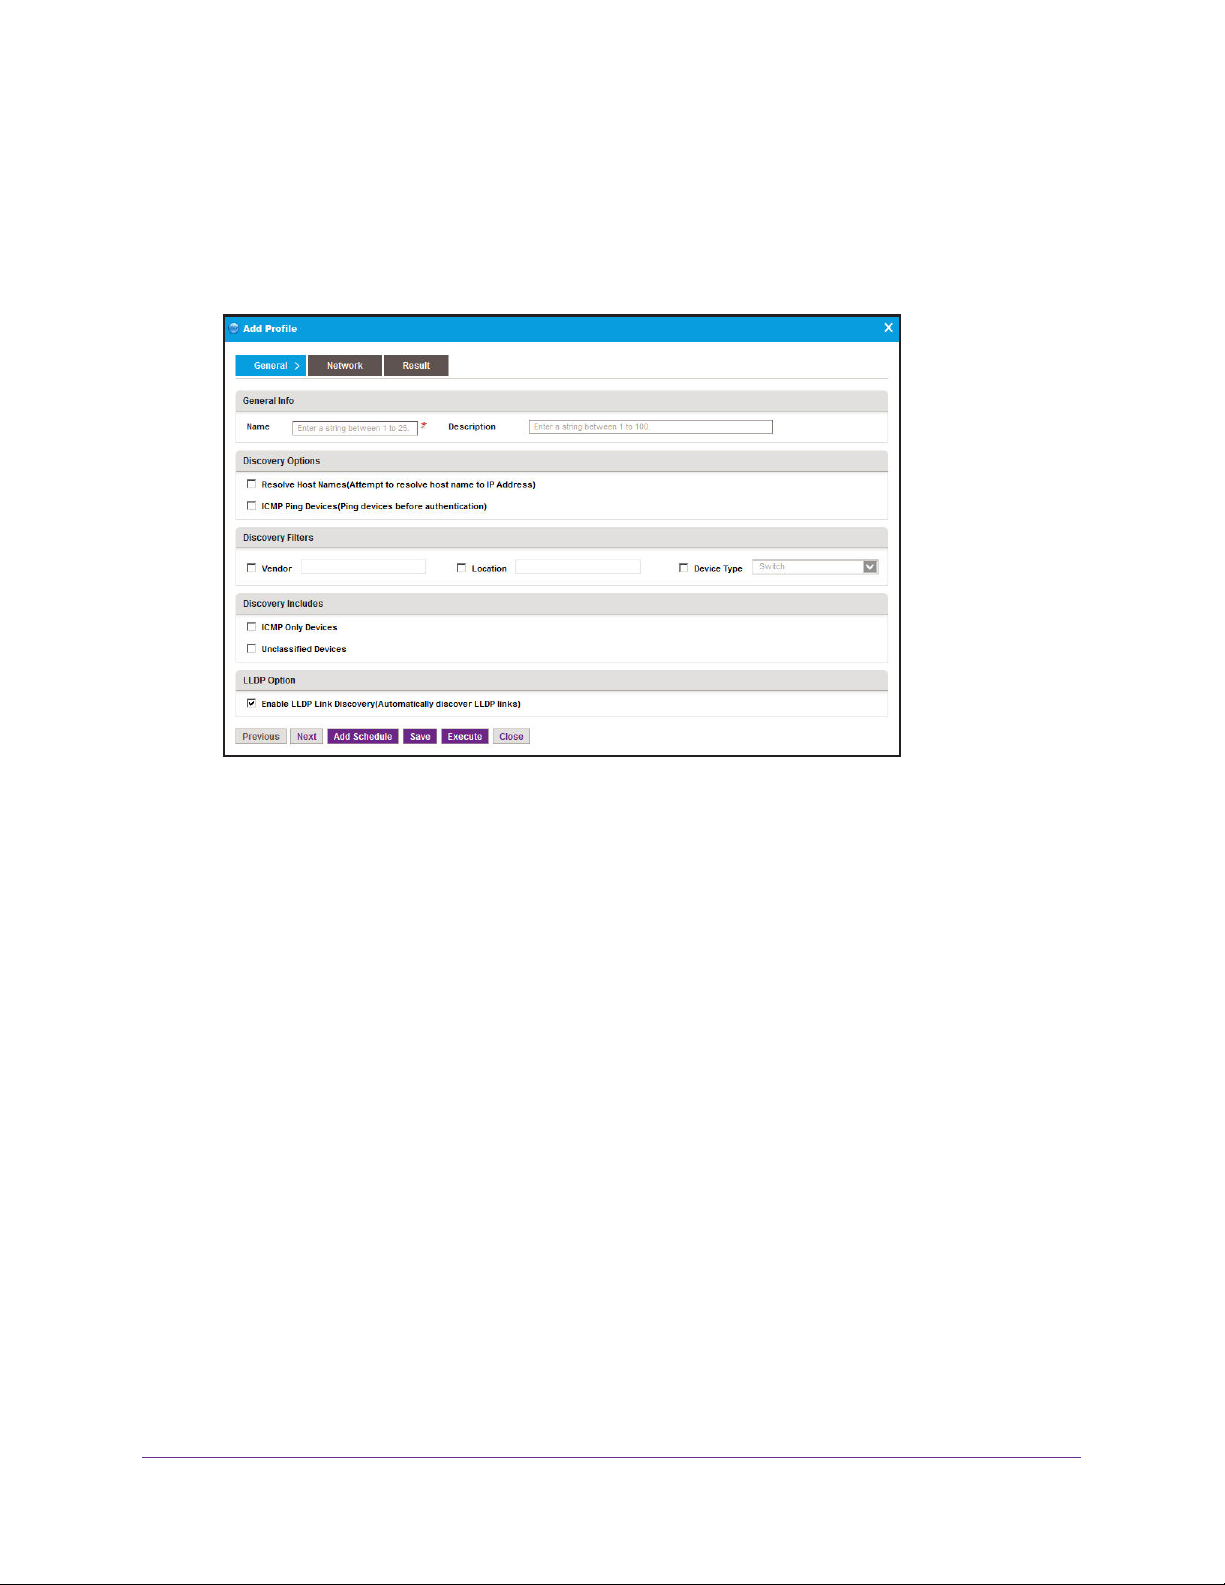
1. Select RESOURCES > DISCOVERY.
A screen similar to the following displays:
This screen lists the existing discovery profiles in the NMS300 system.
When you delete a discovery job from the Jobs list, the NMS300 system deletes the
discovery profile of the job. For more information, see Job Control on page 143.
Resource Management
24
Page 25
NMS300 Network Management System
2. (Optional) To edit an existing discovery profile, select the discovery profile you want to edit
and click the Edit button.
The Edit Profile screen displays, which is similar to the Add Profile screen. For more
information, see step 3 on page 25.
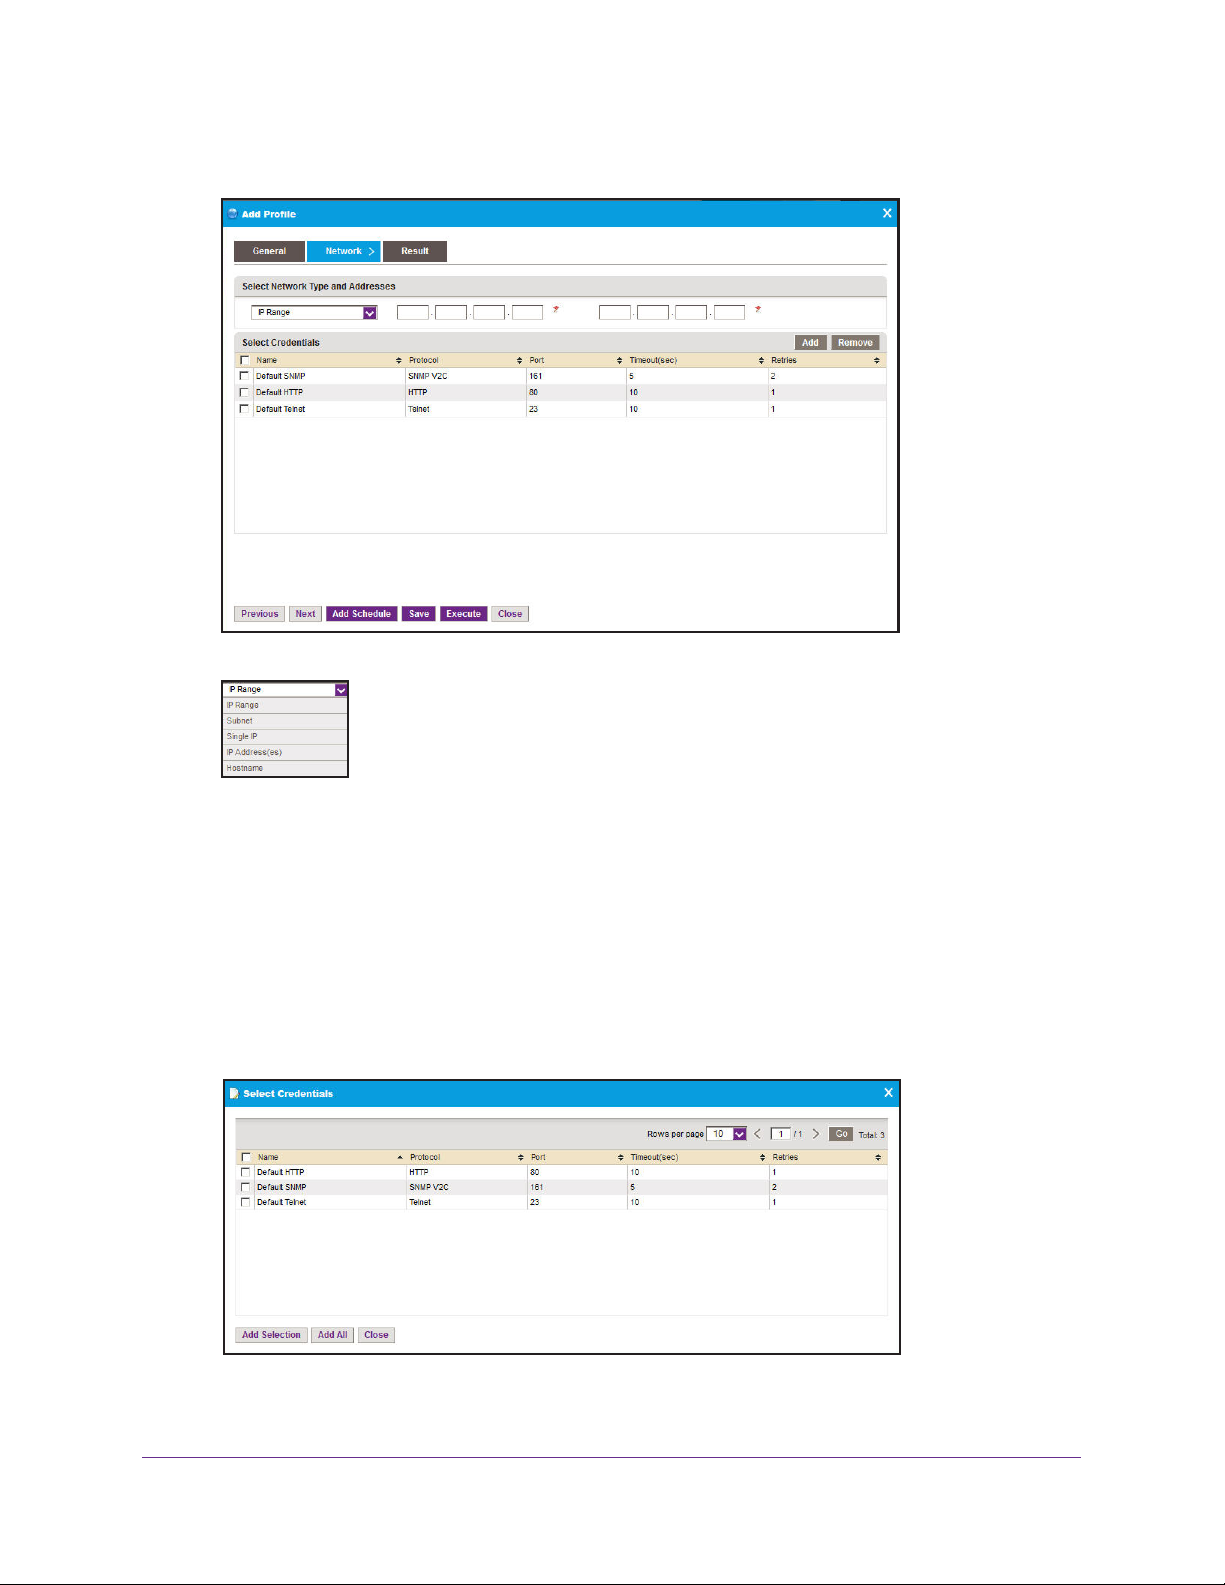
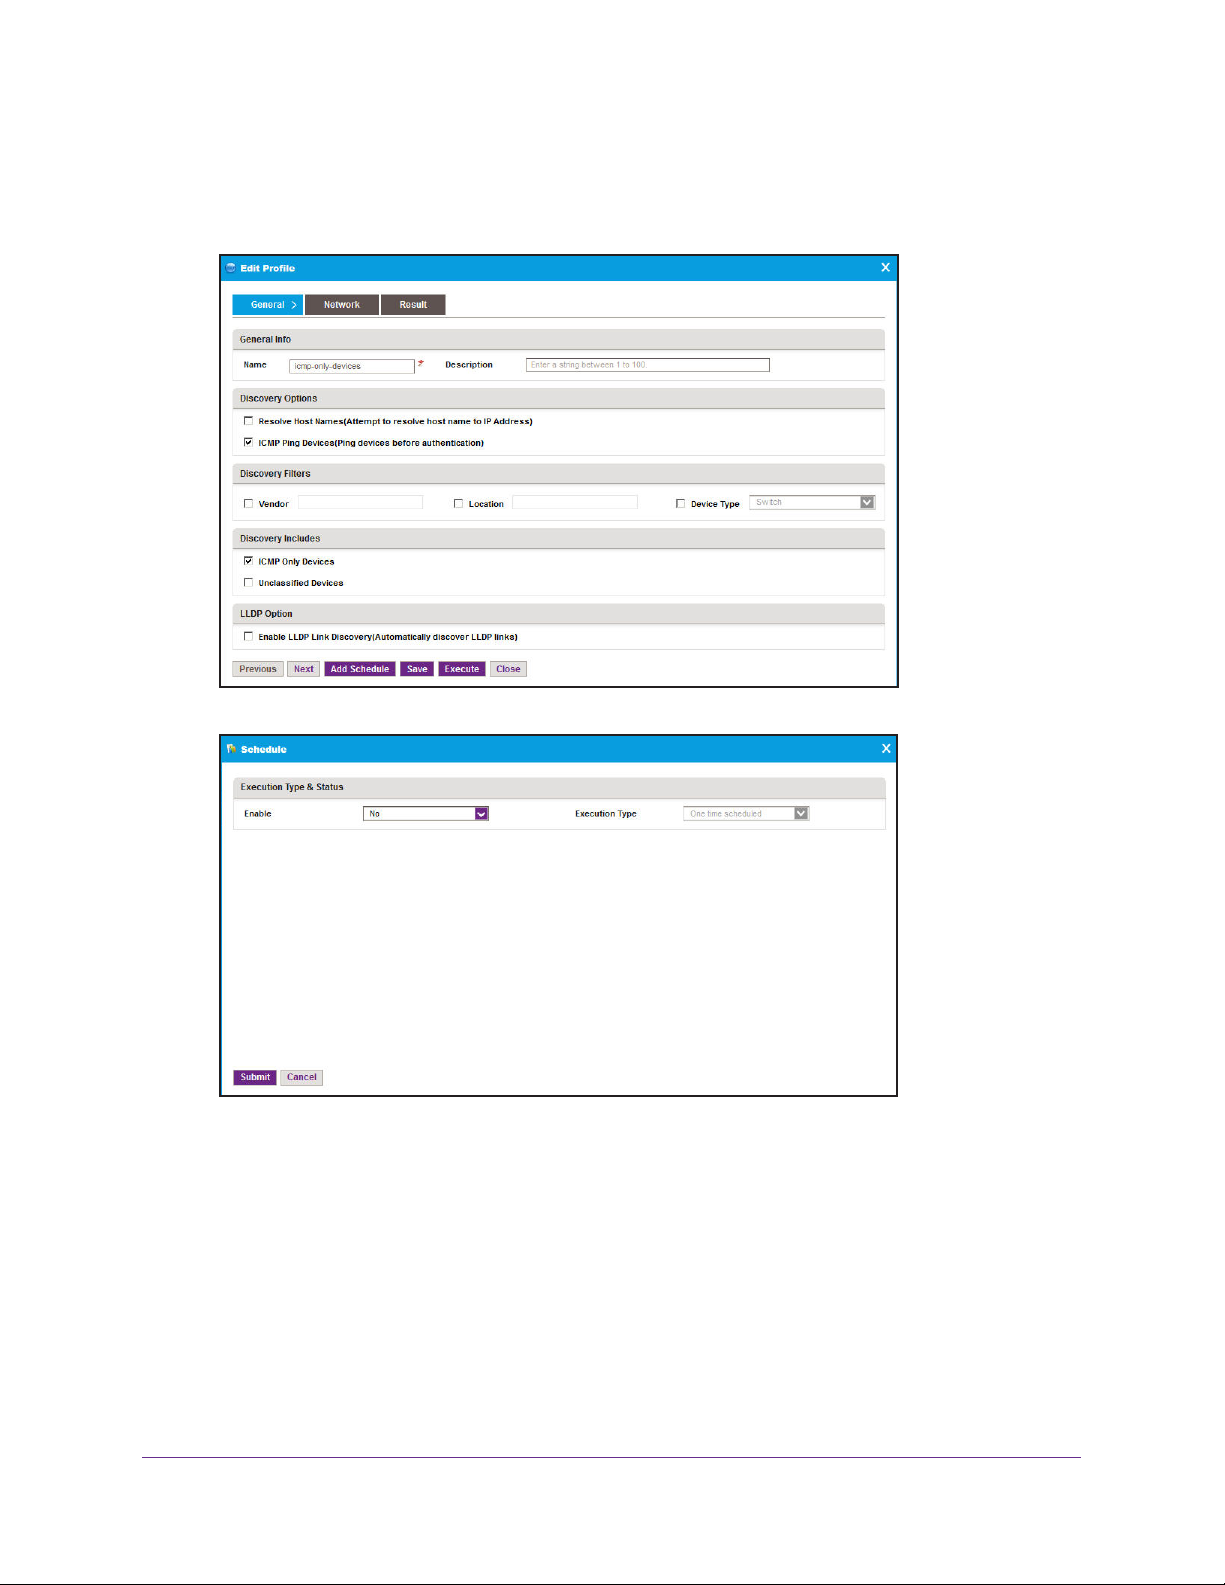
3. Click the Add Profile button.
4. Enter the requested information.
• General Info. Enter the name and description of the profile.
• Discovery Options.
- Resolve Host Names. T
o attempt to resolve a host name to an IP address, select
the Resolve Host Names (Attempt to resolve host name to IP address) radio
button.
- ICMP Ping Devices. T
o monitor the node status of third-party non-SNMP devices,
select the ICMP Ping Devices (Ping devices before authentication) radio
button.
• Discovery Filters. Select the discovery filters you want by vendor, location, and
device type.
• Discovery Includes
• LLDP Option.
. Select whether to include ICMP only and unclassified devices.
o monitor the node status of third-party non-SNMP devices, select
T
the Enable LLDP Link Discovery (Automatically discover LLDP links check box.
Resource Management
25
Page 26
5. Click the Network tab.
NMS300 Network Management System
6. Select the network type.
Depending on your network type selection, one or more fields display where you enter IP
information.
You can screen by IP address range, IP subnet address, a single IP address, a list of IP
addresses, or the device host name.
7. Enter the IP information for the discovery search.
8. (Optional) T
o remove device credentials, select the device credentials you want to remove
and click the Remove button.
9. To add some of the credentials, select the credentials you want to add and click the Add
Selection
button.
To add all credentials, click the Add All button.
Resource Management
26
Page 27
NMS300 Network Management System
You can add device credentials that you create. For more information, see Add a Device
Credential on page 21.
The Select Credentials screen closes and the selected credentials are added to the
Select Credentials list on the Network Screen.
10. Click the Save button.
The Add Profile screen closes and the new device credential displays in the Network
Discovery list.
Execute a Discovery Procedure
You can execute a one-time discovery procedure immediately.
To execute a discovery procedure:
1. Select RESOURCES > DISCOVERY.
A screen similar to the following displays:
2. Select the discovery profile you want to execute.
When you delete a discovery job from the Jobs list, the NMS300 system deletes the
discovery profile of the job. For more information, see Job Control on page 143.
3. Point to More and select Execute.
Resource Management
27
Page 28

NMS300 Network Management System
When discovery has completed, a screen similar to the following displays:
4. Click the Close button.
The screen closes.
Output files from completed jobs are saved for the data retention period. For more
information, see Data Retention Period on page 153.
Schedule a Discovery Procedure
You can schedule a discovery procedure to occur later. This discovery procedure can be one
time or recurrent.
To schedule a discovery procedure for future execution:
1. Select RESOURCES > DISCOVERY.
A screen similar to the following displays:
This screen lists the existing discovery profiles in the NMS300 system.
Resource Management
28
Page 29
NMS300 Network Management System
When you delete a discovery job from the Jobs list, the NMS300 system deletes the
discovery profile of the job. For more information, see Job Control on page 143.
2. Select the discovery profile you want to execute and click the Edit Profile button.
3. Click the Add Schedule button.
4. To enable or disable job execution, from the Enable list, select Yes or No.
5. Specify the scheduling criteria.
Once you enable the job execution, you can specify whether the discovery procedure is
executed once or on a recurring basis.
Resource Management
29
Page 30
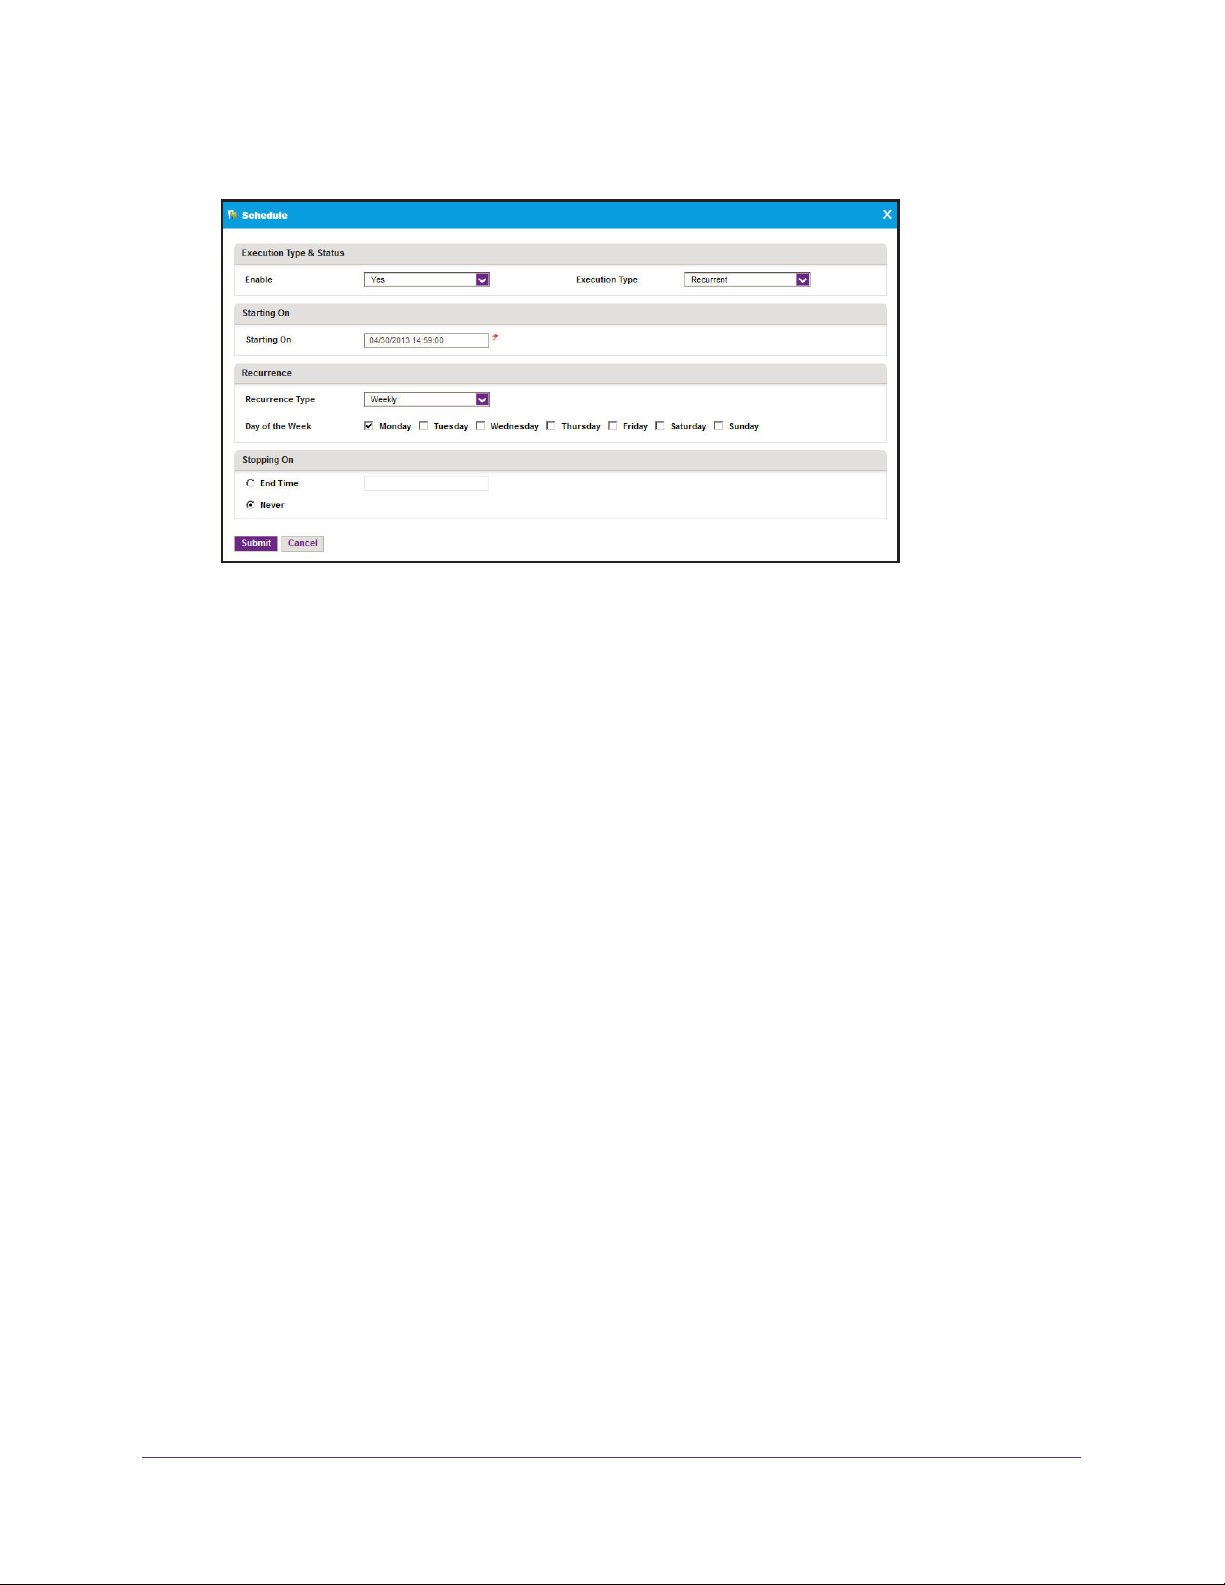
NMS300 Network Management System
Depending on your selections, the schedule screen changes.
6. Enter the schedule information.
7. Click the Submit button.
The Schedule screen closes. Your discovery procedure schedule becomes part of the
discovery profile.
8. On the Edit Profile screen, click the Save button.
Your discovery procedure is executed either once at a future time or on a recurring basis.
9. (Optional) Select JOBS > JOB MANAGEMENT.
You can enable, disable, or delete the future execution of this discovery procedure. For
more information, see Job Control on page 143.
Output files from completed jobs are saved for the data retention period. For more
information, see Data Retention Period on page 153.
Examine the Devices on Your Network
You can view and test the devices that have been discovered on your network.
You can also export a list of the devices on your network. For more information, see Export
the Device Inventory List on page 34.
Once the devices on your network are discovered and added to the inventory database, the
NMS300 system polls the devices to make sure that they are still there. Y
frequently the device inventory is polled. For more information, see Inventory Polling on
page 154.
ou can change how
View Device Information
You can see a list of devices that have been discovered in your entire network.
Resource Management
30
Page 31

NMS300 Network Management System
To view and configure the device list:
1. Select RESOURCES > DEVICES.
A screen similar to the following displays:
This screen displays the devices that have been discovered by the NMS300 system.
2. (Optional) T
o filter the devices that are listed, click the Show Filter button.
You can filter the devices that get listed by criteria such as device type, device name and
IP address, location, device model, and status.
To hide the filter, click the Hide Filter button.
3. To edit the information for a device on the list, select the device for which you want to edit
the information and click the Edit
button.
For more information, see Edit Device Information on page 31.
4. To delete a device from the list, select the device you want to delete and click the Delete
button.
The device is removed from the list.
5. You can also perform the following tasks from the Devices list:
• Time-synchronize a device to the NMS300 server. For more information, see
Synchronize a Network Device on page 32
.
• Log in to a device. For more information, see Log In to a Device on page 33.
• Ping, perform a traceroute, or reboot a device. For more information, see Ping,
Perform a Traceroute, or Reboot a Network Device on page 34.
6. (Optional)
o see the dashboard information for a device, click the device name.
T
For more information, see View Device Details on page 48.
Edit Device Information
You can edit the information for a device.
Resource Management
31
Page 32

NMS300 Network Management System
To edit device information:
1. Select RESOURCES > DEVICES.
A screen similar to the following displays:
2. Select the device you want to edit and click the Edit button.
A screen similar to the following displays:
3. Modify the information you want to update and click the Submit button.
The device information is updated and the screen closes.
Synchronize a Network Device
You can time-synchronize a network device to the NMS300 server.
To synchronize a device:
1. Select RESOURCES > DEVICES.
Resource Management
32
Page 33

NMS300 Network Management System
A screen similar to the following displays:
2. Select the device you want to synchronize and click the Resync button.
A confirmation screen displays.
3. Click the Yes button.
The device is synchronized and the confirmation screen closes.
Log In to a Device
You can log in to a device on your network using either the web user interface or Telnet.
You can log in to a device when your web browser can be routed to the device. Generally,
your web browser has to be on the local network side of the Internet gateway.
To log in to a device on your network:
1. Select RESOURCES > DEVICES.
A screen similar to the following displays:
2. Select the device to which you want to log in.
Resource Management
33
Page 34

NMS300 Network Management System
3. Point to More and select either Web GUI or Telnet.
A login screen displays.
Ping, Perform a Traceroute, or Reboot a Network Device
You can ping, perform a traceroute, or reboot a network device. You do not have to be on the
local network side of the Internet gateway to conduct these tests. Your web browser only has
to be routed to the NMS300 server to conduct these tests.
To test a device on your network:
1. Select RESOURCES > DEVICES.
A screen similar to the following displays:
2. Select the device to which you want to ping, perform a traceroute, or reboot.
3. Point to More and select either Ping, TraceRoute
, or Reboot.
A test results screen displays when the test is completed.
Export the Device Inventory List
The Inventory screen provides a list of devices and interfaces for export to an Excel or PDF
file.
Resource Management
34
Page 35

NMS300 Network Management System
To view the device and interface list:
1. Select RESOURCES > INVENTORY.
A screen similar to the following displays:
2. (Optional) To filter the devices that are listed, click the Show Filter button.
You can filter the devices that get listed by criteria such as device type, device name and
IP address, location, device model, and status.
To hide the filter, click the Hide Filter button.
3. Click the Export to Excel button or the Export to PDF button.
The device information is saved on your computer.
4. (Optional)
For more information, see View Device Details on page 48.
o see the dashboard information for a device, click the device name.
T
Specify Device Groups
To simplify the management of networks with many devices, you can create device groups.
Once discovered, the devices on your network can be grouped by location, device type, and
other criteria to simplify network management. Device groups are optional.
Resource Management
35
Page 36

NMS300 Network Management System
To specify a device group:
1. Select ADMIN > SETTINGS.
2. Under Getting Started with NMS300, select Device Groups.
3. Take any of the following actions for a device group:
• To add a static device group, click the Add Static Group
button.
For more information, see Add a Static Device Group on page 36.
• To add a dynamic device group, click the Add Dynamic Group
button.
For more information, see Add a Dynamic Device Group on page 38.
• To edit an existing device group, select the group you want to edit and click the Edit
Group
button.
• To delete an existing device group, select the group you want to delete and click the
Delete Group
button.
Add a Static Device Group
A static group is a fixed list of specific devices. The list has to be changed manually.
Resource Management
36
Page 37

NMS300 Network Management System
To add a static device group:
1. Select ADMIN > SETTINGS.
2. Under Getting Started with NMS300, select Device Groups.
3. Click the Add Static Group button.
4. Enter the group name.
Resource Management
37
Page 38

NMS300 Network Management System
5. (Optional) Enter a description.
6. Click the Add button.
7. On the Select Devices screen, select the associated devices to add.
(Optional) To filter the devices that display on this screen, click the Show Filter button.
You can filter the devices that get listed by criteria such as device type, device name and
IP address, location, device model, and status.
To hide the device filter, click the Hide Filter button.
8. Click the Add Selection button or the Add All button.
9. Click the Close button.
The Selected Devices screen closes.
10. Click the Submit button.
The Add Static Device Group screen closes.
Add a Dynamic Device Group
A dynamic group is a dynamic list of devices chosen by filter selection criteria. The list
changes automatically as devices that meet the filter criteria are added to and removed from
the network.
You can change how frequently the device inventory is polled. For more information, see
Inventory Polling on page 154.
Resource Management
38
Page 39

NMS300 Network Management System
To add a dynamic device group:
1. Select ADMIN > SETTINGS.
2. Under Getting Started with NMS300, select Device Groups.
3. Click the Add Dynamic Group button.
4. Enter the group name.
5. (Optional) Enter a description.
Resource Management
39
Page 40

NMS300 Network Management System
6. Enter the criteria for the device selection filter.
You can filter by device vendor, device location, device type, device model, or device
contact.
7. (Optional)
The devices that meet the selection criteria are displayed.
8. Click the Submit button.
To view the devices in the group, click the View Devices button.
View the NMS300 Server Information
You can monitor the performance information of the NMS300 server and take appropriate
action when necessary.
To view the NMS300 server information:
1. Select RESOURCES > NMS SER
VER DETAIL.
Resource Management
40
Page 41

NMS300 Network Management System
A screen similar to the following displays:
2. Adjust the system settings as necessary to manage the load on the NMS300 server.
For more information, see Manage the System Settings on page 152.
Resource Management
41
Page 42

3. Performance Monitoring
Monitor how your network performs
3
Network Monitor allows you to view network summary information, performance statistics,
real-time and historical information, and the device and interface dashboard. You can also
enable and disable the network performance monitor collection and set up the threshold criteria
that trigger an alarm.
This chapter covers the following topics:
• Monitor the Top 10 Devices
• Configure the Monitor
• View Device Details
• Manage the Network Dashboard
42
Page 43

NMS300 Network Management System
Monitor the Top 10 Devices
You can monitor the status of the top 10 devices on the network by various criteria.
Table 1. Top 10 device details
View Description Information
Top 10 Devices by Average CPU
(T
oday)
T op 10 Devices by Average Memory
(T
oday)
Top 10 Devices by Average
Response T
Top 10 Devices by Average
Package Loss (T
Top 10 Interfaces by Average
Utilization (T
Top 10 Interfaces by Traffic (Today) Top 10 interfaces by total traffic
ime (T oday)
oday)
oday)
Top 10 devices by average CPU
utilization for today
Top 10 devices by average memory
utilization for today
Top 10 devices by average
response time for today
T op 10 devices by average package
loss percentage for today
Top 10 interfaces by average
interface utilization (combination of
receive and transmit) for today
(combination of receive and
transmit) for today
• Status
• Device name
• Average CPU utilization
• Status
• Device name
• Average memory utilization
• Status
• Device name
• Average response time
• Status
• Device name
• Average package loss
• Status
• Device name
• Interface name
• Receive
• Transmit
• Status
• Device name
• Interface name
• Receive
• Transmit
Top 10 Interfaces by Error (Today) Top 10 interfaces by total errors
(combination of receive and
transmit) for today
Top 10 Interfaces by Discard
(T
oday)
Top 10 interfaces by total discard
(combination of receive and
transmit) for today
Performance Monitoring
43
• Status
• Device name
• Interface name
• Receive
• Transmit
• Status
• Device name
• Interface name
• Receive
• Transmit
Page 44

NMS300 Network Management System
Table 1. Top 10 device details (continued)
View Description Information
Top 10 Interfaces by Current
Utilization (Today)
Top 10 Interfaces by Current Traffic
(T
oday)
To monitor the top 10 devices:
1. Select MONITOR > TOP 10.
A screen similar to the following displays:
Top 10 interfaces by real-time
interface utilization (combination of
receive and transmit)
Top 10 interfaces by real-time traffic
(combination of receive Mbytes per
second and transmit Mbytes per
second)
• Status
• Device name
• Interface name
• Receive
• Transmit
• Status
• Device name
• Interface name
• Receive (Mbps)
• Transmit (Mbps)
2. (Optional) To see the dashboard information for a device, click the device name.
For more information, see View Device Details on page 48.
Performance Monitoring
44
Page 45

NMS300 Network Management System
Configure the Monitor
You can enable or disable monitoring, and specify the information that is monitored.
Configure the Performance Monitor Settings
The monitor configuration list allows you to enable and disable the collection of monitor data
for devices, as well as select monitor metrics to collect. Metrics that can be monitored include
the following:
• Device status
• Device ICMP ping
• Device CPU
• Device memory
• Device temperature
• Device IP traf
• Device ICMP traffic
• Device TCP traf
• Device UDP traffic
• Device SNMP traffic
• Device interface traffic
fic
fic
To configure the performance monitor:
1. Select MONITOR > MONIT
A screen similar to the following displays:
2. Select the item you want to configure.
3. Take any of the following actions:
• To edit the item, click the Edit button.
For more information, see Configure the General Monitor Information on page 46.
• To monitor the item, click the Enable button.
OR CONFIGURATION.
Performance Monitoring
45
Page 46

NMS300 Network Management System
The item is monitored according to the polling interval for the item.
• To stop monitoring the item, click the Disable button.
The item is no longer monitored.
Configure the General Monitor Information
You can enable and disable monitoring, and edit the information that is monitored.
To configure the general monitor information:
1. Select MONITOR > MONIT
OR CONFIGURATION.
2. Select the item you want to configure.
3. Click the Edit button.
A screen similar to the following displays:
The appearance of the Monitor Configuration screen depends on the metric that is edited.
4. In the Enable list, select Yes to enable monitoring and No
to disable monitoring.
5. In the Polling Interval list, select the polling interval.
6. Enter a description.
Performance Monitoring
46
Page 47

NMS300 Network Management System
7. Click the Save button.
Your changes are saved.
8. Click the Monitor Devices tab.
9. Select the devices you want to have monitored with this metric.
• All devices. T
• Devices and device groups. T
o monitor all devices, click the All Devices radio button.
o select the individual devices or device groups you
want to monitor, click the Select Devices or Device Groups radio button.
The appearance of the screen changes to allow you to select the individual devices or
device groups to monitor.
10. Click the Save button.
Your changes are saved.
11. Click the Monitor Parameters tab.
12. Select the parameters you want to monitor.
Performance Monitoring
47
Page 48

NMS300 Network Management System
To move the parameters between the Available and Selected lists, use the >, <, >>, and
<< buttons.
a. In the Available list, click the parameter you want to monitor.
b. Click the > button.
The parameter moves to the Selected list.
13. Click the Save button.
Your changes are saved.
14. Click the Close button.
The Monitor Configuration screen closes.
View and Modify the Polling Interval
You can view and modify the polling interval for each metric to control how frequently the
device and network information is updated.
To view the polling interval for each metric:
1. Select MONITOR > MONIT
A screen similar to the following displays:
The current polling interval for each metric is listed on the screen in the Polling Interval
(minutes) column.
2. Modify the polling interval for each metric.
For more information, see Configure the General Monitor Information on page 46.
OR CONFIGURATION.
View Device Details
You can view the following types of detailed information for a device:
• Switch details
• Interface list
Performance Monitoring
48
Page 49

NMS300 Network Management System
• Traffic monitor
• Bandwidth monitor
• Configuration files
• Credential
To view the detailed information for a device:
1. Go to a screen that displays a list of the devices for which you want to view information.
Examples of screens include:
• Network summary view
. Select HOME > NETWORK SUMMARY.
For more information, see Network Summary on page 11.
• Device list. Select RESOURCES > DEVICES.
For more information, see View Device Information on page 30.
• Inventory list. Select RESOURCES > INVENT
ORY.
For more information, see Export the Device Inventory List on page 34.
• Map view
. Select TOPOLOGY > MAP VIEWS.
For more information, see Map Views on page 104.
• T
opology view. Select TOPOLOGY > NETWORK TOPOLOGY.
For more information, see Network Topology on page 118.
2. Click the name of the device for which you want to see detailed information.
Performance Monitoring
49
Page 50

NMS300 Network Management System
A screen similar to the following displays:
3. Select the type of information you want to view from the Dashboard menu.
Performance Monitoring
50
Page 51

NMS300 Network Management System
Manage the Network Dashboard
You can customize the information that is shown on the network dashboard.
Create Your Custom Dashboard Views
You can specify your own dashboard views. These choices include the ability to view
performance in real time.
To create a custom dashboard view:
1. Select MONITOR > DASHBOARD VIEWS
A screen similar to the following displays:
This screen lists the existing dashboard views in the NMS300 system.
2. (Optional) T
Edit.
The Edit Dashboard screen displays, which is similar to the Add Dashboard screen. For
more information, see step 3 on page 52.
o edit a dashboard view, select the view you want to edit and from More, select
.
Performance Monitoring
51
Page 52

3. Click the Add button.
NMS300 Network Management System
4. Enter the name of the dashboard.
5. Select the time frame and default chart type.
To view performance in real time, from the Time Frame list, select Real-time.
6. Select the source type.
You can create a dashboard view of devices or a dashboard view of the interfaces for a
device.
• Device.
Y
ou can select the devices that appear in your dashboard view.
After you complete the steps to add a dashboard view of devices, you return to this
step. For more information, see Add a Dashboard View of Devices on page 54.
• Interface. Y
ou can select the interfaces for a particular device that appear in your
dashboard view.
After you complete the steps to add a dashboard view of the interfaces for a particular
device, you return to this step. For more information, see Add a Dashboard View of
Interfaces on page 55.
Continue with step 7 on page 53.
Performance Monitoring
52
Page 53

NMS300 Network Management System
7. Click the Monitors and Parameters tab.
Depending on your type of device or interface selection, a different Monitors and
Parameters screen displays.
8. Specify the fields and the order that you want in your new report template.
To select the fields, use the left and right arrows. To arrange their order, use the up and
down arrows.
9. Click the Submit button.
The screen closes. Your view is added to the Dashboard Views list.
10. (Optional) Select the new view and click one of the following buttons:
• Launch (Popup). A screen similar to the following displays:
To close the screen, click the x ( ) button.
• Launch (New). A screen opens in a new browser
Performance Monitoring
53
.
Page 54

NMS300 Network Management System
This view is the one that displays for the network dashboard of this device or interface.
For more information, see View Your Network Dashboards on page 56.
Add a Dashboard View of Devices
You can choose to view devices.
To add a dashboard view of devices:
1. Select MONITOR > DASHBOARD VIEWS.
2. Click the Add
3. For the source type, select the Device button.
button.
4. To add devices to the Device Selection list, click the Add Device button.
5. (Optional) To filter the devices that appear in the list, click the Show Filter button.
6. Select up to 10 devices and click the Add Selection button.
To add all of the devices in the list, click the Add All button.
7. Click the Close button.
Performance Monitoring
54
Page 55

NMS300 Network Management System
The screen closes.
8. Continue creating your custom dashboard view.
For more information see
Create Your Custom Dashboard Views on page 51.
Add a Dashboard View of Interfaces
You can choose to view the interfaces of a device.
To add a dashboard view of interfaces:
1. Select MONITOR > DASHBOARD VIEWS
2. Click the Add button.
3. For the source type, select Interface.
.
4. To add devices to the Interface Selection list, click the Add Interface button.
Performance Monitoring
55
Page 56

NMS300 Network Management System
5. (Optional) To filter the devices that appear in the list, click the Show Filter button.
6. Select the device for which you want to monitor the interfaces.
7. Select the interfaces you want to monitor and click the Add Selection button.
To add all of the interfaces in the list, click the Add All button.
8. Click the Close button.
The screen closes.
9. Continue creating your custom dashboard view
For more information, see
Create Your Custom Dashboard Views on page 51.
.
View Your Network Dashboards
You can view your network dashboards.
To view a network dashboard:
1. Select MONITOR > NETWORK DASHBOARD.
Performance Monitoring
56
Page 57

NMS300 Network Management System
A screen similar to the following displays:
2. To select the network dashboard to view, click the Select View button.
A screen similar to the following one displays:
You have to define the views that display on this screen. For more information, see
Create Your Custom Dashboard Views on page 51.
3. Select the view you want to observe and click the Select View button.
The screen closes and the selected network dashboard view displays.
Performance Monitoring
57
Page 58

4. Configuration Management
Keep your device firmware current
4
You can back up and restore device configurations. You can also upgrade device firmware.
This chapter covers the following topics:
• Back Up Your Device Configurations
• Restore Your Device Configurations
• Upgrade Your Device Firmware
58
Page 59

NMS300 Network Management System
Back Up Your Device Configurations
You can back up the configurations of the NETGEAR devices on your network.
Configuration backup is an example of a job that can be scheduled for future execution on a
recurrent basis for batch operations.
Add a Device Backup Profile
You have to create a backup profile before you can back up a device configuration.
To add a device backup profile:
1. Select CONFIGURATION > BACKUP.
A screen similar to the following displays:
The Backup screen displays the existing backup profiles in the NMS300 system.
When you delete a backup job from the Jobs list, the NMS300 system deletes the backup
profile of the job. For more information, see Job Control on page 143.
Configuration Management
59
Page 60

NMS300 Network Management System
2. Click the Add Profile button.
3. Enter the following information.
• General Info. Enter the name and description of the profile.
• Backup File Setting. Enter the file name and version of the backup file.
4. Click the Select Devices button.
5. Add devices and device groups.
You can also remove existing devices from the Select Target Network Devices or Groups
list.
• To add devices:
Configuration Management
60
Page 61

NMS300 Network Management System
a. Click the Add Device button.
b. Select the devices you want to add and click the Close button.
The screen closes.
• To add a device group:
a. Click the Add Group
button.
b. Select the device groups you want to add and click the Close button.
The screen closes.
• To remove a device, select the device you want to remove and click the Remove
button.
The resulting devices appear in the Select
6. (Optional) T
o save your information on the Backup screen, click the Save button.
Target Network Devices or Groups list.
You can continue editing your backup profile later.
7. (Optional) Click the Add Schedule button.
You can schedule the generation of the report for a later time or have it recur
automatically
. For more information, see Schedule a Backup Procedure on page 63
8. (Optional) Click the Execute button.
Configuration Management
61
.
Page 62

NMS300 Network Management System
Your backup profile is executed immediately . You can also initiate an immediate one-time
backup procedure later. For more information, see Execute a Backup Procedure on
page 62.
9. Click the Close button.
The screen closes.
Execute a Backup Procedure
You can execute a one-time backup procedure immediately.
To execute a backup procedure immediately:
1. Select CONFIGURATION > BACKUP.
A screen similar to the following displays:
The Backup screen displays the existing backup profiles in the NMS300 system.
When you delete a backup job from the Jobs list, the NMS300 system deletes the backup
profile of the job. For more information, see Job Control on page 143.
2. Select the backup profile of the devices for which you want to back up the configuration
immediately .
3. Click the Execute Profile
button.
Configuration Management
62
Page 63

NMS300 Network Management System
A screen similar to the following displays:
Y ou can also execute a backup procedure immediately from the Add Profile or Edit Profile
screen. For more information, see Add a Device Backup Profile on page 59.
4. Click the Close button.
The screen closes.
The backup configuration files are saved on the NMS300 system and listed on the Restore
screen. Y
ou can use these files to restore the configurations for the devices on your network.
For more information, see Restore Your Device Configurations on page 67.
Configuration files from completed backup jobs are saved for the data retention period. For
more information, see Data Retention Period on page 153.
Schedule a Backup Procedure
You can schedule a backup procedure to occur later, either once or on a recurring basis.
Configuration backup is an example of a job that can be scheduled for future execution on a
recurrent basis for batch operations.
To schedule a backup procedure:
1. Select CONFIGURATION > BACKUP.
Configuration Management
63
Page 64

NMS300 Network Management System
A screen similar to the following displays:
The Backup screen displays the existing backup profiles in the NMS300 system.
When you delete a backup job from the Jobs list, the NMS300 system deletes the backup
profile of the job. For more information, see Job Control on page 143.
2. Select the backup profile of the devices for which you want to schedule a backup procedure
to occur later.
3. Click the Edit
button.
A screen similar to the following displays:
Configuration Management
64
Page 65

NMS300 Network Management System
4. Click the Add Schedule button.
5. To enable or disable job execution, from the Enable list, select Yes or No.
6. Specify the scheduling criteria.
You can specify whether the backup procedure is scheduled to occur once at a future
time, or to occur on a recurring basis.
Depending on your selections, the schedule screen changes.
7. Enter the schedule information.
8. Click the Submit button.
The Schedule screen closes. Your backup procedure schedule becomes part of the
backup profile.
9. On the Edit Profile screen, click the Save button.
Your backup profile is executed at a future time either once or on a recurring basis.
10. (Optional) Select JOBS > JOB MANAGEMENT.
Configuration Management
65
Page 66

NMS300 Network Management System
You can enable, disable, or delete the future execution of this backup procedure. For
more information, see Job Control on page 143.
The backup configuration files are saved on the NMS300 system and listed on the Restore
screen. You can use these files to restore the configurations for the devices on your network.
For more information, see Restore Your Device Configurations on page 67.
Configuration files from completed backup jobs are saved for the data retention period. For
more information, see Data Retention Period on page 153.
View the Execution Status of a Backup Job
The NMS300 system supports jobs for configuration and management tasks that are
complicated and time consuming. Configuration backup is an example of a job that can be
scheduled for future execution on a recurrent basis for batch operations.
You can view the execution status of a backup job to ensure that a device configuration has
been backed up as scheduled.
To view the status of a backup job:
1. Select CONFIGURATION > BACKUP.
A screen similar to the following displays:
The Backup screen displays the existing backup profiles in the NMS300 system.
When you delete a backup job from the Jobs list, the NMS300 system deletes the backup
profile of the job. For more information, see Job Control on page 143.
2. Select the backup profile of the devices for which you want to view the status of the backup
job.
3. Point to More and select V
iew Execution Status
.
Configuration Management
66
Page 67

NMS300 Network Management System
A screen similar to the following displays:
This screen displays the execution history of a job and whether the job succeeded or
failed.
4. Click the Close button.
The screen closes.
Restore Your Device Configurations
You can restore the configurations of the NETGEAR devices on your network.
• Single device. Y
more information, see Restore the Configuration of a Single Device on page 67.
• Several identical devices. Y
network to create a template configuration for several identical devices on your network.
For more information, see Configure Several Identical Devices on page 70.
CAUTION:
When you restore the configuration of a device, you have to provide the
correct configuration file. You need to make sure that you select both the
correct device type and correct device model for the configuration file that
you upload to the NMS300 system. When you provide the wrong
configuration file, the NMS300 system pushes out the incorrect
configuration file while it executes the configuration restore and you can
damage the device.
ou can restore the configuration of a single device on your network. For
ou can use the configuration of one of the devices on your
Restore the Configuration of a Single Device
You can restore the configuration of a single device.
Configuration Management
67
Page 68

NMS300 Network Management System
To restore a configuration to a single device:
1. Select CONFIGURATION > RESTORE.
A screen similar to the following displays:
Configuration files are saved in this list during a device configuration backup. For more
information, see Back Up Your Device Configurations on page 59.
Configuration files from completed backup jobs are saved for the data retention period.
For more information, see Data Retention Period on page 153.
If the configuration file you need does not appear on this list, you can import the file into
the NMS300 system. For more information, see Import, Export, or Delete a Configuration
File on page 74.
2. Select the configuration file you want to restore and click the Restore Configuration button.
A screen similar to the following displays:
3. To specify the device, click the Add Device button.
Configuration Management
68
Page 69

NMS300 Network Management System
A screen similar to the following displays:
4. Select the device you want to add and click the Add Selection button.
The screen closes and the selected device is listed on a screen similar to the following
one:
CAUTION:
Failure to select the correct device for the selected configuration file can
damage the device.
5. To restore the configuration immediately, select the device and click the Execute button.
Configuration Management
69
Page 70

NMS300 Network Management System
The configuration is restored immediately. When the job is complete, a Result screen
similar to the following displays:
6. (Optional) To restore the configuration file later, select the device and click the Schedule
button.
For more information, see Schedule a Restore Procedure on page 81.
7. (Optional) Select JOBS > JOB MANAGEMENT.
You can enable, disable, or delete the future execution of this restore procedure. For
more information, see Job Control on page 143.
Configure Several Identical Devices
You can use the configuration of one of the devices on your network to create a template
configuration for several identical devices on your network. This template configuration file
has to be promoted before it can be used. Otherwise, the restore procedure fails.
CAUTION:
Configuring features that are described in this section requires advanced
network knowledge and experience.
To configure several identical devices:
1. Select CONFIGURATION > REST
ORE.
Configuration Management
70
Page 71

NMS300 Network Management System
A screen similar to the following displays:
Configuration files are saved in this list during a device configuration backup. For more
information, see Back Up Your Device Configurations on page 59.
Configuration files from completed backup jobs are saved for the data retention period.
For more information, see Data Retention Period on page 153.
If the configuration file you need does not appear on this list, you can import the file into
the NMS300 system. For more information, see Import, Export, or Delete a Configuration
File on page 74.
2. Select the promoted configuration file you want to use and click the Restore Configuration
button.
The configuration file you select has to be a promoted configuration file. For more
information, see Promote a Configuration File on page 76.
A screen similar to the following displays:
3. Select the target network devices or groups.
Configuration Management
71
Page 72

NMS300 Network Management System
CAUTION:
Failure to select the correct devices or device groups for the selected
configuration file can damage the devices.
• T
o add individual devices:
a. Click the Add Device button.
A screen similar to the following displays:
b. Select the devices you want to add and click the Add Selection button.
To add all devices, click the Add All button.
The screen closes and the selected devices are listed on a screen similar to the
following one:
• T
o add device groups:
a. Click the Add Group button.
Configuration Management
72
Page 73

NMS300 Network Management System
A screen similar to the following displays:
b. Select the groups you want to add and click the Add Selection button.
To add all groups, click the Add All button.
The screen closes and the selected groups are listed on a screen similar to the
following one:
4. T
o restore the configuration immediately, select the devices or groups and click the Execute
button.
Configuration Management
73
Page 74

NMS300 Network Management System
The configuration is restored immediately. When the job is complete, a result screen
similar to the following displays:
5. (Optional) To restore the configuration file later, select the devices or groups and click the
Schedule button.
For more information, see Schedule a Restore Procedure on page 81.
6. (Optional) Select JOBS > JOB MANAGEMENT.
You can enable, disable, or delete the future execution of this backup procedure. For
more information, see Job Control on page 143.
Import, Export, or Delete a Configuration File
You can import, export, or delete a configuration file for a device.
To import, export, or delete a configuration for a device:
1. Select CONFIGURATION > REST
A screen similar to the following displays:
ORE.
Configuration Management
74
Page 75

NMS300 Network Management System
2. Click the Import File button.
A screen similar to the following displays:
3. Specify the following information:
• Select Y our
File. Click the Select button.
Select the image file from your system that you want to import.
• Enable MD5 Check. T
o enable file validation with the Message Digest 5 algorithm,
select this check box and click the Select button.
Select the image file from your system that you want to import.
• File Name. Enter the name of the configuration file that you want to use.
• V
endor. Select the vendor of the device.
• Device Type
. Select the device type.
• Device Model. Select the device model.
• File T
ype. Select the file type.
• Version. Enter the version of the configuration file.
• Description
. Enter a description of the configuration file.
4. Click the Submit button.
Configuration Management
75
Page 76

NMS300 Network Management System
The Import File screen closes and the imported file is listed on a Restore screen similar to
the following one:
5. To export or delete a configuration file, select the file you want to export or delete, point to
more, and select Export File or Delete File..
The exported configuration file is saved on your system.
The deleted configuration file is removed from the NMS300 database.
Configuration files from completed backup jobs are saved for the data retention period.
For more information, see Data Retention Period on page 153.
Promote a Configuration File
To use the configuration file of a device as a template to configure several devices, you have
to promote the file.
CAUTION:
Configuring features that are described in this section requires advanced
network knowledge and experience.
To promote a configuration file:
1. Select CONFIGURATION > REST
ORE.
Configuration Management
76
Page 77

NMS300 Network Management System
A screen similar to the following displays:
Configuration files are saved in this list during a device configuration backup. For more
information, see Back Up Your Device Configurations on page 59.
Configuration files from completed backup jobs are saved for the data retention period.
For more information, see Data Retention Period on page 153.
If the configuration file you need does not appear on this list, you can import the file into
the NMS300 system. For more information, see Import, Export, or Delete a Configuration
File on page 74.
2. Select the configuration file you want to use as the template, point to more, and select
Promote File.
A screen similar to the following displays:
3. Edit the promoted configuration file.
a. Select the line of code you want to edit:
Configuration Management
77
Page 78

NMS300 Network Management System
b. Erase the value and leave the cursor positioned where you want the parameter
inserted in the line of code.
c. Double-click the parameter in the Filter Parameters list:
The selected parameter displays in the line of code.
CAUTION:
When you restore the configuration of a device, you have to provide the
correct configuration file. You need to make sure that any changes you
make in the Promote Configuration screen do not corrupt the configuration
file. When you provide a corrupted configuration file, the NMS300 system
pushes out the corrupted configuration file while it executes the
configuration restore and you can damage the device.
4. Click the Submit button.
The Promote Configuration screen closes and the promoted configuration file is listed on
a Restore screen similar to the following one:
Edit a Configuration File
You can edit a configuration file.
CAUTION:
Configuring features that are described in this section requires advanced
network knowledge and experience.
Configuration Management
78
Page 79

NMS300 Network Management System
To edit a configuration file:
1. Select CONFIGURATION > RESTORE.
A screen similar to the following displays:
Configuration files are saved in this list during a device configuration backup. For more
information, see Back Up Your Device Configurations on page 59.
Configuration files from completed backup jobs are saved for the data retention period.
For more information, see Data Retention Period on page 153.
If the configuration file you need does not appear on this list, you can import the file into
the NMS300 system. For more information, see Import, Export, or Delete a Configuration
File on page 74.
2. Select the configuration file you want to restore and click the Restore Configuration button.
A screen similar to the following displays:
3. Edit the configuration file.
Configuration Management
79
Page 80

NMS300 Network Management System
CAUTION:
When you restore the configuration of a device, you have to provide the
correct configuration file. You need to make sure that any changes you
make do not corrupt the configuration file. When you provide a corrupted
configuration file, the NMS300 system pushes out the corrupted
configuration file while it executes the configuration restore and you can
damage the device.
4. Click the Submit button.
The edited file is saved and the Edit Config File screen closes.
Compare Two Configuration Files
You can compare two configuration files.
To compare two configuration files:
1. Select CONFIGURATION > REST
ORE.
A screen similar to the following displays:
Configuration files are saved in this list during a device configuration backup. For more
information, see Back Up Your Device Configurations on page 59.
Configuration files from completed backup jobs are saved for the data retention period.
For more information, see Data Retention Period on page 153.
If the configuration file you need does not appear on this list, you can import the file into
the NMS300 system. For more information, see Import, Export, or Delete a Configuration
File on page 74.
2. Select the two files you want to compare and from More, select Compare Files.
Configuration Management
80
Page 81

NMS300 Network Management System
A screen similar to the following one displays:
3. Click the Close button.
The File Compare screen closes.
Schedule a Restore Procedure
You can schedule a restore procedure to occur later.
To schedule a restore procedure:
1. Select CONFIGURATION > REST
A screen similar to the following displays:
Configuration files are saved in this list during a device configuration backup. For more
information, see Back Up Your Device Configurations on page 59.
ORE.
Configuration files from completed backup jobs are saved for the data retention period.
For more information, see Data Retention Period on page 153.
If the configuration file you need does not appear on this list, you can import the file into
the NMS300 system. For more information, see Import, Export, or Delete a Configuration
File on page 74.
Configuration Management
81
Page 82

NMS300 Network Management System
2. Select the configuration file for which you want to schedule a restore procedure and click the
Restore Configuration button.
3. Select the target network devices or groups.
For more information, see Restore the Configuration of a Single Device on page 67 or
Configure Several Identical Devices on page 70.
CAUTION:
Failure to select the correct devices for the selected configuration file can
damage the devices.
4. Click the Schedule button.
A screen similar to the following displays:
5. Specify the time you want the procedure to start and click the Submit button.
Your restore procedure is executed once at the specified time.
6. (Optional) Select JOBS > JOB MANAGEMENT.
You can enable, disable, or delete the future execution of this backup procedure. For
more information, see Job Control on page 143.
Upgrade Your Device Firmware
NETGEAR posts the latest firmware for each NETGEAR device on support.netgear.com.
Note: As a best practice, NETGEAR recommends that you check
support.netgear.com regularly for the latest firmware.
Configuration Management
82
Page 83

NMS300 Network Management System
CAUTION:
When you update the firmware of a device, you have to provide the correct
firmware file. You need to make sure that you select both the correct
device type and correct device model for the firmware file that you upload
to the NMS300 system. When you provide the wrong firmware file, the
NMS300 system pushes out the incorrect firmware file while it executes
the firmware upgrade and you can damage the device.
CAUTION:
When updating the firmware of stacked switches, you have to ensure that
all of the switches in the stack support the firmware you choose to update
the stack master.
Import, Export, or Delete a Firmware File
You can upgrade device firmware with the NMS300 system.
To import, export, or delete a firmware file:
1. Download the latest device firmware from support.netgear.com to your system.
2. Select CONFIGURATION > IMAGE MANAGEMENT.
A screen similar to the following displays:
3. Click the Load Image button.
Configuration Management
83
Page 84

NMS300 Network Management System
A screen similar to the following displays:
4. Specify the following information:
• Select Y our
File. Click the Select button.
Select the image file from your system that you want to import.
• Enable MD5 Check. T
o enable file validation with the Message Digest 5 algorithm,
select this check box and click the Select button.
Select the image file from your system that you want to import.
• File Name. Enter the name of the image file that you want to use.
• V
endor. Select the vendor of the device.
• Device Type
. Select the device type.
• Device Model. Select the device model.
• V
ersion. Enter the version of the image file.
• Description
. Enter a description of the image file.
5. Click the Submit button.
The firmware file is transferred from your system to the NMS300 system.
Imported image files are saved for the data retention period. For more information, see
Data Retention Period on page 153.
6. (Optional) Edit the information of a firmware file.
You can edit the file name, version, and description of a firmware file. For more
information, see Edit the Information of a Firmware File on page 85.
7. Upgrade the firmware of the device.
You can upgrade the firmware of a device immediately. For more information, see
Execute a Firmware Upgrade on page 86.
You can also schedule the upgrade procedure to execute later. For more information, see
Schedule a Firmware Upgrade on page 90.
Configuration Management
84
Page 85

NMS300 Network Management System
8. To export or delete an image, select the image you want to export or delete and from More,
select Export Image or Delete Image.
The exported image file is saved on your system.
The deleted image file is removed from the NMS300 database.
Edit the Information of a Firmware File
You can edit the information of a firmware file.
To edit the firmware file information:
1. Select CONFIGURATION > IMAGE MANAGEMENT.
A screen similar to the following displays:
If the image file you need does not appear on this list, you can import the file into the
NMS300 system. For more information, see Import, Export, or Delete a Firmware File on
page 83.
Imported image files are saved for the data retention period. For more information, see
Data Retention Period on page 153.
2. Select the firmware file for which you want to edit the information and click the Edit button.
Configuration Management
85
Page 86

NMS300 Network Management System
A screen similar to the following displays:
3. Edit the information.
4. Click the Submit button.
The edited file is saved and the edit screen closes.
Execute a Firmware Upgrade
You can execute a firmware upgrade immediately.
To execute a firmware upgrade:
1. Select CONFIGURATION > IMAGE MANAGEMENT.
A screen similar to the following displays:
If the image file you need does not appear on this list, you can import the file into the
NMS300 system. For more information, see Import, Export, or Delete a Firmware File on
page 83.
Imported image files are saved for the data retention period. For more information, see
Data Retention Period on page 153.
2. Select the firmware file you want to upgrade and click the Upgrade Firmware button.
Configuration Management
86
Page 87

NMS300 Network Management System
A screen similar to the following displays:
3. Select the target network devices or groups.
CAUTION:
Failure to select the correct devices or device groups for the selected
firmware file can damage the devices.
• To specify individual devices:
a. Click the Add Device
button.
A screen similar to the following displays:
b. Select the devices you want to add and click the Add Selection button.
To add all devices, click the Add All button.
Configuration Management
87
Page 88

NMS300 Network Management System
The screen closes and the selected device is listed on a screen similar to the
following one:
• To specify device groups:
a. Click the Add Group button.
A screen similar to the following displays:
b. Select the groups you want to add and click the Add Selection button.
To add all groups, click the Add All button.
Configuration Management
88
Page 89

NMS300 Network Management System
The screen closes and the selected device is listed on a screen similar to the
following one:
4. To upgrade the firmware immediately, select the devices or groups and click the Execute
button.
The firmware is upgraded immediately . When the job is complete, a Result screen similar
to the following displays:
5. (Optional) To upgrade the firmware later, select the devices or groups and click the
Schedule button.
For more information, see Schedule a Firmware Upgrade on page 90.
Configuration Management
89
Page 90

NMS300 Network Management System
6. (Optional) Select JOBS > JOB MANAGEMENT.
You can enable, disable, or delete the future execution of this backup procedure. For
more information, see Job Control on page 143.
Schedule a Firmware Upgrade
You can schedule a one-time firmware upgrade to occur later.
To schedule a firmware upgrade:
1. Select CONFIGURATION > IMAGE MANAGEMENT.
A screen similar to the following displays:
If the image file you need does not appear on this list, you can import the file into the
NMS300 system. For more information, see Import, Export, or Delete a Firmware File on
page 83.
Imported image files are saved for the data retention period. For more information, see
Data Retention Period on page 153.
2. Select the firmware file you want to schedule and click the Upgrade Firmware button.
3. Select the target network devices or groups.
For more information, see Execute a Firmware Upgrade on page 86.
CAUTION:
Failure to select the correct devices for the selected firmware file can
damage the devices.
4. Click the Schedule button.
Configuration Management
90
Page 91

NMS300 Network Management System
A screen similar to the following displays:
5. Specify the time you want the upgrade to occur and click the Submit button.
Your upgrade procedure is executed once at the specified time.
6. (Optional) Select JOBS > JOB MANAGEMENT.
You can enable, disable, or delete the future execution of this backup procedure. For
more information, see Job Control on page 143.
Configuration Management
91
Page 92

5. Alarm Management
Be notified when something goes wrong
You can receive alarm notifications when conditions are suboptimal and view current and
previous alarms using various filter options. As an option, you can receive these alarm
notifications with email.
This chapter covers the following topics:
• Manage the Current Alarms
• View the Alarm History
• Configure the Alarm Trigger Settings
• Configure the Alarm Notification Profiles
• View the Network Events
• View the Device Traps
• View the Device System Logs
• Customize the Alarm Colors
5
92
Page 93

NMS300 Network Management System
Manage the Current Alarms
The Current Alarms list shows the active alarms for the entire network. You can acknowledge
alarms, clear alarms, and perform other functions from this list.
To manage the current alarms:
1. Select ALARMS > CURRENT ALARMS.
A screen similar to the following displays:
2. (Optional) To filter the alarms that are listed, click the Show Filter button.
You can filter the current alarms by criteria such as alarm time range, severity, and
acknowledged status.
To hide the filter, click the Hide Filter button.
3. Select the alarm you want to manage.
4. T
ake any of the following actions for an alarm:
• To acknowledge the alarm, click the Acknowledge button.
An alarm that is acknowledged means someone is taking ownership of the issue.
• To clear the alarm, click the Clear button.
An alarm that is cleared means the fault indicated by the alarm no longer exists.
• To view the alarm details, click the Detail button.
A screen similar to the following displays:
Alarm Management
93
Page 94

NMS300 Network Management System
To close the Alarm Detail screen, click the Close button.
5. To manage several alarms as a batch, select the alarms you want to manage.
Point to More and select the action you want to take:
The action that you select is taken.
View the Alarm History
The Alarm History list shows the previous alarms for the entire network. You can delete
previous alarms from this list. The more alarms that accumulate on this list, the greater the
amount of disk space on the server that is required to store this list.
To view the alarm history:
1. Select ALARMS > ALARM HIST
A screen similar to the following displays:
2. (Optional) To filter the alarm histories that are listed, click the Show Filter button.
You can filter the alarm histories by criteria such as clear time range, device name,
severity, and alarm name.
T
o hide the filter, click the Hide Filter button.
3. (Optional) T
• To delete the history of an alarm, select the alarm history you want to delete and click
the
• To delete all alarm histories, click the Batch Delete button.
• To export the alarm history to an Excel or PDF file, point to More and select the
desired action.
ake any of the following actions for an alarm history:
Delete button.
ORY.
4. To view the alarm history details, select the alarm history you want to view and click the
Detail button.
Alarm Management
94
Page 95

NMS300 Network Management System
A screen similar to the following displays:
5. To close the History Alarm Detail screen, click the Close button.
Configure the Alarm Trigger Settings
The NMS300 system has 70 built-in alarms. You can enable and disable these alarms and
modify them, and you can define your own custom alarms.
To configure the alarm trigger settings:
1. Select ALARMS > ALARM CONFIGUA
A screen similar to the following displays:
2. (Optional) To filter the alarm triggers that are listed, click the Show Filter button.
You can filter the alarm trigger configuration by criteria such as alarm name, enabled
status, alarm type, and severity.
TION.
T
o hide the filter, click the Hide Filter button.
3. To enable an alarm trigger, select the alarm trigger you want to enable and click the Enable
button.
The alarm trigger is enabled.
Alarm Management
95
Page 96

NMS300 Network Management System
4. To disable an alarm trigger, select the alarm trigger you want to disable and from More,
select Disable.
The alarm trigger is disabled.
5. To add an alarm trigger, click the Add
Depending on your selection, a different Add Threshold Alarm screen might display.
6. (Optional) T
want to edit and click the Edit button.
A screen displays for you to modify the alarm trigger criteria.
o edit the information for an existing alarm trigger, select the alarm trigger you
button.
Configure the Alarm Notification Profiles
You can define the criteria that are used to generate a notification email to you and other
users when an alarm occurs.
For email notifications to work, you have to specify an email server. For more information,
see Get Started with the NMS300 System on page 151.
To configure the alarm notification criteria:
1. Select ALARMS > NOTIFICATION PROFILES.
Alarm Management
96
Page 97

NMS300 Network Management System
A screen similar to the following displays:
2. Click the Add button.
3. Enter the following information:
• Basic Information.
- Enter the name and description of the profile.
- To restrict the alarm notification criteria to a particular device group, select the
device group.
- To enable the alarm notification profile, select the Ye
• Select Alarm.
- T
o select the alarms by severity, select the Select Alarms by Severity radio
button.
- To select one or more alarms by alarm name, select the Select one or more
Alarms
radio button.
The appearance of the screen changes and provides a screen from which you
can select the alarms to add.
4. Click the Trigger button.
s button.
Alarm Management
97
Page 98

NMS300 Network Management System
A screen similar to the following displays:
5. Enter the following information:
• Alarm Generation Time
• Trigger Action. Enter the email address to send the notification to when the alarm
notification condition is triggered.
For email notifications to work, you have to specify an email server
see Get Started with the NMS300 System on page 151.
6. Click the Save button.
The Add Alarm Notification screen closes.
7. (Optional) T
want to modify and click the Edit button.
A screen displays for you to edit the alarm notification profile.
8. (Optional) T
profile you want to enable or disable and from More, select Enable or Disable.
o modify an alarm notification profile, select the alarm notification profile you
o enable or disable an alarm notification profile, select the alarm notification
. Enter the alarm generation time information.
View the Network Events
. For more information,
You can view events from the entire network.
To view the network events:
1. Select ALARMS > EVENTS.
Alarm Management
98
Page 99

NMS300 Network Management System
A screen similar to the following displays:
2. Select the event you want to manage.
3. To view the event, click the Detail button.
A screen similar to the following displays:
4. To close the Event Detail screen, click the Close button.
5. To delete the event, on the Events screen, click the Delete
The event is removed from the database.
6. To delete all of the events, on the Events screen, click the Batch Delete
All of the events are removed from the database.
7. (Optional) T
PDF.
The action that you select is taken.
o export the event data, point to More and select Export to Excel or Export to
button.
View the Device Traps
You can view the device traps that the NMS300 system has received.
To view the device traps:
1. Select ALARMS > TRAPS.
button.
Alarm Management
99
Page 100

NMS300 Network Management System
A screen similar to the following displays:
2. Select the trap you want to manage.
3. To view the trap, click the Detail
A screen similar to the following displays:
button.
4. To close the Trap Detail screen, click the Close button.
5. To delete the trap, on the Traps screen, click the Delete
The trap is removed from the database.
6. To delete all of the traps, ob the Traps screen, click the Batch Delete button.
All of the traps are removed from the database.
7. (Optional)
PDF.
The action that you select is taken.
To export the trap data, point to More and select Export to Excel or Export to
button.
View the Device System Logs
You can view the device system logs that the NMS300 system has received.
Alarm Management
100
 Loading...