

Page 1
Quick Start Guide
NMS300 Network Management System Application
Quick Start Guide
March 2020
202-11288-06
NETGEAR, Inc.
350 East Plumeria Drive
San Jose, CA 95134, USA
Page 2

NMS300 Network Management System Application
Support and Community
Visit netgear.com/support to get your questions answered and access the latest downloads.
You can also check out our NETGEAR Community for helpful advice at
community.netgear.com.
Regulatory and Legal
Si ce produit est vendu au Canada, vous pouvez accéder à ce document en français canadien à
https://www.netgear.com/support/download/.
(If this product is sold in Canada, you can access this document in Canadian French at
https://www.netgear.com/support/download/.)
For regulatory compliance information including the EU Declaration of Conformity, visit
https://www.netgear.com/about/regulatory/.
See the regulatory compliance document before connecting the power supply.
For NETGEAR's Privacy Policy, visit
By using this device, you are agreeing to NETGEAR's Terms and Conditions at
https://www.netgear.com/about/terms-and-conditions. If you do not agree, return the device to your place of
purchase within your return period.
https://www.netgear.com/about/privacy-policy.
Trademarks
© NETGEAR, Inc., NETGEAR, and the NETGEAR Logo are trademarks of NETGEAR, Inc. Any non-NETGEAR
trademarks are used for reference purposes only.
Revision History
Publication Part
Number
202-11288-06 March 2020 • Updated the
Publish Date Comments
Legal section on this page.
• Added
GS308T and GS310TP
-
- GS324T
GS728TPv2, GS728TPPv2, GS752TPv2, and GS752TPP
-
- MS510TX and MS510TXPP
- XS712Tv2
• Added
M4300-16X, M4300-24XF, and M4300-48XF
-
-
M4300-96X
- M4500-32C and M4500-48XF8C
• Added
-
GS418TPP, GS510TLP
- GS724TPv2
- XS708T and XS716T
• Added
• Published the
support for the following new smart switches:
support for the following new managed switches:
support for the following smart switches:
support for existing products that were not yet listed.
Support and Community section and the Regulatory and
, GS324TP, and GS348T
, and GS510TPP
manual in the latest format.
Quick Start Guide2
Page 3

NMS300 Network Management System Application
202-11288-05 December 2015 • Added support for the following platforms:
- M4200 series managed switches, including the M4200-10MG-POE+
- M43000 series managed switches, including the M4300-8X8F
M4300-12X12F
M4300-28G-POE+, and M4300-52G-POE+
- XS728T smart managed switch
- W
AC720, WAC730, and WND930 wireless access points
-
ReadyNAS RN716X, RN3130 (all models), RN31200 (all models),
RN31400 (all
• Added information about the new MIB browser
the user manual.)
• Added
• Added
• Added
202-11288-04 December 2014 • Added support for the following platforms:
• Added
• Added
• Added an option to send an SMS message when an alarm is triggered
• Added
• Added
• Added
the option to search for the switch to which a host is directly
connected.
the option to add and change an alarm configuration for a link on a
hierarchical
the option to back up and restore the system settings. (For more
information,
-
M6100 managed switch, including blades and supervisors inserted in the
chassis: XCM8944, XCM8944-POE+, XCM8944-uPOE, XCM8948,
XCM8948-POE+, XCM8948-uPOE, XCM8944F
- S3300 smart switch: S3300-28X, S3300-28X-PoE+, S3300-52X, and
S3300-52X-PoE+
- FVS336Gv3 firewall
- WN370 wireless access point
the option to display the slot list for an M6100 managed switch. (For
more
information, see the user manual.)
the option to enter an email address for notification of file backup
(see
results
page 72).
(see
Configure the SMS server for alerts and alarm notifications on
page 27 and Add an alarm notification profile on page 67). However, this
option is supported for a particular SMS gateway in the People's Republic
of
China only.
sampled flow (sFlow) for managed switches. (For more information,
the user manual.)
see
support for an external file storage server on which you can store
backup
files. (For more information, see the user manual.)
the capacity to support Chinese characters for device names.
, M4300-24X24F, M4300-28G, M4300-52G,
models), RN31600 (all models), and RN51600 (all models)
(For more information, see the user manual.)
map. (For more information, see the user manual.)
see the user manual.)
Add a backup profile and execute a backup job on
. (For more informat
, and XCM8924X
,
ion, see
1288-03 January 2014 • Added support for storage systems.
202-1
• Added support for additional firewalls.
• Added support for additional switches and wireless devices.
• Removed devices
202-11288-02 October 2013 • Revised many
• Added support for wireless devices.
• Added support for firewalls.
202-1
1288-01 June 2013 First publication.
that are no longer supported (EOL).
procedures for more clarity.
Quick Start Guide3
Page 4

Contents
Chapter 1 Install the NMS300 Application
Chapter 2 Get Started
Computer requirements . . . . . . . . . . . . . . . . . . . . . . . . . . . . . . . . . . . . . . . . . . . 7
Compatible devices . . . . . . . . . . . . . . . . . . . . . . . . . . . . . . . . . . . . . . . . . . . . . .8
NETGEAR managed switches . . . . . . . . . . . . . . . . . . . . . . . . . . . . . . . . . . . . 8
NETGEAR smart switches. . . . . . . . . . . . . . . . . . . . . . . . . . . . . . . . . . . . . . .10
NETGEAR firewalls . . . . . . . . . . . . . . . . . . . . . . . . . . . . . . . . . . . . . . . . . . . .11
NETGEAR wireless access points . . . . . . . . . . . . . . . . . . . . . . . . . . . . . . . .11
NETGEAR wireless management systems and controllers. . . . . . . . . . .12
NETGEAR storage systems . . . . . . . . . . . . . . . . . . . . . . . . . . . . . . . . . . . . .12
Download, install, and run the application. . . . . . . . . . . . . . . . . . . . . . . . . . . 13
Prepare the network devices for discovery. . . . . . . . . . . . . . . . . . . . . . . . . . . 14
Log in to the application. . . . . . . . . . . . . . . . . . . . . . . . . . . . . . . . . . . . . . . . . .16
Change your password and account information. . . . . . . . . . . . . . . . . . . . .18
Change your password . . . . . . . . . . . . . . . . . . . . . . . . . . . . . . . . . . . . . . . .18
Change your account information . . . . . . . . . . . . . . . . . . . . . . . . . . . . . . .20
Add a user profile to the user base . . . . . . . . . . . . . . . . . . . . . . . . . . . . . . . . . 21
Configure the email server for alerts and alarm notifications. . . . . . . . . . .23
Configure the general email server settings. . . . . . . . . . . . . . . . . . . . . . .23
Configure email server settings for a gmail account. . . . . . . . . . . . . . . .25
Configure the SMS server for alerts and alarm notifications . . . . . . . . . . . .27
Chapter 3 Discover Resources
Discovery concepts . . . . . . . . . . . . . . . . . . . . . . . . . . . . . . . . . . . . . . . . . . . . . .31
Use quick discovery to discover devices on your network . . . . . . . . . . . . . 32
Use a discovery profile to discover devices on your network . . . . . . . . . . .35
Add a device credential . . . . . . . . . . . . . . . . . . . . . . . . . . . . . . . . . . . . . . . .35
Add a discovery profile . . . . . . . . . . . . . . . . . . . . . . . . . . . . . . . . . . . . . . . .38
Execute a discovery job . . . . . . . . . . . . . . . . . . . . . . . . . . . . . . . . . . . . . . . .41
Add device groups. . . . . . . . . . . . . . . . . . . . . . . . . . . . . . . . . . . . . . . . . . . . . . .43
Add a static device group . . . . . . . . . . . . . . . . . . . . . . . . . . . . . . . . . . . . . .43
Add a dynamic device group . . . . . . . . . . . . . . . . . . . . . . . . . . . . . . . . . . .45
Chapter 4 Monitor Your Network
Monitor device and network information . . . . . . . . . . . . . . . . . . . . . . . . . . .48
View and export the Inventory table and Interface List table. . . . . . . . .48
View device information and device details . . . . . . . . . . . . . . . . . . . . . . .50
4
Page 5

NMS300 Network Management System Application
View wireless device information only . . . . . . . . . . . . . . . . . . . . . . . . . . . .53
View wireless client information . . . . . . . . . . . . . . . . . . . . . . . . . . . . . . . . .56
View the default network summary . . . . . . . . . . . . . . . . . . . . . . . . . . . . . .59
Manage the configuration monitors. . . . . . . . . . . . . . . . . . . . . . . . . . . . . . . .62
Manage device alarms and alerts. . . . . . . . . . . . . . . . . . . . . . . . . . . . . . . . . . .65
View and manage current alarms . . . . . . . . . . . . . . . . . . . . . . . . . . . . . . . .65
Add an alarm notification profile . . . . . . . . . . . . . . . . . . . . . . . . . . . . . . . .67
Chapter 5 Manage Configurations and Firmware
Add a backup profile and execute a backup job . . . . . . . . . . . . . . . . . . . . .72
Restore the configuration of a single device . . . . . . . . . . . . . . . . . . . . . . . . .75
Upgrade firmware for one or more devices. . . . . . . . . . . . . . . . . . . . . . . . . .79
Import a Firmware File . . . . . . . . . . . . . . . . . . . . . . . . . . . . . . . . . . . . . . . . .80
Execute or schedule a firmware upgrade . . . . . . . . . . . . . . . . . . . . . . . . .82
Quick Start Guide5
Page 6

1
1Install the NMS300 Application
Install the application and prepare your network
The NETGEAR Network Management System 300 (NMS300) is a centralized and
comprehensive management application that enables you to discover, monitor, configure, and
report on enterprise-class networks with NETGEAR and third-party network devices.
This Quick Start Guide is intended for network administrators and describes how to install the
software and get started quickly. For a complete description of
the NMS300, see the NMS300 Network Management System Application User Manual, which
you can download by visiting
This chapter covers the following topics:
•
Computer requirements
• Compatible devices
• Download, install, and run the application
• Prepare the network devices for discovery
netgear.com/support/download/.
the features and capabilities of
Note: In this manual, the NMS300 application is referred to as the
application. The server on which the application is installed is referred
to as the NMS300 server.
Note: For more information about the topics covered in this manual, visit the
support website at netgear.com/support/.
Note: For more information about this NMS300 release, see the NMS300
Release Notes, which are available on
netgear.com/support/download/.
6
Page 7

NMS300 Network Management System Application
Note: Firmware updates with new features and bug fixes are made available
from time to time on
products can regularly check the site and download new firmware, or
you can check for and download new firmware manually. If the
features
in this guide, you might need to update your firmware.
or behavior of your product does not match what is described
netgear.com/support/download/. Some
Computer requirements
For this release of the application, the computer that functions as the NMS300 server must
meet the following requirements:
• 2.8 GHz dual-core CPU
• 4 G RAM (32-bit OS) or 8 G RAM (64-bit OS)
• 20 G storage
• Static IP address
This release of the application supports the following operating systems:
• Microsoft Windows XP (Professional) with SP3 or later
• Microsoft Windows 7 (Professional, Enterprise, and Ultimate), 32-bit and 64-bit
• Microsoft Windows 8 and 8.1 (Enterprise), 64-bit
• Microsoft Windows 10 (Home, Pro, Enterprise) 32-bit and 64-bit
• Microsoft Windows Server 2003 (Standard, Enterprise, and W
• Microsoft Windows Server 2008 (Enterprise), 32-bit and 64-bit
• Microsoft Windows Server 2012 (Standard) and 2012 R2, 64-bit
• Microsoft Windows Server 2016, 64-bit
• Microsoft Windows Server 2019, 64-bit
This release of the application supports the following browsers:
• Microsoft Internet Explorer latest version
• Mozilla Firefox latest version
• Google Chrome latest version
, 32-bit a
nd 64-bit
32-bit and 64-bit
eb),
Install the NMS300 Application Quick Start Guide7
Page 8

NMS300 Network Management System Application
Compatible devices
This release of the application supports the following features:
• Support for NETGEAR managed and smart switches
• Support for NETGEAR wireless devices
• Support for NETGEAR firewalls
• Support for ReadyDA
• Support for discovery and node status monitoring of third-party devices
Products that reached their end of life (EOL) are not included in the following lists.
NETGEAR managed switches
This release supports the following NETGEAR managed switches:
• GSM5212P
• GSM7212F
• GSM7212P
• GSM7224P
• JGSM7224
• M4100-12G-POE+
• M4100-12GF
• M4100-24G-POE+
• M4100-26-POE+
• M4100-26G
• M4100-26G-POE
• M4100-50-POE
• M4100-50G
• M4100-50G-POE+
• M4100-D10-POE
• M4100-D12G
• M4100-D12G-POE+
• M4200-10MG-POE+
• M4300-8X8F
• M4300-12X12F
• M4300-16X
• M4300-24XF
• M4300-24X24F
A and ReadyNAS storage devices
T
Install the NMS300 Application Quick Start Guide8
Page 9

NMS300 Network Management System Application
• M4300-28G
• M4300-48XF
• M4300-52G
• M4300-28G-POE+
• M4300-52G-POE+
• M4300-96X
• M4500-32C
• M4500-48XF8C
• M5300-28G
• M5300-28G-POE+
• M5300-28G3
• M5300-28GF
• M5300-52G
• M5300-52G-POE+
• M5300-52G3
• M6100, including blades and supervisors inserted in chassis:
- XCM8944
- XCM8944-POE+
- XCM8944-uPOE
- XCM8948
- XCM8948-POE+
- XCM8948-uPOE
- XCM8944F
- XCM8924X
• M7100 XSM7224
• M7100 XSM7224S
• S3300-28X
• S3300-28X-PoE+
• S3300-52X
• S3300-52X-PoE+
When a model S3300 switch and a model M4300 switch function together in a mixed
stacking configuration, the switches can be displayed as “Smart_M4300.”
The following
applies:
•
M4300 software release 6.6.x.x or a later release. For a mixed stacking configuration
only, the application displays a model M4300 switch as “Smart_M
4300.” In earlier
releases and in a mixed stacking configuration, the application displays a model M4300
switch as “M4300,” not as “Smart_M4300.”
Install the NMS300 Application Quick Start Guide9
Page 10

NMS300 Network Management System Application
• S3300 software release 6.6.4.x or a later release. For a mixed stacking configuration
only, the application displays a model S3300 switch as “Smart_M4300.” In earlier
releases and in a mixed stacking configuration, the application displays a model S3300
switch as “S3300,” not as “Smart_M4300.”
NETGEAR smart switches
This release supports the following NETGEAR smart switches:
• FS526Tv2
• FS726Tv2
• FS728TLP
• FS728TPv2
• FS728TP-200
• GS108T
• GS110TP
• GS308T
• GS310TP
• GS324T
• GS324TP
• GS348T
• GS418TPP
• GS510TLP
• GS510TP
• GS510TPP
• GS516TP
• GS716T
• GS724T-400
• GS724TPv2
• GS748T
• GS728TPv2
• GS728TPPv2
• GS728TPS
• GS728TS
• GS728TXS
• GS748T
• GS752TPv2
• GS752TPP
• GS752TPS
-200
-300
-500
-400
Install the NMS300 Application Quick Start Guide10
Page 11

NMS300 Network Management System Application
• GS752TS
• GS752TXS
• MS510TX
• MS510TXPP
• XS708T
• XS712Tv2
• XS716T
• XS728T
NETGEAR firewalls
This release supports the following NETGEAR firewalls:
• FVS318G
• FVS318N
• FVS336Gv2
• FVS336Gv3
• SRX5308
NETGEAR wireless access points
This release supports the following NETGEAR wireless access points:
• WAC720
• WAC730
• WG103
• WN203
• WN203-200
• WN370
• WND930
• WNAP210
• WNAP320
• WNAP370
• WNDAP350
• WNDAP360
• WNDAP380R
• WNDAP380Rv2
• WNDAP620
• WNDAP660
Install the NMS300 Application Quick Start Guide11
Page 12

NMS300 Network Management System Application
NETGEAR wireless management systems and controllers
This release supports the following NETGEAR wireless controllers and wireless
management system:
• WC7520
• WC7600
• WC9500
• WMS5316
NETGEAR storage systems
This release supports the following NETGEAR ReadyDATA and ReadyNAS storage
systems:
• RD5200
• RDD516
• RN102
• RN104
• RN202
• RN204
• RN212
• RN214
• RN312
• RN314
• RN316
• RN422
• RN424
• RN426
• RN516
• RN524X
• RN526X
• RN528X
• RN626X
• RN628X
• RN716X
• RN2120
• RN3130
• RN3138
Install the NMS300 Application Quick Start Guide12
Page 13

NMS300 Network Management System Application
• RN3220
• RN4220
• RR2312
• RR2304
• RR3312
• RR4312X/S
• RR4360X/S
Download, install, and run the application
The application must reside on a server at a static IP address on the local area network.
To download, install, and run the application:
1. Review the
requirements on page 7).
2. Visit
3. Make sure that the Windows computer on which you intend to install the application
4. Unzip the file you downloaded to obtain the executable installer file.
5. Launch the
6. Follow the installer wizard prompts.
netgear.com/support/download/ and download the application zip file that
corresponds to your Windows-based operating system.
assigned a static IP address.
The application binds itself to the static IP address of the host computer, which is the
NMS300 server
The installer wizard guides you through the default settings an
them.
• If another application is already using port number 8080 on the Windows computer,
modify this default setting to a dif
• Other settings can be customized as well.
• If
your Windows computer includes multiple network interface cards (NICs), select the
appropriate NIC in the NIC selection window of the wizard.
Once the installer finishes executing, you are prompted to rebo
supported Windows computer operating systems (see Computer
.
installer wizard by double-clicking the executable file.
d allows you to customize
ferent port number.
ot the computer.
is
7. Reboot your
We recommend that you reboot your computer.
After the reboot, for Windows 7 and Windows XP operating systems, the application is
already running as a service.
Install the NMS300 Application Quick Start Guide13
computer.
Page 14

NMS300 Network Management System Application
8. For Windows 2008 and Windows 2003 operating systems, use either of the following
methods to start the application manually.
• Select NMS300 > Service > Start Server.
• Navigate to the directory that you selected for the application installation and under
that directory, navigate to the NMS300\StartService.bat folder
You do not need to enter a license key for the application.
.
Prepare the network devices for discovery
To manage the devices on your network, you must prepare them for the application. By
default, the application lets you manage up to 200 devices. For information about managing
more than 200 devices, contact your NETGEAR sales contact.
To prepare the devices on your network:
1. Upgrade your
To upgrade the firmware, use the local browser user interface (UI) of the device.
Each device must run the latest firmware before the application can
the device. Once you perform this one-time upgrade, the application can centrally
manage future device firmware upgrades.
2. Create the credentials for your devices.
application uses a combination of SNMP, HTTP, and Telnet protocols to
The
the devices on your network. You must configure the application with the device
credentials to authenticate with the devices over the following protocols:
• Telnet and HTTP protocols. If the devices are not configured with the default
password for the admin user, create two new credentials in the
Create one credential for the Telnet protocol and another credential for the HTTP
protocol that contain either the admin user credential or the credential of another user
of the device with administrative privileges.
• SNMP community strings. If the devices are not configured with the default SNMP
community strings, create a credential in the application for the SNMP protocol that
contains the matching community strings.
For more information, see
devices to their latest released firmware.
discover and manage
interact with
application.
Add a device credential on page 35.
3. Make sure that each device on your network is configured to send SNMPv1 or SNMPv2
traps
to the IP address of the NMS300 server.
The application listens for SNMPv1 and SNMPv2 traps.
Install the NMS300 Application Quick Start Guide14
Page 15

2
2Get Started
Log in and perform basic configuration tasks
After you logged in to the application, you can change your password and account information
and configure the email server.
This chapter covers the following topics:
•
Log in to the application
• Change your password and account information
• Add a user profile to the user base
• Configure the email server for alerts and alarm notifications
• Configure the SMS server for alerts and alarm notifications
15
Page 16
NMS300 Network Management System Application
Log in to the application
The application uses a browser server architecture. Administrators and other types of users
can access the application from any supported browser. Before you log in to the application,
check the following items:
• Make sure that the application is installed on a server with a static IP address.
• Clear your browser cache before you use the application.
CAUTION:
The application supports multiple concurrent users. We recommend that
different users coordinate their application activities so that modifications
to a page made by one user are not inadvertently changed by another
user.
To select your language and log in to the application:
1. Open
NMS300 server
• T
• To connect to the application from a remote computer, replace localhost with the IP
After you connect to the application, the User Login window opens.
a browser and connect to the application through the static IP address of the
.
o connect to the application from the same NMS300 server on which you installed
the application, enter the URL http://localhost:8080
If you entered a different port number for the NMS300 server during the application
installation, replace 8080 in this URL with the port number that you provided during
installation.
address of the NMS300 server
which 203.0.113.56 is the IP address of the NMS300 server and 8080 is the port
number for the NMS300 server.
. For example, enter http://203.0.113.56:8080, in
.
2. From the Language menu, select your language.
The default language is English. You can also select Chinese.
3. Enter your user name and password.
Get Started Quick Start Guide16
Page 17
NMS300 Network Management System Application
When the application is initially installed, the default administrator user name is admin
and the default administrator password is also admin.
You must be an administrator (admin user, that is, a user with a security profile that is set
to Admin) to be able to create user names and passwords for other types of users.
4. Click the Sign In button.
For more information about the Network Summary page, see View the default network
summary on page 59.
Get Started Quick Start Guide17
Page 18

NMS300 Network Management System Application
Change your password and account information
We recommend that you change your password to a more secure password. This
recommendation applies to admin users only because nonadministrative users such as users
with a security profile set to Operator or Observer cannot change their password.
As an admin user, you can also change your account information. Items
include your email address, real name, and telephone number. You cannot change your user
name but you can add a second admin account with a different user name. For more
information, see the NMS300 Network Management System Application User Manual.
that you can change
Change your password
When the application is initially installed, the default administrator user name is admin and
the default administrator password is admin. As an admin user, you can create user names
and passwords for other types of users.
To change your password:
1. Open a browser and connect to the application through the static IP address of the
NMS300
For more information, see
A login window opens.
2. Enter your user name and password.
The default administrator user name is
also admin.
server.
Log in to the application on page 16.
admin and the default administrator password is
3. Click the Sign
The Network Summary page displays.
Get Started Quick Start Guide18
In button.
Page 19
NMS300 Network Management System Application
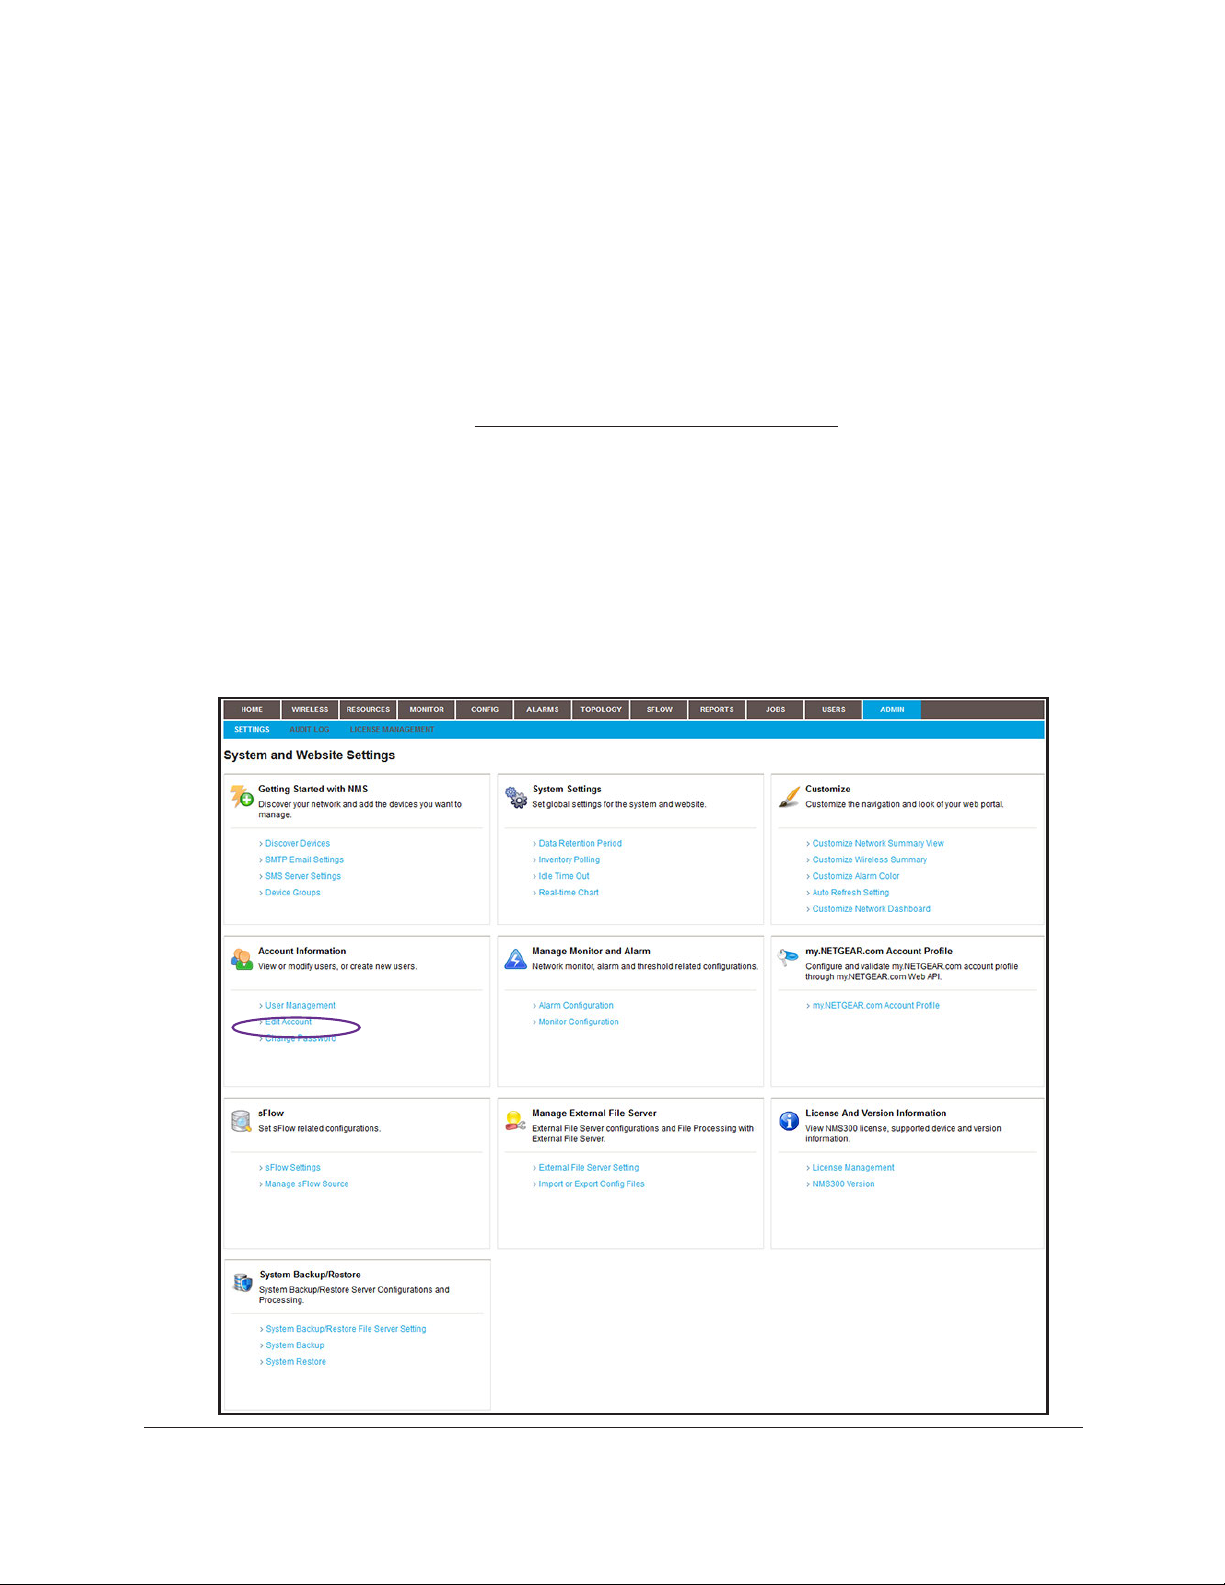
4. Select ADMIN > SETTINGS.
5. Under Account Information, click the Change Password link.
6. Enter your old and new passwords
7. Click the Submit
button.
Your password is updated.
Get Started Quick Start Guide19
Page 20
NMS300 Network Management System Application
Change your account information
You can change your general account settings such as your email address and telephone
number.
To change your account information:
1. Open a browser and connect to the application through the static IP address of the
NMS300 server
.
For more information, see
A login window opens.
2. Enter your user name and password.
The default administrator user name is admin
also admin.
3. Click the Sign In
The Network Summary page displays.
4. Select ADMIN > SETTINGS
button.
Log in to the application on page 16.
.
and the default administrator password is
Get Started Quick Start Guide20
Page 21
NMS300 Network Management System Application
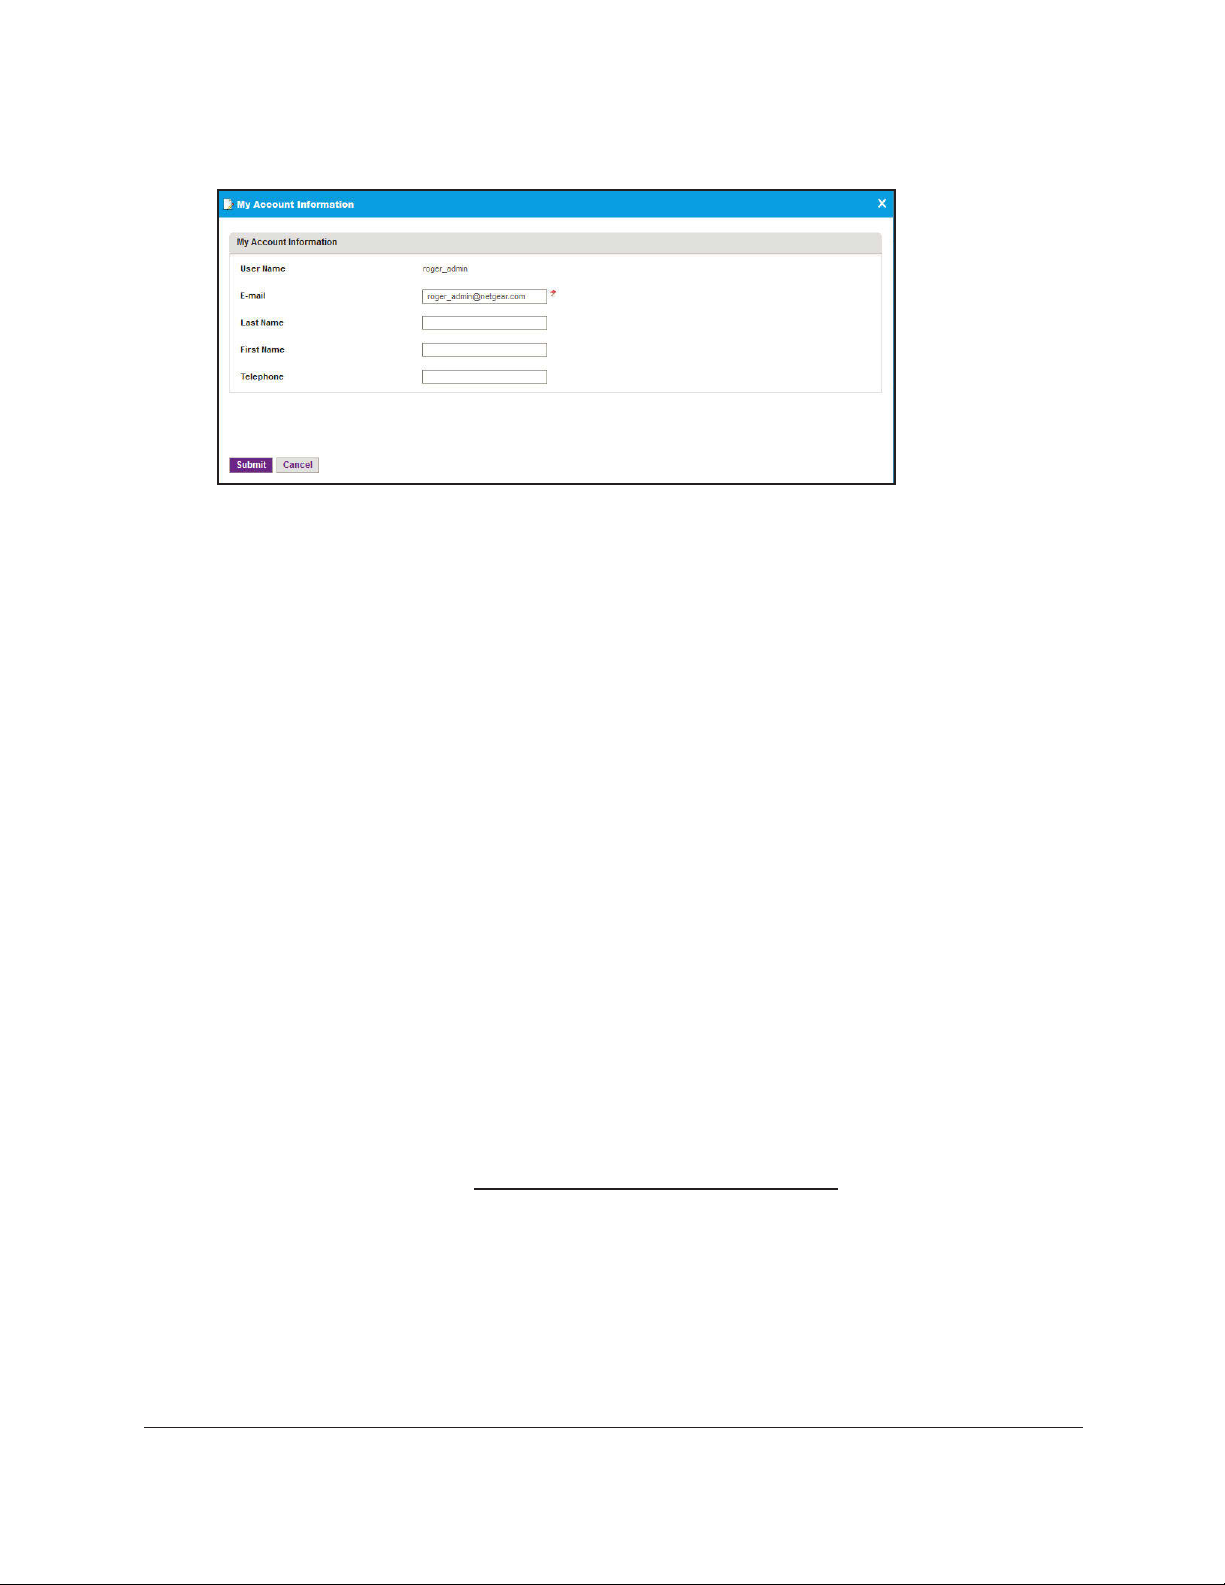
5. Under Account Information, click the Edit Account link.
6. Modify the information as needed.
7. Click the Submit
Your account information is updated.
button.
Add a user profile to the user base
The application provides the following default user security profiles:
• Admin. A user
users and security profiles.
• Operator. A user who can manage the network functions, but cannot manage users or
security profiles, or perform administrative tasks.
•
Observer. A user who can only monitor and view network functions.
As an
security profiles. For example, you can add a security profile for someone who can only run
and view network reports but is not authorized to perform any other tasks. For more
information, see the NMS300 Network Management System Application User Manual.
To add a user profile:
1. Open
admin user, you can modify and delete these security profiles and you
a browser and connect to the application through the static IP address of the
NMS300 server
For more information, see
A login window opens.
who can perform all functions of the application, including management of
can define new
.
Log in to the application on page 16.
2. Enter your user name and password.
The default administrator user name is admin and the default administrator password is
also admin.
3. Click the Sign
The Network Summary page displays.
Get Started Quick Start Guide21
button.
In
Page 22
NMS300 Network Management System Application
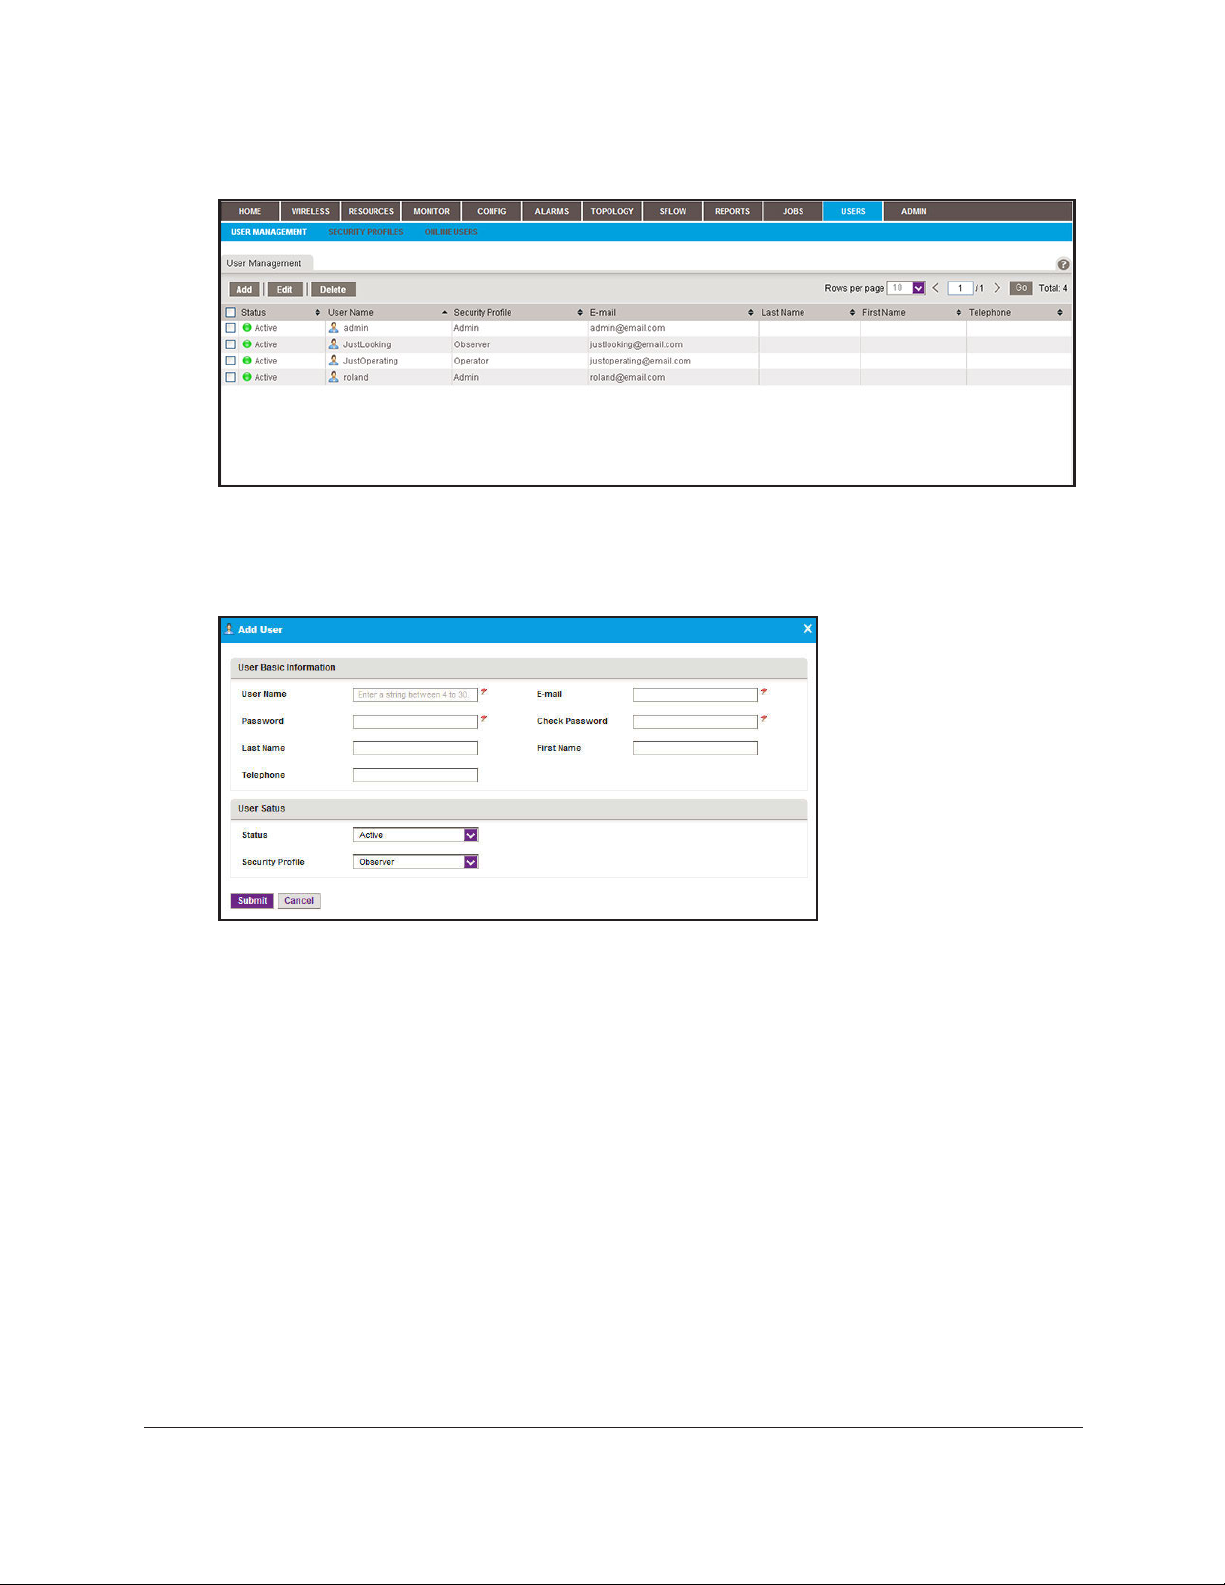
4. Select USERS > USER MANAGEMENT.
The Status column displays whether the user is active and the user can log in.
5. Click the Add
button.
The Add User pop-up window opens.
6. Specify the following information:
• In the User Basic Information section, enter the user name, password, and email
address for the user. The first and last name and telephone num
ber are optional.
• In the User Status section, select whether the user profile is active and select the
security profile that applies to the user.
7. Click the Submit
button.
The pop-up window closes and the new user is added to the User Management table.
Get Started Quick Start Guide22
Page 23

NMS300 Network Management System Application
Configure the email server for alerts and alarm notifications
Before the application can send email updates and alarm notifications, you must configure
the email server settings. Only an admin user can configure the email server settings.
Note: For information about adding an alarm notification profile with an email
address to which the application can send a notification, see
alarm notification profile on page 67.
Configure the general email server settings
The following procedure describes how to configure the general email server settings.
Add an
To configure the email server:
1. Open a browser and connect to the application through the static IP address of the
NMS300
For more information, see
A login window opens.
2. Enter your user name and password.
The default administrator user name is admin and the default administrator password is
also admin.
3. Click the Sign
The Network Summary page displays.
server.
Log in to the application on page 16.
In button.
Get Started Quick Start Guide23
Page 24
NMS300 Network Management System Application
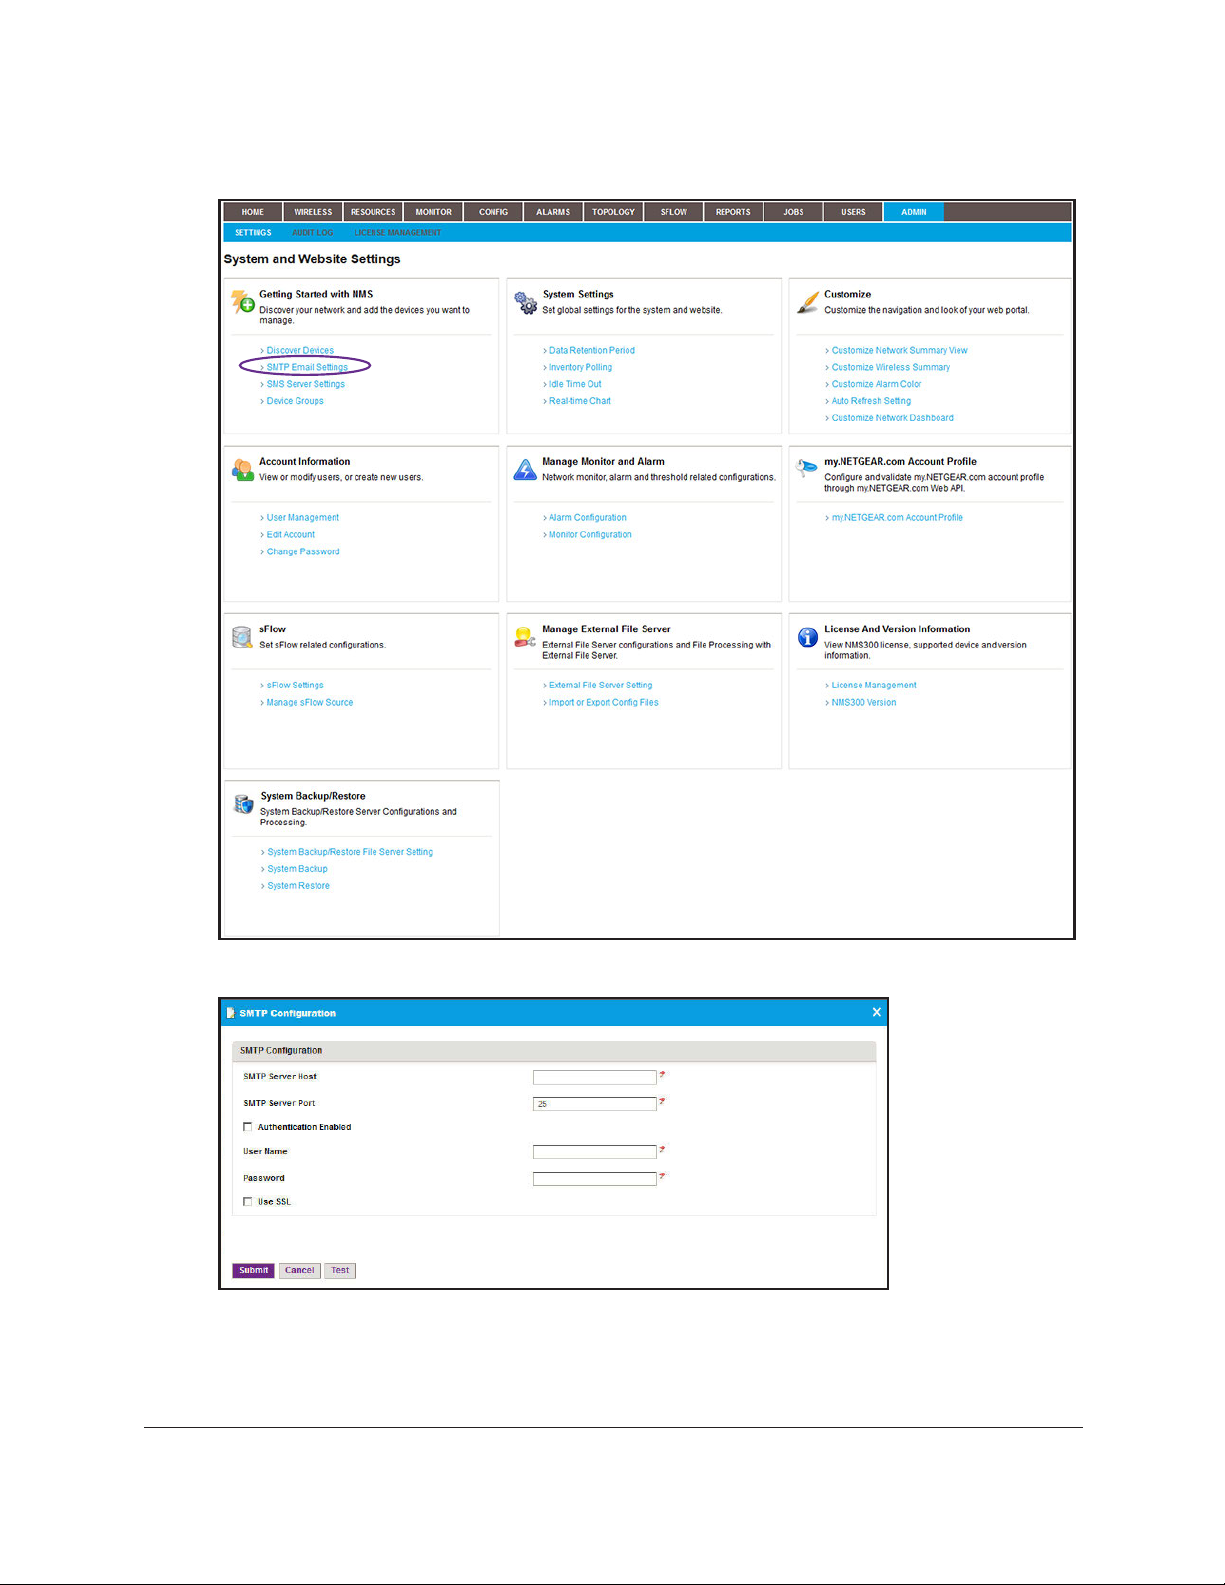
4. Select ADMIN > SETTINGS.
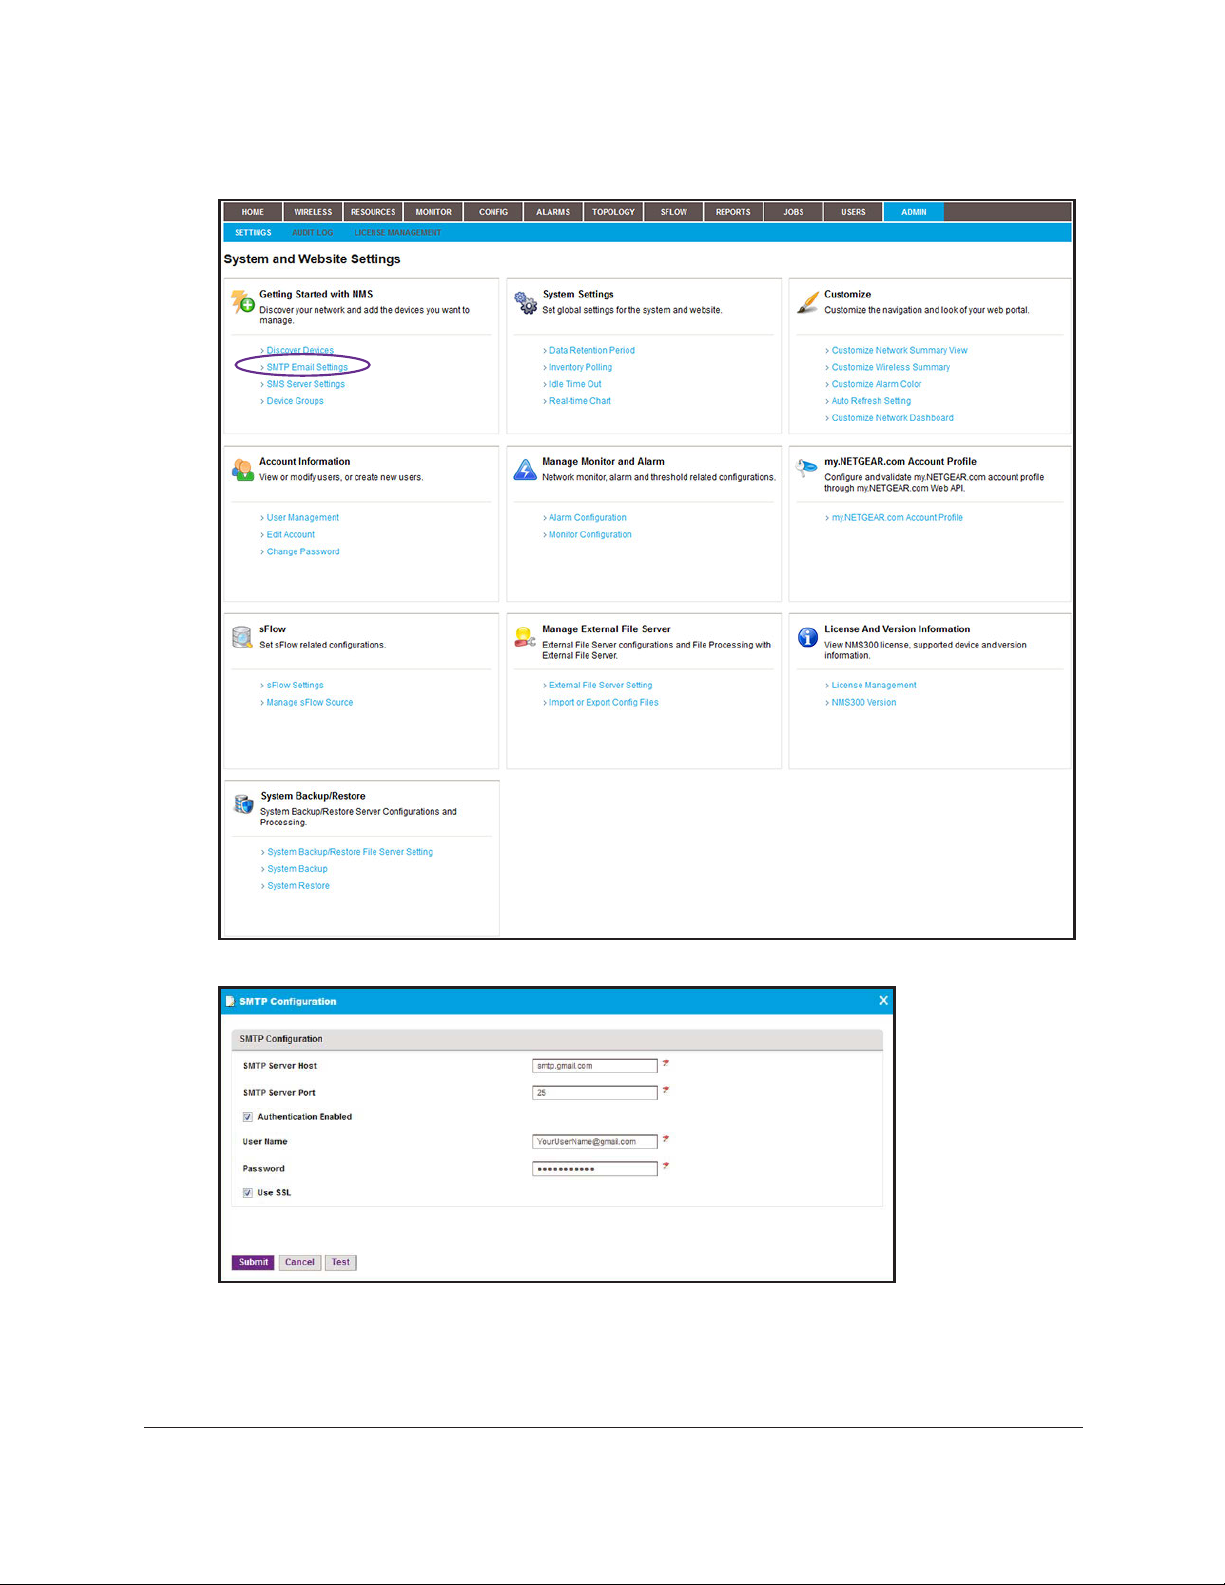
5. Under Getting Started with NMS, click the SMTP Email Settings link.
6. Enter your SMTP configuration settings.
7. If your SMTP server requires authentication, select the Authentication Enabled
8. In the User Name
Get Started Quick Start Guide24
field, enter the user name for your email account.
check box.
Page 25

NMS300 Network Management System Application
Note: You must enter the email user name entirely, that is with the at sign
(@) and domain name. For example, username@domain.com. The
SMTP server also uses the entire user name as the address from
which email is sent.
9. In
10. To use a secure email connection, select the Use
11. Click the T
12. Click the Submit
the Password
Port field, enter the port number for the SSL connection.
est button.
Your SMTP configuration settings are verified.
Your changes are saved.
field, enter the password for your email account.
SSL check box, and in the SMTP Server
button.
Configure email server settings for a gmail account
The following procedure describes how to configure the email server for a Gmail account.
To configure the email server for a Gmail account:
1. Open a browser and connect to the application through the static IP address of the
NMS300
For more information, see
A login window opens.
2. Enter your user name and password.
server.
Log in to the application on page 16.
The default administrator user name is admin and the default administrator password is
also admin.
3. Click the Sign
The Network Summary page displays.
Get Started Quick Start Guide25
In button.
Page 26
NMS300 Network Management System Application
4. Select ADMIN > SETTINGS.
5. Under Getting Started with NMS, click the SMTP Email Settings link.
6. Enter the following settings and select the following check boxes:
• In the SMTP Server Host field, enter smtp.gmail.com.
• In the SMTP Server Port field, enter 25.
Get Started Quick Start Guide26
Page 27

NMS300 Network Management System Application
• Select the Authentication Enabled check box.
• In the User Name field, enter the user name for your Gmail account.
Note: You must enter the email user name entirely, that is with the at sign
(@) and domain name. For example, username@gmail.com. The
SMTP server also uses the entire user name as the address from
which email is sent.
• In the Password field, enter the password for your Gmail account.
o use a secure email connection, select the Use
7. T
Port field, enter 465.
8. Click the T
Your SMTP configuration settings are verified.
9. Click the Submit
Your changes are saved.
est button.
button.
SSL check box, and in the SMTP Server
Configure the SMS server for alerts and alarm notifications
Note: The SMS server option is supported for a particular SMS gateway in
the People's Republic of China only. No other SMS servers are
supported in this release.
Before the application can send SMS updates and alarm notifications, you
SMS server settings. Only an admin user can configure the SMS server settings.
must configure the
For information about adding an alarm notification profile with an SMS telephone number to
which the application can send a notification, see
page 67.
To configure the SMS server:
1. Contact NETGEAR
SMS server that is supported.
2. Open a browser and connect to the application through the static IP address of the NMS300
server
.
For more information, see
A login window opens.
3. Enter your user name and password.
Get Started Quick Start Guide27
support to obtain the corporation ID and password for the Chinese
Log in to the application on page 16.
Add an alarm notification profile on
Page 28

NMS300 Network Management System Application
The default administrator user name is admin and the default administrator password is
also admin.
4. Click the Sign In button.
The Network Summary page displays.
5. Select ADMIN > SETTINGS
.
Get Started Quick Start Guide28
Page 29

NMS300 Network Management System Application
6. Under Getting Started with NMS, click the SMS Server Settings link.
7. Enter the corporation ID.
The corporation ID specifies the SMS gateways that the application must use.
corporation ID that NETGEAR support gave you.
8. Enter the password for accessing the SMS gateway.
This is the password that NETGEAR support gave you.
9. Click the Test
button.
Your SMS configuration settings are verified.
10. Click the Submit
button.
Your changes are saved.
This is the
Get Started Quick Start Guide29
Page 30

3
3Discover Resources
Discover your devices and add device groups
Before you can manage your network, you must let the application find the devices that are on
your network and perform other setup tasks that could simplify the management of your network.
This chapter covers the following topics:
•
Discovery concepts
• Use quick discovery to discover devices on your network
• Use a discovery profile to discover devices on your network
• Add device groups
Note: For more information about the topics that are described in this
chapter, see the NMS300 Network Management System Application
User Manual.
30
Page 31

NMS300 Network Management System Application
Discovery concepts
You can discover devices on your network by using the following methods:
• Quick discovery. Discovers devices without using a discovery profile. This met
quick and easy discovery method but gives you limited control over the discovery
process.
• Regular discovery. Filters the devices on your network through a discovery profile that
you must configure first. This method gives you more control th
method but is a bit more complicated.
With both methods, the application can discover wired devices, wireless devices, NETGEAR
devices, and third-party devices that support standard SNMP MIBs.
The application can discover and monitor NETGEAR firewalls over the WAN. Firewalls can
a static WAN IP address, dynamic WAN IP address, or WAN host name. If a firewall uses
use
a WAN host name, the firewall must also use DNS.
Note: By default, the application lets you discover up to 200 devices. For
information about discovering more than 200 devices, contact your
NETGEAR sales contact.
For wireless access points (APs), the nature of the AP determines whether the application
can discover the AP:
Standalone AP. An AP that is not controlled by another device and that operates in
•
standalone mode. This type of AP is also referred to as a Fat AP. The application can
discover and manage standalone APs just like any other network device that the
application supports.
AP that a NETGEAR WC7520 or WC9500 wireless
• Controller-managed AP.
controller manages. This type of AP is also referred to as a Fit AP. After the application
discovers a wireless controller, it displays the controller-managed APs in the device table.
In this indirect way, the application can discover the controller-managed APs but cannot
manage them. You cannot back up or restore the configuration, upgrade the firmware, or
delete the access points from the application. Controller-managed APs are not subtracted
from the number of devices that the license of the application supports. The license of the
application ignores the controller-managed APs.
An
an the quick discovery
hod is a
Discover Resources Quick Start Guide31
Page 32

NMS300 Network Management System Application
Use quick discovery to discover devices on your network
Quick Discovery is a quick and easy discovery method but gives you limited control over the
discovery process.
To discover the devices on your network:
1. Open a browser and connect to the application through the static IP address of the
NMS300 server
.
For more information, see
A login window opens.
2. Enter your user name and password.
The default administrator user name is admin
also admin.
3. Click the Sign In
The Network Summary page displays.
4. Select RESOURCES > DISCOVER
button.
Log in to the application on page 16.
Y.
and the default administrator password is
Discover Resources Quick Start Guide32
Page 33

NMS300 Network Management System Application
5. Click the Quick Discovery button.
6. From the menu on the upper left of the pop-up window, select one of the following network
types and enter the applicable address information in the fields to the right of the menu:
• IP Range
• Subnet
• Single IP
• IP Address(es)
• Hostname
7. Specify
the credentials
that pertain to the devices on your network by select one of the
following types of credentials:
• Default SNMP
• Default HTTP
• Default Telnet
• Default HTTPS
• Default FVS318G HTTPS
Note: For the NETGEAR FVS318N, FVS336Gv2, FVS336Gv3, and
SRX5308 firewalls, use the default SNMP device credentials. For the
NETGEAR FVS318G firewall, use the default FVS381G HTTPS
device credential.
Discover Resources Quick Start Guide33
Page 34

NMS300 Network Management System Application
8. If the credential that you need is not listed in the table, do the following:
a. Click the Add button.
The Select Credentials pop-up window displays. In addition to the
the pop-up window displays the device credentials that you adde
information, see
Add a device credential on page 35.
b. Select one or more credentials and click the Add Selection
To add all credentials, click the Add All button.
The Select
Credentials pop-up window closes and the selected credentials are added
to the credentials table.
c. Select
the credential or credentials that you added.
9. Click the Execute button.
When
the quick discovery process completes, the Quick Discovery pop-up window
and displays the results.
default credentials,
d. For more
button.
opens
Note: If a credential failure occurs, a common reason is that the device login
information changed from its default. When a credential failure occurs,
add or modify the credential and run the discovery job again. For more
information, see
10. Click the Close
button.
Add a device credential on page 35.
The Quick Discovery pop-up window closes.
Discover Resources Quick Start Guide34
Page 35

NMS300 Network Management System Application
Use a discovery profile to discover devices on your network
A discovery profile gives you more control over the discovery process than the quick
discovery method but is a bit more complicated. The following sections describe how you can
use a discovery profile to discover devices:
Add a device credential
1.
2. Add a discovery profile
3. Execute a discovery job
Add a device credential
During the discovery process, the application must log in to devices to obtain the information
to discover and manage the devices. A device credential includes the user name, password,
and SNMP community string that allows the application to log in to the device. The user
name and password are the same user information that you use to log in to the device to
perform system configuration. The application provides default device credentials for
discovery over HTTP, HTTPS, SNMP, and Telnet, and for discovery of the NETGEAR
FVS318G firewall over HTTPS.
that
You must configure the correct device credentials for any device
to manage. If a device is not configured with its default credentials, do the following:
• If a device is not configured with its default admin user password, create two new
credentials in the application, one for Telnet and another for the HTTP protocol. These
credentials contain either the admin user credential or the credential of another user with
administrative privileges.
a device is not configured with its default SNMP community strings, create a credential
• If
in the application for the SNMP protocol that contains the matc
To add a device credential:
1. Open a browser and connect to the application through the static IP address of the
NMS300
For more information, see
A login window opens.
2. Enter your user name and password.
The default administrator user name is admin and the default administrator password is
also admin.
3. Click the Sign
The Network Summary page displays.
server.
Log in to the application on page 16.
In button.
you want the application
hing community strings.
Discover Resources Quick Start Guide35
Page 36

NMS300 Network Management System Application
4. Select RESOURCES > DEVICE CREDENTIALS.
5. Click the Add button.
6. In the Credential General Info section, enter the name for the credential.
7. From the Protocol menu,
select one of the following protocols:
• SNMP V1
• SNMP V2C
• SNMP V3
• Telnet
• SSH
• HTTP
• HTTPS
Depending on your protocol selection, the pop-up window might adjust to display other
fields and menus.
8. In
Discover Resources Quick Start Guide36
the Authentication Info section, enter the information for the selected protocol.
Page 37

NMS300 Network Management System Application
Note: If you are setting up a Telnet device credential for a managed switch
for which the privileged EXEC password was changed (on the Enable
Password Configuration page of the switch local browser UI), enter the
privileged EXEC password in the Enable Password field. The Enable
Password field displays when you select Telnet from the Protocol
menu.
9. Click
the Management Interface
tab.
10. Enter the port number, time-out period in seconds, and the number of retries.
11. Click the Associated Devices
tab.
Discover Resources Quick Start Guide37
Page 38

NMS300 Network Management System Application
12. Click the Add button.
13. Select one or more devices and click the Add Selection button.
To add all devices to the device credential, click the Add All button.
The Select Devices pop-up window closes and the selected device
Associated Devices table.
14. Click the Save button.
The pop-up window closes and the new or modified device credent
Device Credentials table.
s are added to the
ial displays in the
Add a discovery profile
A discovery profile filters the network device information that the application can detect. The
application can discover devices through an IP address range, IP subnet address, a single IP
address, a list of IP addresses, or device host name.
To add a discovery profile:
1. Open a browser and connect to the application through the static IP address of the
NMS300 server
For more information, see
A login window opens.
2. Enter your user name and password.
The default administrator user name is admin
also admin.
.
Log in to the application on page 16.
and the default administrator password is
3. Click the Sign In
The Network Summary page displays.
Discover Resources Quick Start Guide38
button.
Page 39

NMS300 Network Management System Application
4. Select RESOURCES > DISCOVERY.
The page displays the existing discovery profiles.
5. Click the Add Profile button.
6. Enter the information in the following sections:
• General Info. Enter the name and description of the profile.
• Discovery Options:
- Resolve Host Names. To
attempt to resolve a host name to an IP address, select
the Resolve Host Names (Attempt to resolve host name to IP address) check
box.
- ICMP Ping Devices. To monitor the node status of third-party non-SNMP
devices, select the
ICMP Ping Devices (Ping devices before authentication)
check box.
• Discovery Filters. Select the discovery filters you want by vendor, location, and
device type.
Discover Resources Quick Start Guide39
Page 40

NMS300 Network Management System Application
• Discovery Includes. Select whether to include ICMP-only devices or unclassified
devices.
• LLDP Option. To
monitor the node status of third-party non-SNMP devices, select the
Enable LLDP Link Discovery (Automatically discover LLDP links) check box.
7. Click the Network
tab.
8. From the menu on the upper left of the pop-up window, select one of the following network
types and enter the applicable address information in the fields to the right of the menu:
• IP Range
• Subnet
• Single IP
• IP Address(es)
• Hostname
9. Specify
the credentials
that pertain to the devices on your network by selecting one of the
following types of credentials:
• Default SNMP
• Default HTTP
• Default Telnet
• Default HTTPS
• Default FVS318G HTTPS
Discover Resources Quick Start Guide40
Page 41

NMS300 Network Management System Application
10. If the credential that you need is not listed in the table, do the following:
a. Click the Add button.
In addition to the default credentials, the pop-up window displays the device
credentials that you added. For more information, see
page 35.
Add a device credential on
b. Select one or more credentials and click the Add Selection
To add all credentials, click the Add All button.
The Select Credentials pop-up window closes and the credentials
Select Credentials table on the Network pop-up window (the figure that is shown in
Step 7).
c. On the Network pop-up window, select the credential or credentials that you added.
11. Click the Save
The pop-up window closes and the new or modified discovery profile displays in the
Network Discovery table.
button.
button.
are added to the
Execute a discovery job
You can execute a one-time discovery job immediately. For information about scheduling a
one-time or recurring discovery job, see the NMS300 Network Management System
Application User Manual.
To execute a discovery job:
1. Open a browser and connect to the application through the static IP address of the
NMS300 server
.
For more information, see
A login window opens.
2. Enter your user name and password.
The default administrator user name is admin and the default administrator password is
also admin.
Discover Resources Quick Start Guide41
Log in to the application on page 16.
Page 42

NMS300 Network Management System Application
3. Click the Sign In button.
The Network Summary page displays.
4. Select RESOURCES > DISCOVER
Y.
5. Select the discovery profile.
6. From the More
menu, select Execute.
When discovery completes, the Execution Results pop-up window opens and displays the
discovered devices that the application adds to its inventory database.
7. Click the Close button.
The pop-up window closes.
Discover Resources Quick Start Guide42
Page 43

NMS300 Network Management System Application
Note: Output files from completed resource discovery jobs are saved for the
data retention period. For more information, see the NMS300 Network
Management System Application User Manual.
Add device groups
To simplify the management of networks with many devices, you can create device groups.
Once they are discovered, you can group the devices on your network by location, device
type, and other criteria.
You can create static and dynamic device groups:
• Static device group. A fixed group of specific devices that you add manually. For more
information, see
• Dynamic device group. A dynamic list of devices that are selected automatically bas
on your filter selection criteria. For more information, see
on page 45.
Add a static device group on page 43.
Add a dynamic device group
ed
Add a static device group
A static group is a fixed list of specific devices. You must add devices manually.
To add a static device group:
1. Open a browser and connect to the application through the static IP address of the
NMS300
For more information, see
A login window opens.
2. Enter your user name and password.
The default administrator user name is admin and the default administrator password is
also admin.
3. Click the Sign
The Network Summary page displays.
server.
Log in to the application on page 16.
In button.
Discover Resources Quick Start Guide43
Page 44

NMS300 Network Management System Application
4. Select RESOURCES > DEVICE GROUPS.
5. Click the Add Static Group button.
6. Enter a group name.
7. Enter a description.
Discover Resources Quick Start Guide44
Page 45

NMS300 Network Management System Application
8. Click the Add button.
9. To filter the devices that display on the pop-up window, click the Show Filter button.
You can filter the devices by criteria such as device type, device name and IP address,
location, device model, and status.
To hide the device filter, click the Hide Filter button.
10. On the Select Devices pop-up window
11. Click the Add Selection
To add all devices, click the Add All button.
12. Click the Submit
The pop-up window closes. The devices are added to the static device group, and the
group is displayed in the Device Groups table.
button.
button.
, select devices for the group.
Add a dynamic device group
A dynamic group is a dynamic list of devices that are selected automatically based on your
filter selection criteria. The list changes automatically as devices that meet the filter criteria
are added to and removed from the network.
To add a dynamic device group:
1. Open a browser and connect to the application through the static IP address of the
NMS300 server
For more information, see
A login window opens.
.
Log in to the application on page 16.
2. Enter your user name and password.
The default administrator user name is admin and the default administrator password is
also admin.
3. Click the Sign
Discover Resources Quick Start Guide45
button.
In
Page 46

NMS300 Network Management System Application
The Network Summary page displays.
4. Select RESOURCES > DEVICE
GROUPS.
5. Click the Add Dynamic Group button.
6. Enter a group name.
7. Enter a description.
8. Enter the criteria for the device selection filter.
Y
ou can filter by device vendor
contact. You can select more than one filter
, device location, device type, device model, and device
. To filter by device type, make a selection
from the Device Type menu.
9. To view the devices in the group before you save the group, select the View
The devices that meet the selection criteria are displayed.
10. Click the Submit
button.
The pop-up window closes. The devices are added to the dynamic device group, and
group is displayed in the Device Groups table.
Discover Resources Quick Start Guide46
Devices button.
the
Page 47

4
4Monitor Your Network
Monitor devices and alarms
You can view summary and detailed information about the network, devices, and interfaces,
including real-time and historical information and performance statistics. You can also enable
and disable the configuration monitors and manage alarms.
This chapter covers the following topics:
• Monitor device and network information
• Manage the configuration monitors
• Manage device alarms and alerts
Note: For more information about the topics that are described in this
chapter, see the NMS300 Network Management System Application
User Manual.
47
Page 48

NMS300 Network Management System Application
Monitor device and network information
The network monitor lets you view device and interface information, network summary
information, performance statistics, real-time information, and historical information.
The application provides the following types of views:
• Inventory and interface view. View the devices that the application discovered and the
interfaces that are associated with the devices. For more infor
export the Inventory table and Interface List table on page 48.
• Device view. View and manage the information for devices that the applicat
discovered. For more information, see
page 50.
• Wireless device view. View and manage the information for wireless devices that the
application discovered. For more information, see
on page 53.
• Wireless client view. View and manage the information for wireless clients of wirel
devices that the application discovered. For more information, see
information on page 56
• Network summary view. Display a network overview with a device tree, an enterprise
network map, and the status of and statistics for the devices that the application
discovered. For more information, see
View device information and device details on
View wireless device information only
View the default network summary on page 59.
mation, see
View wireless client
View and
ion
ess
The application provides several more views that you first must configure
useful information: the topology map view, network topology view, and dashboard views that
you can display on the network dashboard. For information about these views and
dashboards, see the NMS300 Network Management System Application User Manual.
The following sections describe the tasks that you can perform:
View and export the Inventory table and Interface List table
•
• View device information and device details
• View wireless device information only
• View wireless client information
• View the default network summary
before they display
View and export the Inventory table and Interface List table
You can view the table of wired and wireless devices and interfaces that the application
manages, and export this table to an Excel or PDF file.
To view and export the Inventory table and Interface List table:
1. Open a browser and connect to the application through the static IP address of the
NMS300
server.
For more information, see
Monitor Your Network Quick Start Guide48
Log in to the application on page 16.
Page 49

NMS300 Network Management System Application
A login window opens.
2. Enter your user name and password.
The default administrator user name is admin and the default administrator password is
also admin.
3. Click the Sign In
button.
The Network Summary page displays.
4. Select RESOURCES > INVENT
ORY.
5. To add columns to or remove them from the Inventory table, right-click the table heading
anywhere, and specify the columns by selecting the corresponding check boxes.
You can choose from the following columns: Status, Device Name, IP Address, Device
Model, Device
Type, Firmware Version, Serial Number, MAC Address, Last Update Time,
Location, Registered, Hostname, Managed By, Date of Purchase, Vendor, Country of
Purchase, Hardware Version, Configuration Version, Contact, Discover Time, and
Description.
o filter the devices that are listed, click the Show Filter
6. T
button.
You can filter the devices by criteria such as device type, device name and IP address,
device model, and status.
To hide the filter, click the Hide Filter button.
7. To view interfaces for a specific device, click the table row for a device anywhere but in the
Device Name
Monitor Your Network Quick Start Guide49
column.
Page 50

NMS300 Network Management System Application
8. To view details about an individual device or interface, in the Device Name column, click a
device name (or IP address), or, in the Name column, click an interface name.
For information about viewing device details, see
details on page 50.
9. Click the Export to
10. To save the device information on your computer, follow the directions of your browser.
Excel button or the Export to PDF button.
View device information and device
View device information and device details
You can see a table of devices that the application discovered in your network.
To view the Devices table:
1. Open a browser and connect to the application through the static IP address of the
NMS300 server
For more information, see
A login window opens.
2. Enter your user name and password.
The default administrator user name is admin
also admin.
3. Click the Sign In
.
Log in to the application on page 16.
and the default administrator password is
button.
The Network Summary page displays.
4. Select RESOURCES > DEVICES
The page displays the devices that the application discovered.
5. To add columns to or remove them from the Devices table, right-click the table heading
anywhere, and
You can choose from the following columns: Status, Device Name, IP Address, Device
Model, Device
Location, Registered, Hostname, Managed By, Date of Purchase, Vendor, Country of
specify the columns by selecting the corresponding check boxes.
Type, Firmware Version, Serial Number, MAC Address, Last Update Time,
.
Monitor Your Network Quick Start Guide50
Page 51

NMS300 Network Management System Application
Purchase, Hardware Version, Configuration Version, Contact, Discover Time, and
Description.
6. To filter the devices that are listed, click the Show Filter button.
You can filter the devices by criteria such as type, name, IP address, vendor,
model, and
status.
To hide the filter, click the Hide Filter button.
7. To view details about a device, click the device name (or IP address) for the device.
The following figure shows the page that displays when the device that you select is a
switch.
Monitor Your Network Quick Start Guide51
Page 52

NMS300 Network Management System Application
The following figure shows the Dashboard menu for a switch.
Note: If the device that you select is an M6100 managed switch, the
Dashboard also displays the Slot List option.
8. From
the Dashboard
menu, select a menu option.
The page adjusts to display information that corresponds to your menu option.
For switches, wireless controllers, wireless management systems, and routers, you can
display interface details.
9. To display interface details:
a. Select Interface List
.
A page similar to the following displays.
The following figure shows the Dashboard menu for an interface:
Monitor Your Network Quick Start Guide52
Page 53

NMS300 Network Management System Application
b. From the Dashboard menu, select a menu option.
The page adjusts to display information that corresponds to your menu option.
View wireless device information only
You can easily monitor your wireless network by displaying wireless controllers, wireless
access point (APs), wireless management systems, and active wireless clients.
Because of the nature of controller-managed APs, the application can provide only limited
information for controller-managed APs, compared to standalone APs.
Note: For information about viewing wireless clients of wireless controllers,
APs, and management systems, see
on page 56.
View wireless controller information only
View wireless client information
You can display only the wireless controllers that the application manages.
To view wireless controller information:
1. Open a browser and connect to the application through the static IP address of the
NMS300
For more information, see
A login window opens.
2. Enter your user name and password.
The default administrator user name is admin and the default administrator password is
also admin.
3. Click the Sign
The Network Summary page displays.
server.
Log in to the application on page 16.
In button.
Monitor Your Network Quick Start Guide53
Page 54

NMS300 Network Management System Application
4. Select WIRELESS > CONTROLLERS.
5. To add columns to or remove them from the Wireless Controllers table, right-click the table
heading anywhere, and specify the columns by selecting the corresponding check boxes.
You can choose from the following columns: Status, Device Name, IP Address,
Hostname, Managed By, MAC
Last Update Time, Hardware Version, Firmware Version, Configuration Version, Serial
Number, Contact, and Discover Time.
Address, Location, Device Model, Vendor, Device Type,
6. To filter the devices that are listed, click the Show Filter
You can filter the devices by criteria such as name, IP address, location, model, and
status.
To hide the filter, click the Hide Filter button.
7. To view details about a device, click the device name (or IP address) for the device.
For more information, see
View device information and device details on page 50.
button.
View wireless access point information only
You can display only the standalone APs and controller-managed APs. The application
manages the standalone APs. The controller-managed APs are managed by their wireless
controllers and display for information only.
To view wireless access point information:
1. Open a browser and connect to the application through the static IP address of the
NMS300 server
For more information, see
A login window opens.
2. Enter your user name and password.
.
Log in to the application on page 16.
The default administrator user name is admin
also admin.
3. Click the Sign In
Monitor Your Network Quick Start Guide54
button.
and the default administrator password is
Page 55

NMS300 Network Management System Application
The Network Summary page displays.
4. Select WIRELESS > AP.
5. To add columns to or remove them from the Access Points table, right-click the table
heading anywhere, and specify the columns by selecting the corresponding check boxes.
You can choose from the following columns: Status, Device Name, Associated Controller
IP Address, Hostname, Managed By, MAC Address, Location, Device Type, Device
Model, Vendor, Last Update Time, Hardware Version, Firmware Version, Configuration
Version, Serial Number, Contact, Discover Time, and Description.
6. To filter the devices that are listed, click the Show Filter
You can filter the devices by criteria such as device name, device IP address, controller
name, location, device model, and status.
To hide the filter, click the Hide Filter button.
7. To view details about a device, click the device name (or IP address) for the device.
For more information, see
View device information and device details on page 50.
button.
View wireless management system information only
You can display only the wireless management systems that the application manages.
To view wireless management system information:
1. Open a browser and connect to the application through the static IP address of the
NMS300 server
For more information, see
.
Log in to the application on page 16.
,
A login window opens.
2. Enter your user name and password.
The default administrator user name is admin and the default administrator password is
also admin.
3. Click the Sign
The Network Summary page displays.
Monitor Your Network Quick Start Guide55
button.
In
Page 56

NMS300 Network Management System Application
4. Select WIRELESS > WMS.
5. To add columns to or remove them from the WMS List table, right-click the table heading
anywhere, and specify the columns by selecting the corresponding check boxes.
You can choose from the following columns: Status, Device Name, IP Address,
Hostname, Managed By, MAC
Last Update Time, Hardware Version, Firmware Version, Configuration Version, Serial,
Number, Contact, and Discover Time.
Address, Device Model, Vendor, Location, Device Type,
6. To filter the devices that are listed, click the Show Filter
You can filter the devices by criteria such as type, name, IP address, vendor, model, and
status.
To hide the filter
7. To view details about a device, click the device name (or IP address) for the device.
For more information, see
, click the Hide Filter button.
View device information and device details on page 50.
button.
View wireless client information
The application lets you monitor the active wireless clients by wireless controller, standalone
AP, controller-managed AP, or SSID.
You can display various wireless details for each client.
To monitor wireless clients and view details for a single client:
1. Open a browser and connect to the application through the static IP address of the
NMS300 server
For more information, see
A login window opens.
.
Log in to the application on page 16.
2. Enter your user name and password.
The default administrator user name is admin
also admin.
Monitor Your Network Quick Start Guide56
and the default administrator password is
Page 57

NMS300 Network Management System Application
3. Click the Sign In button.
The Network Summary page displays.
4. Select WIRELESS > ACTIVE
CLIENTS.
By default, the filter is active because the Active Client List table can display many
wireless clients.
5. To hide the filter for active clients, click the Hide Filter button and go to Step 12.
6. From the Device T
ype / SSID menu, select Wireless Controller, Standalone AP,
Controller Managed AP, or SSID.
The name of the field to the right of the Device Type / SSID menu adjusts according to
your selection from the menu.
7. Click
the dots next to the field to the right of the Device Type / SSID menu.
A pop-up window similar to the following displays.
8. To filter the devices or SSIDs that are listed, click the Show Filter button.
You can filter the devices by criteria such as name, IP address, location, and model. You
can filter the SSIDs by criteria such as SSID name, device name
Monitor Your Network Quick Start Guide57
, and device IP address.
Page 58

NMS300 Network Management System Application
To hide the filter for devices or SSIDs, click the Hide Filter button.
The following figure shows a sample of a pop-up window that displays when you filter by
device IP address:
9. Select the device or SSID.
10. Click the Select button.
The pop-up window closes and the empty
11. Click the Apply
button.
Active Client List table displays.
The application populates the Active Client List table with the wireless clients of the
selected device or SSID.
12. To add columns to or remove them from the Active Client List table, right-click the table
heading anywhere, and specify the columns by selecting the corresponding check boxes.
You can choose from the following columns: Client MAC Address, Client IP Address,
Location, AP
Name, Associated Controller, SSID, BSSID, Protocol, Authentication Mode,
Duration, Channel, RSSI, SNR, Transmit Power, Transmitted, Rate (Mbps), Received
Monitor Your Network Quick Start Guide58
Page 59

NMS300 Network Management System Application
Rate (Mbps), Transmitted Bytes, Received Bytes, Transmitted Packets, Received
Packets, and Status.
13. To view details for an individual wireless client, in the Client MAC Address column, click a
MAC address. A page similar to the following displays.
14. From the Dashboard menu, select a menu option.
By default, the page displays the Signal Monitor menu option. If you select the Traffic
Monitor menu option, the page adjusts.
View the default network summary
The Network Summary page displays a device tree, an enterprise network map, a physical
representation of the status and device type of the inventory, and various top 10 widgets.
To view the default network summary:
1. Open a browser and connect to the application through the static IP address of the
NMS300 server
For more information, see
A login window opens.
2. Enter your user name and password.
The default administrator user name is admin and the default administrator password is
also admin.
.
Log in to the application on page 16.
Monitor Your Network Quick Start Guide59
Page 60

NMS300 Network Management System Application
3. Click the Sign In button.
Monitor Your Network Quick Start Guide60
Page 61

NMS300 Network Management System Application
By default, the following widgets display on the page.
Widget Description Information
Device Tree View A tree of all discovered and
managed devices in the network.
You can expand the tree.
Enterprise Network Map A world map that displays the
location of each device and its
connections to other devices
Device Inventory
Status/Device T
Top 10 Devices by
Average CPU (Today)
T
op 10 Devices by
Average Memory (Today)
ype
A slice graph displaying the device status (Up or Down) and a s
displaying the network breakdown per device type.
T
op 10 devices by average CPU
utilization for today
T
op 10 devices by average
memory utilization for today
Group devices by:
• Location (the
• Vendor
• Device T
• Device Group
• Manual link
• LLDP link
• < 1.5
• >= 1.5 Mbps < 10 Mbps link
• >= 10 Mbps < 100 Mbps link
• >= 100 Mbps < 1 Gbps link
• >= 1 Gbps < 10 Gbps link
• >= 10 Gbps link
• Link of unknown speed
• Device status
• Device name
• Device type
• CPU utilization in percentage
• Device status
• Device name
• Device type
• Memory utilization
Mbps link
default
ype
setting)
lice graph
in
percentage
Latest 10 Alarms • Alarm Name
4. To view details about a device, click the device name.
For more information, see
Monitor Your Network Quick Start Guide61
View device information and device details on page 50.
• Device Name
• Severity
• Alarm
Time
Page 62

NMS300 Network Management System Application
Manage the configuration monitors
The application provides monitors for the following device metrics:
• Status
• ICMP ping
• CPU
• Memory
• T
emperature
• Disk (for storage devices)
• IP traf
• ICMP traffic
• TCP traffic
• UDP traffic
• SNMP traffic
• Interface traffic
fic
In addition, the application provides monitors for the followin
storage system metrics:
• NMS system server
• Radio statistics
• WLAN utilization
• V
AP statistics (wireless performance statistics of the WLAN network based on SSID)
• Wired Ethernet statistics (wired performance statistics of stan
• Storage temperature
• Storage disk temperature
• Storage disk capacity
By default, all monitors are enabled.
specify the information and devices that are monitored.
For each individual monitor, you can modify the information and devices that are monitored.
To configure an individual monitor:
1. Open
NMS300
For more information, see
a browser and connect to the application through the static IP address of the
server.
Log in to the application on page 16.
You can disable or reenable individual monitors and
g server, wireless device, and
dalone APs)
A login window opens.
2. Enter your user name and password.
Monitor Your Network Quick Start Guide62
Page 63

NMS300 Network Management System Application
The default administrator user name is admin and the default administrator password is
also admin.
3. Click the Sign In button.
The Network Summary page displays.
4. Select MONITOR >
5. Select the monitor.
6. Click the Edit
button.
MONITOR CONFIGURATION.
7. (Optional) In the General Information pop-up window, modify the following settings:
• From the Polling Interval menu, select a polling interval.
• Enter a description.
Monitor Your Network Quick Start Guide63
Page 64

NMS300 Network Management System Application
8. Click the Monitor Devices tab.
9. (Optional) In the Monitor Devices pop-up window, select one of the following radio buttons:
• All Devices. Monitors all devices.
• Select Devices or Device Groups. The pop-up window adjusts to let you select
devices, device groups, or both to monitor:
10. Click
a. Click the Add Device
b. Either select individual devices and click the click Add Selection
button.
button, or click
the Add All button.
The device or devices are added to the table on the Monitor Devices pop-up
window.
c. Click the Add Group
d. Either select individual devices and click the click Add Selection
button.
button, or click
the Add All button.
The device groups or groups are added to the table on the Monitor Devices pop-up
window.
the Monitor Parameters tab.
Monitor Your Network Quick Start Guide64
Page 65

NMS300 Network Management System Application
11. (Optional) In the Monitor Devices pop-up window, move parameters between the Available
Fields table and Selected Fields table by using the >, <, >>, and << buttons.
a. In the Available Fields table, select a parameter.
b. Click the >
The parameter moves to the Selected Fields table.
button.
c. To move another parameter, repeat
12. Click the Save
Your changes are saved.
button.
Step a and Step b.
Manage device alarms and alerts
The application provides many default alarms, including status alarms, monitor alarms, and
trap alarms. If an upper or lower threshold is exceeded, an alarm configuration generates an
alarm.
The application provides the following four severity levels for alarms:
• Critical (by default, red color indication)
• Major (by default, yellow color indication)
• Minor (by default, blue color indication)
• Info (by default, no color indication)
You can view and manage the current alarms and use optional alarm notification profiles to
specify
if an alarm occurs.
criteria
that enable the application to generate and send a notification email message
For more about how to view and manage the alarm history and how to add custom alarm
configurations that are based on existing configuration monitors, see the NMS300 Network
Management System Application User Manual.
View and manage current alarms
The Current Alarms table shows the active alarms for the entire network. You can
acknowledge alarms, display details about alarms, clear alarms, and export alarms.
To view and manage the current alarms:
1. Open a browser and connect to the application through the static IP address of the
NMS300
For more information, see
A login window opens.
2. Enter your user name and password.
Monitor Your Network Quick Start Guide65
server.
Log in to the application on page 16.
Page 66

NMS300 Network Management System Application
The default administrator user name is admin and the default administrator password is
also admin.
3. Click the Sign In button.
The Network Summary page displays.
4. Select ALARMS > CURRENT
ALARMS.
5. To add columns to or remove them from the Current Alarms table, right-click the table
heading anywhere, and specify the columns by selecting the corresponding check boxes.
You can choose from the following columns: Acknowledged, Alarm Name, Device Name,
Alarm Source, Severity
, Alarm Time, Occurrence Counter, Alarm Type, Device IP,
Acknowledge By, Acknowledge Time, and Notification OID.
6. To filter the alarm entries that are listed, click the Show Filter
button.
You can filter the alarm entries by criteria such as time range, device name, device IP
address, alarm name, severity level, and acknowledgment. By default, the alarm entries
are filtered to display today’s entries.
To hide the filter
, click the Hide Filter button.
7. Take one of the following actions:
• View details for an alarm:
a. Select the alarm.
b. Click the Detail
Monitor Your Network Quick Start Guide66
button.
Page 67

NMS300 Network Management System Application
c. To close the Alarm Detail pop-up window, click the Close button.
• Acknowledge an alarm:
a. Select the alarm.
b. Click the Acknowledge
Acknowledging an alarm means that you take ownership of the issue.
• Clear an alarm:
button.
a. Select
b. Click the Clear
Clearing an alarm means that the fault that the alarm indicates no longer exists.
• Acknowledge a batch of alarms:
a. Select
b. From the More
• Clear a batch of alarms:
a. Select multiple alarms.
b. From the More
• Export the entire Current Alarms table to an Excel spreadsheet:
a. From the More
b. To save the alarms on your computer, follow the directions of your browser.
• Export the entire Current Alarms table to a PDF:
a. From the More
b. To save the alarms on your computer, follow the directions of your browser.
the alarm.
button.
multiple alarms.
menu, select Batch Acknowledge.
menu, select Batch Clear.
menu, select Export to Excel.
menu, select Export to PDF.
Add an alarm notification profile
By default, the application does not include any alarm notification profiles. To be notified if an
alarm occurs, you need to add an alarm notification profile.
Before the application can generate email and SMS messages, you must provide email
server settings and SMS server settings. For more information, see
server for alerts and alarm notifications on page 23 and Configure the SMS server for alerts
and alarm notifications on page 27.
To add an alarm notification profile:
1. Open a browser and connect to the application through the static IP address of the
NMS300
For more information, see
A login window opens.
2. Enter your user name and password.
Monitor Your Network Quick Start Guide67
server.
Log in to the application on page 16.
Configure the email
Page 68

NMS300 Network Management System Application
The default administrator user name is admin and the default administrator password is
also admin.
3. Click the Sign In button.
The Network Summary page displays.
4. Select ALARMS > NOTIFICA
5. Click the Add button.
TION PROFILES.
6. In the Basic Information section, specify the following information:
• Profile Name. Enter the name for the profile.
• Description. Enter the description for the profile.
• Device Groups. Select whether to apply the profile to all device groups or to a
particular device group.
• Enable. Select whether to enable the alarm notification profile.
Monitor Your Network Quick Start Guide68
Page 69

NMS300 Network Management System Application
7. In the Select Alarm section, select one of the following radio buttons:
• Select Alarms by Severity. Select the
alarms by severity by selecting a severity level
from the menu.
• Select one or more Alarms. The appearance of the pop-up window changes,
enabling you to add alarms:
a. Click the Add
b. Select the alarms that you want to include in the alarm notification profile.
c. Click the Add Selection
To add all alarms, click the Add All button.
The alarms are added to the
8. Click the Trigger
button.
button.
Add Alarm Notification page.
tab.
Monitor Your Network Quick Start Guide69
Page 70

NMS300 Network Management System Application
9. Specify the following information:
• Alarm Generation Time. Select one of the following radio buttons:
- All Day. The alarm notification applies to alarms that occur in any time of the day.
- Time Frame. From
the menus, select a time frame. The alarm notification applies
only to alarms that occur in the specified time frame.
• Trigger Action. Select one or both check boxes:
- E-mail To. Enter the email address to send the notification to if the alarm
notification condition is triggered.
- SMS To. Enter the telephone number to send the notification to if the alarm
notification condition is triggered.
Note: The SMS
notification option is supported for a particular SMS gateway
in the People's Republic of China only. For more information, see
Configure the SMS server for alerts and alarm notifications on
page 27.
10. Click the Save
button.
The Add Alarm Notification pop-up window closes. The alarm profile notification displays
in the Alarm Notification table.
Monitor Your Network Quick Start Guide70
Page 71

5
5Manage Configurations and Firmware
Keep your device firmware current
You can back up and restore device configurations. You can also upgrade device firmware.
This chapter covers the following topics:
•
Add a backup profile and execute a backup job
• Restore the configuration of a single device
• Upgrade firmware for one or more devices
Note: For more information about the topics that are described in this
chapter, see the NMS300 Network Management System Application
User Manual.
71
Page 72

NMS300 Network Management System Application
Add a backup profile and execute a backup job
A backup profile defines the devices that are included in a backup job, and as an option, the
schedule with which the backup job occurs. For information about scheduling a backup job,
see the NMS300 Network Management System Application User Manual.
You must create a backup profile before you can back up the configuration of one or more
devices. After you executed a backup job, you can use the backup file to restore device
configurations for the devices on your network. For more inform
configuration of a single device on page 75.
To a single backup profile, you can add devices, device groups, or both.
To add a backup profile and execute a backup job:
1. Open a browser and connect to the application through the static IP address of the
NMS300 server
.
ation, see
Restore the
For more information, see
A login window opens.
2. Enter your user name and password.
The default administrator user name is admin
also admin.
3. Click the Sign In
The Network Summary page displays.
4. Select CONFIG > BACKUP.
button.
Log in to the application on page 16.
and the default administrator password is
The Backup page displays the existing backup profiles.
5. To add columns to or remove them from the Backup table,
anywhere, and specify the columns by selecting the corresponding check boxes.
Manage Configurations and Firmware Quick Start Guide72
right-click the table heading
Page 73

NMS300 Network Management System Application
You can choose from the following columns: Name, Scheduled, Recurrent Type, Last
Execution Time, Last Execution Status, Next Execution Time, Description, Created By,
and Created Time.
Click the Add Profile button.
6. Enter or modify the following information:
• General Info. Enter a name and description for the new profile.
• Backup File Setting. Enter a file name and version for the backup file.
• Backup Result Notification. To enable the application to send an email message
with the backup results, select the
7. Click the Select Devices
tab.
E-mail To check box and enter an email address.
Manage Configurations and Firmware Quick Start Guide73
Page 74

NMS300 Network Management System Application
8. Add devices, device groups, or both:
a. Click the Add Device button.
b. Select devices to add and click the Add Selection button.
To add all the devices in the table, click the Add All button.
c. Click the Add Group
button.
d. Select device groups to add and click the Add Selection button.
To add all the device groups in the table, click the Add All button.
The selected devices, groups, or both, display in the Select
Target Network Devices or
Groups table.
9. Click the Save button.
The new or modified backup profile is saved and displays on the
Backup page.
10. Click the Execute button.
Y
our backup profile is executed immediately.
Manage Configurations and Firmware Quick Start Guide74
Page 75

NMS300 Network Management System Application
A pop-up window similar to the following opens.
The Status field displays the progress of the backup job. After the job completes
successfully, the Status field displays Succeeded.
11. Click the Close button.
The pop-up window closes.
Restore the configuration of a single device
You can restore the configurations of the devices that the application manages on your
network, as follows:
• Single device. You can restore the configuration of a single device on your network. This
procedure is described in this section.
• Several identical devices. You can use the configuration of one of the devices on your
network to create a configuration template for several identica
For more information, see the NMS300 Network Management System Application User
Manual.
The Restore table (which you access by selecting CONFIG > RESTORE) displays the
backup configuration files that the application adds after it backed up a configuration.
l devices on your network.
The application saves backup configuration files for the data r
information, see the NMS300 Network Management System Application User Manual.
If the configuration file that you need does not display in the Restore table, you can import the
file into the application. For more information, see the NMS300 Network Management
System Application User Manual.
Manage Configurations and Firmware Quick Start Guide75
etention period. For more
Page 76

NMS300 Network Management System Application
CAUTION:
When you restore the configuration of a device, you must provide the
correct configuration file. Make sure that you select both the correct device
type and correct device model for the configuration file that you upload to
the application. If you provide the wrong configuration file, the application
pushes the incorrect configuration file when it executes the configuration
restore job and you can damage the device.
To restore a configuration to a single device:
1. Open
NMS300 server
For more information, see
a browser and connect to the application through the static IP address of the
.
Log in to the application on page 16.
A login window opens.
2. Enter your user name and password.
The default administrator user name is admin
also admin.
3. Click the Sign In
button.
The Network Summary page displays.
4. Select CONFIG > REST
ORE.
and the default administrator password is
5. To add columns to or remove them from the Restore table, right-click the table heading
anywhere, and specify the columns by selecting the corresponding check boxes.
You can choose from the following columns: File Name, Device Name, File Type, Create
T
ime, Device Type, Size (KB), Promoted, Description, Device IP, Device Model, Version,
Vendor, and Created By.
6. To filter the configuration files that are listed, click the Show Filter
button.
You can filter the configuration files by criteria such as device type, device model, device
name, and device IP address.
To hide the filter, click the Hide Filter button.
Manage Configurations and Firmware Quick Start Guide76
Page 77

NMS300 Network Management System Application
7. Select the configuration file.
8. Click the Restore Configuration
button.
9. Click the Add Device button.
10. Select the device.
11. Click the Add Selection
button.
Manage Configurations and Firmware Quick Start Guide77
Page 78

NMS300 Network Management System Application
The Select Devices pop-up window closes and the selected device is listed on the
Restore Configuration pop-up window.
CAUTION:
Make sure that you select the correct device. Selecting the wrong device
for the selected configuration file can damage the device.
12. Specify
whether to
restore the configuration file immediately or later by clicking one of the
following buttons:
• Execute. Restores the configuration file immediately
When the job completes, a pop-up window similar to the following opens.
.
Manage Configurations and Firmware Quick Start Guide78
Page 79

NMS300 Network Management System Application
• Schedule. Lets you set up a schedule to restore the configuration file later.
A pop-up window similar to the following opens.
a. Specify the time that you want the procedure to start.
b. Click the Submit
The restore procedure is executed once at the specified time.
button.
Upgrade firmware for one or more devices
NETGEAR posts the latest firmware for each NETGEAR device on netgear.com/support/.
We recommend that you visit this site regularly to see if new firmware is available.
CAUTION:
When you update the firmware of a device, you must provide the correct
firmware file. Make sure that you select both the correct device type and
correct device model for the firmware file that you upload to the
application. If you provide the wrong firmware file, the application pushes
out the incorrect firmware file while it executes the firmware upgrade and
you can damage the device.
CAUTION:
When you update the firmware of stacked switches, make sure that all of
the switches in the stack support the firmware that you select to update on
the stack master.
The following sections describe the tasks that are related to firmware upgrades:
•
Import a Firmware File
• Execute or schedule a firmware upgrade
Manage Configurations and Firmware Quick Start Guide79
Page 80

NMS300 Network Management System Application
Import a Firmware File
After you download device firmware (an image) from the NETGEAR website at
netgear.com/support/ to your computer, you can load the firmware file onto the NMS300
server.
If you want to use an MD5 file for error checking during the import process, first use an MD5
tool to generate an MD5 file that is based on the firmware file that you want to import.
To load a firmware file onto the NMS300 server:
1. Open a browser and connect to the application through the static IP address of the
NMS300 server
.
For more information, see
A login window opens.
2. Enter your user name and password.
The default administrator user name is admin
also admin.
3. Click the Sign In
The Network Summary page displays.
4. Select CONFIG > IMAGE
button.
Log in to the application on page 16.
MANAGEMENT.
and the default administrator password is
Manage Configurations and Firmware Quick Start Guide80
Page 81

NMS300 Network Management System Application
5. Click the Load Image button.
6. Specify the following information:
• Select Your File. Click the Select button.
To select the firmware from your computer, follow the directions of your browser.
• Enable MD5 Check
. To enable file validation with the Message Digest 5 algorithm
select this check box and click the Select button.
To select the MD5 file from your computer, follow the directions of your browser.
• File Name. Enter the name of the firmware file.
• Vendor. Select the vendor of the device.
• Device Type. Select the device type.
• Device Model. Select the device model.
• Version. Enter the version of the firmware file.
• Description. Enter a description for the firmware file.
7. Click
the Submit
button.
The firmware file is transferred from your computer to the NMS300 server.
The imported firmware file is saved for the data retention period. For more information,
see the
NMS300 Network Management System Application User Manual.
,
Manage Configurations and Firmware Quick Start Guide81
Page 82

NMS300 Network Management System Application
Execute or schedule a firmware upgrade
After you import a firmware file into the NMS300 server (see Import a Firmware File on
page 80), you can execute a firmware upgrade immediately or schedule the application to
execute a firmware upgrade later.
To execute or schedule a firmware upgrade:
1. Open a browser and connect to the application through the static IP address of the
NMS300 server
.
For more information, see
A login window opens.
2. Enter your user name and password.
The default administrator user name is admin
also admin.
3. Click the Sign In
The Network Summary page displays.
4. Select CONFIG > IMAGE
button.
Log in to the application on page 16.
MANAGEMENT.
and the default administrator password is
5. To add columns to or remove them from the Image Management table, right-click the table
heading anywhere, and specify the columns by selecting the corresponding check boxes.
You can choose from the following columns: File Name, Create Time, Device Type,
V
ersion, Created By, Vendor, Device Model, Size (MB), and Description.
6. To filter the firmware files that are listed, click the Show Filter button.
You can filter the firmware files by criteria such as time range, device type,
and file name.
To hide the filter, click the Hide Filter button.
7. Select the firmware file.
Manage Configurations and Firmware Quick Start Guide82
device model,
Page 83

NMS300 Network Management System Application
8. Click the Upgrade Firmware button.
9. Select the target network devices or groups:
CAUTION:
Make sure that you select the correct devices or device groups. Selecting
the wrong devices or device groups for the selected firmware file can
damage the devices.
o specify individual devices:
• T
a. Click the Add Device
button.
b. Select devices and click the Add Selection button.
To add all devices, click the Add All button.
Manage Configurations and Firmware Quick Start Guide83
Page 84

NMS300 Network Management System Application
The Select Devices pop-up window closes and the selected device or devices are
listed on the Upgrade Firmware pop-up window.
• To specify device groups:
a. Click the Add Group
button.
b. Select groups and click the Add Selection button.
To add all groups, click the Add All button.
Manage Configurations and Firmware Quick Start Guide84
Page 85

NMS300 Network Management System Application
The Select Groups pop-up window closes and the selected group or groups are
listed on the Upgrade Firmware pop-up window.
10. Specify whether to execute the firmware upgrade immediately or later by clicking one of the
following buttons:
• Execute. Upgrades the firmware immediately
.
When the job completes, a Result pop-up window similar to the following opens.
Manage Configurations and Firmware Quick Start Guide85
Page 86

NMS300 Network Management System Application
• Schedule. Lets you set up a schedule to upgrade the firmware later.
A pop-up window similar to the following opens.
a. Specify the time that you want the upgrade to occur.
b. Click the Submit button.
The upgrade procedure is executed once at the specified time.
Manage Configurations and Firmware Quick Start Guide86
 Loading...