

Page 1
User Manual
NMS300 Network Management System Application
User Manual
March 2020
202-11289-07
NETGEAR, Inc.
350 East Plumeria Drive
San Jose, CA 95134, USA
Page 2

NMS300 Network Management System Application
Support and Community
Visit netgear.com/support to get your questions answered and access the latest downloads.
You can also check out our NETGEAR Community for helpful advice at
community.netgear.com.
Regulatory and Legal
Si ce produit est vendu au Canada, vous pouvez accéder à ce document en français canadien à
https://www.netgear.com/support/download/.
(If this product is sold in Canada, you can access this document in Canadian French at
https://www.netgear.com/support/download/.)
For regulatory compliance information including the EU Declaration of Conformity, visit
https://www.netgear.com/about/regulatory/.
See the regulatory compliance document before connecting the power supply.
For NETGEAR's Privacy Policy, visit
By using this device, you are agreeing to NETGEAR's Terms and Conditions at
https://www.netgear.com/about/terms-and-conditions. If you do not agree, return the device to your place of
purchase within your return period.
https://www.netgear.com/about/privacy-policy.
Trademarks
© NETGEAR, Inc., NETGEAR, and the NETGEAR Logo are trademarks of NETGEAR, Inc. Any non-NETGEAR
trademarks are used for reference purposes only.
Revision History
Publication
Part Number
202-11289-07 March 2020 • Updated the
202-11289-06 June 2017 • Updated the
Publish Date Comments
section on this page.
• Added
GS308T and GS310TP
-
- GS324T
GS728TPv2, GS728TPPv2, GS752TPv2, and GS752TPP
-
- MS510TX and MS510TXPP
- XS712Tv2
• Added
M4300-16X, M4300-24XF, and M4300-48XF
-
-
M4300-96X
- M4500-32C and M4500-48XF8C
• Added
• Published the
• Added support for the following smart switches:
-
GS418TPP, GS510TLP
- GS724TPv2
- XS708T and XS716T
support for the following new smart switches:
support for the following new managed switches:
support for existing products that were not yet listed.
Support and Community section and the Regulatory and Legal
, GS324TP, and GS348T
manual in the latest format.
Support section. Added Conformity, and Compliance sections.
, and GS510TPP
User Manual2
Page 3

NMS300 Network Management System Application
202-11289-05 December 2015 • Added support for the following platforms:
- M4200 series managed switches, including the M4200-10MG-POE+.
- M43000 series managed switches, including the M4300-8X8F
M4300-12X12F
M4300-28G-POE+, and M4300-52G-POE+.
- XS728T smart managed switch.
- W
AC720, WAC730, and WND930 wireless access points.
-
ReadyNAS RN716X, RN3130 (all models), RN31200 (all models),
RN31400 (all models), RN31600 (all models), and RN51600 (all models).
• Added
• Added the option to search for the switch to which a host is directly
• Added the option to add and change an alarm configuration for a link on a
• Added the option to back up and restore the system settings. For more
information about the new MIB browser (see
browser on page 64).
connected
page 78).
hierarchical
-
Add an alarm configuration for a link on a hierarchical map on page 204.
-
Change an alarm configuration for a link on a hierarchical map on
page 208.
information,
-
Set up a file server for system backup and restore operations on
page 280.
-
Back up the system settings on page 282.
-
Restore the system settings on page 286.
, M4300-24X24F, M4300-28G, M4300-52G,
(see
Search for the switch to which a host is connected on
map. For more information, see the following sections:
see the following sections:
,
Use the SNMP MIB
202-11289-04 December 2014 • Added support for the following platforms:
-
M6100 managed switch, including blades and supervisors inserted in the
chassis: XCM8944, XCM8944-POE+, XCM8944-uPOE, XCM8948,
XCM8948-POE+, XCM8948-uPOE, XCM8944F, and XCM8924X.
-
S3300 smart switch: S3300-28X, S3300-28X-PoE+, S3300-52X, and
S3300-52X-PoE+.
- FVS336Gv3 firewall.
- WN370 wireless access point.
• Added
• Added the option to enter an email address for notification of file backup
• Added an option to send an SMS message when an alarm is triggered (see
• Added sampled
• Added support for an external file storage server on which you can store
• Added the capacity to support Chinese characters for device names.
the option to display the slot list for an M6100 managed switch (see
View device details and interface details on page 99).
results
(see
Add or modify a backup profile on page 126).
Configure the SMS server for alerts and alarm notifications on page 30 and
Add or modify an alarm notification profile on page 187). However, this
option is supported for a particular SMS gateway in the People's Republic
China only.
flow (sFlow) for managed switches (see
sFlow).
backup
export configuration files to an external file server on page 160).
files (see
Set up an external file server on page 270 and Import and
of
Chapter 8, Manage
User Manual3
Page 4

NMS300 Network Management System Application
202-11289-03 January 2014 • Added support for storage systems.
• Added support for additional firewalls.
• Added support for additional switches and wireless devices.
• Removed devices
• Added
• Added an
Chapter 14, Register Devices.
Index.
that are no longer supported (EOL).
202-11289-02 October 2013 • Revised the
• Added support for wireless devices.
• Added support for the FVS318G firewall.
202-1
1289-01 June 2013 First publication.
structure of the manual entirely.
User Manual4
Page 5

Contents
Chapter 1 Introduction
Chapter 2 Get Started
Network environment concepts . . . . . . . . . . . . . . . . . . . . . . . . . . . . . . . . . . .11
Device groups . . . . . . . . . . . . . . . . . . . . . . . . . . . . . . . . . . . . . . . . . . . . . . . . . .12
Types of users. . . . . . . . . . . . . . . . . . . . . . . . . . . . . . . . . . . . . . . . . . . . . . . . .12
Compatible devices . . . . . . . . . . . . . . . . . . . . . . . . . . . . . . . . . . . . . . . . . . . . . .13
NETGEAR managed switches . . . . . . . . . . . . . . . . . . . . . . . . . . . . . . . . . . .13
NETGEAR smart switches. . . . . . . . . . . . . . . . . . . . . . . . . . . . . . . . . . . . . . .15
NETGEAR firewalls . . . . . . . . . . . . . . . . . . . . . . . . . . . . . . . . . . . . . . . . . . . .16
NETGEAR wireless access points . . . . . . . . . . . . . . . . . . . . . . . . . . . . . . . .16
NETGEAR wireless management systems and controllers. . . . . . . . . . .17
NETGEAR storage systems . . . . . . . . . . . . . . . . . . . . . . . . . . . . . . . . . . . . .17
Prepare the network devices for discovery. . . . . . . . . . . . . . . . . . . . . . . . . . . 18
What to do next. . . . . . . . . . . . . . . . . . . . . . . . . . . . . . . . . . . . . . . . . . . . . . . . . . 19
Log in to the application. . . . . . . . . . . . . . . . . . . . . . . . . . . . . . . . . . . . . . . . . .21
Change your password and account information. . . . . . . . . . . . . . . . . . . . . 23
Change your password . . . . . . . . . . . . . . . . . . . . . . . . . . . . . . . . . . . . . . . .23
Change your account information . . . . . . . . . . . . . . . . . . . . . . . . . . . . . . . . .25
Configure the email server for alerts and alarm notifications . . . . . . . . . . . 26
Configure the general email server settings. . . . . . . . . . . . . . . . . . . . . . .26
Configure email server settings for a gmail account. . . . . . . . . . . . . . . .28
Configure the SMS server for alerts and alarm notifications . . . . . . . . . . . .30
Chapter 3 Discover and Manage Resources
Discovery concepts . . . . . . . . . . . . . . . . . . . . . . . . . . . . . . . . . . . . . . . . . . . . . .34
Use quick discovery to discover devices on your network . . . . . . . . . . . . .35
Use a discovery profile to discover devices on your network . . . . . . . . . . .37
Add or modify a device credential . . . . . . . . . . . . . . . . . . . . . . . . . . . . . . .38
Add or modify a discovery profile . . . . . . . . . . . . . . . . . . . . . . . . . . . . . . .42
Execute a discovery job . . . . . . . . . . . . . . . . . . . . . . . . . . . . . . . . . . . . . . . .45
Schedule or reschedule an existing discovery job . . . . . . . . . . . . . . . . .47
Remove a device credential . . . . . . . . . . . . . . . . . . . . . . . . . . . . . . . . . . . .50
Remove a discovery profile . . . . . . . . . . . . . . . . . . . . . . . . . . . . . . . . . . . . .51
View and manage the wired and wireless devices on your network . . . . . 52
View device information. . . . . . . . . . . . . . . . . . . . . . . . . . . . . . . . . . . . . . . .52
View wireless device information only. . . . . . . . . . . . . . . . . . . . . . . . . . . .53
Modify the name, location information, and contact information. . . . .57
Remove device information. . . . . . . . . . . . . . . . . . . . . . . . . . . . . . . . . . . . .58
5
Page 6

NMS300 Network Management System Application
Synchronize a network device. . . . . . . . . . . . . . . . . . . . . . . . . . . . . . . . . . .59
Log in to a device . . . . . . . . . . . . . . . . . . . . . . . . . . . . . . . . . . . . . . . . . . . . .61
Ping, perform a traceroute, or reboot a device . . . . . . . . . . . . . . . . . . . .62
Use the SNMP MIB browser. . . . . . . . . . . . . . . . . . . . . . . . . . . . . . . . . . . . .64
View and e
Manage device groups . . . . . . . . . . . . . . . . . . . . . . . . . . . . . . . . . . . . . . . . . . . 73
Add or modify a static device group . . . . . . . . . . . . . . . . . . . . . . . . . . . . .73
Add or modify a dynamic device group . . . . . . . . . . . . . . . . . . . . . . . . . .75
Remove a device group . . . . . . . . . . . . . . . . . . . . . . . . . . . . . . . . . . . . . . . .77
Search for the switch to which a host is connected. . . . . . . . . . . . . . . . . . . . 78
xport the Inventory table and Interface List table. . . . . . . . .72
Chapter 4 Monitor Devices and the Network
Monitor the network . . . . . . . . . . . . . . . . . . . . . . . . . . . . . . . . . . . . . . . . . . . . .81
View the default network summary . . . . . . . . . . . . . . . . . . . . . . . . . . . . . .81
Customize the Network Summary Page . . . . . . . . . . . . . . . . . . . . . . . . . .83
Monitor the top 10 widgets for all devices. . . . . . . . . . . . . . . . . . . . . . . . . . . 86
View the default top 10 widgets . . . . . . . . . . . . . . . . . . . . . . . . . . . . . . . . .87
Customize the top 10 page . . . . . . . . . . . . . . . . . . . . . . . . . . . . . . . . . . . . . . .89
View the wireless summary and monitor the
top 10 widgets for wireless devices. . . . . . . . . . . . . . . . . . . . . . . . . . . . . . . . . 93
View the wireless summary and default top 10 wireless widgets . . . . .94
Customize the wireless summary page . . . . . . . . . . . . . . . . . . . . . . . . . . .96
View device details and interface details . . . . . . . . . . . . . . . . . . . . . . . . . . . . 99
Monitor wireless clients and view client details . . . . . . . . . . . . . . . . . . . . . .103
Manage the configuration monitors . . . . . . . . . . . . . . . . . . . . . . . . . . . . . . .106
Configure an individual monitor. . . . . . . . . . . . . . . . . . . . . . . . . . . . . . . 107
Disable a monitor . . . . . . . . . . . . . . . . . . . . . . . . . . . . . . . . . . . . . . . . . . . 109
Reenable a monitor. . . . . . . . . . . . . . . . . . . . . . . . . . . . . . . . . . . . . . . . . . 110
View or modify the polling interval for a monitor . . . . . . . . . . . . . . . . 111
Customize the optional network dashboard . . . . . . . . . . . . . . . . . . . . . . . .112
Create or modify a dashboard view and launch the
dashboard view . . . . . . . . . . . . . . . . . . . . . . . . . . . . . . . . . . . . . . . . . . . . . 112
Remove a dashboard view. . . . . . . . . . . . . . . . . . . . . . . . . . . . . . . . . . . . 116
Customize the network dashboard . . . . . . . . . . . . . . . . . . . . . . . . . . . . 117
View and export audit logs . . . . . . . . . . . . . . . . . . . . . . . . . . . . . . . . . . . . . . .119
View firmware version information. . . . . . . . . . . . . . . . . . . . . . . . . . . . . . . . .120
View the NMS300 server information . . . . . . . . . . . . . . . . . . . . . . . . . . . . . .121
View application notifications . . . . . . . . . . . . . . . . . . . . . . . . . . . . . . . . . . . 123
Chapter 5 Manage Configurations and Firmware
Back up your device configurations . . . . . . . . . . . . . . . . . . . . . . . . . . . . . . 126
Add or modify a backup profile . . . . . . . . . . . . . . . . . . . . . . . . . . . . . . . 126
Execute a backup job . . . . . . . . . . . . . . . . . . . . . . . . . . . . . . . . . . . . . . . . 129
Schedule a backup job. . . . . . . . . . . . . . . . . . . . . . . . . . . . . . . . . . . . . . . 131
View the execution status of a backup job . . . . . . . . . . . . . . . . . . . . . . 134
Remove a backup profile . . . . . . . . . . . . . . . . . . . . . . . . . . . . . . . . . . . . . 135
Restore your device configurations . . . . . . . . . . . . . . . . . . . . . . . . . . . . . . . .136
User Manual6
Page 7

NMS300 Network Management System Application
Restore the configuration of a single device. . . . . . . . . . . . . . . . . . . . . 138
Customize and promote a configuration file . . . . . . . . . . . . . . . . . . . . . . . .141
Promote a configuration file for an FVS318G firewall . . . . . . . . . . . . . 144
Restore the configuration of several identical devices . . . . . . . . . . . . 148
Import a configuration file . . . . . . . . . . . . . . . . . . . . . . . . . . . . . . . . . . . . 153
Export a configuration file . . . . . . . . . . . . . . . . . . . . . . . . . . . . . . . . . . . . 155
Modify a configuration file . . . . . . . . . . . . . . . . . . . . . . . . . . . . . . . . . . . . 156
Remove a configuration file. . . . . . . . . . . . . . . . . . . . . . . . . . . . . . . . . . . 158
Compare two configuration files. . . . . . . . . . . . . . . . . . . . . . . . . . . . . . . 159
Import and export configuration files to an external file server . . . . . . . .160
Upgrade firmware for one or more devices. . . . . . . . . . . . . . . . . . . . . . . . .163
Import a firmware file . . . . . . . . . . . . . . . . . . . . . . . . . . . . . . . . . . . . . . . . 163
Execute or schedule a firmware upgrade. . . . . . . . . . . . . . . . . . . . . . . . . . .165
Modify the file name, version information, and description
for a firmware file. . . . . . . . . . . . . . . . . . . . . . . . . . . . . . . . . . . . . . . . . . . . 169
Export a firmware file . . . . . . . . . . . . . . . . . . . . . . . . . . . . . . . . . . . . . . . . 171
Remove a firmware file . . . . . . . . . . . . . . . . . . . . . . . . . . . . . . . . . . . . . . . 172
Chapter 6 Manage Alarms and Logs
View and manage alarms, triggers, and notification profiles . . . . . . . . . 175
View and manage current alarms . . . . . . . . . . . . . . . . . . . . . . . . . . . . . . 175
View and manage the alarm history . . . . . . . . . . . . . . . . . . . . . . . . . . . . 177
View and manage alarm configurations . . . . . . . . . . . . . . . . . . . . . . . . 179
Add a custom alarm configuration . . . . . . . . . . . . . . . . . . . . . . . . . . . . . 181
Modify an alarm configuration . . . . . . . . . . . . . . . . . . . . . . . . . . . . . . . . 184
View and manage alarm notification profiles . . . . . . . . . . . . . . . . . . . . 185
Add or modify an alarm notification profile . . . . . . . . . . . . . . . . . . . . . 187
Customize alarm colors . . . . . . . . . . . . . . . . . . . . . . . . . . . . . . . . . . . . . . 190
View and manage network event notifications . . . . . . . . . . . . . . . . . . . . . .192
View and manage device traps . . . . . . . . . . . . . . . . . . . . . . . . . . . . . . . . . . 194
View and manage device system logs . . . . . . . . . . . . . . . . . . . . . . . . . . . . 196
Chapter 7 Manage Maps and Topologies
View and manage maps . . . . . . . . . . . . . . . . . . . . . . . . . . . . . . . . . . . . . . . . 199
View a hierarchical map and locate a device . . . . . . . . . . . . . . . . . . . . 199
Manage a hierarchical map . . . . . . . . . . . . . . . . . . . . . . . . . . . . . . . . . . . 202
Add an alarm configuration for a link on a hierarchical map . . . . . . . 204
Change an alarm configuration for a link on a hierarchical map. . . . 208
Add a childmap . . . . . . . . . . . . . . . . . . . . . . . . . . . . . . . . . . . . . . . . . . . . . 211
Add devices to a map. . . . . . . . . . . . . . . . . . . . . . . . . . . . . . . . . . . . . . . . 213
Add a link between devices on a map. . . . . . . . . . . . . . . . . . . . . . . . . . 216
Customize the style of a link on a map. . . . . . . . . . . . . . . . . . . . . . . . . . 218
View and manage network topologies . . . . . . . . . . . . . . . . . . . . . . . . . . . . .221
Add a topology view. . . . . . . . . . . . . . . . . . . . . . . . . . . . . . . . . . . . . . . . . 221
View a network topology and details about a device . . . . . . . . . . . . . 223
Manage a topology view . . . . . . . . . . . . . . . . . . . . . . . . . . . . . . . . . . . . . 226
Add a link between devices on a topology view . . . . . . . . . . . . . . . . . 228
User Manual7
Page 8

NMS300 Network Management System Application
Customize the style of a node and link on a topology view. . . . . . . . 231
Remove a topology view . . . . . . . . . . . . . . . . . . . . . . . . . . . . . . . . . . . . . 234
Chapter 8 Manage sFlow
Set up the sFlow collection server and manage the sFlow settings . . . 237
Manage sFlow sources. . . . . . . . . . . . . . . . . . . . . . . . . . . . . . . . . . . . . . . . . . .238
View and export the results of sFlow monitoring . . . . . . . . . . . . . . . . . . . .240
Chapter 9 Generate and View Reports
Manage report templates. . . . . . . . . . . . . . . . . . . . . . . . . . . . . . . . . . . . . . . 243
Add or modify a report template . . . . . . . . . . . . . . . . . . . . . . . . . . . . . . 243
Remove a report template. . . . . . . . . . . . . . . . . . . . . . . . . . . . . . . . . . . . 247
Generate and schedule reports . . . . . . . . . . . . . . . . . . . . . . . . . . . . . . . . . 249
Generate a one-time report immediately . . . . . . . . . . . . . . . . . . . . . . . 249
Schedule a report . . . . . . . . . . . . . . . . . . . . . . . . . . . . . . . . . . . . . . . . . . . 250
View and remove saved reports . . . . . . . . . . . . . . . . . . . . . . . . . . . . . . . . . . . 253
View a saved report. . . . . . . . . . . . . . . . . . . . . . . . . . . . . . . . . . . . . . . . . . 253
Remove a saved report. . . . . . . . . . . . . . . . . . . . . . . . . . . . . . . . . . . . . . . 254
Chapter 10 Manage Jobs
Schedule jobs. . . . . . . . . . . . . . . . . . . . . . . . . . . . . . . . . . . . . . . . . . . . . . . . . 257
View and manage jobs . . . . . . . . . . . . . . . . . . . . . . . . . . . . . . . . . . . . . . . . . .257
Chapter 11 Manage Users and Security Profiles
Security profile concepts . . . . . . . . . . . . . . . . . . . . . . . . . . . . . . . . . . . . . . . 261
Add a security profile . . . . . . . . . . . . . . . . . . . . . . . . . . . . . . . . . . . . . . . . . . . .261
Modify or remove a security profile. . . . . . . . . . . . . . . . . . . . . . . . . . . . . . . .263
Add a user profile to the user base . . . . . . . . . . . . . . . . . . . . . . . . . . . . . . . .264
Modify or remove a user profile. . . . . . . . . . . . . . . . . . . . . . . . . . . . . . . . . . .266
View and log off online users . . . . . . . . . . . . . . . . . . . . . . . . . . . . . . . . . . . . .267
Chapter 12 Manage Global Settings and Backups
Set up an external file server . . . . . . . . . . . . . . . . . . . . . . . . . . . . . . . . . . . . 270
Set the data retention period . . . . . . . . . . . . . . . . . . . . . . . . . . . . . . . . . . . . .271
Set the inventory polling . . . . . . . . . . . . . . . . . . . . . . . . . . . . . . . . . . . . . . . . .274
Set the idle time-out. . . . . . . . . . . . . . . . . . . . . . . . . . . . . . . . . . . . . . . . . . . . .275
Set the real-time chart . . . . . . . . . . . . . . . . . . . . . . . . . . . . . . . . . . . . . . . . . . .277
Change the auto refresh setting. . . . . . . . . . . . . . . . . . . . . . . . . . . . . . . . . . .278
Set up a file server for system backup and restore operations . . . . . . . . .280
Back up the system settings. . . . . . . . . . . . . . . . . . . . . . . . . . . . . . . . . . . . . 282
Execute a system settings backup job and see the history . . . . . . . . 282
Schedule a system settings backup job. . . . . . . . . . . . . . . . . . . . . . . . . 284
Restore the system settings. . . . . . . . . . . . . . . . . . . . . . . . . . . . . . . . . . . . . . .286
User Manual8
Page 9

NMS300 Network Management System Application
Chapter 13 Manage Licenses
View license information. . . . . . . . . . . . . . . . . . . . . . . . . . . . . . . . . . . . . . . . 289
Register a license . . . . . . . . . . . . . . . . . . . . . . . . . . . . . . . . . . . . . . . . . . . . . . .290
Deregister a license . . . . . . . . . . . . . . . . . . . . . . . . . . . . . . . . . . . . . . . . . . . . .291
Chapter 14 Register Devices
Registration concepts . . . . . . . . . . . . . . . . . . . . . . . . . . . . . . . . . . . . . . . . . . 294
Set up and validate your account profile in the application . . . . . . . . . . .294
Set up your account profile for device registration . . . . . . . . . . . . . . . 294
Validate and retrieve your customer account information . . . . . . . . . 296
Register one or more devices . . . . . . . . . . . . . . . . . . . . . . . . . . . . . . . . . . . 299
Register all devices . . . . . . . . . . . . . . . . . . . . . . . . . . . . . . . . . . . . . . . . . . . . . .301
Resynchronize previously registered devices . . . . . . . . . . . . . . . . . . . . . . 304
Appendix A Technical Specifications
Appendix B Device Details
Switch details. . . . . . . . . . . . . . . . . . . . . . . . . . . . . . . . . . . . . . . . . . . . . . . . . . .309
Firewall details. . . . . . . . . . . . . . . . . . . . . . . . . . . . . . . . . . . . . . . . . . . . . . . . . .310
Standalone AP details . . . . . . . . . . . . . . . . . . . . . . . . . . . . . . . . . . . . . . . . . . .311
Controller-managed AP details . . . . . . . . . . . . . . . . . . . . . . . . . . . . . . . . . . 313
Wireless controller details . . . . . . . . . . . . . . . . . . . . . . . . . . . . . . . . . . . . . . . .314
Wireless management system details . . . . . . . . . . . . . . . . . . . . . . . . . . . . . .315
Storage system details . . . . . . . . . . . . . . . . . . . . . . . . . . . . . . . . . . . . . . . . . . .316
Router details. . . . . . . . . . . . . . . . . . . . . . . . . . . . . . . . . . . . . . . . . . . . . . . . . . .317
Unknown device details. . . . . . . . . . . . . . . . . . . . . . . . . . . . . . . . . . . . . . . . . .317
Interface details. . . . . . . . . . . . . . . . . . . . . . . . . . . . . . . . . . . . . . . . . . . . . . . . .318
Appendix C Index
User Manual9
Page 10

1
1Introduction
Streamline network management tasks
The NETGEAR Network Management System 300 (NMS300) is a centralized and
comprehensive management application that enables you to discover, monitor, configure, and
report on enterprise-class networks with NETGEAR and third-party network devices.
This manual is intended for network administrators.
This chapter covers the following topics:
•
Network environment concepts
• Compatible devices
• Prepare the network devices for discovery
• What to do next
Note: In this manual, the NMS300 application is referred to as the
application. The server on which the application is installed is referred
to as the NMS300 server.
Note: For more information about the topics covered in this manual, visit the
support website at netgear.com/support/.
Note: For more information about this NMS300 release, see the NMS300
Release Notes, which are available on
netgear.com/support/download/.
Note: Firmware updates with new features and bug fixes are made available
from time to time on
products can regularly check the site and download new firmware, or
you can check for and download new firmware manually
features or behavior of your product does not match what is
described in this guide, you might need to update your firmware.
netgear.com/support/download/. Some
. If the
10
Page 11

NMS300 Network Management System Application
Network environment concepts
The application resides on the NMS300 server at a static IP address on the local area
network. The application monitors the NETGEAR and third-party devices on the network.
Local area network
Static IP
address
NMS300
server
Figure 1. The Network Management System 300
Web
browser
NETGEAR
devices
Third-party
devices
Internet
gateway
Internet
Web
browser
You access the application through a web browser. The IP address for a web browser that is
located outside the Internet gateway must be permitted to access the network.
The application supports the following devices:
• NETGEAR devices
For detailed information about the supported NETGEAR devices, including model
numbers, see
Compatible devices on page 13.
• Third-party (non-NETGEAR) devices, including the following:
- Routers
- V
oIP gateways
- Hosts
- V
irtualization servers
• The managed NMS300 server
The application displays whether third-party devices are up or down. If a third-party device
supports SNMP
, the application uses SNMP MIBs to gather and present health and status
information about the device.
Introduction User Manual11
Page 12
NMS300 Network Management System Application
Device groups
To simplify the management of networks with many devices, you can create device groups.
Group devices by vendor, location, device type, device model, and contact. Device groups
are optional.
Device group M
Local area network
Static IP
address
NMS300
server
Figure 2. Device groups
Web
browser
Network
device M1
Network
device N1
Device group N
Network
device Mm
Network
Device Nn
Internet
gateway
Internet
Web
browser
You can create two types of device groups:
• Static device groups. A static
this list manually. For more information, see
group is a fixed list of specific devices. You must configure
Add or modify a static device group on
page 73.
• Dynamic device groups. A dynamic group is a dynamic list of devices that filter
selection criteria
determine. The list changes automatically as devices that meet the filter
criteria are added to and removed from the network. For more information, see
modify a dynamic device group on page 75.
Add or
Types of users
The application includes the following default user security profiles:
• Admin. A user who can perform administration-related functions. An a
authorized to perform all application functions. Only an admin user can modify and delete
the default security profiles, can define new security profiles, and can add or remove user
profiles.
For more information, see
Chapter 11, Manage Users and Security Profiles.
• Operator. A user who can manage the enterprise network functions, but cannot perform
administration-related functions.
•
Observer. A user who can only monitor and view enterprise network functions.
This manual is written for the admin user but also contains inf
ormation that is useful for
operators and observers.
Introduction User Manual12
dmin user is
Page 13

NMS300 Network Management System Application
Compatible devices
This release of the application supports the following features:
• Support for NETGEAR managed and smart switches
• Support for NETGEAR wireless devices
• Support for NETGEAR firewalls
• Support for ReadyDA
• Support for discovery and node status monitoring of third-party devices
Note: Products that reached their end of life (EOL) might not be included in
the following lists.
NETGEAR managed switches
A and ReadyNAS storage devices
T
This release supports the following NETGEAR managed switches:
• GSM5212P
• GSM7212F
• GSM7212P
• GSM7224P
• JGSM7224
• M4100-12G-POE+
• M4100-12GF
• M4100-24G-POE+
• M4100-26-POE+
• M4100-26G
• M4100-26G-POE
• M4100-50-POE
• M4100-50G
• M4100-50G-POE+
• M4100-D10-POE
• M4100-D12G
• M4100-D12G-POE+
• M4200-10MG-POE+
• M4300-8X8F
• M4300-12X12F
Introduction User Manual13
Page 14

NMS300 Network Management System Application
• M4300-16X
• M4300-24XF
• M4300-24X24F
• M4300-28G
• M4300-48XF
• M4300-52G
• M4300-28G-POE+
• M4300-52G-POE+
• M4300-96X
• M4500-32C
• M4500-48XF8C
• M5300-28G
• M5300-28G-POE+
• M5300-28G3
• M5300-28GF
• M5300-52G
• M5300-52G-POE+
• M5300-52G3
• M6100, including blades and supervisors inserted in chassis:
- XCM8944
- XCM8944-POE+
- XCM8944-uPOE
- XCM8948
- XCM8948-POE+
- XCM8948-uPOE
- XCM8944F
- XCM8924X
• M7100 XSM7224
• M7100 XSM7224S
• S3300-28X
• S3300-28X-PoE+
• S3300-52X
• S3300-52X-PoE+
When a model S3300 switch and a model M4300 switch function together
a mixed stacking
in
configuration, the switches can be displayed as “Smart_M4300.” The following applies:
• M4300 software release 6.6.x.x or a later release. For a mixed stacking configuration
only, the application displays a model M4300 switch as “Smart_M4300.” In earlier
Introduction User Manual14
Page 15

NMS300 Network Management System Application
releases and in a mixed stacking configuration, the application displays a model M4300
switch as “M4300,” not as “Smart_M4300.”
• S3300 software release 6.6.4.x or a later release. For a mixed stacking configuration
only, the application displays a model S3300 switch as “Smart_M
releases and in a mixed stacking configuration, the application displays a model S3300
switch as “S3300,” not as “Smart_M4300.”
4300.” In earlier
NETGEAR smart switches
This release supports the following NETGEAR smart switches:
• FS526Tv2
• FS726Tv2
• FS728TLP
• FS728TPv2
• FS728TP-200
• GS108T
• GS110TP
• GS308T
• GS310TP
• GS324T
• GS324TP
• GS348T
• GS418TPP
• GS510TLP
• GS510TP
• GS510TPP
• GS516TP
• GS716T
• GS724T-400
• GS724TPv2
• GS748T
• GS728TPv2
• GS728TPPv2
• GS728TPS
• GS728TS
• GS728TXS
• GS748T
• GS752TPv2
-200
-300
-500
-400
Introduction User Manual15
Page 16

NMS300 Network Management System Application
• GS752TPP
• GS752TPS
• GS752TS
• GS752TXS
• MS510TX
• MS510TXPP
• XS708T
• XS712Tv2
• XS716T
• XS728T
NETGEAR firewalls
This release supports the following NETGEAR firewalls:
• FVS318G
• FVS318N
• FVS336Gv2
• FVS336Gv3
• SRX5308
NETGEAR wireless access points
This release supports the following NETGEAR wireless access points:
• WAC720
• WAC730
• WG103
• WN203
• WN203-200
• WN370
• WND930
• WNAP210
• WNAP320
• WNAP370
• WNDAP350
• WNDAP360
• WNDAP380R
• WNDAP380Rv2
Introduction User Manual16
Page 17

NMS300 Network Management System Application
• WNDAP620
• WNDAP660
NETGEAR wireless management systems and controllers
This release supports the following NETGEAR wireless controllers and wireless
management system:
• WC7520
• WC7600
• WC9500
• WMS5316
NETGEAR storage systems
This release supports the following NETGEAR ReadyDATA and ReadyNAS storage
systems:
• RD5200
• RDD516
• RN102
• RN104
• RN202
• RN204
• RN212
• RN214
• RN312
• RN314
• RN316
• RN422
• RN424
• RN426
• RN516
• RN524X
• RN526X
• RN528X
• RN626X
• RN628X
• RN716X
• RN2120
Introduction User Manual17
Page 18

NMS300 Network Management System Application
• RN3130
• RN3138
• RN3220
• RN4220
• RR2312
• RR2304
• RR3312
• RR4312X/S
• RR4360X/S
Prepare the network devices for discovery
To manage the devices on your network, you must prepare them for the application. By
default, the application lets you manage up to 200 devices. For information about managing
more than 200 devices, contact your NETGEAR sales contact.
To prepare the devices on your network:
1. Upgrade your
To upgrade the firmware, use the local browser user interface (UI) of the device.
Each device must run the latest firmware before the application can
the device. Once you perform this one-time upgrade, the application can centrally
manage future device firmware upgrades.
2. Create the credentials for your devices.
application uses a combination of SNMP, HTTP, and Telnet protocols to
The
the devices on your network.
You must configure the application with the device credentials to authenticate with the
devices over the following protocols:
• Telnet and HTTP protocols. If the devices are not configured with the default
password for the admin user, create two new credentials in the application.
Create one credential for the Telnet protocol and another credential for the HTTP
protocol that contain either the admin user credential or the credential of another user
of the device with administrative privileges.
• SNMP community strings. If the devices are not configured with the default SNMP
community strings, create a credential in the application for the SNMP protocol that
contains the matching community strings.
devices to their latest released firmware.
discover and manage
interact with
For more information, see
Introduction User Manual18
Add or modify a device credential on page 38.
Page 19

NMS300 Network Management System Application
3. Make sure that each device on your network is configured to send SNMPv1 or SNMPv2
traps to the IP address of the NMS300 server.
The application listens for SNMPv1 and SNMPv2 traps.
What to do next
Before you can manage your network, you must perform certain basic configuration tasks
and let the application find the devices that are on your network. These tasks are described
in the following chapters:
Chapter 2, Get Started
•
• Chapter 3, Discover and Manage Resources
Introduction User Manual19
Page 20

2
2Get Started
Log in and perform basic configuration tasks
After you logged in to the application, you can change your password and account information
and configure the email server.
This chapter covers the following topics:
•
Log in to the application
• Change your password and account information
• Configure the email server for alerts and alarm notifications
• Configure the SMS server for alerts and alarm notifications
20
Page 21

NMS300 Network Management System Application
Log in to the application
The application uses a browser server architecture. Administrators and other types of users
can access the application from any supported browser. For more information about installing
the application, see the NMS300 Network Management Quick Start Guide, which is available
netgear.com/support/download/.
at
Before you log in to the application, check the following items:
• Make sure that the application is installed on a server with a static IP address.
• Clear your browser cache before you use the application.
CAUTION:
The application supports multiple concurrent users. We recommend that
different users coordinate their application activities so that modifications
to a page made by one user are not inadvertently changed by another
user.
To select your language and log in to the application:
1. Open
NMS300 server
• T
• To connect to the application from a remote computer, replace localhost with the IP
After you connect to the application, the User Login window opens.
a browser and connect to the application through the static IP address of the
.
o connect to the application from the same NMS300 server on which you installed
the application, enter the URL http://localhost:8080
If you entered a different port number for the NMS300 server during the application
installation, replace 8080 in this URL with the port number that you provided during
installation.
address of the NMS300 server
which 203.0.113.56 is the IP address of the NMS300 server and 8080 is the port
number for the NMS300 server.
. For example, enter http://203.0.113.56:8080, in
.
2. From the Language menu, select your language.
The default language is English. You can also select Chinese.
Get Started User Manual21
Page 22
NMS300 Network Management System Application
3. Enter your user name and password.
When the application is initially installed, the default administrator user name is admin
and the default administrator password is also admin.
You must be an administrator (admin user, that is, a user with a security profile
to Admin) to be able to create user names and passwords for other types of users.
4. Click the Sign In button.
that is set
For more information about the Network Summary page, see Monitor the network on
page 81.
Get Started User Manual22
Page 23

NMS300 Network Management System Application
Change your password and account information
We recommend that you change your password to a more secure password. This
recommendation applies to admin users only because nonadministrative users such as users
with a security profile set to Operator or Observer cannot change their password.
As an admin user, you can also change your account information. Items
include your email address, real name, and telephone number. You cannot change your user
name but you can add a second admin account with a different user name. For more
information, see
Chapter 11, Manage Users and Security Profiles.
that you can change
Change your password
When the application is initially installed, the default administrator user name is admin and
the default administrator password is admin. As an admin user, you can create user names
and passwords for other types of users.
To change your password:
1. Open a browser and connect to the application through the static IP address of the
NMS300
For more information, see
A login window opens.
2. Enter your user name and password.
The default administrator user name is admin and the default administrator password is
also admin.
server.
Log in to the application on page 21.
3. Click the Sign
The Network Summary page displays.
Get Started User Manual23
In button.
Page 24
NMS300 Network Management System Application
4. Select ADMIN > SETTINGS.
5. Under Account Information, click the Change Password link.
6. Enter your old and new passwords.
7. Click the Submit
button.
Your password is updated.
Get Started User Manual24
Page 25

NMS300 Network Management System Application
Change your account information
You can change your general account settings such as your email address and telephone
number.
To change your account information:
1. Open a browser and connect to the application through the static IP address of the
NMS300 server
.
For more information, see
A login window opens.
2. Enter your user name and password.
The default administrator user name is admin and the default administrator password is
also admin.
3. Click the Sign
The Network Summary page displays.
4. Select ADMIN > SETTINGS.
button.
In
Log in to the application on page 21.
Get Started User Manual25
Page 26
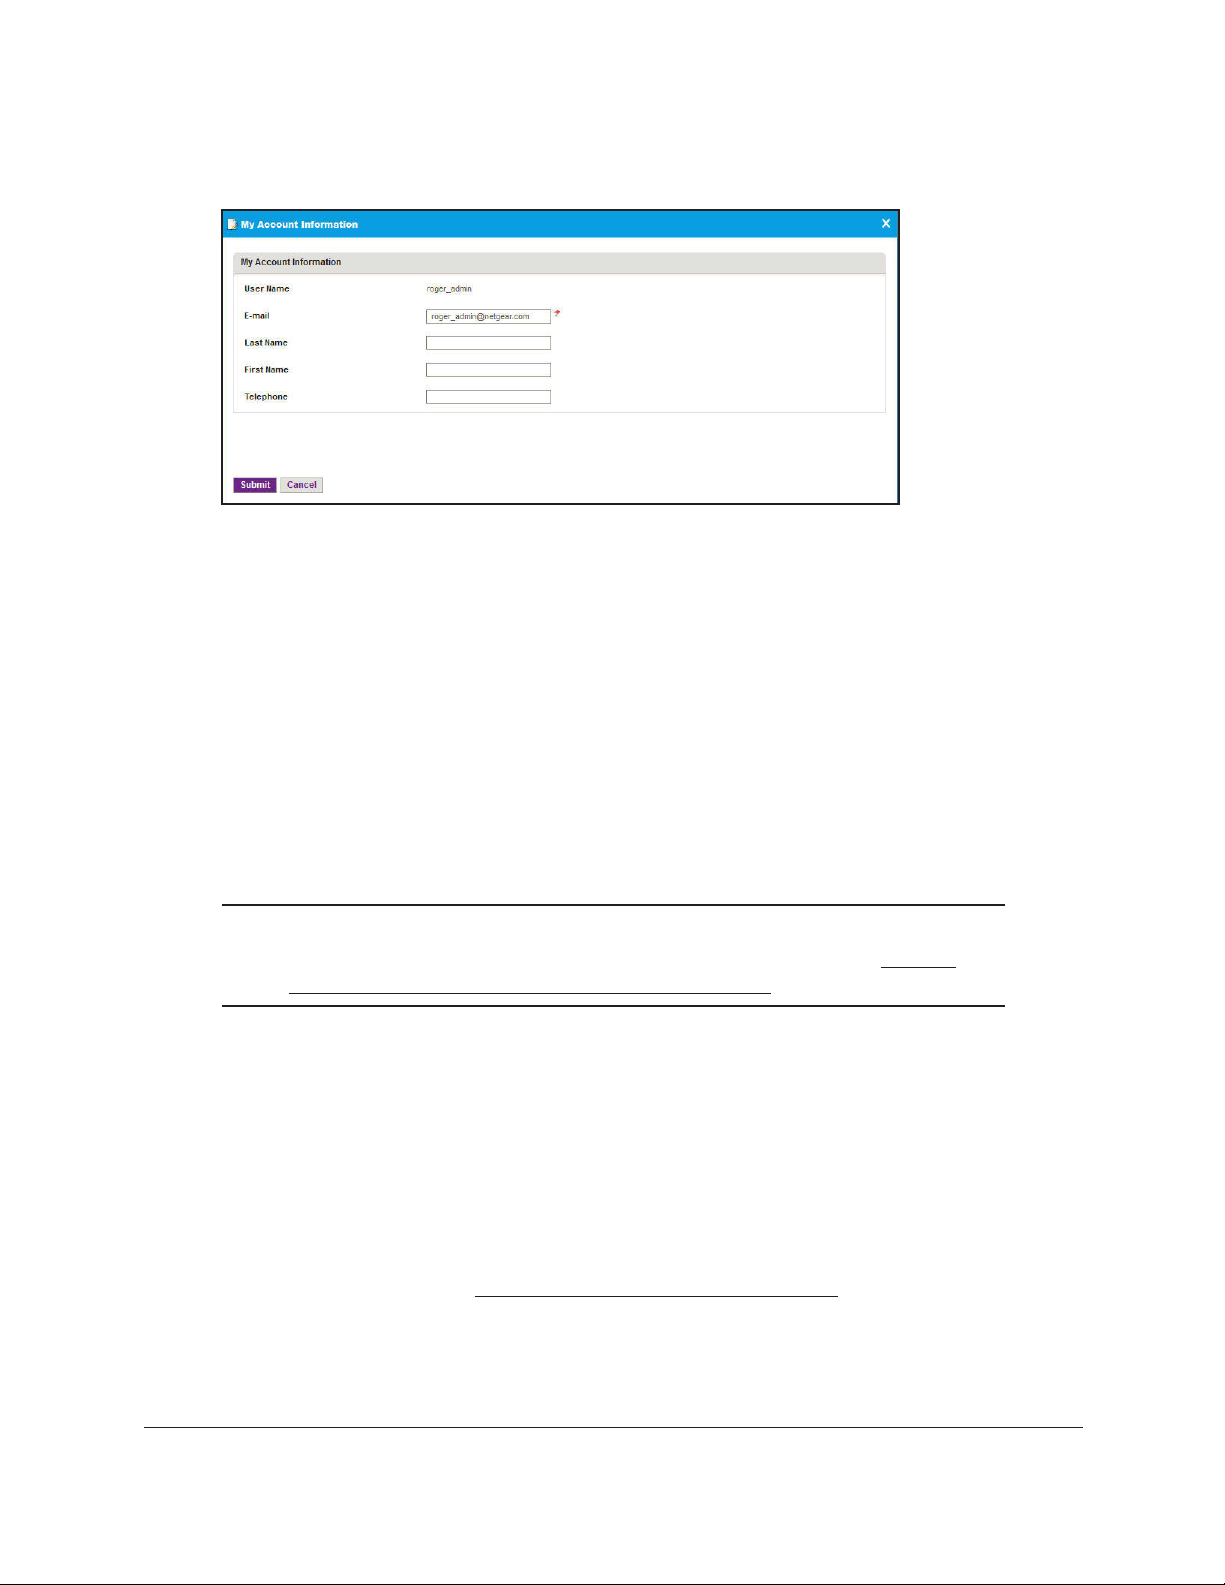
NMS300 Network Management System Application
5. Under Account Information, click the Edit Account link.
6. Modify the information as needed.
7. Click the Submit
Your account information is updated.
button.
Configure the email server for alerts and alarm notifications
Before the application can send email updates and alarm notifications, you must configure
the email server settings. Only an admin user can configure the email server settings.
Note: For information about adding an alarm notification profile with an email
address to which the application can send a notification, see
modify an alarm notification profile on page 187.
Configure the general email server settings
The following procedure describes how to configure the general email server settings.
To configure the email server:
1. Open a browser and connect to the application through the static IP address of the
NMS300 server
.
Add or
For more information, see
A login window opens.
2. Enter your user name and password.
Get Started User Manual26
Log in to the application on page 21.
Page 27
NMS300 Network Management System Application
The default administrator user name is admin and the default administrator password is
also admin.
3. Click the Sign In button.
The Network Summary page displays.
4. Select ADMIN > SETTINGS.
5. Under Getting Started with NMS, click the SMTP Email Settings link.
6. Enter your SMTP configuration settings.
7. If your SMTP server requires authentication, select the Authentication Enabled
Get Started User Manual27
check box.
Page 28

NMS300 Network Management System Application
8. In the User Name field, enter the user name for your email account.
Note: You must
and domain name. For example, username@domain.com. The SMTP
server also uses the entire user name as the address from which email
is sent.
9. In
10. To use a secure email connection, select the Use
11. Click the T
12. Click the Submit
the Password
Port field, enter the port number for the SSL connection.
est button.
Your SMTP configuration settings are verified.
Your changes are saved.
enter the email user name entirely, that is with the at sign (@)
field, enter the password for your email account.
SSL check box, and in the SMTP Server
button.
Configure email server settings for a gmail account
The following procedure describes how to configure the email server for a Gmail account.
To configure the email server for a Gmail account:
1. Open a browser and connect to the application through the static IP address of the
NMS300
server.
For more information, see
A login window opens.
2. Enter your user name and password.
The default administrator user name is
also admin.
3. Click the Sign
The Network Summary page displays.
In button.
Log in to the application on page 21.
admin and the default administrator password is
Get Started User Manual28
Page 29

NMS300 Network Management System Application
4. Select ADMIN > SETTINGS.
5. Under Getting Started with NMS, click the SMTP Email Settings link.
6. Enter the following settings and select the following check boxes:
• In the SMTP Server Host field, enter smtp.gmail.com.
• In the SMTP Server Port field, enter 25.
• Select the Authentication Enabled check box.
• In the User Name field, enter the user name for your Gmail account.
Get Started User Manual29
Page 30

NMS300 Network Management System Application
Note: You must enter the email user name entirely, that is with the at sign (@)
and domain name. For example, username@gmail.com. The SMTP
server also uses the entire user name as the address from which email
is sent.
• In the Password field, enter the password for your Gmail account.
o use a secure email connection, select the Use
7. T
Port field, enter 465.
8. Click the T
Your SMTP configuration settings are verified.
9. Click the Submit
Your changes are saved.
est button.
button.
SSL check box, and in the SMTP Server
Configure the SMS server for alerts and alarm notifications
Note: The SMS server option is supported for a particular SMS gateway in
the People's Republic of China only. No other SMS servers are
supported in this release.
Before the application can send SMS updates and alarm notifications, you
SMS server settings. Only an admin user can configure the SMS server settings.
must configure the
For information about adding an alarm notification profile with an SMS telephone number to
which the application can send a notification, see
on page 187.
To configure the SMS server:
1. Contact NETGEAR
SMS server that is supported.
2. Open a browser and connect to the application through the static IP address of the NMS300
server
.
For more information, see
A login window opens.
3. Enter your user name and password.
The default administrator user name is
also admin.
Get Started User Manual30
support to obtain the corporation ID and password for the Chinese
Log in to the application on page 21.
Add or modify an alarm notification profile
admin and the default administrator password is
Page 31
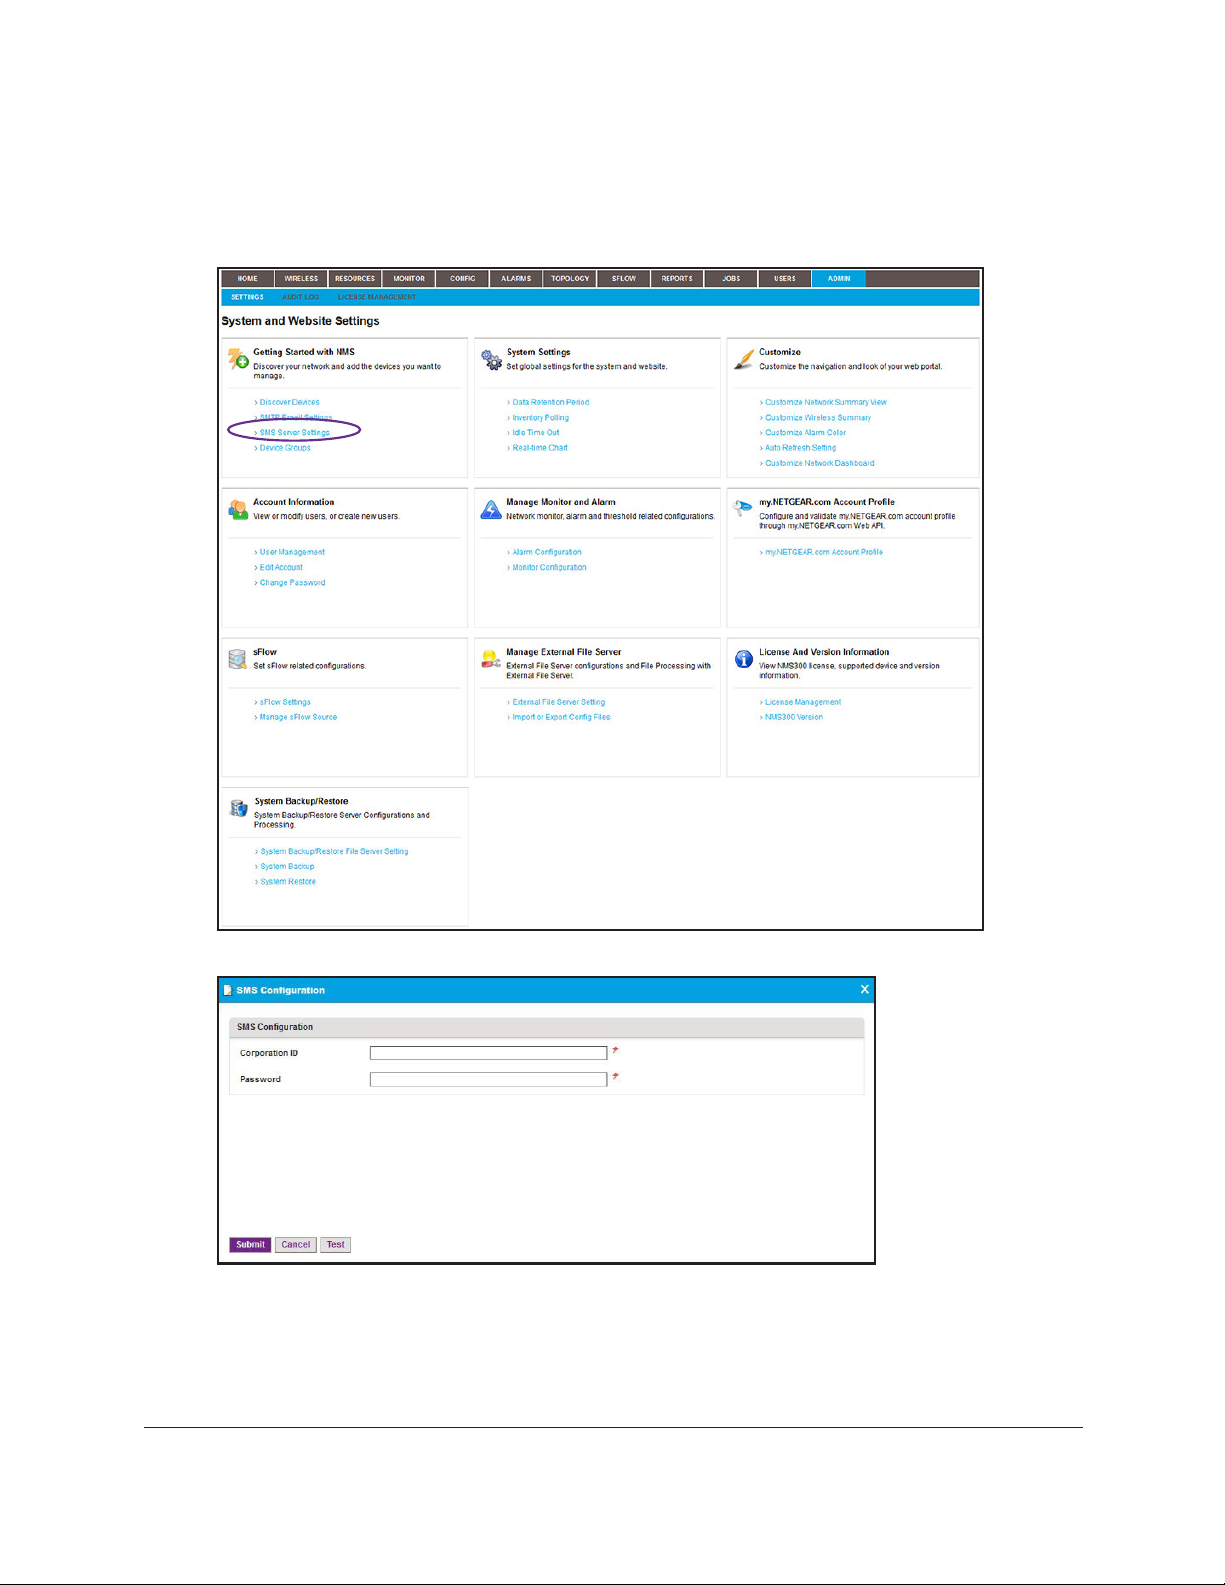
NMS300 Network Management System Application
4. Click the Sign In button.
The Network Summary page displays.
5. Select ADMIN > SETTINGS.
6. Under Getting Started with NMS, click the SMS Server Settings link.
7. Enter the corporation ID.
The corporation ID specifies the SMS gateways that the application must use.
corporation ID that NETGEAR support gave you.
8. Enter the password for accessing the SMS gateway.
Get Started User Manual31
This is the
Page 32

NMS300 Network Management System Application
This is the password that NETGEAR support gave you.
9. Click the T
est button.
Your SMS configuration settings are verified.
10. Click the Submit
button.
Your changes are saved.
Get Started User Manual32
Page 33

3
3Discover and Manage Resources
Find and manage the devices on your network
Before you can manage your network, you must let the application find the devices that are on
your network and perform other setup tasks that could simplify the management of your network.
This chapter covers the following topics:
•
Discovery concepts
• Use quick discovery to discover devices on your network
• Use a discovery profile to discover devices on your network
• View and manage the wired and wireless devices on your network
• Manage device groups
• Search for the switch to which a host is connected
33
Page 34

NMS300 Network Management System Application
Discovery concepts
You can discover devices on your network by using the following methods:
• Quick discovery. Discovers devices without using a discovery profile. This met
quick and easy discovery method but gives you limited control over the discovery
process.
• Regular discovery. Filters the devices on your network through a discovery profile that
you must configure first. This method gives you more control th
method but is a bit more complicated.
With both methods, the application can discover wired devices, wireless devices, NETGEAR
devices, and third-party devices that support standard SNMP MIBs.
The application can discover and monitor NETGEAR firewalls over the WAN. Firewalls can
a static WAN IP address, dynamic WAN IP address, or WAN host name. If a firewall uses
use
a WAN host name, the firewall must also use DNS.
Note: By default, the application lets you discover up to 200 devices. For
information about discovering more than 200 devices, contact your
NETGEAR sales contact.
For wireless access points (APs), the nature of the AP determines whether the application
can discover the AP:
Standalone AP. An AP that is not controlled by another device and that operates in
•
standalone mode. This type of AP is also referred to as a Fat AP. The application can
discover and manage standalone APs just like any other network device that the
application supports.
AP that a NETGEAR WC7520 or WC9500 wireless
• Controller-managed AP.
controller manages. This type of AP is also referred to as a Fit AP. After the application
discovers a wireless controller, it displays the controller-managed APs in the device table.
In this indirect way, the application can discover the controller-managed APs but cannot
manage them. You cannot back up or restore the configuration, upgrade the firmware, or
delete the access points from the application. Controller-managed APs are not subtracted
from the number of devices that the license of the application supports. The license of the
application ignores the controller-managed APs.
An
an the quick discovery
hod is a
Discover and Manage Resources User Manual34
Page 35

NMS300 Network Management System Application
Use quick discovery to discover devices on your network
Quick Discovery is a quick and easy discovery method but gives you limited control over the
discovery process.
To discover the devices on your network:
1. Open a browser and connect to the application through the static IP address of the
NMS300 server
.
For more information, see
A login window opens.
2. Enter your user name and password.
The default administrator user name is admin and the default administrator password is
also admin.
3. Click the Sign
The Network Summary page displays.
4. Select RESOURCES > DISCOVER
5. Click the Quick Discovery button.
button.
In
Log in to the application on page 21.
Y.
Discover and Manage Resources User Manual35
Page 36

NMS300 Network Management System Application
6. From the menu in the upper left on the pop-up window, select one of the following network
types and enter the applicable address information in the fields to the right of the menu:
• IP Range
• Subnet
• Single IP
• IP Address(es)
• Hostname
7. Specify
credentials that pertain to the devices on your network by selecting one of the
the
following types of credentials:
• Default SNMP
• Default HTTP
• Default Telnet
• Default HTTPS
• Default FVS318G HTTPS
Note: For the NETGEAR FVS318N, FVS336Gv2, FVS336Gv3, and
SRX5308 firewalls, use the default SNMP device credentials. For the
NETGEAR FVS318G firewall, use the default FVS381G HTTPS
device credential.
8. If the credential that you need is not listed in the table, do the following:
a. Click the Add button.
The Select Credentials page displays. In addition to the default credentials, the page
displays the device credentials that you added. For more information, see
modify a device credential on page 38.
b. Select one or more credentials and click the Add
Selection button.
To add all credentials, click the Add All button.
Add or
The Select Credentials page closes and the selected credentials
credentials table.
c. Select the credential or credentials that you added.
9. Click the Execute
Discover and Manage Resources User Manual36
button.
are added to the
Page 37

NMS300 Network Management System Application
When the quick discovery process completes, the Quick Discovery pop-up window opens
and displays the results.
Note: If a credential failure occurs, a common reason is that the device login
information changed from its default. When a credential failure occurs,
add or modify the credential and run the discovery job again. For more
information, see
10. Click the Close
The Quick Discovery pop-up window closes.
button.
Add or modify a device credential on page 38.
Use a discovery profile to discover devices on your network
A discovery profile gives you more control over the discovery process than the quick
discovery method but is a bit more complicated. The following sections describe how you can
use a discovery profile to discover devices:
Add or modify a device credential
1.
2. Add or modify a discovery profile
3. Execute a discovery job or Schedule or reschedule an existing discovery job
Discover and Manage Resources User Manual37
Page 38

NMS300 Network Management System Application
Add or modify a device credential
During the discovery process, the application must log in to devices to obtain the information
to discover and manage the devices. A device credential includes the user name, password,
and SNMP community string that allows the application to log in to the device. The user
name and password are the same user information that you use to log in to the device to
perform system configuration. The application provides default device credentials for
discovery over HTTP, HTTPS, SNMP, and Telnet, and for discovery of a NETGEAR
FVS318G firewall over HTTPS. (The NETGEAR FVS318N, FVS336Gv2, FVS336Gv3, and
SRX5308 firewalls use an SNMP device credential.)
You must configure the correct device credentials for any device that you want the
application to manage. If a device is not configured with its default credentials, do the
following:
• If a device is not configured with its default admin user password, create two new
elnet and another for the HTTP protocol. These
credentials in the application, one for
credentials contain either the admin user credential or the credential of another user with
administrative privileges.
• If a
device is not configured with its default SNMP community strings, create
in the application for the SNMP protocol that contains the matching community strings.
T
a credential
To add a device credential or modify an existing device credential:
1. Open a browser and connect to the application through the static IP address of the
NMS300
For more information, see
A login window opens.
2. Enter your user name and password.
The default administrator user name is
also admin.
3. Click the Sign
The Network Summary page displays.
server.
Log in to the application on page 21.
admin and the default administrator password is
In button.
Discover and Manage Resources User Manual38
Page 39

NMS300 Network Management System Application
4. Select RESOURCES > DEVICE CREDENTIALS.
5. Add a device credential or modify an existing device credential:
• To add a device credential, click the Add button.
• To modify an existing device credential:
a. From the
Device Credentials table, select a device credential.
b. Click the Edit button.
For a new device credential, the
Add Credential pop-up window o
device credential, the Edit Credential pop-up window opens.
pens. For an existing
6. In the Credential General Info section, enter or modify the name for the credential.
7. From the Protocol
menu, select one of the following protocols:
• SNMP V1
• SNMP V2C
• SNMP V3
• Telnet
• SSH
Discover and Manage Resources User Manual39
Page 40

NMS300 Network Management System Application
• HTTP
• HTTPS
Depending on your protocol selection, the pop-up window might adjust to display other
fields and menus.
8. In
the Authentication Info section, enter or modify the information for the selected protocol.
Note: If you are setting up a Telnet device credential for a managed switch
for which the
privileged EXEC password was changed (on the Enable
Password Configuration page of the switch local browser UI, enter the
privileged EXEC password in the Enable Password field. The Enable
Password field displays when you select Telnet from the Protocol
menu.
9. Click
the Management Interface
tab.
10. Enter or modify the port number, time-out period in seconds, and the number of retries.
Discover and Manage Resources User Manual40
Page 41

NMS300 Network Management System Application
11. Click the Associated Devices tab.
12. Click the Add button.
13. Select one or more devices and click the Add Selection button.
To add all devices to the device credential, click the Add All button.
The Select Devices pop-up window closes and the selected device
Associated Devices table.
14. If you are modifying an existing device credential, to remove devices:
a. Select the devices.
b. Click
the Remove
button.
s are added to the
The devices are removed from the Associated Devices table.
15. Click the Save button.
Discover and Manage Resources User Manual41
Page 42

NMS300 Network Management System Application
The page closes and the new or modified device credential displays in the Device
Credentials table.
Add or modify a discovery profile
A discovery profile filters the network device information that the application can detect. The
application can discover devices through an IP address range, IP subnet address, a single IP
address, a list of IP addresses, or device host name.
To add a discovery profile or modify an existing discovery profile:
1. Open a browser and connect to the application through the static IP address of the
NMS300 server
.
For more information, see
A login window opens.
2. Enter your user name and password.
The default administrator user name is admin
also admin.
3. Click the Sign In
The Network Summary page displays.
4. Select RESOURCES > DISCOVER
button.
Log in to the application on page 21.
Y.
and the default administrator password is
The page displays the existing discovery profiles.
5. Add a discovery profile
• To add a discovery profile, click the Add Profile button.
• To modify an existing discovery profile:
a. From the
b. Click the Edit
Discover and Manage Resources User Manual42
Network Discovery table, select a discovery profile.
or modify an existing discovery profile:
Profile button.
Page 43

NMS300 Network Management System Application
For a new discovery profile, the Add Profile pop-up window opens. For an existing
discovery profile, the Edit Profile pop-up window opens.
6. Enter or modify the information in the following sections:
• General Info. Enter the name and description of the profile.
• Discovery Options:
Resolve Host Names. To
-
attempt to resolve a host name to an IP address, select
the Resolve Host Names (Attempt to resolve host name to IP address) check
box.
- ICMP Ping Devices. To monitor the node status of third-party non-SNMP
devices, select the
ICMP Ping Devices (Ping devices before authentication)
check box.
• Discovery Filters. Select the discovery filters you want by vendor, location, and
device type.
•
Discovery Includes. Select whether to include ICMP-only devices or unclassified
devices.
• LLDP Option.
To monitor the node status of third-party non-SNMP devices, s
the Enable LLDP Link Discovery (Automatically discover LLDP links) check box.
elect
Discover and Manage Resources User Manual43
Page 44

NMS300 Network Management System Application
7. Click the Network tab.
8. From the menu in the upper left of the pop-up window, select one of the following network
types and enter the applicable address information in the fields to the right of the menu:
• IP Range
• Subnet
• Single IP
• IP Address(es)
• Hostname
9. Specify
or modify
the credentials that pertain to the devices on your network by selecting
one of the following types of credentials:
• Default SNMP
• Default HTTP
• Default Telnet
• Default HTTPS
• Default FVS318G HTTPS
10. If
the credential that you need is not listed in the table, do the following:
Discover and Manage Resources User Manual44
Page 45

NMS300 Network Management System Application
a. Click the Add button.
In addition to the default credentials, the pop-up window displays the device
credentials that you added. For more information, see
credential on page 38.
Add or modify a device
b. Select one or more credentials and click the Add Selection
To add all credentials, click the Add All button.
The Select Credentials pop-up window closes and the credentials
Select Credentials table on the Network pop-up window (see the figure that is shown
Step 7).
in
c. In the Network pop-up window, select the credential or credentials that you added.
11. Click the Save
The pop-up window closes and the new or modified discovery profile displays in the
Network Discovery table.
button.
button.
are added to the
Execute a discovery job
You can execute a one-time discovery job immediately.
To execute a discovery job:
1. Open a browser and connect to the application through the static IP address of the
NMS300 server
For more information, see
.
Log in to the application on page 21.
A login window opens.
2. Enter your user name and password.
The default administrator user name is admin and the default administrator password is
also admin.
3. Click the Sign
The Network Summary page displays.
Discover and Manage Resources User Manual45
button.
In
Page 46

NMS300 Network Management System Application
4. Select RESOURCES > DISCOVERY.
5. Select the discovery profile.
6. From the More
menu, select Execute.
When discovery completes, the Execution Results pop-up window opens and displays the
discovered devices that the application adds to its inventory database.
7. Click the Close button.
The pop-up window closes.
Note: Output files from completed resource discovery jobs are saved for the
data retention period. For more information, see
retention period on page 271.
Discover and Manage Resources User Manual46
Set the data
Page 47

NMS300 Network Management System Application
Schedule or reschedule an existing discovery job
You can schedule or reschedule an existing discovery job to occur later. This discovery job
can be one time or recurrent.
To schedule or reschedule an existing discovery job for future execution:
1. Open a browser and connect to the application through the static IP address of the
NMS300 server
.
For more information, see
A login window opens.
2. Enter your user name and password.
The default administrator user name is admin and the default administrator password is
also admin.
3. Click the Sign
The Network Summary page displays.
4. Select RESOURCES > DISCOVER
button.
In
Log in to the application on page 21.
Y.
The page lists the existing discovery profiles in the application.
5. Select the discovery profile.
Discover and Manage Resources User Manual47
Page 48

NMS300 Network Management System Application
6. Click the Edit Profile button.
7. Take one of the following actions:
• To add a new schedule, click the Add Schedule button.
• To modify an existing schedule, click the Edit Schedule button.
8. From the Enable menu, select Yes.
Discover and Manage Resources User Manual48
Page 49

NMS300 Network Management System Application
The pop-up window adjusts to display more fields.
9. Specify whether the application executes the discovery job once or on a recurring basis by
selecting one of the following options from the Execution Type menu and entering or
modifying the corresponding information:
• One time scheduled.
This is the default selection.
In the Starting On
• Recurrent. The pop-up window
field, enter or modify the date and time.
adjusts to display more fields.
Enter or modify the following information:
a. In the Starting On
field, enter or modify the date and time.
b. From the Recurrence Type menu, select how the schedule recurs and complete
the corresponding
field or select the corresponding check boxes.
Discover and Manage Resources User Manual49
Page 50

NMS300 Network Management System Application
c. Select the End Time radio button and enter or modify the date and time in the
corresponding field, or leave the Never radio button selected, which is the
default setting.
10. Click the Submit
The Schedule pop-up window closes. The discovery job schedule becomes part of the
discovery profile.
button.
11. In
the Edit Profile pop-up window, click the Save button.
Your discovery job is executed according to the schedule that you set.
Note: Output files from completed resource discovery jobs are saved for the
data retention period. For more information, see
retention period on page 271.
Set the data
Remove a device credential
You can remove a device credential that you no longer need.
To remove a device credential:
1. Open a browser and connect to the application through the static IP address of the
NMS300 server
For more information, see
A login window opens.
2. Enter your user name and password.
.
Log in to the application on page 21.
The default administrator user name is admin
also admin.
3. Click the Sign In
The Network Summary page displays.
4. Select RESOURCES > DEVICE
Discover and Manage Resources User Manual50
button.
CREDENTIALS.
and the default administrator password is
Page 51

NMS300 Network Management System Application
5. Select the device credential.
6. Click the Delete
A confirmation pop-up window opens.
button.
7. Click the Yes
The device credential is removed from the Device Credentials table and deleted.
button.
Remove a discovery profile
If you delete a discovery job from the Jobs table, the application deletes the discovery profile
for the job automatically. For more information, see
You can also remove a discovery profile manually.
To remove a discovery profile manually:
1. Open a browser and connect to the application through the static IP address of the
NMS300 server
For more information, see
A login window opens.
2. Enter your user name and password.
The default administrator user name is admin and the default administrator password is
also admin.
3. Click the Sign
.
button.
In
Log in to the application on page 21.
View and manage jobs on page 257.
The Network Summary page displays.
4. Select RESOURCES > DISCOVER
5. Select the discovery profile.
6. From the More
A confirmation pop-up window opens.
7. Click the Yes
The discovery profile is removed from the Network Discovery table and deleted.
menu, select Delete.
button.
Y.
Discover and Manage Resources User Manual51
Page 52

NMS300 Network Management System Application
View and manage the wired and wireless devices on your network
After the application discovers the wired and wireless devices on your network and adds
them to the inventory database, you can view and test the devices. The following sections
describe the tasks that you can perform:
View device information
•
• View wireless device information only
• Modify the name, location information, and contact information
• Remove device information
• Synchronize a network device
• Log in to a device
• Ping, perform a traceroute, or reboot a device
• Use the SNMP MIB browser
• View and export the Inventory table and Interface List table
The application polls the devices to make sure that they are still on the network. You can
change how frequently the device inventory is polled. For more information, see
inventory polling on page 274.
View device information
You can see a table of devices that the application discovered in your network.
To view the Devices table:
1. Open a browser and connect to the application through the static IP address of the
NMS300
For more information, see
A login window opens.
2. Enter your user name and password.
The default administrator user name is
also admin.
3. Click the Sign
The Network Summary page displays.
server.
Log in to the application on page 21.
admin and the default administrator password is
In button.
Set the
Discover and Manage Resources User Manual52
Page 53

NMS300 Network Management System Application
4. Select RESOURCES > DEVICES.
The page displays the devices that the application discovered.
5. To add columns to or remove them from the Devices table, right-click the table heading
anywhere, and
You can choose from the following columns: Status, Device Name, IP Address, Device
Model, Device
Location, Registered, Hostname, Managed By, Date of Purchase, Vendor, Country of
Purchase, Hardware Version, Configuration Version, Contact, Discover Time, and
Description.
specify the columns by selecting the corresponding check boxes.
Type, Firmware Version, Serial Number, MAC Address, Last Update Time,
o filter the devices that are listed, click the Show Filter
6. T
You can filter the devices by criteria such as type, name, IP address, vendor,
status.
To hide the filter, click the Hide Filter button.
7. To view details about a device, click the device name (or IP address) for the device.
For more information, see
View device details and interface details on page 99.
button.
View wireless device information only
You can easily monitor your wireless network by displaying wireless controllers, wireless
access point (APs), wireless management systems, and active wireless clients.
Note: For information about viewing wireless clients of wireless controllers,
APs, and management systems, see
view client details on page 103.
Monitor wireless clients and
model, and
Discover and Manage Resources User Manual53
Page 54

NMS300 Network Management System Application
View wireless controller information only
You can display only the wireless controllers that the application manages.
To view wireless controller information:
1. Open a browser and connect to the application through the static IP address of the
NMS300 server
.
For more information, see
A login window opens.
2. Enter your user name and password.
The default administrator user name is admin
also admin.
3. Click the Sign In
The Network Summary page displays.
4. Select WIRELESS > CONTROLLERS.
button.
Log in to the application on page 21.
and the default administrator password is
5. To add columns to or remove them from the Wireless Controllers table, right-click the table
heading anywhere, and specify the columns by selecting the corresponding check boxes.
You can choose from the following columns: Status, Device Name, IP Address,
Hostname, Managed By, MAC
Last Update Time, Hardware Version, Firmware Version, Configuration Version, Serial
Number, Contact, and Discover Time.
6. To filter the devices that are listed, click the Show Filter
You can filter the devices by criteria such as name, IP address, location, model, and
status.
To hide the filter, click the Hide Filter button.
7. To view details about a device, click the device name (or IP address) for the device.
For more information, see
Discover and Manage Resources User Manual54
Address, Location, Device Model, Vendor, Device Type,
button.
View device details and interface details on page 99.
Page 55

NMS300 Network Management System Application
View wireless access point information only
You can display only the standalone APs and controller-managed APs. The application
manages the standalone APs. The controller-managed APs are managed by their wireless
controllers and display for information only.
To view wireless access point information:
1. Open a browser and connect to the application through the static IP address of the
NMS300 server
.
For more information, see
A login window opens.
2. Enter your user name and password.
The default administrator user name is admin and the default administrator password is
also admin.
3. Click the Sign
The Network Summary page displays.
4. Select WIRELESS > AP.
button.
In
Log in to the application on page 21.
5. To add columns to or remove them from the Access Points table, right-click the table
heading anywhere, and specify the columns by selecting the corresponding check boxes.
You can choose from the following columns: Status, Device Name, Associated Controller
IP Address, Hostname, Managed By, MAC Address, Location, Device Type, Device
Model, Vendor, Last Update Time, Hardware Version, Firmware Version, Configuration
Version, Serial Number, Contact, Discover Time, and Description.
6. To filter the devices that are listed, click the Show Filter
You can filter the devices by criteria such as device name, device IP address, controller
name, location, device model, and status.
To hide the filter, click the Hide Filter button.
7. To view details about a device, click the device name (or IP address) for the device.
For more information, see
Discover and Manage Resources User Manual55
View device details and interface details on page 99.
button.
,
Page 56

NMS300 Network Management System Application
View wireless management system information only
You can display only the wireless management systems that the application manages.
To view wireless management system information:
1. Open a browser and connect to the application through the static IP address of the
NMS300 server
.
For more information, see
A login window opens.
2. Enter your user name and password.
The default administrator user name is admin
also admin.
3. Click the Sign In
The Network Summary page displays.
4. Select WIRELESS > WMS.
button.
Log in to the application on page 21.
and the default administrator password is
5. To add columns to or remove them from the WMS List table, right-click the table heading
anywhere, and specify the columns by selecting the corresponding check boxes.
You can choose from the following columns: Status, Device Name, IP Address,
Hostname, Managed By, MAC
Last Update Time, Hardware Version, Firmware Version, Configuration Version, Serial
Number, Contact, and Discover Time.
6. To filter the devices that are listed, click the Show Filter
You can filter the devices by criteria such as type, name, IP address, vendor, model, and
status.
To hide the filter
7. To view details about a device, click the device name (or IP address) for the device.
For more information, see
Discover and Manage Resources User Manual56
, click the Hide Filter button.
Address, Device Model, Vendor, Location, Device Type,
button.
View device details and interface details on page 99.
Page 57

NMS300 Network Management System Application
Modify the name, location information, and contact information
You can modify the device name, location information, and contact information that the
application displays for a wired or wireless device.
To modify information for a device:
1. Open a browser and connect to the application through the static IP address of the
NMS300 server
.
For more information, see
A login window opens.
2. Enter your user name and password.
The default administrator user name is admin and the default administrator password is
also admin.
3. Click the Sign
The Network Summary page displays.
4. Select RESOURCES > DEVICES
button.
In
Log in to the application on page 21.
.
The page displays the devices that the application discovered.
5. To add columns to or remove them from the Devices table, right-click the table heading
anywhere, and
You can choose from the following columns: Status, Device Name, IP Address, Device
Model, Device
Location, Registered, Hostname, Managed By, Date of Purchase, Vendor, Country of
Purchase, Hardware Version, Configuration Version, Contact, Discover Time, and
Description.
o filter the devices that are listed, click the Show Filter
6. T
You can filter the devices by criteria such as type, name, IP address, vendor,
status.
Discover and Manage Resources User Manual57
specify the columns by selecting the corresponding check boxes.
Type, Firmware Version, Serial Number, MAC Address, Last Update Time,
button.
model, and
Page 58

NMS300 Network Management System Application
To hide the filter, click the Hide Filter button.
7. Select the device.
8. Click the Edit
button.
9. Modify the device information.
10. Click the Submit
The device information is updated and the pop-up window closes.
button.
Remove device information
You can remove all information that the application displays for a wired or wireless device.
However, when you run another discovery job, the application might rediscover the device
and add it again to its inventory database.
To remove information for a device:
1. Open a browser and connect to the application through the static IP address of the
NMS300 server
For more information, see
A login window opens.
2. Enter your user name and password.
The default administrator user name is admin
also admin.
.
Log in to the application on page 21.
and the default administrator password is
3. Click the Sign In
The Network Summary page displays.
Discover and Manage Resources User Manual58
button.
Page 59

NMS300 Network Management System Application
4. Select RESOURCES > DEVICES.
The page displays the devices that the application discovered.
5. To add columns to or remove them from the Devices table, right-click the table heading
anywhere, and
You can choose from the following columns: Status, Device Name, IP Address, Device
Model, Device
Location, Registered, Hostname, Managed By, Date of Purchase, Vendor, Country of
Purchase, Hardware Version, Configuration Version, Contact, Discover Time, and
Description.
specify the columns by selecting the corresponding check boxes.
Type, Firmware Version, Serial Number, MAC Address, Last Update Time,
o filter the devices that are listed, click the Show Filter
6. T
You can filter the devices by criteria such as type, name, IP address, vendor,
status.
To hide the filter, click the Hide Filter button.
7. Select the device.
8. Click the Delete
A confirmation pop-up window opens.
9. Click the Yes
The device is removed from the Devices table and deleted.
button.
button.
button.
Synchronize a network device
You can time-synchronize a wired or wireless network device to the NMS300 server.
To synchronize a device:
1. Open a browser and connect to the application through the static IP address of the
NMS300 server
For more information, see
.
Log in to the application on page 21.
model, and
A login window opens.
Discover and Manage Resources User Manual59
Page 60

NMS300 Network Management System Application
2. Enter your user name and password.
The default administrator user name is admin and the default administrator password is
also admin.
3. Click the Sign In
button.
The Network Summary page displays.
4. Select RESOURCES > DEVICES
.
The page displays the devices that the application discovered.
5. To add columns to or remove them from the Devices table, right-click the table heading
anywhere, and
specify the columns by selecting the corresponding check boxes.
You can choose from the following columns: Status, Device Name, IP Address, Device
Model, Device
Type, Firmware Version, Serial Number, MAC Address, Last Update Time,
Location, Registered, Hostname, Managed By, Date of Purchase, Vendor, Country of
Purchase, Hardware Version, Configuration Version, Contact, Discover Time, and
Description.
o filter the devices that are listed, click the Show Filter
6. T
You can filter the devices by criteria such as type, name, IP address, vendor, model, and
status.
To hide the filter
, click the Hide Filter button.
7. Select the device.
8. Click the Resync
button.
A confirmation pop-up window opens.
9. Click the Yes
button.
The device is synchronized and the confirmation pop-up window closes.
Discover and Manage Resources User Manual60
button.
Page 61

NMS300 Network Management System Application
Log in to a device
You can log in to a wired or wireless device on your network using either the local browser UI
or Telnet.
Note: To log in over a Telnet connection to a model M4500-32C or
model M4500-48XF8C switch, use port 1223 instead of default port 23.
You can log in to a device when your web browser can be routed to the device. Generally,
your web browser must be on the local network side of the Internet gateway
To log in to a device:
1. Open a browser and connect to the application through the static IP address of the
NMS300 server
.
.
For more information, see
A login window opens.
2. Enter your user name and password.
The default administrator user name is admin and the default administrator password is
also admin.
3. Click the Sign
The Network Summary page displays.
4. Select RESOURCES > DEVICES
button.
In
Log in to the application on page 21.
.
The page displays the devices that the application discovered.
5. To add columns to or remove them from the Devices table, right-click the table heading
anywhere, and
You can choose from the following columns: Status, Device Name, IP Address, Device
Model, Device
Location, Registered, Hostname, Managed By, Date of Purchase, Vendor, Country of
Discover and Manage Resources User Manual61
specify the columns by selecting the corresponding check boxes.
Type, Firmware Version, Serial Number, MAC Address, Last Update Time,
Page 62

NMS300 Network Management System Application
Purchase, Hardware Version, Configuration Version, Contact, Discover Time, and
Description.
6. To filter the devices that are listed, click the Show Filter button.
You can filter the devices by criteria such as type, name, IP address, vendor, model, and
status.
T
o hide the filter, click the Hide Filter button.
7. Select the device.
8. Take one of the following actions:
• Log in over the local browser UI:
a. From the More
A login window for the local browser UI opens.
b. Enter the user name and password.
For most NETGEAR products, the user name is
password.
c. Click the button that lets you log in to the device.
The
name of the button depends on the device. For most NETGEAR products, the
button is called the
• Log in over a Telnet connection:
a. From the More
A login pop-up window for the CLI opens.
b. Enter the user name and password.
For most NETGEAR products, the user name is
password.
menu, select Web GUI.
admin and the password is
Login button.
menu, select Telnet.
admin and the password is
Ping, perform a traceroute, or reboot a device
You can ping, perform a traceroute, or reboot a wired or wireless network device from the
LAN or WAN. Your web browser must be routed to the NMS300 server to conduct these
tasks.
To test or reboot a device:
1. Open a browser and connect to the application through the static IP address of the
NMS300
For more information, see
A login window opens.
2. Enter your user name and password.
Discover and Manage Resources User Manual62
server.
Log in to the application on page 21.
Page 63

NMS300 Network Management System Application
The default administrator user name is admin and the default administrator password is
also admin.
3. Click the Sign In button.
The Network Summary page displays.
4. Select RESOURCES > DEVICES
.
The page displays the devices that the application discovered.
5. To add columns to or remove them from the Devices table, right-click the table heading
anywhere, and
specify the columns by selecting the corresponding check boxes.
You can choose from the following columns: Status, Device Name, IP Address, Device
Model, Device
Type, Firmware Version, Serial Number, MAC Address, Last Update Time,
Location, Registered, Hostname, Managed By, Date of Purchase, Vendor, Country of
Purchase, Hardware Version, Configuration Version, Contact, Discover Time, and
Description.
o filter the devices that are listed, click the Show Filter
6. T
You can filter the devices by criteria such as type, name, IP address, vendor,
status.
To hide the filter, click the Hide Filter button.
7. Select the device.
8. Take one of the following actions:
• Ping the device. From the More menu, select
When the ping completes, a pop-up window opens and displays the results.
• Trace a route. From the More menu, select TraceRoute
When the traceroute completes, a pop-up window opens and displays the results.
• Reboot the device. From the More menu, select Reboot.
Even though you reboot the device, the device remains in the inventory of the
application.
Discover and Manage Resources User Manual63
Ping
button.
model, and
.
.
Page 64

NMS300 Network Management System Application
Use the SNMP MIB browser
The SNMP MIB browser lets you retrieve information about SNMP-enabled devices directly.
The application supports SNMPv1, SNMPv2c, and SNMPv3 and all supported standard and
private MIBs. The SNMP MIB browser lets you select one of several MIB databases (such as
RFC Standard MIBs or NETGEAR Private MIBs) and navigate a MIB tree to select a specific
MIB object. You can also search for a MIB object, upload MIBs to the MIB browser, and
delete MIBs from the MIB browser.
The application displays the data that the MIB object collects,
MIB object, and information about the SNMP credentials.
information about
the selected
Select a MIB object and collect SNMP data or issue SNMP commands
You can use the MIB browser to collect data from SNMP-enabled devices or issue SNMP
commands.
To select a MIB object, view information about the MIB object, and collect SNMP data
or issue an SNMP command:
1. Open a browser and connect to the application through the static IP address of the
NMS300 server
For more information, see
A login window opens.
2. Enter your user name and password.
The default administrator user name is admin
also admin.
3. Click the Sign In
The Network Summary page displays.
.
Log in to the application on page 21.
and the default administrator password is
button.
4. Select RESOURCES > DEVICES
The page displays the devices that the application discovered.
Discover and Manage Resources User Manual64
.
Page 65

NMS300 Network Management System Application
5. To add columns to or remove them from the Devices table, right-click the table heading
anywhere, and specify the columns by selecting the corresponding check boxes.
You can choose from the following columns: Status, Device Name, IP Address, Device
Model, Device
Type, Firmware Version, Serial Number, MAC Address, Last Update Time,
Location, Registered, Hostname, Managed By, Date of Purchase, Vendor, Country of
Purchase, Hardware Version, Configuration Version, Contact, Discover Time, and
Description.
o filter the devices that are listed, click the Show Filter
6. T
button.
You can filter the devices by criteria such as type, name, IP address, vendor,
status.
To hide the filter, click the Hide Filter button.
7. Select the device.
8. From the More
menu, select MIB Browser.
model, and
The MIB browser opens in a new browser page.
9. To specify the SNMP credentials for the device that you are polling, do the following:
a. Click the Credential button at the top of the page.
b. From the Protocol menu, select the SNMP version.
Discover and Manage Resources User Manual65
Page 66

NMS300 Network Management System Application
By default, the SNMPv3 information is displayed.
c. If you select SNMP
V1 or SNMP V2C, specify the write community and read
community strings.
If you select SNMP V3, specify the user name and, if required, the authentication
protocol.
d. Click the Submit
button.
10. From the menu in the upper left of MIB Groups pane, select the MIB database.
A MIB tree populates the MIB Groups pane.
1
1. Navigate to
the MIB object.
The MIB Information pane below the MIB Groups pane displays the name and object ID
of the selected MIB trap, along with a description and other information.
If you cannot find the MIB object, search for it in the MIB tree by doing the following:
a. Click the magnifier icon next to the menu in the upper left of MIB Groups pane.
A pop-up window opens.
b. In
the Find
c. Click the Find
what field, enter your search criteria.
Next button.
If a match is found, it is highlighted in the MIB tree.
d. To close the pop-up window, click the Cancel
12. From the Operations
menu in the upper right of the page, select one of the following SNMP
button.
commands:
• Get. Collects data based on the selected MIB object.
• Get Next. Collects data based on the next MIB object (relative to the selected MIB
object) in the MIB tree.
• Set. Changes the value of the selected MIB object.
The SNMP SET pop-up window opens, allowing you to specify the data type and
value for the command.
• Table View. Collects table data based on the selected MIB object. This co
available only for table-related MIB objects.
Discover and Manage Resources User Manual66
mmand is
Page 67

NMS300 Network Management System Application
13. Click the Go button.
The Results List pane displays the name and object ID and the value that the MIB object
collected.
If the data collected applies to a table-related MIB object, the Table View button lets you
switch to a table view.
14. To collect SNMP data or issue an SNMP command for another MIB object, repeat Step 10
through
15. To clear all collected data, click the Clear All
The Results List pane is cleared.
Step 13.
button.
Add MIB files
You can load new MIB files into the MIB browser.
To add new MIB files to the MIB browser:
1. Open a browser and connect to the application through the static IP address of the
NMS300 server
For more information, see
A login window opens.
2. Enter your user name and password.
.
Log in to the application on page 21.
The default administrator user name is admin and the default administrator password is
also admin.
3. Click the Sign
Discover and Manage Resources User Manual67
button.
In
Page 68

NMS300 Network Management System Application
The Network Summary page displays.
4. Select RESOURCES > DEVICES
.
Note: To add MIB files to the MIB browser, you do not need to select a
device.
5. From
the More
menu, select MIB Browser.
The MIB browser opens in a new browser page.
Discover and Manage Resources User Manual68
Page 69

NMS300 Network Management System Application
6. Click the green + icon next to the menu in the upper left of MIB Groups pane.
7. Either select an existing MIB file group from the Select a MIB File Group menu or select
the Add a new MIB File Group radio button and specify the name for a new MIB file group
in the field.
8. Compose the list
of MIB files to be added to the MIB browser by doing the following:
• To add one or more MIB files to the table in the Upload new MIB files pop-up window,
do the following:
a. Click the Add button.
A pop-up window opens.
b. Navigate to the
MIB file or files that you want to upload and select one, several,
or all MIB files in the pop-up window.
The MIB file or files are uploaded to table in the Upload new MIB files pop-up
window.
• To remove one or more MIB files from the table in the Upload new MIB files pop-up
window, do the following:
a. Select the
To select all MIB files in the table, select the check box in t
b. Click the Remove
check boxes to the left of the MIB files in the table.
he table heading.
button.
The MIB file or files are removed from the table in the Upload new MIB files
pop-up window.
9. Click the Submit
button.
The MIB file or files on the list are saved in the group that you specified in
Discover and Manage Resources User Manual69
Step 7.
Page 70

NMS300 Network Management System Application
Remove a MIB file
You can remove a MIB file MIB browser. For example, you can remove a MIB file that is
obsolete.
To remove a MIB file from the MIB browser:
1. Open a browser and connect to the application through the static IP address of the
NMS300 server
.
For more information, see
A login window opens.
2. Enter your user name and password.
The default administrator user name is admin
also admin.
3. Click the Sign In
The Network Summary page displays.
4. Select RESOURCES > DEVICES
button.
Log in to the application on page 21.
.
and the default administrator password is
Note: To remove a MIB file from the MIB browser, you do not need to select
a device.
Discover and Manage Resources User Manual70
Page 71

NMS300 Network Management System Application
5. From the More menu, select MIB Browser.
The MIB browser opens in a new browser page.
6. Navigate to the
MIB object.
The MIB Information pane below the MIB Groups pane displays the name and object ID
of the selected MIB trap, along with a description and other information.
If you cannot find the MIB object, search for it in the MIB tree by doing the following:
a. Click the magnifier icon next to the menu in the upper left of MIB Groups pane.
A pop-up window opens.
b. In
the Find what
c. Click the Find Next
field, enter your search criteria.
button.
If a match is found, it is highlighted in the MIB tree.
d. To close the pop-up window, click the Cancel
7. Click the red x icon
next to the menu in the upper left of MIB Groups pane.
button.
A confirmation pop-up window opens.
8. Click the Yes
button.
The MIB file is deleted.
Discover and Manage Resources User Manual71
Page 72

NMS300 Network Management System Application
View and export the Inventory table and Interface List table
You can view the table of wired and wireless devices and interfaces that the application
manages, and export this table to an Excel or PDF file.
To view and export the Inventory table and Interface List table:
1. Open a browser and connect to the application through the static IP address of the
NMS300 server
.
For more information, see
A login window opens.
2. Enter your user name and password.
The default administrator user name is admin
also admin.
3. Click the Sign In
The Network Summary page displays.
4. Select RESOURCES > INVENT
button.
Log in to the application on page 21.
ORY.
and the default administrator password is
5. To add columns to or remove them from the Inventory table, right-click the table heading
anywhere, and specify the columns by selecting the corresponding check boxes.
You can choose from the following columns: Status, Device Name, IP Address, Device
Model, Device
Location, Registered, Hostname, Managed By, Date of Purchase, Vendor, Country of
Discover and Manage Resources User Manual72
Type, Firmware Version, Serial Number, MAC Address, Last Update Time,
Page 73

NMS300 Network Management System Application
Purchase, Hardware Version, Configuration Version, Contact, Discover Time, and
Description.
6. To filter the devices that are listed, click the Show Filter button.
You can filter the devices by criteria such as device type, device name and IP address,
device model, and status.
To hide the filter, click the Hide Filter button.
7. To view interfaces for a specific device, click the table row for
Device Name column.
8. To view details about an individual device or interface, in the Device Name column, click the
device
For information about viewing device details, see
details on page 99.
9. Click the Export
10. To save the device information on your computer, follow the directions of your browser.
name (or IP address), or, in the Name column, click the interface name.
View device details and interface
to Excel button or the Export to PDF button.
the device anywhere but in the
Manage device groups
To simplify the management of networks with many devices, you can create device groups.
Once they are discovered, you can group the devices on your network by location, device
type, and other criteria.
You can create static and dynamic device groups:
• Static device group. A fixed group of specific devices that you add manually. For more
information, see
• Dynamic device group. A dynamic list of devices that are selected automatically bas
on your filter selection criteria. For more information, see
device group on page 75.
Add or modify a static device group on page 73.
Add or modify a dynamic
ed
For general information about device groups, see
Device groups on page 12.
Add or modify a static device group
A static group is a fixed list of specific devices. You must add devices manually.
To add a static device group or modify an existing static device group:
1. Open a browser and connect to the application through the static IP address of the
NMS300
For more information, see
A login window opens.
2. Enter your user name and password.
Discover and Manage Resources User Manual73
server.
Log in to the application on page 21.
Page 74
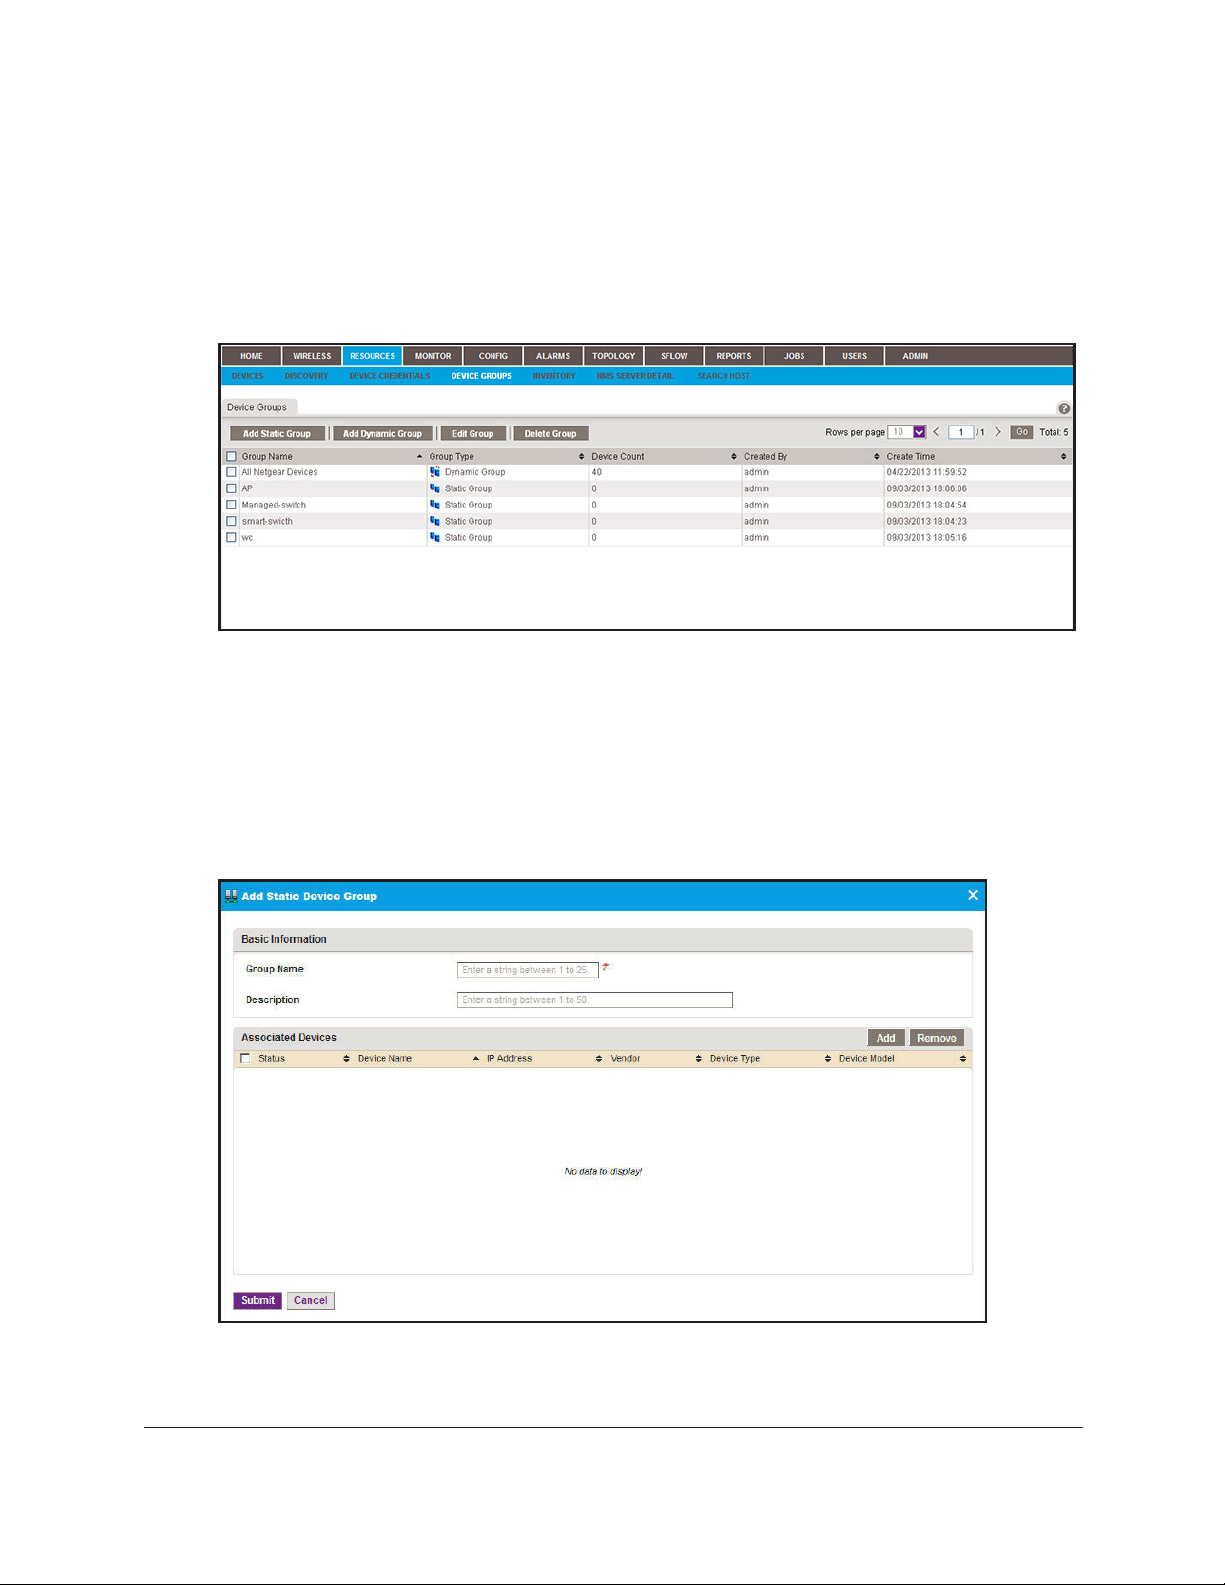
NMS300 Network Management System Application
The default administrator user name is admin and the default administrator password is
also admin.
3. Click the Sign In button.
The Network Summary page displays.
4. Select RESOURCES > DEVICE
GROUPS.
5. Add a static device group or modify an existing static device group:
• To add a static device group, click the Add Static Group button.
• To modify an existing static device group:
a. From the Device Groups table, select the static device group.
b. Click the Edit
For a new
static device group, the Add Static Device Group
Group button.
pop-up window opens. For an
existing static device group, the Edit Static Device Group pop-up window opens.
6. Enter or modify the group name.
7. Enter or modify the description.
Discover and Manage Resources User Manual74
Page 75

NMS300 Network Management System Application
8. Click the Add button.
9. To filter the devices that display in the pop-up window, click the Show Filter button.
You can filter the devices by criteria such as device type, device name and IP address,
location, device model, and status.
To hide the device filter, click the Hide Filter button.
10. In the Select Devices pop-up window
11. Click the Add Selection
To add all devices, click the Add All button.
12. If you
a. Select the devices.
b. Click
The devices are removed from the Associated Devices table.
13. Click the Submit
The pop-up window closes. The devices are added to the static device group, and the
group is displayed in the Device Groups table.
are modifying an existing static device group, to remove devices:
the Remove
button.
button.
button.
, select devices for the group.
Add or modify a dynamic device group
A dynamic group is a dynamic list of devices that are selected automatically based on your
filter selection criteria. The list changes automatically as devices that meet the filter criteria
are added to and removed from the network.
To add a dynamic device group or modify an existing dynamic device group:
1. Open a browser and connect to the application through the static IP address of the
NMS300 server
For more information, see
Discover and Manage Resources User Manual75
.
Log in to the application on page 21.
Page 76

NMS300 Network Management System Application
A login window opens.
2. Enter your user name and password.
The default administrator user name is admin
and the default administrator password is
also admin.
3. Click the Sign In
button.
The Network Summary page displays.
4. Select RESOURCES > DEVICE
GROUPS.
5. Add a dynamic device group or modify an existing dynamic device group:
• To add a dynamic device group, click the Add Dynamic Group button.
• To modify an existing
dynamic device group:
a. From the Device Groups table, select the dynamic device group.
b. Click the Edit
For a new
dynamic device group, the Add Dynamic Device Group
Group button.
pop-up window opens.
For an existing dynamic device group, the Edit Dynamic Device Group pop-up window
opens.
Discover and Manage Resources User Manual76
Page 77

NMS300 Network Management System Application
6. Enter or modify the group name.
7. Enter or modify the description.
8. Enter or modify the criteria for the device selection filter.
Y
ou can filter by device vendor
contact. You can select more than one filter
from the Device Type menu.
9. To view the devices in the group before you save the group, select the View
button.
The devices that meet the selection criteria are displayed.
10. Click the Submit
The pop-up window closes. The devices are added to the dynamic device group, and
group is displayed in the Device Groups table.
button.
, device location, device type, device model, and device
. To filter by device type, make a selection
Devices
Remove a device group
You can remove a device group that you no longer need.
To remove a device group:
1. Open a browser and connect to the application through the static IP address of the
NMS300 server
For more information, see
A login window opens.
.
Log in to the application on page 21.
the
2. Enter your user name and password.
The default administrator user name is admin and the default administrator password is
also admin.
3. Click the Sign
The Network Summary page displays.
4. Select RESOURCES > DEVICE
5. Select the device group.
Discover and Manage Resources User Manual77
button.
In
GROUPS.
Page 78
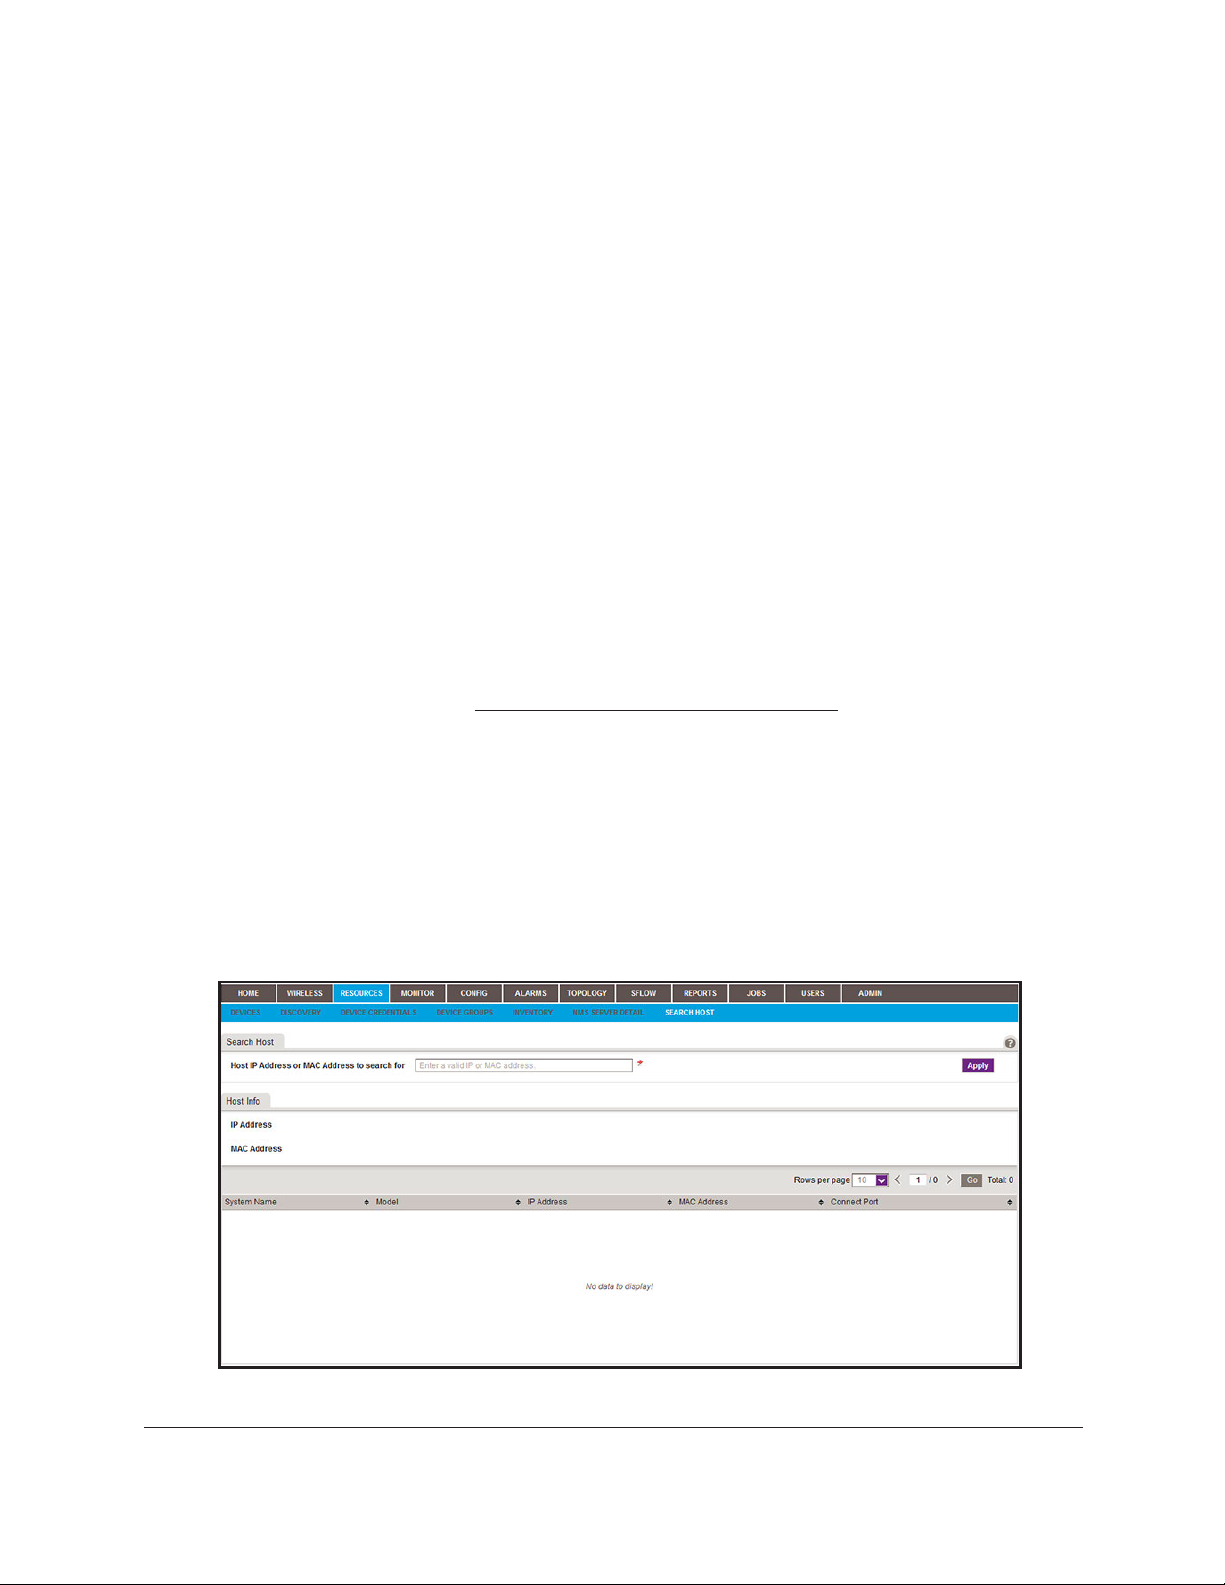
NMS300 Network Management System Application
6. Click the Delete Group button.
A confirmation pop-up window opens.
7. Click the Yes
The device group is removed from the Device Groups table and deleted.
button.
Search for the switch to which a host is connected
You can enter an IP address or MAC address of a device (that is, a host) and let the
application search for the switch in your network to which the host is directly connected.
To search for a switch to which a device is directly connected:
1. Open a browser and connect to the application through the static IP address of the
NMS300 server
For more information, see
A login window opens.
2. Enter your user name and password.
The default administrator user name is admin
also admin.
.
Log in to the application on page 21.
and the default administrator password is
3. Click the Sign In
The Network Summary page displays.
4. Select RESOURCES > SEARCH
Discover and Manage Resources User Manual78
button.
HOST.
Page 79

NMS300 Network Management System Application
5. In the Host IP Address or MAC Address to search for field, enter an IP address or MAC
address.
6. Click the Apply
button.
If a match is found, the table displays information about the switch to which the host is
connected, including the system name, model, IP address, and MAC address of the
switch and the switch port to which the host is connected.
Discover and Manage Resources User Manual79
Page 80

4
4Monitor Devices and the Network
Monitor how devices and the network perform
You can view summary and detailed information about the network, devices, and interfaces,
including real-time and historical information and performance statistics. You can also enable
and disable the configuration monitors, view and export the audit logs, view firmware versions,
and view NMS300 server information.
This chapter covers the following topics:
Monitor the network
•
• Monitor the top 10 widgets for all devices
• View the wireless summary and monitor the top 10 widgets for wireless devices
• View device details and interface details
• Monitor wireless clients and view client details
• Manage the configuration monitors
• Customize the optional network dashboard
• View and export audit logs
• View firmware version information
• View the NMS300 server information
• View application notifications
80
Page 81

NMS300 Network Management System Application
Monitor the network
You can monitor the network by various criteria and you can customize the information that
displays on the Network Summary page.
View the default network summary
If you did not customize the Network Summary page, the page displays a device tree, an
enterprise network map, a physical representation of the status and device type of the
inventory, and various top 10 widgets.
To view the default network summary:
1. Open a browser and connect to the application through the static IP address of the
NMS300
server.
For more information, see
A login window opens.
2. Enter your user name and password.
The default administrator user name is admin and the default administrator password is
also admin.
Log in to the application on page 21.
Monitor Devices and the Network User Manual81
Page 82

NMS300 Network Management System Application
3. Click the Sign In button.
By default, the following widgets display on the page.
Widget Description Information
Device Tree View A tree of all discovered and
managed devices in the network.
You can expand the tree.
Enterprise Network Map A world map that displays the
location of each device and its
connections to other devices
Monitor Devices and the Network User Manual82
Group devices by:
• Location (the
• Vendor
• Device T
• Device Group
• Manual link
• LLDP link
• < 1.5
• >= 1.5 Mbps < 10 Mbps link
• >= 10 Mbps < 100 Mbps link
• >= 100 Mbps < 1 Gbps link
• >= 1 Gbps < 10 Gbps link
• >= 10 Gbps link
• Link of unknown speed
Mbps link
default
ype
setting)
Page 83

NMS300 Network Management System Application
Widget Description Information
Device Inventory
Status/Device Type
Top 10 Devices by
Average CPU (T
T
op 10 Devices by
Average Memory (T
Latest 10 Alarms • Alarm Name
oday)
A slice graph displaying the device status (Up or Down) and a slice graph
displaying the network breakdown per device type.
Top 10 devices by average CPU
utilization for today
Top 10 devices by average
oday)
memory utilization for today
• Device status
• Device name
• Device type
• CPU utilization in percentage
• Device status
• Device name
• Device type
• Memory utilization
• Device Name
• Severity
• Alarm
4. To view details about a device, click the device name.
For more information, see
View device details and interface details on page 99.
Customize the Network Summary Page
in percentage
Time
You can customize the items that display on the Network Summary page. You do not need to
be an admin user to customize the Network Summary page.
In addition to the default widgets that are shown in the table in View the default network
summary on page 81, you can add the optional widgets that are listed in the following table.
Table 1. Optional widgets for the Network Summary page
Widget Description Information
Devices
Top 10 Devices by
Average Response
(Today)
T
op 10 Devices by
Average Packet Loss
(T
oday)
Top 10 devices by average
Time
response time for today
Top 10 devices by average packet
loss percentage for today
• Device status
• Device name
• Device type
• Average response time in ms
• Device status
• Device name
• Device type
• Average packet loss in percentage
Monitor Devices and the Network User Manual83
Page 84

NMS300 Network Management System Application
Table 1. Optional widgets for the Network Summary page (continued)
Widget Description Information
Interfaces
Top 10 Interfaces by
Utilization (Today)
T
op 10 Interfaces by
Traf
fic Rate (Today)
T
op 10 Interfaces by
Traf
fic (Today)
T
op 10 interfaces by interface
utilization for today
Top 10 interfaces by traffic rate for
today
Top 10 interfaces by total traffic for
today
• Device status
• Device name
• Interface status
• Interface name
• Ingress (Rx)
• Egress (Tx)
• Total utilization in percentage
• Device status
• Device name
• Interface status
• Interface name
• Ingress (Rx)
• Egress (Tx)
• Total traffic rate
Note: Traffic rate is stated in bps, Kbps, or
Mbps.
• Device status
• Device name
• Interface status
• Interface name
• Ingress (Rx)
• Egress (Tx)
• Total traffic volume
utilization in percentage
utilization in percentage
traffic rate
traffic rate
traffic volume
traffic volume
Top 10 Interfaces by
Errors (Today)
T
op 10 Interfaces by
Discards (Today)
T
op 10 interfaces by total errors for
today
T
op 10 interfaces by total
discarded packets for today
Monitor Devices and the Network User Manual84
Note: Traffic volume
• Device status
• Device name
• Interface status
• Interface name
• Number of
• Number of
• Total number of errors
• Device status
• Device name
• Interface status
• Interface name
• Number of
• Number of
• Total number of discarded packets
is stated in KB, MB, or GB.
ingress (Rx) errors
egress (Tx) errors
discarded egress (Tx) packets
discarded ingress (Rx) packets
Page 85

NMS300 Network Management System Application
To customize the Network Summary page:
1. Open a browser and connect to the application through the static IP address of the
NMS300 server.
For more information, see
Log in to the application on page 21.
A login window opens.
2. Enter your user name and password.
The default administrator user name is admin and the default administrator password is
also admin.
3. Click the Sign
button.
In
The Network Summary page displays.
4. Select HOME > NETWORK
SUMMARY.
The Network Summary page displays.
5. Click the Customize Portal
button.
Monitor Devices and the Network User Manual85
Page 86

NMS300 Network Management System Application
The page displays the widgets that are currently selected. The left side of the page
displays the Available Widgets menu.
6. Customize the Network Summary page by performing one of the following tasks:
• Add a widget. From the Available Widgets
empty widget area at the bottom of the page. When the widget is in the target widget
area, the widget area displays green and you can drop the widget.
Table 1 on page 83 describes the optional widgets that you can add.
menu, click and drag a widget to an
• Remove a widget. In a widget area that is populated by a widget, click the X (
the upper right of the widget area.
• Adjust the widget order. To
title bar of the widget. When the widget is in the target widget area, the widget area
displays green and you can drop the widget.
• Remove all widgets. Click the Remove All button.
• Reset the Network Summary screen to its defaults
7. Repeat
Summary page.
8. If you are not content with your selections, click the Reset
Step 7.
9. Click the Save button.
The settings are saved for your account.
10. (Optional) Select HOME >
The page displays its customized settings.
Step 6 until you selected all widgets that you want to display on the Network
move a widget to another widget area, click and drag the
. Click the Default button.
button and repeat Step 6 and
NETWORK SUMMARY.
Monitor the top 10 widgets for all devices
) in
You can monitor the status and top 10 widgets for devices on the network by various criteria
and you can customize the information that displays on the Top 10 page.
Monitor Devices and the Network User Manual86
Page 87

NMS300 Network Management System Application
View the default top 10 widgets
If you did not customize the Top 10 page, the page displays the default top 10 widgets.
To monitor the default top 10 widgets and view device details:
1. Open a browser and connect to the application through the static IP address of the
NMS300 server
.
For more information, see
A login window opens.
2. Enter your user name and password.
The default administrator user name is admin and the default administrator password is
also admin.
3. Click the Sign
The Network Summary page displays.
4. Select MONITOR >
button.
In
TOP 10.
Log in to the application on page 21.
Monitor Devices and the Network User Manual87
Page 88

NMS300 Network Management System Application
By default, the following widgets display on the page.
Widget Description Information
Top 10 Devices by
Average CPU (Today)
T
op 10 Devices by
Average Memory (Today)
Top 10 Interfaces by
Utilization (Today)
Top 10 Interfaces by
Traffic Rate (T
oday)
T
op 10 devices by average CPU
utilization for today
T
op 10 devices by average
memory utilization for today
Top 10 interfaces by interface
utilization for today
Top 10 interfaces by traffic rate for
today
• Device status
• Device name
• Device type
• CPU utilization in percentage
• Device status
• Device name
• Device type
• Memory utilization
• Device
• Device name
• Interface status
• Interface name
• Ingress (Rx)
• Egress (Tx) utilization
• Total utilization in percentage
• Device status
• Device name
• Interface status
• Interface name
• Ingress (Rx)
• Egress (Tx) traf
• Total traffic rate
status
in
utilization
fic rate
traf
fic rate
percentage
in percentage
in percentage
Top 10 Interfaces by
Traffic (T
Top 10 Interfaces by
Errors (Today)
oday)
Top 10 interfaces by total traffic for
today
Top
10 interfaces by total errors for
today
Monitor Devices and the Network User Manual88
Note: Traffic rate is
Mbps.
• Device status
• Device name
• Interface status
• Interface name
• Ingress (Rx)
• Egress (Tx) traf
• Total traffic volume
Note: Traffic volume is stated in KB, MB,
or GB.
• Device status
• Device name
• Interface status
• Interface name
• Number of
• Number of egress
• Total number of errors
stated in bps, Kbps, or
fic volume
traf
fic volume
ingress
(Rx) errors
(Tx) errors
Page 89

NMS300 Network Management System Application
5. To view details about a device, click the device name.
For more information, see
View device details and interface details on page 99.
6. To view details about an interface, click the interface name.
For more information, see
View device details and interface details on page 99.
Customize the top 10 page
You can customize the information that displays on the Top 10 page by adding and removing
widgets. You can also reset the page to its default information.
In addition to the default widgets that are shown in the table in View the default top 10
widgets on page 87, you can add the optional widgets that are listed in the following table.
Table 2. Optional widgets for the Top 10 page
Widget Description Information
Top 10 Device
Top 10 Devices by
Average Response
(Today)
Top 10 devices by average
Time
response time for today
• Device status
• Device name
• Device type
• Average response time in ms
T
op 10 Devices by
Average Packet Loss
(T
oday)
T
op 10 Interface
Top 10 Interfaces by
Discards (Today)
T
op 10 Standalone AP
Top 10 Standalone AP by
CPU Utilization (Today)
Top 10 devices by average packet
loss percentage for today
T
op 10 interfaces by total
discarded packets for today
T
op 10 wireless standalone APs by
total CPU utilization for today
• Device status
• Device name
• Device type
• Average packet loss in percentage
• Device status
• Device name
• Interface status
• Interface name
• Number of
• Number of
• Total number of discarded packets
• Device status
• Device name
• Device type
• CPU utilization in percentage
discarded egress (Tx) packets
discarded ingress (Rx) packets
Monitor Devices and the Network User Manual89
Page 90

NMS300 Network Management System Application
Table 2. Optional widgets for the Top 10 page (continued)
Widget Description Information
Top 10 Standalone AP by
WLAN Utilization (Today)
T
op 10 AP by Client
Count (Current)
T
op 10 Standalone AP by
Wired traffic (T
Top 10 SSID
Top 10 SSID by Client
Count (Current)
oday)
Top 10 wireless standalone APs by
total WLAN utilization for today
Top 10 wireless standalone APs
and controller-managed APs by
number of current clients
Top 10 wireless standalone APs by
traffic volume over a wired
connection for today
Top 10 SSIDs by number of
current clients
• Device status
• Device name
• Device type
• WLAN utilization in percentage
• Device status
• Device name
• Device type
• Total number of clients
• Device status
• Device name
• Device type
• Ingress (Rx)
• Egress (Tx)
• Total traffic volume
Note: Traffic volume
• SSID
• Device
• Device name
• Radio
• T
otal number of clients
traffic volume
traffic volume
is stated in KB, MB, or GB.
status
T
op 10 SSID by Traffic
(Today)
T
op 10 SSIDs by traffic volume for
today
Monitor Devices and the Network User Manual90
• SSID
• Device status
• Device name
• Radio
• Ingress
• Egress (Tx)
• Total traffic volume
Note: Traffic volume is stated in KB, MB, or GB.
(Rx)
traffic volume
traffic volume
Page 91

NMS300 Network Management System Application
Table 2. Optional widgets for the Top 10 page (continued)
Widget Description Information
Top 10 Radio
Top 10 Radio by Client
Count (Current)
T
op 10 Radio by Traffic
(Today)
Top 10 radios by number of current
clients
T
op 10 radios by traffic volume for
today
• Radio
• Device
• Device name
• Device type
• Total number of clients
• Radio
• Device status
• Device name
• Device type
• Ingress (Rx)
• Egress (Tx)
• Total traffic volume
Note: Traffic volume is stated in KB, MB, or GB.
status
traffic volume
traffic volume
To customize the Top 10 page:
1. Open a browser and connect to the application through the static IP address of the
NMS300 server.
For more information, see
Log in to the application on page 21.
A login window opens.
2. Enter your user name and password.
The default administrator user name is admin and the default administrator password is
also admin.
3. Click the Sign
In button.
The Network Summary page displays.
4. Select MONITOR
> TOP 10.
The Top 10 page displays.
Monitor Devices and the Network User Manual91
Page 92

NMS300 Network Management System Application
5. Click the Customize Portal button.
Monitor Devices and the Network User Manual92
Page 93

NMS300 Network Management System Application
The page displays the widgets that are currently selected. The left side of the page
displays the Available Widgets menu.
6. Customize the Top 10 page by performing one of the following tasks:
• Add a widget. From the Available Widgets
empty widget area at the bottom of the page. When the widget is in the target widget
area, the widget area displays green and you can drop the widget.
Table 2 on page 89 describes the optional widgets that you can add.
menu, click and drag a widget to an
• Remove a widget. In a widget area that is populated by a widget, click the X (
the upper right of the widget area.
• Adjust the widget order. To move a widget to another widget area, click and drag
the title bar of the widget. When the widget is in the target w
area displays green and you can drop the widget.
• Remove all widgets. Click the Remove All button.
• Reset the T
7. Repeat
8. If you are not content with your selections, click the Reset
Step 7.
9. Click the Save
Your changes are saved.
10. (Optional) Select MONITOR
The page displays its customized settings.
Step 6 until you selected all widgets that you want to display on the Top 10 page.
op 10 screen to its defaults. Click the Default button.
button.
> TOP 10.
button and repeat Step 6 and
idget area, the widget
) in
View the wireless summary and monitor the top 10 widgets for wireless devices
You can monitor the wireless inventory and top 10 widgets for wireless devices on the
network by various criteria and you can customize the information that displays on the
Wireless Summary page.
Monitor Devices and the Network User Manual93
Page 94

NMS300 Network Management System Application
View the wireless summary and default top 10 wireless widgets
If you did not customize the Wireless Summary page, the page displays the wireless
inventory and default top 10 widgets for wireless devices.
To monitor the wireless inventory, monitor the default top 10 widgets for wireless
devices, and view wireless device details:
1. Open a browser and connect to the application through the static IP address of the
NMS300 server
.
For more information, see
A login window opens.
2. Enter your user name and password.
The default administrator user name is admin
also admin.
3. Click the Sign In
The Network Summary page displays.
4. Select WIRELESS > WIRELESS
button.
Log in to the application on page 21.
SUMMARY.
and the default administrator password is
Monitor Devices and the Network User Manual94
Page 95

NMS300 Network Management System Application
By default, the following widgets display on the page.
Widget Description Information
Wireless Inventory Status of the wireless APs and
distribution of wireless devices in
the network
Top 10 SSID by Client
Count (Current)
Top 10
AP by Client
Count (Current)
T
10 Standalone AP by
op
CPU Utilization (Today)
Top 10 SSIDs by number of
current clients
Top 10 wireless standalone APs
and controller-managed APs by
number of current clients
Top
10 wireless standalone APs by
total CPU utilization for today
• Wireless AP status:
-
Number of APs that are up
- Number of APs that are down
• Wireless device
-
Number of standalone APs
- Number of controller-managed APs
- Number of wireless management
systems (WMSs)
-
Number of wireless controllers
• SSID
• Device
• Device name
• Radio
• T
• Device status
• Device name
• Device type
• Total number of clients
• Device status
• Device name
• Device type
• CPU utilization in percentage
status
otal number of clients
type:
T
op
10 Standalone AP by
Wired traffic (Today)
Latest 10 Wireless Alarms • Alarm name
T
op 10 wireless standalone APs by
traffic volume over a wired
connection for today
5. To view details about a device, click the device name.
For more information, see
Monitor Devices and the Network User Manual95
View device details and interface details on page 99.
• Device status
• Device name
• Device type
• Ingress (Rx)
• Egress (Tx) traf
• Total traffic volume
Note: Traffic volume is stated in KB, MB,
or GB.
• Device name
• Severity
• Alarm
time
traf
fic volume
fic volume
Page 96

NMS300 Network Management System Application
Customize the wireless summary page
You can customize the information that displays on the Wireless Summary page by adding
and removing widgets. You can also reset the page to its default information.
In addition to the default widgets that are shown in the table in View the wireless summary
and default top 10 wireless widgets on page 94, you can add the optional widgets that are
listed in the following table.
Table 3. Optional widgets for Wireless Summary page
Widget Description Information
Top 10 Standalone AP
Top 10 Standalone AP by
Memory Utilization
(Today)
Top 10 Standalone AP by
WLAN Utilization (Today)
T
op 10 SSID
Top 10 SSID by Traffic
(Today)
T
op 10 wireless standalone APs by
total memory utilization for today
T
op 10 wireless standalone APs by
total WLAN utilization for today
T
op 10 SSIDs by traffic volume for
today
• Device status
• Device name
• Device type
• Memory utilization
• Device status
• Device name
• Device type
• WLAN utilization in percentage
• SSID
• Device status
• Device name
• Radio
• Egress
• Ingress (Rx)
• Total traffic volume
Note: Traffic volume
(Tx)
in percentage
traffic volume
traffic volume
is stated in KB, MB, or GB.
Monitor Devices and the Network User Manual96
Page 97

NMS300 Network Management System Application
Table 3. Optional widgets for Wireless Summary page (continued)
Widget Description Information
Top 10 Radio
Top 10 Radio by Client
Count (Current)
T
op 10 Radio by Traffic
(Today)
Top 10 radios by number of current
clients
T
op 10 radios by traffic volume for
today
• Radio
• Device
• Device name
• Device type
• Total number of clients
• Radio
• Device status
• Device name
• Device type
• Ingress (Rx)
• Egress (Tx)
• Total traffic volume
Note: Traffic volume is stated in KB, MB, or GB.
status
traffic volume
traffic volume
To customize the Wireless Summary page:
1. Open a browser and connect to the application through the static IP address of the
NMS300 server.
For more information, see
Log in to the application on page 21.
A login window opens.
2. Enter your user name and password.
The default administrator user name is admin and the default administrator password is
also admin.
3. Click the Sign
In button.
The Network Summary page displays.
4. Select WIRELESS >
WIRELESS SUMMARY.
The Wireless Summary page displays.
Monitor Devices and the Network User Manual97
Page 98

NMS300 Network Management System Application
5. Click the Customize Portal button.
The page displays the widgets that are currently selected. The left side of the page
displays the Available Widgets menu.
Monitor Devices and the Network User Manual98
Page 99

NMS300 Network Management System Application
6. Customize the Wireless Summary page by performing one of the following tasks:
• Add a widget. From the Available Widgets
empty widget area at the bottom of the page. When the widget is in the target widget
area, the widget area displays green and you can drop the widget.
Table 3 on page 96 describes the optional widgets that you can add.
menu, click and drag a widget to an
• Remove a widget. In a widget area that is populated by a widget, click the X (
the upper right of the widget area.
• Adjust the widget order. To move a widget to another widget area, click and drag
the title bar of the widget. When the widget is in the target w
area displays green and you can drop the widget.
• Remove all widgets. Click the Remove All button.
• Reset the W
7. Repeat
Summary page.
8. If you are not content with your selections, click the Reset
Step 7.
9. Click the Save
Your changes are saved.
10. (Optional) Select WIRELESS >
The page displays its customized settings.
Step 6 until you selected all widgets that you want to display on the Wireless
ireless Summary screen to its defaults. Click the Default button.
button.
WIRELESS SUMMARY.
button and repeat Step 6 and
idget area, the widget
View device details and interface details
) in
You can view many details for a device and its interfaces. The detailed information that the
application can provide depends on the type of device. The Devices table can list the
following devices in the Device Type column:
• Switch
• Firewall
• Standalone
• Controller-Managed AP
• Wireless Controller
• WMS
• Storage
• Router
• Unknown
For information
Appendix B, Device Details. For information about NETGEAR products that the application
supports, see
Monitor Devices and the Network User Manual99
AP
about the details that the application can provide
Compatible devices on page 13.
for each
type of device, see
Page 100

NMS300 Network Management System Application
To view the detailed information for a device and an interface:
1. Open a browser and connect to the application through the static IP address of the
NMS300 server.
For more information, see
Log in to the application on page 21.
A login window opens.
2. Enter your user name and password.
The default administrator user name is admin
also admin.
3. Click the Sign In
button.
The Network Summary page displays.
4. Select RESOURCES > DEVICES
.
and the default administrator password is
The page displays the devices that the application discovered.
5. To add columns to or remove them from the Devices table, right-click the table heading
anywhere, and
specify the columns by selecting the corresponding check boxes.
You can choose from the following columns: Status, Device Name, IP Address, Device
Model, Device
Type, Firmware Version, Serial Number, MAC Address, Last Update Time,
Location, Registered, Hostname, Managed By, Date of Purchase, Vendor, Country of
Purchase, Hardware Version, Configuration Version, Contact, Discover Time, and
Description.
o filter the devices that are listed, click the Show Filter
6. T
button.
You can filter the devices by criteria such as type, name, IP address, vendor, model, and
status.
To hide the filter
, click the Hide Filter button.
7. Click the name of the device.
Monitor Devices and the Network User Manual100
 Loading...