

Page 1

NETGEAR Stora
User Manual
350 East Plumeria Drive
San Jose, CA 95134
USA
April 2010
202-10540-03
v1.0
Page 2

NETGEAR Stora User Manual
© 2010 NETGEAR, Inc. All rights reserved.
Techni c al Supp o rt
Registration on the website or over the phone is required before you can use our telephone support service. The
phone numbers for worldwide regional customer support centers are on the Warranty and Support Information
card that came with your product.
Go to http://kbserver.netgear.com for product updates and Web support.
Trademarks
NETGEAR, the NETGEAR logo, ReadyNAS, Stora, X-RAID, X-RAID2, FrontView, RAIDar, RAIDiator, Network
Storage Processor, and NSP are trademarks or registered trademarks of NETGEAR, Inc. Microsoft, Windows,
Windows NT and Vista are registered trademarks of Microsoft Corporation. Other brand and product names are
registered trademarks or trademarks of their respective holders.
Statement of Conditions
In the interest of improving internal design, operational function, and/or reliability, NETGEAR reserves the right to
make changes to the products described in this document without notice.
NETGEAR does not assume any liability that may occur due to the use or application of the product(s) or circuit
layout(s) described herein.
Certificate of the Manufacturer/Importer
It is hereby certified that the NETGEAR Stora has been suppressed in accordance with the conditions set out in
the BMPT-AmtsblVfg 243/1991 and Vfg 46/1992. The operation of some equipment (for example, test
transmitters) in accordance with the regulations may, however, be subject to certain restrictions. Please refer to the
notes in the operating instructions.
The Federal Office for Telecommunications Approvals has been notified of the placing of this equipment on the
market and has been granted the right to test the series for compliance with the regulations.
Bestätigung des Herstellers/Importeurs
Es wird hiermit bestätigt, daß dasNETGEAR Stora gemäß der im BMPT-AmtsblVfg 243/1991 und Vfg 46/1992
aufgeführten Bestimmungen entstört ist. Das vorschriftsmäßige Betreiben einiger Geräte (z.B. Testsender) kann
jedoch gewissen Beschränkungen unterliegen. Lesen Sie dazu bitte die Anme rkungen in der Betriebsanleitung.
Das Bundesamt für Zulassungen in der Telekommunikation wurde davon unterrichtet, daß dieses Gerät auf den
Markt gebracht wurde und es ist berechtigt, die Serie auf die Erfüllung der Vorschriften hin zu überprüfen.
Voluntary Control Council for Interference (VCCI) Statement
This equipment is in the Class A category (business use only) and conforms to the standards set by the Voluntary
Control Council for Interference by Data Processing Equipment and Electronic Office Machines aimed at
preventing radio interference in such residential areas. When used near a radio or TV receiver, it may become the
cause of radio interference. Read instructions for correct handling.
2 |
Page 3

Table of Contents
Table of Contents
Chapter 1 Getting Acquainted
About NETGEAR Stora . . . . . . . . . . . . . . . . . . . . . . . . . . . . . . . . . . . . . . . . 6
Standard vs. Premium Features . . . . . . . . . . . . . . . . . . . . . . . . . . . . . . . 7
File Types . . . . . . . . . . . . . . . . . . . . . . . . . . . . . . . . . . . . . . . . . . . . . . . . . . 8
Stora Hardware Overview . . . . . . . . . . . . . . . . . . . . . . . . . . . . . . . . . . . . . 10
Front Panel . . . . . . . . . . . . . . . . . . . . . . . . . . . . . . . . . . . . . . . . . . . . . . 10
Disks and Disk Bays . . . . . . . . . . . . . . . . . . . . . . . . . . . . . . . . . . . . . . . 10
Rear Panel. . . . . . . . . . . . . . . . . . . . . . . . . . . . . . . . . . . . . . . . . . . . . . . 11
LED and Connector Descriptions. . . . . . . . . . . . . . . . . . . . . . . . . . . . . . 12
Initial Setup . . . . . . . . . . . . . . . . . . . . . . . . . . . . . . . . . . . . . . . . . . . . . . . . 14
Check Package Contents . . . . . . . . . . . . . . . . . . . . . . . . . . . . . . . . . . . 14
Connect Stora to your Network . . . . . . . . . . . . . . . . . . . . . . . . . . . . . . . 15
Configure your Stora . . . . . . . . . . . . . . . . . . . . . . . . . . . . . . . . . . . . . . . 16
Installing a Disk . . . . . . . . . . . . . . . . . . . . . . . . . . . . . . . . . . . . . . . . . . . . . 24
Replacing a Failed Disk. . . . . . . . . . . . . . . . . . . . . . . . . . . . . . . . . . . . . 25
Installing the Desktop Applications . . . . . . . . . . . . . . . . . . . . . . . . . . . . . . 27
Accessing Stora. . . . . . . . . . . . . . . . . . . . . . . . . . . . . . . . . . . . . . . . . . . . . 32
Web Browser Access. . . . . . . . . . . . . . . . . . . . . . . . . . . . . . . . . . . . . . . 32
Local Area Networking. . . . . . . . . . . . . . . . . . . . . . . . . . . . . . . . . . . . . . 32
Stora Agent . . . . . . . . . . . . . . . . . . . . . . . . . . . . . . . . . . . . . . . . . . . . . . 32
Mapped Drives. . . . . . . . . . . . . . . . . . . . . . . . . . . . . . . . . . . . . . . . . . . . 32
Remote Access . . . . . . . . . . . . . . . . . . . . . . . . . . . . . . . . . . . . . . . . . . . 33
Resetting Your Stora . . . . . . . . . . . . . . . . . . . . . . . . . . . . . . . . . . . . . . . . . 34
Documentation and Support . . . . . . . . . . . . . . . . . . . . . . . . . . . . . . . . . . . 35
Register your Stora . . . . . . . . . . . . . . . . . . . . . . . . . . . . . . . . . . . . . . . . 35
Technical Support . . . . . . . . . . . . . . . . . . . . . . . . . . . . . . . . . . . . . . . . . 35
Chapter 2 Stora Agent
Using Stora Agent . . . . . . . . . . . . . . . . . . . . . . . . . . . . . . . . . . . . . . . . . . . 37
Starting Stora Agent. . . . . . . . . . . . . . . . . . . . . . . . . . . . . . . . . . . . . . . . 37
Stora Agent Menu Options. . . . . . . . . . . . . . . . . . . . . . . . . . . . . . . . . . . 38
Chapter 3 Stora Application
Starting Stora Application . . . . . . . . . . . . . . . . . . . . . . . . . . . . . . . . . . . . . 49
Logging into Stora Application . . . . . . . . . . . . . . . . . . . . . . . . . . . . . . . . 50
Stora Application Home Page . . . . . . . . . . . . . . . . . . . . . . . . . . . . . . . . 53
Media Library. . . . . . . . . . . . . . . . . . . . . . . . . . . . . . . . . . . . . . . . . . . . . . . 55
Accessing the Media Library . . . . . . . . . . . . . . . . . . . . . . . . . . . . . . . . . 55
Table of Contents | 3
Page 4

NETGEAR Stora User Manual
Media Sources . . . . . . . . . . . . . . . . . . . . . . . . . . . . . . . . . . . . . . . . . . . .57
Albums . . . . . . . . . . . . . . . . . . . . . . . . . . . . . . . . . . . . . . . . . . . . . . . . . .60
Working with Media Source Folders. . . . . . . . . . . . . . . . . . . . . . . . . . . .61
Folder Options . . . . . . . . . . . . . . . . . . . . . . . . . . . . . . . . . . . . . . . . . . . .65
Albums . . . . . . . . . . . . . . . . . . . . . . . . . . . . . . . . . . . . . . . . . . . . . . . . . . . .70
Working with Albums . . . . . . . . . . . . . . . . . . . . . . . . . . . . . . . . . . . . . . .70
Working with Files. . . . . . . . . . . . . . . . . . . . . . . . . . . . . . . . . . . . . . . . . .77
Working with Images . . . . . . . . . . . . . . . . . . . . . . . . . . . . . . . . . . . . . . .81
Setting up Contacts . . . . . . . . . . . . . . . . . . . . . . . . . . . . . . . . . . . . . . . .83
Social Media. . . . . . . . . . . . . . . . . . . . . . . . . . . . . . . . . . . . . . . . . . . . . .86
Preferences . . . . . . . . . . . . . . . . . . . . . . . . . . . . . . . . . . . . . . . . . . . . . . . .91
Displaying the Preferences Page . . . . . . . . . . . . . . . . . . . . . . . . . . . . . .91
User Preferences . . . . . . . . . . . . . . . . . . . . . . . . . . . . . . . . . . . . . . . . . .92
Server Preferences. . . . . . . . . . . . . . . . . . . . . . . . . . . . . . . . . . . . . . . . .95
Administration. . . . . . . . . . . . . . . . . . . . . . . . . . . . . . . . . . . . . . . . . . . .101
Chapter 4 Stora Desktop Mirror
Desktop Mirror Overview . . . . . . . . . . . . . . . . . . . . . . . . . . . . . . . . . . . . .114
Starting Desktop Mirror. . . . . . . . . . . . . . . . . . . . . . . . . . . . . . . . . . . . .114
Initial Configuration. . . . . . . . . . . . . . . . . . . . . . . . . . . . . . . . . . . . . . . .115
File Menu . . . . . . . . . . . . . . . . . . . . . . . . . . . . . . . . . . . . . . . . . . . . . . . . .117
Adding Folders to the Backup. . . . . . . . . . . . . . . . . . . . . . . . . . . . . . . .117
Viewing Files with Folders . . . . . . . . . . . . . . . . . . . . . . . . . . . . . . . . . .118
Removing Folders from the Backup . . . . . . . . . . . . . . . . . . . . . . . . . . .118
Quit. . . . . . . . . . . . . . . . . . . . . . . . . . . . . . . . . . . . . . . . . . . . . . . . . . . .119
View Menu . . . . . . . . . . . . . . . . . . . . . . . . . . . . . . . . . . . . . . . . . . . . . . . .120
Viewing the Report . . . . . . . . . . . . . . . . . . . . . . . . . . . . . . . . . . . . . . . .120
Tools Menu. . . . . . . . . . . . . . . . . . . . . . . . . . . . . . . . . . . . . . . . . . . . . . . .121
Manual Backups. . . . . . . . . . . . . . . . . . . . . . . . . . . . . . . . . . . . . . . . . .121
Restoring All Backed up Folders . . . . . . . . . . . . . . . . . . . . . . . . . . . . .123
Changing Account Settings . . . . . . . . . . . . . . . . . . . . . . . . . . . . . . . . .124
Help Menu . . . . . . . . . . . . . . . . . . . . . . . . . . . . . . . . . . . . . . . . . . . . . . . .128
Index
4 | Ta ble of Contents
Page 5

1. Getting Acquainted
1
This chapter provides an overview of the NETGEAR Stora system and covers the unit’s physical
features, and initial setup steps.
Topics discussed in this chapter include:
• About NETGEAR Stora
• File Types
• Stora Hardware Overview
• Initial Setup
• Installing a Disk
• Installing the Desktop Applications
• Accessing Stora
• Resetting Your Stora
• Documentation and Support
Chapter 1: Getting Acquainted | 5
Page 6

NETGEAR Stora User Manual
About NETGEAR Stora
NETGEAR Stora is a highly secure and stable home server that lets you collect, store,
manage, share and enjoy your digital media content, including personal photos, music,
videos and documents. It is easy to drag and drop digital media to Stora, catalog it into
folders, and share it by creating albums.
Stora is compatible with a wide range of hardware platforms and allows you to access your
content through digital media players on your home network, or from any computer in the
world through the web. You can even view your content on a mobile handset. Stora can also
be set up to automatically back up your data, saving it from loss.
Store
Stora allows you securely store all your digital media in one place and to upload content
locally from a computer on the home network. You can back up any PC and Mac on your
home network to S tora. The Desktop Mirro r sof t ware auto matically backs up selected fo lders
on a regular basis. Backed up content is always available, even if a computer is turned off.
See Chapter 2, “Stora Agent" for more information.
Manage
You can organize your digital media into shared FamilyLibrary folders or private MyLibrary
folders. After you upload a file, you can add a caption and tags to the file. Later you can
search for files that match the caption and tags. See Chapter 3, “Stora Application" for more
information.
Share
You can create albums to share your digital media with family on your home network and
friends across the Internet. You can even share selected content with the public, while
keeping private media secure. For example, you can put the latest baby pictures in a shared
album, and let friends and family know they are available via email or Facebook. See
“Working with Albums” on page 70 for more information.
Enjoy
You can show digital media on computers and media players on your home network. The
media server built into your Sto r a makes conten t available to a wide variety of media players
that support standard network access, and the UPnP-AV, DLNA or Windows Media Connect
standards. This way you can view photos through NETGEAR EVA2000 and EVA9100/9150,
as well as an Xbox 360 or PS3 in the living room, while listening to music through a
networked sound system in the family room.
Print
Connect a USB printer to Stora, and then share the printer with all the computers on your
home network. See “Printer Option” on page 40.
6 | Chapter 1: Getting Acquainted
Page 7

NETGEAR Stora User Manual
Standard vs. Premium Features
Premium features extend Stora capabilities, and are available to licensed users. You will
have the option to upgrade your subscription at the time of installation, or any time after
installation.
The table below outlines the main Standard and Premium features.
To upgrade your subscription, see “Premium Subscription” on page 51 and set subscription
preferences, see “Stora Premium Subscription” on page 105.
Stora Features Standard Premium
User accounts 3 unlimited
FamilyLibrary and MyLibrary access and sharing 3 unlimited
Stora Albums - Local and remote access unlimited unlimited
Stora Media Library - Remote access 3 unlimited
Stora Preferences - Remote access 3 unlimited
Remote access to Stora desktop and web applications and folders 3 unlimited
Mobile access and device support x
Facebook integration and support x x
Flickr integration and support x
RSS integration and support x
FTPS integration x
CoolIris picture wall view x
Access to new Premium features added during your subscription period x
Chapter 1: Getting Acquainted | 7
Page 8
NETGEAR Stora User Manual
File Types
Internal
The Stora Application uses an internal player to provide high performance playback for the
following file types.
Media Class Supported Formats
Image JPEG, GIF, PNG
Audio MP3
Video MPEG-4 (H.264), MOV, FLV
External
The Stora Application uses 3rd party media players and some plugins, such as Windows
Media Player and Quicktime, to play additional content types such as image, audio and video
file types. Also, depending on your browser settings, Stora stores other file types as
documents that can be downloaded, or opened using third party players.
For a list of supported file types, consult the browser plug in specifications on your computer.
Media Players
The media server built into Stora makes content available to a wide variety of media players
on your home network. The media player must support the UPnP-AV (Universal Plug and
Play - Audio Visual), DLNA (Digital Living Network Alliance) or Windows Media Connect
standard.
Media players include gaming consoles (Xbox 360 and PS3), digital photo frames, iTunes
clients, IP televisions, networked sound systems (Sonos), digital video players (Roku,
NETGEAR EVA2000 Digital Entertainer) and many more.
See “Sharing with Media Players” on page 86 for more information.
iTunes
An iTunes client on the network can access music stored on Stora. The music files must be
within folders or albums that are configured to share with DMAs or media players. Music files
appear in the SHARED > Stora:iTunes folder.
See “iTunes” on page 89 for more information.
Mobile Devices
With a premium service subscription, you can use a variety of mobile devices to access your
Stora.
Mobile devices accessing S tora over the Inte rnet will automatica lly be re-directed to a mobile
interface. In turn, Stora will automatically optimize the mobile interface for the device.
8 | Chapter 1: Getting Acquainted
Page 9

NETGEAR Stora User Manual
Depending on the device, mobile users can:
• Browse albums
• Browse folders in the Media Library
• Create new folders
• Upload media directly from the mobile to Stora
Once you set up your Stora, you can access it from a mobile device by going to
http://www.myStora.com/mobile.
Supported devices:
• iPhone
• Blackberry phones
• Windows mobile phones
Chapter 1: Getting Acquainted | 9
Page 10
NETGEAR Stora User Manual
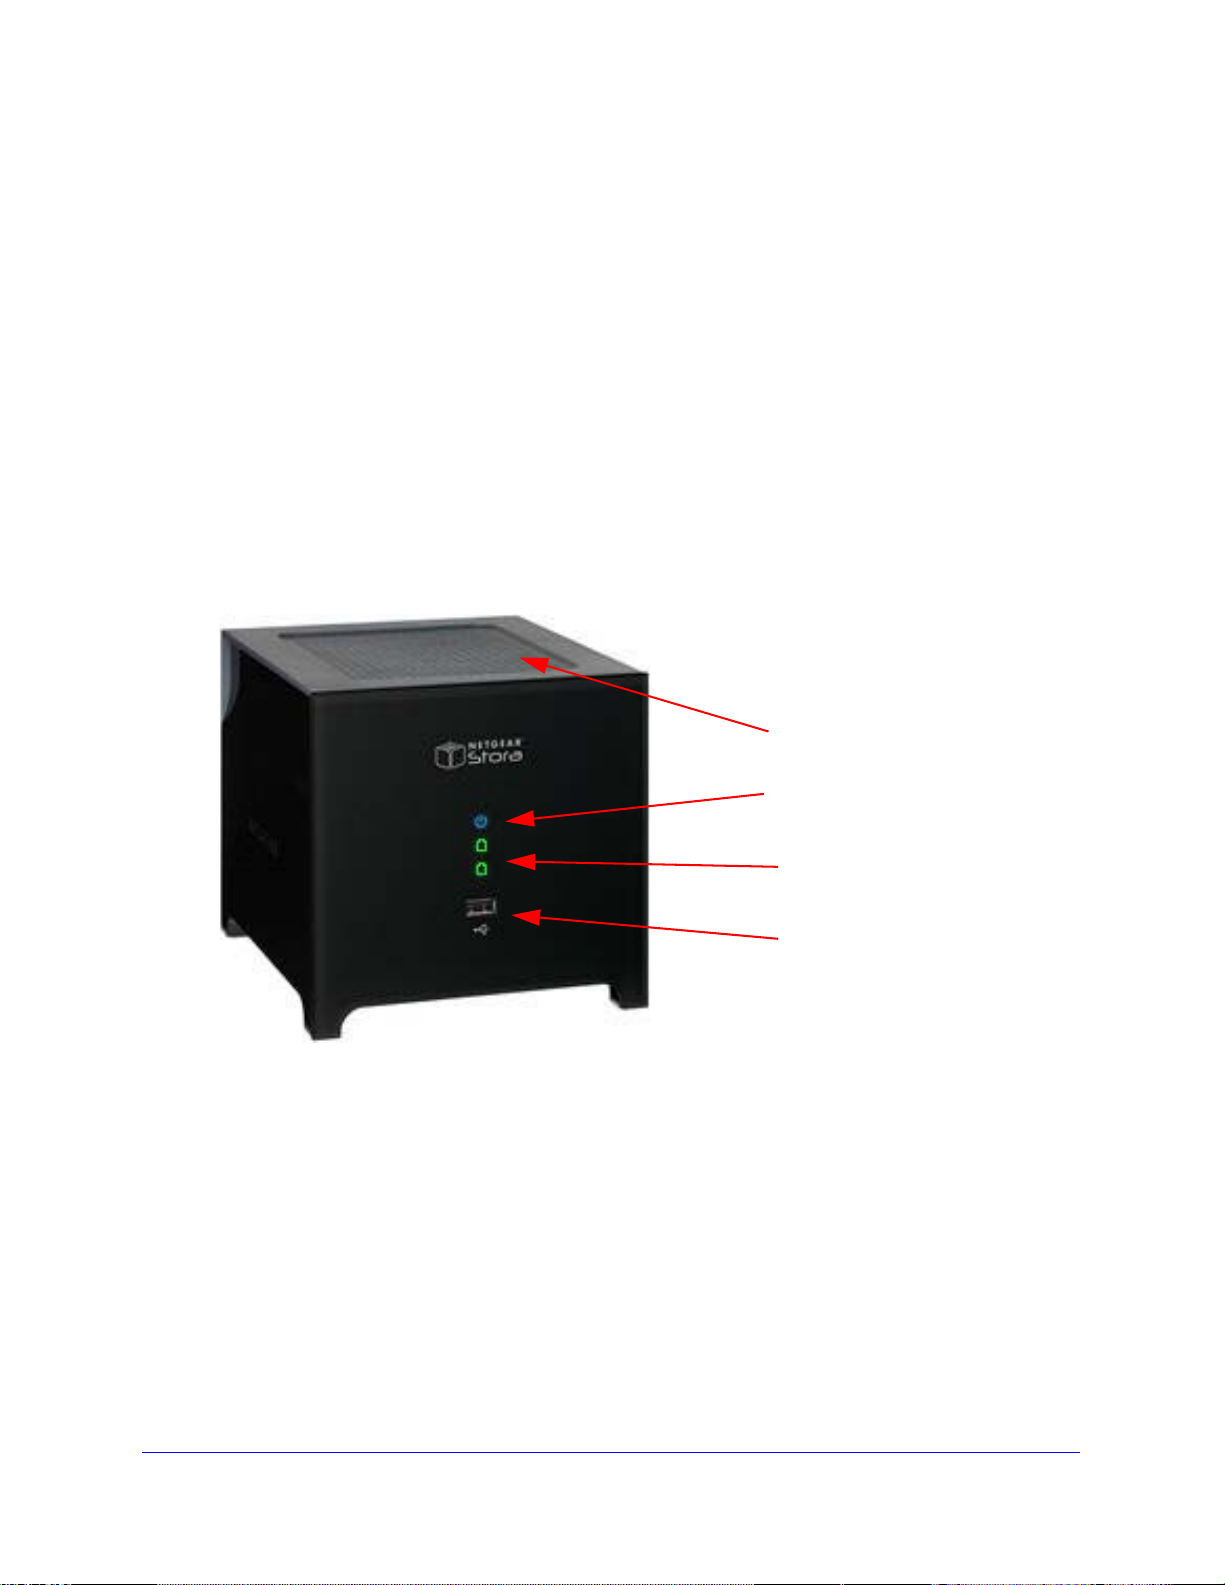
2. Power status LED (Blue)
4. USB port
3. Disk 1 & 2 LEDs (Green)
1. Exhaust Fan Vent
Stora Hardware Overview
This section introduces Stora hardware components, including displays, ports, buttons, and
drive bays.
Front Panel
The sleek, front panel of Stora indicates the active/inactive status of the system and can be
easily removed to access the disks and disk bays located behind it.
1. Exhaust Fan Vent
2. Power Status LED
3. Disk 1 and Disk 2 Status LEDs
4. USB Port
Figure 1 Stora Front Panel
Disks and Disk Bays
Located inside the unit behind the front panel are two disk bays that house up to two SATA
disks. These disks can be easily installed and removed by pressing the release latches
located on the rear panel.
1. Disk 1 Bay
2. Disk 2 Bay
3. Insert or remove disks
10 | Chapter 1: Getting Acquainted
Page 11

NETGEAR Stora User Manual
1. Disk 1 Bay
3. Insert or remove a disk
2. Disk 2 Bay
Figure 2 Stora Disk Bays
Note: Disks can be from different manufacturers, however the disk size
must be the same.
Rear Panel
The back of Stora features a power switch, a power cable socket, a gigabit Ethernet port, a
reset button, and two disk release latches; one for each disk.
1. Disk Release latches
2. Unit serial number and network MAC address
3. Power on/off button.
4. Power cable socket.
5. Ethernet port.
6. Reset button
Chapter 1: Getting Acquainted | 11
Page 12

NETGEAR Stora User Manual
1. Disk
3. Power button
5. Ethernet port
4. Power
6. Reset button
cable socket
release
latches
2. Serial numbers
Figure 3 Stora Rear Panel
LED and Connector Descriptions
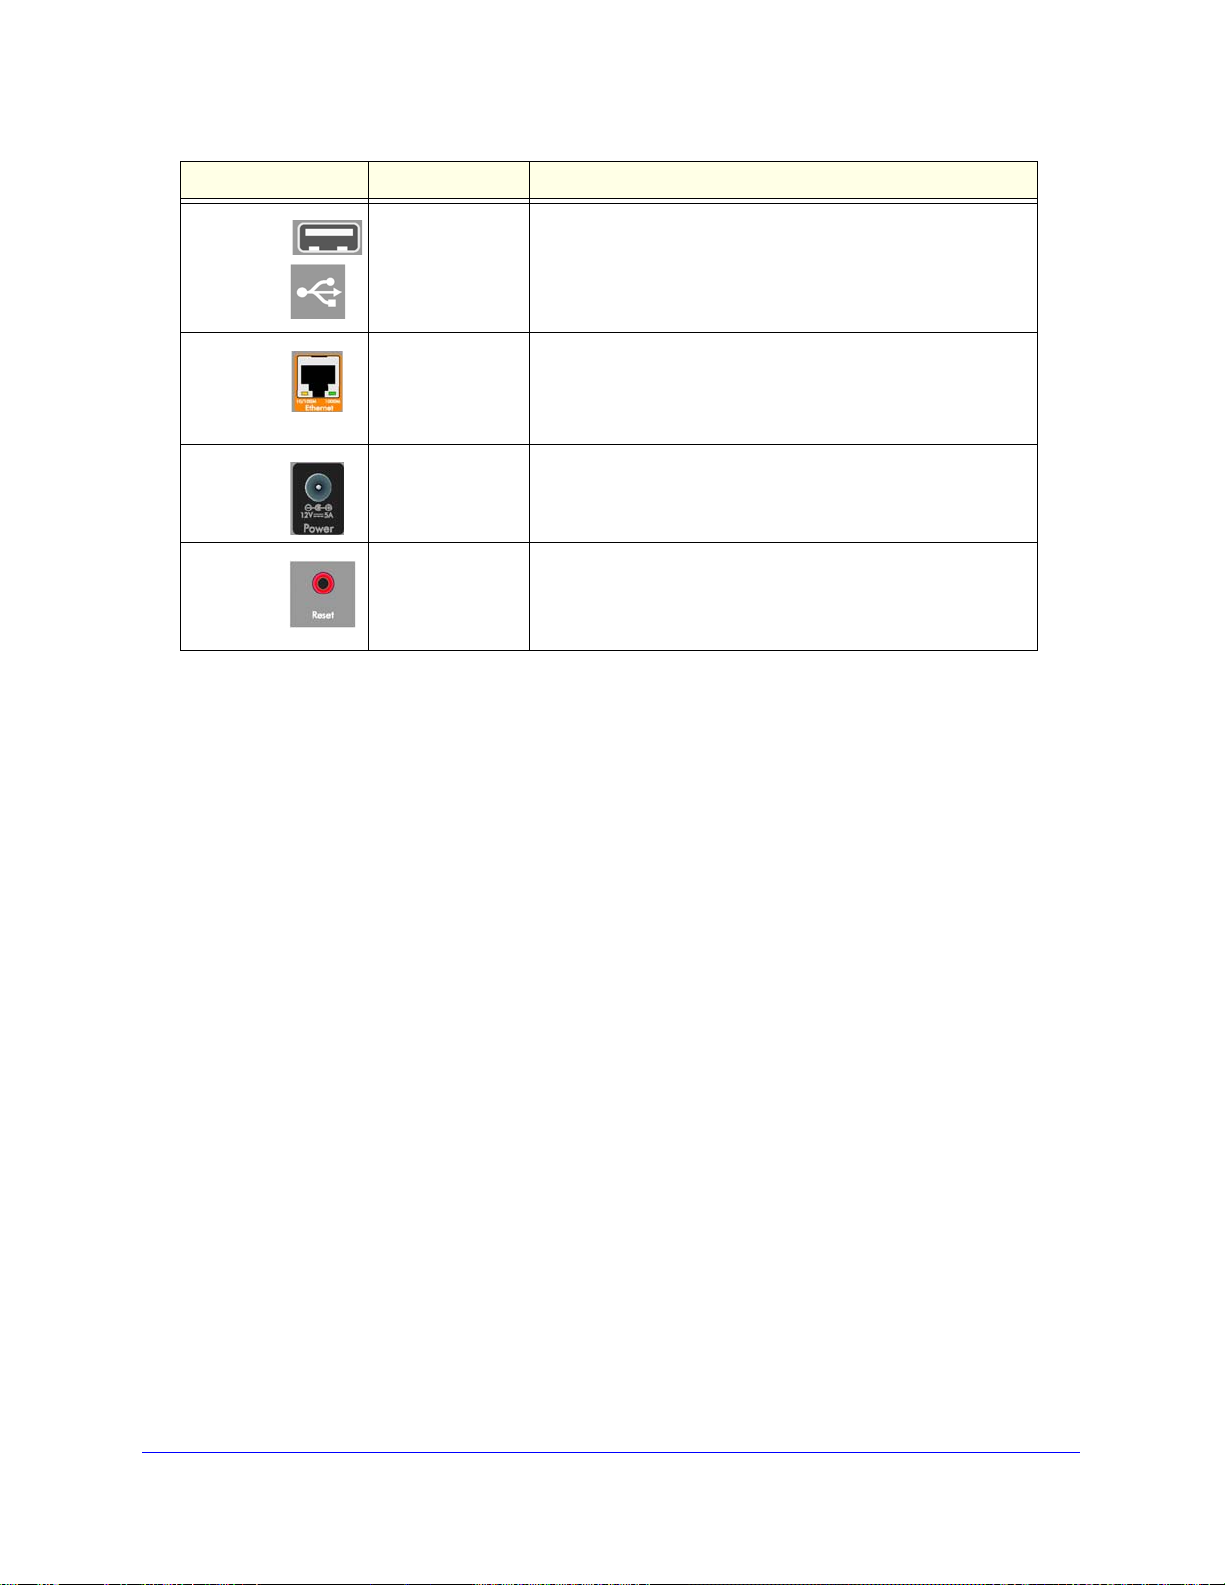
The function of each Stora item is described in the following table:
Item Activity Description
Power
Button
Power
Stat us LED
Disk 1: Top
Disk 2:
Bottom
LEDs
Push button on
back of unit to turn
the on and off.
LED located on
front of unit
LED status
indicators for Disk
1 and Disk 2
located on front of
unit.
T urn on Stora: Press once.
T urn off Stora: To correctly shutdown your Stora, press and
hold the power button for about 5 seconds. The blue light on
the front panel will blink before shutting off. If the unit is hung,
press and hold the power button to force shutdown.
NOTE: To save power, your Stora will automatically go into
disk spin down mode when not used for 12 minutes.
Solid Blue: Power is on.
Blinking Blue: The Stora is booting up or shutti ng do w n.
No LED light: The system is powered off.
On: Disk installed
Solid Green: Drive is operating normally.
Blinking Green: The Stora is booting up or shutting down.
Also indicates activity such as copying data.
Solid Amber: Drive is not ready, however, if solid amber
constantly, it indicates a problem with the drive.
Troubleshooting tips - try one or more of the following:
• check that cables are securely connected and p ower is on.
• remove and th en reinsert the disk.
• turn off Stora and turn it on again to reboot the system.
Off: No disk installed.
12 | Chapter 1: Getting Acquainted
Page 13
NETGEAR Stora User Manual
Item Activity Description
USB Port Plug an external
device into the
USB Port
Ethernet
port
Power
cable
socket
Reset
button
Plug ethernet
cable into port
located on back of
unit.
Plug power cable
into socket located
on back of unit.
Resets Stora to
Factory Defaults
Connect a USB drive and printer.
There is no LED associated with the USB port.
Ethernet Connection LEDs on the back:
Solid Amber: Indicates a 10/100M connection.
Solid Green: Indicates a 1G connection.
Blinking Green or Amber: Indicates link activity.
Plug in Stora system.
There is no LED associated with the power cable socket.
Insert a paper clip or pen to reset Stora system back to its
original factory default settings. Can also be used when
changing your password.
Chapter 1: Getting Acquainted | 13
Page 14
NETGEAR Stora User Manual
Figure 4 Package Contents
Initial Setup
NETGEAR Stora works with both Macintosh and PC computers and comes complete with
everything you need to connect it to your network. An electronic copy of the installa tion guide
is also located on the product CD as well as on the NETGEAR web site at http://netgear.com.
To setup your Stora, complete these steps:
1. “Check Package Contents” on page 14.
2. “Connect Stora to your Network” on page 15.
3. “Configure your Stora” on page 16.
Check Package Contents
1. Unpack the unit and check package
contents.
Before starting installation, unpack the
unit and check your package contents
to be sure all components are
available:
• Stora unit
• Power cable
• Ethernet cable
• Installation Guide
• Stora Resource CD, which
includes:
- Stora software applications
- Warranty Information
- Worldwide Customer Support
Note: If you purchased a Stora unit with only one disk, and want to add a
second disk for redundancy, NETGEAR suggests that you install
your Stora, then connect Stora to your network and validate the
installation before adding the disk. See “Insta lling a Disk” on page 24
for installation instructions.
14 | Chapter 1: Getting Acquainted
Page 15
NETGEAR Stora User Manual
WARNING!
Connect Stora to your Network
The initial setup completion time is approximately 20 minutes.
1. Connect the Ethernet cable and power cord.
Connect one end of the provided Ethernet cable to your router and the other end to the
back of Stora unit. Plug in the power adapter to a power source and connect the other
end to the unit.
Be sure your unit has ample ventilation. Avoid puttin g the unit in a
location where it could be easily knocked over. Do not place items
on top of Stora, or place liquids near or on top of the unit; the
ventilation vents are on the top of Stora.
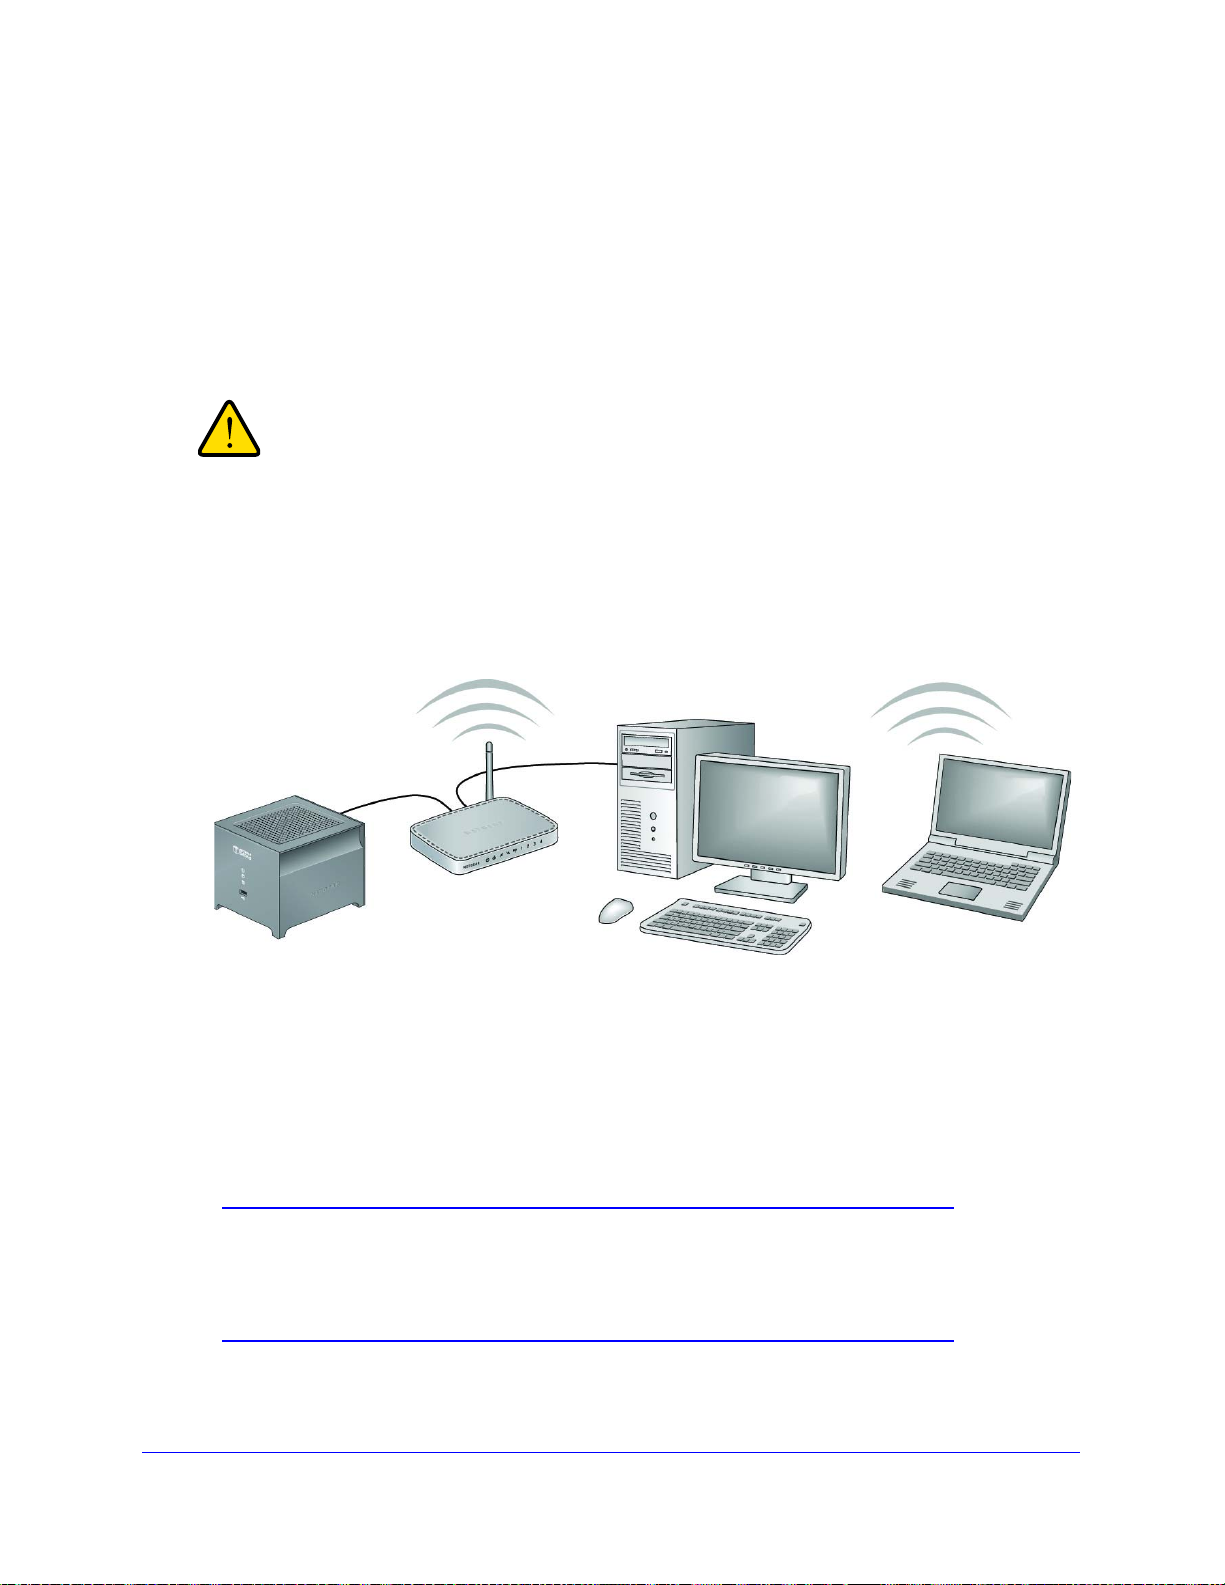
When you have completed connecting your S tora unit, your network should resemble this
illustration.
Figure 5 Connecting Stora to your Network
2. Turn on Stora Unit.
Press the On button located on the back panel of you r unit. The blue light will flicker while
the unit boots and obtains an IP address; then it will turn solid blue. The first time you turn
the unit on, the disk LEDs will be solid amber . Af ter you complete the setup, the disk LED
indicators) will show solid green.
Note: The router in your network must have an ethernet port available to
connect Stora unit to the router via the Ethernet cable. Your router
must also be configured to automatically provide an IP address for
your network devices.
Chapter 1: Getting Acquainted | 15
Page 16
NETGEAR Stora User Manual
Configure your Stora
Use the CD that comes with Stora unit to setup and configure your device and make it ready
for storing data. At this time you will also be ab le to give your unit a unique n ame, and assign
your own user name and password.
To Run the Setup Program
1. Make a note of the Product key, which is located on the Resource CD sleeve, and also
on the bottom of Stora unit. Write this down, as you will need it later in the installation
process.
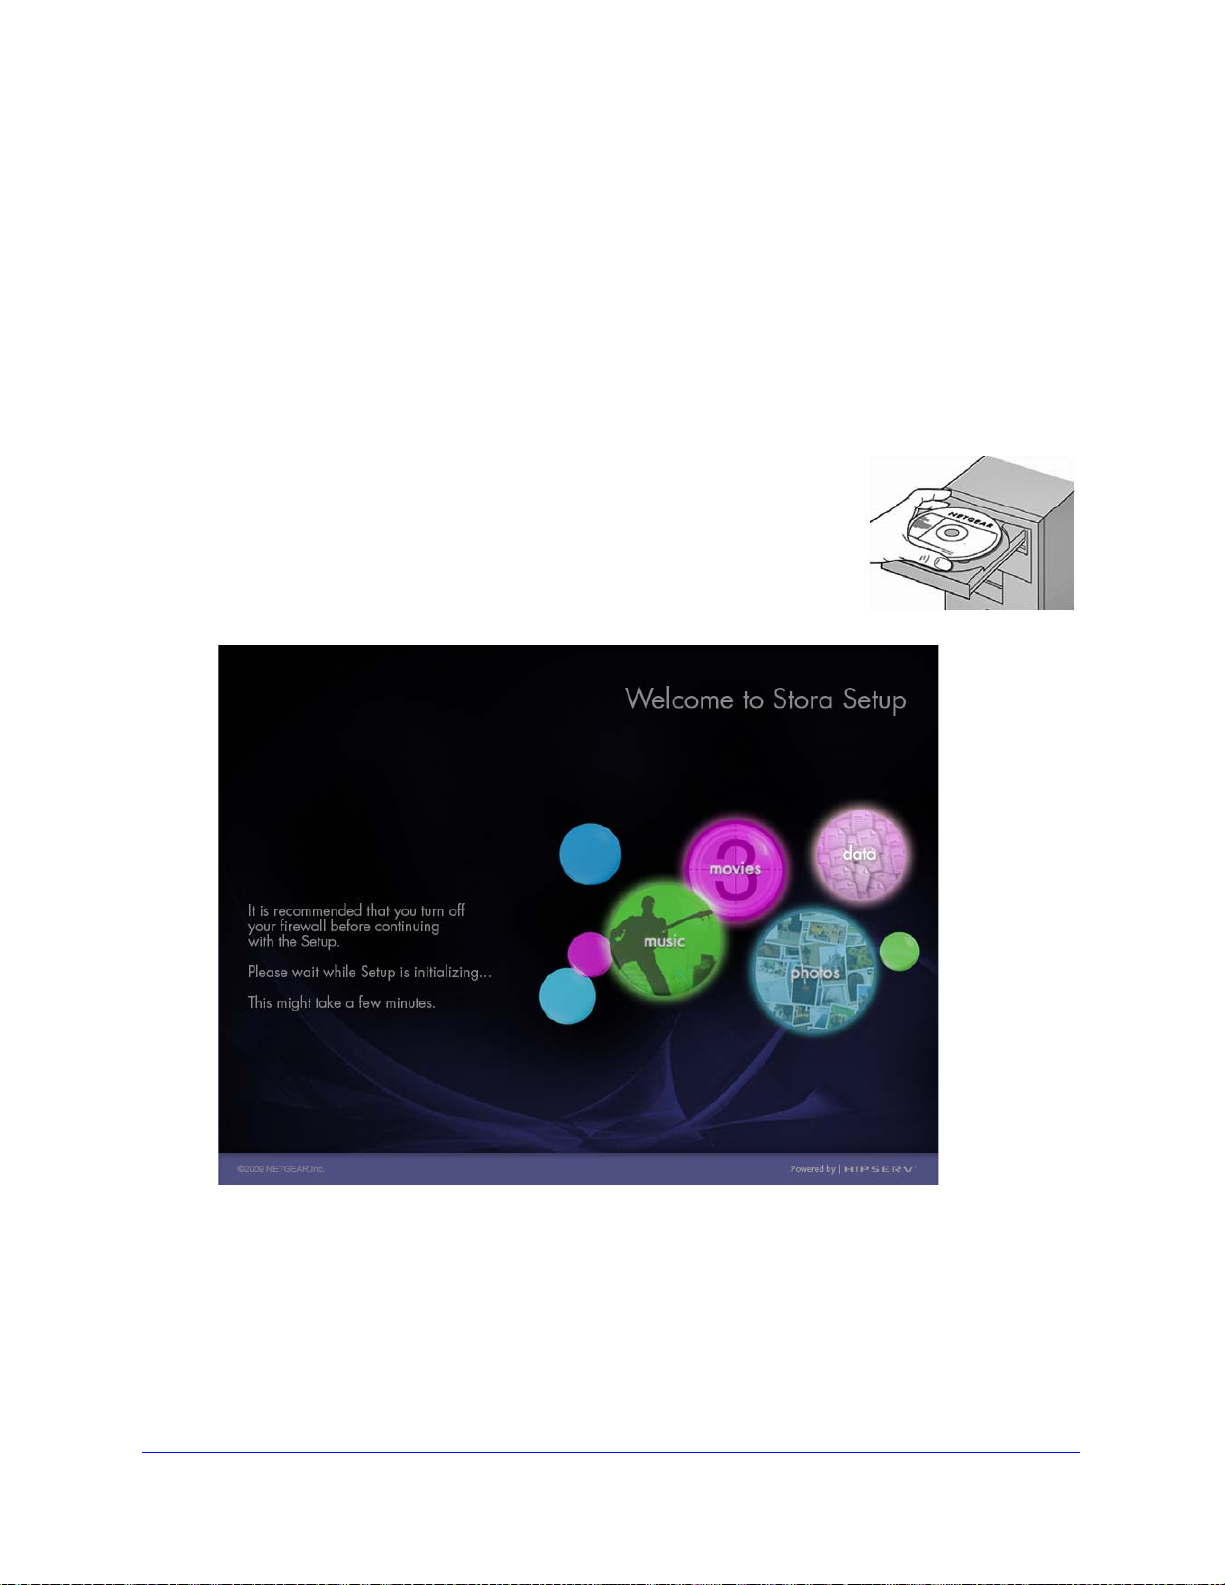
2. Insert the Resource CD into your computer.
Wait approximately 2 minutes for the Setup program to initialize.
The “Welcome to Stora” setup screen displays.
If the CD does not start automatically, go to My Computer and
double-click StoraSetup.exe to start the Setup program.
Figure 6 Welcome Screen
3. Setup Your Stora
a. Click Step 1: Set Up Your S tora to set up S tora so that it can store dat a.The software
license agreement will display.
b. Click the I Accept box.
16 | Chapter 1: Getting Acquainted
Page 17

NETGEAR Stora User Manual
Figure 7 Setup your Stora and License Agreement
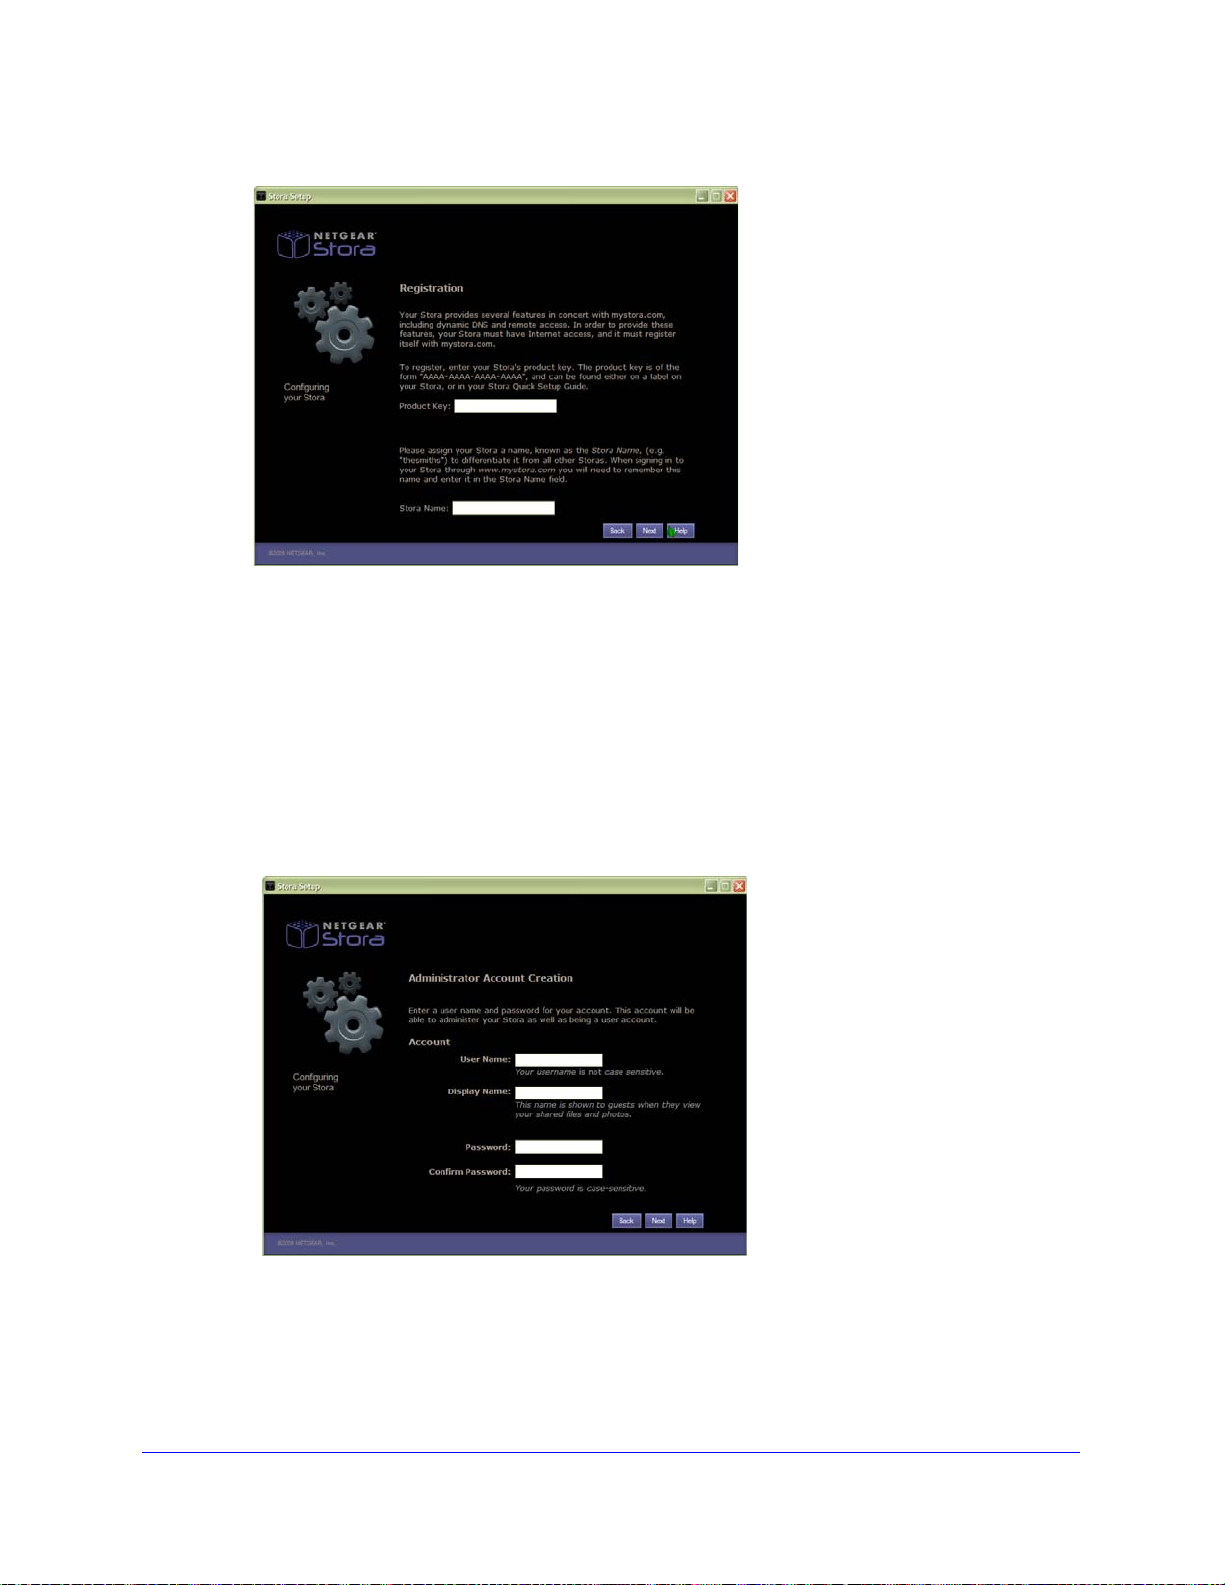
4. Register Your Stora
a. Product Key: enter the product key that you noted in Step 1. The product key is
located on the Resource CD sleeve, and also on the bottom of Stora unit.
b. Stora Name: enter a unique name for your Stora unit.
Note: if the name you choose is already a registered name for a S tora unit,
you will not be able to use it. This is similar to choosing an email
name; there can be no duplicates.
c. Click Next.
Your S tora will then register with http://www.mystora.com. The page will change when
the process is complete.
Chapter 1: Getting Acquainted | 17
Page 18
NETGEAR Stora User Manual
Figure 8 Registration Screen
5. Create your account
a. User Name: Enter a user name. This will be the name you use to login to Stora
system. Your user name is case-sensitive.
b. Display Name: This is a case-sensitive name that guests will see when they view
your shared files and photos.
c. Password: Enter your case-sensitive password and confirm it.
d. Be sure to make a note of Stora name, your username and password.
e. Click Next and follow the on-screen prompts to complete.
Figure 9 Account Creation
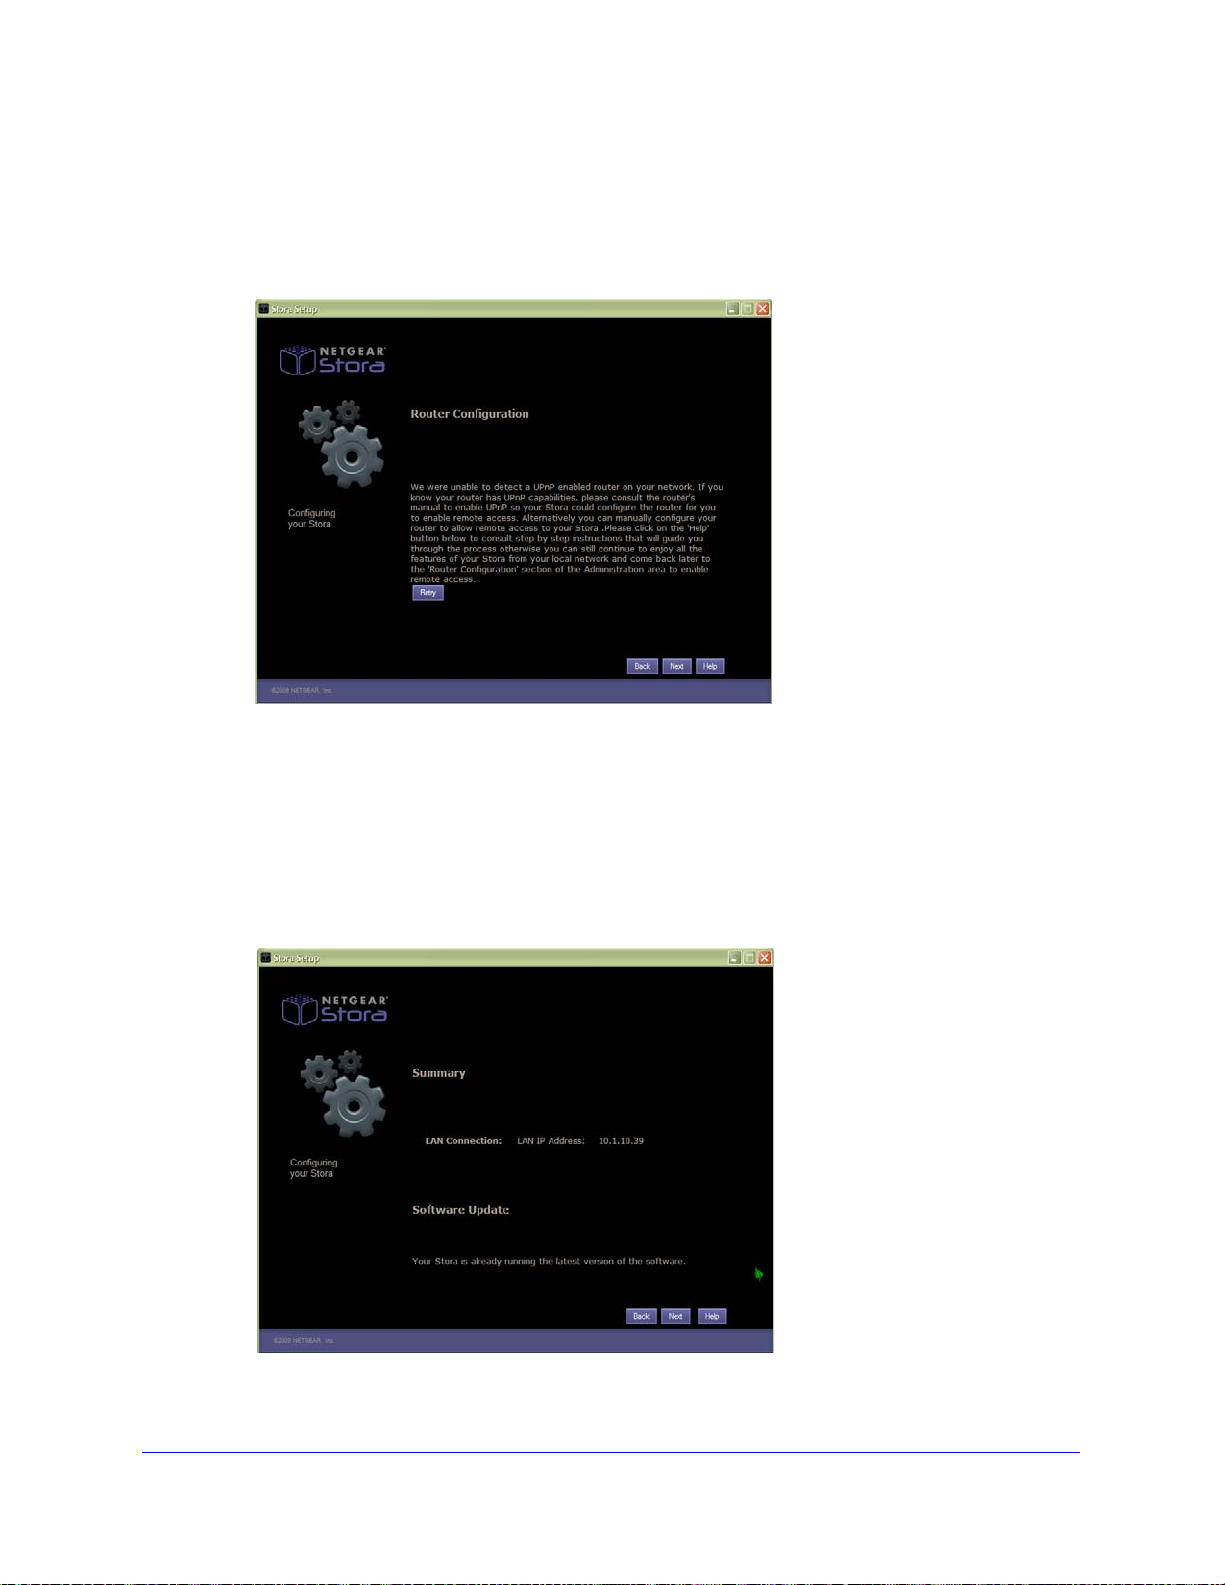
6. Router Configuration
18 | Chapter 1: Getting Acquainted
Page 19
NETGEAR Stora User Manual
a. This screen appears when there is a setup problem with your UPnP router, or if your
router is not UPnP-capable. Most users with newer routers should not see this
message. See “UPnP Router Configuration” on page 96 and“UPnP Port Mapping” on
page 96 for more information.
b. Click Next to continue.
Figure 10 Router Configuration Screen
7. Summary Screen
The summary screen will indicate the IP address Stora unit will use. It will also
automatically check for any software updates that may have occurred since the CD was
shipped.
a. Click Next.
Figure 11 Router Configuration Screen
Chapter 1: Getting Acquainted | 19
Page 20
NETGEAR Stora User Manual
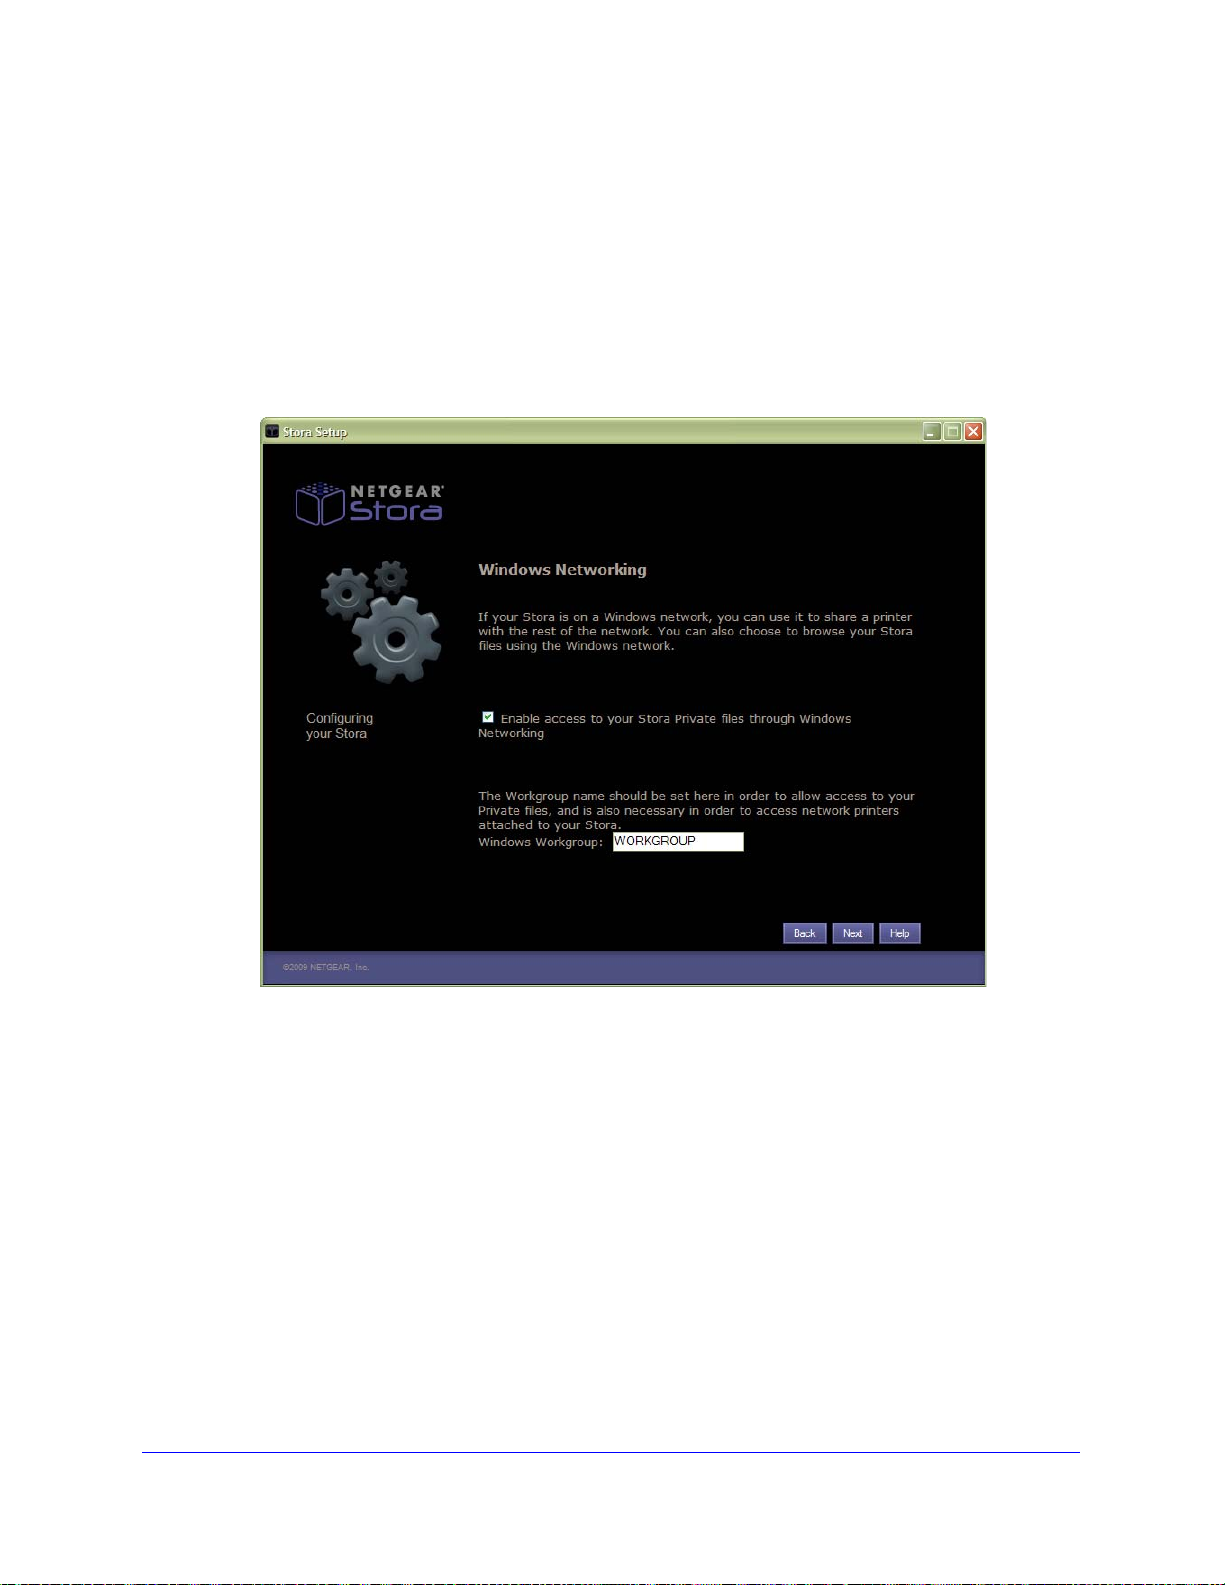
8. Windows Networking
Windows Networking allows you to share files and also a printer connected to Stora.
a. Enable private access: check this box if you want to share a printer with the rest of
the network, or browse your private files using Windows Network.
b. Workgroup Name: Default name is WORKGROUP.
The Workgroup name should
be set in order to allow access to your private files and network printers
attached to your Stora.
Figure 12 Windows Networking
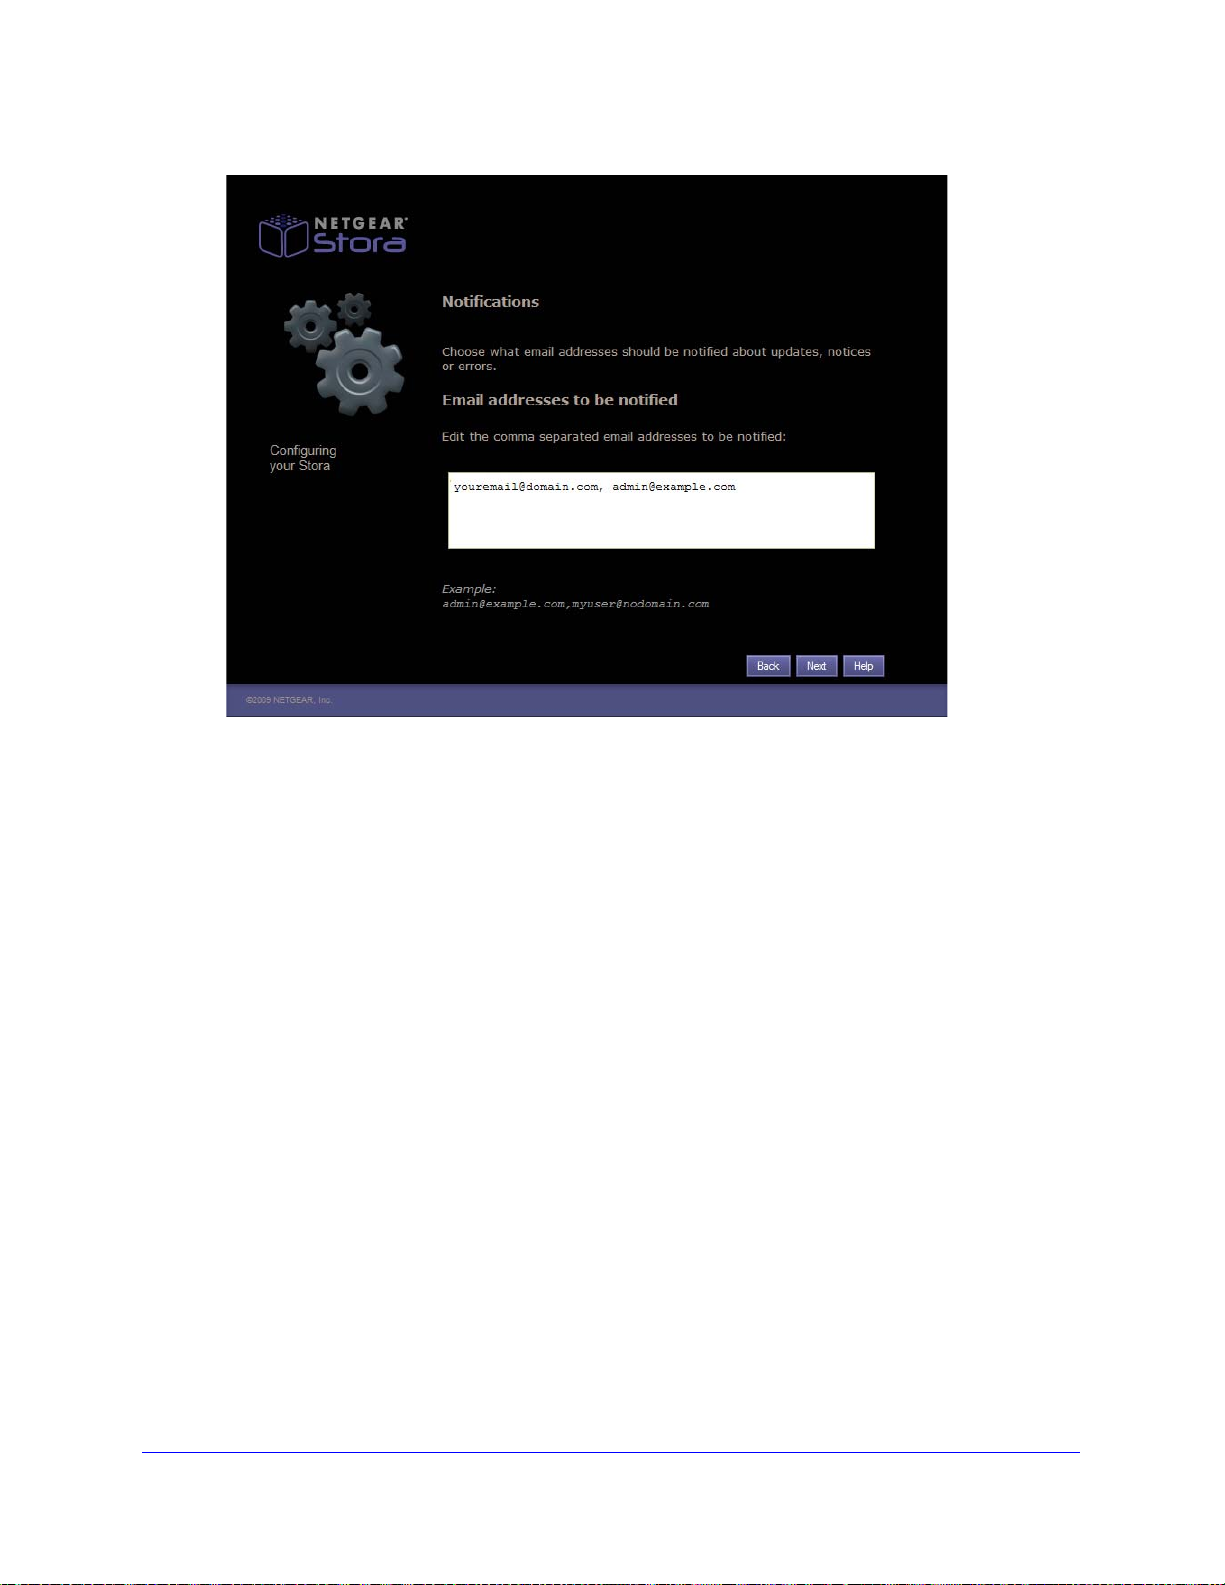
9. Notifications
You can enter one or more email addresses where you would like to be notified of any
updates or messages regarding your NETGEAR Stora unit. These messages will contain
update information, error information, and other information needed to keep your system
running smoothly.
To add more than one email address, separate the addresses by using a comma.
20 | Chapter 1: Getting Acquainted
Page 21
NETGEAR Stora User Manual
Figure 13 Notifications
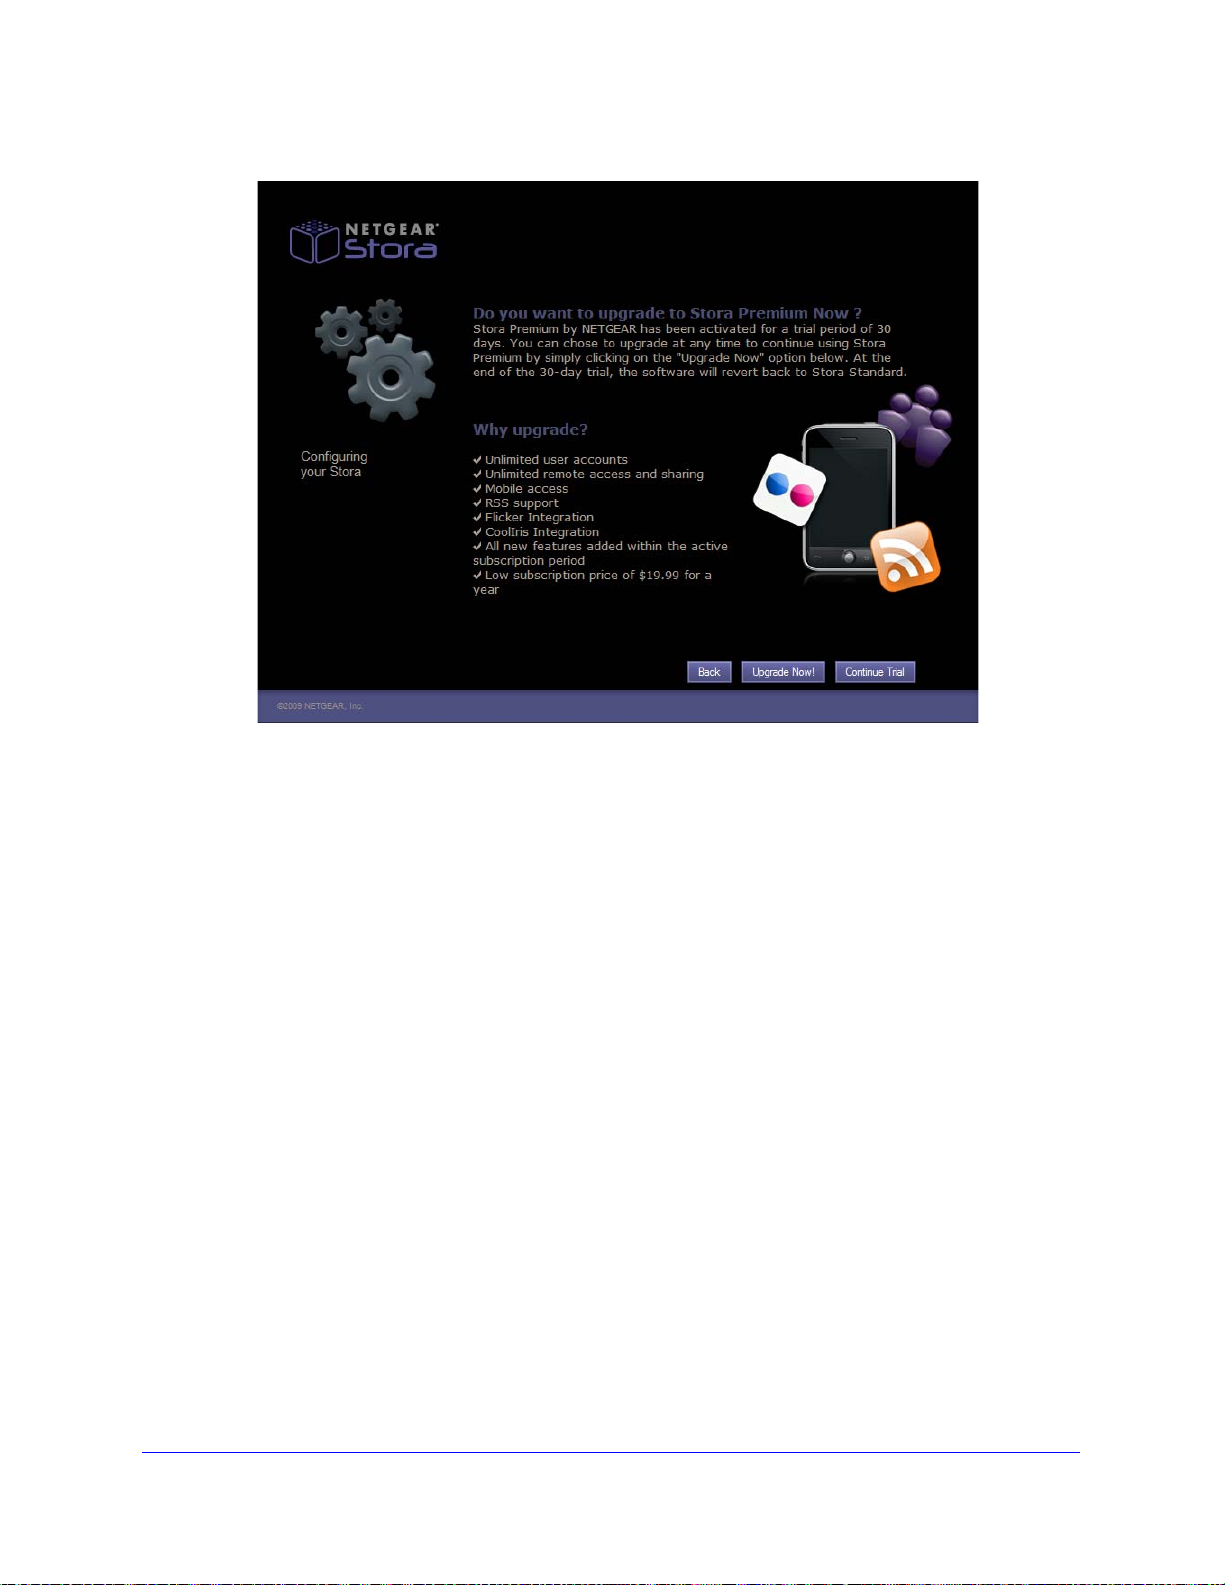
10. Stora Premium Subscription Option
During installation you have the option to upgrade your Stora subscription to include
Premium features not available with the standard subscription.
See “Standard vs. Premium Features” on page 7 for a list of Premium features.
a. Click Upgrade Now! to start your premium service immediately, or
b. Click Continue Trial to activate your 30-day free Premium trial period. You can
always upgrade at a later time.
c. To update after the trial period has ended, see “Stora Premium Subscription” on
page 105.
Chapter 1: Getting Acquainted | 21
Page 22
NETGEAR Stora User Manual
Figure 14 Premium Upgrade Option
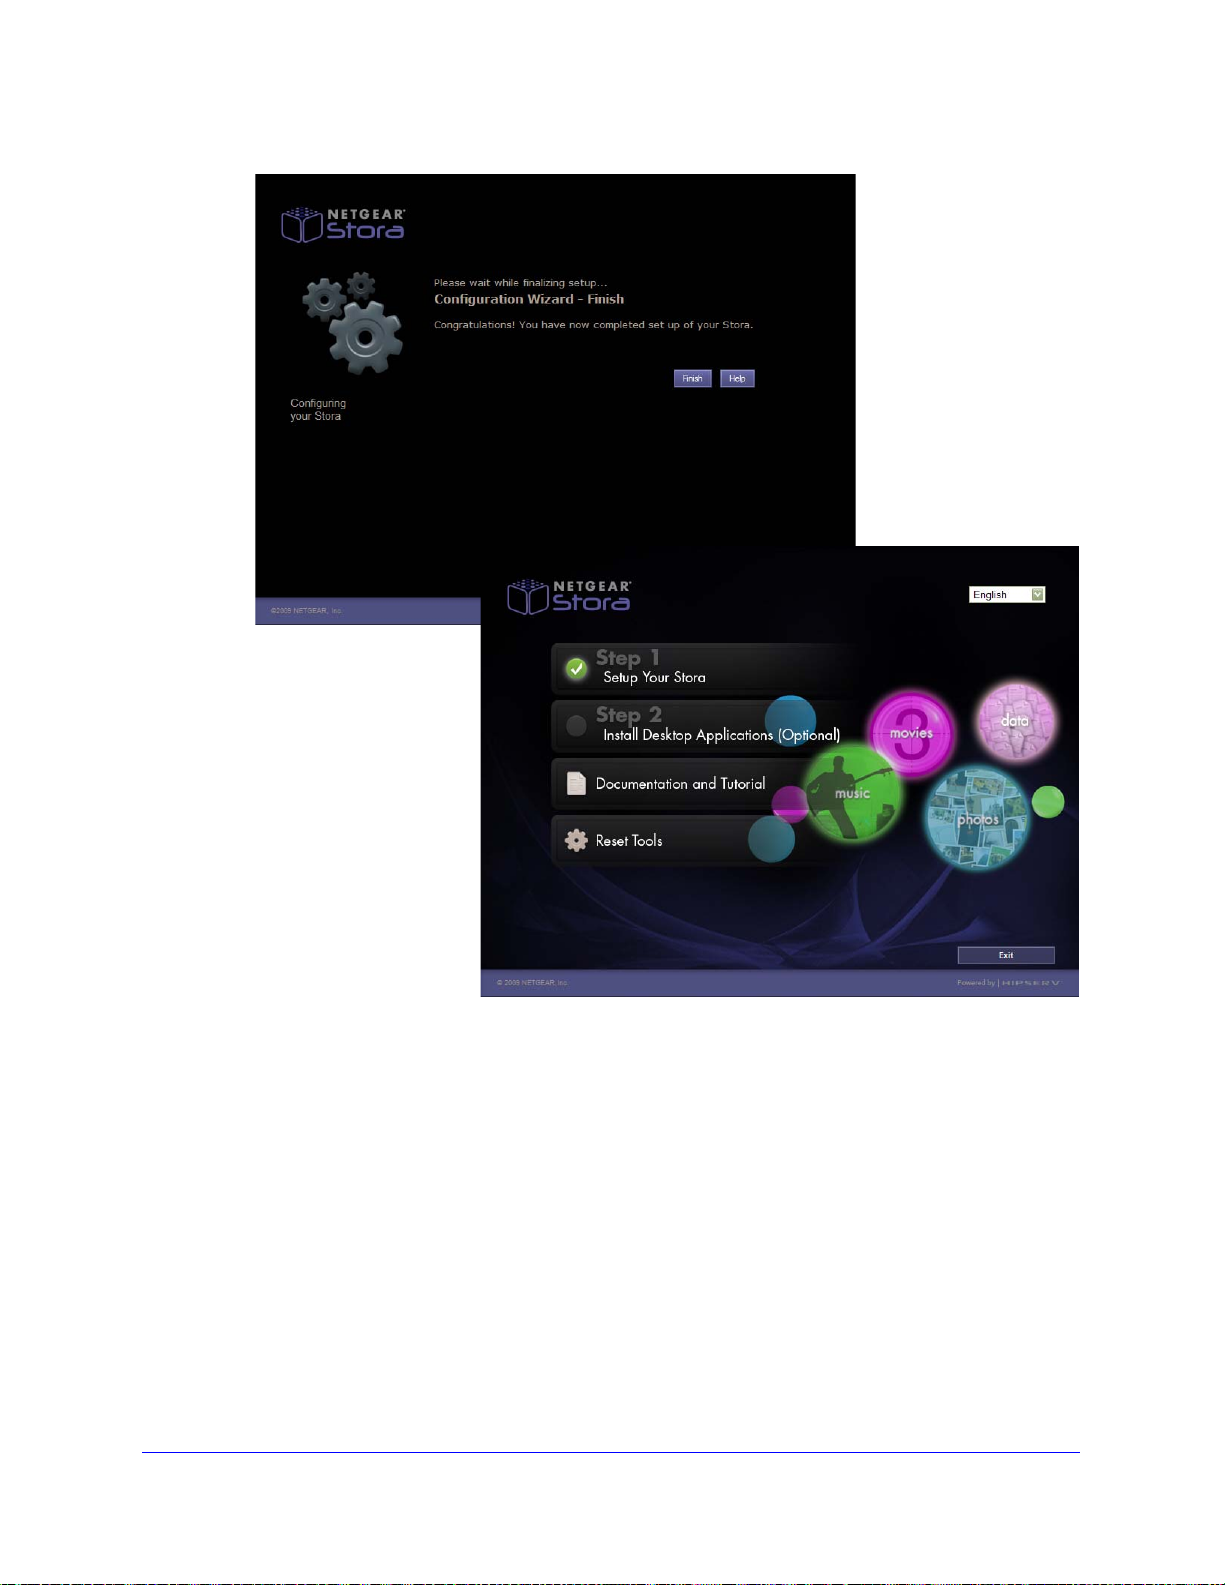
11. Configuration Wizard - Finish
When you have successfully configured your Stora system, the Configuration Wizard
screen will appear.
a. Click the Finish button.
When the Setup screen re-displays, the checkbox next to Set Up Your Stora will be
checked indicating that you have completed this step. You can now exit and use the
device.
b. Next, install the Desktop Application software.
For information on using Stora Applications, see “Installing the Desktop Applications”
on page 27.
22 | Chapter 1: Getting Acquainted
Page 23
NETGEAR Stora User Manual
Figure 15 Configuration Wizard - Finish
Chapter 1: Getting Acquainted | 23
Page 24
NETGEAR Stora User Manual
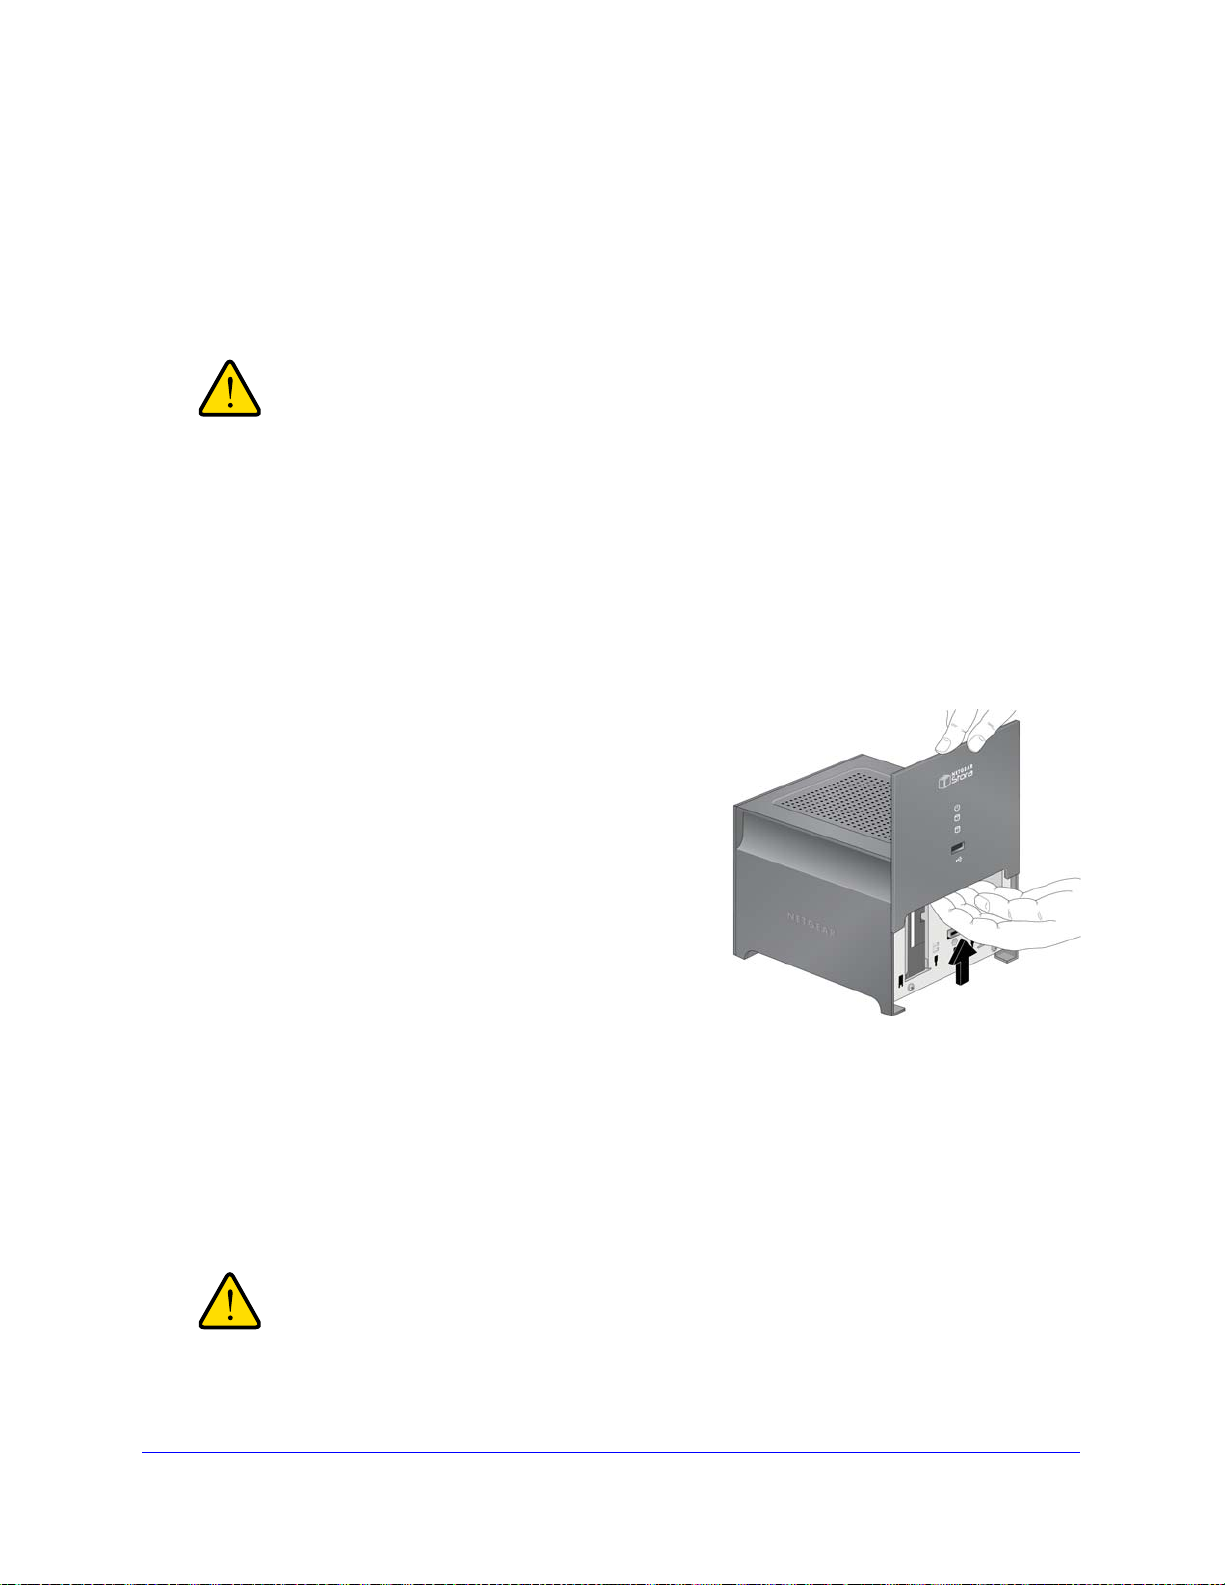
WARNING!
WARNING!
Figure 16 Remove front cover
Installing a Disk
NETGEAR Stora comes with two bays that can accommodate SATA disks. The first bay is
the primary storage disk, and the second can be set up as a mirrore d backup for your primary
disk.
Be sure that Stora power cord is unplugged before adding or
removing the disks. Failure to observe this precaution could
render your disks useless. To safely eject a disk, see Figure 16.
The following instructions explain how to set up and install a single drive. If you purchased a
Stora with only one inst alled drive, and you want to add a second drive, carefully repeat these
same instructions.
To Install a Disk
1. Unplug the power cord.
2. Remove front cover to add or remove a hard drive.
3. Unlock the drive.
A lever on the back on the unit will release the
hard drive from the locked position. See
4. Insert the hard disk.
a. The label must face the outside of the unit.
b. Slide the disk into place in either slot.
c. Lock the drive in place and close the cover.
The green LED on the front of Stora will blink
continuously until the installed drive build
process is complete.
d. A pop up window will appear asking if you want to use the disk for “max capacity” or
“max protection”.
• RAID1 will maximize your protection.
• JBOD will maximize your capacity.
See “RAID1” on page 108 and “JBOD” on page 109 for details about these options.
Stora formats hard drives differently than a computer does. Do not
swap hard drives between a Stora and a computer or your dat a will
be lost.
24 | Chapter 1: Getting Acquainted
Page 25
NETGEAR Stora User Manual
WARNING!
Replacing a Failed Disk
When a disk fails in your S tora device, you are notified of the failure by e-mail. On the fron t of
the Stora device, an amber LED might indicate a failed disk. The top LED is disk 1; the
bottom one is disk 2. Take note of the failed disk.
To assure compatibility, check the Hardware Compatibility list on the NETGEAR support site
for a list of disks qualified to be used in the Stora.
Be sure to power down the unit and then unplug Stora power cord
before adding or removing the disks. Failure to observe this
precaution by “hot-swapping” a drive could render your disks
useless.
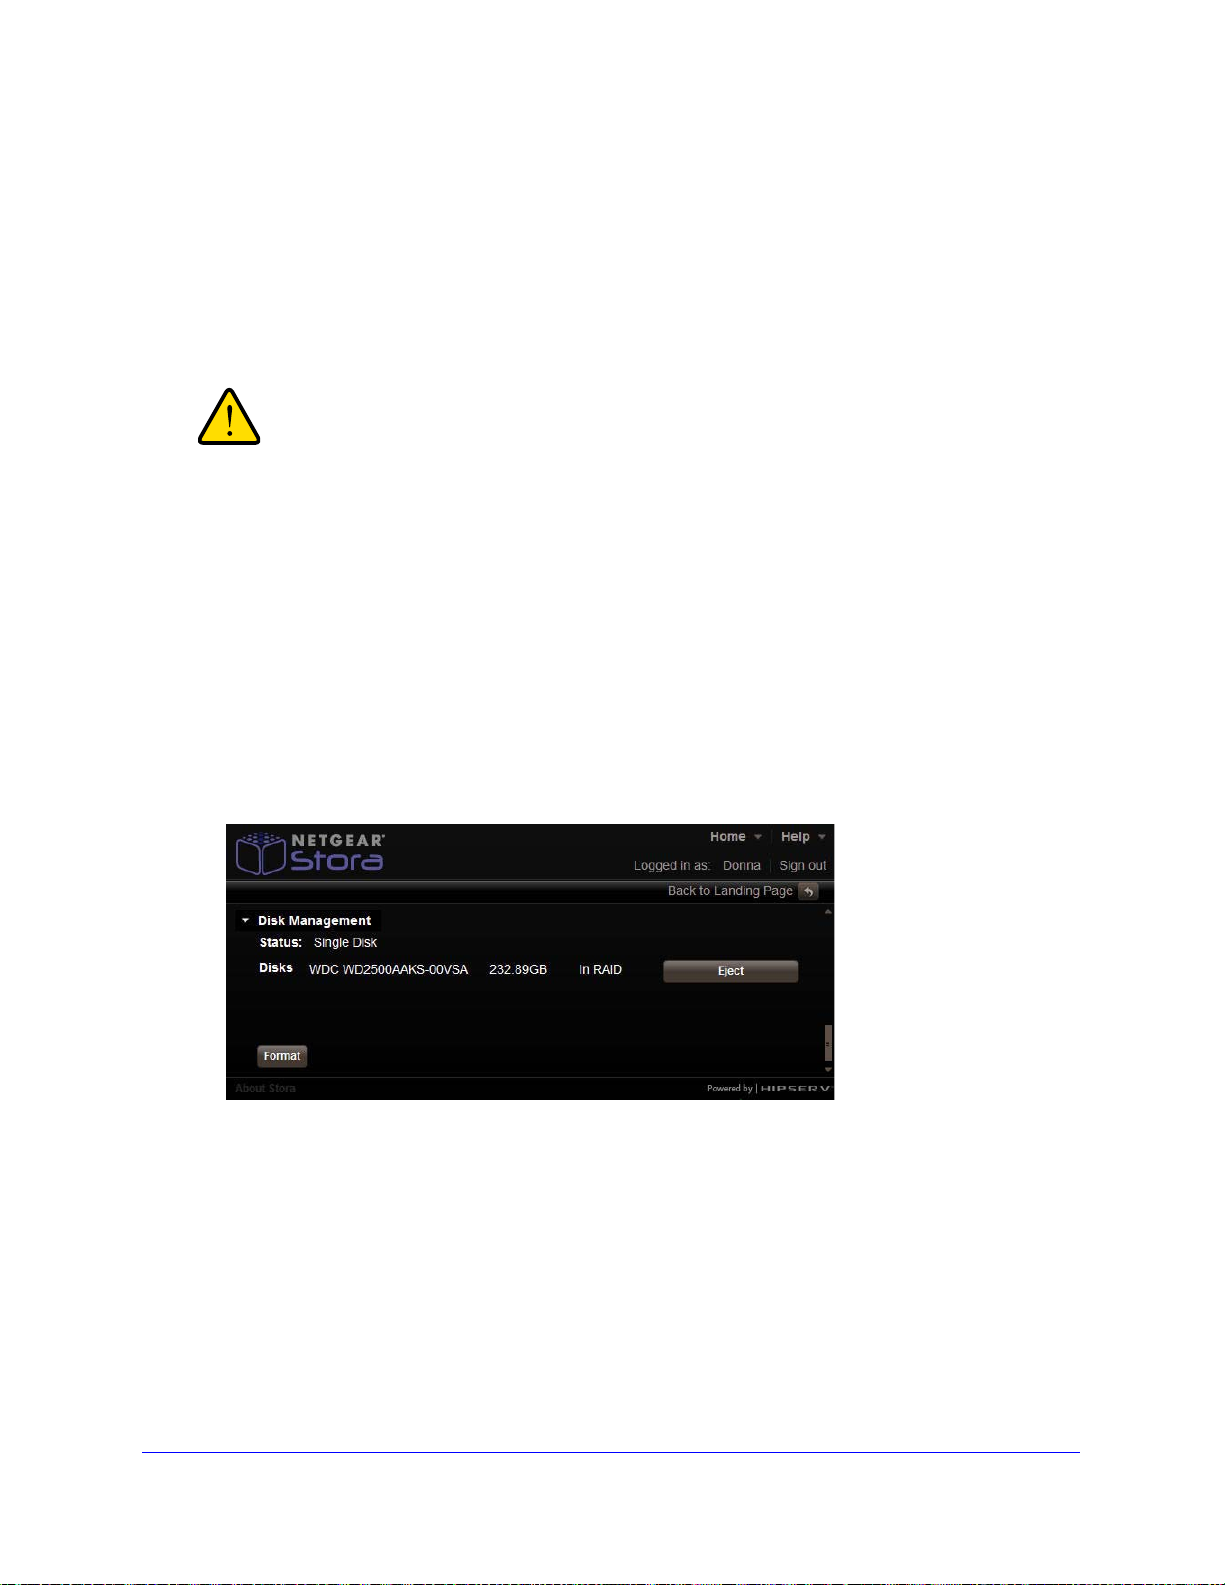
To Eject a Disk
1. Open Stora application user interface.
2. Click Preferences.
3. Navigate to Administration > Disk Management
4. Click the Eject button.
See “Disk Management” on page 106 for more information on ejecting disks.
Figure 17 Safely eject a disk from your Stora
Chapter 1: Getting Acquainted | 25
Page 26
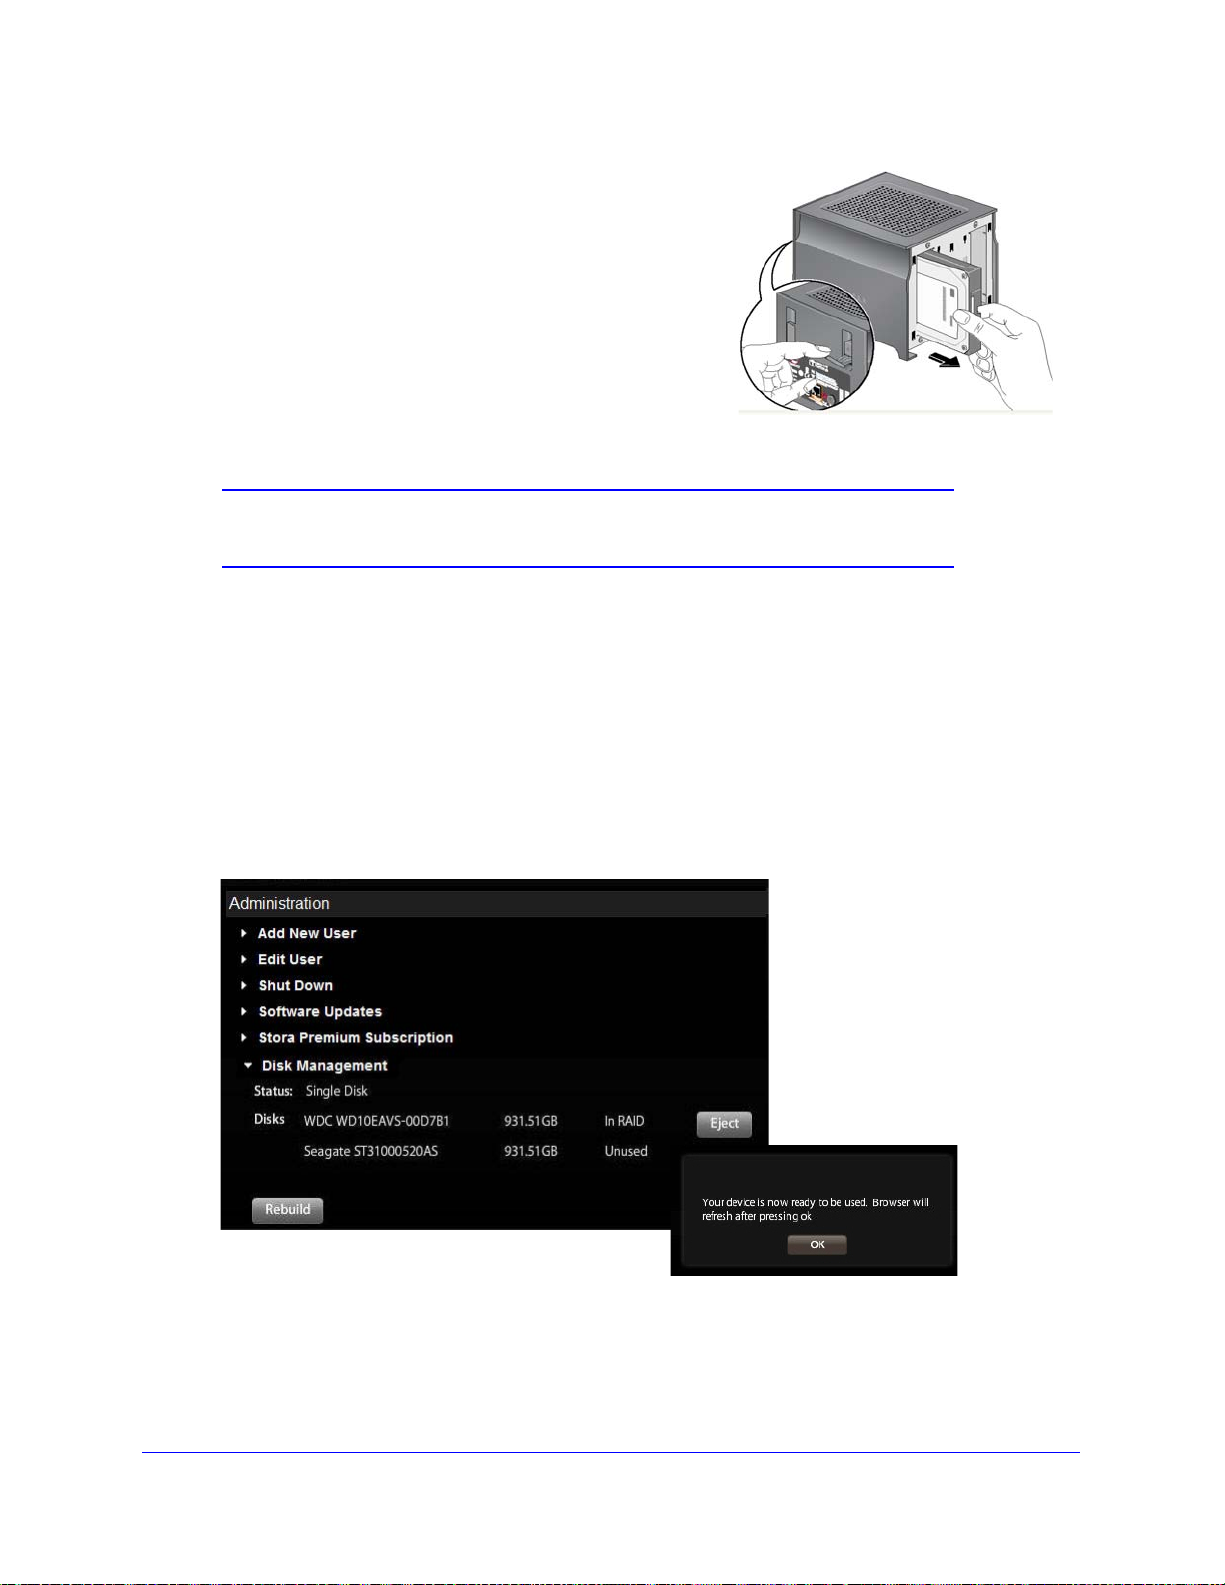
NETGEAR Stora User Manual
Figure 18 Disk Release Latch
To Replace the Disk
1. View the disk status lights to identify which disk
has failed.
If necessary , unlock the tray lock by moving it to the
right, then press the release of the failed disk. The
latch pops out.
2. Pull out the disk, and replace the failed disk.
3. Slide the disk tray back into the unit and secure the
latch.
Note: To protect against data loss, add a second disk to your Stora to be
used as a mirrored backup of the data on the first disk.
To Check Disk Status or Rebuild a Disk
1. Open Stora application user interface.
2. Click Preferences.
3. Navigate to Administration > Disk Management and locate the Rebuild button.
a. If a rebuild button shows on the screen, click it to find the status of the disk.
b. If no rebuild button shows on the screen, the disk is working properly.
4. If the disk is bad, replace it. See “Disk Management” on page 106 for more information.
Figure 19 Rebuild a Disk
26 | Chapter 1: Getting Acquainted
Page 27
NETGEAR Stora User Manual
Installing the Desktop Applications
NETGEAR Stora comes with additional software applications to help you administer the
device. Once you have completed the initial configuration of your Stora device, you have the
option to install those applications.
For information about using Stora Desktop Applications, see:
• Chapter 2, “Stora Agent"
• Chapter 3, “Stora Application"
• Chapter 4, “Stora Desktop Mirror"
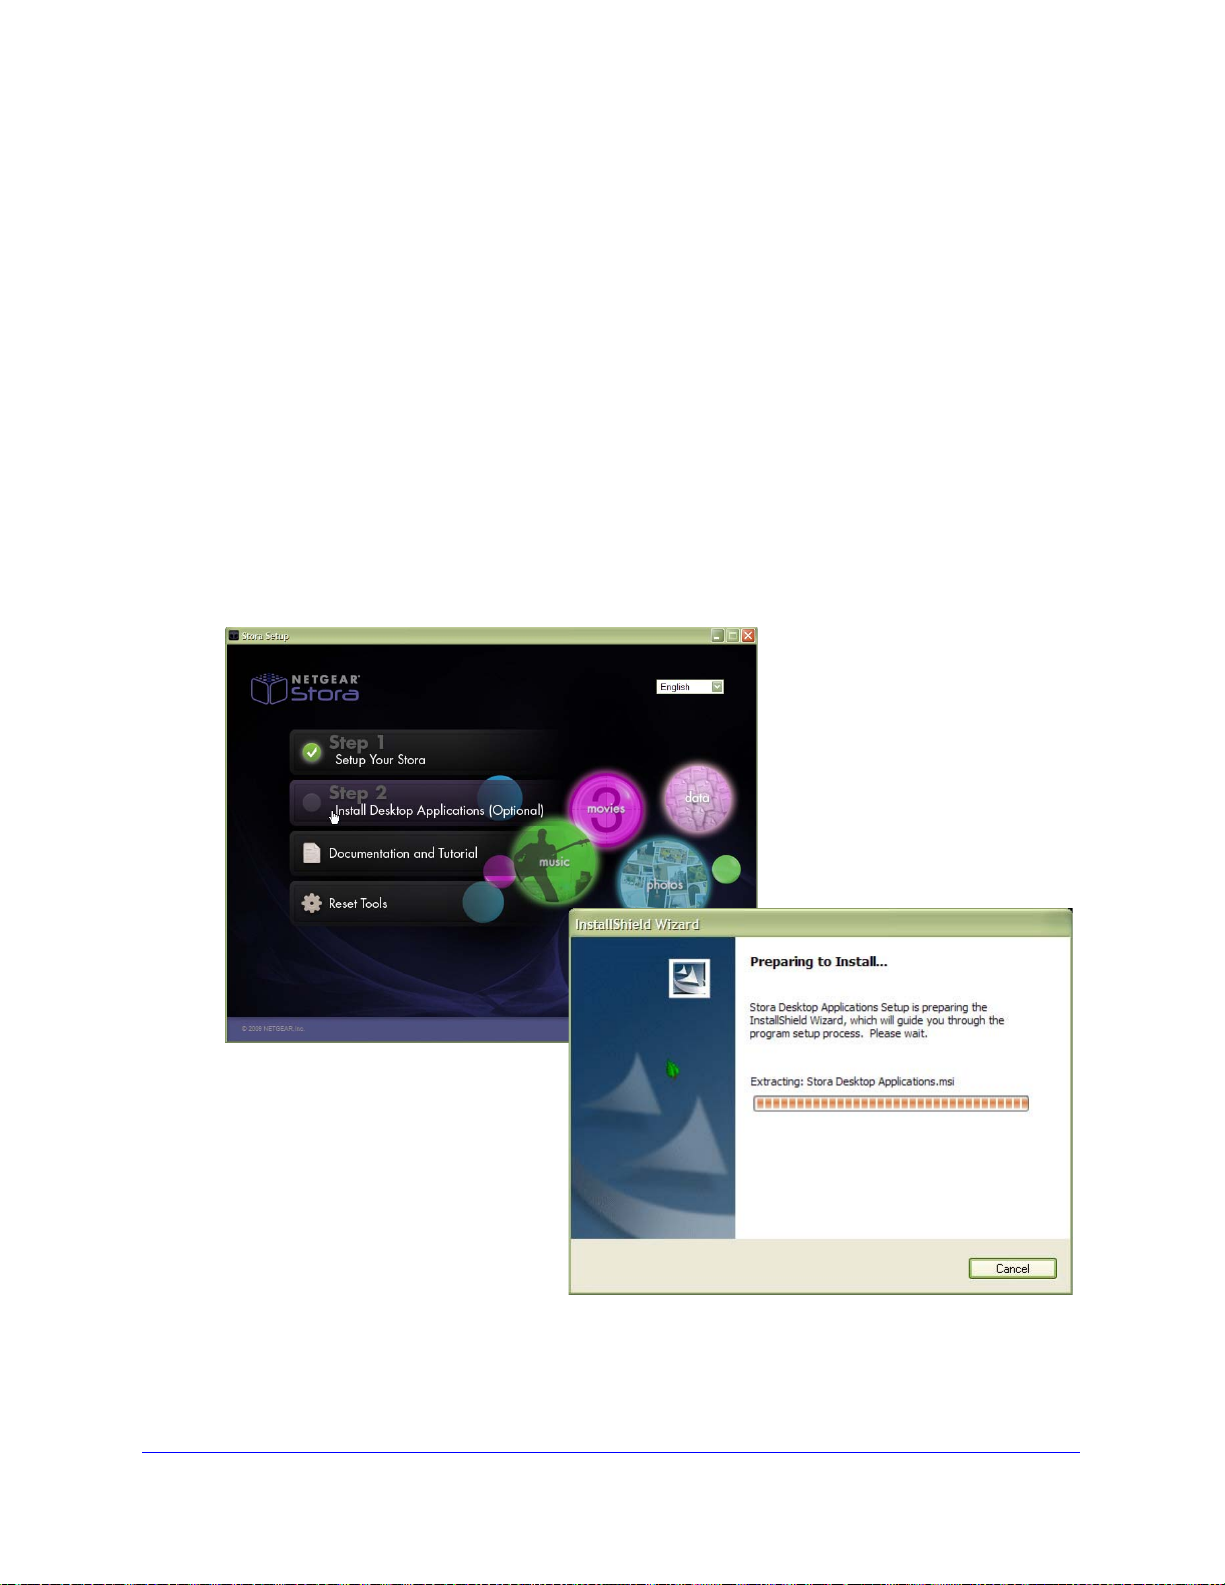
To Install the Desktop Applications
1. Click Step 2: Install Desktop Applications (Optional)
The InstallSheild Wizard will appear.
Figure 20 Install Desktop Applications
Chapter 1: Getting Acquainted | 27
Page 28

2. Welcome Screen
a. Click Next to continue the installation.
NETGEAR Stora User Manual
Figure 21 Desktop Application Welcome Screen
3. Destination Screen
a. Accept the default destination or change locations.
b. Click Next to continue the installation.
Figure 22 Destination Screen
28 | Chapter 1: Getting Acquainted
Page 29
NETGEAR Stora User Manual
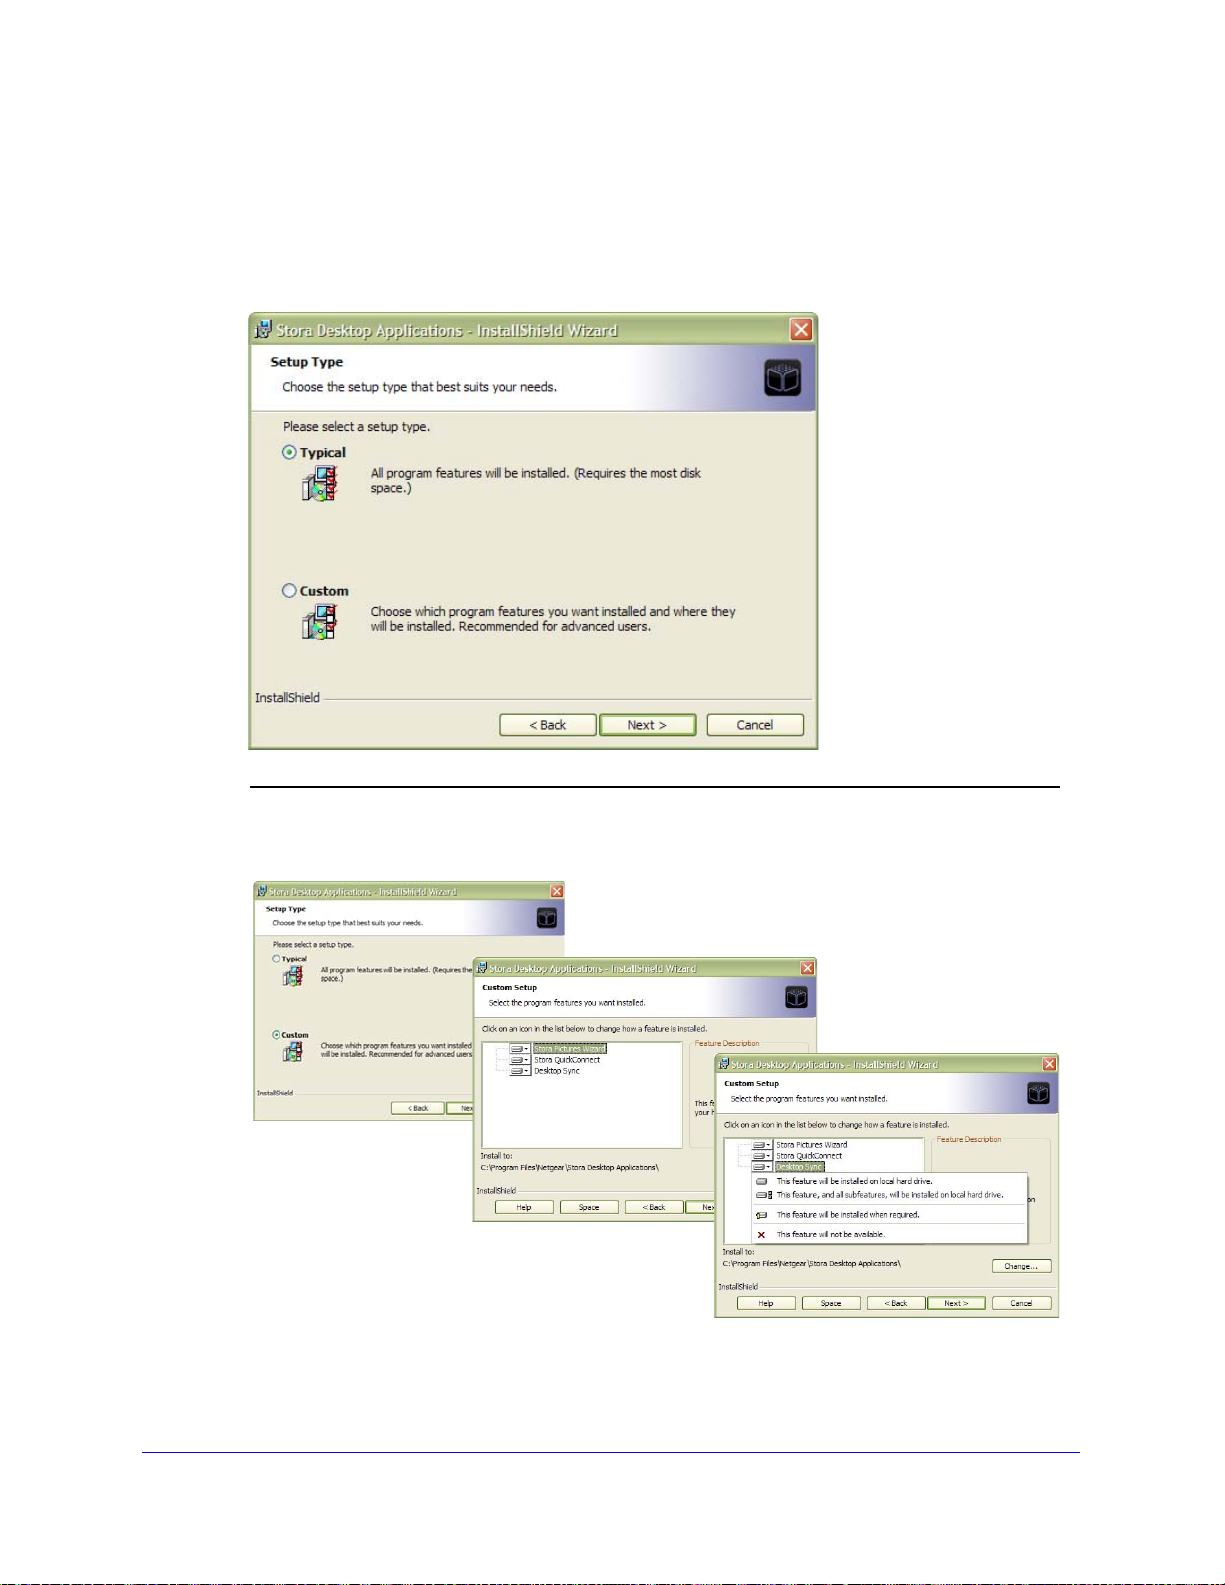
Custom Setup Options
4. Setup Type
a. Typical: Recommended setup
b. Custom: Choose which applications you want to install.
c. Click Next to continue the installation.
Figure 23 Typical and Custom Setup Options
Chapter 1: Getting Acquainted | 29
Page 30
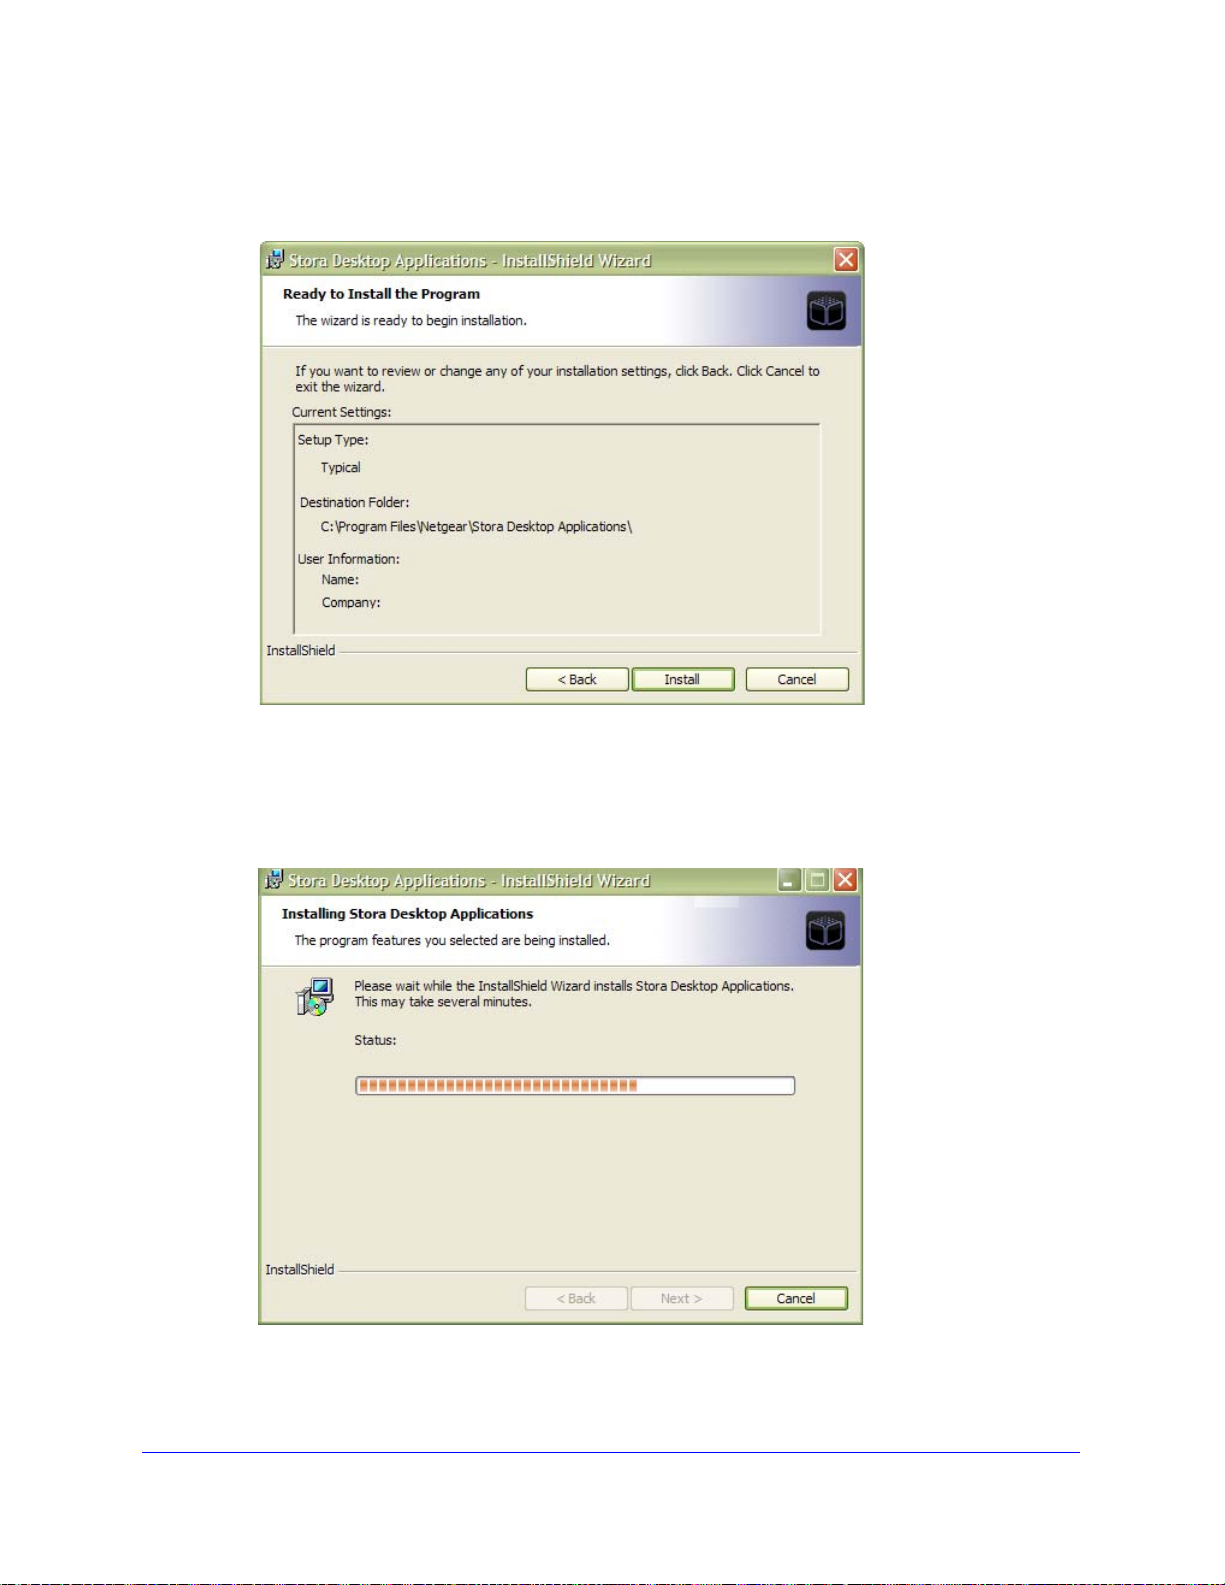
5. Confirm Program Installation
a. Click Next to continue the installation.
NETGEAR Stora User Manual
Figure 24 Program Confirmation
6. Installation Screen
a. Click Next to continue the installation.
Figure 25 Installing Applications
30 | Chapter 1: Getting Acquainted
Page 31

NETGEAR Stora User Manual
7. Installation Completed
a. Click Finish to continue the installation.
Figure 26 Installation Complete
8. Check mark Confirms Successful Installation of Applications
a. Click Exit to finish the installation, or click either the Documentation and Tutorial or
Reset Tools buttons to see additional options.
Figure 27 Successful Installation
Chapter 1: Getting Acquainted | 31
Page 32

NETGEAR Stora User Manual
Accessing Stora
Stora can be accessed in several ways. Dep endin g on your needs and locatio n, you can use
one or all of the following methods to access your Stora.
Web Browser Access
The easiest way to access your Stora is t o go to http://www.mystora.com and enter the name
of your stora name, and your login and password. You will automatically be routed to your
local connection. Once connected locally, no data is passed over the internet.
Local Area Networking
Using default network browsing tools (such as My Network Places), any system connected to
your home network will recognize Stora as a computer in your Workgroup. To access the
Stora web GUI from your local LAN go to http://IP_Address/?local=1.
For example, if your IP Address is 192.168.1.10, enter the following into your web browser:
http://192.168.1.10/?local=1
Stora Agent
Stora Agent is software installed on a PC or Mac and is available from the
bottom menu bar. During installation, it automatically adds a shortcut icon on
your desktop that directly opens Stora folders. This is a drag-and-drop
interface just like any other file or folder on your hard drive an d is a vailable on
demand from the shortcut. See Chapter 2, “Stora Agent" for more information.
Mapped Drives
In a Windows XP or Vista environment, Stora agent automatically maps three drive letters (x,
y and z) to network shares on Stora. This provides a simple drag-and-drop interface,
persistently available from within the My Computer window.
Figure 28 Stora Mapped Drives
32 | Chapter 1: Getting Acquainted
Page 33

NETGEAR Stora User Manual
Remote Access
Stora dat a can be accessed over the Internet using any web browser , which means you could
take a notebook computer anywhere with wireless network connectivity and securely reach
across the Internet to your private data at home. To access your Stora remotely, open your
browser and go to http://www.mystora.com.
Files can be shared and even uploaded with a drag-and-drop interface, however only specific
default folders can be shared over the Internet. A Premium Service subscription enables
further remote access options, including extended permissions and folders.
To access and remotely copy files to and from your Stora
1. Go to http://www.mystora.com and login to your Stora device.
2. Enter your Stora Name that you selected when you set up your device.
3. Enter your Username and Password that you created during Setup.
4. Click Sign In.
Figure 29 Remote Access
Chapter 1: Getting Acquainted | 33
Page 34

Resetting Your Stora
Your Stora system may need to be reset under the following conditions:
• When you want to change the name of your Stora system.
• When you forget your user id or password.
Note: Resetting your Stora will not delete your data from t he disk, however
you will need to recreate the same login and password after the
reset in order to access data in private folders, such as
MyComputers, and MyMedia.
Reset from the CD
1. Insert your Stora CD and open the folder.
NETGEAR Stora User Manual
You do not need to uninstall the software before resetting the system.
2. Click the Reset Tools button.
3. Choose an option:
a. Refresh: choose this option if you have more than one Stora on the system; you can
reset the one you want.
b. Reset: Choose this option when you have only one Stora system.
34 | Chapter 1: Getting Acquainted
Figure 30 Reset Tools Screens
Page 35

NETGEAR Stora User Manual
Documentation and Support
Stora installation provides documentation and tutorials for using Stora.
Figure 31 Documentation and Tutorial Screens
Register your Stora
After installing your device, locate the serial number on the back of your Stora unit and use it
to register your product at http://www.NETGEAR.com/register. Registration is required before
you can use our telephone support service.
Technical Support
After installing your device, locate the serial number on the label of your product an d use it to
register your product at http://www.NETGEAR.com/register. Registration is required before
you can use our telephone support service. Registration via our website is strongly
recommended.
Stora Knowledge Base
For more information about Stora, visit
• http://kb.netgear.com/app/products/model/a_id/11109
• http://kb.netgear.com/app/answers/list/kw/stora
For Warranty and Regional Customer Support information, see the Resource CD that came
with your product.
Documentation
http://documentation.netgear.com/ms200/enu/202-10540-01/index.htm.
Visit http://kb.netgear.com/app/home for other product updates and Web support.
Chapter 1: Getting Acquainted | 35
Page 36

2. Stora Agent
2
This chapter discusses the following Stora Agent topics:
• Using Stora Agent
• Starting Stora Agent
• Stora Agent Menu Options
Chapter 2: Stora Agent | 36
Page 37

NETGEAR Stora User Manual
Right-click the
Stora Agent icon
Using Stora Agent
Stora Agent runs in the background and allows you to explore your folders, quickly open
Stora Application and Desktop Mirror, or check for updates. It can be installed optionally on
any system that is connecting to a Stora.
Stora Agent icon resides on your system tray (PC) or dock (Mac), and normally appears
when you start your computer.
Right-click Stora Agent icon to display the menu options. The menu contains options for
exploring Stora folders, opening Stora Application, and opening Desktop Mirror.
The Preferences option allows you to check for software updates to the desktop applications.
Some of the options vary between a PC and a Mac. For instance, only a PC menu will display
your login status, and provide Login and Logout options, as shown below.
Figure 32 Stora Agent icon and menu on the PC
Starting Stora Agent
Stora agen t automatically appea rs when yo u start your computer. If you exit Stora Agent , the
icon will disappear from the icon tray and will no longer be available until you restart the
agent.
Start Stora Agent on a PC
To start Stora Agent on a PC, navigate to Start > Programs > NETGEAR > Stora Desktop
Applications > Stora Agent > Stora Agent.
Start Stora Agent on a Mac
To start Stora Agent on a Mac, start Finder, browse to Applications > Stora Desktop
Applications, and then launch Stora Agent.
Chapter 2: Stora Agent | 37
Page 38

NETGEAR Stora User Manual
Stora Agent Menu Options
Not logged in/Logged in as
The label at the top of the menu displays who is currently logged into Stora, or shows Not
logged in. This menu option is available on a PC only.
Figure 33 Stora Agent: Logged in vs. Not Logged in
Log in...
The Log in menu option allows you to select your Stora, and then enter your User name and
Password. If you log in and then start one of the deskt op applications, you will have access to
Stora. If you select Remember Me, you won't have to re-enter your password next time you
log in. A successful login opens the server window with access to your available folders. This
menu option is available on a PC only.
Figure 34 Login to Stora
38 | Chapter 2: Stora Agent
Page 39

NETGEAR Stora User Manual
Switch user
If someone is logged into Stora, the Switch user menu option logs out the current user, and
allows another person to log in. Note that this option will not be available if no one is logged
into the system. This menu option is available on a PC only.
Figure 35 Switch User
Log out...
The Log out menu option closes the current user's connection to Stora. Be sure to log out to
prevent other users from accessing your albums and MyLibrary folders. To log in again,
select Log in... and reenter your user and password information. This menu option is
available on a PC only.
Figure 36 Log out
Chapter 2: Stora Agent | 39
Page 40

NETGEAR Stora User Manual
Explore My Stora Folders
Stora Folders lets you use Microsoft Explorer or Mac Finder to work with content on your
Stora. This way you can manage your files in a familiar environment, and can upload files
greater than 2 GB.
If not already logged in, this application prompts you to log in, and opens either Windows
Explorer or Mac Finder. It will display your FamilyLibrary, MyLibrary and MyComputers
folders within a network drive. Folders are available whether Stora is located locally on the
home network or remotely across the Internet.
Note: If your access is blocked, you will not be able to see these folders.
Figure 37 Explore my Stora folder
Viewing Stora Folders
Right-click Stora Agent icon, and then select Explore My Stora Folders. If prompted, enter
your Stora Name, User Name and Password, and then click Sign in. Explore r/Mac shows the
folders within a network drive.
• To view Stora Folders on a PC, click Start > Programs > NETGEAR > Stora
• To view Stora Folders on a Mac, start Finder, browse to Applications > Stora
Desktop Applications, and then launch Smart Folder shortcut.
Printer Option
You can connect a USB printer to S tora and have all computers on your home network share
the same printer.
In general, any non-multifunction USB printer should work with your Stora. While we don’t
maintain a list of all supported printers, you might find that searching this database is help ful.
http://www.openprinting.org/printers
40 | Chapter 2: Stora Agent
Page 41

NETGEAR Stora User Manual
Note: Currently multiple printers are not supported. If you have a
multi-function printer, scanning is not supported
Optionally, you can also use a powered hub to expand the USB port to support a single
printer and multiple USB drives.
To add a printer - PC
1. Connect a USB cable from the printer to the Stora-enabled device, or to a USB hub
connected to the device.
2. Log in to the Stora and go to Explore my Stora folders on the Agent.
.
3. Double-click the Stora printer icon. The following message appears.
4. Click OK.
Note: The Stora icon will only appear if a printer is attached to the USB
drive of your Stora.
5. If you receive the following message, click OK.
Chapter 2: Stora Agent | 41
Page 42

6. Use the Add Printer Wizard to load the printer driver.
NETGEAR Stora User Manual
7. Select the manufacturer and the printer, and then click OK.
The printer is now available through Stora and can be selected from the list of printers in
the Settings ->Printer and Faxes area.
42 | Chapter 2: Stora Agent
Page 43

NETGEAR Stora User Manual
To add a printer - Mac
1. Connect a USB cable from the printer to the Stora-enabled device, or to a USB hub
connected to the device.
2. Go to System Preferences > Printer & Fax.
3. Click the plus sign to add a printer.
4. Click Windows, and then select workgroup and Stora.
Chapter 2: Stora Agent | 43
Page 44

NETGEAR Stora User Manual
5. Select Registered User, enter your User Name and Password, and then click Connect.
6. Select the printer model in Print Using, and then click Add.
7. The first time you print, you will be prompted for your user name and password.
a. Enter your User Name and Password
b. Select ‘remember this password in my keychain’,
c. Click Connect.
The next time you print, you will not be prompted for your password.
Open Stora Application
The Open Stora Application menu option starts Stora Application, which is a fast, sleek and
flexible way to manage your content and administer settings using a web browser. Launching
Stora Application from the agent opens your browser, prompts you to log in (if not already
logged in), and displays Stora Application Home page where you can access your media
library folders, view albums, and set preferences.
With Stora application, your content is always available using familiar file and folder views like
those used in Windows Explorer or the Mac Finder. This option is available whether Stora is
located locally on your home network or remotely across the Internet. See Chapter 3, “Stora
Application" for more details.
Figure 38 Stora Home Page
44 | Chapter 2: Stora Agent
Page 45

NETGEAR Stora User Manual
Albums
Click the Albums icon to view albums that you previously created in the Media library.
Media Library
Click the Media Library icon to view the contents of your device. From here you can add
additional content, and create albums that you can share with friends and family.
Preferences
Click here to change your user preferences or administer your NAS. Additionally, remote
access to Preferences is available with a Premium subscription.
Open Desktop Mirror
Desktop Mirror lets you back up PCs and Macs on your home network to S to ra. The Desktop
Mirror application backs up selected folders on a regular basis.
The Open Desktop Mirror menu option starts the Desktop Mirror application and is used to
back up selected folders. Any computer on your home network can use Desktop Mirror to
automatically backup files and folders to your Stora.
Stora standard allows backups if the computer is on the same home network as Stora.
Additionally, Stora premium allows backups if Stora is in a remote location and you need to
access your data through the Internet.
See Chapter 4, “Stora Desktop Mirror" for more information on using Desktop Mirror.
Figure 39 Open Desktop Mirror
Chapter 2: Stora Agent | 45
Page 46

NETGEAR Stora User Manual
Preferences
The Preferences menu option on S tora agent allows you to check fo r sof tware updates to the
desktop applications, and displays the name and IP address of Stora on your home network.
The Advanced tab shows Stora devices found on your network, and allows you to keep
Desktop Mirror running in the background, if desired.
Note: The Preferences available on Stora Agent are different from the
Preferences offered on Stora Application. For information about
Stora Application Preferences, see “Preferences” on page 91
46 | Chapter 2: Stora Agent
Figure 40 Agent Preferences
Page 47

NETGEAR Stora User Manual
About
The About menu option displays Stora Agent version installed on your computer.
Figure 41 About Stora Agent
Exit Stora Agent
The Exit S tora Agen t menu option closes S to ra Agent, and removes the icon from the syste m
tray. To restart Stora Agent on a Mac or PC, see “Starting Stora Agent” on page 37.
Figure 42 Exit Stora Agent
Chapter 2: Stora Agent | 47
Page 48

3. Stora Application
3
This chapter shows you how to work with and use Stora Application.
• Starting Stora Application
• Logging into Stora Application
• Stora Application Home Page
• Media Library
• Working with Media Source Folders
• Albums
• Working with Files
• Preferences
Chapter 3: Stora Application | 48
Page 49

NETGEAR Stora User Manual
Starting Stora Application
Stora Application runs in your browser, and allows you to access your folders within the
media library, view albums, and set preferences from any web browser. Stora Application is
available whether Stora unit is located locally on the home network or remotely across the
Internet. Stora Application works the same even with different computers and browsers.
There are four ways to launch Stora Application.
From the Desktop
Double-click the Navigate to My Stora (www) icon located on the desktop. This
icon was enabled during installation
From Stora Agent
Right-click Stora Agent icon located on the bottom right corner of
your computer, and then select Open Stora application.
From a Browser
Open a new browser window and navigate to http://www.mystora.com
From the Start Menu
On a PC
To start Stora Application on a PC, click St art > Programs > NETGEAR > Stora Desktop
Applications > QuickConnect > Navigate to My Stora (www).
On a MAC
To start Stora Application on a Mac, start Finder, browse to Applications > Stora Desktop
Applications, and then launch the Smart Web shortcut.
Chapter 3: Stora Application | 49
Page 50

NETGEAR Stora User Manual
Logging into Stora Application
When you launch Stora Application, you will be asked to log in using the credentials you set
up when you first installed your Stora system.
To Log in
1. Select a language. Your language preference may already be set as the default.
2. Enter Your Stora Na m e.
3. Enter Your User Name.
4. Enter Your Password.
5. Click the Sign In button.
Figure 43 Stora Application Login Screen
50 | Chapter 3: Stora Application
Page 51

NETGEAR Stora User Manual
Premium Subscription
The Login page gives you the option to upgrade your subscription. During your 30-day free
trial period, all premium services are available. After the trial period, the Premium
subscription will expire and you will no longer have remote access to the Media Library and
Preferences unless you upgrade your subscription.
Subscription reminders are delivered via email 7-days before the trial ends, and then daily
reminders when 5 days remain in the trial period. If you choose not to upgrade, your trial
premium subscription will revert to a standard subscription.
To set subscription preferences, see “Stora Premium Subscription” on page 105.
To log in
1. Click the Get More From Your Stora button on the Login page.
2. Review the benefits on the screen.
Click the link to view the Standard vs. Premium Comparison Chart.
3. Select either the Try or Buy option.
Yo u can also revisit this option at a later time.
Figure 44 Premium Upgrade
Chapter 3: Stora Application | 51
Page 52

NETGEAR Stora User Manual
Figure 45 Standard vs. Premium Comparison Chart
52 | Chapter 3: Stora Application
Page 53

NETGEAR Stora User Manual
Main Menu
on Home Page
Figure 47 Main Menus
Stora Application Home Page
After you launch and login to Stora Application, Stora home page appears. From this screen
you have local access to the Albums, Media Library and Preferences areas, as well as the
Help menu, which contains a link to the User Manual and Stora support. You can customize
the home page by adding an image to the background. See “Use as Home Background” on
page 81.
Figure 46 Stora Application Landing Page
Main Menu
The main menu appears at the upper
right corner of the Home page, and
shows your display name, gives you
access to Help, and allows you to sign
out of the application.
The Help menu provides access to the
user manual, and connects directly to
Stora support.
When you enter one of the application
areas, such as the Albums area, the
main menu on the top will also contain a
Go To option. This lets you toggle
between the Home page and the three
application areas; Albums, Media Library ,
and Preferences.
Chapter 3: Stora Application | 53
Page 54

NETGEAR Stora User Manual
About Stora
link
About Stora
On the bottom left corner of the Home page is the About Stora link. Click the link to see the
software version, your product key, the name of your Stora unit, and additional information.
54 | Chapter 3: Stora Application
Page 55

NETGEAR Stora User Manual
Media Library
The Media Library is a standard feature and is used to house and manage all your data.
Accessing the Media Library
From Stora application home page, click Media Library.
Note: If you are on one of the other pages, click Home on the Main menu
in the upper right corner, and then select Media Library .
Entering the Media Library brings you to the Media Sources page where you can manage
your files, folders, and digital media and place them into albums that you can share with
friends and family.
Figure 48 Media Library launch page
Chapter 3: Stora Application | 55
Page 56

Tip of the Day
Figure 49 Tip of the Day
Unless you disable it, each time you launch the
media library, Stora will provide a Tip of the Day
screen, giving helpful tips and tricks for using your
system to its fullest potential.
You can click back or forward to see other tips.
If you do not want to see the tips, you can disable it
by checking the “Don’t show tips” box at the bottom
of the screen.
To enable Tip of the Day
1. From the application home page go to
Preferences
2. Select User Preferenc es > User > Hide help tips
3. Select Yes/No
NETGEAR Stora User Manual
4. Click Submit.
For more information, see “Preferences” on page 91.
Information Icon
On each screen you’ll see the information icon located on the toolbar. When
clicked, it provides detailed information about the folder you selected.
56 | Chapter 3: Stora Application
Page 57

NETGEAR Stora User Manual
Media Sources
The Media Sources section shows your FamilyLibrary folders, MyLibrary folders, and
MyComputers folders.The default view is the FamilyLibrary page.
FamilyLibrary
The FamilyLibrary folder comes with the FamilyDocument s, FamilyMusic, FamilyPhotos and
FamilyVideos subfolders. These folders are accessible to all users unless you block their
user access.
These folders can also be shared with digital media adapters (DMAs), such as Xbox360, PS3
and other DLNA-compliant devices, making the content available to media players on the
home network. See “Let user access family folder” on page 102 and “Server Preferences” on
page 95.
For more information about working with these folders, see “Working with Media Source
Folders” on page 61.
Figure 50 Media Sources Page - FamilyLibrary
Note: FamilyLibrary folders will not be available unless you have been
given account access, however, even if access is blocked or
Windows networking is disabled, all users can access the
FamilyLibrary folders through Windows Explorer/Finder.
Chapter 3: Stora Application | 57
Page 58

NETGEAR Stora User Manual
MyLibrary
Each user has their own MyLibrary folders, and only you can access these folders. The
MyLibrary folder contains your private subfolders called MyDocuments, MyMusic, MyPhotos
and MyVideos. Content in the MyLibrary folders is private and secure, however you can
share the content within these folders with family, friends or the public by placing the content
in an album. They can also be shared with DMAs, making the content available to media
players on the home network.
Note: Windows networking must be enabled for users to see their
MyLibrary folders. See “Server Preferences” on page 95.
For more information about working with these folders, see “Working with Media Source
Folders” on page 61.
Figure 51 MyLibrary
Note: Although the subfolders within MyLibrary and FamilyLibrary are
intended for specific file types, you can actually put any type of file
into any folder.
58 | Chapter 3: Stora Application
Page 59

NETGEAR Stora User Manual
MyComputers
The MyComputers folder contains a folder for each computer using Desktop Mirror. You can
download files or folders using Stora Application, or you can copy and paste them through
Stora folders. For added security, you will only be able to access the MyComputers folder if
your login credentials were used to configure the backup.
You can share content from your computer with family, friends or the public by placing them
in files in an album. Folders within MyComputers can be shared with DMAs, making the
content available to media players on the network.
For more information about working with these folders, see “Working with Media Source
Folders” on page 61.
Figure 52 MyComputer
Note: Windows Networking must be enabled in order to see your
MyComputers folders. See “Server Preferences” on page 95.
Chapter 3: Stora Application | 59
Page 60

NETGEAR Stora User Manual
Albums
Albums are created and managed from the MediaLibrary area in the same way as the other
folders in the Media Sources area.
An album allows you to group related pictures, music, videos and documents from multiple
folders. An album contains references to files, but doesn't contain copies of the files
themselves. This way you can have the same file in multiple albums without taking up
additional space. However, if you delete a file from the folder, it will no longer be available in
the albums. You can add files to an Album once they are located in one of the folders in the
Media Source area.
You can add a theme to your album by displaying background graphics that come with Stora
application. You can leave the album unshared for your own enjoyment, or you can share it
with your family, friends or everyone.
The screenshot below shows that an album called “Vacation 2009” has been created, but
there are no files in the album yet. For detailed information about adding files and working
with albums, see “Albums” on page 60.
Figure 53 Albums
60 | Chapter 3: Stora Application
Page 61

NETGEAR Stora User Manual
Figure 55 Expand folders
Working with Media Source Folders
Selecting a Folder
Selecting a folder highlights the folder name, and displa ys its subfolders and files in the Files
section.
1. To select a folder, click the folder name.
Figure 54 shows that the MyMusic folder is selected from the MyLibrary media source.
You’ll see that an Arrow appears on the lower right corner. “Folder Options” on page 65
for more information about these options.
Figure 54 Select the MyMusic folder
Expanding and Collapsing a Folder
Expanding a folder shows its subfolders.
1. To expand a folder, click the right arrow beside the
folder name.
2. To collapse a folder , click the down arrow beside the folder
name. Collapsing a folder hides its subfolders. This is
useful if many folders are open, and you want to reduce
clutter on the screen.
Chapter 3: Stora Application | 61
Page 62

NETGEAR Stora User Manual
icon
New Folder
added
Adding a Folder
Adding a folder creates a new subfolder within the current folder. Using subfolders is a good
way to keep your content organized. A new folder within FamilyLibrary will be accessible to
all users (unless the user's account blocks access). Only you can access a folder within
MyLibrary.
To add a folder
1. Select the area where you want to add the new folder.
2. Click the New Folder icon on the MediaSource panel.
3. When prompted, enter the name of the folder.
4. Click Create.
The new folder will show up on the left navigation panel and in the main window.
Figure 56 Adding a Folder
62 | Chapter 3: Stora Application
Page 63

NETGEAR Stora User Manual
WARNING!
Select Folder then click the
Optional method
“Delete Folder” icon
Deleting a Folder
Deleting a folder removes it and all its files from Stora. Delete folders carefully!
If you delete a folder, any album that contains a reference to an
item within the folder, that item will no longer be available in the
album.
To delete a folder
1. Select the folder from the area you want to delete on the left navigation panel.
2. Click the Delete Folder icon.
3. Optional Method
a. Select the folder from the main window
b. Click the arrow to display the options
c. Select Delete from the menu.
4. Click Yes to delete or No to cancel.
Figure 57 Deleting a Folder
You will be asked to confirm the action.
Chapter 3: Stora Application | 63
Page 64

NETGEAR Stora User Manual
Figure 58 Manual Upload
Figure 59 Drag and Drop
Uploading files
Uploading files copies them from your computer to the selected folder. If you upload to your
MyLibrary folders, only you have access to them. If you upload a file to a folder within
FamilyLibrary , any user with account access permission to this folde r will be able to access it.
Blocked accounts will not have access to it.
Stora Application a llows you to a copy a f ile or set of file s that are less than 2 GB. If you want
to copy files greater than 2 GB, use Stora Folders. See “Explore My Stora Folders” on
page 40, “Desktop Mirror Overview” on page 114, or “FTP” on page 90 for more information.
To upload files
1. Launch the Upload Window
a. Select the destination folder from the left panel or a folder on the main window.
b. From the Option menu select Upload to launch the Upload window.
c. Select either Manual Upload or Drag and Drop
2. Manual Upload (Default method)
Manual Upload lets you select individual
files.
a. Click Manual Upload.
b. Click Add File, browse to the file, and
then click Open.
c. Optionally add more files.
d. Click Upload to upload the file(s).
e. Once the upload is complete, click
Close.
3. Drag and Drop
Drag and Drop lets you drag multiple files and entire
folders from Explorer/Finder.
a. Click Drag and Drop. A window appears, prompting
you to drag and drop your files here.
b. Drag the file from Explorer/Finder and drop it into
the window. You can drag multiple files or folders.
c. Click Upload to upload the file.
d. Once the upload is complete, close the window.
64 | Chapter 3: Stora Application
Page 65

NETGEAR Stora User Manual
Folder Options
Stora Application uses option commands for working with folders.
To display the options from the MediaSource list or subfolders,
1. Move the mouse over a folder.
The a white arrow will appear on the bottom right side of the folder.
2. Click the arrow to display the option menu.
Figure 60 Accessing Options from Subfolders
Open
See “Opening a folder” on page 66.
Autoplay
See “Playing Songs” on page 76 and “Playing a Video” on
page 76.
Slideshow
Plays all pictures within the folder. See “Running a Slideshow”
on page 76.
Download
See “Downloading a file” on page 81.
Upload
See “Uploading files” on page 64.
Add to Album
See “Adding Files to an Album” on page 75.
Share Selected Items
See “Creating a Shared Album” on page 73.
Chapter 3: Stora Application | 65
Page 66

NETGEAR Stora User Manual
Figure 61 View Details
Share with DMA/Unshare with DMA
Enables or disables DMA sharing. See “Sharing files with DMAs” on page 88.
View Details
See “View Details” on page 66.
Copy / Cut / Paste
See “Copying a Folder” on page 68, and “Copying a file” on page 79.
Rename
See “Renaming a Folder” on page 69, “Renaming an Album” on page 71, and “Renaming
a file” on page 80.
Delete
See “Deleting a Folder” on page 63, “Deleting an Album” on page 75, and “Deleting a file”
on page 79.
View Details
Viewing details shows information about the selected folder, and allows you to edit it.
1. To view details
a. Select the folder and display the Options.
b. Select View Details.
The details appear in the Details section, which
is displayed beside the Files section. Folder
details include the name of the folder, and the
number of files and folders it contains.
2. Alternatively, to view details.
a. Select the folder
b. Click the Information icon.
The details appear in the Details section, which
is displayed beside the Files section. Folder details include the name of the folder,
and the number of files and folders it contains.
Opening a folder
Opening a folder shows its subfolders, and displays the subfolders and files.
1. To open a folder
a. Double-click the folder name. You can also display the menu, and then select Open.
66 | Chapter 3: Stora Application
Page 67

NETGEAR Stora User Manual
Moving a folder
Moving a folder puts it into a different location, along with its subfolders and files.
1. To move a folder,
a. Drag and drop it to another folder.
b. Alternatively, you can cut and paste your files
• Select the folder you want to move and display the menu.
• Select Cut.
• Select the destination folder.
• Display the menu.
• Select Paste
Note: You cannot cut and paste a folder to another application, and you
cannot cut and paste data from another application into Stora
Application.
Figure 62 Moving a Folder
Chapter 3: Stora Application | 67
Page 68

NETGEAR Stora User Manual
Copying a Folder
Copying a folder puts it in an additional location, along with its subfolders and files, while
keeping the original folder. If the new location is within FamilyLibrary, the folder will be
accessible to all users (unless the user's account blocks access). Only you can access a
folder within MyLibrary.
1. To copy a folder
a. select the folder and display the menu
b. Select Copy.
c. Select the destination folder and display the menu
d. Select Paste
Note: You cannot copy and paste a folder to another application, and you
cannot copy and paste data from another application into Stora
Application.
68 | Chapter 3: Stora Application
Figure 63 Copying Files or Folders
Page 69

NETGEAR Stora User Manual
Renaming a Folder
Renaming a folder changes its name.
1. To rename a folder
a. Select the folder
b. Display the menu
c. Select Rename.
d. When prompted, enter the new name
e. Click Rename.
Note: If you rename a folder, and an album contains a reference to a file
within the folder, the item will no longer be available from the album.
Figure 64 Rename a folder
Chapter 3: Stora Application | 69
Page 70

NETGEAR Stora User Manual
Albums
The Albums section shows the albums you have created using the Media Library, and allows
you to edit and share them with other users. An album allows you to group related pictures,
music, videos and documents from multiple folders.
To view your albums select Albums from the Home page of Stora application.
Displaying the Albums Page
From the Home page, click Albums. From one of the other pages, click Home in the Main
menu, and then select Albums.
Figure 65 Albums
Working with Albums
An album contains references to files, but doesn't cont ain copies of the files themselves. This
way you can have the same file in multiple albums without t aking up additional spa ce.Albums
are great ways to make specific content accessible from a library without sharing the entire
library . However, if you delete a file from the folder, it will no longer be available in the albums.
You can add a theme to your album by displaying background graphics that come with Stora
application. You can leave the album unshared for your own enjoyment, or you can share it
with your family, friends or everyone.
70 | Chapter 3: Stora Application
Page 71

NETGEAR Stora User Manual
Displaying the Album Menu
Stora Application has a menu with commands for working with alb ums. To display the menu,
move the mouse over an album. An arrow will appear beside the name. Click the arrow to
display the menu.
Figure 66 Album Menu Options
Renaming an Album
Renaming an album changes its name.
1. To rename an album, select the album, display the menu, and then select Rename.
When prompted, enter the new name, and then click Rename
Note: if you rename an album that is shared with friends or with everyone,
the original link will no longer work. However the link will go to a
page listing all your albums, so they might be able to find the
renamed album.
Creating an Unshared Album
You can add the contents of a folder to a new album that only you can see. The folder can be
shared later using the Details area to modify the settings.
1. To add a new unshared album
a. Go to the Media Library section and click the New Album icon.
b. Enter the Name of the album and an optional description.
c. Select the theme, if desired.
d. Click Submit.
Once set up, you can drag and drop folders and files from folders into the album.
If this is a shared album see “Creating a Shared Album” on page 3-25.
Chapter 3: Stora Application | 71
Page 72

NETGEAR Stora User Manual
Figure 67 Create an Unshared Album
72 | Chapter 3: Stora Application
Page 73

NETGEAR Stora User Manual
Creating a Shared Album
You can add the contents of a folder to a new album. The album can be shared with family
and media players on the home network, and with friends and the public on the Internet.
Images in an album can be shared through RSS, Facebook or Flickr.
1. To add a shared album
a. Go to the Media Library section and click the New Album icon.
b. Enter the Name of the album and an optional description.
c. Select the theme, if desired
d. Check the Share this album box at the bottom of the screen.
This will open a new set of options.
Figure 68 Creating a Shared Album
2. Set the Album Sharing options.
a. Share with other family accounts
Checking this option allows you to share the albums with others on the Family
network. Sharing an album with family makes it available to the other Stora users,
unless their account blocks access. See
The album will appear in their Albums page.
b. Share with friend - Set up your Contacts
To share the album with your friends, select Share with friends. Sharing an album with
friends makes it available to selected contacts. If you check this box, you must add at
least one friend. To add a friend, click the plus(+) sign by the icon. This will provide
the opportunity for you to add your contact s with whom you want to share your alb um.
See
“Setting up Contacts” on page 83.
“Let user access family folder” on page 102.
Chapter 3: Stora Application | 73
Page 74

NETGEAR Stora User Manual
The first time you share an album with friends, Stora will prompt you for your email
address. Emails sent by Stora notifying your friends about shared albums will indicate
they are from this email address. Each Stora user can set their own email address.
You can change your email address later. See
“What to do when a file already exists”
on page 92.
c. Share until - Setting an End Date
When you select the Share with friend or Share with everyone option, the “Share
until” option appears so you can set an expiration date, if desired. By default, an
album is shared indefinitely. Setting an end date determines how long you want the
album to be shared.To set an end date, use the calendar to select your end date.
d. Password-protect this album - Limiting Access
Email notifications to friends contains a link to the album. By default, anyone who
clicks the link can view the album unless you limit access allows by requiring a
password. To limit access, select the Password-protect this album option.
If you select this option, an initial password will automatically be generated for your
friends so they can access the file. When a friend first clicks the link in the email
notification, they are prompted to create a password. Next time they click the link, they
are prompted for this password.
e. Send email to invitees - Emailing your Friends
When you share an album with friends, Stora can send them an email notification
from myfriend@emailaddress.com that contains a link to the album. By default,
anyone who clicks the link can view the album. The link will take them to a Guest login
page, where their email address is verified before giving access to the album.To email
your friends, you must first set up your contacts. See “
“Setting up Contacts” on
page 83.
f. Share with everyone.
Sharing an album with everyone makes it available to the public over the web. The
web site URL address will be automatically generated and appear in the album
details. If you share an album with everyone, it will automatically be shared with family
as well, including users without access to albums shared with family. Sharing an
album with everyone also enables RSS.
When you select the this option, you will be able to set an end date for sharing using
the “Share until” option.
g. Share with media players.
Select this option if you want to share albums with media players and other social
media, like RSS, Facebook and Flicr.
h. Allow downloads for this album.
This option allows anyone with access to the album to download the files for their own
use. See
74 | Chapter 3: Stora Application
“Downloading a file” on page 81.
Page 75

NETGEAR Stora User Manual
Adding Files to an Album
You can add contents of any folder to an existing album. If you add files from a folder to an
album, files within subfolders are not included.
Adding a file to an album adds a reference to the file, but doesn't copy the file it se lf. This way
you can have the same file in multiple albums without taking up any more sp ace . However, if
you delete a file from the folder, it will no longer be available in the albums. You can add
multiple files at once.
1. To add files to an album, select the folder, display the menu, then select Add to Album
> [Album Name].
2. Optionally, you can easily drag and drop individual files or entire folders into the album.
Note: if you select multiple files, and then select Add to Album > New or
Share Selected Items, the album will not have a default name.
Deleting an Album
Deleting an album removes access to its files, but the files themselves remain within the
folders in MyLibrary . If you shared the album on Facebook or Flickr , the images will remain on
these services. If you shared an album via RSS, the images will no longer be available to the
RSS readers.
1. To delete an album, select it, click the Delete Album icon.
2. Optionally, you can select the album, display the menu option, and then select Delete.
Disable Sharing
Disabling sharing prevents others from viewing your album.
1. To disable sharing,
a. select the album,
b. view its details using the information icon.
c. Clear the Album Sharing and Social Networking Sites options.
Using a File as the Album Cover
Using a file as the album cover causes its image to appear in the album icon on the Albums
page. You can use an image, music, video or document. A music file will use its album art (if
available). A document will use the generic document image.
1. To use a file as the album cover, start by selecting the album.
2. Select the file, display the menu, and then select Use as Album Cover.
Chapter 3: Stora Application | 75
Page 76

NETGEAR Stora User Manual
Running a Slideshow
Running a slideshow displays the images within the album or folder, one at a time, along with
their captions. Music, videos and documents are not shown. You can run a slideshow using
the Albums page, or after displaying an album.
1. To run a slideshow using the Albums page, select the album, display the menu, and
then select Slideshow. The browser automatically shows each image with its caption.
2. You can also run a slideshow by double-clicking an image, and then clicking the Play button.
The tool bar, illustrated below, allows you to control the slideshow.
Playing Songs
Playing songs plays the music within the folder or album, starting with the selected song.
Images, videos, documents and songs within subfolders are not played.
1. To play songs, select the album, display the menu, and then select Autoplay. The
browser automatically plays each song, and shows the album art and name of the
current song.
2. To play songs after displaying an album, click Play All.
You can also play a song by double-clicking it. All the songs in the album will autoplay,
starting with the first one selected.
Playing a Video
Playing a video shows the video.
1. To play a video, double-click it.
2. You can also select the video, display the menu, and then select Play.
The tool bar allows you control the playback.
76 | Chapter 3: Stora Application
Page 77

NETGEAR Stora User Manual
Figure 69 Media Filter
Figure 69 Views
Working with Files
Filtering Files - Media Filter
Filtering the files specifies which file types will appear.
To filter the files, select All Files, Images, Music or
Videos in the Media Filter list. The Files section will only
display files of the selected type.
Setting the view
Setting the view controls how the files will be displayed
within the currently selected folder or album. To set the
view, select Thumbnail, List, Shuf fle, Cover or CoolIris in
the Views list.
List
List view uses a table to display the files. For each file,
List view shows the file name, whether the file has tags,
caption, date, file type and size. Moving the mouse over
a file in List view shows an arrow, which allows you to
display the menu.
Thumbnail
Thumbnail view displays an image for each file that indicates what the file contains. It also
shows the file name, size and caption. Moving the mouse over a file in Thumbnail view
shows the Options arrow, which allows you to display the menu.
Shuffle
Shuffle view displays a larger image for each file. It also shows the file name and caption.
Yo u can flip through the files by clicking the image to the left or right of the current file. The
menu is not available in Shuffle view.
Cover
Cover view displays your folders and files in such a way that you can click through each of
your photos and media one at a time.
CoolIris
This option will play your slideshow. There’s even a 3-D option.
Chapter 3: Stora Application | 77
Page 78

NETGEAR Stora User Manual
Figure 70 Sorting Filter
Sorting Filter
Y ou can sort your files using the Sorting Filter options.
You can sort using the following filters:
• Name
• Mime Type
• Size
• Modified Time
• Caption
• Tagged
Searching for Files and Folders
Searching for files and folders checks all the folders you have access to, and displays items
with captions, tags or file names that match the search criteria.
1. To run a search, enter text in the Search box, and then click the Search icon.
The Files section will show files that contain the search text in the caption, tags or file
name. It will also show folders that contain the search text in the folder name. The search
term will be highlighted. If you enter one word, you will see all the items that share the
word. If you enter more than one word, the search results will be constrained to items that
have all the words.
Once the files appear , you can add them to an album for sharing with family, friends or the
public. See“Moving a file” on page 79, and“Adding tags” on page 80.
Selecting a File
You can select a file in Thumbnail view or List view. Selecting a file highlights it, and allows
you to perform an operation on it. If the Details section is displayed, it shows the file's details.
1. To select a file, click it. To select multiple files, hold the Ctrl key while clicking files.
Displaying the Menu
Stora Application has a menu with commands for working with files. You can display the
menu in Thumbnail view or List view. The menu is not available in Shuffle view or CoolIris
view.
1. To display the menu, move the mouse over a file.
In List view, an arrow will appear beside the name. In Thumbnail view, the Options arrow
will appear on the image.
2. Click the arrow to display the menu.
The menu has different commands depending on whether the file is within a folder or an
album, and depending on the whether the file is an image, song, video or document.
78 | Chapter 3: Stora Application
Page 79

NETGEAR Stora User Manual
Removing a file
Removing a file deletes it from the album, but leaves the file in the folder. You can remove
multiple files at once.
1. To remove a file, start by selecting its album.
2. Select the file, display the menu, and then select Remove.
Viewing Details
1. To view and edit details, select the file, display the menu, and then select View Details.
Alternatively, select the file, and then click the Show Details icon. The details appear in
the Details section, which is displayed beside the Files section. Details for all files include
the name, size, file type and date. If the file is within a folder, the Details section shows
the tags and caption. Songs include the duration. Pictures include the dimension. Videos
include the duration and the dimension.
Deleting a file
Deleting a file removes it from the folder. You can delete multiple files at once.
1. To delete a file, start by selecting its folder.
2. Select the file, display the menu, and then select Delete.
Note: If you delete a file, and an album contains a reference to it, the item will
no longer be available from the album.
Copying a file
Copying a file puts it in an additional folder, while keeping it in the original folder. You can
copy multiple files at once. Copying a file duplicates the original full-r esolution ve rsion stored
in the folder; not the compressed version displayed in Stora Application.
1. To copy a file, start by selecting its folder.
2. Select the file, display the menu, and then select Copy. Select the destination folder, display
the menu, and then select Paste.
Note: You cannot copy and paste a file to another application, and you cannot
copy and paste data from another application into Stora Application.
Moving a file
Moving a file puts it in a different folder. You can move multiple files at once.
1. To move a file, start by selecting its folder, and then drag and drop it to another folder.
2. You can also select the file, display the menu, and then select Cut. Select the destination
folder, display the menu, and then select Paste.
Note: You cannot cut and paste a file to another application, and you cannot
cut and paste data from another application into Stora Application.
Chapter 3: Stora Application | 79
Page 80

NETGEAR Stora User Manual
Adding a Caption
Adding a caption stores a description of the file. The caption will appear when viewing a file
within a folder or album, and when an image is shared through Facebook, Flickr or RSS. You
can search for a file by entering text from its caption. See “Searching for Files and Folders”
on page 78.
1. To add a caption to a file, start by selecting its folder.
2. Select the file, display the menu, and then select View Details.
3. Enter the caption in the Caption box of the Details section.
Alternatively, in Thumbnail view, you can select the file, click the Click to add caption
message, and then enter the caption. In List view, you can select the file, and then enter
the caption into the Caption column.
Adding tags
Adding tags stores additional information about the file. The tags will appear in the Details
section when viewing a file within a folder. The tags will not appear when viewing an album,
nor when images are shared through Facebook, Flickr or RSS. You can search for a file by
entering text from its tags. See “Searching for Files and Folders” on page 78.
1. To add tags to a file, start by selecting its folder.
2. Select the file, display the menu, and then select View Details.
3. Alternatively, select the file, and then click the Show Details icon. Enter the tags in the Tags
box of the Details section.
Tags allow you to describe each file on your Stora. If you tag files consistently, you will be
able to find them more easily, especially as their number grows over time.
For example, assume you took a number of pictures at Jane's 11th birthday, which was
held at your cottage. You enter tags for each picture: birthday, Jane, eleven, cottage.
Some pictures have Mary or Joe in them, so you enter Mary or Joe as tags in those
pictures.
Later you can search for birthday pictures. Tagged pictures from all birthdays will appear,
including tagged pictures from Jane's birthday. Or you can search for pictures from your
cottage. All tagged pictures from the cottage will appear, including tagged pictures from
Jane's birthday. If you search for birthday cottage, then only birthday pictures from the
cottage will appear . Note that you ca n tag music, video and d ocuments as well as photo s.
Renaming a file
Renaming a file changes its name. You can only rename a file within a folder.
1. To rename a file, start by selecting its folder.
2. Select the file, display the menu, and then select Rename. When prompted, enter the new
name, and then click Rename.
Note: If you rename a file, and an album contains a reference to that file, the
item will no longer be available from the album.
80 | Chapter 3: Stora Application
Page 81

NETGEAR Stora User Manual
Downloading a file
Downloading a file retrieves the original full-resolution version of the file. You can select
multiple files for downloading at once. Depending on your browser settings, you can open the
file, download it to a specific directory, or download it to the default directory.
1. To download a file, select it, display the menu, and then select Download.
A window lists the selected files. Click the Download button beside the desired file.
Working with Images
Use as Home Background
Using an image as the background causes it to appear on your Home page.
1. To set the Landing page background, select the image, display the menu and then
select Use as Landing Page Background.
Y ou can remove the image from the Landing page through User Preferences. See ““Clear
Home Background” on page 92.
View
Viewing an image displays it in a paused slideshow.
1. To view an image, double-click it.
2. You can also select the image, display the menu, and then select View.
If you play the slideshow, it will display the other images within the selected folder or
album. See “Running a Slideshow” on page 76.
Rotate clockwise / Rotate counterclockwise
Rotating an image clockwise turns it to the right. Rotating an image counterclockwise turns it
to the left. If the image is used in an album, it will be rotated there as well.
1. To rotate an image, start by selecting its folder.
2. Select the image, display the menu, and then select Rotate Clockwise or Rotate
Counterclockwise.
Accessing a file
Double-clicking a file opens or downloads it, as follows:
• An image is displayed within a paused slideshow.
• A video is played.
• A song is played, followed by other songs within the album.
• A document is opened or downloaded, depending on your browser settings.
Chapter 3: Stora Application | 81
Page 82

NETGEAR Stora User Manual
Downloading a file
The album streams compressed images, music and videos in order to conserve bandwidth
and improve performance. An album can be configured to allow those viewing it to downlo ad
original full-resolution versions of the files. This is especially important if the album contains
documents, because the album lists these files but cannot open them. To allow files to be
downloaded, select the Allow downloads for this album option.
Downloading a file retrieves the original full-resolution version of the file. You can download
all the files using the Albums page, or individual files after displaying an album.
1. To download all the files using the Albums page, select the album, and then click
Download.
A window lists all the files in the album. Click the Download button beside the desired file.
Depending on your browser settings, you can open the file, download it to a specific
directory, or download it to the default directory.
2. To download a file after displaying an album, select the file by clicking it.
You can select multiple files by holding the Curl while clicking them. After selecting the
files, click Download.
A window lists the selected files. Click the Download button beside the desired file.
Depending on your browser settings, you can open the file, download it to a specific
directory, or download it to the default directory.
3. You can also download a document by double-clicking it.
82 | Chapter 3: Stora Application
Page 83

NETGEAR Stora User Manual
Setting up Contacts
You can set up your contact s in your add ress bo ok, and use the cont act list to share albums.
Yo u only have to set up the address book once, though you can add, edit, and remove
contacts at anytime. The conta ct list contains friends whom you want to share the album with,
and must be set up for each new album. Each album can be shared with a different set of
your friends. Additionally, each Stora user can set up their own address book that contains
the names and email addresses of their contacts.
Viewing your contacts
Viewing your contacts shows your address book and the contact list for the current album.
To view your contacts
1. From an album in the Media Sources window, open the options menu.
2. Click View Details on the option menu to open the album detail information on the right side
of the screen.
3. The list of people with access to this album appears under the Share with friends area of
the Details screen.
Yo u can add to or edit contacts, as necessary.
Figure 71 View Album Details
Chapter 3: Stora Application | 83
Page 84

NETGEAR Stora User Manual
Setting up your address book
To add a friend to your address book, click the Create New Contact icon. Enter the Contact
Name and Email Address, and then click Add. Once you add a friend to your address book,
you can add them to the contact list.
To Add Contacts to your Address Book
1. From an album in the Media Sources window, open the Details screen.
2. Check the Share with friend box next. The list of people, if any, with access to this album
appears under the Share with friends area of the Details screen.
3. Click the Add Friends icon.
4. On the Share with your contacts window, click the Add Friends icon on the bottom of the
screen.
5. On the Add a New Contract screen
a. Enter the name of the person you want to add as a contact.
b. Enter their email address.
c. Click the Add button.
To remove a friend from your address book, select the friend in the Address Book list,
then click the Delete Contact icon.
To edit a friend in your address book, select the friend in the Address Book list, then
click the Edit Contact icon. You can then change their name or email address.
84 | Chapter 3: Stora Application
Figure 72 Add, Edit, Delete Contacts
Page 85

NETGEAR Stora User Manual
Setting up the contact list
Once contacts are entered into your ad dress book, you can include them in the cont act list for
that album.
To add a friend to the contact list
1. Select the friend in the Address Book list, and then click Add >>.
To remove a friend from the contact list, select the friend in the Allowed Access list, and
then click << Remove.
Figure 73 Add friends to Contact list
Note: If you email an invitation to a friend, and then remove them from the
contact list, they will no longer have access to the album.
Finding a friend
If you have a large list of friends, and you want to remove or notify a specific person, enter
some letters from their name in the Find in list box. The Address Book list will show only
matching entries.
Saving your contacts
Once you have set up your address book or contact list, click Save.
Chapter 3: Stora Application | 85
Page 86

NETGEAR Stora User Manual
Social Media
Sharing via RSS
If you share an album with everyone, an RSS icon will appear above the album's images. If
the person viewing the album clicks the RSS icon, the browser will show the album in an RSS
reader. The RSS reader will show the name and description of the album, and its images
sorted by name. Each image will show its name, caption, and when it was added to the
album. The RSS reader will automatically receive new images as they are added to the
album, and will delete them as they are removed. Album RSS feeds can be bookmarked in
any RSS reader, including browsers, Vista and Google gadgets, and digital photo frames.
1. To subscribe to the album's RSS feed, click the RSS icon.
The browser will show the album in an RSS reader. The RSS reader will show the name
and description of the album, and its images sorted by name. Each image will show its
name, caption, and when it was added to the album. The RSS reader will automatically
receive new images as they are added to the album, and will delete them as they are
removed. The RSS feed will not include music, videos and documents within the album.
Album RSS feeds can be bookmarked in any RSS reader, including browsers, Vista and
Google gadgets, and digital photo frames.
2. To use the RSS feed in an RSS reader, type or copy and paste the URL of the RSS feed
into the RSS reader.
Sharing with Media Players
Sharing files with media players allows media players on your home network to detect and
access content within the album. The media player must support the UPnP-AV, DLNA or
Windows Media Connect standard. Media players include gaming consoles (Xbox 360 and
PS3), digital photo frames, iTunes clients, IP televisions, networked sound systems (Sonos,
Logitech), digital video players (Roku, NETGEAR Digital Entertainer, DLink DSM), and many
more.
1. To share the album with media players on your home network, select Share with media
players.
Note: If files are shared with media players if they are in a folder or album with
sharing enabled.
86 | Chapter 3: Stora Application
Page 87

NETGEAR Stora User Manual
Sharing with Facebook
You can share an album with Facebook. Your Stora will upload the images from the album,
and Facebook will add them to a photo album. If you add more images to the album, Stora
will automatically upload them to the photo album.
1. To create a photo album on Facebook that contains the images from your album on
Stora, select Share with Facebook.
The Service Authorization window appears.
2. Click the facebook icon.
A browser window appears, prompting you to authorize Facebook to use Stora. If
necessary, enter your Facebook user name and password, and authorize Stora to link
with your Facebook account. Close the browser window. Click Authorization complete.
3. Select an existing photo album, or create a new photo album by entering its name and
optional description, and then click Submit. Stora will upload the images to the photo album.
4. To complete the photo album, log in to Facebook, and then navigate to the photo album.
You will see a message similar to “This album contains photos uploaded from another
application.
5. Select photos to approve or reject.” and then click Approve Selected Photos.
Once you have approved the photos, you can edit, organize and share them normally.
Stora will only upload images from the album: not documents, music or videos. The
images will be uploaded with their captions, but not their tags. If you add more images to
the album, Stora will automatically upload them. You will have to approve these new
photos as described above. However, removing images from an album will not remove
them from Facebook.
Chapter 3: Stora Application | 87
Page 88

NETGEAR Stora User Manual
Sharing with Flickr
You can share an album with Flickr. Your Stora will upload the images from the album, and
Flickr will add them to the photostream or to a set. If you add more images to the album,
Stora will automatically upload them.
1. To create a set on Flickr that contains the images from your album on Stora, select
Share with Flickr.
The Service Authorization window appears.
2. Click the flickr icon.
A browser window appears, prompting you to authorize Flickr to use Stora. If necessary,
enter your Flickr user name and password. Click OK, I'll Authorize It so S tora can link with
your Flickr account. Close the browser window. Click Authorization complete.
3. Select the default photostream or an existing set, or create a new set by entering its name
and optional description, and then click Submit.
Stora will upload the images to the photostream or set.
Stora will only upload images from the album: not documents, music or videos. The
images will be uploaded with their captions, but not their tags. If you add more images to
the album, Stora will automatically upload them. However, removing images from an
album will not remove them from Flickr.
Note: Sharing an album with Flickr is available with a Premium
subscription only.
Sharing files with DMAs
Sharing files with DMAs (digital media adapters) allows media players on your home network
to detect and access content within the folder. The media player must support the UPnP-AV,
DLNA or Windows Media Connect standard. Media players include gaming consoles (Xbox
360 and PS3), digital photo frames, iTunes clients, IP televisions, networked sound systems
(Sonos, Logitech), digital video players (Roku, NETGEAR EVA2000 Digital Entertainer, DLink
DSM), and many more.
To share folder with media players, select the folder, display the menu, and then select Share
with DMA. All its subfolders will be shared as well.
To stop a folder from sharing with media players, select the folder , display the menu, an d then
select Unshare with DMAs. You can then enable or disable sharing for its individual
subfolders.
Note: If files are shared with media players if they are in a folder or album with
sharing enabled.?
88 | Chapter 3: Stora Application
Page 89

NETGEAR Stora User Manual
iTunes
Computers can use iTunes to access music stored in the iTunes library on Stora. These
iTunes clients must be connected to the same home network as Stora. They cannot
access the iTunes library remotely across the Internet.
1. Adding songs to the iTunes library
The iTunes server can stream music from the iTunes library to the iTunes clients on your
home network. The iTunes server can run on either the host computer or Stora.
Adding songs to the iTunes library makes them available to the iTunes clients.
To add songs to the iTunes library, first move the music files to subfolders within
FamilyLibrary > FamilyMusic. After moving the music files, ensure the folder is shared.
Select the FamilyMusic folder , and display the men u. If the Unshare with DMA command
is displayed, the folder is shared. If the Share with DMA command is available, select it.
2. Configuring an iTunes client
Configuring an iTunes client ensures it will look for shared libraries, including the
FamilyMusic folder on Stora.
To configure an iTunes client, choose Edit > Preferences, and then select the Sharing
tab. Ensure Look for shared libraries is selected.
3. Playing songs with an iTunes client
Music files stored on Stora appear in the SHARED > Stora:iTunes folder. You can play
these songs within iTunes, but you cannot add them to a playlist. Pictures, videos and
documents stored on Stora are not available within iTunes.
Up to five iTunes clients on your home network (i.e., computers and media players) can
play iTunes DRM-protected music, but an unlimited number of iTunes clients can play
iTunes Plus music or songs imported from CD.
To play music, select Stora:iTunes folder, and then double-click the song.
The idea is to take all the music files on all the computers, move them to Stora >
FamilyLibrary > FamilyMusic; and have them all accessible through each computer's
iTunes program.
Chapter 3: Stora Application | 89
Page 90

NETGEAR Stora User Manual
WARNING!
RAID1
If you have a single disk in your Stora, your data is not protected against disk failure. By
adding a second disk, you can make a mirrored backup and protect your data against disk
failure.
For more information about configuring RAID1, see “RAID1” on page 108.
It is best to use Stora Application to stop a disk drive befo re removing it, to ensure maximum
data consistency. There is no need to power the system down. See “Replacing a Failed Disk”
on page 25.
JBOD
If you have two disks in your Stora, you have the option to implement JBOD rather than
RAID1. You can increase your storage capacity by choosing to use the disk as a second
storage drive, rather than mirroring the data between disks as with RAID1.
For more information about configuring JBOD, see “JBOD” on page 109.
Although JBOD will increase storage capacity to the tot al cap acity
of both disks, it provides NO protection against disk failure. JBOD
should not be used if you are storing important irreplaceable data
such as digital photographs. NETGEAR assume s no responsibility
for lost data and does not offer data recovery services if a drive
fails.
FTP
You can upload and download files from your Stora using FTP (file transfer protocol). FTP
provides access to your MyLibrary folders. If your account has access, FTP also provides
access to the FamilyLibrary folders.
The router must forward port 21 to Stora. This is set up automatically if the router has UPnP
enabled.
FTP must be enabled in Preferences > Server Preferences > Network Services. Set
Enable FTP access to your local LAN and Enable FTP access to the Internet to Yes.
To connect via FTP locally, browse to ftp://[Stora IP Address]. You can get the IP address of
Stora by right-clicking Stora Agent icon, selecting Preferences, and then selecting the Home
Library(s) Found tab.
To connect remotely, browse to ftp://[Stora Name].myStora.com.
When logging in, the user name and password are case-sensitive.
90 | Chapter 3: Stora Application
Page 91

NETGEAR Stora User Manual
Preferences
The administrator can set up user, server and administration preferences. Where noted,
some preferences are available to all users. Other preferences require administrator
permission.
Displaying the Preferences Page
From the Landing page, click Preferences. From one of the other pages, click Home in the
Main menu, and then select Preferences.
The Preferences page lists the sets of parameters that can be changed by the user.
• To expand or collapse the set, click the top level name next to the arrow. For example,
click User to expand the user preferences set. Click it a second time to collapse the set.
• To save your changes, click Submit.
• To restore the saved preferences, click Restore.
Figure 74 Preferences\
Chapter 3: Stora Application | 91
Page 92

User Preferences
User
All users can set their user preferences at any time.
NETGEAR Stora User Manual
Figure 75 User Preferences - User Area
1. Language
The Language list sets the language for Stora Application user interface. The selection of
languages depends on your region. The default language is from your computer's
configuration.
2. Sharing Emails Sender
The Sharing Emails Sender box sets the return email address for messages sent by S tora
when you share an album with friends.
3. Home Background Position
a. Center. This is the default position.
b. Fit to screen.
4. Clear Home Background
Clicking Clear Home Background removes the image from your Landing page.
5. What to do when a file already exists
The What to do when a file already exists box sets the behavior if you copy or move a file
to a folder that already contains a file with the same name.
92 | Chapter 3: Stora Application
Page 93

NETGEAR Stora User Manual
Choices are:
a. Overwrite old file - The new file replaces the old file.
b. Keep existing file - The old file is retained, and the new file isn't copied/moved.
c. Rename new file - The old file is retained, and the new file is copied/moved but
renamed.
6. Share new albums with other family members by default
The Share new albums with other family members by default list controls whether new
albums will be shared with other Stora users by default. You can override the setting
when you create or edit an album.
a. No - New albums will not be shared with family.
b. Yes - New albums will be shared with family.
7. Share new albums with media players by default
The Share new albums with media players by default list controls whether new albums
will be shared with media players on your home network by default. You can override the
setting when you create or edit an album.
The media player must support the UPnP-AV (Universal Plug and Play - Audio Visual),
DLNA (Digital Living Network Alliance) or Windows Media Connect standard. Media
players include gaming consoles (Xbox 360 and PS3), digital photo frames, iTunes
clients, IP televisions, networked sound systems (Sonos, Logitech), digital video players
(Roku, NETGEAR Digital Entertainer, DLink DSM), and many more.
a. No - New albums will not be shared with media players.
b. Yes - New albums will be shared with media players.
8. Resume Audio Playback
a. No - Disables playback. Default is No.
b. Yes - Resumes playback.
9. Hide help tips
a. No - Disables the Tip of the Day.
b. Ye s - De fau lt is Yes .
10. Reset All Saved Prompts
Clicking Reset all Saved Prompts removes any saved prompts and reactivates all
windows where the “Do not show me again” option has been previously chosen
Chapter 3: Stora Application | 93
Page 94

NETGEAR Stora User Manual
Disk space
All users can view the amount of space on Stora.
1. Used - The Used field shows how much disk space is occupied.
2. Free - The Free field shows how much disk space is available.
Figure 76 User Preferences - Diskspace Area
Change Password
1. Password - Enter your new password in the Password box.
2. Confirm Password - Re-enter your new password in the Confirm Password box.
Note: If you change your password here and b ack up your computer usin g
Desktop Mirror, you will need to update th e Desktop Mirror with your
new password. See “Changing Account Settings” on page 124.
Figure 77 User Preferences - Change Password Area
94 | Chapter 3: Stora Application
Page 95

NETGEAR Stora User Manual
Figure 78 Server Preferences
Figure 79 Network Sharing
Server Preferences
The Server Preferences area allows you to set the
following:
• Network Sharing
• UPnP Router Configuration
• Registration
• Notifications
• Network Services
• LAN Connection
• Data and Time
Windows Network Sharing
The administrator can control access through Stora Folders to private MyComputers and
MyLibrary folders.
Note: This setting does not control access to FamilyLibrary folders. A user
always has access to these through Explorer/Finder.
1. Enable Network Sharing
The Network Sharing list controls whether
users can access their private folders through
Stora Folders.
a. Yes - Users can access their private
folders through Explorer/Finder.
b. No - Users cannot access their private
folders through Explorer/Finder.
2. Workgroup name
The Workgroup name box sets the name of the workgroup. The workgroup gives the
computers on your home network access to Stora through Explorer/Finder, and to the
USB printer optionally connected to Stora.
Chapter 3: Stora Application | 95
Page 96

UPnP Router Configuration
Figure 80 UPnP Configuration Preferences
Y ou can configure your rout er through
UPnP. Note that disabling UPnP
configuration on your router will
noticeably decrease the performance
of your Stora.
1. Configure router via UPnP
a. Yes -
b. No -
2. Attempt to overwrite UPnP
configuration router?
a. Yes -
b. No -
UPnP Port Mapping
NETGEAR Stora User Manual
The following table shows the router ports assigned by Stora.
Active Protocol Int. Port Ext. Port IP Address
YES TCP 21 21 192.168.1.2
YES TCP 20 20 192.168.1.2
YES TCP 22 22 192.168.1.2
YES TCP 89 89 192.168.1.2
YES TCP 443 443 192.168.1.2
Incoming Port Requirements
• Port 80 and/or 443: For external access to the web interface
• Port 80 and/or 443: For WebDAV access
• Port 21: For external access to Stora FTP (when service is enabled)
Outgoing Port Requirements
• Port 22: For connection to Central Server during setup/re-install
• Port 80: For Stora update check
• Port 443: For IP address updates to the Central Server
96 | Chapter 3: Stora Application
Page 97

NETGEAR Stora User Manual
WARNING!
Registration
You can change the name of your Stora at anytime.
1. Stor a Nam e - Stora Name box sets the device name for your Stora.
The name you choose must be unique. The service provider will automatically ensure
Stora name is unique, and will notify you if you need to try a different name.
Figure 81 Registration Preferences
If you change the device name, friends and the public won't be
able to access your shared albums using the links previously
provided. If you use Desktop Mirror, you will have to update Stora
name. See “Changing Account Settings” on page 124.
Notifications
The Notifications box sets the email address for notifications about Stora.
1. Notifications - You can set one or more email addresses to receive notifications about
Stora. Use a comma to separate emails
Figure 82 Notification Preferences
.
Chapter 3: Stora Application | 97
Page 98

NETGEAR Stora User Manual
Network Services
You can control FTP access to Stora. For better security, disable FTP access unless you
specifically require it. If FTP is enabled, you can use it to upload and download files in the
MyLibrary folders. If your account provides access, you can also use FTP for files in the
FamilyLibrary folders. See “Let user access family folder” on page 102.
1. Enable FTP access to your local LAN
The Enable FTP access to your local LAN list controls whether a local user can FTP into
Stora.
a. Yes - A local user can FTP into Stora.
b. No - A local user cannot FTP into Stora.
2. Enable FTP access to the Internet
The Enable FTP access to the Internet list controls whether a remote user can FTP into
Stora.
a. Yes - A remote user can FTP into Stora.
b. No - A remote user cannot FTP into Stora.
Figure 83 Network Services Preferences
LAN Connection
1. Obtain IP address automatically
The Obtain IP address automatically list controls whether Stora obtains a dynamic IP
address from the router. The administrator can set IP address information for Stora.
a. Yes - Stora automatically obtains a dynamic IP address from the router using DHCP.
In most cases, use this setting.
b. No - Stora will use the static IP address entered into the Server IP address box. This
is rarely required, but may improve performance for remote users. Selecting No
enables the Server IP address, Server netmask, and Gateway boxes.
Server IP address - The Server IP address box sets the static IP address for Stora.
Obtain the static IP address from your ISP (Internet service provider), and use it to
replace the dynamic IP address that appears in the box by default. The Server IP
address box only appears if Obtain IP address automatically is set to No.
98 | Chapter 3: Stora Application
Page 99

NETGEAR Stora User Manual
Server netmask - The server netmask box sets the subnet mask. The subnet mask
determines the address range of the subnet. Data to addresses within the subnet
(e.g. between your computer and Stora) are routed within the network. Data to
addresses outside the subnet (e.g. between a remote user and Stora) are routed to
the Internet. Most home networks with less than 255 nodes use netmask.24. The
Server netmask box only appears if Obtain IP address automatically is set to No.
Netmask choices are:
netmask.24 (255.255.255.0)
/8 (255.0.0.0
/16 (255.255.0.0)
/32 (255.255.255.255)
Gateway - The gateway box sets the IP address of the device that routes data from
Stora to the Internet (i.e. the router). The Gateway box only appears if Obtain IP
address automatically is set to No.
2. DNS Server 1
The DNS server 1 box sets the primary domain name server. This is obtained
automatically from your router's DHCP configuration, and is provided by your ISP.
3. DNS Server 2
The DNS server 2 box sets the secondary domain name server. This is obtained
automatically from your router's DHCP configuration, and is provided by your ISP.
Figure 84 LAN Connection Preferences
Chapter 3: Stora Application | 99
Page 100

Date and Time
The administrator can set the date and time for Stora.
Figure 85 Date and Time Preferences
NETGEAR Stora User Manual
1. Set date and time from the Internet
The Set date and time from the Internet list controls where Stora obtains the date and
time.
a. Yes - Stora obtains the date and time from NTP (network time protocol) servers. In
most cases, use this setting. Selecting Yes enables the Internet Time Servers box.
Internet Time Servers - The Internet Time Servers box sets the NTP servers used by
Stora. In most cases, use the default NTP servers. The Internet Time Servers box
appears if Set date and time from the Internet is set to Yes.
b. No - The administrator sets the date and time for Stora. Selecting No enables the
Date and Time controls.
2. Date
The Date control sets the current date. Set the date by clicking the Calendar icon and
then choosing the year, month and date. The Date control appears if Set date and time
from the Internet is set to No.
3. Time
The Time control sets the current time. Set the time using the up and down arrows after
clicking the hour and minute. The Time control appears if Set date and time from the
Internet is set to No.
4. Country
The Country list allows you to select your country.
5. City
The City list allows you to select a city within your time zone.
100 | Chapter 3: Stora Application
 Loading...