

Page 1
)NSTALLATION'UIDE
10/100 PCI Network Interface Card Model FA311 v2
Estimated Completion: 10 minutes.
Start Here
Follow these instructions to install the NETGEAR FA311 v2 PCI Adapter in a computer
with the Windows XP or Windows 2000 operating system with the latest service pack.
Note: If you are working with a new installation, decide on a name for your network and
for each PC. The whole network must have the same network name, while each PC must
have a unique name. For detailed instructions, see the Windows manual, online help, or
support.
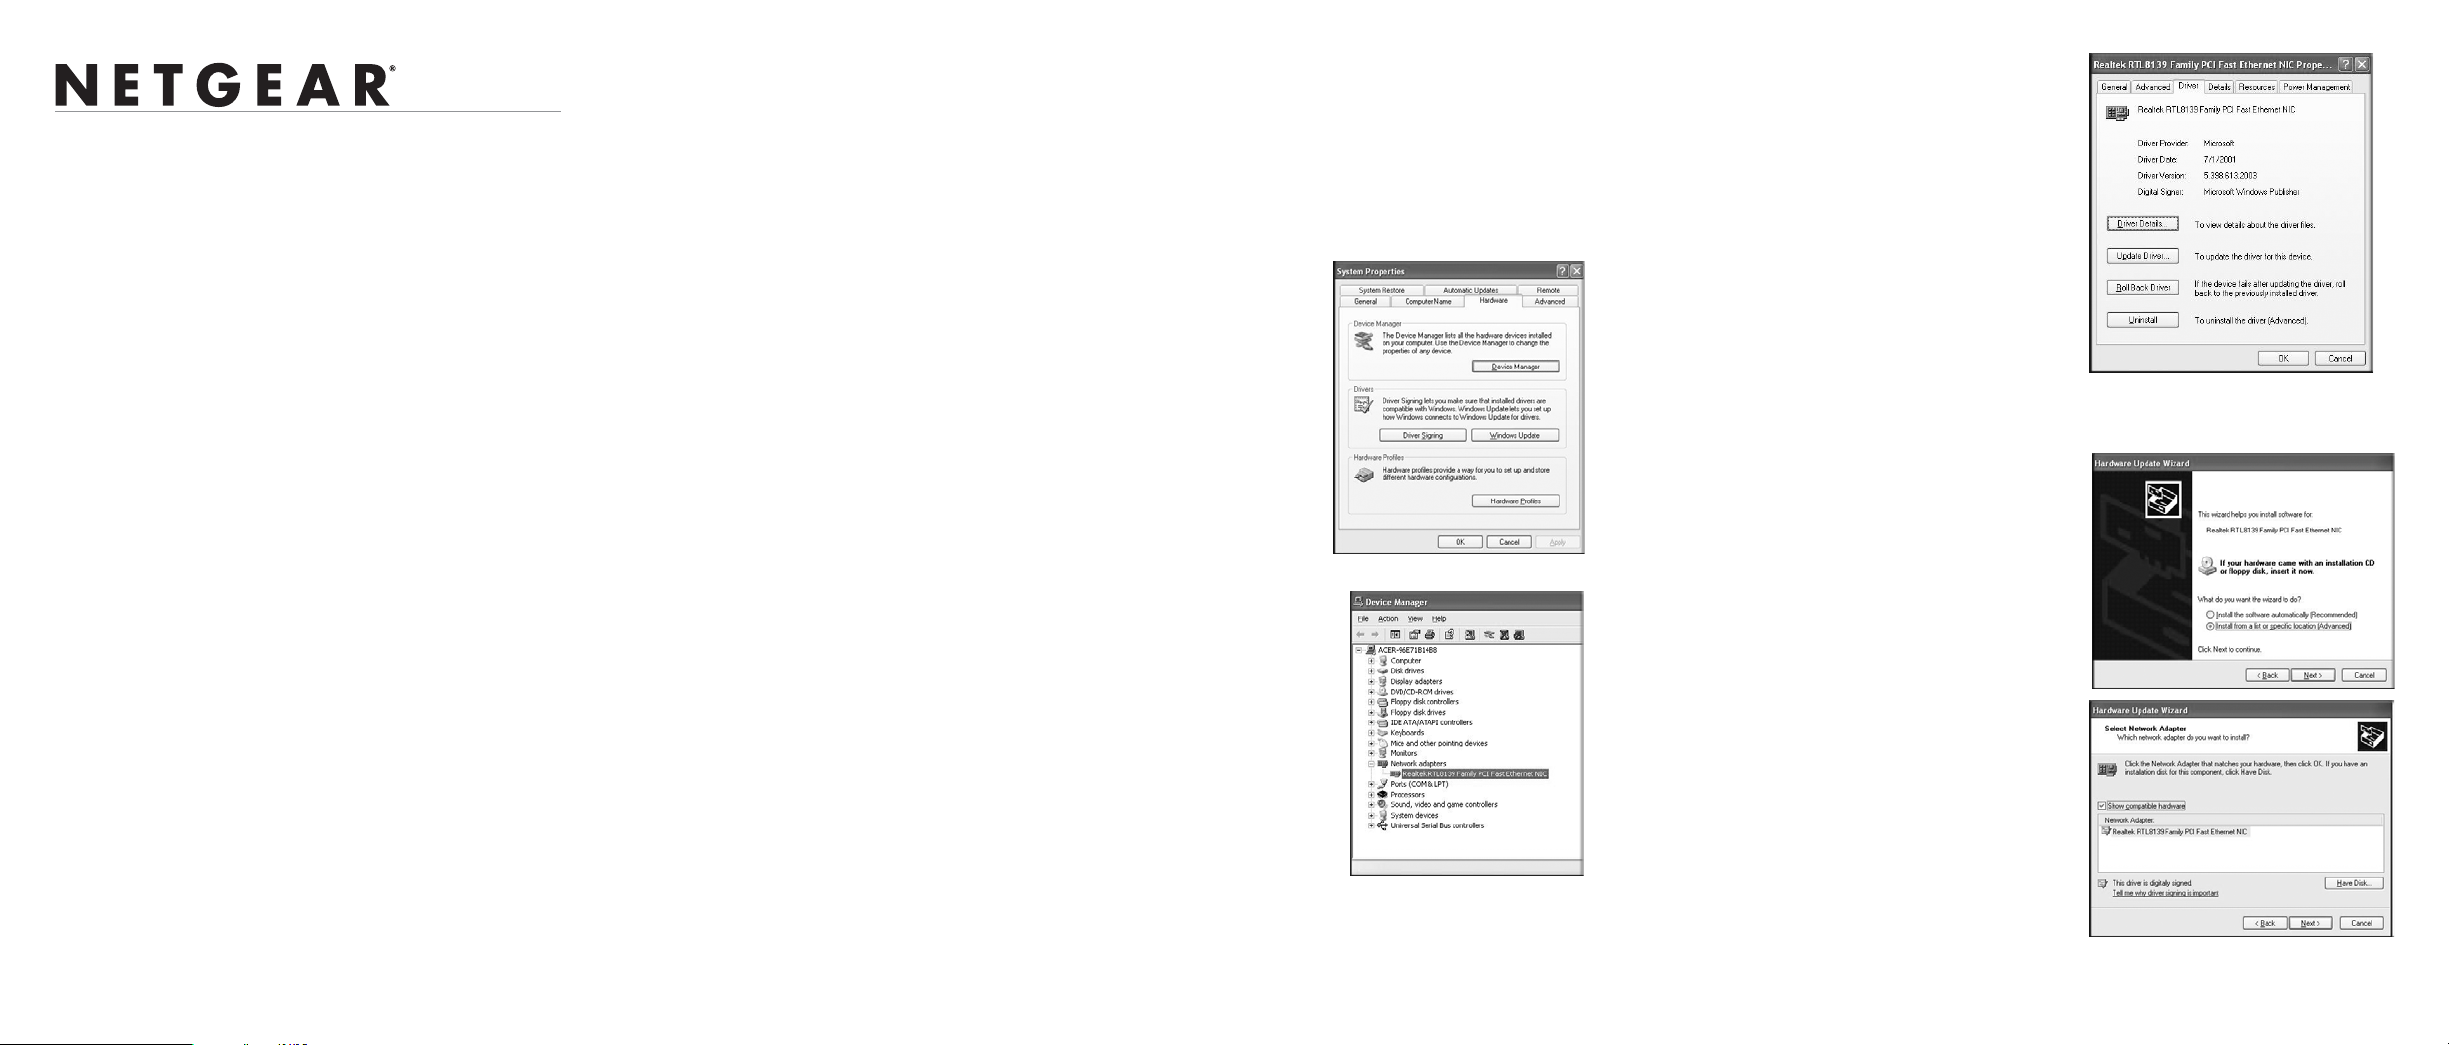
Warning: Windows detects the Ethernet adapter, and automatically installs a driver
based on its chipset. You must update that driver to work with the NETGEAR
NETGEAR FA311 v2 PCI Adapter.
3. Then, use Windows Device Manager.
Note: Windows dialog box displays may vary from one computer to another, but
Windows should prompt for the same information. If a Windows compatibility
warning window pops up, select Continue Anyway.
a. Go to System Properties for the NETGEAR
FA311 v2 PCI Adapter. To do this go to the
Windows Start menu, select Control Panel, and
double-click System; or right-click My
Computer on the desktop and select Properties.
b. Click the Hardware tab, and then click the
Device Manager button.
d. In the Properties dialog box, click the
Driver tab.
e. Click the Update Driver button.
4. Next, use the Windows Hardware Update Wizard
1. First, install the Ethernet adapter.
a. Shut down the computer.
b. Unplug the computer power cord, and open the case.
c. Locate an available PCI slot (check your computer’s manual to determine which
slots are the PCI slots) and remove the corresponding back plate from the PC
chassis.
Caution: Touch a grounded metal object such as the power supply to free yourself of
static electricity before you handle the network card. To avoid damaging any
components on the NETGEAR FA311 v2 PCI Adapter, handle it by the edges.
d. Insert the FA311 v2 into the PCI expansion slot. Make sure that the card is fully
inserted.
e. Fasten the card to the rear of the computer chassis by tightening the screw that is
on the PC.
f. Close the case, plug the power cord back in, and restart your computer.
2. Next, connect the network cables.
Use Ethernet cable to connect a switch or hub to the NETGEAR FA311 v2 PCI
Adapter.
The port on the card performs autonegotiation and supports full-duplex operation.
c. From Device Manager, double-click Network
adapters, and then double-click your network
adapter card.
The network adapter that Windows selected
depends on the operating system. In most cases,
the following will be displayed:
• Windows XP: RealTek RTL8139 Family PC
Fast Ethernet NIC
• Windows 2000: RealT ek R TL8139(A)-based
PCI Fast Ethernet Adapter
The Hardware Update Wizard window opens,
as shown to the right.
a. Insert the NETGEAR Resource CD. This
CD contains drivers for NETGEAR
Ethernet adapters. If the CD main menu
appears, close or minimize the window.
b. Choose to install the driver from a list.
c. Follow the wizard prompts to locate the
driver on the NETGEAR Resource CD
and select it.
d. When the wizard is finished, remove the
NETGEAR Resource CD from your
computer.
Note: If the driver is not installed
properly, there is an exclamation point
next to the adapter in Device Manager.
Reboot the PC and if the exclamation
mark is still there, repeat the software driver update process from Step 3. If the
problem persists, contact NETGEAR Technical Support.
Page 2

Technical Specifications
Standards Compatibility IEEE 802.3U Fast Ethernet
IEEE 802.3 Ethernet
IEEE 802.3U Auto Negotiation
Autosensing PCI Plug and Play 2.1 or 2.2 Compatible
Interface Options RJ-45 Connector
Dimensions Dimensions: 5.7 x 3.7 in (14.4 x 9.3 cm)
Weight: 0.20 lbs (90 g)
January 2006
Environmental Specifications
Agency Compliance CE Mark
Operating Temperature: 0 to 40 degrees C
Operating Humidity: 10% to 90% noncondensing
FCC, Part 15, Class B
EN 55 022 (CISPR 22) Class B
Canada ICES-003, Class B
VCCI Class B
Technical Support
Locate the serial number on the bottom label of your product and use it to register
your product at http://www.NETGEAR.com/register.
Registration on the Web site or over the phone is required before you can use our
telephone support service. The phone numbers for worldwide regional customer
support centers are on the Warranty and Support Information card that came with
your product.
Go to http://kbserver.netgear.com for product updates and Web support.
Phone: 1-888-NETGEAR, for US & Canada only. For other countries, see your
Support information card.
E-mail: support@netgear.com
This symbol was placed in accordance with the European Union Directive 2002/96 on the Waste Electrical and Electronic Equipment (the WEEE Directive). If disposed of within the European Union, this
product should be treated and recycled in accordance with the laws of your jurisdiction implementing
© 2006 by NETGEAR, Inc. All rights reserved. NETGEAR is a registered trademark of Netgear, Inc. in the
United States and/or other countries. Other brand and product names are trademarks or registered trademarks of
their respective holders.
the WEEE Directive.
 Loading...