

Page 1
Page 2
Start Here
Instructions in this guide are for users of Windows® 95 and Windows 98 who
are installing the Model FA310TX Network Card. For instructions on installing
and verifying the Windows network driver, refer to “Install the Windows
Network Driver”
These three easy steps are provided in this guide for installing your Model
FA310TX Network Card:
1. Verify Package Contents
2. Install the Network Card
3. Connect the Network Cables
As a last step, be sure to register your NETGEAR product.
Note:
Drivers and Diagnostics Disk in Dri ve A, type the command A:\HELP,
press [Enter] to execute the program, press [Enter] again to pass the
opening screen, select the name of the operating system, press [Enter],
and then follow the instructions on the screen.
on the other side of this guide
If you are using other network operating systems: Insert the
.
Model FA310TX Network Card Installation Guide
Page 3
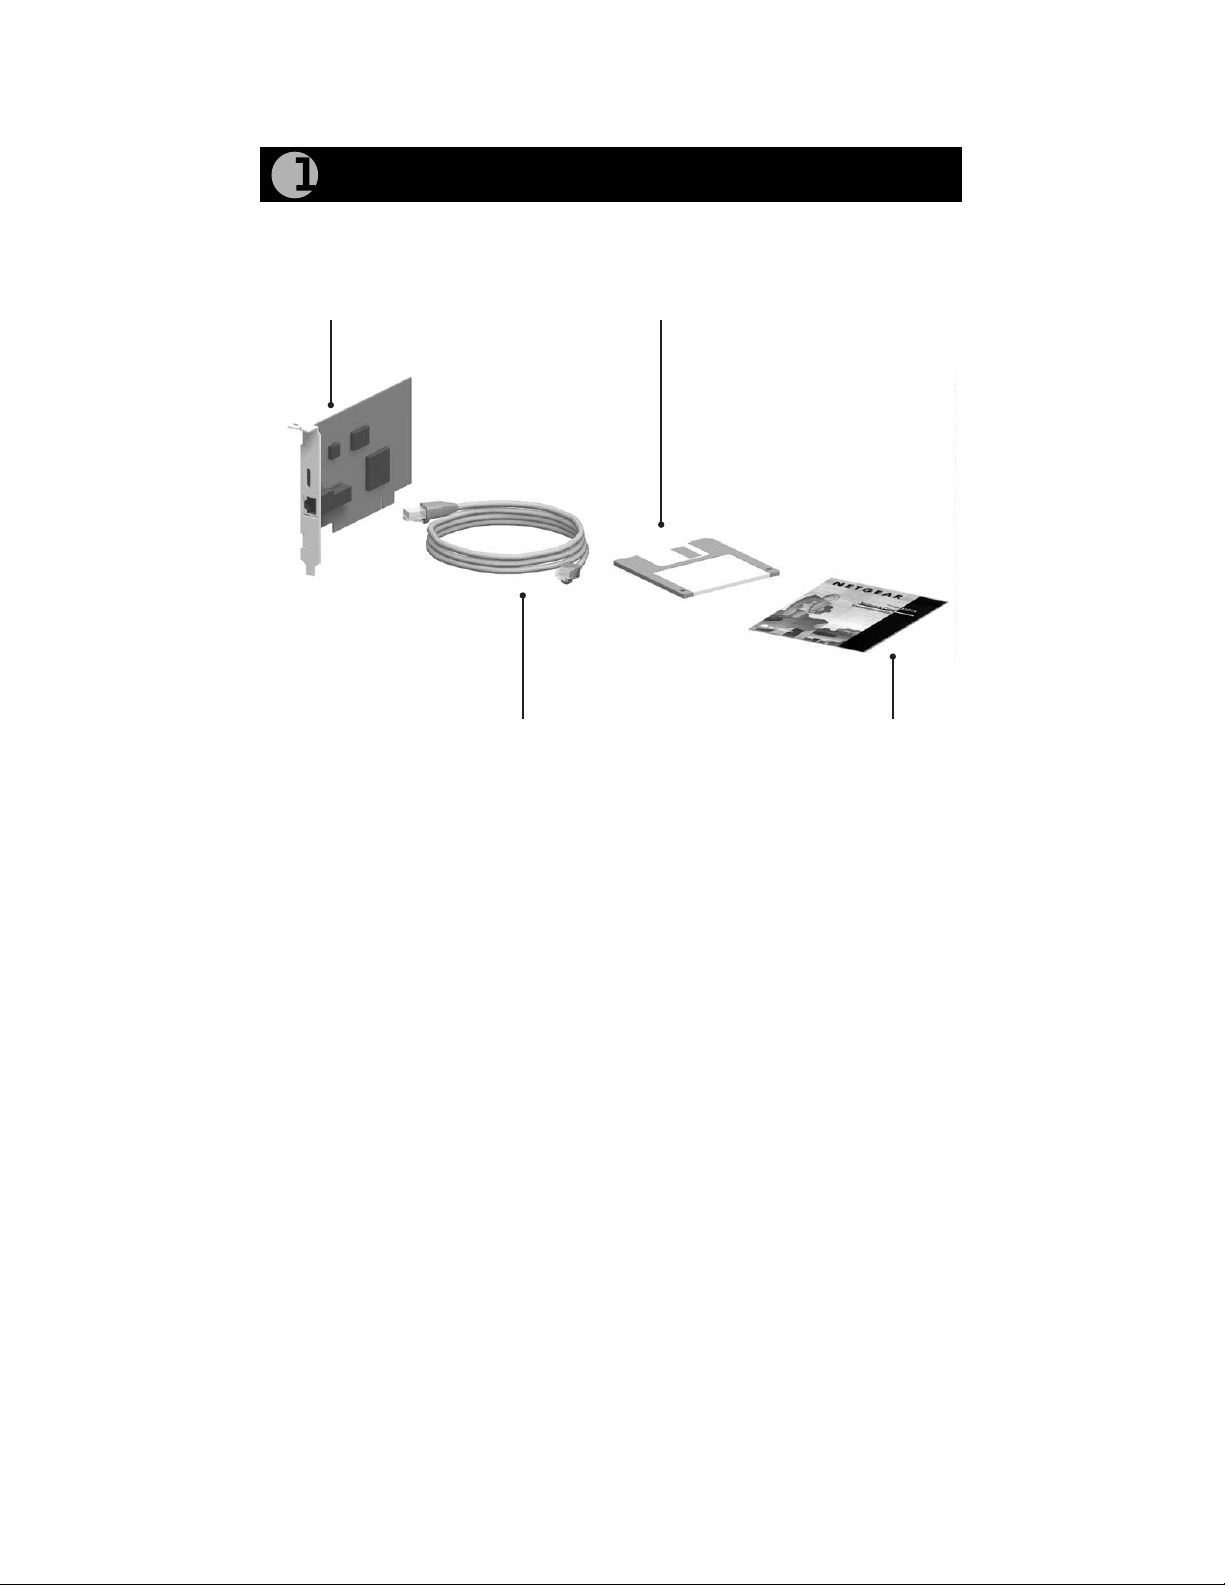
Verify Package Contents
Unpack the contents of the package and make sure that you have everything.
Model FA310TX
Network Card
Category 5
10/100 Mbps UTP cable
(provided with
Model FA310TXC
Network Card)
Drivers and
Diagnostics Disk
Installation
guide
9014FA
Verify PC Requirements
The instructions given in this guide are for using the NETGEAR™ Model
FA310TX Network Card in a PC that has a Microsoft
system.
You must have a PC with a PCI expansion slot that has bus mastering capability.
Model FA310TX Network Card Installation Guide
®
Windows operating
Page 4
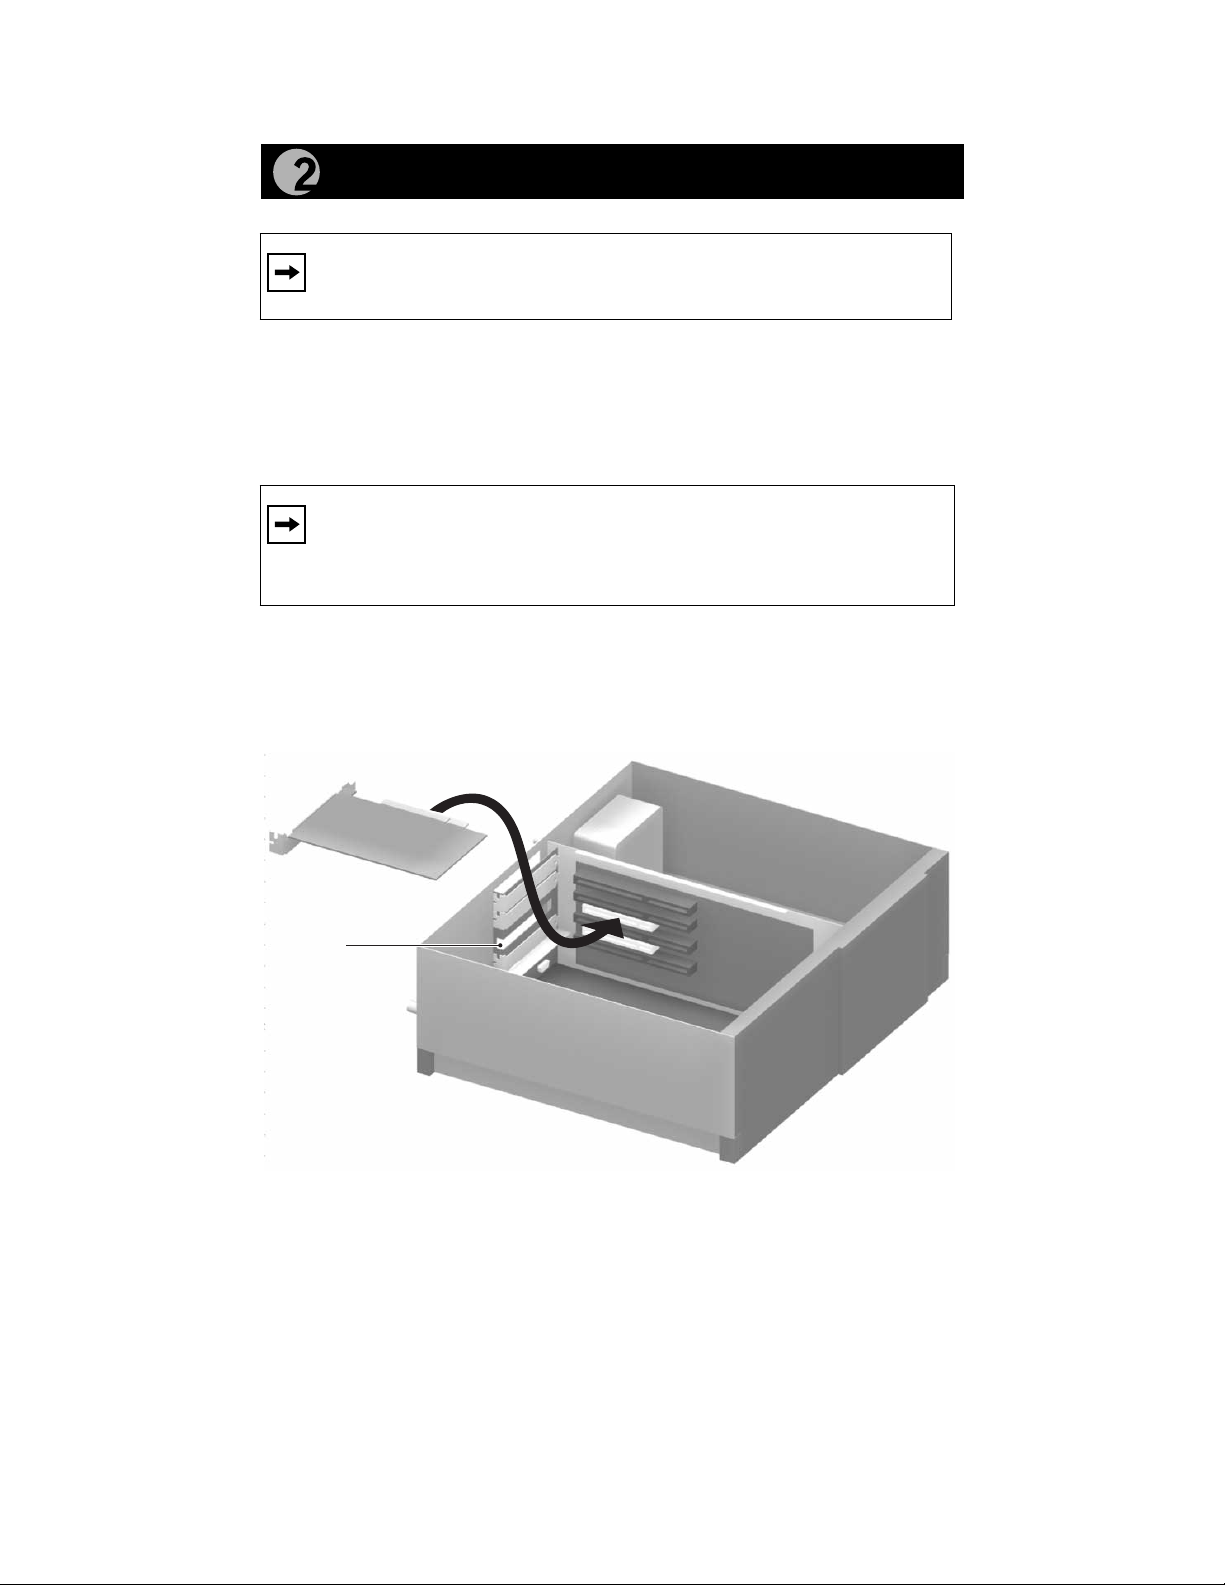
Install the Network Card
Note:
Touch a grounded metal object to free yourself of static
electricity before you handle the network card.
1. Turn the power off and unplug the power cord from your computer.
2. Remove the PC cover.
3. Choose an available PCI slot (PCI slots are the shorter slots) and
remove the corresponding back plate from the PC chassis.
4. Insert the network card into the PCI expansion slot.
Note:
To avoid damaging any components on the network card,
handle it by the edges, using your thumbs to push it securely into the
PCI slot. Make sure the network card is fully inserted into the slot to
prevent the PC operating system from freezing at startup.
5. Fasten the network card to the rear of the computer chassis by
tightening the screw that is on the PC.
6. Replace the PC cover and reconnect the power cord to the PC.
Network card
Back plate
removed
7983FB
Model FA310TX Network Card Installation Guide
Page 5
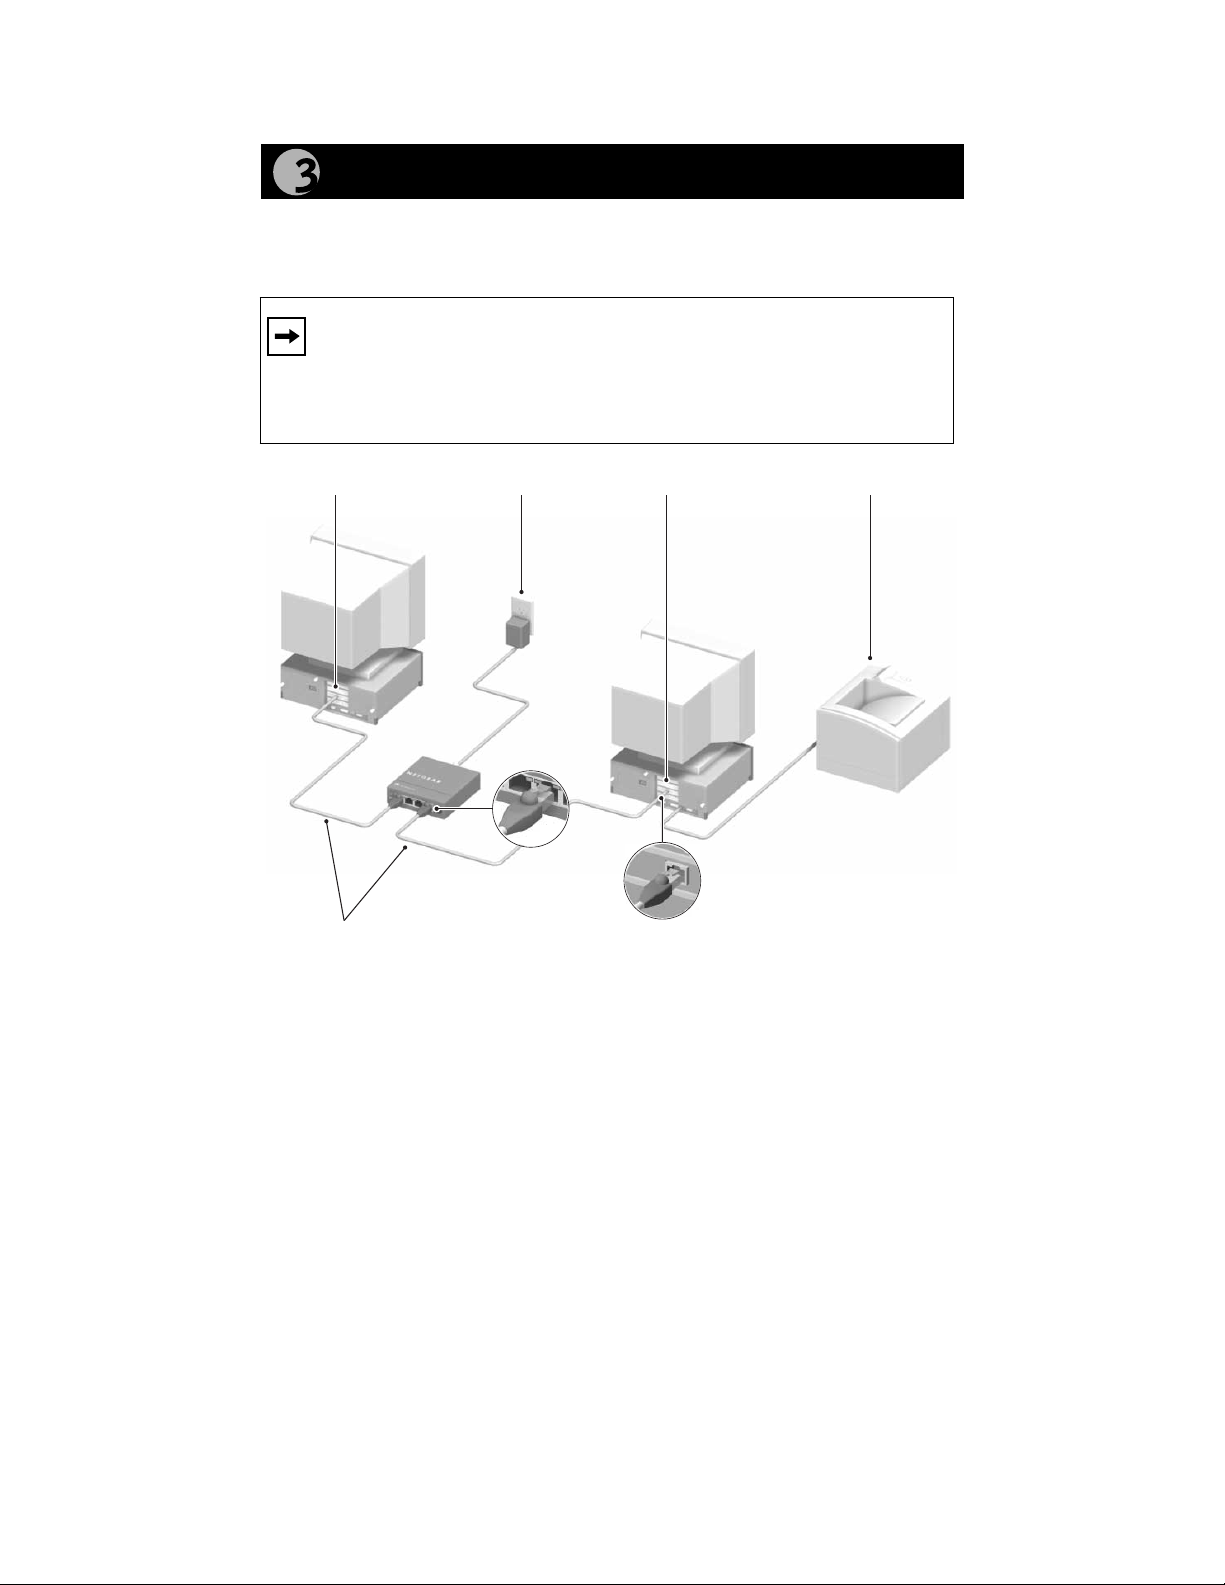
Connect the Network Cables
Using the appropriate UTP cable, connect any port on a network hub to the port
on the network card.
Note: One of the ports on NETGEAR hubs is switchable between
Normal (MDI-X) and Uplink (MDI) with a Normal/Uplink push
button. If you are using this switchable port on a NETGEAR hub to
connect to a PC or the network card, make sure the Normal/Uplink
push button is set to Normal.
PC with network
card installed
Hub
Category 5 10/100 Mbps UTP cables*
*Use the cables provided or any Category 5 UTP cable.
Maximum length = 100 meters (300 feet)
Power adapter
RJ-45
connector
PC with network
card installed
RJ-45
connector
Printer
(optional)
7995FB
Model FA310TX Network Card Installation Guide
Page 6

Install the Windows 95 Network Driver
This guide provides instructions for installing the Windows Network Driver.
The steps given are for users of Windows 95. However, because all versions
of Windows 95 might not respond the same, windows that are different from
those shown in these instructions might open but prompt you for the same
information, or windows might open in a different order than shown in these
instructions.
If you are using Windows 98, read these instructions thoroughly for an
overview of the steps that are necessary for the installation of the software
driver. Follow the instructions given by the Windows 98 Installation Wizard
to install the driver.
Note: You must install the network card (instructions on other side of
this guide) before installing the network driver.
You need to have the Windows CD-ROM and the FA310TX Drivers and
Diagnostics Disk ready to use in the installation process.
If you have not yet named your PC and your network, before you proceed
with the installation steps, decide on a name for your network and for each
PC. When the “Network” window opens, it prompts you to “... provide
computer and workgroup names....” Click on “OK.” The second “Network”
window opens and prompts you for the names. Enter a name (a different oneword name for each computer) in the “Computer name” entry field; enter a
workgroup name (the name of your entire network) in the “Workgroup”
entry field. Click on “OK” or “Close.”
Note: If the “Insert Disk” window opens and the “Please insert the
disk labeled Windows...” message appears at any time during the
installation process, insert the Windows CD-ROM in Drive D (the
CD-ROM drive) and click on “OK.” Then follow the next step in the
instructions.
1. Turn on the power to the computer and start Windows 95.
The new hardware is found, and the driver is automatically loaded.
Model FA310TX Network Card Installation Guide
Page 7

2.
New Hardware Found
PCI Ethernet Controller
Select which driver you want to install for your new hardware:
Windows default driver
Driver from disk provided by hardware manufacturer
Do not install a driver (Windows will not prompt you again)
Select from a list of alternate dirvers
OK Cancel Help
Select “Driver from disk provided by hardware manufacturer,” and
then click on “OK.”
If a different “New Hardware Found” window opens that prompts you to
click on “Next,” doing so opens the “Update Device Dri ver W izard” window
in Step 3.
3.
Update Device Driver Wizard
This wizard will complete the installation of:
PCI Ethernet Controller
by searching your local drives, network, and Internet
locations for the most current driver.
If you have a disk or CD-ROM that came with this device,
insert it now.
It is recommended that you let Windows search for an
updated driver. To do this, click Next to continue.
< Back Next> Cancel
Insert the FA310TX Drivers and Diagnostics Disk in Drive A, and then
click on “Next.”
Model FA310TX Network Card Installation Guide
Page 8

4.
Update Device Driver Wizard
Windows found the following updated driver for this
device:
NETGEAR FA310TX Fast Ethernet PCI Adapter
If you want to use this driver, click Finish. If this is not the
correct driver and you want to search for a different driver
manually, click Other Locations.
Location of Driver
Other Locations...
< Back
Finish Cancel
Click on “Finish.”
5.
Copying Files...
The file NDIS2DOS\NGRPCI.dos on Windows 95 CD-ROM
could not be found.
Insert Windows 95 CD-ROM into the drive
selected below, and click OK.
Copy files from:
A:\
Skip File
Details...
Type A:\ in the “Copy files from” entry field and click on “OK.”
6.
OK
Cancel
Remove the Drivers and Diagnostics Disk from the floppy dri ve, remo ve
the Windows 95 CD-ROM from the CD drive (if you have inserted it),
and then click on “Yes.”
Restarting your system is necessary to enable your PC to finish setting up
your new hardware.
7. Proceed to “Verify Installation.”
Model FA310TX Network Card Installation Guide
Page 9

Verify Installation
1.
Double-click on “My Computer” on the desktop, double-click on
“Control Panel,” and then double-click on “System.”
2.
Click on “Device Manager.”
Model FA310TX Network Card Installation Guide
Page 10

3.
Double-click on “Network adapters.”
4.
If there is a problem with the installation of the driver, an exclamation
point appears next to “NETGEAR FA310TX Fast Ethernet PCI
Adapter.” If there is an exclamation point, double-click on “NETGEAR
FA310TX Fast Ethernet PCI Adapter.” The “Properties” window
opens, and a message regarding the status of the device is displayed in
the window. Continue to click on “OK” or click on the “X” in the right
hand corner to close any open windows and return to Windows 95.
Model FA310TX Network Card Installation Guide
Page 11

Technical Specifications
Model FA310TX Network Card
Standards Compatibility
DC operating voltage +5V +/- 5% @ 630 mA maximum
Physical Specifications
Dimensions 5.125 x 2.813 in.
Weight .20 lb (90 g)
Environmental Specifications
Operating temperature 0
Operating humidity 10% to 90% noncondensing
Agency Compliance
Interface Options
IEEE 802.3u, 100BASE-TX Fast Ethernet
IEEE 802.3i, 10BASE-T Ethernet
NetWare tested and approved
Microsoft Windows, Windows 95, Windo ws NT
compatible
PCI Plug-and-Play compatible
13.02 x 7.15 cm
° to 40
° C
CE mark, commercial
FCC, Part 15, Class B
EN 55 022 (CISPR 22), Class B
Canada ICES-003, Class B
RJ-45 connector for 10BASE-T or 100BASE-T Ethernet
interface
®
Model FA310TX Network Card Installation Guide
Page 12

Hardware W arranty Information
Thank you for selecting NETGEAR products.
Subject to the provisions described below, this NETGEAR product is protected
by a limited lifetime warranty from defects in material and workmanship.
Should a product fail to perform as described above within the first year
following the original date of purchase, NETGEAR will ship a replacement for
the failed product upon return of the defective product.
Products that fail after the first year following the original date of purchase will
be repaired or replaced with the same or functionally equivalent, product by
NETGEAR, at its discretion, free of charge provided you (1) have, within
30 days of the original date of purchase, completed and returned the Owner
Registration Cards which accompanied the products when shipped, (2) return
the failed product to NETGEAR designated repair facility with shipping charge
prepaid, and (3) provide NETGEAR with proof of the original date of purchase.
Repaired or replacement products will be returned to you with shipping charges
prepaid.
Replacement products may be refurbished or contain refurbished materials. If
NETGEAR, by its sole determination, is unable to repair or replace the defective
product, it will refund the depreciated purchase price of the product.
This warranty does not apply if, in the judgement of NETGEAR, the product
fails due to damage from shipment, handling, storage, accident, abuse or misuse,
or if it has been used or maintained in a manner not conforming to product
manual instructions, has been modified in any way, or has had any serial number
removed or defaced. Repair by anyone other than NETGEAR or an approved
agent will void this warranty. The maximum liability of NETGEAR under this
warranty is limited to the purchase price of the product covered by the warranty.
Prior to returning any defective product, the end customer or the reseller from
whom the end customer originally purchased the product must obtain a Return
Materials Authorization (RMA) number from NETGEAR. All defective
products should be returned to NETGEAR with shipping charges prepaid.
NETGEAR will not accept collect shipments.
EXCEPT AS SPECIFICALLY PROVIDED IN THIS AGREEMENT OR AS
REQUIRED BY LAW, THE WARRANTIES AND REMEDIES STATED
ABOVE ARE EXCLUSIVE AND IN LIEU OF ALL OTHERS, ORAL OR
WRITTEN, EXPRESS OR IMPLIED. ANY AND ALL OTHER
WARRANTIES, INCLUDING IMPLIED WARRANTIES OF
MERCHANTABILITY, FITNESS FOR A PARTICULAR PURPOSE AND
NONINFRINGEMENT OF THIRD PARTY RIGHTS ARE EXPRESSLY
EXCLUDED. NETGEAR SHALL NOT UNDER ANY CIRCUMSTANCES
BE LIABLE TO ANY PERSON FOR ANY SPECIAL, INCIDENTAL,
INDIRECT OR CONSEQUENTIAL DAMAGES, INCLUDING WITHOUT
LIMITATION, DAMAGES RESULTING FROM USE OR MALFUNCTION
OF THE PRODUCTS, LOSS OF PROFITS OR REVENUES OR COSTS OF
REPLACEMENT GOODS, EVEN IF NETGEAR IS INFORMED IN
ADVANCE OF THE POSSIBILITY OF SUCH DAMAGES.
Model FA310TX Network Card Installation Guide
Page 13

IMPORTANT!
Please register online. YOU MUST REGISTER TO OBTAIN TECHNICAL
SUPPORT.
PLEASE RETAIN PROOF OF PURCHASE and this warranty information.
To get product support, or to obtain product information and NETGEAR
product documentation, direct your Web browser to the Web page at:
http://www.NETGEAR.com
To register online, direct your Web browser to the Web page at:
http://www.gearguy.com/pub/registration
If you do not have access to the World Wide Web, you can print a registration
card and mail it to NETGEAR customer service. The card is included on your
Drivers and Diagnostics disk as a Microsoft Word document file called
register.doc . Download the file, print the form, and fill in the information. Then
mail the completed form to:
NETGEAR, Inc.
P.O. Box 58185
Santa Clara, CA 95052-9916
Model FA310TX Network Card Installation Guide
Page 14

Compliance Information
© 2000 by NETGEAR, Inc. All rights reserved.
Trademarks
NETGEAR™ is a trademark of NETGEAR, Inc. Windows® is a registered
trademark of Microsoft Corporation. Other brand and product names are
trademarks or registered trademarks of their respective holders. Information is
subject to change without notice.
Statement of Conditions
In the interest of improving internal design, operational function, and/or
reliability, NETGEAR reserves the right to make changes to the products
described in this document without notice.
NETGEAR does not assume any liability that may occur due to the use or
application of the product(s) or circuit layout(s) described herein.
Certificate of the Manufacturer/Importer
It is hereby certified that the Model FA310TX Network Card has been
suppressed in accordance with the conditions set out in the BMPT-AmtsblVfg
243/1991 and Vfg 46/1992. The operation of some equipment (for example, test
transmitters) in accordance with the regulations may, however, be subject to
certain restrictions. Please refer to the notes in the operating instructions.
Federal Office for Telecommunications Approvals has been notified of the
placing of this equipment on the market and has been granted the right to test the
series for compliance with the regulations.
Federal Communications Commission (FCC) Compliance Notice: Radio
Frequency Notice
Note: Modifications to this device change it from the original state it
was in when tested and may alter the device so that it no longer
complies with FCC testing limitations for Class B digital devices.
According to FCC regulations, the user could be prohibited from
operating this equipment if it is modified.
This device complies with Part 15 of the FCC Rules. Operation is subject to the
following two conditions:
1. This device may not cause harmful interference.
2. This device must accept any interference received, including interference that
may causeundesired operation.
Note: This equipment has been tested and found to comply with the limits for a
Class B digital device, pursuant to Part 15 of the FCC Rules. These limits are
designed to provide reasonable protection against harmful interference in a
residential installation. This equipment generates, uses, and can radiate radio
frequency energy and, if not installed and used in accordance with the
instructions, may cause harmful interference to radio communications.
However, there is no guarantee that interference will not occur in a particular
installation. If this equipment does cause harmful interference to radio or
television reception, which can be determined by turning the equipment off and
Model FA310TX Network Card Installation Guide
Page 15

on, the user is encouraged to try to correct the interference by one or more of the
following measures:
• Reorient or relocate the receiving antenna.
• Increase the separation between the equipment and receiver.
• Connect the equipment into an outlet on a circuit different from that to which
the receiver is connected.
• Consult the dealer or an experienced radio/TV technician for help.
Declaration of Conformity
NETGEAR Model FA310TX Network Card
Tested to comply
with FCC Standards
FOR HOME OR OFFICE USE
EN 55 022 Statement
This is to certify that the Model FA310TX Network Card is shielded against the
generation of radio interference in accordance with the application of Council
Directive 89/336/EEC, Article 4a. Conformity is declared by the application of
EN 55 022 Class B (CISPR 22).
Compliance is dependent upon the use of shielded data cables.
Canadian Department of Communications Radio Interference Regulations
This digital apparatus (Model FA310TX Network Card) does not exceed the
Class B limits for radio-noise emissions from digital apparatus as set out in the
Radio Interference Regulations of the Canadian Department of
Communications.
Règlement sur le brouillage radioélectrique du ministère des
Communications
Cet appareil numérique (Model F A310TX Network Card) respecte les limites de
bruits radioélectriques visant les appareils numériques de classe B prescrites
dans le Règlement sur le brouillage radioélectrique du ministère des Communications du Canada.
Model FA310TX Network Card Installation Guide
Page 16

NETGEAR, Inc.
4500 Great America Parkway
Santa Clara, CA 95054
USA
Phone: 1-888-NETGEAR
E-mail: support@NETGEAR.com
Support Information
Support Information
Defective or Damaged Merchandise
Defective or damaged merchandise can be returned to your point-of-purchase
representative.
Internet/World Wide W eb
To get product support, to register your product online, or to obtain product information
and NETGEAR product documentation, direct your Web browser to:
http://www.NETGEAR.com
Customer Support
You can contact Customer Support at the following toll free numbers:
Phone
Australia 1800-787-638 Korea 00308-11-0319
Austria 00800-06384327 Netherlands 0800-023-0981
Denmark 808-82179 Norway 800-12041
Canada 1-888-NETGEAR Singapore 001-800-1233-4566
Finland 0800-111-036 Sweden 0200-298-298
France 0800-77-17-53 Switzerland 00800-0638-4327
Germany 00800-06384327 (00800-0-NETGEAR)
Hong Kong 001-800-1233-4566 United States 1-888-NETGEAR
Japan 0120-66-5402 All Other Countries +1 801-236-8499
(00800-0-NETGEAR) New Zealand 00800-1233-4566
(00800-0-NETGEAR) United Kingdom 020-7216-0014
*M1-FA310TXNA-4*
*M1-FA310TXNA-4*
Model FA310TX Network Card Installation Guide
 Loading...