

Netgear DGN3500 Owner's Manual

N300 Wireless Gigabit ADSL2+ Modem Router DGN3500
User Manual
350 East Plumeria Drive
San Jose, CA 95134
USA
June 2010
202-10487-03
v1.0

N300 Wireless Gigabit ADSL2+ Modem Router DGN3500
Support
Thank you for choosing NETGEAR.
After installing your device, locate the serial number on the label of your product and use it to register your product
at https://my.netgear.com. You must register your product before you can
NETGEAR recommends registering your product through the NETGEAR
support, visit http://support.netgear.com.
Phone (US & Canada only): 1-888-NETGEAR.
Phone (Other Countries): Check the li
http://support.netgear.com/general/cont
NETGEAR recommends that you use only the official NETGEAR support resources.
st of phone numbers at
act/default.aspx.
use NETGEAR telephone support.
web site. For product updates and web
Trademarks
NETGEAR, the NETGEAR logo, and Connect with Innovation are trademarks and/or registered trademarks of
NETGEAR, Inc. and/or its subsidiaries in the United States and/or other countries. Information is subject to change
without notice. ©2010 All rights reserved.
Revision History
Publication Part Number Version Publish Date Comments
202-10487-02 v1.0 June 2010
202-10487-03 v1.0 September 2012 Revisions to specs table
2

Table of Contents
Chapter 1 Connecting Your Router to the Internet
Using the Setup Manual . . . . . . . . . . . . . . . . . . . . . . . . . . . . . . . . . . . . . . . 7
Logging In to Your N300 Wireless Modem Router . . . . . . . . . . . . . . . . . . . 8
Using the Setup Wizard. . . . . . . . . . . . . . . . . . . . . . . . . . . . . . . . . . . . . . . . 9
Viewing or Manually Configuring Your ISP Settings . . . . . . . . . . . . . . . . . 10
Configuring ADSL Settings . . . . . . . . . . . . . . . . . . . . . . . . . . . . . . . . . . . . 13
Chapter 2 Configuring Your Wireless Network and Security Settings
Planning Your Wireless Network . . . . . . . . . . . . . . . . . . . . . . . . . . . . . . . . 15
Wireless Placement and Range Guidelines . . . . . . . . . . . . . . . . . . . . . 16
Wireless Security Options . . . . . . . . . . . . . . . . . . . . . . . . . . . . . . . . . . . 17
Manually Configuring Your Wireless Settings . . . . . . . . . . . . . . . . . . . . . . 17
Manually Configuring Your Wireless Security . . . . . . . . . . . . . . . . . . . . . . 21
Restricting Wireless Access to Your Network . . . . . . . . . . . . . . . . . . . . 21
Configuring Mixed WPA-PSK+WPA2-PSK Security . . . . . . . . . . . . . . . 24
Configuring WEP . . . . . . . . . . . . . . . . . . . . . . . . . . . . . . . . . . . . . . . . . . 25
Configuring WPA-802.1x . . . . . . . . . . . . . . . . . . . . . . . . . . . . . . . . . . . . 26
Using Push 'N' Connect (WPS) to Configure Your Wireless Network . . . . 27
Using a WPS Button to Add a WPS Client . . . . . . . . . . . . . . . . . . . . . . 27
Using PIN Entry to Add a WPS Client . . . . . . . . . . . . . . . . . . . . . . . . . . 29
Connecting Additional Wireless Devices After WPS Setup. . . . . . . . . . . . 30
Adding More WPS Clients . . . . . . . . . . . . . . . . . . . . . . . . . . . . . . . . . . . 30
Adding Both WPS and Non-WPS Clients . . . . . . . . . . . . . . . . . . . . . . . 30
Configuring Advanced WPS Settings . . . . . . . . . . . . . . . . . . . . . . . . . . 31
Chapter 3 Protecting Your Network
Protecting Access to Your N300 Wireless Modem Router . . . . . . . . . . . . 32
How to Change the Built-In Password . . . . . . . . . . . . . . . . . . . . . . . . . . 33
Changing the Administrator Login Time-out . . . . . . . . . . . . . . . . . . . . . 33
Viewing Logs of Web Access or Attempted Web Access . . . . . . . . . . . . . 34
Blocking Sites . . . . . . . . . . . . . . . . . . . . . . . . . . . . . . . . . . . . . . . . . . . . . . 35
Firewall Rules . . . . . . . . . . . . . . . . . . . . . . . . . . . . . . . . . . . . . . . . . . . . . . 36
Inbound Rules (Port Forwarding). . . . . . . . . . . . . . . . . . . . . . . . . . . . . . 37
Outbound Rules (Service Blocking). . . . . . . . . . . . . . . . . . . . . . . . . . . . 40
Order of Precedence for Rules . . . . . . . . . . . . . . . . . . . . . . . . . . . . . . . 41
Services. . . . . . . . . . . . . . . . . . . . . . . . . . . . . . . . . . . . . . . . . . . . . . . . . . . 42
Setting Times and Scheduling Firewall Services. . . . . . . . . . . . . . . . . . . . 44
Setting Your Time Zone. . . . . . . . . . . . . . . . . . . . . . . . . . . . . . . . . . . . . 44
Table of Contents | 4

N300 Wireless Gigabit ADSL2+ Modem Router DGN3500
Scheduling Firewall Services . . . . . . . . . . . . . . . . . . . . . . . . . . . . . . . . . 45
Configuring E-mail Alerts and Web Access Log Notifications . . . . . . . . . .45
Chapter 4 Managing Your Network
Upgrading the Firmware . . . . . . . . . . . . . . . . . . . . . . . . . . . . . . . . . . . . . . . 48
Manually Checking for Firmware Upgrades . . . . . . . . . . . . . . . . . . . . . .49
Viewing N300 Wireless Modem Router Status Information . . . . . . . . . . . .50
Connection Status . . . . . . . . . . . . . . . . . . . . . . . . . . . . . . . . . . . . . . . . . 53
Statistics . . . . . . . . . . . . . . . . . . . . . . . . . . . . . . . . . . . . . . . . . . . . . . . . . 54
Viewing a List of Attached Devices . . . . . . . . . . . . . . . . . . . . . . . . . . . . . . 55
Managing the Configuration File. . . . . . . . . . . . . . . . . . . . . . . . . . . . . . . . . 55
Backing Up and Restoring the Configuration . . . . . . . . . . . . . . . . . . . . . 56
Erasing the Configuration . . . . . . . . . . . . . . . . . . . . . . . . . . . . . . . . . . . . 56
Running Diagnostic Utilities and Rebooting the N300 Wireless Modem Router56
Enabling Remote Management Access . . . . . . . . . . . . . . . . . . . . . . . . . . .57
Chapter 5 Advanced Configuration
WAN Setup. . . . . . . . . . . . . . . . . . . . . . . . . . . . . . . . . . . . . . . . . . . . . . . . . 60
Setting Up a Default DMZ Server . . . . . . . . . . . . . . . . . . . . . . . . . . . . . . 62
Using the N300 Wireless Modem Router as a DHCP Server. . . . . . . . . 65
Address Reservation . . . . . . . . . . . . . . . . . . . . . . . . . . . . . . . . . . . . . . . 65
Configuring LAN Setup. . . . . . . . . . . . . . . . . . . . . . . . . . . . . . . . . . . . . . . .66
Using the N300 Wireless Modem Router as a DHCP Server. . . . . . . . . 69
Address Reservation . . . . . . . . . . . . . . . . . . . . . . . . . . . . . . . . . . . . . . . 69
Dynamic DNS Service . . . . . . . . . . . . . . . . . . . . . . . . . . . . . . . . . . . . . . . . 70
Setting up Static Routes . . . . . . . . . . . . . . . . . . . . . . . . . . . . . . . . . . . . . . . 71
Static Route Example . . . . . . . . . . . . . . . . . . . . . . . . . . . . . . . . . . . . . . . 71
Configuring Static Routes. . . . . . . . . . . . . . . . . . . . . . . . . . . . . . . . . . . .72
Configuring Universal Plug and Play . . . . . . . . . . . . . . . . . . . . . . . . . . . . .74
Building Wireless Bridging and Repeating Networks . . . . . . . . . . . . . . . . .75
Configuring a Point-to-Point Bridge Configuration . . . . . . . . . . . . . . . . . 76
Configuring a Repeater with Wireless Client Association. . . . . . . . . . . . 77
Chapter 6 USB Storage
USB Drive Requirements . . . . . . . . . . . . . . . . . . . . . . . . . . . . . . . . . . . . . . 80
File Sharing Scenarios . . . . . . . . . . . . . . . . . . . . . . . . . . . . . . . . . . . . . . . . 80
Sharing Photos with Friends and Family . . . . . . . . . . . . . . . . . . . . . . . .81
Sharing Large Files with Colleagues . . . . . . . . . . . . . . . . . . . . . . . . . . .81
USB Storage Basic Settings. . . . . . . . . . . . . . . . . . . . . . . . . . . . . . . . . . . .82
Editing a Network Folder . . . . . . . . . . . . . . . . . . . . . . . . . . . . . . . . . . . . . .84
Configuring USB Storage Advanced Settings . . . . . . . . . . . . . . . . . . . . . .84
Creating a Network Folder . . . . . . . . . . . . . . . . . . . . . . . . . . . . . . . . . . . 86
Unmounting a USB Drive . . . . . . . . . . . . . . . . . . . . . . . . . . . . . . . . . . . . . . 87
Specifying Approved USB Devices . . . . . . . . . . . . . . . . . . . . . . . . . . . . . .87
Connecting to the USB Drive from a Remote Computer . . . . . . . . . . . . . . 88
Locating the Internet Port IP Address. . . . . . . . . . . . . . . . . . . . . . . . . . .88
5

N300 Wireless Gigabit ADSL2+ Modem Router DGN3500
Accessing the Router’s USB Drive Remotely Using FTP. . . . . . . . . . . . 88
Connecting to the USB Drive with Microsoft Network Settings . . . . . . . . . 88
Enabling File and Printer Sharing. . . . . . . . . . . . . . . . . . . . . . . . . . . . . . 89
Chapter 7 Troubleshooting
Basic Functioning . . . . . . . . . . . . . . . . . . . . . . . . . . . . . . . . . . . . . . . . . . . . 90
“Welcome” Page Displays instead of Router Management Interface. . . 91
Power LED Is Not On . . . . . . . . . . . . . . . . . . . . . . . . . . . . . . . . . . . . . . . 91
Power LED Is Red . . . . . . . . . . . . . . . . . . . . . . . . . . . . . . . . . . . . . . . . . 91
LAN or ADSL Port LED Is Not On . . . . . . . . . . . . . . . . . . . . . . . . . . . . . 92
Window Appears Asking You to Reload Firmware. . . . . . . . . . . . . . . . . 92
Cannot Log in to the N300 Wireless Modem Router . . . . . . . . . . . . . . . . . 92
Troubleshooting the ISP Connection . . . . . . . . . . . . . . . . . . . . . . . . . . . . . 93
ADSL Link. . . . . . . . . . . . . . . . . . . . . . . . . . . . . . . . . . . . . . . . . . . . . . . . 93
Internet LED is Red . . . . . . . . . . . . . . . . . . . . . . . . . . . . . . . . . . . . . . . . 94
Obtaining an Internet IP Address . . . . . . . . . . . . . . . . . . . . . . . . . . . . . . 94
Troubleshooting PPPoE or PPPoA . . . . . . . . . . . . . . . . . . . . . . . . . . . . 95
Troubleshooting Internet Browsing. . . . . . . . . . . . . . . . . . . . . . . . . . . . . 95
Resolving a ‘Reload Firmware’ Message . . . . . . . . . . . . . . . . . . . . . . . . 96
Troubleshooting a TCP/IP Network Using the Ping Utility . . . . . . . . . . . . . 96
Testing the LAN Path to Your Router. . . . . . . . . . . . . . . . . . . . . . . . . . . 96
Testing the Path from Your Computer to a Remote Device . . . . . . . . . . 97
Restoring the Default Configuration and Password . . . . . . . . . . . . . . . . . . 98
Using the Wireless On/Off and WPS Buttons to Reset the Router . . . . 98
Problems with Date and Time . . . . . . . . . . . . . . . . . . . . . . . . . . . . . . . . . . 98
Appendix A Technical Specifications
General Specifications . . . . . . . . . . . . . . . . . . . . . . . . . . . . . . . . . . . . . . . 100
Factory Default Configuration. . . . . . . . . . . . . . . . . . . . . . . . . . . . . . . . . . 100
Appendix B Related Documents
Appendix C Notification of Compliance
Index
6

1. Connecting Your Router to the Internet
This chapter describes how to configure your N300 Wireless Modem Router Internet connection.
When you install your wireless modem router using the Resource CD as described in the Setup
Manual, these settings are configured automatically for you. This chapter provides instructions
on how to log in to the wireless modem router for further configuration.
Note: NETGEAR recommends that Windows OS users use the Smart
Wizard™ on the Resource CD for initial configuration
Linux OS users should access the
CD.
This chapter includes:
• Logging In to Your N300 Wireless Modem Router
• Using the Setup Wizard
• Viewing or Manually Configuring Your ISP Settings
Setup Manual on the Resource
. Mac and
1
• Configuring ADSL Settings
Using the Setup Manual
For first-time installation of your wireless wireless modem router, refer to the Setup Manual.
The Setup Manual explains how to launch the NETGEAR Smart Wizard on the Resource CD
to step you through the procedure to connect your wireless modem router and computers.
The Smart Wizard will assist you in configuring your wireless settings and enabling wireless
security for your network. After initial configuration using the Setup Manual, you can use the
information in this Reference Manual to configure additional features of your wireless
wireless modem router.
For installation instructions in a language other than English, see the language options on
the Resource CD.
7

N300 Wireless Gigabit ADSL2+ Modem Router DGN3500
Logging In to Your N300 Wireless Modem Router
You can log in to the wireless modem router to view or change its settings. Links to
Knowledge Base and documentation are also available on the wireless modem router main
menu.
Note: Your computer must be configured for DHCP. For help with
configuring DHCP, see the documentation that came with your
computer or see the link to the online document in
Documents in Appendix B.
Related
When you have logged in, if you do not click L
minutes after no activity before it automatically logs you out.
To log in to the wireless modem router:
pe http://www./routerlogin.net, or http://www.routerlogin.com, or the wireless
1 Ty
modem router’s LAN IP address (default is 192.168.0.1) in the address field of your
browser, and then press Enter. A login window displays:
Figure 1.
2 Enter admin for the wireless modem router user name and your password (or the default,
password). For information about how to change the password, see How to Change the
Built-In Password on p
age 33.
ogout, the wireless modem router waits for 5
Note: The wireless modem router user name and password are not the
same as any other user name or password you might use to log in to
your Internet connection.
If the wireless modem router has never been configured, the Smart Wizard screen displays.
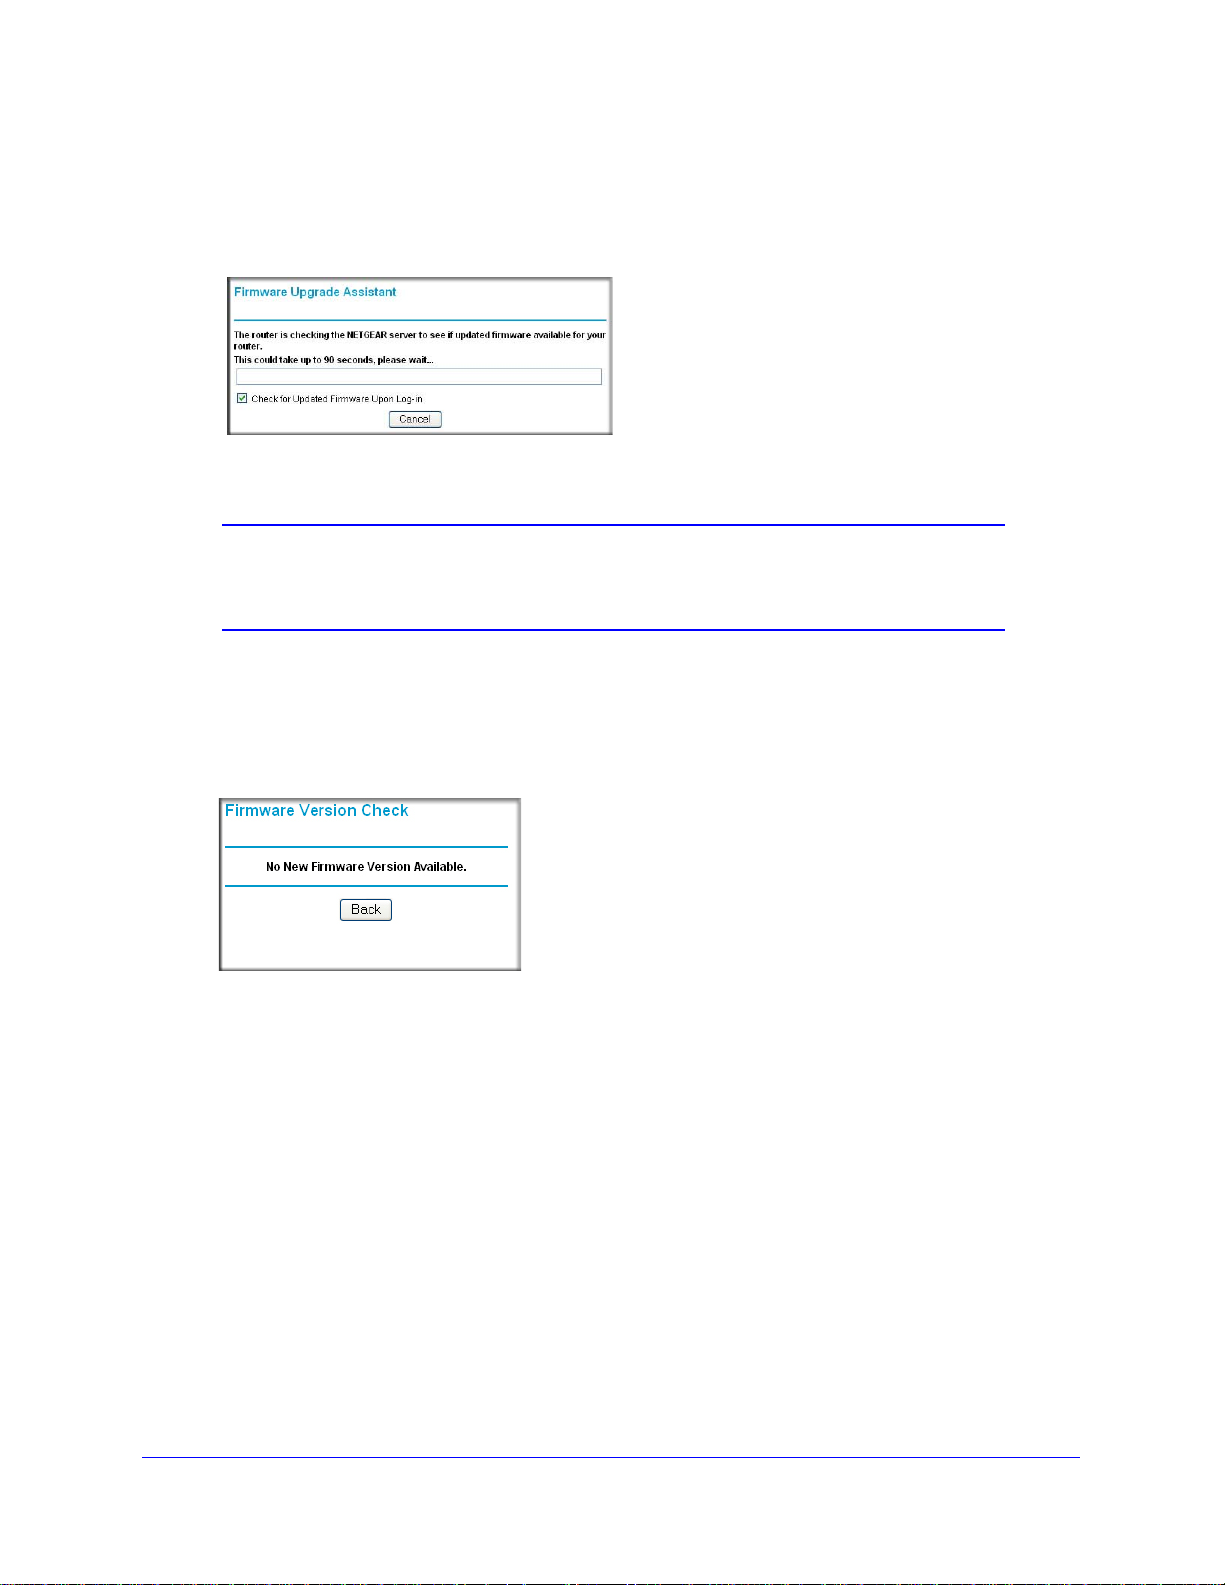
After the wireless modem router has been configured, the Firmware Upgrade assistant will
appear.
Connecting Y our Router to the Internet
8
N300 Wireless Gigabit ADSL2+ Modem Router DGN3500
• Checking for Firmware Updates screen. After initial configuration, this screen displays
unless you previously cleared the Check for Updated Firmware Upon Log-in check
box.
Figure 2.
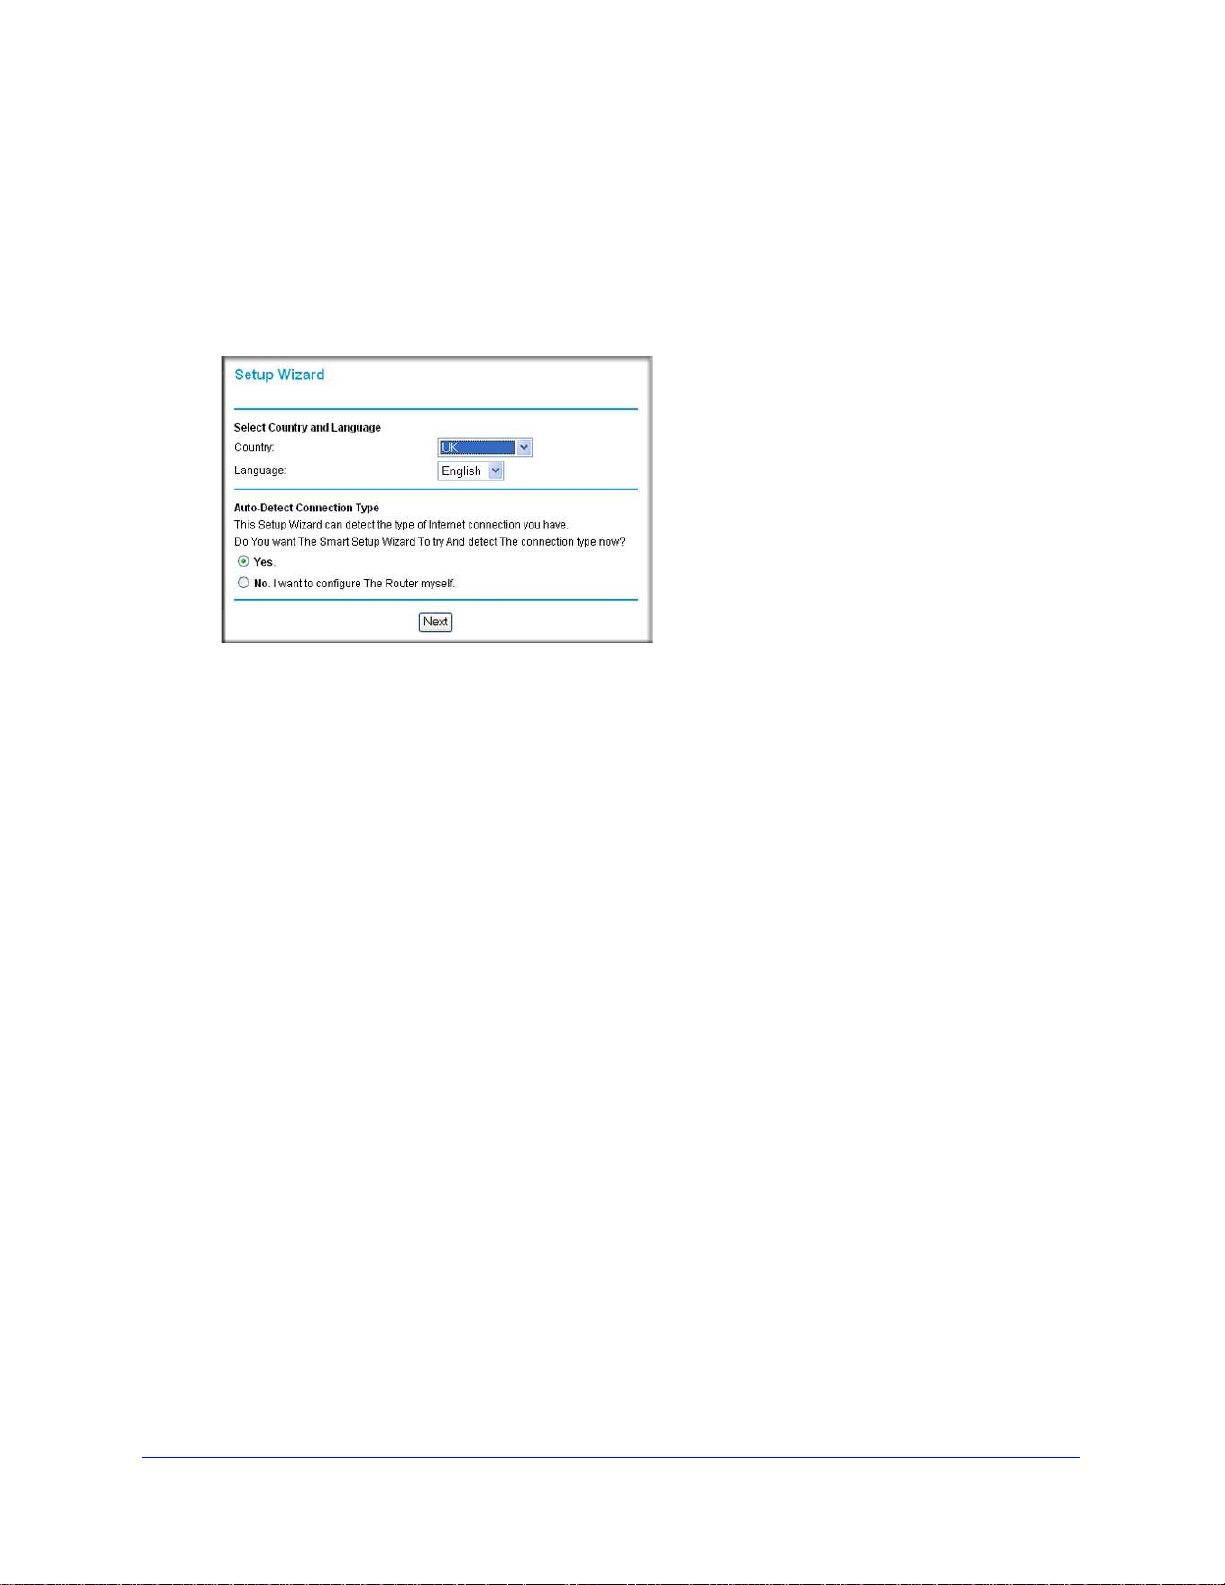
Note: If the wireless modem router is not configured (is in its factory
default state) when you log in, the Setup Wizard displays. See
the Setup Wizard on page 9.
Using
If the wireless modem router discovers a newer version of t
you want to upgrade to the new firmware (see Upgrading the Firmware on p
details). If no new firmware is available
Figure 3.
• Router Status screen. The Router Status screen displays if the wireless modem router
has not been configured yet or has been reset to its factory default settings. See Viewing
N300 Wireless Modem Router Status Information o
You can use the Setup Wizard to automatically det
described in Using the Setup Wizard on p
manually configure your Internet connection as described in Viewing or Manually
Configuring Your ISP Settings on
, the following message displays.
n page 50.
ect your Internet connection as
age 9, or you can bypass the Setup Wizard and
page 10.
he firmware, you are asked if
age 48 for
Using the Setup Wizard
You can manually configure your Internet connection using the Basic Settings screen, or you
can allow the Setup Wizard to detect your Internet connection. The Setup Wizard searches
Connecting Y our Router to the Internet
9
N300 Wireless Gigabit ADSL2+ Modem Router DGN3500
your Internet connection for servers and protocols to determine your ISP configuration. This
feature is not the same as the Smart Wizard on the Resource CD that is used for installation.
To use the Setup Wizard:
o go to the Setup Wizard screen, from the top of the main menu, select Setup Wizard.
1 T
Figure 4.
2 Select Yes for the Auto-Detect Connection Type, and then click Next to proceed.
3 Enter your
4 At the end of the
trouble connecting to the Internet, see Chapter 7, Troubleshooting .
ISP settings, as needed.
Setup Wizard, click T est to verify your Internet connection. If you have
Viewing or Manually Configuring Your ISP Settings
To view or configure the basic settings:
1 Log in to the wir
Modem Router on p
2 Select Basic Set
screen.
eless modem router as described in Logging In to Your N300 Wireless
age 8.
tings from the wireless modem router menu to display the Basic Settings
Connecting Y our Router to the Internet
10
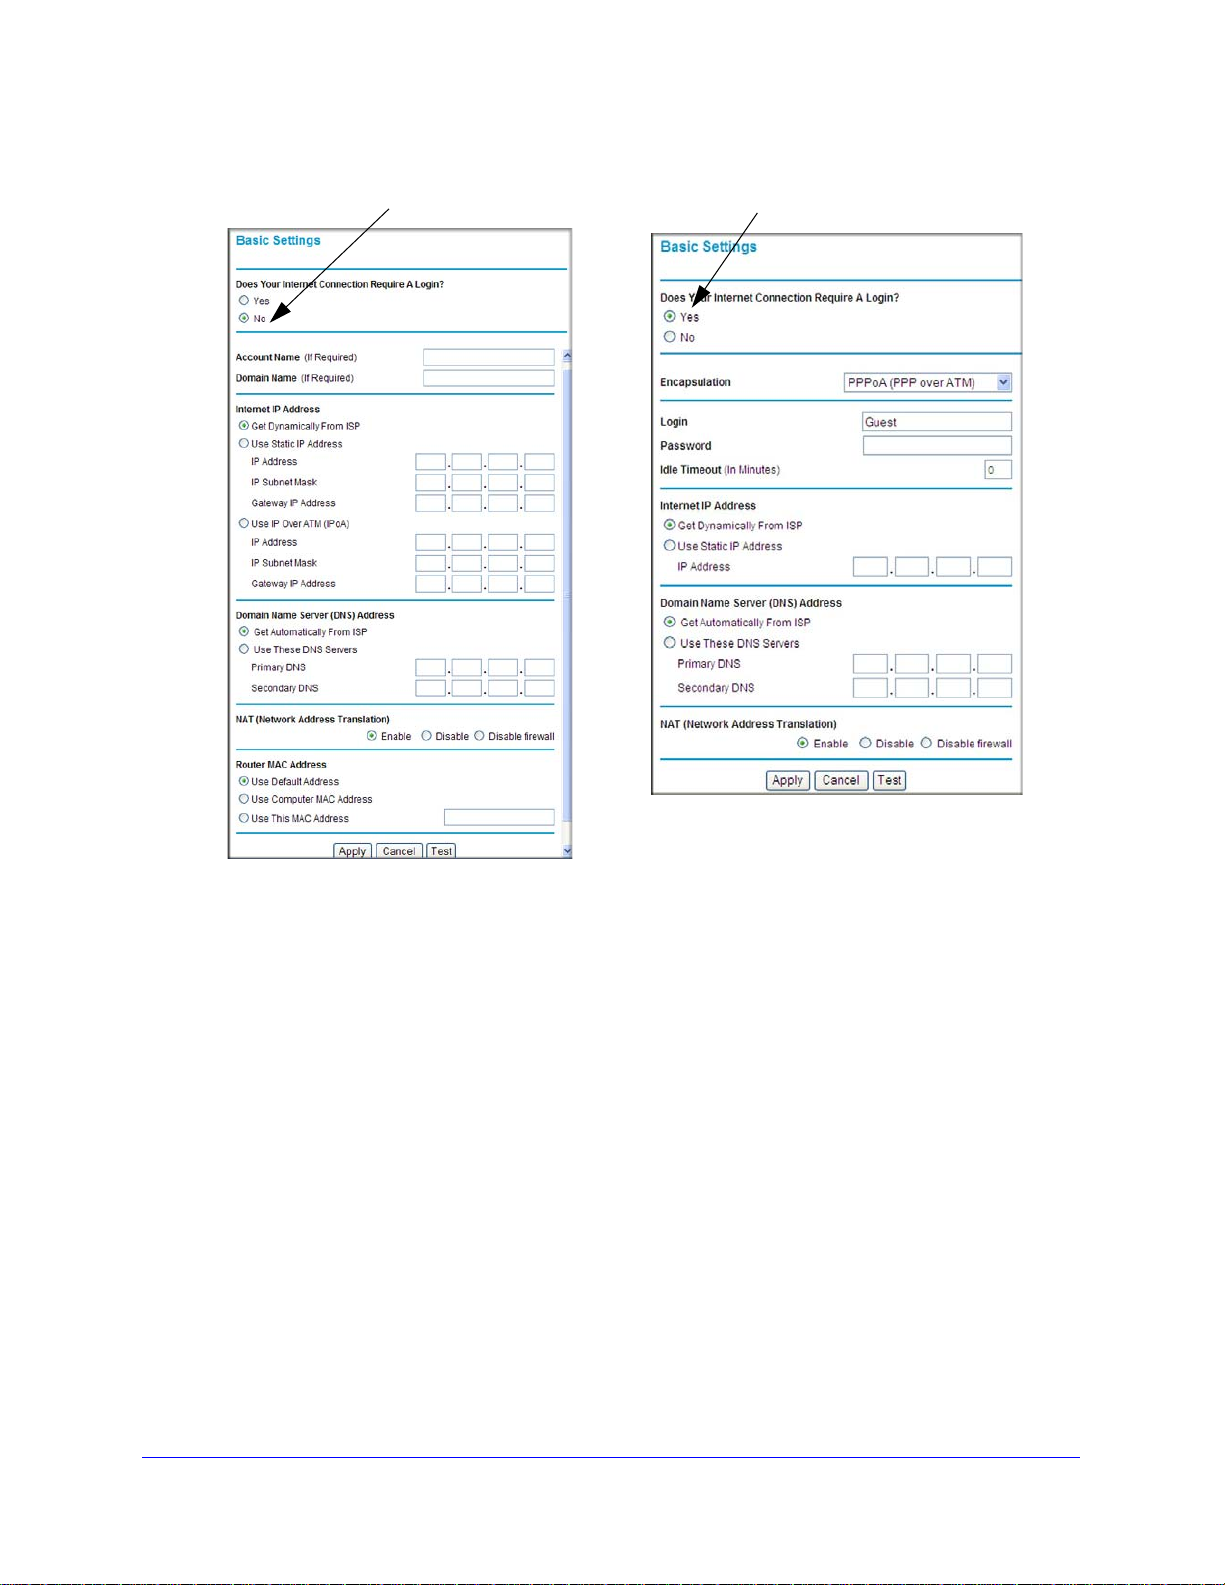
ISP does not require login
ISP does require login
N300 Wireless Gigabit ADSL2+ Modem Router DGN3500
Figure 5.
3 Select Yes or No depending on whether your ISP requires a login. This selection changes
the fields available on the Basic Settings screen.
• Ye
s. If your ISP requires a login, select the encapsulation method. Enter the login
name. If you want to change the login time-out, enter a new value in minutes.
• No.
If your ISP does not require a login, enter the account name, if required, and the
domain name, if required.
4 Ente
r the settings for the IP address and DNS server. If you enter or change a DNS
address, restart the computers on your network so that these settings take effect.
5 If no login is
6 Click App
7 Click T
est to test your Internet connection. If the NETGEAR website does not appear within
one minute, refer to.
required, you can specify the MAC Address setting.
ly to save your settings.
Connecting Y our Router to the Internet
11

N300 Wireless Gigabit ADSL2+ Modem Router DGN3500
When your Internet connection is working, you do not need to launch the ISP’s login
program on your computer to access the Internet. When you start an Internet application,
your wireless modem router automatically logs you in.
Table 1.
Settings Description
Does Your ISP Require a Login? •Yes
•No
These fields
appear only if no
login is required.
These fields
appear only if
your ISP
requires a login.
Internet IP
Address
Account Name
(If required)
Domain Name
(If required)
Encapsulation • PPPoE (PPP over Ethernet)
Login The login name provided by your ISP. This is often an e-mail
Password The password that you use to log in to your ISP.
Idle Timeout (In minutes) If you want to change the login time-out, enter a new value in
Enter the account name provided by your ISP. This might also
be called the host name.
Enter the domain name provided by your ISP.
• PPPoA (PPP over ATM)
address.
minutes. This determines how long the wireless modem router
keeps the Internet connection active after there is no Internet
activity from the LAN. Entering an Idle Timeout value of 0 (zero)
means never log out.
• Get Dynamically from ISP. Your ISP uses DHCP to assign
your IP address. Your ISP automatically assigns these
addresses.
• Use Static IP Address. Enter the IP address that your ISP
assigned. Also enter the IP subnet mask and the gateway IP
address. The gateway is the ISP’s wireless modem router to
which your wireless modem router will connect.
This field appears only if
no login is required.
Domain Name Server (DNS) Address The DNS server is used to look up site addresses based on their
• Use IP Over ATM (IFoA). Your ISP uses Classical IP
addresses (RFC 1577). Enter the IP address, IP subnet
mask, and gateway IP addresses that your ISP assigned.
names.
• Get Automatically from ISP. Your ISP uses DHCP to
assign your DNS servers. Your ISP automatically assigns
this address.
• Use These DNS Servers. If you know that your ISP does
not automatically transmit DNS addresses to the wireless
modem router during login, select this option, and enter the
IP address of your ISP’s primary DNS server. If a secondary
DNS server address is available, enter it also.
Connecting Y our Router to the Internet
12

N300 Wireless Gigabit ADSL2+ Modem Router DGN3500
Ta ble 1.
Settings Description
NAT (Net Address Translation) NAT automatically assigns private IP addresses (10.1.1.x) to
LAN-connected devices.
• Enable. Usually NAT is enabled.
• Disable. This disables NAT, but leaves the firewall active.
Disable NAT only if you are sure that you do not require it.
When NAT is disabled, only standard routing is performed
by this router. Classical routing lets you directly manage the
IP addresses that the wireless modem router uses.
Classical routing should be selected only by experienced
1
users
• Disable firewall. This disables the firewall in addition to
disabling NAT. With the firewall disabled, the protections
usually provided to your network are disabled.
These fields
appear only if no
login is required.
1. Disabling NAT reboots the wireless modem router and resets its configuration settings to the factory defaults.
Disable NAT only if you plan to install the wireless modem router in a setting where you will be manually
administering the IP address space on the LAN side of the router.
Router MAC Address The Ethernet MAC address that will be used by the wireless
modem router on the Internet port. Some ISPs register the
Ethernet MAC address of the network interface card in your
computer when your account is first opened. They will then
accept traffic only from the MAC address of that computer. This
feature allows your wireless modem router to masquerade as
that computer by “cloning” its MAC address.
• Use Default Address. Use the default MAC address.
• Use Computer MAC Address. The wireless modem router
• Use This MAC Address. Enter the MAC address that you
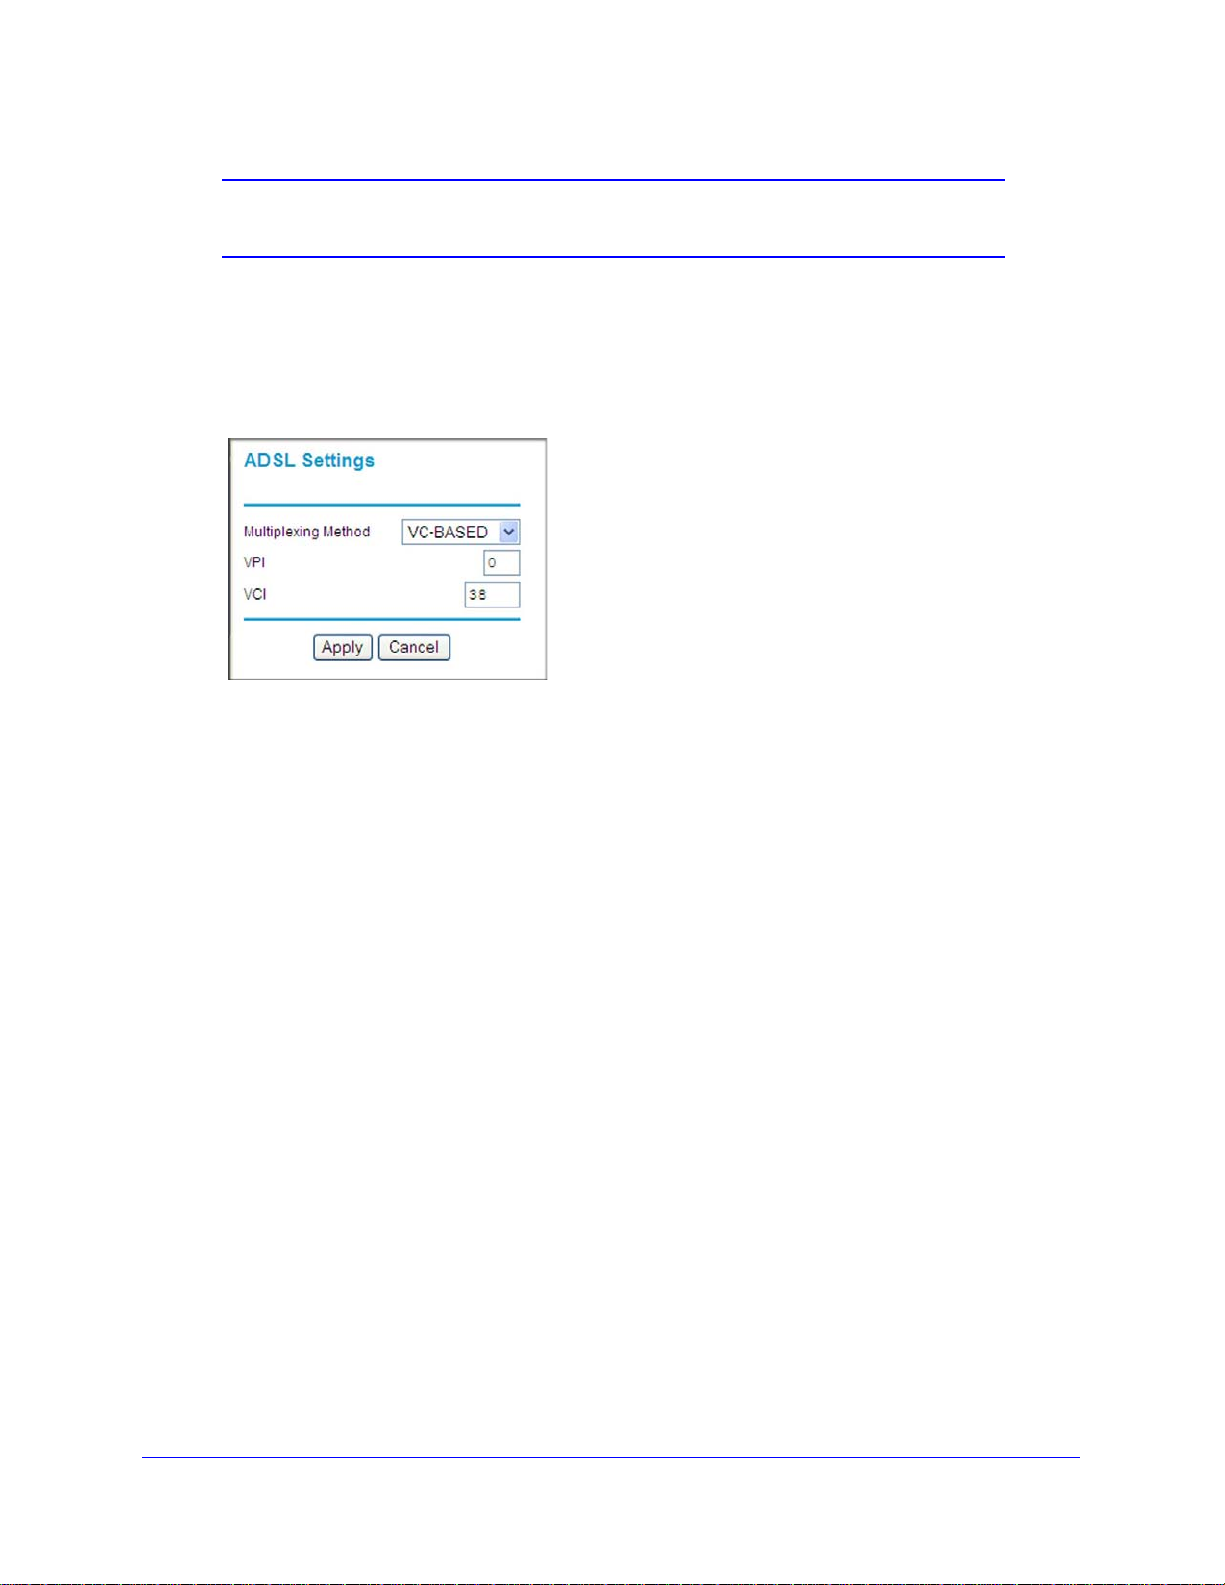
Configuring ADSL Settings
Note: For information about how to install ADSL filters, see the Setup
Manual.
will capture and use the MAC address of the computer that
you are now using. You must be using the one computer
that is allowed by the ISP.
want to use.
NETGEAR recommends that you use the Setup Wizard to automatically detect and configure
your ADSL settings. This usually works fine. However, if you have technical experience and
are sure of the multiplexing method and virtual circuit number for the virtual path identifier
(VPI) and virtual channel identifier (VCI), you can specify those settings here.
Connecting Y our Router to the Internet
13
N300 Wireless Gigabit ADSL2+ Modem Router DGN3500
Note: NETGEAR recommends using the Setup Wizard to select the
correct country to optimize detection of the ADSL settings.
If your ISP provided you with a multiplexing method or VPI/VCI number, then enter the
setting:
1 From the ma
Figure 6.
in menu, select ADSL Settings.The ADSL Settings screen displays.
2 In the Multiplexing Method drop-down list, select LLC-based or VC-based.
3 Fo
4 Fo
r the VPI, type a number between 0 and 255. The default is 8.
r the VCI, type a number between 32 and 65535. The default is 35.
5 Click Apply.
Connecting Y our Router to the Internet
14

2. Configuring Your Wireless Network and
WARNING:
Security Settings
This chapter describes how to configure the wireless features of your N300 Wireless Gigabit
ADSL2+ Modem Router DGN3500. For a wireless connection, the SSID, also called the wireless
network name, and the wireless security setting must be the same for the modem router and
wireless computers or wireless adapters. NETGEAR strongly recommends that you use wireless
security.
Computers can connect wirelessly at a range of several hundred
feet. This can allow others outside of your immediate area to
access your network.
This chapter includes:
• Planning Your Wireless Network
• Manually Configuring Your Wireless Settings
• Manually Configuring Your Wireless Security
2
• Using Push 'N' Connect (WPS) to Configure Your Wireless Network
• Connecting Additional Wireless Devices After WPS Setup
Planning Your Wireless Network
For compliance and compatibility between similar products in your area, the operating
channel and region must be set correctly.
To configure the wireless network, you can either specify the wireless settings, or you can
use Wi-Fi Protected Setup (WPS) to automatically set the SSID and implement WPA/WPA2
security.
• To manually configure the wireless settings, you must know the following:
- SSID. The default SSID for the modem router is NETGEAR.
15

N300 Wireless Gigabit ADSL2+ Modem Router DGN3500
- The wireless mode (802.11n, 802.11g, or 802.11b) that each wireless adapter
supports.
- Wireless security option. To successfully implement wireless security, check each
wireless adapter to determine which wireless security option it supports.
See Manually Configuring Your Wireless Security on page 21.
• Push 'N' Connect (WPS) automatically implements wireless security on the modem router
while, at the same time, allowing you to automatically implement wireless security on any
WPS-enabled devices (such as wireless computers and wireless adapter cards). You
activate WPS by pressing a WPS button on the modem router, clicking an on-screen
WPS button, or entering a PIN number. This generates a new SSID and implements
WPA/WPA2 security.
To set up your wireless network using the WPS feature:
- Use the WPS button on the side of the modem router (there is also an on-screen
WPS button), or enter the PIN of the wireless device.
- Make sure that all wireless computers and wireless adapters on the network are Wi-Fi
certified and WPA or WPA 2 capable, and that they support WPS configuration.
See Using Push 'N' Connect (WPS) to Configure Your Wireless Network on page 27.
Wireless Placement and Range Guidelines
The range of your wireless connection can vary significantly based on the physical placement
of the modem router. The latency, data throughput performance, and notebook power
consumption of wireless adapters also vary depending on your configuration choices.
For best results, place your modem router according to the following guidelines:
• Near the center of the area in which your PCs will operate.
• In an elevated location such as a high shelf where the wirelessly connected PCs have
line-of-sight access (even if through walls).
• Away from sources of interference, such as PCs, microwave ovens, and 2.4 GHz
cordless phones.
• Away from large metal surfaces.
• Put the antenna in a vertical position to provide the best side-to-side coverage. Put the
antenna in a horizontal position to provide the best up-and-down coverage.
• If using multiple access points, it is better if adjacent access points use different radio
frequency channels to reduce interference. The recommended channel spacing between
adjacent access points is 5 channels (for example, use Channels 1 and 6, or 6 and 11).
The time it takes to establish a wireless connection can vary depending on both your security
settings and placement. WEP connections can take slightly longer to establish. Also, WEP
encryption can consume more battery power on a notebook computer.
Configuring Y our Wireless Network and Security Settings
16

N300 Wireless Gigabit ADSL2+ Modem Router DGN3500
Wireless Security Options
Indoors, computers can connect over 802.11g wireless networks at a maximum range of up
to 300
network.
Unlike wired network data, your wireless data transmissions can extend beyond your walls
and can be received by anyone with a compatible adapter. For this reason, use the security
features of your wireless equipment. The wireless modem router provides highly effective
security features, which are covered in detail in this chapter. Deploy the security features
appropriate to your needs.
There are several ways you can enhance the security of your wireless network:
• Restrict access based on MAC address. You can allow only trusted PCs to connect so
• T urn off the broadcast of the wireless network name SSID. If you disable broadcast of
feet. Such distances can allow for others outside your immediate area to access your
that unknown PCs cannot wirelessly connect to the wireless modem router. Restricting
access by MAC address adds an obstacle against unwanted access to your network, but
the data broadcast over the wireless link is fully exposed (see
Access to Your Network on page 21).
the SSID, only devices that have the correct SSID can connect. This nullifies wireless
network discovery feature of some products, such as Windows XP, but the data is still
exposed (see
Hiding your wireless network name (SSID) on page 22).
Restricting Wireless
• WEP. Wired Equivalent Privacy (WEP) data encryption provides data security. WEP
Shared Key authentication and WEP data encryption block all but the most determined
eavesdropper. This data encryption mode has been superseded by WPA-PSK and
WPA2-PSK (see
• WPA-802.1x. Wi-Fi Protected Access (WPA) with user authentication implemented using
802.1x and RADIUS servers (see Configuring WPA-802.1x on page 26).
IEE
• WPA-PSK (TKIP) + WPA2-PSK (AES). Wi-Fi Protected Access (WPA) using a
pre-shared key to perform authentication and generate the initial data encryption keys.
The very strong authentication along with dynamic per frame re-keying of WPA makes it
virtually impossible to compromise (see
Security on page 24).
For more information about wireless technology, see the link to the online document in Virtual
Private Networking Basics in Appendix B.
Configuring WEP on page 25).
Configuring Mixed WPA-PSK+WPA2-PSK
Manually Configuring Your Wireless Settings
You can view or manually configure the wireless settings for the modem router in the
Wireless Settings screen. If you want to make changes, make sure to note the current
settings first.
Configuring Y our Wireless Network and Security Settings
17

N300 Wireless Gigabit ADSL2+ Modem Router DGN3500
Note: If you use a wireless computer to change the wireless network name
(SSID) or wireless security settings, you will be disconnected when
you click Apply. To avoid this problem, use a computer with a wired
connection to access the modem router.
To view or manually configure the wireless settings:
1 Log in to the
wireless modem router at its default LAN address of http://192.168.0.1 with
its default user name of admin and default password of password, or using whatever
LAN address and password you have set up.
2 Select Wirele
ss Settings in the main menu. The Wireless Settings screen displays.
Figure 7.
Table 2 describes the information that is displayed in the Wireless Settings screen.
Configuring Y our Wireless Network and Security Settings
18

N300 Wireless Gigabit ADSL2+ Modem Router DGN3500
Note: The SSID of any wireless access adapters must match the SSID
you specify in the wireless modem router. If they do not match, you
will not get a wireless connection.
3 Select the region in which the wireless modem router will operate.
Note: Up to 270Mbps mode uses two channels, but in this mode only the
first channel is listed in the channel pull-down menu. The associated
channels in this mode are: 1+5, 2+6, 3+7, 4+8, 5+9, 6+10, and 7+11.
When you select another wireless network mode, the channel
pull-down displays all available channels: 1 through 13. However,
available wireless channels depend on the selected wireless region.
4 For initial configuration and test, leave the other settings unchanged.
5 Click Save to save your settings or click Apply to allow your changes to take effect
immediately.
6 Configure and test your computers for wireless connectivity.
Program the wireless adapter of your computers to have the same SSID and wireless
settings l that you specified in the router. Check that they have a wireless link and can
obtain an IP address by DHCP from the wireless modem router. If there is interference,
adjust the channel.
Ta ble 2.
Settings Description
Wireless LAN Select the wireless LAN that you want to set up.
• NETGEAR. This is the primary LAN where you set up the region, channel,
mode, and access control (if used).
• NETGEAR2
• NETGEAR3
• NETGEAR4
Name (SSID) This is the wireless network name. Enter a 32-character (maximum) name in this
field. This field is case-sensitive.
In a setting where there is more than one wireless network, different wireless
network names provide a means for separating the traffic. To join a wireless
network, wireless devices use the SSID.
Region The location where the wireless modem router is used.
Configuring Y our Wireless Network and Security Settings
19

N300 Wireless Gigabit ADSL2+ Modem Router DGN3500
Table 2.
Settings Description
Mode Specify which 802.11 data communications protocol is used. You can select one
of the following modes:
• Up to 270 Mbps. Performance mode, using channel expansion to achieve
the 270 Mbps data rate. The N300 Wireless Modem Router uses the
channel you selected as the primary channel and expands to the secondary
channel (primary channel +4 or –4) to achieve a 40 MHz frame-by-frame
bandwidth. The N300 Wireless Modem Router detects channel usage and
disables frame-by-frame expansion if the expansion would result in
interference with the data transmission of other access points or clients.
• Up to 130 Mbps. Neighbor friendly mode, for reduced interference with
neighboring wireless networks. Provides two transmission streams with
different data on the same channel at the same time, but also allows
802.11b and 802.11g wireless devices.
• g & b allows older 802.11g and 802.11b wireless stations to access this
wireless network. You might use this mode for a wireless computer using
WEP security that does not support WPA-PSK or WPA2-PSK.
• g only allows only 802.11g wireless stations to access the wireless network.
Channel The wireless channel fields determine the operating frequency used for the
wireless networks. Do not change the wireless channel unless you experience
interference (shown by lost connections or slow data transfers). If this happens,
you might need to experiment with different channels to see which is the best.
Enable Wireless Access
Point
Allow Broadcast of Name
.
(SSID)
Wireless Isolation This feature is disabled by default. If you select this check box, then the only way
• Selected by default, this check box enables the wireless radio, which allows
the wireless modem router to work as a wireless access point.
• Turning off the wireless radio can be helpful for configuration, network
tuning, or troubleshooting.
• The Wireless LED on the front of the modem router displays the current
status of the wireless access point to let you know if it is disabled or
enabled. The wireless access point must be enabled to allow wireless
stations to access the Internet.
Selected by default, the wireless modem router broadcasts its SSID. This makes
it easier to select the right wireless network to connect to.
If you clear this check mark and click Apply, your network name will be hidden.
The first time a wireless device connects to it, the SSID must be typed in.
to connect to the wireless modem router will be via cable on the LAN.
Configuring Y our Wireless Network and Security Settings
20

N300 Wireless Gigabit ADSL2+ Modem Router DGN3500
Ta ble 2.
Settings Description
Wireless Station Access
List
Security Options • Disable. You can use this setting to establish wireless connectivity before
This is disabled by default so that any computer configured with the correct
wireless network name or SSID can access to your wireless network. For
increased security, you can restrict access to the wireless network to only
specific computers based on their MAC addresses. See
MAC address
implementing wireless security. NETGEAR strongly recommends that you
implement wireless security.
• WEP ( Wired Equivalent Privacy). Use encryption keys and data encryption
for data security. Select 64-bit or 128-bit encryption. See Configuring WEP
on page 25.
• WPA-PSK (WiFi Protected Access Pre-Shared Key). Allow only computers
configured with WPA to connect to the wireless modem router.
• WPA2-PSK Wi-Fi Protected Access with 2 Pre-Shared Keys). Allow only
computers configured with WPA2 to connect to the wireless modem router.
• Mixed WPA-PSK + WPA2-PSK. Allow computers configured with either
WPA-PSK or WPA2-PSK security to connect to the wireless modem router.
• WPA-802.1x.
• For WPA or WPA2 configuration, see Configuring Mixed
WPA-PSK+WPA2-PSK Security on page 24.
Restricting access by
Manually Configuring Your Wireless Security
To set up wireless security, you can either manually configure it in the Wireless Settings
screen, or you can use Wi-Fi Protected Setup (WPS) to automatically set the SSID and
implement WPA/WPA2 security (see
Using Push 'N' Connect (WPS) to Configure Your
Wireless Network on page 27).
Note: If you use a wireless computer to configure wireless security
settings, you will be disconnected when you click Apply.
Reconfigure your wireless computer to match the new settings, or
access the modem router from a wired computer to make further
changes.
Restricting Wireless Access to Your Network
By default, any wireless PC that is configured with the correct SSID can access your wireless
network. For increased security, the wireless modem router provides several ways to restrict
wireless access to your network. You can do the following:
• Turn off wireless connectivity completely.
• Restrict access based on the wireless network name (SSID).
Configuring Y our Wireless Network and Security Settings
21

N300 Wireless Gigabit ADSL2+ Modem Router DGN3500
WARNING:
• Restrict access based on the Wireless Card Access List.
Turning off wireless connectivity completely
You can completely turn off the wireless connectivity of the wireless modem router by
pressing the Wireless On/Off button on the side panel of the wireless modem router. For
example, if you use your notebook computer to wirelessly connect to your wireless modem
router and you take a business trip, you can turn off the wireless portion of the wireless
modem router while you are traveling. Other members of your household who use computers
connected to the wireless modem router through Ethernet cables can still use the wireless
modem router. To do this, clear the Enable Wireless Access Point check box on the
Wireless Settings screen, and then click Apply.
Hiding your wireless network name (SSID)
By default, the wireless modem router is set to broadcast its wireless network name (SSID).
You can restrict wireless access to your network by not broadcasting the wireless network
name (SSID). To do this, clear the Allow Broadcast of Name (SSID) check box on the
Wireless Settings screen, and then click Apply. Wireless devices will not “see” your wireless
modem router. You must configure your wireless devices to match the wireless network name
(SSID) of the wireless modem router.
The SSID of any wireless access adapters must match the SSID
you specify in the wireless modem router. If they do not match,
you will not get a wireless connection to the wireless modem
router.
Restricting access by MAC address
For increased security, you can restrict access to the wireless network to allow only specific
PCs based on their MAC addresses. You can restrict access to only trusted PCs so that
unknown PCs cannot wirelessly connect to the Awireless modem router. MAC address
filtering adds an obstacle against unwanted access to your network, but the data broadcast
over the wireless link is fully exposed.The Wireless Station Access list determines which
wireless hardware devices will be allowed to connect to the wireless modem router.
To restrict access based on MAC addresses:
1 Log in to the wireless modem router at its default LAN address of http://192.168.0.1 with
its default user name of admin and default password of password, or using whatever
LAN address and password you have set up.
Configuring Y our Wireless Network and Security Settings
22
N300 Wireless Gigabit ADSL2+ Modem Router DGN3500
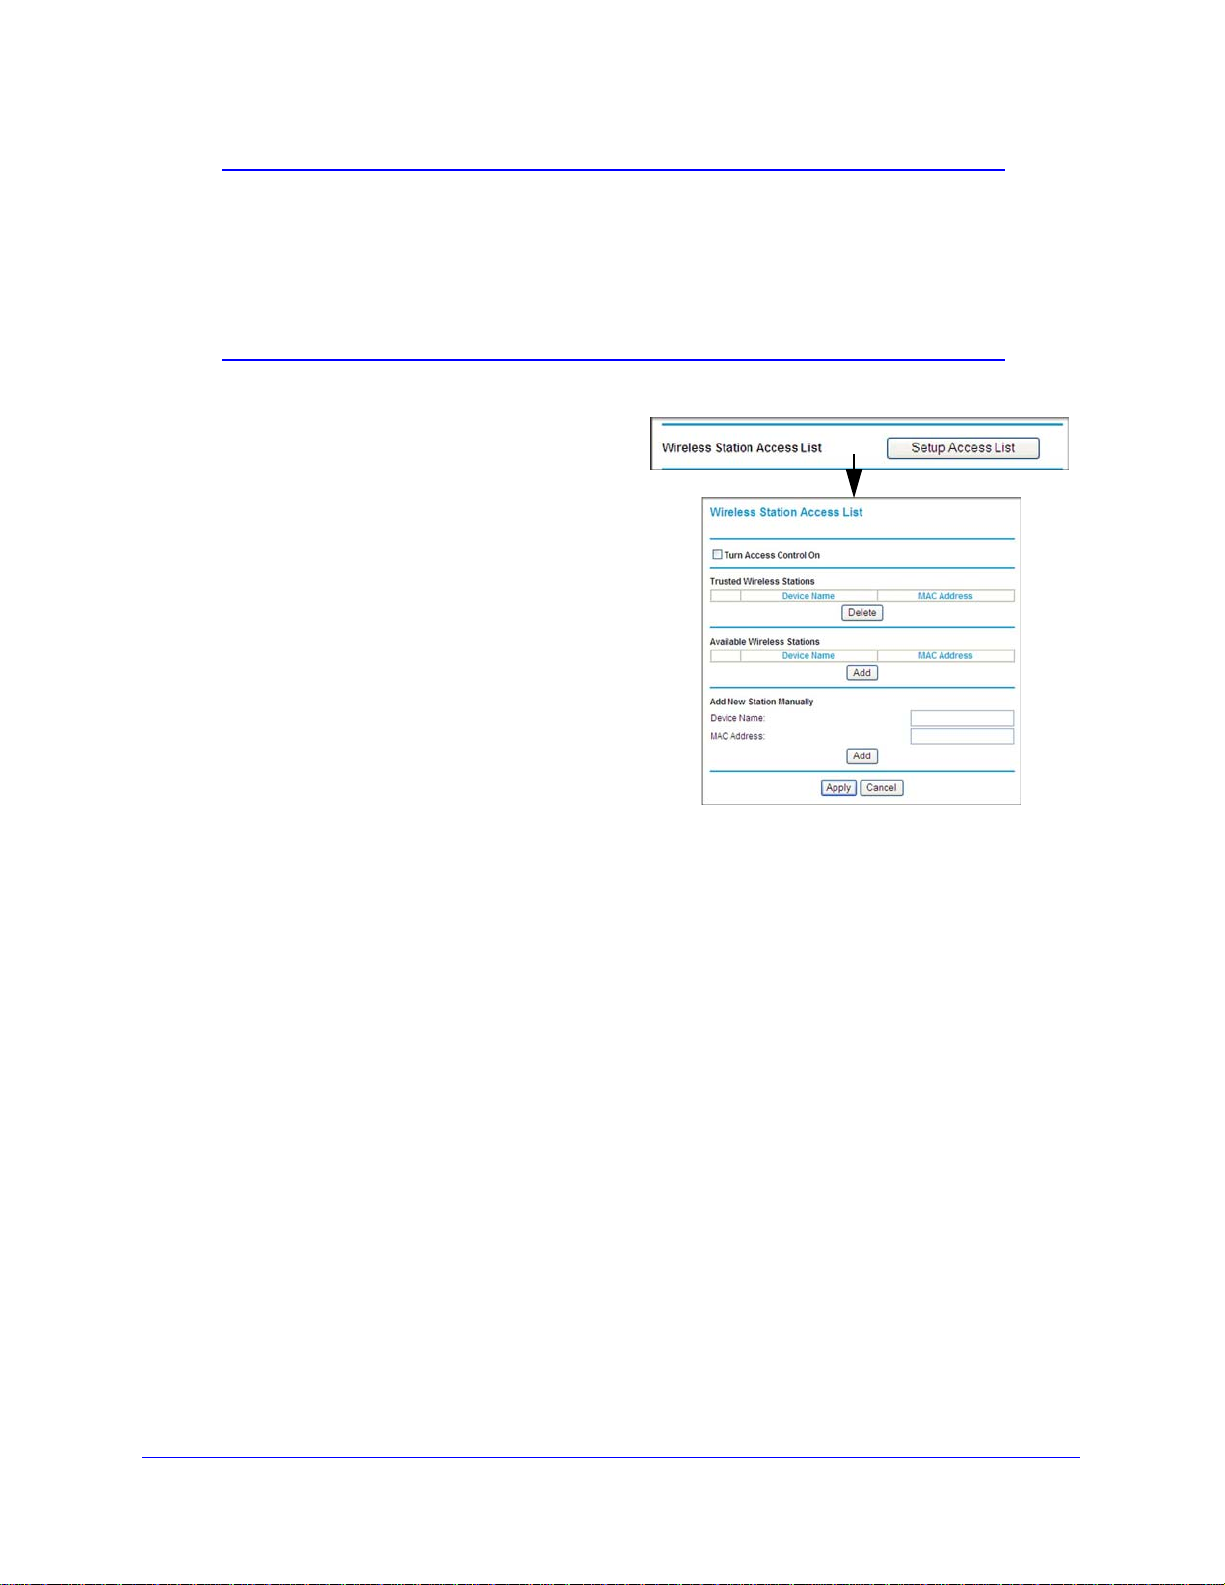
Figure 8.
Note: If you configure the wireless modem router from a wireless
computer, add your computer’s MAC address to the access list.
Otherwise you will lose your wireless connection when you click
Apply. You must then access the wireless modem router from a
wired computer, or from a wireless computer that is on the access
control list, to make any further changes.
2 In the Wireless Settings
screen, under the Wireless
Station Access List section,
click the
Setup Access List
button. The Wireless Station
Access Lis
3 Select th
t screen displays:
e Turn Access
Control On check box to
enable the restricting of
wireless computers by their
MAC addresses.
4 S
pecify which wireless
computers you want to allow to
access your wireless network.
f a computer is
• I
connected to the network,
you can select it from the
Available Wireless Stations list.
ou can copy and paste the MAC addresses from the wireless modem router’s
• Y
Attached Devices screen into the MAC Address field of this screen. To do this,
configure each wireless computer to obtain a wireless link to the wireless modem
router. The computer should then appear in the Attached Devices screen.
• I
f the computer is not connected, you can type in its MAC address. The MAC address
is usually printed on the wireless device, or it might appear in the wireless modem
router’s DHCP table. The MAC address is 12 hexadecimal digits.
5 Click Add
Tip: I
to add the station to the Trusted Wireless Stations list.
f you are using a wireless computer to set up access control, be sure to
add your computer to the Trusted Wireless Stations list. Otherwise when
you click Apply and your changes take effect you will be disconnected
from the wireless network.
6 Ma
ke sure the Turn Access Control On check box is selected, and then click Apply .
Now, only devices on this list will be allowed to
wirelessly connect to the wireless modem
router. This prevents unauthorized access to your network.
Configuring Y our Wireless Network and Security Settings
23

N300 Wireless Gigabit ADSL2+ Modem Router DGN3500
Configuring Mixed WPA-PSK+WPA2-PSK Security
A high-performance client such as the NETGEAR WN511B must connect to the wireless
modem router using WPA2-PSK to achieve maximum performance. Wireless clients that
connect to the wireless modem router using WPA-PSK run at no more than 802.11g speed.
This option allows wireless clients to use either encryption method.
Note: Not all wireless adapters support WPA or WPA2. Furthermore, client
software is required on the client. Windows XP and Windows 2000
with Service Pack 3 do include the client software that supports
WPA. Nevertheless, the wireless adapter hardware and driver must
also support WPA. Consult the product document for your wireless
adapter and WPA client software for instructions on configuring WPA
settings.
To configure Mixed WPA-PSK+WPA2-PSK:
1 Log in at the default LAN address of http://192.168.0.1, with the default user name of
admin and default password of password, or using whatever LAN address and
password you have set up.
2 Select Wireless Settings below Setup in the main menu of the wireless modem router.
3 Select the Mixed WPA-PSK+WPA2-PSK radio button. The Wireless Settings screen
expands to include the WPA-PSK.
4 Enter the pre-shared key in the Network Key field using between 8 and 63 characters.
Click Save to save your settings or click Apply to allow your changes to take effect
immediately.
Note: The procedures to configure WPA-PSK and WPA2-PSK are identical
to the procedure to configure Mixed WPA-PSK+WPA2-PSK. The
only difference is that you select either the WPA-PSK (Wi-Fi
Protected Access Pre-Shared Key) or
WPA2-PSK (Wi-Fi Protected Access 2 with Pre-Shared Key)
radio button in step 3.
For details about WPA-802.1x authentication options, see Configuring WPA-802.1x on
page 26.
Configuring Y our Wireless Network and Security Settings
24

N300 Wireless Gigabit ADSL2+ Modem Router DGN3500
Configuring WEP
Wired Equivalent Privacy (WEP) security is the most basic and simplest form of wireless
security. It is the most often used, but least secure of the available options. WEP Shared Key
authentication and WEP data encryption block all but the most determined eavesdropper.
This data encryption mode has been superseded by WPA-PSK and WPA2-PSK.
To configure WEP data encryption:
og in to the wireless modem router at its default LAN address of http://192.168.0.1
1 L
with its default user name of admin and default password of password, or using
whatever LAN address and password you have set up.
2 Select
Wireless Settings in the main menu.
3 In the Security Optio
ns section of the screen, select WEP (Wired Equivalent Privacy). The
WEP Security Encryption section displays.
Figure 9.
4 Select the authentication type:
• Automatic.Th
• Open Sy
is is the default setting.
stem.
• Sh
5 Select th
• 6
• 1
6 Ente
ared Key.
e encryption strength setting:
4-bit WEP.
28-bit WEP.
r the encryption keys. You can manually or automatically program the four data
encryption keys. These values must be identical on all computers and access points in your
network.
• Aut
omatic. Enter a word or group of printable characters in the Passphrase field and
click Generate. The four key boxes are automatically populated with key values.
Configuring Y our Wireless Network and Security Settings
25

N300 Wireless Gigabit ADSL2+ Modem Router DGN3500
• Manual. The number of hexadecimal digits that you must enter depends on the
encryption strength setting:
- For 64-bit WEP, enter 10 hexadecimal digits (any combination of 0–9, a–f, or
A–F).
- For 128-bit WEP, enter 26 hexadecimal digits (any combination of 0–9, a–f, or
A–F).
7 Select the radio button for the key you want to make active.
Be sure that you clearly understand how the WEP key settings are configured in your
wireless adapter. Wireless adapter configuration utilities such as the one included in
Windows XP allow entry of only one key, which must match the default key you set in the
wireless modem router.
8 Click Save to save your settings or click Apply to allow your changes to take effect
immediately.
Note: When configuring the wireless modem router from a wireless
computer, if you specify WEP settings, you will lose your wireless
connection when you click Apply. You must then either configure
your wireless adapter to match the wireless modem router WEP
settings or access the wireless modem router from a wired computer
to make any further changes.
Configuring WPA-802.1x
This version of WPA requires the use of a RADIUS server for authentication. Each user
(wireless client) must have a user login on the RADIUS server, and the wireless modem
router must have a client login on the RADIUS server. Data transmissions are encrypted
using a key that is automatically generated.
1 Log in to the wireless modem router at its default LAN address of http://192.168.0.1 with
its default user name of admin and default password of password, or using whatever
LAN address and password you have set up.
2 Select Wireless Settings in the main menu.
3 In the Security Options section of the screen, select WPA-802.1x.
4 In the Radius Server Name/IP Address field, enter the name or IP address of the Radius
server on your LAN. This is a required field.
5 In the Radius Port field, enter the port number used for connections to the Radius server.
The default port is 1812.
6 In the Shared Key field, enter the value that you want to use for the RADIUS shared key.
This key enables the wireless modem router to log in to the RADIUS server and must match
the client login value used on the Radius server.
Configuring Y our Wireless Network and Security Settings
26

N300 Wireless Gigabit ADSL2+ Modem Router DGN3500
Using Push 'N' Connect (WPS) to Configure Your Wireless Network
If your wireless clients support Wi-Fi Protected Setup (WPS), you can use this feature to
configure the wireless modem router’s SSID and security settings and, at the same time,
connect the wireless client securely and easily to the wireless modem router. Look for the
symbol on your client device (computers that will connect wirelessly to the wireless
modem router are clients). WPS automatically con
wireless security settings for the wireless modem router (if the wireless modem router is in its
default state) and broadcasts these settings to the wireless client.
Note: NETGEAR’s Push 'N' Connect feature is based on the Wi-Fi
Protected Setup (WPS) standard (for more information, see
http://www.wi-fi.org). All other Wi-Fi-certified and WPS-capable
products should be compatible with NETGEAR products that
implement Push 'N' Connect.
figures the network name (SSID) and
Some considerations regarding WPS are:
PS supports only WPA-PSK and WPA2-PSK wireless security. WEP security is not
• W
supported by WPS.
• I
f your wireless network will include a combination of WPS capable devices and
non-WPS capable devices, NETGEAR suggests that you set up your wireless network
and security settings manually first, and use WPS only for adding additional WPS
capable devices. See Adding Both WPS and Non-WPS Clients on p
A WPS client can be added using the Push Button method or the PIN method.
• Usi
• Ente
ng the Push Button. This is the preferred method. See the following section, Using a
WPS Button to Add a WPS Client .
ring a PIN. For information about using the PIN method, see Using PIN Entry to Add
a WPS Client on p
age 29.
age 30.
Using a WPS Button to Add a WPS Client
Any wireless computer or wireless adapter that will connect to the wireless modem router
wirelessly is a client. The client must support a WPS button, and must have a WPS
configuration utility, such as the NETGEAR Smart Wizard or Atheros Jumpstart.
The first time you add a WPS client, make sure that the Ke
check box on the WPS Settings screen is cleared. This is the default setting for the wireless
modem router, and allows it to generate the SSID and WPA/WPA2 security settings when it
implements WPS. After WPS is implemented, the wireless modem router automatically
selects this check box so that your SSID and wireless security settings remain the same if
other WPS-enabled devices are added later.
ep Existing Wireless Settings
Configuring Y our Wireless Network and Security Settings
27
N300 Wireless Gigabit ADSL2+ Modem Router DGN3500
WPS button
To use the wireless modem router WPS button to add a WPS client:
1 Log in to the
wireless modem router at its default LAN address of http://192.168.0.1 with
its default user name of admin and default password of password, or using whatever
LAN address and password you have set up.
2 On the wireless mo
dem router main menu, select Add a WPS Client, and then click Next.
The following screen displays:
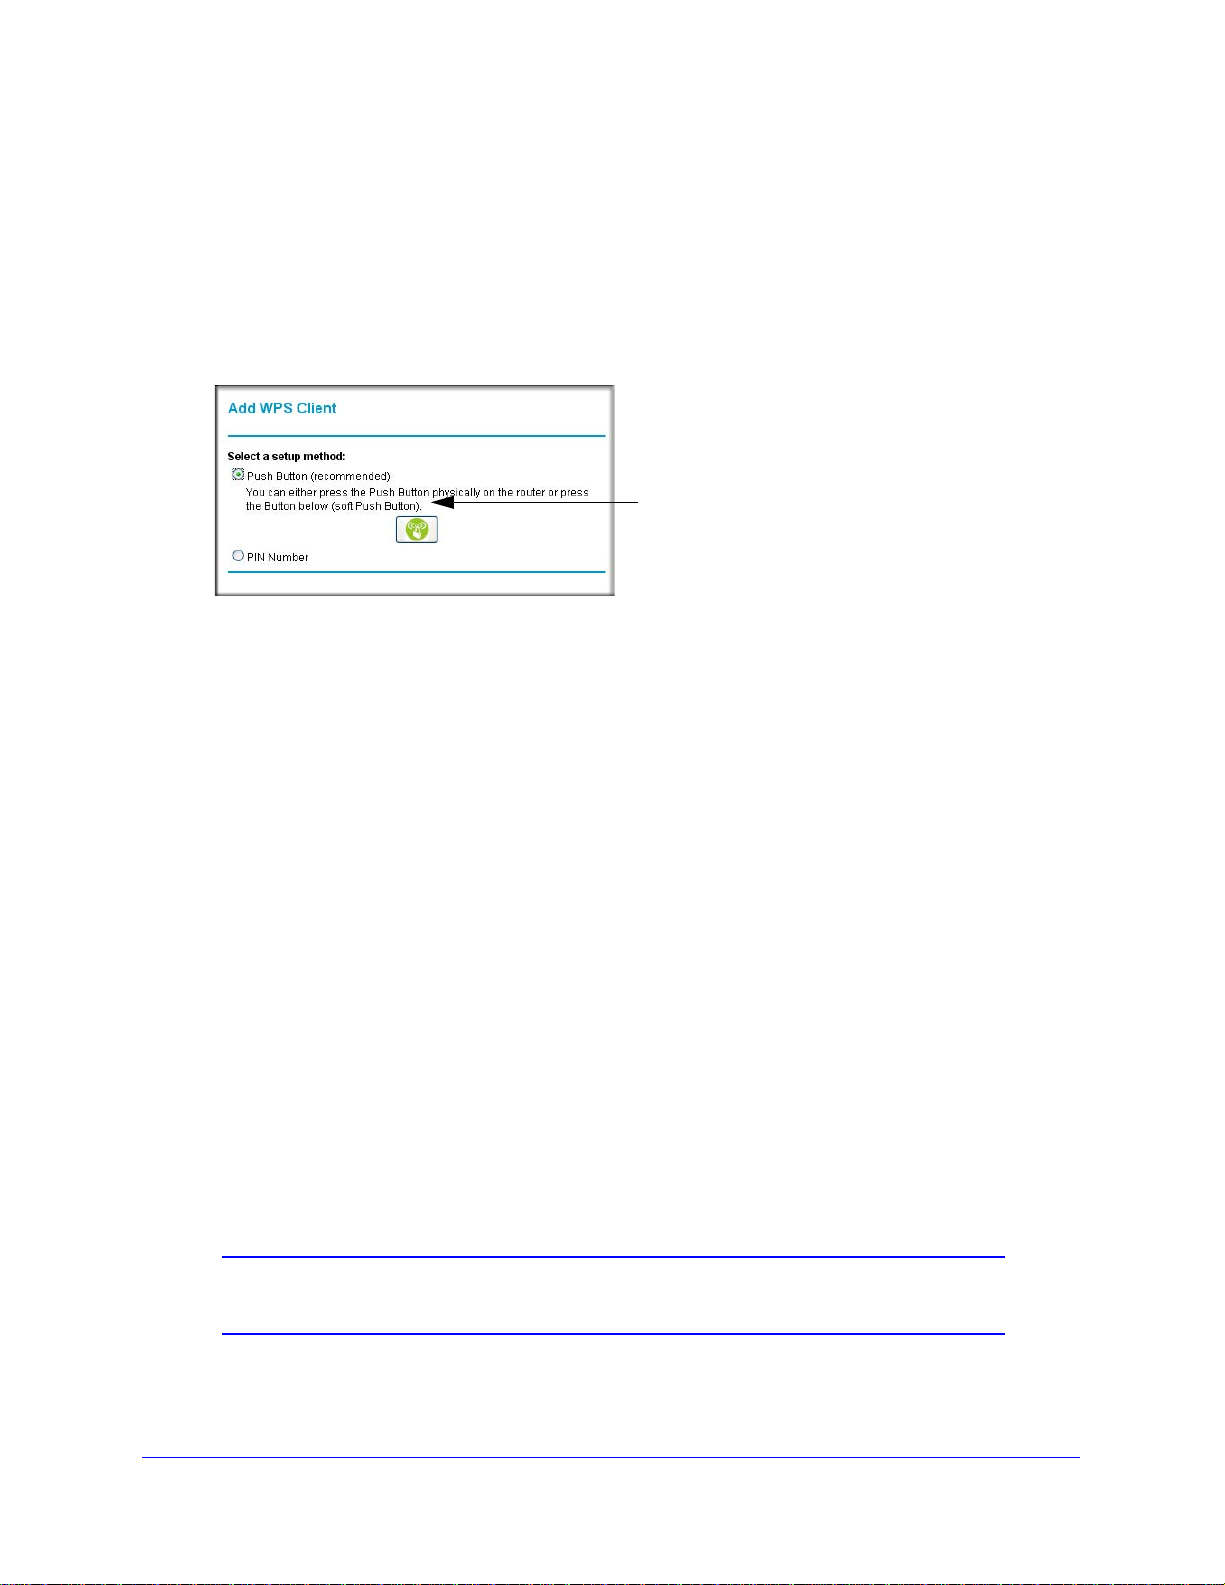
Figure 10.
By default, the Push Button (recommended) radio button is selected.
3 Either
The wireless modem router tries to communicate
4 Go to the client wireless computer
press the WPS button, or click the on screen button.
with the client for 2 minutes.
, and run a WPS configuration utility. Follow the utility’s
instructions to push or click a WPS button.
5 Go back to the wireless
• While the
wireless modem router attempts to connect to a WPS-capable device, the
modem router screen to check for a message.
Push 'N' Connect LED on the front blinks green. When the wireless modem router has
established a WPS connection, the LED is solid green.
• If a conne
ction is established, the wireless modem router WPS screen displays a
message confirming that the wireless client was successfully added to the wireless
network. (The wireless modem router has generated an SSID, implemented
WPA/WPA2 wireless security [including a PSK security password] on the wireless
modem router, and has sent this configuration to the wireless client.)
6 Note the new SSID and
WPA/WPA2 password for the wireless network.
To access the Internet from any computer connected to your wireless modem router,
lau
nch a browser such as Microsoft Internet Explorer. You should see the wireless
modem router’s Internet LED blink, indicating communication to the ISP.
Note: If no WPS-capable client devices are located during the 2-minute
timeframe, security will not be implemented on the modem router.
Configuring Y our Wireless Network and Security Settings
28
N300 Wireless Gigabit ADSL2+ Modem Router DGN3500
Using PIN Entry to Add a WPS Client
Any wireless computer or wireless adapter that will connect to the wireless modem router
wirelessly is a client. The client must support a WPS PIN, and must have a WPS
configuration utility, such as the NETGEAR Smart Wizard or Atheros Jumpstart.
The first time you add a WPS client, make sure that the Ke
ep Existing Wireless Settings
check box on the WPS Settings screen is cleared. This is the default setting for the wireless
modem router, and allows it to generate the SSID and WPA/WPA2 security settings when it
implements WPS. After WPS is implemented, the wireless modem router automatically
selects this check box so that your SSID and wireless security settings remain the same if
other WPS-enabled devices are added later.
To use a PIN to add a WPS client:
og in to the wireless modem router at its default LAN address of http://192.168.0.1
1 L
with its default user name of admin and default password of password, or using
whatever LAN address and password you have set up.
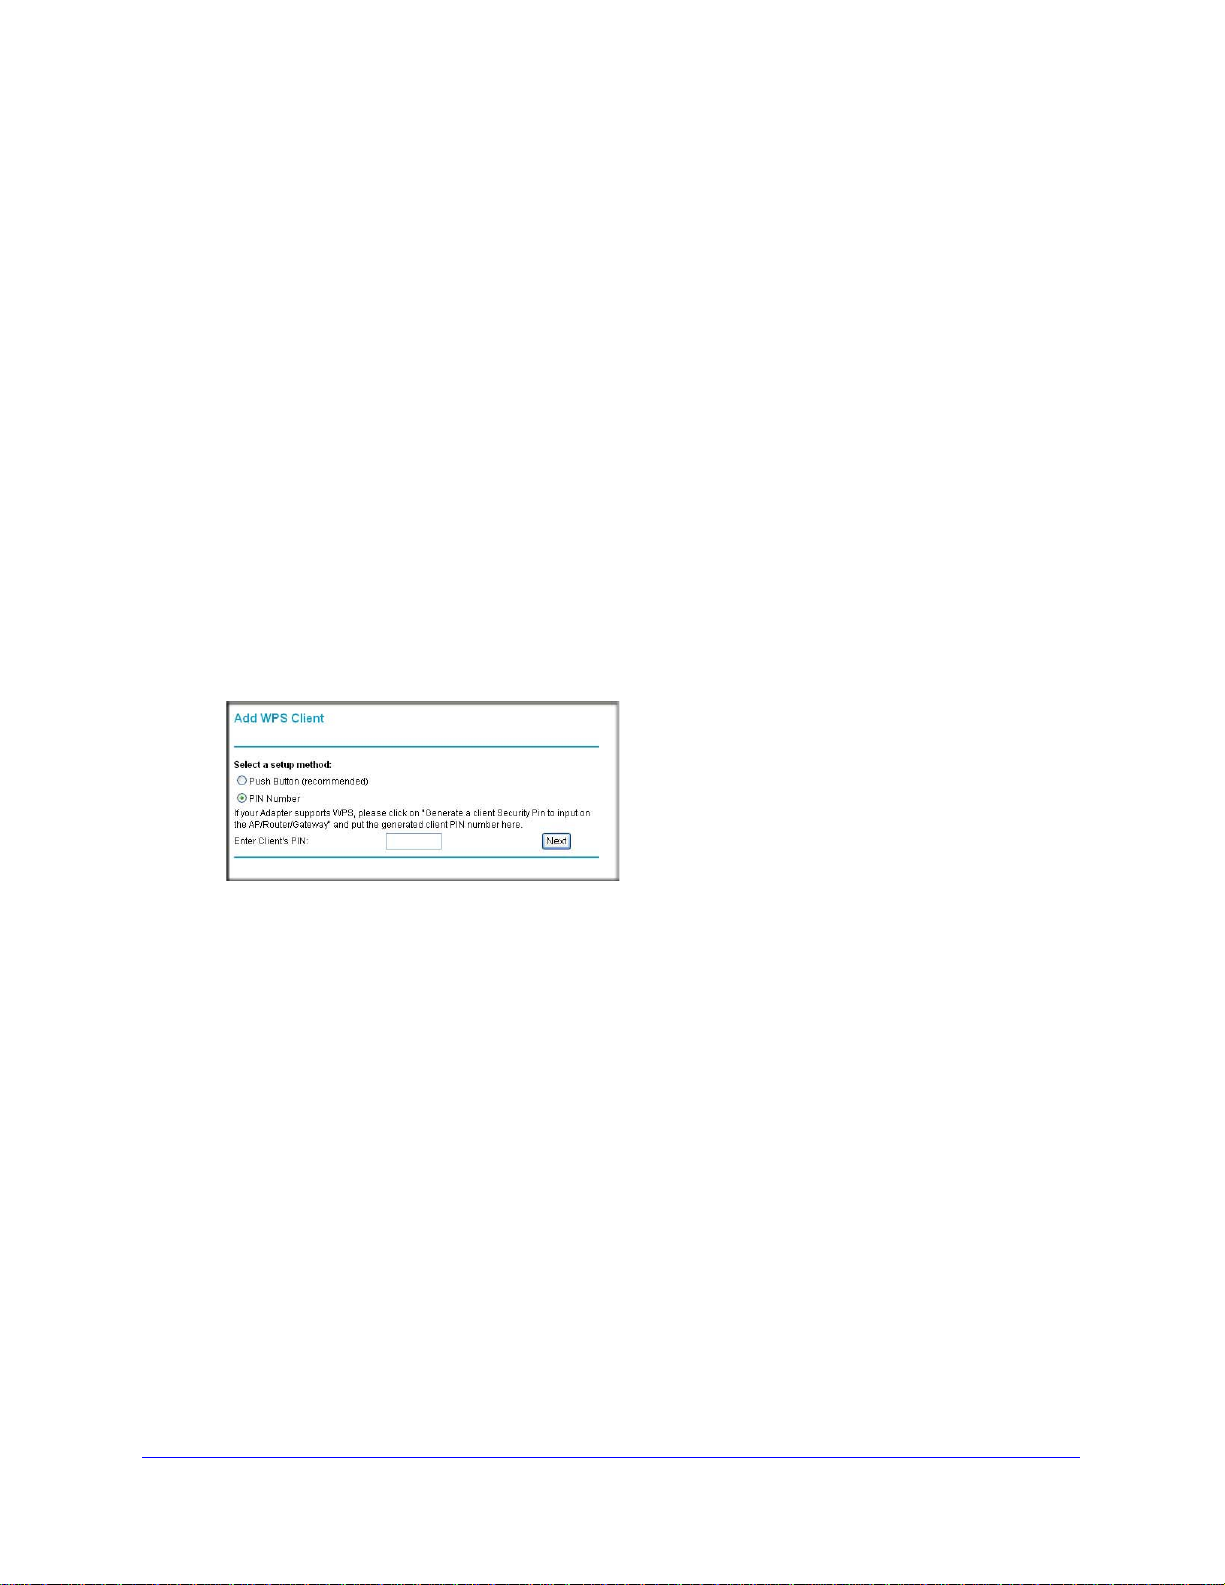
2 On th
e wireless modem router main menu, select Add a WPS Client (computers that will
connect wirelessly to the wireless modem router are clients), and then click Next. The Add
WPS Client screen displays:
Figure 11.
3 Select the PIN Number radio button.
4 Go
to the client wireless computer. Run a WPS configuration utility. Follow the utility’s
instructions to generate a PIN. Take note of the client PIN.
5 From the
wireless modem router Add WPS Client screen, enter the client PIN number, and
then click Next.
he wireless modem router tries to communicate with the client for 4 minutes.
• T
• T
he wireless modem router WPS screen displays a message confirming that the
client was added to the wireless network. The wireless modem router generates an
SSID, and implements WPA/WPA2 wireless security.
6 Note
the new SSID and WPA/WPA2 password for the wireless network. You can view these
settings in the Wireless Settings screen. See Manually Configuring Your Wireless Settings
on page 17.
To access the Internet from any computer con
nected to your wireless modem router,
launch a browser such as Microsoft Internet Explorer or Mozilla Firefox. You should see
the wireless modem router’s Internet LED blink, indicating communication to the ISP. If no
WPS-capable client devices are located during the 2-minute time frame, the SSID will not
be changed and no security will be implemented on the wireless modem router.
Configuring Y our Wireless Network and Security Settings
29

N300 Wireless Gigabit ADSL2+ Modem Router DGN3500
Connecting Additional Wireless Devices After WPS Setup
You can add more WPS clients to your wireless network, or you can add a combination of
WPS-enabled clients and clients without WPS.
Adding More WPS Clients
Note: Your wireless settings remain the same when you add another
WPS-enabled client, as long as the Keep Existing Wireless
Settings check box is selected in the Advanced Wireless screen
(listed under the Advanced heading in the wireless modem router
main menu). If you clear this check box, when you add the client, a
new SSID and passphrase will be generated, and all existing
connected wireless clients will be disassociated and disconnected
from the wireless modem router.
To add a wireless client device that is WPS-enabled:
1 Follow the procedures in Using a WPS Button to Add a WPS Client on page 27 or Using
PIN Entry to Add a WPS Client on page 29.
2 To view a list of all devices connected to your wireless modem router (including wireless and
Ethernet-connected), see
Viewing a List of Attached Devices on page 55.
Adding Both WPS and Non-WPS Clients
For non-WPS clients, you cannot use the WPS setup procedures to add them to the wireless
network. You must record, and then manually enter your security settings (see
Configuring Your Wireless Security on page 21).
To connect a combination of non-WPS enabled and WPS-Enabled clients to the wireless
modem router:
1 Configure the network names (SSIDs), select the WPA/PSK + WPA2/PSK radio button
on the Wireless Settings screen (see
page 21). and click Apply.
2 On the WPA/PSK + WPA2/PSK screen, select a passphrase and click Apply. Record this
information to add additional clients.
3 For the non-WPS devices that you want to connect, open the networking utility and follow
the utility’s instructions to enter the SSID, WPA/PSK + WPA2/PSK security method, and
passphrase.
4 For the WPS devices that you want to connect, follow the procedure Using a WPS Button to
Add a WPS Client on page 27 or Using PIN Entry to Add a WPS Client on page 29.
Manually Configuring Your Wireless Security on
Manually
Configuring Y our Wireless Network and Security Settings
30
N300 Wireless Gigabit ADSL2+ Modem Router DGN3500
Note: To make sure that your new wireless settings remain in effect, verify
that the Keep Existing Wireless Settings checkbox is selected in
the WPS Settings screen.
5 To view a list of all devices connected to your wireless modem router (including wireless and
Ethernet-connected), see Viewing a List of Attached Devices on p
age 55.
Configuring Advanced WPS Settings
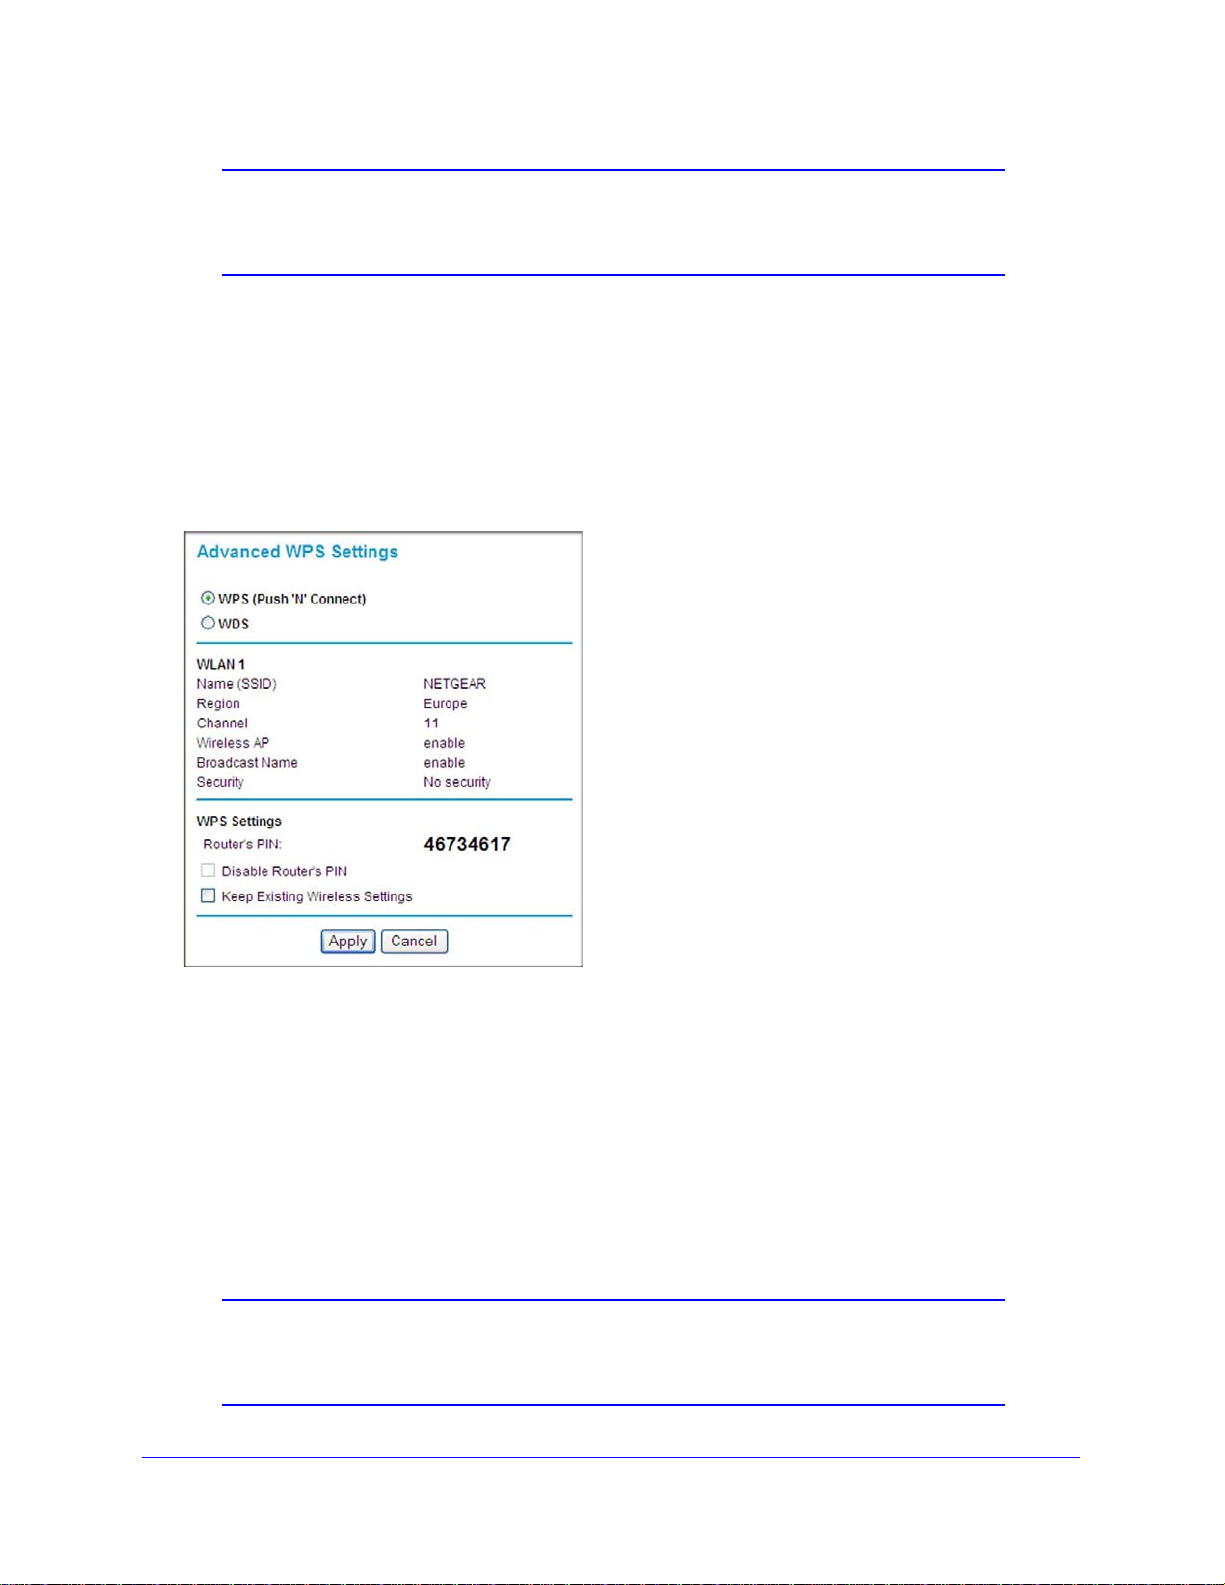
From the main menu, select Advanced Wireless Settings to display the following screen:
Figure 12.
The WPS settings show the wireless modem router PIN, Disable Router’s PIN, and the
Keep Existing Wireless Settings check box.
By default, the Keep Exis
ting Wireless Settings check box is cleared. This allows the
wireless modem router to automatically generate the SSID and WPA/WPA2 security settings
when it implements WPS. After WPS is implemented, the wireless modem router
automatically selects this check box so that your SSID and wireless security settings remain
the same if you add WPS-enabled devices or if you manually add non WPS-capable devices
later.
Note: If you clear the Keep Existing Wireless Settings check box, all
wireless settings and connections will be lost if a WPS client is
added.
Configuring Y our Wireless Network and Security Settings
31
 Loading...