

Page 1
N600 Wireless Dual Band Gigabit
ADSL2+ Modem Router
DGND3700v2
User Manual
September 2013
202-10918-03
350 East Plumeria Drive
San Jose, CA 95134
USA
Page 2

N600 Wireless Dual Band Gigabit ADSL2+ Modem Router DGND3700v2
Support
Thank you for selecting NETGEAR products.
After installing your device, locate the serial number on the label of your product and use it to register your product
at
https://my.netgear.com. You must register your product before you can use NETGEAR telephone support.
NETGEAR recommends registering your product through the NETGEAR website. For product updates and web
support, visit
Phone (US & Canada only): 1-888-NETGEAR.
Phone (Other Countries): Check the list of phone numbers at
http://support.netgear.com/general/contact/default.aspx.
http://support.netgear.com.
Trademarks
NETGEAR, the NETGEAR logo, and Connect with Innovation are trademarks and/or registered trademarks of
NETGEAR, Inc. and/or its subsidiaries in the United States and/or other countries. Information is subject to change
without notice. © NETGEAR, Inc. All rights reserved.
2
Page 3

Contents
Chapter 1 Hardware Setup
Product Specifications . . . . . . . . . . . . . . . . . . . . . . . . . . . . . . . . . . . . . . . . .8
Package Contents . . . . . . . . . . . . . . . . . . . . . . . . . . . . . . . . . . . . . . . . . .8
Warranty . . . . . . . . . . . . . . . . . . . . . . . . . . . . . . . . . . . . . . . . . . . . . . . . . 8
System Requirements . . . . . . . . . . . . . . . . . . . . . . . . . . . . . . . . . . . . . . .8
Standards . . . . . . . . . . . . . . . . . . . . . . . . . . . . . . . . . . . . . . . . . . . . . . . .9
Performance . . . . . . . . . . . . . . . . . . . . . . . . . . . . . . . . . . . . . . . . . . . . . . 9
Security . . . . . . . . . . . . . . . . . . . . . . . . . . . . . . . . . . . . . . . . . . . . . . . . . . 9
Ease of Use . . . . . . . . . . . . . . . . . . . . . . . . . . . . . . . . . . . . . . . . . . . . . . . 9
Advanced Features . . . . . . . . . . . . . . . . . . . . . . . . . . . . . . . . . . . . . . . . .9
Unpack Your New Router. . . . . . . . . . . . . . . . . . . . . . . . . . . . . . . . . . . . . . 11
Hardware Features. . . . . . . . . . . . . . . . . . . . . . . . . . . . . . . . . . . . . . . . . . . 12
Label. . . . . . . . . . . . . . . . . . . . . . . . . . . . . . . . . . . . . . . . . . . . . . . . . . . .12
Back Panel . . . . . . . . . . . . . . . . . . . . . . . . . . . . . . . . . . . . . . . . . . . . . . .13
Front Panel . . . . . . . . . . . . . . . . . . . . . . . . . . . . . . . . . . . . . . . . . . . . . . . 14
Position Your Wireless Router . . . . . . . . . . . . . . . . . . . . . . . . . . . . . . . . . .17
ADSL Microfilters . . . . . . . . . . . . . . . . . . . . . . . . . . . . . . . . . . . . . . . . . . . . 18
One-Line ADSL Microfilter (Not Included) . . . . . . . . . . . . . . . . . . . . . . .18
Two-Line ADSL Microfilter (Included). . . . . . . . . . . . . . . . . . . . . . . . . . .19
Summary . . . . . . . . . . . . . . . . . . . . . . . . . . . . . . . . . . . . . . . . . . . . . . . .19
Cable Your N600 Wireless Modem Router . . . . . . . . . . . . . . . . . . . . . . . .20
Verify the Cabling . . . . . . . . . . . . . . . . . . . . . . . . . . . . . . . . . . . . . . . . . . . . 20
Chapter 2 Get Started with NETGEAR Genie
Prepare to Set Up the Wireless Modem Router . . . . . . . . . . . . . . . . . . . . . 23
Use Standard TCP/IP Properties for DHCP . . . . . . . . . . . . . . . . . . . . . .23
Gather ISP Information. . . . . . . . . . . . . . . . . . . . . . . . . . . . . . . . . . . . . .23
Wireless Devices and Security Settings . . . . . . . . . . . . . . . . . . . . . . . . . 23
Types of Logins and Access. . . . . . . . . . . . . . . . . . . . . . . . . . . . . . . . . . . .24
NETGEAR Genie Setup . . . . . . . . . . . . . . . . . . . . . . . . . . . . . . . . . . . . . . . 24
Use NETGEAR Genie after Installation . . . . . . . . . . . . . . . . . . . . . . . . . . .25
Upgrade Wireless Modem Router Firmware . . . . . . . . . . . . . . . . . . . . . . . 25
Wireless Modem Router Dashboard (Basic Home Screen) . . . . . . . . . . . . 26
Add Wireless Devices or Computers to Your Network. . . . . . . . . . . . . . . .27
Manual Method. . . . . . . . . . . . . . . . . . . . . . . . . . . . . . . . . . . . . . . . . . . .27
Wi-Fi Protected Setup (WPS) Method . . . . . . . . . . . . . . . . . . . . . . . . . .27
Chapter 3 Genie Basic Settings
Internet Basic Settings . . . . . . . . . . . . . . . . . . . . . . . . . . . . . . . . . . . . . . . .30
3
Page 4

N600 Wireless Dual Band Gigabit ADSL2+ Modem Router DGND3700v2
Internet Basic Settings Screen Fields. . . . . . . . . . . . . . . . . . . . . . . . . . . 30
Attached Devices . . . . . . . . . . . . . . . . . . . . . . . . . . . . . . . . . . . . . . . . . . . .32
Parental Controls . . . . . . . . . . . . . . . . . . . . . . . . . . . . . . . . . . . . . . . . . . . . 33
ReadySHARE USB Storage and Printer . . . . . . . . . . . . . . . . . . . . . . . . . . 34
USB Storage (Basic Settings) . . . . . . . . . . . . . . . . . . . . . . . . . . . . . . . .34
ReadySHARE Printer . . . . . . . . . . . . . . . . . . . . . . . . . . . . . . . . . . . . . . . 35
Basic Wireless Settings . . . . . . . . . . . . . . . . . . . . . . . . . . . . . . . . . . . . . . .35
Wireless Settings Screen Fields. . . . . . . . . . . . . . . . . . . . . . . . . . . . . . .37
Change WPA Security Option and Passphrase . . . . . . . . . . . . . . . . . . . 38
Guest Networks . . . . . . . . . . . . . . . . . . . . . . . . . . . . . . . . . . . . . . . . . . . . .39
Guest Network Wireless Security Options . . . . . . . . . . . . . . . . . . . . . . . 40
Chapter 4 Genie Advanced Home
Setup Wizard . . . . . . . . . . . . . . . . . . . . . . . . . . . . . . . . . . . . . . . . . . . . . . .43
WPS Wizard . . . . . . . . . . . . . . . . . . . . . . . . . . . . . . . . . . . . . . . . . . . . . . . . 44
VPN Wizard . . . . . . . . . . . . . . . . . . . . . . . . . . . . . . . . . . . . . . . . . . . . . . . .45
Setup Menu . . . . . . . . . . . . . . . . . . . . . . . . . . . . . . . . . . . . . . . . . . . . . . . . 48
ADSL Setup . . . . . . . . . . . . . . . . . . . . . . . . . . . . . . . . . . . . . . . . . . . . . . . . 48
WAN Setup. . . . . . . . . . . . . . . . . . . . . . . . . . . . . . . . . . . . . . . . . . . . . . . . . 49
Default DMZ Server . . . . . . . . . . . . . . . . . . . . . . . . . . . . . . . . . . . . . . . .50
Change the MTU Size . . . . . . . . . . . . . . . . . . . . . . . . . . . . . . . . . . . . . . 51
LAN Setup . . . . . . . . . . . . . . . . . . . . . . . . . . . . . . . . . . . . . . . . . . . . . . . . . 53
LAN Setup Screen Settings . . . . . . . . . . . . . . . . . . . . . . . . . . . . . . . . . .54
Use the Wireless Modem Router as a DHCP Server. . . . . . . . . . . . . . . 54
Address Reservation . . . . . . . . . . . . . . . . . . . . . . . . . . . . . . . . . . . . . . . 55
Quality of Service (QoS) Setup . . . . . . . . . . . . . . . . . . . . . . . . . . . . . . . . . 56
Chapter 5 USB Storage
USB Drive Requirements . . . . . . . . . . . . . . . . . . . . . . . . . . . . . . . . . . . . . . 62
ReadySHARE Access . . . . . . . . . . . . . . . . . . . . . . . . . . . . . . . . . . . . . . . . 62
File-Sharing Scenarios . . . . . . . . . . . . . . . . . . . . . . . . . . . . . . . . . . . . . . . . 63
USB Storage Basic Settings. . . . . . . . . . . . . . . . . . . . . . . . . . . . . . . . . . . . 64
Add or Edit a Network Folder . . . . . . . . . . . . . . . . . . . . . . . . . . . . . . . . .65
USB Storage Advanced Settings . . . . . . . . . . . . . . . . . . . . . . . . . . . . . . . .66
Safely Remove a USB Drive . . . . . . . . . . . . . . . . . . . . . . . . . . . . . . . . . . . 68
Media Server Settings . . . . . . . . . . . . . . . . . . . . . . . . . . . . . . . . . . . . . . . . 68
Specify Approved USB Devices . . . . . . . . . . . . . . . . . . . . . . . . . . . . . . . . . 69
Connect to the USB Drive from a Remote Computer. . . . . . . . . . . . . . . . . 70
Access the Wireless Modem Router’s USB Drive Remotely Using FTP 70
Chapter 6 USB Printer Control
Control Center Configuration . . . . . . . . . . . . . . . . . . . . . . . . . . . . . . . . . . . 73
USB Printer . . . . . . . . . . . . . . . . . . . . . . . . . . . . . . . . . . . . . . . . . . . . . . . . 73
Scan with a Multifunction Printer . . . . . . . . . . . . . . . . . . . . . . . . . . . . . . . . 74
USB Speaker . . . . . . . . . . . . . . . . . . . . . . . . . . . . . . . . . . . . . . . . . . . . . . . 74
4
Page 5

N600 Wireless Dual Band Gigabit ADSL2+ Modem Router DGND3700v2
Chapter 7 Security
Keyword Blocking of HTTP Traffic . . . . . . . . . . . . . . . . . . . . . . . . . . . . . . .76
Firewall Rules . . . . . . . . . . . . . . . . . . . . . . . . . . . . . . . . . . . . . . . . . . . . . . .77
Add Custom Services to Allow or Block . . . . . . . . . . . . . . . . . . . . . . . . .80
Schedule for Firewall Rules . . . . . . . . . . . . . . . . . . . . . . . . . . . . . . . . . . . .81
Security Event Email Notifications . . . . . . . . . . . . . . . . . . . . . . . . . . . . . . .82
Chapter 8 Administration
Upgrade the Wireless Modem Router Firmware . . . . . . . . . . . . . . . . . . . .84
View Wireless Modem Router Status . . . . . . . . . . . . . . . . . . . . . . . . . . . . .85
Wireless Modem Router Information . . . . . . . . . . . . . . . . . . . . . . . . . . . 85
Internet Provider (WAN) Setup. . . . . . . . . . . . . . . . . . . . . . . . . . . . . . . .85
Wireless Settings (2.4 GHz and 5 GHz) . . . . . . . . . . . . . . . . . . . . . . . . . 88
Guest Network (2.4 GHz and 5 GHz) . . . . . . . . . . . . . . . . . . . . . . . . . . . 89
View VPN Status . . . . . . . . . . . . . . . . . . . . . . . . . . . . . . . . . . . . . . . . . . . .90
View Logs of Web Access or Attempted Web Access . . . . . . . . . . . . . . . .92
Manage the Configuration File . . . . . . . . . . . . . . . . . . . . . . . . . . . . . . . . . .92
Back Up Settings . . . . . . . . . . . . . . . . . . . . . . . . . . . . . . . . . . . . . . . . . . 93
Restore Configuration Settings. . . . . . . . . . . . . . . . . . . . . . . . . . . . . . . .93
Erase . . . . . . . . . . . . . . . . . . . . . . . . . . . . . . . . . . . . . . . . . . . . . . . . . . .93
Set Password . . . . . . . . . . . . . . . . . . . . . . . . . . . . . . . . . . . . . . . . . . . . . . .94
Password Recovery . . . . . . . . . . . . . . . . . . . . . . . . . . . . . . . . . . . . . . . .94
Diagnostics . . . . . . . . . . . . . . . . . . . . . . . . . . . . . . . . . . . . . . . . . . . . . . . . .95
Chapter 9 Advanced Settings
Advanced Wireless Settings. . . . . . . . . . . . . . . . . . . . . . . . . . . . . . . . . . . .98
Wireless Repeating Function (WDS) . . . . . . . . . . . . . . . . . . . . . . . . . . . .101
Wireless Repeating Function . . . . . . . . . . . . . . . . . . . . . . . . . . . . . . . .102
Set Up the Base Station . . . . . . . . . . . . . . . . . . . . . . . . . . . . . . . . . . . .103
Set Up a Repeater Unit. . . . . . . . . . . . . . . . . . . . . . . . . . . . . . . . . . . . .104
Port Forwarding and Triggering . . . . . . . . . . . . . . . . . . . . . . . . . . . . . . . .105
Remote Computer Access Basics . . . . . . . . . . . . . . . . . . . . . . . . . . . . 105
Port Triggering to Open Incoming Ports . . . . . . . . . . . . . . . . . . . . . . . . 106
Port Forwarding to Permit External Host Communications . . . . . . . . .108
How Port Forwarding Differs from Port Triggering . . . . . . . . . . . . . . . .109
Set Up Port Forwarding to Local Servers . . . . . . . . . . . . . . . . . . . . . . . . .109
Add a Custom Service . . . . . . . . . . . . . . . . . . . . . . . . . . . . . . . . . . . . .111
Edit or Delete a Port Forwarding Entry. . . . . . . . . . . . . . . . . . . . . . . . .112
Set Up Port Triggering . . . . . . . . . . . . . . . . . . . . . . . . . . . . . . . . . . . . . . .112
Dynamic DNS . . . . . . . . . . . . . . . . . . . . . . . . . . . . . . . . . . . . . . . . . . . . . .114
Static Routes . . . . . . . . . . . . . . . . . . . . . . . . . . . . . . . . . . . . . . . . . . . . . .116
Remote Management . . . . . . . . . . . . . . . . . . . . . . . . . . . . . . . . . . . . . . . .118
USB Settings . . . . . . . . . . . . . . . . . . . . . . . . . . . . . . . . . . . . . . . . . . . . . .119
Universal Plug and Play . . . . . . . . . . . . . . . . . . . . . . . . . . . . . . . . . . . . . .119
IPv6 . . . . . . . . . . . . . . . . . . . . . . . . . . . . . . . . . . . . . . . . . . . . . . . . . . . . .121
Traffic Meter . . . . . . . . . . . . . . . . . . . . . . . . . . . . . . . . . . . . . . . . . . . . . . .121
5
Page 6

N600 Wireless Dual Band Gigabit ADSL2+ Modem Router DGND3700v2
Device Mode . . . . . . . . . . . . . . . . . . . . . . . . . . . . . . . . . . . . . . . . . . . . . .123
VPN Policies. . . . . . . . . . . . . . . . . . . . . . . . . . . . . . . . . . . . . . . . . . . . . . . 123
Add or Edit an Auto VPN Policy . . . . . . . . . . . . . . . . . . . . . . . . . . . . . .125
Add or Edit a Manual VPN Policy. . . . . . . . . . . . . . . . . . . . . . . . . . . . . 128
Chapter 10 Troubleshooting
Quick Tips . . . . . . . . . . . . . . . . . . . . . . . . . . . . . . . . . . . . . . . . . . . . . . . . 131
Sequence to Restart Your Network . . . . . . . . . . . . . . . . . . . . . . . . . . . 131
Check Ethernet Cable Connections . . . . . . . . . . . . . . . . . . . . . . . . . . .131
Wireless Settings . . . . . . . . . . . . . . . . . . . . . . . . . . . . . . . . . . . . . . . . .131
Network Settings . . . . . . . . . . . . . . . . . . . . . . . . . . . . . . . . . . . . . . . . .131
Troubleshoot with the LEDs . . . . . . . . . . . . . . . . . . . . . . . . . . . . . . . . . . . 132
Power LED Is Off or Blinking . . . . . . . . . . . . . . . . . . . . . . . . . . . . . . . . 132
Power LED Stays Red . . . . . . . . . . . . . . . . . . . . . . . . . . . . . . . . . . . . .132
LEDs Never Turn Off . . . . . . . . . . . . . . . . . . . . . . . . . . . . . . . . . . . . . . 133
Internet or Ethernet Port LEDs Are Off. . . . . . . . . . . . . . . . . . . . . . . . .133
Wireless LEDs Are Off . . . . . . . . . . . . . . . . . . . . . . . . . . . . . . . . . . . . . 133
The Push 'N' Connect (WPS) Button Blinks Red . . . . . . . . . . . . . . . . . 133
Cannot Log In to the Router . . . . . . . . . . . . . . . . . . . . . . . . . . . . . . . . . . . 134
Cannot Access the Internet . . . . . . . . . . . . . . . . . . . . . . . . . . . . . . . . . . . 134
Troubleshoot PPPoE . . . . . . . . . . . . . . . . . . . . . . . . . . . . . . . . . . . . . . 136
Troubleshoot Internet Browsing . . . . . . . . . . . . . . . . . . . . . . . . . . . . . . 136
Changes Not Saved . . . . . . . . . . . . . . . . . . . . . . . . . . . . . . . . . . . . . . . . . 137
Incorrect Date or Time . . . . . . . . . . . . . . . . . . . . . . . . . . . . . . . . . . . . . . . 137
Wireless Connectivity . . . . . . . . . . . . . . . . . . . . . . . . . . . . . . . . . . . . . . . . 137
Wireless Signal Strength . . . . . . . . . . . . . . . . . . . . . . . . . . . . . . . . . . . 138
Restore the Factory Settings and Password . . . . . . . . . . . . . . . . . . . . . . 138
Troubleshoot Your Network Using the Ping Utility . . . . . . . . . . . . . . . . . .138
Test the LAN Path to Your Router . . . . . . . . . . . . . . . . . . . . . . . . . . . .138
Test the Path from Your Computer to a Remote Device . . . . . . . . . . . 139
Appendix A Supplemental Information
Factory Settings . . . . . . . . . . . . . . . . . . . . . . . . . . . . . . . . . . . . . . . . . . . .142
Technical Specifications. . . . . . . . . . . . . . . . . . . . . . . . . . . . . . . . . . . . . .143
Appendix B Notification of Compliance
Index
6
Page 7

1. Hardware Setup
Get to know your wireless router
1
The NETGEAR N600 Wireless Dual Band Gigabit ADSL2+ Modem Router DGND3700v2 is the
ultimate integrated ADSL networking gateway. It offers concurrent dual-band technology that
allows devices to avoid interference and also ensures top speeds and the greatest range for
demanding applications, such as streaming HD video and multiplayer gaming. Complete with a
built-in ADSL modem, it is compatible with all major ADSL Internet service providers. The
Gigabit port on the WAN side also has an option to connect to a fiber or cable modem.
If you have not already set up your new router using the installation guide that comes in the box,
this chapter walks you through the hardware setup.
how to set up your Internet connection.
For more information about the topics covered in this manual, visit the support website at
http://support.netgear.com.
This chapter contains the following sections:
• Product Specifications
• Unpack Your New Router
• Hardware Features
• Position Your Wireless Router
• ADSL Microfilters
• Cable Your N600 Wireless Modem Router
• Verify the Cabling
Chapter 3, Genie Basic Settings, explains
7
Page 8

N600 Wireless Dual Band Gigabit ADSL2+ Modem Router DGND3700v2
Product Specifications
• All-in-one. Built-in ADSL2+ modem and WAN Gigabit-Ethernet port for cable or fiber
combined with a wireless router create the ultimate integrated home gateway.
• Concurrent dual band. Ensures top speeds and the greatest range while minimizing
interference.
• Faster multimedia streaming. Provides Wireless-N speed for streaming HD videos,
simultaneous downloads, and online gaming in addition to basic Internet applications.
• Shared storage. Two (2) ports for ReadySHARE® USB storage access provide fast and
easy shared access to an external USB storage device.
• Live Parental Controls. Keep your Internet experience safe.
• Guest network access. Provides separate security and access restrictions for guests
using the network.
• Secured connection. Push 'N' Connect ensures a quick and secure network connection.
• Broadband usage meter. Monitors Internet traffic and sends customized reports to help
keep costs under control.
• Easy installation. Connect to computer and open your browser to install.
• Compatibility. Compatible with all major ADSL Internet service providers (ISPs).
• Broadband usage meter. Monitors Internet traffic and sends customized reports to help
keep costs under control.
Package Contents
• N600 Wireless Dual Band Gigabit ADSL2+ Modem Router DGND3700v2
• Ethernet cable
• Phone cable and filter
• Power adapter, localized to country of sale
Warranty
• NETGEAR 1-year warranty
System Requirements
• Broadband Internet service
- ADSL broadband Internet service
- Cable or fiber: Connects to cable modem or fiber termination node through the
Gigabit-Ethernet WAN port
• 802.11 a/b/g/n 2.4 or 5.0 GHz specification wireless adapter or an Ethernet adapter and
cable for each computer
Hardware Setup
8
Page 9

N600 Wireless Dual Band Gigabit ADSL2+ Modem Router DGND3700v2
• Microsoft Windows 7, Vista, XP, 2000, Me, Mac OS, UNIX, or Linux
• Microsoft Internet Explorer 5.0, Firefox 2.0, Safari 1.4, or later
• Use with an N600 Wireless Dual Band USB Adapter (WNDA3100 for maximum
performance)
Standards
• IEEE 802.11 b/g/n 2.4 GHz
• IEEE 802.11 a/n 5.0 GHz
• Five (5) 10/100/1000 (1 WAN and 4 LAN) Gigabit Ethernet ports
• Two (2) USB 2.0 ports
• One (1) ADSL2+ port
Performance
• All-in-one. High-speed ADSL2+ modem (built-in) and WAN Gigabit-Ethernet port for
cable or fiber
• Powerful dual-core (400 MHz each) processor
• High-speed access to external USB storage using two USB 2.0 ports
• Memory: 32 MB flash and 64 MB RAM
• Five (5) (1 WAN, 4 LAN) Gigabit-Ethernet ports
• Advanced Quality of Service (QoS)
Security
• Wi-Fi Protected Access® (WPA/WPA2-PSK) and WEP
• Double firewall protection (SPI and NAT firewall)
• Denial-of-service (DoS) attack prevention
Ease of Use
• Easy installation. Connect to computer and open your browser to install
• Push 'N' Connect using Wi-Fi Protected Setup® (WPS)
Physical Specifications
• Dimensions: 223 x 153 x 31 mm (8.8 x 6.0 x 1.2 inches)
• Weight: 0.5 kg (1.2 lb)
Advanced Features
• Live Parental Controls with flexible and customizable filter settings.
Hardware Setup
9
Page 10
N600 Wireless Dual Band Gigabit ADSL2+ Modem Router DGND3700v2
• Simultaneous dual band. 2.4 GHz and 5 GHz operation.
• T
wo (2) ports for ReadySHARE® USB storage access. Supports FAT16/32, NTFS
Read/Write.
• DLNA®. Stream media to DLNA media players.
• Multiple SSID guest networks (separate security and access restrictions).
• Broadband usage meter measures Internet usage.
• Power and Wi-Fi On/Of
f buttons.
NETGEAR Green Features
Power On/Off button
80% recycled packaging
CEC (California Efficiency)
RoHS
WEEE
Hardware Setup
10
Page 11
N600 Wireless Dual Band Gigabit ADSL2+ Modem Router DGND3700v2
Th
de
600
ess Mode
out
er
Unpack Your New Router
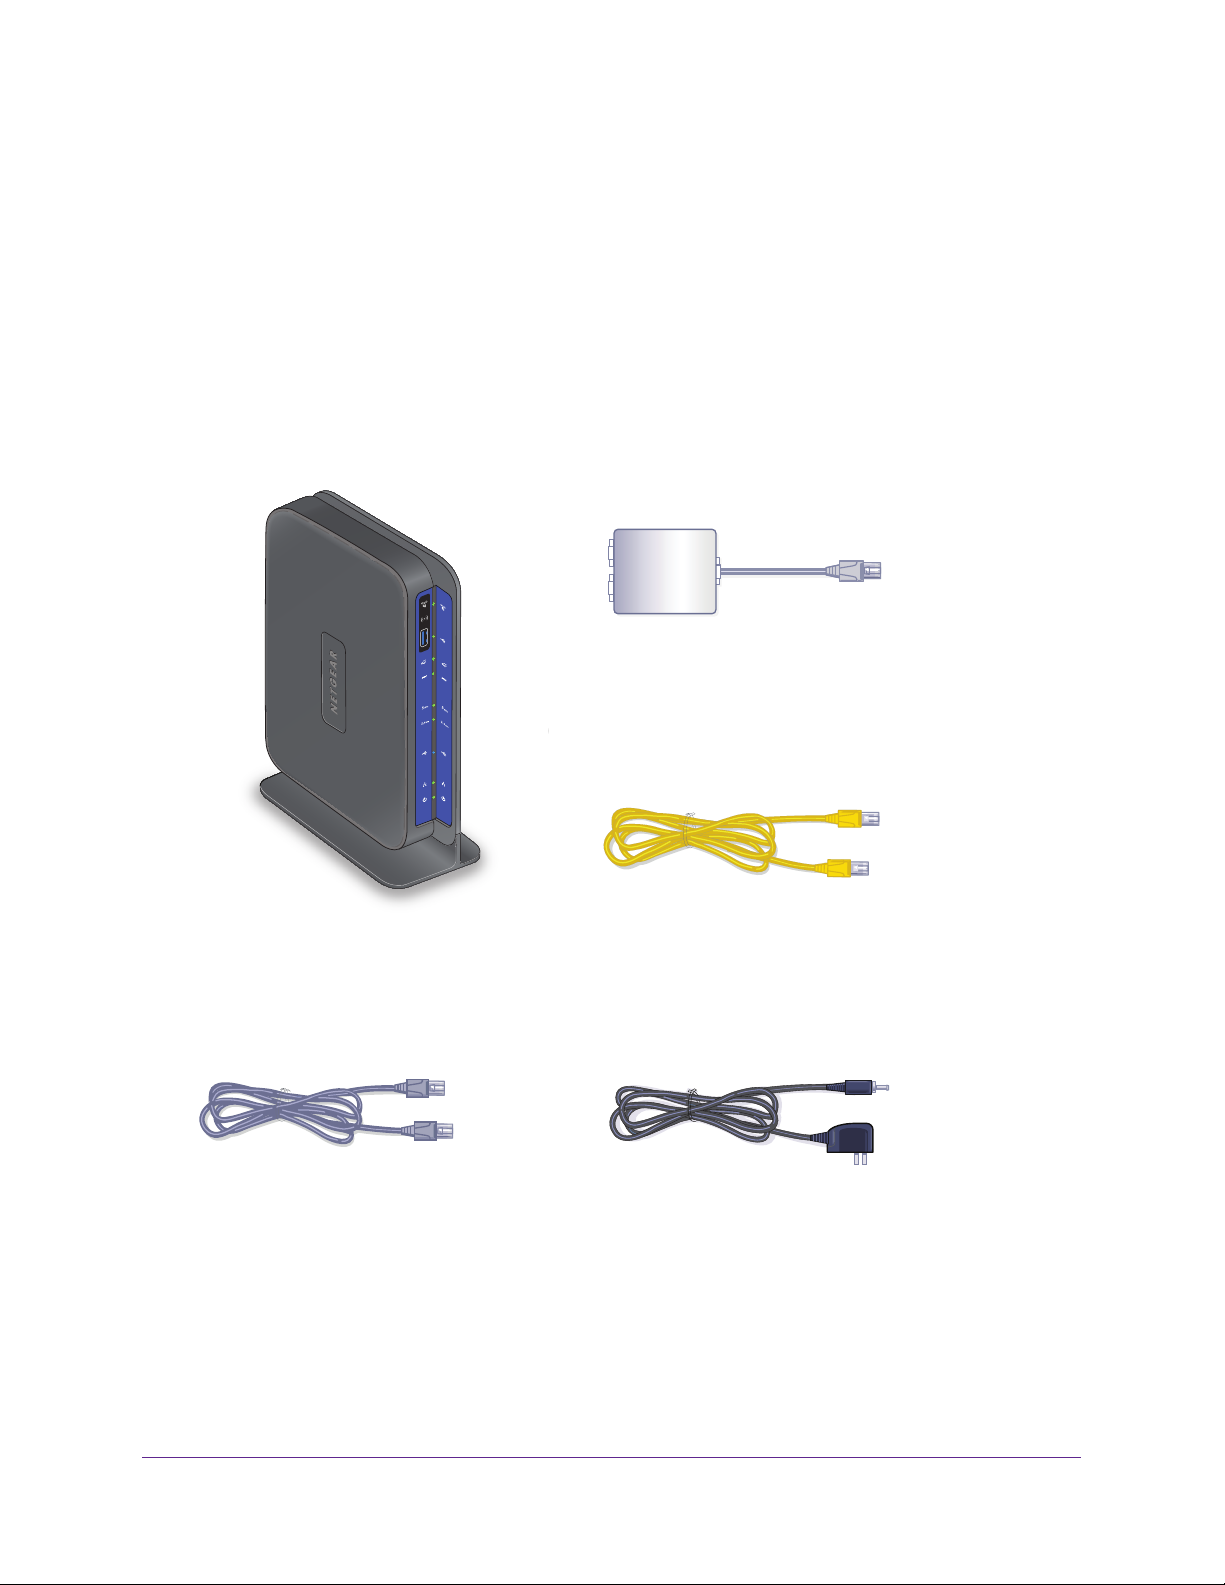
Your box should contain the following items:
• N600 Wireless Dual Band Gigabit
• AC power adapter (plug varies by region)
• Category 5 (Cat 5) Ethernet cable
• T
elephone cable with RJ-11 connector
• Microfilters and splitters (quantity and type vary by region)
• Installation guide with cabling and router setup instructions.
ADSL2+ Modem Router DGND3700v2
ADSL
Phone
Line
ADSL filter
The ADSL filter provided
depends on the region.
N
Wirel
N600 Wireless Modem Router
m R
Phone cable
Figure 1. Box contents
Ethernet cable
Power adapter
Hardware Setup
11
Page 12
N600 Wireless Dual Band Gigabit ADSL2+ Modem Router DGND3700v2
Hardware Features
Before you cable your router, take a moment to become familiar with the label and the front
and back panels. Pay particular attention to the LEDs on the front panel.
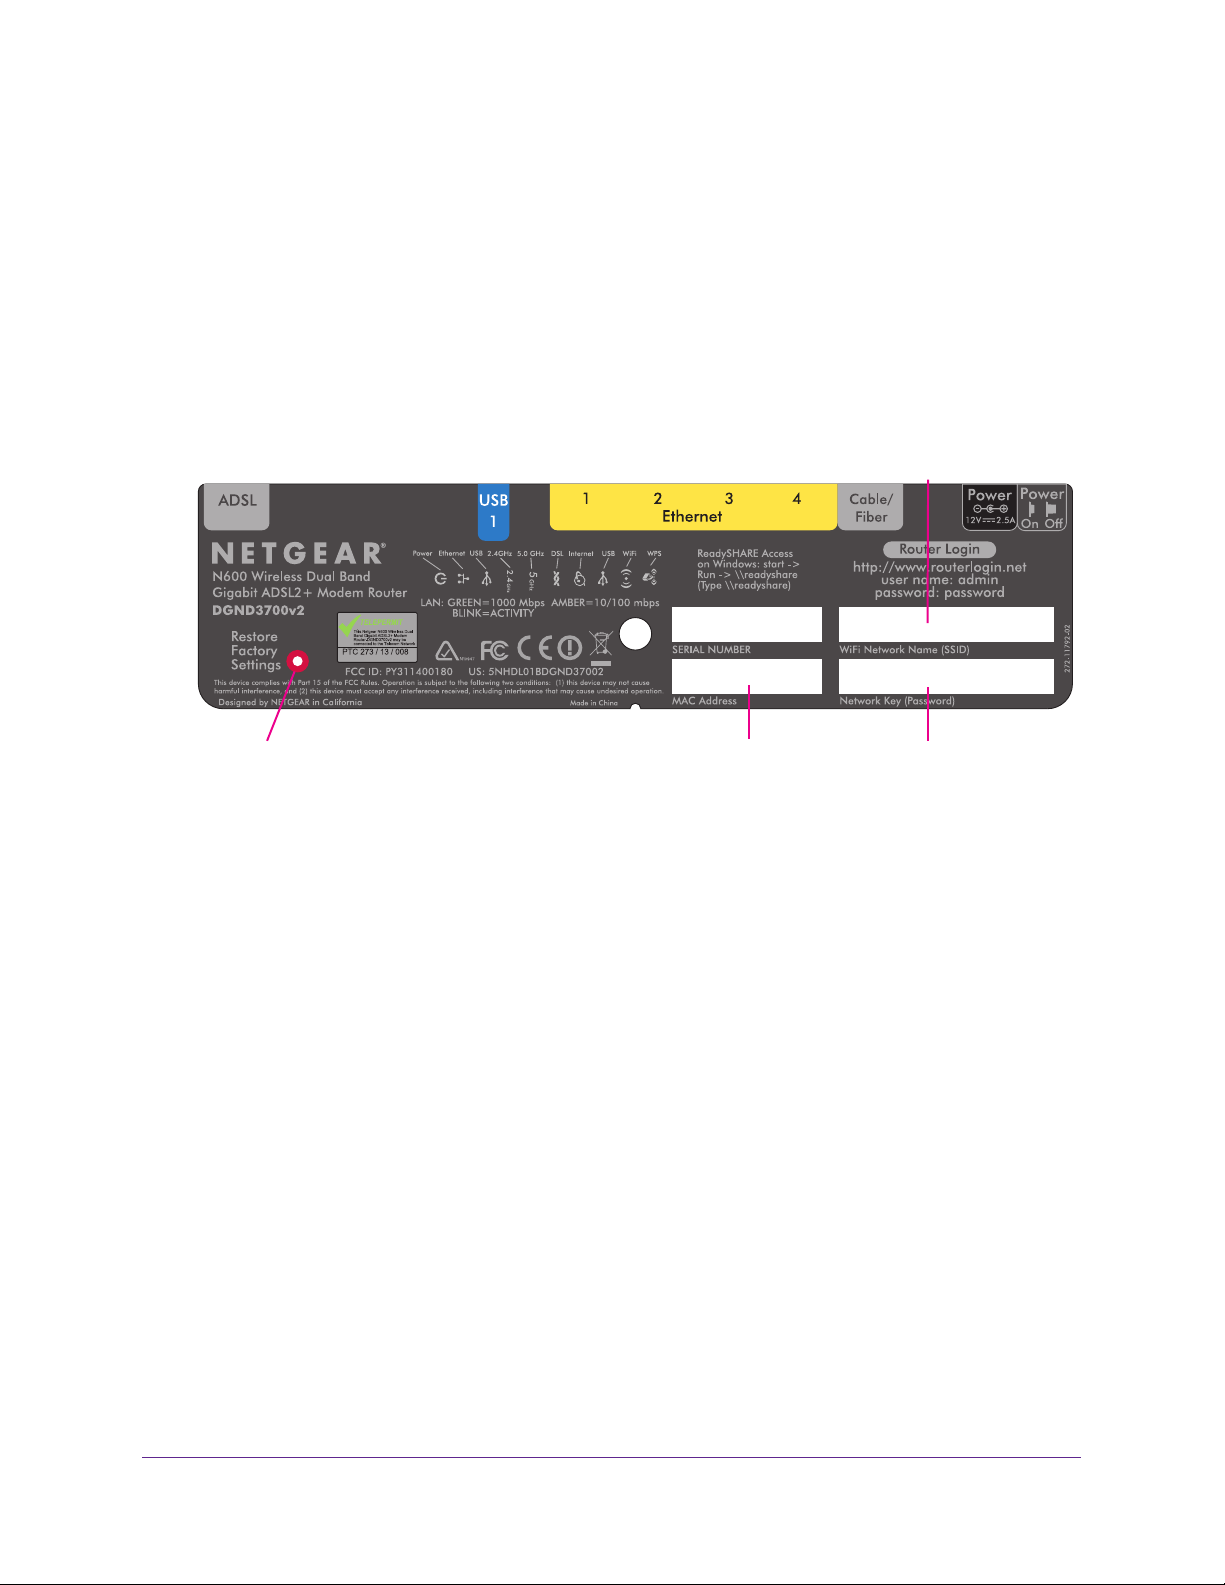
Label
The label on the bottom of the wireless modem router shows the router’s Restore Factory
Settings button, WiFi network name (SSID), network key (password), and MAC address.
WiFi Network Name (SSID)
Restore Factory Settings
Figure 2. Label on router bottom
See Factory Settings on page 142 for information about the Restore Factory Settings button
and the factory setting values.
MAC Address
Network Key (Password)
Hardware Setup
12
Page 13
N600 Wireless Dual Band Gigabit ADSL2+ Modem Router DGND3700v2
Back Panel
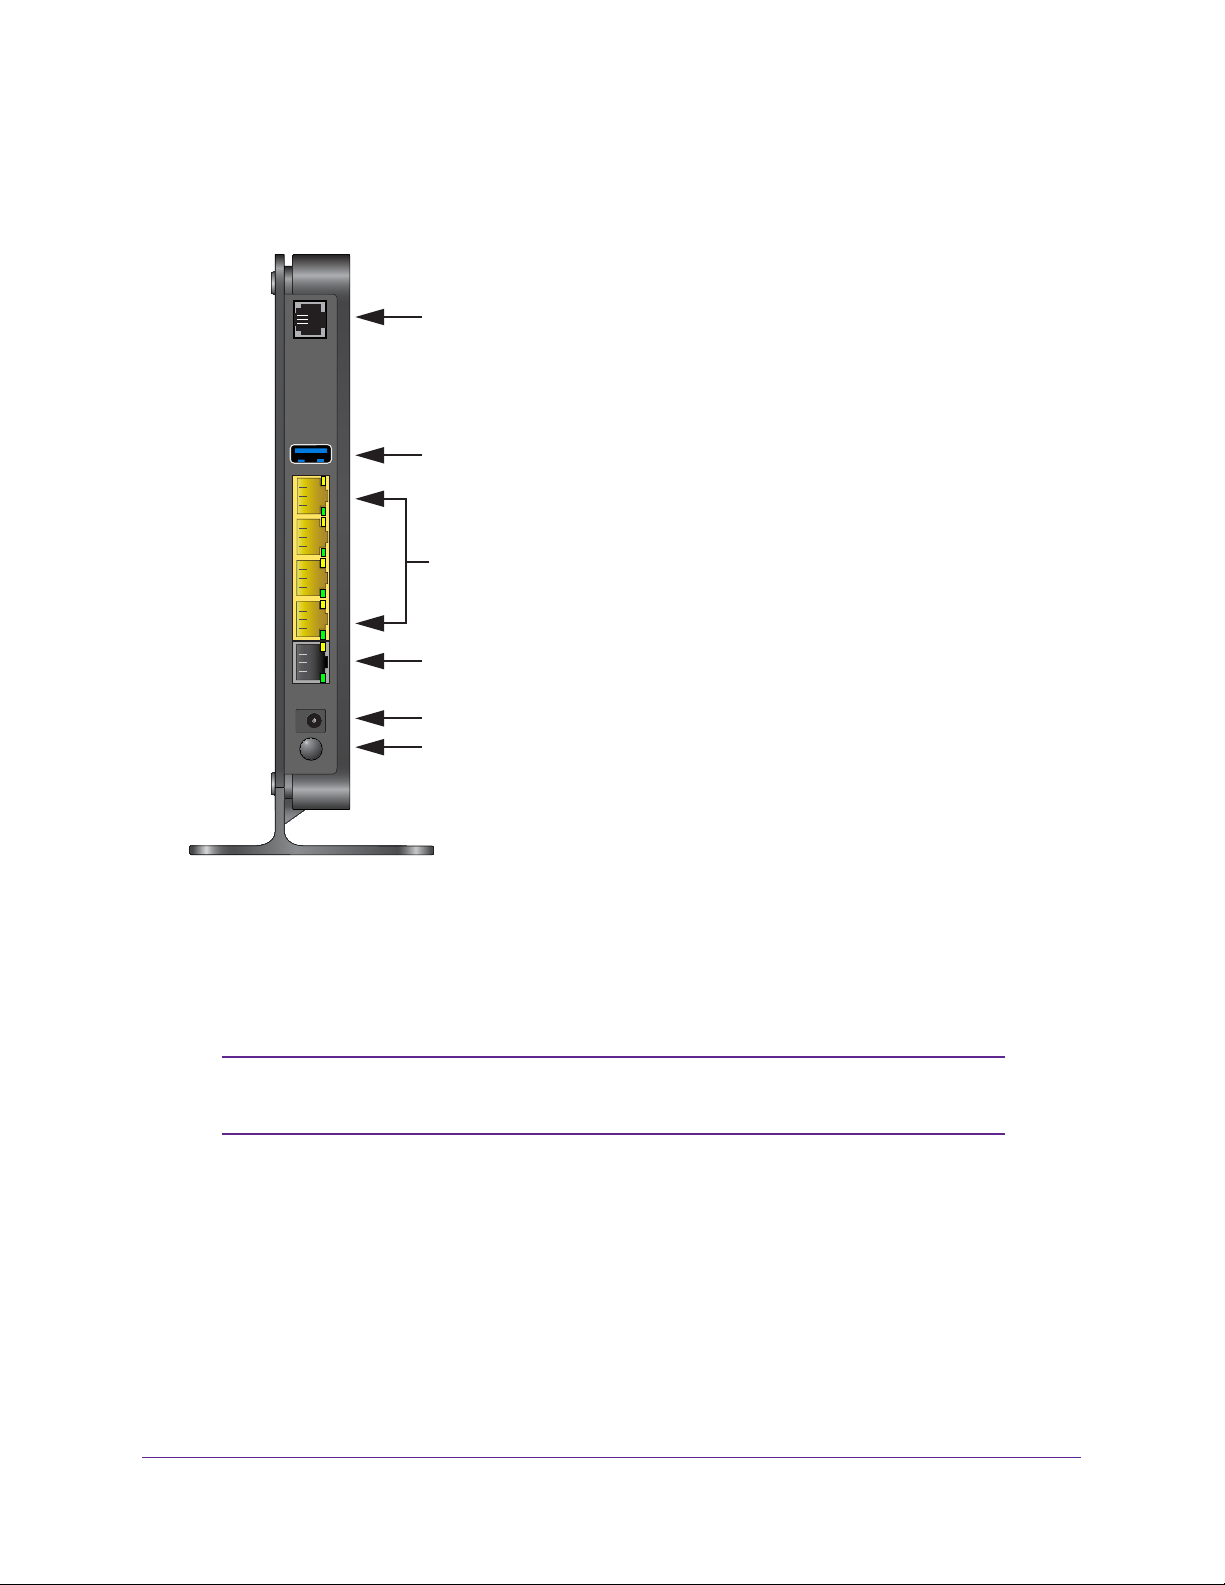
The back panel has the Power On/Off button and port connections shown in the figure:
1. ADSL line
2. USB port
3. Gigabit-Ethernet LAN ports
4. Gigabit-Ethernet WAN port for connecting to external
cable or fiber modem
5. AC power adapter input
6. Power On/Off button
Figure 3. Back panel port connections
Viewed from top to bottom, the back panel contains the following elements:
1. RJ-1
1 asynchronous DSL (ADSL) port for connecting the wireless modem router to an
ADSL line
Note: An ADSL port is capable of sending data over an ADSL line at one
speed and receiving it at another speed.
2. USB port for connecting USB storage devices like flash drives or hard drives
3. Four Gigabit-Ethernet RJ-45 LAN ports for cabling the wireless modem router to the local
computers
4. One Gigabit-Ethernet W
AN port for connecting the wireless modem router to a fiber or
cable modem
Hardware Setup
13
Page 14
N600 Wireless Dual Band Gigabit ADSL2+ Modem Router DGND3700v2
Note: You can use either the ADSL or Gigabit-Ethernet port for WAN
connectivity.
5. AC power adapter input
6. Power On/Of
f button
Front Panel
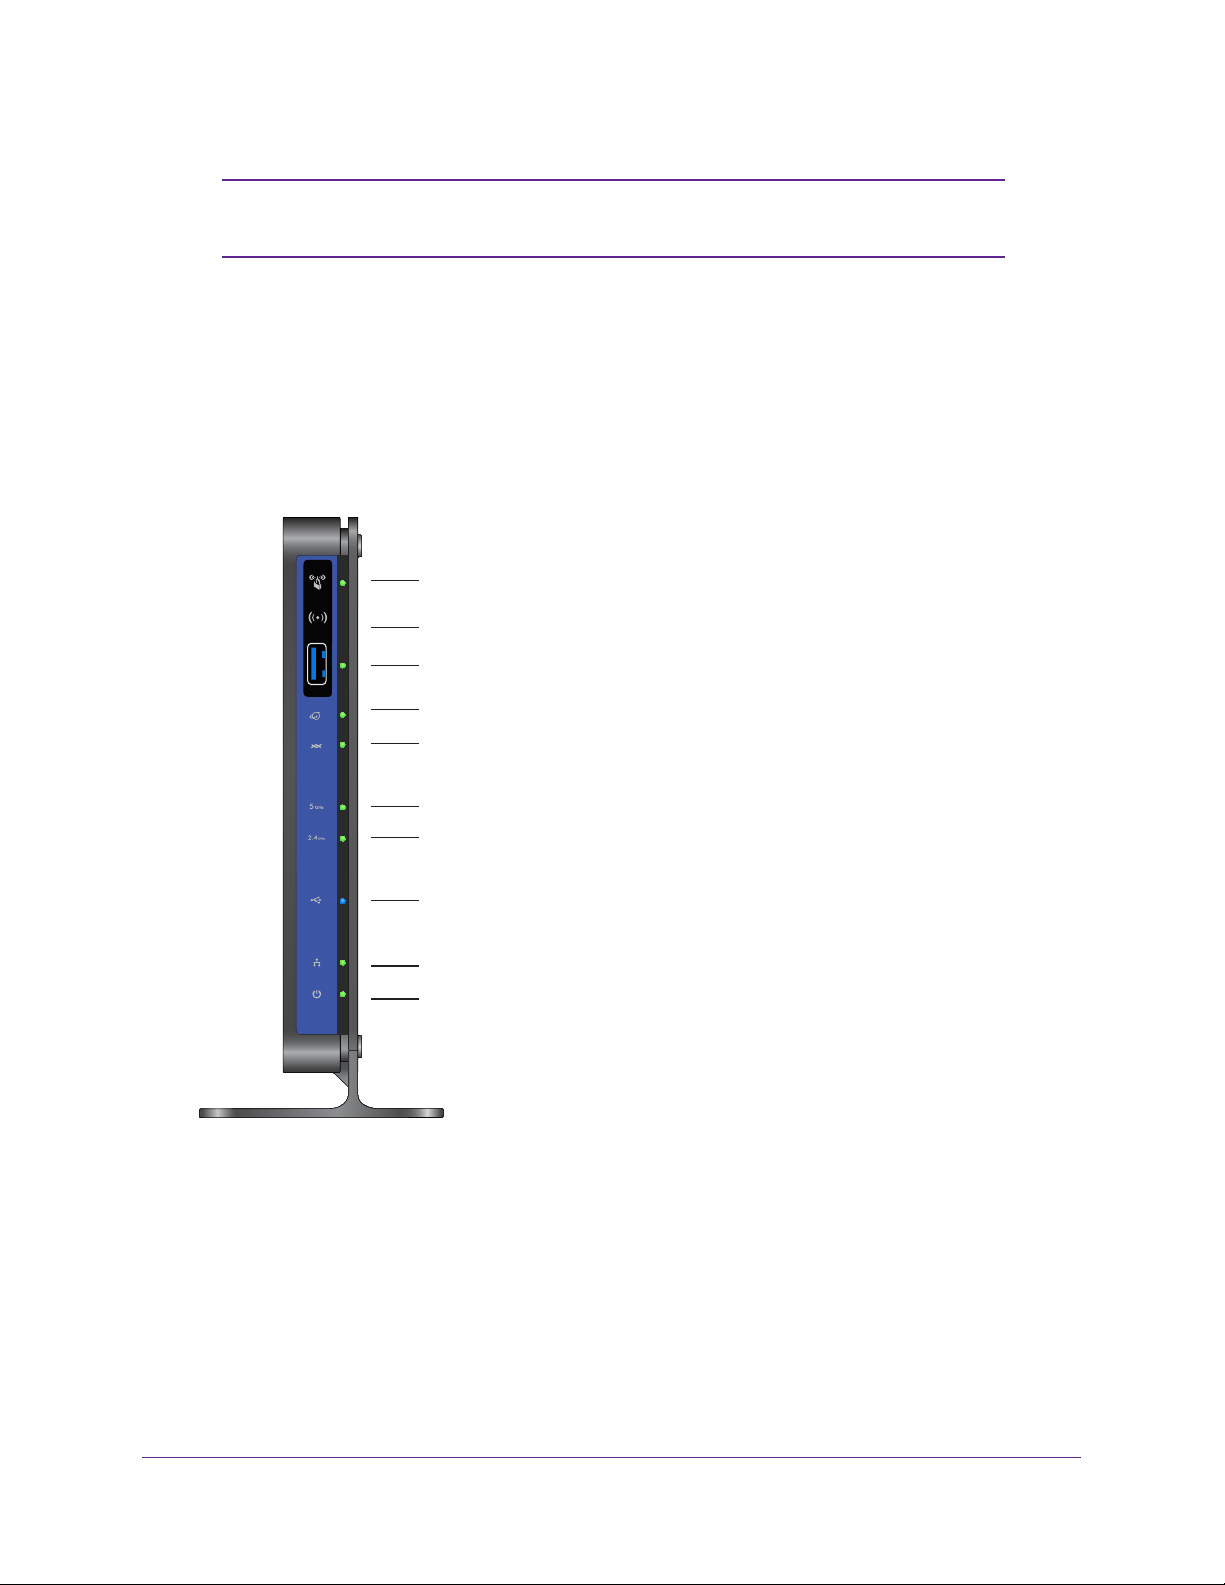
The wireless modem router front panel has the 10 status LEDs, icons, and ports shown in the
figure. Note that the Wireless and WPS icons are buttons.
WPS On/Off button
Wireless On/Off button
USB port
Internet
DSL
5 GHZ wireless
2.4 GHz wireless
USB
LAN ports
Power
Figure 4. Front panel LEDs
The following tables describe the LEDs, icons, and buttons on the front panel from top to
bottom.
Hardware Setup
14
Page 15
N600 Wireless Dual Band Gigabit ADSL2+ Modem Router DGND3700v2
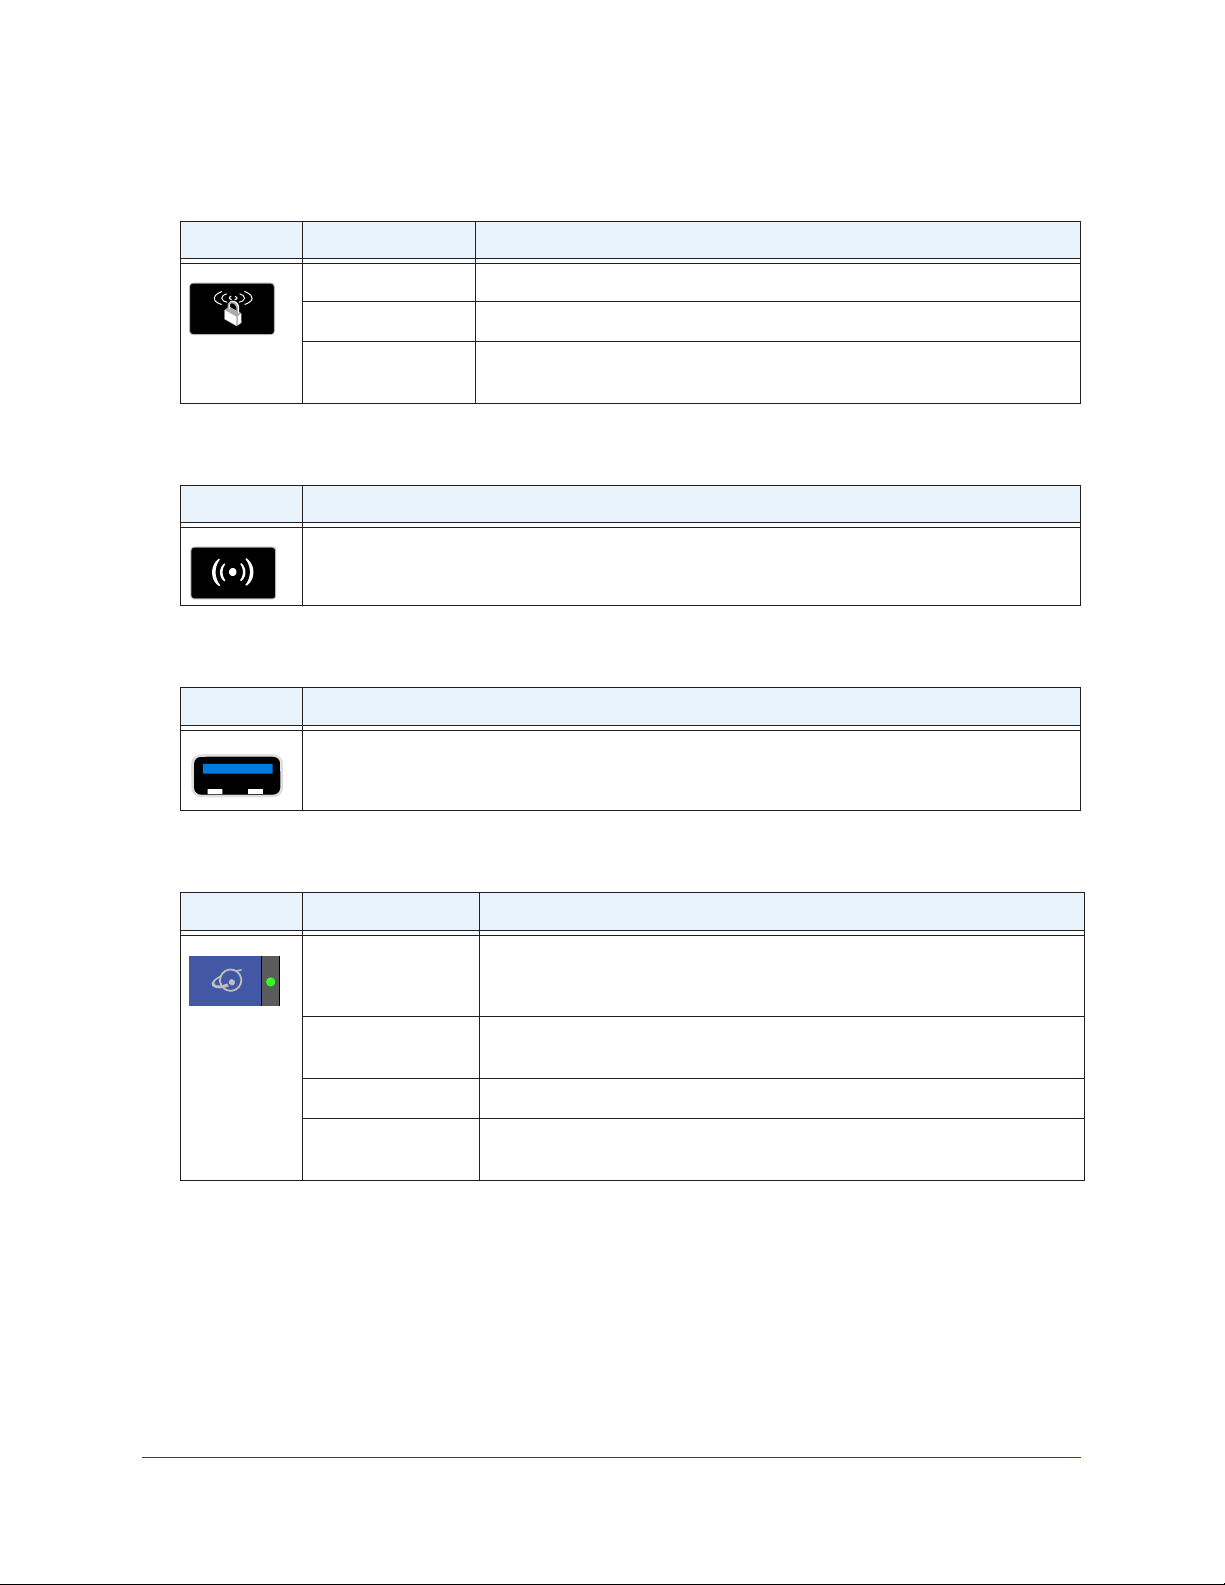
Table 1. WPS button and LED
Icon LED Activity Description
Solid green Indicates that wireless security has been enabled.
Blinking green WPS-capable device is connecting to the device.
Off WPS is not enabled. For information about the use of this button, see Wi-Fi
Protected Setup (WPS) Method on page 27.
Table 2. Wireless button
Icon Description
For information about the use of this button, see Wireless Connectivity on page 137.
Table 3. USB port
Icon Description
USB port for connecting USB storage devices like flash drives or hard drives.
Table 4. Internet LED
Icon LED Activity Description
Solid green You have an Internet connection. If this connection is dropped due to an
idle time-out but the connection is still present, the light stays green. If the
Internet connection is dropped for any other reason, the light turns off.
Solid red The Internet (IP) connection failed. See Cannot Access the Internet on
page 134 for troubleshooting information.
Blinking green Data is being transmitted over the Internet connection.
Off No Internet connection is detected or the device is in bridge mode (an
external device handles the ISP connection).
Hardware Setup
15
Page 16
N600 Wireless Dual Band Gigabit ADSL2+ Modem Router DGND3700v2
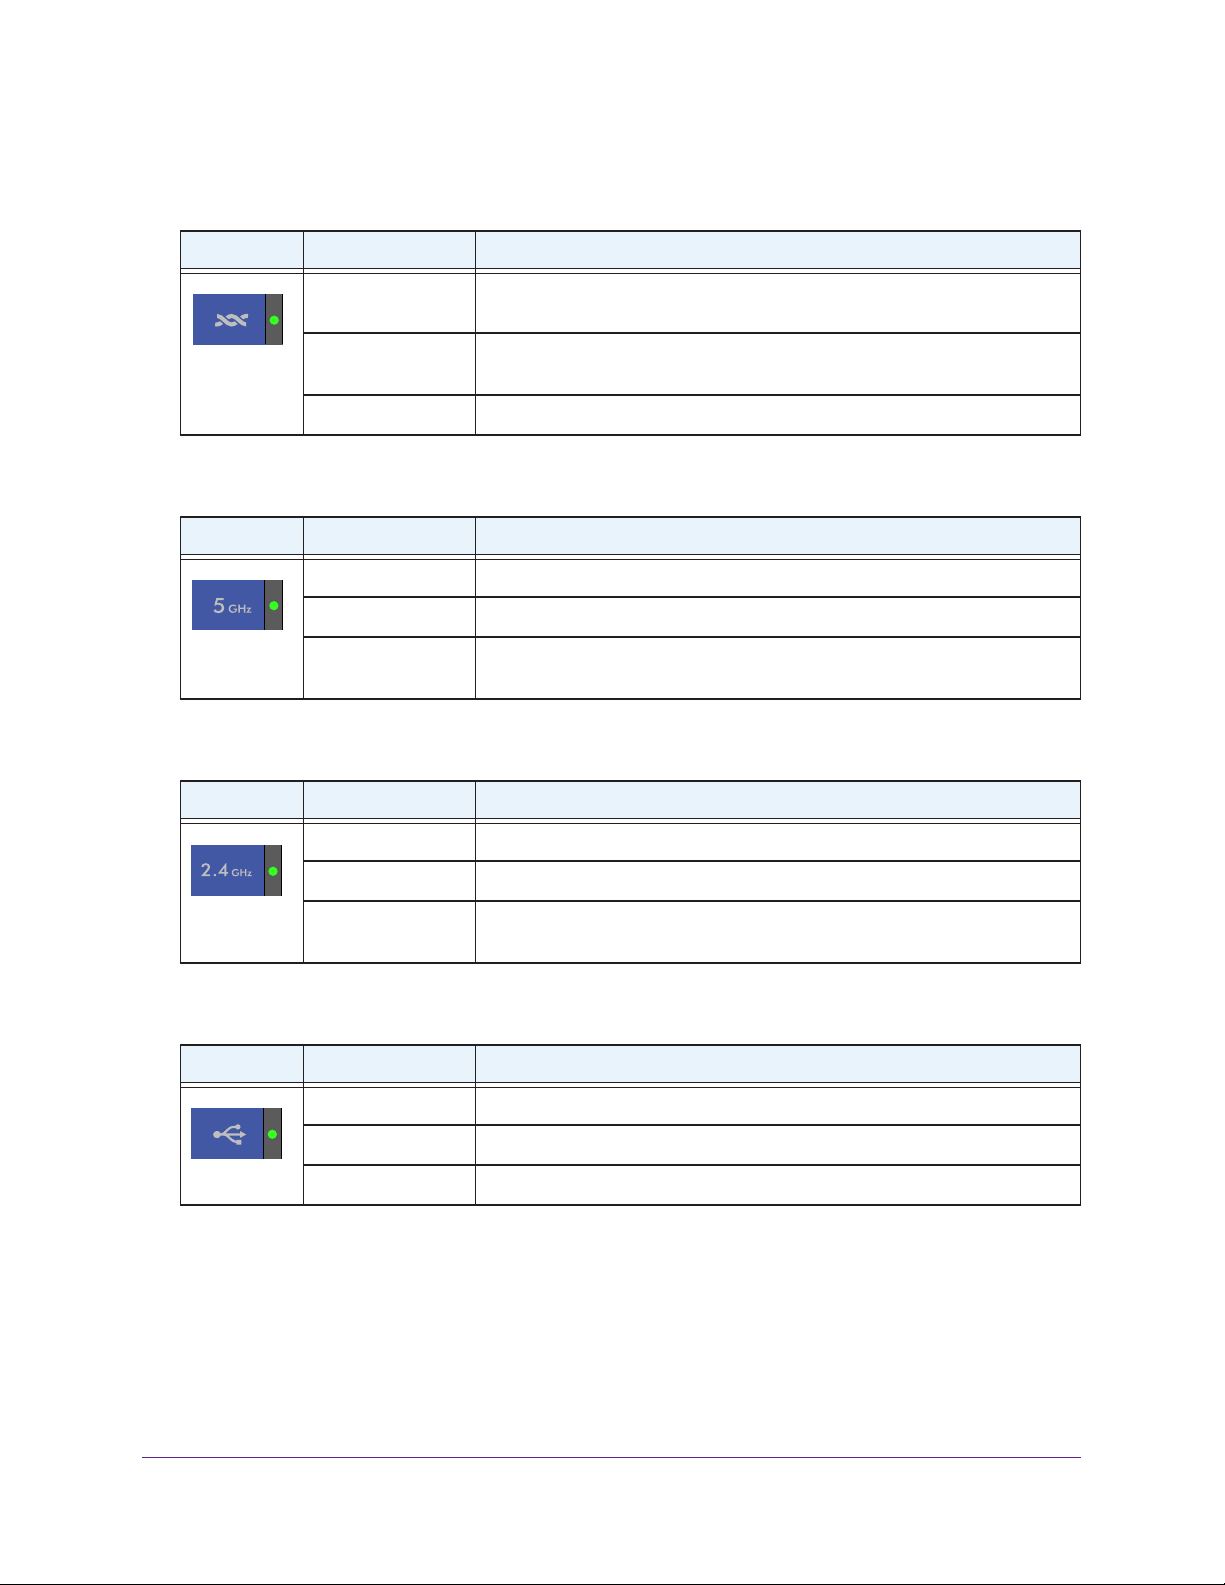
Table 5. DSL LED
Icon LED Activity Description
Solid green You have an ADSL connection. In technical terms, the ADSL port is
synchronized with an ISP’s network-access device.
Blinking green Indicates that the wireless modem router is negotiating the best possible
speed on the
Off The unit is off or there is no IP connection.
Table 6. 5 GHz Wireless LED
Icon LED Activity Description
Solid blue There is wireless connectivity.
Blinking blue Data is being transmitted or received over the 5 GHz wireless link.
ADSL line.
Off There is no wireless connectivity. You can still plug an Ethernet cable into
one of the LAN ports to get wired connectivity
Table 7. 2.4 GHz Wireless LED
Icon LED Activity Description
Solid green There is wireless connectivity.
Blinking green Data is being transmitted or received over the 2.4 GHz wireless link.
Off There is no wireless connectivity. You can still plug an Ethernet cable into
one of the LAN ports to get wired connectivity
Table 8. USB LED
Icon LED Activity Description
Solid green A USB port has detected a USB device.
Blinking green Data is being transmitted or received.
Off No link is detected on these ports.
.
.
Hardware Setup
16
Page 17
N600 Wireless Dual Band Gigabit ADSL2+ Modem Router DGND3700v2
Table 9. LAN LED
Icon LED Activity Description
Solid green A LAN port has detected an Ethernet link with a device.
Blinking green Data is being transmitted or received.
Off No link is detected on these ports.
Table 10. Power On/Off LED
Icon LED Activity Description
Solid green Power is supplied to the router.
Solid red POST (power-on self-test) failure or a device malfunction has occurred.
Off Power is not supplied to the router.
Restore Factory
Settings
Light blinks momentarily when the Restore Factory Settings button on the
bottom of the unit is pressed for six seconds.
red three times when the Restore Factory Settings button is released and
then turns green as the gateway resets to the factory defaults.
The Power LED then blinks
Position Your Wireless Router
The wireless modem router lets you access your network from virtually anywhere within the
operating range of your wireless network. However, the operating distance or range of your
wireless connection can vary significantly depending on the physical placement of your
router. For example, the thickness and number of walls the wireless signal passes through
can limit the range. For best results, place your router:
• Near the center of the area where your computers and other devices operate, and
preferably within line of sight to your wireless devices.
• So it is accessible to an
• In an elevated location such as a high shelf, keeping the number of walls and ceilings
between the wireless modem router and your other devices to a minimum.
• A
way from electrical devices that are potential sources of interference, such as ceiling
fans, home security systems, microwaves, computers, or the base of a cordless phone or
2.4 GHz cordless phone.
• A
way from any large metal surfaces, such as a solid metal door or aluminum studs. Large
expanses of other materials such as glass, insulated walls, fish tanks, mirrors, brick, and
concrete can also affect your wireless signal.
AC power outlet and near Ethernet cables for wired computers.
Note: The DGND3700 should be put in a vertical position only.
Hardware Setup
17
Page 18
N600 Wireless Dual Band Gigabit ADSL2+ Modem Router DGND3700v2
Also be aware that when you use multiple access points, it is better if adjacent access points
use different radio frequency channels to reduce interference. The recommended channel
spacing between adjacent access points is five channels (for example, use Channels 1 and
6, or 6 and 11).
ADSL Microfilters
If this is the first time you have cabled a wireless router between an ADSL phone line and
your computer or laptop, you might not be familiar with ADSL microfilters. If you are, you can
skip this section and proceed to Cable Your N600 Wireless Modem Router on page 20.
An ADSL microfilter is a small in-line device that filters ADSL interference out of standard
phone equipment that shares the same line with your
that connects to a telephone line that provides ADSL service needs an ADSL microfilter to
filter out the ADSL interference. Example devices are telephones, fax machines, answering
machines, and caller ID displays. Note that not every phone line in your home necessarily
carries ADSL service. That depends on the ADSL service setup in your home.
ADSL service. Every telephone device
Note: Often the ADSL microfilter is included in the box with the wireless
modem router. If you purchased the wireless modem router in a
country where a microfilter is not included, you have to acquire the
ADSL microfilter separately.
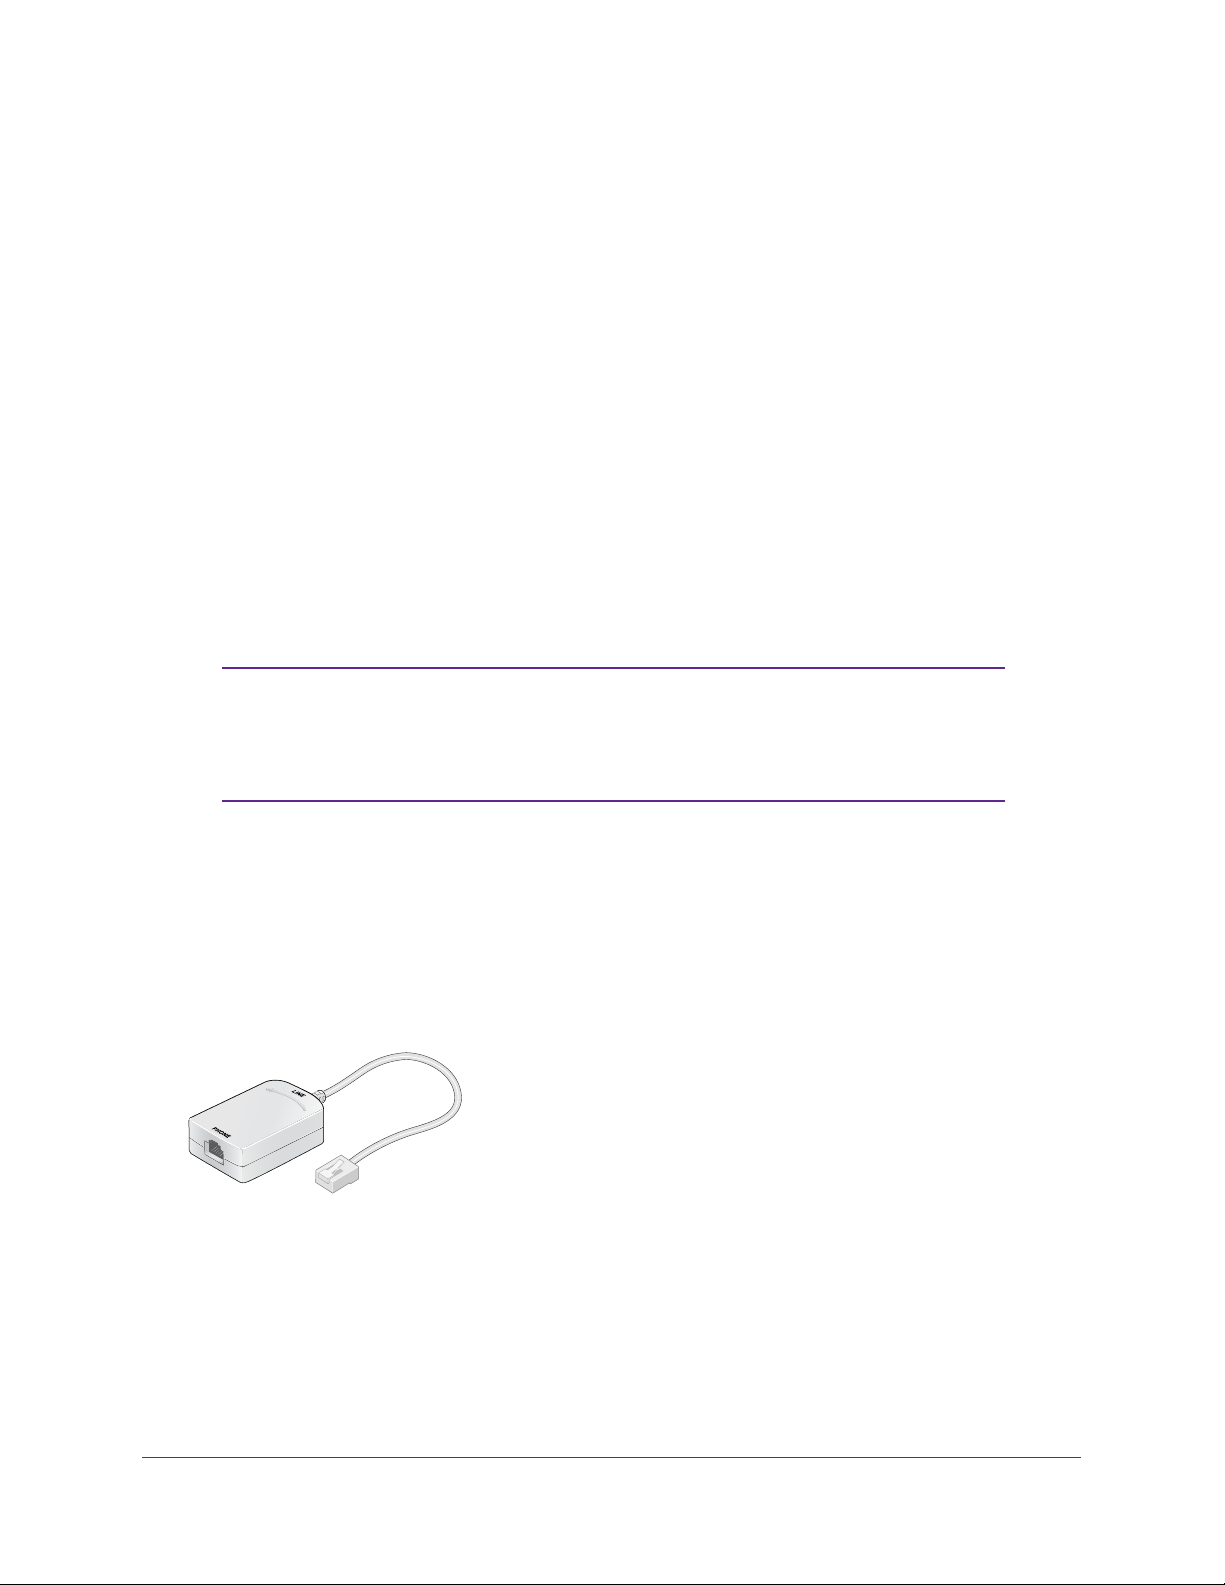
One-Line ADSL Microfilter (Not Included)
Plug the ADSL microfilter into the wall outlet and plug your phone equipment into the jack
labeled Phone. The wireless modem router plugs directly into a separate ADSL line. Plugging
the wireless modem router into the phone jack blocks the Internet connection. If you do not
have a separate ADSL line for the router, the best thing to do is to use an ADSL microfilter
with a built-in splitter.
Plugs into ADSL line
Figure 5. One-line ADSL microfilter
Second best when you do not have a separate ADSL line for the router is to get a separate
splitter. To use a one-line filter with a separate splitter, insert the splitter into the phone outlet,
connect the one-line filter to the splitter, and connect the phone to the filter.
Hardware Setup
18
Page 19
N600 Wireless Dual Band Gigabit ADSL2+ Modem Router DGND3700v2
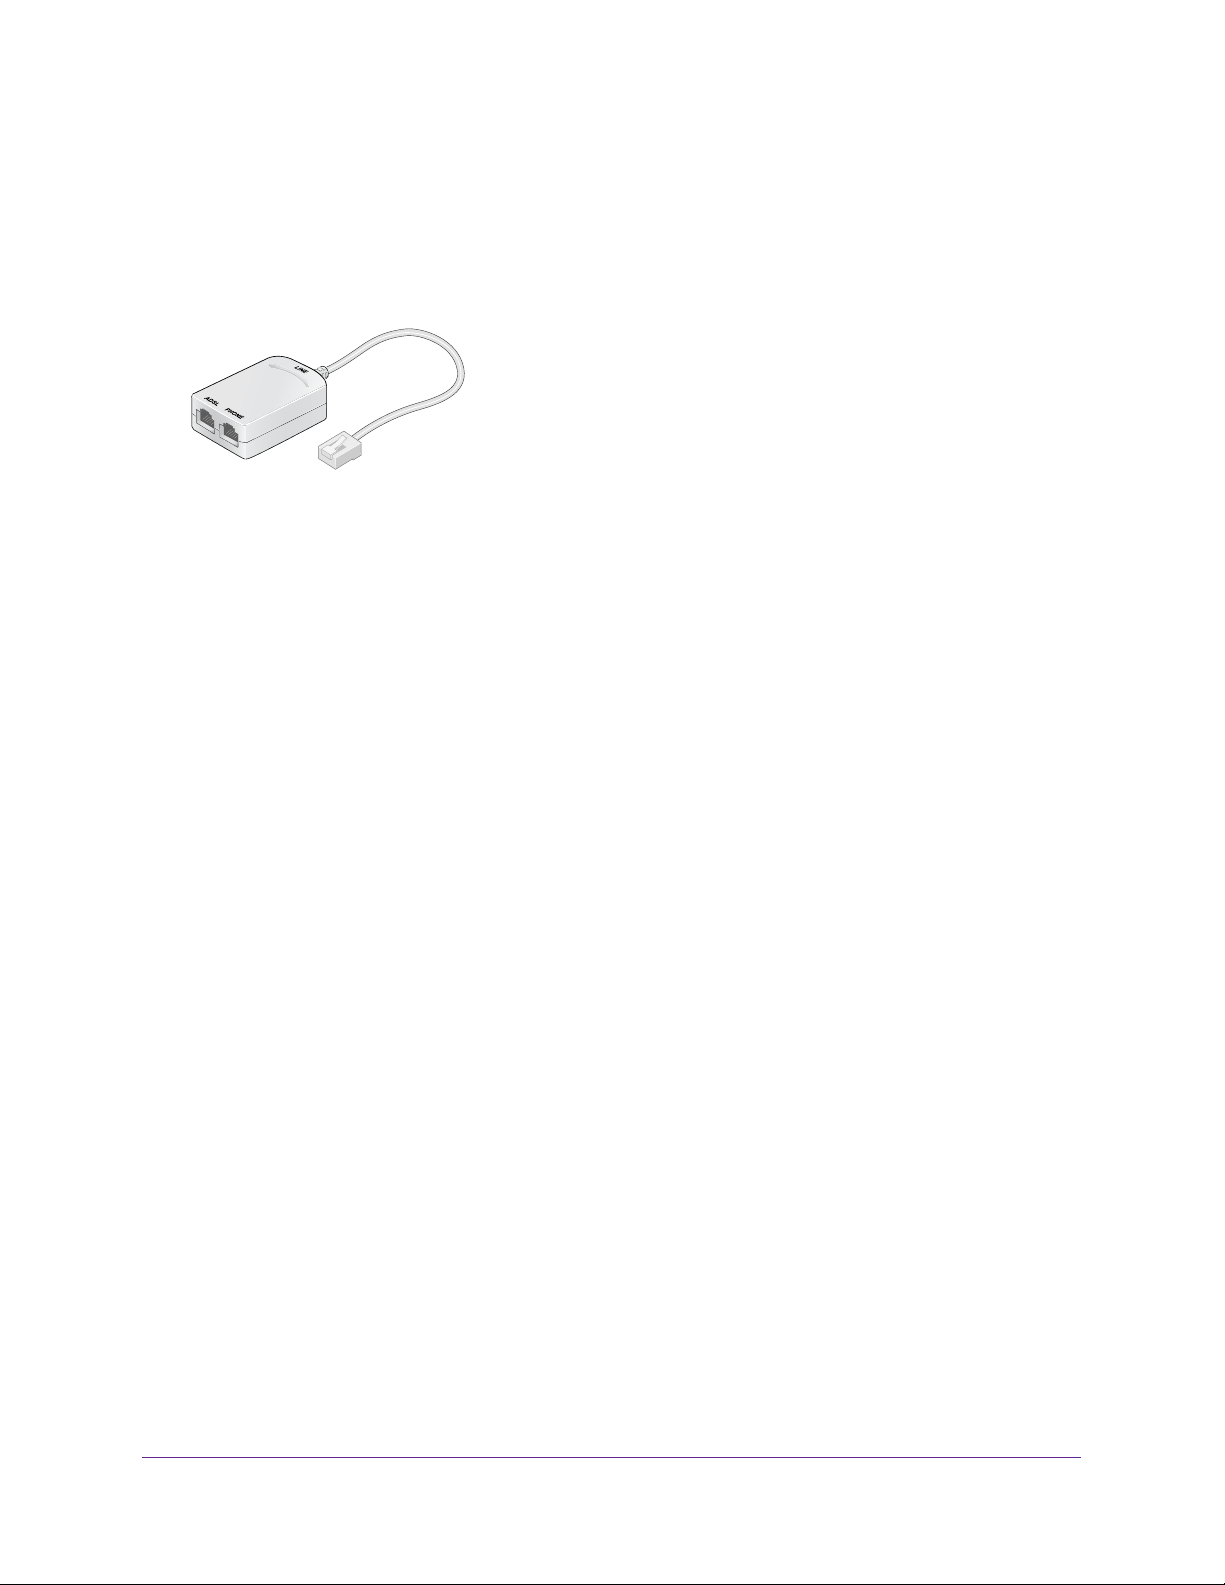
Two-Line ADSL Microfilter (Included)
Use an ADSL microfilter with a built-in splitter when there is a single wall outlet that provides
connectivity for both the wireless modem router and your telephone equipment. Plug the
ADSL microfilter into the wall outlet, plug your phone equipment into the jack labeled Phone,
and plug the wireless modem router into the jack labeled ADSL.
Plugs into the ADSL line
Figure 6. Two-line ADSL microfilter with built-in splitter
Summary
• One-line ADSL microfilter (not included). Use with a phone or fax machine.
• Splitter (not included). Use with a one-line
phone and the wireless modem router.
• T
wo-line ADSL microfilter with built-in splitter (included). Use to share an outlet with a
phone and the wireless modem router.
ADSL microfilter to share an outlet with a
Hardware Setup
19
Page 20
N600 Wireless Dual Band Gigabit ADSL2+ Modem Router DGND3700v2
Cable Your N600 Wireless Modem Router
WARNING:
DO not stack equipment, or place equipment in tight spaces, or in
drawers. Be sure your equipment is surrounded by at least
2 inches of air space. The unit should not be wall mounted.
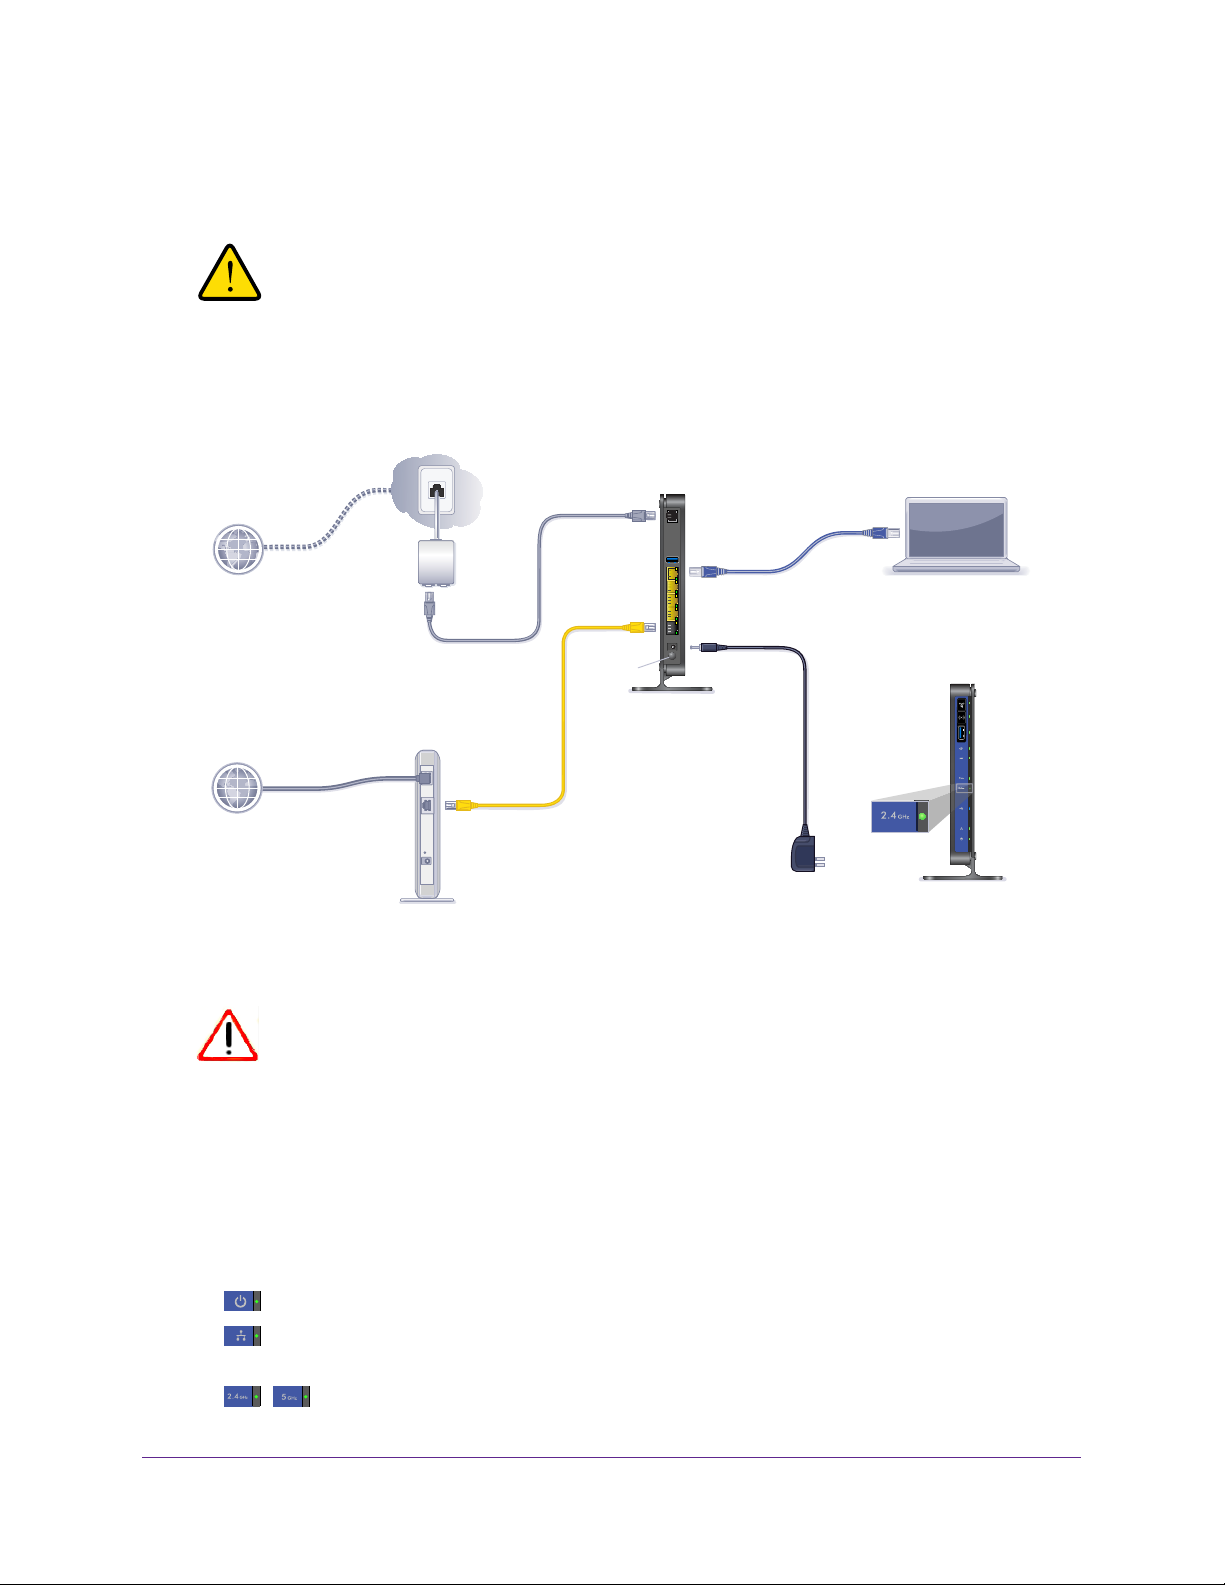
The installation guide that came in the box has a cabling diagram on the first page.
Connect to ADSL
if connecting directly
to a DSL line.
Line
Phone
Internet
Note: Add an ADSL filter for every
telephone on the same phone line
as your wireless modem router.
ADSL
Step 1:
Connect to Internet with ADSL or Ethernet WAN.
Internet
Connect to Ethernet WAN
if connecting to a
fiber/cable modem.
Fiber/Cable modem
Figure 7. Cabling diagram
CAUTION:
Phone cable
Ethernet cable
Power On/Off
N600 Wireless Modem Router
Note: Keep the DGND3700v2
N600 Wireless Modem Router
in a vertical position.
Step 3:
Power on your router.
Wait until the 2.4 GHz
Wireless LED turns solid
green.
Step 2:
Cable your computer.
Ethernet cable
(not included)
Power adapter
Laptop or desktop
computer
2.4 GHz
Wireless LED
N600 Wireless Modem Router
Incorrectly connecting a filter to your wireless modem router blocks your
ADSL connection.
Verify the Cabling
Verify that your router is cabled correctly by checking the wireless modem router LEDs. Turn
on the wireless router by pressing the Power On/Off button on the back.
• The Power LED is green when the modem router is turned on.
•
•
The LAN port LED is green when a computer is cabled to the router by an Ethernet
cable.
The Wireless LEDs are lit when the modem router is turned on.
Hardware Setup
20
Page 21

N600 Wireless Dual Band Gigabit ADSL2+ Modem Router DGND3700v2
• The DSL LED is green when you have an ADSL connection.
•
The Internet LED is green when there is an Internet connection.
Turn on your computer. If software usually logs you in to your Internet connection, do not run
that software. Cancel it if it starts automatically
.
Hardware Setup
21
Page 22

2. Get Started with NETGEAR Genie
Connect to the wireless modem router
2
This chapter explains how to use NETGEAR Genie to set up your wireless modem router after
you complete cabling as described in the installation guide and in the previous chapter in this
book.
This chapter contains the following sections:
• Prepare to Set Up the Wireless Modem Router
• Types of Logins and Access
• NETGEAR Genie Setup
• Use NETGEAR Genie after Installation
• Upgrade Wireless Modem Router Firmware
• Wireless Modem Router Dashboard (Basic Home Screen)
• Add Wireless Devices or Computers to Your Network
22
Page 23

N600 Wireless Dual Band Gigabit ADSL2+ Modem Router DGND3700v2
Prepare to Set Up the Wireless Modem Router
You can set up your wireless modem router with the NETGEAR Genie automatically, or you
can use the Genie menus and screens to set up your wireless modem router manually.
However, before you start the setup process, you need to have your ISP information on hand
and make sure the laptops, computers, and other devices in the network have the settings
described here.
Use Standard TCP/IP Properties for DHCP
If you set up your computer to use a static IP address, you need to change the settings so
that it uses Dynamic Host Configuration Protocol (DHCP).
Gather ISP Information
If you have DSL broadband service, you might need the following information to set up your
wireless modem router and to check that your Internet configuration is correct. Your Internet
service provider (ISP) should have provided you with all of the information needed to connect
to the Internet. If you cannot locate this information, ask your ISP to provide it. When your
Internet connection is working, you no longer need to launch the ISP’s login program on your
computer to access the Internet. When you start an Internet application, your wireless
modem router automatically logs you in.
• The ISP configuration information for your DSL account
• ISP login name and password
• Fixed or static IP address settings (special deployment by ISP; this is rare)
Wireless Devices and Security Settings
Make sure that the wireless device or computer that you are using supports WPA or WPA2
wireless security, which is the wireless security supported by the wireless modem router. See
Basic Wireless Settings on page 35 for information about the wireless modem router’s
preconfigured security settings.
Get Started with NETGEAR Genie
23
Page 24

N600 Wireless Dual Band Gigabit ADSL2+ Modem Router DGND3700v2
Types of Logins and Access
There are two separate types of logins that have different purposes. It is important that you
understand the difference so that you know which login to use when.
• Wireless modem router login logs you in to the wireless modem router interface from
NETGEAR Genie. See
about this login.
Wireless network key or password. Your wireless modem router is preset with a
unique wireless network name (SSID) and password for wireless access. This information
is on the label located on the bottom of your wireless modem router.
• ISP login logs you in to your Internet service. Your service provider has provided you
with this login information in a letter or some other way. If you cannot find this login
information, contact your service provider.
Use NETGEAR Genie after Installation on page 25 for details
NETGEAR Genie Setup
NETGEAR Genie runs on any device with a web browser. It is the easiest way to set up the
wireless modem router because it automates many of the steps and verifies that those steps
have been successfully completed. It takes about 15
minutes to complete.
To use NETGEAR Genie to set up your wireless modem router:
1. Turn the wireless modem router on by pressing the On/Off button, if not done yet.
2. Make sure that your device is connected with an Ethernet cable to your wireless modem
router.
3. Launch your Internet browser.
• If this is the first time you are setting up the Internet connection for your wireless
modem router, the browser automatically goes to http://www.routerlogin.net, and the
NETGEAR Genie screen displays.
• If you already used the NETGEAR Genie, type http://www.routerlogin.net in the
address field for your browser to display the NETGEAR Genie screen. See
NETGEAR Genie after Installation on page 25.
4. Follow the onscreen instructions to complete NETGEAR Genie setup. NETGEAR Genie
guides you through connecting the wireless modem router to the Internet.
If the browser cannot display the web page:
• Make sure that the computer is connected to one of the four Gigabit-Ethernet LAN ports,
or wirelessly to the wireless modem router.
Use
• Make sure that the wireless modem router is fully up and running. Its Wireless LEDs
should turn on.
• Close and reopen the browser to make sure the browser does not cache the previous
page.
• Browse to http://routerlogin.net.
Get Started with NETGEAR Genie
24
Page 25
N600 Wireless Dual Band Gigabit ADSL2+ Modem Router DGND3700v2
• If your computer is set to a static or fixed IP address (this is uncommon), change the
setting to obtain an IP address automatically from the wireless modem router.
If the wireless modem router does not connect to the Internet:
1. Review your settings to be sure that you have selected the correct options and typed
everything correctly
2. Contact your ISP to verify that you have the correct configuration information.
3. Read Chapter 10, Troubleshooting. If problems persist, register your NETGEAR product and
contact NETGEAR technical support.
.
Use NETGEAR Genie after Installation
When you first set up your wireless modem router, NETGEAR Genie automatically starts
when you launch an Internet browser on a computer that is connected to the wireless modem
router. You can use NETGEAR Genie again if you want to view or change settings for the
wireless modem router.
1. Launch your browser from a computer or wireless device that is connected to the
wireless modem router.
2. Type http://www.routerlogin.net or http://www.routerlogin.com.
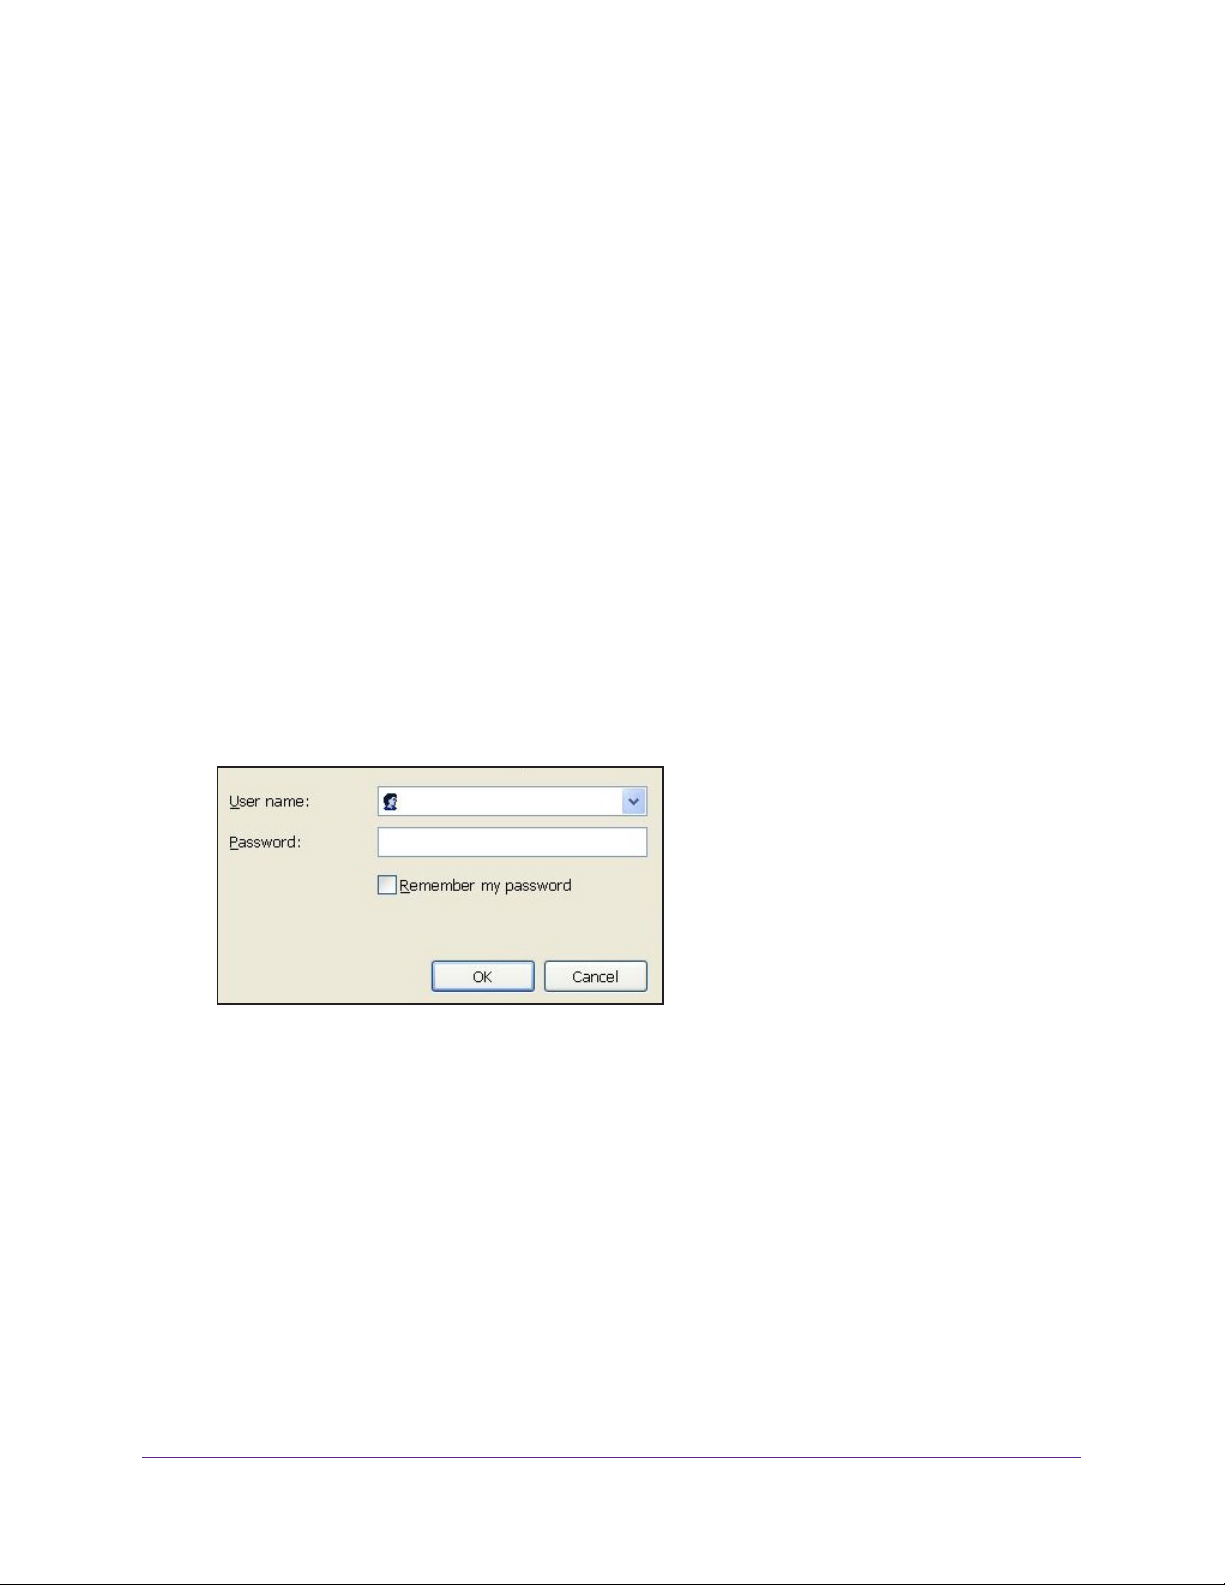
The login window displays:
admin
********
3. Enter admin for the wireless modem router user name and password for the wireless
modem router password, both in lowercase letters.
Note: The wireless modem router user name and password are different from
the user name and password for logging in to your Internet connection. See
Types of Logins and Access on page 24 for more information.
Upgrade Wireless Modem Router Firmware
When you set up your wireless modem router and are connected to the Internet, the wireless
modem router automatically checks for you to see if newer firmware is available. If it is, a
message is displayed on the top of the screen. See Upgrade the Wireless Modem Router
Firmware on page 84 for more information about upgrading firmware.
Get Started with NETGEAR Genie
25
Page 26

N600 Wireless Dual Band Gigabit ADSL2+ Modem Router DGND3700v2
Click the message when it shows up, and click Yes to upgrade the wireless modem router
with the latest firmware. After the upgrade, the wireless modem router restarts.
CAUTION:
Do not try to go online, turn off the wireless modem router, shut down the
computer, or do anything else to the wireless modem router until the
wireless modem router finishes restarting and the Power LED has stopped
blinking for several seconds.
Wireless Modem Router Dashboard (Basic Home Screen)
The wireless modem router Basic Home screen has a dashboard that lets you see the status
of your Internet connection and network at a glance. You can click any of the six sections of
the dashboard to view more detailed information. The left column has the menus, and at the
top there is an Advanced tab that is used to access additional menus and screens.
Menus (Click the Advanced tab to view more)
Language
Dashboard (Click to view details)
Figure 8. Wireless modem router Basic Home screen with dashboard, language, and online
help
• Home. This dashboard screen displays when you log in to the wireless modem
router.
• Internet. Set, update, and check the ISP settings of your wireless modem router.
• W
ireless. View or change the wireless settings for your wireless modem router.
Get Started with NETGEAR Genie
26
Help
Page 27

N600 Wireless Dual Band Gigabit ADSL2+ Modem Router DGND3700v2
• Attached Devices. View the devices connected to your network.
• Parental Controls. Download and set up parental controls to prevent objectionable
content from reaching your computers.
• ReadySHARE. If you connected a USB storage device to the wireless modem router,
then it is displayed here.
• Guest Network. Set up a guest network to allow visitors to use your wireless modem
router’s Internet connection.
• Advanced tab. Set the wireless modem router up for unique situations such as when
remote access by IP or by domain name from the Internet is needed. See
Advanced Settings. Using this tab requires a solid understanding of networking concepts.
• Help & Support. Go to the NETGEAR support site to get information, help, and product
documentation. These links work once you have an Internet connection.
Chapter 9,
Add Wireless Devices or Computers to Your Network
Choose either the manual or the WPS method to add wireless devices and other equipment
to your wireless network. See
guest network.
Guest Networks on page 39 for instructions on how to set up a
Manual Method
To connect manually:
1. Open the software that manages your wireless connections on the wireless device
(laptop computer, gaming device, iPhone) that you want to connect to your wireless
modem router. This software scans for all wireless networks in your area.
2. Look for your network and select it. If you did not change the name of your network during
the setup process, look for the default WiFi network name (SSID) and select it. The default
SSID is located on the product label on the bottom of the wireless modem router.
3. Enter the wireless modem router password and click Connect. The default wireless modem
router passphrase is located on the product label on the bottom of the wireless modem
router.
4. Repeat steps 1–3 to add other wireless devices.
Wi-Fi Protected Setup (WPS) Method
Wi-Fi Protected Setup (WPS) is a standard for easily adding computers and other devices to
a home network while maintaining security. To use WPS, make sure that all wireless devices
to be connected to the network are Wi-Fi certified and support WPS. During the connection
process, the client gets the security settings from the wireless modem router so that every
device in the network has the same security settings.
To use WPS to join the wireless network:
If your wireless device supports WPS (Push 'N' Connect), follow these steps:
Get Started with NETGEAR Genie
27
Page 28

N600 Wireless Dual Band Gigabit ADSL2+ Modem Router DGND3700v2
1. Press the WPS button on the wireless modem router top panel .
2. Within two minutes, press the WPS button on your wireless device, or follow the WPS
instructions that came with the device.
The device is now connected to your wireless
modem router.
3. Repeat steps 1–2 to add other WPS wireless devices.
Get Started with NETGEAR Genie
28
Page 29

3. Genie Basic Settings
Your Internet connection and network
This chapter contains the following sections:
• Internet Basic Settings
• Attached Devices
• Parental Controls
• ReadySHARE USB Storage and Printer
• Basic Wireless Settings
• Guest Networks
3
29
Page 30
N600 Wireless Dual Band Gigabit ADSL2+ Modem Router DGND3700v2
Internet Basic Settings
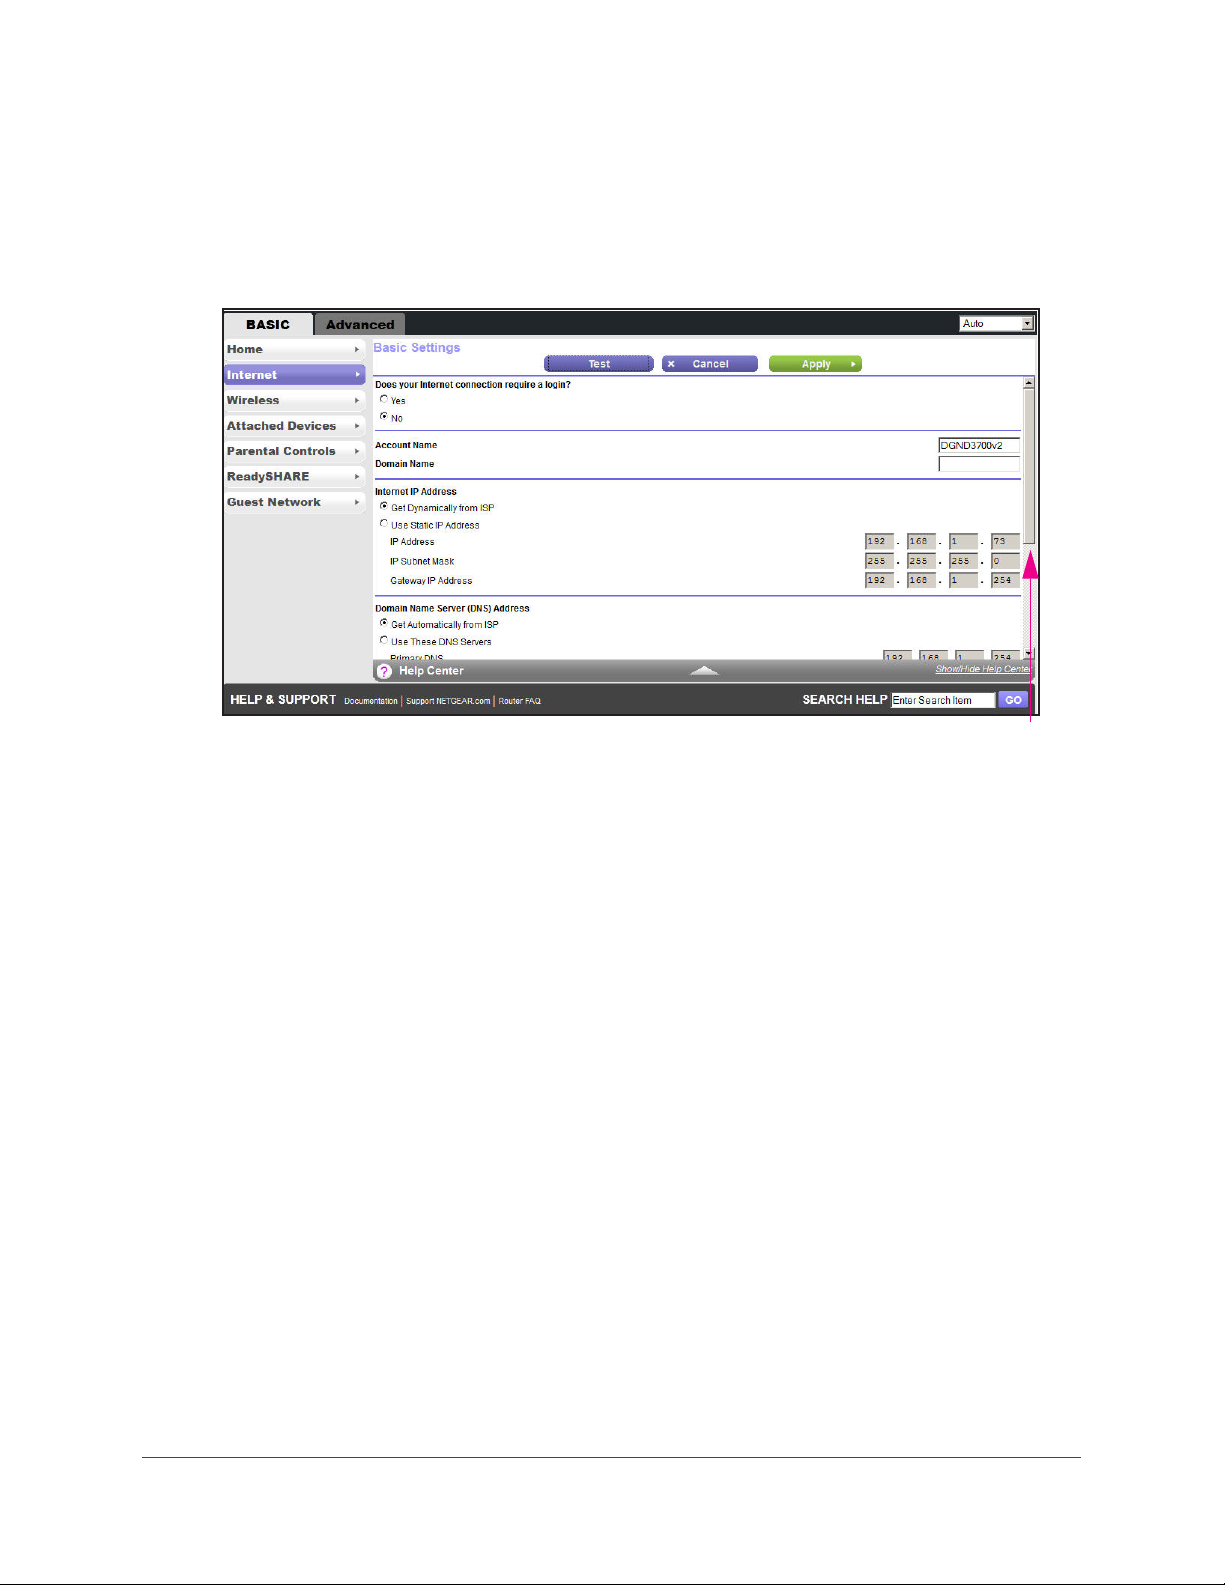
The Internet Basic Settings screen is where you view or change ISP information.
1. From the Basic Home screen, select Internet. The
The fields that display in the Internet Basic Settings screen depend on whether or not
your Internet connection requires a login.
• Yes. Select the encapsulation method and enter the login name. If you want to
change the login time-out, enter a new value in minutes.
• No. Enter the account and domain names, only if needed.
following screen displays:
Scroll to view more settings
2. Enter the settings for the IP address and DNS server
If you have problems with your connection, check the ISP settings.
3. Click Apply to save your settings.
4. Click T
1 minute, see Chapter 10, Troubleshooting.
est to test your Internet connection. If the NETGEAR website does not display within
. The default settings usually work fine.
Internet Basic Settings Screen Fields
The following descriptions explain all of the possible fields in the Internet Basic Settings
screen. Note that which fields display in this screen depends on whether or not an ISP login
is required.
Does Your ISP Require a Login?
These fields display when no login is required:
• Account Name (If required). Enter the account name provided by your ISP
also be called the host name.
• Domain Name (If required). Enter the domain name provided by your ISP
Answer either yes or no.
. This might
.
Genie Basic Settings
30
Page 31

N600 Wireless Dual Band Gigabit ADSL2+ Modem Router DGND3700v2
These fields display when your ISP requires a login:
• Internet Service Provider Encapsulation. ISP types. The choices are PPPoE, PPTP, or
L2TP.
• Login. The login name provided by your ISP. This is often an email address.
• Password. The password that you use to log in to your ISP.
• Idle Timeout (In minutes). If you want to change the login time-out, enter a new value in
minutes. This determines how long the wireless modem router keeps the Internet
connection active after there is no Internet activity from the LAN. Entering a value of 0
(zero) means never log out.
Internet IP Address.
• Get Dynamically from ISP. Your ISP uses DHCP to assign your IP address. Your ISP
automatically assigns these addresses.
• Use Static IP Address. Enter the IP address, IP subnet mask, and the gateway IP
address that your ISP assigned. The gateway is the ISP’s wireless modem router to
which your wireless modem router will connect.
Domain Name Server (DNS) Address. The DNS server is used to look up site addresses
based on their names.
• Get Automatically from ISP. Your ISP uses DHCP to assign your DNS servers. Your ISP
automatically assigns this address.
• Use These DNS Servers. If you know that your ISP does not automatically transmit DNS
addresses to the wireless modem router during login, select this option, and enter the IP
address of your ISP’s primary DNS server. If a secondary DNS server address is
available, enter it also.
Wireless Modem Router MAC Address. The Ethernet MAC address used by the wireless
modem router on the Internet port. Some ISPs register the MAC address of the network
interface card in your computer when your account is first opened. They will then accept
traffic only from the MAC address of that computer. This feature allows your wireless modem
router to use your computer’s MAC address (this is also called cloning).
• Use Default Address. Use the default MAC address.
• Use Computer MAC Address. The wireless modem router will capture and use the MAC
address of the computer that you are now using. You have to use the one computer that
is allowed by the ISP.
• Use This MAC Address. Enter the MAC address that you want to use.
Genie Basic Settings
31
Page 32
N600 Wireless Dual Band Gigabit ADSL2+ Modem Router DGND3700v2
Attached Devices
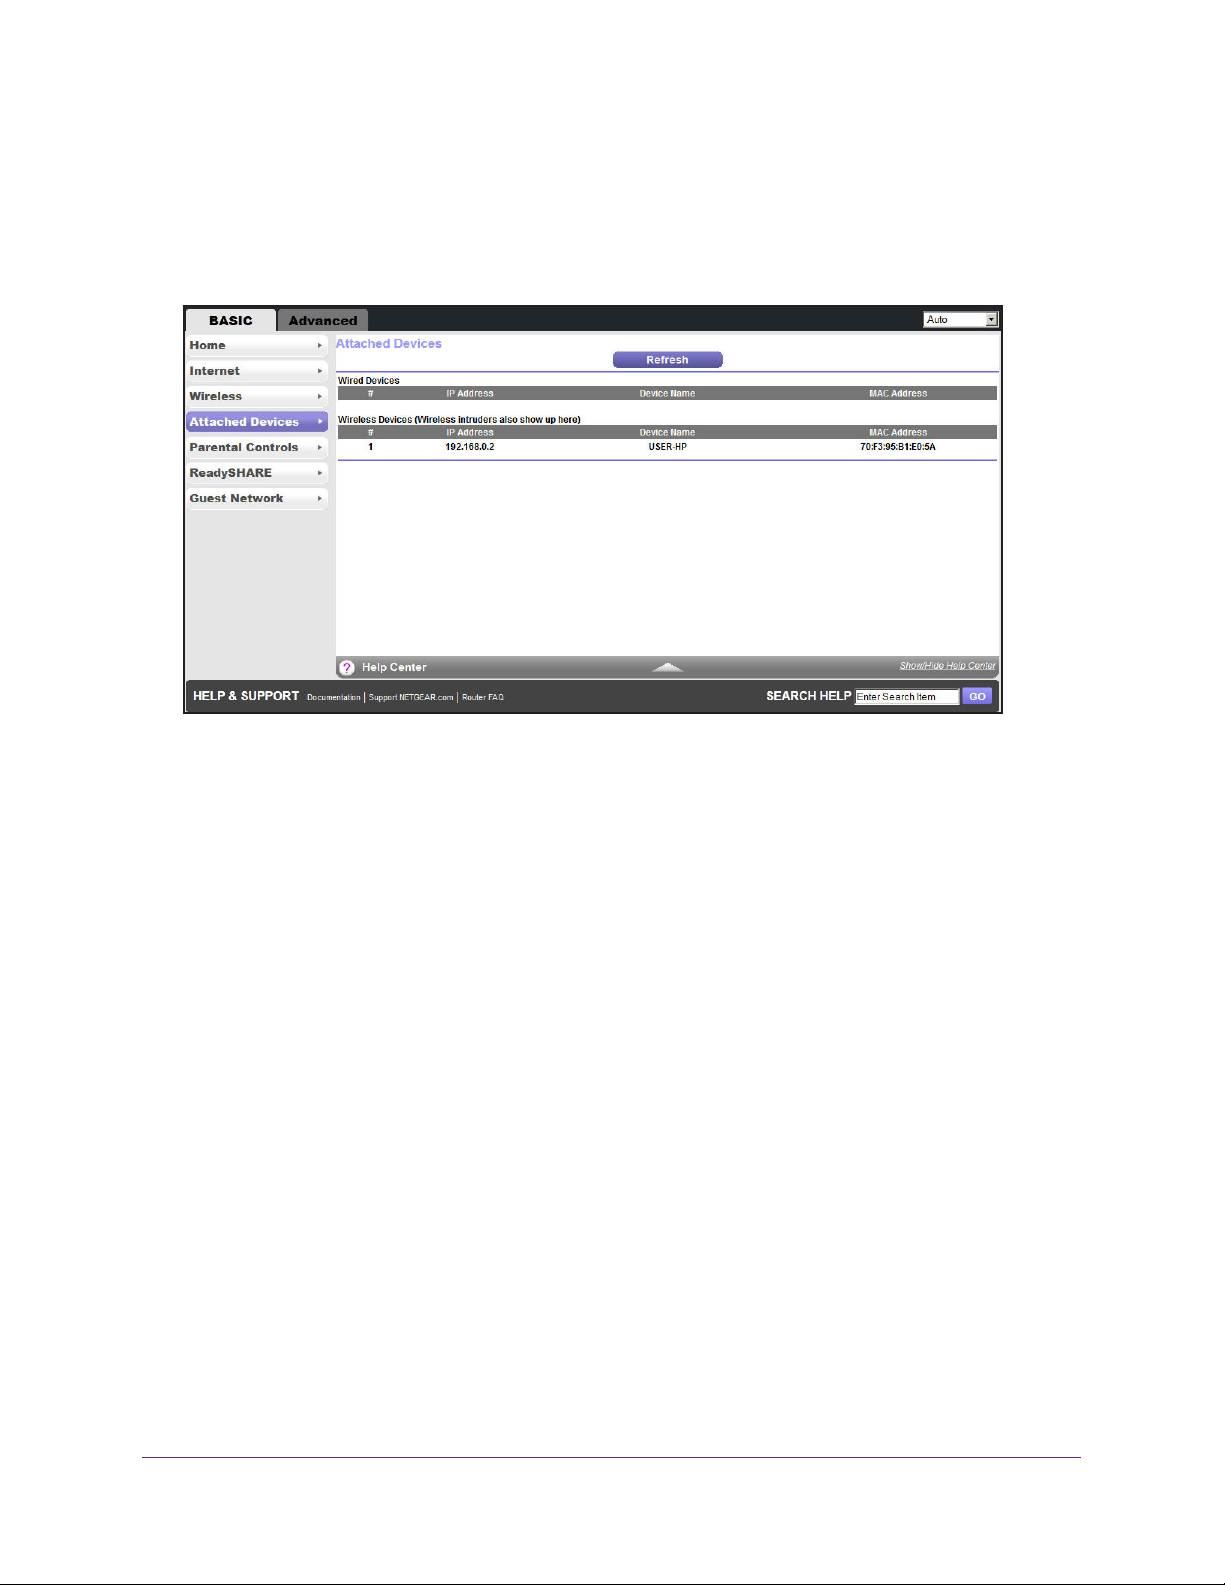
You can view all computers or devices that are currently connected to your network here.
From the Basic Home screen, select Attached Devices to display the following screen:
Wired devices are connected to the wireless modem router with Ethernet cables. Wireless
devices have joined the wireless network.
• # (number). The order in which the device joined the network.
• IP Address.
it joined the network. Note that this number can change if a device is disconnected and
rejoins the network.
• Device Name. If the device name is known, it is shown here.
• MAC Address.
address is typically shown on the product label.
You can click Refresh to update this screen.
The IP address that the wireless modem router assigned to this device when
The unique MAC address for each device does not change. The MAC
Genie Basic Settings
32
Page 33
N600 Wireless Dual Band Gigabit ADSL2+ Modem Router DGND3700v2
Parental Controls
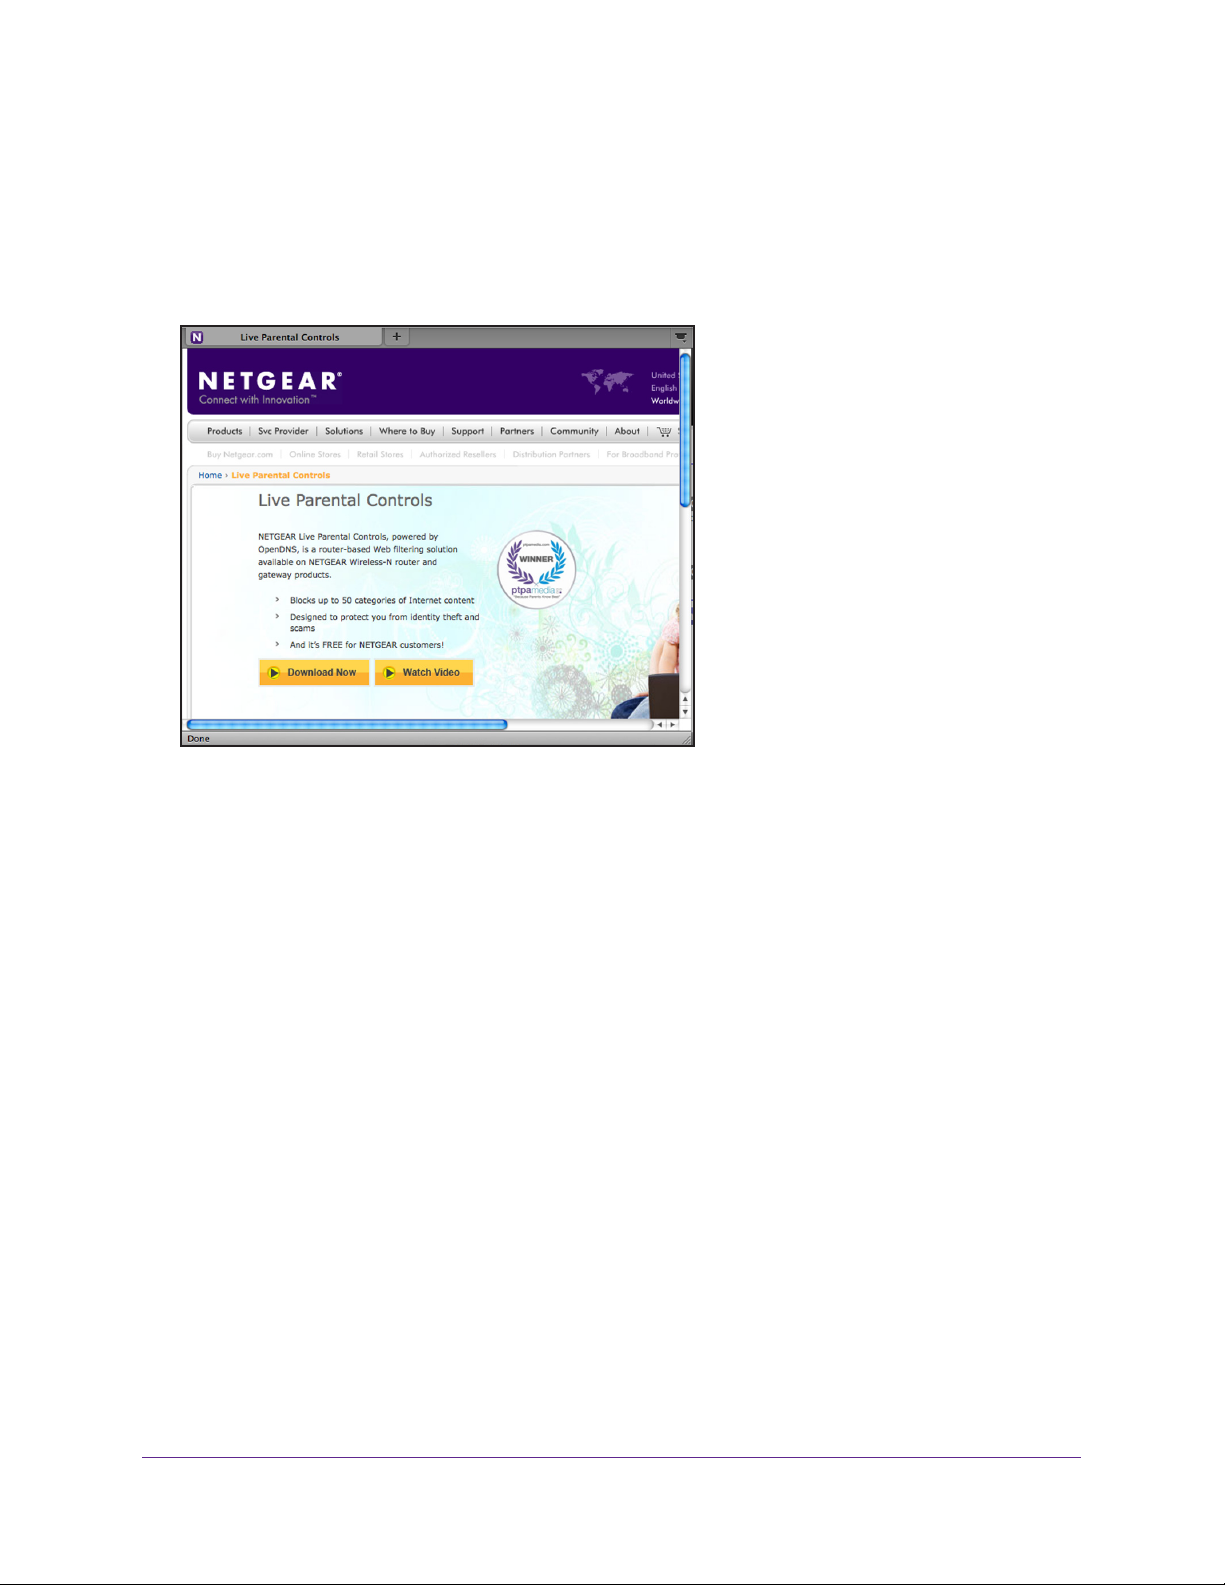
The first time you select Parental Controls from the Basic Home screen, you are
automatically directed to the Internet, where you can learn more about Live Parental Controls
or download the application. The following screen displays:
Genie Basic Settings
33
Page 34
N600 Wireless Dual Band Gigabit ADSL2+ Modem Router DGND3700v2
ReadySHARE USB Storage and Printer
You can view information about a USB storage device that is connected to the wireless
modem router’s USB port here.
USB Storage (Basic Settings)
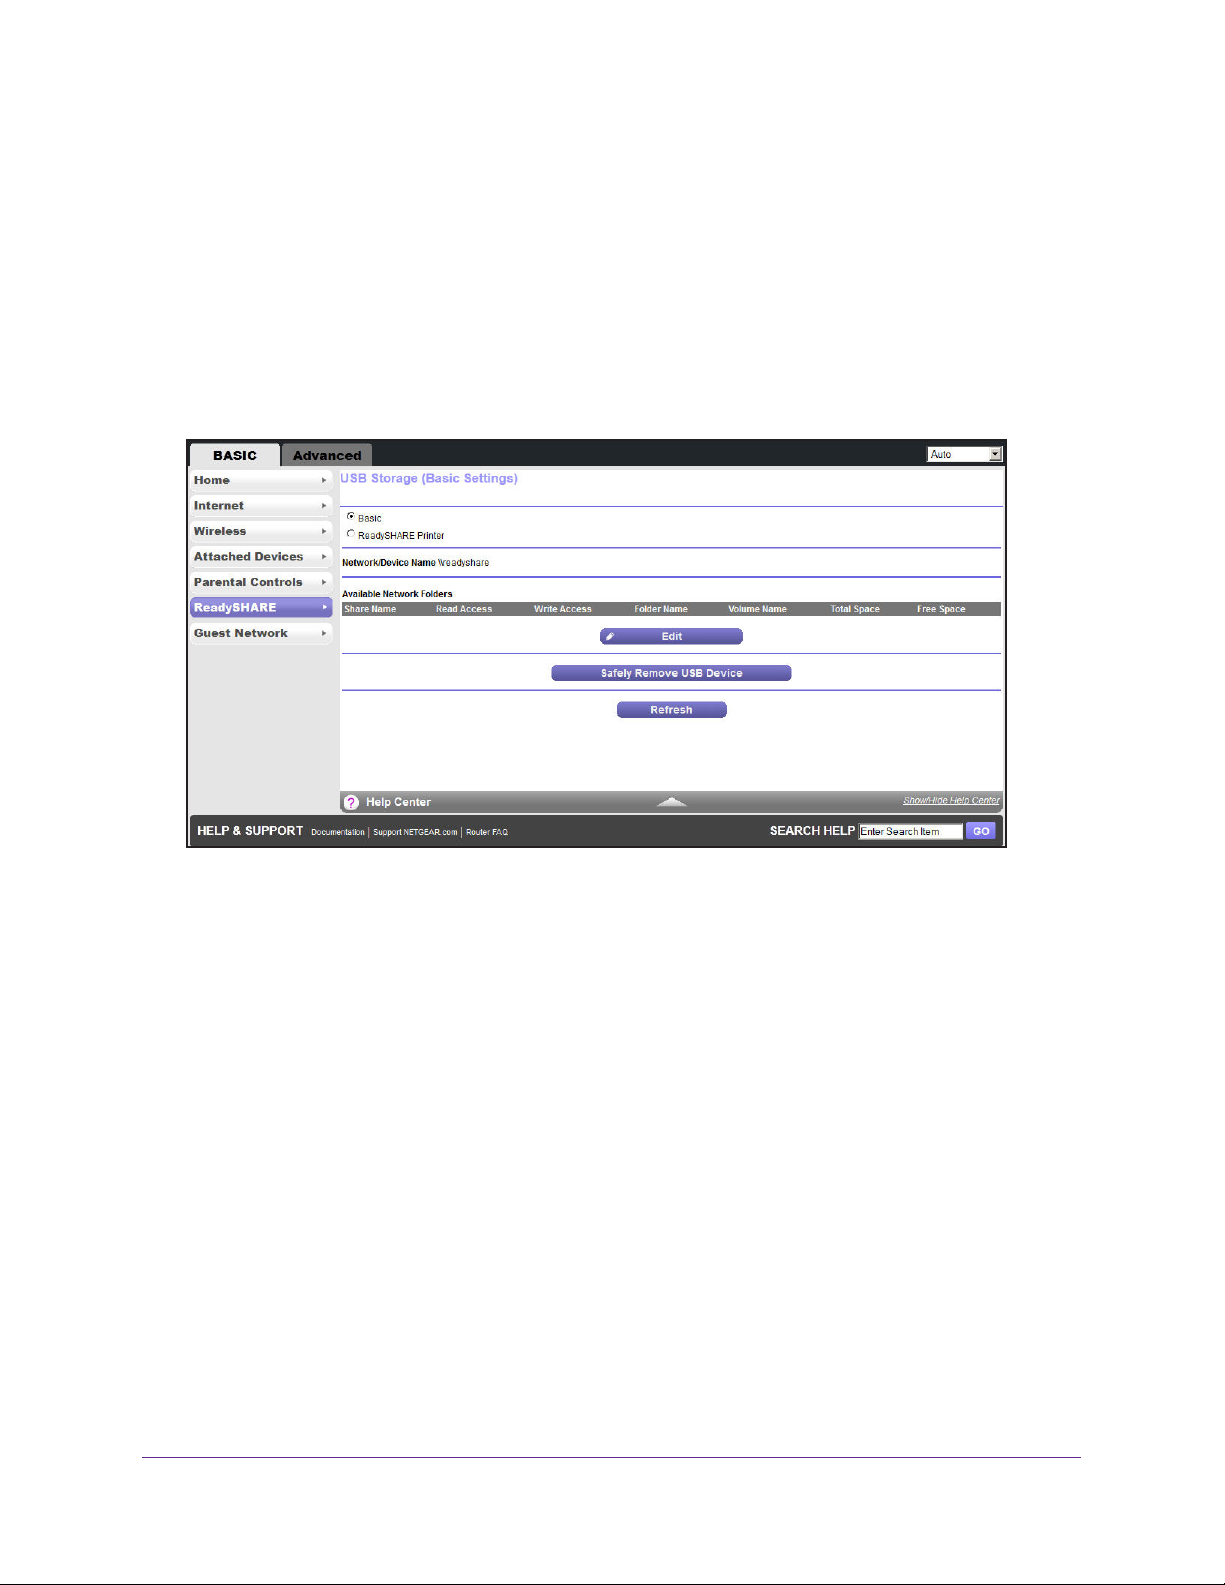
From the Basic Home screen, select ReadySHARE to display the USB Storage (Basic
Settings) screen:
This screen displays the following when Basic is selected:
• Network/Device Name.
USB device connected to the wireless modem router.
• A
vailable Network Folders. The folders on the USB device.
Share Name. If only one device is connected, the default share name is USB_Storage.
Y
ou can click the name shown, or you can type it in the address field of your web
browser. If Not Shared is shown, the default share has been deleted and no other share
for the root folder exists. Click the link to change this setting.
Read and Write Access. Show the permissions and access controls on the network
folder:
user name (account name) for All – no password is guest. The password for admin is the
same one that you use to log in to the wireless modem router. By default, it is password.
Folder Name. Full path used by the network folder
Volume Name. V
Total and Free Space. Show the current utilization of the storage device.
• Edit. Click the Edit button to edit the
All – no password (the default) allows all users to access the network folder. The
olume name from the storage device (either USB drive or HDD).
The default is \\readyshare. This is the name used to access the
.
Available Network Folders settings.
Genie Basic Settings
34
Page 35
N600 Wireless Dual Band Gigabit ADSL2+ Modem Router DGND3700v2
• Safely Remove a USB Device. Click to safely remove the USB device attached to your
wireless modem router.
You can click Refresh to update this screen.
For more information about USB storage, see Chapter 5, USB Storage.
ReadySHARE Printer
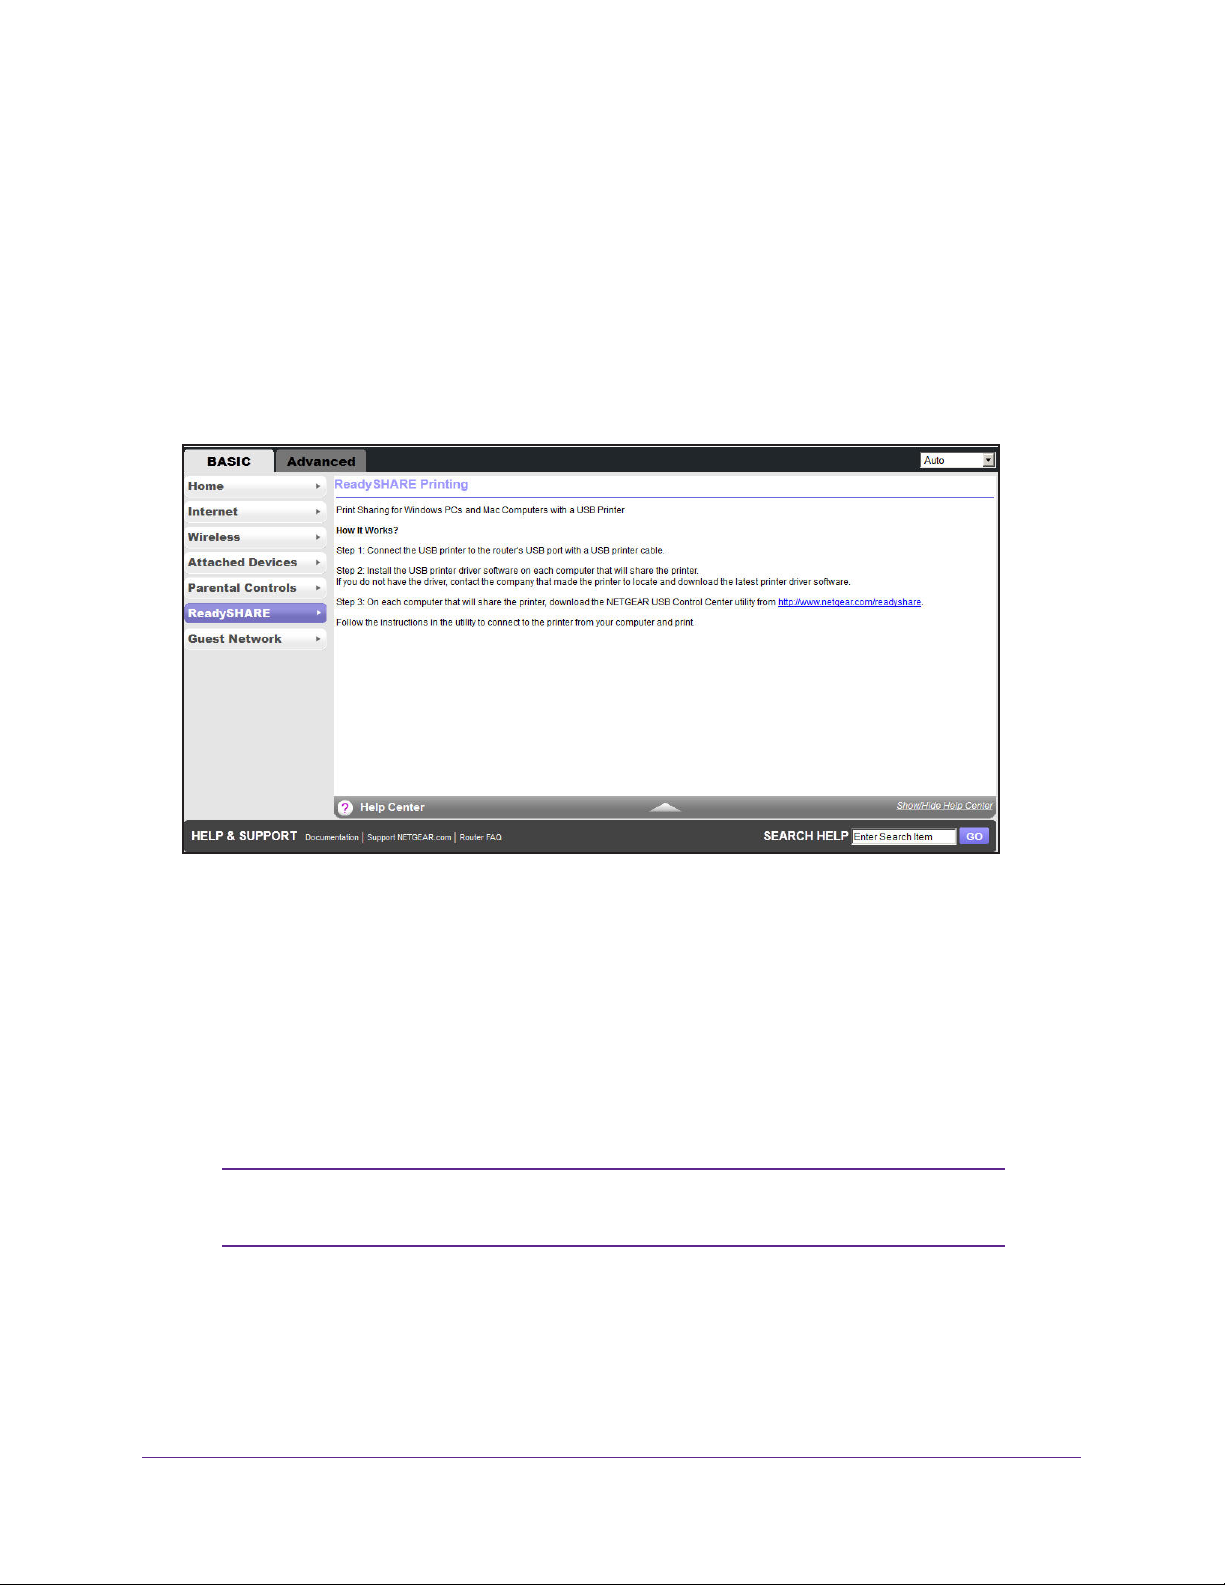
From the Basic Home screen, select ReadySHARE, and from the USB Storage (Basic
Settings) screen, select ReadySHARE Printer to display the following screen:
For more information about USB printing, see Chapter 6, USB Printer Control.
Basic Wireless Settings
The Wireless Settings screen lets you view or configure the wireless network setup.
The N600 Modem Router comes with preset security. This means that the WiFi network
name (SSID), network key (password), and security option (encryption protocol) are preset in
the factory
NETGEAR recommends that you do not change your preset security settings. If you do
decide to change your preset security settings, make a note of the new settings and store it in
a safe place where you can easily find it.
. You can find the preset SSID and password on the bottom of the unit.
Note: The preset SSID and password are uniquely generated for every
device to protect and maximize your wireless security.
Genie Basic Settings
35
Page 36
N600 Wireless Dual Band Gigabit ADSL2+ Modem Router DGND3700v2
If you use a wireless computer to change the wireless network name (SSID) or other wireless
security settings, you are disconnected when you click Apply. To avoid this problem, use a
computer with a wired connection to access the wireless modem router.
To view or change basic wireless settings:
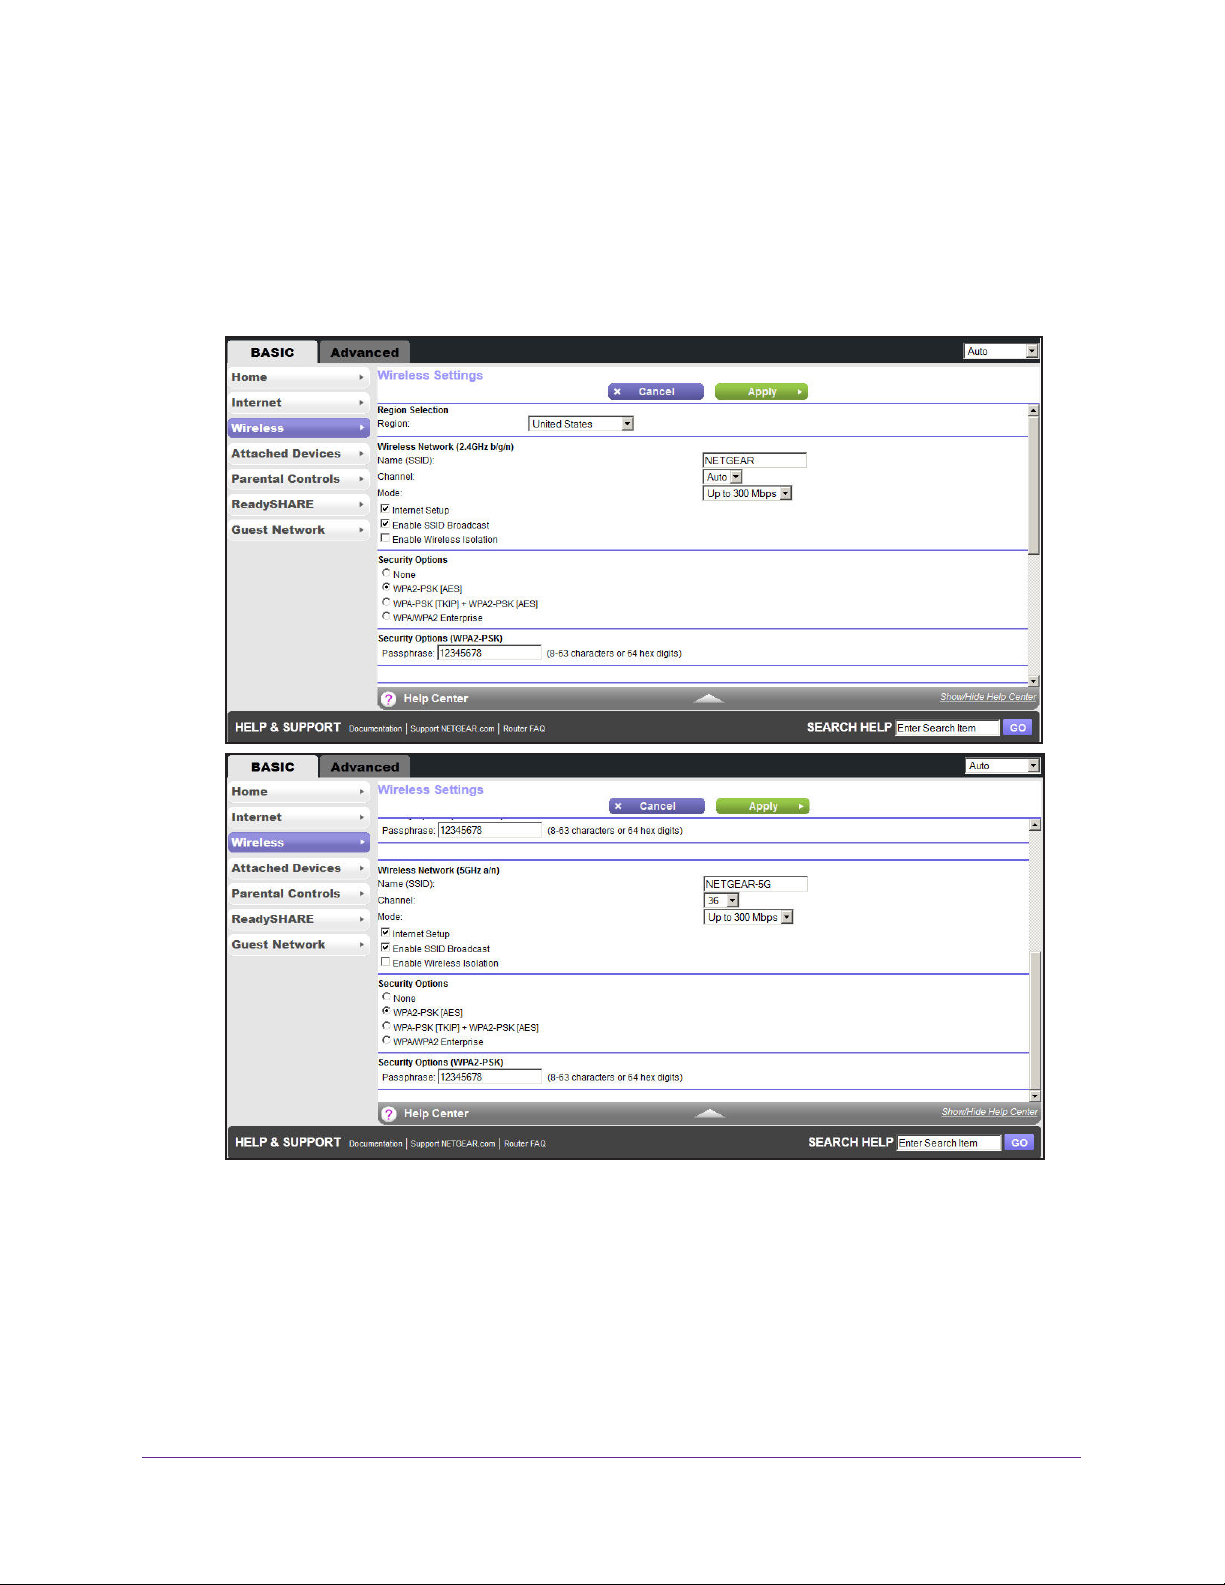
1. On the Basic Home screen, select W
ireless to display the Wireless Settings screen.
The screen sections, settings, and procedures are explained in the following sections.
2. Make any changes that are needed, and click Apply to save your settings.
3. Set up and test your wireless devices and computers to make sure that they can connect
wirelessly
. If they do not, check the following:
• Is your wireless device or computer connected to your network or another wireless
network in your area? Some wireless devices automatically connect to the first open
network (without wireless security) that they discover
Genie Basic Settings
36
.
Page 37

N600 Wireless Dual Band Gigabit ADSL2+ Modem Router DGND3700v2
• Does your wireless device or computer show up on the Attached Devices screen? If it
does, then it is connected to the network.
• If you are not sure what the network name (SSID) or password is, look on the label on
the bottom of your wireless modem router.
Wireless Settings Screen Fields
Region. The location where the wireless modem router is used. Select from the countries in
the list. Note that in the United States, the region is fixed to United States and is not
changeable.
Wireless Network
Note: These settings apply separately to the 2.4 GHz b/g/n and 5 GHz a/n
bands.
Name (SSID). The SSID is also known as the wireless network name. Enter a 32-character
(maximum) name in this field. This field is case-sensitive. The default SSID is randomly
generated, and NETGEAR strongly recommends that you do not change this.
Channel. This setting is the wireless channel used by the gateway. Enter a value from 1
through 13. (For products in the North America market, only Channels 1 through 11 can be
operated.) Do not change the channel unless you experience interference (shown by lost
connections or slow data transfers). If this happens, experiment with different channels to
see which is the best.
Mode. Up to 130 Mbps is the default and allows 802.11n and 802.11g wireless devices to join
the network. g & b supports up to 54 Mbps. The 300 Mbps setting allows 802.11n devices to
connect at this speed.
Enable SSID Broadcast. This setting allows the wireless modem router to broadcast its
SSID so wireless stations can see this wireless name (SSID) in their scanned network lists.
This check box is selected by default. To turn off the SSID broadcast, clear the Enable SSID
Broadcast check box, and click Apply.
Enable Wireless Isolation. If this check box is selected, then wireless clients (computers or
wireless devices) that join the network can use the Internet, but cannot access each other or
access Ethernet devices on the network.
Security Options Settings
Note: These settings apply separately to the 2.4 GHz b/g/n and 5 GHz a/n
bands.
Genie Basic Settings
37
Page 38
N600 Wireless Dual Band Gigabit ADSL2+ Modem Router DGND3700v2
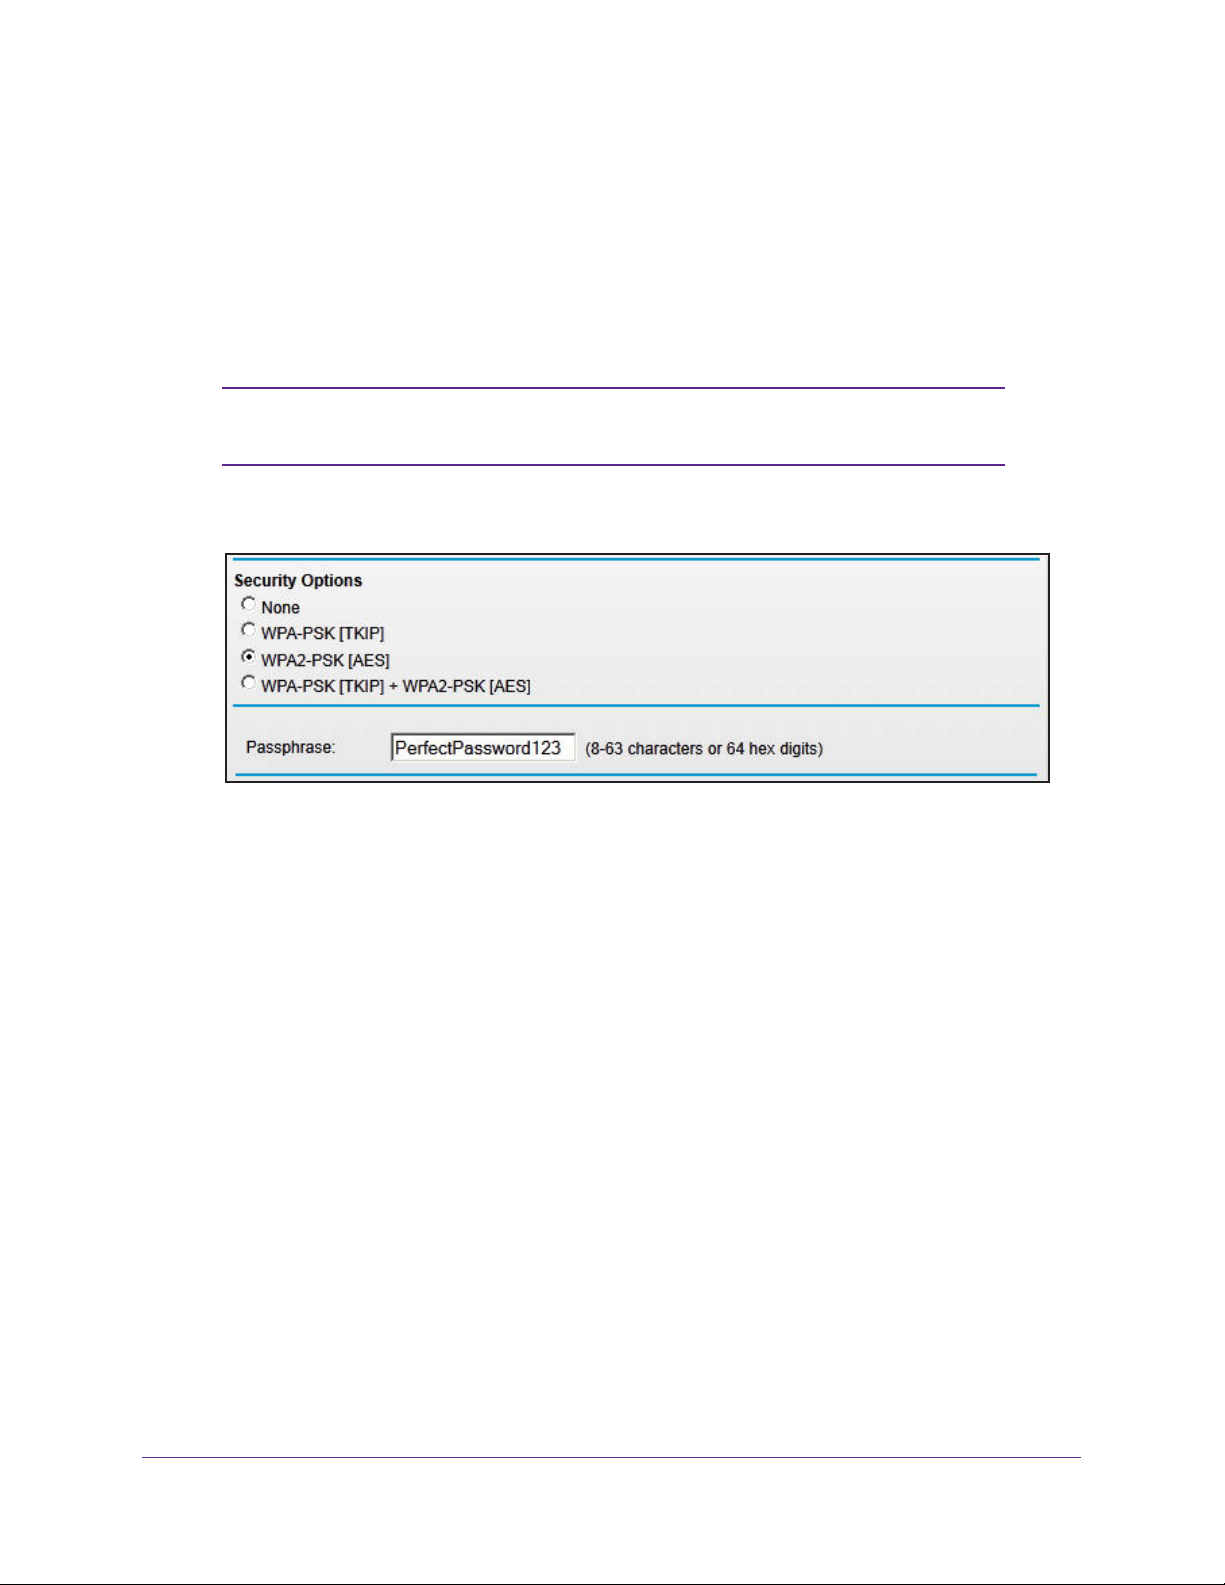
The Security Options section of the Wireless Setup screen lets you change the security
option and passphrase. Please note that NETGEAR recommends that you not change the
security option or passphrase, but if you want to change these settings, this section
explains how. Do not disable security.
Change WPA Security Option and Passphrase
Note: These settings apply separately to the 2.4 GHz b/g/n and 5 GHz a/n
bands.
1. Under Security Options, select the WP
2. In the Passphrase field that displays when you select a WPA security option, enter the
network key (passphrase) that you want to use. It is a text string from 8 to 63 characters.
A option you want.
Genie Basic Settings
38
Page 39
N600 Wireless Dual Band Gigabit ADSL2+ Modem Router DGND3700v2
Guest Networks
Adding a guest network allows visitors at your home to use the Internet without providing
them with your wireless security key. You can add a guest network to each wireless network:
2.4 GHz b/g/n and 5.0 GHz a/n.
To set up a guest network:
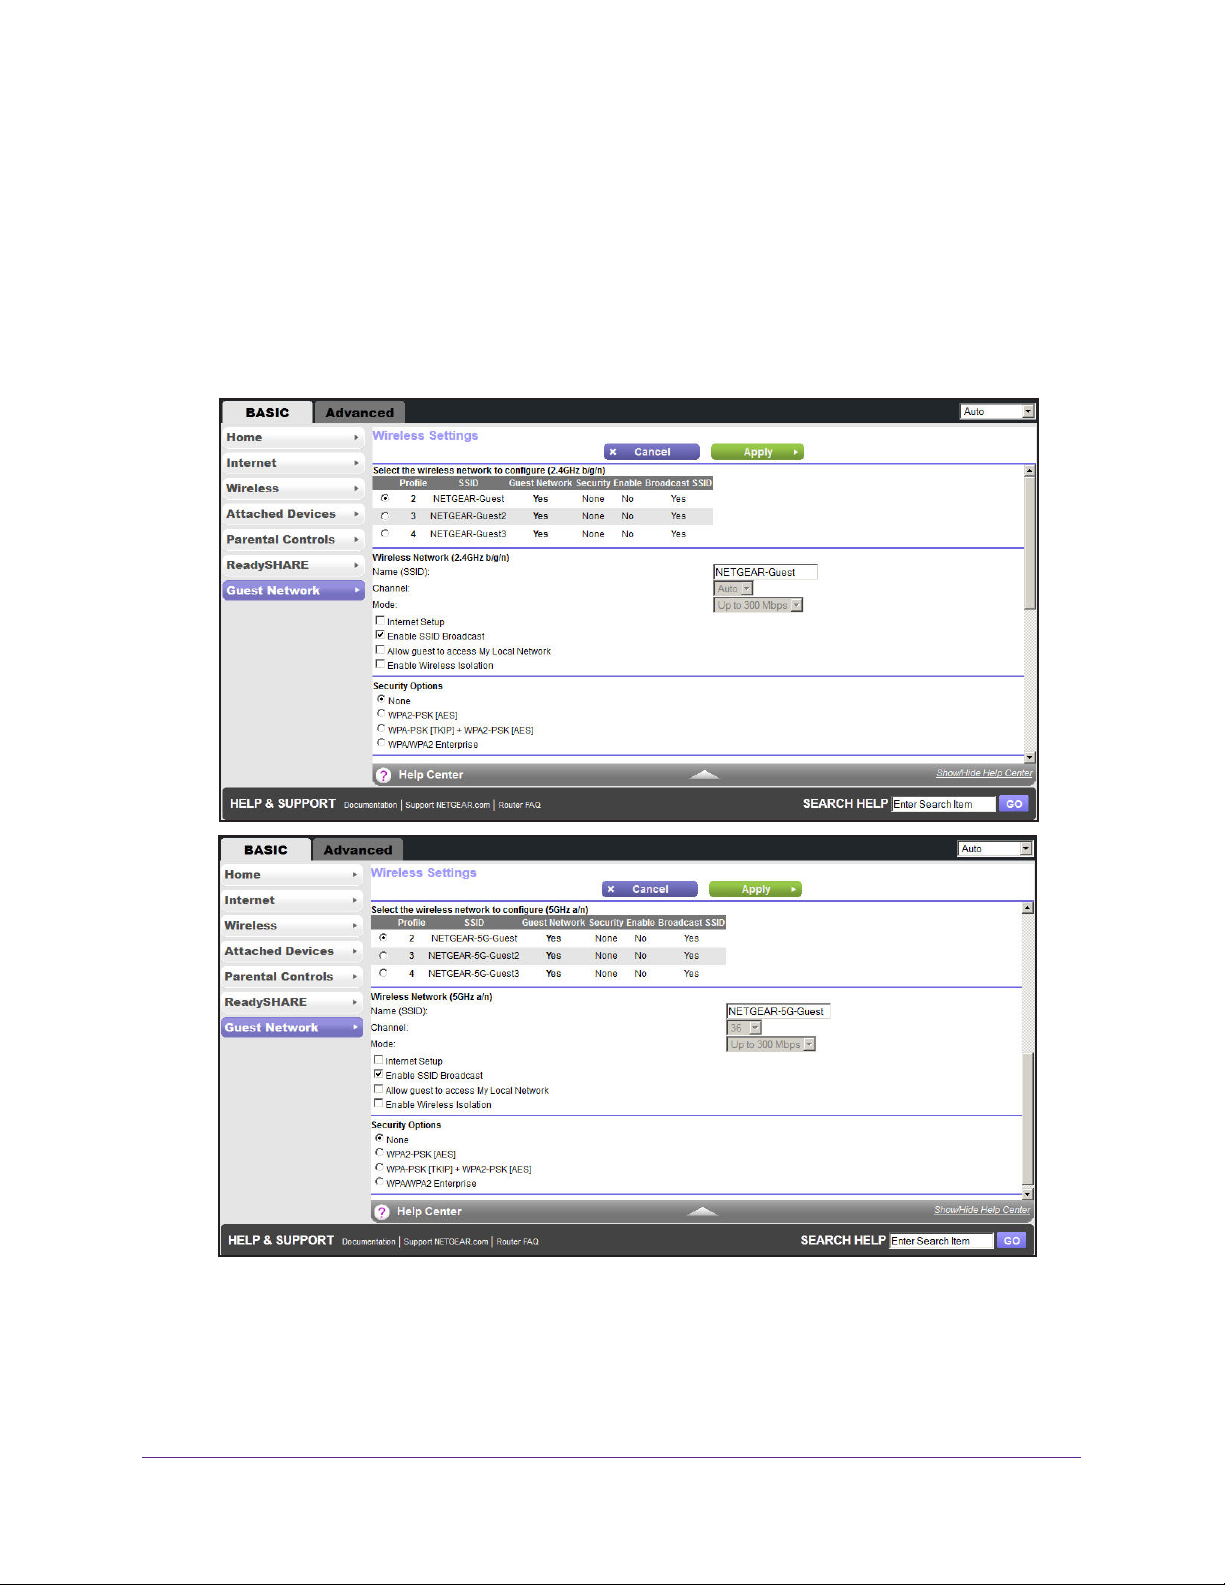
1. From the Basic Home screen, select Guest Network to display the following screen:
2. Select any of the following wireless settings:
Genie Basic Settings
39
Page 40

N600 Wireless Dual Band Gigabit ADSL2+ Modem Router DGND3700v2
Note: These settings apply separately to the 2.4 GHz b/g/n and 5 GHz a/n
bands.
Enable Guest Network. When this check box is selected, the guest network is enabled,
and guests can connect to your network using the SSID of this profile.
Enable SSID Broadcast. If this check box is selected, the wireless access point
broadcasts its name (SSID) to all wireless stations. Stations with no SSID can adopt the
correct SSID for connections to this access point.
Allow guest to access My Local Network. If this check box is selected, any user who
connects to this SSID has access to your local network, not just Internet access.
Enable Wireless Isolation. If this check box is selected, then wireless clients (computers
or wireless devices) that join the network can use the Internet, but cannot access each
other or access Ethernet devices on the network.
3. Give the guest network a name.
The guest network name is case-sensitive and can be up to 32 characters. You then
manually configure the wireless devices in your network to use the guest network name in
addition to the main nonguest SSID.
4. Select a security option from the list. The security options are described in Guest Network
Wireless Security Options on page 40.
5. Click Apply to save your selections.
Guest Network Wireless Security Options
A security option is the type of security protocol applied to your wireless network. The
security protocol in force encrypts data transmissions and ensures that only trusted devices
receive authorization to connect to your network.
This section presents an overview of the security options and provides guidance on when to
use which option. Note that it is also possible to set up a guest network without wireless
security. NETGEAR does not recommend this.
Wi-Fi Protected Access (WPA) encryption is built into all hardware that has the Wi-Fi-certified
seal. This seal means the product is authorized by the Wi-Fi Alliance (http://www.wi-fi.org/)
because it complies with the worldwide single standard for high-speed wireless local area
networking.
WPA-PSK uses a passphrase to perform authentication and generate the initial data
encryption keys. Then it dynamically varies the encryption key. WPA-PSK uses Temporal
Key Integrity Protocol (TKIP) data encryption, implements most of the IEEE 802.11i standard,
and is designed to work with all wireless network interface cards, but not all wireless access
points. It is superseded by WPA2-PSK.
Genie Basic Settings
40
Page 41

N600 Wireless Dual Band Gigabit ADSL2+ Modem Router DGND3700v2
WPA2-PSK is stronger than WPA. It is advertised to be indecipherable due to the greater
degree of randomness in encryption keys that it generates. WPA2-PSK gets higher speed
because it is usually implemented through hardware, while WPA-PSK is usually implemented
through software. WPA2-PSK uses a passphrase to authenticate and generate the initial data
encryption keys. Then it dynamically varies the encryption key.
WPS-PSK + WPA2-PSK Mixed Mode can provide broader support for all wireless clients.
WPA2-PSK clients get higher speed and security, and WPA-PSK clients get decent speed
and security. The product documentation for your wireless adapter and WPA client software
should have instructions about configuring their WPA settings.
Genie Basic Settings
41
Page 42

4. Genie Advanced Home
Specify custom settings
This chapter contains the following sections:
• Setup Wizard
• WPS Wizard
• VPN Wizard
• Setup Menu
• ADSL Setup
• WAN Setup
• LAN Setup
• Quality of Service (QoS) Setup
Some selections on the Advanced Home screen are described in separate chapters:
• USB Storage. See Chapter 5, USB Storage.
• Security. See Chapter 7, Security.
• Administration. See Chapter 8, Administration.
• Advanced Setup. See Chapter 9, Advanced Settings.
4
42
Page 43
N600 Wireless Dual Band Gigabit ADSL2+ Modem Router DGND3700v2
Setup Wizard
The NETGEAR Genie installation process is launched the first time you set up the wireless
modem router. After setting up the wireless modem router the first time, if you want to
perform this task again, you can run Setup Wizard from the Advanced tab of the Genie.
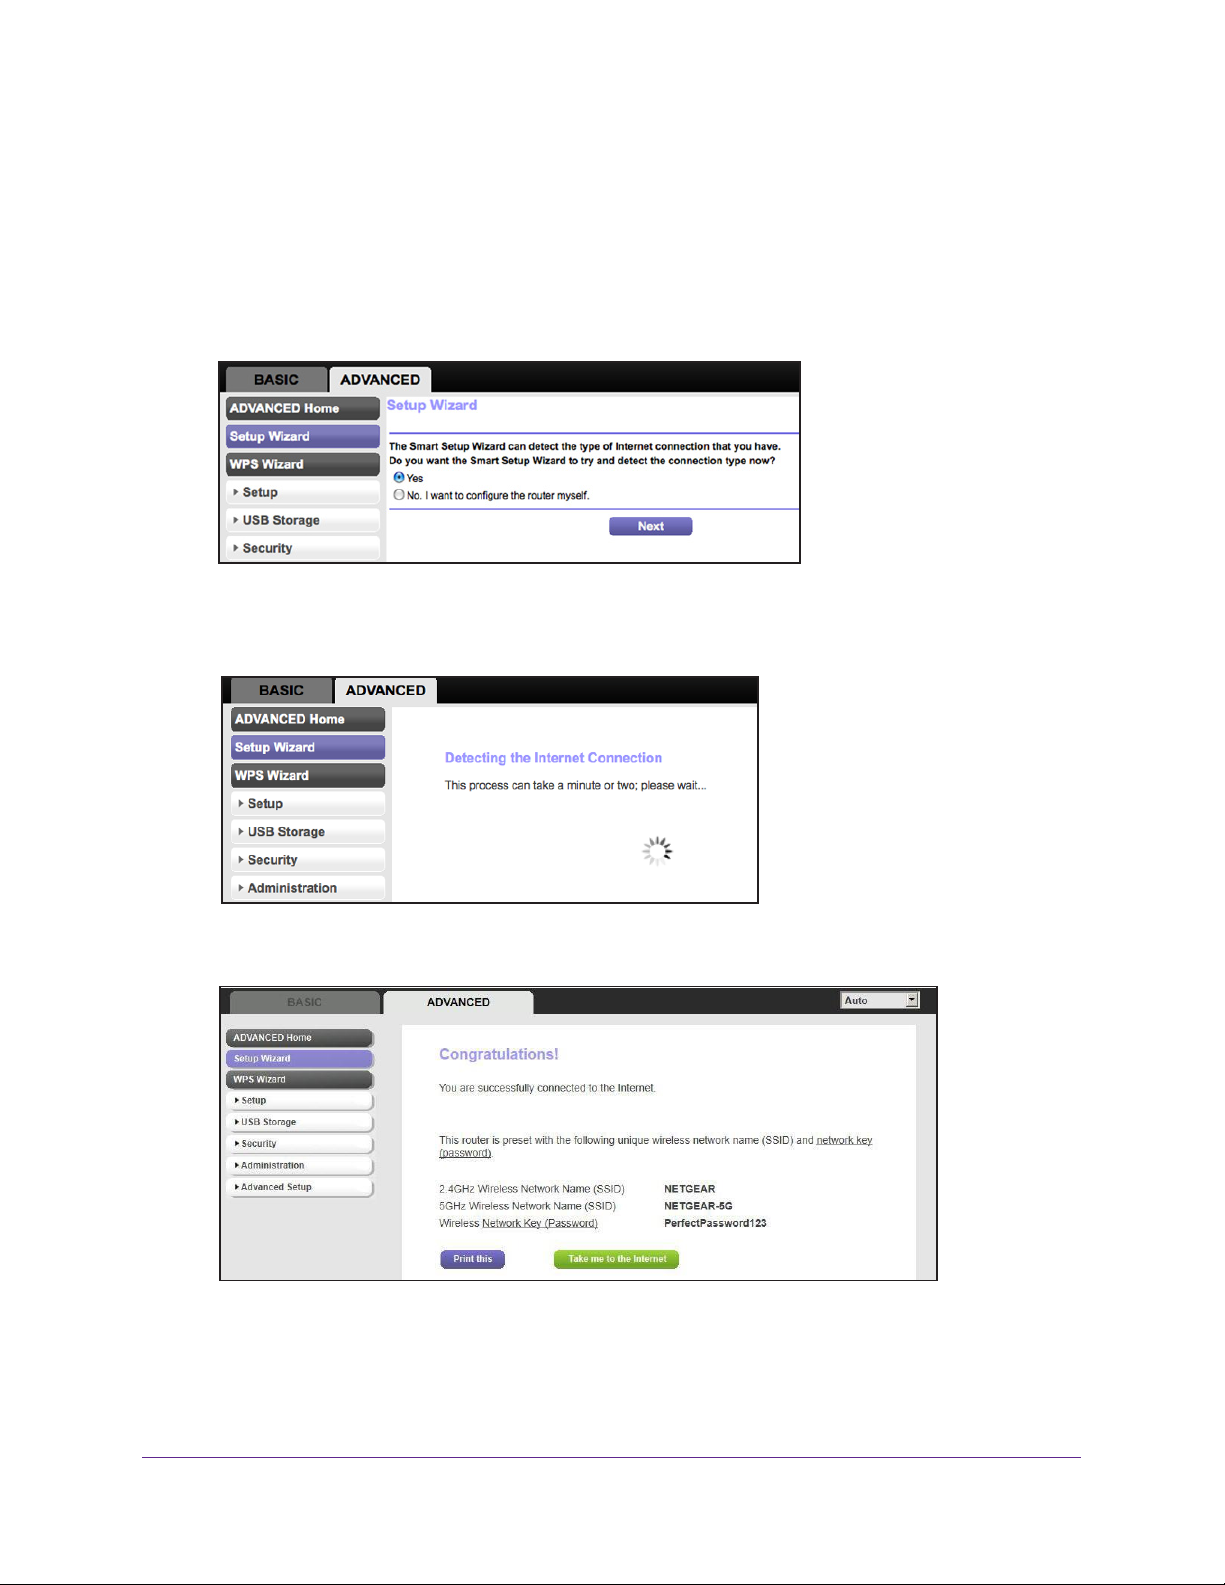
1. Select Setup W
2. Select either Yes or No, I want to configure the router myself. If you select No, you are
taken to the Internet Setup screen (see Internet Basic Settings on page 30).
3. If you selected
izard to display the following screen:
Yes, click Next. The following screen displays:
The Setup Wizard searches your Internet connection for servers and protocols to
determine your ISP configuration. The following screen displays:
Genie Advanced Home
43
Page 44
N600 Wireless Dual Band Gigabit ADSL2+ Modem Router DGND3700v2
WPS Wizard
The WPS Wizard helps you add a WPS-capable client device (a wireless device or
computer) to your network. On the client device you need to either press its WPS button or
locate its WPS PIN.
To use the WPS Wizard:
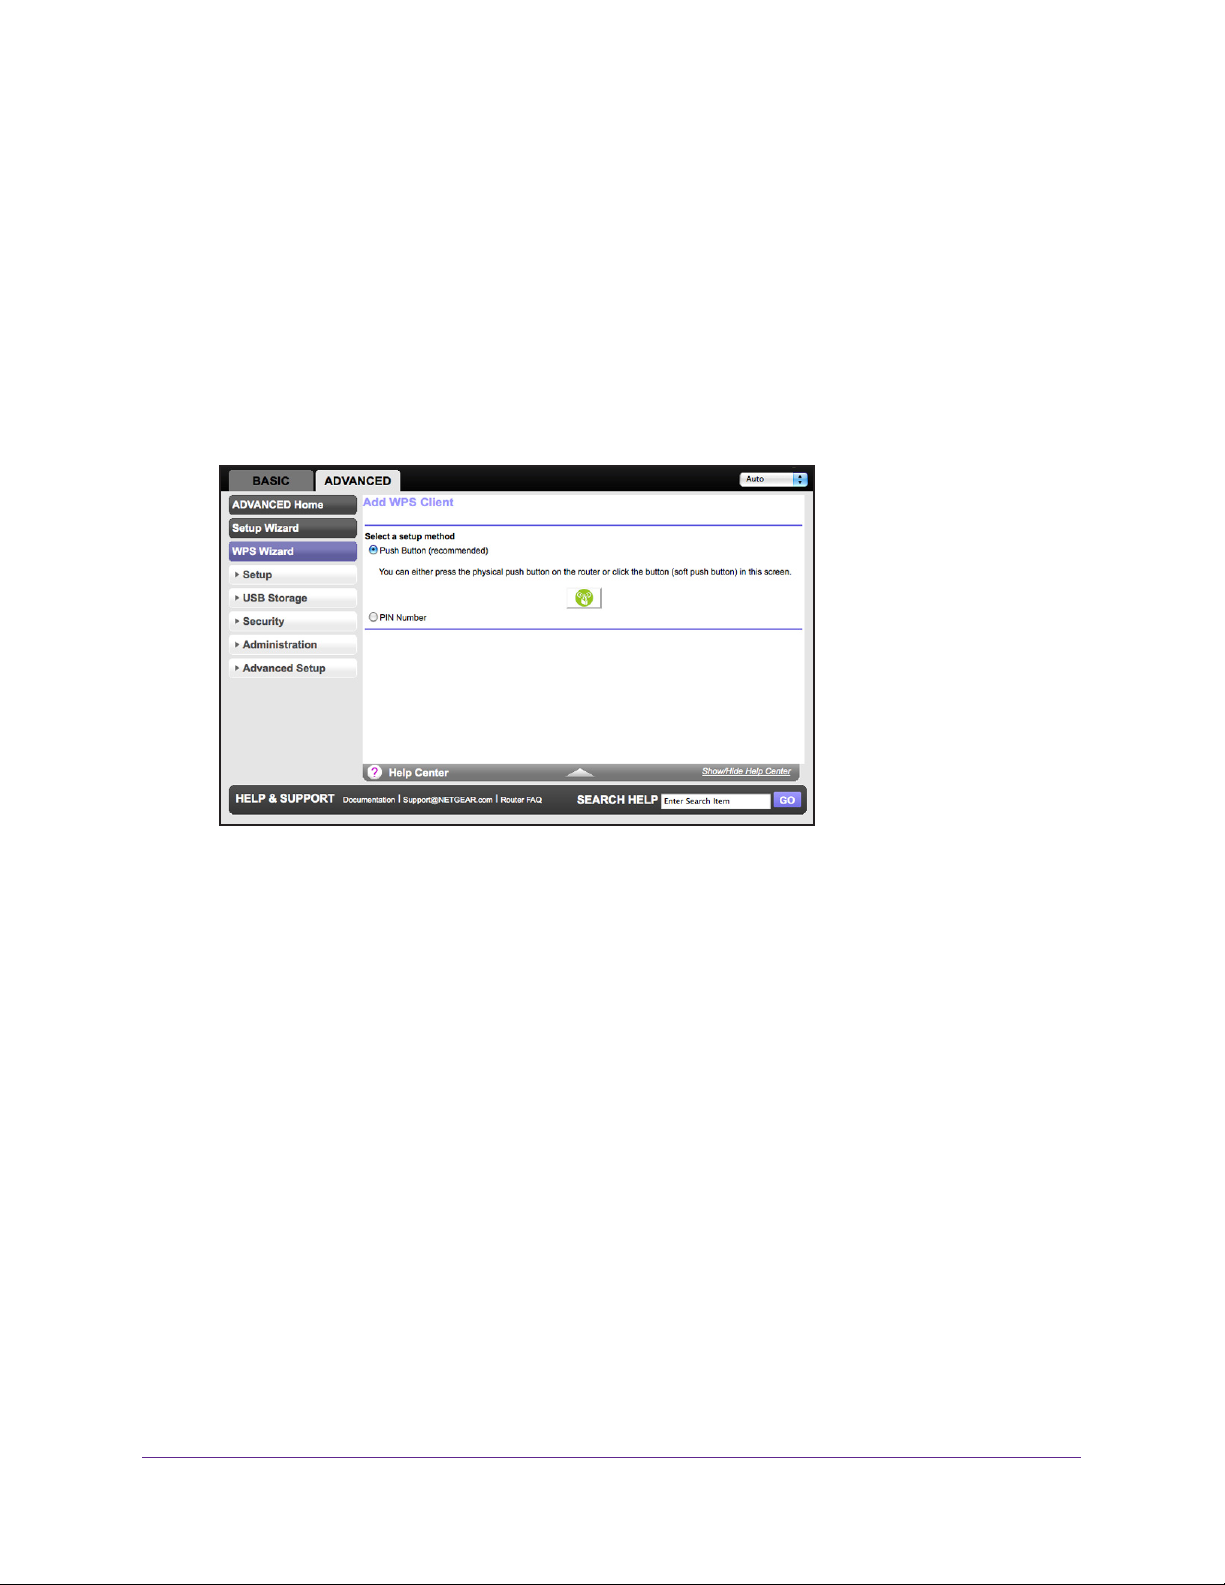
1. Select Advanced > WPS W
2. Click Next.
wireless device or computer).
You can use either the push button or PIN method.
3. Select either Push Button or PIN Number.
• T
o use the push button method, either click the WPS button on this screen, or press
the WPS button located on the top of the wireless modem router. Within two minutes,
go to the wireless client and press its WPS button to join the network without entering
a password.
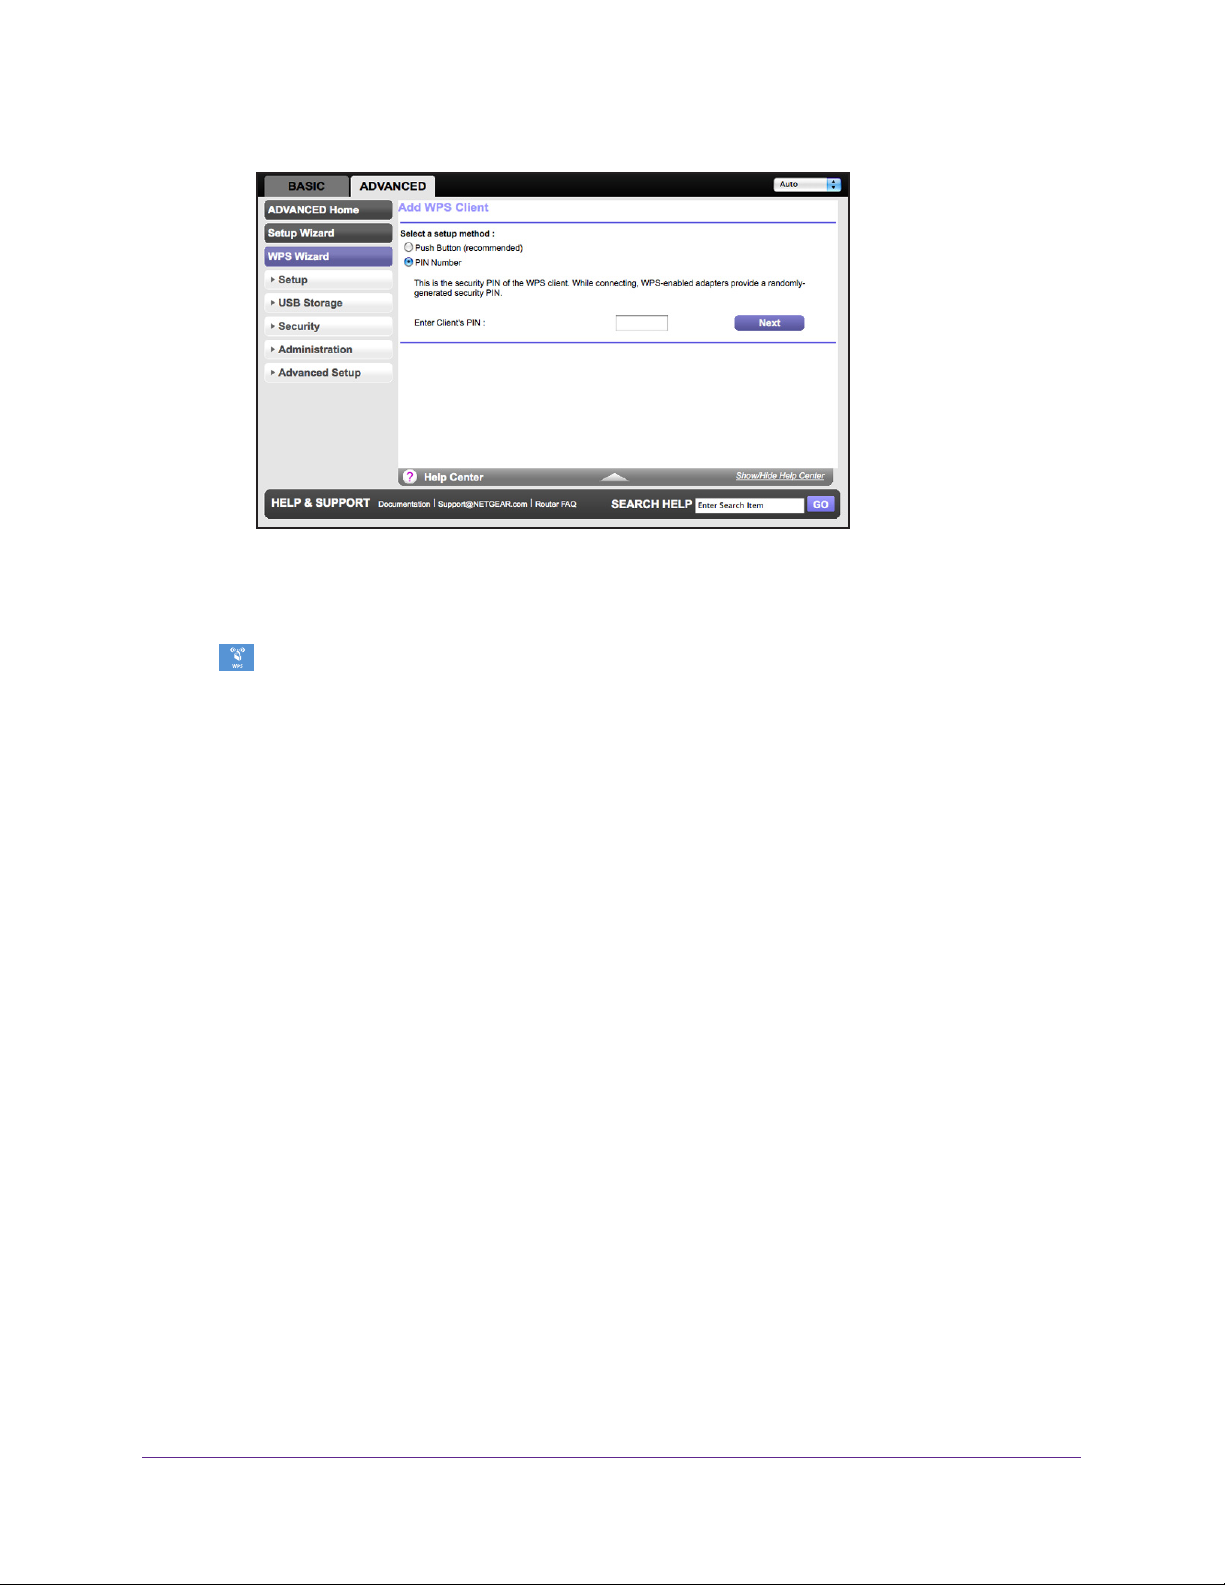
o use the PIN method, select the PIN Number radio button, enter the client security
• T
PIN, and click Next.
The following screen lets you select the method for adding the WPS client (a
izard.
Genie Advanced Home
44
Page 45
N600 Wireless Dual Band Gigabit ADSL2+ Modem Router DGND3700v2
Within two minutes, go to the client device and use its WPS software to join the
network without entering a password.
The wireless modem router attempts to add the WPS-capable device. The WPS LED
on the top of the wireless modem router blinks green. When the wireless modem
router establishes a WPS connection, the LED is solid green, and the wireless modem
router WPS screen displays a confirmation message.
4. Repeat Step 2 and Step 3 to add another WPS client to your network.
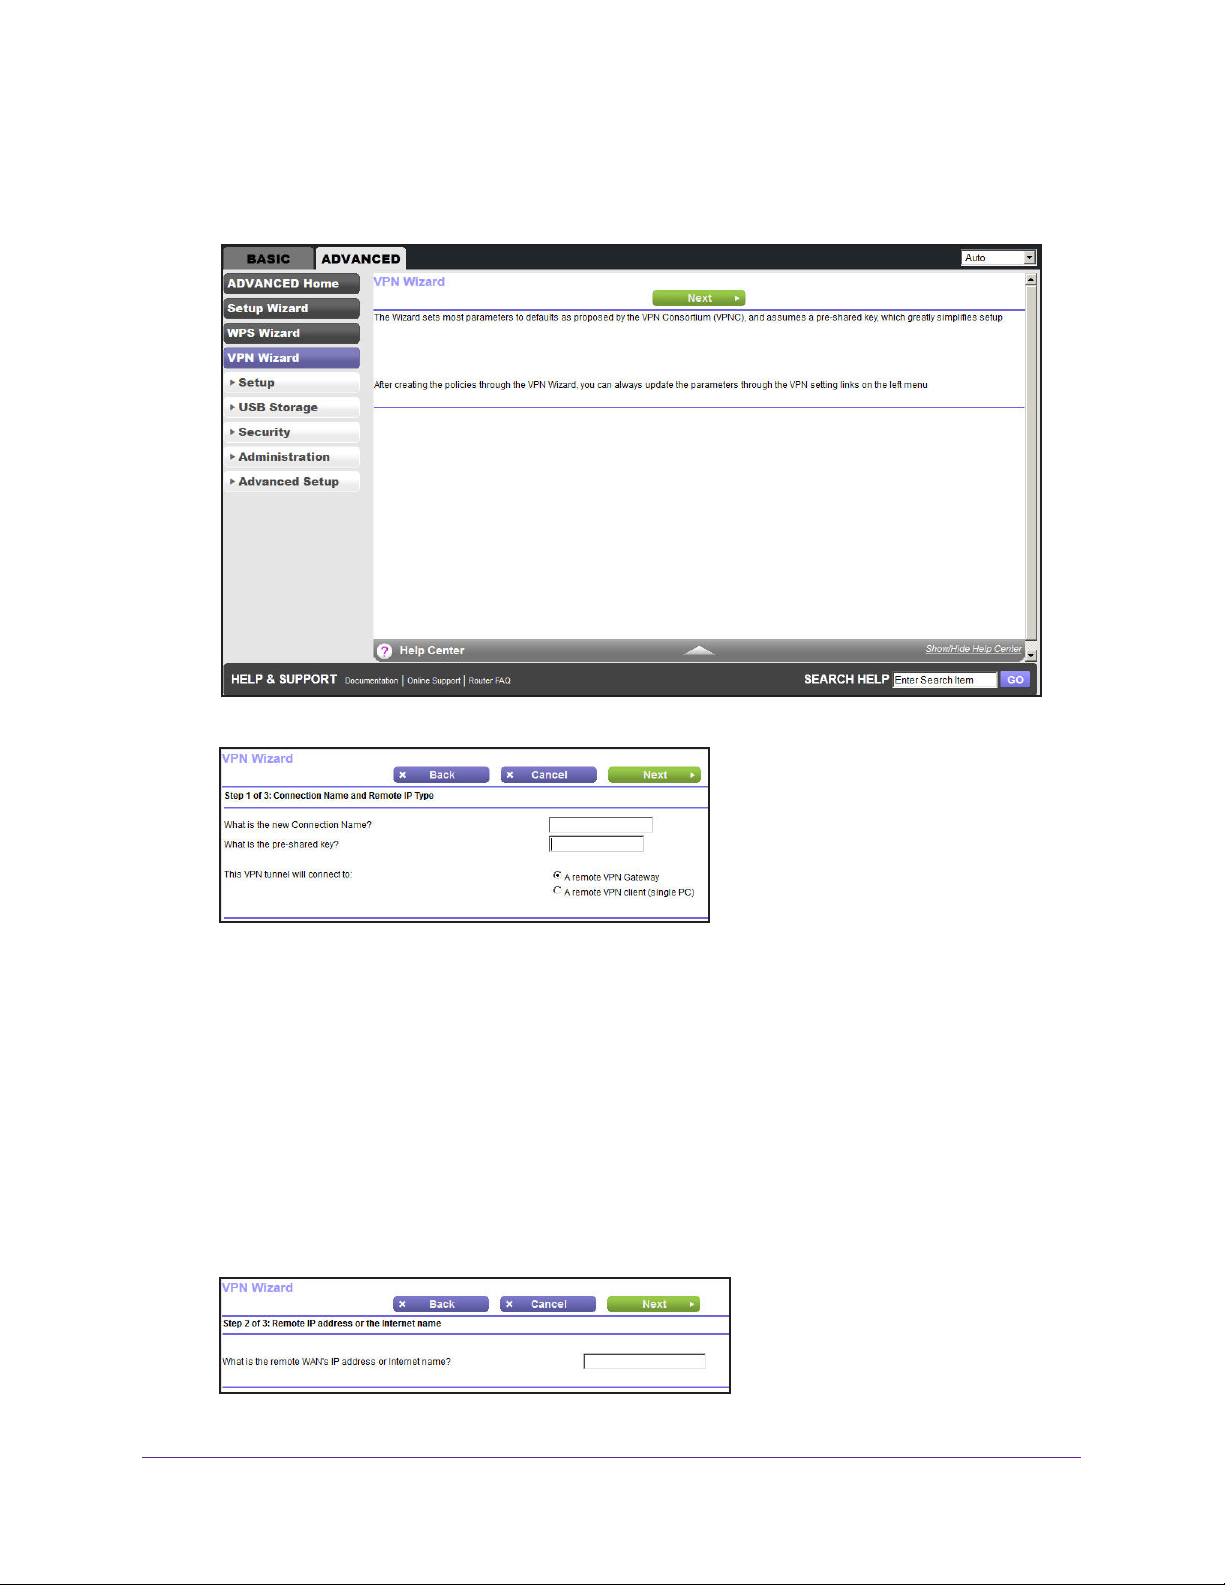
VPN Wizard
The VPN Wizard asks you series of questions that determine the IPSec keys and VPN
policies it sets up. The VPN Wizard sets the parameters for the network connection, Security
Association, traffic selectors, authentication algorithm, and encryption. These parameters are
based on the VPNC recommendations. More information about the VPNC recommendations
is presented in the VPN Wizard summary page.
Genie Advanced Home
45
Page 46
N600 Wireless Dual Band Gigabit ADSL2+ Modem Router DGND3700v2
To use the VPN Wizard:
1. Select ADVANCED > VPN Wizard.
2. Click the Next button.
Enter the requested information:
• Connection name. Enter an appropriate name for the connection.
supplied to the remote VPN endpoint. Rather, it is used to help you manage the VPN
settings.
• Pre-shared key.
The key has to be entered both here and on the remote VPN
Gateway or the remote VPN client. This method does not require using a CA
(Certificate Authority).
• VPN tunnel connection.
The wizard has to know if you are planning to connect to a
remote gateway or setting up the connection for a remote client or computer to
establish a secure connection to this device.
3. Click the Next button.
This name is not
Genie Advanced Home
46
Page 47
N600 Wireless Dual Band Gigabit ADSL2+ Modem Router DGND3700v2
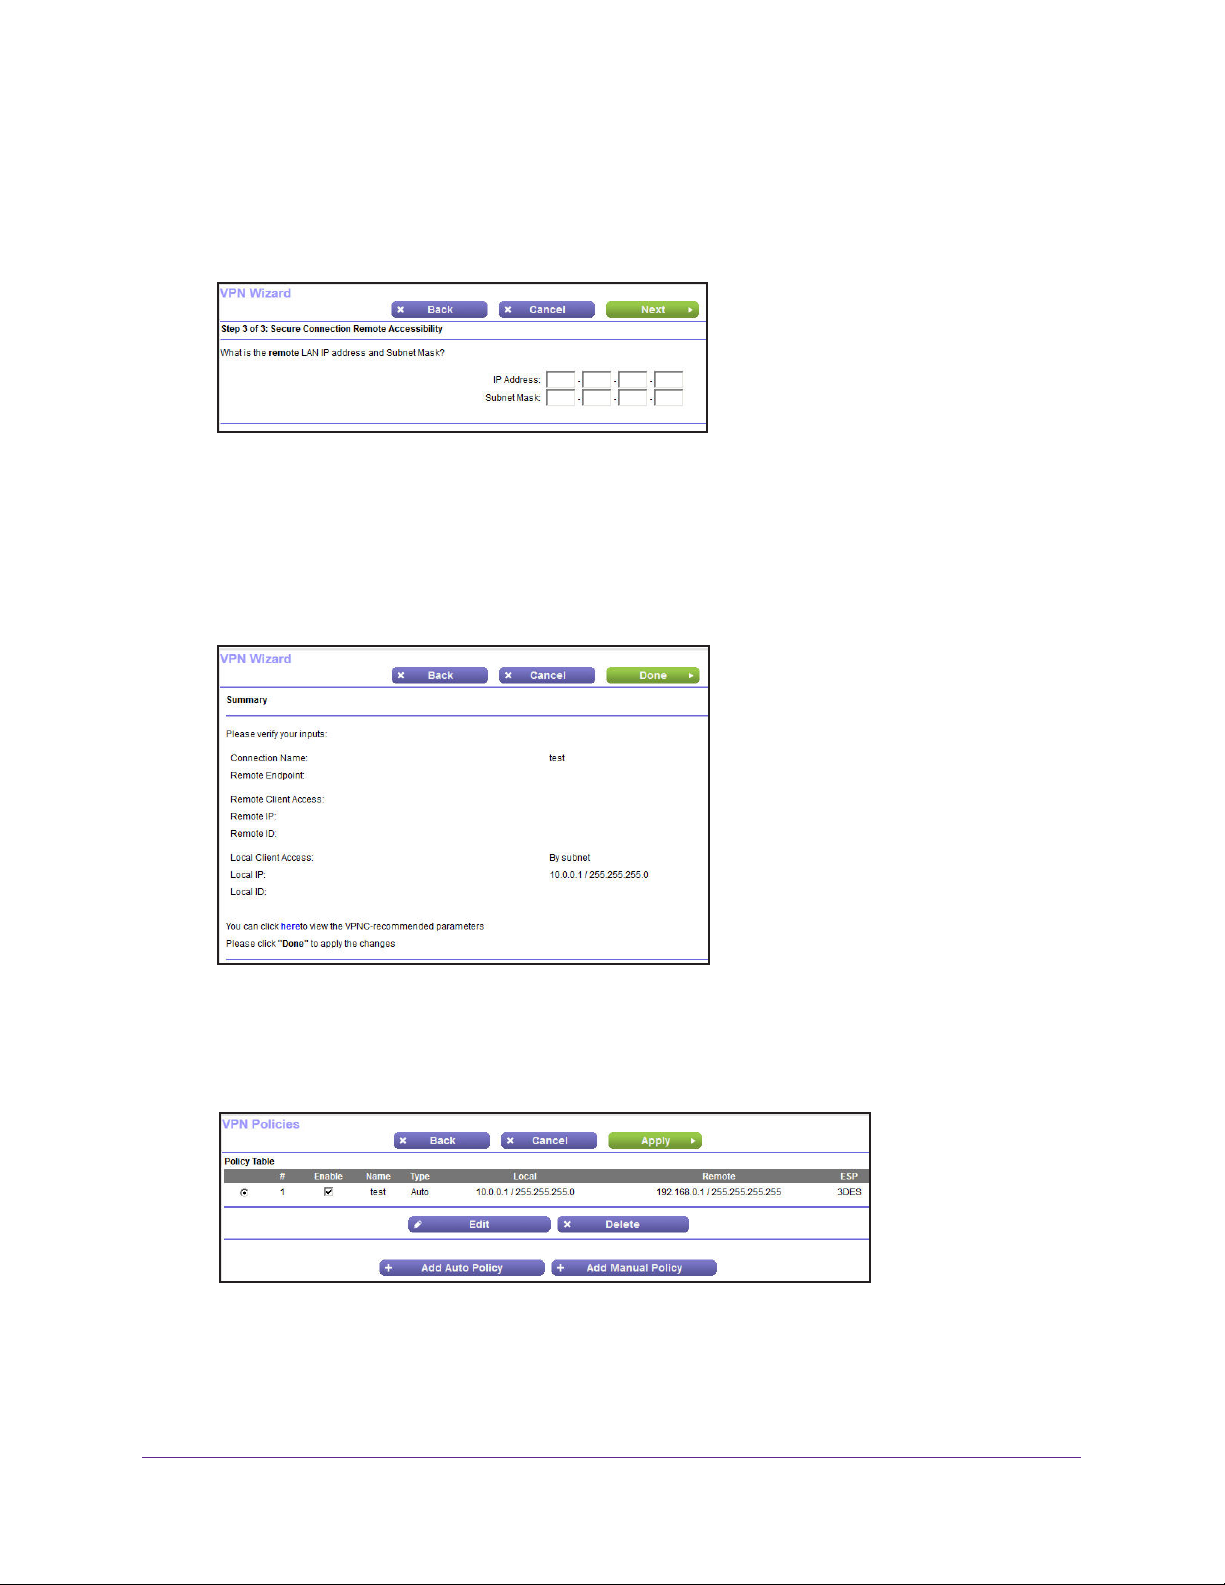
Enter the remote IP address of the gateway you want to connect to, or provide the
Internet name of the gateway. The Internet name is the fully qualified domain name, as
set up in a Dynamic DNS service.
4. Click the Next button.
Enter the remote LAN IP address and subnet mask of the remote gateway.
• If this information does not match the LAN IP address and subnet mask in the remote
gateway
• The IP address range used on the remote LAN has to be dif
, the secure tunnel fails to connect.
ferent from the IP address
range used on the local LAN.
5. Click the Next button.
This screen shows the summary of the Wizard configuration with a link to view the VPNC
recommended parameters (click the here link to view the VPNC-recommended
parameters).
6. Click the Done button.
For information about how to add or modify VPN policies, see VPN Policies on page 123.
Genie Advanced Home
47
Page 48
N600 Wireless Dual Band Gigabit ADSL2+ Modem Router DGND3700v2
Setup Menu
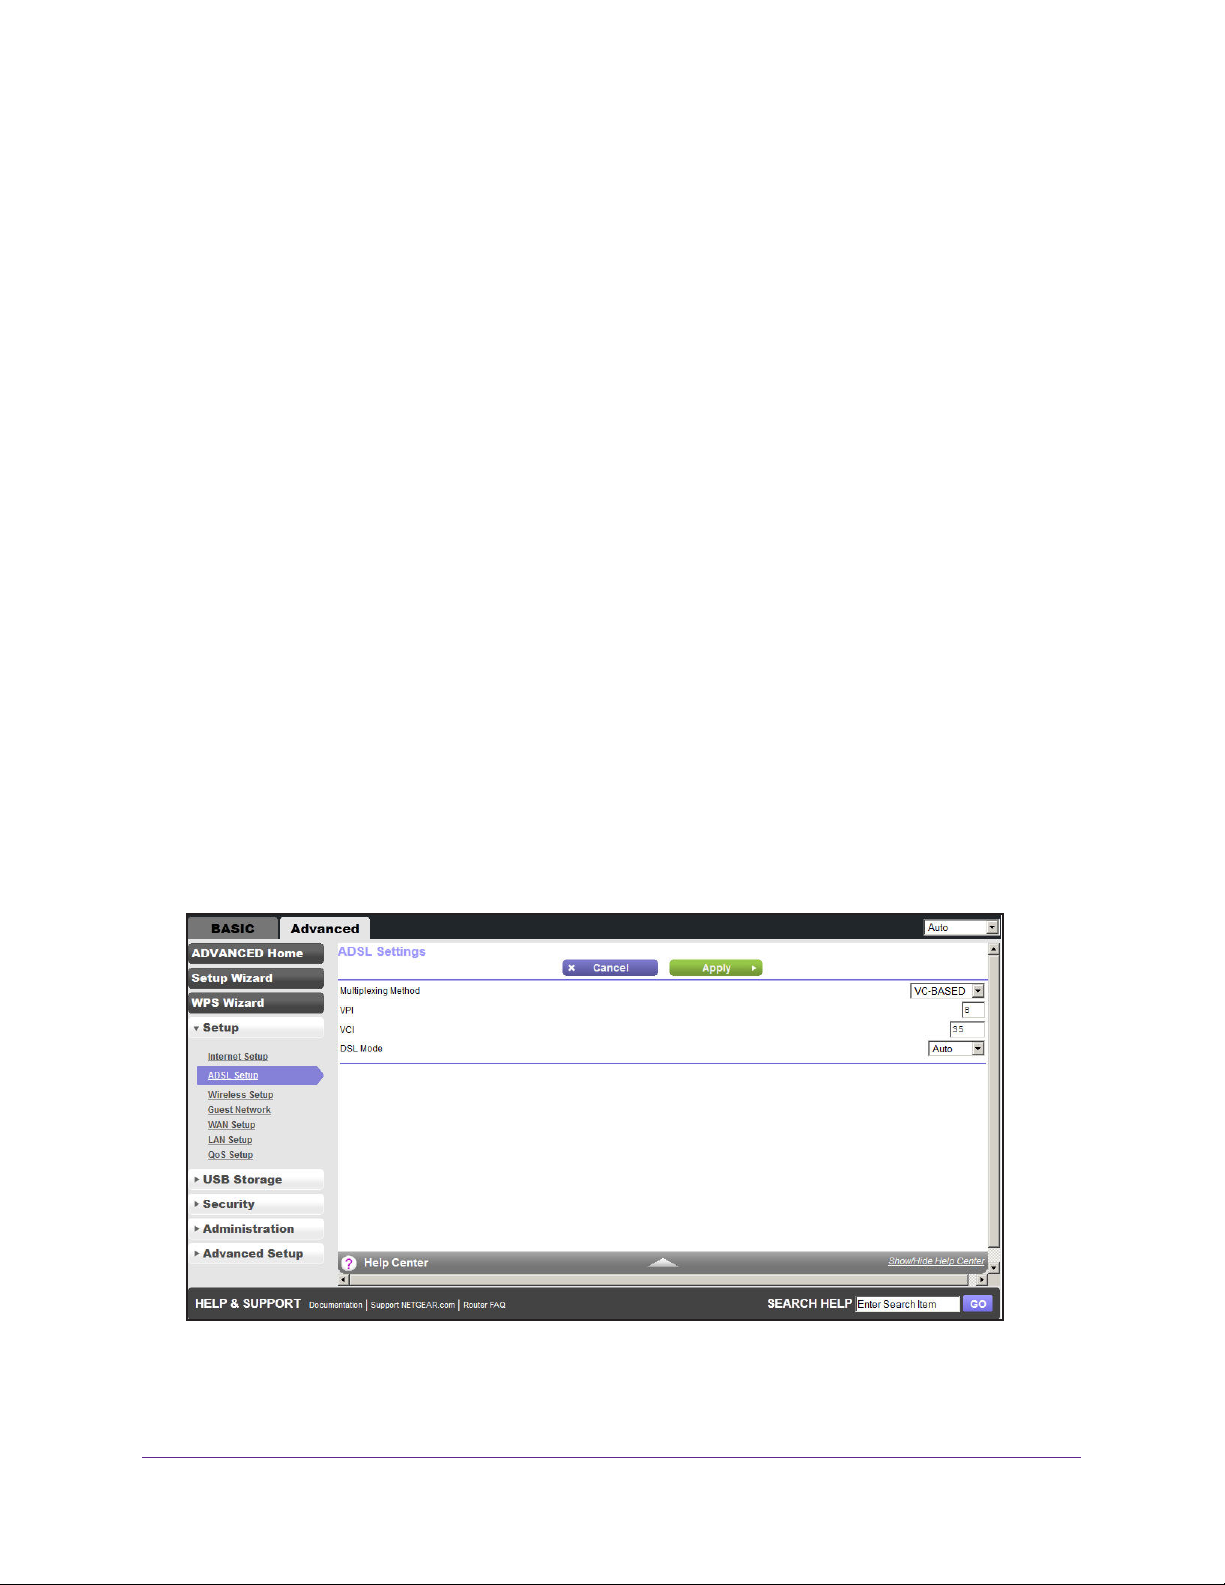
Select ADVANCED > Setup to display the Setup menu. The following selections are
available:
• Internet Setup. This is a shortcut to the same Internet Basic Settings screen that you can
access from the dashboard on the Basic Home screen. See Internet Basic Settings on
page 30.
• ADSL Setup. Internet (ADSL) setup. See ADSL Setup on page 48.
• W
ireless Setup. This is a shortcut to the same Wireless Settings screen that you can
access from the dashboard on the Basic Home screen. See Basic Wireless Settings on
page 35.
• Guest Network.
screen that you can access from the dashboard on the Basic Home screen. See Guest
Networks on page 39.
• W
AN Setup. Internet (WAN) setup. See WAN Setup on page 49.
• LAN Setup. Local area network (LAN) setup. See LAN Setup on page 53.
• QoS Setup. Quality of Service (QoS) setup. See Quality of Service (QoS) Setup on
page 56.
This is a shortcut to the same Wireless Settings (for guest networks)
ADSL Setup
The ADSL Settings screen lets you configure the multiplexing method and virtual circuit of
your ADSL connection. The default parameters should be correct to match the system used
by your ISP. Select Advanced > Setup > ADSL Setup to view the following screen:
• Multiplexing Method. Your ISP will indicate whether your multiplexing method is
VC-BASED or LLC-BASED.
Genie Advanced Home
48
Page 49
N600 Wireless Dual Band Gigabit ADSL2+ Modem Router DGND3700v2
• VPI, VCI. Your ISP will indicate which VPI/VCI combination is used for your service.
WAN Setup
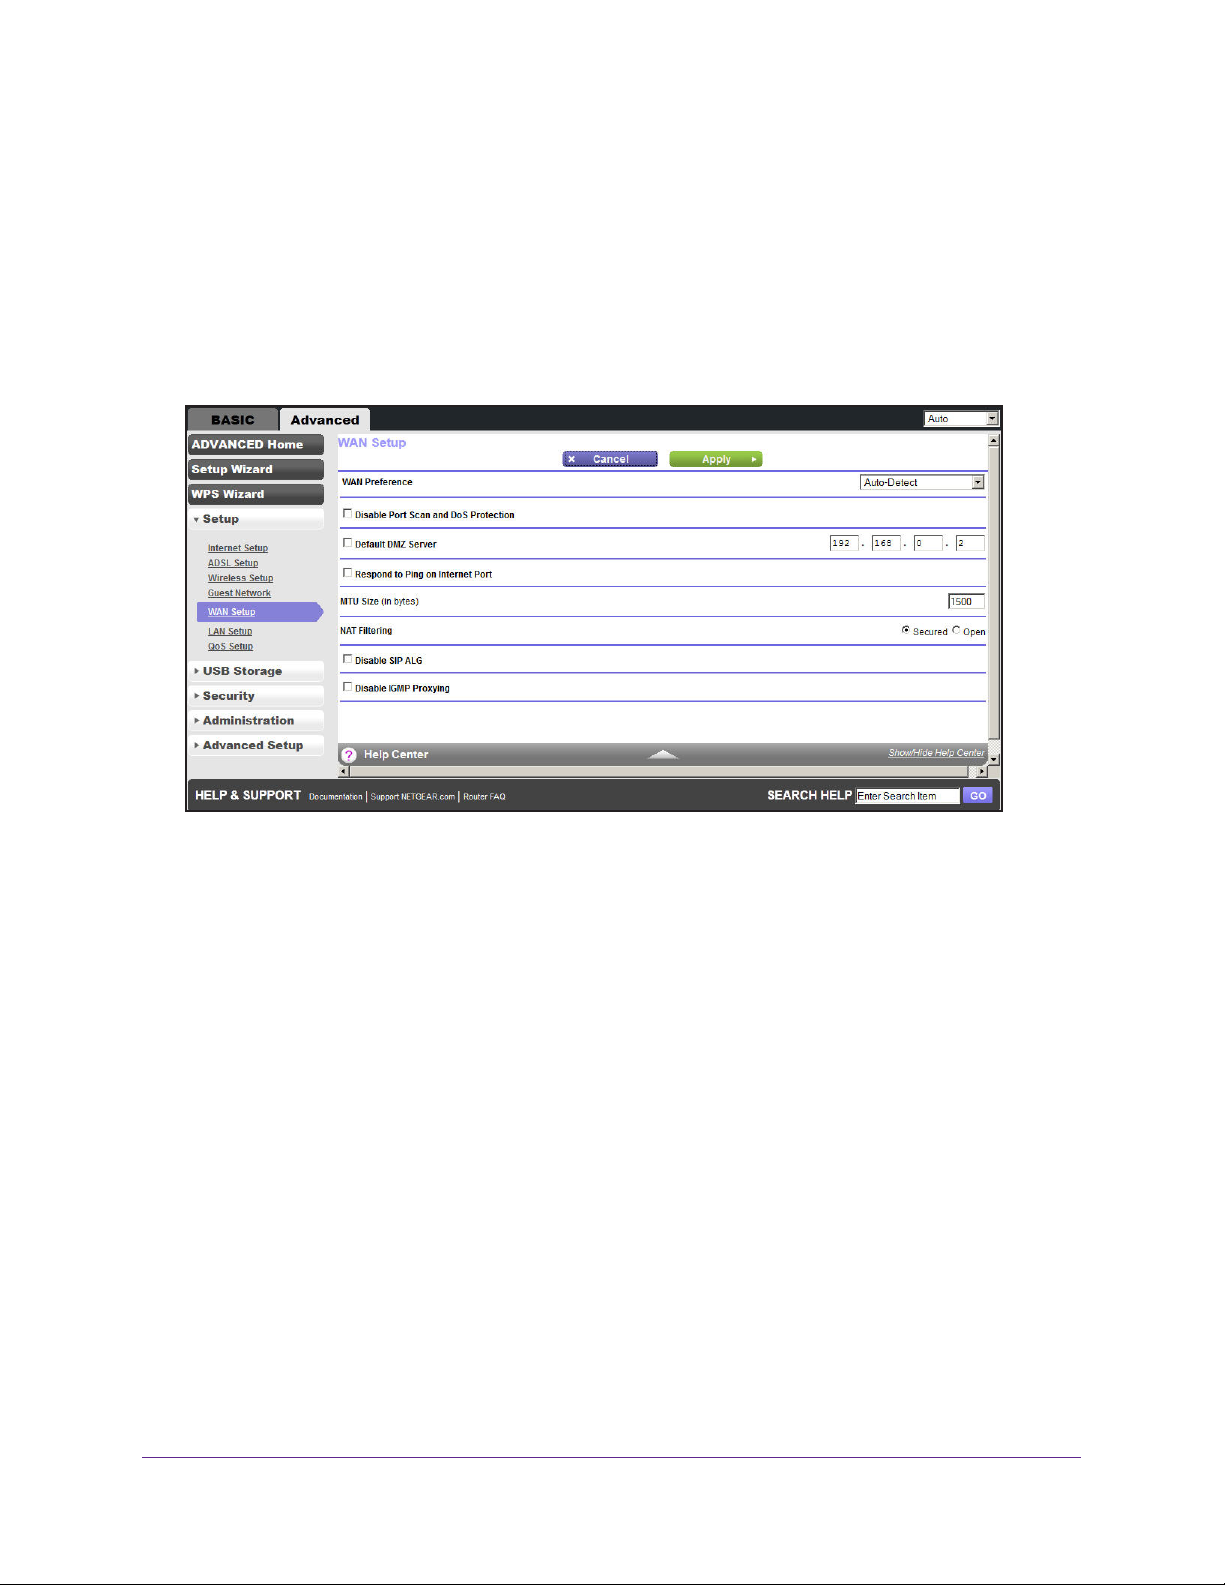
The WAN Setup screen lets you configure a DMZ (demilitarized zone) server, change the
maximum transmit unit (MTU) size, and enable the wireless modem router to respond to a
ping on the WAN (Internet) port. Select Advanced > Setup > WAN Setup to view the
following screen:
• Disable Port Scan and DoS Protection. DoS protection protects your LAN against
denial of service attacks such as Syn flood, Smurf Attack, Ping of Death, Teardrop
Attack, UDP Flood, ARP Attack, Spoofing ICMP, Null Scan, and many others. This should
be disabled only in special circumstances.
• Default DMZ Server.
games and/or videoconferencing. Be careful when using this feature because it makes
the firewall security less effective. See the following section, Default DMZ Server, for
more details.
• Respond to Ping on Internet Port. If you want the wireless modem router to respond to
a ping from the Internet, select this check box. Use this only as a diagnostic tool because
it allows your wireless modem router to be discovered. Do not select this check box
unless you have a specific reason.
• MTU Size (in bytes).
networks is 1500 bytes, or 1492 bytes for PPPoE connections. For some ISPs you might
need to reduce the MTU. This is rarely required, and should not be done unless you are
sure it is necessary for your ISP connection. See Change the MTU Size on page 51.
• NA
T Filtering. Network Address Translation (NAT) determines how the wireless modem
router processes inbound traffic. Secured NAT provides a secured firewall to protect the
computers on the LAN from attacks from the Internet, but might prevent some Internet
games, point-to-point applications, or multimedia applications from functioning. Open
This feature is sometimes helpful when you are playing online
The normal MTU (maximum transmit unit) value for most Ethernet
Genie Advanced Home
49
Page 50

N600 Wireless Dual Band Gigabit ADSL2+ Modem Router DGND3700v2
NAT provides a much less secured firewall, but allows almost all Internet applications to
function.
- Disable SIP ALG. Some VoIP applications do not work well with the SIP ALG.
Enabling this option to turn off the SIP ALG might help your VoIP devices to
create/accept a call through the router.
- Disable IGMP Proxying. The Internet Group Management Protocol (IGMP) is an
Internet protocol that provides a way for an Internet computer to report its multicast
group membership to adjacent routers. The hosts interact with the system through the
exchange of IGMP messages. When you configure IGMP proxy, the router interacts
with other routers through the exchange of IGMP messages. However, when acting
as the proxy, the router performs the host portion of the IGMP task as follows:
• When queried, the router sends membership reports to the group.
• When one of the hosts joins a multicast address group that none of other hosts
belongs to, the router sends unsolicited membership reports to that group.
• When the last host in a particular multicast group leaves the group, the router
sends a leave group membership report to that router's group.
Default DMZ Server
The default DMZ server feature is helpful when you are using some online games and
videoconferencing applications that are incompatible with Network Address Translation
(NAT). The wireless modem router is programmed to recognize some of these applications
and to work correctly with them, but there are other applications that might not function well.
In some cases, one local computer can run the application correctly if that computer’s IP
address is entered as the default DMZ server.
WARNING:
DMZ servers pose a security risk. A computer designated as the
default DMZ server loses much of the protection of the firewall and
is exposed to exploits from the Internet. If compromised, the DMZ
server computer can be used to attack other computers on your
network.
Incoming traffic from the Internet is usually discarded by the wireless modem router unless
the traffic is a response to one of your local computers or a service that you have configured
in the Port Forwarding/Port Triggering screen. Instead of discarding this traffic, you can have
it forwarded to one computer on your network. This computer is called the default DMZ
server.
To set up a default DMZ server:
1. On the WAN Setup screen, select the Default DMZ Server check box.
2. Type the IP address.
3. Click Apply.
Genie Advanced Home
50
Page 51
N600 Wireless Dual Band Gigabit ADSL2+ Modem Router DGND3700v2
Change the MTU Size
The maximum transmission unit (MTU) is the largest data packet a network device transmits.
When one network device communicates across the Internet with another, the data packets
travel through many devices along the way. If any device in the data path has a lower MTU
setting than the other devices, the data packets have to be split or “fragmented” to
accommodate the device with the smallest MTU.
The best MTU setting for NETGEAR equipment is often just the default value, and changing
the value might fix one problem but cause another. Leave MTU unchanged unless one of
these situations occurs:
• You have problems connecting to your ISP or other Internet service, and the technical
support of either the ISP or NETGEAR recommends changing the MTU setting. These
web-based applications might require an MTU change:
- A secure website that will not open, or displays only part of a web page
- Yahoo email
- MSN portal
- America Online’s DSL service
• You use VPN and have severe performance problems.
• You used a program to optimize MTU for performance reasons, and now you have
connectivity or performance problems.
Note: An incorrect MTU setting can cause Internet communication
problems such as the inability to access certain websites, frames
within websites, secure login pages, or FTP or POP servers.
If you suspect an MTU problem, a common solution is to change the MTU to 1400. If you are
willing to experiment, you can gradually reduce the MTU from the maximum value of 1500
until the problem goes away. The following table describes common MTU sizes and
applications.
Table 11. Common MTU sizes
MTU Application
1500 The largest Ethernet packet size and the default value. This is the typical setting for
1492 Used in PPPoE environments.
1472 Maximum size to use for pinging. (Larger packets are fragmented.)
1468 Used in some DHCP environments.
1460 Usable by AOL if you do not have large email attachments, for example.
non-PPPoE, non-VPN connections, and is the default value for NETGEAR wireless
modem routers, adapters, and switches.
Genie Advanced Home
51
Page 52

N600 Wireless Dual Band Gigabit ADSL2+ Modem Router DGND3700v2
Table 11. Common MTU sizes (continued)
MTU Application
1436 Used in PPTP environments or with VPN.
1400 Maximum size for AOL DSL.
576 Typical value to connect to dial-up ISPs.
To change the MTU size:
1. Select Advanced > Setup > WAN Setup.
2. In the MTU Size field, enter a new size between 64 and 1500.
3. Click Apply to save the settings.
Genie Advanced Home
52
Page 53
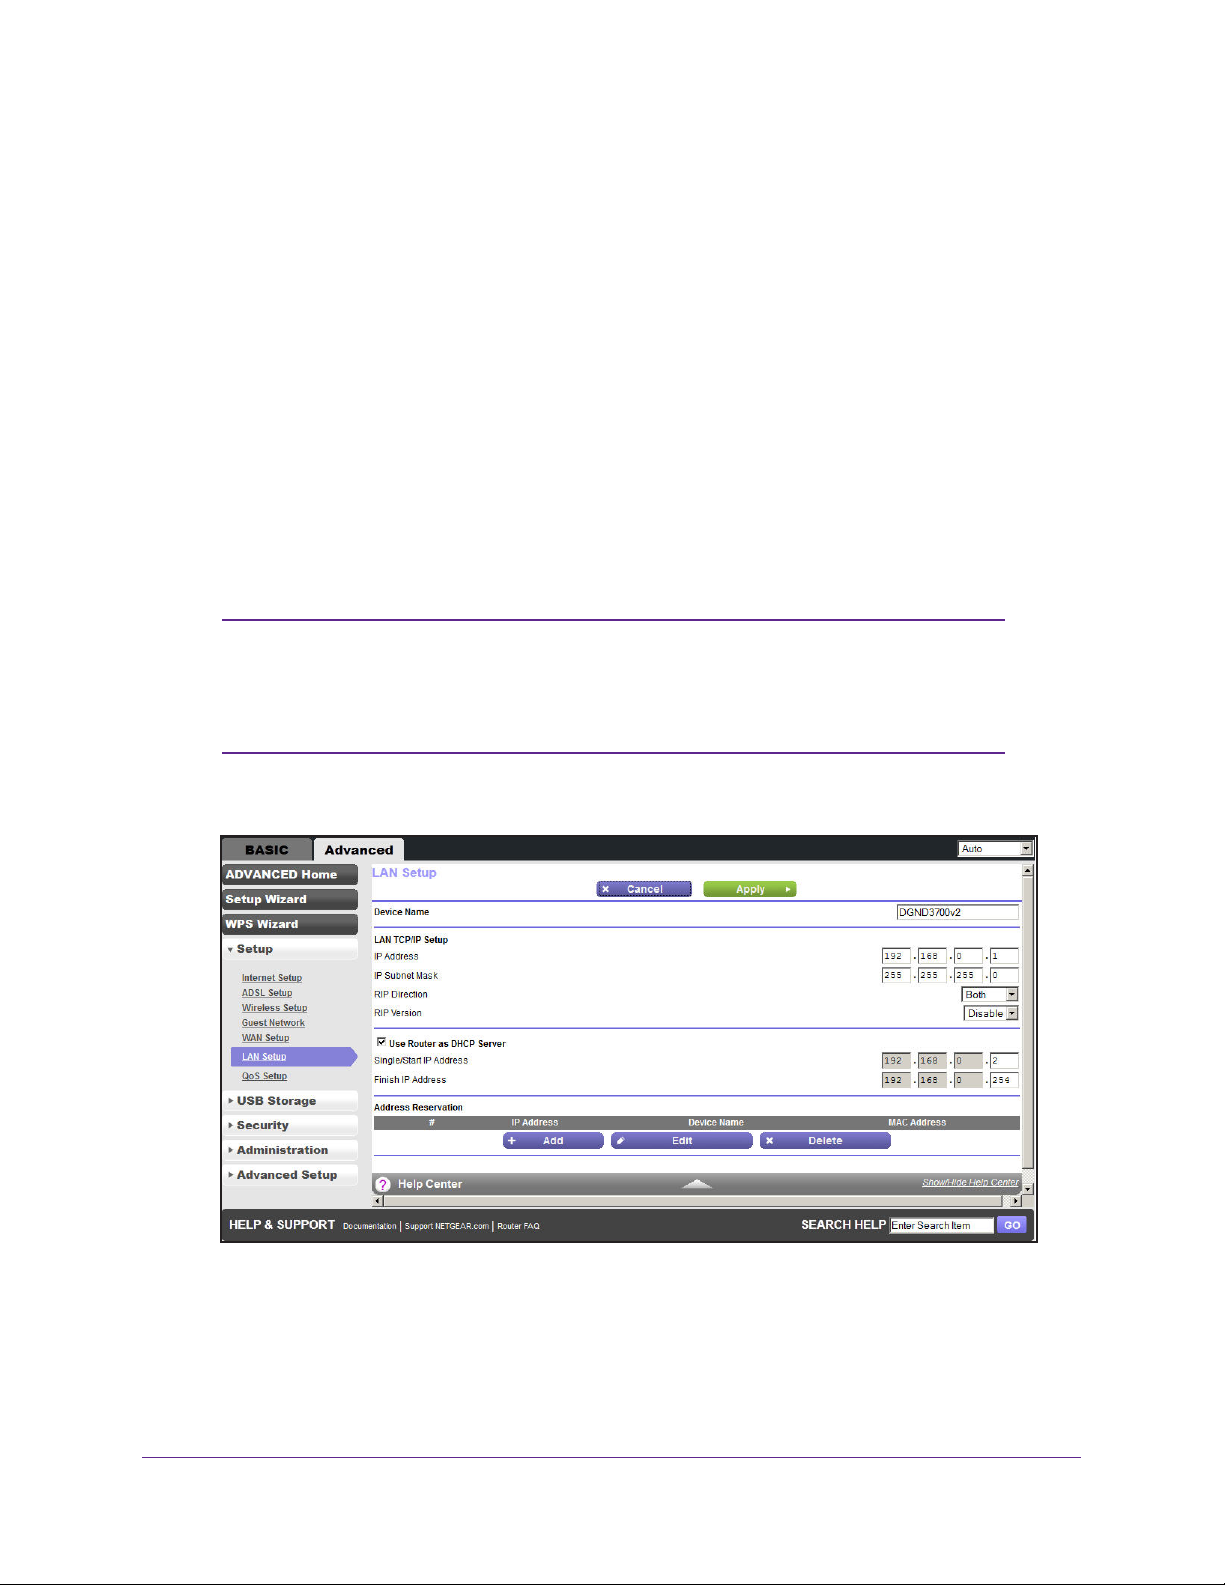
N600 Wireless Dual Band Gigabit ADSL2+ Modem Router DGND3700v2
LAN Setup
The LAN Setup screen allows configuration of LAN IP services such as Dynamic Host
Configuration Protocol (DHCP) and Routing Information Protocol (RIP).
The wireless modem router is shipped preconfigured to use private IP addresses on the LAN
side and to act as a DHCP server
is:
• LAN IP address. 192.168.1.1
• Subnet mask. 255.255.255.0
These addresses are part of the designated private address range for use in private networks
and should be suitable for most applications. If your network has a requirement to use a
dif
ferent IP addressing scheme, you can make those changes in the LAN Setup screen.
To change the LAN settings:
. The wireless modem router’s default LAN IP configuration
Note: If you change the LAN IP address of the wireless modem router
while connected through the browser, you will be disconnected. You
will have to open a new connection to the new IP address and log in
again.
1. Select Advanced > Setup > LAN Setup to display the following screen:
2. Enter the settings that you want to customize. These settings are described in the following
section, LAN Setup Screen Settings.
3. Click Apply to save your changes.
Genie Advanced Home
53
Page 54

N600 Wireless Dual Band Gigabit ADSL2+ Modem Router DGND3700v2
LAN Setup Screen Settings
LAN TCP/IP Setup
• IP Address. The LAN IP address of the wireless modem router.
• IP Subnet Mask. The LAN subnet mask of the wireless modem router. Combined with
the IP address, the IP subnet mask allows a device to know which other addresses are
local to it, and which have to be reached through a gateway or wireless modem router.
• RIP Direction. Router Information Protocol (RIP) allows a router to exchange routing
information with other routers. This setting controls how the router sends and receives
RIP packets. Both is the default setting. With the Both or Out Only setting, the router
broadcasts its routing table periodically. With the Both or In Only setting, the router
incorporates the RIP information that it receives.
• RIP Version. This controls the format and the broadcasting method of the RIP packets
that the wireless modem router sends. It recognizes both formats when receiving. By
default, the RIP function is disabled.
- RIP-1 is universally supported. It is adequate for most networks, unless you have an
unusual network setup.
- RIP-2 carries more information. Both RIP-2B and RIP-2M send the routing data in
RIP-2 format. RIP-2B uses subnet broadcasting. RIP-2M uses multicasting.
Use Router as a DHCP Server
This check box is usually selected so that the wireless modem router functions as a Dynamic
Host Configuration Protocol (DHCP) server.
• Starting IP Address. Specify the start of the range for the pool of IP addresses in the
same subnet as the wireless modem router.
• Ending IP Address. Specify the end of the range for the pool of IP addresses in the
same subnet as the wireless modem router.
Address Reservation
When you specify a reserved IP address for a computer on the LAN, that computer receives
the same IP address each time it accesses the wireless modem router’s DHCP server.
Assign reserved IP addresses to servers that require permanent IP settings.
Use the Wireless Modem Router as a DHCP Server
By default, the wireless modem router functions as a DHCP server, allowing it to assign IP,
DNS server, and default gateway addresses to all computers connected to the wireless
modem router’s LAN. The assigned default gateway address is the LAN address of the
wireless modem router. The wireless modem router assigns IP addresses to the attached
computers from a pool of addresses specified in this screen. Each pool address is tested
before it is assigned to avoid duplicate addresses on the LAN. For most applications, the
default DHCP and TCP/IP settings of the wireless modem router are satisfactory.
Genie Advanced Home
54
Page 55

N600 Wireless Dual Band Gigabit ADSL2+ Modem Router DGND3700v2
You can specify the pool of IP addresses to be assigned by setting the starting IP address
and ending IP address. These addresses should be part of the same IP address subnet as
the wireless modem router’s LAN IP address. Using the default addressing scheme, you
should define a range between 192.168.1.2 and 192.168.1.254, although you might want to
save part of the range for devices with fixed addresses.
The wireless modem router delivers the following parameters to any LAN device that
requests DHCP:
• An IP address from the range that you have defined
• Subnet mask
• Gateway IP address (the wireless modem router’s LAN IP address)
• DNS server IP address (the wireless modem router’s LAN IP address)
To use another device on your network as the DHCP server, or to manually configure the
network settings of all of your computers, clear the Use Router as DHCP Server check box
and click Apply. Otherwise, leave this check box selected. If this service is not enabled and
no other DHCP server is available on your network, you need to set your computers’ IP
addresses manually or they will not be able to access the wireless modem router.
Address Reservation
When you specify a reserved IP address for a computer on the LAN, that computer always
receives the same IP address each time it accesses the wireless modem router’s DHCP
server. Reserved IP addresses should be assigned to computers or servers that require
permanent IP settings.
To reserve an IP address:
1. In the Address Reservation section of the screen, click the Add button.
2. In the IP Address field, type the IP address to assign to the computer or server. (Choose an
IP address from the wireless modem router’s LAN subnet, such as 192.168.1.x.)
3. Type the MAC address of the computer or server.
Tip: If the computer is already on your network, you can copy its MAC
address from the Attached Devices screen and paste it here.
4. Click Apply to enter the reserved address into the table.
The reserved address is not assigned until the next time the computer contacts the
wireless modem router’s DHCP server. Reboot the computer or access its IP
configuration and force a DHCP release and renew.
To edit or delete a reserved address entry, select the radio button next to the reserved
address you want to edit or delete. Then click Edit or Delete.
Genie Advanced Home
55
Page 56
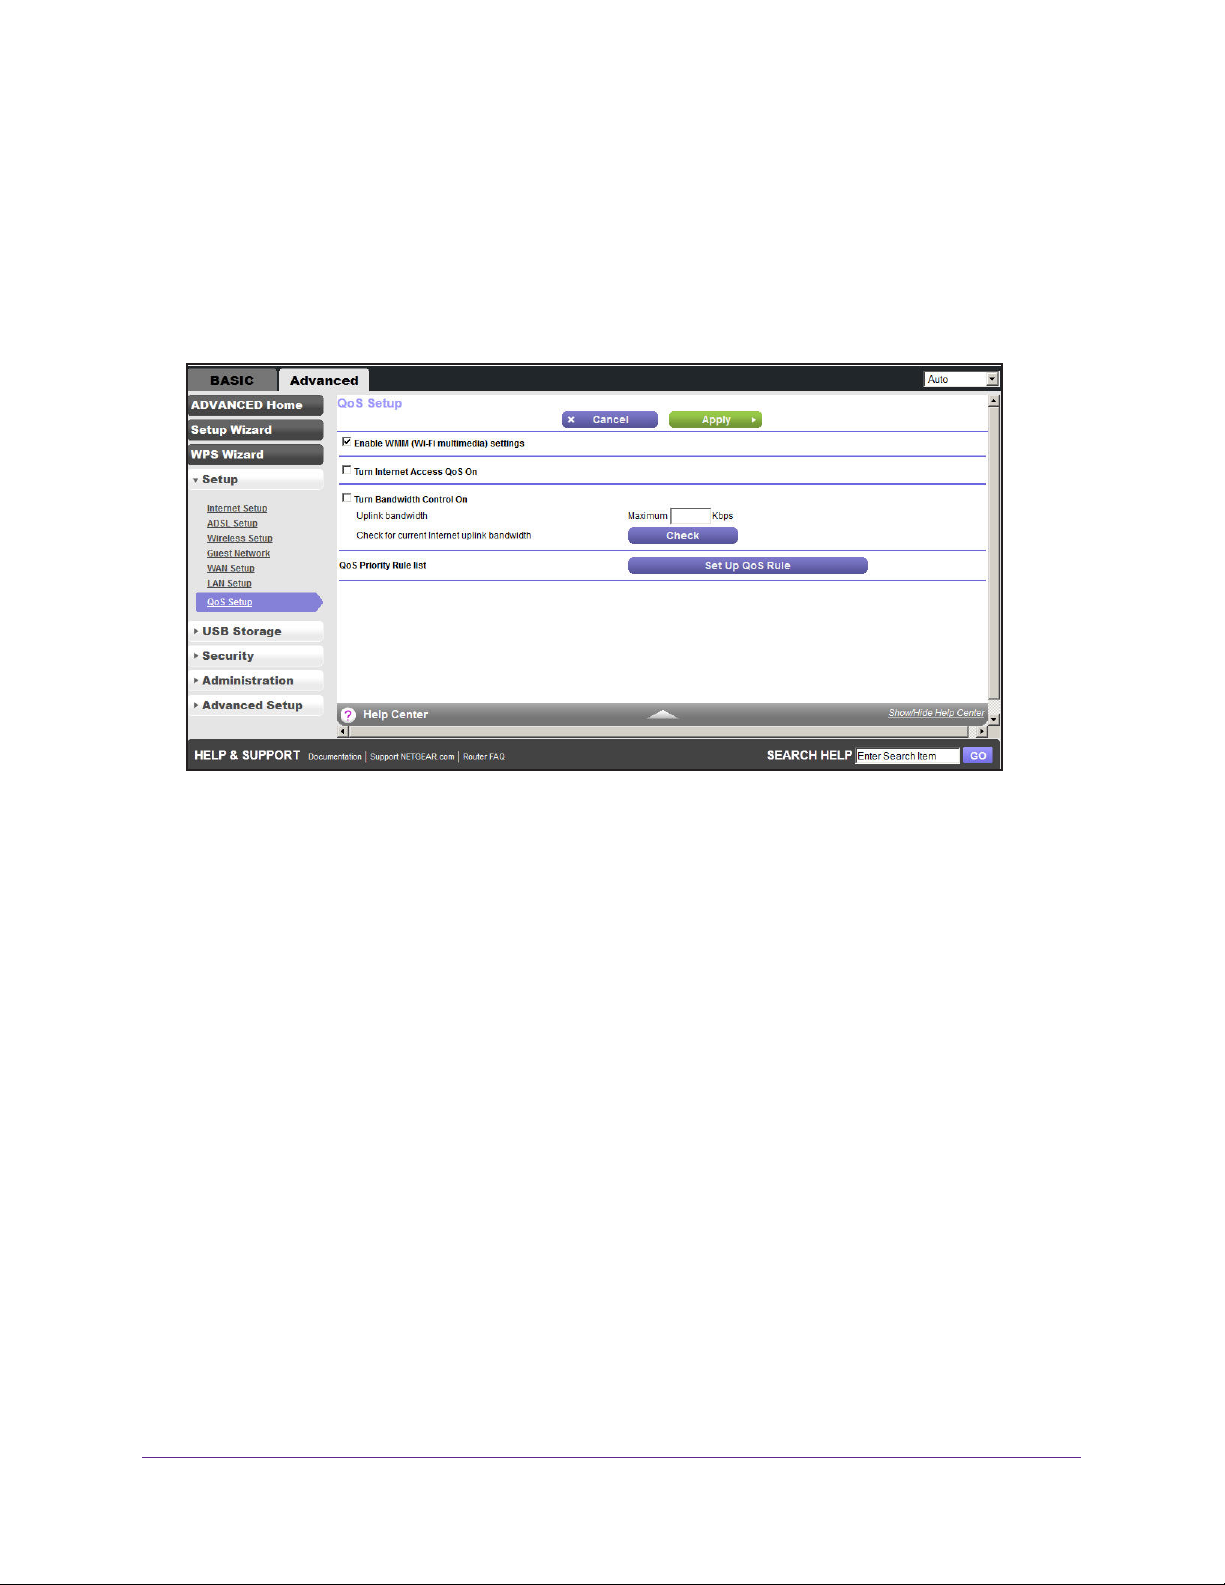
N600 Wireless Dual Band Gigabit ADSL2+ Modem Router DGND3700v2
Quality of Service (QoS) Setup
QoS is an advanced feature that can be used to prioritize some types of traffic ahead of
others. The N600 Modem Router can provide QoS prioritization over the wireless link and on
the Internet connection. To configure QoS, use the QoS Setup screen.
Select Advanced > Setup > QoS Setup to display the following screen:
Enable WMM QoS for Wireless Multimedia Applications
The N600 Modem Router supports Wi-Fi Multimedia Quality of Service (WMM QoS) to
prioritize wireless voice and video traffic over the wireless link. WMM QoS provides
prioritization of wireless data packets from different applications based on four access
categories: voice, video, best effort, and background. For an application to receive the
benefits of WMM QoS, both it and the client running that application have to have WMM
enabled. Legacy applications that do not support WMM and applications that do not require
QoS are assigned to the best effort category, which receives a lower priority than voice and
video.
WMM QoS is enabled by default. You can disable it in the QoS Setup screen by clearing the
Enable WMM check box and clicking Apply.
Set Up QoS for Internet Access
You can give prioritized Internet access to the following types of traffic:
• Specific applications
• Specific online games
• Individual Ethernet LAN ports of the wireless modem router
• A specific device by MAC address
Genie Advanced Home
56
Page 57
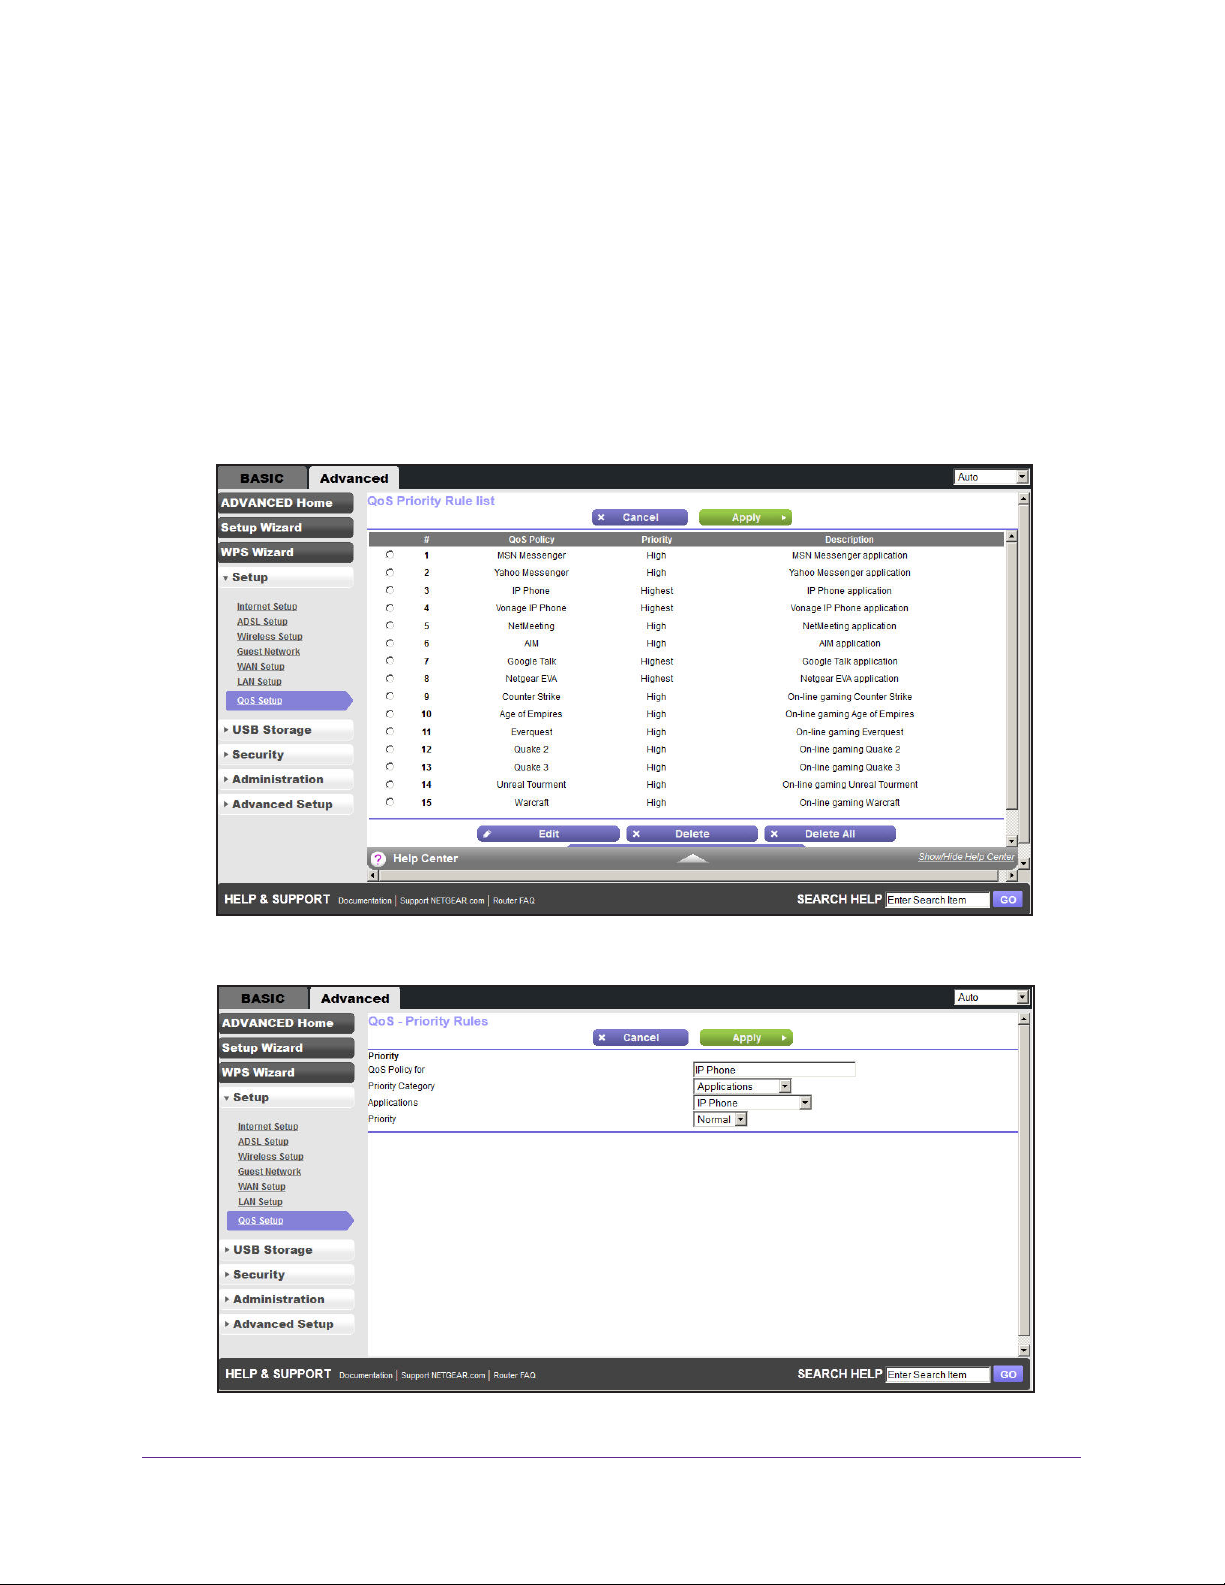
N600 Wireless Dual Band Gigabit ADSL2+ Modem Router DGND3700v2
To specify prioritization of traffic, you have to create a policy for the type of traffic and add the
policy to the QoS Policy table in the QoS Setup screen. For convenience, the QoS Policy
table lists many common applications and online games that can benefit from QoS handling.
QoS for Applications and Online Gaming
To create a QoS policy for applications and online games:
1. In the QoS Setup screen, select the T
urn Internet Access QoS On check box.
2. Click the Setup QoS rule button to see the existing priority rules. On this screen you can
edit or delete a rule by selecting its radio button and clicking either the Edit or Delete button.
Y
ou can also delete all of the rules by simply clicking the Delete All button.
3. To add a priority rule, scroll down to the bottom of the QoS Setup screen and click Add
Priority Rule to display the following screen:
Genie Advanced Home
57
Page 58
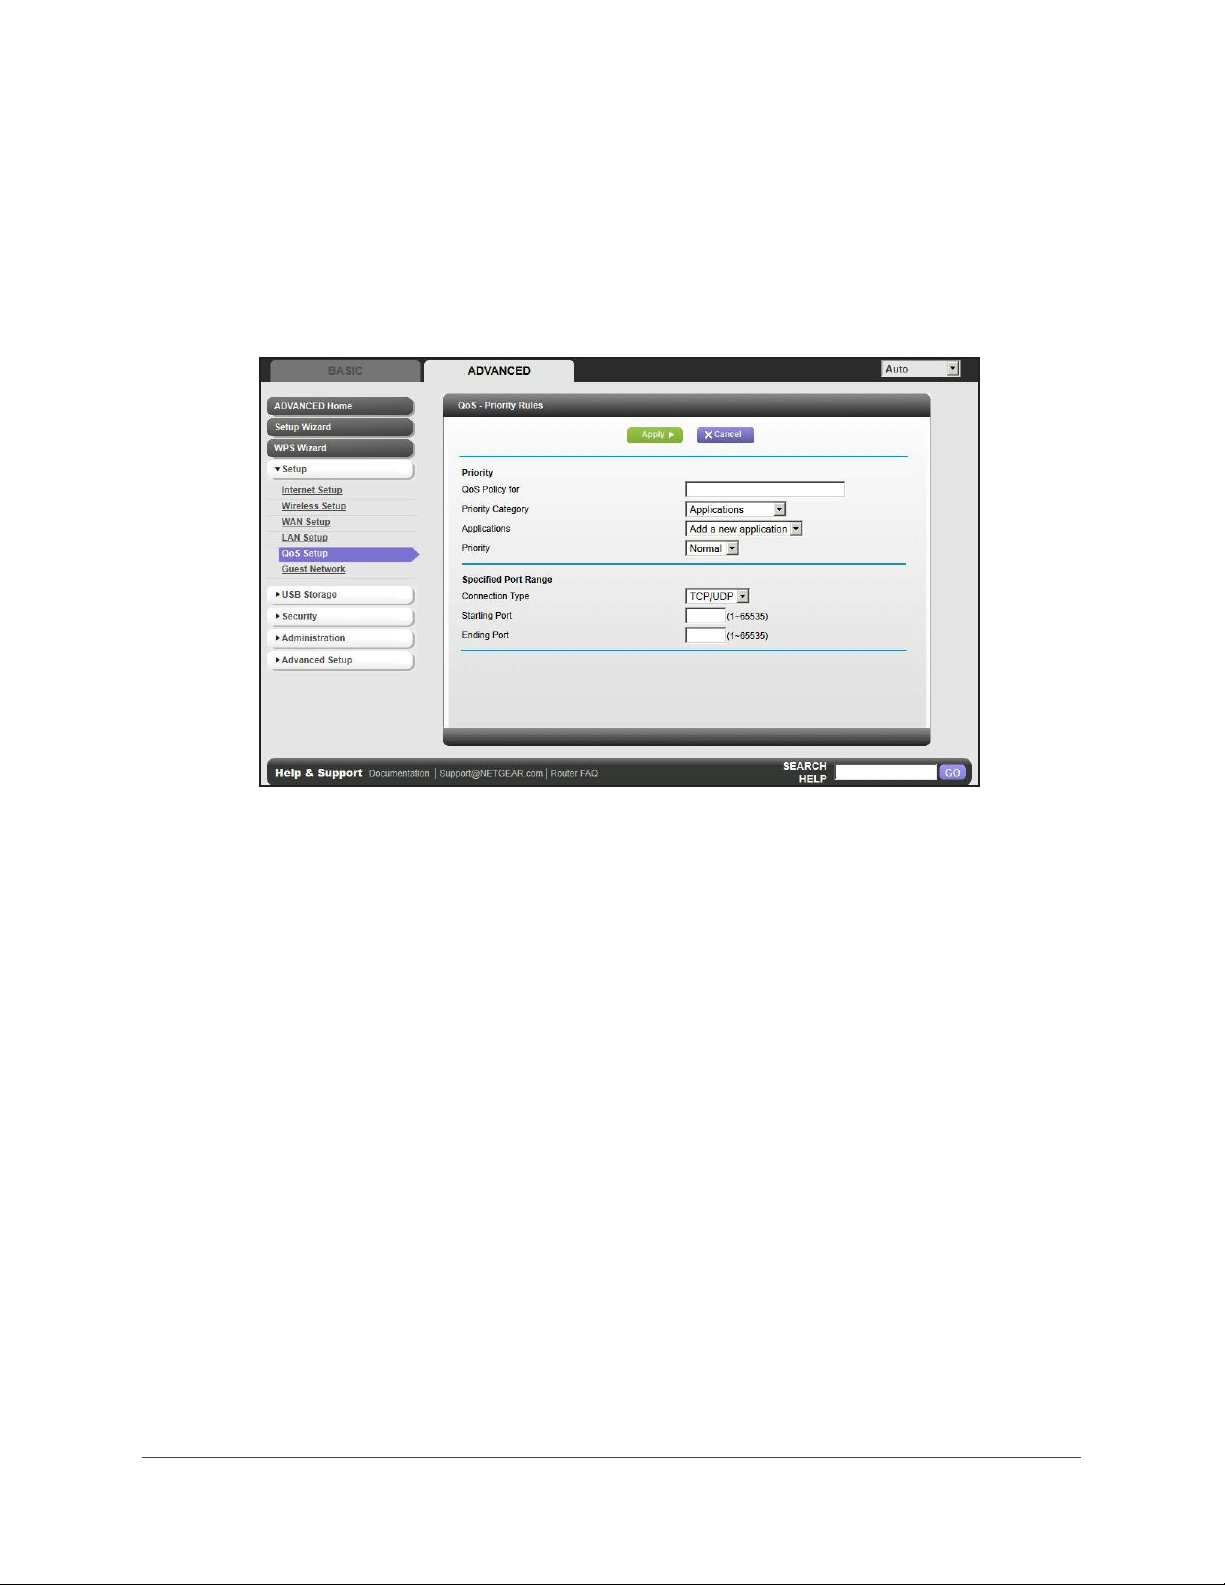
N600 Wireless Dual Band Gigabit ADSL2+ Modem Router DGND3700v2
4. In the QoS Policy for field, type the name of the application or game.
5. In the Priority Category list, select either Applications or Online Gaming. In either case, a
list of applications or games displays in the list.
6. Y
ou can select an existing item from the list, or you can scroll and select Add a New
Application or Add a New Game, as applicable.
a. If you add a new entry
, the QoS - Priority Rules screen expands as shown:
b. In the QoS Policy for field, enter a descriptive name for the new application or game.
c. In the Connection
Type list, select either TCP, UDP, or both (TCP/UDP), and specify
the port number or range of port numbers used by the application or game.
7. From the Priority list, select the priority that this traf
fic should receive relative to other
applications and traffic when accessing the Internet. The options are Low, Normal, High, and
Highest.
8. Click Apply to save this rule to the QoS Policy list and return to the QoS Setup screen.
QoS for a Wireless Modem Router LAN Port
To create a QoS policy for a device connected to one of the wireless modem router’s
LAN ports:
1. Select Advanced > Setup > QoS Setup to display the QoS Setup screen. Select the
Turn Internet Access QoS On check box.
2. Click the Setup QoS Rule button.
3. Click the Add Priority Rule button.
Genie Advanced Home
58
Page 59
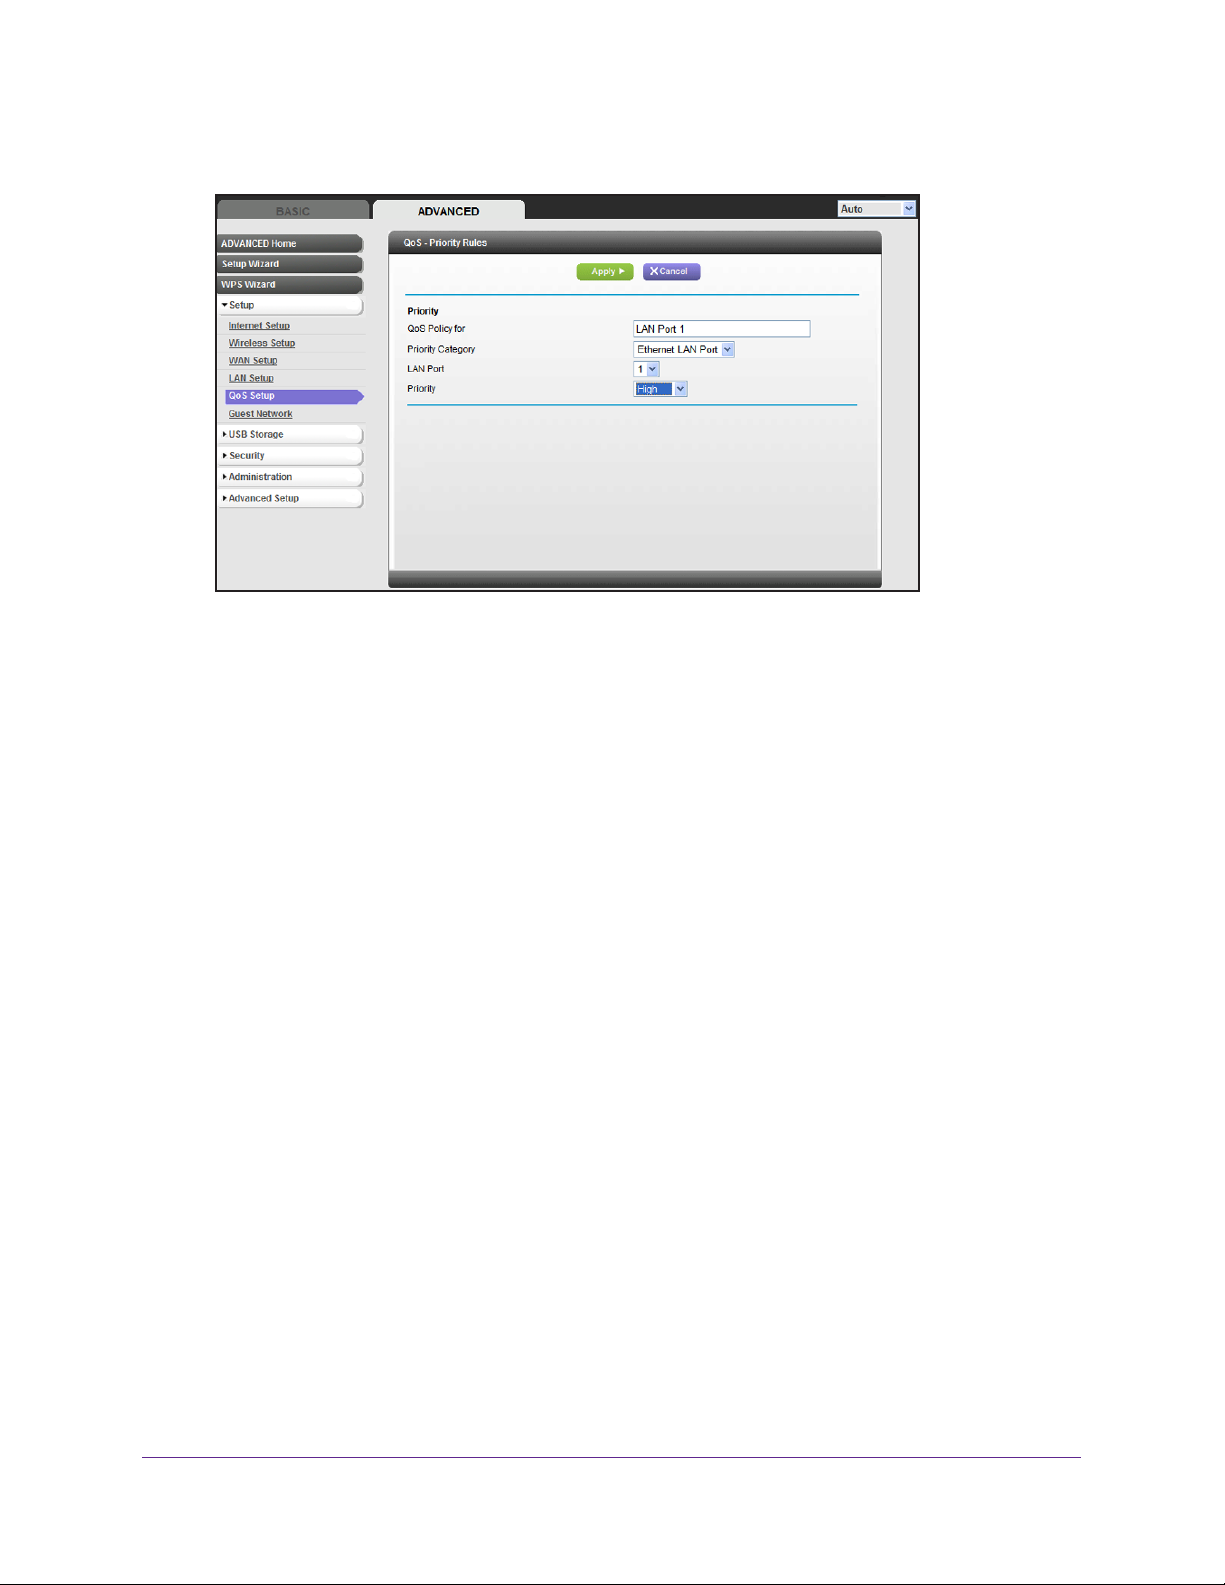
N600 Wireless Dual Band Gigabit ADSL2+ Modem Router DGND3700v2
4. From the Priority Category list, select Ethernet LAN Port, as shown in the following figure:
5. From the LAN port list, select the LAN port that will have a QoS policy.
6. From the Priority list, select the priority that this port’
s traffic should receive relative to other
applications and traffic when accessing the Internet. The options are Low, Normal, High, and
Highest.
7. Click Apply to save this rule to the QoS Policy list and return to the QoS Setup screen.
8. In the QoS Setup screen, click Apply.
QoS for a MAC Address
To create a QoS policy for traffic from a specific MAC address:
1. Select Advanced > Setup > QoS Setup, and click the Setup QoS Rule button.
QoS Setup screen displays.
2. Click Add Priority Rule.
The
Genie Advanced Home
59
Page 60
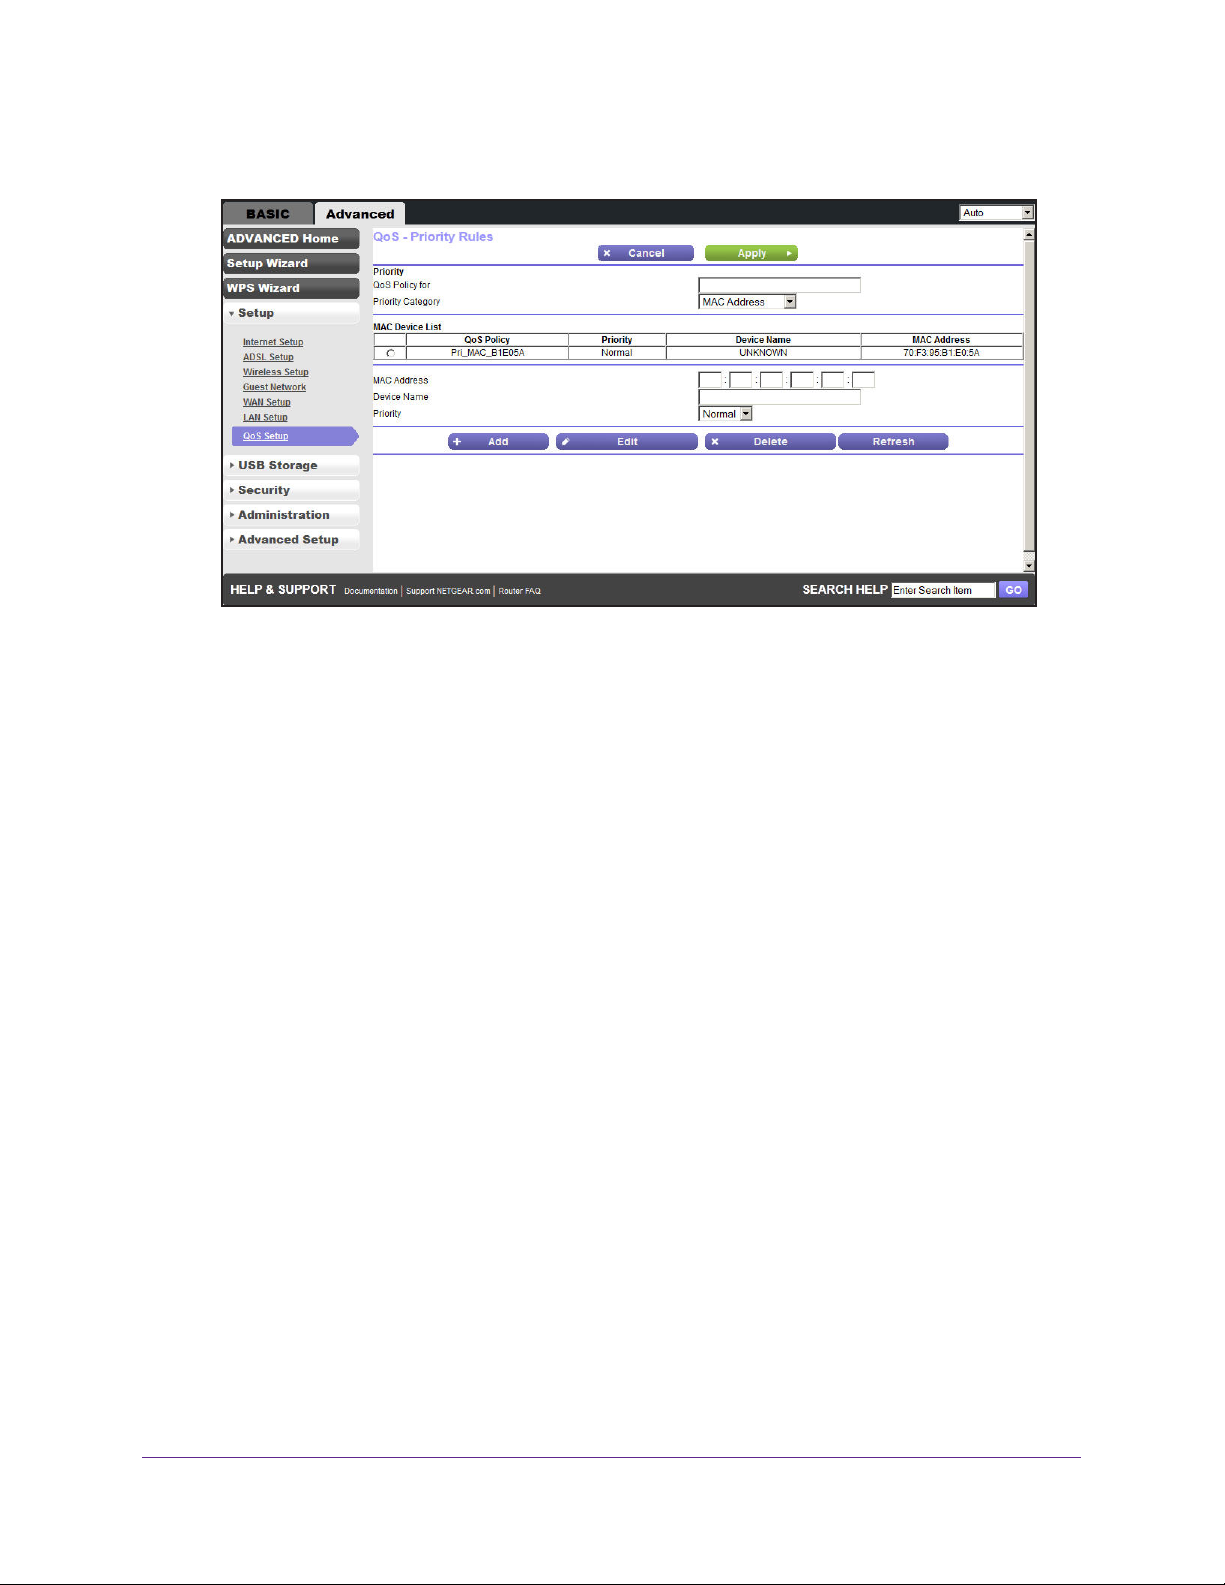
N600 Wireless Dual Band Gigabit ADSL2+ Modem Router DGND3700v2
3. From the Priority Category list, select MAC Address to display the following screen:
4. If the device to be prioritized appears in the MAC Device List, select its radio button. The
information from the MAC Device List populates the policy name, MAC Address, and Device
Name fields. If the device does not appear in the MAC Device List, click Refresh. If it still
does not appear, you have to complete these fields manually.
5. From the Priority list, select the priority that this device’
s traffic should receive relative to
other applications and traffic when accessing the Internet. The options are Low, Normal,
High, and Highest. Click Add to add this rule to MAC Device List.
6. Click Apply to save this rule to the QoS Policy list and return to the QoS Setup screen.
7. In the QoS Setup screen, select the T
urn Internet Access QoS On check box.
8. Click Apply.
Edit or Delete an Existing QoS Policy
To edit or delete a QoS policy:
1. Select Advanced > QoS Setup to display the QoS Setup screen.
2. Select the radio button next to the QoS policy to be edited or deleted, and do one of the
following:
• Click Delete to remove the QoS policy
• Click Edit to edit the QoS policy
. Follow the instructions in the preceding sections to
change the policy settings.
3. Click Apply in the QoS Setup screen to save your changes.
Genie Advanced Home
.
60
Page 61

5. USB Storage
Access and configure a USB storage drive
5
This chapter describes how to access and configure a USB storage drive attached to your
wireless modem router. Be aware that the USB port on the wireless modem router can be used
to connect only to USB storage devices like flash drives or hard drives. Do not connect
computers, USB modems, printers, CD drives, or DVD drives to the wireless modem router USB
port.
This chapter contains the following sections:
• USB Drive Requirements
• ReadySHARE Access
• File-Sharing Scenarios
• USB Storage Basic Settings
• USB Storage Advanced Settings
• Safely Remove a USB Drive
• Media Server Settings
• Specify Approved USB Devices
• Connect to the USB Drive from a Remote Computer
61
Page 62
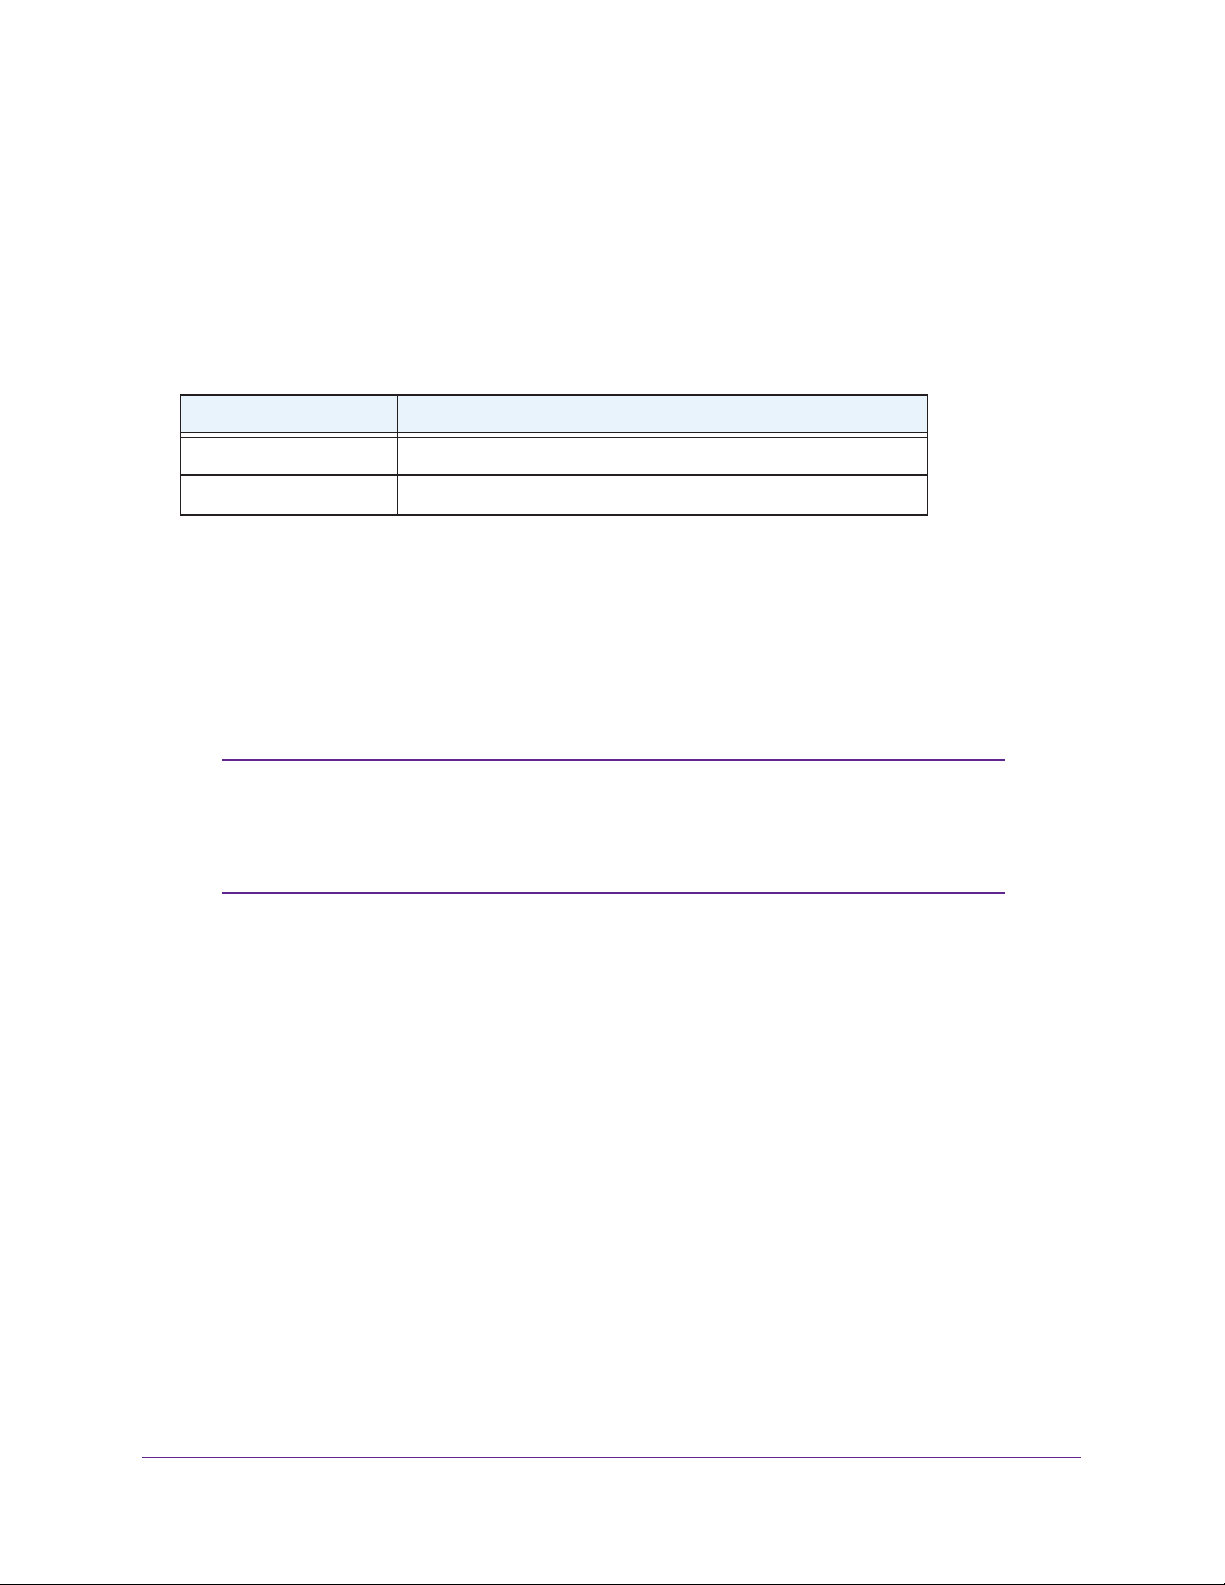
N600 Wireless Dual Band Gigabit ADSL2+ Modem Router DGND3700v2
USB Drive Requirements
The wireless modem router works with 1.0 and 1.1 (USB Full Speed) and 2.0 (USB High
Speed) standards. The approximate USB bus speeds are shown in the following table. Actual
bus speeds can vary, depending on the CPU speed, memory, speed of the network, and
other variables.
Table 12. USB drive speeds
Bus Speed/Sec
USB 1.1 12 Mbits
USB 2.0 480 Mbits
The wireless modem router should work with most USB-compliant external flash and hard
drives. For the most up-to-date list of USB drives supported by the wireless modem router, go
to:
http://kbserver.netgear.com/readyshare
The wireless modem router supports both read and write access for FAT16, FAT32, and
NTFS.
Note: Some USB external hard drives and flash drives require drivers to
be loaded into the computer before the computer can access the
USB device. Such USB devices will not work with the wireless
modem router.
ReadySHARE Access
Once you have set up your wireless modem router, you can connect any USB storage device
and share the contents with other users on your network.
You can access your USB device in any of the following ways:
• On Windows 7, Windows XP
Run, and enter \\readyshare in the dialog box. Click OK.
• On Windows 7, Windows XP
Explorer or Safari, and enter \\readyshare in the address bar.
• On Mac OS X (version 10.2 or later), enter smb://readyshare in the address bar
• In My Network Places, enter \\readyshare in the address bar
, Windows Vista, and Windows 2000 systems, select Start >
, Windows Vista, and Windows 2000 systems, open Internet
.
.
USB Storage
62
Page 63

N600 Wireless Dual Band Gigabit ADSL2+ Modem Router DGND3700v2
File-Sharing Scenarios
You can share files on the USB drive for a wide variety of business and recreational
purposes. The files can be any Windows, Mac, or Linux file type including text files, Word,
PowerPoint, Excel, MP3, pictures, and multimedia. USB drive applications include:
• Sharing multimedia such as MP3 files, pictures, and other multimedia with local and
remote users.
• Sharing resources on your network. You might want to store files in a central location so
that you do not have to power up a computer to perform local sharing. In addition, you
can share files between Macintosh, Linux, and Windows computers by using the USB
drive as a go-between across the systems.
• Sharing files such as Word documents, PowerPoint presentations, and text files with
remote users.
A few common uses are described in the following sections.
Share Photos
You can create your own central storage location for photos and multimedia. This eliminates
the need to log in to (and pay for) an external photo-sharing site.
To share files with your friends and family:
1. Insert your USB drive into the USB port on the wireless modem router either directly or
with a USB cable.
Computers on your local area network (LAN) can automatically access this USB drive
using a web browser or Microsoft Networking.
2. If you want to specify read-only access or to allow access from the Internet, see USB
Storage Advanced Settings on page 66.
Store Files in a Central Location for Printing
This scenario is for a family that has one high-quality color printer directly attached to a
computer, but not shared on the local area network (LAN). This family does not have a print
server.
• One family member has photos on a Macintosh computer that she wants to print.
• The photo-capable color printer is directly attached to a computer, but not shared on the
network.
• The Mac and PC are not visible to each other on the network.
To print photos from a Mac on the printer attached to a PC:
1. On the Mac, access the USB drive by typing \\readyshare in the address field of a web
browser. Then copy the photos to the USB drive.
2. On the PC, use a web browser or Microsoft Networking to copy the files from the USB drive
to the PC. Then print the files.
USB Storage
63
Page 64
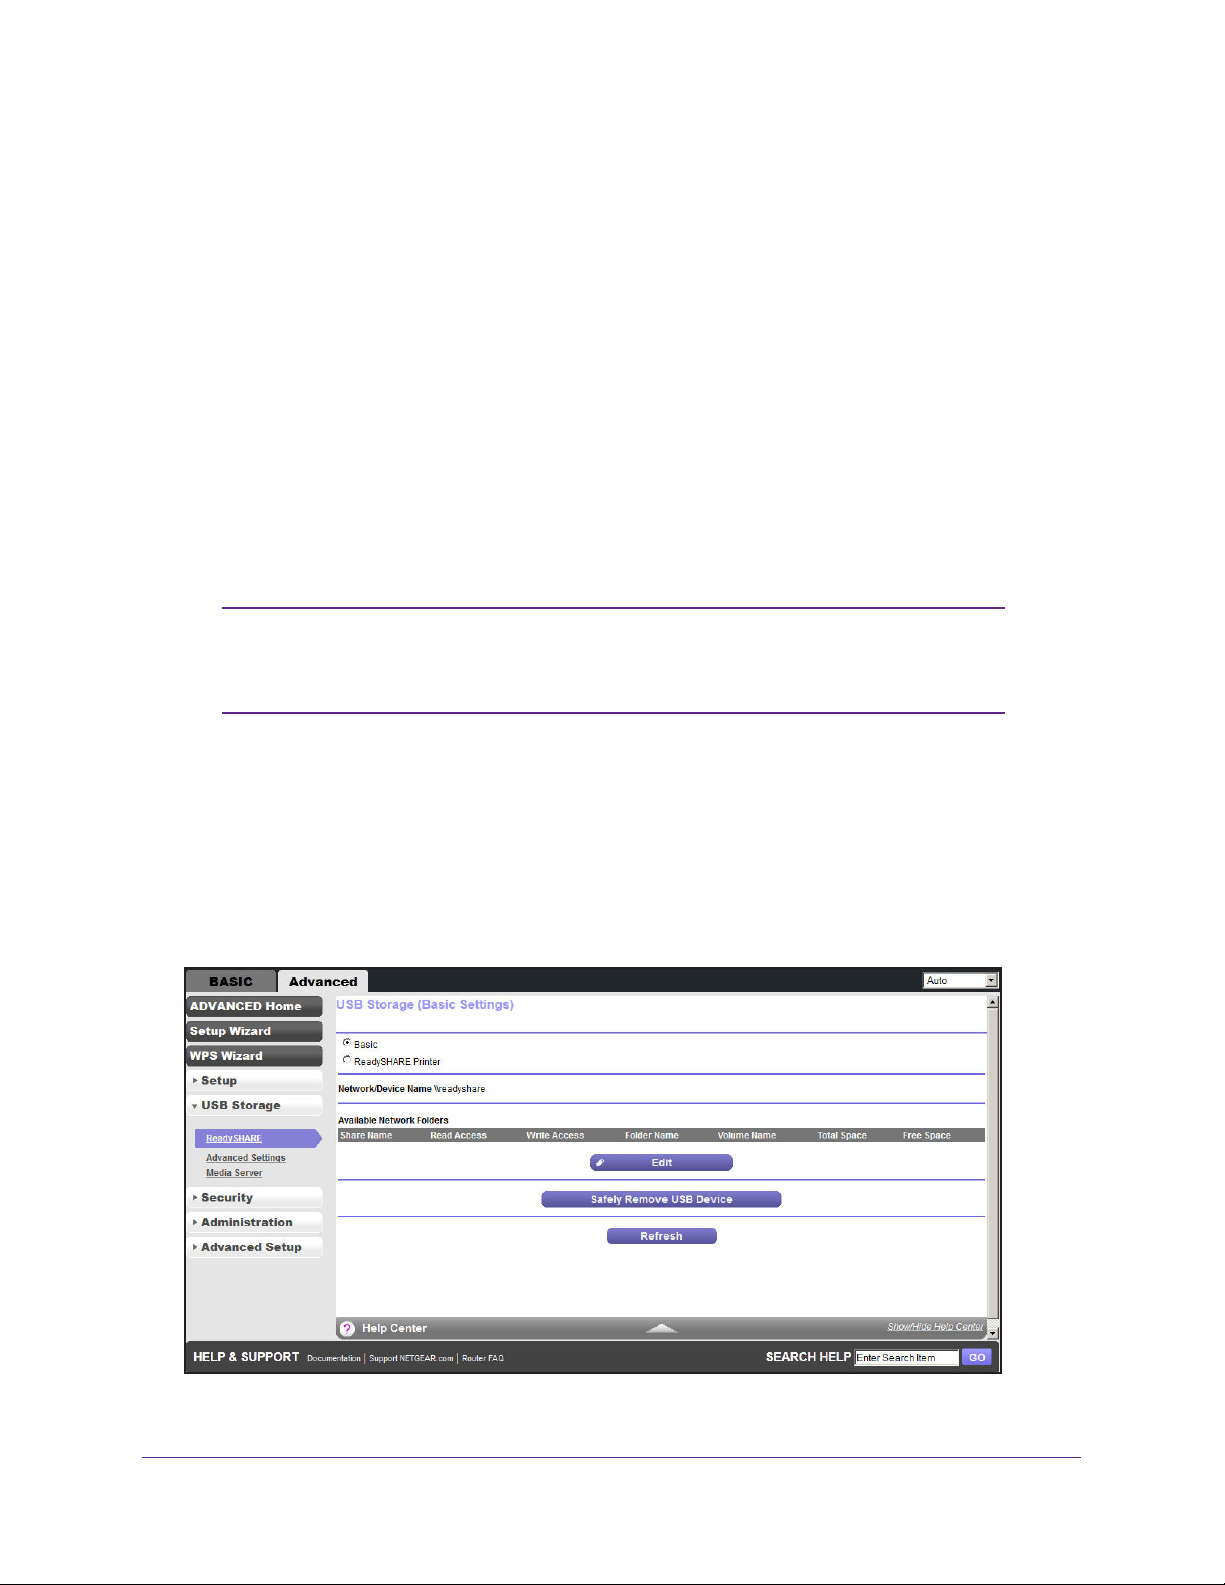
N600 Wireless Dual Band Gigabit ADSL2+ Modem Router DGND3700v2
Share Large Files over the Internet
Sending files that are larger than 5 MB can pose a problem for many email systems. The
wireless modem router allows you to share very large files such as PowerPoint presentations
or .zip files over the Internet. FTP can be used to easily download shared files from the
wireless modem router.
Sharing files with a remote colleague involves the following considerations:
• There are two user accounts: admin and guest.
that you use to access the wireless modem router. By default, it is password. The guest
user account has no password.
• On the FTP site, the person receiving the files should use the guest user account and
enter any password (FTP requires that you type something in the password field).
• Be sure to select the FTP (via Internet) check box in the USB Storage (Advanced
Settings) screen.
Note: You can enable the HTTP (via Internet) option on the USB Storage
(Advanced Settings) screen to share large files. This option supports
downloading files only.
This option supports both downloading and uploading of files.
The password for admin is the same one
USB Storage Basic Settings
You can view or edit basic settings for the USB storage device attached to your wireless
modem router.
You can access this feature through Basic > ReadySHARE, or through Advanced > USB
Storage > ReadySHARE. The USB Storage (Basic Settings) screen displays:
USB Storage
64
Page 65
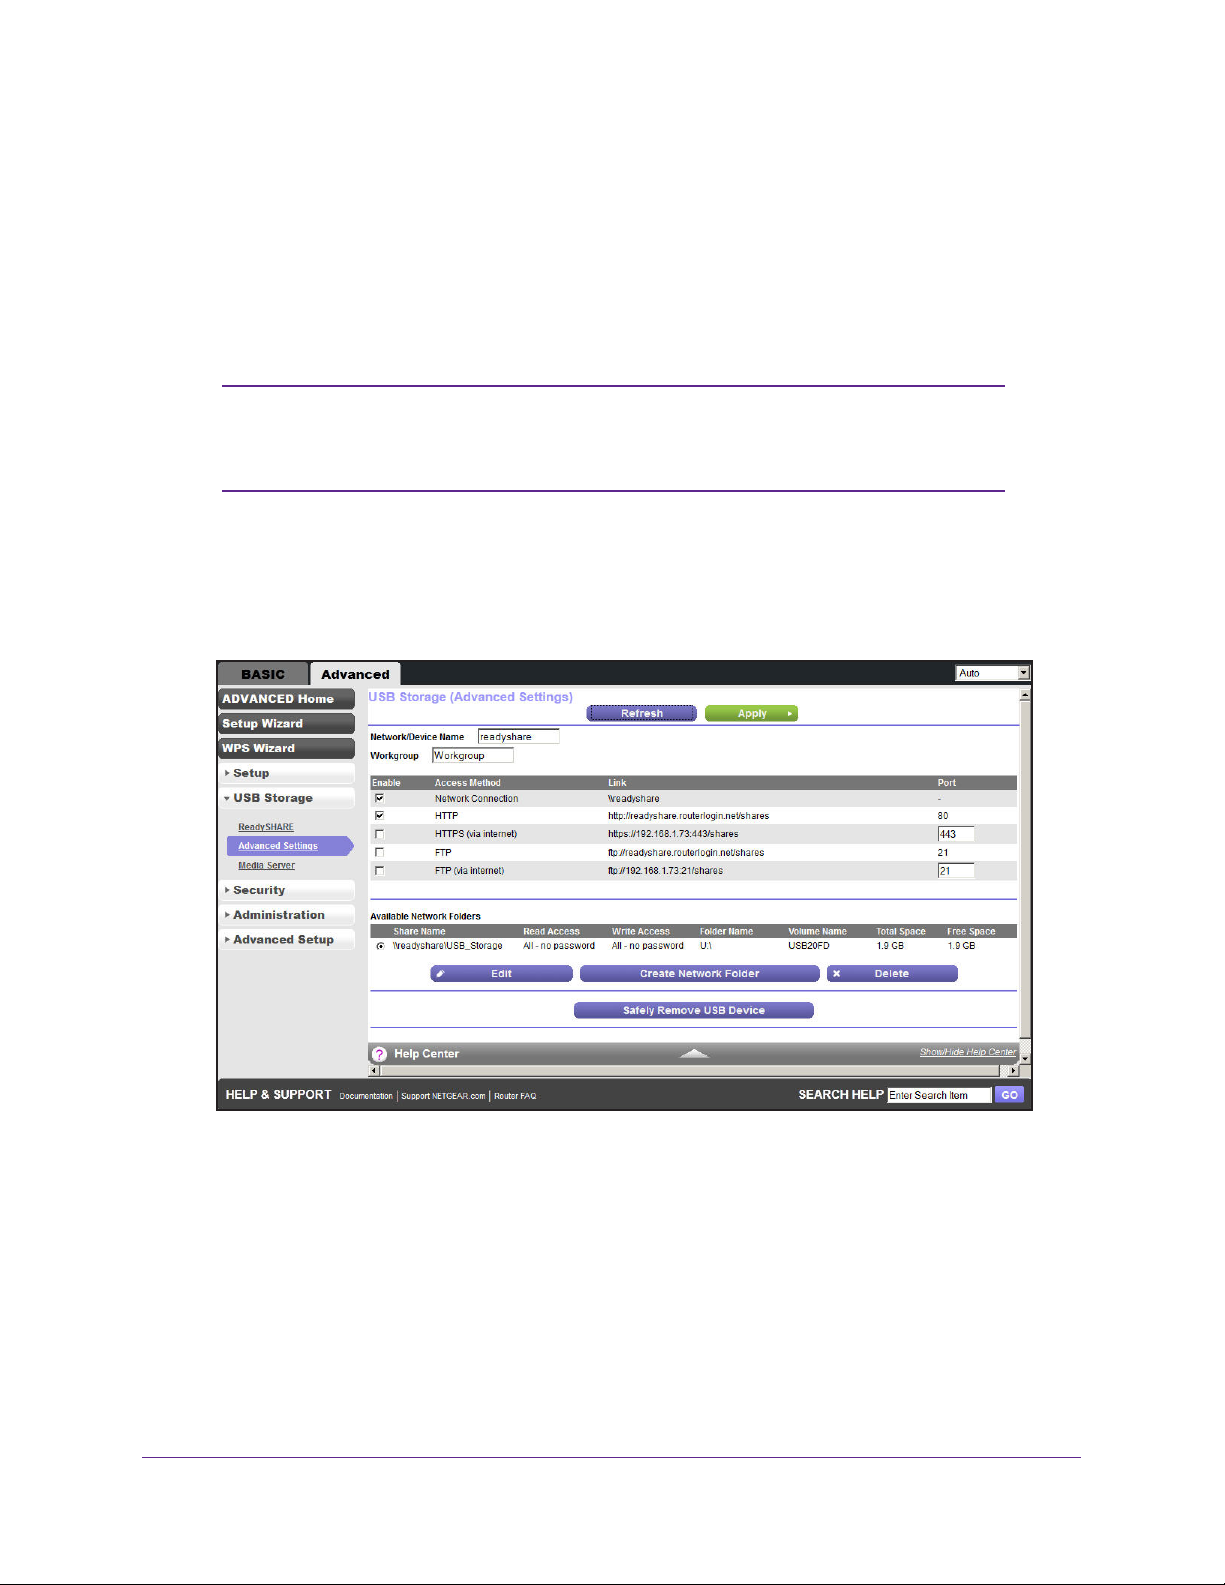
N600 Wireless Dual Band Gigabit ADSL2+ Modem Router DGND3700v2
By default, the USB storage device is available to all computers on your local area network
(LAN).
To access your USB device:
1. Click the network device name or the share name in your computer
’s network folders
list.
2. For SMB://readyshare, click Connect.
Note: If you logged in to the wireless modem router before you connected
your USB device, you might not see your USB device in the wireless
modem router screens until you log out and then log back in again.
Add or Edit a Network Folder
1. You can access this feature by selecting Basic > ReadyShare > Edit, or Advanced >
USB Storage > Advanced Settings.
2. Specify the changes that you want to make:
USB Storage
65
Page 66
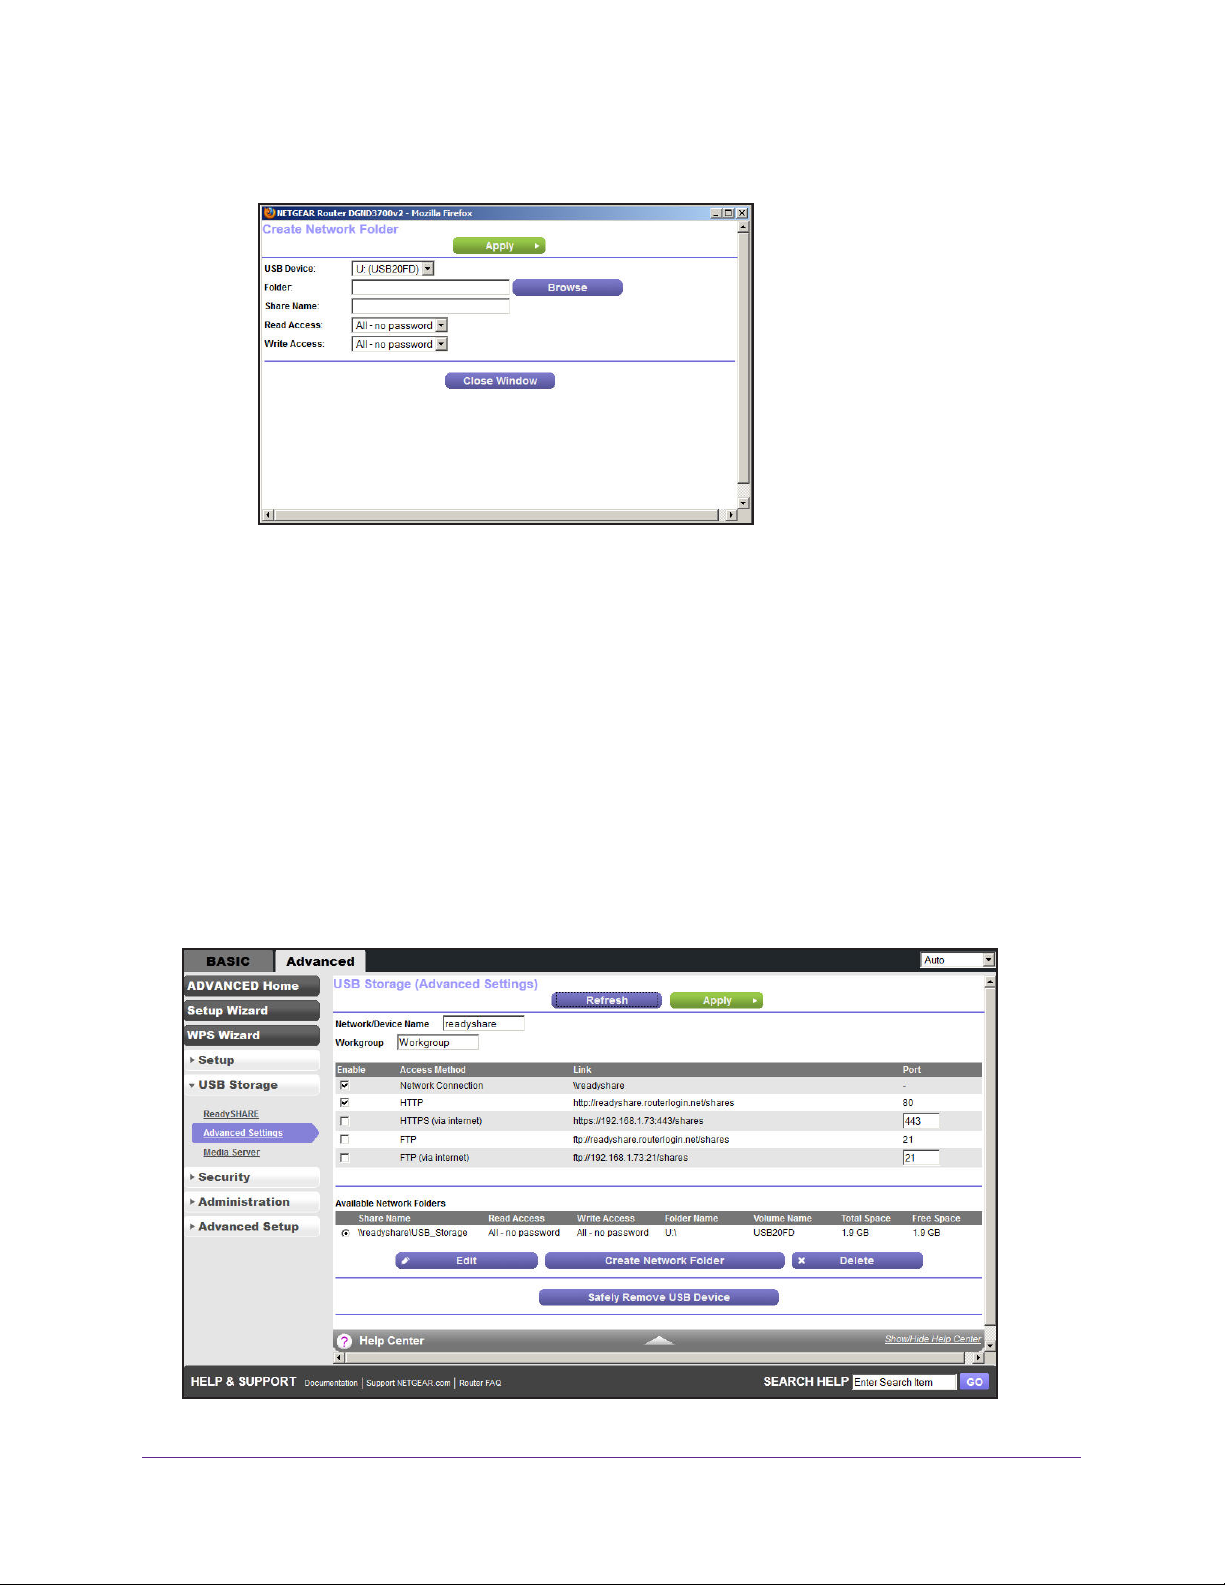
N600 Wireless Dual Band Gigabit ADSL2+ Modem Router DGND3700v2
• To add a folder, click Create Network Folder.
• To edit a folder, select its radio button, and then click Edit.
3. Y
ou can use this screen to select a folder, to change the share name, or to change the read
access or write access from All - no password to admin.
The user name (account name) for All - no password is guest. The password for admin is
the same one that is used to log in to the wireless modem router. By default, it is
password.
4. Click Apply for your changes to take effect.
USB Storage Advanced Settings
You can set up the device name, workgroups, and network folders for your USB device. On
the Advanced tab, select USB Storage > Advanced Settings to display the following
screen:
USB Storage
66
Page 67
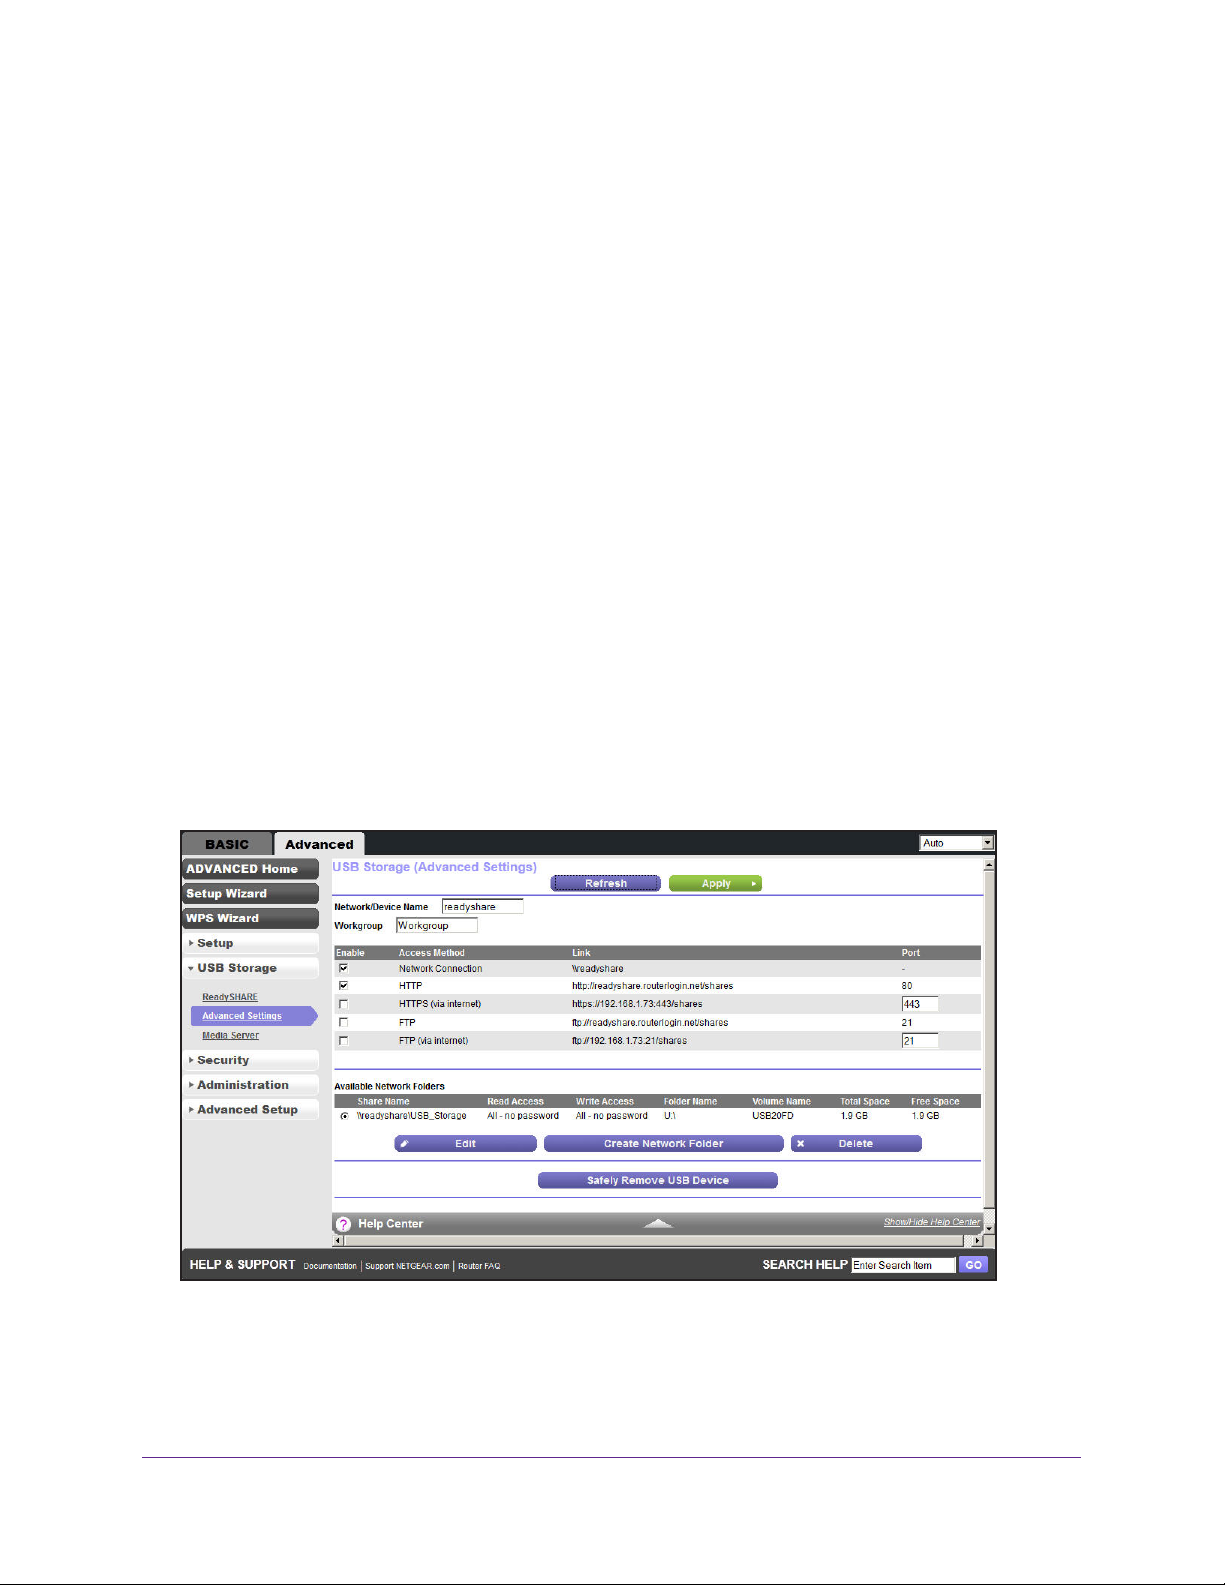
N600 Wireless Dual Band Gigabit ADSL2+ Modem Router DGND3700v2
You can use this screen to specify access to the USB storage device.
• Network Device Name.
The default is readyshare. This is the name used to access the
USB device connected to the wireless modem router.
• W
orkgroup. If you are using a Windows workgroup rather than a domain, the workgroup
name is displayed here. The name works only in an operating system that supports
NetBIOS, such as Microsoft Windows.
• Access Method.
The access methods are described here.
- Network Connection. Enabled by default, this connection allows all users on the
LAN to have access to the USB drive.
- HTTP. Enabled by default.
You can type http://readyshare.routerlogin.net/shares
to access the USB drive.
- HTTP (via internet). Disabled by default. If you enable this setting, remote users can
type http://<public IP address>/shares (for example, http://1.1.10.102/shares) or a
URL domain name to access the USB drive over the Internet.
This setting supports
file uploading only.
- FTP. Disabled by default.
- FTP (via internet). Disabled by default. If you enable this setting, remote users can
access the USB drive through FTP over the Internet.
This setting supports both
downloading and uploading of files.
Available Network Folders
You might need to scroll down to view this section of the screen:
• Share Name. If only 1 device is connected, the default share name is USB_Storage. You
can click the name shown, or you can type it in the address field of your web browser. If
Not Shared is shown, the default share has been deleted, and no other share for the root
folder exists. Click the link to change this setting.
USB Storage
67
Page 68
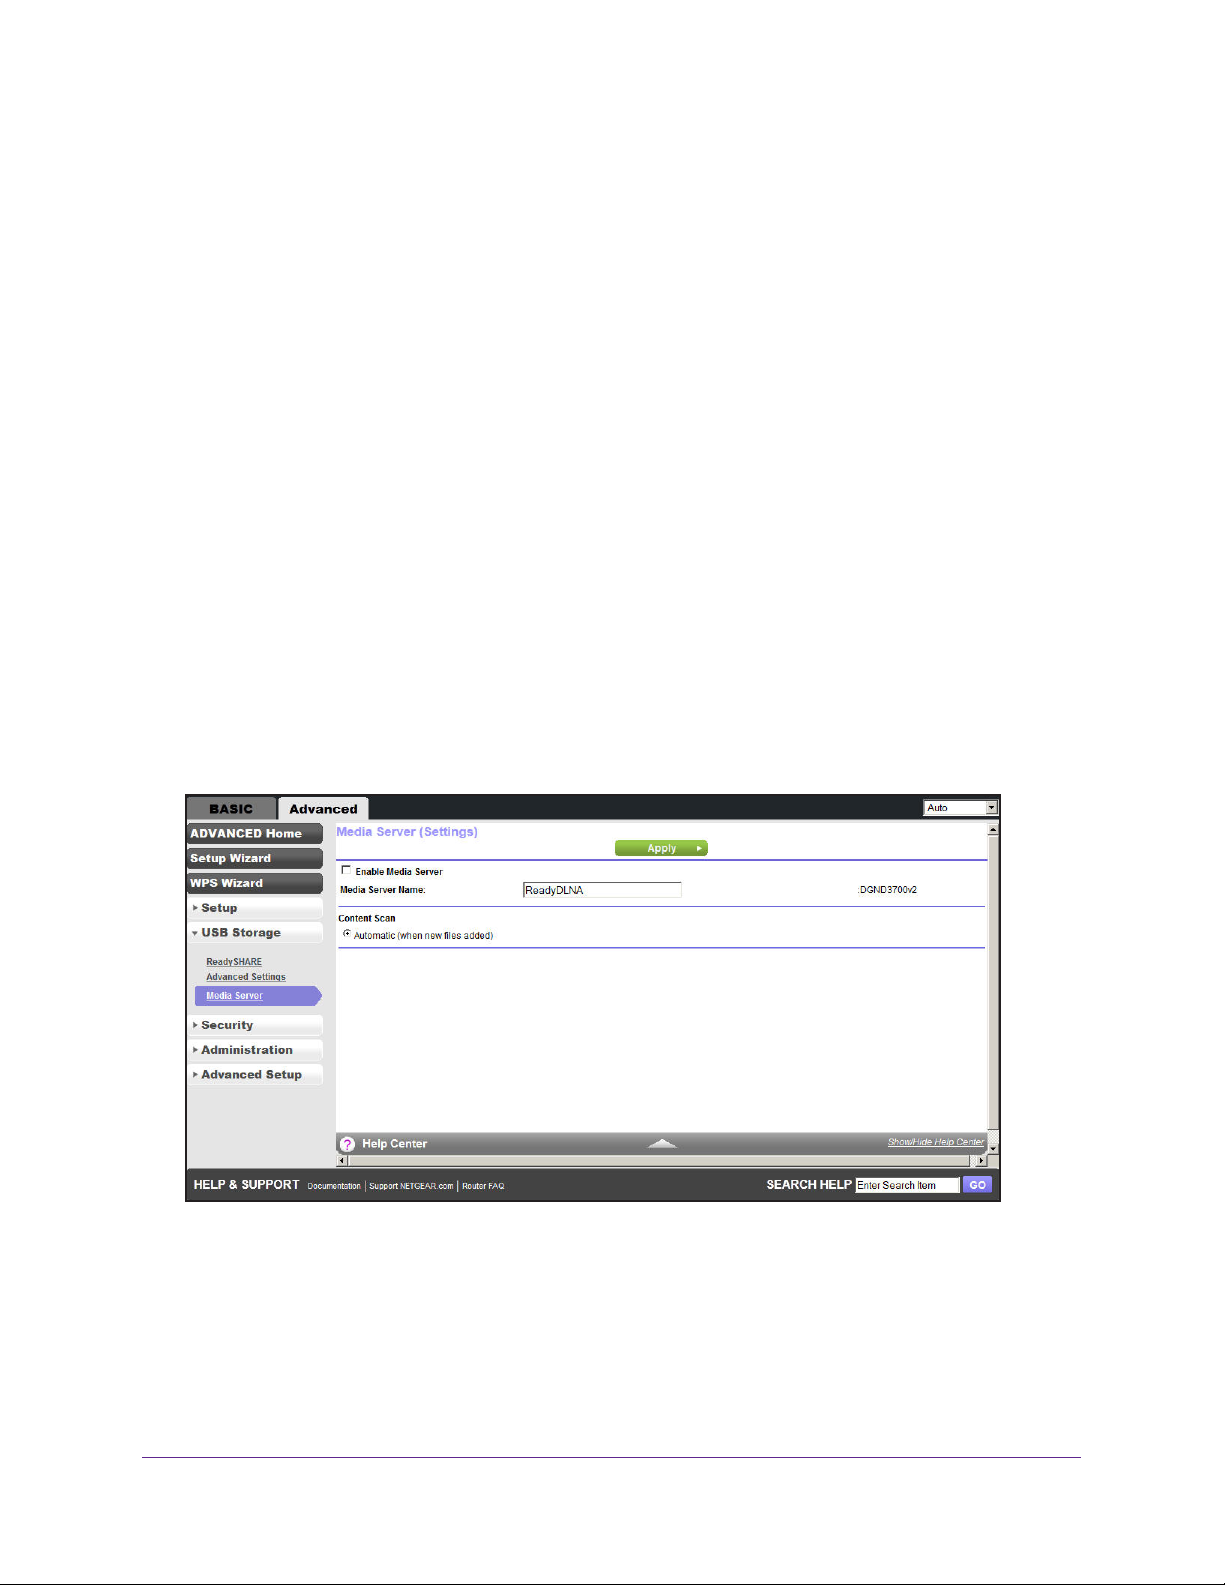
N600 Wireless Dual Band Gigabit ADSL2+ Modem Router DGND3700v2
• Read and Write Access. Show the permissions and access controls on the network
folder: All - no password (the default) allows all users to access the network folder. The
password for admin is the same one that you use to log in to the wireless modem router.
• Folder Name. Full path used by the network folder
• V
olume Name. Volume name from the storage device (either USB drive or HDD).
• T
otal and Free Space. Show the current utilization of the storage device.
.
Safely Remove a USB Drive
To safely remove a USB disk drive so that no users can access it, select USB Storage >
Basic Settings, and click the Safely Remove USB Device button. This takes the drive
offline.
Media Server Settings
By default, the wireless modem router is set up to act as a Ready DLNA Media server, which
lets you view movies and photos on DLNA/UPnP AV–compliant media players, such as
Xbox360, Playstation, and NETGEAR’s Digital Entertainer Live.
To view these settings, select Advanced > USB Storage > Media Server to display the
following screen:
By default the Enable Media Server check box and the Automatic (when new files are added)
radio button are selected. When these options are selected, the wireless modem router
scans for media files whenever new files are added to the ReadySHARE USB hard drive.
USB Storage
68
Page 69
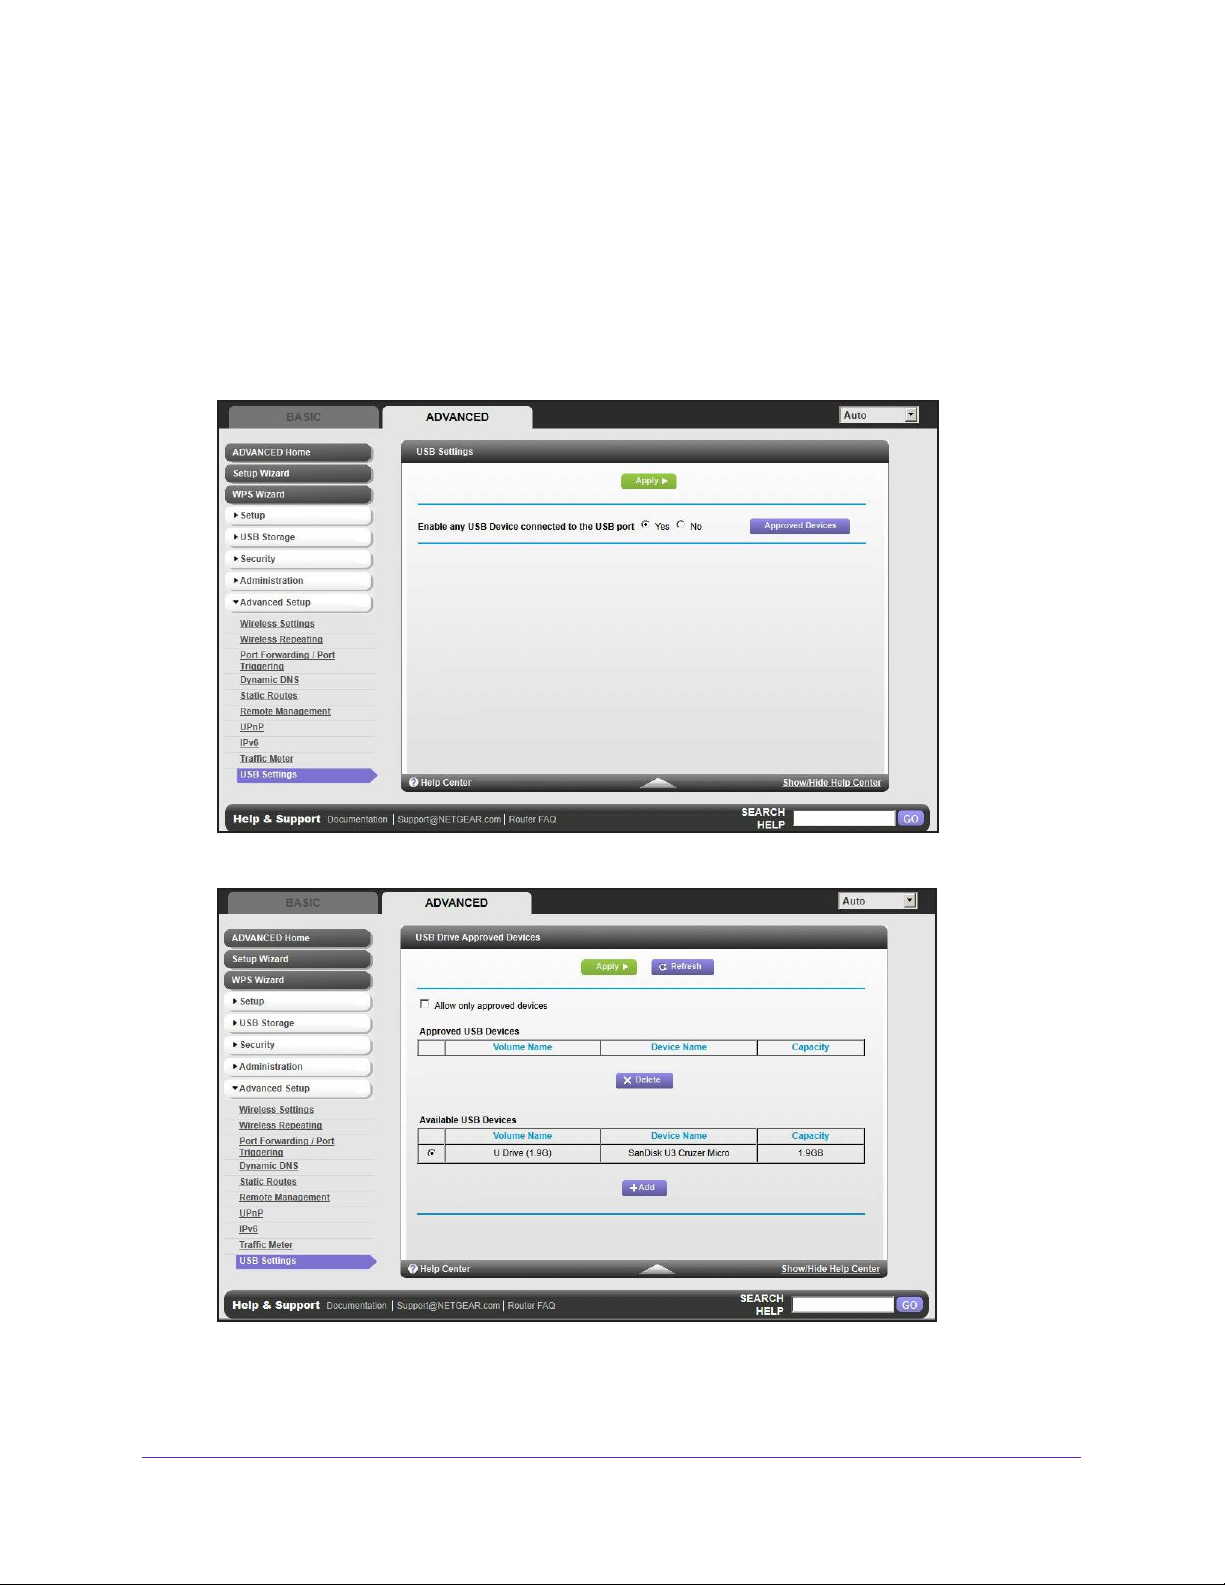
N600 Wireless Dual Band Gigabit ADSL2+ Modem Router DGND3700v2
Specify Approved USB Devices
For more security, you can set up the wireless modem router to share approved USB devices
only. You can access this feature from the Advanced Setup menu on the Advanced tab.
To set up approved USB devices:
1. Select Advanced >
displays:
2. Click the Approved Devices button. The USB Drive Approved Devices screen displays:
Advanced Setup > USB Settings. The following screen
This screen shows the approved USB devices and the available USB devices. You can
remove or add approved USB devices.
USB Storage
69
Page 70

N600 Wireless Dual Band Gigabit ADSL2+ Modem Router DGND3700v2
3. To add an approved USB device, select it from the Available USB Devices list, and then
click Add.
4. Select the Allow only approved devices check box.
5. Click Apply so that your change takes effect.
If you want to work with another USB device, you have to first click the Safely Remove USB
Device button for the currently connected USB device. Connect the other USB device, and
repeat this process.
Connect to the USB Drive from a Remote Computer
To connect to the USB drive from remote computers with a web browser, you have to use the
wireless modem router’s Internet port IP address. If you are using Dynamic DNS, you can
type the DNS name, rather than the IP address. You can view the wireless modem router’s
Internet IP address from the dashboard on the Basic Home screen or the Advanced Home
screen.
Access the Wireless Modem Router’s USB Drive Remotely Using FTP
To connect to the wireless modem router’s USB drive using a web browser:
1. Connect to the wireless modem router by typing ftp:// and the Internet port IP address in
the address field of Internet Explorer or Netscape Navigator, for example:
ftp://10.1.65.4
If you are using Dynamic DNS, you can type the DNS name, rather than the IP address.
2. Type the account name and password for the account that has access rights to the USB
drive. The user name (account name) for All - no password is guest.
3. The directories of the USB drive that your account has access to are displayed, for example,
share/partition1/directory1. You can now read and copy files from the USB directory.
USB Storage
70
Page 71
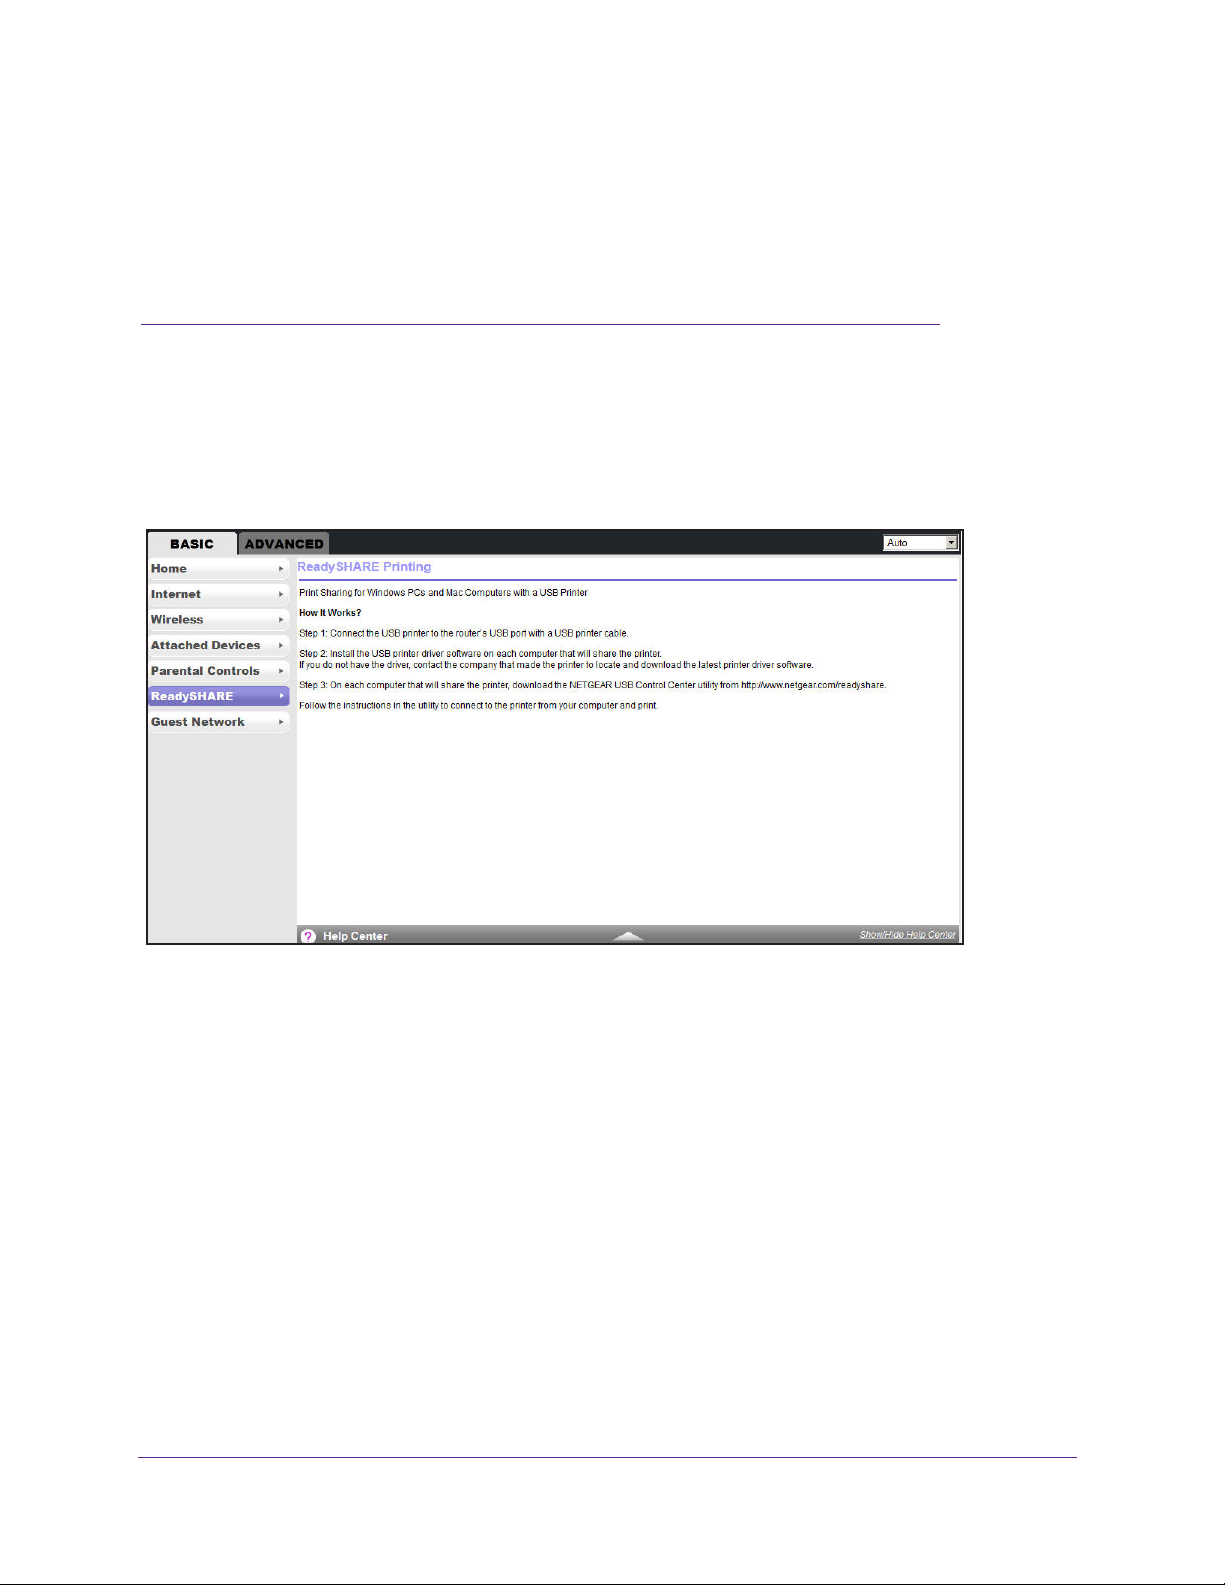
6. USB Printer Control
Access and configure a USB printer
6
This chapter describes how to access and configure a USB printer attached to your wireless
modem router.
The USB Control Center utility allows you to control a shared USB device from your computer
that is connected to the USB port on your router. The utility allows you to control a printer.
The utility has to be installed on each computer on your network from which you want to control
the device. You can download this utility at www.netgear.com/landing/en-us/readyshare.aspx.
71
Page 72
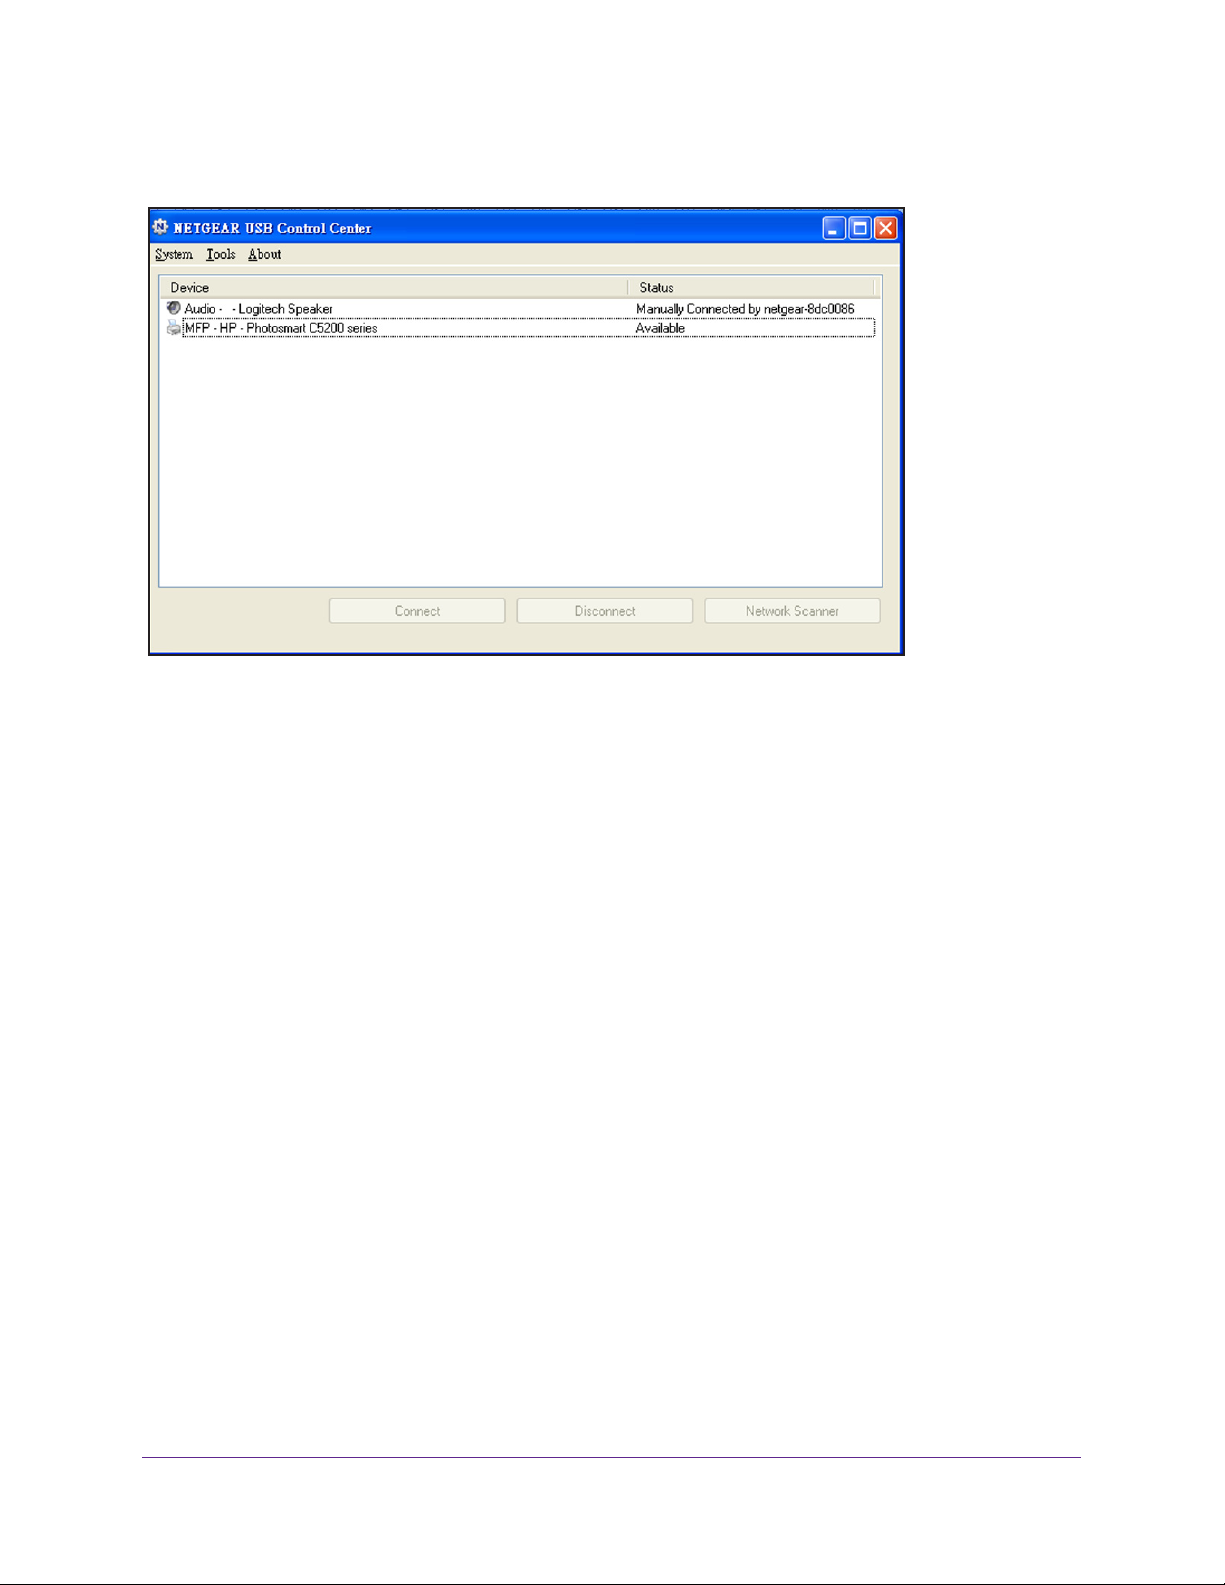
N600 Wireless Dual Band Gigabit ADSL2+ Modem Router DGND3700v2
When you launch the USB Control Center utility, a screen similar to the following displays:
This is the main screen, which shows a device icon, the description for this USB device, and its
status.
• Available. The device is available from the computer that you are using.
• W
aiting to Connect. You need to connect to this device from the computer that you are
using. If this is the first time you are connecting, you might be prompted to install the
device driver.
The following menu selections are available:
• System. Exit the utility.
• T
ools. Access the Control Center Configuration to set up your shared USB device. See
the following section, Control Center Configuration.
• About. V
iew details about the USB Control Center software.
This chapter includes the following sections:
• Control Center Configuration
• USB Printer
• Scan with a Multifunction Printer
• USB Speaker
USB Printer Control
72
Page 73
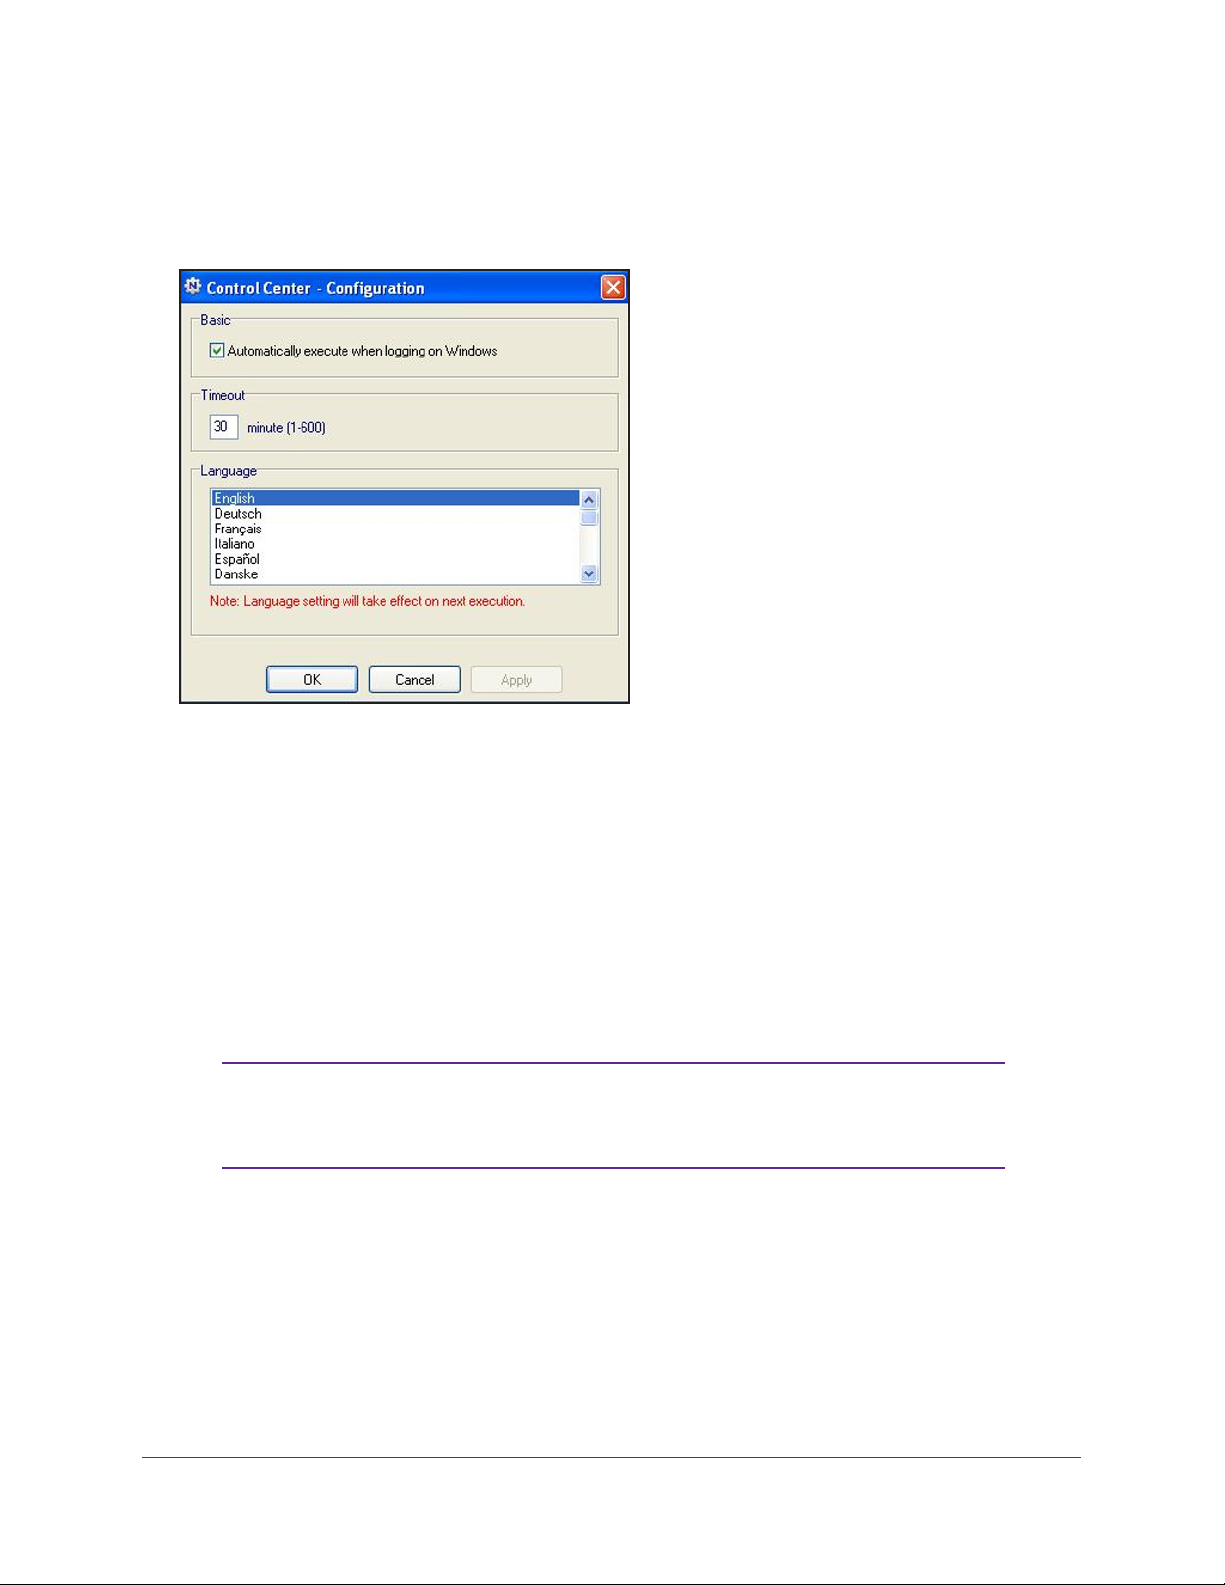
N600 Wireless Dual Band Gigabit ADSL2+ Modem Router DGND3700v2
Control Center Configuration
Select Tools > Configuration to display the following screen:
Automatically execute when logging on Windows. Select this check box to have the utility
start automatically when you are logged in to Windows.
Timeout. Specify the time-out value for holding the USB resource when it is not in use.
Language. Select the display language for this utility
.
USB Printer
The first time you use a printer, you need to click Connect. You might be asked to install the
driver for this printer. After the driver is installed, the printer status changes to Available.
Note: Some USB printers (for example: HP and Lexmark printer) request
that you do not connect the USB cable until you are prompted by the
installation software.
If the USB printer is detected and connected automatically, you need to disconnect the
printer
, and then wait for the prompt asking you to click Connect.
USB Printer Control
73
Page 74
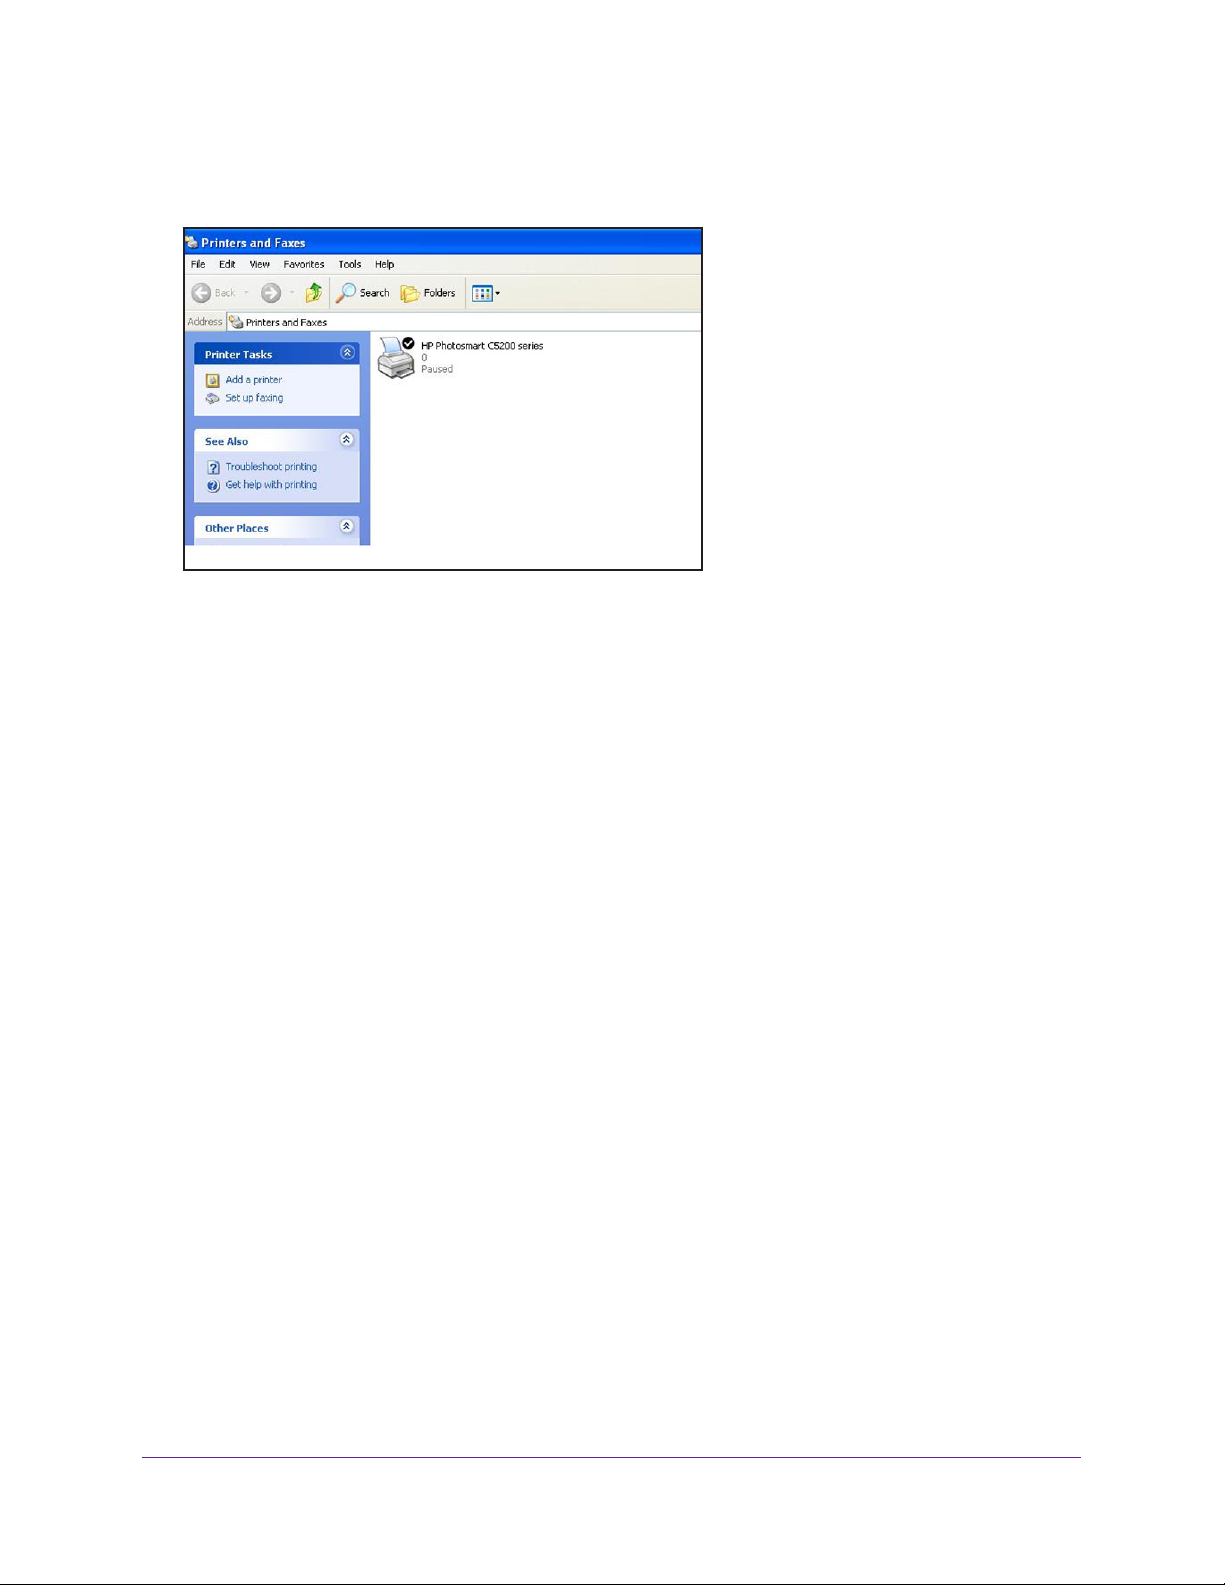
N600 Wireless Dual Band Gigabit ADSL2+ Modem Router DGND3700v2
Once the printer shows Available status, the grayed out Paused state no longer displays in
the Windows Printers and Faxes window.
This USB printer is ready. The utility does not need to always hold the connection of this USB
printer. Once there is any print job for this printer, the USB utility connects to this USB printer
automatically, then prints. After the print job is done, the printer status returns to the Paused
state.
Scan with a Multifunction Printer
You can use the scan feature of a multifunction printer.
1. Make sure that the printer
2. Click the Network Scanner button.
This activates the scanner window that is used to perform the scans.
’s status shows as Available.
USB Speaker
To control a USB speaker:
1. Select the USB speaker
2. Click the Connect button to connect this speaker
speaker.
If you click Connect, and someone else is already connected to the speaker, a request is
sent to that person.
button.
If someone is connected to the speaker and it is not being used (the router does not detect
any activity), the router holds the connection for the amount of time that is in the timeout
value, and then makes it available.
.
, or click Disconnect to disconnect the
The person who receives the request can click an Accept or Reject
USB Printer Control
74
Page 75

7. Security
Keep unwanted content out of your network
7
This chapter explains how to use the basic firewall features of the wireless modem router to
prevent objectionable content from reaching the computers and other devices connected to your
network.
This chapter includes the following sections:
• Keyword Blocking of HTTP Traffic
• Firewall Rules
• Schedule for Firewall Rules
• Security Event Email Notifications
75
Page 76
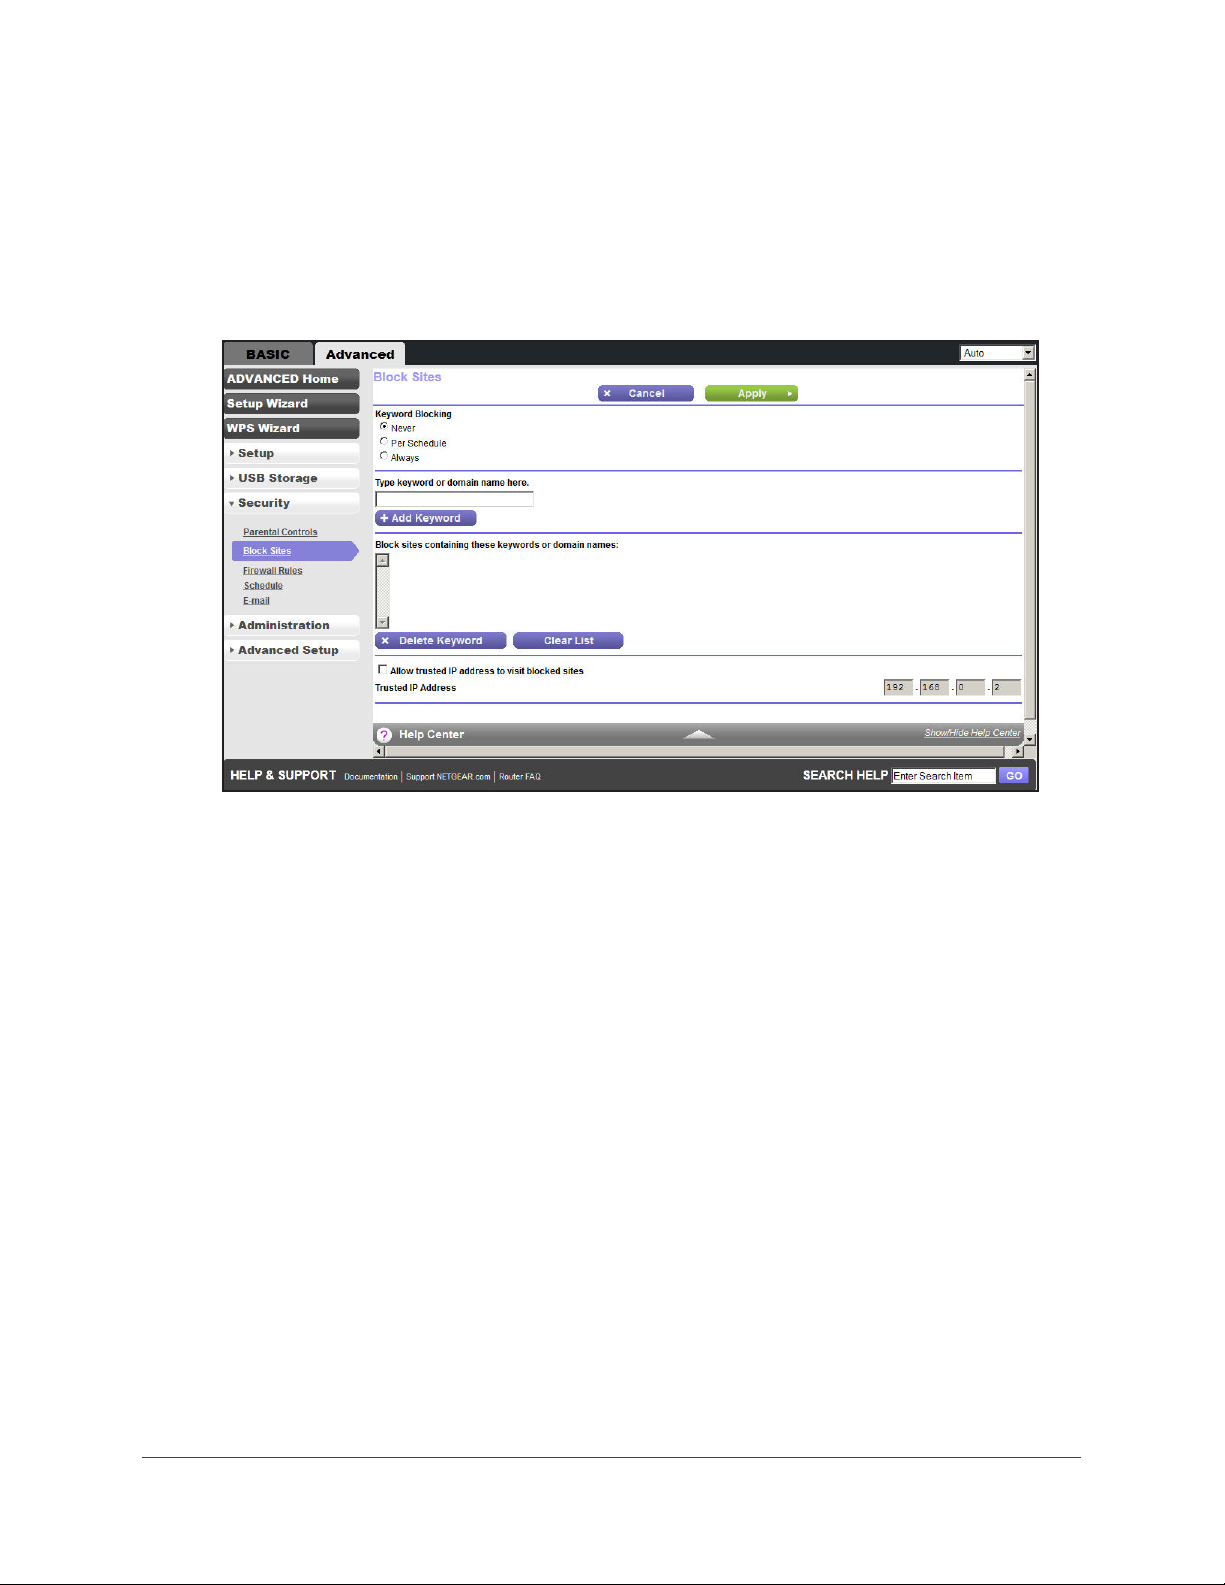
N600 Wireless Dual Band Gigabit ADSL2+ Modem Router DGND3700v2
Keyword Blocking of HTTP Traffic
Use keyword blocking to prevent certain types of HTTP traffic from accessing your network.
The blocking can be always or according to a schedule.
1. Select Advanced > Security > Block Sites to display the following screen:
2. Select one of the keyword blocking options:
• Per Schedule.
• Always.
3. In the Keyword field, enter a keyword or domain, click Add Keyword, and click Apply.
The Keyword list supports up to 32 entries. Here are some sample entries:
• Specify XXX to block http://www
• Specify .com if you want to allow only sites with domain suf
• Enter a period (.) to block all Internet browsing access.
To delete a keyword or domain:
1. Select the keyword you want to delete from the list.
2. Click Delete Keyword, and then Apply to save your changes.
To specify a trusted computer:
You can exempt one trusted computer from blocking and logging. The computer you exempt
has to have a fixed IP address.
1. In the
2. Click Apply to save your changes.
Turn on keyword blocking all the time, independent of the Schedule screen.
Trusted IP Address field, enter the IP address.
Turn on keyword blocking according to the Schedule screen settings.
.badstuff.com/xxx.html.
fixes such as .edu or .gov.
Security
76
Page 77
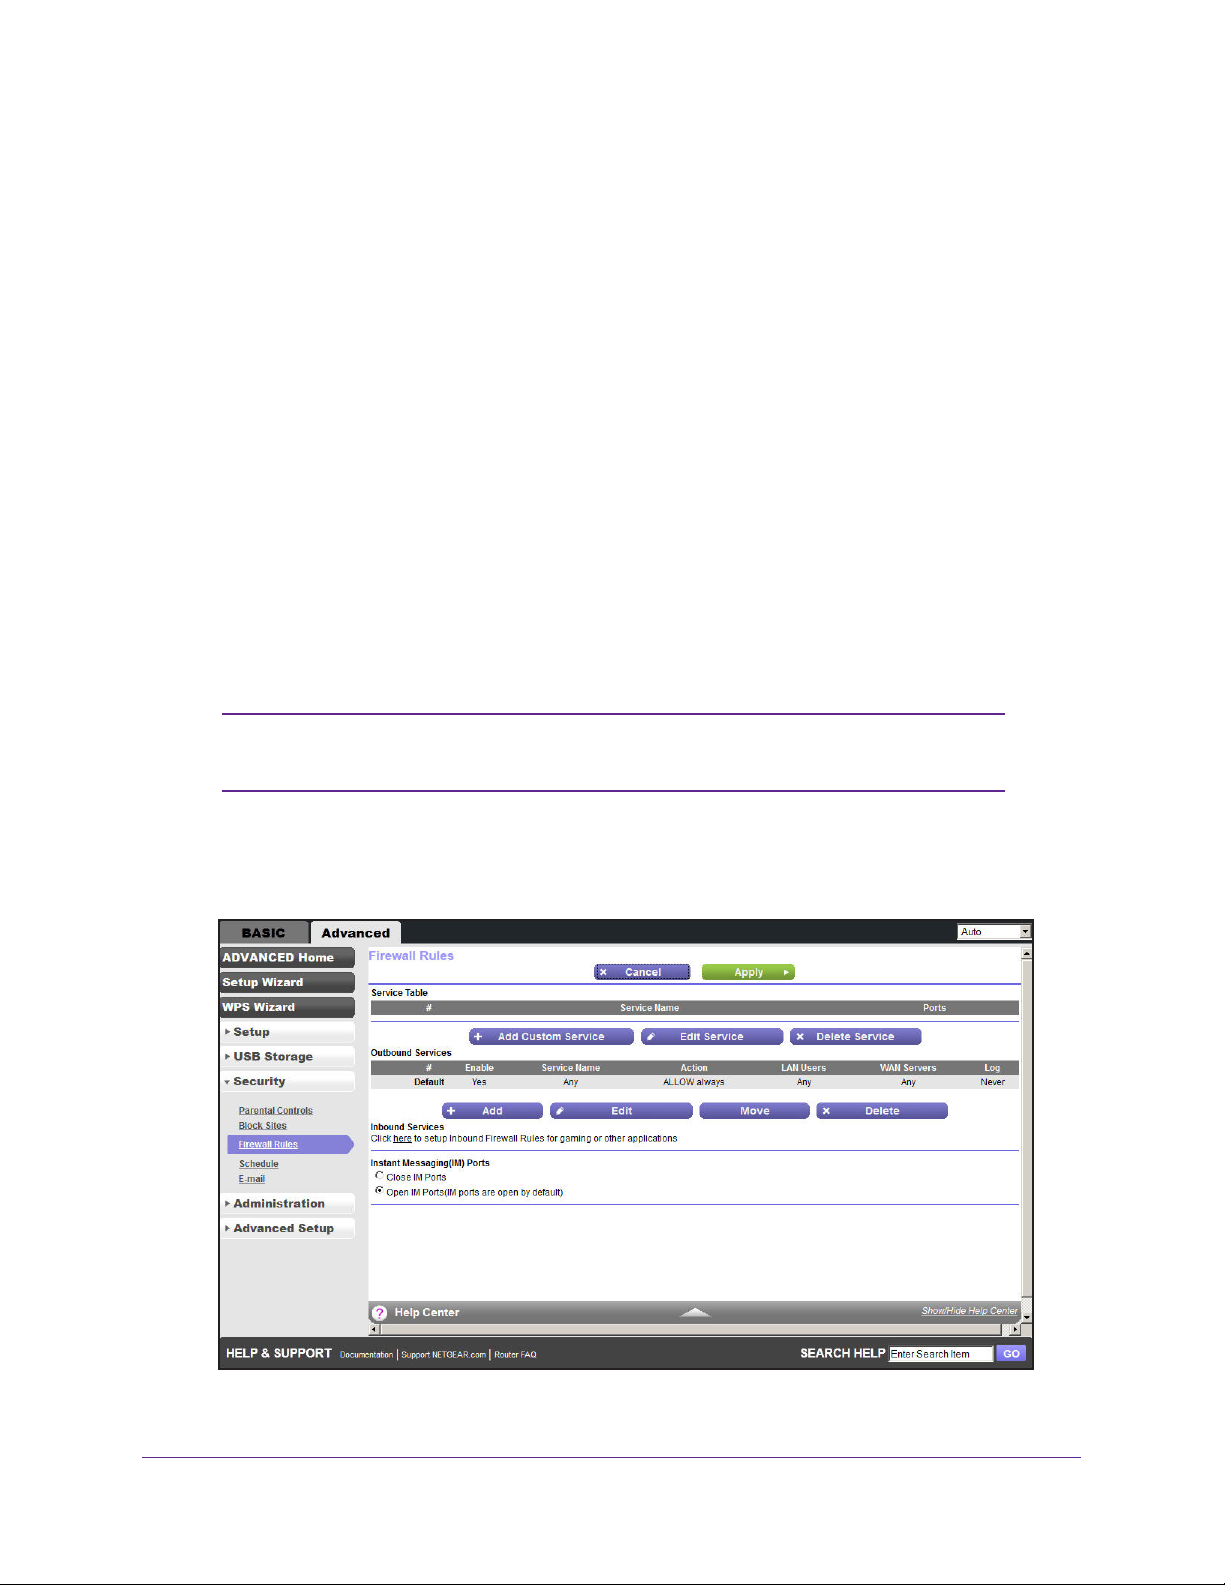
N600 Wireless Dual Band Gigabit ADSL2+ Modem Router DGND3700v2
Firewall Rules
Services are functions performed by server computers at the request of client computers. For
example, web servers serve web pages, time servers serve time and date information, and
game hosts serve data about other players’ moves. When a computer on the Internet sends
a request for service to a server computer, the requested service is identified by a service or
port number. This number appears as the destination port number in the transmitted IP
packets. For example, a packet that is sent with the destination port number 80 is an HTTP
(web server) request.
The service numbers for many common protocols are defined by the Internet Engineering
ask Force (IETF at http://www.ietf.org/) and published in RFC1700, “Assigned Numbers.”
T
Service numbers for other applications are typically chosen from the range 1024 to 65535 by
the authors of the application.
many service port numbers, you are not limited to these choices. You can often determine
port number information by contacting the publisher of the application, by asking user groups
or newsgroups, or by searching.
The Firewall Rules screen lets you to block or allow specific Internet traffic services by
computers on your network.
Although the wireless modem router already holds a list of
This is called service blocking or port filtering.
Note: This feature is for Advanced Administrators only. Incorrect
configuration can cause serious problems.
To create firewall rules:
1. Select
Advanced > Security > Firewall Rules to display the following screen:
Security
77
Page 78
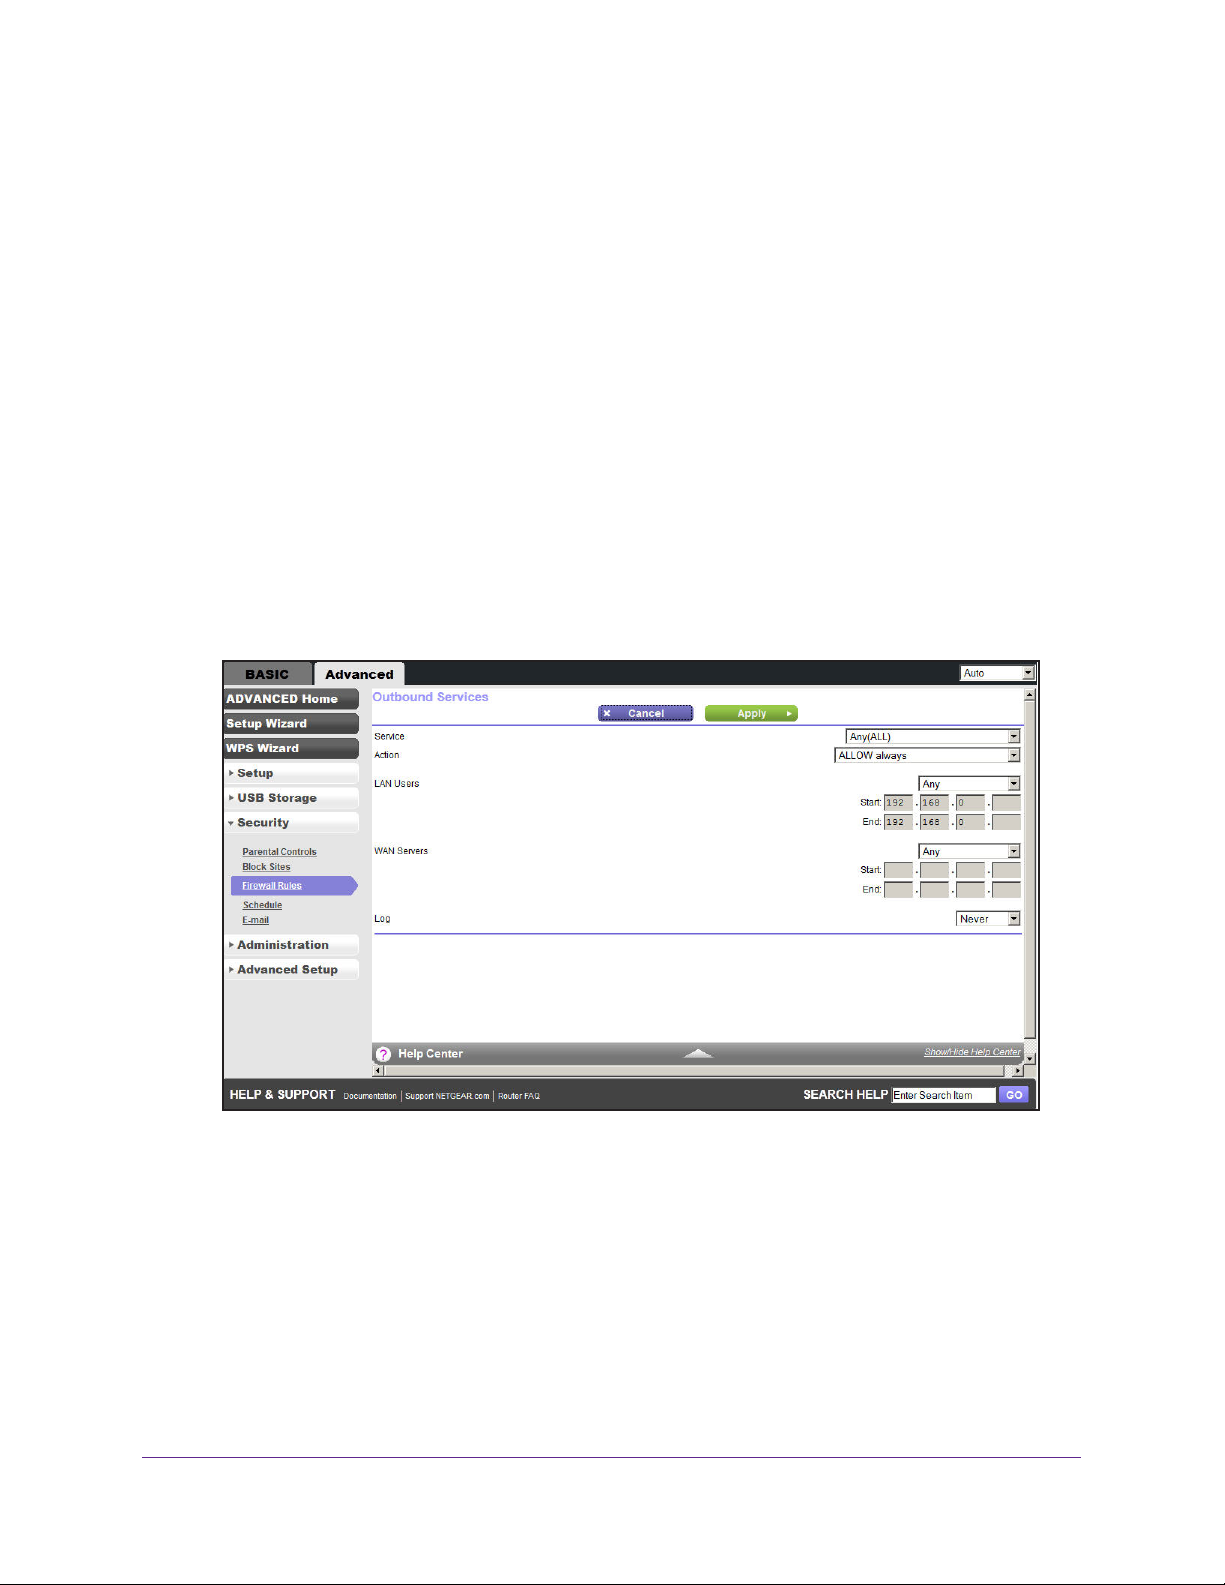
N600 Wireless Dual Band Gigabit ADSL2+ Modem Router DGND3700v2
The Firewall Rules screen lists all firewall rules that have been changed from their default
setting. The default rules allow all outgoing traffic and block all incoming traffic.
• To change the firewall rules for outbound traffic, you need to add it from the Outbound
Services screen as described in Step 2.
• T
o change the firewall rules for inbound traffic, you need to add it from the Port
Forwarding/Port Triggering screen as described in Port Forwarding and Triggering on
page 105.
The Outbound Services and Port Forwarding/Inbound Services screens list the available
services you can allow or block.
You can also define your own custom services to allow or
block with the Add Service screen as described in Add Custom Services to Allow or Block
on page 80. Once you add your own custom services, they are available on the Outbound
Services and Port Forwarding/Inbound Services screens.
You can also specify whether these services are always allowed or blocked, or allowed or
blocked per schedule a
s described in Schedule for Firewall Rules on page 81.
2. Outbound Services. To allow or block an outbound service, click Add to display the
following screen:
Use the Outbound Services screen to define a new Outbound Firewall rule, or edit an
existing rule. The outbound firewall rules are used to block or allow access by computers
on your network to services or applications on the Internet.
a. Service. Select the service or application to be covered by this rule. If the service or
application you want does not appear in the list, you have to define it as described in
Add Custom Services to Allow or Block on page 80.
b. Action. Select the action you want for traf
• BLOCK always.
Always block the traffic covered by this rule.
Security
78
fic covered by this rule:
Page 79

N600 Wireless Dual Band Gigabit ADSL2+ Modem Router DGND3700v2
• BLOCK by schedule, otherwise Allow. Allow the traffic covered by this rule,
unless it is blocked according to the schedule specified on the Schedule screen in
Schedule for Firewall Rules on page 81.
• ALLOW always. Always allow the traffic covered by this rule (this selection is the
default setting).
• ALLOW by schedule, otherwise Block. Block the traffic covered by this rule,
unless it is blocked accourding to the schedule specified on the Schedule screen
in
Schedule for Firewall Rules on page 81.
ALLOW rules are useful only when the traffic is already covered by a BLOCK rule.
You would use these rules when you want to allow a subset of traffic that is currently
blocked by another rule.
c. LAN Users. These settings determine which computers on your network are
affected by this rule, based on their source (LAN) IP address. Select the option you
want:
• Any. All local IP addresses are covered by this choice.
• Address range. You have to fill in the Start and Finish fields when this option is
selected.
• Single address. Enter the required address in the Start field.
d. WAN Servers. These settings determine which Internet locations are covered by the
rule, based on their destination (WAN) IP address. Select the option you want:
• Any. All Internet IP address are covered by this choice.
• Address range. You have to fill in the Start and Finish fields when this option is
selected.
• Single address. Enter the required address in the Start field.
e. Log. This setting determines whether traffic covered by this rule is logged. Select
the action you want:
• Always. This choice always logs traffic that is covered by this rule, whether it
matches or not. (This feature is useful when you are debugging your rules.)
• Never. This choice never logs traffic covered by this rule, whether it matches or
not.
f. Click Apply to have your changes take effect, or click Cancel to return to the
previous screen.
3. Inbound Services. To allow or block an inbound service, click here to set up inbound
firewall rules for gaming or other applications. You are redirected to the Port Forwarding/Port
Triggering screen as described in
Port Forwarding and Triggering on page 105.
4. Click Apply to enable your Firewall Rules selections.
Security
79
Page 80
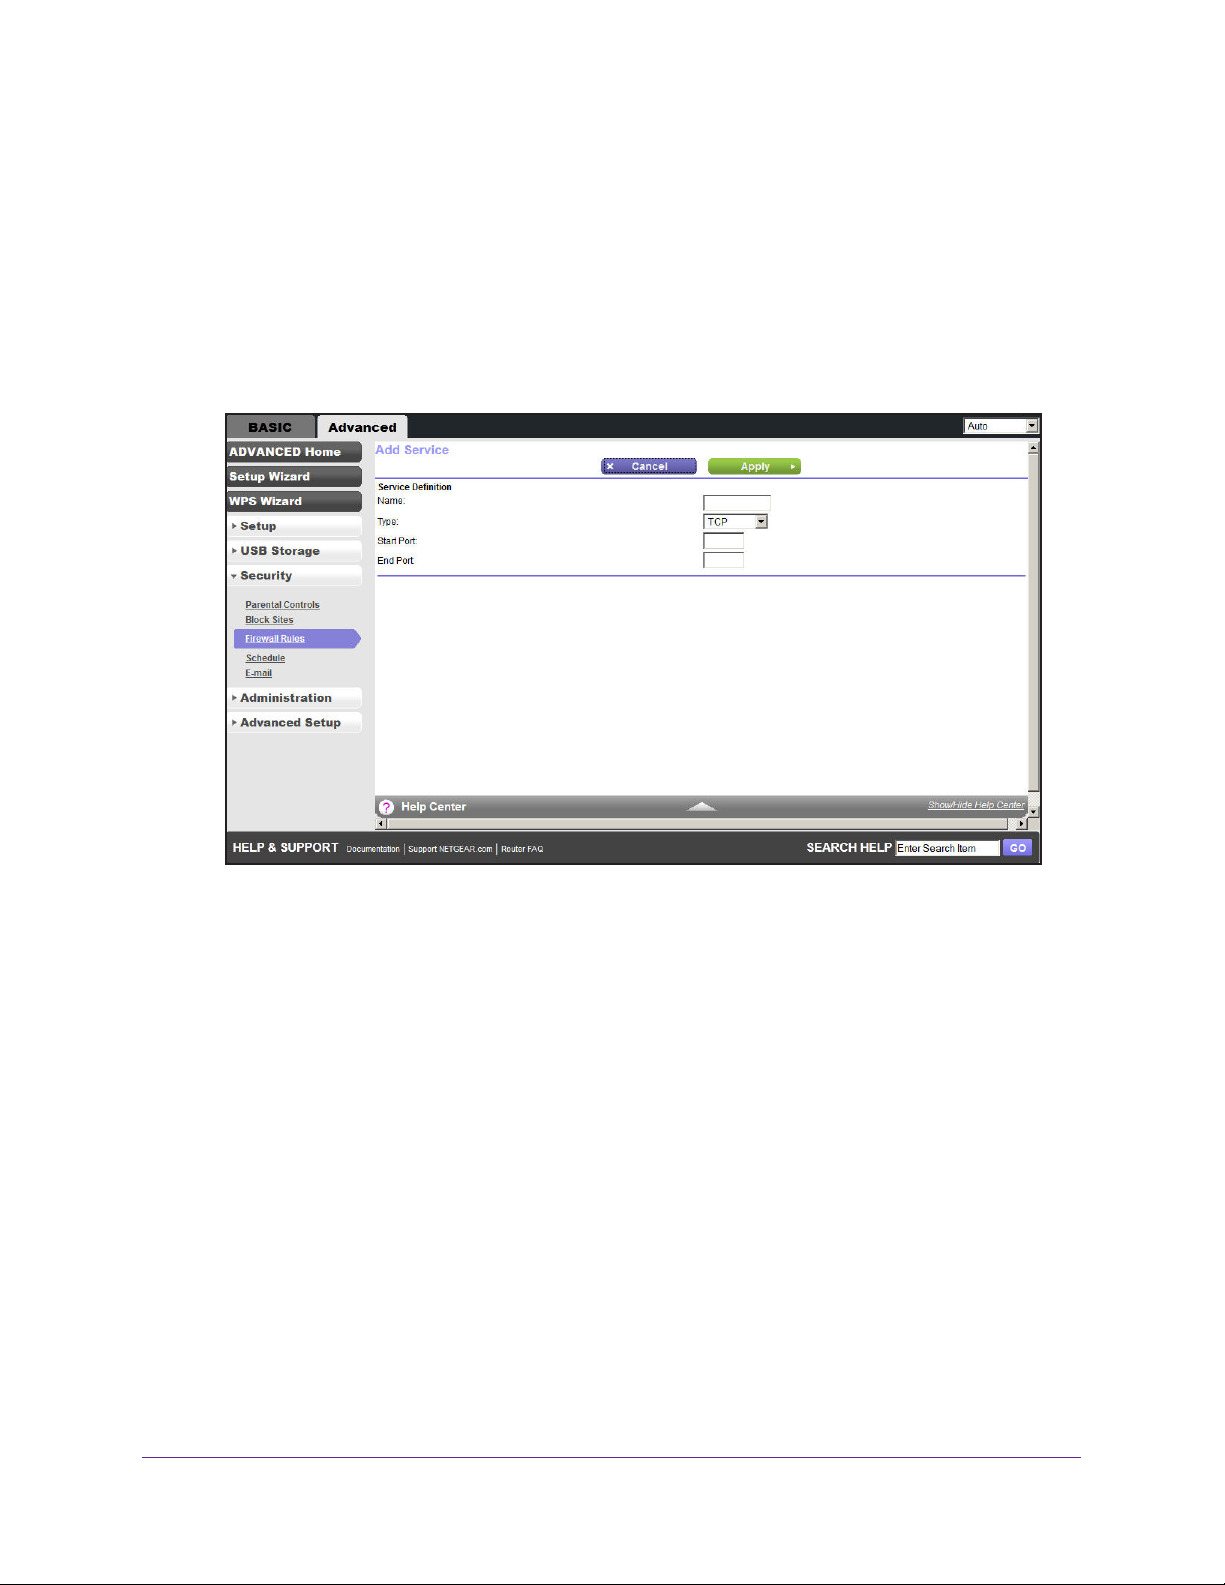
N600 Wireless Dual Band Gigabit ADSL2+ Modem Router DGND3700v2
Add Custom Services to Allow or Block
You can define your own incoming and outgoing custom services to allow or block. Once you
add your own custom services, they will be available on the Outbound Services screen (as
described in Firewall Rules on page 77) and the Port Forwarding/Inbound Services screen
(as described in Port Forwarding and Triggering on page 105).
To add a custom service:
1. Click Add Custom Service to add a service.
The Add Service screen displays:
The Add Service screen allows you to specify or edit your own custom service definition.
You can then use the custom service when creating firewall rules.
2. To add a service for blocking, first determine which port number or range of numbers is used
by the application.
3. Name. In the Name field, enter a suitable name for this service.
4. T
ype. Select the correct type for this service (if in doubt, select TCP/UDP):
• TCP
• UDP
• TCP/UDP
5. Start Port and End Port. Enter the starting and ending port numbers. If the application uses
a single port number
, enter that number in both fields.
6. Click Apply to save your information and return to the previous screen.
Security
80
Page 81
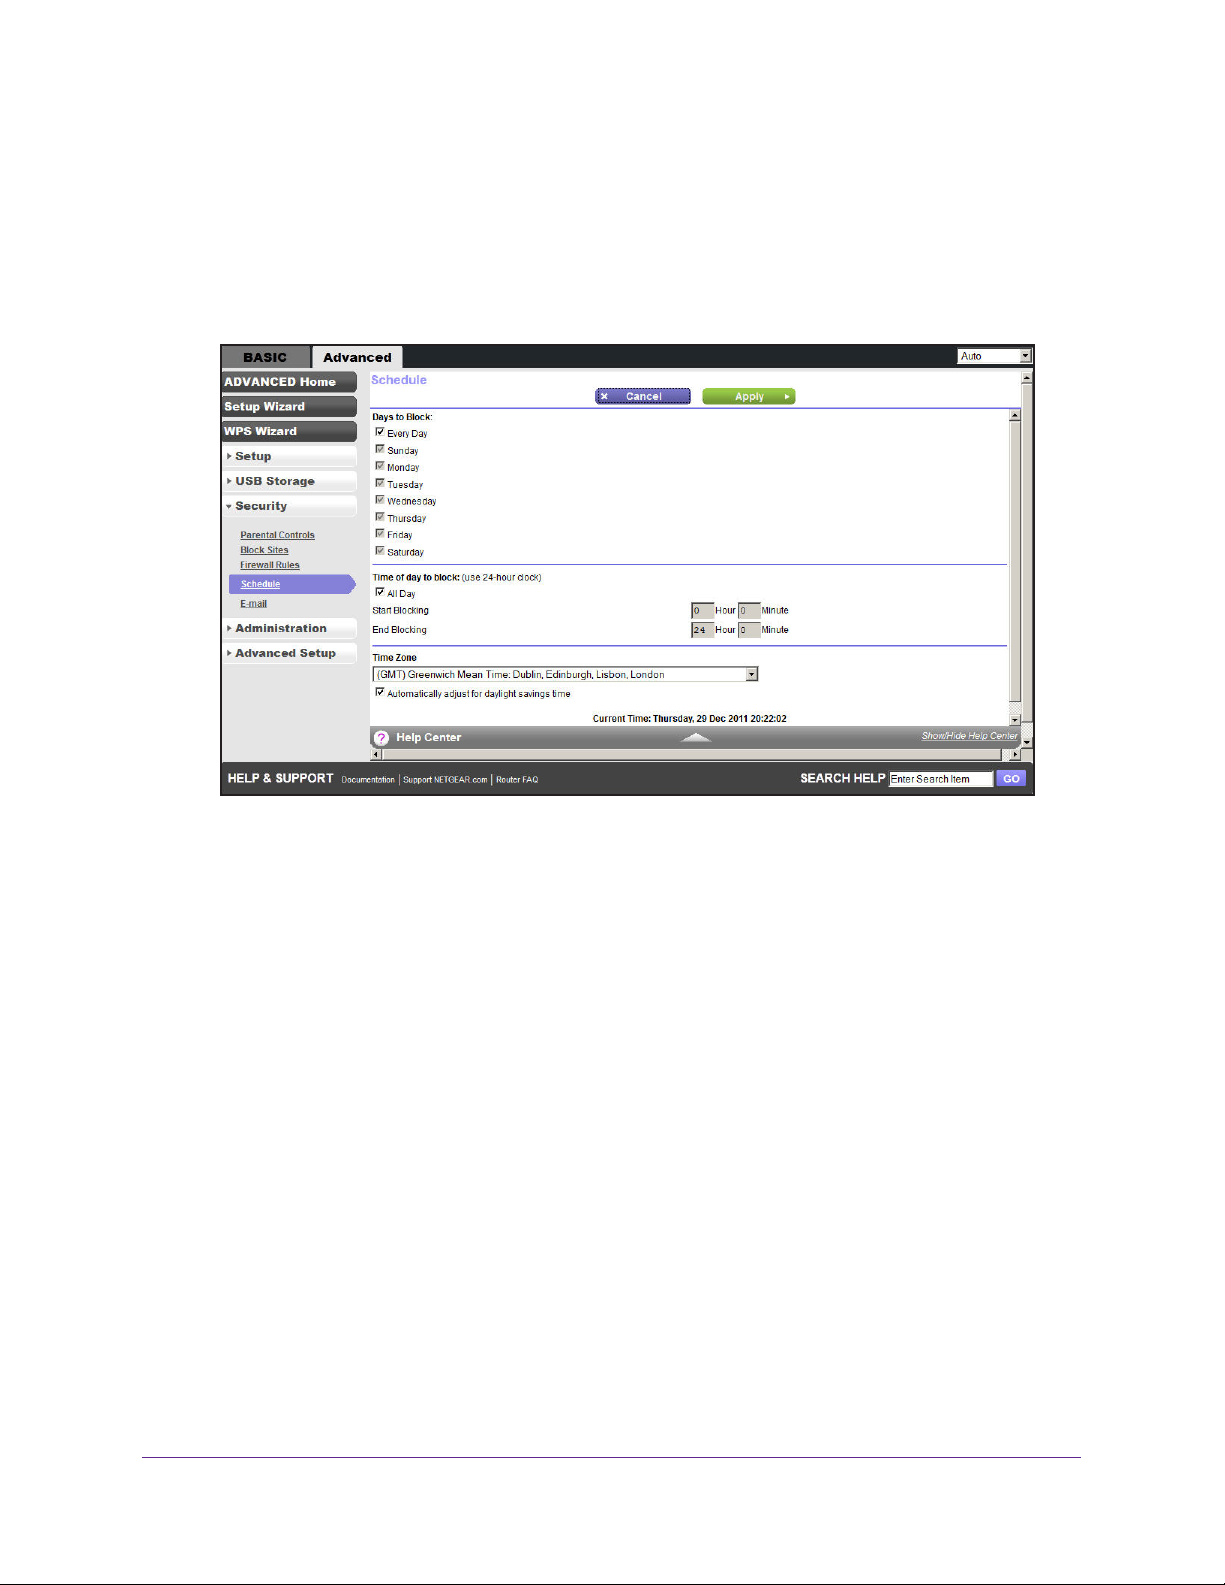
N600 Wireless Dual Band Gigabit ADSL2+ Modem Router DGND3700v2
Schedule for Firewall Rules
You can specify the days and time that you want to block Internet access.
To specify the firewall rule schedule:
1. Select Advanced > Security > Schedule to display the following screen:
2. Set up the schedule for blocking keywords and services.
• Days to Block. Select days on which you want to apply blocking by selecting the
appropriate check boxes, or select Every Day to select the check boxes for all days.
ime of Day to Block. Select a start and end time in 24-hour format, or select All
• T
Day for 24-hour blocking.
3. Select your time zone from the list. If you use daylight saving time, select the Automatically
adjust for daylight savings time check box.
4. Click Apply to save your settings.
Security
81
Page 82
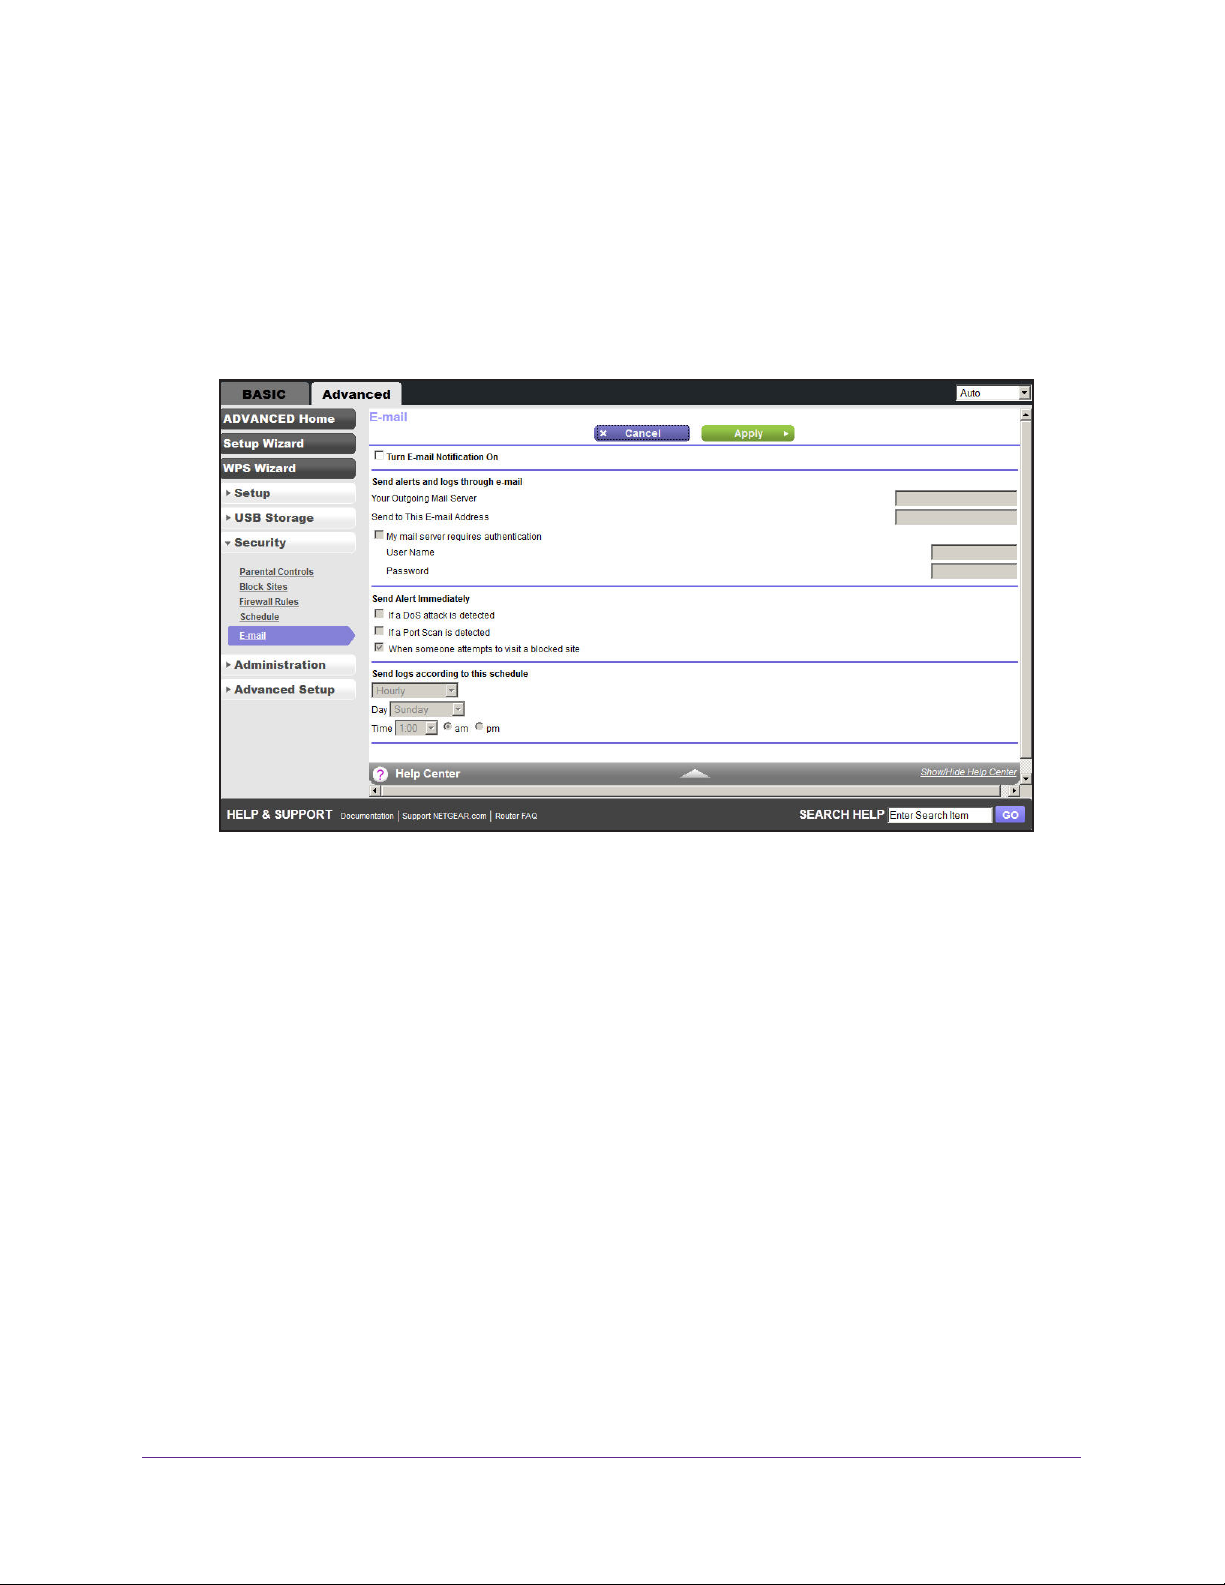
N600 Wireless Dual Band Gigabit ADSL2+ Modem Router DGND3700v2
Security Event Email Notifications
To receive logs and alerts by email, provide your email information in the E-mail screen and
specify which alerts you want to receive and how often.
To set up email notifications:
1. Select Advanced > Security > E-mail to display the following screen:
2. To receive email logs and alerts from the wireless modem router, select the Turn E-mail
Notification On check box.
3. In the
4. In the Send to
5. If your outgoing email server requires authentication, select the My Mail Server requires
6. Y
7. Click Apply to save your settings.
Your Outgoing Mail Server field, enter the name of your ISP’s outgoing (SMTP) mail
server (such as mail.myISP.com). You might be able to find this information in the
configuration screen of your email program. If you leave this field blank, log and alert
messages are not sent by email.
This Email Address field, enter the email address to which logs and alerts are
sent. This email address is also used for the From address. If you leave this field blank, log
and alert messages are not sent by email.
authentication check box. Fill in the User Name and Password fields for the outgoing email
server
.
ou can have email alerts sent immediately when someone attempts to visit a blocked site,
and you can specify that logs are sent automatically.
If you select the Weekly, Daily, or Hourly option and the log fills up before the specified
period, the log is automatically emailed to the specified email address.
sent, the log is cleared from the wireless modem router’s memory. If the wireless modem
router cannot email the log file, the log buffer might fill up. In this case, the wireless
modem router overwrites the log and discards its contents.
After the log is
Security
82
Page 83

8. Administration
Manage your network
8
This chapter describes the settings for administering and maintaining your wireless modem
router and home network. See also
upgrading or checking the status of your wireless modem router over the Internet, and Traffic
Meter on page 121 for information about monitoring the volume of Internet traffic passing
through your wireless modem router’s Internet port.
This chapter includes the following sections:
• Upgrade the Wireless Modem Router Firmware
• View Wireless Modem Router Status
• View VPN Status
• View Logs of Web Access or Attempted Web Access
• Manage the Configuration File
• Set Password
• Diagnostics
Remote Management on page 118 for information about
83
Page 84
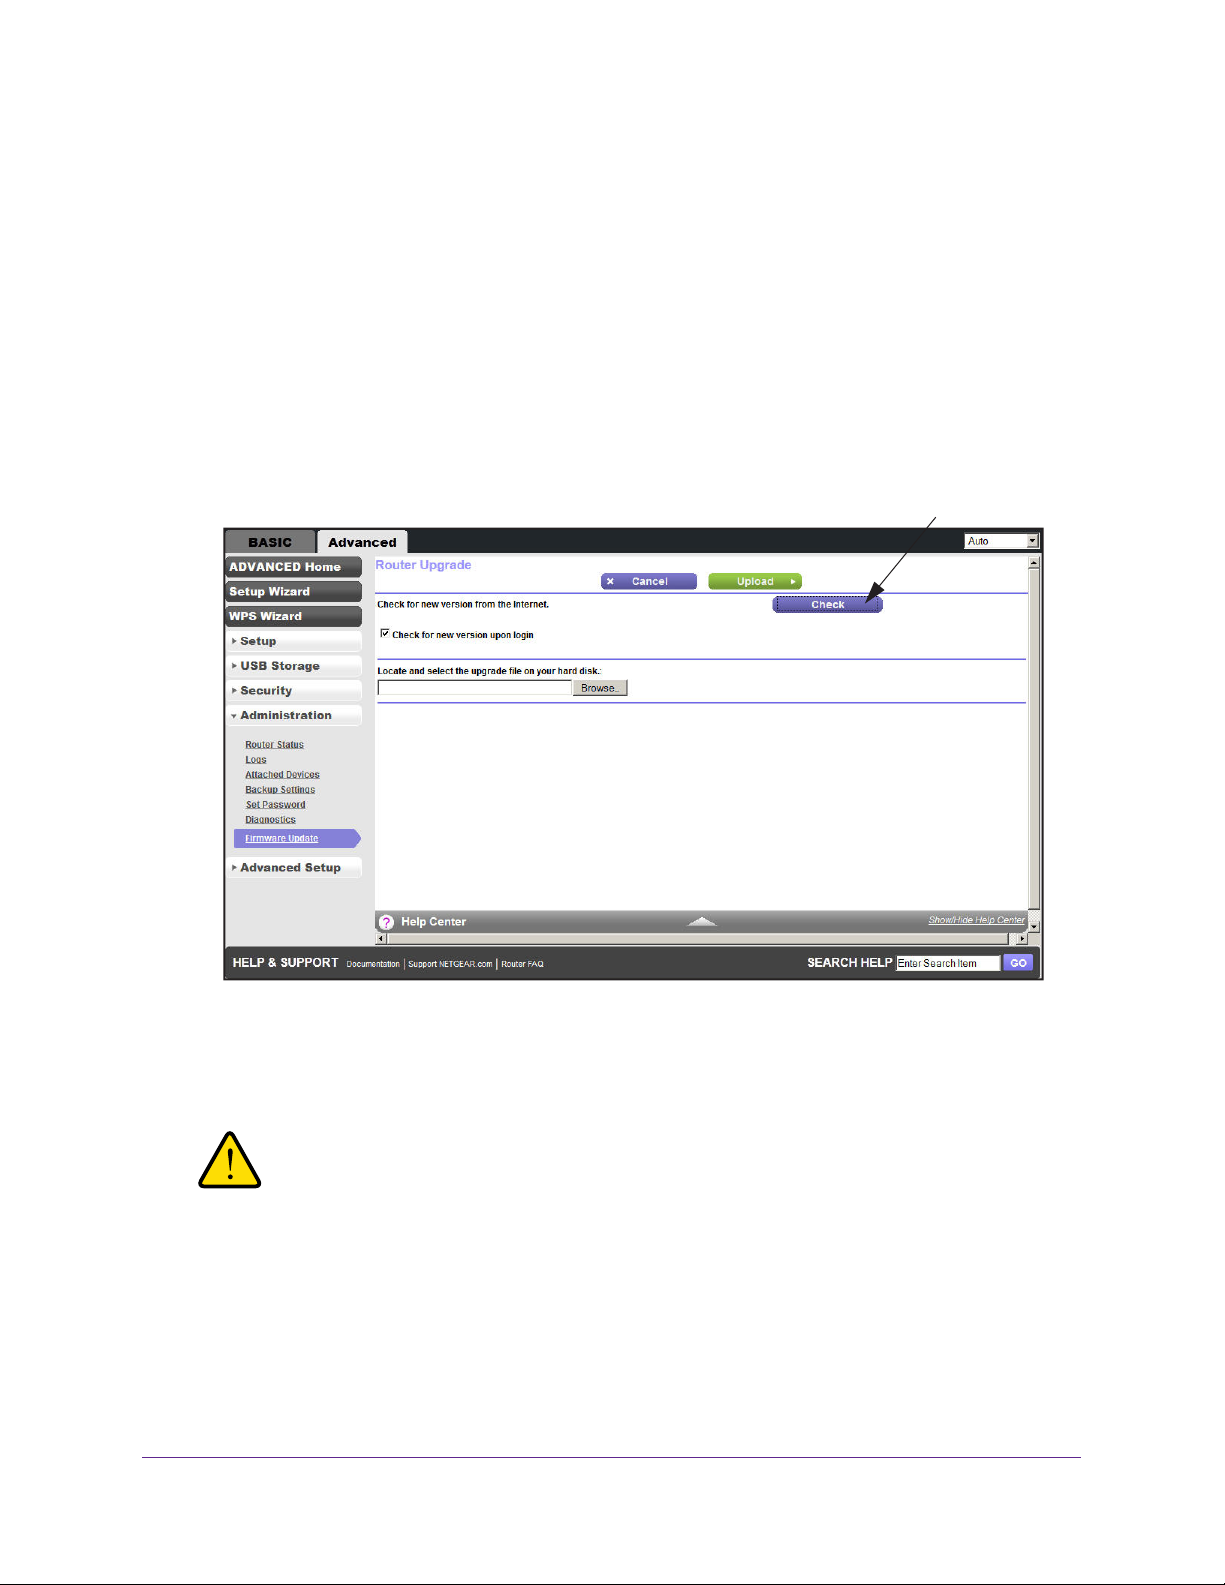
N600 Wireless Dual Band Gigabit ADSL2+ Modem Router DGND3700v2
Upgrade the Wireless Modem Router Firmware
The wireless modem router firmware (routing software) is stored in flash memory. You can
update the firmware from the Administration menu on the Advanced tab. You might see a
message at the top of the Genie screens when new firmware is available for your product.
You can use the Check button on the Router Update screen to check and update to the latest
firmware for your product if new firmware is available.
To check for new firmware and update your wireless modem router:
1. Select Advanced >
screen:
2. Click Check.
Administration > Firmware Update to display the following
Click Check.
The wireless modem router finds new firmware information if any is available.
3. Click Ye
When the upload is complete, your wireless modem router restarts. The upgrade process
typically takes about one minute. Read the new firmware release notes to determine
whether or not you need to reconfigure the wireless modem router after upgrading.
s to update and locate the firmware you downloaded (the file ends in .img).
WARNING:
When uploading firmware to the wireless modem router, do not
interrupt the web browser by closing the window, clicking a link,
or loading a new page. If the browser is interrupted, it could
corrupt the firmware.
Administration
84
Page 85
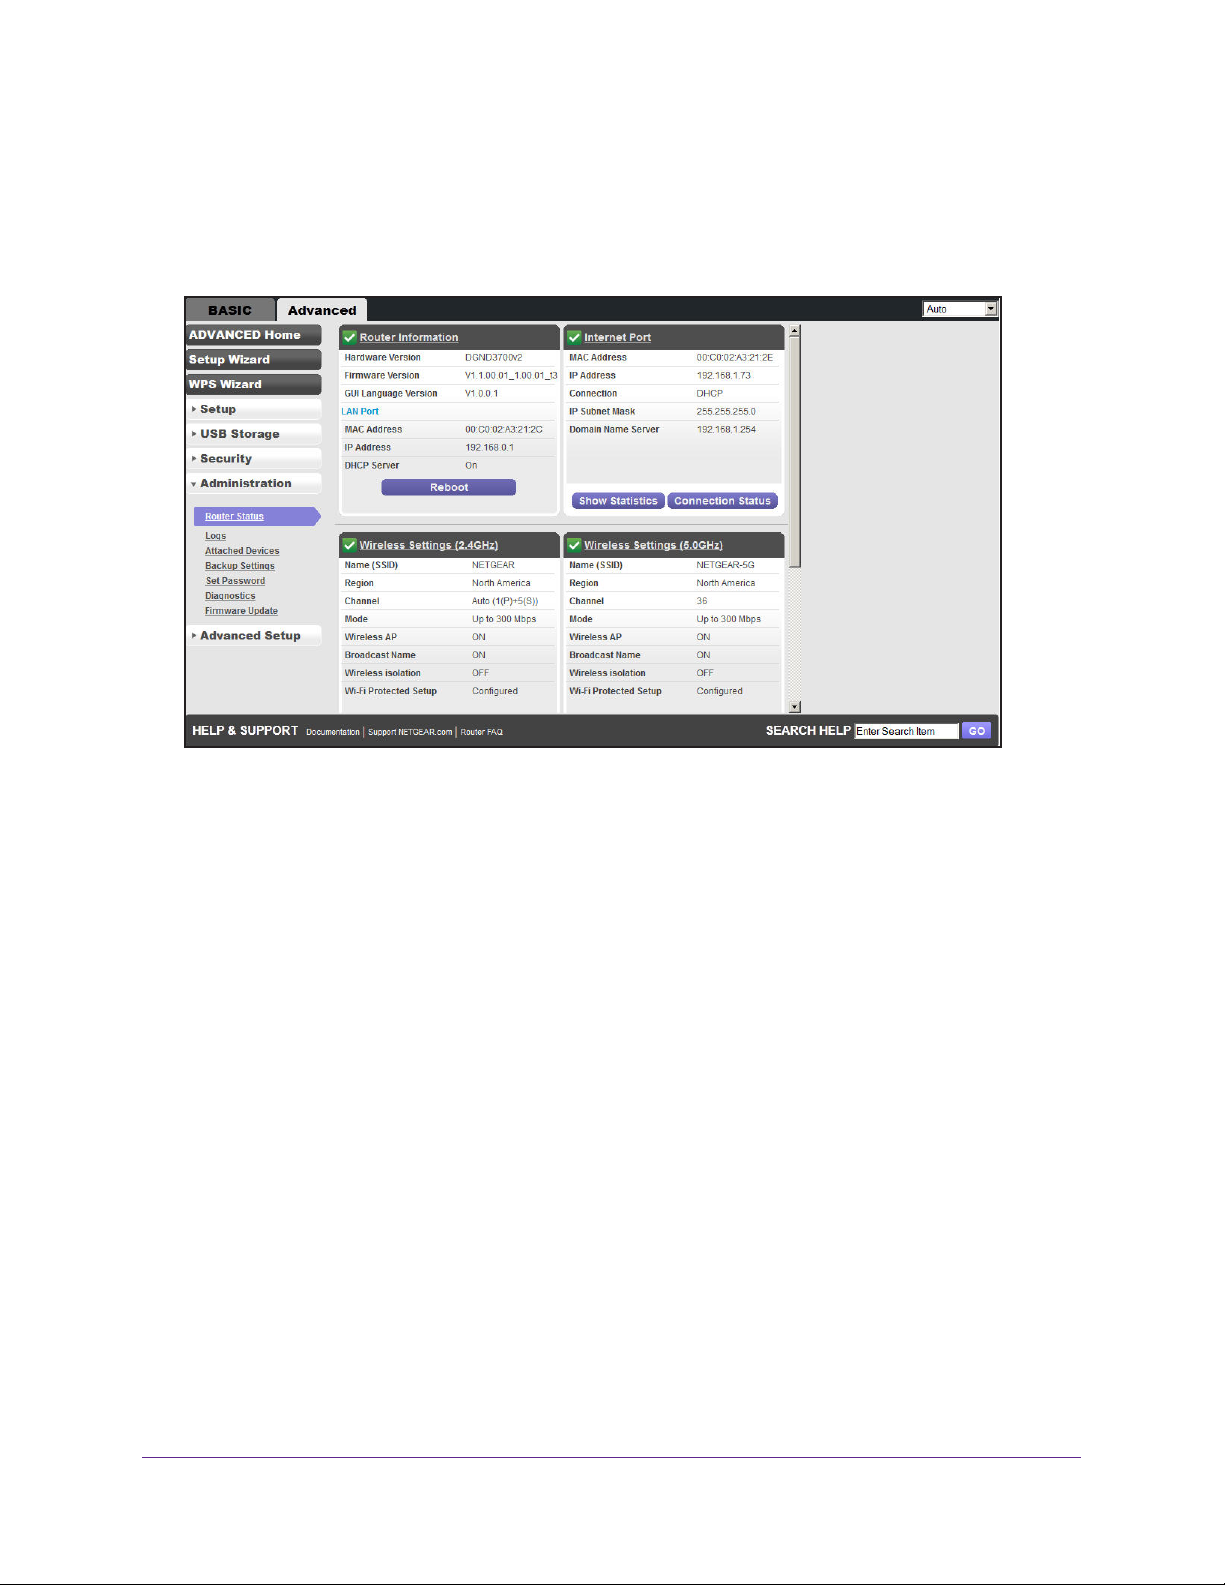
N600 Wireless Dual Band Gigabit ADSL2+ Modem Router DGND3700v2
View Wireless Modem Router Status
To view wireless modem router status and usage information, select Advanced Home, or
select Administration > Router Status to display the following screen:
Wireless Modem Router Information
Hardware Version. The wireless modem router model.
Firmware Version.
upgrade the wireless modem router firmware.
GUI Language Version. The localized language of the user interface.
LAN Port.
• MAC Address.
being used by the Ethernet (LAN) port of the wireless modem router.
• IP Address.
modem router. The default is 192.168.1.1.
• DHCP Server. Identifies whether the wireless modem router’
active for the LAN-attached devices.
The version of the wireless modem router firmware. It changes if you
The Media Access Control address. This is the unique physical address
The IP address being used by the Ethernet (LAN) port of the wireless
s built-in DHCP server is
Internet Provider (WAN) Setup
MAC Address. The Media Access Control address. This is the unique physical address
being used by the Internet (WAN) port of the wireless modem router.
Administration
85
Page 86
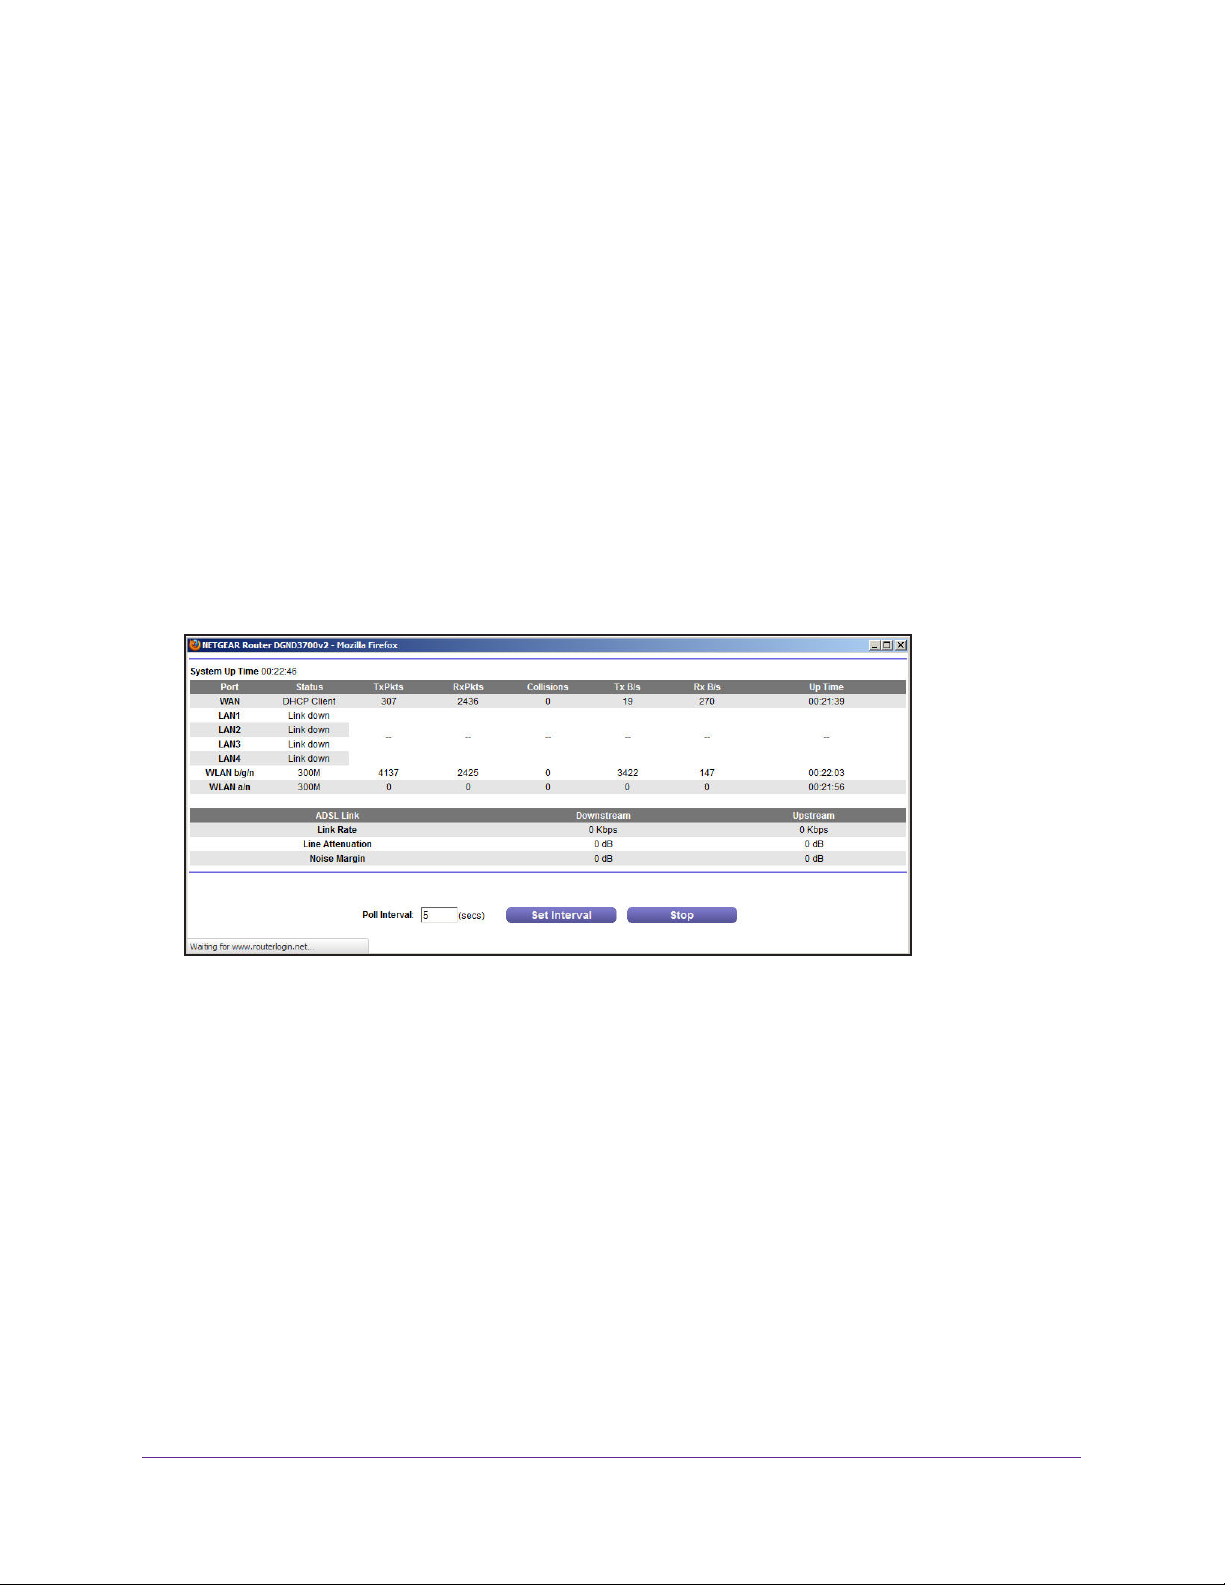
N600 Wireless Dual Band Gigabit ADSL2+ Modem Router DGND3700v2
IP Address. The IP address being used by the Internet (WAN) port of the wireless modem
router. If no address is shown or the address is 0.0.0, the wireless modem router cannot
connect to the Internet.
Connection. This shows if the wireless modem router is using a fixed IP address on the
AN. If the value is DHCP Client, the wireless modem router obtains an IP address
W
dynamically from the ISP.
IP Subnet Mask.
The IP subnet mask being used by the Internet (WAN) port of the wireless
modem router.
Domain Name Server. The Domain Name Server addresses being used by the wireless
modem router. A Domain Name Server translates human-language URLs such as
www.netgear.com into IP addresses.
Statistics Button
On the Router Status screen, in the Internet Port pane, click the Show Statistics button to
display the following screen:
Figure 9. System up time and poll interval statistics
System Up Time. The time elapsed since the wireless modem router was last restarted.
Port.
The statistics for the WAN (Internet) and LAN (Ethernet) ports. For each port, the
screen displays:
• Status. The link status of the port.
• TxPkts.
• RxPkts.
• Collisions.
• Tx B/s.
• Rx B/s.
• Up T
• Poll Interval.
The number of packets transmitted on this port since reset or manual clear.
The number of packets received on this port since reset or manual clear.
The number of collisions on this port since reset or manual clear.
The current transmission (outbound) bandwidth used on the WAN and LAN ports.
The current reception (inbound) bandwidth used on the WAN and LAN ports.
ime. The time elapsed since this port acquired the link.
The interval at which the statistics are updated in this screen.
Administration
86
Page 87
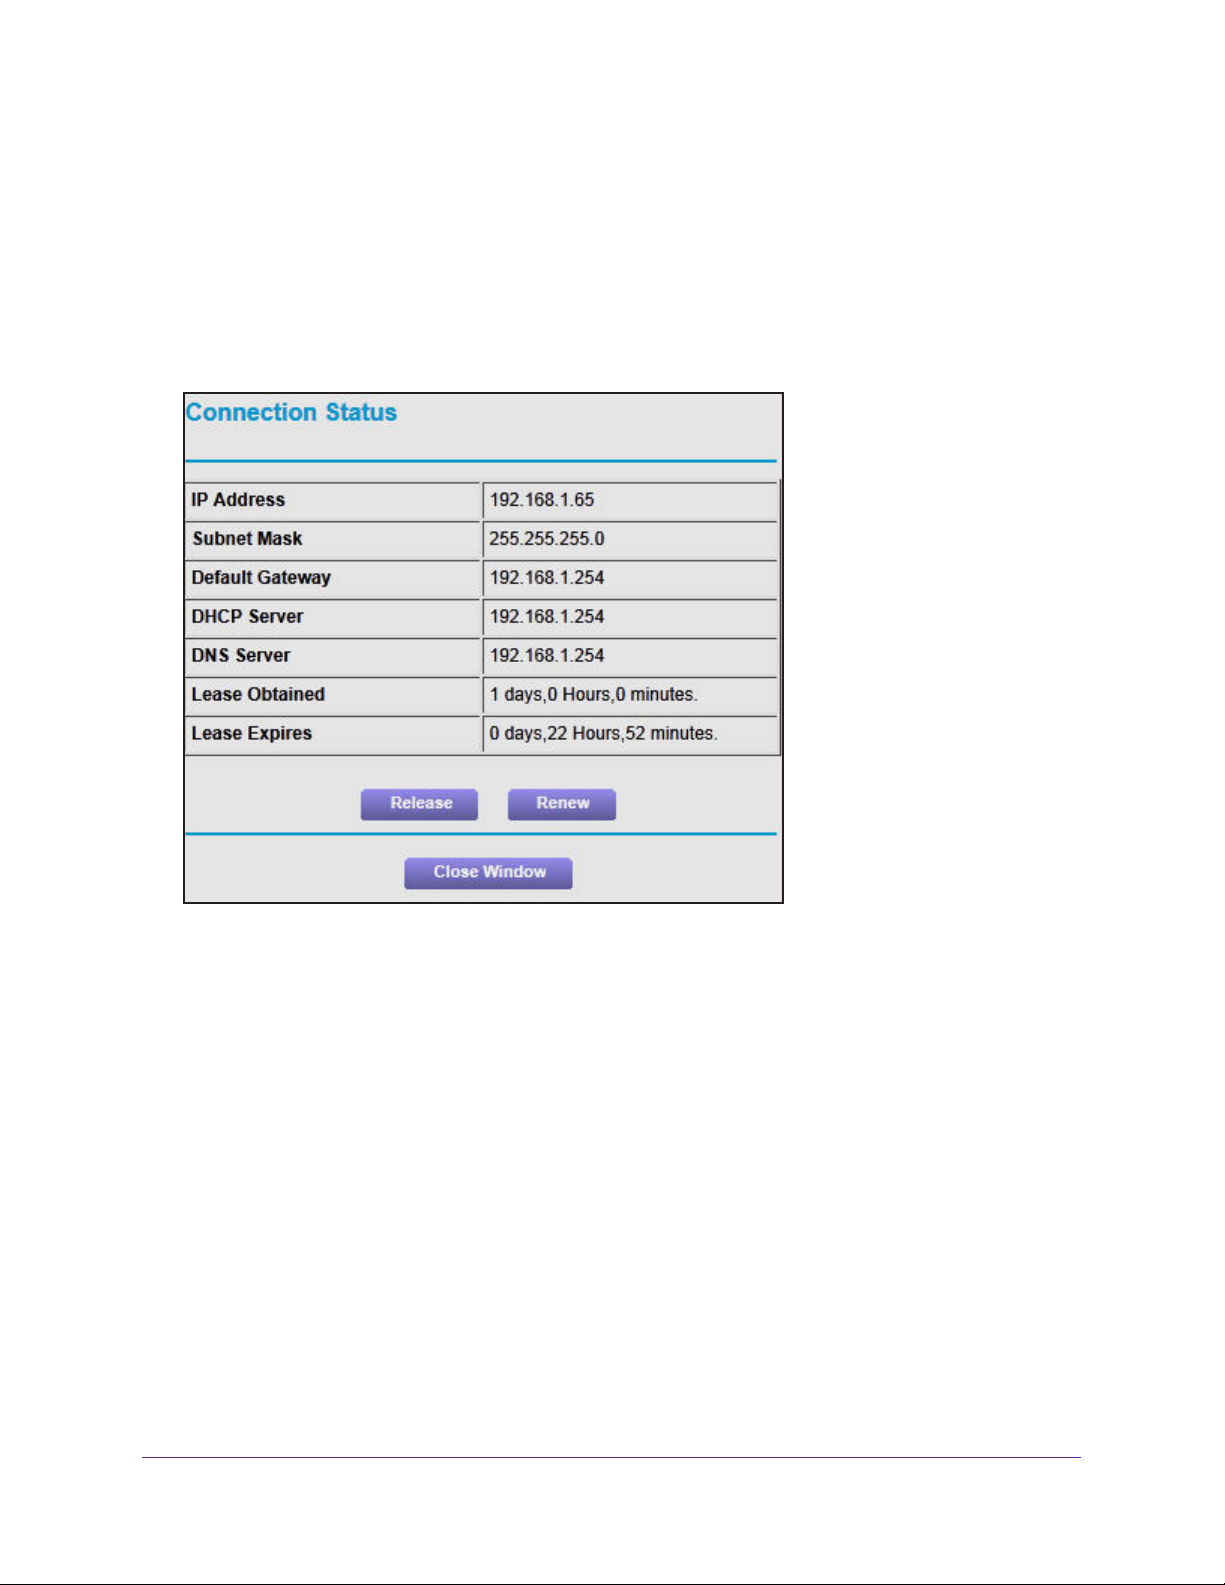
N600 Wireless Dual Band Gigabit ADSL2+ Modem Router DGND3700v2
To change the polling frequency, enter a time in seconds in the Poll Interval field, and click
Set Interval.
To stop the polling entirely, click Stop.
Connection Status Button
On the Router Status screen in the Internet Port pane, click the Connection Status button to
view connection status information.
Figure 10. View connection status information
The Release button returns the status of all items to 0. The Renew button refreshes the
items. The Close Window button closes the Connection Status screen.
IP Address. The IP address that is assigned to the wireless modem router.
Subnet Mask.
Default Gateway.
The subnet mask that is assigned to the wireless modem router.
The IP address for the default gateway that the wireless modem router
communicates with.
DHCP Server. The IP address for the Dynamic Host Configuration Protocol server that
provides the TCP/IP configuration for all the computers that are connected to the wireless
modem router.
DNS Server.
The IP address of the Domain Name Service server that provides translation of
network names to IP addresses.
Lease Obtained. The date and time when the lease was obtained.
Lease Expires.
The date and time that the lease expires.
Administration
87
Page 88
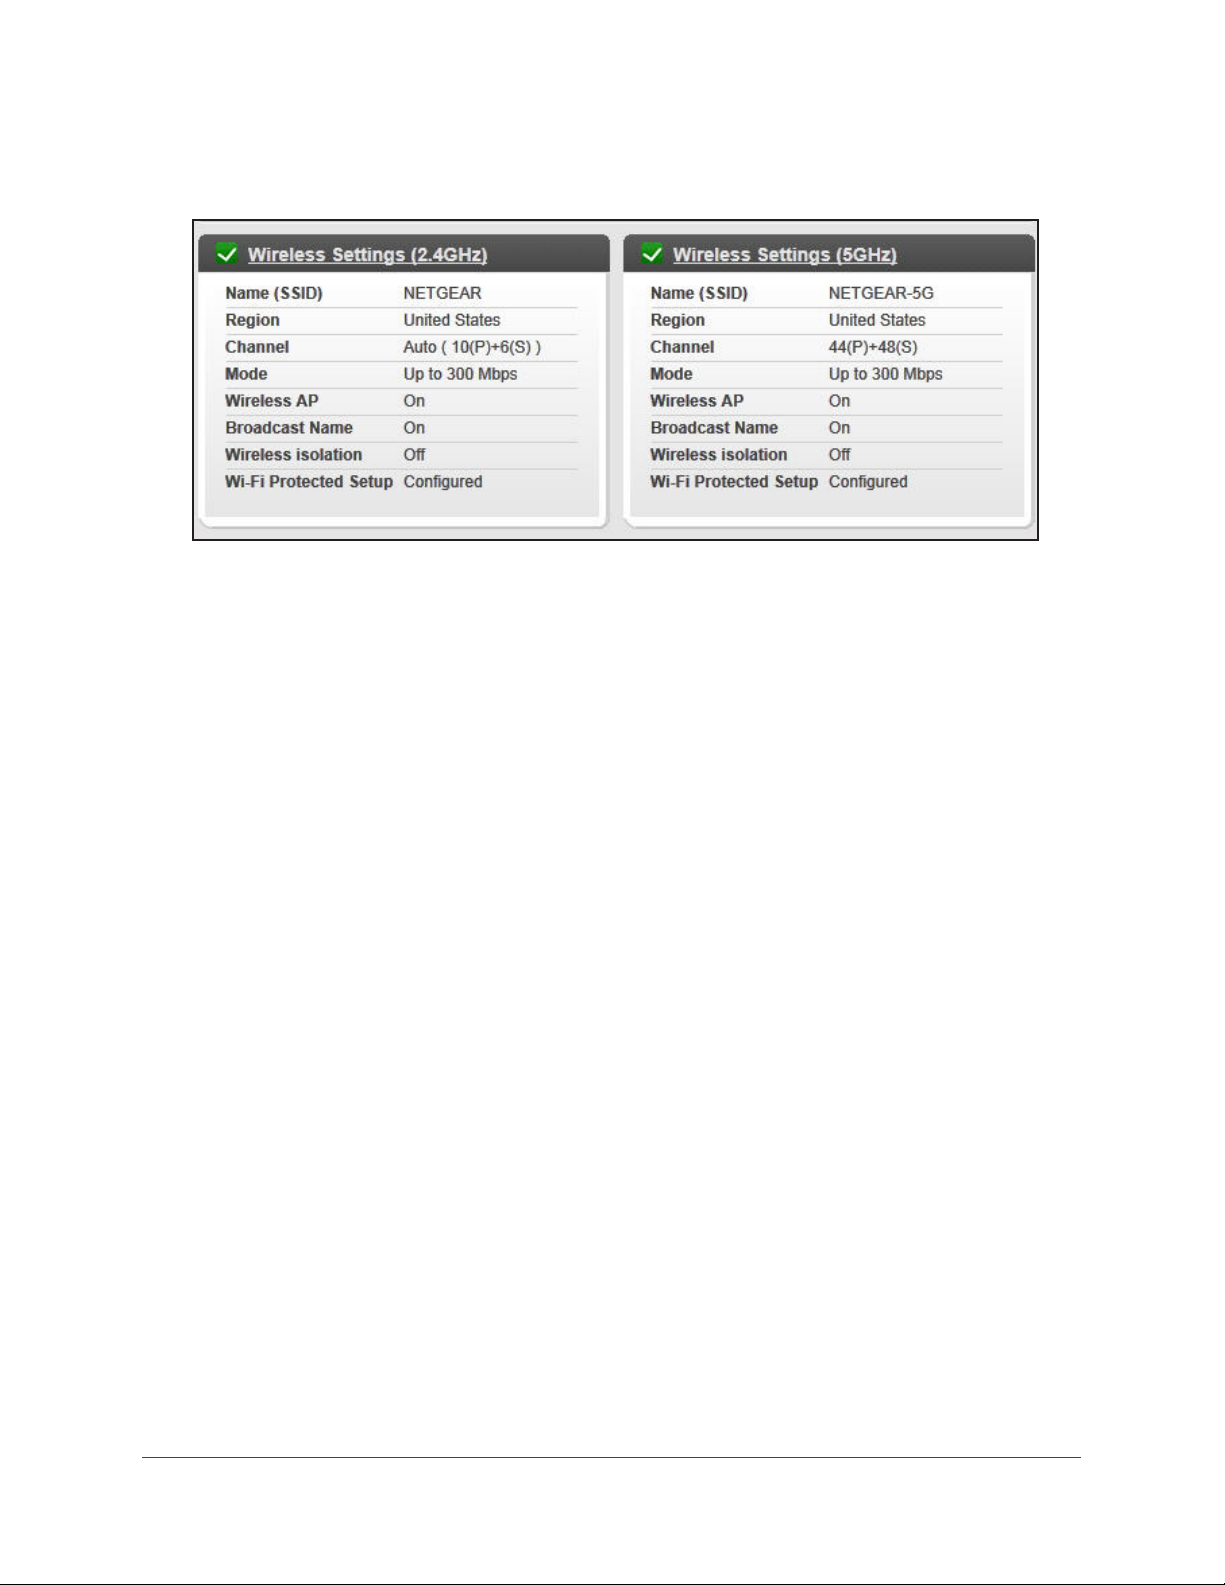
N600 Wireless Dual Band Gigabit ADSL2+ Modem Router DGND3700v2
Wireless Settings (2.4 GHz and 5 GHz)
The following settings are displayed:
Name (SSID).
default names for the 5 GHz ends in -5G to distinguish it from the 2.4 GHz network.
Region. The geographic region where the wireless modem router is being used. It might be
illegal to use the wireless features of the wireless modem router in some parts of the world.
Channel. Identifies the operating channel of the wireless port being used. The default
channel is Auto. When Auto is selected, the wireless modem router will find the best
operating channel available. If you notice interference from nearby devices, you can select a
different channel. Channels 1, 6, and 11 will not interfere with each other.
Mode. Indicates the wireless communication mode: Up to 54 Mbps, Up to 130 Mbps
(default), and Up to 300 Mbps.
Wireless AP. Indicates whether the radio feature of the wireless modem router is enabled. If
this feature is not enabled, the Wireless LED on the front panel is of
Broadcast Name. Indicates whether the wireless modem router is broadcasting its SSID.
Wireless Isolation. Indicates whether wireless connections to the wireless modem router
are prevented.
Wi-Fi Protected Setup. Indicates whether Wi-Fi Protected Setup is configured for this
network.
The wireless network name (SSID) used by the wireless modem router. The
f.
Administration
88
Page 89
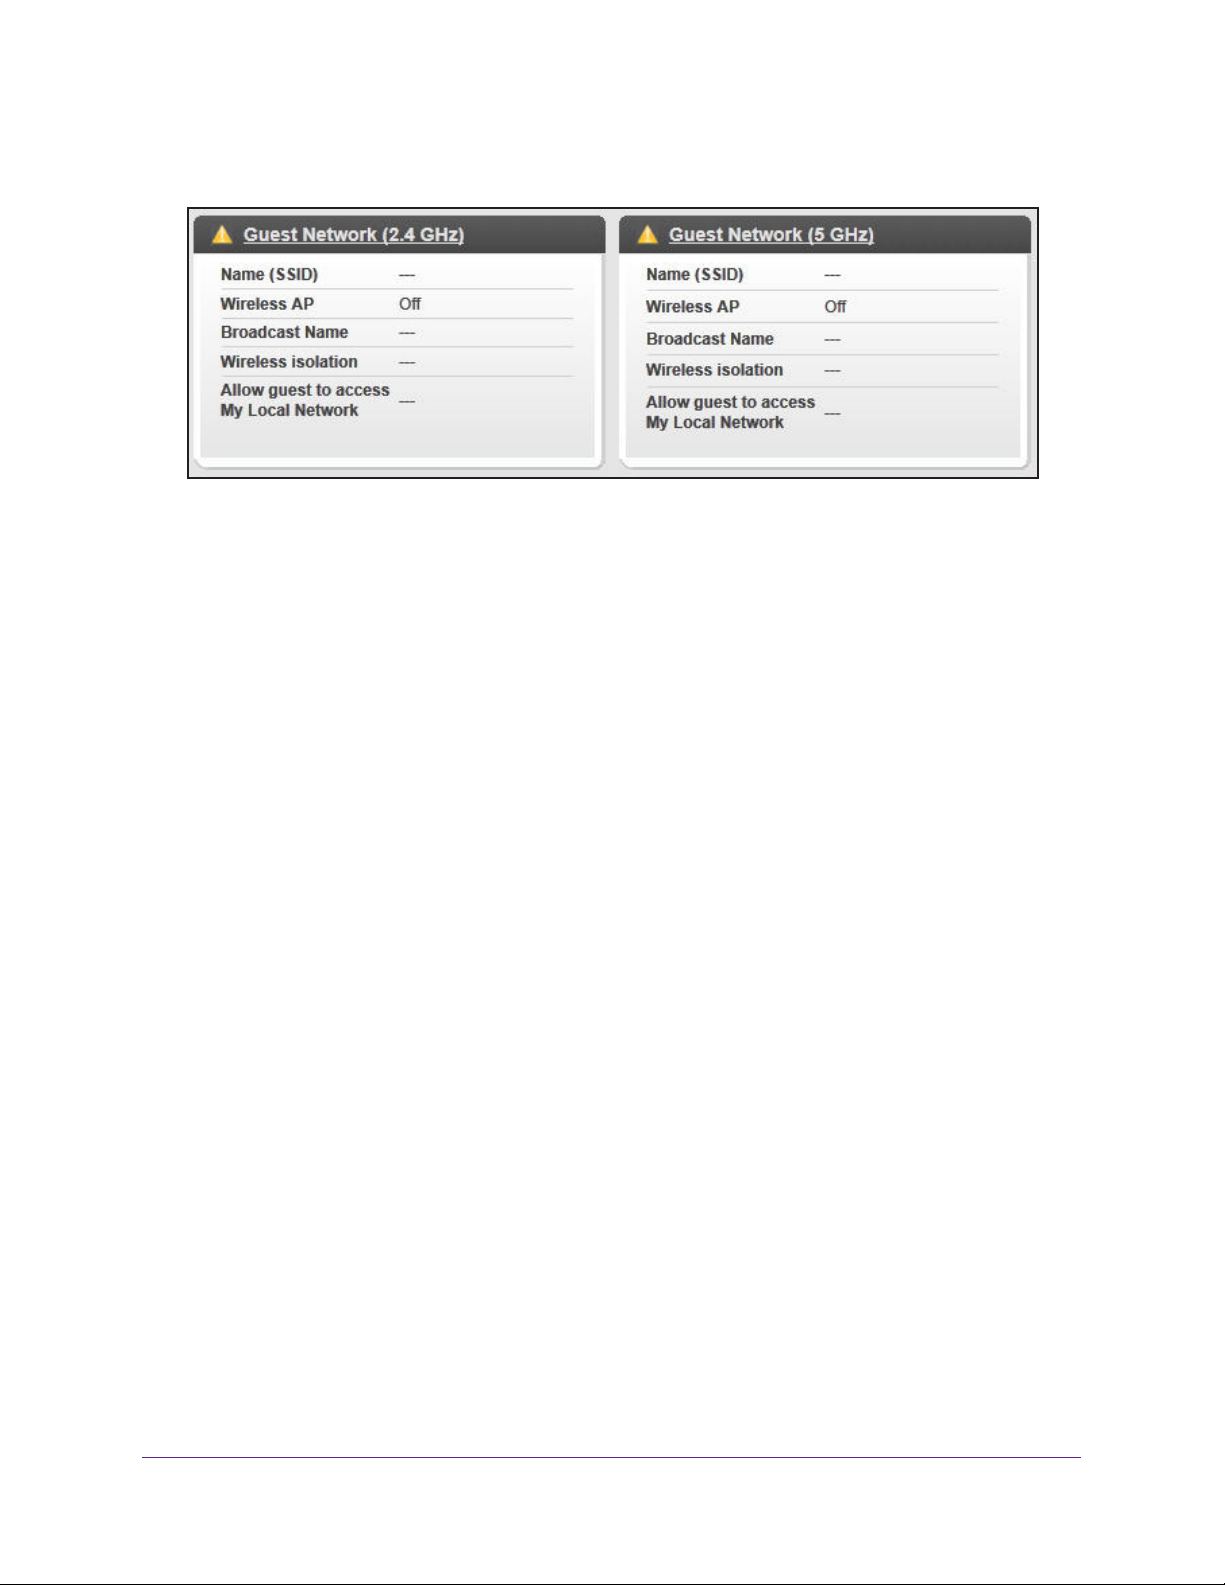
N600 Wireless Dual Band Gigabit ADSL2+ Modem Router DGND3700v2
Guest Network (2.4 GHz and 5 GHz)
Name (SSID). The 11N wireless network name (SSID) used by the wireless modem router.
The default names are NETGEAR-Guest and NETGEAR-5G-Guest.
Wireless AP. Indicates whether the radio feature of the wireless modem router is enabled. If
this feature is not enabled, the Wireless LEDs on the front panel are off.
Broadcast Name. Indicates whether the wireless modem router is broadcasting its SSID.
Wireless Isolation. Indicates whether wireless connections to the wireless modem router
are prevented.
Allow guest to access My Local Network. Indicates whether any user who connects to this
SSID can access local networks associated with the wireless modem router.
Administration
89
Page 90
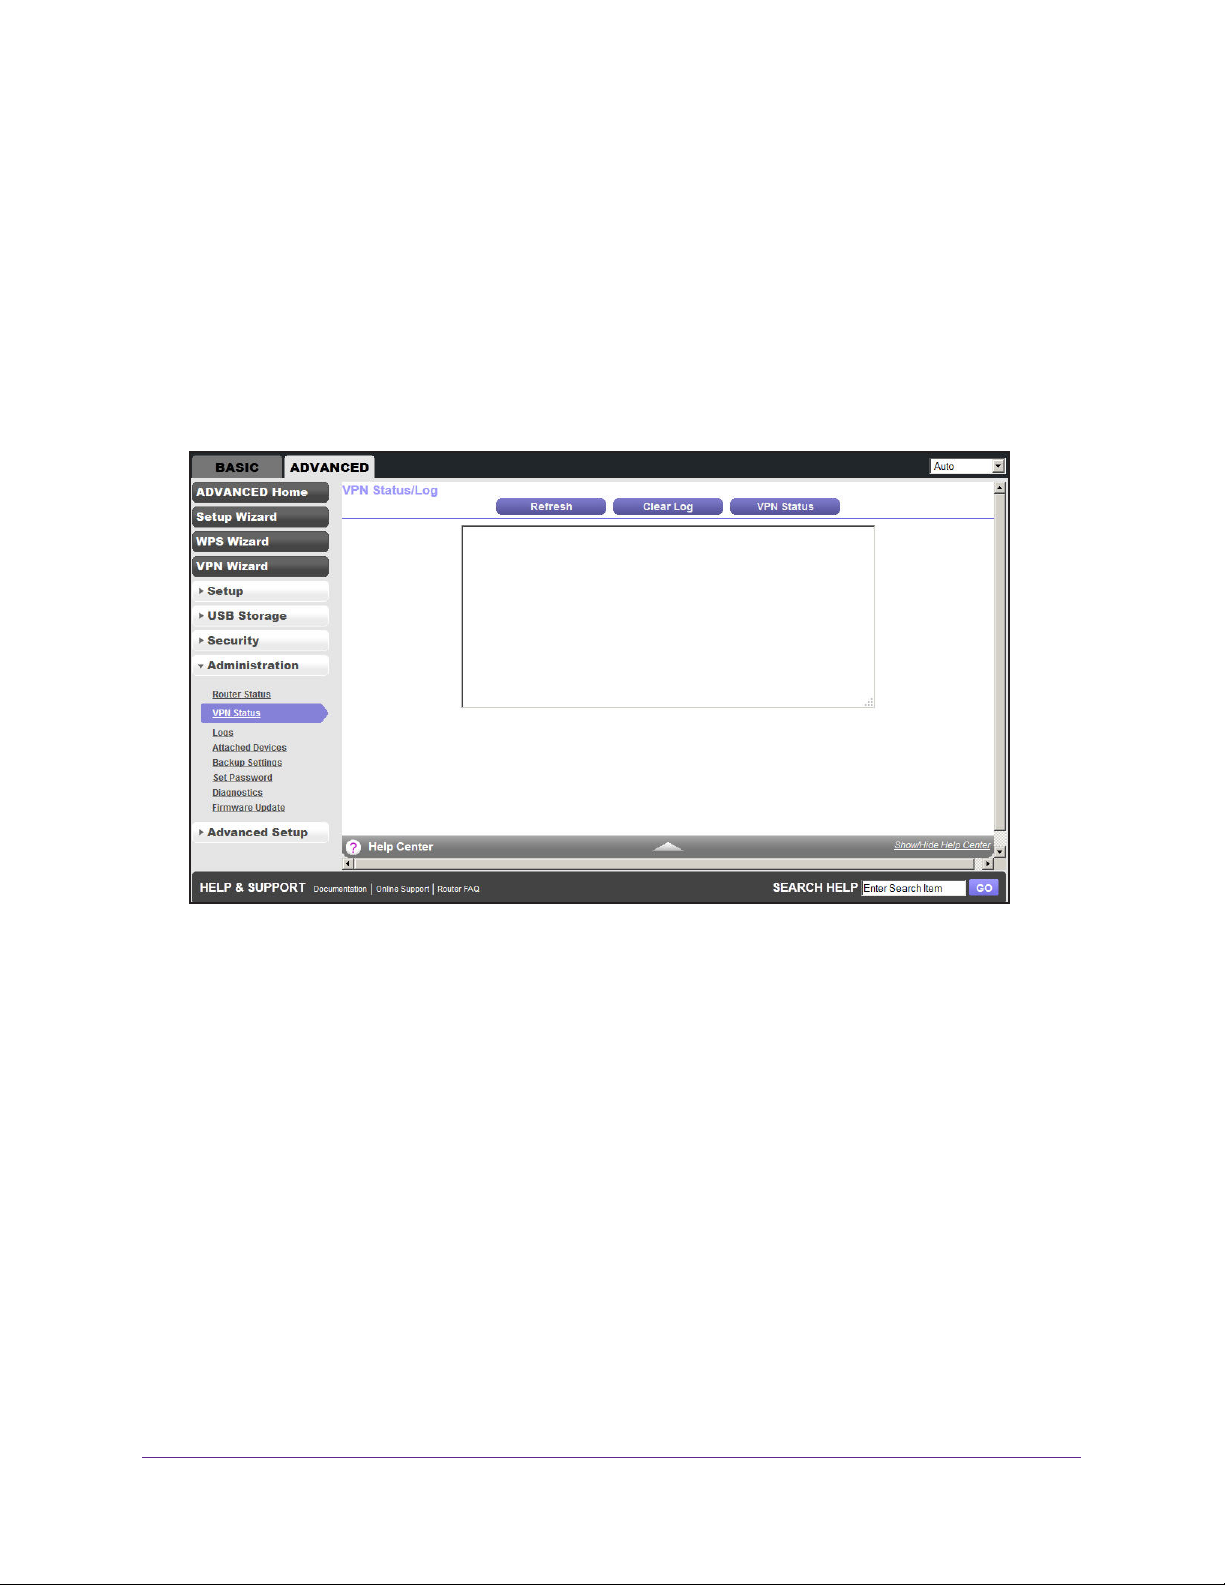
N600 Wireless Dual Band Gigabit ADSL2+ Modem Router DGND3700v2
View VPN Status
The log is a detailed record of the websites you accessed or attempted to access. Up to
256 entries are stored in the log. Log entries appear only when keyword blocking is enabled
and no log entries are made for the trusted user
To view the details of recent VPN activity log:
.
1. Select ADV
The VPN Status/Log screen shows the details of recent VPN activity.
2. (Optional) Click the Refresh button to refresh the log screen.
ANCED > Administration > VPN Status
To clear the VPN activity log:
1. Select ADV
ANCED > Administration > VPN Status.
Administration
90
Page 91
N600 Wireless Dual Band Gigabit ADSL2+ Modem Router DGND3700v2
The VPN Status/Log screen shows the details of recent VPN activity.
2. Click the Clear Log button.
The log entries are cleared.
Administration
91
Page 92
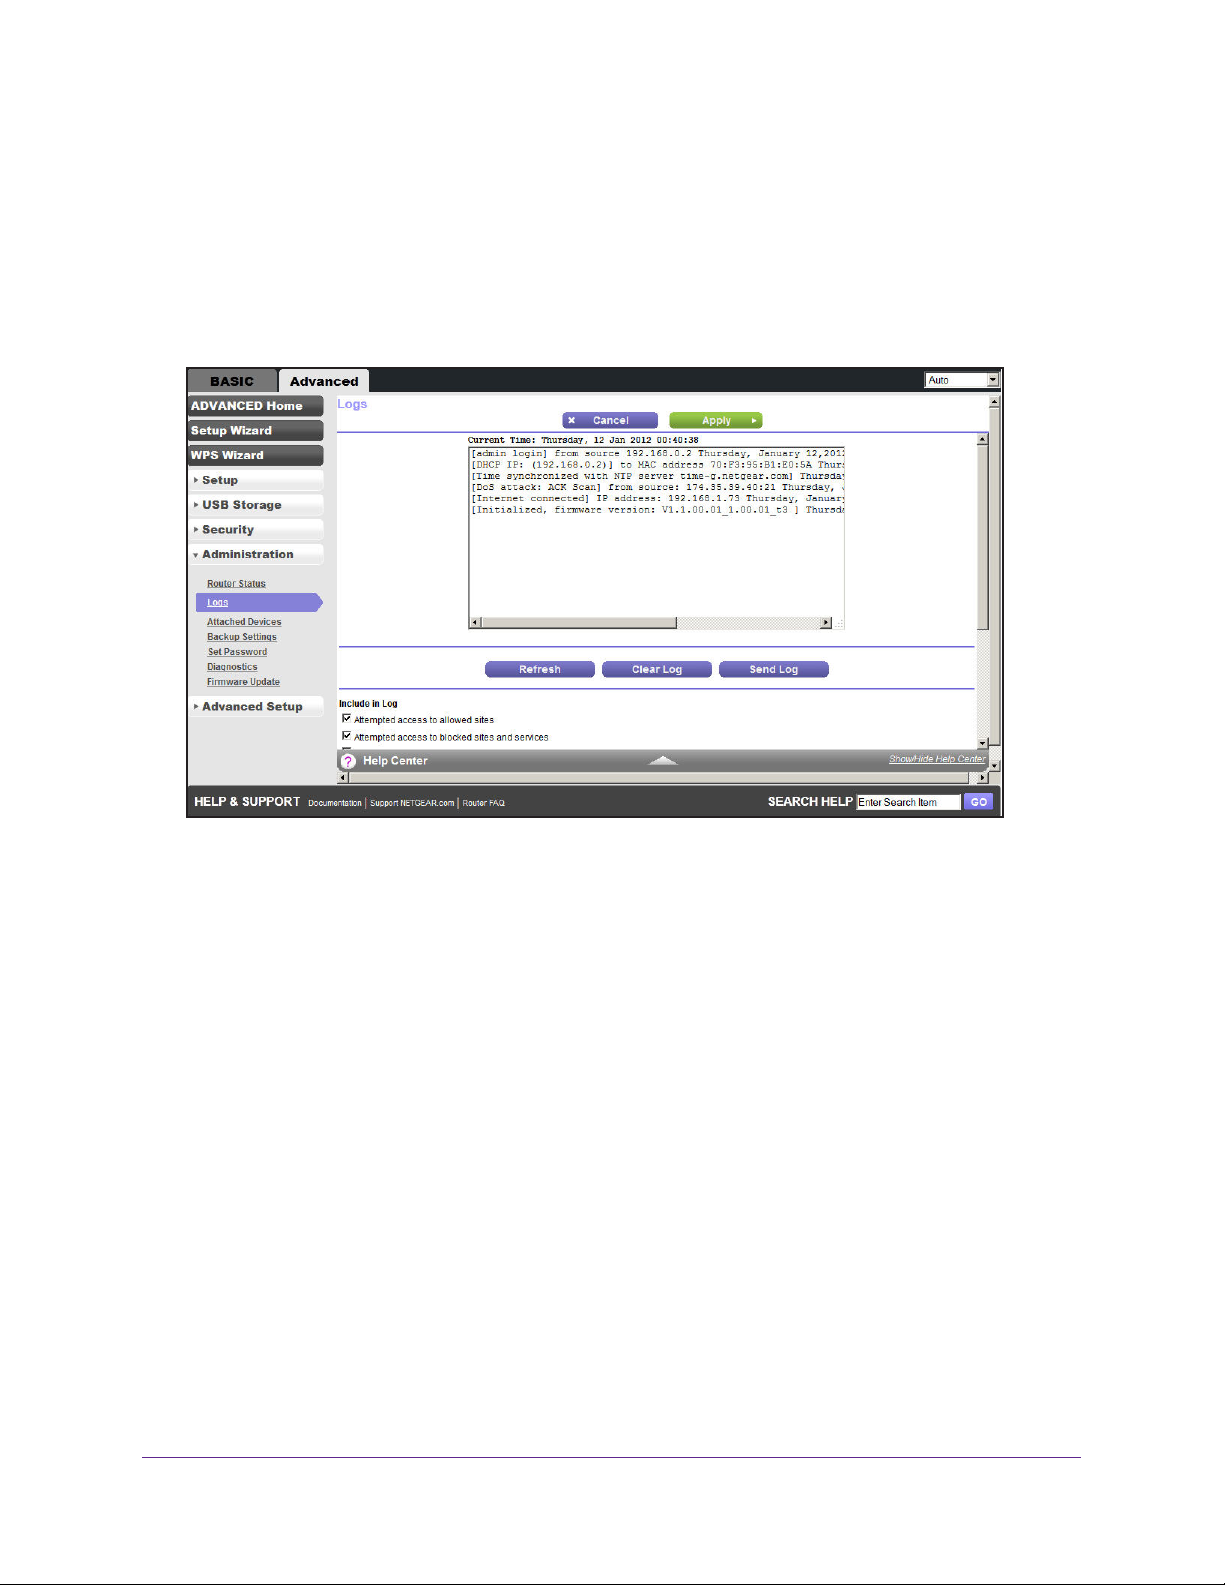
N600 Wireless Dual Band Gigabit ADSL2+ Modem Router DGND3700v2
View Logs of Web Access or Attempted Web Access
The log is a detailed record of the websites you have accessed or attempted to access. Up to
256 entries are stored in the log. Log entries appear only when keyword blocking is enabled
and no log entries are made for the trusted user
Select Advanced > Administration > Logs. The Logs screen displays.
.
The Logs screen shows the following information:
• Date and time.
• Source IP.
• T
arget address. The name or IP address of the website or news group visited or to which
access was attempted.
• Action. Whether the access was blocked or allowed.
To refresh the log screen, click the Refresh button.
To clear the log entries, click the Clear Log button.
To email the log immediately, click the Send Log button.
The date and time the log entry was recorded.
The IP address of the initiating device for this log entry.
Manage the Configuration File
The configuration settings of the N600 Modem Router are stored within the wireless modem
router in a configuration file. You can back up (save) this file to your computer, restore it, or
reset it to the factory default settings.
Administration
92
Page 93
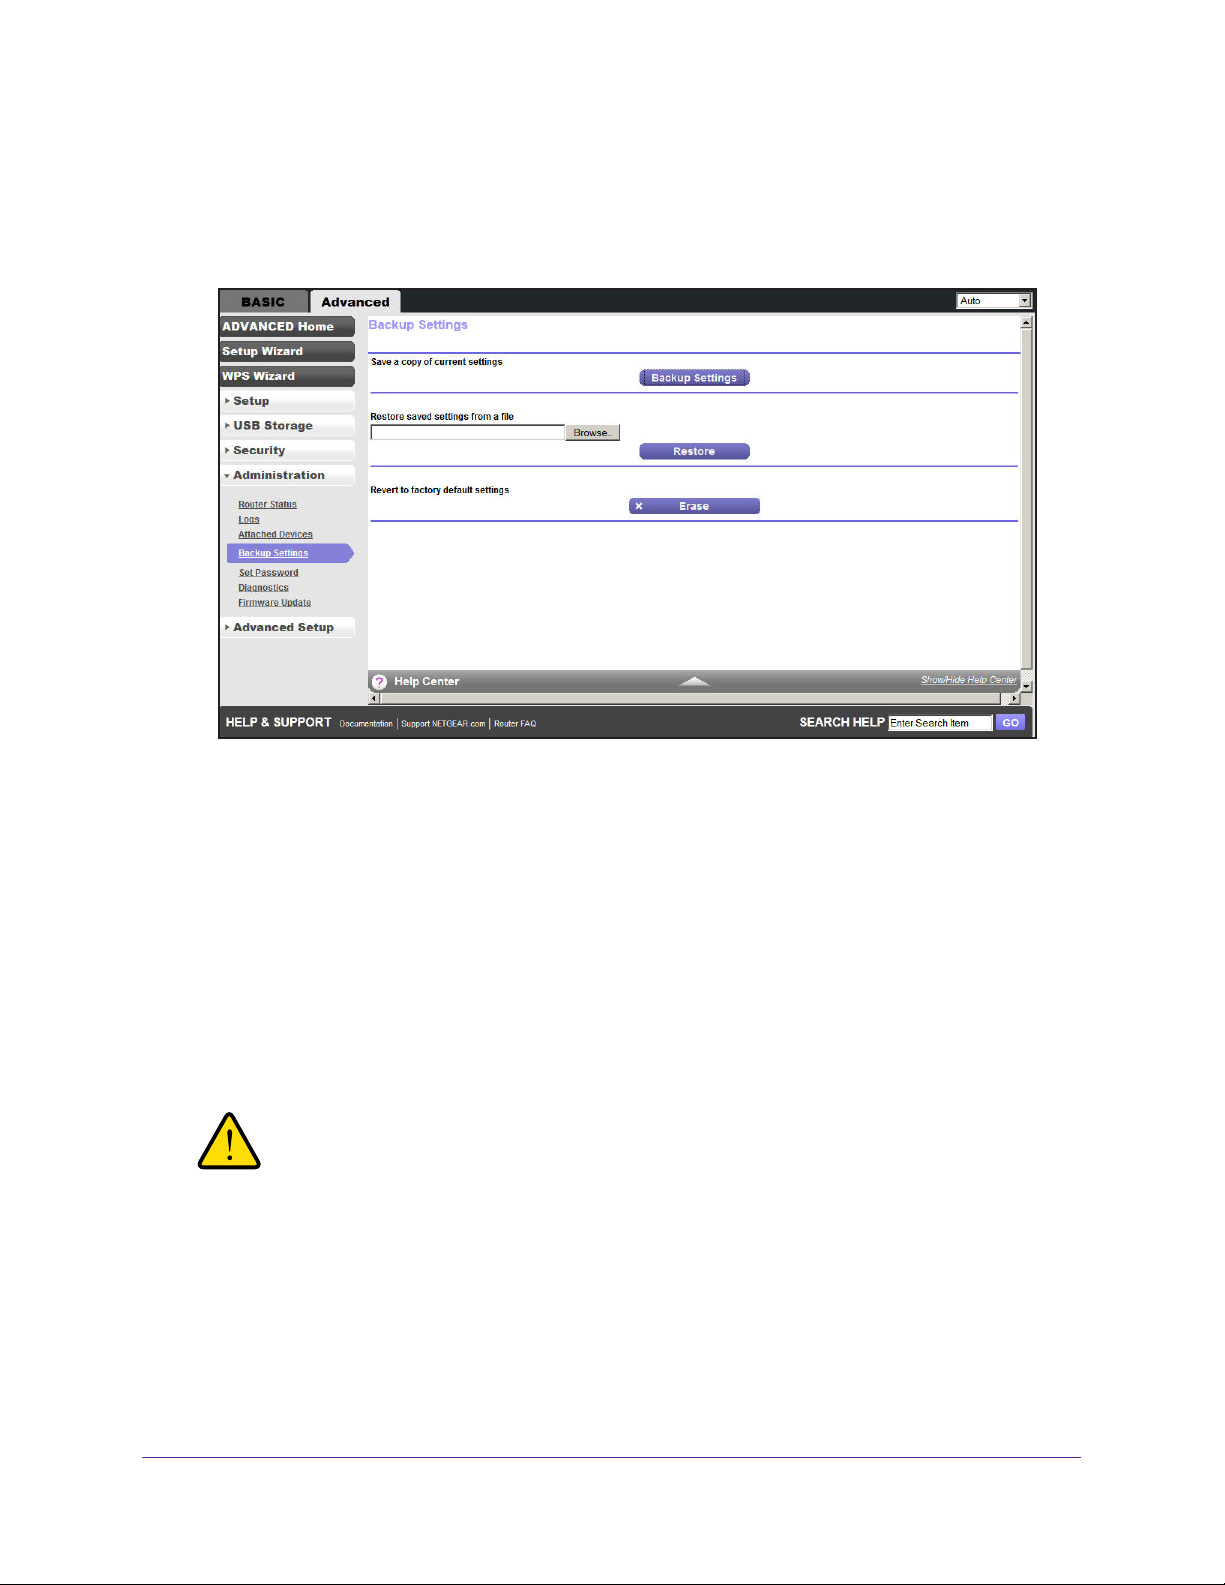
N600 Wireless Dual Band Gigabit ADSL2+ Modem Router DGND3700v2
Back Up Settings
To back up the wireless modem router’s configuration settings:
1. Select Advanced >
2. Click Backup Settings to save a copy of the current settings.
3. Choose a location to store the .cfg file that is on a computer on your network.
Administration > Backup Settings to display the following screen:
Restore Configuration Settings
To restore configuration settings that you backed up:
1. Enter the full path to the file on your network, or click the Browse button to find the file.
2. When you have located the .cfg file, click the Restore button to upload the file to the
wireless modem router.
Upon completion, the wireless modem router reboots.
WARNING:
Do not interrupt the reboot process.
Erase
Under some circumstances (for example, if you move the wireless modem router to a
different network or if you have forgotten the password), you might want to erase the
configuration and restore the factory default settings.
Administration
93
Page 94
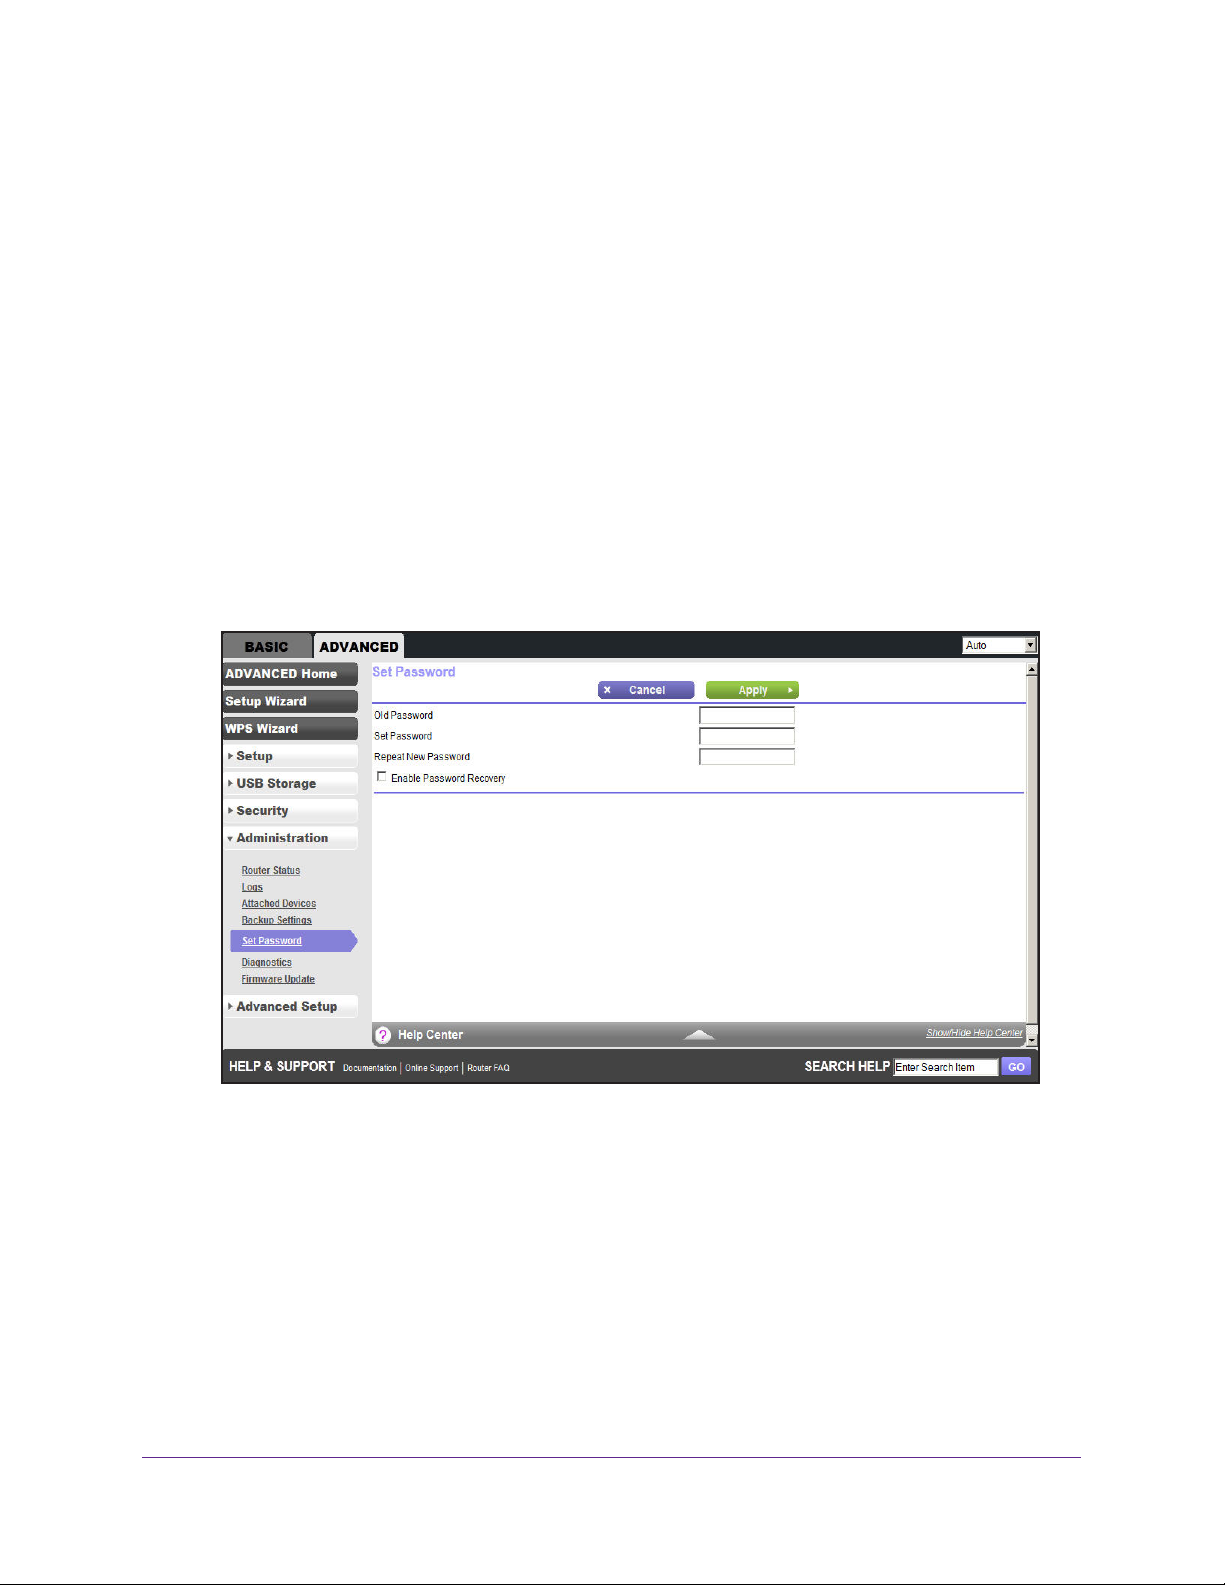
N600 Wireless Dual Band Gigabit ADSL2+ Modem Router DGND3700v2
Either you can use the Restore Factory Settings button on the back of the wireless modem
router (see Factory Settings on page 142), or you can click the Erase button in this screen.
Erase sets the user name to admin, the password to password, and the LAN IP address to
192.168.1.1, and enables the wireless modem router’s DHCP.
Set Password
This feature allows you to change the default password that is used to log in to the wireless
modem router with the user name admin.
This is not the same as changing the password for wireless access. The label on the bottom
of your wireless modem router shows your unique wireless network name (SSID) and
password for wireless access (see Label on page 12).
To set the password for the user name admin:
1. Select Advanced >
2. Type the old password, and type the new password twice in the fields on this screen.
3. If you want to be able to recover the password, select the Enable Password Recovery
check box.
4. Click Apply so that your changes take ef
Administration > Set Password to display the following screen:
fect.
Password Recovery
NETGEAR recommends that you enable password recovery if you change the password for
the router’s user name of admin. Then you will have an easy way to recover the password if it
is forgotten. This recovery process is supported in Internet Explorer, Firefox, and Chrome
browsers, but not in the Safari browser.
Administration
94
Page 95
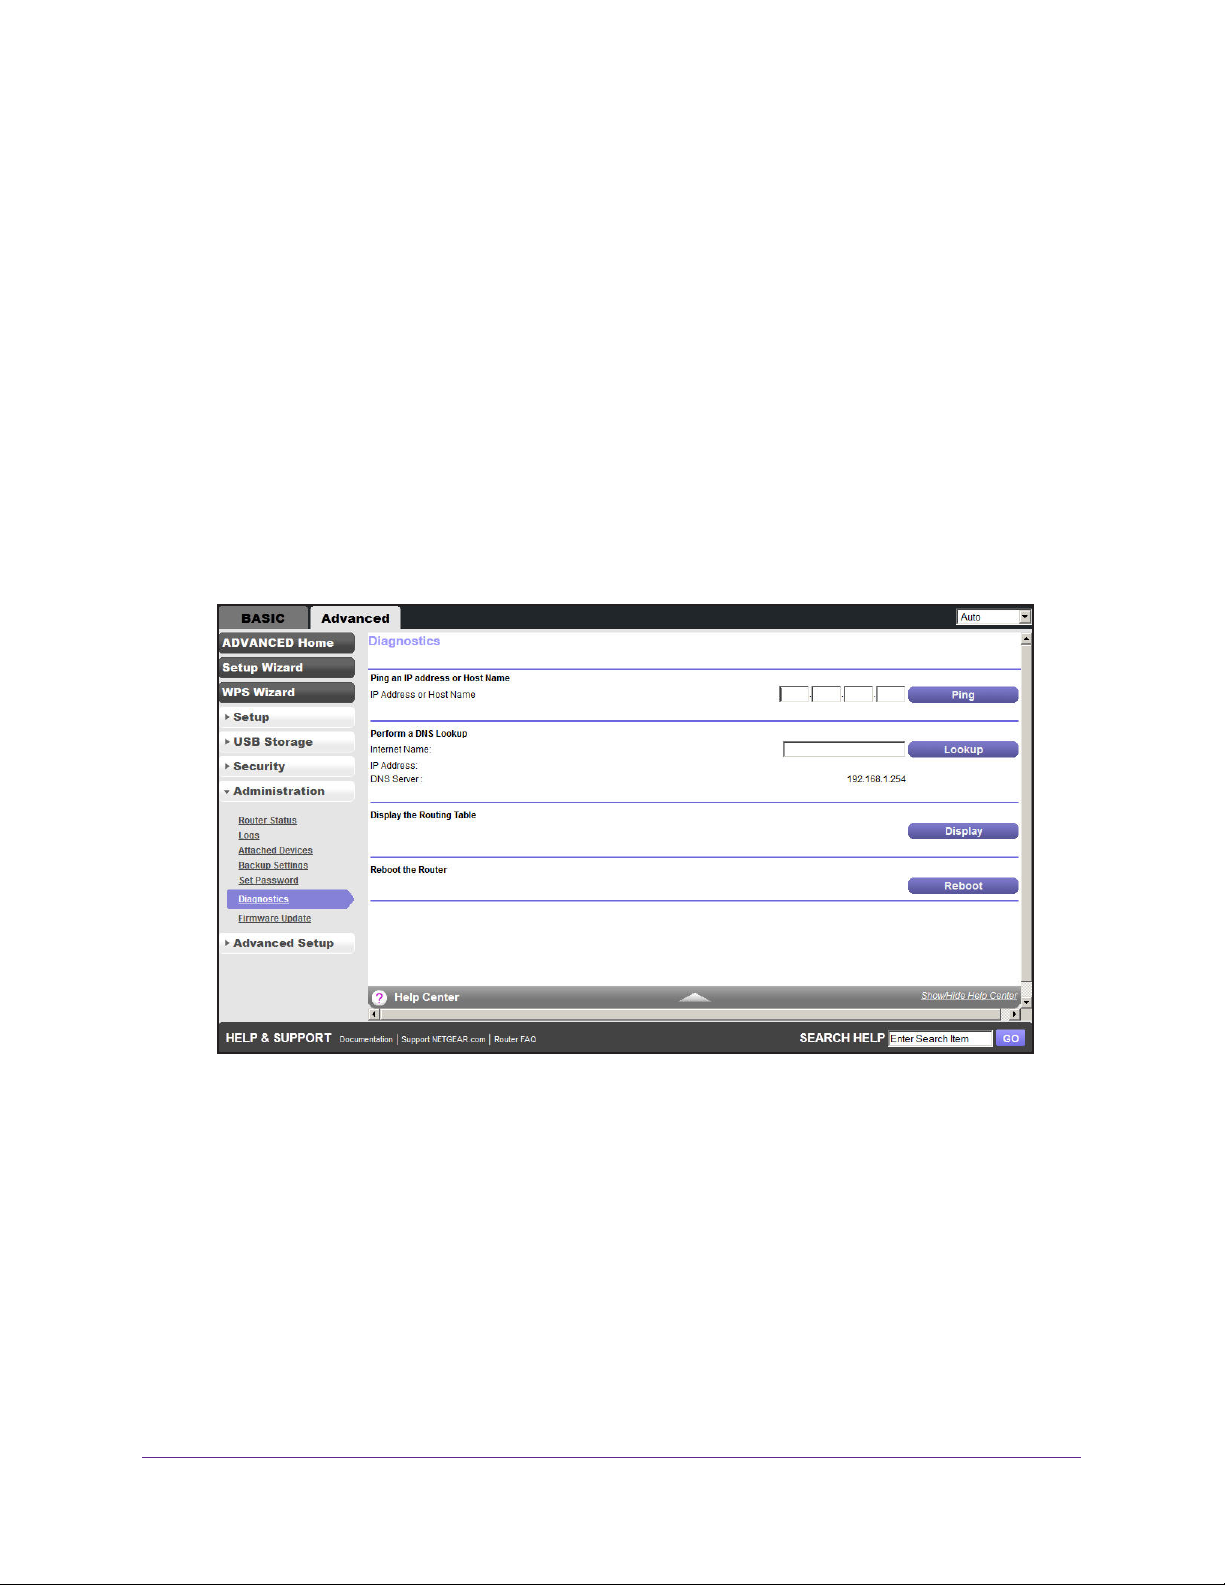
N600 Wireless Dual Band Gigabit ADSL2+ Modem Router DGND3700v2
To set up password recovery:
1. Select the Enable Password Recovery check box.
2. Select two security questions, and provide answers to them.
3. Click Apply to save your changes.
When you use your browser to access the router, the login window displays. If password
recovery is enabled, when you click Cancel, the password recovery process starts.
then enter the saved answers to the security questions to recover the password.
Diagnostics
You can perform various diagnostics. For normal operation, these tests are not required.
To perform diagnostic tests:
You can
1. Select Advanced >
2. Perform the following diagnostics as needed:
• Ping an IP address or Host Name. Use this test to send a ping packet request to the
specified IP address or host name.
request times out (in other words, no reply is received), this result usually means the
destination is unreachable. Note, however, that some network devices can be
configured not to respond to a ping.
• Perform a DNS Lookup.
(for example, www.netgear.com) to an IP address. If you need the IP address of a
web, FTP, mail, or other server on the Internet, do a DNS lookup to find the IP
address.
• Display the Routing T
Administration > Diagnostics to display the following screen:
This test is often used to test a connection. If the
A DNS (Domain Name Server) converts the Internet name
able. This operation displays the internal routing table.
Administration
95
Page 96

N600 Wireless Dual Band Gigabit ADSL2+ Modem Router DGND3700v2
• Reboot the Router. Click this button to perform a remote restart of the router. Use
this operation if the router seems to have become unstable or is not operating
normally.
Note: Rebooting will break any existing connections either to the router
(such as this one) or through the router (for example, LAN users
accessing the Internet). However, connections to the Internet are
automatically reestablished when possible.
Administration
96
Page 97

9. Advanced Settings
Fine tuning your network
9
This chapter describes the advanced features of your wireless modem router. The information is
for users with a solid understanding of networking concepts who want to set the wireless modem
router up for unique situations such as when remote access from the Internet by IP or domain
name is needed.
This chapter includes the following sections:
• Advanced Wireless Settings
• Wireless Repeating Function (WDS)
• Port Forwarding and Triggering
• Set Up Port Forwarding to Local Servers
• Set Up Port Triggering
• Dynamic DNS
• Static Routes
• Remote Management
• USB Settings
• Universal Plug and Play
• IPv6
• Traffic Meter
• Device Mode
• VPN Policies
97
Page 98
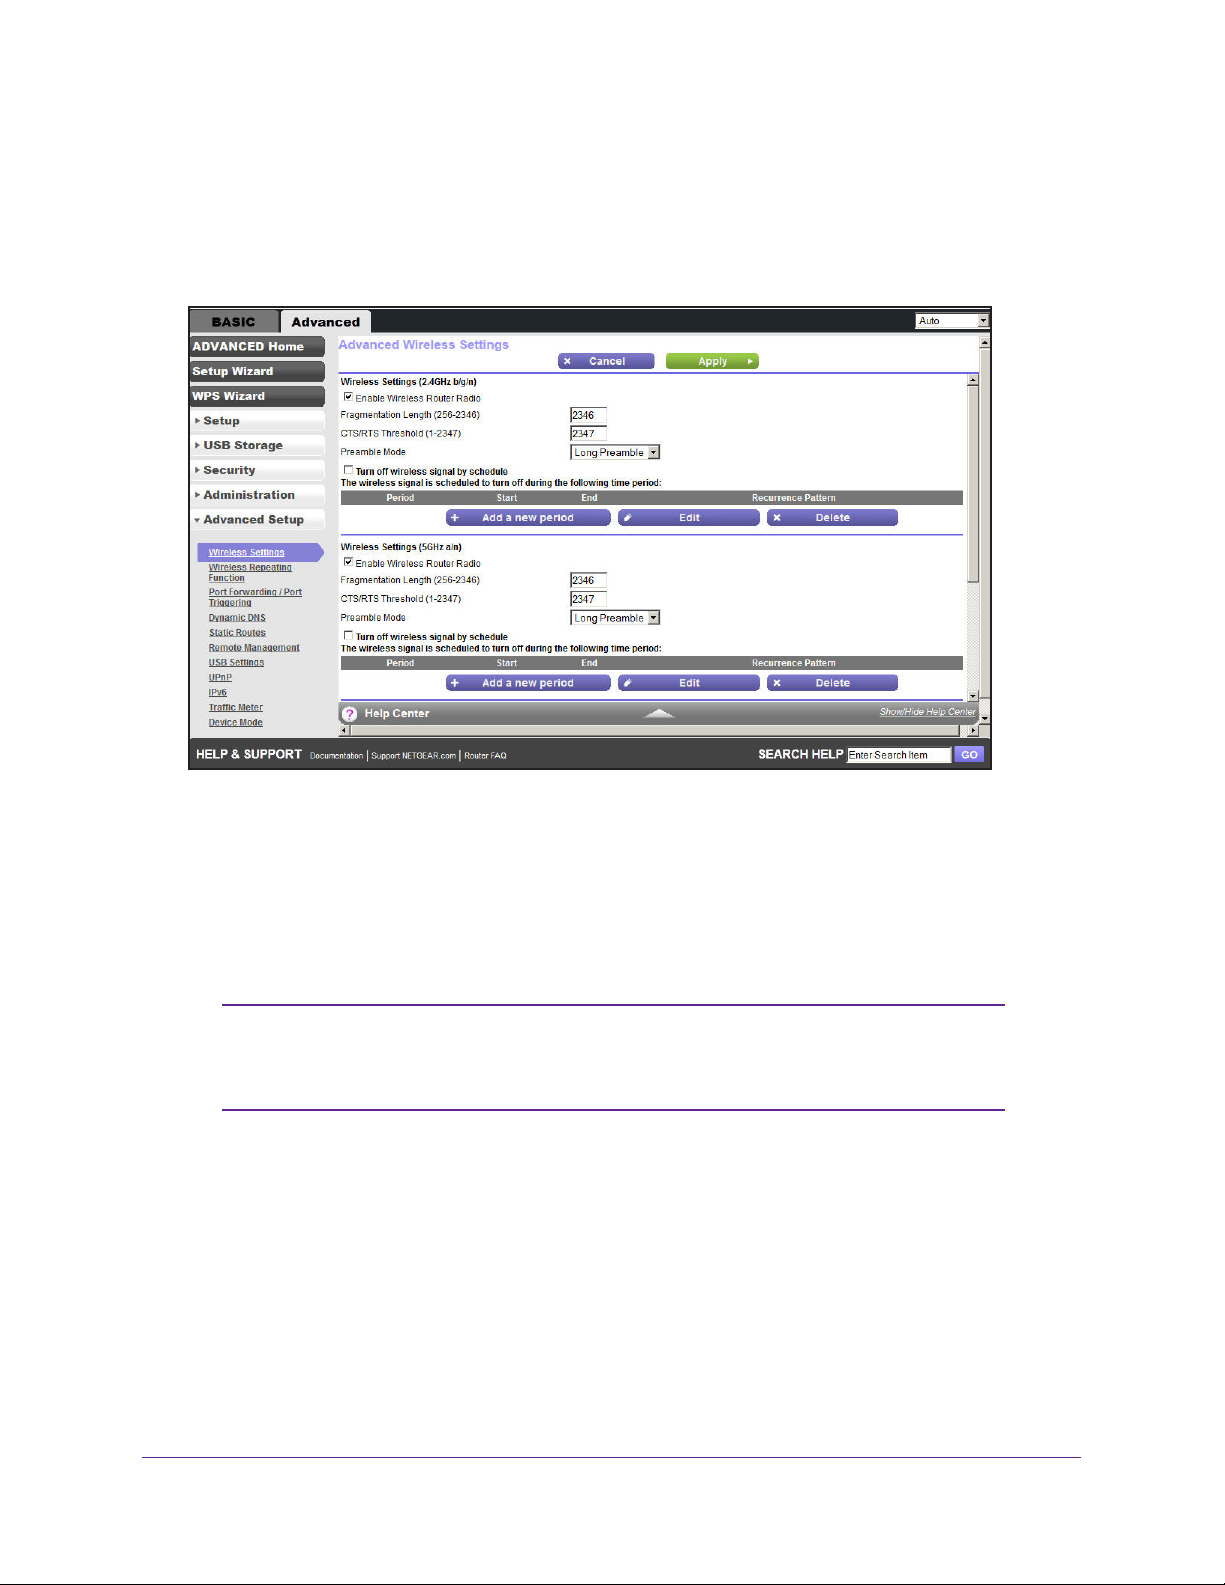
N600 Wireless Dual Band Gigabit ADSL2+ Modem Router DGND3700v2
Advanced Wireless Settings
Select Advanced > Advanced Setup > Wireless Settings to display the Advanced
Wireless Settings screen:
The following settings are available in this screen:
• Enable W
wireless modem router by clearing this check box. Select this check box again to enable
the wireless portion of the wireless modem router. When the wireless radio is disabled,
other members of your household can use the wireless modem router by connecting their
computers to the wireless modem router with an Ethernet cable.
Note: The Fragmentation Length, CTS/RTS Threshold, and Preamble
urn off wireless signal by schedule. From the Advanced Wireless Settings screen
• T
(with the Enable Wireless Router Radio check box selected for the radio band you want
to configure), click the Add a new period button to display the Turn off wireless signal by
schedule screen.
ireless Router Radio. You can completely turn off the wireless portion of the
Mode options are reserved for wireless testing and advanced
configuration only. Do not change these settings.
Advanced Settings
98
Page 99
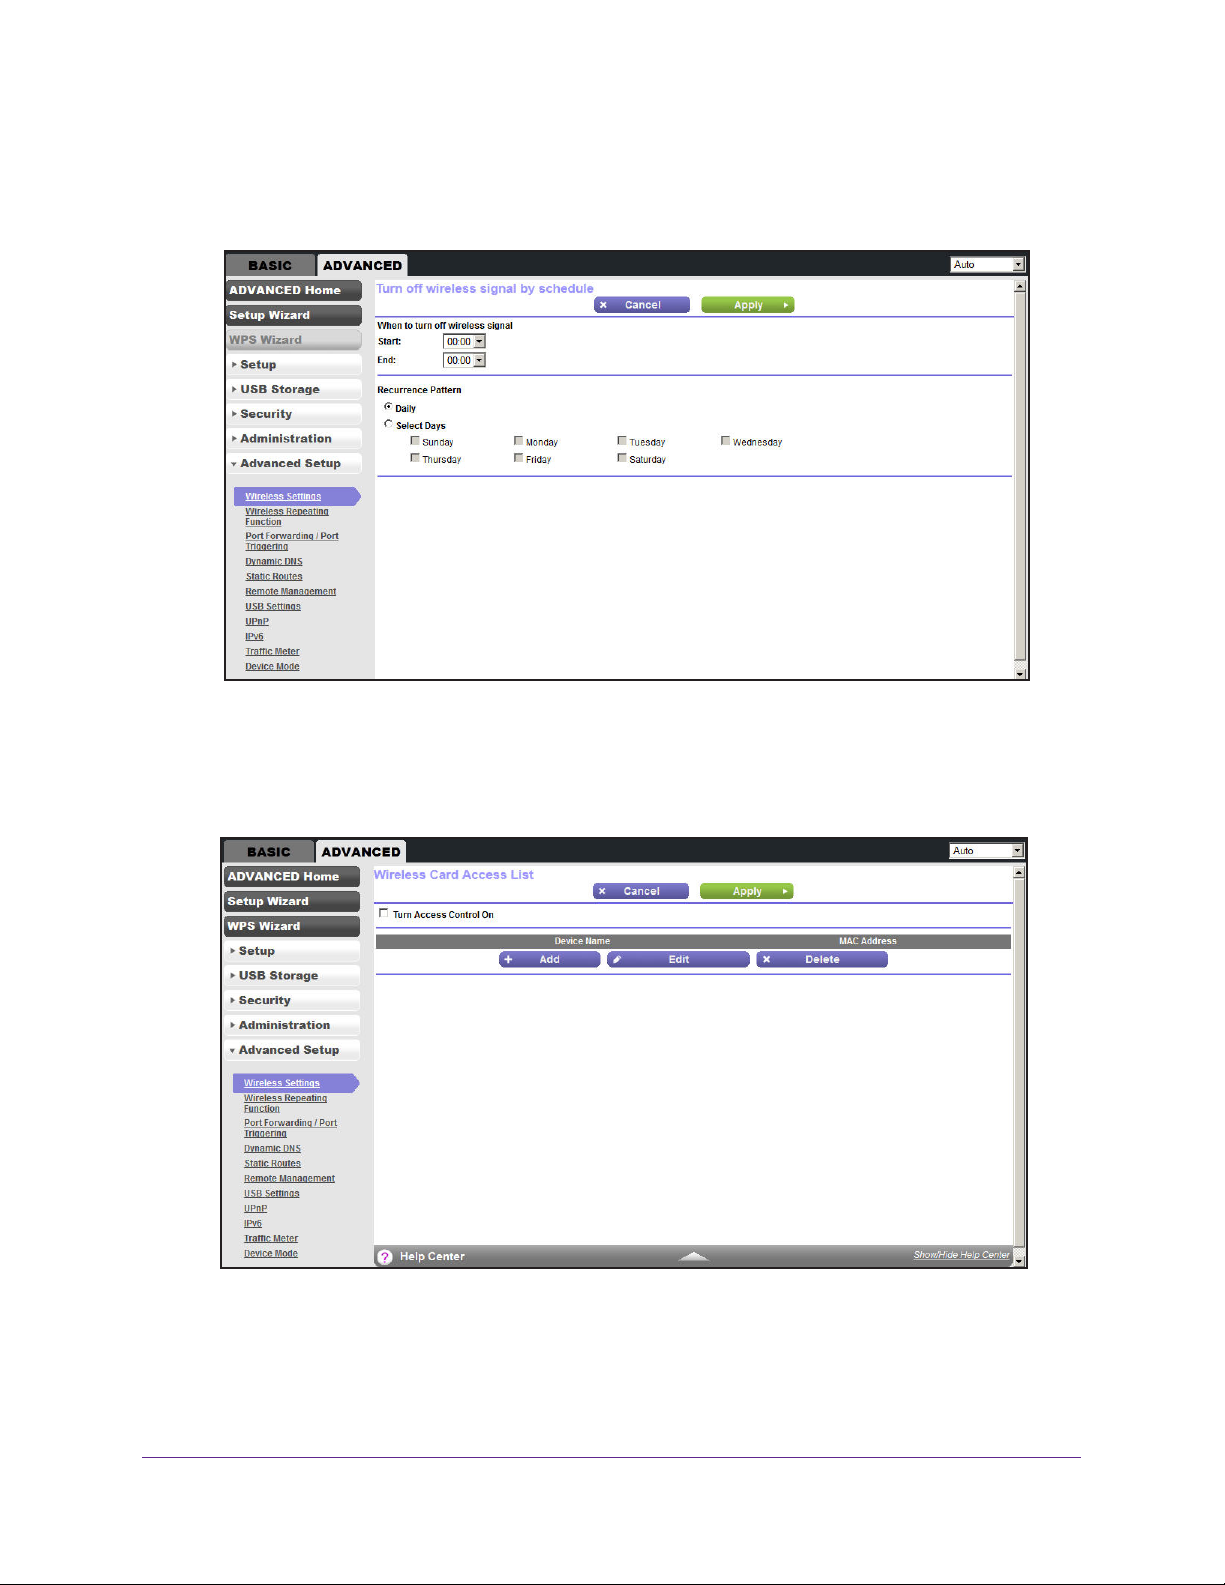
N600 Wireless Dual Band Gigabit ADSL2+ Modem Router DGND3700v2
You can use this feature to turn off the wireless signal from your wireless modem router
at times when you do not need a wireless connection. For instance, you could turn it off
for the weekend if you leave town.
• WPS Settings.You can add WPS devices to your network.
• AP Mode.
• W
ireless Card Access List. From the Advanced Wireless Settings screen, click the Set
You can make the DGND3700v2 function as an access point.
Up Access List button to display the Wireless Card Access List screen.
Advanced Settings
99
Page 100
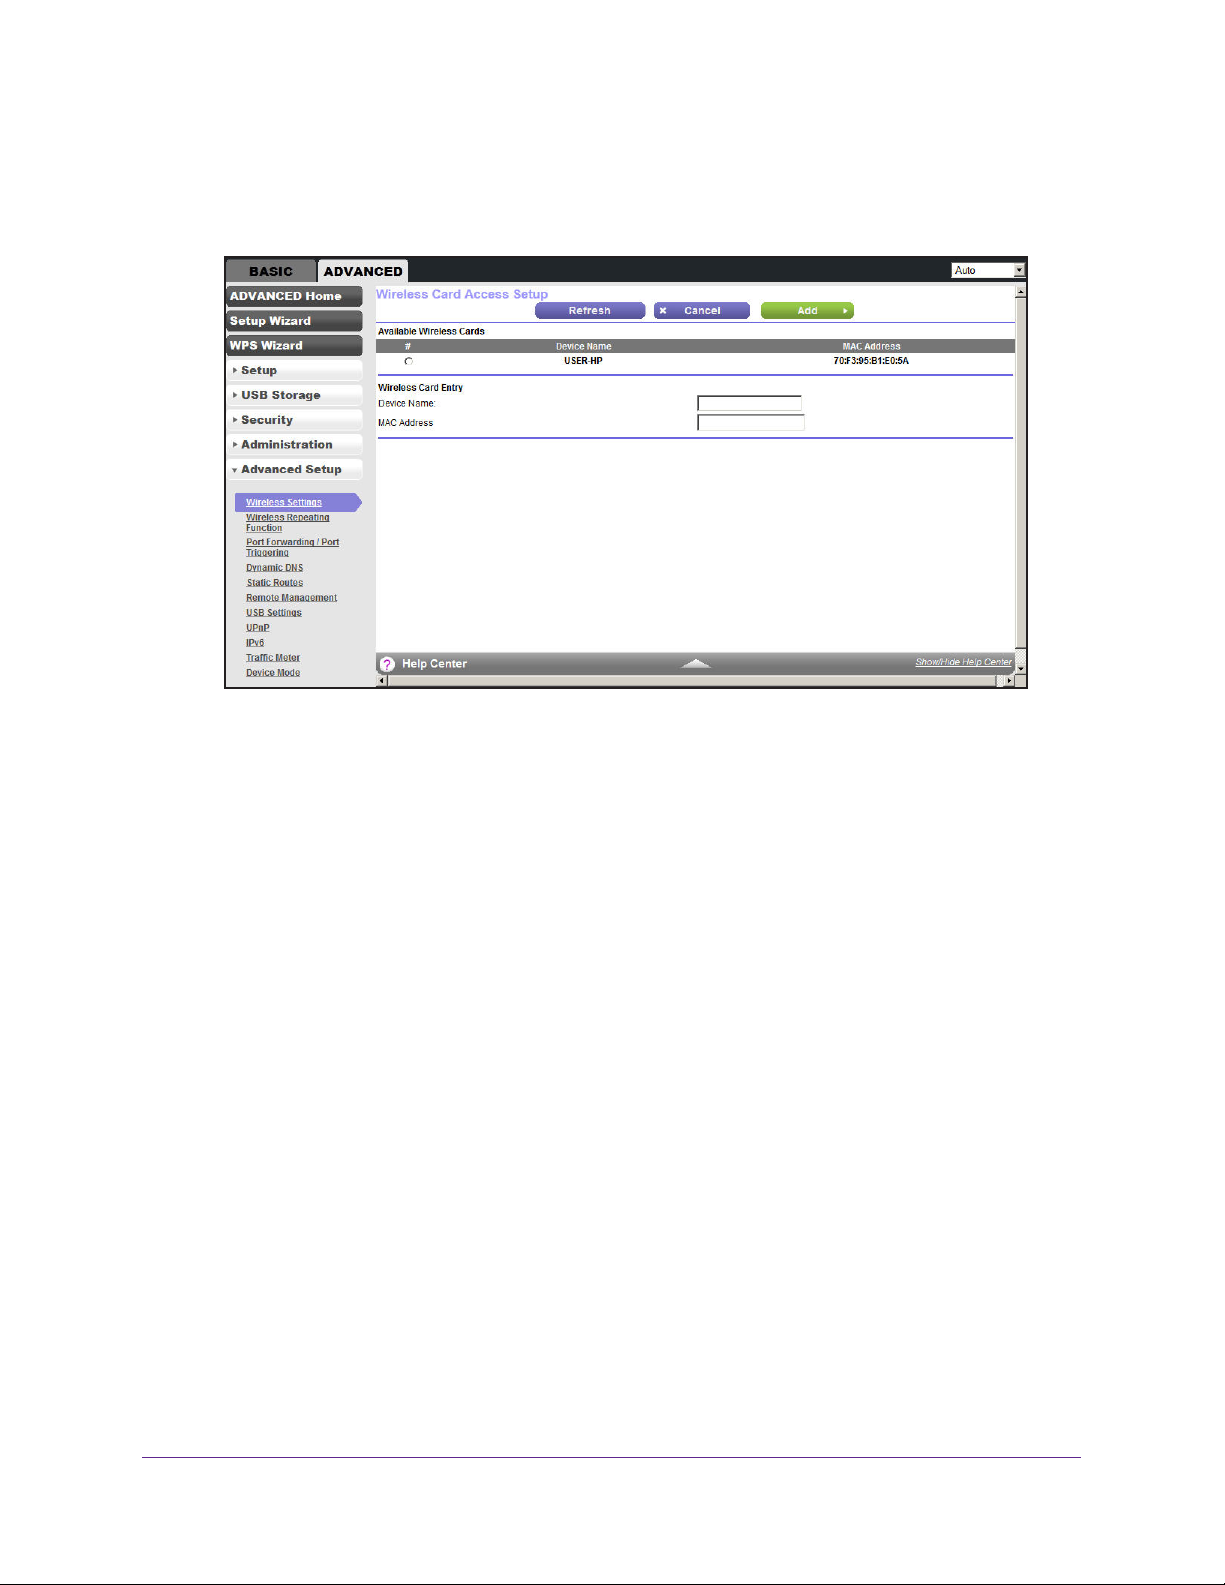
N600 Wireless Dual Band Gigabit ADSL2+ Modem Router DGND3700v2
From the Wireless Card Access List screen, click Add to display the Wireless Card
Access Setup screen. On this screen you can restrict access to your network to specific
devices based on their MAC address.
Advanced Settings
100
 Loading...