

Page 1
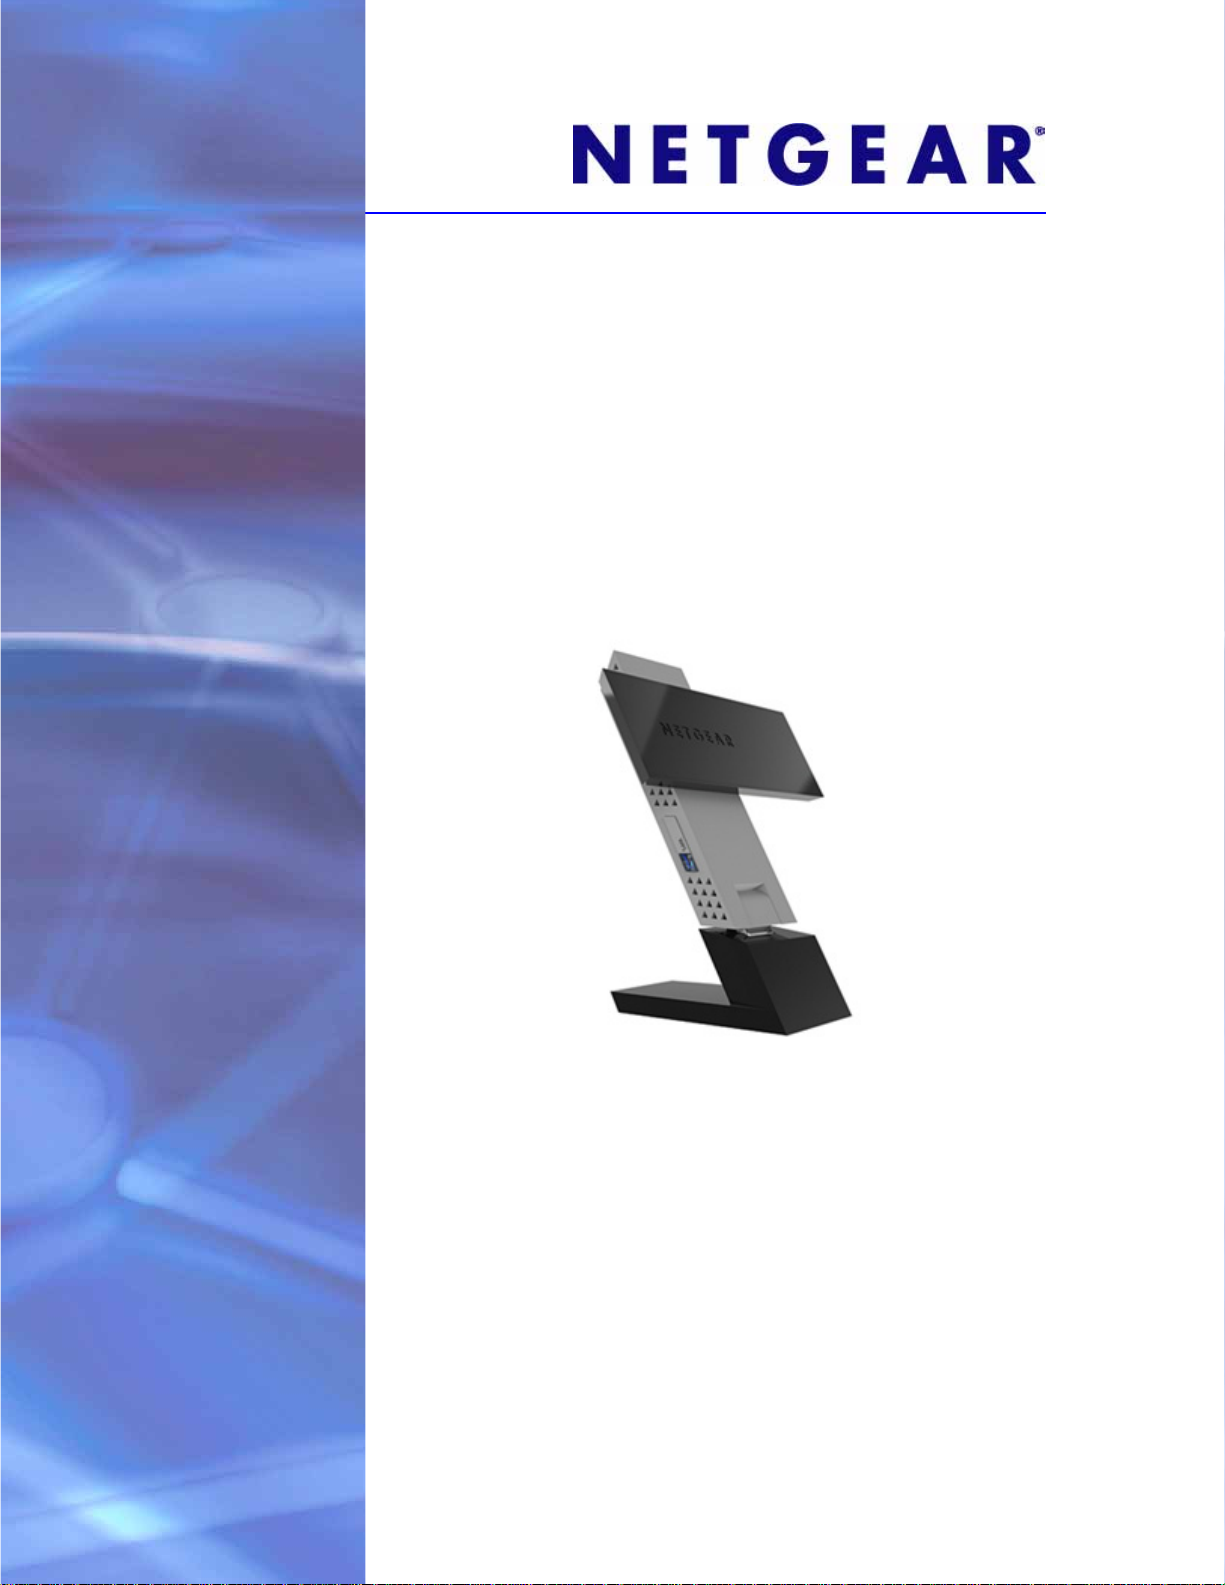
802.11ac USB WiFi Adapter (A6200)
User Manual
350 East Plumeria Drive
San Jose, CA 95134
USA
November 2012
202-11093-01
v1.0
Page 2

802.11ac USB WiFi Adapter (A6200)
Support
Thank you for choosing NETGEAR.
After installing your device, locate the serial number on the label of your product and use it to register your product
at https://my.netgear.com. You must register your product before you can
NETGEAR recommends registering your product through the NETGEAR
support, visit http://support.netgear.com.
Phone (US & Canada only): 1-888-NETGEAR.
Phone (Other Countries): Check the li
http://support.netgear.com/general/cont
NETGEAR recommends that you use only the official NETGEAR support resources.
st of phone numbers at
act/default.aspx.
use NETGEAR telephone support.
website. For product updates and web
Trademarks
NETGEAR, the NETGEAR logo, and Connect with Innovation are trademarks and/or registered trademarks of
NETGEAR, Inc. and/or its subsidiaries in the United States and/or other countries. Information is subject to change
without notice. Other brand and product names are registered trademarks or trademarks of their respective
holders. © NETGEAR, Inc. All rights reserved.
Revision History
Publication Part Number Version Publish Date Comments
202-11093-01 v1.0 November 2012 First publication
2
Page 3

Contents
Chapter 1 Set Up Your Wireless USB Adapter
Chapter 2 Maintenance
USB Adapter Placement and Performance . . . . . . . . . . . . . . . . . . . . . . . . .5
Attach the USB Adapter to Your Computer . . . . . . . . . . . . . . . . . . . . . . .5
Expand Your USB Adapter Range . . . . . . . . . . . . . . . . . . . . . . . . . . . . . .7
NETGEAR genie Desktop Icon . . . . . . . . . . . . . . . . . . . . . . . . . . . . . . . . . .7
NETGEAR genie Home . . . . . . . . . . . . . . . . . . . . . . . . . . . . . . . . . . . . . . . .8
Status Bar. . . . . . . . . . . . . . . . . . . . . . . . . . . . . . . . . . . . . . . . . . . . . . . . .8
Join a Wireless Network with NETGEAR genie . . . . . . . . . . . . . . . . . . . . . .9
Network Details . . . . . . . . . . . . . . . . . . . . . . . . . . . . . . . . . . . . . . . . . . .10
Join a Network or Connect to a Different Network . . . . . . . . . . . . . . . . .11
Join a Hidden Network . . . . . . . . . . . . . . . . . . . . . . . . . . . . . . . . . . . . . .13
Install a Standalone Driver without NETGEAR genie. . . . . . . . . . . . . . . . .15
Other Screen . . . . . . . . . . . . . . . . . . . . . . . . . . . . . . . . . . . . . . . . . . . . . . .17
Sent/Receive Activity . . . . . . . . . . . . . . . . . . . . . . . . . . . . . . . . . . . . . . .17
Network . . . . . . . . . . . . . . . . . . . . . . . . . . . . . . . . . . . . . . . . . . . . . . . . .17
Adapter. . . . . . . . . . . . . . . . . . . . . . . . . . . . . . . . . . . . . . . . . . . . . . . . . .17
Support. . . . . . . . . . . . . . . . . . . . . . . . . . . . . . . . . . . . . . . . . . . . . . . . . .18
Help . . . . . . . . . . . . . . . . . . . . . . . . . . . . . . . . . . . . . . . . . . . . . . . . . . . .18
Remove the genie Software. . . . . . . . . . . . .
Frequently Asked Questions (FAQs) . . . . . . . . . . . . . . . . . . . . . . . . . . . . .19
. . . . . . . . . . . . . . . . . . . . . . .18
Appendix A Technical Specifications and
Factory Default Settings
Technical Specifications. . . . . . . . . . . . . . . . . . . . . . . . . . . . . . . . . . . . . . .23
Factory Default Settings. . . . . . . . . . . . . . . . . . . . . . . . . . . . . . . . . . . . . . .24
Appendix B Notification of Compliance
3
Page 4

1. Set Up Your Wireless USB Adapter
This chapter describes how to set up the 802.11ac USB WiFi Adapter (A6200) and includes the
following sections:
• USB Adapter Placement and Performance
• NETGEAR genie Desktop Icon
• NETGEAR genie Home
• Join a Wireless Network with NETGEAR genie
• Install a Standalone Driver without NETGEAR genie
1
For help installing your USB adapter, see the installation gu
installation is also available at the NETGEAR Download Center at downloadcenter.netgear.com.
Note: For more information about the topics covered in this manual, visit
the support website at support.netgear.com.
Note: Firmware updates with new features and bug fixes are made
available from time to time on
products can regularly check the site a
or you can check for and download new firmware manually. If the
features or behavior of your product do not match what is described
in this guide, you might need to update your firmware.
downloadcenter.netgear.com. Some
ide that came in the package. The
nd download new firmware,
4
Page 5
802.11ac USB WiFi Adapter (A6200)
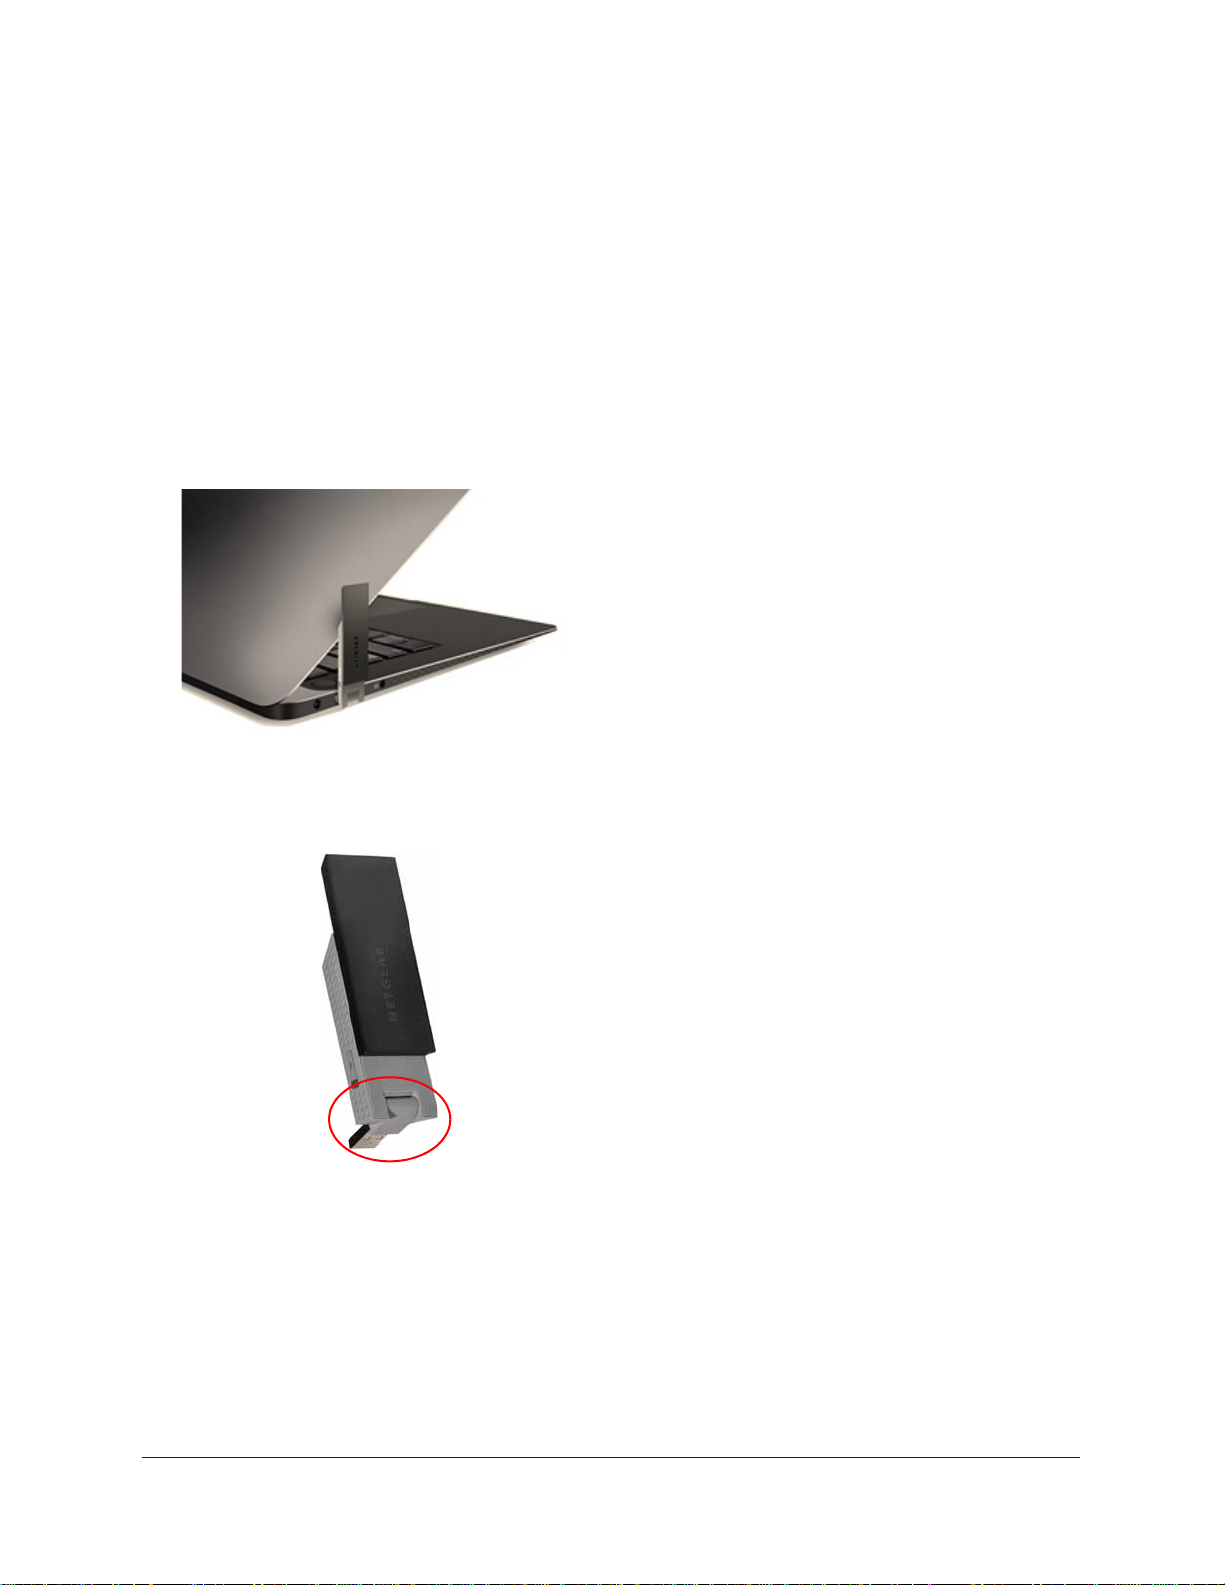
USB Adapter Placement and Performance
Y ou can position the USB adapter to best suit your own environment and to ensure maximum
performance.
Attach the USB Adapter to Your Computer
To attach the USB adapter directly:
Use the USB adapter without the desktop dock, and connect it directly into a USB port on
your comp
uter.
The USB connector on the USB adapter can swivel so the USB adapter can be positioned
lat against your computer.
f
Set Up Y our Wireless USB Adapter
5
Page 6
802.11ac USB WiFi Adapter (A6200)
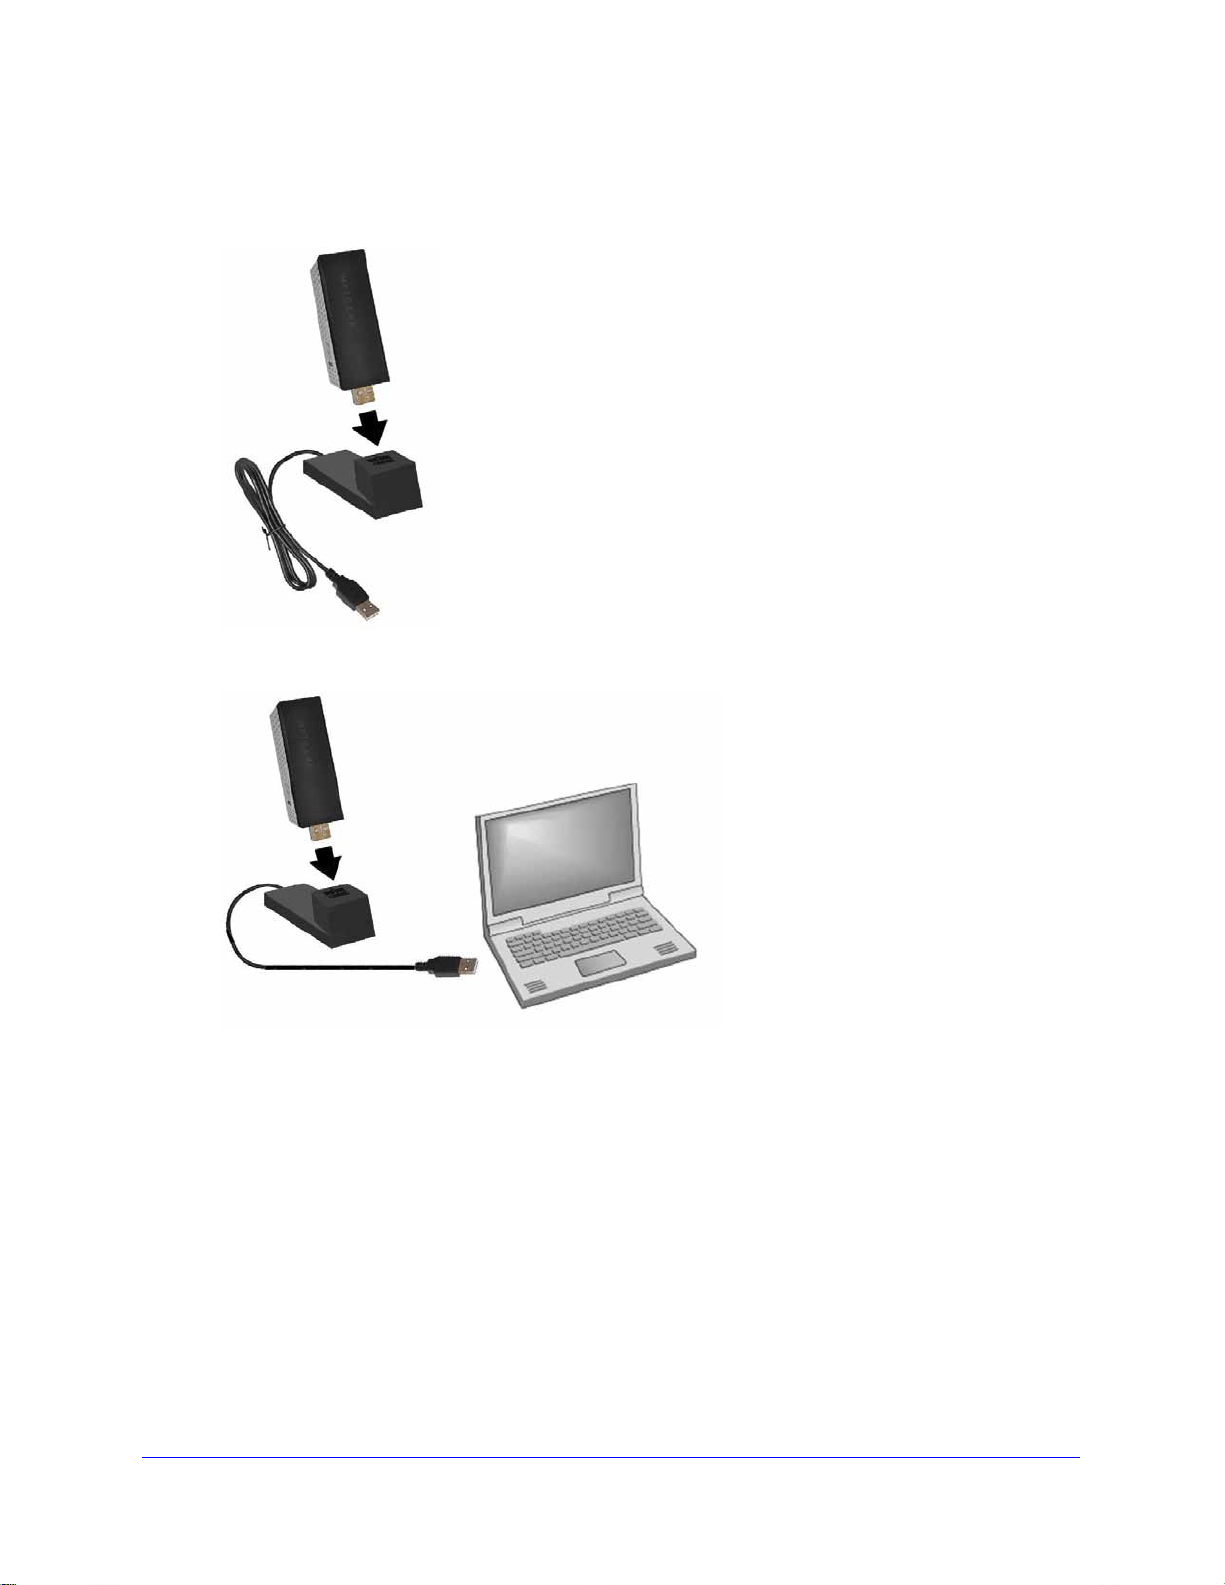
To attach the USB adapter using the desktop dock:
1. Insert the USB adapter into the desktop dock.
2. Connect th
e USB cable of the desktop dock to your computer USB port.
Set Up Y our Wireless USB Adapter
6
Page 7
802.11ac USB WiFi Adapter (A6200)
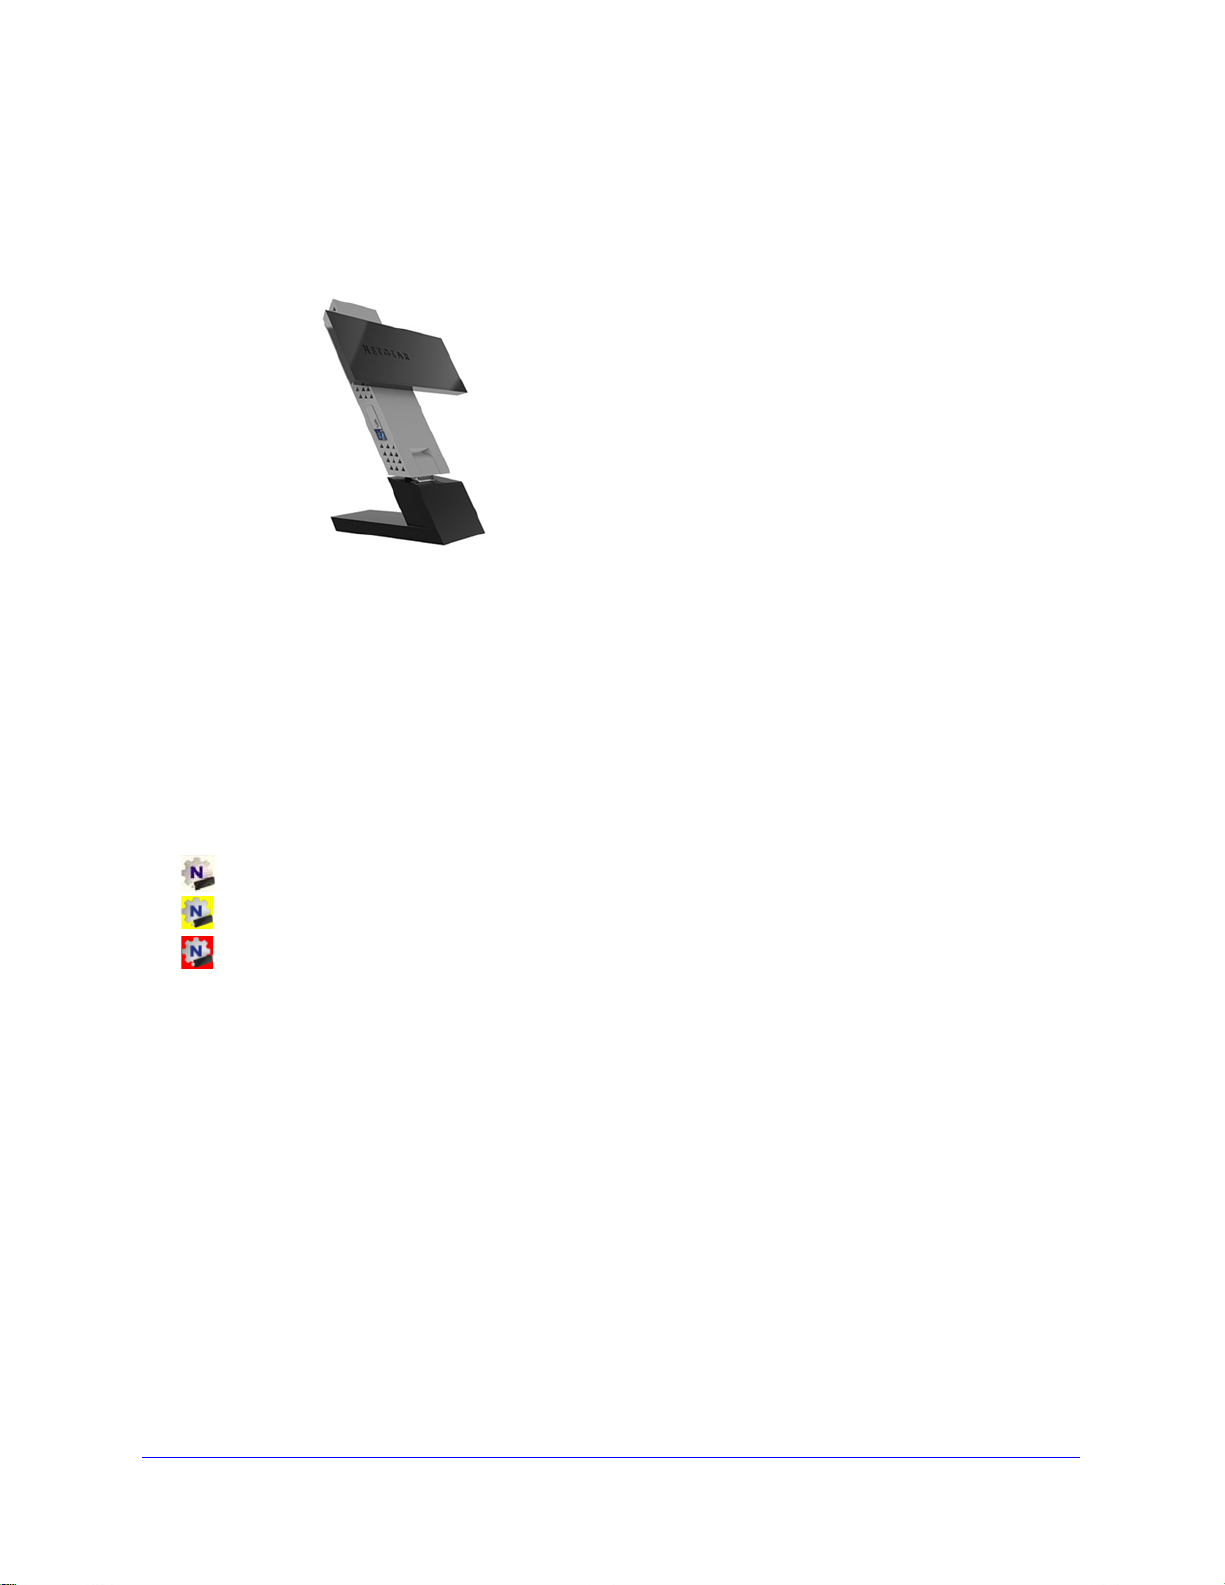
Expand Your USB Adapter Range
For added range and performance, you can flip the top portion of the USB adapter so that it is
perpendicular to the USB adapter:
In this position, the internal antennas are extended out from the USB adapter for increased
W
iFi performance.
NETGEAR genie Desktop Icon
When you install your USB adapter, the NETGEAR genie icon appears in the Windows
system tray and on the desktop. You can click this icon to open NETGEAR genie to make
changes or connect to a different wireless network. The color of the icon indicates the
strength of your wireless connection:
White. 3–5 bars (strong connection)
Yellow. 1–2 bars (weak connection)
Red. 0 (zero) bars (no connection)
If you remove your USB adapter, NETGEAR genie is not available, and the icon is not
isplayed. When you insert the USB adapter again, the icon returns.
d
Set Up Y our Wireless USB Adapter
7
Page 8
802.11ac USB WiFi Adapter (A6200)
Network
Connection
Network
Wireless Signal
security
channel strength
name
status
Physical
rate
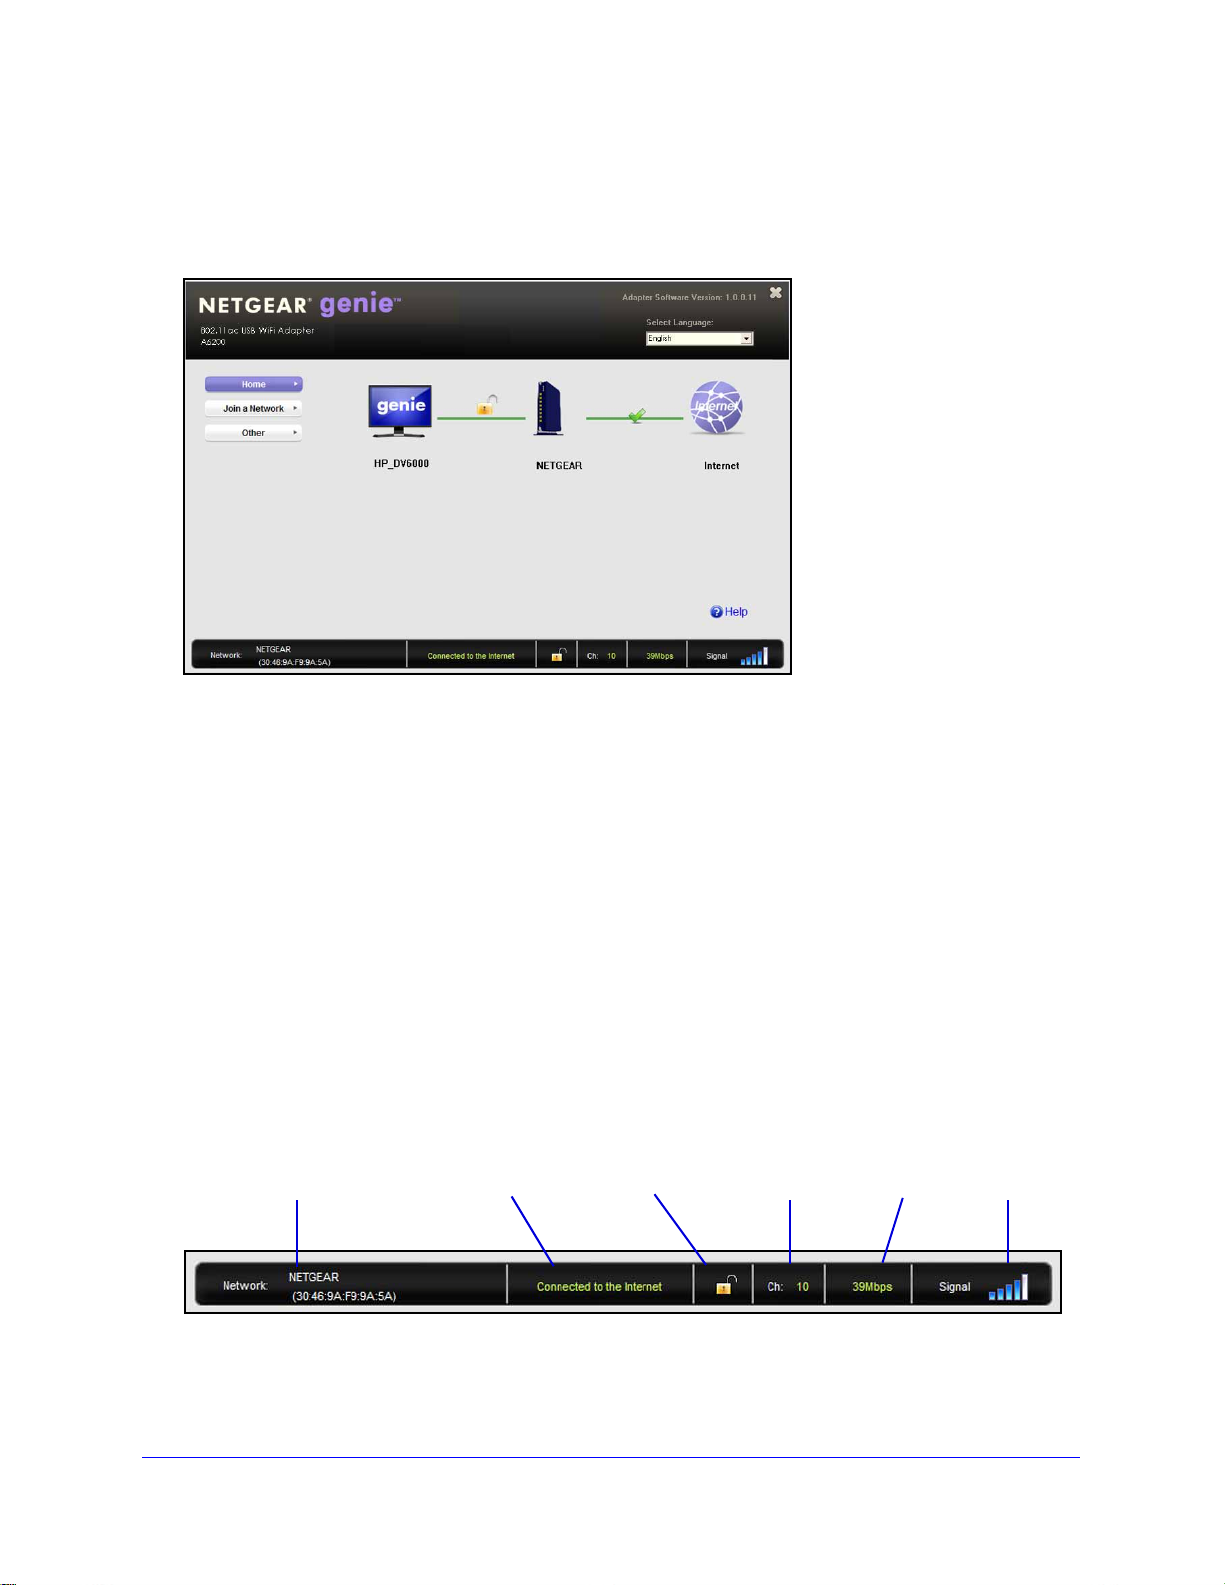
NETGEAR genie Home
When you launch NETGEAR genie, the Home screen displays.
This screen shows you at a glance if you are connected to a network,
and if you have Internet
access. The following options are available:
• Sele
ct Language. If more than one language is available, you can select a language
from this drop-down list. NETGEAR genie screens are displayed in the language that you
select.
• Home button. Th
e currently selected Home screen. You can click the Home button to
return here from a different screen.
• Jo
• Other button.
• Help.
in a Network button. View a list of wireless networks and join a network.
View more information or check for software updates.
Display the help.
Status Bar
The status bar is at the bottom of the screen:
Figure 1. Status bar
Set Up Y our Wireless USB Adapter
8
Page 9
802.11ac USB WiFi Adapter (A6200)
The following information is displayed:
• Netwo
adapter is connected.
• Connectio
shown in the diagram in the middle of this screen):
- Con
- Con
- No Con
• Netwo
uses wireless security. An open lock indicates an open network without wireless security,
such as one that you might use in a coffee shop.
• W
connected.
• Physica
• Signal s
signal. One or two bars indicate a weak signal.
rk name. The network name (SSID) of the wireless network to which the USB
n status. The connection status is one of the following (this status is also
nected to the Internet
nected to the Router
nection
rk security. The lock symbol shows whether the network you are connected to
ireless channel. The wireless channel of the network to which the USB adapter is
l rate. The physical transmission rate for wireless communication.
trength. The strength of the wireless signal. Three to five bars indicate a good
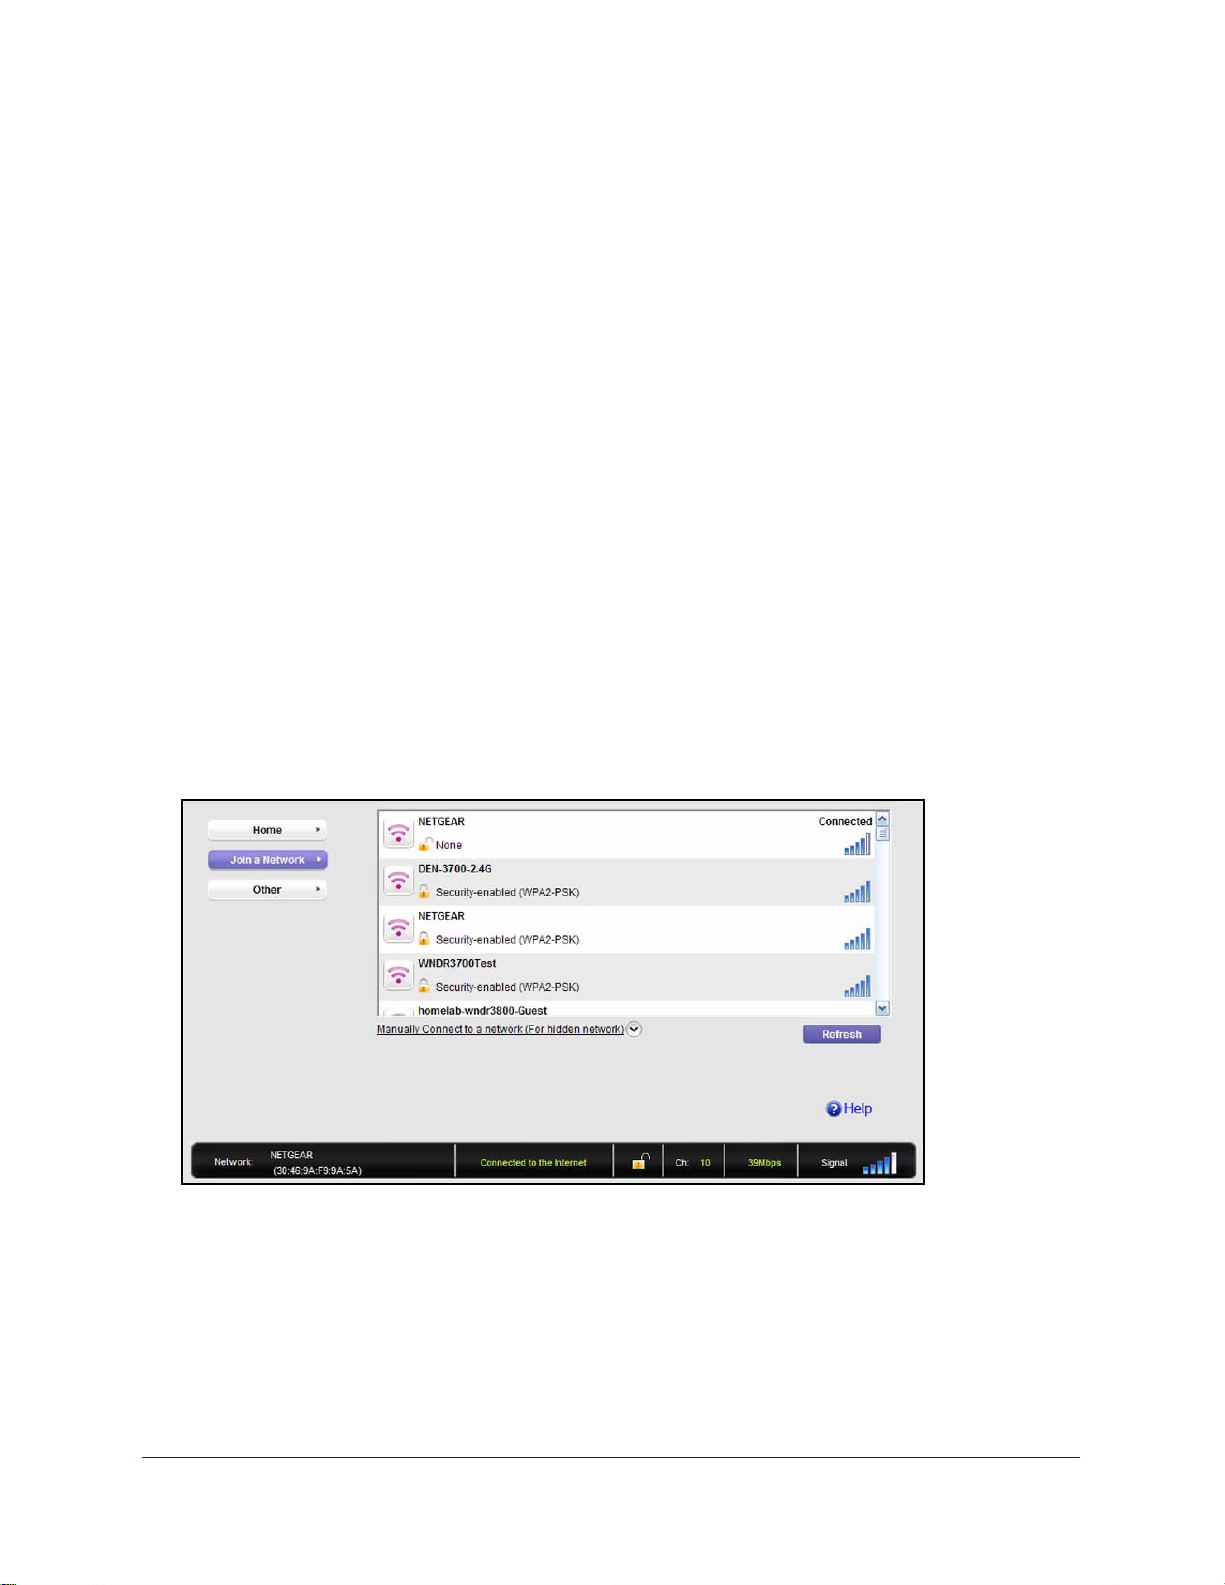
Join a Wireless Network with NETGEAR genie
In NETGEAR genie, click the Join a Network button to display the following screen:
The following information, link, and button are displayed:
• Netwo
• Ma
network list, or to connect to a hidden network. A hidden network does not broadcast its
wireless network name (SSID).
• Refresh. Click this butt
rk list. View the wireless networks in the area. Click a network to select it.
nually Connect to a network. Click this link to join a network without vie wing it on the
on to scan for available networks in the area.
Set Up Y our Wireless USB Adapter
9
Page 10

802.11ac USB WiFi Adapter (A6200)
Network Details
From the Join a Network screen, you can view more details about a specific network.
To view network details:
1. In the n
etwork list, click a network to select it.
2. Click the Det
ails button to display a screen similar to the following one:
The following information is displayed:
• Network name
(SSID). The name assigned to a wireless network. As a security
measure, some wireless access points do not broadcast their SSIDs. In such cases, the
network is hidden. The name (SSID) field is blank even though the rest of the information
is displayed.
• Channe
l. The channel on which the wireless network operates. NETGEAR recommends
that you choose a network that uses a different channel from that of neighboring
networks.
• W
ireless Mode. The wireless technology used for the router or access point, such as N,
A, G, B, or AC.
Set Up Y our Wireless USB Adapter
10
Page 11

802.11ac USB WiFi Adapter (A6200)
• WPS support. Identifies whether the router or access point for this network supports
WPS (Wi-Fi Protected Setup).
• MAC addres
s. The unique hardware address of the wireless device broadcasting this
information. Typically, the wireless device is a wireless router or access point.
Join a Network or Connect to a Different Network
If your wireless network supports WPS, you can use WPS to join a wireless network. Or you
can join a wireless network from this NETGEAR genie screen.
• WPS. Press and
hold the WPS button on the side of the USB adapter for 3 seconds.
Then within 2 minutes, press the WPS button on your wireless router or access point.
• NETGEAR geni
e. Click your wireless network to select it from the list, and click Connect.
If the network is secure, enter its password or network key.
After the USB adapter joins the network, it automatically saves the network connection
informatio
n to a Windows profile. Windows profiles can be used by genie and the Windows
utility. If there is no change in the network information, the next time you launch NETGEAR
genie, it automatically connects to the network you previously joined.
To use WPS to join a wireless network:
1. Pre
ss and hold the WPS button on the side of the USB adapter for 2 seconds.
2. Then wit
hin 2 minutes, press the WPS button on your wireless router or access point.
The USB adapter joins the network, which can take a few minutes. Your settings are
saved in
a profile.
Set Up Y our Wireless USB Adapter
11
Page 12

802.11ac USB WiFi Adapter (A6200)
To select and join a wireless network:
1. From NETGEAR genie, click Join a Network.
2. Loo
k for the network you want to join in the list on this screen. If you do not see your
network, you might need to scroll down to view more networks.
If the network name is not displayed, that indicate
s a hidden network that does not
broadcast its SSID. Use the manual method to connect to a hidden network. See Join a
Hidden Network o
n page 13.
Select the network that you want to join.
3. Click the Conn
4. If
the wireless network is secure, enter the network password.
ect button.
The USB adapter joins the wireless network. This process could take a few minutes.
Set Up Y our Wireless USB Adapter
12
Page 13

802.11ac USB WiFi Adapter (A6200)
Join a Hidden Network
A hidden network does not broadcast its SSID.
1. F
rom NETGEAR genie, click Join a Network.
2. Select th
e Manually Connect to a network (for hidden networks) link.
You can use WPS to connect, or enter the wireless information yourself.
To manually connect using WPS:
1. Click the St
art button.
A pop-up window displays WPS instructions telling
the USB adapter and the router.
2. Press the WPS b
3. Go to
your wireless router or access point, and press its WPS button.
utton on your USB adapter.
you to press the WPS button both on
Set Up Y our Wireless USB Adapter
13
Page 14

802.11ac USB WiFi Adapter (A6200)
To manually connect without WPS:
1. Select the Enter wireless information myself radio button.
There are four security types that can be displayed for the network: None, WEP,
WP
A-PSK, and WPA2-PSK.
• None.
• WEP. The p
• WP
• WP
2. In
the fields provided, type the network name (SSID), select the security type, and type the
There is no password.
assword (key) is a 10 or 26 hexadecimal digit.
A-PSK. The password (passphrase) is 8–63 characters in length.
A2-PSK. The password (passphrase) is 8–63 characters in length.
passphrase (password).
Note: NETGEAR genie does not let you select the WPA or WPA2 security
type. Windows 8, Windows 7, and Windows Vista, use the Win dows
WLAN Autoconfig service to enter WPA or WPA2 credentials to join
the network. For Windows XP, use the Wireless Zero Configuration
service to enter WPA or WPA2 credentials to join the network.
Set Up Y our Wireless USB Adapter
14
Page 15

802.11ac USB WiFi Adapter (A6200)
Install a Standalone Driver without NETGEAR genie
For Windows 8, Windows 7, and Windows Vista, you can install the Windows driver without
the NETGEAR genie and use the Windows WLAN Autoconfig service to join a network. For
Windows XP, you can install the Windows driver without the NETGEAR genie and use the
Wireless Zero Configuration service to join a network.
To install the standalone driver and join a network:
nsert the resource CD in your computer CD drive. If the CD main screen does not
1. I
display, browse the files on the CD and double-click autorun.exe. The Welcome screen
displays:
2. Click Inst
The driver installs on your computer.
ither insert the USB adapter into a USB port on your computer, or connect it with the USB
3. E
cable that came in the package.
4. Use the
Wireless Zero Configuration service.)
all Windows Standalone Driver.
Windows WLAN Autoconfig service to join a network. (For Windows XP, use the
Set Up Y our Wireless USB Adapter
15
Page 16

2. Maintenance
This chapter includes the following sections:
• Other Screen
• Remove the genie Software
• Frequently Asked Questions (FAQs)
2
16
Page 17

802.11ac USB WiFi Adapter (A6200)
Other Screen
In NETGEAR genie, click the Other button to display the following screen:
Sent/Receive Activity
• Sent Packets. Total number of packets sent during communication with the wireless
network.
• Receive
wireless network.
d Packets. Total number of packets received during communication with the
Network
• IPv4 Address. The IPv4 address assigned to this USB adapter. The IPv4 address can
change if you disconnect from the network and rejoin it later.
• IPv6 Address. The I
change if you disconnect from the network and rejoin it later.
• Security T
wireless network.
ype. Wireless security used for the USB adapter to connect to the current
Pv6 address assigned to this USB adapter. The IPv6 address can
Adapter
• Adapter MAC Address. The Media Access Control (MAC) address of this USB adapter.
The MAC address is a unique 48-bit hardware address assigne d to each wireless device.
As a security measure, some wireless networks restrict access based on a list of known
MAC addresses. If you try to join such a network, you have to provide your USB adapter’s
MAC address (shown here) to the network administrator before you can connect.
Maintenance
17
Page 18

802.11ac USB WiFi Adapter (A6200)
• Region. The region setting for the USB adapter. Wireless channels in use depend on the
country or region. Your USB adapter automatically scans approved channels for your
region when it checks to see which networks are available in your area. Governments
regulate the channels used for wireless transmission. Operating the USB adapter in a
different region might violate local laws.
Support
• Get Diagnostics Info. Click the Get Info button if support has directed you to do so. The
genie displays the System Information screen and starts collecting system information, IP
information, client driver and profile information, and site survey information.
• Sof
tware Update. You can check for software updates at the NETGEAR website. Click
the Check button, and the genie displays the Live Check screen and checks for available
software upgrades. If new software is found, the USB adapter software is automatically
updated.
Note: During the software update process, the old software version is
removed and all saved profiles are deleted before the new software
version is installed. When the software update process is complete,
the USB adapter no longer connects to the network automatically.
You need to join the network as described in
Network with NETGEAR genie on p
NETGEAR genie, see Install a S tandalone Driver without NETGEAR
genie on page 15.)
Help
Click the Help button to display help.
Remove the genie Software
Join a Wireless
age 9. (If you do not use the
You can remove the USB adapter software in several different ways:
• Un
• Co
install. In Windows, select Start > All Programs > NETGEAR A6200 genie >
Uninstall NETGEAR A6200 Software.
ntrol Panel. Follow the appropriate instructions for your Windows operating system:
indows 8. Move the pointer to the left bottom corner of the screen to display the
- W
Windows pop-up Start menu. Right-click your mouse button, select 'Program and
Feature' to Uninstall, and select NETGEAR A6200 genie.
- W
indows 7. Select Start > Control Panel > Programs and Features, and then
select NETGEAR A6200 genie. Click Uninstall and follow the screen prompts.
Maintenance
18
Page 19

802.11ac USB WiFi Adapter (A6200)
- Windows Vista. Select Start > Control Panel > Programs and Features, and then
select NETGEAR A6200 genie. Click Uninstall/Change from the top menu and
follow the screen prompts.
- W
indows XP. Select Start > Control Panel > Add or Remove Programs, and then
select NETGEAR A6200 genie.
Frequently Asked Questions (FAQs)
The USB adapter LED is not lit.
The USB adapter is not inserted securely in the USB port (or USB cable if used) or the A6200
sof
tware is not installed.
• Remove an
• Check the
enabled. Reinstall the A6200 software, if necessary.
• Insert the USB ad
I do not see the icon.
Check to make sure that your USB adapter is inserted in the USB port. If it is removed, then
t
he icon is not displayed. When you insert the USB adapter into the USB port, the icon
returns to your desktop and the Windows system tray.
I cannot connect to a wireless network.
• Make
• Click th
sure that your USB adapter is inserted securely into the USB port on your computer
or the USB cable if you are using it. The USB adapter LED should light or blink (see
NETGEAR genie Desktop Icon on p
adapter cannot connect to the network that you selected:
d reinsert the USB adapter.
Windows device manager to see if the USB adapter is recognized and
apter in a different USB port on your computer if one is available.
age 7 for details).
e icon to open NETGEAR genie. The following screen displays if the USB
Maintenance
19
Page 20

802.11ac USB WiFi Adapter (A6200)
• If the network uses wireless security, you need to either know the wireless security
settings or use Push 'N' Connect if the network supports WPS. Some networks also
restrict use to only computers or wireless devices with known MAC addresses. If that is
the case, on the NETGEAR genie screen, click Other to find the MAC address for your
USB adapter and provide it to the network administrator.
When I connect to the network, I cannot access the Internet.
Click to open NETGEAR genie. The following screen displays if the USB adapter can
connect to the network that you selected but you cannot access the Internet:
Make sure that you are connected to the correct network. If you are, then check to see if the
r’s Internet connection is working. If the router’s Internet connection is not working,
route
restart the modem, router, and computer.
When I connect to the network, I cannot access shared resources such as printers.
• Make
• Make
sure that the router or access point is physically connected to the Ethernet network.
sure that the IP addresses and the Windows networking settings are configured
correctly.
Do the USB ports go into a sleep mode if there is no traffic?
The USB devices do go into sleep mode if a USB feature called Selective Suspend is
led, which it is by default. If this feature is enabled, and the connected USB devices to
enab
go into Selective Suspend mode, the network disconnects. To prevent this type of network
disconnection, you can disable Selective Suspend.
To disable Selective Suspend mode:
1. Select S
tart > Control Panel > Hardware and Sound > Power Options > Edit Plan
Settings > Change Advanced Power Settings > USB Settings.
2. Change th
e setting for Selective Suspend mode to Disabled.
Maintenance
20
Page 21

802.11ac USB WiFi Adapter (A6200)
How can I improve the speed of my wireless connection?
You can use the USB cable and USB adapter that came in the package to position the USB
a
dapter for better wireless communication.
The connection speed can vary depending on the type of USB port on your computer, the
cap
acity of the router or access point for the wireless network, and the type of Internet
connection. You can view the throughput in the status bar at the bottom of the Smart Wizard
screen.
• If the
throughput is 54 Mbps, you could be connected to an 802.11g network, or the
wireless-N network could be set with WPA (TKIP) security.
When WPA (TKIP) security mode is configured on the router or access point, WiFi
gulations allow the USB adapter to connect only at up to 54 Mbps. For a faster
re
connection, configure the security for the router or access point as WPA2 or
WPA + WPA2 mixed wireless security. The co
nnection speed still depends on the
wireless capacity of the router or access point.
• If you do
not have a USB 2.0 port on your computer, the throughput is limited to the
14 Mbps of the older USB 1.1 standard.
How can I view the IP address for the USB adapter?
Click the icon to open NETGEAR genie. Then click the Othe
r button to view the IP
address.
No IP address is assigned to the USB adapter.
IP address assignment can be lost if you up
graded your USB adapter software and did not
reboot your computer. To correct this problem, either restart your computer, or connect to a
different access point.
Maintenance
21
Page 22

A. Technical Specifications and
Factory Default Settings
This appendix covers the following topics:
• Technical Specifications
• Factory Default Settings
A
22
Page 23

802.11ac USB WiFi Adapter (A6200)
Technical Specifications
The following table provides technical specifications for the USB adapter.
Feature Description
Antenna 2 LDS antennas
Standards • 8
Radio data rate Autosensing
Frequency • 2.
Encryption • WP
Power 5V bus powered
Bus interface USB 2.0, compatible with USB 1.1
Provided drivers • Microso
02.11ac draft 2.0
• 802.11n
02.1 1g
• 8
02.1 1b
• 8
• 802.11a
4 GHz to 2.5 GHz CCK and OFDM Modulation
• 5 GHz OF
MCS0-9 coding scheme
• WPA-PSK [TKIP]
0-bit (also called 64-bit) WEP data encryption
• 4
28-bit WEP data encryption
• 1
• Microsoft Windows 7
• Microsof
• Microso
DM and 802.11n MCS0-15, MCS32 coding scheme, and 802.11ac
A2-PSK [AES]
ft Windows 8
t Vista
ft Windows XP (32/64-bit)
Dimensions 95.3 x 31.4 x 14.3 mm (3.75 x 1.23 x.56 in.)
Weight 27 g (0.95 oz)
Operating temperature 0–40° C (32–
Emissions FCC, CE
104° F)
T echnical Specifications and Factory Default Settings
23
Page 24

802.11ac USB WiFi Adapter (A6200)
Factory Default Settings
The following table lists the default settings of your USB adapter.
Default Settings
Wireless communication Enabled
Country/region United States (varies by region)
Operating mode 802.11ac draft 2.0, 802.11n, 802.11a, or 802.11g
Data rate • Up to 866
to 300 Mbps with a router or access point that supports 802.11n
• Up
Mbps with a router or access point that supports 802.11ac
T echnical Specifications and Factory Default Settings
24
Page 25

B. Notification of Compliance
NETGEAR Dual Band Wireless Adapters
B
Regulatory Compliance Information
This section includes user requirements for operating this product in accordance with National laws for usage of radio
spectrum and operation of radio devices. Failure of the end-user to comply with the applicabl e re qu i r e men ts may
result in unlawful operation and adverse action against the end-user by the applicable National regulatory authority.
Note: This product’s firmware limits operation to only the chan
Therefore, all options described in this user's guide may not be available in your version of the product.
nels allowed in a particular Region or Country.
FCC Requirements for Operation in the United States
FCC Information to User
This product does not contain any user serviceable components and is to be used with approved antennas only.
Any product changes or modifications will invalidate all applicable regulatory certifications and approvals
Operations in the 5.15-5.25 GHz band are restri
cted to indoor usage only.
FCC RF Radiation Exposure and SAR Statements
SAR Statement
The 802.11ac USB WiFi Adapter (A6200) has been tested for body-worn Specific Absorption Rate (SAR)
compliance. The FCC has established detailed SAR requirements and has established that these requirements
have been met while the 802.11ac USB WiFi Adapter (A6200) was installed in a host notebook computer. The SAR
limit set by the FCC is 1.6 W/kg.
RF Exposure Information
The radio module has been evaluated under FCC Bulletin OET 65C (01-01) and found to be compliant to the
requirements as set forth in CFR 47 Sections, 2.1093, and 15.247 (b) (4) addressing RF Exposure from radio
frequency devices. This model meets the applicable government requirements for exposure to radio frequency
waves. The highest SAR level measured for this device was 1.18 W/kg. The FCC ID for this device is
PY312200200.
Product label: To view the FCC ID, rot
FCC Declaration of Conformity
We, NETGEAR, Inc., 350 East Plumeria Drive, San Jose, CA 95134, declare under our sole responsibility that the
802.11ac USB WiFi Adapter (A6200) complies with Part 15 Subpart B of FCC CFR47 Rules.
Operation is subject to the following two conditions:
• Th
is device may not cause harmful interference, and
• This device
must accept any interference received, including interference that may cause undesired operation.
ate the upper part of the device.
FCC Radio Frequency Interference Warnings & Instructions
This equipment has been tested and found to comply with the limits for a Class B digital device, pursuant to Part 15 of
the FCC Rules. These limits are designed to provide reasonable protection against harmful interference in a
residential installation. This equipment uses and can radiate radio frequency energy and, if not installed and used in
accordance with the instructions, may cause harmful interference to radio communications. However, there is no
25
Page 26

802.11ac USB WiFi Adapter (A6200)
guarantee that interference will not occur in a particular installation. If this equipment does cause harmful interference
to radio or television reception, which can be determined by turning the equipment off and on, the user is encouraged
to try to correct the interference by one or more of the following methods:
• Re
orient or relocate the receiving antenna.
• Increa
• Connect the equipment into an electrical outlet on a circuit different from that which the radio receiver is
• Co
se the separation between the equipment and the receiver.
connected.
nsult the dealer or an experienced radio/TV technician for help.
Canadian Department of Communications Radio Interference Regulations
This digital apparatus (802.11ac USB WiFi Adapter (A6200)) does not exceed the Class B limits for radio-noise
emissions from digital apparatus as set out in the Radio Interference Regulations of the Canadian Department of
Communications.
This Class [B] digital apparatus complies with Canadian ICES-003.
Cet appareil numérique de la classe [B] est conforme à la norme NMB-003 du Canada.
Industry Canada
This device complies with RSS-210 of the Industry Canada Rules. Operation is subject to the following two conditions:
(1) This device may not cause harmful interference, and (2) this device must accept any interference received,
including interference that may cause undesired operation.
Ce dispositif est conforme à la norme CNR-210 d'Industrie Can
Son fonctionnement est sujet aux deux conditions suivantes: (1) le dispositif ne doit pas produire de brouillage
préjudiciable, et (2) ce dispositif doit accepter tout brouillage reçu, y compris un brouillage susceptible de provoquer un
fonctionnement indésirable.
ada applicable aux appareils radio exempts de licence.
External Amplifiers
Under Industry Canada regulations, this radio frequency power amplifier may only be used with the transmitter with
which the amplifier has been certified by Industry Canada. The certification number fo r the transmitter with which this
amplifier is permitted to operate is IC: SKY85803.
Conformément à la réglementation d’Industrie Canada, le présent amplificateur de puissance radiofréquence peut être
utilisé seulement avec un émetteur avec lequel il a été certifié par Industrie Canada. Le numéro d’identification
d’Industrie Canada pour l’émetteur avec lequel l’amplificateur est autorisé à fonctionner est IC: SKY85803.
Caution:
The device for the band 5150-5250 MHz is only for indoor usage to reduce potential for harmful interference to
co-channel mobile satellite systems.
High power radars are allocated as primary users (meaning they h
and these radars could cause interference and/or damage to LE-LAN devices.
ave priority) of 5250-5350 MHz and 5650-5850 MHz
Avertissement:
Le dispositif fonctionnant dans la bande 5150-5250 MHz est réservé uniquement pour une utili-sation à l'intérieur afin
de réduire les risques de brouillage préjudiciable aux systèmes de satellites mobiles utilisant les mêmes canaux.
Les utilisateurs de radars de haute puissance sont désig
les bandes 5250-5350 MHz et 5650-5850 MHz et que ces radars pourraient causer du brouillage et/ou des dommages
aux dispositifs LAN-EL.
nés utilisateurs principaux (c.-à-d., qu'ils ont la priorité) pour
IMPORTANT NOTE: Radiation Exposure Statement
This equipment complies with IC radiation exposure limits set forth for an uncontrolled environment. This equipment
should be installed and operated with minimum distance 20cm between the radiator & your body.
NOTE IMPORTANTE: Déclaration d'exposition aux radiations
Cet équipement est conforme aux limites d'exposition aux rayonnements IC établies pour un environnement non
contrôlé. Cet équipement doit être installé et utilisé avec un minimum de 20 cm de distance entre la source de
rayonnement et votre corps.
Notification of Compliance
26
Page 27

802.11ac USB WiFi Adapter (A6200)
Europe – EU Declaration of Conformity
Marking by the above symbol indicates compliance with the Essential Requirements of the R&TTE Directive of the
European Union (1999/5/EC).
This equipment meets the following conformance standards:
• EN3
00 328 (2.4Ghz), EN301 489-17, EN301 893 (5Ghz), EN60950-1
• This device is a 2.4 GHz and 5 GHz wideband transmission system (transceiver), intended for use in all EU member
states and EFTA countries, except in France and Italy where restrictive use applies.
• In It
aly the end-user should apply for a license at the national spectrum authorities in order to obtain authorization to
use the device for setting up outdoor radio links and/or for supplying public access to telecommunications and/o r
network services.
• T
his device may not be used for setting up outdoor radio links in France and in some areas the RF output power may
be limited to 10 mW EIRP in the frequency range of 2454 – 2483.5 MHz. For detailed information the end-user
should contact the national spectrum authority in France.
For the complete EU Declarations of Conformity, visit http://support.netgear.com/app/answers/detail/a_id/11621/.
Language Statement
Cesky [Czech] NETGEAR Inc. tím
požadavky a dalšími príslušnými ustanoveními smernice 1999/5/ES.
Dansk [Danish] Undertegnede NETGEAR Inc. erklærer herved, at følgende udstyr Radiolan
overholder de væsentlige krav og øvrige relevante krav i direktiv 1999/5/EF.
Deutsch [German] Hiermit erklärt NETGEAR Inc., dass sich das Ge
den grundlegenden Anforderungen und den übrigen einschlägigen Bestimmungen der
Richtlinie 1999/5/EG befindet.
Eesti [Estonian] Käesolevaga kinnitab NETGEAR Inc
põhinõuetele ja nimetatud direktiivist tulenevatele teistele asjakohastele sätetele.
English Hereby, NETGEAR Inc., de
requirements and other relevant provisions of Directive 1999/5/EC.
Español [Spanish] Por medio de la presente NETGEAR Inc.
requisitos esenciales y cualesquiera otras disposiciones aplicables o exigibles de la
Directiva 1999/5/CE.
Ελληνική [Greek] ΜΕ ΤΗΝ ΠΑΡΟ
ΠΡΟΣ ΤΙΣ ΟΥΣΙΩΔΕΙΣ ΑΠΑΙΤΗΣΕΙΣ ΚΑΙ ΤΙΣ ΛΟΙΠΕΣ ΣΧΕΤΙΚΕΣ ΔΙΑΤΑΞΕΙΣ ΤΗΣ
ΟΔΗΓΙΑΣ 1999/5/ΕΚ.
Français [French] Par la présente NETGEAR Inc
exigences essentielles et aux autres dispositions pertinentes de la directive
1999/5/CE.
to prohlašuje, že tento Radiolan je ve shode se základními
rät Radiolan in Übereinstimmung mit
. seadme Radiolan vastavust direktiivi 1999/5/EÜ
clares that this Radiolan is in compliance with the essential
declara que el Radiolan cumple con los
ΥΣΑ NETGEAR Inc. ΔΗΛΩΝΕΙ ΟΤΙ Radiolan ΣΥΜΜΟΡΦΩΝΕΤΑΙ
. déclare que l'appareil Radiolan est conforme aux
Italiano [Italian] Con la presente NET
essenziali ed alle altre disposizioni pertinenti stabilite dalla direttiva 1999/5/CE.
Latviski [Latvian] Ar šo NETGEAR Inc. dekla
prasībām un citiem ar to saistītajiem noteikumiem.
GEAR Inc. dichiara che questo Radiolan è conforme ai requisiti
Notification of Compliance
rē, ka Radiolan atbilst Direktīvas 1999/5/EK būtiskajām
27
Page 28

802.11ac USB WiFi Adapter (A6200)
Language Statement
Lietuvių [Lithuanian] Šiuo NETGEAR Inc. deklaruoja, kad šis Radiolan atitinka esminius reikalavimus ir
kitas 1999/5/EB Direktyvos nuostatas.
Nederlands [Dutch] Hierbij verklaart NETGEAR Inc. dat het to
de essentiële eisen en de andere relevante bepalingen van richtlijn 1999/5/EG.
Malti [Maltese] Hawnhekk, NETGEAR Inc., ji
essenzjali u ma provvedimenti ohrajn relevanti li hemm fid-Dirrettiva 1999/5/EC.
Magyar [Hungarian Alulírott, NETGEAR Inc. nyilatkozom, hogy a Radiolan megfelel a vonatkozó alapvetõ
követelményeknek és az 1999/5/EC irányelv egyéb elõírásainak.
Polski [Polish] Niniejszym NETGEAR Inc. oświad
wymogami oraz pozostałymi stosownymi postanowieniami Dyrektywy 1999/5/EC.
Português [Portuguese] NETGEAR Inc. d
e outras disposições da Directiva 1999/5/CE.
Slovensko [Slovenian] NETGEAR Inc. izjavlja, da je ta Radiolan v skladu z bistvenimi zahtevami in ostalimi
relevantnimi določili direktive 1999/5/ES.
Slovensky [Slovak] NETGEAR Inc. tý
príslušné ustanovenia Smernice 1999/5/ES.
Suomi [Finnish] NETGEAR Inc. vakuu
oleellisten vaatimusten ja sitä koskevien direktiivin muiden ehtojen mukainen.
Svenska [Swedish] Härmed intygar NETGEAR Inc. att denna Radiola n står I övere nsstämmelse med de
väsentliga egenskapskrav och övriga relevanta bestämmelser som framgår av direktiv
1999/5/EG.
Íslenska [Icelandic] Hér með lýsir NETGEAR Inc
aðrar kröfur, sem gerðar eru í tilskipun 1999/5/EC.
eclara que este Radiolan está conforme com os requisitos essenciais
mto vyhlasuje, že Radiolan spĺňa základné požiadavky a všetky
ddikjara li dan Radiolan jikkonforma mal-htigijiet
ttaa täten että Radiolan tyyppinen laite on direktiivin 1999/5/EY
. yfir því að Radiolan er í samræmi við grunnkröfur og
estel Radiolan in overeenstemming is met
cza, że Radiolan jest zgodny z zasadniczymi
Norsk [Norwegian] NETGEAR Inc. e
grunnleggende krav og øvrige relevante krav i direktiv 1999/5/EF.
rklærer herved at utstyret Radiolan er i samsvar med de
Interference Reduction Table
The following table shows the recommended minimum distance between NETGEAR equipment and household
appliances to reduce interference (in feet and meters).
Household Appliance Recommended Minimum Distance (in feet and meters)
Microwave ovens 30 feet / 9 meters
Baby Monitor - Analog 20 feet / 6 meters
Baby Monitor - Digital 40 feet / 12 meters
Cordless phone - Analog 20 feet / 6 meters
Cordless phone - Digital 30 feet / 9 meters
Bluetooth devices 20 feet / 6 meters
ZigBee 20 feet / 6 meters
Notification of Compliance
28
 Loading...