

NETGEAR 7550 Installation Manual
Business HSI Basic Installation
NETGEAR 7550
Technical Reference Guide v2.0
Static Business Class HSI Basic Installation
NETGEAR 7550
Table of Contents
Multiple LAN Support ........................................................................................................ 3
Full BHSI Install Summary ................................................................................................ 7
Physical Connections .......................................................................................................... 8
Auto Configuration ............................................................................................................. 9
Auto Configuration ............................................................................................................. 9
Gateway Configuration ..................................................................................................... 10
Remote Access Configuration .......................................................................................... 15
Public LAN Configuration ................................................................................................ 19
Wireless Network Configuration ...................................................................................... 23
Support Team Contacts ..................................................................................................... 41
Appendix A: Configuring Static IP into Computers ......................................................... 42
Appendix B: Wireless Guest Access ................................................................................ 59
1
Document Overview
ISP Product Plan:
Business Class
HSI (3M/386K
Static
IP)
ISP Product Plan:
Business Class HSI (10M/1M)
Business HSI Basic Installation
NETGEAR 7550
Technical Reference Guide v2.0
Background
In September 2011, Frontier Legacy phased out the residential and business
class Sagem HSI modems (SE567 and SX762) and replaced them with the
Westell 7500. Although a good replacement for the Sagem modems, the
7500 is a temporary solution because it will be manufacturer discontinued in
2012. The final solution, which is similar to the 7500 but has many
improvements, is the Netgear 7550.
Note: Westell sold its modem technology to Netgear in early 2011 and
Netgear has rebranded the 7550 as a Netgear product. Except for the
name change the Netgear version is the same as the Westell version.
Replacing the 7500 with the 7550 results in several significant changes to
Frontier Legacy Business HSI installs:
• The 7550 replaces the 7500 for Business Class HSI products
• The 7550’s gateway address is 192.168.254.254
• The 7550 includes Wireless N
• The 7550 includes a second, “Guest”, wireless network which allows
customers to provide wireless access to their guests without the risk of
those guests accessing the customer’s network or the 7550’s
administrative features
• The 7550 can be setup without a DSL connection
When to use
this document
This document is for Legacy Static BHSI installs.
For a Dynamic BHSI install see “Legacy Residential NETGEAR 7550
Modem Technical Reference”.
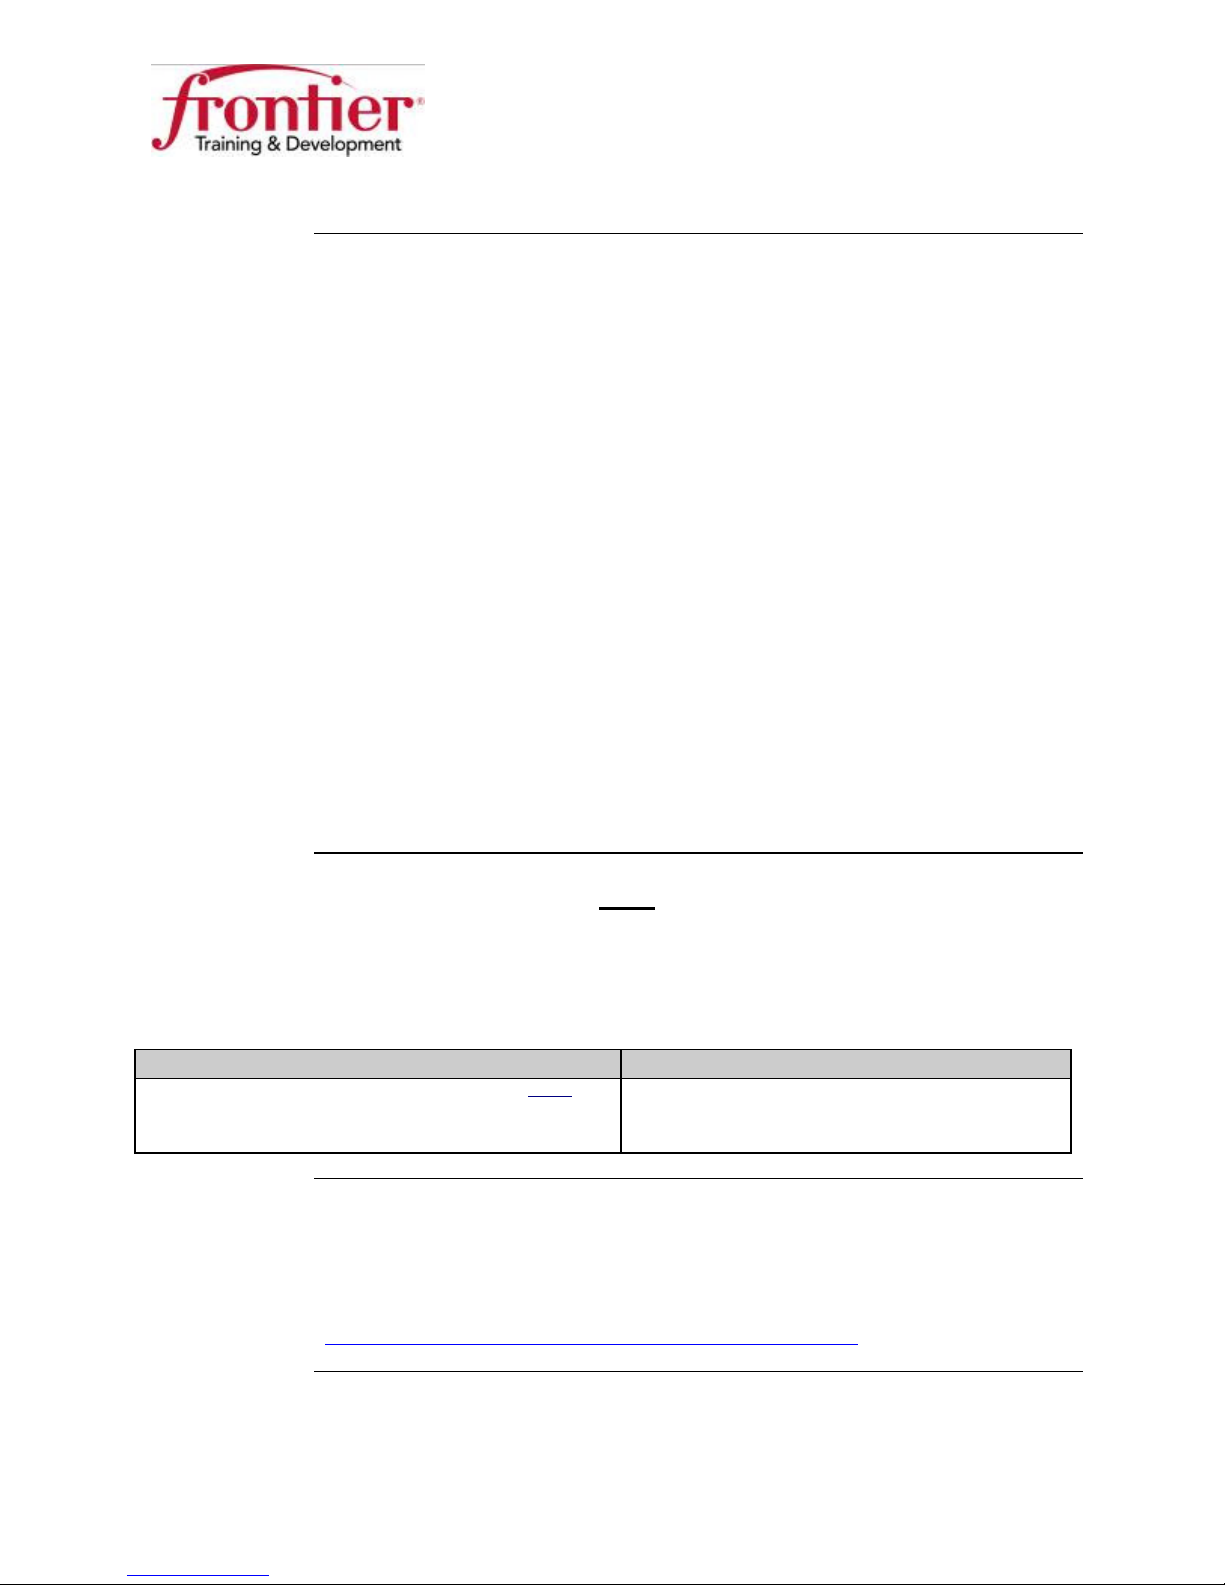
Identify type of install (static vs. dynamic) from the Viryanet work order:
Static Dynamic
ISP WAN Static IP: 173.84.104.138
ISP LAN Network: 173.84.104.164/30
ISP Network Size: /30
Limited scope
This document does not describe any features or provisioning possibilities not
associated with a Static Business Class install. For that information, please
see “Legacy Residential NETGEAR 7550 Modem Technical Reference”
posted on the Outside Plant Reference Guide
(http://wcon.east.frontiercorp.com/corgs/OSP/index.htm).
Not covered in this document
2
Multiple LAN Support
173.84.136.169
192.168.254.254
DHCP
Server
NAT
74.42.86.10
On by default
LAN Support
New
Feature
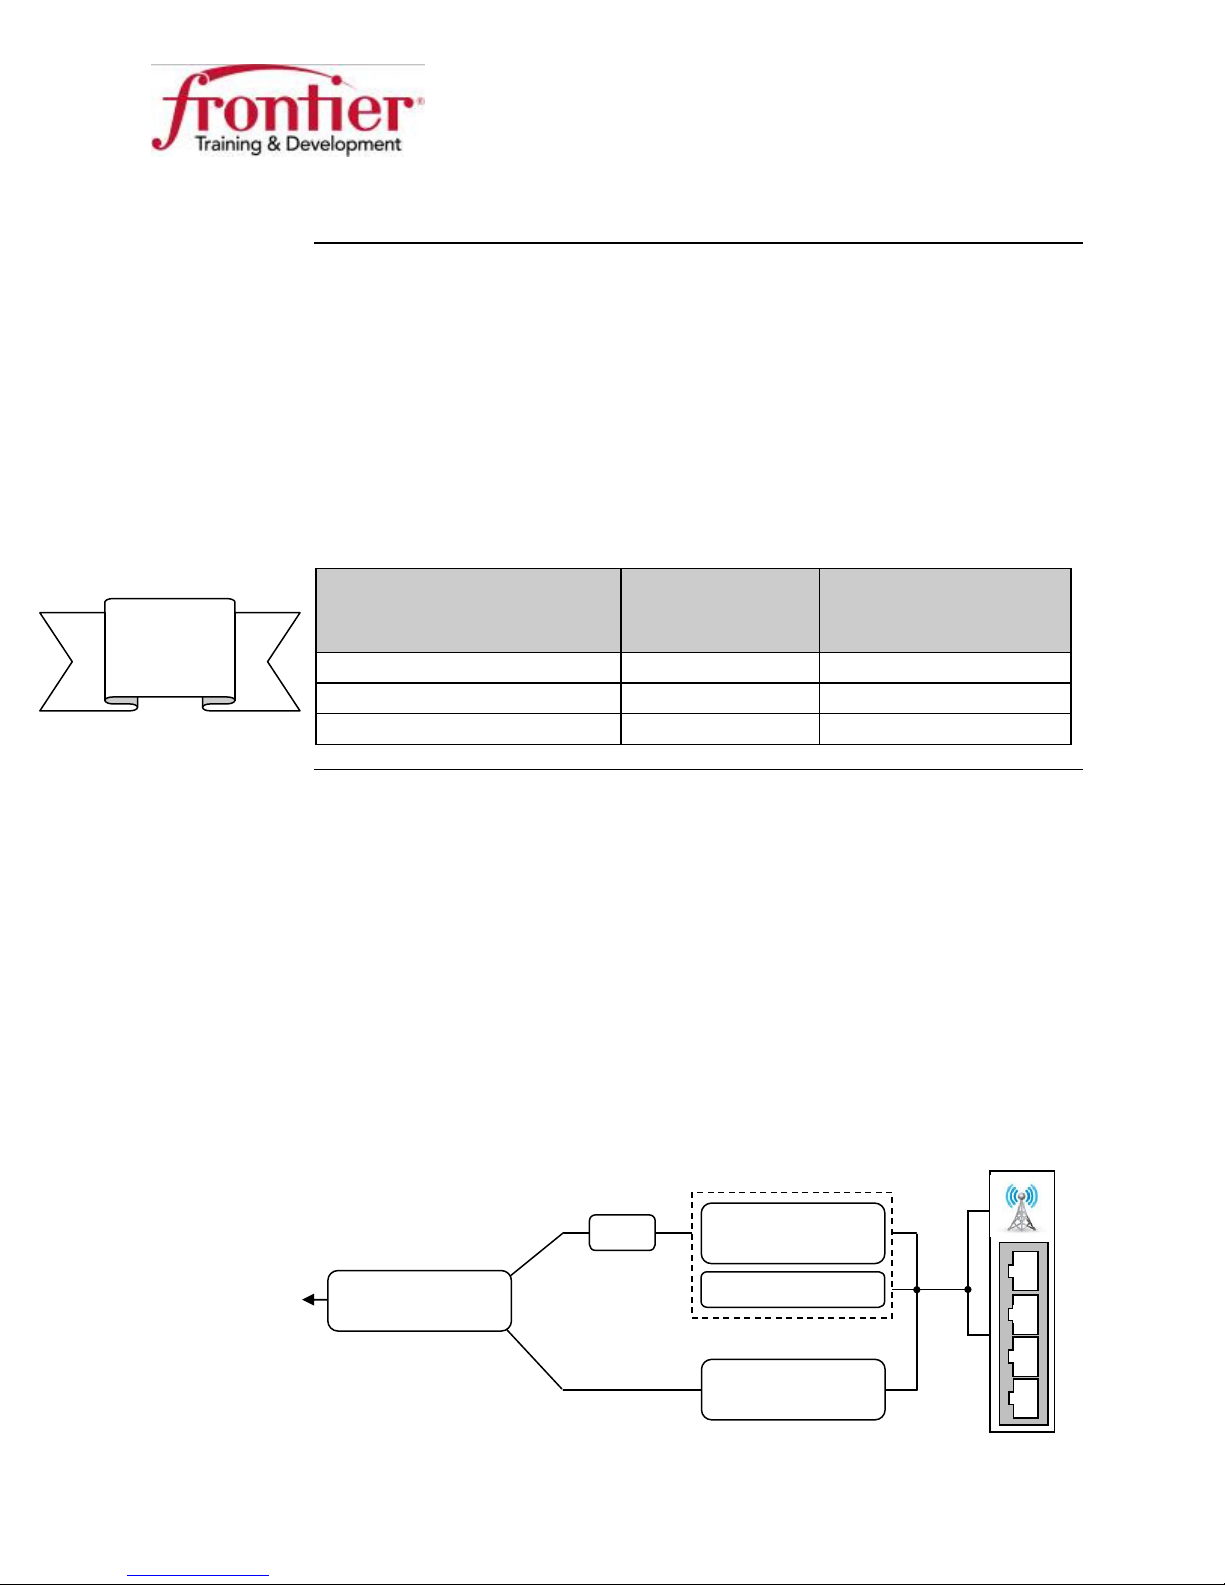
The 7550/7500 supports two simultaneous LAN networks: Private and Public
NOTE: The Private LAN address for the 7550 is 192.168.254.254, the Private
LAN address for the 7500 is 192.168.1.1.
The SE567 only supports a private LAN*: customer devices assigned private
addresses (like 192.168.254.1).
The SX762 only supports a public LAN*: customer devices assigned public
addresses (LAN Block from work order).
Modem Number of LAN
SE567
SX762
(resi or dynamic business)
(static business)
7550/7500
1 Public
(resi or business)
Business HSI Basic Installation
NETGEAR 7550
Technical Reference Guide v2.0
*When provisioned to product specifications
Type of LAN network
networks
supported
supported
1 Private
2 Private + Public
What does this
mean?
When deploying a 7550 to a Static Business Class customer, there are no
restrictions on wireless use. (Wireless devices can use the Private LAN)
Any customer devices manually provisioned with the assigned LAN Block IP
addresses will use the Public LAN. These devices on the Public LAN will
have unrestricted Internet access, both incoming and outgoing.
Any customer devices requesting an IP address will be assigned addresses
from the Private LAN (via the DHCP server). These devices on the Private
LAN will have unrestricted Internet access in only the outbound direction (to
the Internet). Internet devices trying to initiate a connection to a Private LAN
device will be blocked by network address translation (NAT). – just like
residential
Private LAN
WAN
Assigned via PPP
See page 12 for setup
Public LAN
Assigned by you
See page 21 for setup
3
Multiple LAN Support, Continued
173.84.136.169
192.168.254.254
DHCP Server
173.84.136.169
192.168.254.254
DHCP Server
NAT
74.42.86.10
On by default
Path to Internet
Working with
two LANs
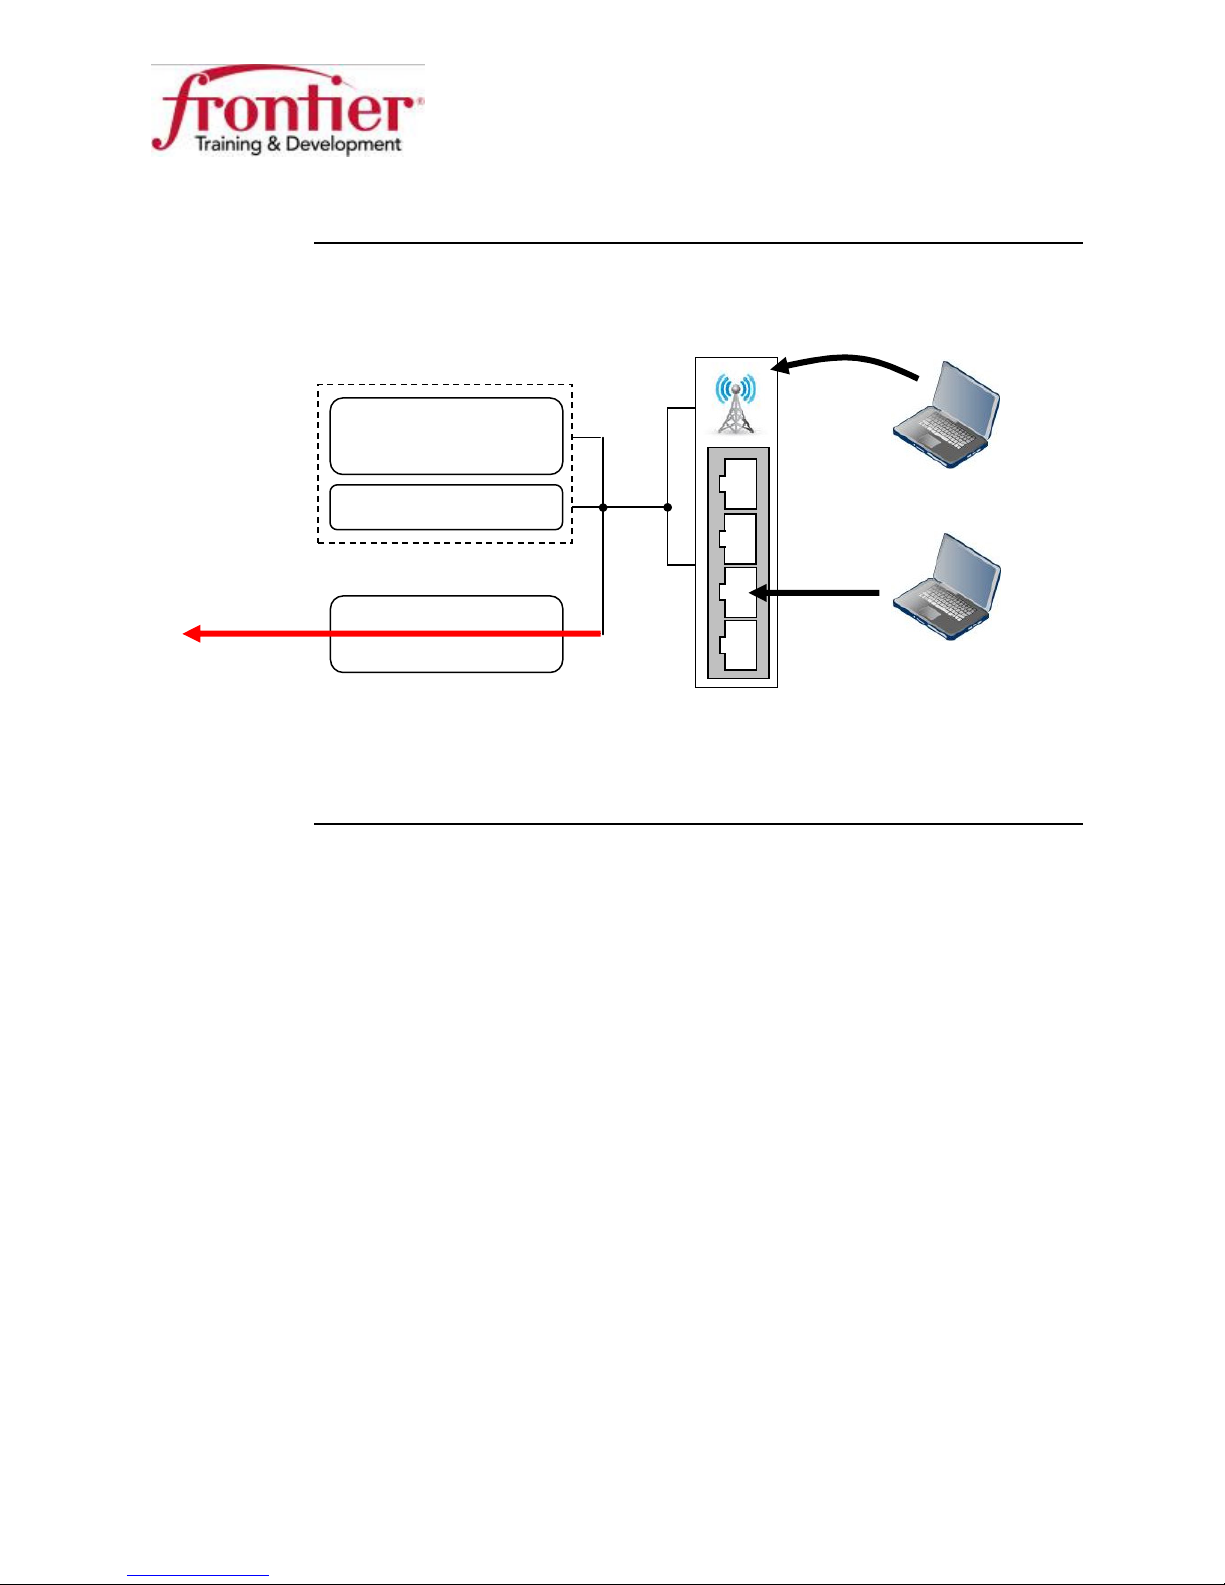
At the conclusion of a Business Class install both Private and Public LANs
will be enabled and configured.
Note: The WAN and Public LAN addresses were simply chosen for example.
They will be different for every install.
WAN
Assigned via PPP
See page 12 for setup
Business HSI Basic Installation
NETGEAR 7550
Technical Reference Guide v2.0
Private LAN
Public LAN
Assigned by you
See page 21 for setup
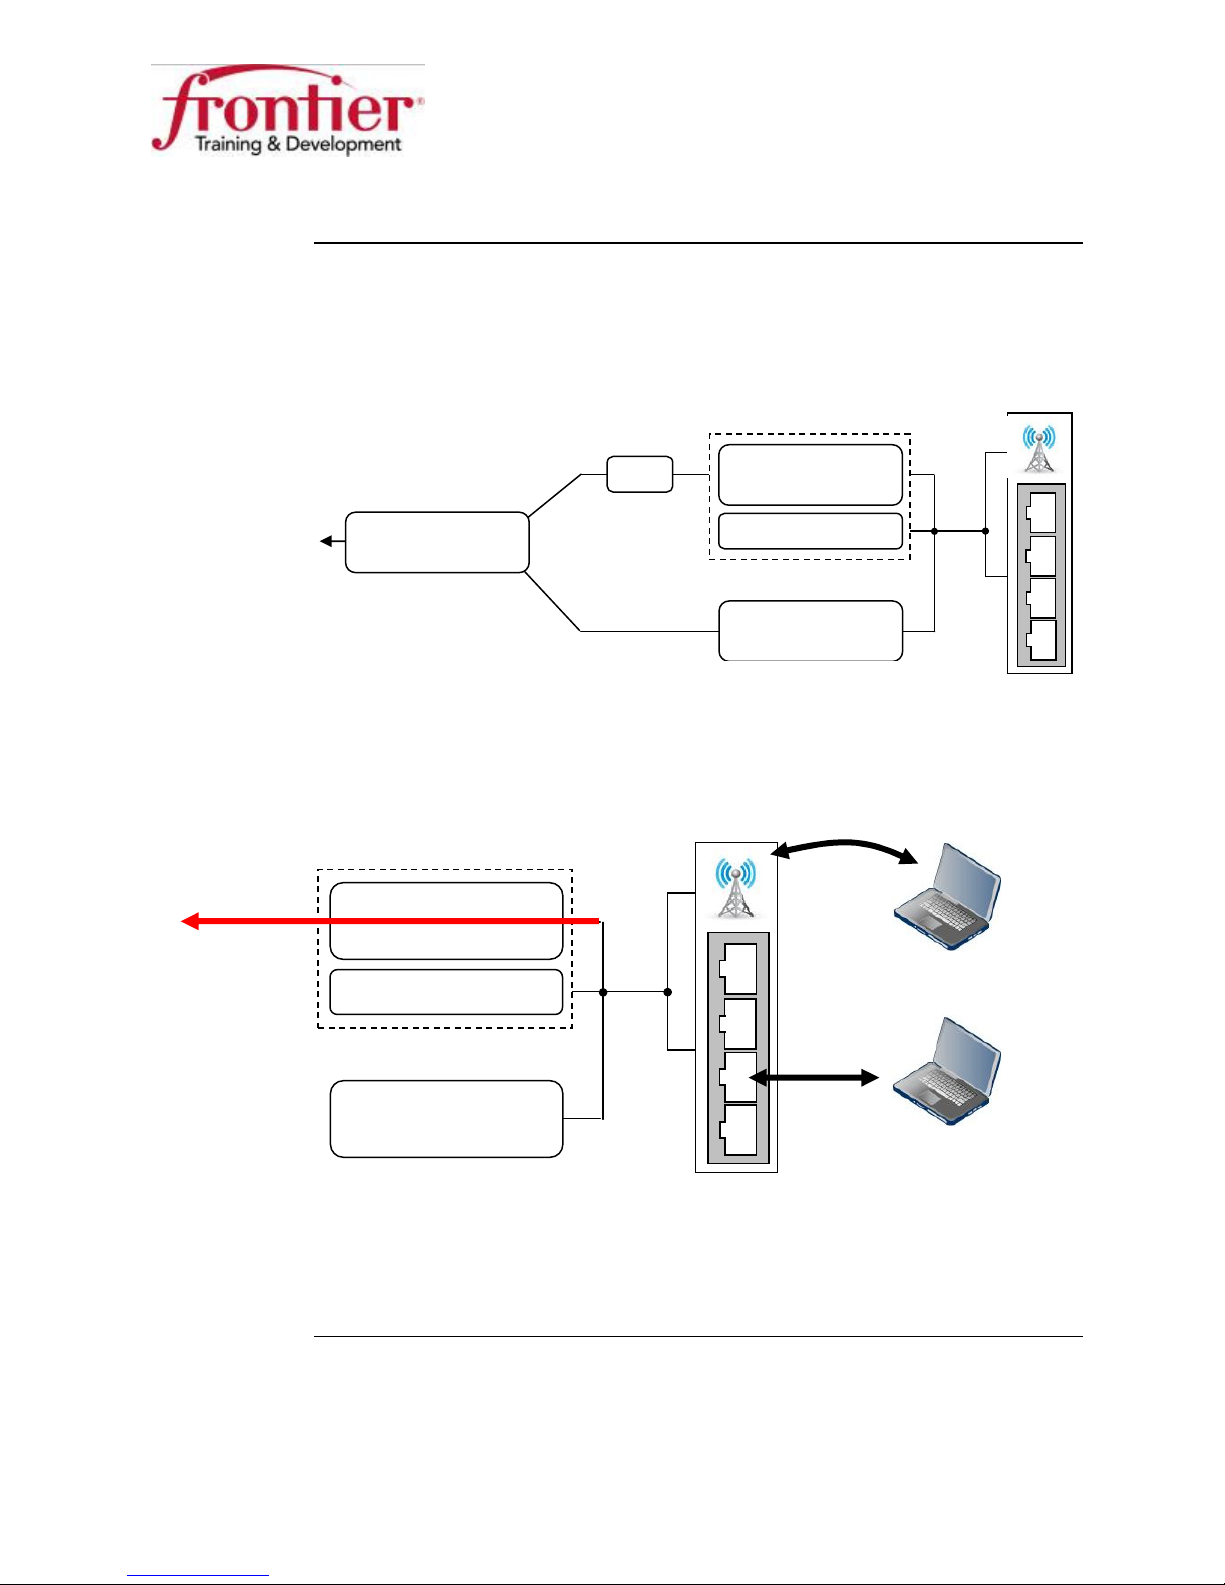
Any device connected via wireless or wired that requests an IP address will
be automatically assigned an IP address from the Private LAN (via the DHCP
server).
Private LAN
Auto assigned 192.168.254.14
Public LAN
Auto assigned 192.168.254.15
To access modem: Use the 7550’s Private LAN address - 192.168.254.254
How many devices can the Private LAN support?
Answer: 33 devices (with default settings)
Continued on next page
4
Multiple LAN Support, Continued
173.84.136.169
192.168.254.254
DHCP Server
Path to Internet
Working with
two LANs
(continued)
Any device connected via wireless or wired that has been manually assigned
an IP address from the Public LAN will be assigned to the Public LAN.
Private LAN
Public LAN
To access modem: Use the 7550’s Public LAN address – 173.84.136.169
How many devices can the Public LAN support?
Answer: depends on the LAN Block subnet mask: /30=1, /29=5, /28=13
Business HSI Basic Installation
NETGEAR 7550
Technical Reference Guide v2.0
Manually assigned 173.84.136.170
(IP is LAN Block + 2)
Manually assigned 173.84.136.171
(IP is LAN Block +3)
5

Typical two
173.84.136.169
192.168.254.254
DHCP
Server
LAN scenario
Customer
Value
Business HSI Basic Installation
NETGEAR 7550
Technical Reference Guide v2.0
A typical scenario using both Private and Public LANs together is shown
here: A customer with 1 usable public LAN address (/30) can still benefit
from wireless by using the 33 available private addresses for wireless
connections.
Wireless users connect, and are assigned private IP addresses. They access
the Internet through the Private LAN – just like residential HSI.
Wired devices have been pre-provisioned with addresses from the Public
LAN block. They access the Internet through the Public LAN.
Devices on different LANs do not have access to each other.
Private LAN
Auto assigned
Public LAN
Manually assigned 173.84.136.170
(IP is LAN Block +2)
6

Full BHSI Install Summary
Full install
summary
The following list summarizes all the tasks required to be manually
completed for a Business HSI full install.
• Outside cable and equipment conditioning and maintenance.
• Filter installation & Gateway installation and connection.
• Gateway configuration
a. Complete one-time setup wizard.
b. Verify the gateway static WAN IP address assignment.
c. Configure the gateway for remote access.
d. Configure the Public LAN.
e. Test service.
• Close order.
Business HSI Basic Installation
NETGEAR 7550
Technical Reference Guide v2.0
7
Physical Connections
Install microfilters (A)
Connect the Ethernet cable (B)
Connect the RJ
-
11 phone cable (C)
Connect power
Overview
Connection
diagram
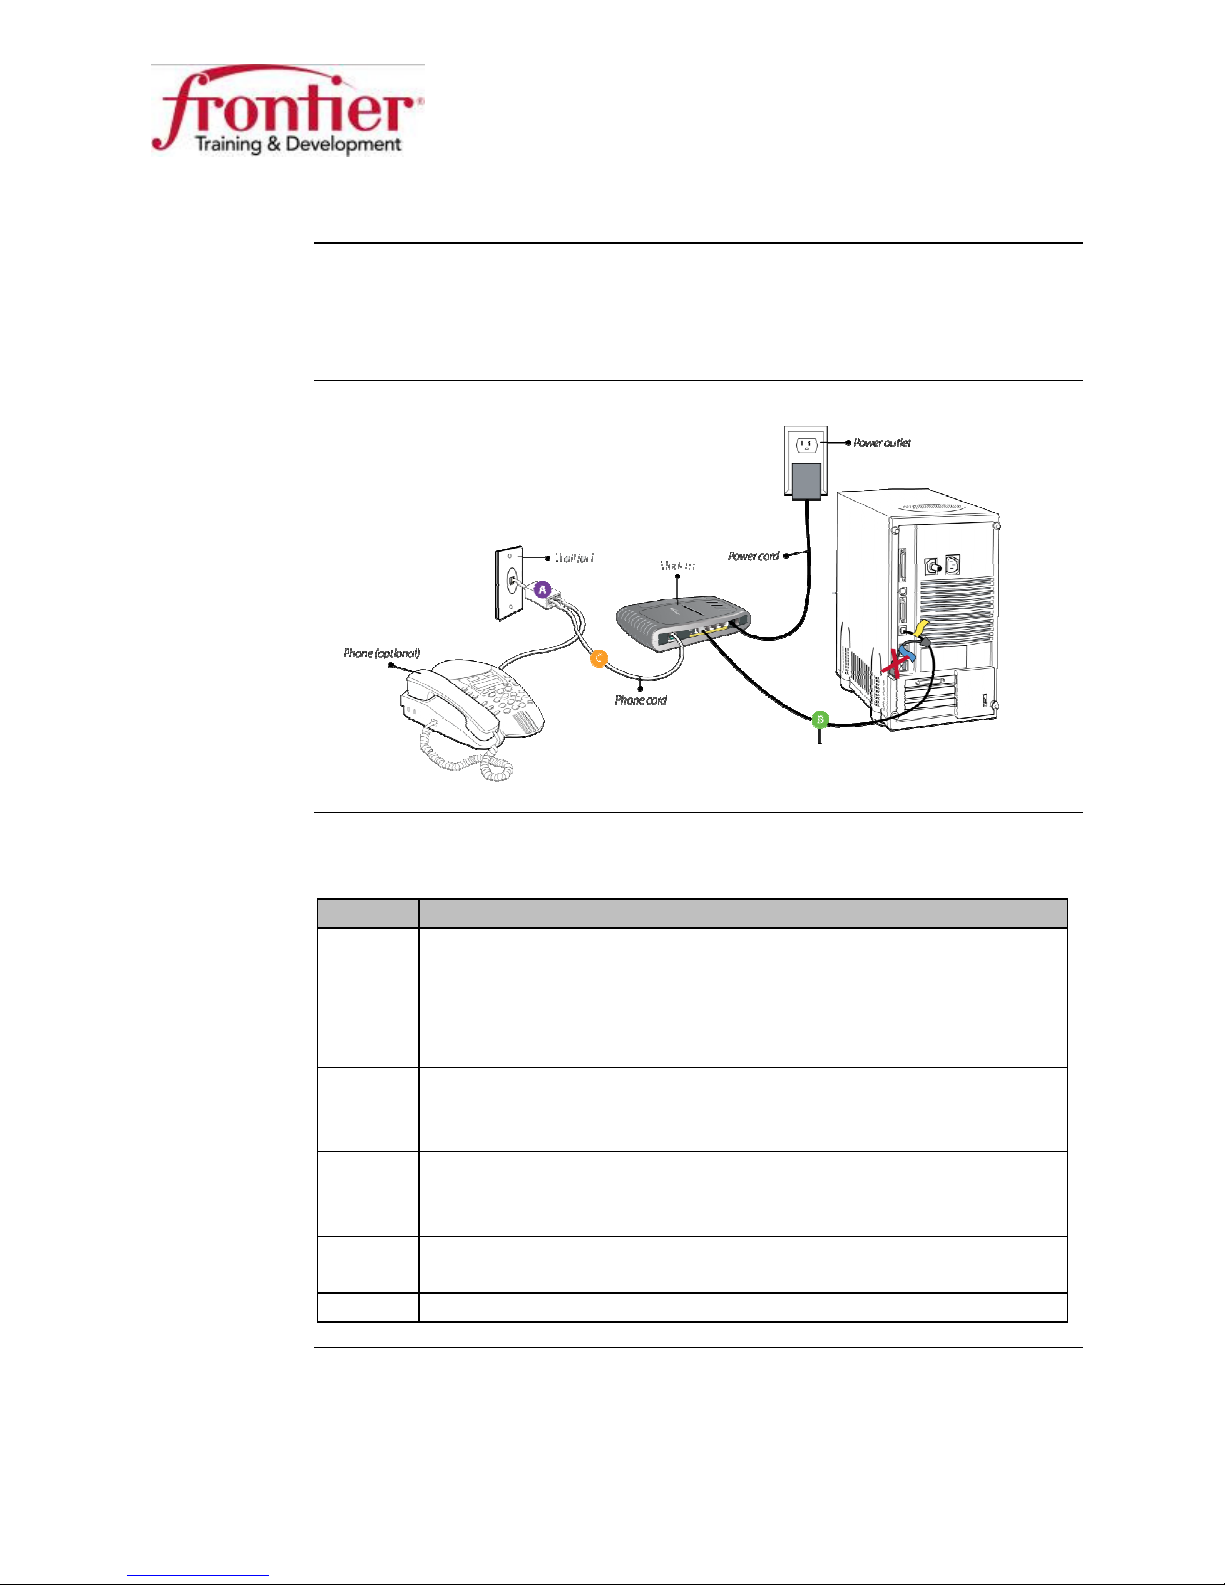
The connections section of this document describes the physical
connections required prior to configuration of a NETGEAR 7550
gateway.
Business HSI Basic Installation
NETGEAR 7550
Technical Reference Guide v2.0
Connect the
gateway
Ethernet cable
Follow these steps to properly connect the gateway prior to configuration:
Step Action
1
on all of the occupied phone jacks or
run a dedicated line directly to the phone jack from the NID.
Note: Microfilters vary. Use a phone line splitter with a singleport microfilter or a dual-port microfilter (as shown).
2
between the computer and
gateway.
3
between the phone jack (or
unfiltered side of microfilter) and gateway.
4
to the gateway.
5
Continue to the next section
8
Auto Configuration
Auto
Configuration
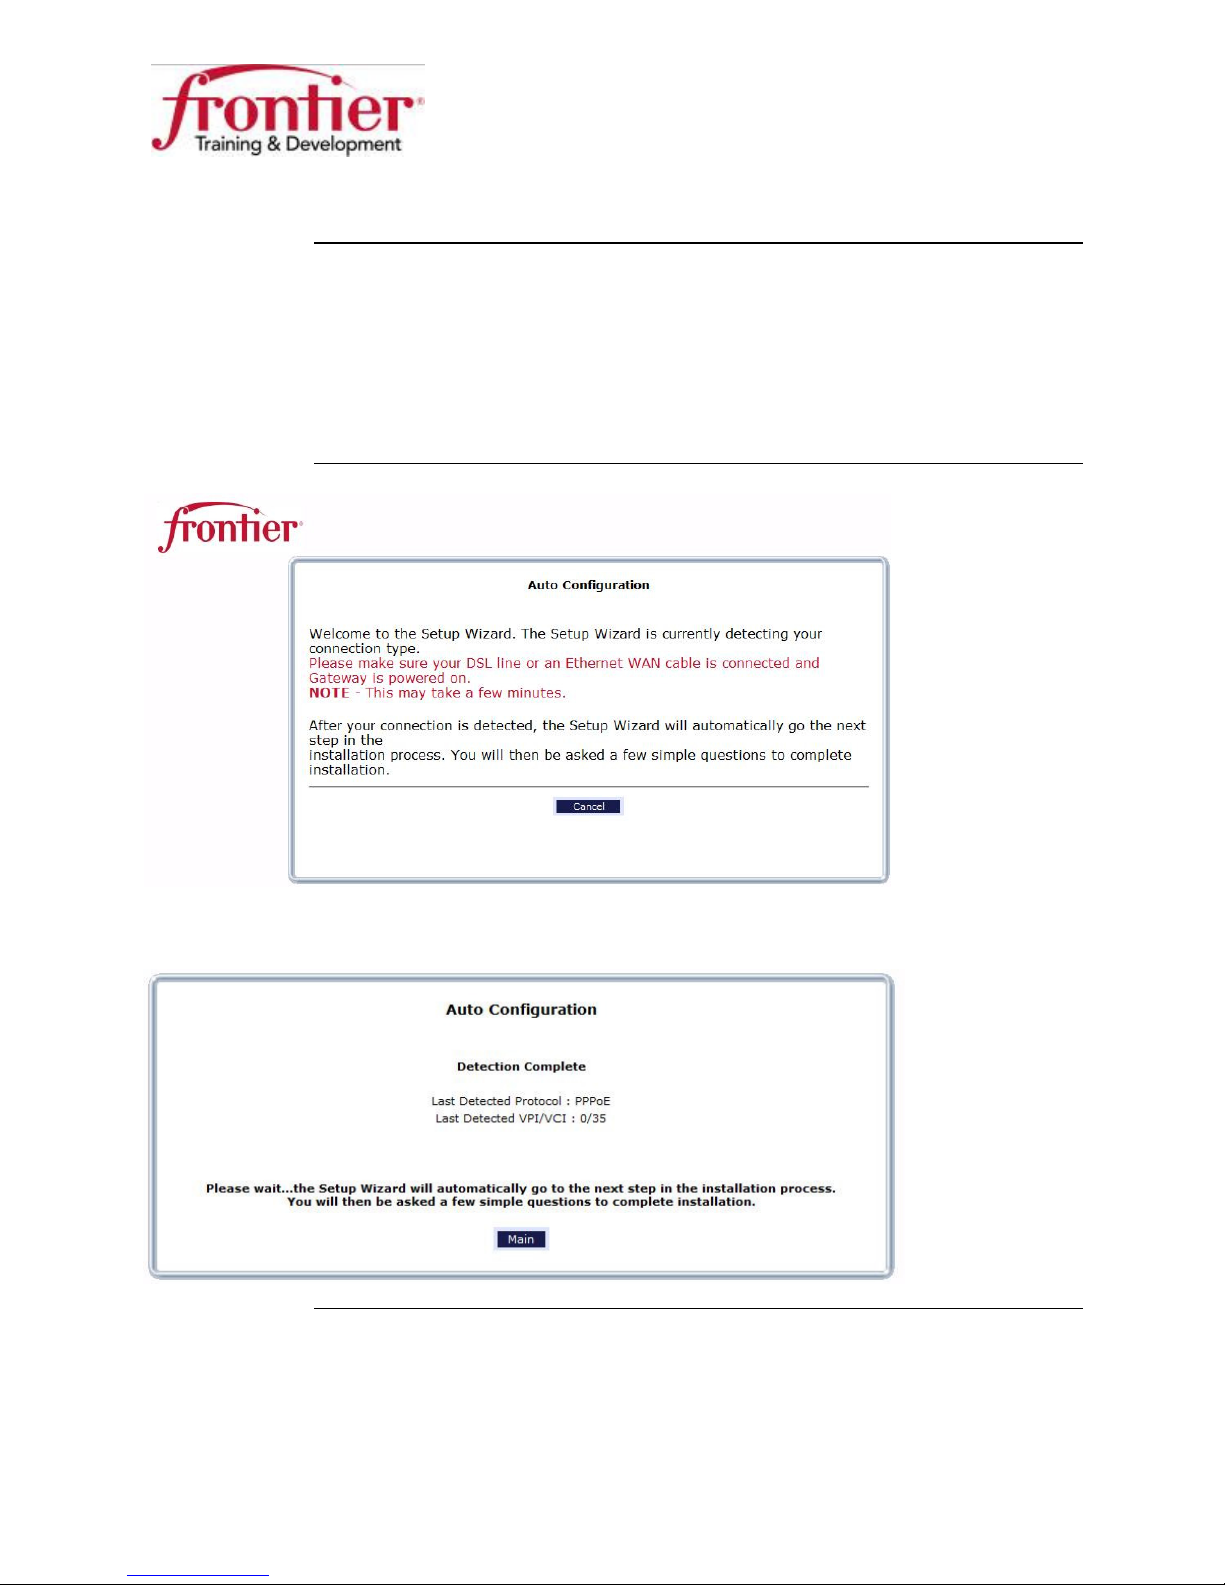
On initial setup (out of box installation) or after a factory reset, the 7550 will
run auto configuration. During the process, 7550 automatically detects WAN
connection type, i.e. DSL or Ethernet (E1/Uplink Port). It also auto detects
the PVC (0/35, 8/35 and 0/36) and connection type, i.e. PPPoE or Routed
Bridge (aka DHCP). Once the auto configuration completes, the user will be
directed to the Setup Wizard.
Business HSI Basic Installation
NETGEAR 7550
Technical Reference Guide v2.0
9
Gateway Configuration
Power
DSL
fr0nt13r
New Password
Walled garden
Configure the
gateway
An Internet connection that is restricted prior to authentication. The Frontier
Netgear 7550 gateway has a built-in walled garden, also known as the onetime setup wizard. When the walled garden/setup wizard is successfully
completed, the customer should be able to surf the Internet.
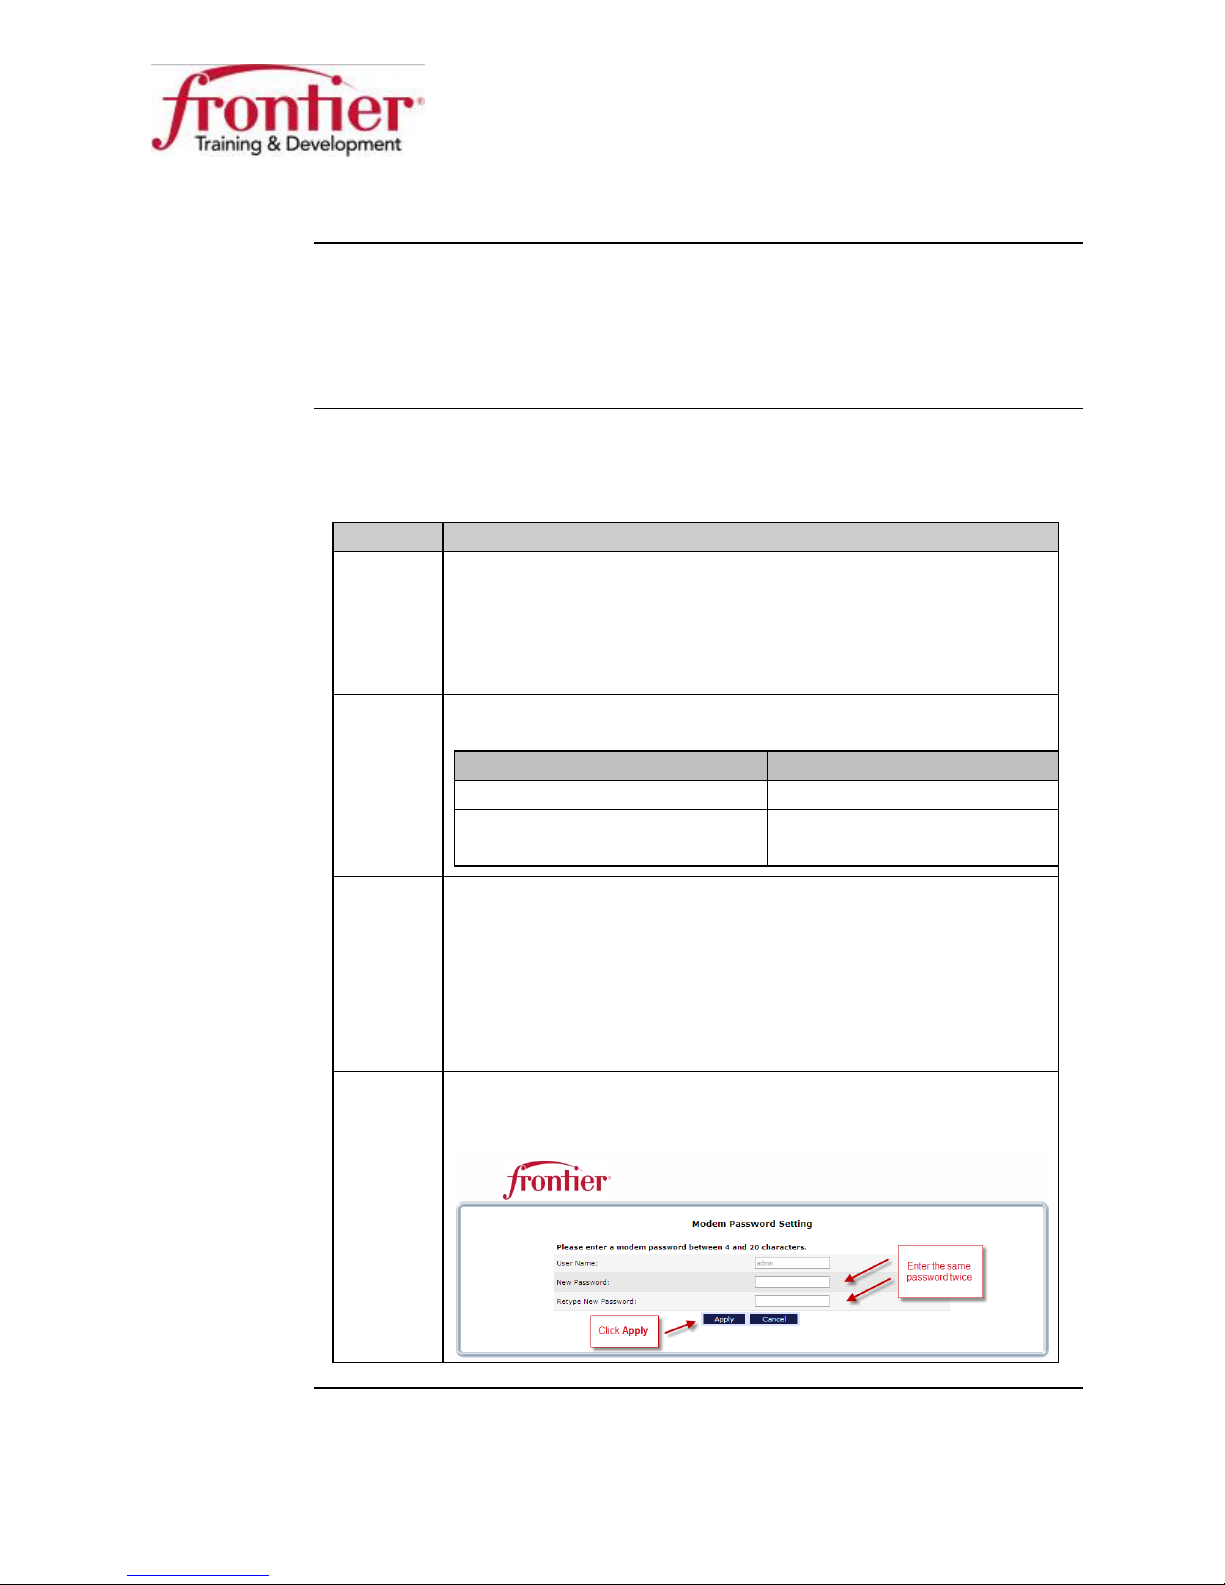
After the physical connections are made, follow these steps to complete the
one-time setup wizard:
Step Action
1 Turn the switch labeled
to the On position.
Result: The modem boots and the DSL LED begins to blink
(training).
2 Wait for the
If ... Then ...
The LED is solid green Continue to step 3.
The LED stays flashing
(slow) green or off,
3 Open a web browser on the computer connected to the
gateway.
Result: The web browser should redirect to the gateway’s
one time setup wizard. If it does not, type a known URL (i.e.,
www.frontier.com, or www.yahoo.com) or 192.168.254.254
into the web browser address field.
4 Enter
Retype New Password fields, and then click the Apply
button on the Modem Password Setting screen.
Business HSI Basic Installation
Technical Reference Guide v2.0
on the gateway’s back panel
LED to be solid green (trained).
Check the physical
connections.
as the password in the
NETGEAR 7550
and
Continued on next page
10
Gateway Configuration, Continued
Configure the
gateway
(continued)
Step Action
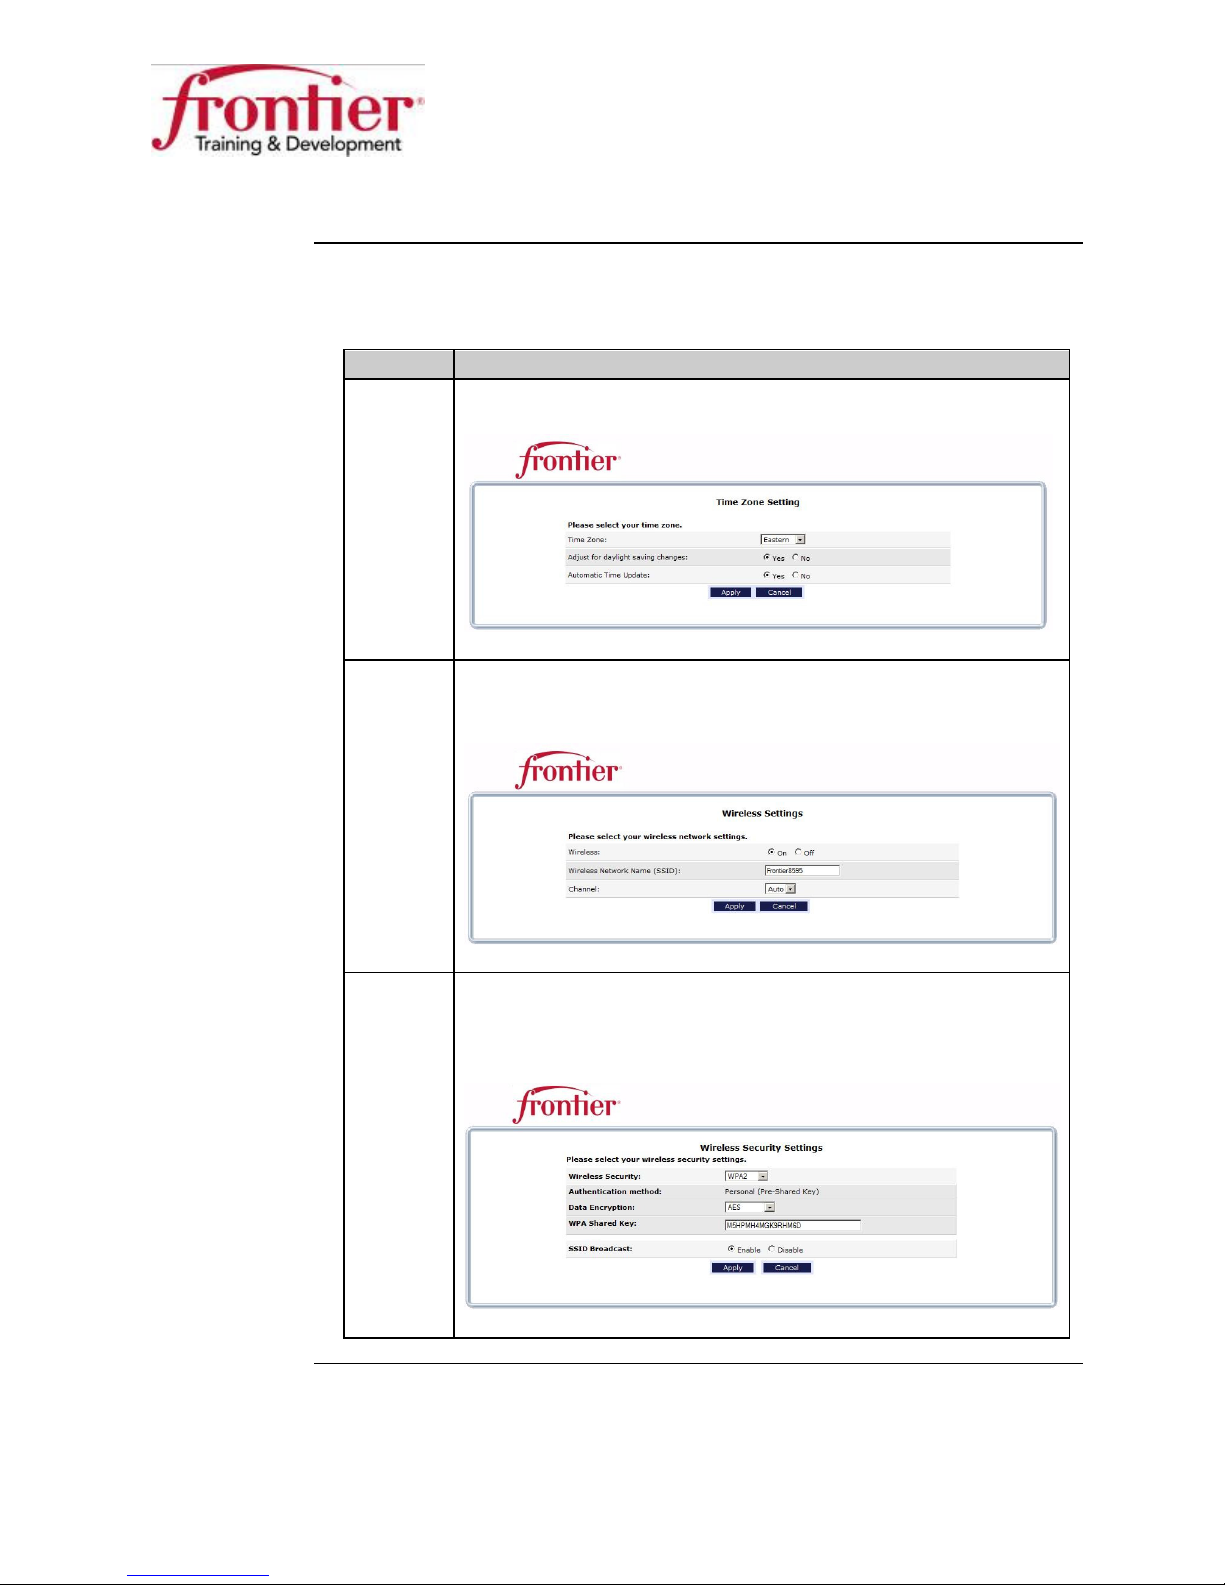
5 Time Zone Setting: Select your time zone and click on
Apply.
6 Wireless Settings: By default, Wireless is enabled (On).
SSID is Frontier plus the last 4 digits of the gateway serial
number. Channel is configured as Auto.
Business HSI Basic Installation
NETGEAR 7550
Technical Reference Guide v2.0
7 Wireless Security Settings: By default, it is WPA2 Personal
(PSK) and AES. SSID Broadcast is enabled. Note that WPA
Share Key is printed on the bottom of the gateway panel.
Continued on next page
11
Gateway Configuration, Continued
Configure the
gateway
(continued)
Step Action
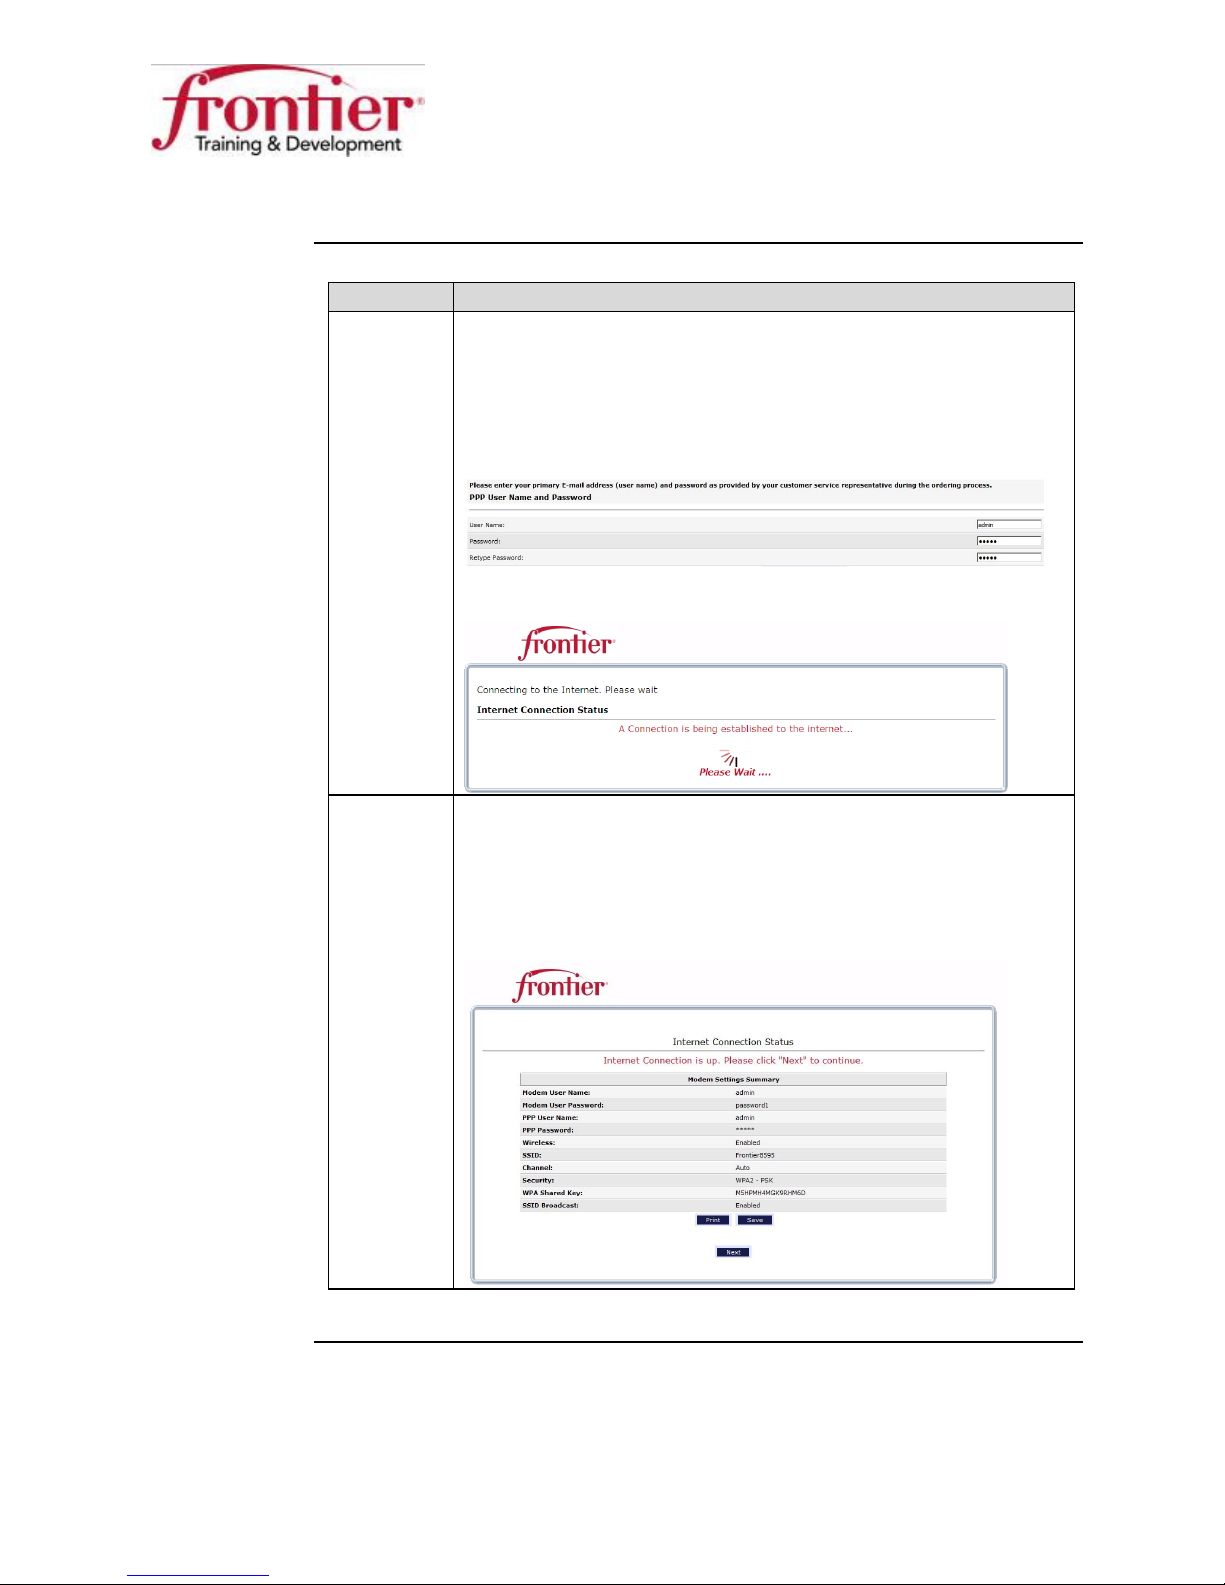
8 PPPoE User Name and Password: Enter the primary account
email address into the User Name field and the primary
account password into the New Password and Retype New
Password fields, and then click the Apply button on the PPP
User Name and Password screen.
Result: An Internet Connection Status page is displayed.
Business HSI Basic Installation
NETGEAR 7550
Technical Reference Guide v2.0
9 Summary Page: This page summarizes Modem Settings.
Note that PPP Password is hidden for security reason. You
can click on Print to print out the Summary page and ask the
customer to save it for future reference and click on Next to
continue.
Continued on next page
12
Gateway Configuration, Continued
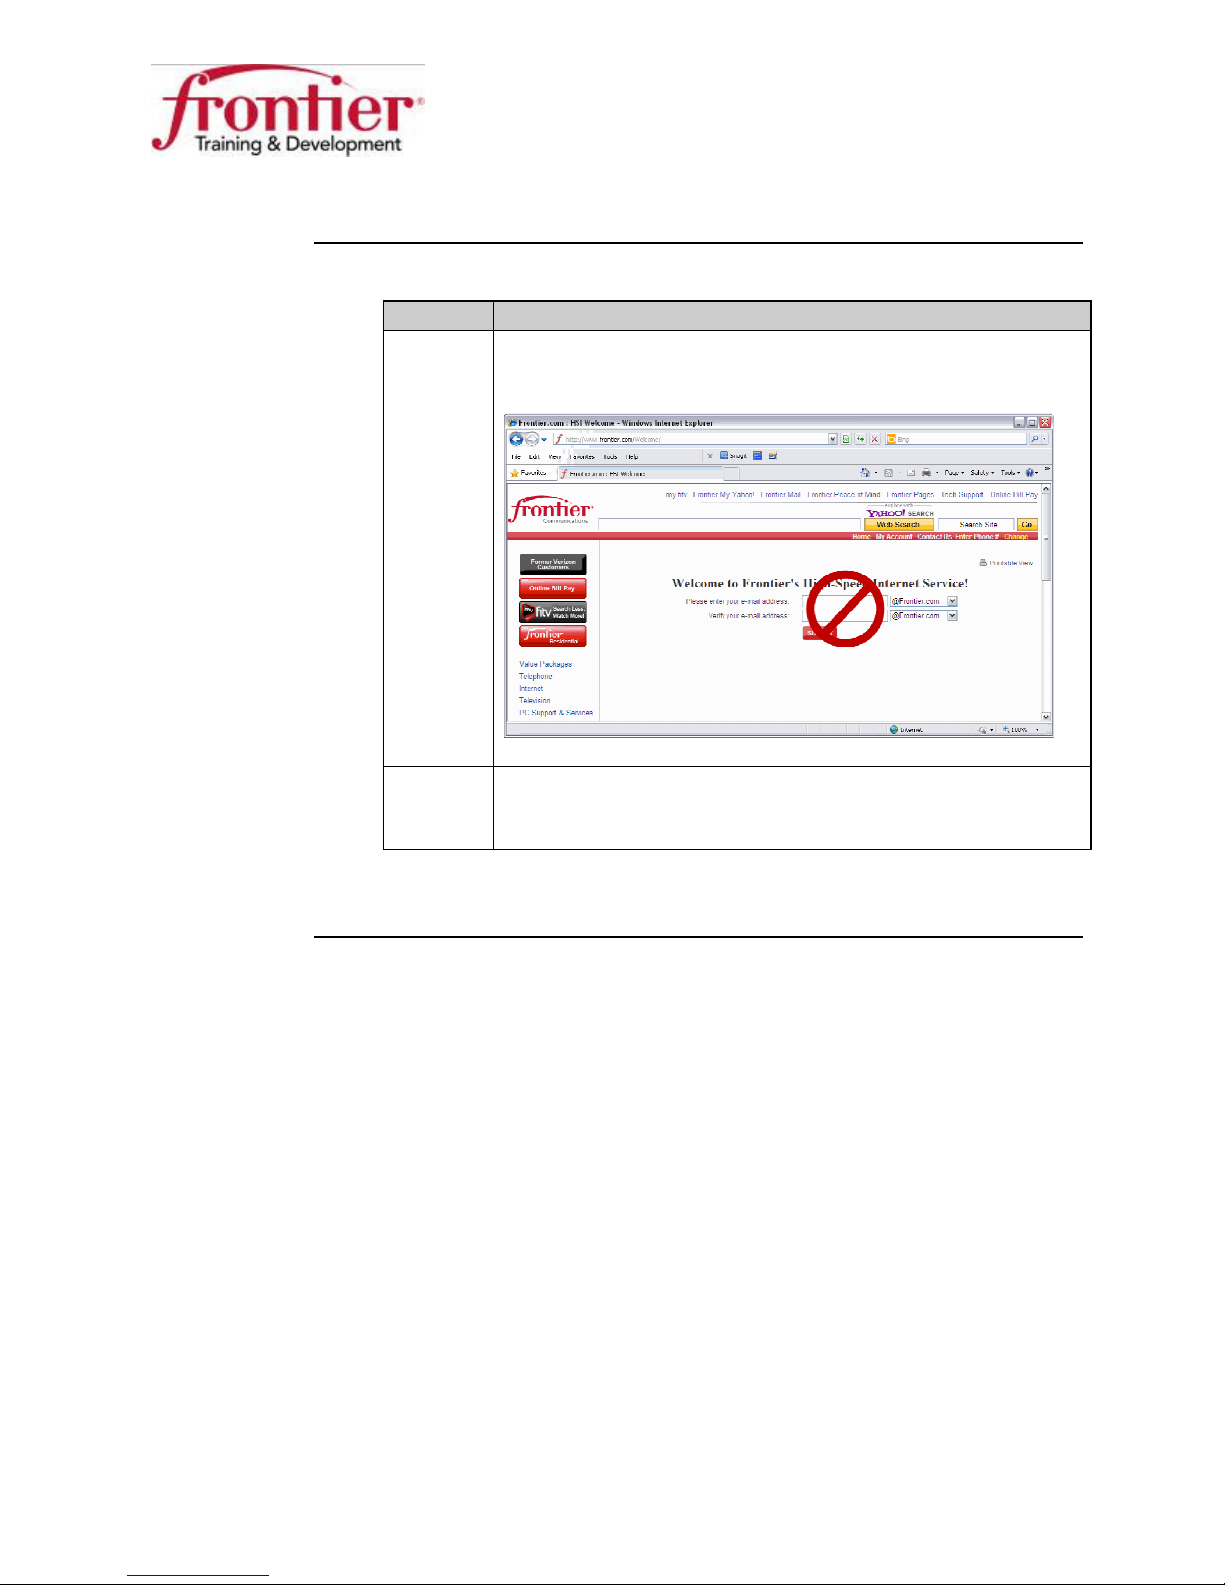
Welcome to Frontier’s
Configure the
gateway
(continued)
(continued)
Step Action
10 Do not fill out the fields on the
High-Speed Internet Service page when displayed.
Business HSI Basic Installation
NETGEAR 7550
Technical Reference Guide v2.0
11 Leave the web browser open and continue to the next
section: “Verify the gateway static WAN IP address”.
Continued on next page
13
Gateway Configuration, Continued
IP Address
My Gateway
Main
matches
doesn’t match
Username
Example: From Viryanet Work Order…
Verify the
gateway static
WAN IP
address
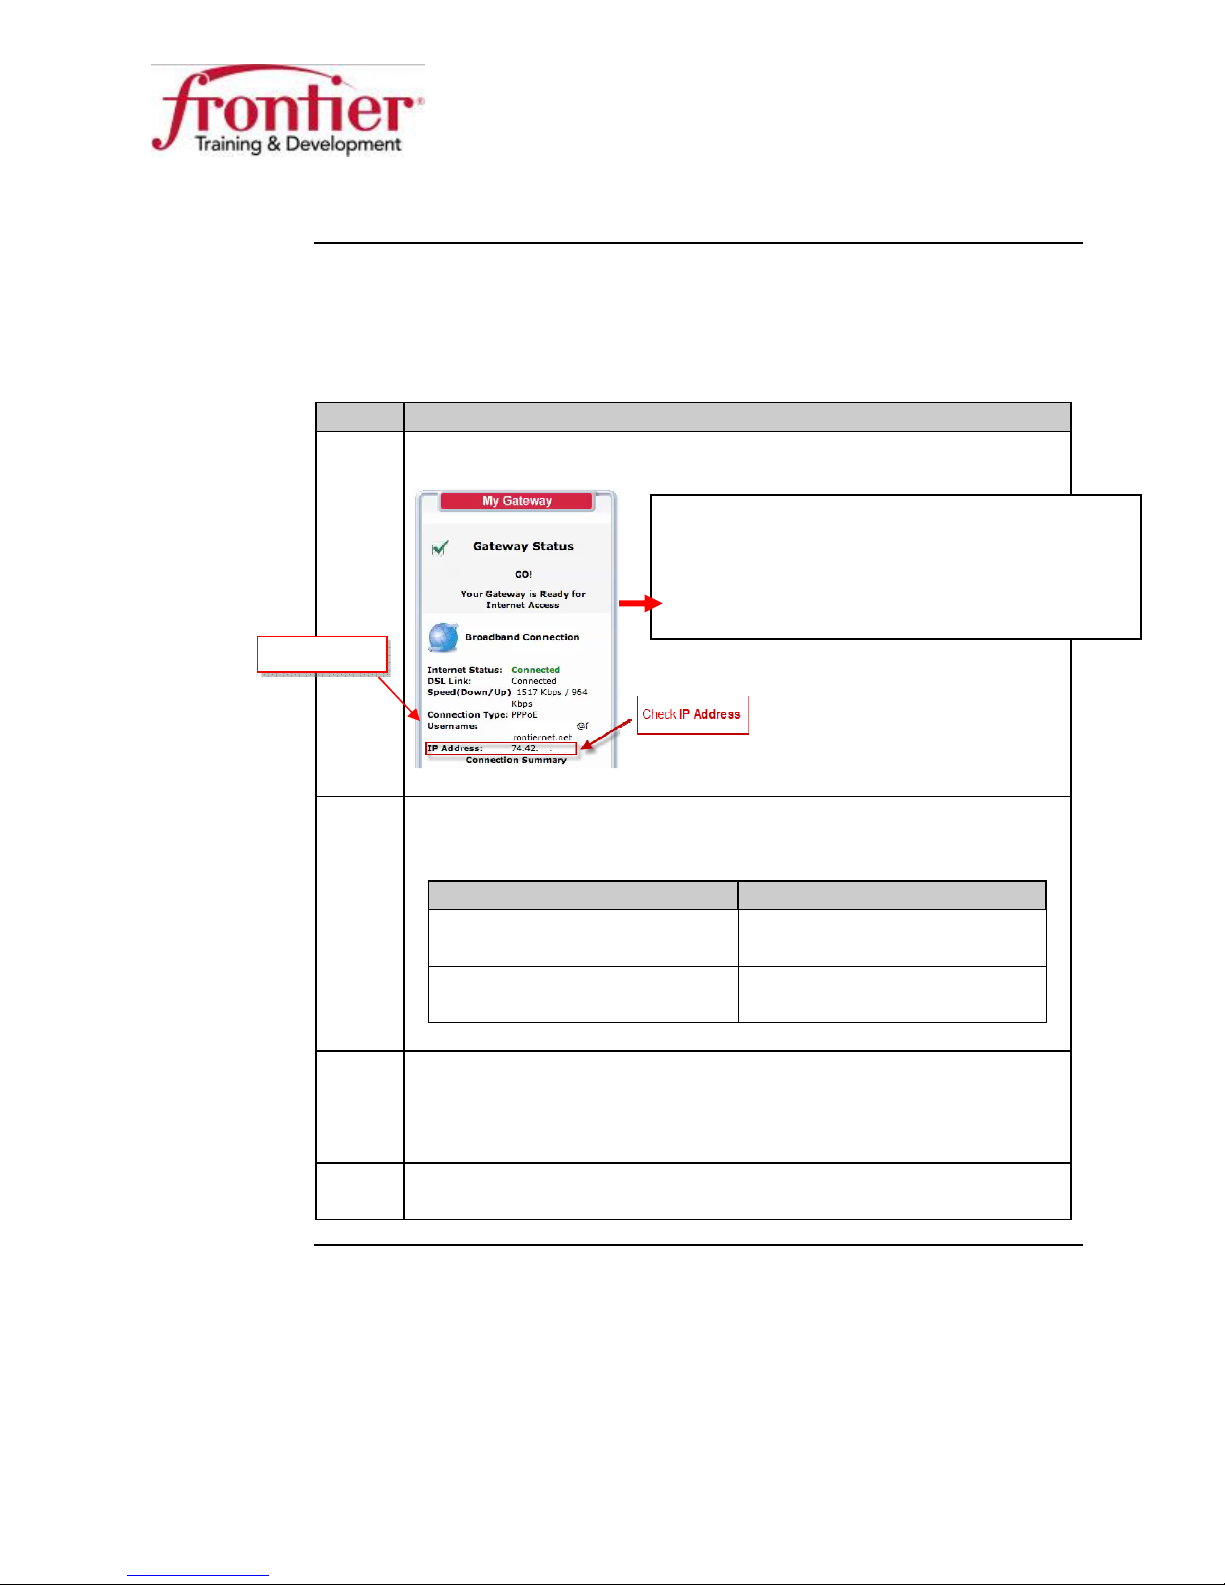
When the one-time setup wizard is successfully completed, verify that the
gateway has the correct static WAN IP address assigned. Follow these steps
to check the static WAN IP address on the gateway:
Step Action
1 Check the
screen.
Business HSI Basic Installation
NETGEAR 7550
Technical Reference Guide v2.0
shown under
ISP Domain: frontier.com
ISP User Name: customer
ISP Product Plan: Business Class DSL (3M/386K Static IP)
ISP WAN Static IP: 74.42.86.10
ISP LAN Network: 173.84.136.168/29
on the
2 Verify that the address shown matches the WAN static IP address
provided on the work order.
IP address
IF… THEN…
WAN
Good. Jump ahead to step 4
address on work order
IP address
Bad. Go to next step (step 3)
WAN address on work order
3 The expected WAN IP address does not match work order. Call
the ISIS NOC to resolve before continuing. 866-ISIS-NOC (866474-7662)
4 Leave the web browser open and continue to the next section:
“Configure the gateway for remote access”.
14
Remote Access Configuration
Advanced
Main
Yes
Warning
Background
Configure the
gateway for
remote access
Remote access is configured to provide the Internet Help Desk (IHD) direct
access to the gateway via the WAN, rather than the LAN, minimizing
customer and technician on-site assistance requirements.
Follow these steps to configure remote access:
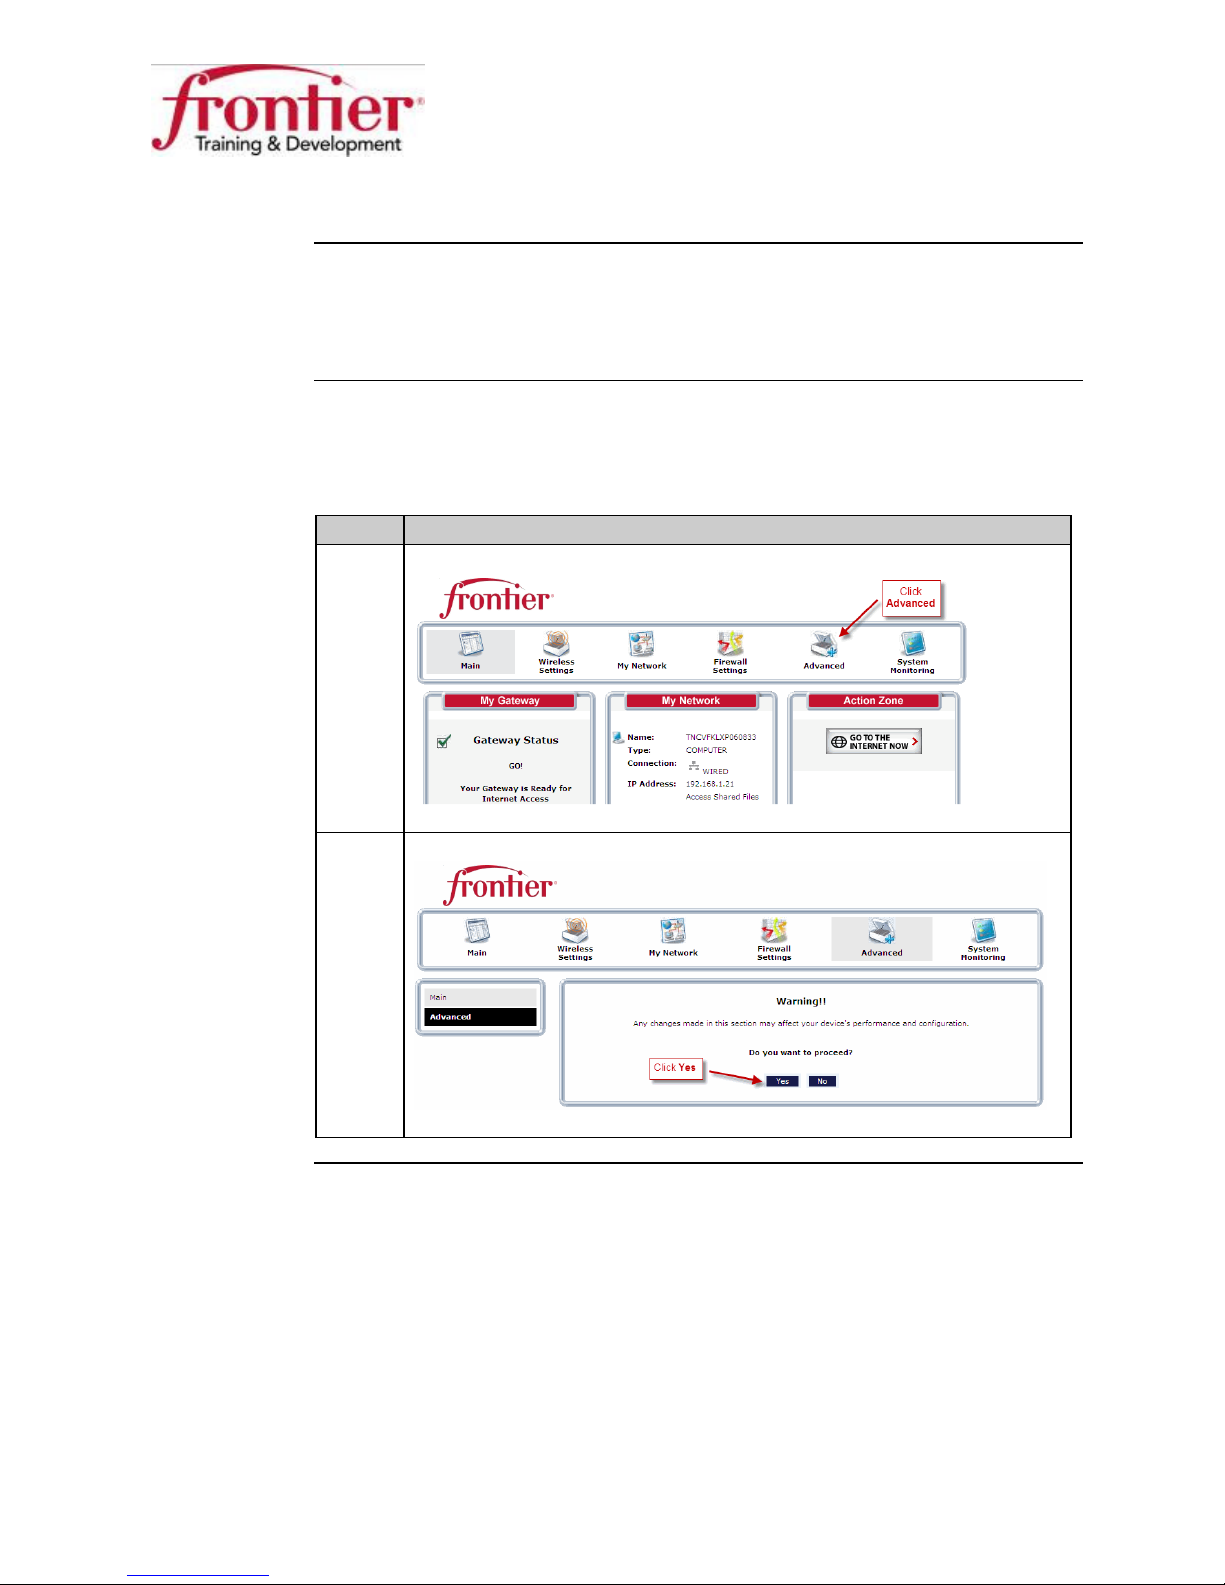
Step Action
1 Click the
button on the
Business HSI Basic Installation
NETGEAR 7550
Technical Reference Guide v2.0
screen.
2 Click the
button on the
screen.
Continued on next page
15

Remote Access Configuration, Continued
Configure the gateway for remote access
Remote Administration
Advanced
(continued)
Step Action
3 Click
Business HSI Basic Installation
NETGEAR 7550
Technical Reference Guide v2.0
on the
screen.
4 If presented, login to the gateway. Remember the password?
(fr0nt13r)
Result: The Remote Administration screen is displayed.
Continued on next page
16
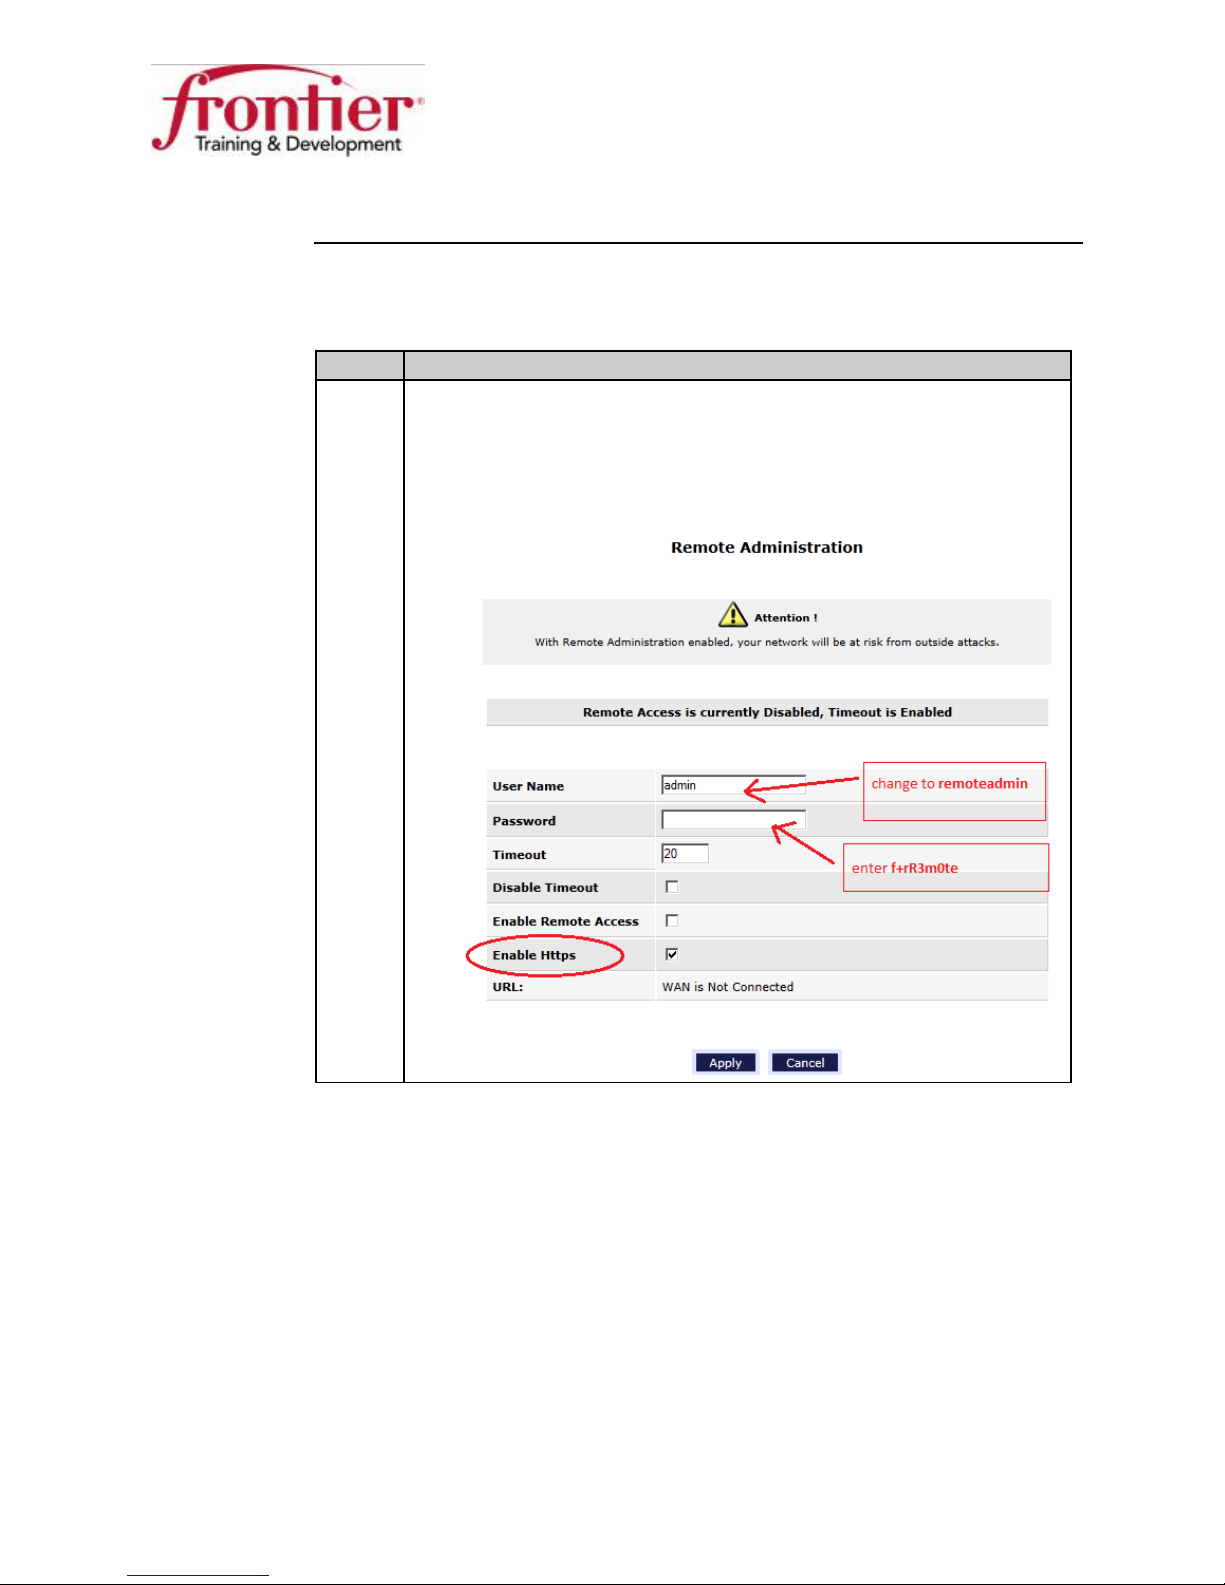
Remote Access Configuration, Continued
Configure the gateway for remote access
remoteadmin
User Name
f+rR3m0te
(continued)
Step Action
5 Enter
the Password field on the Remote Administration screen. Note
that the 7550 now supports both HTTP and HTTPS with a check
box “Enable Https” (Secured Communication) in the GUI.
HTTPS is enabled by default.
in
Business HSI Basic Installation
NETGEAR 7550
Technical Reference Guide v2.0
field and enter
in
17
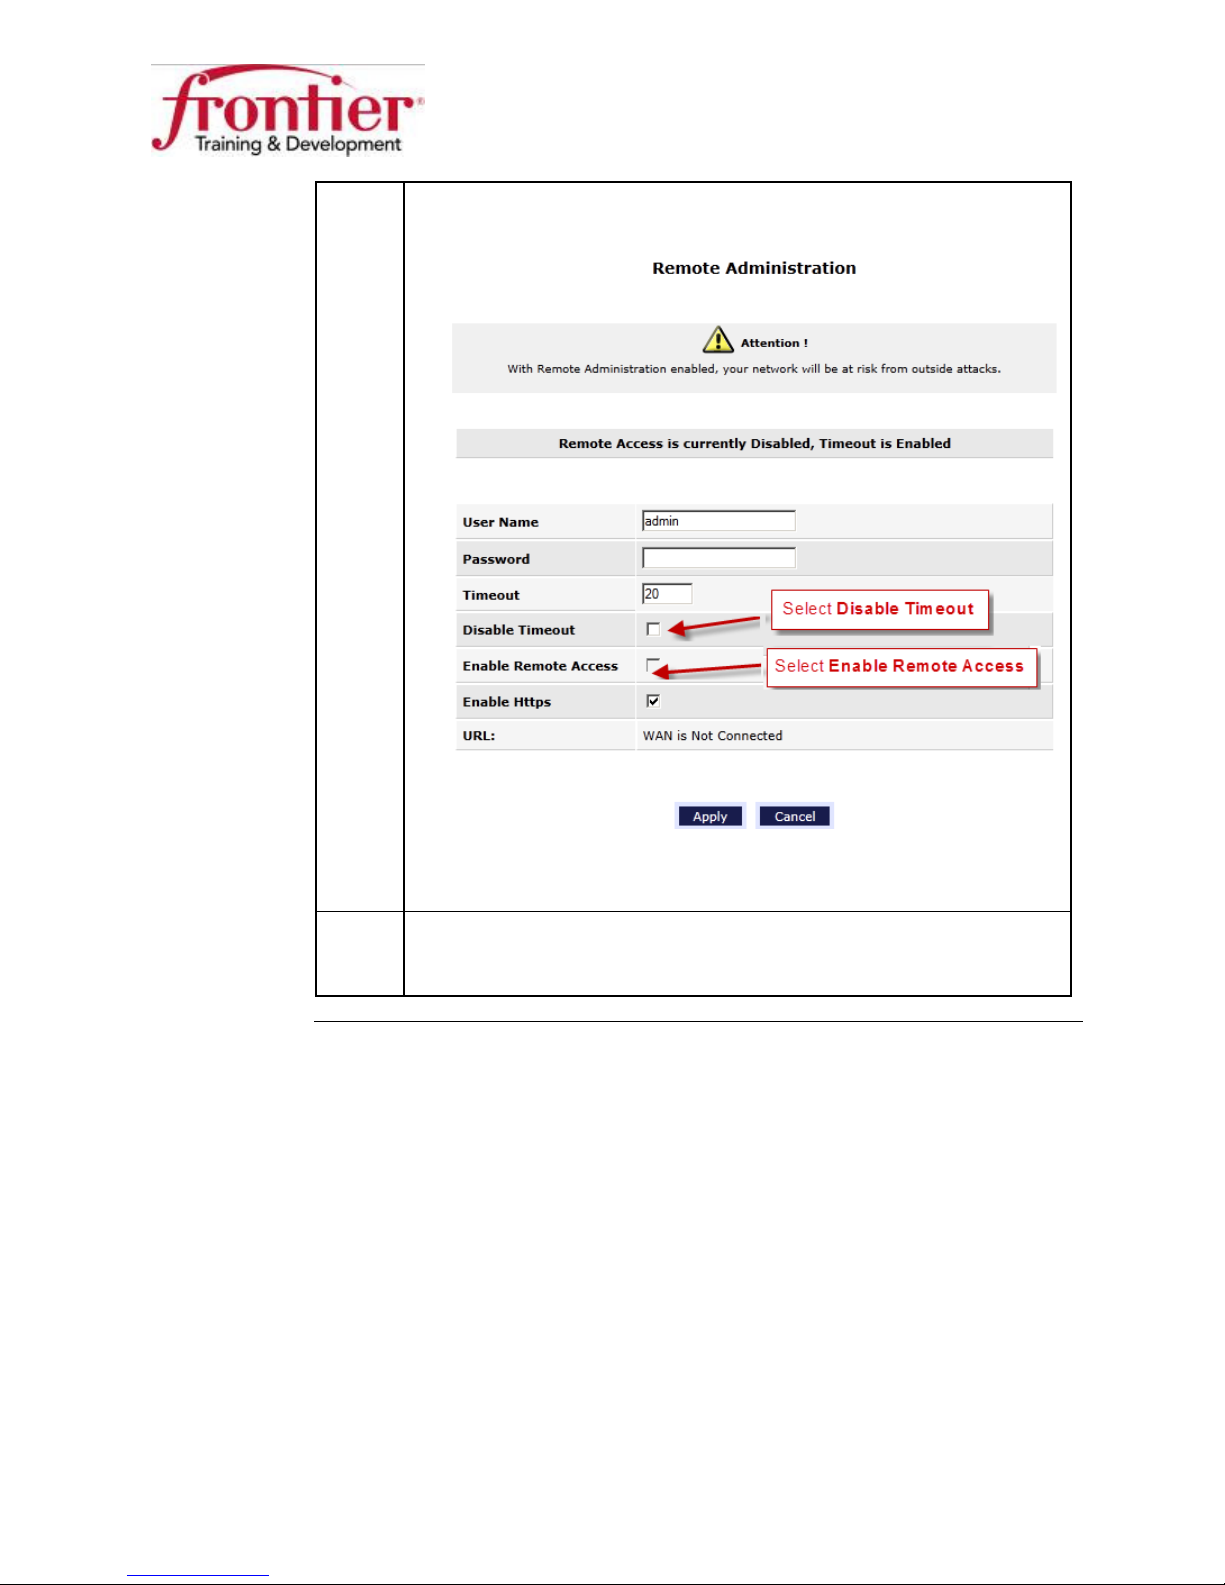
6 Select
Enable Remote Access
Disable Timeout
the Apply button on the Remote Administration screen.
Business HSI Basic Installation
NETGEAR 7550
Technical Reference Guide v2.0
and
then click
Result: Remote access is enabled. IHD can access the gateway at
http://WAN IP Address: 2420 (i.e., http://74.42.41.170:2420).
7 Leave the web browser open and continue to the next section:
“Configure the Public LAN”.
18
Public LAN Configuration
Yes
Warning
Public LAN
WARNING:
DHCP server
Configure the
Public LAN
The NETGEAR 7550 will be configured to allow two simultaneous LAN
networks: Public LAN and Private LAN. This section deals with the Public
LAN.
The Public LAN supports the customer’s devices assigned public IP addresses
(from the work order’s LAN Block).
Do not enable the DHCP server on the Public LAN .
Follow these steps to configure the Public LAN :
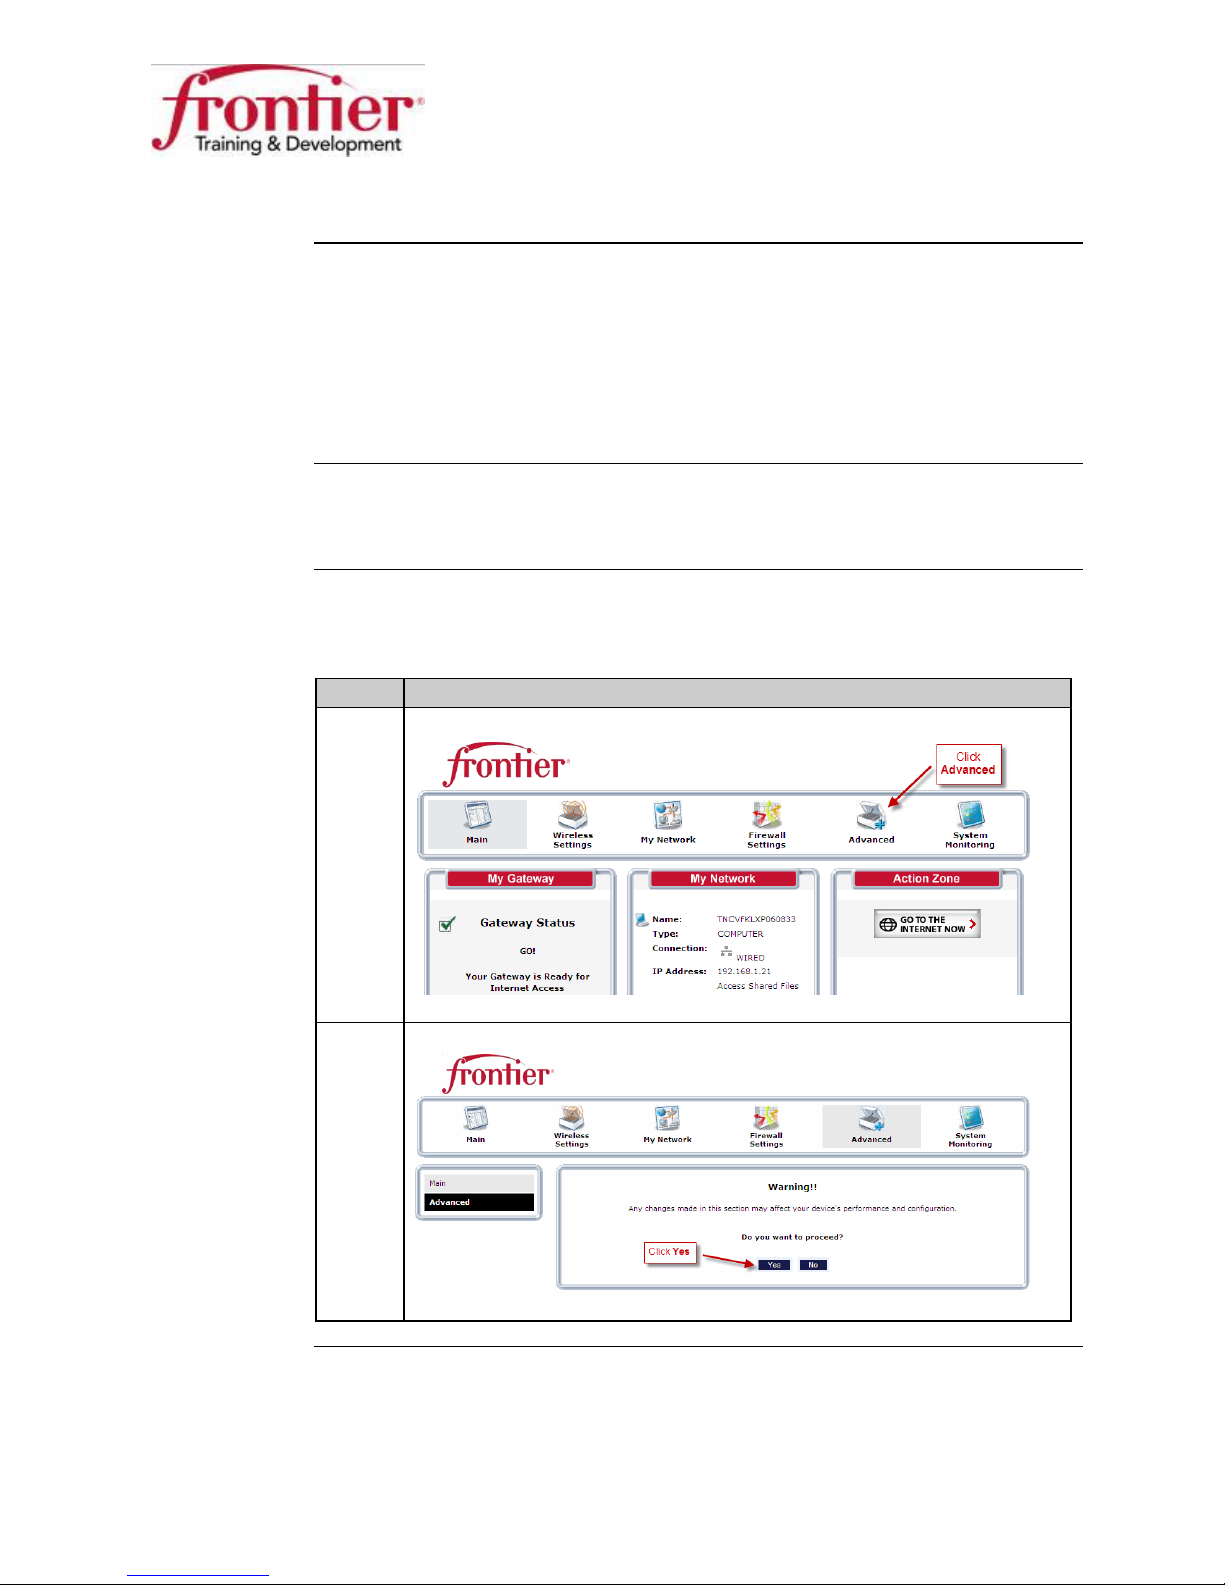
Step Action
1 Click the Advanced button on the Main screen.
Business HSI Basic Installation
NETGEAR 7550
Technical Reference Guide v2.0
2 Click the
button on the
screen.
Continued on next page
19
 Loading...