

Page 1
M 200
Mode d'emploi
Gebruiksaanwijzing
Users' Manual
Ne mettez l'appareil en marche qu'après avoir pris connaissance de ce mode d'emploi! Les consignes de sécurité voir page 8!
Het apparaat pas na het lezen van deze gebruiksaanwijzing in gebruik nemen. Veiligheidsvoorschriften zie pagina 8 en 9!
Read these instructions before using your appliance. Safety instructions, see page 9!
Page 2
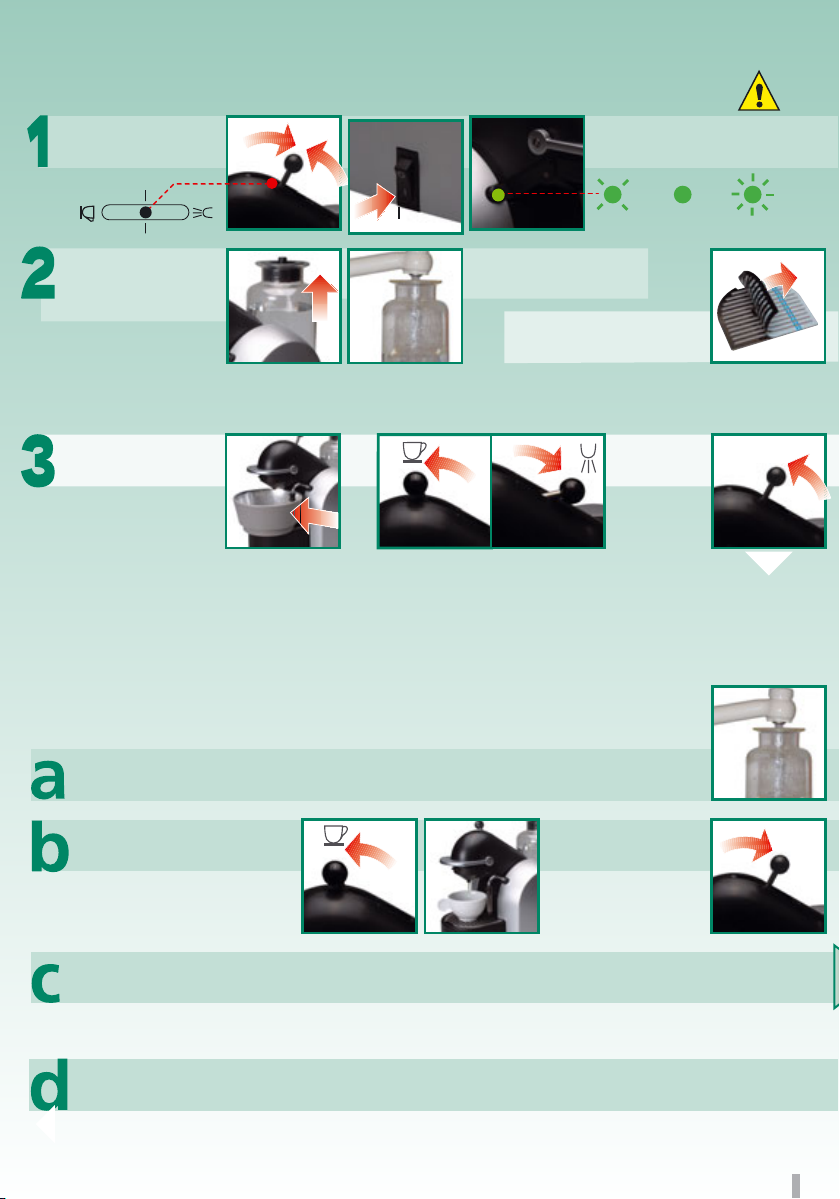
Mise en marche • Inwerkingstelling • Preparation
Mettre en marche
Aanzetten
Switch on
Remplir le réservoir
d’eau fraîche
Met water vullen
retirer + remplir
wegnemen + vullen
remove + fill with water
Fill fresh water
... également après une période de non-utilisation prolongée:
...
na langere tijd niet in gebruik te zijn geweest:
...
after a long period of non-operation:
Enlever le film de protection
Afschermfolie verwijderen
Remove protective foil
chauffe
verwarmt
heating
prêt
gereed
ready
Rincer
Doorspoelen
Rinse
sortie café + buse
vapeur / eau chaude
koffie + heetwater-/
stoompijpje
coffee / hotwater /
steam nozzle
placer un récipient
large sur la grille
kommetje plaatsen
put a container in
place
faire couler de l'eau pendant 1 minute sur
chaque position
in elke positie gedurende 1 minuut water
laten doorstromen
dispense water for 1 minute in every position
Entretien quotidien • Dagelijks onderhoud • Daily care
trop chaud
te heet
too hot
STOP
prêt
gereed
ready
Avant le 1er café • Voor 1. koffie • Before 1st coffee
Remplir d’eau fraîche
Met vers water vullen
Fill with fresh water
Préchauffer et rincer
Voorverwarmen en spoelen
Preheat and rinse
Vider le bac d‘égouttage et le réservoir à capsules
Lekbak en capsule-opvangbak legen
Empty drawer and capsule holder
Après le dernier café • Na de laatste koffie • After last coffee
Essuyer l’appareil avec un chiffon humide
Apparaat afnemen met een vochtige doek
Wipe the appliance with a damp cloth
Ne pas utiliser de produits agressifs ou abrasifs
Gebruik een mild, niet schurend reinigingsmiddel
Use non-agressive and non-abrasive detergents only
STOP
2 tasses sans capsule
2 kopjes zonder capsules
2 cups without capsules
1
Page 3
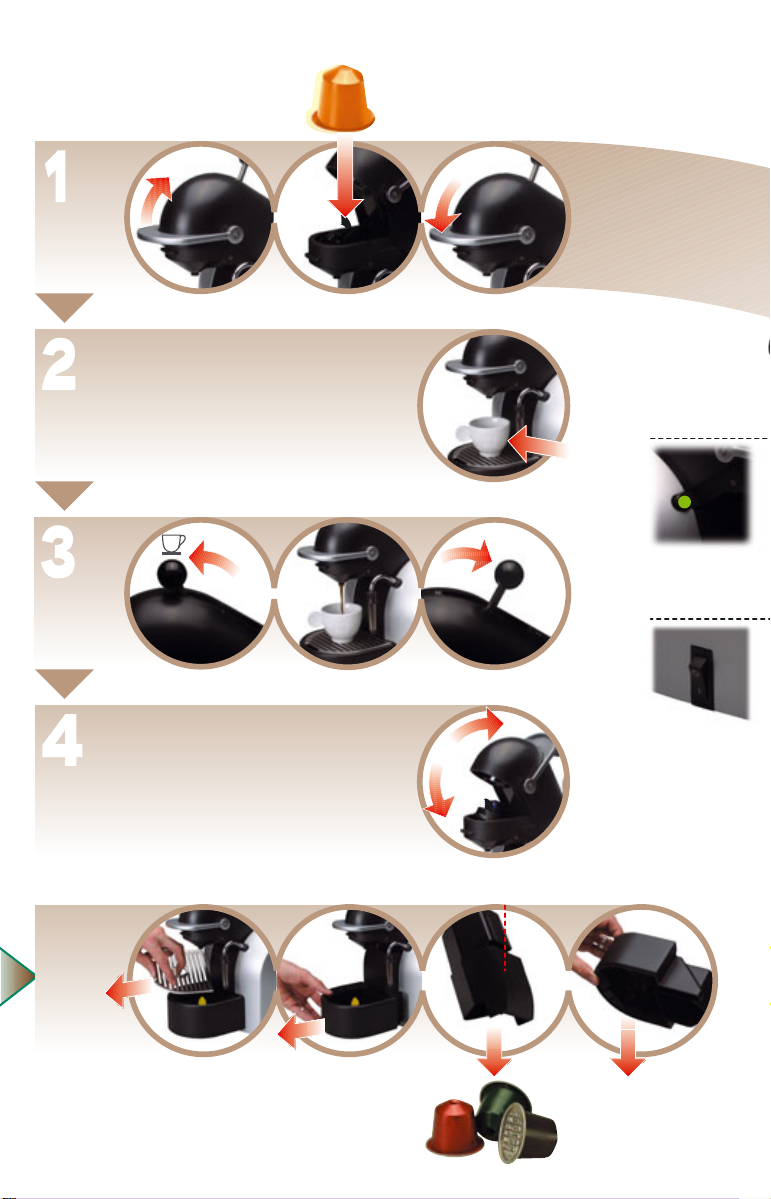
Espresso
p
s
a
u
c
l
e
1
Placer une tasse sur la grille
Kop in de juiste positie plaatsen
Put the cup in position
Ejecter la capsule
Capsule verwijderen
Eject the capsule
la capsule glisse dans le réservoir à capsules
de capsule valt in de capsule-opvangbak
the capsule falls into the container
Après 10-12 cafés env. • Na het bereiden van ongeveer
10 à 12 espresso's • After approx. 10 to 12 espressos
Réservoir à capsules • Capsule-opvangbak • Container
2.
STOP
1.
Lampe témoin
«prêt à l’emploi»
Lichtje «klaar
voor gebruik»
Indicator
«ready to use»
on / off
aan / uit
on / off
Après chaque café, attendre environ
1 minute avant d’enlever le bac d’égouttage
Wacht na elk kopje espresso ongeveer 1
minuut alvorens het lekbakje te verwijderen
After each coffee wait approx. 1 minute
before removing the drawer
Il est normal d’avoir un
reste d’eau
Restwater is normaal
Residual water is normal
Page 4
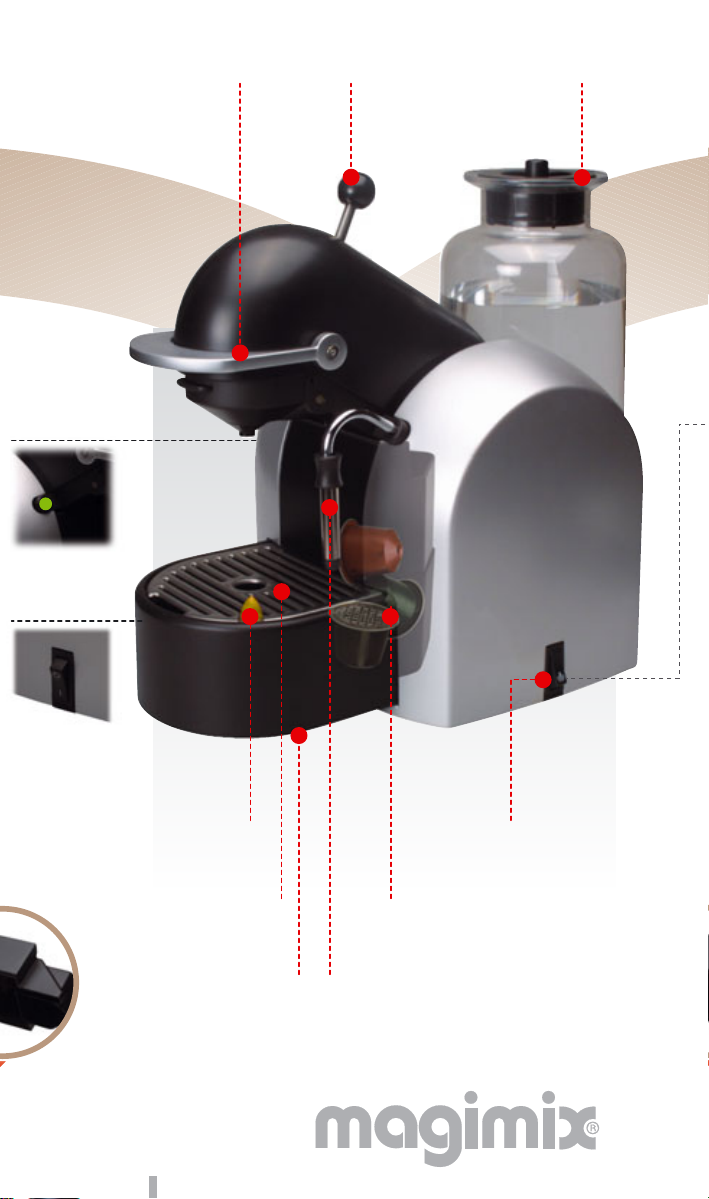
Lampe témoin
«prêt à l’emploi»
Lichtje «klaar
voor gebruik»
Indicator
«ready to use»
on / off
aan / uit
on / off
Poignée
Beugel
Handle
Levier
Hendel
Lever
Réservoir
d’eau fraîche
Waterreservoir
Fresh water tank
Flotteur
Vlotter
Float spindle
Grille d’égouttage
Lekrooster
Drip grid
Bac d’égouttage
lekbakje
Drip tray
2
Touche «vapeur»
Schakelaar «stoom»
Button «steam»
Réservoir à capsules pour
10 – 12 capsules
Opvangbak voor 10 – 12 capsules
Container for 10 – 12 capsules
Buse vapeur / eau chaude
Heetwater- / stoompijpje
Hotwater / steam nozzle
Page 5

Ejecter
la capsule
Capsule
verwijderen
Eject capsule
2.
1.
Cappuccino
Verser du lait froid
Koude melk
toevoegen
Add cold milk
~ 2 cm
Appuyer
brièvement
Kort
opdrukken
Press briefly
voir •
Espresso
zie • see
Sélectionner le
mode «vapeur»
«stoom» kiezen
Select «steam» mode
chauffe
verwarmt
heating
STOP
Buse brûlante • Pijpje wordt heet • Nozzle gets hot
Refroidir le système (sans capsule)
Systeem afkoelen (zonder capsule)
Cool down the system (without capsule)
2 tasses d'eau
2 kopjes water
2 cups of water
Préparer l'espresso dans la mousse de lait
Espresso toevoegen aan het melkschuim
Add Espresso to the effervescent milk
trop chaud
te heet
too hot
prêt
klaar
ready
prêt
klaar
ready
Nettoyer la buse
Pijpje reinigen
Clean the nozzle
avec une éponge ou un chiffon humide
met een spons of een vochtige doek
with a wet sponge or cloth
3
Page 6

Eau chaude / préchauffer
Heet water / voorverwarmen
Hot water / preheat
Placer une tasse ou un verre
sous la buse
Plaats een kopje / glas
Put glass or cup in position
STOP
Buse brûlante • Pijpje wordt heet • Nozzle gets hot
Faire couler
l'eau
Water toevoegen
Dispense water
Réchauffer les boissons
Vloeistoffen verwarmen
Heating up drinks
voir • zie • see Cappuccino «2»
Sélectionner le mode «vapeur»
«stoom» kiezen
Select «steam» mode
voir • zie • see Cappuccino «3»
Plonger la buse dans le liquide + mettre le levier
sur vapeur
Pijpje in vloeistof steken + hendel op stoom
Dip nozzle into the drink + put lever in position steam
Réchauffer la boisson en effectuant des
mouvements circulaires
Vloeistof met draaiende bewegingen verhitten
Heat up the drink while moving the cup in a circle
voir • zie • see Cappuccino «4 / 6»
Refroidir le système / Nettoyer la buse
Systeem afkoelen / Pijpje reinigen
Cool down the system / Clean the nozzle
4
Page 7

Détartrant: peut endommager la suface des matériaux
STOP
STOP
Détartrage • Ontkalken • Descaling
Ontkalker: kann oppervlakte materialen beschadigen
Descaling agent: might damage housing surface
2
2
Dureté de l‘eau
Waterhardheid
Water hardness
dH
fH
20
36
10
18
0
0
Preparation •
1
1. 2.
Détartrage circuit eau • Ontkalken Watersysteem • Descaling water system
a
onon
Détartrage circuit café • Ontkalken Koffiesysteem • Descaling coffee system
b
Détartrer après
Ontkalken na
Descale after
300
600
1200
Inwerkingstelling
Dévisser
la buse
Pijpje
losschroeven
Dismantle
nozzle
Allumer
Inschakelen
Switch on
Remplir à nouveau le réservoir d’eau
avec la solution détartrante
Vul het waterreservoir opnieuw met
het gebruikte ontkalkingsmiddel
Fill the water tank again with the
used descaling solution
• Preparation
Le détartrant
puis 0.5 l d'eau
Ontkalker en 0.5 l
water toevoegen
Fill in descaling
agent + 0.5 l water
«eau chaude»
Positie «heet
«Hot water»
La procédure de détartrage peut dégager une odeur âcre!
De ontkalking kan een bijtende geur veroorzaken!
Descaling can produce a sour smell!
Le vinaigre endommage votre appareil
Azijn beschadigt het apparaat!
Vinegar will damage the appliance
Put the container in place
Un chiffon contre un
éventuel jet de vapeur
Vod tegen mogelijke
dampuitstoting
Place a cloth in case of
possible steam ejection
P
osition
water»
position
Faire passer
le détartrant
Het ontkalkingsmiddel
door laten lopen
Let the entire descaling
solution pass through
Placer un récipient
Bakje plaatsen
Put the container in place
Placer un récipient
Bakje plaatsen
STOP
min.
0,6 l
Rinçage • Spoelen • Rinse
3
Rincer +
remplir le bac
Uitspoelen +
vullen
Rinse + fill in
water
La buse • Pijpje • Nozzle
4
Démonter + nettoyer la buse
Demonteer + reinig pijpje
Remove + clean nozzle
En position «café»
Positie «koffie»
«Coffee» position
Laisser passer
1/2 réservoir
1/2 reservoir door
laten lopen
Let 1/2 tank
run through
Faire passer
le détartrant
Het ontkalkingsmiddel
door laten lopen
Let the entire descaling
solution pass through
Laisser passer
le reste
De rest door
laten lopen
Let rest run
through
Remonter + revisser la buse
Monteer pijpje en schroef vast
Refit and tighten nozzle
5
Page 8

Solutions à quelques problèmes
Storingen verhelpen
Trouble shooting
La lampe ne s‘allume pas
Geen indicatie
No display
Le café n'est pas assez chaud
Uw koffie is niet heet genoeg
Your coffee isn't hot enough
Le café ne coule pas
Er komt geen koffie uit
No coffee delivering
L'espace réservé à la capsule
n'est pas étanche
De capsuleruimte lekt
Capsule area leaking
Pas d'eau chaude / pas de vapeur
Geen heet water / stoom
No hot water / no steam
Vérifier la prise et les fusibles,
ev. enclencher l’interrupteur
Stekker, zekeringen controleren,
eventueel knop omdraaien
Check power cord and fuses,
eventually turn the power switch on
Préchauffer les tasses (eau chaude sans capsule),
si nécessaire, détartrer
Kopjes voorverwarmen (heet water zonder
capsule), indien nodig ontkalken
Preheat the cups (hot water without capsule),
descale if necessary
Nettoyer et, si nécessaire, détartrer
Reinigen, indien nodig ontkalken
Clean, descale if necessary
Contacter le Club NESPRESSO
Neem contact op met de NESPRESSO Club
Call the NESPRESSO Club
Dévisser
+ nettoyer la buse et,
si nécessaire, détartrer
Pijpje demonteren, reinigen
en zo nodig ontkalken
Dismantle + clean nozzle,
descale if neccessary
Le lait ne mousse pas
Melk schuimt niet
Milk does not get effervescent/ frothy
L'eau ne coule pas
Geen water toevoer
No water flow
Dévisser
+ nettoyer la buse
Pijpje demonteren + reinigen
Dismantle and clean nozzle
Remplir le réservoir
Reservoir vullen
Refill water
appuyer
aandrukken
press
6
Page 9

nl
en es
fr
de
it
INSTRUCCIONES PARA LA DESINCRUSTACION
DESCALING INSTRUCTIONS
ONTKALKINGSHANDLEIDING
Kortere procedure
Shorter procedure
Procedimiento más corto
15 min
slechts
only
sólo
Pièces de rechange • Onderdelen • Spare parts
Réservoir d'eau
Waterreservoir
Water tank
Couvercle
Deksel
Cover
Accessoires optionnels • Optionele accessoires • Optional accessories
Kit de détartrage NESPRESSO
NESPRESSO ontkalkingsset
NESPRESSO descaling kit
Service-Kit 1b
Pose-capsule, éjecteur
Kapsule plaatje, uitwerper
Capsule baseplate
Contacter le Club
NESPRESSO
Neem contact op met de NESPRESSO Club
Call the
NESPRESSO
Club
Service-Kit 2
Cage à capsule, clé pour cage à capsule
Capsulehuis, capsulehuis sleutel
Capsule cage, capsule cage key
Données techniques • Technische gegevens • Technical data
220–240 V
50 Hz
1260 W 19 bar
max.
P
1,2 l
4,9 kg
kg
32 cm
23 cm
35 cm
SEV-TSM
ASE-TSM
CH
En cas d'erreur de branchement, la garantie prendra fin automatiquement.
Le fabricant ne peut être tenu responsable pour les dommages causés par une utilisation non conforme ou une mauvaise manipulation de l'appareil.
Nous nous réservons le droit de modifier à tout moment et sans préavis les caractéristiques techniques de cet appareil. Les informations figurant dans
ce document ne sont pas contractuelles et peuvent être modifiées à tout moment.
Bij verkeerde aansluiting vervalt de garantie.
De producent kan niet aansprakelijk worden gesteld voor schade die wordt veroorzaakt door ondoelmatig gebruik of verkeerde bediening.
Magimix behoudt zich het recht voor op ieder moment zonder voorafgaande waarschuwing wijzigingen aan te brengen aan of in de machine.
The guarantee becomes void if incorrectly connected.
The manufacturer cannot be held liable for damages caused by use for other than the intended purpose or by improper operation.
Magimix reserves the right to alter at any time without notice the specifications of the appliance.
TSM SUCCESS MANUAL® Safe to use - easy to understand due to
TSM® - Total Security Management and ergonomic communication®
D190/V2/180804
Page 10

Conseils de sécurité
• Lisez attentivement le mode d’emploi avant la première
utilisation de votre appareil et conservez-le pour les
futures utilisations: une utilisation non conforme au mode
d’emploi dégagerait Magimix de toute responsabilité.
• Urgence: Retirez immédiatement la prise de l'appareil.
• Ne pas laissez l’appareil à la portée des enfants sans
surveillance. L’utilisation de cet appareil par des jeunes
enfants doit être faite sous surveillance.
• Vérifiez que la tension d’alimentation de votre appareil correspond
bien à celle de votre installation électrique.
• Branchez l’appareil uniquement sur une prise secteur reliée à la
terre. Toute erreur de branchement annule la garantie.
•Votre appareil est destiné uniquement à un usage domestique et
à l’intérieur de la maison.
• L'eau chaude, la vapeur et les buses d'eau chaude/ de vapeur sont
brûlants. Attention aux risques de brûlure!
• Ne dirigez jamais les jets d'eau chaude/ de vapeur vers des parties
du corps. Attention aux risques de brûlure!
• Attention: Si le témoin lumineux vert clignote rapidement ne
un jet de vapeur important se produirait. Risque de brûlures!
Refroidir le système, voir Cappuccino «4»
• Attention aux risques de blessure aux doigts en vous piquant sur
les couteaux dans la cage à capsule!
• Réchauffage de boissons: plongez la buse de vapeur aussi
profondément que possible dans le liquide, la vapeur et le
liquide risquent sinon de gicler.
• Ne refermez la mâchoire qu'avec la poignée et ne l'ouvrez jamais
pendant la préparation d'une boisson.
• Debranchez votre appareil dès que vous cessez de l’utiliser. Avant
toute maintenance ou entretien, débranchez l'appareil
et laissez-le refroidir. Ne le débranchez pas en tirant sur le câble.
• N’utilisez pas votre appareil s’il ne fonctionne pas correctement ou
pas extraire de l’eau chaude. Au lieu d’eau chaude
.
s’il a été endommagé. Dans ce cas, adressez-vous à un centre service
agréé Magimix
•Toute intervention autre que le nettoyage et l’entretien usuel par
le client doit être effectuée par un centre service agréé Magimix.
• Ne mettez pas l’appareil, le câble d’alimentation ou la fiche dans
l’eau ou tout autre liquide.
• Ne laissez pas pendre le câble d’alimentation à portée de mains
des enfants.
• Le câble d’alimentation ne doit jamais être à proximité ou en contact
avec les parties chaudes de votre appareil, près d’une source de
chaleur ou sur angle vif.
• Si le câble d’alimentation ou la fiche sont endommagés, n’utilisez
pas l’appareil. Afin d’éviter tout danger, faites-les obligatoirement
remplacer par un centre service agréé Magimix.
• Ne posez pas l’appareil sur une surface chaude telle qu’une plaque
chauffante et ne l’utilisez pas à proximité d’une flamme nue.
• Pour votre sécurité, n’utilisez que des accessoires et des pièces
détachées Magimix adaptés à votre appareil.
• N’utilisez pas l’appareil lorsque le bac d‘égouttage et la grille ne
sont pas mis en place.
•Tous les appareils Magimix sont soumis à un contrôle sévère. Des
essais d’utilisation oratiques sont faits avec des appareils pris au
hasard ce qui explique d’éventuelles traces d’utilisation.
• Détartrer:1 Préparation: Veuillez lire les consignes de sécurité
•
Elimination
indiquées sur l’emballage du détartrant.
2 Détartrer: Ne pas ouvrir la mâchoire et ne pas
utiliser la fonction vapeur durant le détartrage.
3 Rinçage: Rincer le bac à eau et nettoyer la machine
pour enlever les résidus de détartrant.
: Débranchez la fiche. Coupez le câble au niveau
de l'appareil. Apportez l'appareil et le câble
dans un centre officiel d'élimination des déchets
ou à votre service après-vente.
Veiligheidsvoorschriften
• Lees deze gebruiksaanwijzing zorgvuldig door voordat u het
apparaat in gebruik neemt en houd u aan de
gebruiksinstructies: als het apparaat niet overeenkomstig de
gebruiks-aanwijzing wordt gebruikt, vervalt de
aansprakelijkheid van Magimix.
• In geval van nood: direct de stekker uit het stopcontact
trekken.
• Houd het apparaat buiten bereik van kinderen. Het gebruik
van het apparaat door kinderen dient uitsluitend onder toezicht
plaats te vinden.
• Controleer of de netspanning, aangegeven op het apparaat,
overeenkomt met de netspanning van het elektriciteitsnet.
•U dient het apparaat aan te sluiten op een stopcontact met randaarde.
Verkeerde aansluiting maakt de garantie ongeldig.
• Het apparaat is uitsluitend bestemd voor huishoudelijk gebruik en
mag alleen binnenshuis gebruik worden.
• Heet water, stoom, heetwater-/ stoompijpje en capsulecontainer zijn
heet. Gevaar voor verbranding!
• Heet water-/ stoomstraal nooit op lichaamsdelen richten. Gevaar
voor verbranding!
• Opgepast: bij snel knipperen van het groene lampje geen
Verbrandingsgevaar. Systeem afkoelen zie Cappuccino «4».
• Gevaar voor verwondingen van vingers door de scherpe capsuleopeners in de capsuleruimte!
• Vloeistoffen verwarmen: stoom-/ heetwaterpijpje zo diep mogelijk
in de vloeistof steken, anders kunnen stoom en vloeistof omhoog
spuiten.
warm water nemen. In plaats plaats van warm
water ontstaat er een sterke stoomstraal –
• Sluit het compartiment met behulp van de beugel. Nooit tijdens
•Trek, na gebruik, de stekker uit het stopcontact. Voor onderhoud/
• Maak geen gebruik van het apparaat als het niet goed functioneert
• Met uitzondering van reiniging en gebruikelijk onderhoud, dienen
• Doe het apparaat, noch het aansluitsnoer, noch de stekker in water
• Laat het aansluitsnoer niet binnen handbereik van kinderen hangen.
• Laat het aansluitsnoer nooit in aanraking komen met of in de buurt
• Laat het aansluitsnoer niet over scherpe hoeken en randen hangen.
• Maak geen gebruik van het apparaat als het aansluitsnoer of de
• Plaats het apparaat niet op een hete ondergr ond, zoals een kookplaat,
•Voor uw eigen veiligheid, dient u uitsluitend gebruik te maken van
• Maak geen gebruik van het apparaat zonder de lekbak en het r ooster.
• Alle Magimix apparaten worden onderworpen aan een strenge
gebruik openen.
reiniging stekker uit stopcontact trekken en apparaat laten afkoelen.
Haal de stekker niet uit het stopcontact door aan het aansluitsnoer
te trekken.
of als het beschadigd is. Neem in zo'n geval contact op met een
Magimix servicecentrum.
werkzaamheden aan het apparaat te worden ultgevoerd door een
Magimix servicecentrum.
of in een andere vloeistof.
hangen van warme onderdelen van het apparaat of van andere
warmtebronnen.
stekker beschadigd is. Om elk risico te vermijden, dient u ze te laten
vervangen door een Magimix servicecentrum.
en gebruik het niet in de buurt van een open gasflam.
Magimix accessoires en onderdelen, afgestemd op het apparaat.
controle. Steekproefsgewijs worden gebruikstesten gedaan. Dit
verklaart eventuele sporen van gebruik.
8
Page 11

• Ontkalken:
1 voorbereiden: veiligheidsvoorschriften op de
verpakking in acht nemen. 2: ontkalken: tijdens het
ontkalken handgreep niet openen en stoompijpje niet
gebruiken. 3 spoelen: Waterreservoir en machine reinigen
om ontkalkingsresten te
verwijderen
Safety advice
• Please read these instructions carefully before using your
appliance for the first time and retain them for future use:
any use which does not conform to the instructions will
absolve Magimix from any liability.
• Emergency: remove immediately the power cord from the
socket.
• Do not leave this appliance within reach of unsupervised
children. The use of this appliance by young children or by
disabled persons must be supervised at all times.
• Check that voltage indicated on the information plate on the
appliance does in fact match that of your electrical system.
• Only use an earthed socket to connect the appliance.
Wiring instructions for U.K. and Ireland only:
Appliances with fitted plug
Important: For your convenience this appliance is supplied complete
with a plug incorporating a 13 amp fuse. In the event of replacing
a fuse in the plug supplied, a 13 amp fuse approved by ASTA to
BS1362 must be used. If the socket outlets are not of the 13A
BS1362 type and therefore do not accept the plug connected to
this appliance, cut off the plug if moulded type or remove the plug
if connected by screw terminals.
When the plug is a moulded type and this is cut off from the
appliance, the connected wires are a shock hazard. Do not under
any circumstances connect a cut off plug into the electrical socket
outlet. The cut off plug must be disposed of in a safe manner that
prevents any form of connection. If the fuse cover is detachable,
never use the plug with the cover omitted. Replacement covers
can be obtained from your service agent. Fit the appropriate plug
according to the instructions in paragraph "Fitting a plug". With
alternative plugs a 15 amp fuse must be fitted either in the plug
or adapter or at the main fuse box.
Appliances without fitted plug –> Fitting a plug - Important
The wires in the mains lead are coloured in accordance with the
following code: GREEN & YELLOW: EARTH
As the colours in the mains lead of this appliance may not correspond
with the coloured markings identifying the terminals in your plug,
proceed as follows:
The wire which is coloured GREEN & YELLOW must be connected
to the terminal in the plug which is marked with the letter "E" or
by the earth symbol
The wire which is coloured BLUE must be connected to the
terminal which is marked with the letter "N" or coloured black.
The wire which is coloured BROWN must be connected to the
terminal which is marked with the letter "L" or coloured red.
This appliance is manufactured to conform to the Low Voltage
Electrical Equipment (Safety) Regulations 1989 and is designed to
comply with BS 3456. It complies with the requirements of the EEC
Directive (89/336/EEC).
BLUE: NEUTRAL
BROWN: LIVE
or coloured green or green & yellow.
• Afval: Neem de stekker uit het stopcontact. Snijd het
Any connection error will nullify the guarantee.
•Your appliance is intended solely for domestic and indoor use.
• Hot water, steam, spout and capsule holder are hot. Danger of
burning Injuries.
• Do not direct steam or hot water towards the body. Danger of
burning injuries.
• Attention: Do not draw off hot water when green lamp blinks
• Heat up drinks: Dip the steam nozzle deep into the liquid in order
to avoid hot water or steam splashes.
• Danger of finger injury in the capsule holder from the sharp capsule
puncher.
• Close the jaw firmly by using the handle.
Do not open the machine during operation.
• Unplug your appliance as soon as you have finished using it. Before
maintenance/ cleaning unplug the machine and let it cool down.
Do not unplug it by pulling on the cord.
• Do not use the appliance if it is not working correctly or if it has
been damaged. If this happens, please contact an approved Magimix
service centre.
•
Any intervention other than normal cleaning and maintenance by the
customer must be carried out by an approved Magimix service centre.
• Do not place the appliance, the power cord or the plug in water
or any other liquid.
• Do not allow the cord to hang down within reach of children.
•
The power cord must not be close to or in contact with hot parts of
your appliance, close to a source of heat or resting on a sharp edge.
• If the power cord or the plug are damaged, do not use the
appliance. To prevent any risk, you must have these replaced by an
approved Magimix service centre.
• Do not place the appliance on a hot surface such as a hotplate and
never use it close to a naked flame.
• For your own safety, please use only the Magimix accessories and
spare parts which are suitable for your appliance.
• Do not use the appliance when the drip tray and the grille are not
in place.
• All Magimix appliances are subject to strict quality controls. Practical
user tests are done with appliances selected at random, which
explains any signs of use.
•
Descaling:1 Preparation: please read carefully the safety
• Disposal: Unplug the machine and cut off the power cord. Bring
netsnoer van het apparaat. Breng apparaat en
snoer naar een officieel inzamelingspunt voor afval.
fast. Strong steam jet would result instead of hot
water - hazard of burning!
see Cappuccino «4».
instructions on the packaging. 2 Descaling: do not
open the jaw and do not use the steam nozzle during
descaling process. 3 Rinse: rinse the water tank and
clean the machine to avoid any residual descaling agent.
machine and power cord to your next customer service
or any public collection area.
Cool down the system
9
 Loading...