

Page 1
Page 2
1
คำเตือน! ห้ามฉีดพ่นไอน้ำโดยตรงเข้าหาคนหรือสัตว์และห้ามพ่นรีดเสื้อผ้าในขณะสวมใส่
Page 3

เครื่องพ่นรีดไอน้ำ
รุ่น เพรส มี NC 103
1500 W 220-230 V 50/60 Hz
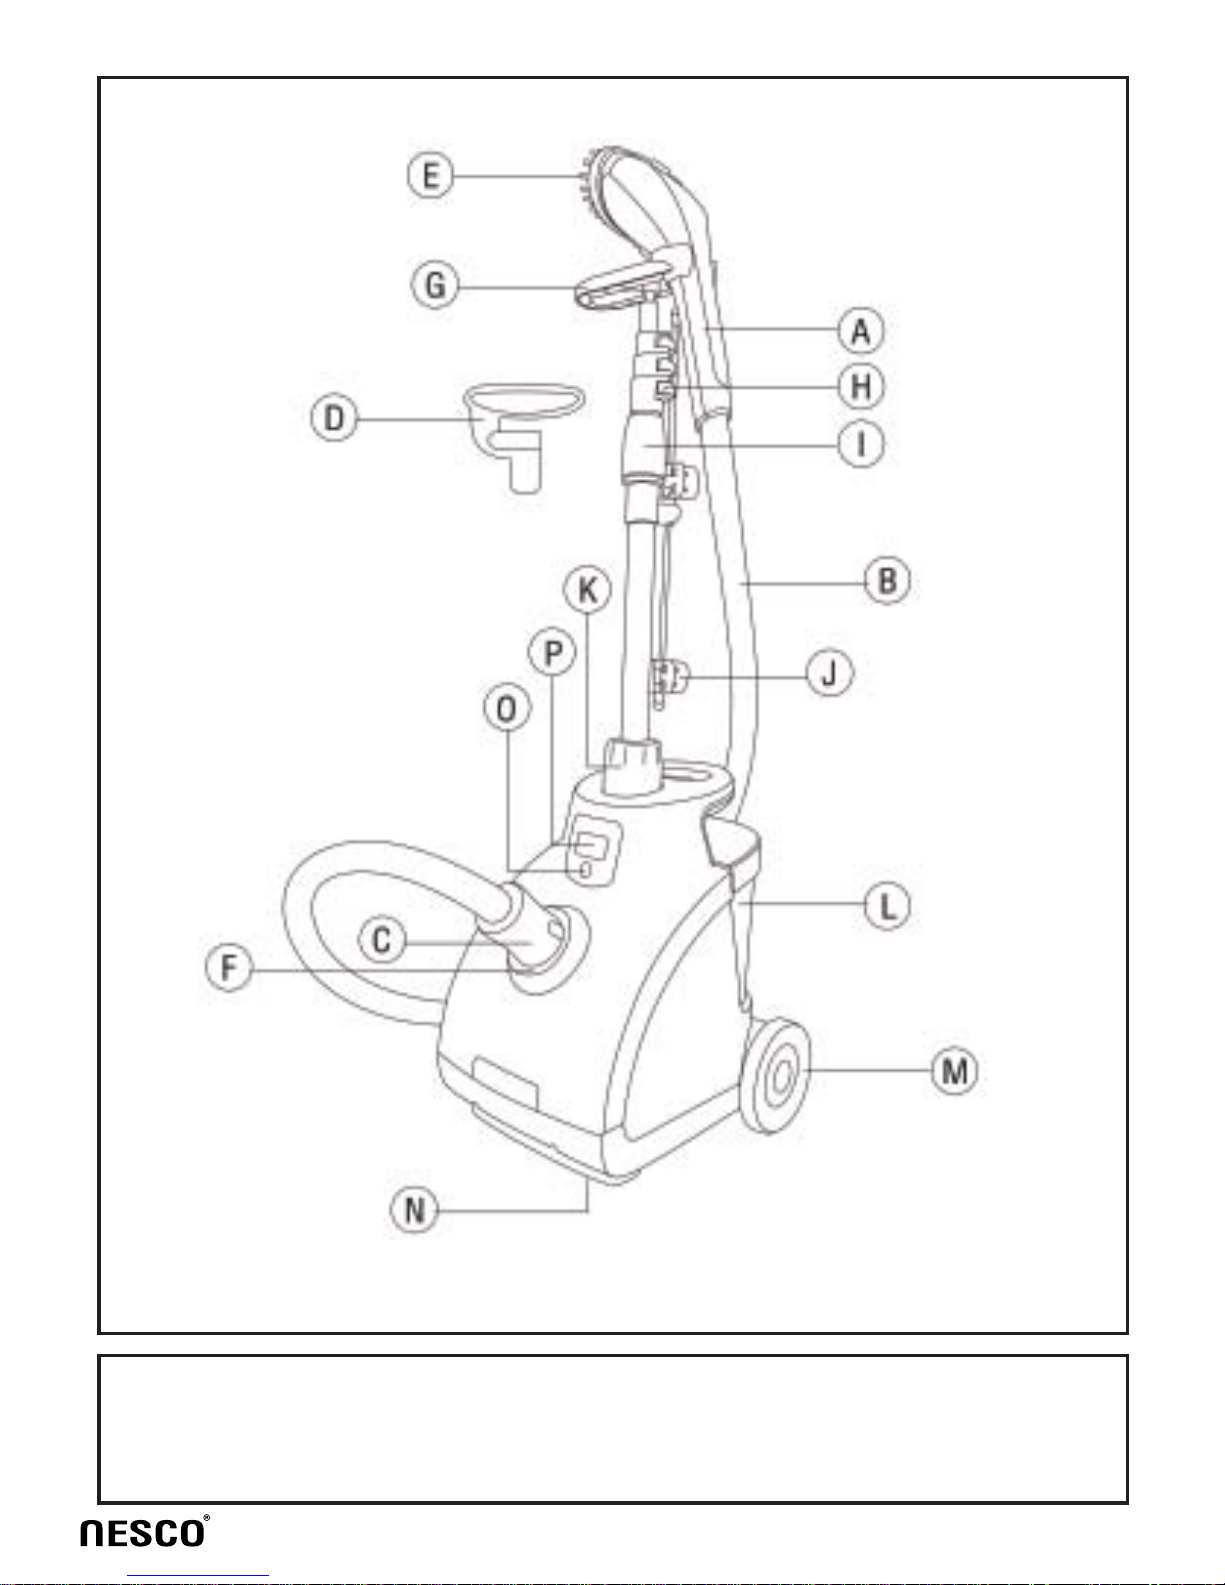
ส่วนประกอบ
A.
B.
C.
D.
E.
F.
G.
H.
I.
J.
K.
L.
M.
N.
มือจับหัวพ่นไอน้ำ
สายส่งไอน้ำ
ข้อต่อสายส่งไอน้ำ
คลิปหนีบรีดผ้า
แปรงรีดผ้า
ช่องเสียบข้อต่อสายส่งไอน้ำ
ที่วางพักหัวพ่น
ตัวล็อกปรับระดับเสา
เกลียวหมุนล็อกปรับระดับเสา
คลิปหนีบขึงผ้า
เกลียวหมุนล็อกต่อเสาเข้าเครื่อง
แทงค์บรรจุน้ำ
ล้อเลื่อนด้านหลัง
ล้อเลื่อนด้านหน้า
ไฟแสดงสถานะน้ำหมด
สวิตซ์ เปิด/ปิดและไฟแสดงการทำงาน
O.
P.
คำเตือนเพื่อความปลอดภัย
1.เมื่อใช้งานเครื่องใช้ไฟฟ้าทุกชนิด ควร
ปฏิบัติตามคำแนะนำเพื่อความปลอดภัยอย่าง
เคร่งครัด
2.อ่านและทำความเข้าใจกับคำแนะนำในคู่มือ
การใช้นี้ก่อนการใช้งาน
3.ใช้งานเครื่องใช้ไฟฟ้าตามวัตถุประสงค์ที่
ระบุไว้ในคู่มือการใช้งานเท่านั้น
4.เครื่องใช้ไฟฟ้านี้ถูกออกแบบมาเพื่อใช้
งานภายในครัวเรือนเท่านั้น บริษัทฯ ขอสงวน
สิทธิ์ที่จะไม่รับผิดชอบต่อความชำรุดเสียหาย
ของผลิตภัณฑ์อันเนื่องมาจาก การใช้งาน
ในเชิงพาณิชย์ หรือการใช้งานผิดประเภท
หรือการใช้งานโดยไม่ปฏิบัติตามคำแนะนำใน
คู่มือการใช้งานนี้
5.เครื่องใช้ไฟฟ้านี้ไม่ได้ถูกออกแบบมาให้บุคคล
(รวมถึงเด็ก) ผู้ทุพพลภาพ บุคคลไร้ความ
สามารถทั้งด้านร่างกายหรือจิตใจ,บุคคลผู้ขาด
ความรู้และความเข้าใจเกี่ยวกับผลิตภัณฑ์เป็นผู้
ใช้งานยกเว้นอยู่ภายใต้การดูแลและแนะนำ
ของผู้ที่มีหน้าที่รับผิดชอบต่อความปลอดภัย
ของบุคคลเหล่านั้น
6.ควรระมัดระวังไม่ให้เด็กเล่นเครื่องใช้ไฟฟ้า
หรือนำเครื่องใช้ไฟฟ้ามาเป็นของเล่น
7.ไม่ควรทิ้งเครื่องใช้ไฟฟ้าไว้โดยไม่มีผู้ดูแล
ในขณะที่เครื่องกำลังทำงาน หรือในขณะที่
ถึงท่านผู้มีอุปการะคุณทุกท่าน
ขอขอบคุณทุกท่านที่ไว้วางใจเลือกใช้
ผลิตภัณฑ์ของเนสโก้ด้วยประสบการณ์
และการออกแบบที่ทันสมัยและโดดเด่น
ของผลิตภัณฑ์ที่มากด้วยคุณประโยชน์
ในการใช้งานจะสามารถตอบสนองความ
พึงพอใจในการใช้งานของท่านได้อย่าง
คุ้มค่า
ภาษาไทย
2
Page 4

เครื่องมีความร้อน
8.ไม่ควรใช้งานเครื่องใช้ไฟฟ้าในขณะที่สายไฟ
หรือปลั๊กไฟ หรือสายส่งไอน้ำ ชำรุดเสียหาย
หรือเมื่อเครื่องใช้ไฟฟ้าทำงานผิดปกติ หรือ
หลังจากเครื่องตกหล่น หรือเมื่อเครื่องชำรุด
เสียหายไม่ว่ากรณีใดๆและเพื่อเป็นการป้องกัน
อันตรายจากไฟฟ้าช็อต ห้ามแกะประกอบ
เครื่องหรือซ่อมเครื่องใช้ไฟฟ้าด้วยตัวท่าน
เอง ควรส่งให้ศูนย์บริการของบริษัทหรือส่ง
ให้ช่างที่มีความชำนาญเป็นผู้ซ่อม
9.เพื่อป้องกันอันตรายที่อาจเกิดจากสัมผัสไอน้ำ
ร้อนที่ออกมาจากเครื่องพ่นรีดไอน้ำควรตรวจ
สอบเครื่องทุกครั้งก่อนการใช้งาน โดยการหัน
หัวพ่นไอน้ำให้ออกจากตัวและเปิดการทำงาน
ควรจับหัวพ่นรีดไอน้ำในแนวตั้งเพื่อให้ไอ
น้ำออกจากหัวพ่นด้านบนและล่าง ห้ามใช้หัว
พ่นรีดให้รีดในแนวนอน หรือหมุนหัวพ่นรีด
กลับหลังเพราะจะทำให้การส่งไอน้ำไม่สม่ำเสมอ
10. เพื่อป้องกันอันตรายที่อาจเกิดจากไฟฟ้า
ช็อตห้ามนำเครื่องใส่ลงในน้ำหรือของเหลวชนิด
อื่นใด ก่อนเสียบปลั๊กหรือถอดปลั๊กเข้ากับ
เต้ารับทุกครั้ง ควรปิดการทำงานของเครื่อง
เมื่อต้องการถอดปลั๊ก ห้ามดึงบริเวณสายไฟ
ให้จับที่ปลั๊กแล้วดึงออก
11. ไม่ควรปล่อยให้สายไฟพาดผ่านพื้นผิว
บริเวณที่มีความร้อน ควรรอให้เครื่องเย็น
สนิทก่อนเก็บเครื่อง ควรม้วนสายไฟหลวมๆ
ไว้ใต้เครื่องเมื่อเก็บเครื่อง
12.ไม่ควรปล่อยให้สายไฟพาดผ่านกับขอบ
หรือมุมที่มีความคมหรือพื้นผิวที่มีความร้อน
ไม่ควรพยายามรัดสายส่งไอน้ำในระหว่างที่เครื่อง
กำลังทำงานและไม่ควรถอดสายส่งไอน้ำใน
ระหว่างใช้งาน ควรถอดปลั๊กเครื่องออกจาก
เต้ารับเสมอเมื่อต้องเติมน้ำลงในแทงค์น้ำ
หรือเมื่อต้องการเทน้ำออกจากแทงค์หรือ
เมื่อไม่ได้ใช้งาน
13. ห้ามหิ้วหรือยกเครื่องพ่นรีดไอน้ำโดยจับ
ที่สายส่งไอน้ำ ควรจับบริเวณมือจับ
14.ไม่ควรนำอุปกรณ์ประกอบอื่นใดนอกเหนือ
จากอุปกรณ์ที่มาพร้อมกับเครื่อง มาใช้งาน
ร่วมกับเครื่องพ่นรีดไอน้ำนี้เพราะอาจทำให้เกิด
ไฟฟ้าลัดวงจรหรือเป็นอันตรายต่อผู้ใช้
การสัมผัสส่วนประกอบของเครื่องในขณะที่มี
ความร้อนหรือสัมผัสน้ำร้อนหรือสัมผัสไอน้ำ
ร้อนอาจทำให้เกิดการบาดเจ็บได้ ควรใช้
ความระมัดระวังเป็นอย่างสูงเมื่อต้องการเทน้ำ
ออกจากเครื่องเพราะอาจมีน้ำร้อนค้างอยู่
ภายในแทงค์น้ำ
15. ห้ามฉีดพ่นไอน้ำโดยตรงเข้าหาคน สัตว์
หรือพ่นรีดเสื้อผ้าในขณะสวมใส่
16.เครื่องพ่นรีดไอน้ำนี้ถูกออกแบบมาโดยมี
วัตถุประสงค์เพื่อการใช้งานภายในครัวเรือน
เท่านั้นและสำหรับการใช้งานโดยวางลงบนพื้น
ดังนั้นจึงไม่ควรยกหรือหิ้วเครื่องในขณะที่
กำลังใช้งาน
3
Page 5
คำแนะนำในการใช้งานเครื่องพ่นรีดไอน้ำ
- เครื่องพ่นรีดไอน้ำนี้ใช้กำลังไฟ 1500 วัตต์
เพื่อป้องกันกำลังไฟฟ้าเกิน ไม่ควรใช้งาน
เครื่องใช้ไฟฟ้าที่ใช้กำลังไฟสูงหลายๆเครื่อง
ในเวลาเดียวกัน
- กรณีที่มีความจำเป็นต้องใช้สายไฟต่อพ่วง
ควรตรวจดูให้แน่ใจว่าสายไฟต่อพ่วงสามารถ
รองรับกำลังไฟของเครื่องพ่นรีดไอน้ำนี้ได้
หากใช้สายต่อพ่วงที่รับกำลังไฟฟ้าได้ต่ำกว่า
กำลังไฟของเครื่องอาจทำให้สายไฟต่อพ่วง
ไหม้ได้ ควรจัดสายไฟให้เป็นระเบียบและ
ระมัดระวังไม่ให้ผู้ใดสะดุดสายไฟ
- ห้ามตัดหรือพยายามต่อสายส่งไอน้ำ
การดูแลรักษาสิ่งแวดล้อม
เครื่องพ่นรีดไอน้ำนี้ประกอบด้วยวัสดุหลาย
ชนิด ที่สามารถนำกลับมาใช้ซ้ำได้ (recycle)
เมื่อต้องการทิ้งเครื่อง ควรส่งให้กับผู้ที่
สามารถนำวัสดุกลับมาใช้ใหม่
วิธีการใช้งาน
ปุ่มปิด/เปิดเครื่องและไฟแสดงการทำงาน
เครื่องพ่นรีดไอน้ำนี้ถูกควบคุมการทำงาน
โดยปุ่มปิด/เปิดเครื่อง เมื่อกดปุ่มเปิดเครื่อง
ไฟแสดงการทำงานจะติดขึ้นและเครื่อง
จะเริ่มทำงาน รอจนกระทั่งเครื่องต้มน้ำแล้ว
พ่นไอน้ำออกมา เมื่อใช้งานจนกระทั่งน้ำ
ในแทงค์หมดหรือเมื่อไม่ได้ประกอบแทงค์น้ำ
ลงในเครื่อง ไฟแสดงสถานะน้ำหมดจะติดขึ้น
ให้เติมน้ำหรือนำแทงค์ประกอบลงบนเครื่อง
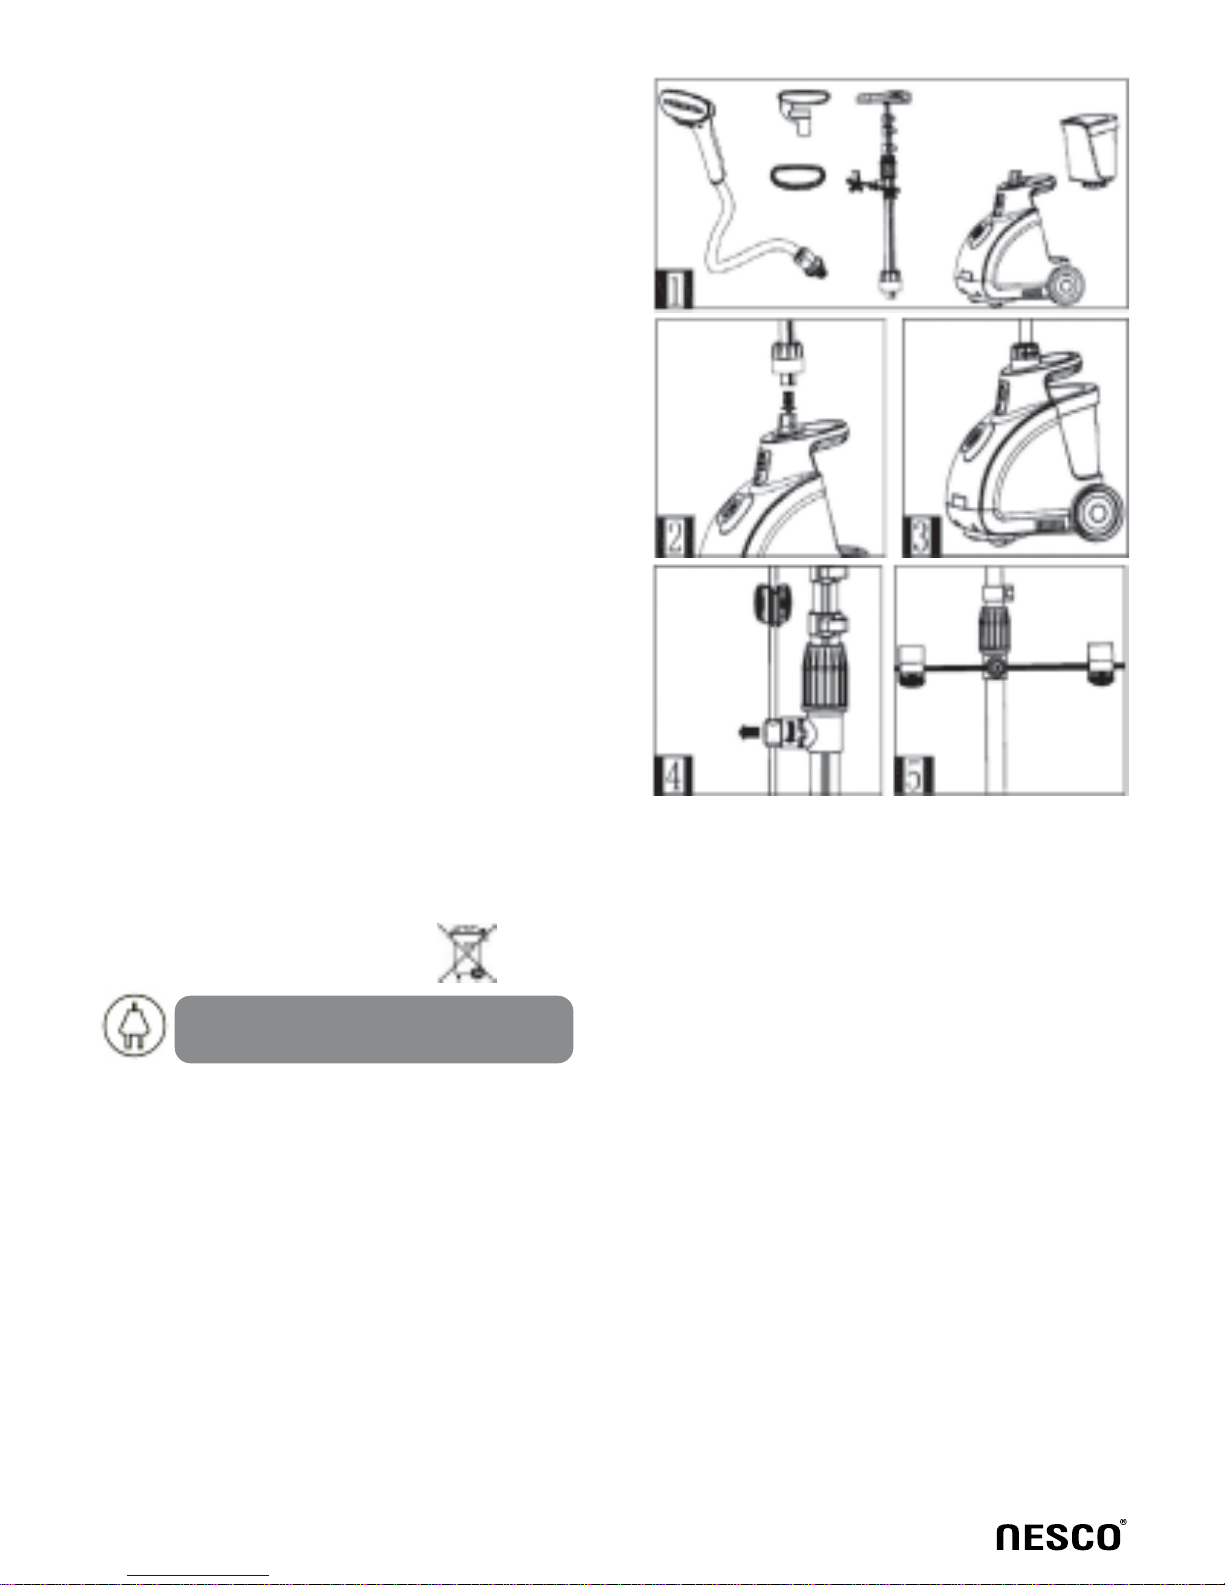
การประกอบเครื่อง (ก่อนการใช้งาน)
- กรุณาอ่านคำแนะนำในคู่มือการใช้งานนี้
อย่างละเอียด
- นำเครื่องออกมาจากบรรจุภัณฑ์ทั้งหมด
(กล่อง, โฟม, ถุงพลาสติก)
- ควรประกอบเครื่องให้เรียบร้อยก่อนเสียบ
ปลั๊กเครื่องเข้ากับเต้ารับหรือกดปุ่มเปิดเครื่อง
- ตั้งเครื่องและอุปกรณ์ต่างๆ ของเครื่องตาม
ภาพที่ 1
- ประกอบเสาสำหรับแขวนรีดผ้าและสวมลง
ในฐานเสา ตามวิธีการที่แนะนำในภาพที่ 2
- ตรวจดูให้แน่ใจว่าเสาประกอบลงบนเครื่อง
แน่นสนิทแล้ว ตามคำแนะนำในภาพที่ 3
- ดึงบริเวณข้อต่อของไม้ขึงผ้าขึ้นเล็กน้อย
4
Page 6
แล้วหมุนข้อต่อ 90 องศา เพื่อให้ไม้ขึงผ้าตั้ง
ฉากกับเสาแขวนผ้า ตามภาพที่ 4 - 5
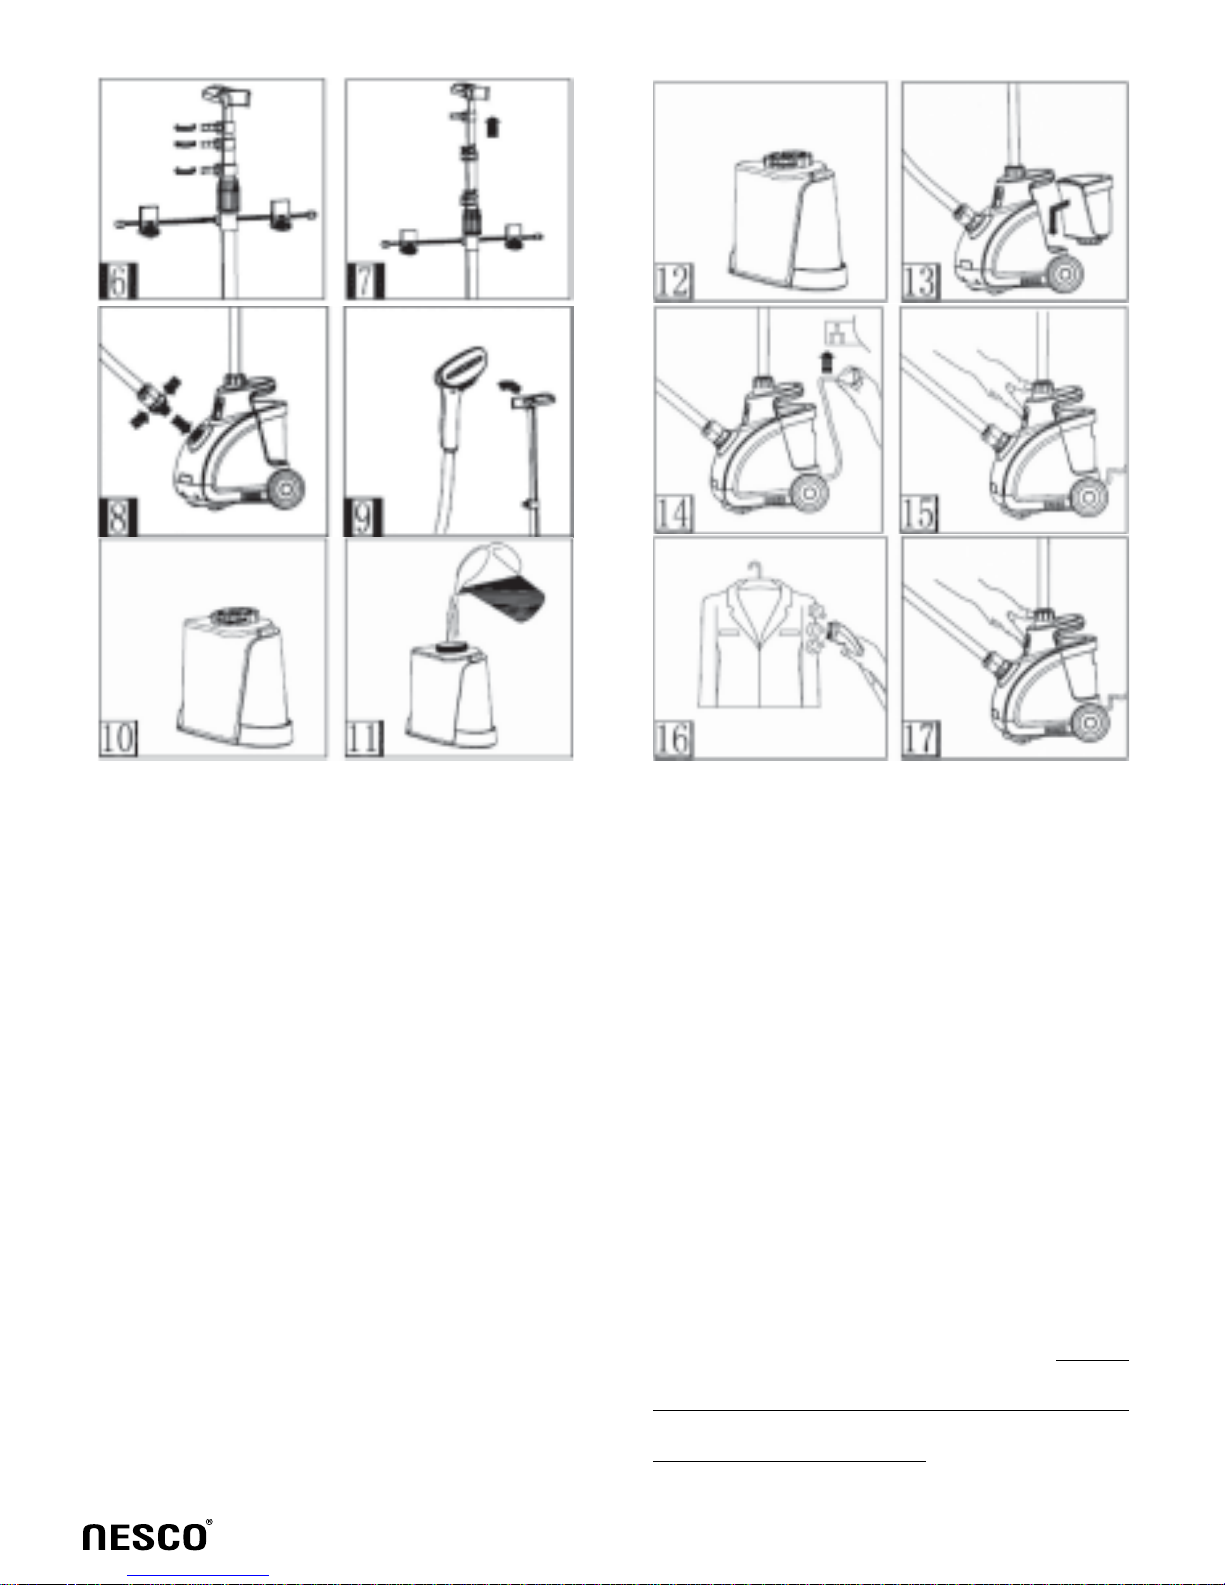
- ปลดล็อคตัวล็อคข้อต่อของเสาสำหรับ
แขวนผ้า ดึงเสาขึ้นเพื่อปรับระดับความสูง
ของเสาตามคำแนะนำในภาพที่ 6
- เมื่อปรับระดับความสูงของเสาได้ตามความ
ต้องการแล้ว ให้กดตัวล็อคเสาลง ภาพที่ 7
- สวมข้อต่อของสายส่งไอน้ำลงในช่องบนตัว
เครื่อง ตามคำแนะนำในภาพที่ 8
- วางหัวพ่นรีดไอน้ำลงบนที่วางพักหัวพ่น
ตามคำแนะนำในภาพที่ 9
วิธีการใช้งานรีดผ้า
- เติมน้ำลงในแทงค์บรรจุน้ำโดยการหมุนเปิด
ฝาแทงค์แล้วเติมน้ำลงในแทงค์ตามคำแนะนำ
ในภาพที่ 10 และ 11
- ห้ามเติมน้ำร้อนลงในแทงค์
- ปิดฝาแทงค์บรรจุน้ำ แล้วนำแทงค์ ประกอบ
ลงบนตัวเครื่อง ตามคำแนะนำในภาพที่ 12
และ 13
- คลายสายไฟออก เสียบปลั๊กเข้ากับเต้ารับ
กดปุ่มเปิดเครื่อง ตามคำแนะนำในภาพที่ 14
และ 15
- หลังจากเสียบปลั๊กและกดปุ่มเปิดเครื่อง
ไฟแสดงสถานะติดขึ้น(โปรดสังเกตไฟแสดง
สถานะ)
-ในขณะที่เครื่องเริ่มทำงานเครื่องจะต้มน้ำ
และส่งไอน้ำผ่านสายส่งทำให้มีเสียงขึ้นควรยืด
สายส่งไอน้ำตรงไม่ม้วนงอเพื่อช่วยให้ไอน้ำ
เคลื่อนตัวอย่างสม่ำเสมอ
5
Page 7

- จับที่มือจับหัวพ่นไอน้ำโดยจัดสายส่งไอน้ำ
ให้ยืดออกจากตัวเครื่อง ใช้หัวแปรงสัมผัสกับ
ผ้าที่ต้องการรีดในแนวตั้งเบาๆ แล้วเริ่มรีดผ้า
จากด้านบนลงล่างตามคำแนะนำในภาพที่ 16
- ในระหว่างที่เครื่องกำลังทำงานอาจมีเสียง
ดังออกมาจากสายส่งไอน้ำซึ่งเป็นเสียงไอน้ำ
เคลื่อนที่ และเป็นอาการปกติ เมื่อมีเสียงดัง
ให้ยืดสายส่งไอน้ำขึ้นด้านบน จะทำให้หยด
น้ำกลับลงไปในแทงค์
- เพื่อเป็นการยืดอายุการใช้งานของเครื่อง
หลังจากใช้งานแล้ว ควรเปิดให้เครื่องทำงาน
จนกระทั่งน้ำแห้งประมาณ 5 นาที เพื่อให้
แผ่นทำความร้อนแห้ง แล้วจึงกดปุ่มปิดเครื่อง
เมื่อไม่มีไอน้ำออกจากเครื่องแล้ว
- เมื่อต้องการประกอบแปรงรีดผ้า ให้หงาย
หัวพ่นรีดขึ้นด้านบน และค่อยๆ ประกอบ
แปรงลงบนหัวรีดเบาๆ ตรวจดูว่าแปรง
ประกอบเข้ากับหัวพ่นรีดสนิทดีแล้ว
- ให้พ่นรีดผ้าจากด้านบนลงล่าง
- ก่อนถอดแปรงออกจากหัวพ่นรีด ควรกดปุ่ม
ปิดเครื่อง แล้วรอจนกระทั่งไม่มีไอน้ำออกมา
จากหัวแปรงพ่นรีด จึงค่อยถอดแปรงออก
ควรระวังไม่ให้ส่วนใดส่วนหนึ่งของร่างกาย
สัมผัสกับหัวพ่นรีดด้านที่เป็นสแตนเลสสตีล
เนื่องจากมีความร้อนและอาจทำให้บาดเจ็บได้
คลิปหนีบรีดผ้า
- คลิปหนีบรีดผ้าเหมาะสำหรับการรีดผ้า
บริเวณขอบผ้า บริเวณตะเข็บผ้าหรือรีดเสื้อผ้า
ที่ต้องการจับจีบ
- ประกอบคลิปหนีบเข้ากับหัวพ่นรีดไอน้ำ
โดยเสียบลงในตำแหน่งให้แน่น
- จับบริเวณหัวฉีดพ่นไอน้ำ และกดขาคลิป
ให้เปิดออก
- สอดผ้าที่ต้องการรีดเข้าไประหว่างคลิป
หนีบกับหัวพ่นรีดไอน้ำ
- ปล่อยขาคลิปให้หนีบลงบนผ้า แล้วเริ่มรีด
จากด้านบนลงด้านล่าง
* ก่อนถอดคลิปหนีบผ้าออกจากหัวพ่นรีด
ควรกดปุ่มปิดเครื่อง แล้วรอจนกระทั่งไม่มี
ไอน้ำออกมาจากหัวพ่นรีด ถอดคลิปหนีบออก
จากหัวพ่นรีด ครระวังไม่ให้ส่วนของร่างกาย
สัมผัสกับหัวพ่นรีดด้านที่เป็นสแตนเลสสตีล
เนื่องจากมีความร้อนและอาจทำให้บาดเจ็บได้
คำแนะนำในการใช้งานอุปกรณ์ต่าง ๆ
- ข้อควรระวัง เมื่อใช้อุปกรณ์ต่างๆ ในการ
รีดผ้า ให้รีดในแนวตั้งเท่านั้นไม่ควรรีดใน
แนวนอน
- ในการใช้งานอุปกรณ์ต่างๆ เป็นครั้งแรก
ควรอ่านและทำความเข้าใจวิธีการใช้งานในคู่มือ
การใช้นี้ และควรทดลองรีดผ้าเก่าหรือผ้าที่
ไม่ใช้แล้วก่อน
แปรงรีดผ้า
- การใช้แปรงในการรีดผ้า ช่วยให้ไอน้ำ
สามารถแทรกซึมเข้าไปในเนื้อผ้า และทำให้
พ่นรีดผ้าได้เรียบ
- ข้อควรระวัง การถอดหรือประกอบแปรง
รีดผ้าควรทำในขณะที่เครื่องเย็นและแปรง
ไม่ร้อน
6
Page 8

ขั้นตอนการดูแลรักษา
การดูแลรักษาเครื่องหลังการใช้งาน
- หลังจากใช้งานแล้ว นำแทงค์น้ำออกมาจาก
ตัวเครื่อง และเทน้ำในแทงค์ทิ้ง
- ปล่อยให้เครื่องทำงานโดยไม่มีน้ำประมาณ
5 นาที เพื่อให้แผ่นความร้อนแห้ง
- กดปุ่มปิดการทำงานของเครื่อง (ไฟแสดง
การทำงานจะดับ) ถอดปลั๊กออกจากเต้ารับ
ม้วนเก็บสายไฟให้เรียบร้อย
- ข้อควรระวัง ไม่ควรสัมผัสหัวแปรงรีดผ้า
ในขณะที่มียังร้อนควรรอให้หัวแปรงเย็นลง
และควรให้แผ่นความร้อนแห้งลงก่อนเก็บเครื่อง
- หลังจากทำความสะอาดตามวิธีดังกล่าว
ข้างต้น แล้วยังมีตะกอนตะกรันค้างอยู่ ให้ทำ
ซ้ำอีกครั้ง
การทำความสะอาดเครื่อง
- ทำความสะอาดตัวเครื่องโดยการใช้ผ้า
หมาดๆ เช็ดทำความสะอาด และเพื่อรักษา
ประสิทธิภาพการทำงานของเครื่องพ่นรีดไอน้ำ
ควรทำความสะอาดโดยการขจัดตะกอนตะกรัน
ตามระยะเวลา โดยขึ้นอยู่กับความถี่ในการ
ใช้งานหรือระยะเวลาในการใช้งาน ควรทำ
ความสะอาดแทงค์น้ำอย่างน้อยปีละครั้งหรือ
หลังการใช้งาน 100 ชั่วโมง วิธีการทำความ
สะอาดดังต่อไปนี้
* นำแทงค์น้ำออกมาจากเครื่อง ล้างตัวเครื่อง
บริเวณฐานรองรับแทงค์ด้วยน้ำสะอาด
* เปิดฝาแทงค์น้ำโดยการหมุนปุ่มเปิดที่ฐาน
ใส่น้ำผสมผงซักฟอกหรือน้ำยาซักผ้าลงล้าง
ในแทงค์น้ำ เททิ้งแล้วใส่น้ำสะอาดลงใน
แทงค์เพื่อล้างอีกครั้ง
อุณหภูมิไอน้ำที่ออกมาจากเครื่อง 98 ํC
ความจุแทงค์บรรจุน้ำ 1.8 ลิตร
เสาแขวนผ้า ปรับได้ต่ำสุด 0.5 เมตร
เสาแขวนผ้า ปรับได้สูงสุด1.35เมตร
ใช้งานได้ต่อเนื่อง 60 นาที
ความยาวท่อส่งไอน้ำ 1.7 เมตร
กำลังไอน้ำ 40 กรัม/นาที
คุณสมบัติเครื่องพ่นรีดไอน้ำ
7
Page 9

อุปกรณ์เพื่อความปลอดภัยไม่
ทำงาน
มีเสียงดังออกมาจากสายส่งไอน้ำ
แต่กำลังไอน้ำที่ออกมาจากหัวพ่น
ไอน้ำมีปริมาณน้อย
หัวพ่นไอน้ำมีน้ำรั่ว
ข้อต่อระหว่างสายส่งไอน้ำกับ
ตัวเครื่องรั่ว
มีน้ำล้นหรือไหลออกมาจาก
แทงค์น้ำ
กำลังไอน้ำอ่อน
แทงค์น้ำชำรุดหรือเปลี
่ยนรูป
ไม่มีไอน้ำออกมาจากเครื่องใน
ขณะที่ไฟแสดงสถานะติด
อุปกรณ์ภายในวงจรไฟฟ้าบางอย่าง
อาจชำรุดหรือปลั๊กหลวมหรือฟิวส์
ขาด ไฟ LED แสดงการทำงานดับ
สายส่งไอน้ำบิดงอ หรือถูกวาง
ในระดับต่ำกว่าตัวเครื่อง
หัวพ่นไอน้ำชำรุดหรือพ่นรีดใน
แนวนอน
ส่วนรองรับข้อต่ออาจชำรุ
ดเสียหาย
เนื่องจากอายุการใช้งานหรือข้อต่อ
หลวม
แทงค์น้ำชำรุดหรือแตกหัก
มีรอยรั่ว
กระแสไฟฟ้าที่จ่ายเข้าเครื่องอาจมี
กำลังอ่อน หรือไฟตก หรือมีวัสดุ
ไปติดอยู่ในสายส่งไอน้ำ
ใส่น้ำที่มีความร้อนสูงหรือน้ำเดือด
ลงในแทงค์น้
ำ หรือใส่สารเคมี
บางประเภทที่มีฤทธิ์กัดกร่อนลงใน
แทงค์
แผ่นทำความร้อนชำรุด
อุปกรณ์ไฟฟ้าภายในชำรุดเสียหาย
ส่งเครื่องให้กับศูนย์บริการหรือ
ช่างผู้มีความชำนาญเป็นผู้ตรวจสอบ
ยกสายส่งไอน้ำขึ้นเพื่อให้ไอน้ำที่
ค้างอยู่ภายในสายส่งไอน้ำไหลกลับ
ลงในเครื่อง
เปลี่ยนหัวพ่นรีดหรือพ่นรีดใน
แนวตั้ง
เปลี่ยนอุปกรณ์ส่วนรองรับข้อต่อ
หรือประกอบข้อต่อเข้ากับตัว
เครื่องให้แน่นสนิท
เปลี่ยนแทงค์น้ำ
ใช้กระแสไฟที่มีความสม่ำเสมอ
หรือทำความสะอาดสายส่งไอน้ำ
เปลี่ยนแทงค์บรรจุน้ำ
ส่งเครื่องให้กับศูนย์บริการ
หรือช่างที่มีความชำนาญเป็น
ผู้ตรวจสอบ
ปัญหา สาเหตุ วิธีการแก้ไข
การแก้ไขปัญหาเบื้องต้น
8
Page 10

สินค้าจะหลุดพ้นจากการรับประกันเมื่อ
- รับประกันเฉพาะในพื้นที่รับประกัน
เท่านั้น ( รับประกันเฉพาะฮีตเตอร์)
- เสียหายจากการใช้งานไม่ถูกต้อง
(ไม่ปฏิบัติตามคู่มือ) หรือดัดแปลงสินค้า
- เสียหายจากการขนส่ง
- เสียหายจากการใช้งานเป็นประจำ หรือ
ขาดการดูแลรักษาเครื่อง
- เสียหายจากการสูญหาย หรือชิ้นส่วน
บางอย่างหายไปจากการถอดประกอบสินค้า
หมายเหตุ
เงื่อนไขการรับประกันสินค้า
- สัญญาการรับประกันมีระยะเวลา 1 ปี
นับจากวันที่ท่านซื้อสินค้า
- การรับประกันจะมีผลกับความ
บกพร่องที่เกิดจากความผิดพลาด
ของบริษัทเท่านั้นทางบริษัทจะไม่รับประกัน
สินค้าที่เสียหายจากการที่ท่านไม่ปฏิบัติ
ตามคำแนะนำในคู่มือนี้เด็ดขาดรวมถึง
การตกแตก การสึกหรอจากการใช้งาน
- หากท่านดัดแปลง เปลี่ยนชิ้นส่วนใดๆ
ที่ไม่ใช่อุปกรณ์ที่มาเป็นชุดของผลิตภัณฑ์
การรับประกันสินค้าถือว่าเป็นโมฆะทันที
- หากเครื่องของท่านเกิดความเสียหาย
แล้วอยู่ในเงื่อนไขการรับประกัน ท่าน
สามารถส่งเครื่องไปตรวจเช็คยังศูนย์ตัวแทน
จัดจำหน่ายได้ โดยบรรจุหีบห่อผลิตภัณฑ์ให้
เรียบร้อยแล้วเขียน ชื่อ ที่อยู่ เบอร์โทรศัพท์
และเขียนสาเหตุที่ส่งเครื่องมา ว่าเป็นเพราะ
เหตุใดพร้อมแนบสัญญาการรับประกันมาด้วย
9
Page 11

10
Warning!
Do not direct steam at people, animal or steam clothes
while they are being worn.
Page 12

Dear Customer
Thank you for choosing a
NESCO appliance.The experience, design, feature and technology of this appliance, as well
as the strict quality controls
used during manufacture, will
provide full satisfaction for
many years.
STEAM CLEANER
Model : NC 103
PREZ ME
Description
Tip&safty precautions
English
A.
B.
C.
D.
E.
F.
G.
H.
I.
J.
K.
L.
M.
N.
O.
P.
1500 W 220-230 V 50/60 Hz
Handle
Steam hose
Steam tube head
Steam press board
Brush accessories
Steam tube fixation
Bracket head
Up and down pole
Up and down fixation ring
Press board
Bracket pole set
Water tank
Back wheel
Front wheel
No water light
On/Off switch
1. When using your appliance,
basic precautions should always
be followed, including the
following:
2. Read all instructions before
use.
3. Use appliance for its intended
use only.
4. This product has been
designed for domestic use only.
Any commercial use, inappropriate use or failure to comply
with the instructions, the
manufacturer accepts no
responsibility and the guarantee
willnot apply .
5. This appliance is not designed
to be used by people (including
children) with a physical,
sensory or mental impairment,
or people without knowledge or
experience, unless they are
supervised or given prior
instructions concerning the use
of the appliance by someone
responsible for their safety.
6. Children must be supervised
to ensure that they do not play
with the appliance.
7. Do not leave appliance
unattended while plugged in or
11
Page 13

while it is still hot.
8. Do not operate any appliance
with a damaged cord, plug or
steam hose or after the appliance
malfunctions, or is dropped or
damaged in any manner. To
reduce the risk of electric shock,
do not disassemble or attempt to
repair the appliance. Return
appliance to nearest authorized
service center for examination,
repair or adjustment.
9. To reduce the risk of contact
with hot water emitting from
steam vents, check appliance
before each use by holding it
away from your body and
operating. Steam only in an up
and down vertical motion. Never
use steam head in a horizontal
position or tilt into a backward
position, this may result in water
discharge.
10. To reduce the risk of electric
shock, do not immerse the
appliance in water or other
liquids. Appliance should always
be turned off before plugging or
unplugging. Never pull on the
cord to unplug from outlet,
instead grasp plug and pull to
unplug.
11. Do not allow cord to touch
hot surfaces. Let appliance cool
completely before putting away.
Loop cord loosely under the
appliance when storing.
12. Do not let power cord
co
ntact sharp edges or hot
surfaces. Do not try to fasten the
hose adapter during operation.
Scalding may occur if the hose
adapter is removed while using
the appliance. Always unplug
appliance from an electrical outlet
when filling with water,
emptying or when not in use.
13. Do not attempt to hang up
the unit using the hose.
14. The use of foreign accessory
attachments that are not supplied
by manufacturer is not
recommended and may result in
fire, electric shock or personal
injury. Burns could occur from
touching hot parts, hot water or
steam. Use care when you empty
a steam appliance. There may be
hot water in the reservoir.
15. Do not direct steam at people,
animals or steam clothes while
they are being worn.
12
16. Y our appliance is intended for
household use only. This is a
floor appliance never carry it
while in use.
Page 14

Special Instructions
- This is a 1500 watt appliance.
To avoid a circuit overload, do
not operate a high wattage
appliance on the same circuit.
- If an extension cord is
absolutely necessary, the
marked electrical rating should
be at least as great as the
electrical rating of the
appliance. Cords rated for less
amperage may overheat. Care
should be taken to arrange the
cord so that it cannot be pulled
or tripped over.
- Do not cut or attempt to extend
the steaming hose.
Environment protection first!
- Your appliance contains
valuable materials which can be
recovered or recycled.
- Leave it at a civic waste
disposal centre.
Operating Instruction
On/off switch and indicate
lamp Description
Garment Steamer can control
by power switch. Push the on/
off switch, the power indicator
light on, the appliance start to
work. The garment steamer will
start to produce the steam. If
the no water light is on, should
fill water or put the water tank
on the body .
13
Page 15

- Please read the instruction
carefully.
- Remove all packages from the
appliance.
- Do not power on or open
before finish assembly.
- Appliance knock down
assembly picture, Fig. 1
- Put the telescopic pole insert in
the base. Fig. 2
- Make sure the knob tight after
insert into the body. Fig. 3.
- Pull the little telescopic pole,
knob 90 degree, telescopic open.
Fig.4, Fig.5.
- Open the telescopic buckle, pull
the Aluminum pole. Fig .6.
- Keep the buckle tight.
- Put the steam tube tie-in insert
the hole. Fig.8.
- Put the steam brush on the
brush fix base.Fig.9
Installations (before use)
Iron instruction
- Fill the water from the water
tank cover, open the cover of
water tank, fill the water into
water tank.Fig.10, Fig.11.
- Do not fill hot water.
- Close the water tank cover , put
the water tank on the body. Fig.
12, Fig. 13
- Pull the power cord, socket on,
press the power switch. Fig .
14,Fig.15
- After around one minute, the
appliance start to produce the
steam ( please notice the
indicator)
- At the beginning, there will be
some noise come from the hose.
It caused from the moving of
stream inside the hose, it is
normal.
- Hold steam brush and made the
steam pole out of body, use
steam brush touch the cloth
vertically gently start ironing,
Fig .16, from upside to downside.
- During operate, steam tube will
be some sound of water flow,
14
Page 16

this is normal. When heard this
sound, pull the tube upside made
the bead back to boiler.
- In order to extend the appliance
life, after operating, dump the
water inside the water tank,
make the appliance dry working
5 minutes, make the boiler dry,
power off when without steam .
Brush
- Use brush can make the steam
infiltrate cloth, make good iron
effect.
- Remind: Installation of brush
should do only when the steam
brush is cool.
- When install brush, make steam
brush panel upside, push brush
accessories gently, make the
buckle tightly .
- When ironing, should be from
top to end.
- Before remove the brush, please
power off the power control
switch, when there is no steam
from the steam brush, remove
the brush, please note do not
touch the stainless steal panel,
avoid scald hand.
Iron splint
- Splint can help iron hem and
cockle easily.
- Install the splint on the steam
brush, push it tightly to its
position.
- Hold the steam brush, open the
splint.
- Put the cloth between splint and
steam brush.
- Release handle, made it clamp
cloth, ironing from upside to
downside.
Accessories instruction
- Remind: When use the
accessories, only can use at
vertical direction, please don’t
iron at horizon direction.
- Before using the accessories,
please read the instruction
manual, first use, suggest test
with some old or waste cloth.
15
Page 17

*Before remove splint, please
power off the power control
switch, when there is no steam
from the steam brush, remove
the brush, please note do not
touch the stainless steel panel, to
avoid scald hand.
Maintenance &Cleaning
Storage
- After using, remove the water
tank from the body, dump the
water in the water tank.
- Make the appliance dry
working 5 minutes. Make the
boiler dry.
- Power off the power
switch,(power indicate lamp will
be off),remove the power cord
from the socket,
- Warning: please do not touch
the steam brush before it cool
down, let the boiler dry before
storage.
per 100 hours. The process for
clean the scale is as below:
* Remove the water tank, wash
the scale at water base with clean
water.
* Open the water tank base knob,
dump mixture in the water tank
then wash with clean water.
- After clean the scale, if you
think there is still scale, please
repeat the above process.
Cleaning
- Please use a wet rag clean the
body. In order to make your
product always have a good
capability , should clean the scale
timely, the period depend on the
using period. Clean water tank
at least once per year, or once
Output steam temperature 98 ํC
Capacity 1.8 L
Min length of lever 0.5 m
Max length of lever 1.35 m
Continued steam time 60 min
Steam pipe length 1.7m
Steam flow 40g/min
Parameter
16
Page 18

The security device
does not work.
A noise originates
pipe of steam but
the produced steam
is weak.
Spray head is leaked
Hooking connection
of steam pipe is
leaked.
Water spilled out
water tank.
Steam is weak.
Water tank is in
distortion.
No steam but the
indicator is lighted.
One of the circuits has
fault, the plug is loose,
the fuse burned, the
LED
of supply source is
extinguished.
The pipe is twisted
below level to iron.
The head is broken, or
the ironing is vertical.
The cushion can be
damaged itself with
the aging, the junction
interface loosen itself.
Water tank is broken
or has a hole.
The power source is
lower or deposits can
obstruct the arrival pipe.
Over heated water is
put. Or other chemical
element is put.
The steam creator is
broken.
The internal electric
component is broken.
Check and maintain
by specialized
technician or service
center.
Raise the steam pipe
(residual water in top
returns into the
device).
Replace the spray
head. Move from top
down to operate.
Replace the cushion.
Rotate the junction of
steam pipe tightly.
Replace the water
tank.
Add a stabilizer of
power source. Use a
cleaning respecting
the environment.
Continue to use.
Replace the water tank.
Call a specialized
technician to do an
examination.
Problem Cause Solution
Trouble shooting
19
Page 19

Warranty:
Waranty heater only
-Damage or defect from
misunderstand how to use or
service from non authorized
people.
-Electrical shock or any
electrical problem.
-Lost or damage some part by
accident or natural damage.
-Damage or defective from
manufacturer, dealer & service.
-1 year warranty for house hold
use only.
-Use according to this
instruction carefully.
Warranty is expired
When(void of warranty)
20
Page 20

 Loading...