

Page 1
User Manual
Upright Turkey Roaster (Model: ITR-01)
Page 2

TABLE OF CONTENTS
Important Safeguards ............................................................................1-2
Intro & Overview .....................................................................................3
Components List ......................................................................................4
Control Panel Functions ...........................................................................5
Parts Assembly ......................................................................................6-7
Before First Use .......................................................................................7
Preparation Instructions ...........................................................................8
Operating Instructions .........................................................................9-10
Estimated Cooking Settings ...................................................................11
Cleaning and Maintenance .....................................................................12
Important Guidelines ..............................................................................13
Troubleshooting ................................................................................14-15
One Year Limited Warranty ...................................................................17
“NESCO®” is a registered trademark of e Metal Ware Corporation.
e Metal Ware Corporation
1700 Monroe St., P.O. Box 237
Two Rivers, WI 54241-0237
Phone: 1-(800) 288-4545
For accessories and additional products, go to
www.nesco.com
English
Please visit channel: NESCO Upright Turkey Roaster
Page 3
English
IMPORTANT SAFEGUARDS
READ ALL INSTRUCTIONS
When using any electrical appliance basic safety precautions
should always be observed including the following:
1. Do not touch hot surfaces. Use handles or knobs.
2. To protect against electrical shock, do not immerse cord, plug, or appli-
ance in water or other liquid.
3. This appliance is not a toy. Close supervision is necessary when any appliance is used by or near children. Store this appliance in a safe place, out
of the reach of children.
4. Unplug from outlet when not in use and before cleaning. Allow to cool
before putting on or taking off parts.
5. Do not operate any appliance with a damaged cord or plug or after the
appliance malfunctions or has been damaged or appears to be damaged in
any manner. Return appliance to the NESCO® Factory Service Department for
examination, repair, or adjustment.
6. Do not attempt to repair the appliance.
7. Do not use any accessory attachments not recommended by the appliance
manufacturer as they may cause injuries and void the warranty.
8. Always place the appliance on a firm and stable surface. Make sure the
surface is clean and dry.
9. Do not use this appliance on wet or hot surfaces or near any heat sources.
10. Do not place on or near a hot gas or electric burner, or in a heated oven.
11. Do not use outdoors.
12. To disconnect the appliance, turn any control to ‘OFF’, then remove
plug from wall outlet.
13. Do not use appliance for other than intended use.
1
• This instruction manual contains important information necessary
for the proper use of this appliance.
• Read and follow all warnings and instructions before assembling and
using this appliance.
• This appliance is designed for household use only.
The inner heating elements become VERY HOT during use.
NEVER touch the inner heating elements while the appliance is in
operation.
ALWAYS allow the appliance to cool down completely before cleaning.
Page 4

14. Do not operate unattended.
15. Do not clean with metal scouring pads. Pieces can break off the pad
and touch electrical parts, creating a risk of electric shock.
16. Oversize foods, metal foil packages, or utensils must not be inserted
in the roaster as they may involve a risk of fire or electric shock.
17. This appliance is not intended for use by persons (including children)
with reduced physical, sensory or mental capabilities, or lack of experience and knowledge, unless they have been given supervision or instruction concerning use of the appliance by a person responsible for their
safety.
18. Do not let cord hang over edge of table or counter, touch hot surfaces
and never pull on the cord.
19. Before plugging the appliance in or operating, make sure your hands
are dry and safe to do the actions. Do not operate the appliance if the cord
or plug is wet.
20. A fire may occur if the roaster is covered or touching flammable material, including curtains, draperies, walls, and the like, when in operation.
21. When disconnecting, to avoid any injury, please unplug by grasping
the plug, not the cord.
22. Extreme caution must be used when moving an appliance containing
hot liquids.
23. Polarized Plug: This appliance has a polarized plug (one blade is
wider than the other). To reduce risk of electric shock, plug is intended to
fit into polarized outlet only one way. If the plug does not fit fully into the
outlet, reverse the plug. If it still does not fit, contact a qualified electrician. Do not try to modify the plug in any way.
24. Short Cord Instructions: A short power supply cord is provided to
reduce the risk resulting from becoming entangled in or tripping over
a longer cord. Extension cords may be used if care is exercised in their
use. If an extension cord is used, the marked electrical rating of the cord
should be at least as great as the electrical rating of the appliance. The
longer cord should be arranged so that it will not drape over the tabletop
where it can be pulled on by children or tripped over unintentionally.
English
2
This appliance is designed for household use only.
IMPORTANT SAFEGUARDS
Follow all warnings and instructions.
Save this instruction manual for future use.
Page 5

INTRO & OVERVIEW
English
3
Thank you for selecting the NESCO® Upright Turkey Roaster.
Welcome to the exciting world of convenient, oil-free vertical roasting.
The NESCO® Upright Turkey Roaster is the ideal appliance for saving time in the kitchen and offers the user a ‘second’ oven allowing for
additional cooking options. This upright roaster is perfect to have around
during the holidays or any time of year as it can cook more than just a
turkey.
The innovative Roast-Ryte™ Technology uses vertical heating
elements to cook a turkey inside and out, maintaining the moisture on the
inside while searing the skin on the outside. The outer heating elements
rotate heat around the turkey, while the center heating element cooks
from the inside out. These special features provides perfect, even cooking throughout while enabling the poultry to be cooked faster than in a
conventional oven.
With enough space for your cooking demands, this oil-free,
easy to use vertical roaster can cook up to an 18-lb. bird in two hours.
The easy-to-read control panel has an adjustable digital timer as well as
a built in 120-minute auto turkey program. The pre-set high/low heat
selection function takes the guesswork out of nding the optimal cooking
temperature. Illuminated lights indicate when the heating elements are on
and cycling.
Removable and dish washer safe, the cooking stand drip tray
collects all unwanted turkey drippings and the interior surface is nonstick making clean-up quick and minimal. This upright roaster is lightweight, includes side handles for safe handling and has a glass cover for
convenient viewing during use. The color and stainless steel nish is a
classic combination which will accent any kitchen counter perfectly and
the compact design offers the room needed to prepare delicious meals.
With just a touch of a button, the NESCO® Upright Turkey
Roaster provides the most convenient and mess-free way to cook poultry
and meat, allowing you to cook comfortably and enjoy more time with
your family outside of the kitchen.
This instruction manual will help ensure maximum performance and
product life while you enjoy using your new upright roaster. Please read
the entire manual before using your product for the rst time. Keep this
manual as a reference and save for future use.
Page 6
COMPONENTS LIST
4
English
FOR MISSING OR REPLACEMENT PARTS, PLEASE CALL 1-800-288-4545.
DO NOT RETURN TO STORE.
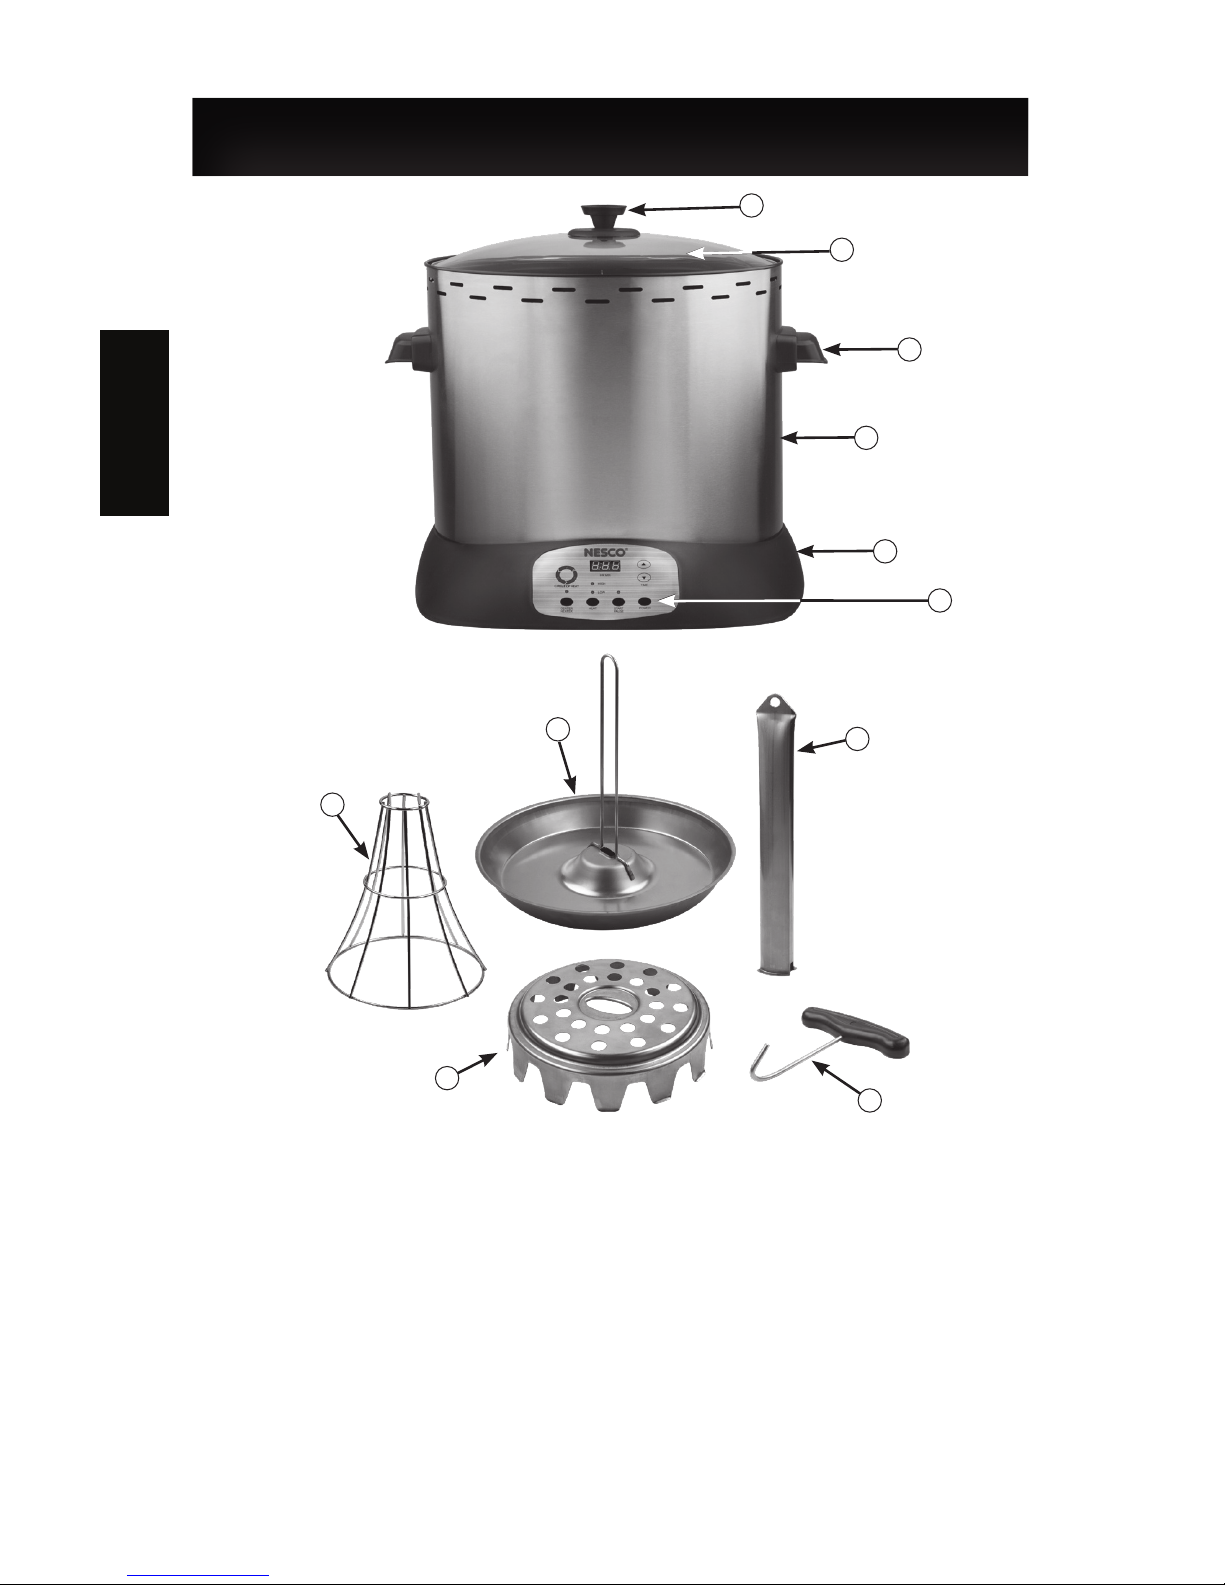
1. Cover Handle
2. Glass Viewing Cover
3. Side Handles
4. Main Body
5. Base
6. Control Panel
7. Top Rack
8. Drip Tray
9. Heating Element Cover
10. Bottom Rack
11. Rack Remover
1
2
3
4
5
6
8
11
9
10
7
Page 7
CONTROL PANEL FUNCTIONS
5
English
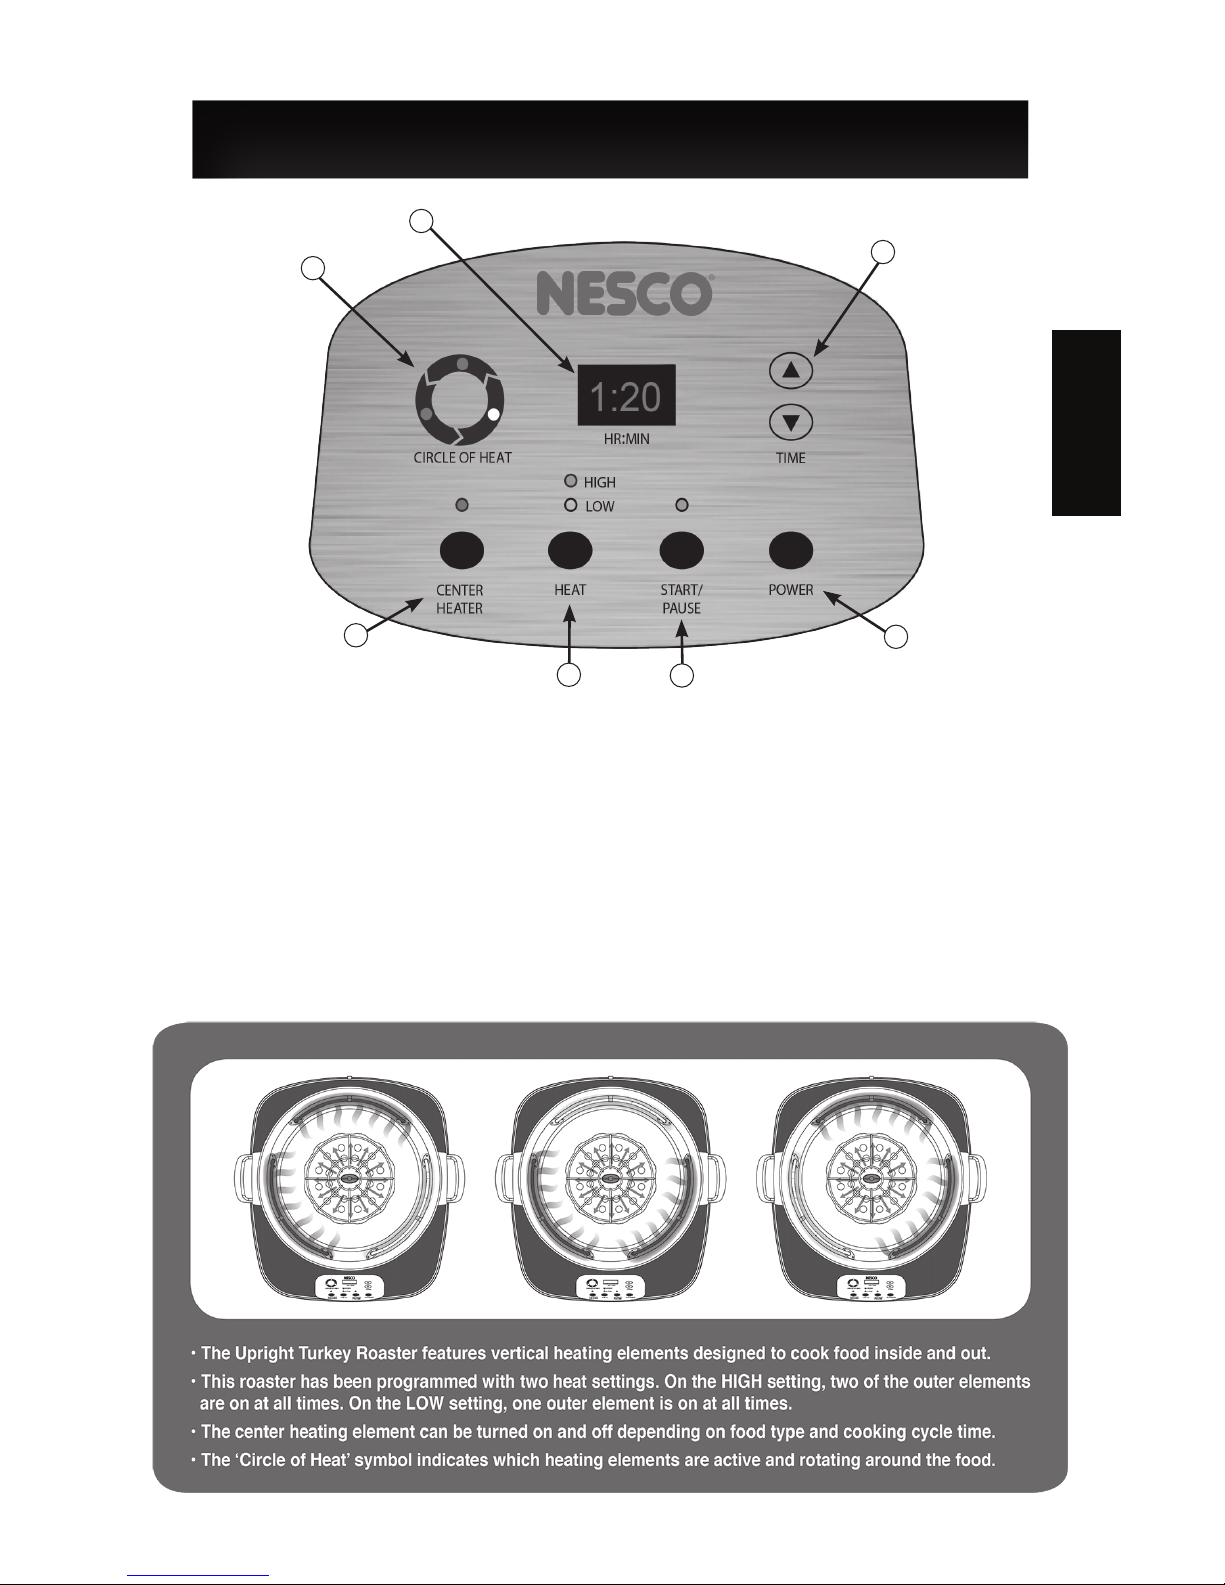
12. Outer Heat Elements Cycle Indicator - Indicates which elements are working.
13. Digital Display (HR:MIN) - Displays remaining cooking time in hours and minutes.
14. Time Adjustment - Timer range: 0 to 4:00 hours Max.
15. Center Heat Element Selection Button - Turns center element on and off.
16. Heat Selection Button - Default Low Heat: 300°F / Default High Heat: 500°F
17. Cooking Cycle Start/Pause Button - Starts and pauses the cooking cycle.
18. Power Button - Turns the appliance on and off.
12
13
14
15
16
17
18
Roaster Features:
Page 8

6
English
Roaster Features: (Continued)
• 120 minute default turkey cooking program for a 16-18 lb. bird.
- Default settings: High Heat, Center Element ON, Time: 2 hours
- Thaw temperature of food may vary cooking cycle times.
• When the default cooking cycle expires, the Digital Display will
beep twice, return to the default cooking cycle time and display
“02:00”. T
he heating elements will turn off automatically. Power
will remain on.
• Maximum cooking time is 04:00 hours.
• Time on the Digital Display increases and decreases in “minute”
increments.
• Removable parts are dishwasher safe (except Main Body).
PARTS ASSEMBLY
Parts Assembly for Poultry
Top Rack
Bottom Rack
Heating Element Cover
Page 9

7
PARTS ASSEMBLY
(CONTINUED)
BEFORE FIRST USE
English
1. Unpack the appliance and remove all packaging and accesso-
ries, including the Glass Cover. Wash and wipe the accessories
and set aside.
2. It is normal for some smoke and odor to occur from
the appliance when using it for the rst time. This is not
harmful. We recommend to ‘SMOKE OUT” the appliance for 15 minutes, using the roaster on default setting
(HIGH) in a well ventilated area. (garage, carport, etc.)
Keep the Glass Cover and accessories off of the unit
while operating during the “SMOKE OUT” session.
3. Once the roaster is prepared for indoor usage, wipe the inside
and outside of the roaster with a sponge or damp cloth and dry
thoroughly.
• NEVER IMMERSE THE APPLIANCE IN WATER.
•
Save the packaging for transporting or storage of the appliance
when not in use.
Parts Assembly for Meats
Bottom Rack
Heating Element Cover
Page 10

PREPARATION INSTRUCTIONS
8
Preparing Poultry:
A. Thoroughly defrost the poultry before cooking.
B. Remove the giblets from the poultry. Rinse and pat dry the poultry.
Season as desired.
C.
Spray the surfaces of the cooking stand assembly with spray-on cook-
ing oil.
D. Pull the poultry open and position it over the Top Rack. Ensure that
the drumsticks hang downwards to the side of the Top Rack.
E. The Heating Element Cover end should come through the neck of the
poultry as much as possible.
F. Using the Rack Remover, insert the hook into the hole at the end of the
Heating Element Cover to lift the food.
English
Preparing Meats:
A. Thoroughly defrost the meat before cooking.
B. Place the meat (roast) on a cutting board or knife friendly surface. Us-
ing a knife, carefully cut an X-shaped slit through the center of the roast,
ensuring that the opening is large enough for the Heating Element Cover
to t through. Season as desired.
C.
Spray the surface of cooking stand assembly with spray-on cooking
oil.
D. Position the meat over Heating Element Cover. If the length of the
roast isn’t the same size as the Heating Element Cover, please leave the
meat positioned near the top instead of near the bottom end of the Center
Heating Element.
STEP F
Page 11
9
OPERATING INSTRUCTIONS
English
CAUTION!
NEVER OPERATE THIS APPLIANCE UNATTENDED!
WARNING!
THE GLASS COVER IS HOT DURING USE; ALWAYS USE
THE HANDLE AND LIFT WITH CARE.
1. Place the appliance on a at, heat resistant surface.
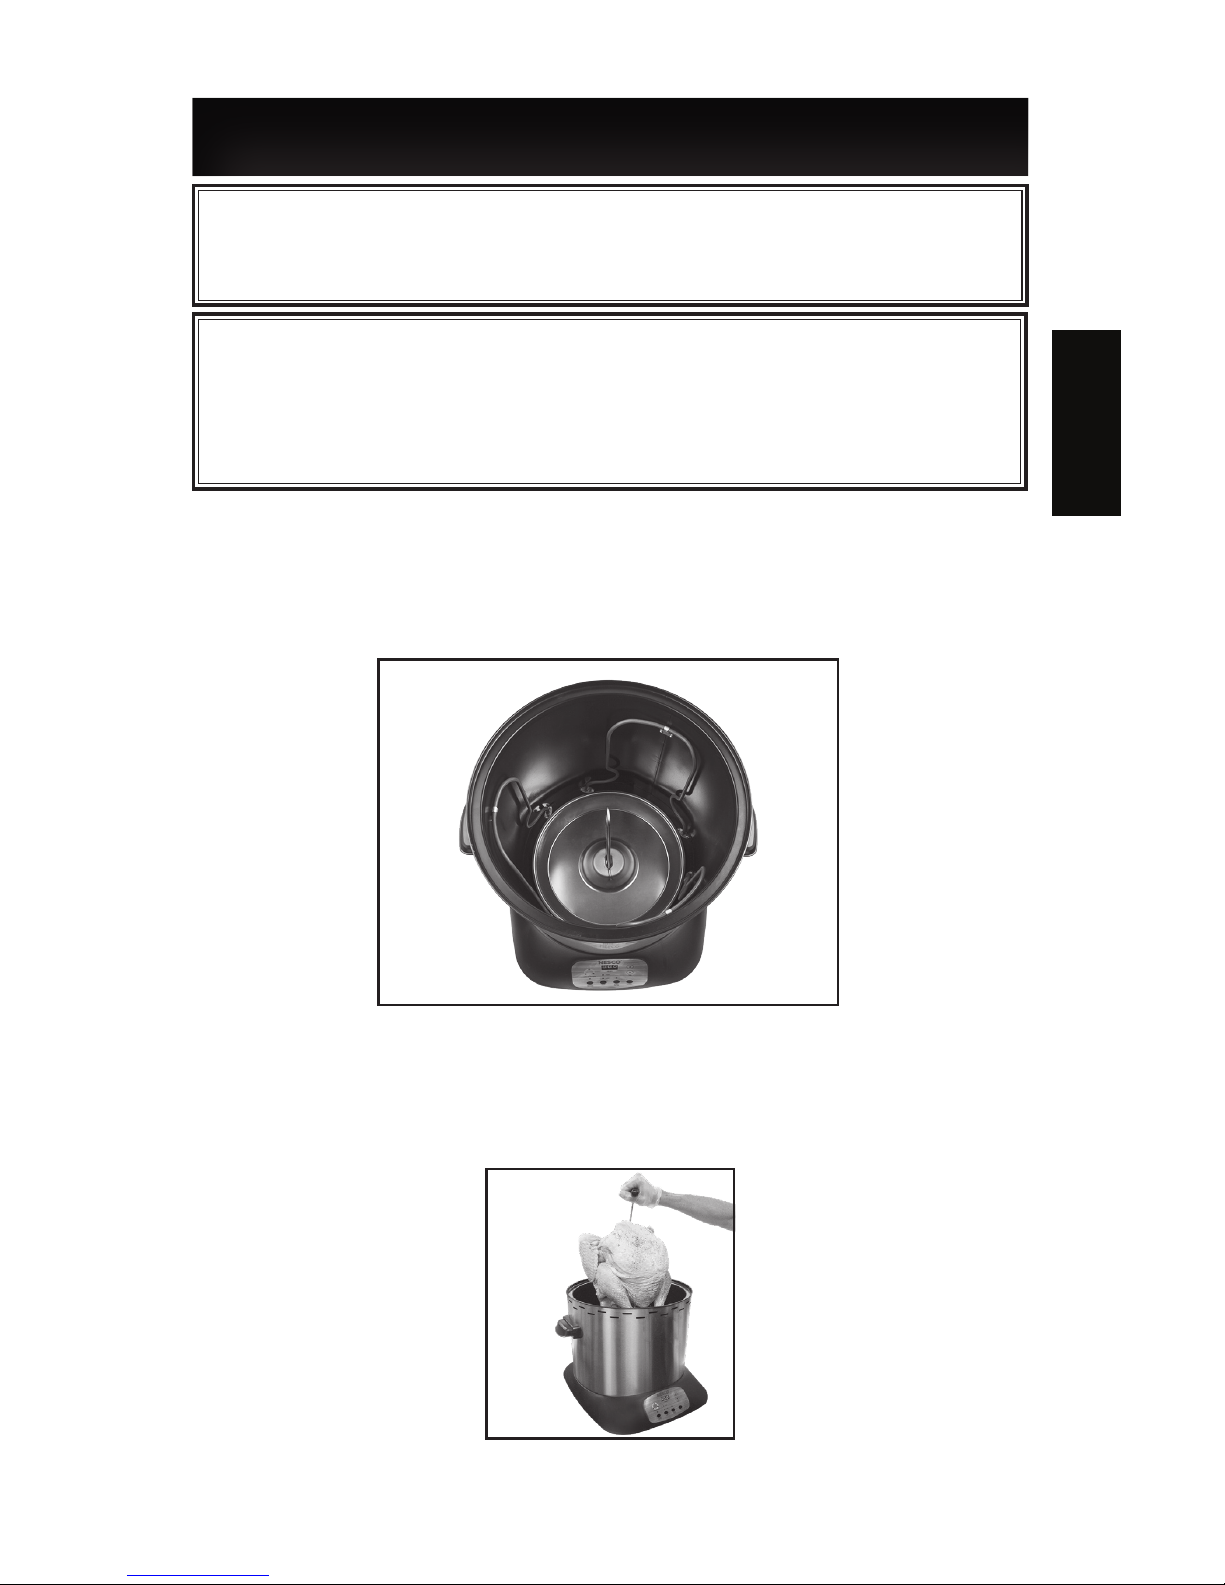
2. Remove the Glass Cover and position the Drip Tray over the
heating element and lower it into position inside the Main Body
until resting on bottom surface. (FIG. 1)
3. Using the Rack Remover, insert the hook into the hole of Heating Element Cover. Lift and place the prepared poultry or meat
over the Drip Tray handle and Center Heater and lower into position. Always unhook and remove the Rack Remover before cooking. (FIG.2)
4. Place the Glass Cover into position on the Main Body.
FIG. 1
FIG. 2
Page 12

10
English
OPERATING INSTRUCTIONS
5. Plug the power cord into a polarized 120 Volt A.C. electrical
outlet. If the plug does not t try reversing the plug. If it still does
not t, consult a qualied electrician.
6. Press the ‘POWER’ button. The Control Panel will be lit showing default settings. (Default settings: High Heat, Center Heating
ON, Time 2:00 hours).
7. Press the “ “ or “ “ keypad to increase or decrease cooking
time in “minute” increments. Maximum cooking time is 4:00
hours.
8. Press the “HEAT” button to select “HIGH” or “LOW” heat
settings. On HIGH setting two of the outside heaters are active at
all time. On LOW setting only one heater is active at all time.
9. Press “START/PAUSE” button to begin cooking. The digital
display will begin to countdown and show the time remaining.
The ‘Circle of Heat’ will show which heating elements are active
and will rotate around the food.
10. When the cooking cycle has nished, the roaster will beep
twice and the Digital Display will show “02:00” and the heating
elements will turn off automatically.
CAUTION: The Glass Cover will become very hot during use.
Always handle with care and use oven pads or mitts. The cooking
process creates steam that can cause burns.
11. Use a hot pad or oven mitt to carefully lift the Glass Cover
and set aside on a heat resistant surface. Tilt the Glass Cover
when opening so that the steam is directed away from the face
and hands.
• To ensure that the food is cooked properly, check the internal
temperature of the food periodically with a food thermometer.
12. Using the Rack Remover, insert the hook into the hole at the
end of the Heating Element Cover to lift the food from the Main
Body.
Page 13

English
11
ESTIMATED COOKING SETTINGS
Meat
Type
Suggested
Heat
Setting
Recommended
Internal
Temperature
Estimated
Cook
Time
Whole Turkey
10 to 14 lbs.
HIGH 165°F 6 min/lb
Whole Turkey
14 to 18 lbs.
HIGH 165°F 6 min/lb
Whole Chicken
4-6 lbs.
HIGH 165°F 8 min/lb
Beef Roast
2 to 3 lbs.
HIGH 145°F
Allow to rest for at
least 3 minutes.
15 min/lb
Beef Roast
4 to 6 lbs.
HIGH 145°F
Allow to rest for at
least 3 minutes.
10 min/lb
Boneless Pork
Loin Roast
2 to 4 lbs.
HIGH 145°F
Allow to rest for at
least 3 minutes.
8 min/lb
Please nd the estimated settings and cooking times below:
•
Estimated cooking times shall be used as a reference point.
Adjust
estimated cook times accordingly for desired results.
• Cook times will be slightly longer when using the LOW Heat setting.
• Cooking times for beef will vary depending on the desired doneness of
the meat.
Do not use the center heating element if you want the food to be
cooked “rare”.
• Check the internal temperature of the food periodically with a food
thermometer.
• Always reference the recommended internal temperatures of the food
at the end of the cooking cycle, according to USDFA Food Safety and
Inspection guidelines.
• For best results, allow food to rest for 10 to 15 minutes before serving.
• A small amount of “trial and error” may occur as you perfect your
cooking technique and experiment with different sizes and types of foods.
• A NOTES section has been added to this manual for documenting tips,
recipes and other important cooking notes.
Page 14

12
English
CLEANING AND MAINTENANCE
• Turn off the roaster by pressing “POWER” on the Control Panel. Remove the
plug from the wall outlet and allow the appliance to cool completely.
• All removable parts are dishwasher safe or may be washed by hand in hot soapy
water. Rinse and dry thoroughly after washing.
• Carefully remove the Drip Tray from the Main Body and pour the drippings
into a suitable container. Always clean the Drip Tray after each use.
• The Glass Cover may be cleaned with a scouring pad, along with a non-abrasive
cleanser to remove burnt-on residue. Dry thoroughly.
• After a few uses the Heating Element Cover will discolor - this is normal.
• Clean the interior of Main Body and heating elements with a damp cloth or
sponge to remove residue. Dry with a paper towel or soft cloth. Do not use abrasive cleaners on interior or exterior surfaces.
• When cleaning cooked-on food residue located on the interior surfaces or Glass
Cover, use a brush, non-abrasive mesh pad with a dishwashing detergent and
water. NEVER spray water or cleaners directly onto the interior surface of the
Main Body.
• Clean the exterior surface of the Main Body with a damp cloth after each use.
Dry thoroughly with a soft cloth.
DO NOT SPRAY OR IMMERSE THE MAIN BODY OF THE
APPLIANCE IN WATER OR ANY OTHER LIQUID.
STORAGE AND DISPOSAL
STORAGE:
• NEVER store the appliance on its side. Store the appliance on a at, clean,
cool, dry area out of the reach of children and pets.
• Always ensure that the appliance is unplugged and has cooled down completely before storing or cleaning.
• Clean with a damp cloth and mild detergent and dry thoroughly before storing.
• Save the packaging for transporting or storage of the appliance when not in
use for extended periods of time.
DISPOSAL:
• This appliance may not be disposed of with ordinary household waste. Electrical and electronic waste must be disposed of properly.
• Contact your local municipal authorities for further information on product
disposal.
FOR MISSING OR REPLACEMENT PARTS, PLEASE CALL 1-800-288-4545.
DO NOT RETURN TO STORE.
Page 15

13
IMPORTANT GUIDELINES
• Thoroughly defrost all meat and poultry before cooking.
• Cooking cycles will vary according to thickness, shape and
consistency of the food. To avoid over-cooking, it is recommended
that the food be checked after the minimum cook time stated in the
estimated cooking settings on page 11.
• Select roasts that have even shape as they will cook in a more
uniform way.
• The maximum recommended size for poultry is 18 lbs.
• Marinate, rubs, seasonings and spices should be applied to foods
before loading into the roaster.
• Recommended internal temperatures for beef are: Rare 140°F;
Medium Rare 145°F; Medium 160°F; Well 170°F.
• For even cooking results, center the Heating Element Cover
as much as possible inside the roast. The larger end of the roast
should be positioned at the top, not at the bottom.
• If the length of the roast isn’t the same size as the Heating Element Cover, please leave the meat positioned near the top instead
of near the bottom end of the Center Heating Element.
CAUTION: Always ensure that the poultry or meat is thoroughly
cooked. The drippings from the poultry should be clear when cooking cycle is complete.
• We recommend using a meat thermometer to ensure that the food
is thoroughly cooked.
• Before serving, let the food rest for 10 minutes after removing
it from the roaster. For a juicier poultry or roast, do not serve the
food immediately after the cooking cycle has nished.
• For easier cleanup, spray the Drip Tray, Top Rack, Bottom Rack
and Heating Element Cover with a spray-on cooking oil before
cooking. NEVER spray these parts while the roaster is in operation.
English
Page 16

TROUBLESHOOTING
14
The turkey does not t in the roaster:
• Try to center the turkey as much as possible when postioning on the Top
Rack.
• If necessary, tuck the wing tips behind the neck or keep the turkey wings
in place by using food safe string.
• Large birds may simply not t in. We do not recommend using this
roaster for poultry over 18 lbs.
Countdown minutes will not change on display:
• The keypad may not have been pushed long enough or with enough
force.
• To advance the time faster on the digital display, push and hold the “ “
time button down.
The roaster does not turn on or will not get hot:
• The POWER button must be pressed before pushing the START/PAUSE
button.
• Ensure that the roaster was plugged in properly.
The roasts and poultry are not thoroughly done:
• Estimated cooking cycles shall be used as a reference point. Make sure
the Timer is set up properly.
• The cooking cycles in this manual are approximate. Increase the cooking times for desired results.
The meat is done on the inside but overdone on the outside:
• Turn off the center element when cooking or switch to Low heat half
way through the cooking cycle.
• Thicker meats require more cooking time at a reduced heat.
English
Page 17

English
TROUBLESHOOTING
15
The meat sticks to the Heating Element Cover:
• Spray the Center Heating Element with spray-on cooking oil
before
loading the roast.
• Let the roast rest for about 10 minutes before trying to remove it from
the Heating Element Cover.
• If necessary, cut the roast lengthwise down one entire side to remove
the Heating Element Cover.
Liquid or drippings are collecting at the bottom the Main Body :
• If cooked food is allowed to stand in the roaster to cool, condensation
will collect and run down the interior walls into the bottom of the unit.
• Make sure the drip tray is in place and properly positioned. Clean before and after each use.
• Drippings may run down the Heating Element Cover and collect in the
bottom.
• During operation, some drippings may bypass the drip tray and splatter
onto the interior walls and run down into the bottom of the unit.
• Press the PAUSE button and carefully remove the cooking stand and
food. Always use oven mitts or pads. Empty the Drip Tray halfway
through cooking cycle if it is full or if the food being cooked has a high
percentage of fat content.
Steam and/or smoke is present during operation:
• It is normal to have some smoke coming from the unit during rst use.
(Please refer to the Before First Use section on page 7.)
• Food residue or splatters on the interior surface may cause minimal
smoke. Make sure to wipe out the interior of the roaster after every use.
• Always ensure that the food is not touching the outer heating elements.
Tuck or tie the turkey wings in with food safe string so they won’t touch
the outer heating elements.
Page 18

NOTES
English
16
English
Page 19

WARRANTY
Your product warranty is good for one year from date of purchase against all
defects in material and workmanship. Should your product prove defective
within one year from date of purchase or receipt, return the unit, freight
prepaid, along with an explanation of the claim. Please package your product
carefully in its original box and packing material to avoid damage in transit. We
are not responsible for any damage caused to the product in return shipment.
Under this warranty, we undertake to repair or replace any parts found to be
defective.
This warranty is only valid if the product is used solely for household purposes
in accordance with the instructions. This warranty is invalid if the unit is
connected to an unsuitable electrical supply, or dismantled or interfered with
in any way or damaged through misuse.
We ask that you kindly ll in the details on your warranty card and return it
with a copy of your receipt within one week from date of purchase. Send
warranty card to:
NESCO
®
Upright Turkey Roaster / ITR-01
C/O MW
PO Box 237
Two Rivers, WI 54241-0237
17
English
Page 20

Part No. 300-01000 ©2017 e Metal Ware Corporation
All Rights reserved, including the right of reproduction in whole or part.
1 - 800 - 288 - 4545
English
Page 21

Mode d’emploi
Rôtissoire verticale pour dinde (Modèle : ITR-01)
Français
Page 22

TABLE DES MATIÈRES
Importantes mesures de sécurité ...........................................................1-2
Intro & Vue d’ensemble ...........................................................................3
Liste des composants ...............................................................................4
Fonctions Panneau de commande ............................................................5
Pièces Assemblage ................................................................................6-7
Avant la première utilisation ....................................................................7
Préparation Instructions ...........................................................................8
Mode d’emploi ...................................................................................9-10
Réglages de cuisson estimés ..................................................................11
Nettoyage et entretien ............................................................................12
Importantes mesures de sécurité ............................................................13
Dépannage ........................................................................................14-15
Garantie limitée d’un an ........................................................................17
« NESCO® » est une marque déposée de e Metal Ware Corporation.
e Metal Ware Corporation
1700 Monroe St., P.O. Box 237
Two Rivers, WI 54241-0237
Phone: 1-(800) 288-4545
Veuillez visiter : NESCO Rôtissoire verticale pour dinde
Français
Pour accewssoiress.anndeadsdictioonal.pcrodoucmts, allez à
www.nesco.com
Page 23

Français
IMPORTANTES MESURES
LIRE TOUTES LES INSTRUCTIONS
Lors de l’utilisation d’appareils électriques, des consignes de sécurité de base
devraient toujours être suivies, incluant ce qui suit:
1. Ne pas toucher aux surfaces chaudes. Utilisez les poignées ou les boutons.
2. Pour se protéger contre les chocs électriques, ne pas immerger le cordon, la fiche, ou
l’appareil dans l’eauou autre liquide.
3. Cet appareil n’est pas un jouet. Une supervision étroite est nécessaire lorsque tout appareil est utilisé par ou près des enfants. Ranger cet appareil dans un endroit sécuritaire,
hors de la portée des enfants.
4. Débrancher de la prise lorsque non utilisé et avant de nettoyer. Laisser refroidir avant
de mettre ou d’enlever des pièces.
5. Ne pas faire fonctionner aucun appareil avec un cordon ou une fiche endommagée ou
après un mauvais fonctionnement ou si l’appareil a été endommagé ou semble être endommagé de quelque façon que ce soit. Retourner l’appareil à NESCO® Factory Service
Department pour examen, réparation ou ajustement.
6. Ne pas tenter de réparer l’appareil.
7. Ne pas utiliser des accessoires non recommandés par le fabricant de l’appareil puis-
qu’ils peuvent causer des blessures et annuler la garantie.
8. Toujours placer l’appareil sur une surface ferme et stable. S’assurer que la surface est
propre et sèche.
9. Ne pas utiliser cet appareil sur des surfaces chaudes ou humides ou près de toutes
sources de chaleur.
10. Ne pas placer l’appareil sur ou près d’un brûleur à gaz ou électrique chaud, ou un
four chaud.
11. Ne pas utiliser à l’extérieur.
12. Pour débrancher l’appareil tourner toute commande à « OFF », puis enlever la fiche
de la prise murale.
13. Ne pas utiliser l’appareil pour un usage autre que celui prévu.
1
• Ce mode d’emploi contient des informations importantes et nécessaires pour
une utilisation appropriée de cet appareil.
• Lire et suivre tous les avertissements et instructions avant d’assembler et
d’utiliser cet appareil.
• Cet appareil est conçu pour un usage ménager seulement.
Les éléments chauffants internes deviennent TRÈS CHAUDS durant l’utilisation.
NE JAMAIS toucher aux éléments chauffants internes tandis que l’appareil
est en utilisation.
TOUJOURS laisser l’appareil refroidir complètement avant de nettoyer.
Page 24

Français
14. Ne pas utiliser sans surveillance.
15. Ne pas nettoyer avec des tampons à récurer métalliques. Des morceaux peuvent
s’échapper du tampon et toucher les pièces électriques, créant un risque de choc électrique.
16. Les aliments trop gros, les emballages en aluminium ou les ustensiles ne doivent
pas être insérés dans la rôtissoire puisqu’ils peuvent causer un risque d’incendie ou de
choc électrique.
17. Cet appareil n’est pas prévu pour être utilisé par des personnes (incluant les enfants) avec des capacité physiques, sensorielles ou mentales réduites, ou un manque
d’expérience et de connaissances, à moins qu’elles aient eu une supervision ou des
instructions concernant l’utilisation de cet appareil par une personne responsable pour
leur sécurité.
18. Ne pas laisser le cordon pendre par-dessus la table ou le comptoir, toucher des
surfaces chaudes et ne jamais tirer sur le cordon.
19. Avant de brancher l’appareil ou de faire fonctionner, s’assurer que vos mains sont
propres et sèches pour ce faire. Ne pas faire fonctionner l’appareil si le cordon ou la
fiche est humide.
20. Un incendie peut se produire si la rotissoire est recouverte ou touche des matières
inflammables incluant les rideaux, les draperies, les murs, et similaires, lorsqu’en
fonctionnement.
21. Pour débrancher, pour éviter toutes blessures, débrancher en saisissant la fiche, et
non le cordon.
22. Une prudence extrême doit être exercée lors du déplacement d’un appareil contenant de l’huile chaude ou ou autres liquides chauds.
23. Fiche polarisée : Cet appareil a une fiche polarisée (une lame est
plus large que l’autre). Pour réduire le risque de choc électrique, la fiche est prévue
pour entrer la prise polarisée seulement d’une façon. Si la fiche n’entre pas complètement dans la prise, inverser la fiche. Si elle n’entre toujours pas, contacter un électricien qualifié. Ne pas tenter de modifier la fiche d’aucune façon.
24. Cordon court Instructions : Un cordon d’alimentation court est fourni pour réduire
le risque causé par un cordon qui devient entremêlé ou de trébucher sur un cordon plus
long. Des rallonges peuvent être utilisées avec une attention particulière lors de leur
usage. Si une rallonge est utilisée, les caractéristiques électriques indiquées pour le
cordon devraient être au moins aussi grandes que les caractéristiques électriques de
l’appareil. Le cordon plus long devrait être positionné de sorte qu’il ne drapera pas sur
le dessus de la table où il peut être tiré par des enfants ou faire trébucher involontairement.
2
IMPORTANTES MESURES
Suivre tous les avertissements et toutes les instructions.
Conserver ce manuel d’utilisation pour consultation ultérieure.
Page 25

Français
INTRO & VUE
3
Merci d’avoir choisi la Rôtissoire verticale pour dinde de NESCO®.
Bienvenue dans le monde excitant de la rôtisserie verticale pratique et sans
huile. La rôtissoire verticale pour dinde NESCO® est l’appareil idéal pour
sauver du temps dans la cuisine et elle offre à l’utilisateur un « second » four
permettant des options de cuisson supplémentaires. La rôtissoire verticale est
parfaite durant les fêtes ou en tout temps de l’année puisqu’elle peut cuire plus
que seulement une dinde.
La technologie novatrice Roast-Ryte™ Technology utilise des éléments
de chauffage verticaux pour cuire une dinde à l’intérieur et à l’extérieur, maintenant l’humidité à l’intérieur tout en grillant la peau à l’extérieur. Les éléments
chauffants extérieurs fait pivoter la chaleur autour de la dinde, tandis que l’élément chauffant du centre cuit de l’intérieur vers l’extérieur. Ces caractéristiques
spéciales offrent une cuisson parfaite et uniforme tout en permettant à la volaille
d’être cuite plus rapidement que dans un four conventionnel.
Avec sufsamment d’espace pour les besoins de cuisson, cette rôtissoire sans huile et facile à utiliser peut cuire une volaille jusqu’à 18-lb. en deux
heures. Le panneau de commande facile à lire a une minuterie numérique ajustable de même qu’un programme automatique intégré pour dinde de 120 minutes.
La fonction de sélection de chaleur
élevée/basse préréglée empêche de spéculer au sujet de la température de cuisson optimale. Des voyants lumineux indiquent lorsque les éléments chauffants
sont actifs ainsi que leurs cycles.
Le ramasse-gouttes du support de cuisson qui est amovible et qui va au
lave-vaisselle collecte tous les jus de cuisson non désirés de la dinde et la surface intérieure est anti-adhérente rendant le nettoyage rapide et minimal. Cette
rôtissoire verticale est légère, inclut des poignées latérales pour une manipulation sécuritaire et a un couvercle en verre pour un regard pratique durant l’utili-
sation. La couleur et le ni en acier inoxydable sont une combinaison classique
qui accentuera votre comptoir de cuisine parfaitement et le design compact offre
l’espace requis pour préparer de délicieux repas.
À la seule touche d’un bouton, la Rôtissoire verticale pour dinde NESCO® offre la façon la plus pratique et sans dégât de cuire de la volaille et des
viandes, vous permettant de cuisiner confortablement et de proter de plus de
temps avec votre famille en dehors de la cuisine.
Ce manuel d’instruction aidera à assurer une performance et une durée de
vie maximales tandis que vous protez ce votre nouvelle rôtissoire verticale.
Veuillez lire le manuel au complet avant d’utiliser votre produit pour la première
fois. Conserver ce manuel comme référence pour utilisation ultérieure.
Page 26

Français
LISTE DES
4
POUR LES PIÈCES MANQUANTES OU DE REMPLACEMENT, VEUILLEZ
APPELER AU 1-800-288-4545. NE PAS RETOURNER AU MAGASIN.
1. Poignée du couvercle
2. Couvercle de regard en
verre
3. Poignées latérales
4. Partie principale
5. Base
6. Panneau de commande
7. Grille supérieure
8. Ramasse- gouttes
9. Couvercle d’élément chauffant
10. Grille inférieure
11. Enlève- grille
1
2
3
4
5
6
8
11
9
10
7
Page 27

Français
FONCTIONS PANNEAU DE
5
12. Indicateur de cycle des éléments chauffants - Indique quels éléments sont en fonction.
13. Afchage numérique (HR:MIN) - Afche le temps de cuisson restant en heures et en
minutes.
14. Ajustement de l’heure - Plage de la minuterie : 0 à 4:00 heures Max.
15. Bouton de sélection de l’élément chauffant du centre - Active et désactive l’élément du
centre.
16. Bouton de sélection de chaleur - Chaleur basse par défaut :300 °F / Chaleur élevée par
défaut :500 °F
17. Bouton de départ/pause du cycle de cuisson - Démarre et arrête le cycle de cuisson.
18. Bouton d’alimentation - Met en marche et arrête l’appareil.
12
13
14
15
16
17
18
Caractéristiques de la rôtissoire :
Page 28

Français
6
Caractéristiques de la rôtissoire : (Suite)
• Programme de cuisson de dinde par défaut de 120 minutes pour une volaille de
16-18 lb.
- Réglages par défaut : Chaleur élevée, élément du centre ON, Durée: 2 heures
- La température de décongélation des aliments peut faire varier les durées de
cycle de cuisson.
• Lorsque le cycle de cuisson par défaut expire, l’afchage numérique émettra
deux bips, reviendra à la durée du cycle de cuisson par défaut et afchera
« 02:00 ». Les éléments chauffants s’arrêteront automatiquement. L’alimentation
restera en marche.
• Le temps de cuisson maximal est de 04:00 heures.
• Le temps sur l’afchage numérique augmentera et diminuera par incréments
d’une minute.
• Les pièces amovibles sont sécuritaires dans le lave-vaisselle (excepté la partie
principale).
PIÈCES ASSEMBLAGE
Assemblage des pièces
Grille supérieure
Grille inférieure
Couvre-élément chauffant
Page 29

Français
PIÈCES ASSEMBLAGE (SUITE)
AVANT LA PREMIÈRE UTILISATION
1. Déballer l’appareil et enlever tout l’emballage et accessoires, incluant le couvercle en verre. Laver et essuyer les
accessoires et mettre de côté.
2. Il est normal que de la fumée et une odeur émanent de l’appareil lors de sa première utilisation.
Ceci n’est pas nocif. Nous recommandons de laisser
sortir la fumée de l’appareil pendant 15 minutes,
en utilisant le réglage par défaut (HIGH) dans un
endroit bien ventilé. (garage, abri pour voiture, etc.)
Garder le couvercle en verre et les accessoires hors
de l’unité lors de la sortie de fumée.
3. Lorsque la rôtissoire est préparée pour une utilisation
intérieure, essuyer l’intérieur et l’extérieur avec une éponge
ou un chiffon humide et sécher à fond.
• NE JAMAIS IMMERGER L’APPAREIL DANS L’EAU.
• Conserver l’emballage pour le transport ou le rangement
de l’appareil lorsque non utilisé.
Assemblage des pièces pour viandes
Grille inférieure
Couvre-élément chauffant
7
Page 30

Français
PRÉPARATION INSTRUCTIONS
8
Préparer la volaille :
A. Décongeler complètement la volaille avant la cuisson.
B. Enlever les abats de la volaille. Rincer et tapoter pour assécher la
volaille. Assaisonner tel que désiré.
C. Vaporiser les surfaces de l’ensemble du support de cuisson avec de
l’huile de cuisson à vaporiser.
D. Ouvrez la volaille et positionnez-la sur la Grille supérieure. S’assurer
que les pilons pendent vers le bas sur le côté de la Grille supérieure.
E. L’extrémité du Couvre-élément chauffant devrait passer à travers le
cou autant que possible.
F. À l’aide de l’enlève-grille, insérer le crochet dans le trou à l’extrémité
du Couvre-élément chauffant pour soulever les aliments.
Préparer les viandes :
A. Décongeler complètement la viande avant la cuisson.
B. Placer la viande (rôti) sur une planche à découper ou une surface pour
la viande. À l’aide d’un couteau, couper une incision en forme de X à
travers le centre du rôti, en s’assurant que l’ouverture est assez grande
pour que le couvre-élément chauffant passe à travers. Assaisonner tel que
désiré.
C. Vaporiser les surfaces de l’ensemble du support de cuisson avec de
l’huile de cuisson à vaporiser.
D. Positionner la viande sur le couvre-élément chauffant. Si la longueur
du rôti n’est pas la même longueur que le couvre-élément chauffant,
veuillez la viande près du haut et non près de l’extrémité du bas de l’élément chauffant du centre.
ÉTAPE F
Page 31

Français
9
MODE D’EMPLOI
PRUDENCE!
NE JAMAIS FAIRE FONCTIONNER CET APPAREIL SANS SURVEILLANCE!
1. Placer l’appareil sur une surface plate et résistante à la chaleur.
2. Enlever le couvercle en verre et positionner le ramasse-gouttes sur
l’élément chauffant et l’abaisser en position à l’intérieur de la partie principale jusqu’à ce qu’il repose sur la surface du bas. (FIG. 1)
3. À l’aide de l’enlève-grille, insérer le crochet dans le trou à l’extrémité
du Couvre-élément chauffant. Soulever et placer la volaille ou la viande
préparée par-dessus la poignée du ramasse-gouttes et de l’élément chauffant du centre et abaisser en place. Toujours décrocher l’enlève-grille
avant la cuisson. (FIG.2)
4. Placer le couvercle en verre en position sur la partie principale.
FIG. 1
FIG. 2
AVERTISSEMENT!
LE COUVERCLE EN VERRE EST CHAUD DURANT L’UTILISA-
TION; TOUJOURS UTILISER LA POIGNÉE ET SOULEVER AVEC
SOIN.
Page 32

Français
10
MODE D’EMPLOI
5. Brancher le cordon d’alimentation dans une prise électrique polar-
isée de 120 Volt CA. Si la che n’entre pas complètement dans la prise,
inverser la che. Si elle n’entre toujours pas, contacter un électricien
qualié.
6. Appuyer le bouton « POWER ». Le panneau de commande s’al-
lumera et afchera les réglages par défaut. (Réglages par défaut : Chaleur élevée, élément du centre ON,Durée2:00 heures).
7. Appuyer la touche « » ou « » pour augmenter ou diminuer le
temps de cuisson en incréments d’une minute. Le temps de cuisson
maximal est de 04:00 heures.
8. Appuyez le bouton « HEAT » pour sélectionner les réglages de chaleur « HIGH » ou « LOW ». Au réglage HIGH deux des éléments chauffants extérieurs sont active en tout temps. Au réglage LOW seulement
un élément chauffant est actif en tout temps.
9. Appuyez le bouton « START/PAUSE » pour commencer la cuisson.
L’afchage numérique commencera le compte à rebours et afchera le
temps restant. Le « Circle of Heat » afchera quels éléments chauffants
sont actifs et tourneront autour des aliments.
10. Lorsque le cycle de cuisson est terminé, la rôtissoire émettra deux
bips et l’afchage numérique afchera « 02:00 » et les éléments chauffants s’éteindront automatiquement.
PRUDENCE: Le couvercle en verre deviendra très chaud durant l’utilisation. Toujours manipuler avec soin et utiliser des mitaines de four.
Le processus de cuisson crée de la vapeur qui peut causer des brûlures.
11. Utiliser des mitaines de four pour soulever soigneusement le couvercle en verre et le mettre de côté sur une surface résistante à la chal-
eur. Incliner le couvercle de verre lors de l’ouverture an que la vapeur
soit dirigée loin du visage et des mains.
• Pour s’assurer que les aliments sont cuits correctement, vérier périodiquement la température interne des aliments avec un thermomètre
pour aliments.
12. À l’aide de l’enlève-grille, insérer le crochet dans le trou à l’extrémité du Couvre-élément chauffant pour soulever les aliments de la
partie principale.
Page 33

Français
11
RÉGLAGES DE CUISSON ESTIMÉS
Type
de
viande
Réglage
de chaleur
suggéré
Température
interne
recommandée
Temps de
cuisson estimé
Dinde complète
10 à 14 lb
ÉLEVÉ 165 °F 6 min/lb
Dinde complète
14 à 18 lb
ÉLEVÉ 165 °F 6 min/lb
Poulet complet
4-6 lb.
ÉLEVÉ 165 °F 8 min/lb
Rôti de boeuf 2
à 3 lb
ÉLEVÉ 145 °F 15 min/lb
Rôti de boeuf 4
à 6 lb
ÉLEVÉ 145°F
Laisser reposer pour
au moins 3 minutes.
10 min/lb
Rôti de longe de
porc désossé
ÉLEVÉ 145°F
Laisser reposer pour
au moins 3 minutes.
8 min/lb
Veuillez trouver les réglages estimés et les temps de cuisson ci-dessous:
• Les temps de cuisson estimés seront utilisés comme point de référence. Ajuster
les temps de cuisson estimés selon les résultats désirés.
• Les temps de cuisson selon légèrement plus longs lorsque le réglage de chaleur
LOW est utilisé.
• Les temps de cuisson pour le boeuf varieront selon la cuisson désirée de la vi
ande. Ne pas utiliser l’élément de chauffage du centre si vous voulez une cuisson
saignante.
• Vérier périodiquement la température interne des aliments avec un ther
-
momètre pour aliments.
• Toujours consulter les températures internes recommandées des aliments à la n
du cycle de cuisson, selon les directives du USDFA Food Safety and Inspection.
• Pour de meilleurs résultats, laisser les aliments reposer pendant 10 à 15 minutes
avant de servir.
• Un peu d’essais et erreurs peuvent se produire lorsque vous perfectionnez votre
technique de cuisson et expérimentez avec différentes grosseurs et différents types
d’aliments.
• Une section REMARQUES a été ajoutée à ce manuel pour documenter les con
-
seils, les recettes et autres remarques importantes de cuisson.
Page 34

Français
12
NETTOYAGE ET ENTRETIEN
• Fermer la rôtissoire en appuyant « POWER » sur le panneau de commande. Enlever la
che de la prise murale et laisser l’appareil refroidir complètement.
• Toutes les pièces amovibles vont au lave-vaisselle ou peuvent être lavées à la main dans
de l’eau chaude savonneuse. Rincer et sécher complètement après avoir lavé.
• Enlever soigneusement le ramasse-gouttes e la partie principale et verser les jus de
cuisson dans un contenant approprié. Toujours nettoyer le ramasse-gouttes après chaque
utilisation.
• Le couvercle en verre peut être nettoyé avec un tampon à récurer et un nettoyant non
abrasif pour enlever les résidus de cuisson. Sécher à fond.
• Après quelques utilisations le couvre-élément chauffant se décolorera - ceci est normal.
• Nettoyer l’intérieur de la partie principale et les éléments chauffants avec un chiffon
ou une éponge humide pour enlever tous résidus. Sécher avec un papier essuie-tout ou
un chiffon doux. Ne pas utiliser des nettoyants abrasifs sur l’intérieur ou l’extérieur des
surfaces.
• Lors du nettoyage des résidus de cuisson situés sur les surfaces intérieures ou le couvercle en verre, utiliser une brosse, un tampon non abrasif avec un détergent de vaisselle et
de l’eau. NE JAMAIS vaporiser de l’eau ou des nettoyants sur la surface intérieure de la
partie principale.
• Nettoyer la surface extérieure de la partie principale avec un chiffon humide après chaque utilisation. Séchez à fond avec un chiffon doux.
NE PAS VAPORISER OU IMMERGER LA PARTIE PRINCIPALE
DE L’APPAREIL DANS L’EAU OU TOUT AUTRE LIQUIDE.
STOCKAGE ET ÉLIMINATION
STOCKAGE :
• NE JAMAIS stocker l’appareil sur le côté. Stocker l’appareil sur une surface
plate, froide, et sèche hors de la portée des enfants et des animaux.
• Toujours s’assurer que l’appareil est débranché et qu’il a eu le temps de re
-
froidir complètement avant de le ranger ou de le nettoyer.
• Nettoyer avec un chiffon humide et un détergent doux et sécher à fond avant
d’ent repose r.
• Conserver l’emballage pourtransporterou ranger l’appareil lorsque nonutilisé
pour des périodesprolongées de temps.
ÉLIMINATION :
•Cet appareil ne doit pasêtre éliminé de la même façon que les ordures
ménagères ordinaires. Les déchets électriques et électroniques doivent être
éliminés correctement.
•Contactez vos autoritésmunicipales locales pour plus d’information sur
l’élimination des produits.
POUR LES PIÈCES MANQUANTES OU DE REMPLACEMENT, VEUILLEZ
APPELER AU 1-800-288-4545. NE PAS RETOURNER AU MAGASIN.
Page 35

Français
13
IMPORTANTES MESURES
• Décongeler complètement la viande et la volaille avant la cuisson.
• Les cycles de cuisson varieront selon l’épaisseur, la forme et la consistance de l’aliment. Pour éviter une sur cuisson, il est recommandé
de vérier les aliments après le temps de cuisson minimal indiqué
dans les réglages de cuisson estimés à la page 11.
• Sélectionnez des rôtis qui ont une forme uniforme puisqu’ils cuiront
de façon plus uniforme.
• La grosseur maximale recommandée pour une volaille est de 18 lb.
• La marinade, les assaisonnements et les épices devraient être appliqués aux aliments avant de mettre dans la rôtissoire.
• Les températures internes recommandées pour le boeuf sont : Saignant 140 °F; Médium saignant 145 °F; Médium 160 °F; Bien cuit
170 °F.
• Pour des résultats de cuisson uniforme, centrer le couvre-élément
chauffant autant que possible à l’intérieur du rôti. La plus grosse extrémité du rôti devrait être en haut et non en bas.
• Si la longueur du rôti n’est pas la même longueur que le couvre-élément chauffant, veuillez laisser la viande près du haut et non près de
l’extrémité du bas de l’élément chauffant du centre.
PRUDENCE: Toujours s’assurer que la volaille ou la viande est complètement cuite. Les jus de cuisson de la volaille devraient être clairs
lorsque le cycle de cuisson est complété.
• Nous recommandons d’utiliser un thermomètre à viande pour s’assurer que la viande est complètement cuite.
• Avant de servir, laisser reposer pendant 10 minutes après avoir
enlevé de la rôtissoire. Pour une volaille ou un rôti plus juteux, ne pas
servir immédiatement après la n du cycle de cuisson.
• Pour un nettoyage plus facile, vaporiser le ramasse-gouttes, la
grillesupérieure, la grille inférieure et le couvre-élément chauffant
avec de l’huile de cuisson avant la cuisson. NE JAMAIS vaporiser
ces pièces tandis que la rôtissoire est en marche.
Page 36

Français
DÉPANNAGE
14
La dinde n’entre pas dans la rôtissoire:
• Essayer de centrer la dinde autant que possible lors du positionnement
sur la grille supérieure.
• Si nécessaire, rentrer les bouts des ailes derrière le cou garder les ailes
de la dinde en place en utilisant de la celle pour aliments.
• Les grosses volailles peuvent tout simplement ne pas entrer. Nous ne
recommandons pas d’utiliser cette rôtissoire pour des volailles de plus de
18 lb.
Le compte à rebours ne change pas sur l’afchage:
• La touche peut ne pas avoir été appuyée assez longtemps ou avec assez
de force.
•Pour avancer le temps plus rapidement sur l’afchage numérique, pousser et tenir enfoncé le bouton de temps « ».
La rôtissoire ne se met pas en marche ou ne chauffe pas:
• Le bouton POWER doit être appuyé avant de pousser le bouton START/
PAUSE .
• S’assurer que la rôtissoire est bien branchée.
Les rôtis et les volailles ne sont pas complètement cuits:
• Les cycles de cuisson estimés seront utilisés comme point de référence.
S’assurer que la minuterie est réglée correctement.
• Les cycles de cuisson dans ce manuel sont approximatifs. Augmenter les
temps de cuisson selon les résultats désirés.
La viande est bien cuite à l’intérieur mais trop cuite à l’extérieur:
• Fermer l’élément du centre lors de la cuisson ou passer à chaleur basse
au milieu du cycle de cuisson
• Les viandes plus épaisses exigent un temps de cuisson plus long à une
chaleur réduite.
Page 37

Français
DÉPANNAGE
15
La viande colle sur le couvre-élément chauffant:
• Vaporiser l’élément chauffant du centre avec de l’huile de cuisson à
vaporiser avant de mettre le rôti.
• Laisser le rôti reposer pendant environ 10 minutes avant d’essayer de
l’enlever du couvre-élément chauffant.
• Si nécessaire, couper le rôti sur la longueur sur un côté en entier pour
enlever le couvre-élément chauffant.
Du liquide ou des jus de cuisson se ramassent au bas de la partie
principale:
• Si les aliments cuits restent trop longtemps dans la rôtissoire pour
refroidir, la condensation s’accumulera et coulera le long des murs intérieurs dans le bas de l’unité.
• S’assurer que le ramasse-gouttes est en place et correctement positionné.
Nettoyer avant et après chaque utilisation.
• Les jus de cuisson peuvent couler le long du couvre-élément chauffant
et se ramasser dans le fond.
• Durant le fonctionnement, certains jus de cuisson peuvent tomber à côté
du ramasse-gouttes et éclabousser sur les murs intérieurs et couler dans le
bas de l’unité.
• Appuyer le bouton PAUSE et enlever soigneusement le support de
cuisson et les aliments. Toujours utiliser des mitaines de four. Vider le
ramasse-gouttes au milieu du cycle de cuisson s’il est plein ou si les aliments qui cuisent ont un haut pourcentage de teneur en gras.
De la vapeur et/ou de la fumée est présente durant le fonctionnement:
• Il est normal d’avoir de la fumée qui émane de l’unité durant la première
utilisation. (Veuillez consulter la section Avant la première utilisation à la
page 7.)
• Des résidus d’aliments ou des éclaboussures sur la surface intérieure
peuvent causer un peu de fumée. S’assurer d’essuyer l’intérieur de la
rôtissoire après chaque utilisation.
• Toujours s’assurer que les aliments ne touchent pas aux éléments chauf-
fants extérieurs. Rentrer ou celer les ailes de dinde avec de la celle alimentaire an qu’elles ne touchent pas aux éléments chauffants extérieurs.
Page 38

Français
REMA
16
Page 39

Français
GARANTIE
Votre appareil est garanti pour un an à partir de la date d’achat originale
contre tous défauts de matériaux et de main d’oeuvre. Si votre produit
devenait défectueux en dedans d’un an de la date d’achat ou du reçu,
retourner l’unité, fret prépayé, de même qu’une explication pour la
réclamation. Veuillez emballer votre produit soigneusement dans sa boîte
original et son matériel d’emballage pour éviter tout dommage durant le
transport. Nous ne sommes pas responsable de tous dommages causés au
produit lors du transport du retour.
Sous cette garantie, nous nous engageons à réparer ou remplacer toutes les
pièces défectueuses.
Cette garantie est uniquement valide si le produit est utilisé uniquement à
des ns ménagères et selon les instructions. Cette garantie est non valide si
l’unité est branché à une source électrique non appropriée, ou démantelée ou
causant une interférence quelconque ou endommagée suite à une mauvaise
utilisation.
Nous vous demandons de remplir les détails sur votre carte de garantie et de
la retourner avec une copie de votre reçu en dedans d’une semaine de la date
d’achat.. Envoyer la carte de garantie à:
NESCO® Rôtissoire verticale pour dinde / ITR-01 C/O MW
PO Box 237
Two Rivers, WI 54241-0237
17
Page 40

Pièce No. 300-01000 ©2017 e Metal Ware Corporation
Tous droits réservés, incluant le droit de reproduction en tout ou en partie.
1 - 800 - 288 - 4545
 Loading...