

Page 1
25 cup Coffee Urn (Model CU-25)
Care/Use Guide
25 Tasse de Café Urn (Modèle CU-25)
Guide d’entretien et d’utilisation
25 Taza Cafetera
(Modelo CU-25)
Guía del cuidado/del uso
Page 2

Table of Contents
Important Safeguards ............................................................................. 1
Parts ..................................................................................................... 2
Operating Instructions ............................................................................. 3
Care and Cleaning ................................................................................... 3
One Year Limited Warranty ...................................................................... 4
Table des Matières
Mesures de précaution importantes ......................................................... 5
Pièces ................................................................................................... 6
Mode d’emploi ........................................................................................ 7
Consiels Entretien et Nettoyage ................................................................ 7
Garantie Limitée d’un an .......................................................................... 8
Tabla de Contenido
Salvaguardas importantes ........................................................................ 9
Partes ...................................................................................................10
Instrucciones de uso ..............................................................................11
Consejos, Cuidado y Limpieza .................................................................11
Garantía limitada de un año ....................................................................12
Technical Specications
Specication / Caractéristiques / Especicaciones: 950W, 120 VAC, 60Hz
Page 3

1
English
When using electrical appliances, basic safety precautions should always be
followed, including the following:
IMPORTANT SAFEGUARDS
1. READ ALL INSTRUCTIONS.
2. Do not touch hot surfaces. Use handles or knobs.
3. To protect against electrical shock and personal injury, do not immerse this
appliance, including cord and plug, in water or other liquid.
4. This appliance is not intended for use by persons (including children) with
reduced physical, sensory or mental capabilities, or lack of experience and
knowledge, unless they have been given supervision or instruction concerning
use of the appliance by a person responsible for their safety.
5. Close supervision is necessary when any appliance is used by or near
children.
6. Unplug from outlet when not in use and before cleaning. Allow to cool
completely before putting on or taking off parts, and before cleaning.
7. Do not operate any appliance with a damaged cord or plug or after the
appliance malfunctions or has been damaged in any manner. To avoid
hazards, return appliance to NESCO® Factory Service Department for
examination, repair or adjustment.
8. The use of accessory attachments not recommended by the manufacturer
may result in re, electric shock or injury to persons.
9. Do not use outdoors.
10. Do not let cord hang over edge of table or counter, or touch hot surfaces.
11. Do not place on or near a hot gas or electrical burner or in a heated
oven.
12. Do not use appliance for other than its intended use, as described in this
manual
13. Extreme CAUTION must be used when moving an appliance containing hot oil
or other hot liquids.
14. Scalding may occur if the lid is removed during the brewing cycles.
15. Always place appliance on a at and sturdy surface.
16. While in use, keep appliance out of the reach of babies and children.
SAVE THESE INSTRUCTIONS
Polarized Plug: This appliance has a polarized plug (one blade is wider than the
other). To reduce risk of electric shock, plug is intended to t into polarized outlet
only one way. If the plug does not t fully into the outlet, reverse the plug. If it
still does not t, contact a qualied electrician. Do not try to modify the plug in
any way.
Short Cord Instructions: A short power supply cord is provided to reduce the risk
resulting from becoming entangled in or tripping over a longer cord. Extension
cords may be used if care is exercised in their use. If an extension cord is
used, the marked electrical rating of the cord should be at least as great as the
electrical rating of the appliance. The longer cord should be arranged so that it
will not drape over the tabletop where it can be pulled on by children or tripped
over unintentionally.
Page 4
2
English
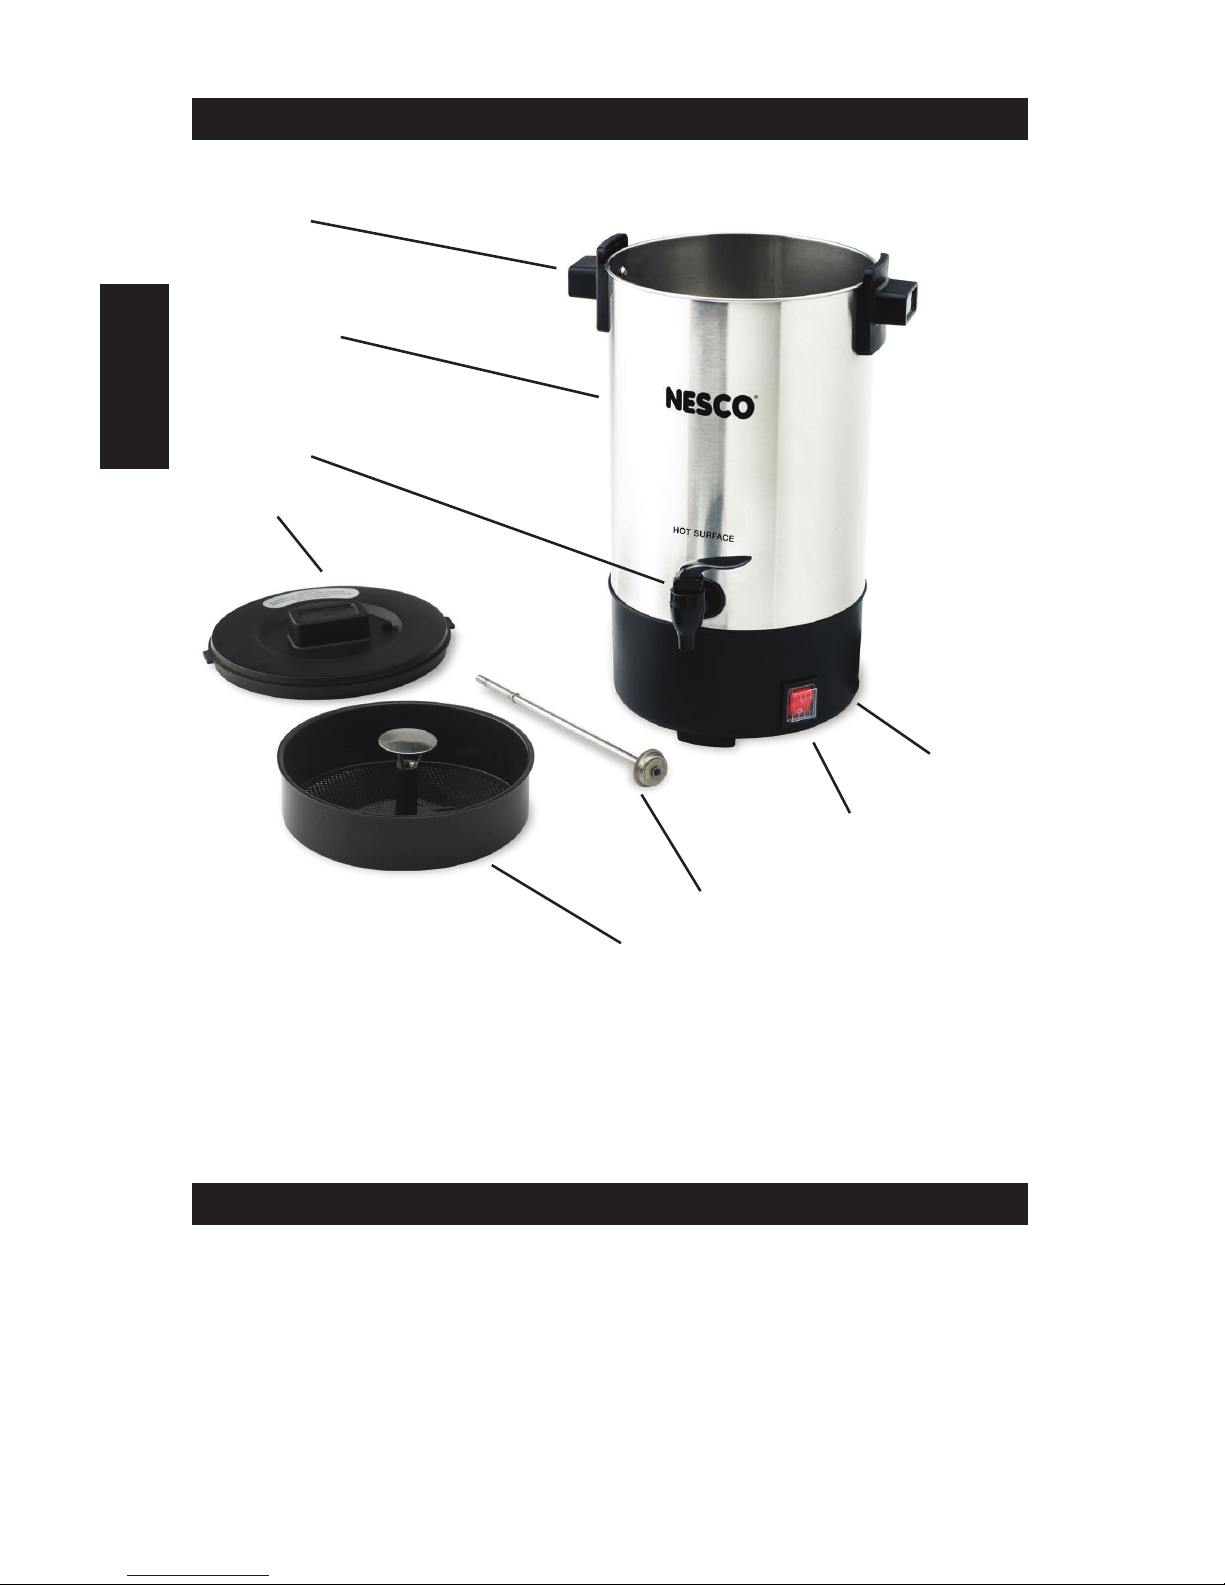
Parts
Before rst time use
1. Read and follow all instructions and save for reference.
2. Remove all packaging and labels.
3. Clean all parts following instructions in the ‘Care and Cleaning ’ section.
4. Fill the urn with water to “MAX” level, boil, discard the water, and then rinse.
Repeat the procedure several times to remove any dust, residues, etc., from
the urn
5. Wipe the Base with a damp cloth.
6. TO REDUCE RISK OF SHOCK HAZARD NEVER IMMERSE THE BASE IN WATER
OR ANY OTHER LIQUID.
Faucet
Lid
Urn body
Handle
Power
Switch
Base
Filter
Basket
Pump Tube
Page 5

3
English
Operation
1. Always use the coffee urn on a at level surface.
2. Remove lid, lter basket and pump tube. Fill with COLD WATER to desired
amount on water gauge. Do not ll more than the MAX mark or operate when
the level is below the MIN mark. Capacity = 3 to 25 cups.
3. Insert pump tube rmly into the heating element at bottom of the urn body
then place lter basket on tube.
4. Add coffee grounds evenly into lter basket. (1 Tbsp = 1 cup or to taste).
NOTE: To heat only water, use basket and tube but do not add coffee grounds.
5. Place lid on urn body and turn clockwise to lock into place.
6. Check power switch is OFF position. Plug cord into grounded 120V. electric
outlet. Press power switch ON, the red HEATING light will turn on to indicate
start of brew cycle.
7. When nished brewing. about 20 to 45 minutes or until you can no longer
hear noise from the pump, remove coffee basket and grounds.
• This also helps maintain coffee avor.
• The urn’s lid can be used as a carrying tray when disposing of wet coffee
grounds.
8. WARNING - NEVER OPERATE WHILE EMPTY. This can damage the heating
element and void warranty.
9. To serve coffee, place cup under faucet then lift or press faucet handle to
serve.
10. When about 3 cups of coffee is remaining in the tank (MIN water mark), turn
the appliance off and unplug it from the electric outlet.
“BOIL DRY” SAFETY FEATURE:
Boil dry is the result of boiling all the water out of the urn. To prevent boil dry
accidents, this appliance is equipped with a thermal protector with an automatic
reset. If the water in the tank is completely boiled away, the appliance will
automatically turn off. Empty and let the urn cool down about half an hour and
then try another brew cycle. Operators are advised to turn the appliance off
when not in use, especially overnight.
Care and Cleaning Instructions
1. Before cleaning, turn off any switches and ensure the power cord is removed
from the electrical outlet and allow appliance to cool.
2. Empty remaining liquid by removing lid, basket and pump tube and slowly
pour liquid into drain.
3. Wipe the outside area with a damp cloth and dry with a lint free cloth.
4. Never place appliance in water or other liquids
5. Never use abrasive cleaners or scouring pads.
6. Allow to dry before storage.
7. Some water has higher mineral content that can discolor the inside of the urn
body. To remove these stains, ll to desired level with COLD WATER and use
several tablespoons of vinegar or cream of tartar powder. Allow to heat for
one BREW cycle, then turn power OFF and remove plug from wall outlet. Drain
solution, rinse and clean as noted above.
Page 6

4
English
ONE YEAR LIMITED WARRANTY
This appliance is warranted for one year from date of original purchase
against defects in material and workmanship. This warranty does not cover
transportation damage, misuse, accident or similar incident. This warranty gives
you specic legal rights and you may have other rights, which vary from state
to state. This product is intended for commercial use.
Your new NESCO® appliance comes equipped with numerous safety features.
Any attempt to interfere with the operation of these safety features makes this
warranty null and void. In the event we receive an appliance for service that
has been tampered with, we reserve the right to restore it to its original state
and charge for the repair.
For service in warranty - Defective products may be returned, postage prepaid,
with a description of the defect to: The Metal Ware Corporation, 1700 Monroe
Street, Two Rivers, Wisconsin 54241, for no-charge repair or replacement at
our option.
Must include proof of purchase or copy of original bill of sale when returning
product for warranty service.
Please call Customer Satisfaction at 1-800-288-4545 to obtain a Return
Authorization before shipping.
• For service in warranty, follow instructions set forth in warranty. When
ordering new parts, make sure that you always mention the model number
of the product.
• Call us on our toll free number, 1-800-288-4545 and tell us about your
problem.
• If we instruct you to send all or part of your appliance to us for repair or
replacement, our Customer Satisfaction representative will provide a Return
Authorization number (this number noties our receiving department
to expedite your repair). Pack your unit carefully in a sturdy carton with
sufcient padding to prevent damage because any damage caused in
shipping is not covered by the warranty.
• Print your name, address and Return Authorization number on the carton.
• Write a letter explaining the problem. Include the following: your name,
address and telephone number and a copy of the original bill of sale.
• Attach the sealed envelope containing the letter inside the carton. Insure the
package for the value of the NESCO® appliance and ship prepaid to:
Attn: Factory Service Dept.
The Metal Ware Corporation
1700 Monroe Street
Two Rivers, WI 54241
Page 7

5
Français
Lorsque vous utilisez des appareils électriques, il est essentiel de toujours
respecter les mesures de sécurité suivantes:
MESURES DE PRÉCAUTION IMPORTANTES
1. LIRE TOUTES LES INSTRUCTIONS.
2. Ne touchez pas les surfaces chaudes. Utilisez la poignée.
3. Pour vous protéger contre les décharges électriques et les blessures, ne pas
immerger cet appareil, le cordon, ou la prise dans l’eau ou dans un autre
liquide.
4. Cet appareil n’a pas destiné à être utilisé par des personnes (y compris les
enfants) ayant un handicap physique réduite, sensorielles ou mentales, ou
le manque d’expérience et de connaissance, sauf si elles ont été encadrées
pour l’utilisation de l’appareil donnée par une personne responsable de leur
sécurité.
5. Ne laissez jamais des enfants utiliser cet appareil sans surveillance.
6. Débranchez l’appareil lorsque vous ne l’utilisez pas et avant de le nettoyer.
Laissez-le refroidir complètement avant d’ajouter ou de retirer des pièces et
avant le nettoyage.
7. N’utilisez jamais un appareil dont le cordon ou la prise de courant sont
endommagés, ou si l’appareil a mal fonctionné ou qu’il a été endommagé
de quelque façon que ce soit. Pour éviter tout danger, retournez l’appareil à
NESCO
®
au département de service d’entretient pour vérication, réparation
ou ajustement.
8. L’utilisation des attachements accessoires non recommandés par le fabricant
peut avoir comme conséquence le feu, la décharge électrique ou les
dommages aux personnes.
9. Ne pas utiliser à l’extérieur.
10. Ne pas laisser le cordon pendre sur le bord d’une table ou d’un comptoir ou
entrer en contact avec des surfaces chaudes.
11. Ne pas placer sur ou près d’une source de gaz chaud, d’un brûleur électrique
ou dans un four chaud.
12. Ne pas utiliser cet appareil pour un autre emploi que celui qui est décrit dans
le présent manuel.
13. Faites preuve de la plus grande PRUDENCE lors de la manipulation d’un
appareil contenant de l’huile chaude ou de tout autre liquide chaud.
14. Pour prévenir les risques de brûlures, n’ôtez pas le couvercle pendant le cycle
d’infusion.
15. Placez toujours l’appareil sur une surface plane et robuste.
16. Pendant l’utilisation, placez l’appareil hors de la portée des bébés et des enfants.
CONSERVER CES DIRECTIVES
Fiche polarisée: Cet appareil possède une che polarisée (une branche est plus large
que l’autre). Pour réduire le risque de choc électrique, la che est conçue pour entrer
dans la prise polarisée d’une seule façon. Si la che n’entre pas correctement dans la
prise, retourner la che. Si elle n’entre toujours pas correctement, communiquer avec un
électricien qualié. Ne pas tenter de modier la che.
Directives relatives au cordon court: Un cordon d’alimentation court est fourni dans le but
de réduire le risque de s’y empêtrer ou de trébucher. Des rallonges peuvent convenir si
elles sont utilisées avec prudence. En cas d’utilisation d’une rallonge, les caractéristiques
électriques indiquées sur le cordon doivent être au moins celles inscrites sur l’appareil. Le
cordon long ne doit pas s’étendre d’un côté à l’autre du dessus de la table où les enfants
pourraient le tirer ou quelqu’un pourrait trébucher involontairement.
Page 8

6
Français
Pièces
Avant la première utilisation
1. Veillez à bien lire et comprendre toutes les instructions et à les conserver
pour vous y reporter ultérieurement.
2. Ôtez tous les emballages et étiquettes.
3. Nettoyez toutes les pièces à l’exception du corps de l’appareil en suivant les
instructions gurant dans la section Instructions de nettoyage.
4. Essuyez le corps de l’appareil à l’aide d’un chiffon humide.
5. AVERTISSEMENT: POUR RÉDUIRE LES RISQUES DE CHOCS ÉLECTRIQUES, NE
PLONGEZ JAMAIS LE CORPS DE L’APPAREIL DANS L’EAU OU TOUT AUTRE LIQUIDE
.
Couvercle
Urne Corps
Poignée
Interrupteur
Base
Panier
Filtre
Tube de la
Pompe
Robinet
Page 9

7
Français
Mode d’emploi
1. Placez l’appareil sur une surface plane et stable.
2. Retirer le couvercle, le panier-ltre et le tube de la pompe. Remplir d’eau
froide à la quantité désirée sur la jauge d’eau. Ne pas remplir plus de la
marque MAX ou de faire fonctionner lorsque le niveau est en dessous du
repère MIN. Capacité = 3 à 25 tasses.
3. Insérer le tube de la pompe fermement dans l’élément de chauffage au fond
du corps de l’urne puis placez le panier-ltre sur le tube.
4. Ajouter marc de café uniformément dans le panier-ltre. (1 cuillère à soupe =
1 tasse ou au goût). NOTE: Pour chauffer uniquement l’eau, l’utilisation et le
tube panier mais ne pas ajouter le marc de café.
5. Placer le couvercle sur le corps urne et tourner dans le sens horaire pour
verrouiller en place.
6. Interrupteur de contrôle est en position OFF. Branchez le cordon dans 120V
à la terre. prise électrique. Appuyez sur le bouton de mise sous tension, le
voyant CHAUFFAGE rouge s’allume pour indiquer le début du cycle d’infusion.
7. Lorsque vous avez terminé le brassage. environ 20 à 45 minutes ou jusqu’à
ce que vous ne pouvez plus entendre le bruit de la pompe, retirez le café
panier et motifs.
• Cela contribue également à maintenir la saveur du café.
• Le couvercle de l’urne peut être utilisé comme un plateau de transport lors
de l’élimination du marc de café humide.
8. AVERTISSEMENT - NE JAMAIS UTILISER TOUT VIDE. Cela peut endommager
l’élément chauffant et annuler la garantie.
9. Pour servir le café, le lieu tasse sous le robinet puis soulevez ou poignée de
presse du robinet pour servir.
10. Quand environ 3 tasses de café restante dans le réservoir (MIN marque
d’eau), éteindre l’appareil et de le débrancher de la prise électrique.
«BOIL DRY» DISPOSITIF DE SÉCURITÉ:
Faire bouillir à sec est le résultat d’ébullition toute l’eau d’une urne. Pour éviter les
accidents bouillir secs, cet appareil est équipé d’une protection thermique avec
réarmement automatique. Si l’eau dans le réservoir est complètement évaporée,
l’appareil se met automatiquement hors tension. Vide et laissez l’urne refroidir
environ une demi-heure, puis essayer un autre cycle d’infusion. Les opérateurs
sont invités à éteindre l’appareil lorsqu’il ne sert pas, en particulier la nuit.
Conseils d’entretien et de Nettoyage
1. Avant de procéder au nettoyage, mettez tous les interrupteurs en position
arrêt, assurez-vous que le cordon d’alimentation est débranché et laissez
l’appareil refroidir.
2. Videz le liquide restant en ôtant le couvercle, le panier et la tige et en versant
le liquide dans l’évier.
3. Essuyez l’extérieur de l’appareil à l’aide d’un chiffon humide et séchez-le à
l’aide d’un chiffon non pelucheux.
4. Ne placez jamais l’appareil dans l’eau ou d’autres liquides.
5. N’utilisez jamais de détergents abrasifs ou de tampons à récurer. NE PAS
utiliser le bicarbonate de soude, car il peut opposer le métal et décolorent.
6. Laissez l’appareil sécher avant de le ranger.
7. Certaines eaux ont un contenu minéral plus élevé que d’autres pouvant
entraîner la décoloration de l’intérieur du corps du percolateur. Pour ôter ces
taches, remplissez le percolateur jusqu’au niveau souhaité à l’aide d’EAU
FROIDE additionnée de plusieurs cuillers de table de vinaigre ou de poudre
de crème de tartre. Faites chauffer le temps d’un cycle d’infusion puis coupez
l’alimentation et débranchez la prise. Videz la solution, rincez et nettoyez en
suivant les indications ci-dessus.
Page 10

8
Français
GARANTIE LIMITÉE D’UN (1) AN
Le présent appareil est garanti pendant un an suivant la date de l’achat initial
contre les défauts de matériau ou de fabrication. La présente garantie ne couvre
pas les dommages causés par le transport, l’usage abusif, les accidents ou
incidents semblables. La présente garantie vous confère des droits juridiques
précis et vous pouvez disposer d’autres droits, qui peuvent varier selon l’État ou
la province. Ce produit est à des ns commerciales.
Votre nouvel appareil NESCO® est équipé de nombreuses caractéristiques de
sécurité. Toute tentative d’entrave au fonctionnement de ces dispositifs de
sécurité rend la présente garantie nulle et sans effet. En cas de réception d’un
appareil aux ns de réparation ayant été traqué, nous nous réservons le droit
de le remettre dans son état d’origine et de facturer la réparation au client.
Pour une réparation en vertu de la garantie - Veuillez retourner les produits
défectueux, par courrier affranchi, avec une description du défaut à l’adresse
suivante : The Metal Ware Corporation, 1700 Monroe Street, Two Rivers,
Wisconsin 54241, pour une réparation ou un remplacement sans frais à notre
choix.
Veuillez inclure une preuve d’achat ou une copie de la facture
originale lors du retour d’un produit aux ns de réparation en vertu de
la garantie.
Appelez le service de satisfaction du client au 1-800-288-4545 pour obtenir une
autorisation de retour avant d’expédier le produit.
• Pour une réparation en vertu de la garantie, suivez les directives indiquées
dans la garantie. Lors de la commande de nouvelles pièces, assurez-vous de
toujours mentionner le numéro de modèle du produit.
• Appelez-nous au numéro sans frais 1-800-288-4545 pour nous faire part du
problème.
• Si nous vous indiquons de nous envoyer votre appareil en tout ou en
partie aux ns de réparation ou de remplacement, notre représentant de la
satisfaction du client vous fournira un numéro d’autorisation de retour (ce
numéro avise notre service de la réception d’accélérer votre réparation).
Emballez votre appareil avec soin dans une boîte robuste avec une quantité
sufsante de rembourrage, étant donné que les dommages causés lors de
l’expédition ne sont pas couverts par la garantie.
• Inscrivez vos nom, adresse et numéro d’autorisation de retour en caractères
d’imprimerie sur la boîte.
• Rédigez une lettre expliquant le problème. Veuillez inclure les éléments
suivants: vos nom, adresse et numéro de téléphone, ainsi qu’une copie de la
facture originale.
• Mettez l’enveloppe scellée à l’intérieur de la boîte. Assurez le colis pour la
valeur de l’appareil NESCO® et envoyez-le port payé à l’adresse suivante:
Attn: Factory Service Dept.
The Metal Ware Corporation
1700 Monroe Street
Two Rivers, WI 54241
Page 11

Español
9
Al usar productos electrodomésticos siempre se deben seguir precauciones de
seguridad básicas como las siguientes:
SALVAGUARDAS IMPORTANTES
1. LEA TODAS LAS INSTRUCCIONES.
2. No toque las supercies calientes. Use las asas o perillas.
3. Para protegerse contra un choque eléctrico y lesiones físicas, no sumerja este
electrodoméstico, incluyendo su cable y enchufe, en agua u otro líquido.
4. Este aparato no está diseñado para ser utilizado por personas (incluidos
niños) con capacidades físicas, sensoriales o mentales, o la falta de
experiencia y conocimiento, a menos que sean supervisados o instruidos
acerca del uso del aparato por una persona responsable de su seguridad.
5. Supervisar de cerca cuando se usa un electrodoméstico en presencia de
niños.
6. Desenchufe del toma-corriente cuando no use el aparato y antes de limpiarlo.
Deje enfriar completamente antes de colocar o sacar piezas y antes de
limpiar.
7. No use los electrodomésticos cuyo cable o enchufe está dañado o si el
aparato funciona mal o si se dañó de alguna manera. Para evitar peligros,
devuelva el electrodoméstico al Departamento de servicio de fábrica de
NESCO® para su revisión, reparación o ajuste.
8. El uso de los accesorios no recomendados por el fabricante puede dar lugar a
fuego, a descarga eléctrica o a lesión a las personas.
9. No usar en el exterior.
10. No permitir que el cable cuelgue de la mesa o encimera, ni que esté en
contacto con supercies calientes.
11. No colocar el aparato sobre o cerca de un quemador caliente, eléctrico o a
gas, o dentro de un horno caliente.
12. No usar el electrodoméstico para un uso que no sea para el cual se lo diseño,
tal como se describe en este manual.
13. Debe tener extremo CUIDADO al mover un electrodoméstico que contenga
aceite u otros líquidos calientes.
14. Se puede escaldar si se quita la tapa mientras se está haciendo el café.
15. Siempre use el aparato en una supercie plana y resistente.
16. Mientras esté en uso, mantenga el aparato lejos del alcance de bebés y niños.
GUARDE ESTAS INSTRUCCIONES
Enchufe polarizado: Este electrodoméstico tiene un enchufe polarizado (una pata
es más ancha que la otra). Para reducir el riesgo de choque eléctrico, el enchufe
está diseñado para encajar en un toma-corriente polarizado solamente de un
lado. Si el enchufe no encaja bien en el toma-corriente, délo vuelta. Si aún no
encaja, contacte a un electricista calicado. No intente modicar el enchufe de
ninguna manera.
Instrucciones para el cable corto: Este aparato tiene un cable de suministro
de energía corto para reducir el riesgo de que se enrosque o de que alguien
se tropiece con él. Se pueden usar cables de extensión en tanto se tomen
precauciones al usarlos. Si usa un cable de extensión, el régimen del cable debe
ser al menos igual al régimen de potencia del aparato. El cable más largo debe
disponerse de manera tal que no caiga por la encimera y evitar así que los niños
tiren de él o que alguien se tropiece.
Page 12

Español
10
Antes de usar por primera vez
1. Lea y siga todas las instrucciones y guárdelas para referencia. Retire todo el
embalaje y etiquetas.
2. Nunca meta el aparato en agua ni otros líquidos.
3. Limpie el exterior del electrodoméstico con un paño húmedo y séquelo con un
paño que no tenga pelusas.
4. Permita que se seque antes de guardarlo.
5. PARA REDUCIR EL RIESGO DE DESCARGAS ELÉCTRICAS NUNCA SUMERJA LA
BASE EN AGUA O CUALQUIER OTRO LÍQUIDO.
Partes
Tapa
Cuerpo Urna
Grifo
Manija
Interruptor de
Alimentación
Base
Canasta
del Filtro
Pump Tuve
Page 13

Español
11
Instrucciones de uso
1. Coloque el aparato en una supercie plana y estable.
2. Retire la tapa, la cesta del ltro y el tubo de la bomba. Rellenar con agua fría
para la cantidad deseada en el medidor de agua. No llene más de la marca
MAX. u operar cuando el nivel está por debajo de la marca MIN. Capacidad =
3 a 25 tazas.
3. Introduzca el tubo de la bomba rmemente en el elemento de calefacción en
la parte inferior del cuerpo urna luego colocar la cesta del ltro en el tubo.
4. Añadir posos de café uniformemente en la canasta del ltro. (1 cucharada =
1 taza o al gusto). NOTA: Para calentar solamente el agua, el uso de la cesta
y el tubo pero no agregue café molido.
5. Coloque la tapa sobre el cuerpo urna y gire hacia la derecha para bloquear en
su lugar.
6. Interruptor de encendido está en OFF Comprobar posición. Enchufe el cable
a tierra de 120 Voltios. toma de corriente eléctrica. Coloque el interruptor
ON, la luz roja CALEFACCIÓN se encenderá para indicar comienzo del ciclo de
preparación.
7. Cuando haya colado. aproximadamente 20 a 45 minutos o hasta que ya no
puede oír el ruido de la bomba, retire la cesta de café y motivos.
• Esto también ayuda a mantener el sabor del café.
• La tapa de la urna se puede utilizar como una bandeja de carga cuando se
deshaga de café molido en húmedo.
8. ADVERTENCIA - Nunca conduzca mientras está vacío. Esto puede dañar el
elemento calefactor y anular la garantía.
9. Para servir el café, coloque el recipiente debajo del grifo y luego levantar o
mango de prensa grifo para servir.
10. Cuando alrededor de 3 tazas de café se queda en la (marca de agua MIN) del
tanque, apague el aparato y desenchúfelo de la toma eléctrica.
“HIERVA EN SECO” MEDIDA DE SEGURIDAD:
Hervir en seco es el resultado de hervir toda el agua de una urna. Para evitar
accidentes secos hervir, este aparato está equipado con un protector térmico
con una restauración automática. Si el agua en el tanque está completamente
evaporado, el aparato se apagará automáticamente. Vaciar y dejar que se
enfríe la urna alrededor de media hora y luego tratar de otro ciclo de colado.
Se aconseja a los operadores para apagar el aparato cuando no esté en uso,
especialmente durante la noche.
Instrucciones de cuidado y limpieza
1. Antes de limpiar, apague todos los interruptores y asegúrese de que el enchufe
esté desconectado del toma-corriente y deje que el electrodoméstico se enfríe.
2. Vacíe el líquido que haya quedado retirando la tapa, el ltro, el.
3. Limpie el exterior del electrodoméstico con un paño húmedo y séquelo con un
paño que no tenga pelusas.
4. Nunca coloque el electrodoméstico en agua ni en otros líquidos.
5. Nunca use limpiadores abrasivos o estropajos. NO use bicarbonato de sodio,
ya que puede enfrentar el metal y decolorar de manera permanente.
6. Guarde el electrodoméstico en un lugar limpio y seco.
7. Ciertas aguas tienen un contenido mineral más alto que puede descololar la
parte interna del cuerpo de la cafetera. Para quitar esas manchas, llene hasta
el nivel deseado con AGUA FRÍA usando varias cucharas de vinagre o polvo
de hidrogenotartrato de potasio. Permita calentar durante un ciclo, luego
APAGUE y quite el enchufe de la pared. Escurra la solución, enjuague y limpie
como se indicó antes
Page 14

Español
12
Garantí Limitada d 1 Ańo
Este electrodoméstico está cubierto por una garantía de un año a partir
de la fecha de compra original contra defectos en los materiales y en la
mano de obra. Esta garantía no cubre los daños por transporte, el uso
inadecuado, accidentes u otros incidentes similares. La garantía le conere
derechos legales especícos y es posible que tenga otros derechos que
varían de estado en estado. Este producto está concebido para usos
comerciales.
Su nuevo electrodoméstico NESCO® está equipado con numerosas
funciones de seguridad. Todo intento de interferir con el funcionamiento
de estas características de seguridad anulará la garantía. En el caso de que
recibamos un electrodoméstico para servicio técnico que haya sido forzado,
nos reservamos el derecho de repararlo a su estado original y cobrar por la
reparación.
Para servicio técnico bajo la garantía – Los productos defectuosos pueden
restituirse, con franqueo postal prepago, con una descripción del defecto
a: The Metal Ware Corporation, 1700 Monroe Street, Two Rivers, Wisconsin
54241, para su reparación o reemplazo libre de cargo, a nuestra discreción.
Se debe incluir el comprobante de compra o una copia del contrato de
compra cuando devuelva el producto para el servicio bajo la garantía.
Llame al servicio de Satisfacción del Cliente al 1-800-288-4545 para obtener
una Autorización de Devolución antes de enviar el producto.
• Para servicio técnico bajo la garantía, siga las instrucciones consignadas en
la garantía. Cuando pida nuevas piezas, asegúrese de mencionar siempre
el número de modelo del producto.
• Llámenos a nuestro número gratuito, 1-800-288-4545 e infórmenos de su
problema.
• Si le indicamos que nos envíe todo su electrodoméstico o parte de él,
nuestro representante de Satisfacción al Cliente la dará un número de
Autorización de Devolución (este número le notica nuestro departamento
receptor que acelere su reparación). Empaque su unidad cuidadosamente
en una caja de cartón fuerte con suciente material de protección para
prevenir daños dado que los daños causados por el envío no están
cubiertos por la garantía.
• Escriba su nombre, dirección y número de Autorización de Devolución en la caja.
• Escriba una carta explicando el problema. Incluya lo siguiente: su nombre,
dirección y teléfono y una copia del contrato de compra original.
• Incluya el sobre cerrado con la carta dentro de la caja. Asegure el paquete
por el valor del electrodoméstico NESCO® y envíelo con franqueo pago a:
Atención: Repare el departamento
The Metal Ware Corporation
1700 Monroe Street
Two Rivers, WI 54241, USA
Page 15

Page 16

Part No. 67834 ©2016 (rev 7/21/16) The Metal Ware Corporation
All Rights reserved, including the right of reproduction in whole or part
1 - 800 - 288 - 4545
 Loading...