

Page 1

12-Qt. Convection
Roaster Oven
USE / CARE AND RECIPE GUIDE
Page 2

Congratulations on the purchase of your new NESCO
N
Convection Oven! Please spend a few minutes reviewing this
booklet. By doing so, you will learn how to get the most
satisfaction out of your NESCO Convection Oven. Enjoy your
cooking with our compliments.
TABLE OF CONTENTS
IMPORTANT SAFEGUARDS . . . . . . . . . . . . . . . . . . . . . . . . . . . . . . . . . . . . . 1
SAVE THESE INSTRUCTIONS . . . . . . . . . . . . . . . . . . . . . . . . . . . . . . . . . . . . 2
INTRODUCTION . . . . . . . . . . . . . . . . . . . . . . . . . . . . . . . . . . . . . . . . . . . . . . . 2
GET TO KNOW YOUR NESCO® ROASTER OVEN . . . . . . . . . . . . . . . . . 3
DIRECTIONS FOR USE . . . . . . . . . . . . . . . . . . . . . . . . . . . . . . . . . . . . . . . . . 4
CLEANING INSTRUCTIONS / OPERATION OF ROASTER . . . . . . . . . . 5
HELPFUL HINTS . . . . . . . . . . . . . . . . . . . . . . . . . . . . . . . . . . . . . . . . . . . . . . . 6
CONVECTION ROASTING & BAKING CHARTS / RECIPES . . . . . . . 7-14
TRADITIONAL ROASTING & BAKING CHARTS / RECIPES . . . . . . 15-25
WARRANTY . . . . . . . . . . . . . . . . . . . . . . . . . . . . . . . . . . . . . . . . . . . . . . . . . . . 26
ESCO→ and Circle Of Heat® are registered trademarks of
The Metal Ware Corporation
1700 Monroe St., P.O. Box 237
Two Rivers, WI 54241-0237
Phone: (800) 288-4545
FAX: (920) 794-3164
Website: www.nesco.com
©The Metal Ware Corporation., 2003
Made in China. Printed in China.
NESCO
®
12-Qt. Convection Oven 1
IMPORTANT
SAFEGUARDS
When using electrical appliances, basic safety precautions should always be
followed, including the following:
1. READ ALL INSTRUCTIONS.
2. Do not touch hot surfaces. Use handles and knobs.
3. Always plug appliance cord into 120-volt wall outlet, and then adjust
temperature control to the desired temperature. To disconnect, turn
control to lowest setting, then remove plug from wall outlet.
4. To protect against electrical shock, do not immerse this appliance,
including cord and plug, in water or other liquid.
5. Close supervision is necessary when any appliance is used by or near
children.
6. Unplug from outlet when not in use and before cleaning. Allow cooling
completely before putting on or taking off parts, and before cleaning.
7. Do not operate any appliance with a damaged cord or plug or after the
appliance malfunctions or has been damaged in any manner. To avoid
hazard, contact NESCO
or repair.
8. The use of accessory attachments not recommended by the manufacturer
may cause injury.
9. Do not use outdoors.
10. Do not let cord hang over edge of table or counter, or touch hot surfaces.
Never pull on the cord.
11. Do not place on or near a hot gas or electrical burner, or in a heated
oven.
12. Extreme caution must be used when moving an appliance containing hot
oil or hot liquids.
13. Do not use appliance for other than its intended use, as described in this
manual.
Do not use metal scouring pads on the exterior surface of the Roaster Oven.
Pieces can break off the pad and touch electrical parts creating a shock
hazard.
®
Factory Service Department for examination
Page 3

SAVE THESE
INTRODUCTION
INSTRUCTIONS
This Appliance Is For Household Use. A short cord is provided to reduce the
hazard resulting from becoming entangled in or tripping over a longer cord. Longer
cords and extension cords are available and may be used if the marked electrical
rating of the longer cord set is at least as great as the electrical rating of the
appliance. Care must be taken to arrange the longer cord so that it will not drape
over the countertop or tabletop where it can be pulled on by children or tripped over
accidentally.
This appliance has a polarized plug (one blade is wider than the other). To
reduce the risk of electrical shock, this plug is intended to fit into a polarized
outlet only one way. If the plug does not fit fully into the outlet, reverse the
plug. If it still does not fit, contact a qualified electrician. Do not attempt to
modify the plug in any way.
Please take a few minutes to read this Guide. You will find out how to better use the
12-Qt. Convection Oven and find a selection of healthful and fun recipes – all
carefully tried and tested for your enjoyment.
®
NESCO
Roaster Ovens have a long tradition in family home cooking, beginning in
the 1930’s. Yet, very few cooking appliances can demonstrate that they are as upto-date and useful today as they were in the past. NESCO
truly kept pace with consumers’ cooking needs.
The NESCO
the Cover to give you greater flexibility than ever before. The distinctive fan design
coupled with the exclusive “Circle of Heat
transfer of heat for evenly browned foods. Convection cooking enhances the flavor
and moistness and reduces cooking time for some foods. You can remove the
Fan/Motor and use the Convection Roaster Oven as a traditional Roaster Oven that
we have used for many years.
We hope you realize many years of cooking enjoyment from your NESCO® 12-Qt.
Convection Roaster Oven. If you have any questions regarding this versatile
appliance, please contact our Customer Satisfaction Department at (800) 288-4545
or visit us at www. NESCO.com
®
12-Qt. Convection Roaster Oven incorporates a new Fan/Motor on
”
®
construction, provides convection
®
Roaster Ovens have
2 NESCO
®
12-Qt. Convection Oven
Page 4
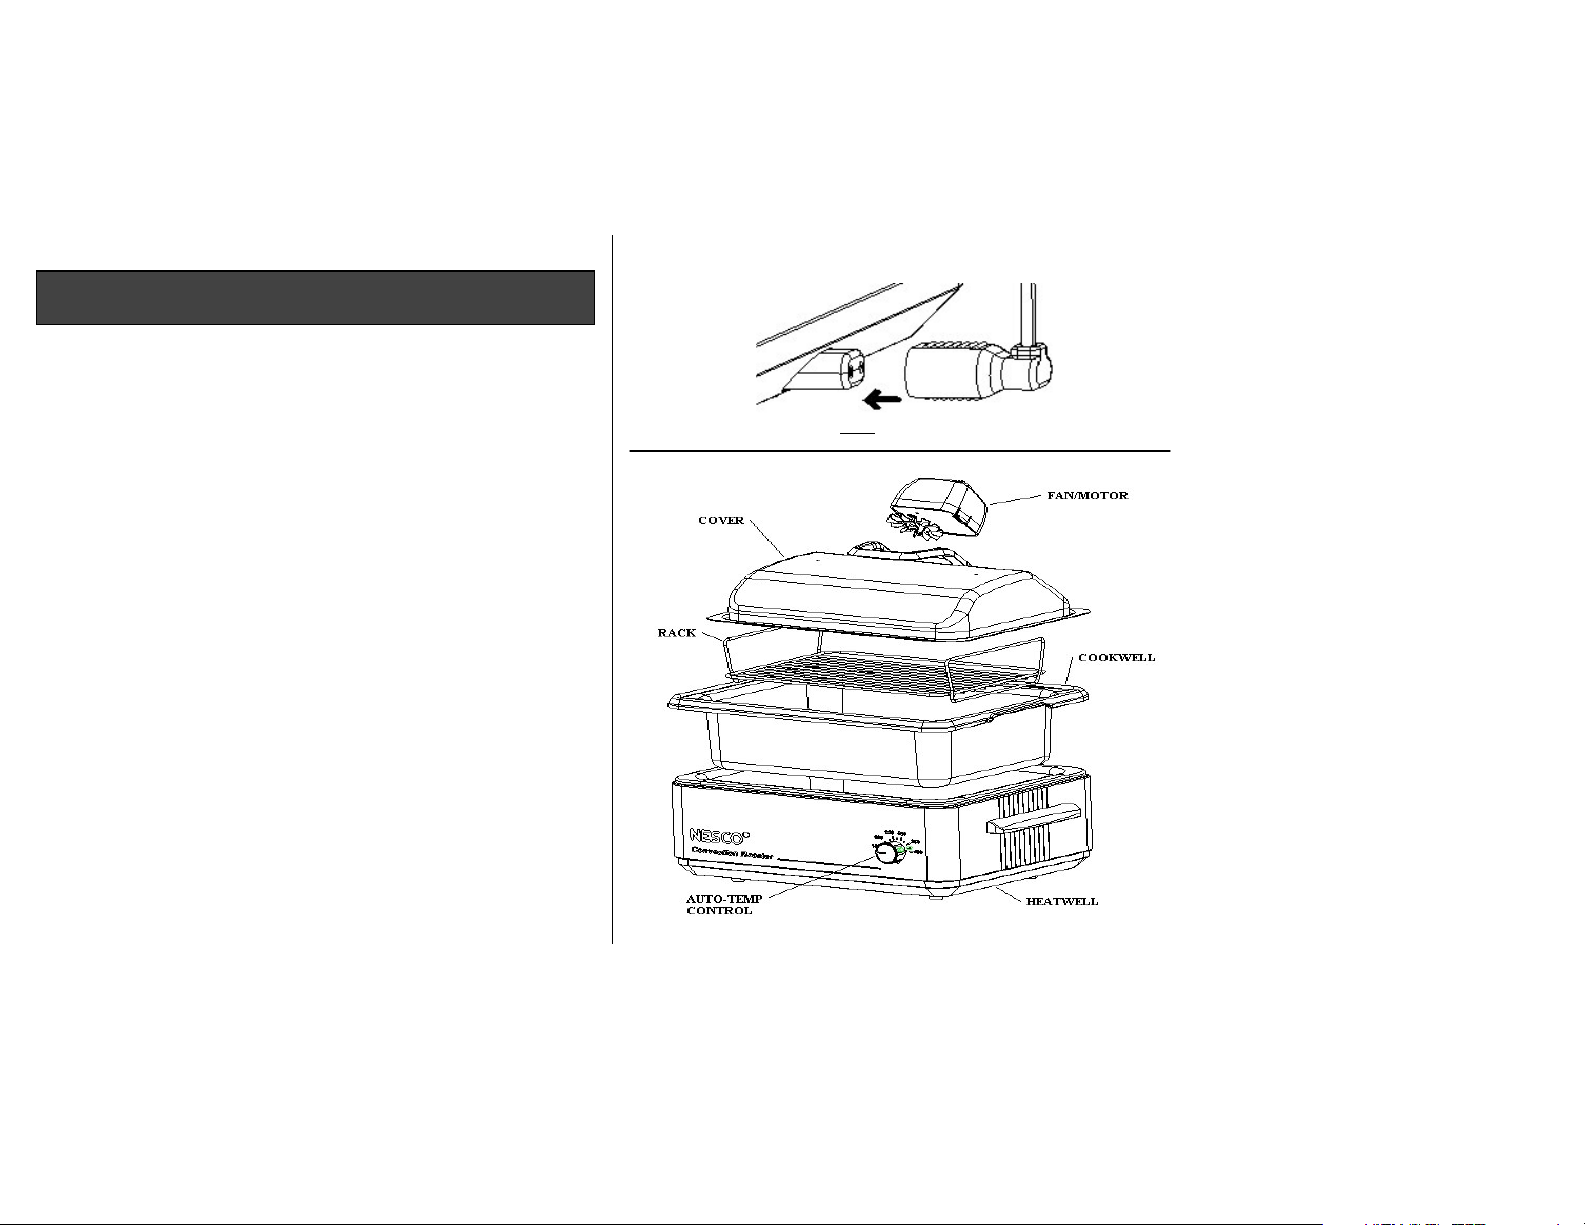
p
F
GET TO KNOW YOUR ROASTER OVEN
FAN/MOTOR.
erformance. To operate the FAN/MOTOR you must plug into the receptacle, located
to the back of the Roaster Oven (See Fig. 1). The fan can be stopped or started at any
time during cooking by turning the motor “I” on or “0” off using switch on top of
housing. Note: The Plug and Receptacle are exclusive to the NESCO 12-
Qt.Convection Oven and will not work in 120 V a.c. wall outlets. No attempts should
be made to use the Receptacle for anything other than the intended use of the
AN/MOTOR assembly.
Attaches easily to cover for exclusive convection cooking
COVER. Heavy gauge aluminum and high profile design, control heat and moisture
efficiently. Vent holes are provided to allow just the right amount of steam to escape
during cooking. During the cooking process, steam will accumulate inside the
Cookwell. Cover is provided with hinge clips that allow a convenient way to store the
Cover while serving or preparing foods. Always stand to the side when removing the
lid. Do not apply extra pressure to the Cover while in hinged position, damage to the
hinge clips may occur.
RACK. Chrome plated steel or Non-stick rack provides cooking flexibility. The rack
allows for easy baking and fat-free roasting.
COOKWELL. The porcelain enamel or Non-stick cookwell has a full 12-Qt.
capacity. It is removable for easy cleanup in dishwasher or sink, or for food storage in
your refrigerator.
HEATWELL/BODY. The sides of the 12-Qt. Convection Oven contain the
exclusive Circle Of Heat® element for even, moist cooking, plus the added advantages
of thick insulation and a full range automatic oven temperature control. NEVER
PLACE FOOD OR WATER DIRECTLY INTO HEATWELL.
AUTOMATIC TEMPERATURE CONTROL. The Control regulates
cooking temperature to maintain the dial setting in the Roaster interior.
Fig 1
Page 5

NESCO
®
12-Qt. C
3
onvection Oven
Page 6
BEFORE USING FOR THE FIRST TIME
1. Unpack your NESCO Roaster Oven completely. Remove the Cookwell, all
packing materials and information labels. Place the Roaster Oven in a
well-ventilated area and on a heat resistant surface. Plug the cord into a
120-volt AC outlet, set the temperature to its maximum setting. Operate the
Roaster Oven empty (without the Cookwell and Cover) for about 60
minutes, or until any odor or smoke disappears. Some odor and smoke is a
normal part of “curing” the heating element, and will not occur while
cooking. When “curing” is completed, turn the temperature control to the
lowest setting, unplug the cord from electrical outlet and allow unit to cool.
2. Wash the Cover, Cookwell and Rack in warm, sudsy water. Rinse and Dry.
See “Care and Cleaning” section for complete instructions.
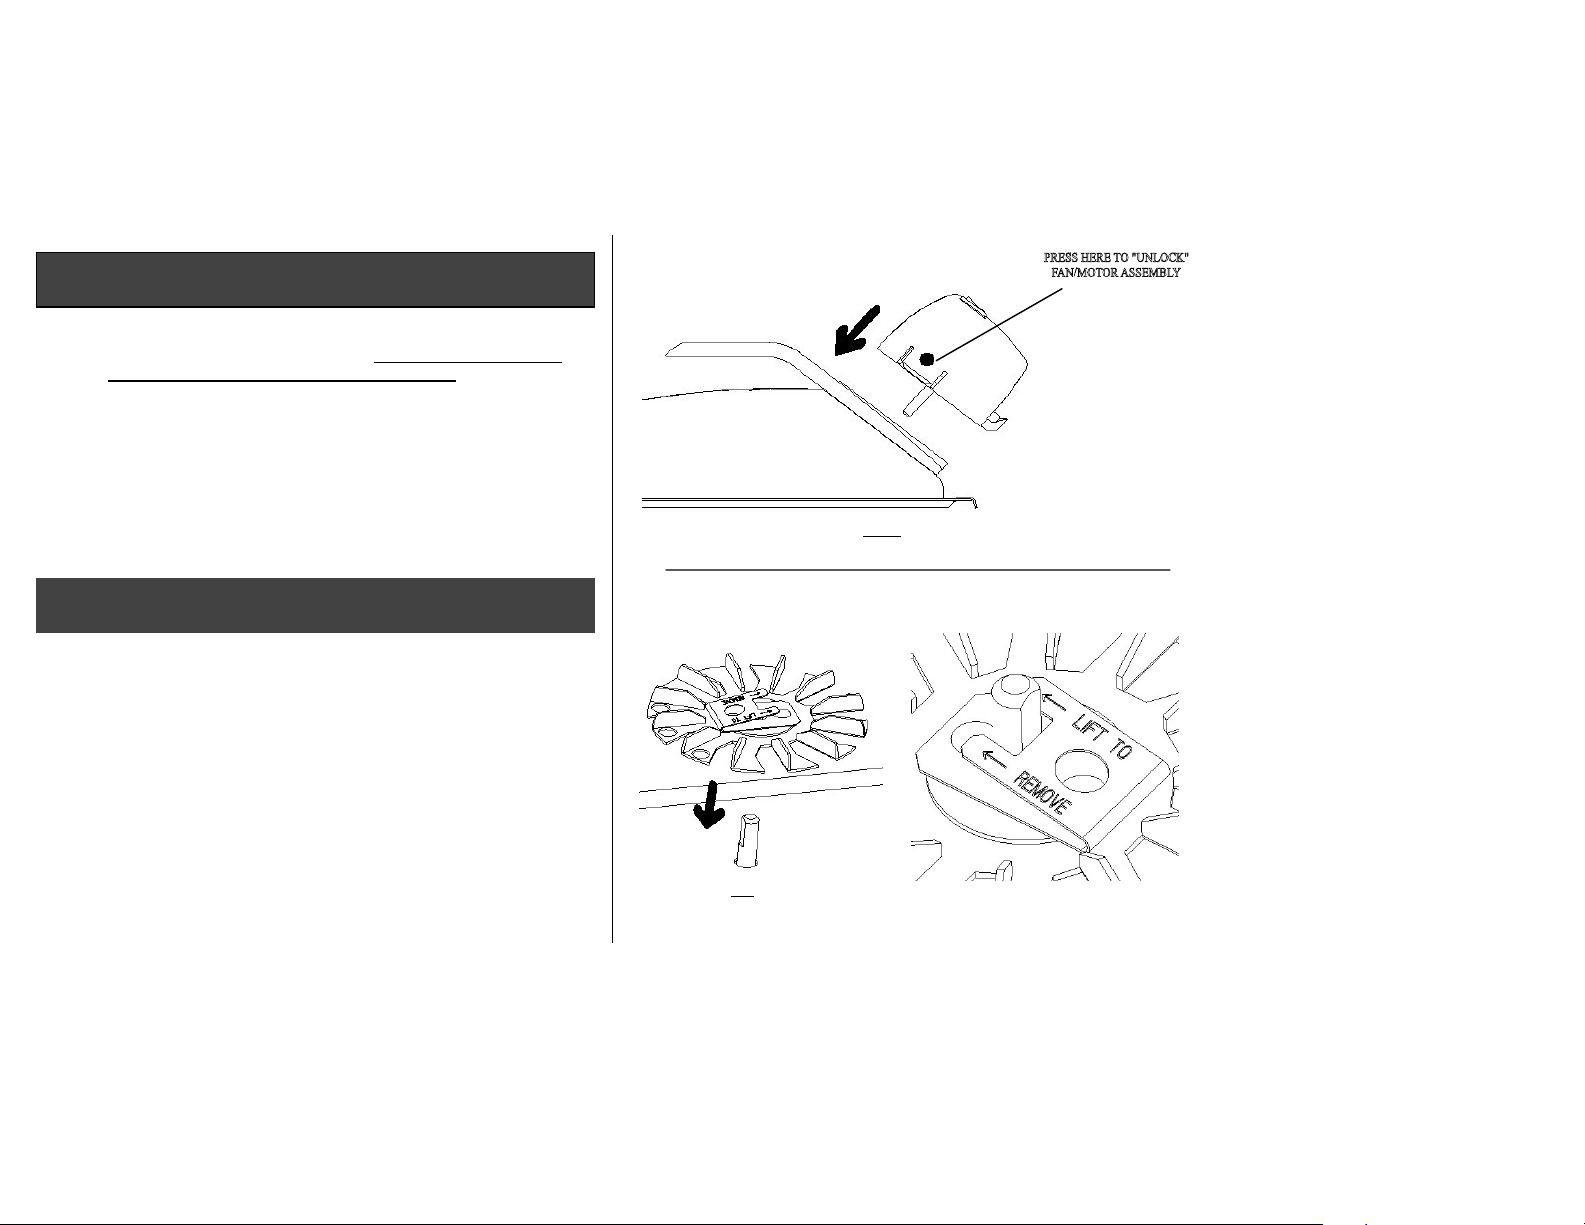
INSTALLING THE MOTOR AND FAN
1. Remove the fan by lifting tabs on Fan. Then insert Motor Housing into the
Handle, align hole in Cover with shaft of Motor, and push on Motor
Housing until it “locks” onto the Handle. (See Fig. 1)
2. To attach the Fan to the Motor, align flat edge of spring clip with flat
surface on motor shaft and gently press the fan onto the motor shaft until
the fan can no longer be pushed onto the shaft. Note: Do not press or pull
on the fan blades while handling. (See Fig 2)
3. Reverse the steps to remove Fan and Motor assembly when cleaning the
Cover is necessary.
Fig.2
Fig. 1
Page 7

4
NESCO
®
12-Qt. C
onvection Oven
Page 8

CARE AND CLEANING TO OPERATE YOUR ROASTER OVEN
1. After the NESCO Roaster Oven has cooled, remove the Fan, then the
Fan/Motor from the Cover. Wash Cover, Fan, Rack and Cookwell in
warm sudsy water or dishwasher. CAUTION: DO NOT PLACE
COVER IN DISHWASHER. Note: Motor cannot be removed from
Cover while fan is in position.
2. PORCELAIN ENAMEL COOKWELL has a strong and durable finish and
provides easy cleaning along with years of use. It will not stain and stays
attractive, even when used often. However, it will chip if subjected to sharp
blows or is mistreated. If interior cooking surface is chipped, the cookwell
should not be used. Water spots or mineral deposits (characterized by white
film on surface) may be removed with household vinegar or non-abrasive
cleansers.
3. NON-STICK COOKWELL is made of durable carbon steel. In order to
maintain the non-stick surface, the use of rubber or wood utensils is
recommended.
used; however, care must be taken in order to prevent unintentional damage
to the non-stick surface. Avoid cutting food in the Cookwell. Use of nonstick cooking spray is optional. Avoid storing items in the Cookwell that
may scratch the surface. When roasting or baking at high temperatures you
may notice an irregular band of discoloration around the sidewalls of the
Cookwell. This characteristic is normal for the super tough non-stick finish
and does not affect the performance or durability of the Cookwell. With
continued use, the discoloration will become less noticeable.
4. Cooked-on foods may be removed from the cookwell by using a nonabrasive cleaning pad and a non-abrasive cleanser, such as Soft Scrub® or
Bon Ami®. Do not use abrasive cleansers or steel wool as these may
scratch the finish. Hint: To easily remove baked on food residue, place
Cookwell in Heatwell with soapy water and heat at a low temperature for
30 minutes. Turn off and allow cooling completely. Wash Cookwell as
directed above.
5. NEVER IMMERSE THE ROASTER OVEN IN WATER. To clean,
wipe the outside of the Roaster Oven with a damp cloth and dry. Do not
use abrasive cleansers on the exterior surface.
The non-stick surface is durable and metal utensils may be
Place the Cookwell into the Heatwell. Always use the cookwell for food.
NEVER PLACE FOOD OR LIQUID DIRECTLY INTO THE
HEATWELL. ALWAYS TURN OFF THE FAN BEFORE LIFTING
COVER.
1. Preheating is recommended. To preheat, place the Cookwell into the
Heatwell and cover. Be sure the temperature control is turned to the lowest
setting. Plug the cord into the 120-volt AC outlet. Reset the temperature
control to desired temperature. Preheat 20 minutes. Carefully, using hot
pads, add food to the Cookwell.
2. The Rack may be used for baking or fat-free roasting. Other foods such as
meats, soups and stews are prepared without the Rack.
3. For convection cooking, assemble the Fan/Motor to the Cover as
instructed. Replace the Cover. Always cook with the Cover in place. When
lifting Cover, tilt it away or lift from the side, to avoid escaping steam
and switch off fan before lifting cover.
4. When removing the Cover, unplug the Fan/Motor from the Heatwell/Body,
and set it on a heat resistant surface.
5. If the Roaster Oven has not been preheated, turn the temperature control to
the lowest setting and plug the Roaster Oven cord into a 120-volt AC
electrical outlet. Set the temperature control to the desired temperature, and
fill the Cookwell with food.
6. Cook the food for the desired amount of time. When finished, turn the
temperature control to the lowest setting and unplug the cord from the 120volt AC electrical outlet. Allow the Roaster Oven to cool, clean as
recommended.
NOTE: COOKWELL, COVER, BODY AND ACCUMULATED
STEAM WILL BE HOT DURING USE. USE CAUTION AND HOT
PADS WHEN LIFTING COVER OR TO REMOVE COOKWELL
FROM HEATWELL.
NESCO
®
12-Qt. Convection Oven 5
Page 9

HELPFUL HINTS
ROASTER OVEN SHOULD ALWAYS BE PREHEATED FOR
20 MINUTES
.
ROAST
• For additional browning: Use the Convection Fan to attain better browning or
combine browning sauce with margarine or oil to brush over meat. Sprinkle
herbs or dry soup mix over the meat before roasting. Remove natural juices with
a baster during the last half of roasting.
• The natural meat juices form moisture during roasting, which may collect on the
inside of the Cover. Remove Cover carefully, tilting it away from you.
• Roasting times in the recipes and charts begin with refrigerated meat. If meat is
frozen, allow an additional 15 to 20 minutes per pound cooking time.
• To sear meat: Preheat to 425°F. Add margarine, then meat. Cover; sear meat 5 to
10 minutes per side until lightly browned. Stir ground meat. Times may vary
depending on the quantity of meat.
• To simmer meat: Preheat to 425°F. Reduce temperature to 250°F and allow 1-
1/2 hrs for each 30 minutes of cooking time given in the recipe. Simmering less
tender cuts of meat will make them very tender. Adding a gravy or sauce will
make them more flavorful.
COOK
• Food may be placed in a cold or preheated Roaster Oven. Follow recipe
directions for temperature settings.
• Cooking times in the recipes and charts are guides. Times may vary due to
density, thickness, freshness, altitude and personal tastes. We recommend that
the internal temperature of the meat be the final determining factor of doneness,
as opposed to the cooking times.
• Cut-up meats and vegetables should be of uniform size pieces. To prevent
vegetables from drying out, shield with pieces of meat or wrap in aluminum foil
or a covered casserole with added liquid.
NESCO
®
12-Qt. Convection Oven 6
• Cook for at least the minimum time stated, or longer if needed, to complete the
cooking. The exact cooking time is given in a range and is not critical since the
heat is slow and gentle. Always cook food fully, until completely done and
tender.
BAKE
• To make the most out of the convection process in baking, you will get better
browning and faster baking by using a loaf pan or casserole.
• Several loaf pans will fit into the Cookwell, try combining different dishes like
meat and vegetables or include bread to complete the meal. When baking bread,
either one or two loaf pans are recommended
• Cover the Rack with aluminum foil and use as baking sheet or place bake sheet
on rack.
• Most 1 & 2 Qt. Casserole dishes, 9-inch pie pans and 9 x 13 bake pans (without
handles) will fit into the Cookwell. Place dishes onto Rack for a more even
baking.
STEAM
• Steaming is a healthful way to prepare low calorie, nutritious foods.
• Place water to fill the bottom of the Cookwell, approx. 1-3 quarts. Quantity and
type of food will determine the amount of water to use; more water can be added
to the cookwell at any time. Place foods on the Rack above the water.
SLOW COOK
• Slow Cooking does not use the Convection process; the heat is gradual which
allows a very slow simmer. No stirring is necessary.
• To convert a standard recipe to Slow Cook recipe; for each 30 minutes of
standard recipe, slow cook for about 1-1/2 hours at 150°F to 200°F.
• When Slow Cooking meats and poultry the rack is not necessary. The low
temperature is much cooler and does not allow the foods to stick to the bottom of
the Cookwell.
Page 10

CONVECTION ROAST MEAT CHART
Preheat 12-Qt. Convection Oven to roasting temperature. Minutes per pound are ONLY A GUIDE. Use a meat thermometer for more accurate roasting. Set
meat on Rack to roast.
Weight Temp. Setting Roast Time
Meat In Pounds
BEEF Ground Beef 2 to 10 450°F/450°F 5 to 10 medium
Sirloin Tip 3 to 5 400°F/400°F 22 to 28 rare-medium
Tenderloin 3-1/2 to 4 425°F/425°F 18 to 24 rare-medium
Preheat/Roast In Minutes/Lb.
LAMB Leg, sirloin 3-1/2 to 5 400°F/350°F 25 to 30 medium-well
Shoulder, boneless 3 to 4 400°F/375°F 30 to 35 medium-well
PORK Chops, center cut 1 inch 4 to 5 425°F/400°F 15 to 20 well
Loin Roast, center 4 to 6 400°F/400°F 20 to 25 well
Shoulder, rolled 4 to 6 400°F/400°F 35 to 40 well
SMOKED PORK Ham, bone-in, shankless 8 to 12 350°F/350°F 25 to 30 well
Ham, boneless 5 to 10 350°F/350°F 20 to 25 well
Ham, precooked 5 to 10 350°F/325°F 15 to 20 heated
VEAL Shoulder, boned 3 to 5 350°F/325°F 25 to 30 well
Loin 4 to 6 350°F/325°F 25 to 30 well
POULTRY* Chicken, pieces 4 to 6 425°F/400°F 10 to 15 well
Chicken, whole 3-1/2 to 5 425°F/400°F 15 to 20 well
Cornish Hens (4) 3-1/2 to 4-1/2 425°F/425°F 20 to 25 well
Turkey, whole 10 to 13 400°F/400°F 10 to 12 well
*To get better browning and quicker roasting on poultry, mix 1/4 Cup margarine with 1 tsp. browning sauce; brush over skin before roasting.
*For crisper skin, baste and then remove liquid during roasting. Let meat stand for 5 minutes before serving.
7 NESCO
®
12-Qt. Convection Oven
Page 11

y
CONVECTION ROASTING
Convection Roast Turke
1 (10-13 lb.) Fresh or Frozen (thawed) Turkey
Preheat Convection Oven at 425°F for 20 minutes.
Clean and Rinse turkey; pat dry. Truss bird so that the wings and legs do not touch the
sides of the Cookwell. Place turkey on Rack and set into preheated Cookwell. Cover;
turn on Fan using switch on top of Motor. Roast 10-12 minutes per pound or until the
meat thermometer reaches 180°F in thickest part of meat, not touching the bone.
Let the bird stand for 10 minutes before slicing.
If turkey is ready before serving time; simply turn off Fan/Motor and reduce
temperature on Roaster Oven to 250°F until time to serve.
Serves 6 to 8
Lemon and Herb Chicken
1 (6 to 7 lb.) Chicken pieces 1/2 Cup Lemon juice
1/4 Cup Vegetable oil 2 Tbsp. Sugar or Honey
1 Tbsp. Grated lemon peel 1 Tbsp. Chopped parsley
2 Tbsp. Italian herb seasoning 1 Clove Garlic, minced, optional
Preheat Convection Oven at 425°F for 20 minutes.
Rinse chicken and pat dry. Combine all the ingredients, except chicken, in small bowl;
whisk to blend. Brush over chicken.
Arrange chicken pieces on Rack and place in preheated Cookwell. Cover; turn on Fan
using switch on top of Motor. Roast 12 to 15 minutes per pound or until the meat
thermometer reaches 180°F in thickest part of meat.
Serves 6 to 8
NESCO
®
12-Qt. Convection Oven 8
Stuffed Cornish Hens
4 (22 to 24 oz. ea.) Cornish Hens 2 Tbsp. Vegetable oil
2 Tbsp. Lemon juice 1 tsp. Paprika
2 tsp. Parsley, chopped
Fruit and Bread Stuffing:
6 Cups Dried Bread Crumbs 1 Tbsp. Butter or margarine
3 Green Onions, thinly sliced 1 Large Apple, cored, chopped
1 Large Pear, cored, chopped 1/2 Cup Golden raisins
2 tsp. Poultry seasoning
Preheat Convection Oven at 425°F for 20 minutes.
Rinse hens and pat dry. Combine all stuffing ingredients in a large bowl; stir until well
mixed. Spoon equal portions of stuffing into cavities of hens. Truss birds.
Combine remaining ingredients in a small bowl; whisk to blend. Brush over hens.
Place hens on Rack and place in preheated Cookwell. Cover; turn on Fan using switch
on top of Motor. Roast 65 to 75 minutes or until meat thermometer reaches 180°F and
stuffing reaches 160°F.
Serves 4
Pork Sirloin Roast
1 (3 to 4 lb.) Pork sirloin roast 1-1/2 Cups Orange juice, divided
1 tsp. Pumpkin pie spice 1/4 tsp. Thyme
1/4 tsp. Rosemary 8 Large Pears, peeled, halved, cored
Preheat Convection Oven at 400°F for 20 minutes
Combine 1 cup orange juice, spice and herbs in a small bowl; whisk to blend. Brush
over meat. Brush remaining juice over pear halves; wrap in aluminum foil. Place meat
and packet on Rack and place in preheated Cookwell. Cover; turn on Fan using switch
on top of Motor. Roast 22 to 27 minutes per lb. or until meat thermometer reaches
155°F.
Serves 6 to 8
Page 12

CONVECTION ROASTING
Beef Tenderloin
1 (3-1/2 to 4 lb.) Beef tenderloin 3 Tbsp. Butter or margarine
1 Tbsp. Minced onion 1 tsp. Ground black pepper
1/2 tsp. Ground mustard
Preheat Convection Oven at 425°F for 20 minutes.
Combine ingredients, except meat, in small bowl; whisk to blend. Brush over meat.
Place meat on Rack and place in preheated Cookwell. Cover; turn on Fan using switch
on top of Motor. Roast 8 to 12 minutes per lb. or until meat thermometer reaches
125°F.
Serves 8
Herb Leg of Lamb
1 (3 to 4 lb.) Half leg of lamb 3 Tbsp. White wine or Herb vinegar
2 Tbsp. Light olive oil 1 Tbsp. Celery flakes
1/4 Cup Parmesan cheese, grated 1 tsp. Rosemary
1/2 tsp. Italian herb seasoning 1/2 tsp. Ground black pepper
Preheat Convection Oven at 350°F for 20 minutes.
Trim fat from lamb. Rub wine, then oil, then cheese and herbs over lamb.
Place meat on Rack and place in preheated Cookwell. Cover; turn on Fan using switch
on top of Motor. Roast 25 to 30 minutes per lb. or until meat thermometer reaches
165°F.
Serves 6 to 8
Marinated Pork Roast
1 (4 to 6 lb.) Pork, rolled shoulder 1/4 Cup Teriyaki sauce
2 Tbsp. Vegetable oil 2 Tbsp. Honey
1 Clove Garlic, minced Dash Red Pepper, optional
Preheat Convection Oven at 400°F for 20 minutes.
Combine ingredients, except meat, in small bowl; whisk to blend. Brush over meat.
Place meat on Rack and place in preheated Cookwell. Cover; turn on Fan using switch
on top of Motor. Roast 25 to 30 minutes per lb. or until meat thermometer reaches
155°F.
Serves 6
Turkey Roll with Spinach and Tomatoes
1 (3 to 4 lb.) Boneless turkey breast 8 oz. Fresh spinach leaves, rinsed
1 Large Tomato, thinly sliced 2 tsp. Poultry seasoning
1 Small onion, thinly sliced 1 tsp. Lemon pepper or ground pepper
1 Lime 1 tsp. Paprika
Preheat Convection Oven at 400°F for 20 minutes.
Make horizontal cut, almost through meat, to form a pocket. Sprinkle half of seasoning
and half of lime onto meat. Line pocket with spinach, tomato and onion slices. Close
pocket; secure with wooden skewers or truss meat closed. Squeeze remaining lime
over skin. Sprinkle remaining seasonings.
Place meat on Rack and place in preheated Cookwell. Cover; turn on Fan using switch
on top of Motor. Roast 25 to 30 minutes per lb. or until meat thermometer reaches
155°F.
Serves 6
9 NESCO
®
12-Qt. Convection Oven
Page 13

CONVECTION ROASTING
Orange Glazed Chicken
1 (4 to 6 lb.) Chicken, whole 1 Cup Orange marmalade
1 Tbsp. Lemon juice 1 Tbsp. Parsley or Cilantro, chopped
1 tsp. Poultry seasoning
Preheat Convection Oven at 400°F for 20 minutes.
Rinse chicken and pat dry. Combine ingredients in small saucepan; Stir. Warm over
low heat until marmalade is melted. Brush over chicken.
Place meat on Rack and place in preheated Cookwell. Cover; turn on Fan using switch
on top of Motor. Roast 12 to 15 minutes per lb. or until meat thermometer reaches
180°F.
Serves 4
Ham Patties
2 lb. Ground lean ham 1 large Egg
1/2 Cup Plain yogurt 3/4 Cup Seasoned Bread crumbs
2 Tbsp. Sweet pickle relish 1/2 tsp. Mustard
Combine ingredients in large bowl; stir until well mixed. Form into 8 patties.
Place meat on Rack and place in preheated Cookwell. Cover; turn on Fan using switch
on top of Motor. Roast 10 to 14 minutes per lb. or until meat thermometer reaches
165°F.
Serves 6 to 8
Fish Steaks
2 (6 to 8 oz) Halibut or Swordfish steaks 1 small Lime, quartered
2 tsp. Olive or peanut oil 1/2 tsp. Paprika
1/4 tsp. Ground Ginger Dash of ground pepper
Preheat Convection Oven at 450°F for 20 minutes.
Place steaks on Rack. Squeeze limejuice over steaks; Brush on oil. Sprinkle paprika,
ginger and pepper. Set Rack into preheated Cookwell. Cover; turn on Fan using switch
on top of Motor. Roast 12 to 15 minutes per lb. or until fish flakes, depending on
thickness of steak.
Serves 2
BBQ Pork Chops
6 (9 to 11 oz. ea..) Bone-in Pork chops 1/2 Cup Barbeque sauce
1/4 Cup Lemon juice 1 Tbsp. Brown sugar
1 tsp. Italian herb seasoning
Preheat Convection Oven at 450°F for 20 minutes.
Place meat on Rack and place in preheated Cookwell. Cover; turn on Fan using switch
on top of Motor. Cook for 5 minutes. Remove from Cookwell.
Combine ingredients in small bowl; whisk to blend. Brush over meat. Return rack to
Cookwell. Cover and roast 20 to 25 minutes per pound or until meat thermometer
reaches 155°F.
Serves 6
Page 14

NESCO
®
12-Qt. C
10
onvection Oven
Page 15

CONVECTION BAKING CHART
Preheat 12-Qt. Roaster Oven to roasting temperature for at least 20 minutes. Bake times are ONLY A GUIDE. Place bake pan on Rack. Two loaf pans will fit
on Rack.
Type of Food Size of Bake pan
Bar Cookies 9 x 9 inch 350°F 22 to 25
Bread, Quick 9 x 9 in. loaf 400°F 33 to 35
Bread, Yeast 9 x 5 in. loaf 400°F 25 to 28
Cake, Angel food 10 Cup 350°F 45 to 50
Cake, Bundt 6 Cup 350°F 28 to 32
Cake, Bundt 12 Cup 350°F 38 to 42
Cake, Package 9 x 5 in. loaf 350°F 40 to 45
Cake, Pound 9 x 5 in. loaf 350°F 38 to 42
Cake, Scratch 9 x 9 inch 375°F 20 to 25
Cupcakes 6 Cup 375°F 20 to23
Muffins 6 Cup 400°F 18 to 22
Pie, Fruit 9 inch 400°F 45 to 50
Pie, Pastry 9 inch 425°F 12 to 15
Pizza (9 inch) On Rack 450°F 7 to 9
Apples, baked Custard cups on Rack 350°F 20 to 25
Baked potatoes On Rack 400°F 40 to 45
Sweet potatoes On Rack 375°F 40 to 45
Winter Squash, Quartered On Rack 375°F 50 to 60
11 NESCO
Temperature setting Bake time (minutes)
®
12-Qt. Convection Oven
Page 16

b
p
CONVECTION BAKING
Almond Spice Cake
1/2 Cup Sugar 1/2 Cup Brown sugar
1/2 Cup Butter or margarine 2 Large eggs
1 tsp. Almond extract 1/2 Cup Mashed potatoes
1/2 Cup Plain low fat Yogurt 1/4 Cup Milk
1-1/4 Cup Flour, all purpose 1 tsp. Baking powder
1-1/2 tsp. Pumpkin pie spice 1/2 tsp. Baking soda
1/2 Cup Almond, chopped
Preheat Convection Oven to 375°F for 20 minutes
Combine sugars and butter in a medium bowl; beat until light and fluffy. Beat in eggs
and almond extract. Beat in potatoes, yogurt and milk.
Add dry ingredients, beat on medium speed 1 minute or until light and smooth. Pour
atter into lightly greased 9 inch baking pan.
Place pan on Rack and place in preheated Cookwell. Cover; turn on Fan using switch
on top of Motor. Bake 23 to 25 minutes or until wooden pick inserted in center comes
out clean. Cool on Rack for 5 minutes before serving.
Makes one 9 inch cake.
Light Lemon Cake
4 Large eggs, separated 1 tsp. Cream of tartar
3/4 Cup Sugar 1 Tbsp. Lemon juice
1 tsp. Vanilla extract 1 Cup Flour, all purpose
1-1/2 tsp. Baking powder 1-1/2 tsp. Grated lemon peel
Preheat Convection Oven at 350°F for 20 minutes.
Combine egg whites and cream of tartar in medium bowl; beat on high speed until soft
eaks form. Gradually beat in 1/4 cup sugar until stiff peaks form. In large bowl,
combine egg yolks, sugar, lemon juice and vanilla; beat on medium speed until thick
and creamy. Fold in flour, baking powder and lemon peel with egg whites. Pour into
lightly greased 6 cup Bundt pan. Place pan on Rack and place in preheated Cookwell.
Cover; turn on Fan using switch on top of Motor. Bake 15 to 20 minutes or until
wooden pick, inserted into muffin, comes out clean.
Serves 8
Peach Pie
2 (9 inch) Pastry crust, unbaked 4 Cups Peaches, peeled, sliced
3/4/ to 1 Cup sugar 1/4 Cup Flour, all purpose
1 Tbsp. Lemon juice 1/2 tsp. Almond extract
2 Tbsp. Butter or margarine
Preheat Convection Oven to 400°F for 20 minutes
Pat one crust into 9 inch pie pan. Combine remaining ingredients in large bowl; stir
until well mixed. Spoon into pie crust. Dot pieces of butter over filling. Place second
crust atop filling; pinch edges of crust together and flute. Cut air slits in a design in top
crust.
Place pan on Rack and place in preheated Cookwell. Cover; turn on Fan using switch
on top of Motor. Bake 45 to 50 minutes or until crust is golden brown. Cool on Rack
for 5 minutes before serving.
Makes one 9 inch pie
Apple Pie
2 (9 inch) Pastry crust, unbaked 5 Cups Apples, peeled, sliced, cored
3/4 to 1 Cup sugar 3/4 tsp. Ground cinnamon
3/4 Cup Flour, all purpose 6 Tbsp. Butter or margarine
Preheat Convection Oven to 400°F for 20 minutes.
Pat one crust into 9 inch pie pan. Combine remaining ingredients in large bowl; stir
until well mixed. Spoon into pie crust. Dot pieces of butter over filling. Place second
crust atop filling; pinch edges of crust together and flute. Cut air slits in a design in top
crust.
Place pan on Rack and place in preheated Cookwell. Cover; turn on Fan using switch
on top of Motor. Bake 45 to 50 minutes or until crust is golden brown. Cool on Rack
for 5 minutes before serving.
Makes one 9 inch pie.
Page 17

NESCO
®
12-Qt. C
12
onvection Oven
Page 18

b
CONVECTION BAKING
Banana Bran Muffins
2 Cups Bran cereal 1 Cup Wheat germ
1 Cup Boiling water 2 Cups Milk
2 tsp. Lemon juice 2 Large eggs
1/2 Cup Butter or margarine 3/4 Cup Honey
1/2 Cup Whole wheat flour 1 Tbsp. Baking soda
Pumpkin pie spice 1 Banana coarsely chopped
Preheat Convection Oven to 400°F for 20 minutes
Combine cereal, wheat germ and water in large bowl; let stand for 10 minutes. Add
milk, lemon juice, eggs, butter and honey to cereal mixture; stir to mix. Add flour,
aking soda and spice; stir just until moistened. Carefully fold in bananas. Spoon half
the mixture evenly into lightly greased 6 cup muffin pan.
Place pan on Rack and place in preheated Cookwell. Cover; turn on Fan using switch
on top of Motor. Bake 15 to 20 minutes or until wooden pick, inserted into muffin,
comes out clean.
Repeat with remaining dough. Cool muffins on Rack. Store in airtight container.
Makes 12 larger muffins
Brownies
1 Cup Sugar 1/2 Cup Semi-sweet chocolate pieces,
2 Large eggs melted
2 Tbsp. Milk or coffee 3/4 Cup Flour, all purpose
1 tsp. Vanilla extract 1-1/2 tsp. Baking powder
1/2 Cup Butter or margarine, room
temperature
Preheat Convection Oven at 350°F for 20 minutes.
Combine sugar, eggs, milk and vanilla in medium bowl; cream until light. Beat in
butter. Whisk in chocolate. Add flour and baking powder; whisk until blended. Pour
into lightly greased 8 inch baking pan.
Place pan on Rack and place in preheated Cookwell. Cover; turn on Fan using switch
on top of Motor. Bake 22 to 25 minutes or until wooden pick, inserted into brownie,
comes out clean. Cool on Rack. Serve warm or store in air-tight container.
Makes 10 to 12 pieces.
Tortellini and Seafood Bake
2 Pkg. (9 oz. ea.) Frozen cheese tortellini, cooked and drained
1 Lb. Large Shrimp, shelled, de-veined 1 Lb. Sea scallops
2 Green onions, thinly sliced 1 clove garlic, minced
1 Can (16 oz.) Stewed tomatoes 1/2 Cup Italian salad dressing
1-1/2 tsp. Cornstarch 1 Tbsp. Parsley, chopped
Preheat Convection Oven to 400°F for 20 minutes.
Combined tortellini, seafood, onion and garlic in a 1-1/2 quart casserole dish. Combine
tomatoes, salad dressing, cornstarch and parsley in a small bowl; stir to blend. Pour
over pasta mixture. Stir to coat evenly.
Place casserole on Rack and place in preheated Cookwell. Cover; turn on Fan using
switch on top of Motor. Bake 10 to 14 minutes or until shrimp turn pink and scallops
become white.
Serves 6 to 8
13 NESCO
®
12-Qt. Convection Oven
Page 19

CONVECTION BAKING
Rye Casserole Bread
1-1/2 Cups Milk 1/4 Cup Sugar
2 Pkg. Active dry yeast 2 Tbsp. Cooking oil
2 Large eggs 2 Cups Rye flour
1 Tbsp. Salt 1 tsp. Caraway seeds
2-1/4 Cups Flour, all purpose
Preheat Convection Oven to 400°F for 20 minutes
Scald milk in small saucepan. Let cool to 105-115°F. Add sugar and yeast; stir once.
Let stand 5 minutes or until yeast bubbles. Add oil and eggs; stir to mix.
Combine remaining ingredients, except for 1/2 cup of flour, in large bowl. Add liquid
mixture; stir with wooden spoon until smooth. Stir in remaining flour as needed
.Spoon batter into a greased 1-1/2 quart casserole dish. Cover; let rise 45 to 60 minutes
or until double in bulk.
Place dish on Rack and place in preheated Cookwell. Cover; turn on Fan using switch
on top of Motor. Bake 30 to 35 minutes or until bread sounds hollow when tapped.
Remove from dish onto cooling rack. Serve warm.
Serves 6 to 8
Mexican Casserole
6 Cups Long grained rice, cooked 2 Lb. ground beef, browned
2 Cans (16 oz. ea.) Refried beans 1 Large onion, chopped
1/2 Pkg. (1-1/4 oz.) Dry taco seasoning 1 Lb. Cheddar cheese, shredded
1 Pint Tomato juice
Topping:
1 Large Head iceberg lettuce, chopped 4 Large Tomatoes, chopped
2 Medium Green peppers, chopped 3 Green onions, thinly sliced
Preheat Convection Oven at 350°F for 20 minutes.
Layer rice, beef, beans and onions in casserole dish. Sprinkle on seasoning and cheese.
Pour tomato juice evenly over casserole.
Place casserole on Rack and place in preheated Cookwell. Cover; turn on Fan using
switch on top of Motor. Bake 25 to 30 minutes or until hot and bubbling.
Arrange toppings and remaining cheese on serving plates. Serve casserole by
spoonfuls onto plates or in taco shells. Spoon on toppings.
Serves 12
Oriental Casserole
2 Lb. Boneless Pork, cut into strips 2 Stalks Celery, diagonal cut
1 Small each Red, Green and 1/2 Lb. Bean sprouts
Yellow pepper, julienne cut 1 Can (6 oz.) Water chestnuts
2 Green onions, diagonal cut 1 Pint Beef broth
1/2 Lb. Oriental pea pods 1/4 Cup cornstarch, to thicken
1 Can (6 oz.) Bamboo shoots
1/4 Cup Soy sauce
12 Oz. Long grained rice, cooked and drained
Preheat Convection Oven to 350°F for 20 minutes.
Place pork and vegetables in Cookwell. Cover; turn on Fan. Bake 10 to 12 minutes or
until meat is browned. Add broth and half of soy sauce, stir.
Reduce temperature to 250°F. Slow cook 30 to 40 minutes or until meat is tender.
Thicken juice with a mixture of cornstarch and remaining soy sauce. Cover; turn on
Fan using switch on top of Motor, bake additional 5 to 10 minutes or until juice is
thickened, stir once. Serve over cooked rice or chow mien noodles.
Serves 12
NESCO
®
12-Qt. Convection Oven 14
Page 20

TRADITIONAL ROASTER OVEN SECTION
Reminder: You may enjoy your NESCO
12-Qt. Convection Roaster Oven as a
Traditional Roaster Oven by simply
removing the Fan and Fan/Motor. The
following pages will give you many
suggestions and recipes to Roast, Bake,
Slow Cook, Cook and Steam your way to
healthful meals for years to come.
NESCO
15
®
®
12-Qt. Convection Oven
Page 21

TRADITIONAL ROASTING MEAT CHART
Preheat 12-Qt. Roaster Oven to roasting temperature. Minutes per pound are ONLY A GUIDE. Use a meat thermometer for more accurate roasting. Set meat
on Rack to roast.
Weight Temp. Setting Roast Time
Meat In Pounds
BEEF Corned Beef 3-1/2 to 4 350°F/275°F 20 to 25 medium- well
Sirloin Tip 3 to 5 400°F/325°F 20 to 25 rare-medium
Tenderloin 3-1/2 to 4 425°F/425°F 9 to 12 rare-medium
Preheat/Roast In Minutes/Lb.
LAMB Leg, sirloin 3-1/2 to 5 400°F/350°F 25 to 30 medium-well
Shoulder, boneless 3 to 4 400°F/325°F 30 to 35 medium-well
PORK Chops, center cut 1 inch 4 to 5 425°F/300°F 15 to 20 well
Loin Roast, center 4 to 6 400°F/325°F 20 to 25 well
Shoulder, rolled 4 to 6 400°F/325°F 35 to 40 well
Ribs, lean, country 6 to 8 250°F/250°F 20 to 25 well
(Precook to tender; finish in 425°F Roaster or outdoor grill)
SMOKED PORK Ham, bone-in, shank less 8 to 12 350°F/350°F 25 to 30 well
Ham, boneless 5 to 10 350°F/325°F 20 to 25 well
Ham, precooked 5 to 10 350°F/325°F 15 to 20 heated
VEAL Shoulder, boned 3 to 5 350°F/325°F 25 to 30 well
Loin 4 to 6 350°F/325°F 25 to 30 well
POULTRY* Chicken, pieces 4 to 6 400°F/375°F 10 to 15 well
Chicken, whole 3-1/2 to 5 400°F/375°F 15 to 20 well
Cornish Hens (4) 3-1/2 to 4-1/2 425°F/425°F 20 to 25 well
Turkey, whole 10 to 13 400°F/350°F/400°F** 12 to 15 well
* To get better browning and quicker roasting on poultry, mix 1/4 Cup margarine with 1 tsp. browning sauce; brush over skin before roasting.
* For crisper skin, baste and then remove liquid during roasting. Let meat stand for 5 minutes before serving.
** Divide cooking time into three cycles using indicated settings; remove excess liquid after second cycle completes.
NESCO
®
12-Qt. Convection Oven 16
Page 22

b
y
TRADITIONAL ROAST
Pot Roast Dinner
1 (4 to 6 lb.) Pot Roast 7 Medium Carrots
1 Cup Barbeque sauce 1 Leek, cleaned, chunked
8 Medium Onions 3-4 Turnips, peeled, chunked
12 Whole Red potatoes, peeled
Preheat Roaster Oven at 350°F for 20 minutes.
Place meat into preheated Cookwell. Spoon half the BBQ sauce over meat; arrange
vegetables around meat. Cover; roast 10 minutes. Turn meat over; spoon remaining
sauce over meat. Cover; roast 10 – 15 minutes or until meat begins to brown.
Reduce temperature to 275°F; roast 1-1/2 hours or until meat reaches 150°F on meat
thermometer.
Serves 8
Beef Tenderloin
1 (4 lb.) Beef tenderloin 1 Green onion, chopped
1 Cup Teriyaki sauce 1 Clove Garlic, minced
1/4 Cup Soy sauce 1 Tbsp. Celery seed
1/4 Cup Beef broth 1 tsp. Ground black pepper
1/4 Cup Honey, warmed 1/4 tsp. Grated Lemon peel
Place beef in shallow casserole. Combine remaining ingredients; stir until well
lended. Pour over meat. Cover with plastic wrap; refrigerate 4-6 hrs, turn meat
several times
Lightly spray Cookwell with cooking oil. Preheat Roaster Oven at 425°F for 20
minutes.
Place meat on Rack and place in preheated Cookwell. Cover, roast 35 to 45 minutes or
until meat thermometer reaches 125°F.
Serves 8
Roast Pork
1 (6 to 8 lbs) Pork loin, center cut 1 Lb. Mushrooms, sliced
2 Tbsp. Dijon mustard 1/2 Tbsp. Ground black pepper
1 tsp. Thyme, crushed 2 Tbsp. Butter or margarine
Preheat Roaster Oven at 400°F for 20 minutes.
Add butter; cover; cook until melted. Arrange meat on Rack and place in preheated
Cookwell. Cover; roast 10 minutes. Reduce temperatures to 325°F. Combine
remaining ingredients.
Remove Rack with meat, place onto a heat resistant surface. Spread mustard mixture
over roast. Set Rack in Cookwell. Cover; roast 2 hours or until meat thermometer
reaches 170°F.
Serves 10 to 12
Fresh Turke
1 (10-13 lb.) Fresh or Frozen (thawed) Turkey 1 tsp. Browning sauce
2 Tbsp. Butter or margarine, melted
Preheat Roaster Oven at 400°F for 20 minutes.
Clean and Rinse turkey; pat dry. Truss bird so that the wings and legs do not touch the
sides of the Cookwell. Place turkey on Rack. Combine remaining ingredients; stir until
well mixed. Spread evenly over meat. Set Rack into preheated Cookwell. Cover; roast
10-12 minutes per pound or until the meat thermometer reaches 180°F in thickest part
of meat, not touching the bone. Remove excess liquid 1 hour before finished.
Let the bird stand for 10 minutes before slicing.
If turkey is ready before serving time, simply reduce temperature on Roaster Oven to
250°F until time to serve.
Serves 6 to 8
17 NESCO
®
12-Qt. Convection Oven
Page 23

TRADITIONAL ROAST
Leg Of Lamb
1 (3 to 4 lb.) Leg of Lamb 2 Tbsp. Butter or margarine, melted
1 Small Red pepper, finely chopped 1 tsp. Rosemary
1 Small Yellow pepper, chopped 1/2 tsp. Basil
1/2 tsp. Tarragon
Preheat Roaster Oven at 400°F for 20 minutes.
Arrange meat on Rack. Combine remaining ingredients; stir until well mixed. Spread
evenly over meat. Place Rack into preheated Cookwell. Cover; roast 10 minutes.
Reduce temperature to 325°F. Roast 1-1/2 hours or until meat thermometer reaches
175°F.
Serves 6 to 9
Pork Tenderloin
1 (6 to 8 lb.) Pork tenderloin 1 Lb. Mushrooms, sliced
1 tsp. Italian herb seasoning 6 Red onions, sliced
6 Baking apples, cored, quartered 1/2 Cup Butter or margarine
Preheat Roaster Oven at 425°F for 20 minutes. Add butter; Cook until melted. Arrange
meat in center of preheated Cookwell. Cover; roast 8 minutes. Turn meat over. Cover;
roast 8 minutes.
Reduce temperature to 350°F. Add remaining ingredients, except apples. Cover; roast
1-1/2 hours or until meat thermometer reaches 170°F. Add apples during last 15
minutes of roasting.
Serves 12 to 14
B-B-Q Ribs
6 to 8 Spare ribs 1 Bay leaf
1 Large onion, chopped 2 cups B-B-Q sauce
Preheat Roaster Oven at 425°F for 20 minutes. Arrange meat on Rack and place in
preheated Cookwell. Add onion, bay leaf and enough hot water to cover meat. Cover;
roast 2 hours or until meat is tender.
Carefully lift Rack out onto large tray with sides. Remove Cookwell; pour out and
discard hot water. Clean cookwell.
Set Cookwell into Heatwell. Cover; preheat to 425°F. Place Rack with meat into
Cookwell; brush sauce evenly over meat. Cover; roast 25 to 30 minutes or until sauce
is set and edges begin to brown.
Serves 8
Whole Chicken
1 (4 lb.) Whole Chicken 1 Tbsp. Parsley, minced
1 Tbsp. Olive or vegetable oil 2 Tbsp. Paprika
Preheat Roaster Oven at 425°F for 20 minutes.
Rub skin with oil; rub on seasonings. Place bird on Rack and place in preheated
Cookwell. Cover; reduce temperature to 375°F.; roast 1 hour or until meat
thermometer reaches 180°F.
Serves 2 to 3
NESCO
®
12-Qt. Convection Oven 18
Page 24

p
TRADITIONAL ROAST
Chicken Pieces
4 to 6 lb. Chicken breasts, thighs, and wings
Preheat Roaster Oven at 425°F for 20 minutes.
Select from variations below. Brush over chicken pieces before roasting.
Place bird on Rack and place in preheated Cookwell. Cover; reduce temperature to
375°F; roast 1 hour or until meat thermometer reaches 180°F.
Serves 8 to 12
Variations:
*Barbeque sauce *Sweet and Sour oriental sauce
*Honey Mustard sauce *Mushroom sauce
*Peanut sauce
*Combine Paprika, Tarragon, Parsley and Parmesan cheese
Honey Mustard Sauce
1 Cup Olive or peanut oil 1/4 Cup Cider vinegar
1/2 Cup Dijon mustard 1 Tbsp. Brown sugar
1/3 Cup Honey 1/2 tsp. Cinnamon
Combine all ingredients in small bowl; stir until well blended. Brush over poultry or
ork before roasting.
Makes about 1-1/2 cups
Mushroom Sauce
8 Oz. Mushrooms, chopped 1/2 Cup Milk
1 Green onion, thinly sliced 1 Tbsp. Butter or margarine
1 Tbsp. Parsley, chopped 1 tsp. Steak sauce
1 Tbsp. Flour, all purpose Salt and Pepper, to taste
Melt butter in medium saucepan. Sauté mushrooms, onion and parsley over medium
heat until tender. Sprinkle flour over; gently stir into vegetables. Gradually stir in mild,
steak sauce, salt and pepper. Continue to cook until sauce thickens, stirring constantly.
Spoon sauce over meat during last 20 minutes of roasting.
Makes about 1-1/4 cups
Peanut Sauce
1 Cup Chunky peanut butter 2 Tbsp. Lemon juice
2 Tbsp. Orange marmalade 1 Tbsp. Peanut oil
2 Tbsp. Soy sauce 3/4 Cup Milk
Combine all ingredients in small bowl; stir until well blended. Brush over poultry or
pork before roasting.
Makes about 2 cups
Applesauce Barbeque Sauce
1/4 Cup Applesauce 1/4 Cup Ketchup
1 Cup Brown sugar 4 Tbsp. Lemon juice
1/2 tsp. Salt 1/tsp. Ground black pepper
1/2 tsp Paprika 1/2 tsp. Garlic powder
Combine all ingredients in medium saucepan; stir until well blended. Bring to boil;
reduce heat. Brush over poultry or pork before roasting.
Makes about 1-1/2 cups.
19 NESCO
®
12-Qt. Convection Oven
Page 25

TRADITIONAL BAKING CHART
Preheat 12-Qt. Roaster Oven to roasting temperature for at least 20 minutes. Bake times are ONLY A GUIDE. Place bake pan on Rack.
Type of Food Size of Bake pan
Baking Powder Biscuits Bake sheet 425°F 15 to 18
Refrigerated Quick Rolls Bake sheet 375°F 14 to 16
Muffins 6 Cup pan 400°F 20 to 25
Quick Bread 9 x 5 loaf pan 375°F 55 to 60
Yeast Bread 9 x 5 loaf pan 400°F 30 to 35
Yeast Rolls Bake sheet 375°F 20 to 25
Cookies Bake sheet 375°F 10 to 12
Cupcakes 6 Cup pan 375°F 15 to 18
Package Cake 9 inch pan 375°F 25 to 30
Scratch Cake 9 inch pan 350°F 35 to 40
Pound Cake 9 x 5 loaf pan 375°F 50 to 55
Cheesecake 9 inch 400°F 50 to 55
Fruit Pie 9 inch pie pan 400°F 60 to 65
Custard Pie 9 inch pie pan 400°F 50 to 55
Pastry Shell 9 inch pan 400°F 20 to 25
Pizza (9 inch) On Rack 425°F 15 to 20
Baking Potatoes On Rack 400°F 50 to 55
Sweet Potatoes On Rack 400°F 45 to 50
Winter Squash On Rack 400°F 45 to 50
Baked Apples Custard cup 350°F 30 to 35
NESCO
®
12-Qt. Convection Oven 20
Temperature setting Bake time (minutes)
Page 26

p
b
TRADITIONAL BAKE
Pumpkin Pie
1-1/2 Cups Pumpkin, canned 1 Cup Evaporated milk
1/2 Cup Granulated sugar 2 Eggs
1 Tbsp. Flour, all purpose 1 Tbsp. Pumpkin pie spice
1 (9 inch) Pastry crust, unbaked
Preheat 12 Qt. Roaster Oven at 400°F for 20 minutes.
In large bowl, combine pumpkin, sugar, flour and spice; stir until well blended. Add
milk and eggs; stir until smooth.
Pat crust into 9 inch pie pan and flute edge. Pour filling into crust. Place pie pan onto
Rack and place in preheated Cookwell. Cover; bake 55 to 60 minutes.
Creamy Cheesecake
For Crust: For Filling:
40 Vanilla wafers, crushed 2 (8 oz. ea.) Cream cheese, softened
1/4 Cup Pecans, finely chopped 1/2 Cup Granulated sugar
1/4 Cup Butter or margarine, melted 1 tsp. Vanilla extract
2 Tbsp. Granulated sugar 3 Eggs
Preheat Roaster Oven at 400°F for 20 minutes.
Combine crust ingredients; stir until well blended. Pour into 9 inch springform pan;
at down with back of fork; set aside.
Place cream cheese, sugar and vanilla extract in large bowl; beat until smooth. Add
eggs one at a time, beat well after each addition. Beat for two minutes on medium
speed. Pour over crust. Place pan on Rack and place in preheated Cookwell. Cover;
ake 50 to 55 minutes or until set.
Serves 8 to 12
Strawberry Shortcakes
2 Cups Flour, all purpose 2/3 Cup Milk
1/4 Cup Granulated sugar 1/2 Cup Butter or margarine, chilled
1 tsp. Vanilla extract 1/2 tsp. Salt
1 Tbsp. Baking powder 1 tsp. Lemon juice
Preheat Roaster Oven at 425°F for 20 minutes.
Combine flour, baking powder, salt and sugar. Cut in butter until mixture crumbles.
Stir in milk, lemon juice and vanilla extract, just until moistened.
Drop dough from a large spoon onto lightly greased 9 x 13 inch baking sheet. Place
baking sheet on Rack and place in preheated Cookwell. Cover; bake 20 to 25 minutes
or until lightly browned. Remove from baking sheet to cooling rack. Let cool, then
slice to serve with whipped cream and strawberries.
Serves 8
Apple Cake
1 (18.25 oz. pkg.) Yellow cake mix 3 Eggs
1 (21 oz. can) Apple pie filling 3/4 Cup Brown sugar, packed
1 Tbsp. Flour, all purpose 1 Tbsp. Butter or margarine
1 tsp. Cinnamon, ground 1 Cup Walnut, chopped
Preheat 12 Qt. Roaster Oven at 350°F for 20 minutes. Lightly grease 9 x 13 inch bake
pan.
In large bowl, combine cake mix, eggs and apple filling; stir until well blended. Pour
into bake pan. Combine brown sugar, flour, butter, cinnamon and walnuts. Sprinkle
over the top of the batter.
Place pan on Rack and place in preheated Cookwell; bake 35 to 40 minutes or until
wooden pick comes out clean. Allow to cool before serving.
Serves 8
21 NESCO
®
12-Qt. Convection Oven
Page 27

N
p
TRADITIONAL BAKE
Chocolate Chip Cookie Bar
1/2 Cup Butter or margarine 1 Cup Flour, all purpose
1/2 Cup Brown sugar, packed 1 tsp. Baking soda
1/4 Cup Granulated sugar 1/4 tsp. Salt
1 Egg 1 tsp. Vanilla extract
1 (6 oz. pkg.) Semi-sweet chocolate chips
Preheat Roaster Oven at 375°F for 20 minutes.
Place butter, brown and granulated sugar in large bowl; beat until creamed.
Add egg and vanilla extract; beat until smooth.
Stir in dry ingredients. Add chocolate chips; stir until well mixed. Spread into lightly
greased 9 x 9 inch baking pan.
Place pan on Rack and place in preheated Cookwell. Cover; bake 18 to 22 minutes or
until center is set. Cool pan on cooling rack. Cut into bars; store in air tight container
Makes 9 pieces
ote: Substitute or mix white chocolate chips, butterscotch pieces or M&M® candies.
Sugar Cookies
1 Cup Butter or margarine 2 Cups Flour, all purpose
1 Cup Powdered sugar 1 Tbsp. Baking soda
1 Egg 1 tsp. Cream of tartar
1 tsp. Vanilla extract
Preheat Roaster Oven at 350°F for 20 minutes.
Place butter and powdered sugar in large bowl; beat until creamed. Beat in egg and
vanilla extract. Add dry ingredients; stir until smooth.
Form dough into 1-inch balls; roll balls in granulated sugar. Place 2 inches apart on
lightly greased 9 x 13 inch baking sheet. Set baking sheet on Rack and place in
reheated Cookwell. Cover; bake 10 to 12 minutes. Allow cookies to cool on cooling
rack.
Makes about 4 dozen
NESCO
®
12-Qt. Convection Oven 22
Peanut Butter and Peanuts Cookies
2 Cups Flour, all purpose 1-1/2 Cups Chunky peanut butter
1-1/2 Cup Brown sugar, packed 1/2 Cup Butter or margarine
1 tsp, Vanilla extract 2 Eggs
1/2 tsp. Baking soda 2 tsp. Baking powder
1 Cup dry roasted peanuts 1 Cup Chocolate chips
Preheat Roaster Oven at 375°F for 20 minutes.
In large bowl, cream peanut butter and butter. Add brown sugar; beat until smooth.
Beat in eggs and vanilla extract. Add dry ingredients; stir until blended. Mix in
peanuts and chocolate chips.
Drop by spoonful 2 inches apart on lightly greased 9 x 13 baking sheet. Place baking
sheet on Rack. Set Rack in preheated Cookwell. Cover; bake 10 to 12 minutes
Remove cookies and allow to cool on cooling rack.
Makes about 5 dozen
Gingersnap Cookies
1/2 Cup Butter or margarine 1 tsp. Vanilla extract
1 Cup Butter flavored shortening 2 Cups Flour, all purpose
1 Cup Granulated sugar 2 tsp. Baking soda
1 Egg 2 tsp. Pumpkin pie spice
1/4 Cup Molasses
Preheat 12 Qt. Roaster Oven at 350°F for 20 minutes. Lightly grease 9 x 13 inch bake
pan.
In large bowl, cream butter and shortening. Gradually add sugar; beat until smooth.
Beat in egg, molasses and vanilla extract. Add dry ingredients; stir until mixed.
Form dough into 1 inch balls. Place 2 inches apart on 9 x 13 baking sheet. Lightly
flatten cookies with bottom of glass dipped in sugar. Place baking sheet on rack and
place in preheated Cookwell. Cover, bake 9 to 11 minutes. Allow cookies to cool on
cooling rack.
Makes about 4 dozen
Page 28

TRADITIONAL BAKE
Zucchini Quick Bread
2 Cups Flour, all purpose 2 Eggs
1 Cup Granulated sugar 1/3 Cup Apple juice
1 Tbsp. Wheat germ 1/4 Cup Vegetable oil
1 tsp. Baking powder 2 tsp. Vanilla extract
2 tsp. Cinnamon 1-1/2 Cups Shredded zucchini
1 tsp. Baking soda 1/2 tsp. Ground nutmeg
Preheat Roaster Oven at 325°F for 20 minutes.
Combine dry ingredients, set aside. In large bowl, combine eggs, juice, oil and extract.
Stir until well blended. Stir in dry ingredients alternately with zucchini. Pour into
lightly greased 9 x 5 loaf pan.
Place pan on Rack and place in preheated Cookwell. Cover; bake 55 to 60 minutes or
until set. Remove bread from pan and allow to cool.
Makes one 9 x 5 loaf
Granola
10 Cups Quick rolled oats 1 Cup Raisins
2 Cups Flour, all purpose 1 Cup Dried fruit, chopped
2 Cups Honey 1 Cup Sesame seeds
2 Cups Corn oil 1 Cup Coconut, flaked
2 Cups Sunflower nuts 1 Cup Walnuts, chopped
Lightly spray Cookwell with spray cooking oil. Preheat Roaster Oven at 275°F for 20
minutes.
Combine all ingredients in preheated Cookwell; stir until well mixed. Cover; bake 60
to75 minutes, stirring twice.
Allow to cool and store in air tight container.
Makes about 1 gallon.
French Bread
6 Cups Flour, all purpose 2 Cups Warm water
1 (1/4 oz. pkg.) Active dry yeast 2 Tbsp. Cornmeal
1/2 tsp. Granulated sugar 1 Egg white
3 tbsp. Butter or margarine, melted 2 Tbsp. Water
1 Tbsp. Salt
Preheat Roaster Oven at 400°F for 20 minutes.
In large bowl, place warm water, yeast and sugar. Stir just until mixed. Let stand 5
minutes or until it starts to bubble.
Add butter, salt and 4 cups flour. Beat until smooth. Gradually stir in remaining flour.
Dump dough onto counter. Knead until dough is smooth and not sticky. Lightly grease
mixing bowl. Place dough in bowl, turn dough over to bring greased side up. Cover
with towel. Let rise in warm place for 1 hour or until doubled in bulk.
Shape into two 10 inch loaves. Lightly grease 9 x 13 inch baking sheet; sprinkle on
cornmeal. Arrange loaves on sheet; cut 4 slashes 1/4 inch deep on top of each loaf.
Stir egg white and water together; brush over loaves.
Place baking sheet on Rack and place in preheated Cookwell. Cover; bake 35 to 40
minutes or until golden brown.
Makes two 10 inch loaves.
23 NESCO
®
12-Qt. Convection Oven
Page 29

b
TRADITIONAL COOK
Chili
1/4 Cup Butter or margarine 1 (8oz.) can Tomato sauce
5 lbs. Ground beef 3 (16 oz. ea.) cans Red kidney beans
2 Large onions, chopped 1/4 Cup Chili powder
2 Cloves garlic, minced 1 Tbsp. Italian herb seasoning
1 (29 oz.) can Stewed Tomatoes 1 Tbsp. Brown sugar
3 (11 oz. ea.) cans Tomato soup
Lightly spray Cookwell with spray cooking oil. Preheat Roaster Oven at 425°F for 20
minutes. Add butter; stir to melt. Break apart meat while placing into preheated
Cookwell. Add onions and garlic. Cover; cook 10 to 15 minutes or until meat is
rowned. Stir in remaining ingredients until well mixed. Reduce temperature to 350°F;
cover; cook 1 to 1-1/2 hours.
Serves 25 to 30
.
Lasagna
1 (32 oz.) jar Spaghetti sauce 1 tsp. Ground black pepper
15 Lasagna noodles, uncooked 2 –1/2 Cups Ricotta cheese
2 lbs. Ground beef, browned 4 Cups Mozzarella cheese, shredded
1 Large onion, chopped 1/2 Cup Grated parmesan cheese
1 Tbsp. Italian herb seasoning
Remove Cookwell; preheat covered Heatwell at 400°F. Lightly spray Cookwell with
spray cooking oil. Spread 1/2 Cup spaghetti sauce in bottom of Cookwell. Lay 4
lasagna noodles abreast and lengthwise and one crosswise at end of Cookwell.
Combine beef, onions and seasonings; spread one third of the mixture over the
noodles. Spoon over one third of the remaining spaghetti sauce and cheese. Repeat
twice.
Set Cookwell into preheated Heatwell. Cover; cook 1 to 1-1/2 hours or until center is
set. If edges become brown, reduce temperature to 350°F and add about 20 extra
minutes of cooking.
Serves 10 to 12
NESCO
®
12-Qt. Convection Oven 24
Cajun Red Beans and Rice
1 Lb Dry Red kidney beans 1/4 tsp. Marjoram
Water to cover beans, plus 2 inches 1/2 tsp. Paprika
1 tsp. Cayenne pepper 4 tsp. Chili powder
1 Clove garlic, minced 1-1/2 tsp. Cajun seasoning
1/4 tsp. Oregano Salt and Pepper to taste
Combine above ingredients in Cookwell. Cover; soak overnight
3 Cups Water 2 Whole bay leaves
1 (16 oz.) can Stewed tomatoes 1 Celery stalk, thinly sliced
3 Tbsp. Beef bouillon cubes 1/2 Green pepper, chopped
1 Tbsp. Brown sugar 1 Lb. German or Italian sausage
1 Tbsp. Worcestershire sauce 2 Tbsp. Tabasco sauce
Cooked rice to serve
Preheat Roaster Oven at 250°F for 20 minutes.
Drain off soaking water. Add the first 7 ingredients. Cover; cook at 250°F. for 4 to 5
hours, adding water to cover beans, if needed. Increase temperature to 325°F. Add
remaining ingredients; stir. Cover; cook 2 to 2-1/2 hours or until thickened.
Serves 6 to 8
Barbeque Sandwich
1/4 Cup Butter or margarine, melted 1 Tbsp. Worcestershire sauce
3 Lbs. Ground turkey 2 (10 oz.) Cans Tomato soup
2 Large Onions, chopped 2 Cups Ketchup
4 Celery stalks, thinly sliced 1 Cup B-B-Q sauce
Lightly spray Cookwell with spray cooking oil. Preheat Roaster Oven at 425°F for 20
minutes. Add butter, meat, onions and celery. Cover; cook 15 to 20 minutes or until
browned.
Reduce temperature to 350°F. Add remaining ingredients: stir to mix. Cover; cook 30
to 40 minutes.
Serves 12 to 15
Page 30

p
TRADITIONAL STEAM
Vegetable Steam Chart
Place Rack in Roaster Oven; add hot water to the amount given in chart. Cover;
reheat to 400°F for 20 minutes.
Steaming will bring out the fresh flavor, color, and texture of each vegetable. Times
may vary due to freshness, size differences, and desired degree of doneness. The
suggested times will give you crisp, tender vegetables.
Vegetable Steam Time (min.)
Artichoke, trimmed 25 to 30 3 Cups
Asparagus, trimmed 15 to 20 2 Cups
Green Beans, whole 15 to 20 2 Cups
Beets, whole 25 to 30 3 Cups
Broccoli, stalks 20 to 25 3 Cups
Broccoli, flowerettes 12 to 15 3 Cups
Cabbage, quartered 15 to 20 3 Cups
Carrots, medium 20 to 25 3 Cups
Cauliflower, whole 25 to 30 4 Cups
Cauliflower, flowerettes 10 to 15 2 Cups
Corn on the Cob 20 to 25 3 Cups
Leeks, trimmed 10 to 15 2 Cups
Potatoes, whole, red 20 to 25 4 Cups
Sweet potatoes 40 to 45 4 Cups
Summer Squash 15 to 20 3 Cups
Winter Squash, quartered 30 to 35 4 Cups
Water Amount
Fish and Seafood Chart
To steam: Place Rack in Roaster Oven. Add hot water to the amount given in the
chart. Cover; preheat to 350°F for 20 minutes.
Steaming will retain the delicate texture and flavor of fish and seafood. Serve hot
directly from Roaster Oven. To serve cold, plunge in cold water to stop cooking; chill
before serving.
Type of Fish Steam time (min.)
Fish Fillets 15 to 20 3 Cups
Fish Steaks 20 to 25 4 Cups
Clams, in shell 10 to 15 3 Cups
Crab, claws and legs 25 to 35 3 Cups
Lobster, tails 20 to 25 4 Cups
Mussels, in shell 10 to 15 3 Cups
Oysters, in shell 10 to 15 3 Cups
Shrimp, large, in shell 8 to 12 3 Cups
Sea Scallops, in shallow dish 10 to 15 3 Cups
Water Amount
25 NESCO
®
12-Qt. Convection Oven
Page 31

ONE YEAR LIMITED WARRANTY
This appliance is warranted for one year from date of original purchase
against defects in material and workmanship. This warranty does not
cover transportation damage, misuse, accidents or similar incidents.
This warranty gives you special legal rights and you may have other
rights that vary from state to state. Always call 1-800-288-4545 to
obtain a return authorization number before returning defective
product.
Defective products, within warranty period, may be returned, postage
prepaid, with a description of the defect, along with a copy of the
original bill of sale, to The Metal Ware Corporation, 1700 Monroe St.,
Two Rivers, WI 54241 for no-charge repair or replacement at our
discretion. Out of warranty products may also be returned for repairs
or replacement. A charge for parts and labor will be implied.
NESCO
Service and genuine NESCO
from NESCO
For service in warranty, follow instructions set forth in warranty. When
ordering new parts, make sure that you always mention the model
number of the product, which is located on the bottom of the Roaster
Oven.
®
12-Qt. Convection Oven 26
®
FACTORY SERVICE DEPARTMENT.
®
replacement parts may be obtained
Page 32

©2003, The Metal Ware Corporation Printed in China Made in China
#66413 rev.06/28/04
 Loading...