

Page 1

InCD Reader Manual
Nero AG
Page 2

Copyright and Trademark Information
This manual and all its contents are protected by copyright and are the property of Nero AG.
All rights reserved. This manual contains material that is protected by internationally valid
copyright. No part of this manual may be reproduced, transmitted or transcribed without the
express written permission of Nero AG.
Nero AG rejects any claims that transcend the clauses of the guarantee rights. Nero AG
does not undertake any liability for the correctness of the content of the user manual. The
contents of the supplied software, as well as of the user manual, may be changed without
prior warning.
All trade names and trademarks are the property of their respective owners.
The trademarks mentioned here are named for information purposes only.
The "Mount Rainier" and "EasyWrite" trademarks are the property of the Mount Rainier
group.
Copyright © 2007 Nero AG and its licensees. All rights reserved
REV 1; SW: 5.5.2.9
Page 3

Contents
Contents
1 General information 4
1.1 About the manual 4
1.2 About InCD Reader 4
2 Technical information 5
2.1 System requirements 5
2.1.1 Operating systems 5
2.1.2 Hardware 5
3 Installation 6
3.1 Installing InCD Reader 6
4 Accessing SecurDisc discs 8
4.1 SecurDisc context menu 8
4.1.1 SecurDisc - Options window 9
4.2 SecurDisc - Drive and disc features window 10
4.3 Opening a SecurDisc disc 11
5 Accessing InCD discs 15
6 Index 16
7 Contact 17
7.1 Contact details 17
Page 4
General information
1 General information
1.1 About the manual
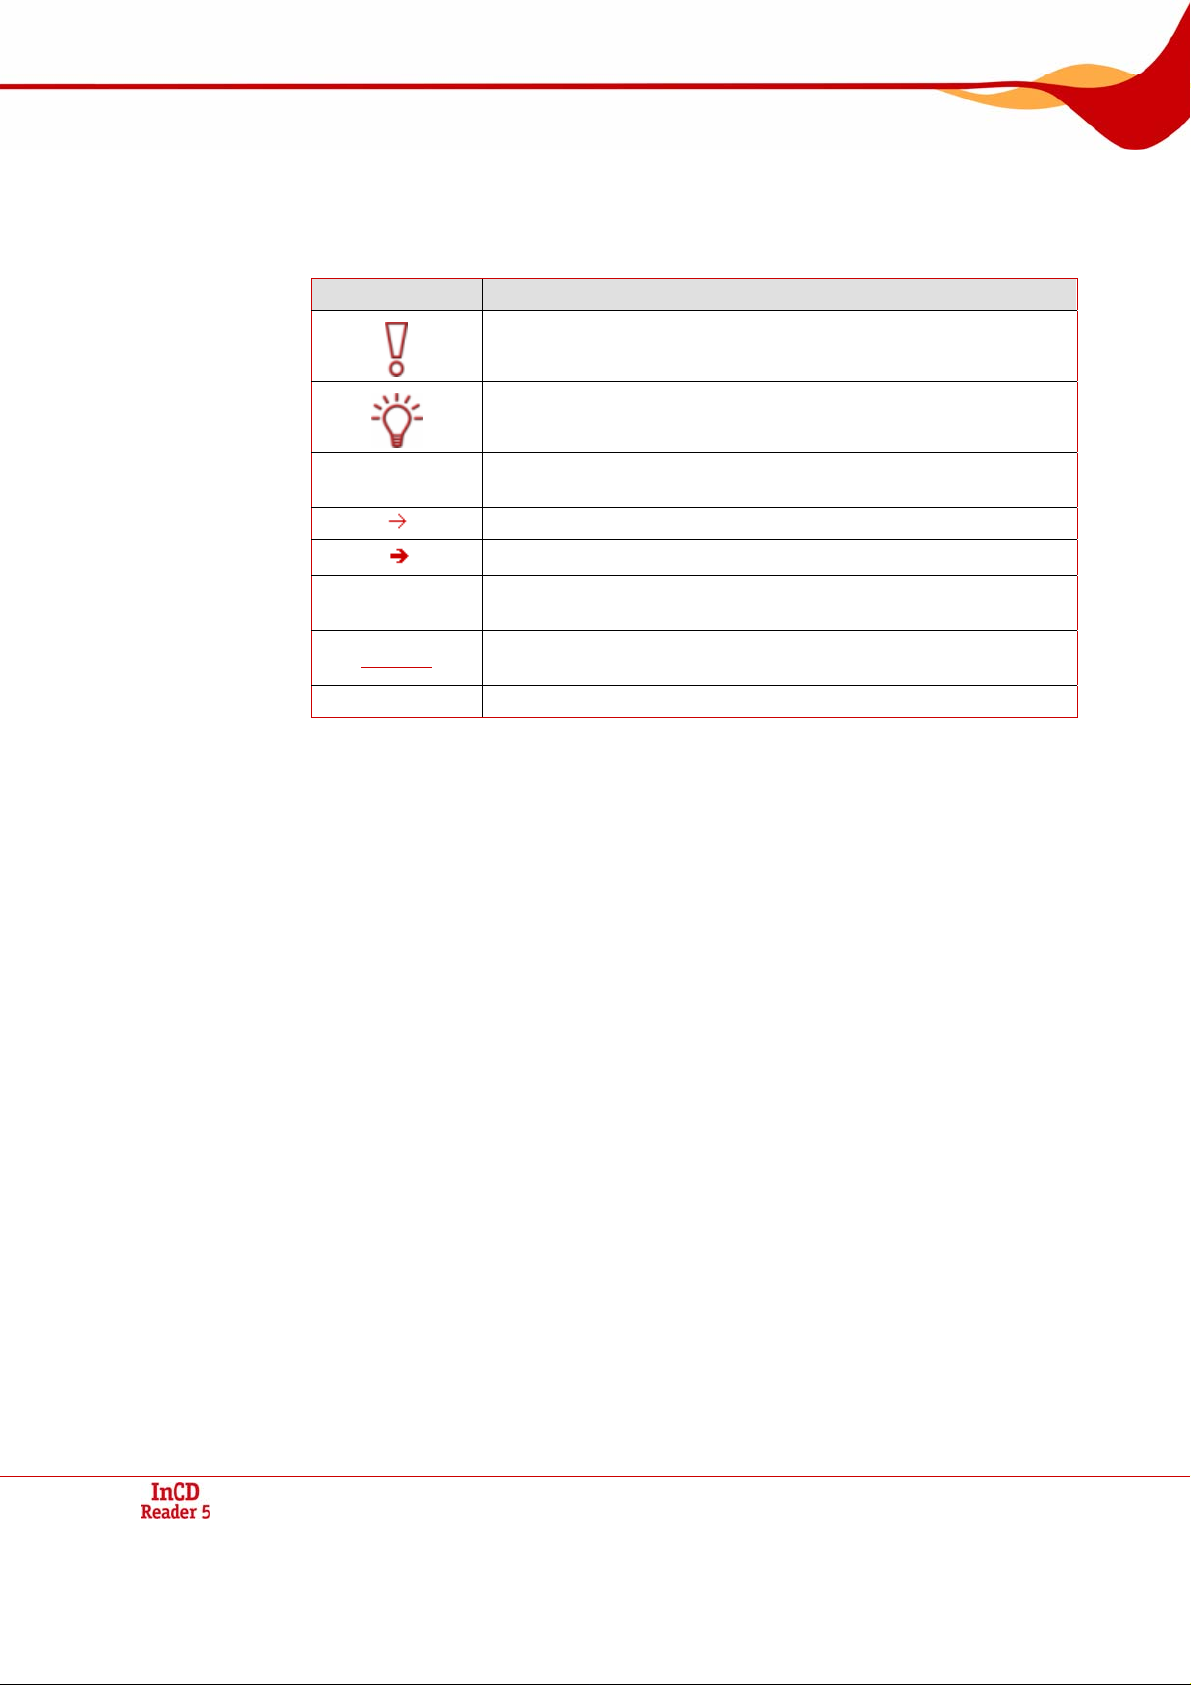
In order to make best use of this manual, please note the following conventions:
Symbol Meaning
Indicates warnings, preconditions or instructions that have to be
1. Start …
followed strictly.
Indicates additional information or advice.
A number at the beginning of a line indicates a request for action.
Carry out these actions in the order specified.
Indicates an intermediate result.
Indicates a result.
OK
Chapter
[…] Indicates keyboard shortcuts for entering commands.
1.2 About InCD Reader
With InCD Reader, all discs that were created with InCD can be read, even on computers
that do not have InCD installed. InCD Reader also assumes the function of the so-called
Remapper. The Remapper is necessary if you wish to read MRW-Disks (Mt. - Rainer-Disks)
in hard drives that do not support the MRW disc format.
In addition, InCD Reader provides read access to all discs that were created with SecurDisc
– even on drives without SecurDisc support.
Indicates text passages or buttons that appear in the program
interface. They are shown in bold face.
Indicates references to other chapters. They are executed as
links and are shown in red and underlined.
Page 4
Page 5

Technical information
2 Technical information
2.1 System requirements
2.1.1 Operating systems
Windows® 2000
Windows® XP
Windows® 2003 Server
Windows Vista™
2.1.2 Hardw
are
CD/DVD recorder that supports write-once and rewritable discs.
Page 5
Page 6

Installation
3 Installation
3.1 Installing InCD Reader
When InCD Reader is being installed, the SecurDisc reading feature is automatically installed simultaneously.The following requirements have to be fulfilled:
You must have administrator rights for the computer on which you want to install or
uninstall InCD Reader.
InCD Reader is a standalone application and can be downloaded free of charge from
www.nero.com or www.securdisc.net.
To install InCD Reader, proceed as follows:
1. Download InCD Reader from www.nero.com or www.securdisc.net to your PC.
Close all non-essential Windows
be running.
3.
Double-click on the InCD Reader installation file.
Æ temporary
The required files are automatically unzipped and stored on the C:\ drive in a
folder from which they are automatically deleted once they have been used.
The start screen of the Nero InCD Reader Installation Wizard is displayed.
®
applications and close any anti-virus software which may 2.
4.
Click on the Next button.
Æ The License Agreement screen is displayed.
Carefully read through the license agreement. If you agree to the terms of the license
5.
agreement, click on ‘I accept
cept to install InCD Reade
6.
Click on the Next button.
all terms of the preceding License Agreement’. You must ac-
r.
Æ The Customer Details screen is displayed.
Enter your name in th
7.
rate customer. A serial num
modify this number.
e text boxes, including the name of your company if you are a corpo-
ber has already been entered in the Serial Number box. Do not
8. Click on the Next button.
Æ The Setup Type screen is displayed.
9. Select the desired installation type. You can select a Norm
InCD Reader, there is no difference between the
10. ue with the installation.
Click on the Next button to contin
Æ The Start Installation screen is displayed.
11. Clic
k on the Install button.
InCD Reader is installed; you can follow the progress of the installa
Æ tion with the progress
bar.
The Settings screen is displayed at the end of the insta
se two options.
al or Custom installation. For
llation.
12. Click on the Next button.
Æ The final screen of the Installation Wizard is displayed.
Page 6
Page 7

Installation
13.
Click on the Exit button.
The Installation Wizard is
Æ closed. A dialog box informing you that Windows
restarted is displayed
14.
Click on the Yes button.
.
Your computer is restarted.
InCD Reader is installed.
As soon as you insert a SecurDisc disc the SecurDisc
icon is available in the system
tray.
®
has to be
Page 7
Page 8

Accessing SecurDisc discs
4 Accessing SecurDisc discs
If InCD Reader is installed, the SecurDisc icon appears in the syst em tray after the computer has been booted and a SecurDisc disc has been inserted. No special link is created in
the program directory.
Using the
Open the context menu by right-clicking (see SecurDisc context menu)
Open the SecurDisc - drive a
SecurDisc - Options window
The Always show a notification when a SecurDisc™ disc is inserted box is checked
default in the SecurDisc™ - Options window, which means SecurD
sends a notification when a SecurDisc™ disc is detected in
In this way access takes place automatically, so to speak.
The windows appropriate to the properties of the detected SecurDisc™ disc for entering a
password and/or a digital signature are also displayed. You can enter these convenien
here, af
plore
r.
icon, you can:
ter which you can immediately access all data on the SecurDisc™ disc via Ex-
4.1 SecurDisc context menu
The following selection o
Drive
drop-down menu
Show supported
features
Options
About...
ptions are available in the context menu:
Lists all connected drives for selection.A fly-out menu corre-
sponding to the properties of the disc in the drive additionally
permits access to the windows for entering a password and d
tal signature as
tures window.
Opens the SecurDisc Drive and disc features window where
you define which drive you wish to select, the capabilities of
choses drive, displays the inserted disc and enter any passwords and digital signatures required as well as check for data
manipulation (see
Opens the SecurDisc - Options window where you can define
whether notifications should always be shown when you insert a
disc created using SecurDisc. You can also specify whether the
system should prompt for the password for password-protecte
data u
dow))
Shows information about InCD Reader.
nd disc features window by double-clicking (see
)
by
isc™ automatically
a drive.
tly
igi-
well as the SecurDisc - Drive and disc fea-
the
SecurDisc - Drive and disc features window).
d
pon insertion of the disc (see SecurDisc - Options win-
Page 8
Page 9

Accessing SecurDisc discs
4.1.1 SecurDisc - Options window
In you can specify how SecurDisc should behave when a SecurDisc disc is inserted.
The following check boxes are available:
Always show a
notification when a SecurDisc
disc is inserted
Prompt for password for
protected data on disc
insertion
Fig. 1: SecurDisc Options window
Displays a window each time a SecurDisc disc is inserted in a connected drive containing the Show disc
features button for opening the SecurDisc - Drive and
disc features window (see
features window
).
SecurDisc - Drive and disc
Prompts for the password for protected data when the
disc is inserted, not just when you want to access the
data.
Page 9
Page 10

Accessing SecurDisc discs
4.2 SecurDisc - Drive and disc features window
In the SecurDisc - Drive and disc features window you can select the drive you want, display the capabilities of the selected drive, enter a password in the General area if the disc
is password-protected, confirm a digital signature, and ascertain whether the files on the
disc have been changed since they were last opened.
Fig. 2: : SecurDisc - Drive and disc features window
The following information and selection options are available:
Drive area
Drive
drop-down
menu
Disc name
Permits selection of the drive in which the SecurDisc disc was inserted.
Shows the name of the disc inserted in the selected drive.
Capabilities area
Drive sup-
ported features
Lists the read and write capabilities supported by the relevant
drive.
column
In use on disc
column
Lists which of these capabilities are used by the inserted disc.
Page 10
Page 11

Accessing SecurDisc discs
Allow Duplication
button
General area
Enter pass-
word button
Confirm digital
signature
button
Altered data
detection
button
Opens the Allow Duplication window where you can enter a
password in the corresponding text box if required to remove the
duplication protection for files in PDF format on the disc.
This button is only available if a SecurDisc-capable drive is selected, a SecurDisc data DVD is inserted, and files in PDF format
on the disc are password-protected against duplication.
Opens the Data Protection window where you can enter a password in the text box if required to open the disc or the files on the
disc.
This button is only available if the data on the disc is passwordprotected.
Opens the Verify Digital Signature window where you can select
and start a suitable public key.
This button is only available if the SecurDisc disc is protected with
a digital signature.
Opens the Detection of Altered Data window where you can
check whether the data has been manipulated without permission.
4.3 Opening a SecurDisc disc
Access to the SecurDisc disc can be protected with access passwords and/or digital signatures. In addition, PDF files on SecurDisc DVDs can be protected against duplication. . If a
retrieval password has been defined, you can remove this duplication protection with InCD
Reader.
To do this, proceed as follows:
1. Insert the SecurDisc disc into a drive of the computer on which InCD or InCD Reader is in-
stalled.
2. Double click the SecurDisc icon in the system tray..
The SecurDisc - Drive and disc features window is displayed.
If a SecurDisc disc has already been inserted into a drive which supports SecurDisc te chnology, this drive will automatically be selected in the Drive menu as soon as a SecurDisc
disc is inserted again.
3. In the Drive drop-down menu, select the drive in which you inserted the SecurDisc disc. The
drive in which a SecurDisc disc was last inserted is g enerally selected by default.
Æ The name of the disc inserted in the chosen drive is displayed in the Disc name box.
Also displayed in the Capabilities area are the properties of the selected drive and the
disc it contains.
The Always show a notification when a SecurDisc disc is inserted box is checked by
default in the SecurDisc - Options window, which means SecurDisc™ automatically
sends a notification when a SecurDisc™ disc is detected in a drive..
In this way access takes place automatically, so to speak.
The windows appropriate to the properties of the detected SecurDisc disc for entering a
password and/or a digital signature are also displayed. You can enter these conveniently
here, after which you can immediately access all data on the SecurDisc disc via Explorer.
Page 11
Page 12

Accessing SecurDisc discs
4. ted, click on the Enter password button..
If data on the SecurDisc disc is password-protec
Æ The Data Protection window is displayed.
Fig. 3: SecurDisc - Data Protection w
indow
1. Enter the required passw
ord in the text box or insert it using the Copy from clip-
board button.
Click on the OK button.
2.
Æ You are returned to the SecurDisc - Drive and disc features window.
5. lick on the Confirm digital signa-
If the SecurDisc disc is protected by a digital signature, c
ture button.
Æ The Verify Digital Signature window is displayed.
Fig. 4: SecurDisc - Verify Digital Signature window
1.
Click on the Select public key button.
Æ The Open window is displayed
.
2. Select the appropriate public key.
Click on the Open button.
3.
Æ The Verify Digital Signature window is displayed once more with the name of
the selected public ke
Click on the Start button.
4.
The digital signature is ch
Æ ecked using the selected public key. A progress bar
y entered under Key name.
keeps you informed of the processing status. The Close button is displayed once
verification is complete
.
5. Click on the Close button.
Page 12
Page 13

Accessing SecurDisc discs
Æ The public key has been accepted and the files are ready for you to access.
6. If the PDF file on the SecurDisc DVD has a removeable copy-protection, click the Allow Du-
plication button.
Æ The Allow Duplication window is displayed.
You are returned to the SecurDisc - Drive and disc features window.
Fig . 5: SecurDisc - Allow Duplication window
6. Enter the required password in the text box or insert it using the Copy from clip-
board button.
7. Click on the OK button.
Æ The copy protection is removed for access.
You are returned to the SecurDisc - Drive and disc features window.
7. Click on the Altered data detection button to check whether data has been manipulated.
Æ The Detection of Altered Data window is displayed..
Checksums are used to determine whether data manipulation has taken place. A progress bar and a growing list of the files examined keep you informed of the progress of
the verification process. The Close<< button is displayed once verification is complete.
Page 13
Page 14

Accessing SecurDisc discs
Fig. 6: : SecurDisc - Detection of Altered Data window
1. Click the Close<< button.
Æ You are returned to the SecurDisc - Drive and disc features window.
Î You can now open the SecurDisc disc using, for example, Windows Explorer.
Page 14
Page 15

Accessing InCD discs
5 Accessing InCD discs
Once InCD Reader is installed, your computer has all of the drivers it needs for reading discs
created with InCD. In the case of MRW discs, InCD Reader performs the required remapper
function so that you can open MRW discs as normal and without any problems in Microsoft
Windows Explorer™, for example.
Page 15
Page 16

Index
6 Index
A
Access to InCD discs....................................................4
Access to MRW discs...................................................4
Accessing InCD Disks................................................15
Accessing MRW Disks ...............................................15
C
Contact.......................................................................17
Conventions..................................................................4
D
Digital signature..........................................................12
Drive and disc features...............................................10
I
InCD Disks
Access.............................................................................4, 15
Installing InCD Reader .................................................6
M
Mount Rainier (MRW)...................................................4
O
Operating System.........................................................5
P
Password protection ...................................................12
R
Remapper.....................................................................4
S
SecurDisc .....................................................................8
SecurDisc
Options window ....................................................................9
SecurDisc
Drive and disc features.......................................................10
SecurDisc
Password protection........................................................... 12
SecurDisc
Digital signature..................................................................12
System Requirements ..................................................5
Hardware.............................................................................. 5
Operating System.................................................................5
Page 16
Page 17

Contact
7 Contact
7.1 Contact details
InCD Reader is a Nero AG product.
Nero AG
Im Stoeckmaedle 13-15
76307 Karlsbad
Germany
Web:
Help:
Fax:
Copyright © 2007 Nero AG and its licensees. All rights reserved.
www.nero.com
http://support.nero.com
+49 7248 928 499
Page 17
 Loading...