

Nemox Gelato 5 5K Twin Crea User guide
EN
Gelato
INSTRUCTION BOOK
5+5
Pag.
4
K
Twin
crea
serie
FR
ES
Nl
РУ
MODE D’EMPLOI
INSTRUCCIONES PARA EL USO
ISTRUZIONI PER L’USO
IT
GEBRAUCHSANWEISUNG
D
GEBRUIKSAANWIJZING
ИНСТРУКЦИИ
Pag.
Pag.
Pag.
Seite
Pag.
Pag.
12
21
30
39
48
56
www.nemox.com
3a
3
Gelato
5+5
K
Twin
crea
serie
10
8
9
6
7
4
5
13
2
1
11
12
1615
2 a
1 a
11 A
11 b
11 C
11 D
12 A
12 b
12 C
12 D
14
13
Made in Italy by
2

U.K.: IMPORTANT INFORMATION FOR CORRECT DISPOSAL OF THE PRODUCT IN ACCORDANCE WITH EC DIRECTIVE
U.K.: IMPORTANT INFORMATION FOR CORRECT DISPOSAL OF THE PRODUCT IN ACCORDANCE WITH EC DIRECTIVE
2002/96/EC.
2002/96/EC.
At the end of its working life, the product must not be disposed of as urban waste. It must be taken to a special local authority
differentiated waste collection centre or to a dealer providing this service. Disposing of a household appliance separately avoids
possible negative consequences for the environment and health deriving from inappropriate disposal and enables the constituent
materials to be recovered to obtain significant savings in energy and resources.As a reminder of the need to dispose of household
appliances separately, the product is marked with a crossed-out wheeled dustbin.
F: AVERTISSEMENTS POUR L'ÉLIMINATION CORRECTE DU PRODUIT AUX TERMES DE LA DIRECTIVE EUROPÉENNE
F: AVERTISSEMENTS POUR L'ÉLIMINATION CORRECTE DU PRODUIT AUX TERMES DE LA DIRECTIVE EUROPÉENNE
2002/96/EC.
2002/96/EC.
Au terme de son utilisation, le produit ne doit pas être éliminé avec les déchets urbains. Le produit doit être remis à l'un des centres de
collecte sélective prévus par l'administration communale ou auprès des revendeurs assurant ce service. Éliminer séparément un
appareil électroménager permet d'éviter les retombées négatives pour l'environnement et la santé dérivant d'une élimination
incorrecte, et permet de récupérer les matériaux qui le composent dans le but d'une économie importante en termes d'énergie et de
ressources. Pour rappeler l'obligation d'éliminer séparément les appareils électroménagers, le produit porte le symbole d'un caisson
à ordures barré.
E : ADVERTENCIAS PARA LA ELIMINACIÓN CORRECTA DEL PRODUCTO SEGÚN ESTABLECE LA DIRECTIVA EUROPEA
E : ADVERTENCIAS PARA LA ELIMINACIÓN CORRECTA DEL PRODUCTO SEGÚN ESTABLECE LA DIRECTIVA EUROPEA
2002/96/CE.
2002/96/CE.
Al final de su vida útil, el producto no debe eliminarse junto a los desechos urbanos. Puede entregarse a centros específicos de
recogida diferenciada dispuestos por las administraciones municipales, o a distribuidores que facilitan este servicio. Eliminar por
separado un electrodoméstico significa evitar posibles consecuencias negativas para el medio ambiente y la salud derivadas de una
eliminación inadecuada y permite reciclar los materiales que lo componen, obteniendo así un ahorro importante de energía y
recursos. Para subrayar la obligación de eliminar por separado los electrodomésticos, en el producto aparece un contenedor de
basura móvil tachado.
I: AVVERTENZE PER IL CORRETTO SMALTIMENTO DEL PRODOTTO AI SENSI DELLA DIRETTIVA EUROPEA 2002/96/EC.
I: AVVERTENZE PER IL CORRETTO SMALTIMENTO DEL PRODOTTO AI SENSI DELLA DIRETTIVA EUROPEA 2002/96/EC.
Alla fine della sua vita utile il prodotto non deve esser smaltito insieme ai rifiuti urbani. Può essere consegnato presso gli appositi centri
di raccolta differenziata predisposti dalle amministrazioni comunali, oppure presso i rivenditori che forniscono questo
servizio.Smaltire separatamente un elettrodomestico consente di evitare possibili conseguenze negative per l'ambiente e per la
salute derivanti da un suo smaltimento inadeguato e permette di recuperare i materiali di cui è composto al fine di ottenere un
importante risparmio di energia e di risorse. Per rimarcare l'obbligo di smaltire separatamente gli elettrodomestici, sul prodotto è
riportato il marchio del contenitore di spazzatura mobile barrato.
D: WICHTIGER HINWEIS FÜR DIE KORREKTE ENTSORGUNG DES PRODUKTS IN ÜBEREINSTIMMUNG MIT DER EGRICHTLINIE
D: WICHTIGER HINWEIS FÜR DIE KORREKTE ENTSORGUNG DES PRODUKTS IN ÜBEREINSTIMMUNG MIT DER EGRICHTLINIE
2002/96/EG.
2002/96/EG.
Am Ende seiner Nutzzeit darf das Produkt NICHT zusammen mit dem Siedlungsabfall beseitigt werden. Es kann zu den eigens von
den städtischen Behörden eingerichteten Sammelstellen oder zu den Fachhändlern, die einen Rücknahmeservice anbieten,
gebracht werden. Die getrennte Entsorgung eines Haushaltsgerätes vermeidet mögliche negative Auswirkungen auf die Umwelt und
die menschliche Gesundheit, die durch eine nicht vorschriftsmäßige Entsorgung bedingt sind. Zudem ermöglicht wird die
Wiederverwertung der Materialien, aus denen sich das Gerät zusammensetzt, was wiederum eine bedeutende Einsparung an
Energie und Ressourcen mit sich bringt. Zur Erinnerung an die Verpflichtung, die Elektrohaushaltsgeräte getrennt zu beseitigen, ist
das Produkt mit einer Mülltonne, die durchgestrichen ist, gekennzeichnet.
NL: BELANGRIJKE INFORMATIE VOOR DE CORRECTE VERWERKING VAN HET PRODUCT IN OVEREENSTEMMING MET DE
NL: BELANGRIJKE INFORMATIE VOOR DE CORRECTE VERWERKING VAN HET PRODUCT IN OVEREENSTEMMING MET DE
EUROPESE RICHTLIJN 2002/96/EC
EUROPESE RICHTLIJN 2002/96/EC
Aan het einde van zijn nuttig leven mag het product niet samen met het gewone huishoudelijke afval worden verwerkt. Het moet naar
een speciaal centrum voor gescheiden afvalinzameling van de gemeente worden gebracht, of naar een verkooppunt dat deze
service verschaft. Het apart verwerken van een huishoudelijk apparaat voorkomt mogelijke negatieve gevolgen voor het milieu en de
gezondheid die door een ongeschikte verwerking ontstaan en zorgt ervoor dat de materialen waaruit het apparaat bestaat
teruggewonnen kunnen worden om een aanmerkelijke besparing van energie en grondstoffen te verkrijgen. Om op de verplichting tot
gescheiden verwerking van elektrische huishoudelijke apparatuur te wijzen, is op het product het symbool van een doorgekruiste
vuilnisbak aangebracht.
РУ: ВАЖНАЯ ИНФОРМАЦИЯ ДЛЯ ПРАВИЛЬНОЙ УТИЛИЗАЦИИ ИЗДЕЛИЯ, В СООТВЕТСТВИИ С ДИРЕКТИВОЙ ЕС
РУ: ВАЖНАЯ ИНФОРМАЦИЯ ДЛЯ ПРАВИЛЬНОЙ УТИЛИЗАЦИИ ИЗДЕЛИЯ, В СООТВЕТСТВИИ С ДИРЕКТИВОЙ ЕС
(ЕВРОПЕЙСКОГО ЭКОНОМИЧЕСКОГО СООБЩЕСТВА) 2002/96/ЕС
(ЕВРОПЕЙСКОГО ЭКОНОМИЧЕСКОГО СООБЩЕСТВА) 2002/96/ЕС
В конце своей рабочей жизни продукт не может быть утилизован как городские отходы. Его необходимо доставить в специальный цент
дифференцированного сбора отходов, предусмотренный городской администрацией, либо продавцу, предоставляющему данный вид услуг.
Отдельная утилизация бытовых приборов позволяет избежать вероятных негативных последствий для окружающей среды и здоровья, которые
могут возникнуть в результате неподобающей утилизации, а также предоставляет возможность повторного использования составляющих
материалов, что способствует значительной экономии энергии и ресурсов. Для напоминания о необходимости отдельной утилизации бытовых
приборов продукт маркирован значком перечёркнутого контейнера для сбора мусора.
|
Nemox International s.r.l. reserves the right to carry out all modifications which might be considered necessary.
Nemox International s.r.l. se réserve le droit d'apporter toute modification qui se rend nécessaire.
Nemox International s.r.l. se reserva el derecho de hacer toda modificaciòn que cree necesaria.
Nemox International s.r.l. si riserva il diritto di apportare tutte le modifiche ritenute necessarie.
Nemox International s.r.l. hält das Recht alle notwendingen Aenderungen durchzufuehren.
Nemox International s.r.l. behoudt zich het recht voor om alle wijzigingen die zouden kunnen worden geacht.
Nemox International s.r.l. Сохраняет за собой право на внесение необходимых поправок и изменений.
3

EnglishEnglish EnglishEnglish
IMPORTANT SAFEGUARDS
IMPORTANT SAFEGUARDS
When using electrical appliances, basic safety precautions should always be observed, including the
following:
•Read all instructions carefully.
•To protect against risk of electric shock, do not put the main body of appliance in water or any other liquid.
•This appliance has not been designed to be used by persons (including children) with physical, sensory
or mental impairments or who are lacking in experience or knowledge, unless they have been given the
necessary supervision and prior instructions about how to use this appliance by a person responsible for
their safety. Young children should be supervised to ensure that they do not play with the appliance.
•Unplug from outlet when not in use, before putting on or taking off parts, and before cleaning.
•Avoid contact with moving parts.
•Do not operate any appliance with a damaged cord or plug, or after the appliance malfunctions, or is
dropped or damaged in any manner. Return the appliance to an authorised Service Center for
examination, repair or electrical or mechanical adjustment.
•The use of attachments not recommended or sold by the appliance manufacturer may result in fire,
electric shock or injury.
•Do not use outdoors.
•Do not let cord hang over edge of table or counter, or touch hot surfaces.
SAVE THESE INSTRUCTIONS
SAVE THESE INSTRUCTIONS
CAUTION
CAUTION
•An authorised service representative should perform any servicing other than cleaning and user
maintenance. Authorised service personnel only should do repair.
•After removing the appliance from the packaging, check it for damage. If in doubt, do not use the
appliance and contact an authorised service centre.
•Plastic bags, polystyrene, nails, etc. must not be left within reach of children as they are potentially
dangerous.
•The appliance's manufacturer and vendor reject any responsibility for failure to comply with the
instructions provided in this user manual.
•Check that the voltage shown on the rating plate corresponds to the voltage of the mains.
•Do not use sharp utensils inside the bowl! Sharp objects will scratch and damage the inside of the bowl.
A rubber spatula or metal spoon may be used, when the appliance is in the “OFF”or “0” position.
•Never clean with scouring powders or hard implements.
•Do not place or use the appliance on or near hot surfaces, such as stoves, hotplates, or near open gas
flames.
•Do not unplug the unit by pulling on the cord.
•The appliance must be connected to an electrical system and power supply socket with a minimum
capacity of 10A, equiped with an efficient earth contact. The manufacturer is not responsible for
damages to things or people in the event that the prescribed safety norms have not been respected.
•Before carrying out any maintenance or cleaning operations, make sure that the appliance has been
disconnected from the electrical mains by removing the plug from the power supply socket.
•Never wash the appliance using water jets or place it in water!
•This appliance is suitable for use with 43°C max. ambient temperature (climatic class “T”).
IMPORTANT:
IMPORTANT:
This Ice Cream Machine contains its own refrigerant which must be allowed to settle after transport. Leave
This Ice Cream Machine contains its own refrigerant which must be allowed to settle after transport. Leave
the Ice Cream Machine on a horizontal surface for at least 12 hours after purchase or after any move which
the Ice Cream Machine on a horizontal surface for at least 12 hours after purchase or after any move which
might have stored the machine the wrong way up.
might have stored the machine the wrong way up.
Leave at least 20 cm on each side of the machine to allow free air circulation. Make sure the vent slots are
Leave at least 20 cm on each side of the machine to allow free air circulation. Make sure the vent slots are
free and unobstructed.
free and unobstructed.
4
UK USERS ONLY
UK USERS ONLY
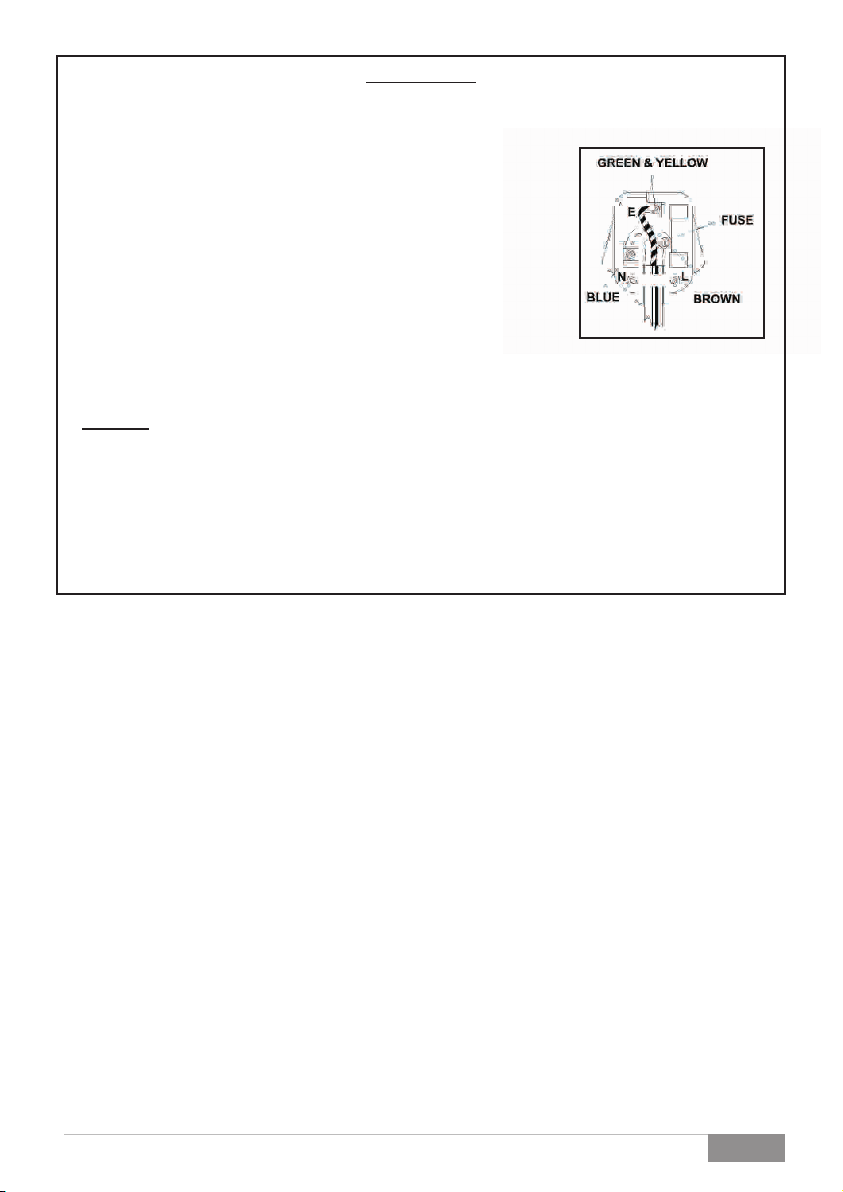
HOW TO CONNECT THE CORD TO A U.K. PLUG: IMPORTANT
HOW TO CONNECT THE CORD TO A U.K. PLUG: IMPORTANT
The wires in the mains lead are coloured in accordance with the following code:
•Green and yellow: Earth
•Blue: Neutral
•Brown: Live
Please, read the instructions given below before connecting the cord to a plug.
If in doubt, please, consult a qualified electrician. As the colours of the wires in
the mains lead of this appliance may not correspond with the coloured
markings identifyng the terminals in your plug, proceed as follows: the wire
that is coloured Green and Yellow must be connected to the terminal in the
plug which is marked with the letter E or the Earth symbol (G), or coloured
Green or Green and Yellow.
The wire that is coloured Brown must be connected to the terminal which is
marked with the letter L or coloured Red. The wire that is coloured Blue must be
connected to the terminal which is marked with the letter N or coloured Black.
SAFETY POINTS FOR REWIRABLE OR MOULDED PLUG
SAFETY POINTS FOR REWIRABLE OR MOULDED PLUG
The mains lead of this appliance may be already fitted with a BS1363 13A plug.
•If your socket outlet is not suitable for the plug, then the plug must be removed (cut off if it is a moulded on plug),
the flexible cord insulation should be stripped back as appropriate and a suitable 3 pin plug fitted.
WARNING
•WARNING: Dispose of a plug that has been cut from the power supply cord, as such a plug is hazardous if
inserted in a live 13A socket outlet elsewhere in the house.
inserted in a live 13A socket outlet elsewhere in the house.
•Should the fuse need to be replaced an ASTA marked fuse, approved to BS 1362, of the same rating must be
used.
•Always replace the fuse cover after fitting a fuse. The plug must NOT be used if the cover is omitted or lost until a
replacement is obtained. Make certain that only the correct fuse cover is used and fitted.
•For plugs with detachable fuse cover, the replacement must be the same as the colour insert in the base of the
plug, or as directed by the embossed wording on the base of the plug.
•If the detachable fuse cover is lost a replacement may be purchased from a Service Centre.
•Information for supply may also be obtained from the plug manufacturer.
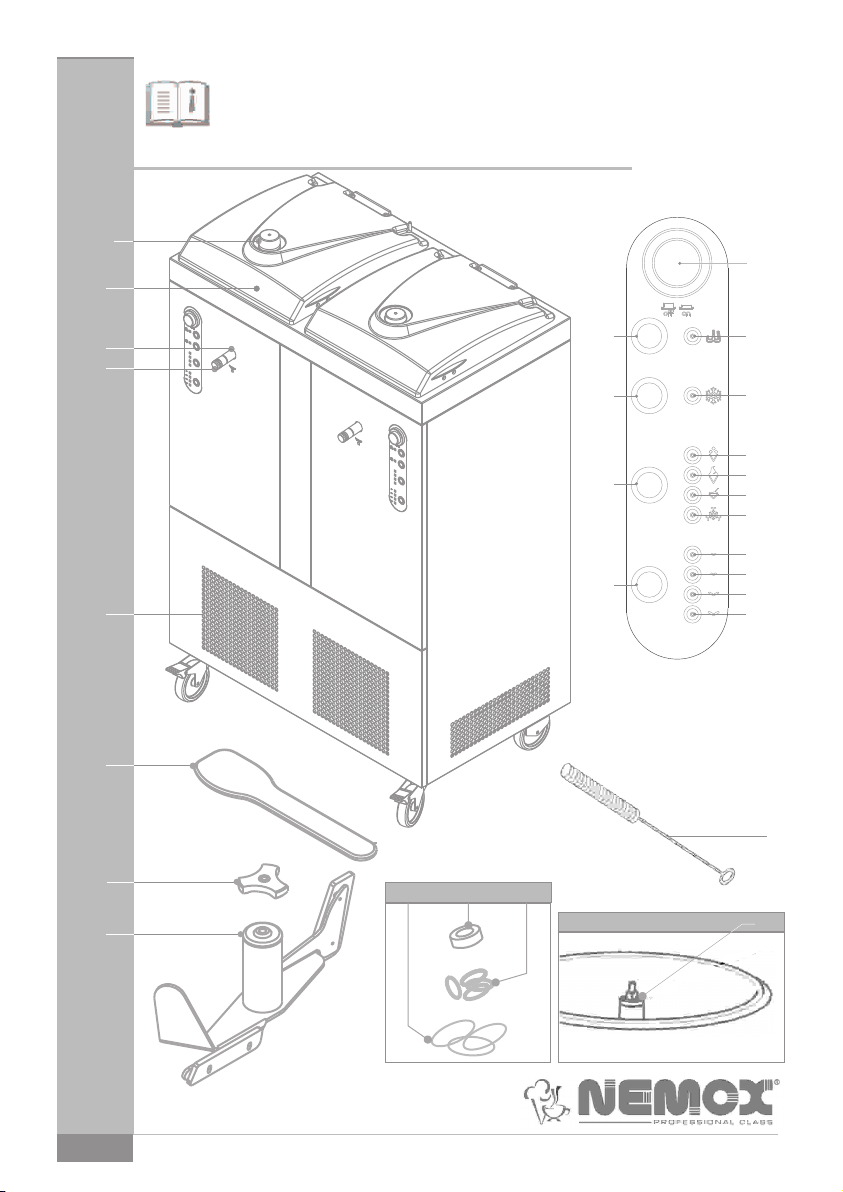
1). 9). 12b).
1). Cooling button. 9). Water discharge tap. 12b). Preservation cycle
1a). 10).
1a). Cooling system 10). Master light switch.
2).
2). Mixing paddle button.
2a).
2a). Paddle operation LED. cream program LED.
3). 11b).
3). Transparent lid. 11b). Semi soft Gelato
3a).
3a). Hole to add ingredients
4). 11d).
4). Paddle locking ring. 11d). Fast cooling
5).
5). Mixing paddle.
6).
6). Ventilation grid.
7).
7). Spatula.
8).
8). Water discharge tube.
Congratulations!
Congratulations! An onboard computer will help you get the job
You have purchased a latest generation
NEMOX ice cream machine.
In addition to producing all the ice cream,
sorbet and Granita you want, you can also
conserve the preparations in the pot, so they are
always at the ideal serving temperature and •Manual mode, the operation of the
: Dispose of a plug that has been cut from the power supply cord, as such a plug is hazardous if
No.2 LED.
operation LED. 12c). Preservation cycle
11).
11). Program selection button.
11a).
11a). Gelato italiano ice
12c).
No.3 LED.
12d).
12d). Preservation cycle
No.4 LED.
13).
program LED.
with cap. 11c). Granita program LED.
11c).
program LED.
12).
12). Preservation time selection
button.
12a).
12a). Preservation cycle
13). Oil seal.
14).
14). Cleaner.
15).
15). Paddle plastic sleeve
gasket set.
16).
16). Water discharge tap gasket
set.
17).
17). Paddle plastic sleeve.
No.1 LED.
done in the best way, enhancing your
professionalism and hard work and saving you
valuable time.
Your ice cream machine has two types of
operation:
Manual mode
density. compressor and paddle are independent so
GELATO 5+5 K TWIN CREA
GELATO 5+5 K TWIN CREA is composed of
two identical groups which are totally
independent and autonomous: two ice-cream
makers in a single device!
as to make the most of your experience. The
preservation system can be started on its own
if you consider it appropriate. An electronic
device stops the paddle when the consistency
5

EnglishEnglish EnglishEnglish
Of the preparation is excessive, thus while mixing.
preventing compromising the mechanical •For the preparation of Granitas, the maximum
functions of the machine. The cooling system recommended amount is 1kg. mixed with the
will continue to run until it is manually stopped. paddle provided. It can process up to 1.5kg. of
In automatic mode
•In automatic mode, you can first choose one of Granita using the special Granita paddle that
the 4 programs available (classic Italian can be purchased separately.
gelato, semi-soft gelato, Granita, fast cooling) •It is recommended to pour the mixture at a
and 4 preservation programs for every temperature between +10°C and +20°C.
production type. Higher temperatures may also considerably
With this operating mode you will not have to increase the processing time.
worry about anything, once the selections are
made and the ice cream machine is started, it
produces ice cream and automatically
switches to the desired preservation mode.
You just have to serve the ice cream to your
cust omers, alw ays with t h e correct
consistency.
FIRST USE
FIRST USE the power plug into the power outlet and
•Place GELATO 5+5K TWIN CREA on a flat operate the main switch (10); the light will
•During use, the appliance must be kept clear •Insert the mixing paddle (5) in the pot, turning it
•Leave the machine in a horizontal position for 8 •Close the lid (3).
•Before starting to use the machine, carefully
•Hygiene is extremely important when dealing
PREPARING THE MIXTURE
PREPARING THE MIXTURE quantity, initial temperature of the mixture,
Select the recipe and prepare the mixture, product type (creamed, sorbet or Granita) and
paying attention to the following: ambient temperature.
•Handle the ingredients as required by the IMPORTANT: The movement of the paddle is
•For the preparation of ice creams and sorbets, when the lid is lifted.
GELATO 5+5K TWIN CREA
surface, make sure that the ventilation grids (6) indicate the presence of voltage. The
are not obstructed. Leave a minimum electronic board will run an initialization check,
clearance of 10 cm. around the ventilation triggering all the LEDs on the control panel in
grids. sequence.
of walls or furniture so as to not obstruct the clockwise until it is positioned in the bottom of
inflow and outflow of cooling air. The leakage the pot.
of warm or hot air is an integral part of the •Tighten the locking ring (4) to the bottom so
operation of the device, that exchanges heat that the mixing paddle is securely attached.
with the outside for refrigeration. •Pour the previously prepared mixture.
hours or more before first use, as if it has been
tilted during transport, the cooling agents
must re-settle in the correct position.
clean the parts that are in direct or indirect
contact with processed foods (pot, mixing
paddle, paddle inserts, locking ring, lid etc).
with food. Carefully follow the provisions of
hygiene standards applicable in your country
(HACCP or equivalent).
hygiene standards applicable in your country entirely independent of the cooling system. A
(HACCP or equivalent). safety device stops the movement of the paddle
do not introduce more than 1.25kg of mixture
do not introduce more than 1.25kg of mixture, If the lid remains raised for prolonged periods,
in order to allow for proper volume increase the cooling system will continue to operate.
DIRECTIONS FOR USE
DIRECTIONS FOR USE
GELATO 5+5 K TWIN CREA
•GELATO 5+5 K TWIN CREA is composed of
two identical groups which are totally
independent and autonomous: here is
illustrated the operation of the single group.
•Check that the voltage indicated on the data
plate corresponds to the local network. Insert
MANUAL MODE
MANUAL MODE
•Start the cooling system by pressing the
Button (1); the LED (1a) will light up.
IMPORTANT:
IMPORTANT: if the machine is turned off due to
sudden and temporary suspension of power
supply or incorrect operation using the power
keys of the refrigerant, wait a few minutes
before restarting.
•Press button (2) to start the paddle; the LED
(2a) lights up, the production cycle begins.
The preparation time varies depending on the
IMPORTANT:
6

Consequently, when the lid is lowered again the programs in sequence.
paddle may not start or stop due to the
excessive consistency of the mixture. In this
case, the electronic control will permanently
stop the paddle and LED (2a) will flash to
indicate the fault.
If the preparation is not yet complete, turn off the
compressor by pressing the button (1) and the
paddle via the button (2), wait until the mixture
becomes softer and restart production.
•When the LED becomes steadily lit, the
associated program starts up and begins the
production cycle.
•The machine has 4 production programs and
4 preservation cycles for each of them. When
the program selected starts up you can
choose the preservation cycle desired. Chose
the preservation cycle by pressing the button
(12) repeatedly. When switching from the first
•According to the recipe and the amount of preservation program to the fourth, gelato
ingredients used, average production time is consistency increases gradually.
15/20 minutes.
•When the ice cream reaches the right
•Through the opening (3a) on the lid, you can consistency, the production program stops
add additional ingredients (e.g. to make ripple automatically and the preset preservation
ice cream during the last preparation phase). cycle is enabled.
•When the preparation has reached the •Every production program has a preset
desired consistency, turn off the cooling threshold time after which the machine enters
system by pressing button (1) and stop the in preservation cycle, regardless of the current
paddle by pressing button (2). To easily production phase.
remove the preparation from the pot, remove
the mixing paddle (5) by loosening the
appropriate locking ring (4).
MANUAL START OF THE PRESERVATION
MANUAL START OF THE PRESERVATION
CYCLE
CYCLE
•Should it become necessary to start the
preservation cycle manually, you can do this at
any time. Keep paddle button (2) and
c o m p r e s s o r b u t t o n ( 1 ) p r e s s e d
simultaneously for 3 seconds. The machine
will immediately switch to preservation cycle
related to the classic Italian gelato production
program. The LED (12a) will turn on.
•Should you need to run a preservation cycle
related to a different production program,
before switching from manual mode to
preservation mode, select the desired
pr od uc ti on pr o gr am ( s ee s e ct io n
"CHANGING THE PRESERVATION CYCLE").
AUTOMATIC MODE
AUTOMATIC MODE
GELATO 5+5K TWIN CREA
The GELATO 5+5K TWIN CREA machine has a
series of programs which automate the
production and preservation process.
•Follow the steps described in the section
"DIRECTIONS FOR USE".
•Press button (11) to start up the machine in
automatic mode by selecting the first
operation program. The LED flashes for 3
seconds during which, if you keep on pressing
the button (11), you will be able to select other
•If deemed appropriate, it is possible to enable
the selected preservation cycle at any time ,
ending the production program. Select the
preservation cycle desired via the key 12
(sequence selection). Keep the paddle button
(2) an compressor button (1) pressed
simultaneously for 3 seconds. The machine
will immediately switch from production cycle
to preservation cycle.
CLASSIC ITALIAN GELATO AND SORBET
•CLASSIC ITALIAN GELATO AND SORBET
PROGRAM
PROGRAM. By pressing button (11) once, the
LED (11a) will light up and activate the
production program. At the end of the
production cycle, the LED (11a) flashes
indicating that the selected preservation cycle
has been activated.
If the preparation was ready before reaching
the operation time limit, the whipping paddle
lock s. The pr e servation function i s
automatically activated.
SEMI-SOFT GELATO PROGRAM
•SEMI-SOFT GELATO PROGRAM. By pressing
button (11) twice, LED (11b) will light up and
activate the processing program. At the end of
the production cycle, the LED (11b) flashes
indicating that the selected preservation cycle
has been activated.
If the preparation was ready before reaching
the operation time limit, the whipping paddle
lock s. The pr e servation function i s
automatically activated.
7

EnglishEnglish EnglishEnglish
GRANITA PROGRAM PRESERVATION CYCLE VARIATION WHILE A
•GRANITA PROGRAM. By pressing button (11) PRESERVATION CYCLE VARIATION WHILE A
PROGRAM IS RUNNING
three times causes LED (11c) to light up and
activate Granita processing. At the end of the
production cycle, the LED (11c) flashes
indicating that the selected preservation cycle
has been activated.
If the preparation was ready before reaching
the operation time limit, the whipping paddle
lock s. The pres ervation fu nction is
automatically activated.
FAST COOLING PROGRAM.
•FAST COOLING PROGRAM. Pressing button
(11) four times causes LED (11d) to light up
and activate the fast cooling program. At the
end of the production cycle, the LED (11d)
fl ashes indicating that the sele cted
preservation cycle has been activated.
This program is used when processing
mixtures with high initial temperatures. The
program quickly brings down the temperature
without adding too much air into the mixture,
saving time and improving the quality of the
ice cream made.
SELECTED PROGRAM VARIATION
SELECTED PROGRAM VARIATION
Should it become necessary to select a different
program when a program is running, you can
simply press button (11). When the new
program is selected, the currently running
program will stop. The new program will be
active immediately with its own execution times
that will restart from the initial values.
SWITCHING FROM AUTOMATIC TO MANUAL
SWITCHING FROM AUTOMATIC TO MANUAL
OPERATION
OPERATION
During the processing program, it is possible to
switch to manual mode at any time.
Holding down button (11) for 3 seconds
switches the machine to manual mode while
enabling the paddle LEDs (2a) and compressor
(1a).
The preservation cycle selected will be
deactivated.
TURNING OFF THE MACHINE DURING
TURNING OFF THE MACHINE DURING
AUTOMATIC OPERATION MODE
AUTOMATIC OPERATION MODE
If you need to turn off the machine before the
completion of the active processing program,
you first need to switch to manual mode by
pressing and holding button (11) for 3 seconds
and then pressing paddle (2) and compressor
(1) to stop any activity. Do not act directly on the
main switch (10)!
8
PROGRAM IS RUNNING
During the preparation phase it is possible to
automatically vary the preservation cycle set at
any time. Repeatedly press button (12) until the
LED that corresponds to the desired cycle is
activated. The LED will flash for 3 seconds and
becomes steadily lit: the new preservation cycle
is selected at this point and will be performed at
the end of the program. Each preparation
program will activate at the end of the selected
preservation cycle.
PADDLE LOCK UPON LID OPENING
PADDLE LOCK UPON LID OPENING
The opening of the lid (3) only stops paddle (5)
and does not affect the preparation program.
The closure of the lid (3) starts the motion of the
paddle (5) (where, at that time it is provided by
the selected program). If the mixture proves
excessively thick to prevent the movement of
the paddle, the machine will automatically
activate the previously selected preservation
cycle.
AUTOMATIC PRESERVATION
AUTOMATIC PRESERVATION
There are 4 preservation cycles available for
every whipping program (total of 16 cycles)
devised to meet a wide range of needs.
•In automatic mode, if the machine is not
stopped, at the end of each production cycle
is enabled the ice cream preservation cycle
selected.
•The activation of the preservation function is
ind i cat e d by f l as h ing o f th e L ED
corresponding to the processing program of
the ice cream selected.
•The desired cycle selection can take place
either at the beginning or during the
processing phase.
•Depending on the type of recipe and/or the
quantity prepared, every set of preservation
cycles combined with paddle speed enables
keeping gelato, Granita and sorbet or other
whipped products at the desired conditions.
•Pressing the button (12) several times causes
the selection LEDs of the various preservation
cycles to light up in sequence. If you switch
from the first (LED (12a) active) to the fourth
(LED (12d) active) preservation program, the
density of gelato increases gradually.
•Once you have selected the desired cycle, the
corresponding LED will flash for 3 seconds
and will become steadily lit, enabling the
selection.

VARIATION OF THE PRESERVATION CYCLE The machine is not designed for use either for
VARIATION OF THE PRESERVATION CYCLE •The machine is not designed for use either for
You can always select a different preservation
cycle either during the active phase and during
the pause phase of the running cycle.
storage or as a refrigerator!
storage or as a refrigerator!
Store the
preparation in the pot for no longer than 12
hours.
Repeatedly press button (12) until the LED that •The cooling fan of the cooling system will
corresponds to the desired cycle is activated. always remain in operation for the entire
The LED will flash for 3 seconds and become duration of the preservation period.
steadily lit: The new preservation cycle is now
selected and it will be run for the set execution
times.
Should it become necessary to switch to a
preservation cycle associated to a different
program, you must enable the corresponding
program priorly, by pressing the button (11).
Once you have enabled the program, switch to
the preservation cycle by pressing buttons (2)
and (1) simultaneously for 3 seconds. The
machine will enable the preservation cycles
associated to the preset program.
SWITCHING FROM PRESERVATION PHASE
SWITCHING FROM PRESERVATION PHASE
TO A PRODUCTION PROGRAM
TO A PRODUCTION PROGRAM
With the preservation active, you can activate an
automatic program simply by selecting it by
pressing button (11). The LED corresponding to
the selected program will flash for 3 seconds
and become steadily lit; the machine will exit the
preservation cycle and run the selected
program.
Subsequently, the preservation cycles
associated to the selected program ill be
enabled.
PADDLE LOCK UPON LID OPENING
PADDLE LOCK UPON LID OPENING
The opening of the lid (3) only stops the paddle
(5) and does not affect the preservation cycle.
The closure of the lid (3) enables the paddle
operation (5) (on the condition that it is provided
by the selected preservation cycle in that
moment). If the mixture proves excessively hard
and prevents the movement of the paddle, the
machine will automatically re-activate the
preservation cycle from the start.
TURNING OFF THE MACHINE DURING
TURNING OFF THE MACHINE DURING
PRESERVATION
PRESERVATION
To turn off the machine, hold down button (11)
for 3 seconds and then act on the main switch
(10). Do not act directly on the main switch (10)!
IMPORTANT
IMPORTANT
•Each preservation cycle continues until the
user decides to stop it.
•After use, ALWAYS turn the machine off using
the main switch (10).
TIPS
TIPS
•Using ingredients at refrigerator temperature
will reduce the processing time. Furthermore,
it is possible to reduce the temperature of the
ingredients if hot with the appropriate fast
cooling program.
•Be careful not to insert ingredients that are too
cold or nearly froze, as whipping may have a
poor quality.
•For a correct volume increase during mixing,
use maximum 1.25kg of ingredients
use maximum 1.25kg of ingredients for the
preparation of ice cream and sorbet.
•For the preparation of Granita, the maximum
amount of ingredients is 1Kg with the paddle
supplied with the machine.
It can process up to 1.5kg of Granita using the
special Granita paddle that can be purchased
separately.
CLEANING THE POT
CLEANING THE POT
GELATO 5+5K TWIN CREA
GELATO 5+5K TWIN CREA is designed to
facilitate pot cleaning. Proceed as follows:
•Turn off the cooling system, remove the paddle
and pour at least 2 litres of hot water and a lowfoaming detergent into the pot.
•Wash the pot with a sponge. Do not use sharp
utensils inside the pot.
utensils inside the pot.
Do not use sharp
•Place an empty container of at least 3 litres
under the drain (8).
•Remove the plug (9). The water in the pot
begins to flow into the container below.
•Repeat the operation using hot, clean water
and rinse thoroughly.
•When the pot is empty, clean the discharge
pipe using the cleaner (14) previously
cleaned.
•Reposition the plug (9) until the pot discharge
is fully closed.
•If necessary, repeat the cycle until the pot is
completely cleaned.
•Dry with a disposable paper towel.
9

EnglishEnglish
MAINTENANCE AND CLEANING OF THE
MAINTENANCE AND CLEANING OF THE •Remove the coarse dirt mechanically.
MACHINE
MACHINE
•Before cleaning the machine, make sure that it grease and facilitate its removal, but below
is turned off (main switch (10) to OFF) and 60°C to avoid "cooking" proteins, sugar or fat
unplugged from the power plug. and make them stick even firmly to the
•Remove paddle inserts.
•Remove the steel pin and remove the
transparent lid (3) from the machine.
•The paddle (5), paddle inserts, transparent lid
(3) and locking ring (4) can be washed in the
dishwasher or in hot water with suitable
detergent.
•If the paddle inserts are damaged or worn out,
they must be replaced to prevent mixing
ingredients less effectively.
•Wash the basket with a sponge. Do not use
sharp utensils inside the basket.
sharp utensils inside the basket.
•Clean the body of the machine and the nonremovable parts with the specific product
given in SANITIZING chapter.
IMPORTANT:
IMPORTANT: do not wash the machine with
jets of water! It contains electrical parts.
•Clean the ventilation grids (6) on the rear part
and the bottom of the machine at least once a
year.
•Regularly (at least once every 3 months) check
the oil seal (13) on top of the transmission
shaft: if necessary replace or lubricate with H1
category grease or higher. A specially
designed grease can be purchased at any
Authorized Service Centre. An oil seal
replacement (13) is supplied with the
machine.
SANITIZATION
SANITIZATION
Sanitizing operations, if properly carried out,
allow for the removal of a significant proportion
of micro-organisms whose cells and spores
find, thanks to processing residues, favourable
conditions for survival and proliferation. Must be
carried out at the end of daily production cycle
or more often, if necessary. Sanitizing involves
two phases:
CLEANSING
•CLEANSING Remove dirt (coarse residues)
and rinse with lukewarm water immediately
after work; cleaning action is provided by
manual friction and water pressure. The use of
a chemical detergent reduces, but does not
cancel, the manual cleaning requested above.
CAUTION:
CAUTION: cleansing only, even if accurate,
does not ensure complete removal of microbiotic contaminants. Proceed as follows:
10
Do not use
•Rinse with hot water first, at 45°C, to dissolve
surfaces subjected to cleaning. The tools
and removable parts of the equipment can
be cleaned simply, in about 15 minutes.
•Apply detergent: due to the fact that most of
food residues (proteins and fat) cannot be
dissolved in water, their complete removal
requires the use of a detergent that detaches
dirt form the surface and enables its further
removal by rinsing
•Final rinsing with water at tap temperature for
at least 5 minutes if immersed.
D IS IN F E C T IO N
• DI SI N F E C TI O N . D i si n f e c ti on o r
decontamination involves the verified
destruction of non spore forming pathogenic
bacteria and significant reduction of non
pathogenic and non spore forming bacteria.
Cleansing and disinfecting operations must
be performed separately.
After cleansing, proceed with disinfection.
Proceed as follows:
•Use a specific disinfecting agent suitable for
food industry sector. Check that on the
package are properly marked the following
features:
•Disinfecting agent, Medical Device or
similar.
•Registration number at Healthcare Agency.
•The message "for food industry use“.
•Dosage and use times.
•Ingredients, manufacturer, batch and
production date.
•Warnings on safe use.
•Dilute the disinfecting product following the
instructions given by the manufacturer.
Attention: using less disinfecting product than
recommended may promote bacteria
proliferation at dangerous levels, as well as
using excess active principle does not
improve efficiency.
•Leave the disinfecting agent to act for the
contact time required. If left less time than
required, disinfection may be ineffective.
•In order to carry out the various operations
correctly, you must proceed from up
downwards, finishing with the floor.
•After applying disinfecting agent, remove
residues with a final rinse.

EnglishEnglish
•Pay utmost care to clean the discharge special locking ring (4).
opening. •Make sure it is free from obstacles that
•Dry thoroughly the surfaces to avoid bacteria prevent it from rotating.
proliferation due to moisture; •Make sure the lid is closed in the correct
•We recommend you alternate every 6 months position: a safety device stops the paddle
the type of disinfecting agent to avoid when the lid is opened.
developing resistant forms of bacteria. •Check that the LED paddle (2a) is not
Bacteria spores are the most resistant flashing. In this case, press the button (2)
biological forms and, therefore, it is twice to restart the paddle. Make sure that
recommended you use chloride-based the mixture is not too thick to prevent the
products. rotation of the paddle.
TROUBLESHOOTING
TROUBLESHOOTING
Machine does not cool:
•Machine does not cool:
•Check that the power plug is properly
inserted and the appliance has electrical •The machine is noisy:
energy. •Some noise is part of the normal operating
•The safety device of the compressor comes specifications, but if it becomes excessive
into action: wait 5-10 minutes before contact the Service Centre to avoid further
restarting the machine. Rapid and continued and more serious problems.
start-up attempts do nothing but prolong the
period of inactivity of the machine.
•Check that the machine is correctly
positioned with the ventilation grids (6) free
of any obstructions.
•Check that the machine is not running a
preservation cycle (LED (11a,b,c,d) flashing)
that stops the compressor.
•Check that when the machine (switch (10))
turns on, the control panel shows the correct
initialization procedure by turning on all LEDs
in sequence.
The paddle does not turn:
•The paddle does not turn:
•Check that the paddle (5) is properly
attached to the tube and locked with a
•Make sure that the machine is not running a
preservation cycle (LEDs (11a-b-c-d)
flashing) that stops the paddle.
The machine is noisy:
•The water discharge pipe leaks:
•The water discharge pipe leaks:
•Replace the gaskets of the water discharge
tap (9). Two additional gaskets sets (16) are
provided with the machine.
The plastic sleeve (17) on the lower part of the
•The plastic sleeve (17) on the lower part of the
paddle is tto easy to separate.
paddle is tto easy to separate.
•Replace the gasket with the new one. Four
additional gasket (15) are provided with the
machine.
ACTION
BLADE ACTIVATION
COMPRESSOR ACTIVATION
PROGRAMACTIVATION
CONSERVATIONACTIVATION
TURN OFFFROM PROGRAM
TURN OFFFROM CONSERVATION
PROGRAM CHANGE
CONSERVATIONCHANGE
PROGRAM ACTIVATION FROM CONSERVATION*
PROGRAM ACTIVATION FROM CONSERVATION***
* If conservation is activated after a program.
** To activate the program whose LED is flashing, first select a different program.
*** If conservation is activated without running programs.
ACTION
KEY COMBINATION
KEY COMBINATION
2
1
11
1+2 (3 seconds)
11 (3 seconds) then 1 and 2
11 (3 seconds)
11
12
11**
11
11

INSTRUCTIONS GENERALES DE SECURITE
INSTRUCTIONS GENERALES DE SECURITE
Pendant l'utilisation des appareils électriques, il est indispensable de respecter scrupuleusement quelques
règles de sécurité fondamentales, en particulier:
•Lire attentivement le mode d'emploi avant d'installer et utiliser l'appareil.
•Ne pas plonger le corps principal de l'appareil dans l'eau ou autres liquides: danger de chocs électriques.
•Cet appareil n'est pas prévu pour être utilisé par des personnes (y compris les enfants) dont les capacités
physiques, sensorielles ou mentales sont réduites, ou des personnes dénuées d'expérience ou de
connaissance, sauf si elles ont pu bénéficier, par l'intermédiaire d'une personne responsable de leur
sécurité, d'une surveillance ou d'instructions préalables concernant l'utilisation de l'appareil. Il convient de
surveiller les enfants pour s'assurer qu'ils ne jouent pas avec l'appareil.
•Débrancher l'appareil de la prise de courant quand il n'est pas utilisé et avant de le démonter ou de le
nettoyer.
•Ne pas toucher les parties en mouvement.
•Ne pas utiliser l'appareil si le cordon d'alimentation ou la fiche sont abîmés, ou après un fonctionnement
anormal de l'appareil, ou si l'appareil est tombé par terre ou s'il a été endommagé de quelque façon que ce
soit. Dans ces cas, il est recommandé de s'adresser au Service Après-vente agrée pour les réparations.
•Emploi d'accessoires qui n'ont pas été recomandés ou vendus par le constructeur de cet appareil pourrait
entraîner des risques d'incendie ou des chocs électriques ou des lésions à l’utilisateur.
•Ne pas utiliser l'appareil à l'extérieur.
•Eviter que le cordon d'alimentation puisse pendre le long du bord de la table ou du plan de travail ou
touches des surfaces chaudes.
CONSERVER CES INSTRUCTIONS
CONSERVER CES INSTRUCTIONS
ATTENTION
•Toute réparation ne devra être exécutée que par des centres d'assistance technique ou de personnel agrées.
•Après avoir sorti l'appareil de l'emballage, s'assurer qu'il soit intact. En cas de doute, ne pas utiliser l'appareil et
s'adresser à un centre d'assistance technique agrée.
•Les sachets en plastique, le polystyrène, les clous etc., étant des sources potentielles de danger, ne doivent
pas être laissés à la portée des enfants.
•Cet appareil est destiné exclusivement à l'emploi pour lequel il a été conçu. Le constructeur et le vendeur de
l'appareil déclinent toute responsabilité en cas de non-respect des indications contenues dans ce manuel
d'utilisation.
•S'assurer que la tension de réseau correspond à celle qui est indiquée sur l'appareil avant d'insérer la fiche
dans la prise de courant.
•Ne pas utiliser d’objets ou d'outiles coupants à l’intérieur du bol. Ceux-ci risquent en effet de griffer ou abîmer
la cuve. Une spatule en caoutchouc ou une cuillère plastique peuvent être utilisées lorsque l'appareil est
éteint en position “0” ou “OFF”.
•Ne jamais nettoyer l’appareil avec des utensiles abrasives.
•Ne pas utiliser l’appareil sur surfaces chaudes ou près de flammes.
•N’arrêter jamais la machine en retirant la fiche de la prise de courant.
•L'appareil doit obligatoirement être relié au secteur et avoir une prise de courant avec une portée minimum de
10A, avec contact de mise à la terre efficace. Le constructeur n'est pas responsable des dommages
éventuels causés par l'absence de la mise à terre dans l'installation.
•Avant d'effectuer n'importe quelle opération d'entretien ou de nettoyage, vérifier que l'appareil ait été
débranché du secteur en retirant la fiche de la prise de courant.
•Ne jamais laver l'appareil avec des jets d'eau, ne jamais l'immerger dans l'eau!
•Cet appareil appartient à la classe climatique “T” pour l’utilisation avec une témperature ambiante de 43°C.
IMPORTANT:
IMPORTANT:
Laisser la machine reposer sur un plan horizontal pendant au moins 12 h avant de l'utiliser pour la première fois.
Laisser la machine reposer sur un plan horizontal pendant au moins 12 h avant de l'utiliser pour la première fois.
Les agents réfrigérants pourraient en effet être dispersés, au cas où la machine aurait été renversée pendant le
Les agents réfrigérants pourraient en effet être dispersés, au cas où la machine aurait été renversée pendant le
transport et ils doivent avoir le temps de revenir dans la bonne position. Suivre la même procédure par la suite
transport et ils doivent avoir le temps de revenir dans la bonne position. Suivre la même procédure par la suite
aussi, toutes les fois que la machine aura été mise en position non horizontale pour quelque motif que ce soit.
aussi, toutes les fois que la machine aura été mise en position non horizontale pour quelque motif que ce soit.
Placer la machine de façon à ce qu'il y ait suffisamment d'espace autour (au moins 20 cm), pour ne pas
Placer la machine de façon à ce qu'il y ait suffisamment d'espace autour (au moins 20 cm), pour ne pas
obstruer les prises d'air latérales.
obstruer les prises d'air latérales.
ATTENTION
12

FrançaisFrançaisFrançaisFrançais
1). 9). 12a).
1). Bouton-poussoir de 9). Bouchon écoulement eau. 12a). Led cycle
refroidissement. 10). Interrupteur lumineux conservation N°1.
1a).
1a). Led de fonctionnement général. 12b). Led cycle
installation réfrigérante. 11). Bouton-poussoir sélection conservation N°2.
2).
2). Bouton-poussoir pelle programmes. 12c). Led cycle
mélangeuse. 11a). Led programme conservation N°3.
2a).
2a). Led fonctionnement Gelato Italien. 12d). Led cycle
pelle. 11b). Led programme conservation N°4.
3). 13).
3). Couvercle transparent. Gelato Semi-soft. 13). Joint.
3a). 11c). 14).
3a). Trou d'ajout ingrédients 11c). Led programme 14). Goupillon.
avec bouchon. Granite. 15). Set joints pour douille
4). 11d).
4). Bague de fixation pelle. 11d). Led programme
5).
5). Pelle mélangeuse. Refroidissement rapide.
6). 12).
6). Grille de ventilation. 12). Bouton-poussoir
7).
7). Spatule. sélection temps
8).
8). Raccord écoulement eau.
Félicitations!
Félicitations! pour chaque typologie de production.
Vous avez acheté une turbine à glace NEMOX Avec cette modalité de fonctionnement vous
de dernière génération. ne devrez plus vous préoccuper de rien, une
Outre produire tout le gelato, sorbet, granite
que vous voudrez, vous pourrez conserver les
préparations dans le bac, afin de les garder
toujours à la température et densité idéales
pour le service. Il ne vous reste qu'à servir le gelato à vos
GELATO 5+5K TWIN CREA
GELATO 5+5K TWIN CREA est composée de
deux groupes identiques qui sont totalement
indépendants et autonomes: deux turbines à
glace dans un seul appareil!
Un ordinateur de bord vous aidera à réaliser au
mieux vos préparations, en exaltant votre
professionnalisme et en vous faisant
économiser de l'énergie et du temps précieux.
Votre turbine à glace dispose de deux
typologies de fonctionnement :
En modalité manuelle
•En modalité manuelle, le fonctionnement du
comp r ess e ur e t de l a pel l e so n t
indépendants pour exploiter au mieux votre
expérience. Le système de conservation peut
être démarré uniquement et si vous le jugerez
opportun. Un dispositif électrique intervient
pour arrêter la pelle au cas où la consistance
de la préparation soit excessive, afin d'éviter
de compromettre les fonctionnalités
mécaniques de la machine. L'installation
réfrigérante continue de fonctionner jusqu'à
son arrêt manuel.
En modalité automatique
•En modalité automatique, il permet de choisir
à priori un des 4 programmes de
fonctionnement (gelato italien classique,
gelato semi-soft, granite, refroidissement
rapide) et 4 programmes de conservation
10).
11).
11a).
11b).
conservation.
12b).
12c).
12d).
15).
pale mélangeuse.
16).
16). Set joints bouchon de
vidange.
17).
17). Douille pale
mélangeuse.
fois que vous avez fait vos choix et que vous
avez démarré la turbine à glace, ce dernier
produit le gelato et passe automatiquement
en modalité de conservation désirée.
clients, toujours avec une consistance
parfaite.
PREMIERE UTILISATION
PREMIERE UTILISATION
•Positionner GELATO 5+5K TWIN CREA sur
une surface plate, vérifier que les grilles de
ventilation (6) ne soient pas colmatées.
Laisser un espace minimum de 10 cm autour
des grilles de ventilation.
•Pendant l'utilisation l'appareil doit être
conservé loin de murs ou meubles afin de ne
pas créer d'obstacle à la circulation de l'air de
refroidissement. La sortie d'air tiède ou chaud
fait partie intégrante du fonctionnement de
l'appareil qui échange la chaleur avec
l'extérieur pour la réfrigération.
•Laisser la machine en position horizontale
pendant 8 heures ou plus avant sa première
utilisation car, si inclinée pendant le transport,
les agents réfrigérants devront se rétablir en
position correcte.
•Avant de commencer à utiliser la machine,
nettoyer soigneusement les parties qui
entrent en contact direct ou indirect avec les
aliments traités (bac, pelle de mélange,
inserts pelle, bague de fixation, couvercle,
etc.).
GELATO 5+5K TWIN CREA
13

•L'hygiène est extrêmement importante quand UTILISATION EN MODALITE MANUELLE
o n t ra it e d es a li me nt s. S ui vr e
scrupuleusement les prescriptions de la
réglementation hygiénique applicable dans
votre Pays (HACCP ou correspondant).
PRÉPARATION DU MÉLANGE
PRÉPARATION DU MÉLANGE
Choisir la recette et préparer le mélange, en
faisant attention à ce qui suit :
•Manipuler les ingrédients selon ce qui est
prescrit par les normes hygiéniques
applicables dans votre Pays (HACCP ou
correspondant).
•Pour la préparation de gelati et sorbets ne
pas introduire plus de 1.25kg de mélange
pas introduire plus de 1.25kg de mélange,
afin de permettre une augmentation correcte
de volume pendant le mélange.
•Pour la préparation de granite la quantité
maximum conseillée est de 1kg de mélange
avec la pelle fournie. On peut travailler jusqu'à
1.5kg de granite en utilisant la pelle spéciale
pour granite achetable séparément.
•Il est conseillé de verser le mélange à une
température comprise entre +10°C et
+20°C. Avec des températures plus élevées
les temps de production pourraient
augmenter même considérablement .
MODE D'EMPLOI
MODE D'EMPLOI
GELATO 5+5K TWIN CREA
•GELATO 5+5K TWIN CREA est composée
de deux groupes identiques qui sont
totalement indépendants et autonomes : ici
est illustré le fonctionnement du groupe
unique.
•Vérifier que le voltage indiqué sur la plaque
des données correspond à celui de réseau.
Insérer la fiche d'alimentation dans la prise de
courant et actionner l'interrupteur général
(10); la lumière indiquera la présence de
tension. La carte électronique effectuera un
contrôle d'initialisation, en accédant à une
séquence tous les leds du panneau
commandes.
•Insérer la pelle mélangeuse (5) dans le bac,
en la tournant dans le sens des aiguilles d'une
montre jusqu'à ce qu'elle soit positionnée
dans son logement sur le fond du bac.
•Visser la bague de fixation (4) à fond de façon
à ce que la pelle mélangeuse soit bien fixe.
•Verser le mélange préparé auparavant.
•Fermer le couvercle (3).
14
UTILISATION EN MODALITE MANUELLE
•Démarrer l'installation réfrigérante en
appuyant le bouton-poussoir (1); la led (1a)
s'allumera.
IMPORTANT:
IMPORTANT: En cas d'extinction de la
machi n e , due à d es sus p ensio n s
temporaires et improvisées de la distribution
de l'énergie électrique ou à une manœuvre
erronée sur les touches d'allumage de la
partie réfrigérante, attendre quelques
minutes avant de redémarrer.
•Appuyer sur le bouton-poussoir (2) pour faire
démarrer la pelle; la led (2a) s'allume, le cycle
ne
de production commence. Le temps de
préparation varie en fonction de la quantité,
de la température initiale de la mélange, du
type de produit (parfait, sorbet ou granite) et
de la température ambiante.
IMPORTANT:
IMPORTANT: Le mouvement de la pelle est
complètement indépendant de l'installation
réfrigérante. Un dispositif de sécurité arrête le
mouvement de la pelle quand le couvercle est
soulevé.
Dans le cas où le couvercle reste longtemps
soulevé, l'installation réfrigérante continuera a
fonctionner. Par conséquent, quand le
couvercle est rabaissé, la pelle pourrait ne pas
repartir ou s'arrêter à cause de l'excessive
consistance du mélange. Dans ce cas le
contrôle électrique arrêtera définitivement la
pelle et la led (2a) deviendra clignotante pou
signaler l'anomalie.
Si la préparation n'était pas encore terminée,
éteindre le compresseur en agissant sur le
bouton-poussoir (1) et la pelle au moyen du
bouton-poussoir (2), attendre que mélange
devienne plus moelleux et redémarrer la
production.
•En fonction de la recette et de la quantité
d'ingrédients utilisés, les temps de
production moyens sont de 15/20 minutes.
•Au moyen de l'ouverture (3a) sur le couvercle
il est possible d'ajouter d'autres ingrédients
(ex. pour agrémenter le gelato pendant la
dernière phase de la préparation).
•Quand la préparation a atteint la consistance
voulue, éteindre le circuit réfrigérant en
appuyant sur le bouton-poussoir (1) et arrêter
la pelle en appuyant sur le bouton-poussoir
(2). Pour enlever sans difficulté la préparation

FrançaisFrançaisFrançaisFrançais
Du bac, extraire la pelle mélangeuse (5) en augmente progressivement.
dévissant la bague de fixation (4)
spécialement prévue.
DEMARRAGE MANUEL DU CYCLE DE
DEMARRAGE MANUEL DU CYCLE DE
CONSERVATION
CONSERVATION
•Au cas où vous le jugiez opportun, il est
possible d'activer manuellement à tout
moment le cycle de conservation. Maintenir
appuyé simultanément les boutonspoussoirs pelle (2) et compresseur (1)
pendant 3 secondes. La machine passera
immédiatement au cycle de conservation
relatif au programme de production du
gelato classique italien. La led (12a)
s'allumera.
•Au cas où l'on veuille exécuter une
conservation relative à un programme de
production différent, avant de passer de
fonctionnement manuel à conservation il est
nécessaire de sélectionner le programme de
production désir é (voir paragraphe
“ V A R I A T I O N D U C Y C L E D E
CONSERVATION”).
UTILISATION EN MODALITE AUTOMATIQUE
UTILISATION EN MODALITE AUTOMATIQUE
La machine GELATO 5+5K TWIN CREA
dispose d'une série de programmes qui
automatisent le processus de production et de
conservation.
•Suivre ce qui est décrit dans le paragraphe
«MODE D'UTILISATION».
•En appuyant sur le bouton-poussoir (11) la
machine démarre en modalité automatique
en sélectionnant le premier programme de
fonctionnement. La led clignote pendant 3
secondes pendant lesquelles, en appuyant
encore le bouton-poussoir (11), il est
possible de sélectionner les autres
programmes en séquence.
•Quand la lumière led devienne stable, le
programme relatif démarre et le cycle de
production commence.
•La machine dispone de 4 programmes de
production et de 4 cycles de conservation
pour tout programme de production. Au
démarrage du programme sélectionné, il est
possible de choisir le cycle de conservation
désiré. Le choix du cycle de conservation
s'effectue en appuyant à plusieurs reprises
sur la touche (12). En passant du premier au
quatrième programme de conservation la
consistance du gelato en conservation
GELATO 5+5K TWIN CREA
•Quand le gelato atteint la consistance
correcte, le programme de production
termine automatiquement et le cycle de
conservation présélectionné démarre.
•Tout programme de production a un temps
limite préétabli, après quoi, la machine entre
dans tous les cas automatiquement en
conservation.
•Au cas où on le juge opportun, il est possible
de terminer le programme de production et
activer à tout moment le cycle de
conservation. Sélectionner le cycle de
conservation voulu en agissant sur la touche
12 (sélection en séquence). Maintenir
appuyé simultanément les boutonspoussoirs pelle (2) et compresseur (1)
pendant 3 secondes. La machine passera
immédiatement du cycle de production à
celui de conservation.
• P R OG RA MM E G EL AT O I T A L I E N
• P R OG RA MM E G EL AT O I T A L I E N
CLASSIQUE ET SORBET.
CLASSIQUE ET SORBET. En appuyant une
fois le bouton-poussoir (11) la led (11a)
s'allume et le programme de production
commence. Au terme du cycle de production
la led (11a) clignote en signalant l'activation
du cycle de conservation sélectionné.
Si la préparation était prête avant d'atteindre
le temps limite de fonctionnement, la pelle de
la turbine se bloquerait. La fonction de
c o n s e r v a t i o n s ' a c t i v e a l o r s
automatiquement.
•PROGRAMME GELATO SEMI-SOFT.
•PROGRAMME GELATO SEMI-SOFT. En
appuyant deux fois sur le bouton-poussoir
(11) la led (11b) s'allume et le programme de
production commence. Au terme du cycle de
production la led (11b) clignote en signalant
l'activation du cycle de conservation
sélectionné.
Si la préparation était prête avant d'atteindre
le temps limite de fonctionnement, la pelle de
la turbine se bloquerait. La fonction de
c o n s e r v a t i o n s ' a c t i v e a l o r s
automatiquement.
•PROGRAMME GRANITE
•PROGRAMME GRANITE. En appuyant trois
fois sur le bouton-poussoir (11) la led (11c)
s'allume et le programme pour la production
de la granite commence. A la fin du cycle de
production la led (11c) clignote en signalant
l'activation du cycle de conservation
sélectionné.
15

Si la préparation était prête avant d'atteindre appuyé pendant 3 secondes la touche (11) et
le temps limite de fonctionnement, la pelle de ensuite appuyer sur les boutons pelle (2) et
la turbine à glace se bloquerait. La fonction compresseur (1) pour arrêter toute activité.
d e c on se rv at io n s 'a ct iv e a l o r s Eviter d'agir directement sur l'interrupteur
automatiquement. général (10)!
PR O GR AM ME RE FR O ID I S SE ME NT
•P R OG RA MM E R EF R OI D I S S EM EN T
RAPIDE.
RAPIDE. En appuyant quatre fois sur le
bouton-poussoir (11) la led (11d) s'allume et
le programme de refroidissement rapide
commence. A la fin du cycle de production la
led (11d) clignote en signalant l'activation du
cycle de conservation sélectionné.
Ce programme est utilisé quand on part de
mélanges à des températures élevées. Le
programme fait en sorte d'abaisser
rapidement la température sans que le
mélange n'absorbe trop air, en économisant
du temps et en améliorant la qualité du gelato
produit.
VARIATION DU PROGRAMME SELECTIONNE
VARIATION DU PROGRAMME SELECTIONNE
Au cas où avec un programme déjà
commencé il soit nécessaire d'en sélectionner
un différent, ce sera possible en appuyant
simplement sur la touche (11). Quand le
nouveau programme est sélectionné le
programme en exécution sera arrêté. Le
nouveau programme sera immédiatement en
service avec ses temps d'exécution qui
repartiront des valeurs initiales.
PAS SA G E D E F O N CT I O NN E M E NT
PAS SA G E D E F O N CT I O NN E M E NT sélectionné). Si le mélange s'avérait
AUTOMATIQUE A FONCTIONNEMENT
AUTOMATIQUE A FONCTIONNEMENT exce s sive m ent c onsi s tan t au p o i nt
MANUEL
MANUEL d'empêcher le mouvement de la pelle, la
Pendant le programme de production, il est
possible à tout moment de passer en modalité
manuelle.
En maintenant appuyé la touche (11) pendant
3 secondes la machine passera en modalité
manuelle en allumant simultanément les led
pelle (2a) et compresseur (1a). Le cycle de
conservation sélectionné sera désactivé.
EXCTINCTION DE LA MACHINE PENDANT LE
EXCTINCTION DE LA MACHINE PENDANT LE machine ne soit pas arrêtée, à la fin de
FO NC TI O NN EM EN T E N M O D AL IT E
FO NC TI O NN EM EN T E N M O D AL IT E ch a q u e p r ogramme de productio n
AUTOMATIQUE
AUTOMATIQUE commence le cycle sélectionné de
Au cas où il soit nécessaire d'éteindre la
VARIATION DU CYCLE DE CONSERVATION
VARIATION DU CYCLE DE CONSERVATION
PENDANT LE FONCTIONNEMENT D'UN
PENDANT LE FONCTIONNEMENT D'UN
PROGRAMME
PROGRAMME
Pendant la phase de production automatique il
est possible de varier à tout moment le cycle
de conservation choisi. Appuyer à plusieurs
reprises sur le bouton-poussoir (12) jusqu'à
l'activation de la led correspondant au cycle
voulu. La led clignotera pendant 3 secondes et
successivement deviendra fixe : le nouveau
cycle de conservation est à ce stade
sélectionné et sera exécuté à la fin du
programme d e p roduction . C h aque
programme de production activera, une fois
arrivé à terme, le cycle de conservation
sélectionné.
BLOCAGE PELLE A L'OUVERTURE DU
BLOCAGE PELLE A L'OUVERTURE DU
COUVERCLE
COUVERCLE
L'ouverture du couvercle (3) arrête uniquement
la pelle (5) et n'influence pas le programme de
production.
La fermeture du couvercle (3) démarre le
mouvement de la pelle (5) (au cas où, à ce
moment, il soit prévu par le programme
machine activera automatiquement le cycle de
conservation sélectionné auparavant.
CONSERVATION AUTOMATIQUE
CONSERVATION AUTOMATIQUE
4 cycles de conservation sont prévus pour
chaque programme de la turbine à glace (16
cycles au total) étudiés pour répondre aux
exigences les plus diverses .
•En modalité automatique, au cas où la
conservation du gelato.
machine avant la fin du programme de •L'activation de la fonction de conservation est
production en service, il est nécessaire avant signalée par le clignotement de la led relative
de passer en modalité manuelle en maintenant au programme de production sélectionné.
16

FrançaisFrançaisFrançaisFrançais
•La sélection du cycle de conservation voulu automatique, simplement en le sélectionnant
peut être effectuée indifféremment au début en appuyant sur la touche (11). La led relative
ou pendant la phase de production. au programme sélectionné clignotera pendant
•Selon le type de recette et/ou de la quantité
en préparation, chaque série de cycles de
conservation, en combinaison avec la
vitesse de la pelle, permet de maintenir
gelato, granite ou d'autres préparations Par conséquent la série de cycles de
amalgamées, aux conditions voulues. conservation relative au program me
•En appuyant sur le bouton-poussoir (12) à
plusieurs reprises s'allument en séquence
les leds de sélection des divers cycles de
conservation. En passant du premier (LED
(12a) actif) au quartrième (LED (12d) actif)
programme de conservation la densité du
gelato augmente progressivement.
•Une fois sélectionné le cycle voulu, la led
correspondante clignotera pendant 3
secondes et deviendra stable en rendant
opérative la sélection.
VARIATION DE CYCLE DE CONSERVATION
VARIATION DE CYCLE DE CONSERVATION mouvement de la pelle, la machine rétablira
Il est toujours possible de sélectionner un
cycle de conservation différent (relatif au
même programme de production), soit
pendant la phase active que pendant la phase
de pause du cycle en exécution. Appuyer à
plusieurs reprises sur le bouton-poussoir (12)
jusqu'à l'activation de la led correspondant au
cycle voulu. La led clignotera pendant 3
secondes et deviendra stable : le nouveau
cycle de conservation est à ce point
sélectionné et sera exécuté selon ses propres
temps d'exécution. Au cas où il soit nécessaire
de passer à une série de cycles de
conservation propre d'un programme différent
de celui sélectionné, il faut auparavant activer
le programme correspondant en appuyant sur
la touche (11). Une fois activé le programme,
passer à la fonction de conservation en
appuyant simultanément sur les boutons (2) et
(1) pendant 3 secondes. La machine activera
la série de cycles de conservation relatifs au
programme pré-choisi.
PASSAGE DE LA PHASE DE CONSERVATION
PASSAGE DE LA PHASE DE CONSERVATION
A UN PROGRAMME DE PRODUCTION
A UN PROGRAMME DE PRODUCTION
Avec la conservation active, il est possible
d'activer un programme de production
3 secondes et deviendra stable; la machine
sortira du cycle de conservation et
commencera à exécuter le programme de
production sélectionné.
sélectionné sera activée.
BLOCAGE DE LA PELLE A L'OUVERTURE DU
BLOCAGE DE LA PELLE A L'OUVERTURE DU
COUVERCLE
COUVERCLE
L'ouverture du couvercle (3) arrête uniquement
la pelle (5) et n'a pas de répercutions sur les
temps du cycle de conservation.
La fermeture du couvercle (3) fait démarrer le
mouvement de la pelle (5) (au cas où, à ce
moment, il soit prévu par cycle de
conservation sélectionné). Si le mélange était
excessivement dur tel à empêcher le
automatiquement le cycle de conservation du
début.
EXTINCTION DE LA MACHINE PENDANT LA
EXTINCTION DE LA MACHINE PENDANT LA
CONSERVATION
CONSERVATION
Pour éteindre la machine maintenir appuyé le
bouton-poussoir (11) pendant 3 secondes et
Successivement agir sur l'interrupteur général
(10). Eviter d'agir directement sur l'interrupteur
général (10)!
IMPORTANT
IMPORTANT
•Chaque cycle de conservation continue
jusqu'à ce que l'opérateur ne décide de
l'arrêter.
•La machine n'est pas conçue pour une
•La machine n'est pas conçue pour une
utilisation comme conservateur ou cellule
utilisation comme conservateur ou cellule
frigorifique !
frigorifique ! Il est conseillé de conserver la
préparation dans le bac pendant 12 heures
au maximum.
•La ventilateur de refroidissement de
l'installation de réfrigération restera toujours
en service pendant toute la durée de la
période de conservation.
•A la fin de l'utilisation, éteindre la machine
toujours au moyen de l'interrupteur général
(10).
17

CONSEILS UTILES
CONSEILS UTILES débranchée de la prise de courant.
•A l'aide d'ingrédients à température de •Enlever les inserts de la pelle.
réfrigérateur on réduit les temps de •Enlever le pivot en acier et enlever le
production. En outre il est possible de réduire couvercle transparent (3) de la machine.
la température des ingrédients, s'ils sont •La pelle (5), inserts, couvercle transparent (3)
chauds, en utilisant le programme spécial de et bague de fixation (4) peuvent être lavés en
refroidissement rapide. machine à laver la vaisselle ou à l'eau chaude
•Attention à ne pas introduire d'ingrédients avec détergent adapté .
trop froids ou presque congelés, l'amalgame •Si les inserts de la pelle sont abimés ou usés,
pourrait s'avérer de mauvaise qualité. ils doivent être remplacés pour éviter que le
•Pour une augmentation correcte du volume mélange des ingrédients devienne moins
pendant le mélange, utiliser au maximum efficace.
1.25kg d'ingrédients Ne pas
1.25kg d'ingrédients pour des préparations •Laver la cuve à l'aide d'une éponge. Ne pas
de gelato et sorbet. utiliser d'ustensiles coupants à l'intérieur de la
•Pour la préparation de granite la quantité cuve.
utiliser au maximum
utiliser d'ustensiles coupants à l'intérieur de la
cuve.
maximum d'ingrédients est de 1kg avec la •Nettoyer le corps de la machine et les parties
pelle fournie avec la machine. On peut non éliminables avec le produit spécifié dans
travailler jusqu'à 1.5kg de granite en utilisant le chapitre DÉSINFECTION.
la pelle à granite spéciale, qui peut être IMPORTANT: ne pas laver la machine avec
achetée séparément. des jets d'eau! Elle contient des parties
NETTOYAGE DU BAC
NETTOYAGE DU BAC
GELATO 5+5K TWIN CREA
GELATO 5+5K TWIN CREA est projetée de
façon à faciliter le nettoyage du bac. Procéder
comme suit :
•Eteindre l'installation réfrigérante, enlever la
pelle et verser au moins 2 litres d'eau chaude
et du détergent non moussant dans le bac.
•Laver le bac à l'aide d'une éponge. Ne pas
utiliser d'outils coupants à l'intérieur du bac.
utiliser d'outils coupants à l'intérieur du bac.
Ne pas
•Placer un récipient vide d'au moins 3 litres
sous la sortie (8).
•Extraire le bouchon (9). L'eau dans la
casserole commencera à fluer dans le
récipient placé en-dessous.
•Répéter l'opération avec de l'eau chaude et
propre pour un rinçage soigné.
•Quand le bac est vide nettoyer le conduit de ASSAINISSEMENT
IMPORTANT: ne pas laver la machine avec
des jets d'eau! Elle contient des parties
électriques.
électriques.
•Sécher soigneusement avec du papier
absorbant pour éviter que ne se forme tout
type de dépôt.
•Au moins une fois par an, nettoyer les grilles
d'aération (6) sur la partie arrière et sur le fond
de la machine.
•Périodiquement (au moins une fois tous les 3
mois) contrôler le joint (13) sur l'arbre de
transmission: remplacer si nécessaire, ou
lubrifier avec de la graisse de catégorie H1 ou
supérieure. Une graisse spécialement
étudiée peut être demandé auprès de tout
Centre d'Assistance autorisé. Une bague
d'étanchéité (13) de remplacement est livré
avec la machine.
ASSAINISSEMENT
vidage au moyen du goupillon (14) nettoyé Les opérations d'assainissement permettent
auparavant. d'éliminer une remarquable partie de micro-
•Re-positionner le bouchon (9) jusqu'à la organismes dont les cellules et spores
fermeture de l'évacuation de la casserole. trouvent des conditions favorables à la survie
•Si nécessaire répéter le cycle jusqu'au et à leur prolifération, également grâce aux
nettoyage complet du bac. résidus de préparation. Elles doivent être
•Sécher avec du papier absorbant. effectuées en fin de cycle de production
CONSERVATION ET NETTOYAGE DE LA
CONSERVATION ET NETTOYAGE DE LA
MACHINE
MACHINE
•Avant de commencer le nettoyage de la
machine vérifier qu'elle soit éteinte
(interrupteur général (10) sur OFF) et la fiche
18
journalière ou plus souvent si nécessaire. La
assainissement comprend deux phases :
•LAVAGE.
•LAVAGE. Eliminer la saleté (résidus
grossiers) et prévoir un rinçage à l'eau tiède
immédiatement après la fin de la préparation;

FrançaisFrançaisFrançaisFrançais
L'action détergente est confiée à la friction sanitaire.
manuel et à la pression de l'eau. L'utilisation
d'un détergent chimique réduit, mais
n'annule pas le nettoyage manuel demandé
ci-avant. ATTENTION : la seule détersion,
même scrupuleuse, ne garantit pas
l'élimination complète des contaminants
microbiens.Agir comme suit:
•Eliminer mécaniquement la grosse saleté.
•Rincer en premier à l'eau chaude à
température supérieure à 45°C pour faire
fondre les graisses et en favoriser leur
détachement, mais inférieure à 60°C pour
éviter de «cuire» protéines, sucres ou
grasses, en les rendant plus tenacement
attachés aux surfaces à nettoyer. Pour les
outils et les parties démontables des
équipements une immersion de la durée de
15 minutes est suffisante.
•Appliquer le détergent: étant donné que la
plupart des résidus alimentaires (protéines
et graisses) ne se dissolvent pas dans l'eau,
pour les éliminer complètement il faut
utiliser un détergent qui détache la saleté
de la surface et en permette l'élimination
avec le rinçage successif
•Rinçage final à l'eau à température de
robinet, pendant au moins 5 minutes si en
immersion.
DESINFECTION
•DESINFECTION. La désinfection (ou
décontamination) comporte la destruction
certaine des bactéries pathogènes ne
produisant pas de spores et la réduction
draconienne de la présence des bactéries
non pathogènes et ne produisant pas de
spores. Les opérations de détersion et de
désinfection doivent être effectuées
séparément après avoir effectué le lavage
procéder à la désinfection. Procéder comme
suit:
•Utiliser un désinfectant spécifique pour
l'utilisation dans l'industrie alimentaire.
Contrôler que sur l'emballage soient bien
indiquées les caractéristiques suivantes:
•Désinfectant, service médical chirurgical
ou équivalent.
•N° d'enregistrement auprès de l'autorité
•Inscription «à utiliser dans l'industrie
alimentaire»
•Doses et temps d'utilisation.
•Composition, producteur, lot et date de
production.
•Instructions sur la sécurité pour
l'utilisation.
•Diluer le produit désinfectant selon les
instructions du producteur. Attention:
économiser sur le désinfectant peut
permettre la survie de niveaux bactériens
dangereux, tout comme excéder avec le
principe actif n'en améliore pas l'efficacité.
•Laisser agir le désinfectant pendant le
temps de contact spécifié. Un temps trop
bref peut rendre inefficace la désinfection.
•Pour une exécution correcte des différentes
opérations il faut effectuer le nettoyage du
haut vers le bas, en terminant par le sol.
•Après l'application du désinfectant en
éliminer les résidus avec un rinçage final.
•Prêter une attention particulière au
nettoyage de la sortie.
•Bien sécher les surfaces pour éviter la
multiplication bactérienne favorisée par
l'environnement humide;
• Il est conseillé d'alterner tous les 6 mois le
type de désinfectant pour éviter la sélection
de bactéries tenaces. Les spores
bactériennes sont les formes biologiques
plus résistantes donc il est préférable
d'utiliser les produits à base de chlore.
EVENTUELS PROBLEMES ET SOLUTIONS
EVENTUELS PROBLEMES ET SOLUTIONS
•La machine ne produit pas de froid:
•La machine ne produit pas de froid:
•Contrôler que la fiche d'alimentation soit
correctement insérée et l'énergie électrique
arrive à l'appareil.
•Le dispositif de sécurité du compresseur
est entré en action : attendre 5-10 minutes
avant de redémarrer la machine. Des
tentatives soudaines et continues de
démarrage ne font que prolonger le période
d ' i n a c t i v i t é d e l a m a c h i n e .
•Contrôler que la machine soit positionnée
correctement avec les grilles de ventilation
(6) non obstruées.
19

FrançaisFrançais
•Contrôler que la machine n'exécute pas un devenait excessif, contacter le Centre
cycle de conservation (led (11a,b,c,d) d'Assistance pour éviter des problèmes
cligno t a nt) qui p révoit l ' arrêt d u futurs plus graves.
compresseur.
•Contrôler qu'à l'allumage de la machine
(in terrupte ur (10)) l e panneau de
commandes indique la procédure correcte
d'initialisation en allumant toutes les leds en
séquence.
•La pelle ne tourne pas:
•La pelle ne tourne pas:
•Contrôler que la pelle (5) soit correctement
accrochée à l'arbre de transmission et
bloquée avec la bague de fixation spéciale
(4).
•Contrôler qu'il n'y a pas d'obstacles qui
empêche sa rotation.
•S'assurer que le couvercle soit fermé dans
la position correcte: un dispositif de
sécurité arrête la pelle si le couvercle est
ouvert .
•Contrôler que le led pelle (2a) ne clignote
pas. Si elle clignote appuyer le boutonPoussoir (2) deux fois pour faire repartir la
pelle. S'assurer que le mélange ne soit pas
trop consistant pour empêcher la rotation
de la pelle.
•S'assurer que la machine n'exécute pas un
cycle de conservation (led (11a-b-c-d)
clignotant) qui prévoit l'arrêt de la pelle.
•La machine est bruyante :
•La machine est bruyante :
•Un certain bruit fait partie des spécifications
normales de fonctionnement; toutefois, s'il
•Le bouchon de vidange a une fuite:
•Le bouchon de vidange a une fuite:
•Remplacer les joints d'étanchéité. La
machine est livrée avec 2 sets additionnels
de joints (16).
•La douille en plastique (17) ne reste pas
•La douille en plastique (17) ne reste pas
accrochée à la pale mélangeuse:
accrochée à la pale mélangeuse:
•Remplacer le joint de la douille. La machine
est livrée avec 4 joints (15).
COMBINAISON TOUCHES
ACTION
ACTIVATION BRAS
ACTIVATION COMPRESSEUR
ACTIVATION PROGRAMMES
ACTIVATION CONSERVATION
EXTINCTION DEPUIS PROGRAMME
EXTINCTION DEPUIS CONSERVATION
CHANGEMENT PROGRAMME
CHANGEMENT CONSERVATION
ACTIVATION PROGRAMME DEPUIS CONSERVATION*
ACTIVATION PROGRAMME DEPUIS CONSERVATION***
*Si conservation est activée après un programme.
**Pour activer le programme dont le voyant clignote, sélectionner avant un programme différent.
***Si conservation est activée sans effectuer de programme.
20
ACTION
COMBINAISON TOUCHES
2
1
11
1+2 (3 secondes)
11 (3 secondes) puis 1 et 2
11 (3 secondes)
11
12
11**
11
 Loading...