

Nemox gelato 12k Instruction Book
Gelato 12K
EN
FR
ES
D
INSTRUCTION BOOK
MODE D’EMPLOI
INSTRUCCIONES PARA EL USO
ISTRUZIONI PER L’USO
IT
GEBRAUCHSANWEISUNG
Pag.
Pag.
Pag.
Pag.
Seite
4
10
16
22
28
www.nemox.com
3A
3
13
9
11
14
12
8
6
Gelato 12K
10
1
2
7
4
23
2
5
21
20
19
17
22
18
20
1615
22
2

ATTENTION:
Pls keep the packaging boxes. They will be necessary in case you should return the machine for
repair or you should return it for any other reason. If the machine will be sent back with a
packaging box not suitable for transportation all repairing charges will be at charge of the sender,
even if the machine is under warranty . If the machines doesn't need to be repaired and the
package will not be suitable the machine will be returned to the sender too.
ATTENTION:
Veuillez conserver les emballages. Ils seront necessaires au cas où la machine sera retournée
pour réparation ou pour n'import quelle raison. Si les machines seront retournées dans un
emballage pas conforme au transport toutes les frais de réparation seront à charge de
l'expéditeur même si la machine sera sous garantie. Aussi s'il ne s'agit pas de réparation et si
l'emballage ne sera pas conforme la machine ne sera pas acceptée et elle sera retournée à
l'expéditeur.
CUIDADO:
Guardar los emballajes en el caso el aparato sea devuelto para reparacion o devoluciòn. En el
caso los aparatos seran entrgados en cajas no bien protegidas los gastos de la reparaciòn seran
cargados al cliente a pesar de la garancia, mientras las devoluciones no seran aceptadas.
ATTENZIONE:
Conservare gli imballi in caso la macchina debba essere restituita per riparazioni o resa. In caso
di macchine spedite in imballo non adatto alle modalità di trasporto gli interventi di riparazione
saranno interamente a carico del mittente a prescindere dalla garanzia, mentre i resi non saranno
accettati.
ACHTUNG:
Bewahren Sie bitte immer die Originalverpackung. Falls das Gerät nicht in seiner
Originalverpackung zum Kundendienst zugeschickt wird, gehen die Kosten für die Reparatur
auch während der Garantiezeit zu Lasten des Kunden. Retouren ohne Originalverpackung
werden verweigert.
Made in Italy by
Nemox International s.r.l. reserves the right to carry out all modifications which might be considered necessary.
Nemox International s.r.l. se réserve le droit d'apporter toute modification qui se rend nécessaire.
Nemox International s.r.l. se reserva el derecho de hacer toda modificaciòn que cree necesaria.
Nemox International s.r.l. si riserva il diritto di apportare tutte le modifiche ritenute necessarie.
Nemox International s.r.l. hält das Recht alle notwendingen Aenderungen durchzufuehren.
|
3

English English
IMPORTANT SAFEGUARDS
When using electrical appliances, basic safety precautions should always be observed, including the
following:
•Read all instructions carefully.
•To protect against risk of electric shock, do not put the main body of appliance in water or any other liquid.
•This appliance has not been designed to be used by persons (including children) with physical, sensory
or mental impairments or who are lacking in experience or knowledge, unless they have been given the
necessary supervision and prior instructions about how to use this appliance by a person responsible for
their safety. Young children should be supervised to ensure that they do not play with the appliance.
•Unplug from outlet when not in use, before putting on or taking off parts, and before cleaning.
•Avoid contact with moving parts.
•Do not operate any appliance with a damaged cord or plug, or after the appliance malfunctions, or is
dropped or damaged in any manner. Return the appliance to an authorised Service Center for
examination, repair or electrical or mechanical adjustment.
•The use of attachments not recommended or sold by the appliance manufacturer may result in fire,
electric shock or injury.
•Do not use outdoors.
•Do not let cord hang over edge of table or counter, or touch hot surfaces.
SAVE THESE INSTRUCTIONS
CAUTION
•An authorised service representative should perform any servicing other than cleaning and user
maintenance. Authorised service personnel only should do repair.
•After removing the appliance from the packaging, check it for damage. If in doubt, do not use the
appliance and contact an authorised service centre.
•Plastic bags, polystyrene, nails, etc. must not be left within reach of children as they are potentially
dangerous.
•The appliance's manufacturer and vendor reject any responsibility for failure to comply with the
instructions provided in this user manual.
•Check that the voltage shown on the rating plate corresponds to the voltage of the mains.
•Do not use sharp utensils inside the bowl! Sharp objects will scratch and damage the inside of the bowl.
A rubber spatula or metal spoon may be used, when the appliance is in the “OFF”or “0” position.
•Never clean with scouring powders or hard implements.
•Do not place or use the appliance on or near hot surfaces, such as stoves, hotplates, or near open gas
flames.
•Do not unplug the unit by pulling on the cord.
•The appliance must be connected to an electrical system and power supply socket with a minimum
capacity of 16A, equiped with an efficient earth contact. The manufacturer is not responsible for
damages to things or people in the event that the prescribed safety norms have not been respected.
•Before carrying out any maintenance or cleaning operations, make sure that the appliance has been
disconnected from the electrical mains by removing the plug from the power supply socket.
•Never wash the appliance using water jets or place it in water!
•This appliance is suitable for use with 43°C max. ambient temperature (climatic class “T”).
IMPORTANT:
This Ice Cream Machine contains its own refrigerant which must be allowed to settle after transport. Leave
the Ice Cream Machine on a horizontal surface for at least 12 hours after purchase or after any move which
might have stored the machine the wrong way up.
Leave at least 20 cm on each side of the machine to allow free air circulation. Make sure the vent slots are
free and unobstructed.
4
UK USERS ONLY
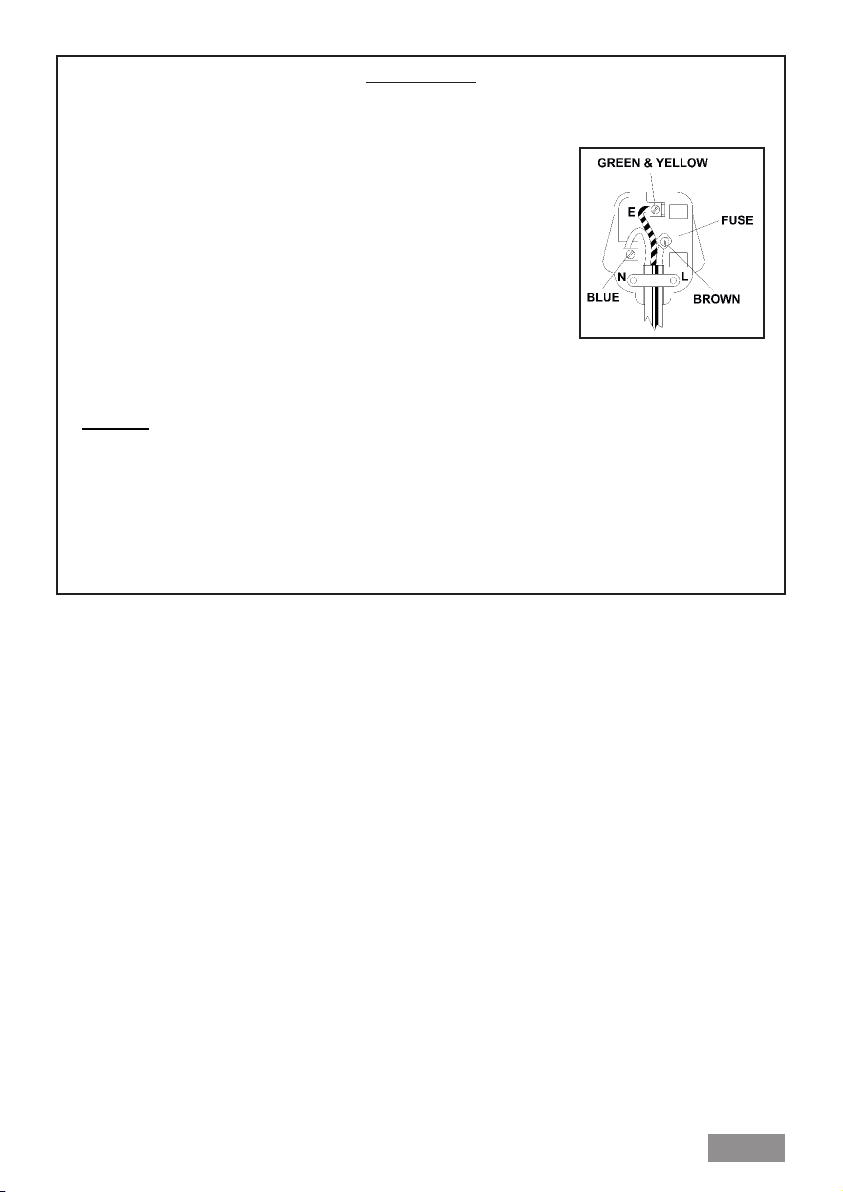
HOW TO CONNECT THE CORD TO A U.K. PLUG: IMPORTANT
The wires in the mains lead are coloured in accordance with the following code:
•Green and yellow: Earth
•Blue: Neutral
•Brown: Live
Please, read the instructions given below before connecting the cord to a plug.
If in doubt, please, consult a qualified electrician. As the colours of the wires in
the mains lead of this appliance may not correspond with the coloured
markings identifyng the terminals in your plug, proceed as follows: the wire
that is coloured Green and Yellow must be connected to the terminal in the
plug which is marked with the letter E or the Earth symbol (G), or coloured
Green or Green and Yellow.
The wire that is coloured Brown must be connected to the terminal which is
marked with the letter L or coloured Red. The wire that is coloured Blue must be
connected to the terminal which is marked with the letter N or coloured Black.
SAFETY POINTS FOR REWIRABLE OR MOULDED PLUG
The mains lead of this appliance may be already fitted with a BS1363 13A plug.
•If your socket outlet is not suitable for the plug, then the plug must be removed (cut off if it is a moulded on plug),
the flexible cord insulation should be stripped back as appropriate and a suitable 3 pin plug fitted.
•WARNING: Dispose of a plug that has been cut from the power supply cord, as such a plug is hazardous if
inserted in a live 13A socket outlet elsewhere in the house.
•Should the fuse need to be replaced an ASTA marked fuse, approved to BS 1362, of the same rating must be
used.
•Always replace the fuse cover after fitting a fuse. The plug must NOT be used if the cover is omitted or lost until a
replacement is obtained. Make certain that only the correct fuse cover is used and fitted.
•For plugs with detachable fuse cover, the replacement must be the same as the colour insert in the base of the
plug, or as directed by the embossed wording on the base of the plug.
•If the detachable fuse cover is lost a replacement may be purchased from a Service Centre.
•Information for supply may also be obtained from the plug manufacturer.
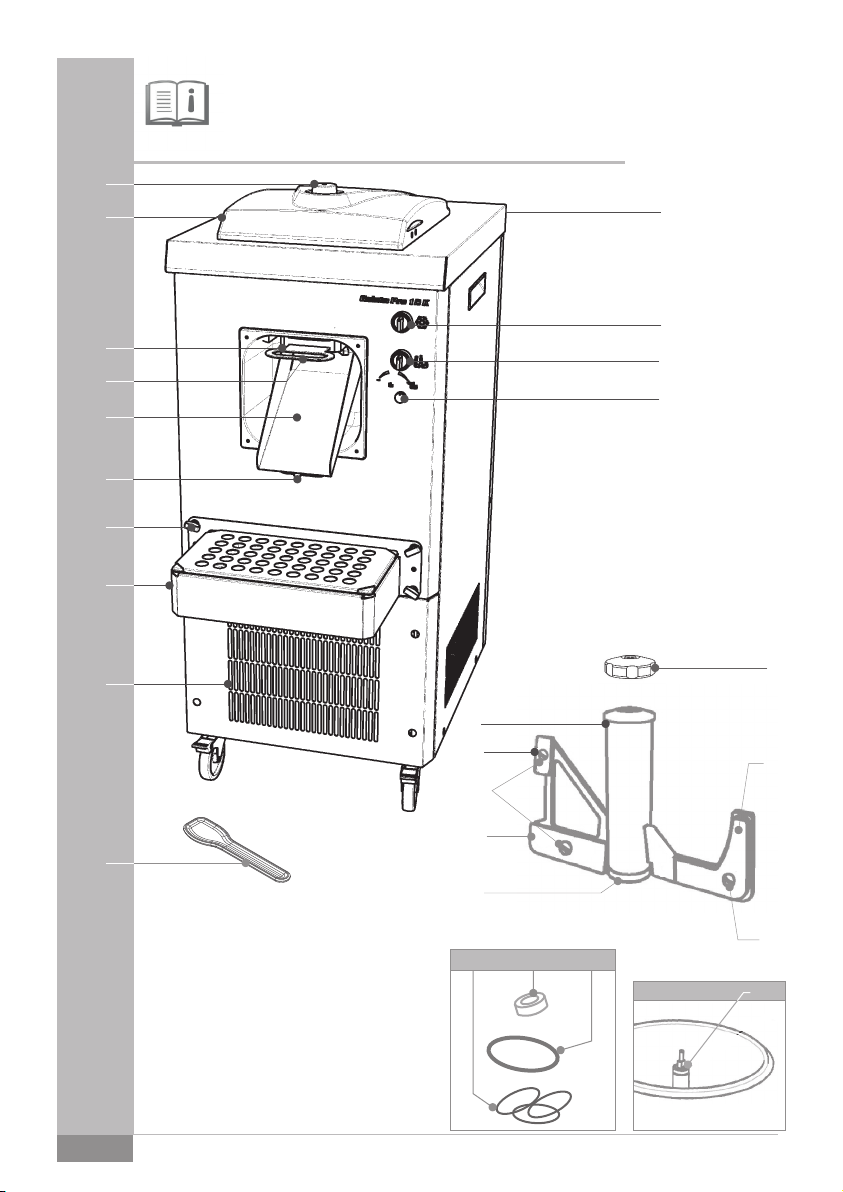
1). Refrigeration system knob.
2). Mixing paddle and rotation sense knob.
3). Transparent lid.
3a). Ingredients adding hole.
4). Paddle locking nut.
5). Mixing paddle with inserts.
6). Ventilation slot.
7). Speed adjusting knob.
8). Support frame for tray.
9). Extrusion flat gate handle.
10). Power switch.
11). Ice cream chute.
12). Support frame fixation screws.
Congratulations!
You have purchased a latest generation
NEMOX ice cream machine.
The operation of the compressor and
paddle are independent so as to make the
most of your experience.
An electronic device stops the paddle when
the consistency of the preparation is
excessive, thus preventing compromising
the mechanical functions of the machine.
13). Flat gate fixation screws.
14). Chute fixation screw.
15). Paddle plastic sleeve gasket set.
16). Extrusion gate gasket set.
17). Paddle plastic sleeve.
18). Vertical scraper.
19). Horizontal scraper.
20). Interlocking buffer.
21). Small vertical scraper.
22). Oil seal.
23). Spatula.
The cooling system will continue to run until
it is manually stopped.
FIRST USE
•Place on a flat surface, make GELATO 12K
sure that the ventilation grids (6) are not
obstructed. Leave a minimum clearance
of 10 cm. around the ventilation grids.
•During use, the appliance must be kept
clear of walls or furniture so as to not
obstruct the inflow and outflow of cooling
5

air. The leakage of warm or hot air is an
integral part of the operation of the device,
that exchanges heat with the outside for
refrigeration.
•Hygiene is extremely important when
dealing with food. Carefully follow the
provi s i ons of hygi e ne standa r d s
applicable in your country (HACCP or
equivalent). Wash thoroughly all parts
coming in contact with ice cream (bowl,
paddle, lid, chute and flat gate).
•Mount the chute (11) and fix it in position by
the appropriate screws (14).
•Mount the metal frame and fix it in position
by the appropriate screws (12). Place in
position the tray and the cover grid.
•Insert the flat gate in the appropriate seat
and verify that there is no leaking when in
closed position.
PREPARING THE MIXTURE
Select the recipe and prepare the mixture,
paying attention to the following:
•Handle the ingredients as required by the
hygiene standards applicable in your
country (HACCP or equivalent).
•For the preparation of ice creams and
sorbets, do not introduce more than 5kg 2.
of mixture, in order to allow for proper
volume increase while mixing.
•It is recommended to pour the mixture at a
temperature between +10°C and +20°C.
H i g her t em p e rat u r es m ay a l so
considerably increase the processing
time.
METHOD OF OPERATION
•Check that voltage on the rating plate
corresponds to the voltage of the mains.
Connect the plug to an electrical socket.
•Power on the machine by rotating the
general power switch (10).
•Insert the mixing paddle (5) in the
container, turning it clockwise until it is
correctly positioned on the bottom.
•Fit the retainer (4) to ensure that the mixing
paddle is locked in position.
•Verify that the flat gate (9) is in closed
position.
•Pour the ice-cream mixture previously
prepared intothe bowl.
•Turn on the knob (1) to start cooling.
IMPORTANT: if the appliance switches off,
due to a temporary power blackout, or
because the refrigeration switch was
accidentally turned off, wait five minutes
before restarting. The refrigeration circuit
has a special safety device preventing the
compressor to restart until cool, as to avoid
damages to the unit.
•Close the transparent lid (3) over the bowl.
•To start the paddle movement, rotate the
knob (2) clockwise. Set the rotating speed
near the half of maximum by rotating the
kno b (7) . Prepar ation time varies
according to quantity, temperature of the
mix, type of ice cream (cream-style or
sherbet), and room temperature.
IMPORTANT: Movement of the mixing
paddle is completely independent from the
freezing system. A safety device stops
automatically the paddle when the lid is not
in closed position.
•Depending on the quantity of ingredients
and recipe used you will have a delicious
fresh ice cream in 10/15 minutes.
•By the opening (3a) on the cover, you can
add s ome ingredi ents d uring the
preparation of the ice cream.
•When the ice cream has reached the
desired consistency, is now possible to
proceed with the extrusion operation.
EXTRUSION OF THE ICE CREAM
Proceed as described:
•Prepare the ice cream tray on the bracket
(8).
•Turn off the freezing plant by rotating the
knob (1).
•Open the extrusion system by pull out the
flat gate (9).
•Rotate counterclockwise the knob (2). The
paddle will turn clockwise starting the
extrusion process.
•When the quantity of the ice cream in the
6

EnglishEnglish
bowl decrease, you can increase the
rotating speed of the paddle by turnig the
knob (7).
•In order to extrude the last portion of ice
cream, stop the paddle by operating the
knob (2), lift the cover (3) and patch the
residual ice cream on the bottom of the
bowl. Proceed again with the extrusion
procedure.
•Once the extrusion process is terminated,
close the extrusion gate with the handle
(9).
ATTENTION! The extrusion time strictly
depends from the ice cream hardness. An
hard ice cream will thake longer time to
extrude. Under certain circumstances, the
power required to start the extrusion
process may cause the motor thermal
protection trip. In this case, power off the
motor, wait a few
minutes in order to allow to the ice cream
becoming softer and power on the motor
again: the extrusion process will restart.
HELPFUL HINTS
•Ingredients should preferably be prechilled to refrigerator temperature; this will
shorten ice-cream making times.
•For better results, start refrigeration by
turning the knob (1) 5 minutes before
pouring in the ingredients.
•To allow volume to increase of the mixture,
do not fill the container to more than half its
capacity (use max. 2,5 Kg of ingredients).
•The ice-cream maker has a GELATO 12K
powerful refrigeration system. Do not
leave the ice cream in the container for too
long with the refrigeration on, you might
find it frozen!
CLEANING THE BOWL
Cleaning the bowl of is very GELATO 12K
easy. Proceed as follows:
•Once the paddle is removed, turn off the
freezing plant and simply put inside the
bowl 2 litres of warm water.
•Wash out the bowl with a sponge. Do not
use sharp utensils inside the bowl!
•Pout an empty container of at least 3 litres
capacity under the chute (11).
•Open the extrusion system by pulling
theFlat gate (9); the water will flow on the
container below.
•If necessary, repeat the cleaning cycle until
the bowl will be clean. Clean the bottom of
the bowl with a sponge. Proceed with the
sanitization (see the SANITIZATION
chapter) in order to avoid any bacteria
growth.
•Dry the carefully the ice cream maker bowl
with a cloth in order to avoid any dirty deposit.
APPLIANCE CLEANING AND MAINTENANCE
•Before starting to clean make sure that the
machine is switched off (power switch (10)
in OFF position) and unplugged.
•Remove the steel pin and remove the
transparent lid (3) from the machine.
•Wash the paddle (5), the transparent lid (3)
and the locking nut (4), in a soapy warm
water.
•To better clean the paddle, remove the
plastic inserts (18), (19) and (21) by pulling
it from his site.
•If the inserts are worn out, they must be
replaced to prevent the mixing action from
becoming less effective. These parts are
available from all authorised service
centres.
•Clean the chute (11) and the frame (8).
Leave it out from his site by unscrewing the
aprropriate screws (12) and (14). Clean
carefully the surrounding area.
ATTENTION: when mounting the pieces,
the screws must be tightened by hands.
•Clean carefully the extrusion system by
leaving out the flat gate support (9).
Unscrew the appropriate screws (13).
Clean carefully the gasket and the
surrounding zone. Check the integrity of
the gasket: an excessive wear can cause a
mixture leakage during ice cream making
operations.
ATTENTION: when mounting the pieces,
the screws must be tightened by hands.
7

•Clean the body of the appliance and nonremovable parts with a specific product
given in the SANITIZATION paragraph.
IMPORTANT: never wash the appliance
with jets of water! - it contains electrical
parts.
•Before storing the appliance, clean it with
an absorbent cloth.
•Clean the ventilation grids (6) also on the
rear part of the machine at least once a
year.
•Regularly (at least once every 3 months)
check the oil seal (22) on top of the
transmission shaft: if necessary replace or
lubricate with H1 category grease or
higher. A specially designed grease can
be purchased at any Authorized Service
Centre. An oil seal replacement (22) is
supplied with the machine.
SANITIZATION
Sanitizing operations, if properly carried out,
allow for the removal of a significant
proportion of micro-organisms whose cells
and spores find, thanks to processing
residues, favourable conditions for survival
and proliferation. Must be carried out at the
end of daily production cycle or more often,
if necessary.
WARNING: standby mode should not be
used in lieu of proper cleaning and
sanitization proceduces at the frequencies
required by the federal, state, or local
regulatory agency.
Sanitizing involves two phases:
• Remove dirt (coa rse CLE ANSING
residues) and rinse with lukewarm water
immediately after work; cleaning action is
provided by manual friction and water
pressure. The use of a chemical detergent
reduces, but does not cancel, the manual
cleaning requested above. CAUTION:
cleansing only, even if accurate, does not
ensure complete removal of micro-biotic
contaminants. Proceed as follows:
•Remove the coarse dirt mechanically.
•Rinse with hot water first, at 45°C, to
8
dissolve grease and facilitate its removal,
but below 60°C to avoid "cooking"
proteins, sugar or fat and make them
stick even firml y to the surfaces
subjected to cleaning. The tools and
removable parts of the equipment can be
cleaned simply, in about 15 minutes.
•Apply detergent: due to the fact that most
of food residues (proteins and fat) cannot
be dissolved in water, their complete
removal requires the use of a detergent
that detaches dirt form the surface and
enables its further removal by rinsing.
•Carefully clean the recessed zones like
the extrusion opening and the bottom of
the bowl. Use a cleaner or an hard bristle
brush, if required.
•Final rinsi n g w i t h w a t er a t t ap
temperature for at least 5 minutes if
immersed.
• . D i sinfecti o n o r D ISINFEC T I O N
decontamination involves the verified
des tru ction of n on sp ore f orming
pathogenic bacteria and significant
reduction of non pathogenic and non
spore forming bacteria. Cleansing and
disinfec t i n g o p erations must be
performed separately.
After cleansing, proceed with disinfection.
Proceed as follows:
•Use a specific disinfecting agent suitable
for food industry sector. For the best
result in the disinfection operations we
suggest to use a product with ethanol
(concentration between 20 and 30%),
iso propyl alcohol ( concent ration
between 1 and 5%) and a quaternary
ammonium compound (concentration
under 200ppm). Anyway, check that on
the package are properly marked the
following features:
•Disinfecting agent, Medical Device or
similar.
•Registration number at Healthcare
Agency.
•The message "for food industry use“.
•Dosage and use times.

EnglishEnglish
•Ingredients, manufacturer, batch and
production date.
•Warnings on safe use.
•Dilute the disinfecting product following
th e i n structions g i v e n by th e
manufacturer. Attention: using less
d i s i n f e c t i n g p r o d u c t t h a n
recommended may promote bacteria
proliferation at dangerous levels, as well
as using excess active principle does
not improve efficiency.
•Leave the disinfecting agent to act for the
contact time required. If left less time than
required, disinfection may be ineffective.
•In order to carry out the various operations
correctly, you must proceed from up
downwards, finishing with the floor.
•After applying disinfecting agent, remove
residues with a final rinse.
•Pay utmost care to clean the extrusion
opening, the bottom of the bowl and all the
recessed zones which can to be in contact
with food. Use a cleaner or an hard bristle
brush, if required.
•Dry thoroughly the surfaces to avoid
bacteria proliferation due to moisture;
•We recommend you alternate every 6
months the type of disinfecting agent to
avoid developing resistant forms of
bacteria. Bacteria spores are the most
resistant biological forms and, therefore, it
is recommended you use chloride-based
products.
TROUBLESHOOTING
•Machine does not cool:
•Check that the power plug is properly
inserted and the appliance has electrical
energy.
•The safety device of the compressor
comes into action: wait 5-10 minutes
before restarting the machine. Rapid and
continued start-up attempts do nothing
but prolong the period of inactivity of the
machine.
•Check that the machine is correctly
positioned with the ventilation grids (6)
free of any obstructions.
•The paddle does not turn:
•Check that the paddle (5) is properly
attached to the tube and locked with a
special locking ring (4).
•Make sure it is free from obstacles that
prevent it from rotating.
•Make sure the lid is closed in the correct
position: a safety device stops the
paddle when the lid is opened.
•The ice cream was too hard and the
motor has stalled. A safety system has
stopped the motor in order to prevent any
damage. Turn off the paddle motor by
turning the knob (2), let the mixture
become softer (turn off the freezing plant)
and restart.
•The machine is noisy:
•Some noise is part of the normal
operating specification s, but if it
becomes excessive contact the Service
Centre to avoid further and more serious
problems.
•Extrusion procedure is very slow:
•The ice cream is too hard. Turn off the
freezing plant, wait a few minutes and try
again.
•The extrusion discharge gate leaks:
•Replace the gasket. Two additional
gaskets sets (16) are provided with the
machine.
•The plastic sleeve (17) on the lower part of
the paddle is too easy to separate.
•Replace the gasket with the new one.
Four additional gasket (15) are provided
with the machine.
•The paddle does not scrape properly the
sides of the bowl.
•Check that the scrapers (18), (19) and
(21) are not damaged or worn.
•Check that the resilient pads (20) are not
distorted. If they are distorted replace
them with new parts. One set is included.
9

Français
INSTRUCTIONS GENERALES DE SECURITE
Pendant l'utilisation des appareils électriques, il est indispensable de respecter scrupuleusement quelques
règles de sécurité fondamentales, en particulier:
•Lire attentivement le mode d'emploi avant d'installer et utiliser l'appareil.
•Ne pas plonger le corps principal de l'appareil dans l'eau ou autres liquides: danger de chocs électriques.
•Cet appareil n'est pas prévu pour être utilisé par des personnes (y compris les enfants) dont les capacités
physiques, sensorielles ou mentales sont réduites, ou des personnes dénuées d'expérience ou de
connaissance, sauf si elles ont pu bénéficier, par l'intermédiaire d'une personne responsable de leur
sécurité, d'une surveillance ou d'instructions préalables concernant l'utilisation de l'appareil. Il convient de
surveiller les enfants pour s'assurer qu'ils ne jouent pas avec l'appareil.
•Débrancher l'appareil de la prise de courant quand il n'est pas utilisé et avant de le démonter ou de le
nettoyer.
•Ne pas toucher les parties en mouvement.
•Ne pas utiliser l'appareil si le cordon d'alimentation ou la fiche sont abîmés, ou après un fonctionnement
anormal de l'appareil, ou si l'appareil est tombé par terre ou s'il a été endommagé de quelque façon que ce
soit. Dans ces cas, il est recommandé de s'adresser au Service Après-vente agrée pour les réparations.
•Emploi d'accessoires qui n'ont pas été recomandés ou vendus par le constructeur de cet appareil pourrait
entraîner des risques d'incendie ou des chocs électriques ou des lésions à l’utilisateur.
•Ne pas utiliser l'appareil à l'extérieur.
•Eviter que le cordon d'alimentation puisse pendre le long du bord de la table ou du plan de travail ou
touches des surfaces chaudes.
CONSERVER CES INSTRUCTIONS
•Toute réparation ne devra être exécutée que par des centres d'assistance technique ou de personnel agrées.
•Après avoir sorti l'appareil de l'emballage, s'assurer qu'il soit intact. En cas de doute, ne pas utiliser l'appareil
et s'adresser à un centre d'assistance technique agrée.
•Les sachets en plastique, le polystyrène, les clous etc., étant des sources potentielles de danger, ne doivent
pas être laissés à la portée des enfants.
•Cet appareil est destiné exclusivement à l'emploi pour lequel il a été conçu. Le constructeur et le vendeur de
l'appareil déclinent toute responsabilité en cas de non-respect des indications contenues dans ce manuel
d'utilisation.
•S'assurer que la tension de réseau correspond à celle qui est indiquée sur l'appareil avant d'insérer la fiche
dans la prise de courant.
•Ne pas utiliser d’objets ou d'outiles coupants à l’intérieur du bol. Ceux-ci risquent en effet de griffer ou abîmer
la cuve. Une spatule en caoutchouc ou une cuillère plastique peuvent être utilisées lorsque l'appareil est
éteint en position “0” ou “OFF”.
•Ne jamais nettoyer l’appareil avec des utensiles abrasives.
•Ne pas utiliser l’appareil sur surfaces chaudes ou près de flammes.
•N’arrêter jamais la machine en retirant la fiche de la prise de courant.
•L'appareil doit obligatoirement être relié au secteur et avoir une prise de courant avec une portée minimum de
16A, avec contact de mise à la terre efficace. Le constructeur n'est pas responsable des dommages
éventuels causés par l'absence de la mise à terre dans l'installation.
•Avant d'effectuer n'importe quelle opération d'entretien ou de nettoyage, vérifier que l'appareil ait été
débranché du secteur en retirant la fiche de la prise de courant.
•Ne jamais laver l'appareil avec des jets d'eau, ne jamais l'immerger dans l'eau!
•Cet appareil appartient à la classe climatique “T” pour l’utilisation avec une témperature ambiante de 43°C.
IMPORTANT:
Laisser la machine reposer sur un plan horizontal pendant au moins 12 h avant de l'utiliser pour la première
fois. Les agents réfrigérants pourraient en effet être dispersés, au cas où la machine aurait été renversée
pendant le transport et ils doivent avoir le temps de revenir dans la bonne position. Suivre la même procédure
par la suite aussi, toutes les fois que la machine aura été mise en position non horizontale pour quelque motif
que ce soit. Placer la machine de façon à ce qu'il y ait suffisamment d'espace autour (au moins 20 cm), pour ne
pas obstruer les prises d'air latérales.
ATTENTION
10

Français
1). Interrupteur de refroidissement.
2). Interrupteur pale mélangeuse et
rotation.
3). Couvercle transparent.
3a). Trou pour ingrédients supplémentaires.
4). Ecrou de fixage pale.
5). Pale mélangeuse.
6). Grille d'aération.
7). Poignée pour régler la vitesse de la
pale.
8). Plateau.
9). Poignée de la vanne.
10). Interrupteur général.
11). Goulotte.
Félicitations!
Vous avez acheté une turbine à glace
NEMOX de dernière génération.
Le fonctionnement du compresseur et de la
pelle sont indépendants pour exploiter au
mieux votre expérience.
Un dispositif électrique intervient pour
arrêter la pelle au cas où la consistance de la
préparation soit excessive, afin d'éviter de
compromettre les fonctionnalités
mécaniques de la machine. L'installation
réfrigérante continue de fonctionner jusqu'à
son arrêt manuel.
MISE EN PLACE DE L'APPAREIL
•Placez votre sur une surface GELATO 12K
plate vérifiez que rien ne puisse obstruer
les grilles d'aération (6) situées sur les
côtés et qu'il y ait autour de l'appareil un
espace suffisant pour assurer une
circulation correcte de l'air.
•Pendant l'utilisation l'appareil doit être
conservé loin de murs ou meubles afin de
ne pas créer d'obstacle à la circulation de
l'air de refroidissement. La sortie d'air tiède
ou cha ud fait pa rtie intégrante du
fonctionnement de l'appareil qui échange
la chaleur avec l'extérieur pour la
réfrigération.
•Pour la préparation de la glace, le
nettoyage et l'hygiène ont une importance
primordial. Avant d'employer l'appareil
laver soigneusement toutes les parties qui
entrent en contact avec la glace, tels que:
12). Vis fixage du plateau.
13). Vis fixage de la vanne d'extrusion.
14). Vis fixage de la goulotte.
15). Set joints pour douille pale
mélangeuse.
16). Set joints système extrusion.
17). Douille pale mélangeuse.
18). Insert vertical.
Insert horizontal.19).
Tampon de verrouillage.20).
21). Insert supérieur.
22). Joint.
23). Spatule.
le bol, la pale et le couvercle, la goulotte et
la vanne. Suivre scrupuleusement les
prescriptions de la réglementation
hygiénique applicable dans votre Pays
(HACCP ou correspondant).
•Monter la goulotte (11) et la fixer avec sa vis
(14).
•Monter la corniche de support, la fixer avec
les vis (12) et y positionner le plateau (8) et
la grille. Positionner la vanne jusqu'au fond
de sa siège et contrôler qu'elle fais une
tenue hermétique..
PRÉPARATION DU MÉLANGE
Choisir la recette et préparer le mélange, en
faisant attention à ce qui suit :
•Manipuler les ingrédients selon ce qui est
prescrit par les normes hygiéniques
applicables dans votre Pays (HACCP ou
correspondant).
•Pour la préparation de gelati et sorbets ne
pas introduire plus de 2.5kg de mélange,
afin de permettre une augmentation
correcte de volume pendant le mélange.
•Il est conseillé de verser le mélange à une
température comprise entre +10°C et
+20°C. Avec des températures plus
élevées les temps de pr oduct ion
p o u r r a i e n t a u g m e n t e r m ê m e
considérablement .
FONCTIONNEMENT
•Contrôler que le voltage indiqué sur la
plaque des caractéristiques techniques
11
 Loading...