

Nemox Caffe Dellopera, Caffe Fenice Instruction Book

INSTRUCTION BOOK
MODE D’EMPLOI
INSTRUCCIONES PARA EL USO
ISTRUZIONI PER L’USO
GEBRUIKSAANWIJZING
GEBRAUCHSANWEISUNG
I: ISTRUZIONI D’ USO pag. 16 NL: GEBRUIKSAANWIJZING pag. 20 D: GEBRAUCHSANWEISUNGEN Seite 24
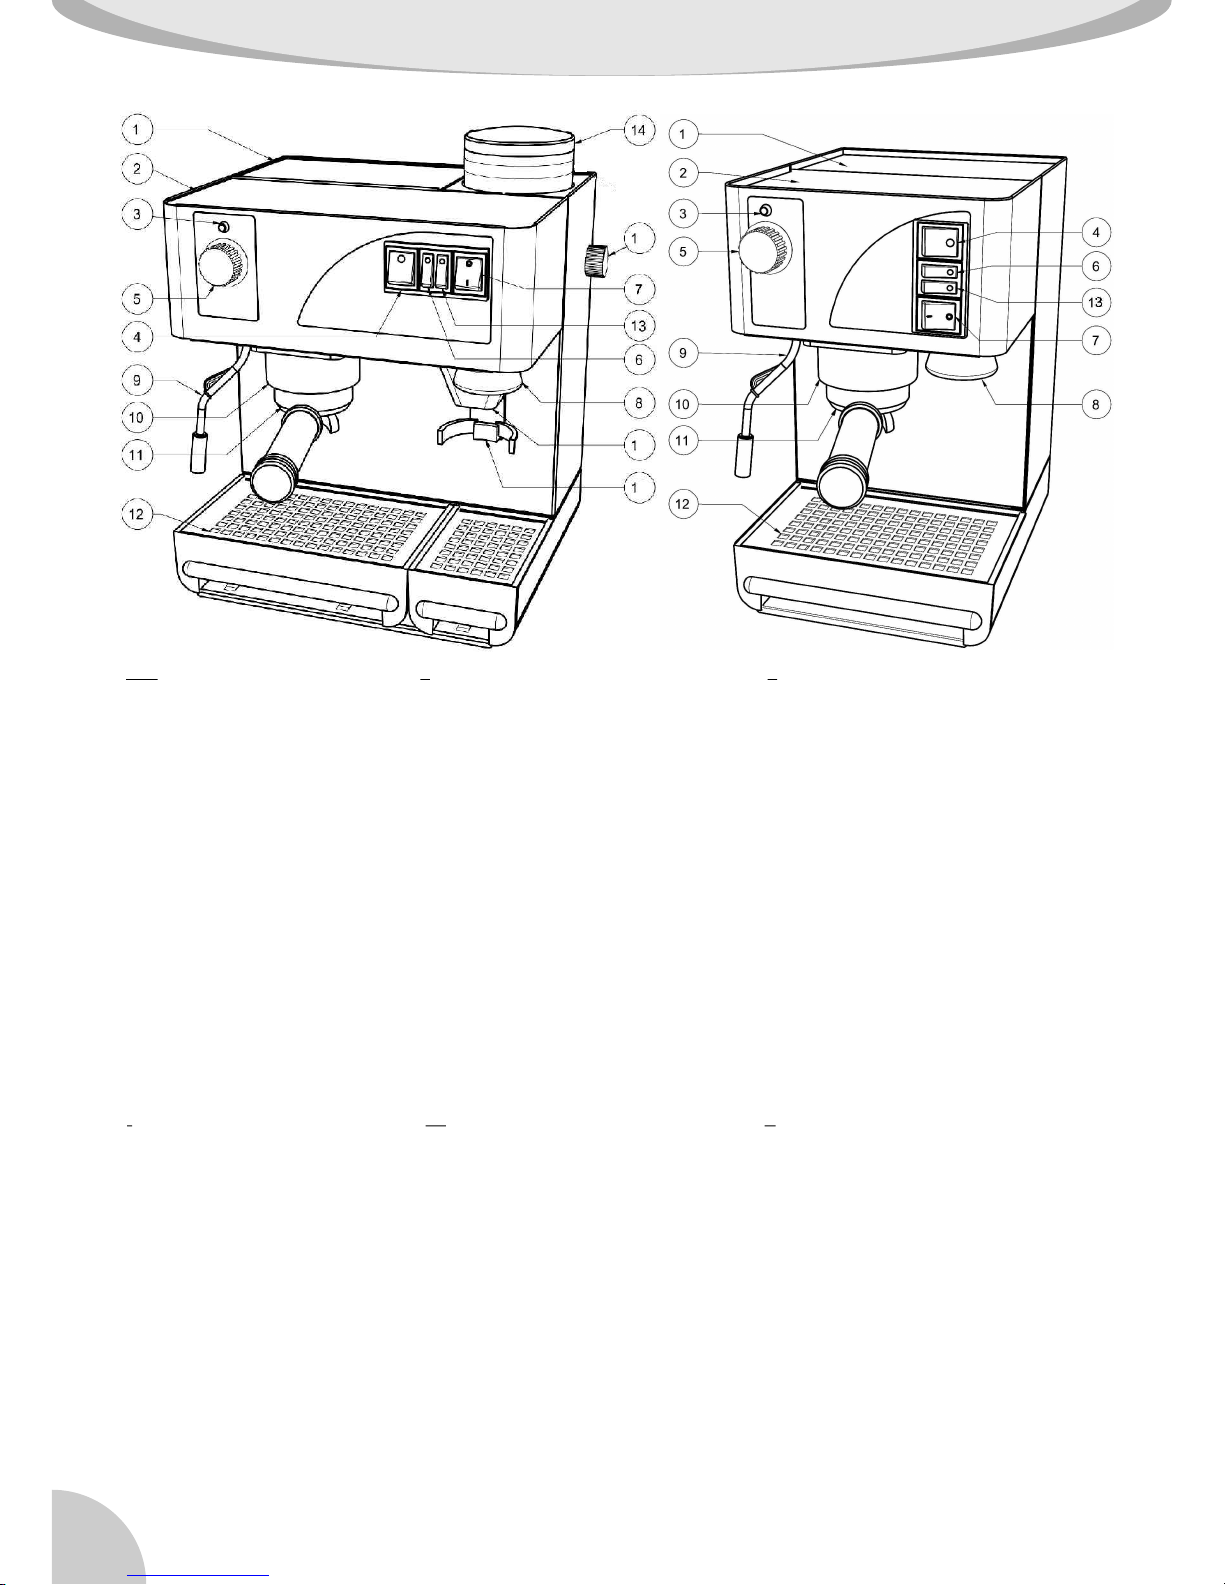
1). Serbatoio acqua. 1). 1).
2). Piano scalda tazze. 2). 2).
3). Spia luminosa temperatura. 3). 3).
4). Interruttore generale. 4). 4). .
5). Rubinetto acqua calda/vapore. 5). Stoom-/warmwaterkraantje. 5). .
6). Interruttore vapore. 6). Stoomschakelaar. 6). .
7). Interruttore erogazione caffè. 7). Koffieschakelaar. 7).
8). Pressino. 8). Gemalenkoffiepersje. 8). .
9). Lancia vapore/acqua calda. 9). Stoom-/warmwaterpijpje. 9).
10). Aggancio portafiltro. 10). Sluiting filterhouder. 10). .
11). Portafiltro. 11). 11). .
12). Cassetto raccogli gocce e griglia. 12). Nadruppellade. 12). .
13). Interruttore acqua calda. 13). Warmwaterschakelaar. 13). Heißwasser Schalter.
14). Contenitore caffè in grani. 14). Koffiebonenreservoir. 14). .
15). Manolopola regolazione macinatura. 15). Knop voor regeling maalfijnheid. 15). .
16). Uscita caffè macinato. 16). Uitvoer gemalen koffie. 16).
17). Pulsante macinatura caffè. 17). Drukknop koffiemolen. 17). .
Waterreservoir. Wasserbehälter.
Verwarmingsplaat kopjes. Tassenaufwärmefeld.
Controlelampje water-/stoomtemperatuur. Anzeigelampe für die Wasser/Dampftemperatur.
Hoofdschakelaar. Hauptschalter
Dampf/Heißwasser-Hahn
Dampf-Schalter
Kaffee Schalter.
Stopfer für den gemahlenen Kaffee
Dampf/Heißwasserversorgungs-Düse.
Filterträger-Einklemmvorrichtung
Filterhouder. Filterträger
Tropfensammelbehälter
Behälter für Kaffeebohnen
Mahlreguliergriff
Kaffeemahltaste.
Austritt gemahlener Kaffee
U.S. ONLY
FOR ASSISTANCE OR IF YOU EXPERIENCE OPERATING PROBLEMS WITH YOUR MACHINE CALL FREE
TOLL NUMBER
SEULEMENT POUR LES ETATS-UNIS
POUR L'ASSISTANCE OU SI VOUS AUREZ DES PROBLÈMES AVEC L'USAGE DE LA MACHINE VEUILLEZ
APPELER LE NUMÉRO GRATUIT
SOLO PARA ESTADOS UNIDOS
PARA ASISTENCIA O EN EL CASO QUE UD TENGA PROBLEMAS TECNICOS LA ROGAMOS LLAMAR AL
NUMERO (LLAMADA GRATUIDA)
U.K.: INSTRUCTIONS OF USE pag. 4 F: MODE D’EMPLOI pag. 8 E: INSTRUCCIONES pag. 12
1). .
2).
3).
4). .
5). .
6).
7). .
8). .
9).
10). E .
11). Portafiltro.
12). .
13). .
14). .
15). .
16). .
17). .
1). Water tank. 1). Réservoir d'eau. Depósito de agua
2). Cup warming shelf. 2). Plan chauffe-tasses. Superficie calienta tazas.
3). Water/steam temperature light. 3). Voyant lumineux température eau/vapeur. Testigo luminoso temperatura agua/vapor.
4). Master switch. 4). Interrupteur général. Interruptor general
5). Steam/hot water lever. 5). Robinet vapeur/eau chaude. Grifo del vapor/agua caliente
6). Steam switch. 6). Interrupteur vapeur. Interruptor de vapor.
7). Coffee dispensing switch. 7). Interrupteur débit café. Interruptor de suministro de café
8). Ground coffee presser. 8). Tasseur-café moulu. Prensador del café molido
9). Steam/hot water outlet spout. 9). Canule de débit vapeur/eau chaude. Tubo de suministro vapor/agua caliente.
10). Boiler outlet/filter holder seat. 10). Accrochage porte-filtre. nganche portafiltro
11). Filter holder. 11). Porte-filtre.
12). Drip tray. 12). Bac ramasse gouttes. Cajón recolector de gotas
13). Hot water switch.. 13). Interrupteur eau chaude. Interruptor de agua caliente
14). Coffee bean container. 14). Conteneur café en grains. Recipiente de café en granos
15). Grinding regulator knob. 15). Poignée de réglage mouture. Disco de regulación de la molienda
16). Ground coffee outlet. 16). Sortie café moulu. Salida del café molido
17). Coffee grinding button. 17). Bouton-poussoir mouture café. Pulsador de la molienda del café
CAFFE' OPERA - FENICE
7
6
5
ENGLISH (EUROPEANS COUNTRY)
FRANÇAIS (PAYS EUROPEENS)
Materials and articles destined for use in contact with food products are conform to the EC Directives
89/109. This appliance complies with the requirements of the Low Voltage Directive 72/23 and
successive amendment 93/68, and the Electromagnetic Compatibility Directive 89/336 and successive
amendment 92/31 and 93/68.
Les matériaux et les objets, qui sont en contact avec des produits alimentaires, sont conformes aux
dispositions de la Directive CEE/89/109. Cet appareil est conforme aux prescriptions de la Directive de
Basse Tension 72/23 avec amendement successif 93/68 et de la Directive pour la Compatibilité
Electromagnétique 89/336 avec amendement successif 92/31 et 93/68.
ESPAÑOL (ESTADOS EUROPEOS)
Los materiales y los objetos destinados al contacto con productos alimenticios corresponden a la Norma
CEE 89/109. Este aparato cumple lo dipuestos por la Directiva de Baja Tensión 72/23 con enmienda
siguiente 93/68 y por la Directiva de la Compatibilidad Electromagnética 89/336 con enmienda
siguiente 92/31 y 93/68.
Die benutzten Materialen und die Gegenstände, die für den Kontakt mit Lebensmitteln bestimmt sind,
entsprechen den CE Normen 89/109.
ITALIANO
I materiali e gli oggetti destinati al contatto con prodotti alimentari sono conformi alle prescrizioni della
Direttiva CE 89/109. Inoltre questo apparecchio è conforme alle prescrizioni della Direttiva di Bassa
Tensione 72/23 con successivo emendamento 93/68 e della Direttiva per la Compatibilità
Elettromagnetica 89/336 e successivi emendamenti 92/31 e 93/68.
DUTCH
Het materiaal en het Artikel dat voor gebruik in contact met levensmiddelen worden zijn voorgenomen in
overeenstemming met de EC richtlijnen 89/109. Dit apparaat beantwoordt aan de voorschriften van de
Laagspanningsrichtlijn 73/23 met latere wijziging 93/98 en de Richtlijn met betrekking tot de
elektromagnetische 89/336 met latere wijziging 92/31 en 93/68.
DEUTSCH
Niederspannung 72/23 mit anschließender Abänderung 93/68 sowie der Richtlinie der
Elektromagnetischen Kompatibilität 89/336 mit anschließender Abänderung 92/31 und 93/68.
U.S. ONLY
FOR ASSISTANCE OR IF YOU EXPERIENCE OPERATING PROBLEMS WITH YOUR MACHINE CALL FREE
TOLL NUMBER
1-888-353 CASA
SEULEMENT POUR LES ETATS-UNIS
POUR L'ASSISTANCE OU SI VOUS AUREZ DES PROBLÈMES AVEC L'USAGE DE LA MACHINE VEUILLEZ
APPELER LE NUMÉRO GRATUIT
1-888-353 CASA
SOLO PARA ESTADOS UNIDOS
PARA ASISTENCIA O EN EL CASO QUE UD TENGA PROBLEMAS TECNICOS LA ROGAMOS LLAMAR AL
NUMERO (LLAMADA GRATUIDA)
1-888-353 CASA
|
32
Made in Italy by
ENGLISH (EUROPEANS COUNTRY)
FRANÇAIS (PAYS EUROPEENS)
Materials and articles destined for use in contact with food products are conform to the EC Directives
89/109. This appliance complies with the requirements of the Low Voltage Directive 72/23 and
successive amendment 93/68, and the Electromagnetic Compatibility Directive 89/336 and successive
amendment 92/31 and 93/68.
Les matériaux et les objets, qui sont en contact avec des produits alimentaires, sont conformes aux
dispositions de la Directive CEE/89/109. Cet appareil est conforme aux prescriptions de la Directive de
Basse Tension 72/23 avec amendement successif 93/68 et de la Directive pour la Compatibilité
Electromagnétique 89/336 avec amendement successif 92/31 et 93/68.
ESPAÑOL (ESTADOS EUROPEOS)
Los materiales y los objetos destinados al contacto con productos alimenticios corresponden a la Norma
CEE 89/109. Este aparato cumple lo dipuestos por la Directiva de Baja Tensión 72/23 con enmienda
siguiente 93/68 y por la Directiva de la Compatibilidad Electromagnética 89/336 con enmienda
siguiente 92/31 y 93/68.
Verenigbaarheid
Die benutzten Materialen und die Gegenstände, die für den Kontakt mit Lebensmitteln bestimmt sind,
entsprechen den CE Normen 89/109.
ITALIANO
I materiali e gli oggetti destinati al contatto con prodotti alimentari sono conformi alle prescrizioni della
Direttiva CE 89/109. Inoltre questo apparecchio è conforme alle prescrizioni della Direttiva di Bassa
Tensione 72/23 con successivo emendamento 93/68 e della Direttiva per la Compatibilità
Elettromagnetica 89/336 e successivi emendamenti 92/31 e 93/68.
DUTCH
Het materiaal en het Artikel dat voor gebruik in contact met levensmiddelen worden zijn voorgenomen in
overeenstemming met de EC richtlijnen 89/109. Dit apparaat beantwoordt aan de voorschriften van de
Laagspanningsrichtlijn 73/23 met latere wijziging 93/98 en de Richtlijn met betrekking tot de
elektromagnetische 89/336 met latere wijziging 92/31 en 93/68.
DEUTSCH
Dieses Gerät entspricht den Vorschriften der Richtlinie für
Niederspannung 72/23 mit anschließender Abänderung 93/68 sowie der Richtlinie der
Elektromagnetischen Kompatibilität 89/336 mit anschließender Abänderung 92/31 und 93/68.
Made in Italy by

English English
English
IMPORTANT SAFEGUARDS
When using electrical appliances, basic safety precautions should always be observed, including the
following:
•Read all instructions carefully.
•Do not touch hot surfaces. Use handles or knobs.
•To protect against risk of fire, electric shock, and injury to persons do not immerse cord or plug or
appliance in water or any other liquid.
•Close supervision is necessary when any appliance is used by or near children.
•Unplug from outlet when not in use and before cleaning. Allow to cool before putting on or taking off parts,
and before cleaning the appliance.
•Do not operate any appliance with a damaged cord or plug, or after the appliance malfunctions, or if it is
dropped or damaged in any manner. Return appliance to the nearest authorized Service Center for
examination, repair or electrical or mechanical adjustment.
•The use of accessory attachments not recommended or sold by the appliance manufacturer may result in
fire, electric shock or injury.
•Do not use outdoors.
•Do not let cord hang over edge of table or counter, or touch hot surfaces.
•Do not place on or near a hot gas or electric burner, or in a heated oven.
•Always attach plug to appliance first, then plug cord into the wall outlet. To disconnect, turn any control to
“OFF” or “0”, then remove plug from wall outlet.
•Do not use appliance for other than intended use. The manufacturer cannot be considered responsible for
any damage caused by improper, incorrect or unreasonable use.
SAVE THESE INSTRUCTIONS
CAUTION
•After removing the appliance from the packaging, check it for damage. If in doubt, do not use the appliance
and contact an authorised service centre.
•Plastic bags, polystyrene, nails, etc. must not be left within reach of children as they are potentially
dangerous.
•The appliance must be connected to an electrical system and power supply socket with a minimum
capacity of 10A, equipped with an efficient earth contact. The manufacturer is not responsible for any
damage caused by failure to earth the system.
•Any repairs must only be carried out by authorised service centres. (This includes replacement of the
power supply cable, since special tools are required).
•The appliance's manufacturer and vendor reject any responsibility for failure to comply with the
instructions provided in this user manual.
•Never operate the appliance without water; it would be damaged beyond repair.
•Never touch hot parts of the appliance with bare hands, as burns might result.
•The appliance dispenses hot water and steam, and temperatures are therefore high. Take great care to
avoid burns.
•Never remove the filter holder when the appliance is pressurized or is dispensing coffee.
•Never leave water inside the appliance at temperatures of 0°C or below.
•Before carrying out any maintenance or cleaning operations, make sure that the appliance has been
disconnected from the electrical mains by removing the plug from the power supply socket.
•Never wash the appliance using water jets or place it in water!
•Never touch the appliance with wet or damp hands or feet.
PUTTING THE APPLIANCE INTO SERVICE - USING For hygiene reasons, the water in the tank should
IT FOR THE FIRST TIME
Wash all the accessories in the packaging carefully.
Remove the tank (1) from its seat and clean it
thoroughly. Then fill it with fresh water and put it
back in place. Caution: take care to fit the filler hose
properly, with no kinks or restrictions which might
impair water intake.
Connect the plug to the power supply socket after
checking that the voltage on the electrical data plate
is the same as the mains voltage. Press the master
switch (4); the light inside the switch will illuminate
to show that the appliance is receiving power. Load
water into water circuit immediately as described
in the paragraph below. Do not let the machine
powered without the water circuit loaded.
Wash the coffee making unit proceeding as
follows:
Then wash the hot water/steam dispenser unit
proceeding as follows:
•
•
•
•
•
•
•
•
•
•
•

54
PUTTING THE APPLIANCE INTO SERVICE - USING For hygiene reasons, the water in the tank should
IT FOR THE FIRST TIME
also be changed and the washing procedure
carried out if the appliance is left unused for more
Wash all the accessories in the packaging carefully.
than a week. In this case, replace the water still in
Remove the tank (1) from its seat and clean it
the tank with fresh water before starting the
thoroughly. Then fill it with fresh water and put it
cleaning process.
back in place. Caution: take care to fit the filler hose
properly, with no kinks or restrictions which might
ADJUSTING GRINDING (OPERA)
impair water intake.
Fill the container (14) with coffee beans. The
Connect the plug to the power supply socket after
numbered scale on the container indicates the
checking that the voltage on the electrical data plate
grinding level setting.
is the same as the mains voltage. Press the master
7 . 6 . 5 . 4 . 3 . 2 . 1
switch (4); the light inside the switch will illuminate
Taking the notch on the frame of the machine as
to show that the appliance is receiving power. Load
reference, turn the coffee grinding regulator knob
water into water circuit immediately as described
(15) until the number corresponding to the desired
in the paragraph below. Do not let the machine
grinding fineness is in line with the reference notch.
powered without the water circuit loaded.
High numbers give coarser grinding and low
Wash the coffee making unit proceeding as
numbers finer grinding. Setting the correct grinding
follows:
fineness is fundamental in obtaining a goods, creamy
Remove the filter holder (11) and press the coffee
cup of coffee. The right setting depends on the
dispenser switch (7); the pump will start to load
different blends of coffee available on the market and
water. Wait until water flows from the boiler outlet
personal preference.
(10). Now, the appliance's water circuit is now
MAKING ESPRESSO COFFEE
primed.
Make sure that the operations described in the
Press the coffee switch (7) to bring it to the “0”
PUTTING THE APPLIANCE INTO SERVICE section
position and stop the flow.
have been carried out.
Repeat the operation whenever the appliance's
Wait until the water/steam temperature light (3)
water circuit has to be re-primed because the
goes out, indicating that the appliance is ready to
tank has been emptied completely. Do not let
make coffee (while the appliance is in use, the light
the machine powered without the water circuit
will go on whenever the water temperature drops
loaded.
below the pre-set values. Do not start to make
For hygiene reasons, the water in the tank should
coffee until the light is off).
also be changed and washing procedure carried
Place the filter for one cup or for two cups in the filter
out if the appliance is left unused for more than a
holder (11).
week. In this case, replace the water still in the
tank with fresh water before starting the cleaning
OPERA. Place the filter holder against the support
process.
provided under the coffee outlet (16) and press the
button (17) to start coffee grinding. When the
When the appliance is used for the first time, allow
desired quantity is reached, release the coffee
about a litre of water to flow to ensure it is
grinding button (17).
thoroughly cleaned.
FENICE. Whit the doser measure, place the ground
Then wash the hot water/steam dispenser unit
coffee in the filter (one measure = one cup; two
proceeding as follows:
measures = two cups).
Turn on the steam/hot water tap (5) by turning it
Use the presser (8) to press the coffee in the filter
anti-clockwise.
firmly down. The creaminess of the coffee will
Press the hot water dispenser switch (13); the
depend on how the beans have been ground and
pump will start to load water. Wait until an even jet
how hard the grounds are pressed down (if the
of water, containing no air, flows from the hot
coffee is damp or finely ground, lighter pressure is
water/steam dispenser spout (9).
sufficient, while if it is coarsely ground it requires a
When the appliance is used for the first time, allow
firmer pressure). Remove any excess coffee from
about a litre of water to flow from the steam spout
the rim of the filter.
to ensure it is thoroughly cleaned.
Connect the filter holder (11) under the boiler outlet
Press the hot water switch (13) to bring it to the
(10), turning it from left to right until it cannot be
"0" position and turn off the steam/hot water tap
turned any further. Caution: it is important always
(5) by turning it clockwise to stop the flow.
to push the filter holder firmly home until it cannot
•
•
•
•
•
•
•
•
•
•
•
•
•
•
•
•

English
IMPORTANT: Check that there are no foreign circuit as described in the PUTTING THE
bodies with the coffee beans; they might damage
the grinders. Tale care not to pour water straight
into the coffee grinder, it damages the grinders!
Clean the appliance using a soft, damp cloth only
and then dry. Never use solvents, detergents,
abrasives or any substances not suitable for
contact with foods.
The steam outlet tip may be removed for cleaning
by turning it clockwise. It must be cleaned
whenever the steam/hot water spout is used to heat
milk or liquids.
Never place the appliance in water; it contains
electrical parts!
DESCALING
In some areas, the water contains a large amount of
scale, which is deposited in the appliance's circuit,
impairing its operation.
The appliance should be de-scaled every 3-4 months
or about every 300 coffees, proceeding as follows.
1). Fill the tank (1) with water, adding about 100 cc of
2). Switch on the master switch (4). Proceed as if
3). Then dispense hot water through the spout (9),
4). Turn off the master switch and leave the descaling
5). Repeat the operations described in points 2-3-4
6). Wash the tank thoroughly and fill it with fresh
7). Clean the circuit as described in the PUTTING THE
WHAT MIGHT GO WRONG?
The indicator lights do not come on.
No power.
Check that the plug has been connected to the
power supply socket correctly.
The power supply lead is damaged. Remove the
plug immediately and take the appliance to an
authorised service centre.
The appliance does not make coffee.
The water tank is empty or the water circuit has not
been primed. In both cases, an abnormal noise will
be heard, since the pump will be sucking in air
instead of water. Switch off the appliance and leave
it to cool for a few minutes, then prime the water
•
•
•
•
•
•
•
be turned any more, to ensure a secure connection. bottom to the top of the container. The steam spout
has a special tip which aids the formation of froth
Place the coffee cups under the spouts of the filter
on milk.
holder (11) and press the coffee dispenser switch
(7). When the desired amount of coffee has been When enough steam has been dispensed, move
the steam/hot water spout (9) back over the grating
obtained, return the switch (7) to "0".
(12), turn off the steam switch (6) by moving it
Remove the filter holder (11) by turning from right to
to”0” and press the hot water switch (13). Wait until
left and throw the grounds away. Never leave the
the water is expelled from the spout (9) and press
filter containing the spent grounds connected to the
the hot water switch (13) by moving it to “0”. This
appliance.
operation empty the steam/hot water spout from
Note: it is normal for a few drops of water to flow
the residual steam and re-prime the water circuit.
from the boiler outlet; this does not mean that the
Turn the steam/hot water tap (5) off again by
appliance is defective.
turning it clockwise.
USEFUL HINTS FOR MAKING DELICIOUS ITALIAN
Clean the steam spout and outlet tip thoroughly.
ESPRESSO
USEFUL HINTS FOR MAKING DELICIOUS ITALIAN
Always use fresh water and clean the tank often.
CAPPUCCINO
Do not make coffee until the water has reached the
First make the coffee in a cappuccino cup.
optimum temperature (indicated by the light (3),
Fill just 1/3 of the container to be used with cold
which goes out).
milk. To obtain dense froth, place the evaporator tip
Do not wash the filters and the filter holder (11) with
just below the level of the milk and turn the
detergent whenever they have been used; rinsing
container in circles until the desired consistency is
with water is sufficient. However, it is important to
obtained. Then insert the spout down to the bottom
check that coffee residues have not blocked the tiny
of the container until the milk is heated to the
holes in the filters.
temperature required.
Warm the cups, filters and filter holder before
Add the milk to the coffee and use a spoon to carry
making coffee. The cups can be warmed by placing
the desired amount of froth into the cup. The
them on the cup warmer shelf (2) with the
optimum proportion for a good cappuccino is 1/3
appliance switched on. The filters and filter holder
coffee, 1/3 hot milk and 1/3 milk froth.
can be warmed with hot tap water or by connecting
Dust with cocoa powder if liked.
the filter holder containing the filter to be used
(without coffee, naturally) under the boiler outlet.
HOT WATER
Press the coffee switch (7) and allow a cup full of
Make sure that the operations described in the
water to flow out. Disconnect the filter holder and
PUTTING THE APPLIANCE INTO SERVICE section
filter and dry them before adding the coffee.
have been carried out.
Do not use paper or plastic cups, as the flavour of
Wait until the indicator light (3) goes out.
the coffee is affected.
Turn on the steam/hot water tap (5) by turning it
Good quality, well roasted coffee ground to the right
anti-clockwise; a little water will come out of the
fineness is essential for making good espresso.
spout. Now press the switch (13) to obtain a
DISPENSING STEAM
continuous flow of water at a temperature of about
95°C.
Make sure that the operations described in the
PUTTING THE APPLIANCE INTO SERVICE section
When the desired amount of water has been
have been carried out.
obtained, switch off the switch (13) and turn off the
tap (5) by turning it clockwise.
Press the steam switch (6) and wait until the
water/steam temperature indicator light (3) goes
ROUTINE MAINTENANCE
out.
Before carrying out any maintenance or cleaning
Turn the steam/hot water spout so that it is over the
operation, remove the plug from the power supply
drip tray (12). Turn on the steam/hot water tap (5)
socket and leave the appliance to cool.
slightly by turning it anti-clockwise and wait until
Clean the drip tray, the tank, the filters and the filter
only steam comes out of the spout. Turn off the tap.
holder regularly.
Turn the spout outward and insert it to the bottom of
Clean the coffee grinder container
the recipient containing the beverage to be heated.
periodically using a slightly damp cloth to remove
Turn the steam tap fully on and heat the liquid by
the coffee powder.
moving the spout in circles, working from the
•
•
•
•
•
•
•
•
•
•
•
•
•
•
•
•
•
•
•
•
•
•
•
•
•OPERA.

76
IMPORTANT: Check that there are no foreign circuit as described in the PUTTING THE
bodies with the coffee beans; they might damage
APPLIANCE INTO SERVICE section.
the grinders. Tale care not to pour water straight
The water temperature is too high, the steam
into the coffee grinder, it damages the grinders!
function has been used without discharging the
Clean the appliance using a soft, damp cloth only
residual steam from the spout. Leave the appliance
and then dry. Never use solvents, detergents,
to cool for a few minutes, then proceed as
abrasives or any substances not suitable for
described in the PUTTING THE APPLIANCE INTO
contact with foods.
SERVICE - USING IT FOR THE FIRST TIME - wash
the coffee maker unit.
The steam outlet tip may be removed for cleaning
by turning it clockwise. It must be cleaned
Coffee flows out too quickly.
whenever the steam/hot water spout is used to heat
The coffee is too coarsely ground.
milk or liquids.
The coffee inside the filter has not been pressed
Never place the appliance in water; it contains
down firmly enough.
electrical parts!
There is not enough coffee in the filter.
Coffee flows out too slowly.
DESCALING
The coffee is too finely ground.
In some areas, the water contains a large amount of
scale, which is deposited in the appliance's circuit,
The coffee inside the filter has been pressed down
impairing its operation.
too firmly.
The appliance should be de-scaled every 3-4 months
Some of the holes in the filter are blocked; free them
or about every 300 coffees, proceeding as follows.
with a needle.
1). Fill the tank (1) with water, adding about 100 cc of
The coffee is not creamy.
white wine vinegar or a de-scaling product, for
The coffee is too coarsely ground.
use with foods, using the quantity stated in the
The coffee is no longer fresh.
instructions.
The blend used is not suitable for espresso.
2). Switch on the master switch (4). Proceed as if
The coffee is not hot enough.
making coffee, allowing a cappuccino cup full of
The cup, filter and filter holder have not been
water to flow out.
warmed up.
3). Then dispense hot water through the spout (9),
You have not waited for the water temperature light
allowing a cappuccino cup full of water to flow
(3) to go out.
out.
The steam/water spout does not dispense steam or
4). Turn off the master switch and leave the descaling
water.
product to act for about 15-20 minutes.
The hole in the spout is blocked by dried residues.
5). Repeat the operations described in points 2-3-4
Clean the hole with a needle.
until the water tank is empty.
It is difficult to connect the filter holder.
6). Wash the tank thoroughly and fill it with fresh
Too much coffee has been put in the filter holder.
water.
Remove a little coffee before connecting.
7). Clean the circuit as described in the PUTTING THE
There is coffee on the rim of the filter. Clean both the
APPLIANCE INTO SERVICE - USING IT FOR THE
filter and the corresponding connection zone
FIRST TIME section.
around the boiler outlet.
WHAT MIGHT GO WRONG?
OPERA - The coffee grinder does not dispense the
The indicator lights do not come on.
ground coffee.
No power.
The coffee is being ground too fine. Set coarser
Check that the plug has been connected to the
grinding.
power supply socket correctly.
If the noise indicating that the coffee grinder motor
The power supply lead is damaged. Remove the
is running is not heard, contact an authorised
plug immediately and take the appliance to an
service centre.
authorised service centre.
You are urged to check all the points listed above
The appliance does not make coffee.
before calling in an authorised service centre.
The water tank is empty or the water circuit has not
If the service centre does not find any
been primed. In both cases, an abnormal noise will
malfunctions, the expenses for these checks will
be heard, since the pump will be sucking in air
be charged to the customer.
instead of water. Switch off the appliance and leave
it to cool for a few minutes, then prime the water
•
•
•
•
•
•
•
•
•
•
•
•
•
•
•
•
•
•
•
•
•
•
•
•
English

INSTRUCTIONS GENERALES DE SECURITE
Avant l'usage des appareils électriques est très important tenir en considération les normes de sécurité cidessus indiquée :
•Lisez le mode d'emploi attentivement.
•Ne toucher pour aucune raison, les mains nues, les parties chaudes de la machine, vous pourriez vous brûler.
Utiliser des protections.
•Pour éviter le risque d'incendie ou de choque électrique ainsi que des dommages aux personnes, ne pas
immerger l'appareil, son fiche ou ses câbles dans l'eau ou dans n'importe quel liquide .
•Ne jamais permettre l'usage de l'appareil aux enfants ou près d'eux, bien aux personnes inaptes, faute de
surveillance.
•Débrancher l'appareil du secteur en retirant la fiche de la prise de courant avant d'effectuer n'importe quelle
opération de nettoyage ou si l'appareil n'est pas en fonction. Laissez l'appareil se refroidir avant d'enlever des
components et avant du nettoyage.
•Ne pas utiliser l'appareil si la fiche ou la prise sont endommagés, si l'appareil ne marche pas correctement, s'il
n'est pas intact dans son emballage ou s'il est endommagé. S'adresser à un centre d'assistance technique
agrée.
•Utiliser seulement des accessoires recommandés produits par le constructeur de l'appareil, l'utilisation des
accessoires différents pourrait être cause d'incendie ou choque électrique ou des lésions à l'utilisateur.
•Ne pas usager l'appareil en plein air.
•Ne pas laisser que la fiche électrique pencher du plan ou la machine est positionnée ou qu'il puisse entrer en
contacte avec des surfaces chaudes .
•Ne pas placer la fiche électrique dans ou près d'un fourneau a gaz ou électrique ou dans le four chaude .
•Toujours enforcer la fiche dans la machine avant de l'enforcer dans le secteur. Pour fermer la machine on doit
désactiver l'interrupteur en le portant sur la position OFF et retirer la fiche de la prise de courant.
•Cet appareil est destiné seulement et exclusivement à l'utilisation pour laquelle il a été conçu. Le constructeur ne
peut être considéré comme responsable de dommages éventuels causés à la suite d'un emploi abusif, erroné et
déraisonnable.
CONSERVER CES INSTRUCTIONS
ATTENTION
•Après avoir sorti l'appareil de l'emballage, s'assurer qu'il soit intact. En cas de doute, ne pas utiliser l'appareil et
s'adresser à un centre d'assistance technique agrée.
•Les sachets en plastique, le polystyrène, les clous etc., étant des sources potentielles de danger, ne doivent pas
être laissés à la portée des enfants.
•L'appareil doit obligatoirement être relié au secteur et avoir une prise de courant avec une portée minimum de
10 A, avec contact de mise à la terre efficace. Le constructeur n'est pas responsable des dommages éventuels
causés par l'absence de la mise à terre dans l'installation.
•Toute réparation ne devra être exécutée que par des centres d'assistance technique agréés, y compris le
remplacement du câble d'alimentation, qui requiert l'utilisation d'outils spéciaux.
•Le constructeur et le vendeur de l'appareil déclinent toute responsabilité en cas de non-respect des indications
contenues dans ce manuel d'utilisation.
•Ne jamais faire fonctionner la machine sans eau, elle serait endommagée irrémédiablement.
•Ne toucher pour aucune raison, les mains nues, les parties chaudes de la machine, vous pourriez vous brûler.
•La machine produit de la vapeur et de l'eau chaude, les températures sont donc élevée. Tenez vos mains loin des
parties chaudes de la machine pendant l'utilisation, faites très attention afin de ne pas vous brûler !
•Ne jamais enlever le porte-filtre lorsque l'appareil est sous pression ou débite le café!
•Ne jamais laisser l'appareil contenant l'eau à température égale ou inférieure a 0°C.
•Avant d'effectuer n'importe quelle opération d'entretien ou de nettoyage, vérifier que l'appareil ait été débranché
du secteur en retirant la fiche de la prise de courant.
•Ne jamais laver l'appareil avec des jets d'eau, ne jamais l'immerger dans l'eau!
•Ne pas toucher l'appareil avec les mains ou des pieds humides ou mouillés.
MISE EN MARCHE - PREMIERE UTILISATION DE LA chaude (5) en le tournant dans le sens des aiguilles
MACHINE
•Laver avec soin tous les accessoires contenus dans
l'emballage. Retirer le réservoir (1) de son logement et
le nettoyer avec soin. Ensuite, le remplir d'eau fraîche
et le ranger dans son logement. Attention: introduire
correctement le tube de remplissage, en évitant qu'il
fasse des plis ou des étranglements qui pourraient
empêcher l'aspiration de l'eau.
•La partie gauche de la machine est dotée d'une rainure
qui permet de contrôler facilement le niveau d'eau
dans le réservoir. Insérer la fiche dans la prise de
courant après avoir contrôlé que la tension indiquée
sur l'étiquette des données électriques correspond à
la tension du réseau d'alimentation secteur. Enfoncer
l'interrupteur général (4), l'indicateur lumineux
incorporé à l'interrupteur s'allume et indique que
l'appareil est sous tension; remplir immédiatement
avec de l'eau comme décrit plus bas. Éviter tout
fonctionnement de la machine à sec pour ne pas
risquer d'endommager irrémédiablement cette
dernière.
•Procéder au lavage du groupe de distribution café.
•Après avoir retiré le porte-filtre (11), enfoncer
•Enfoncer l'interrupteur café (7) en le plaçant sur "0".
•Lors de la première utilisation, il est conseillé de
•Procéder ensuite au lavage du groupe de distribution
eau chaude/vapeur.
•Ouvrir le robinet vapeur/eau chaude (5) en le
•Enfoncer l'interrupteur de distribution d'eau chaude
•Lors de la première utilisation, il est conseillé de
•Éteindre l'interrupteur d'eau chaude (13) en le

FrançaisFrançais
98
MISE EN MARCHE - PREMIERE UTILISATION DE LA chaude (5) en le tournant dans le sens des aiguilles
MACHINE
d'une montre.
•Laver avec soin tous les accessoires contenus dans
Pour des raisons d'hygiène, il est également
l'emballage. Retirer le réservoir (1) de son logement et
conseillé de procéder au lavage et de remplacer
le nettoyer avec soin. Ensuite, le remplir d'eau fraîche
l'eau du réservoir en cas de non-utilisation de
et le ranger dans son logement. Attention: introduire
l'appareil pendant plus d'une semaine. Vider le reste
correctement le tube de remplissage, en évitant qu'il
d'eau du réservoir et remplir ce dernier avec de l'eau
fasse des plis ou des étranglements qui pourraient
propre avant de commencer le nettoyage.
empêcher l'aspiration de l'eau.
REGLAGE DE LA MOUTURE (OPERA)
•La partie gauche de la machine est dotée d'une rainure
Remplir le conteneur (14) de café en grains. L'échelle
qui permet de contrôler facilement le niveau d'eau
graduée présente sur le conteneur permet d'effectuer le
dans le réservoir. Insérer la fiche dans la prise de
réglage du degré de mouture.
courant après avoir contrôlé que la tension indiquée
7 . 6 . 5 . 4 . 3 . 2 . 1
sur l'étiquette des données électriques correspond à
En prenant comme référence l'encoche se trouvant sur
la tension du réseau d'alimentation secteur. Enfoncer
la machine, tourner la poignée de réglage de mouture
l'interrupteur général (4), l'indicateur lumineux
café (15) jusqu'au numéro correspondant à la mouture
incorporé à l'interrupteur s'allume et indique que
souhaitée sur l'encoche de référence.
l'appareil est sous tension; remplir immédiatement
Plus le chiffre est grand, plus la mouture est grosse et
avec de l'eau comme décrit plus bas. Éviter tout
plus le chiffre est petit, plus la mouture est fine. Le
fonctionnement de la machine à sec pour ne pas
réglage du degré de mouture est fondamental pour
risquer d'endommager irrémédiablement cette
obtenir un bon café crémeux. Ce réglage doit être
dernière.
effectué en fonction des différents mélanges de café
•Procéder au lavage du groupe de distribution café.
présents sur le marché et selon les goûts personnels.
•Après avoir retiré le porte-filtre (11), enfoncer
PREPARATION DU CAFE EXPRESS
l'interrupteur de distribution café (7), la pompe
commence le remplissage d'eau. Attendre que l'eau
•Vérifier que toutes les opérations décrites au
coule normalement de la distribution du café. Le
paragraphe MISE EN MARCHE aient été effectuées.
circuit hydrique de la machine est maintenant activé.
•Attendre que le voyant lumineux température
•Enfoncer l'interrupteur café (7) en le plaçant sur "0".
eau/vapeur (3), qui indique que la machine est prête à
fonctionner, ne s'éteigne. Durant l'utilisation de la
Répéter les opérations décrites plus haut chaque
machine, le voyant s'allume dès que la température de
fois qu'il est nécessaire de remplir le circuit
l'eau est inférieure aux valeurs nécessaires pour
hydriqu e de la machin e. Évi ter tout
obtenir un bon café chaud. Ne commencer la
fonctionnement de la machine à sec pour ne pas
distribution de café que lorsque le voyant lumineux est
risquer d'endommager irrémédiablement cette
éteint.
dernière.
•Introduire dans le porte-filtre (11) le filtre pour une
Pour des raisons d'hygiène, il est également
tasse ou pour deux tasses.
conseillé de procéder au lavage et de remplacer
l'eau du réservoir en cas de non-utilisation de
OPERA. Placer le porte-filtre dans le support
l'appareil pendant plus d'une semaine.
correspondant sous le bec de sortie du café (16) tout
en pressant le bouton (17) pour actionner la mouture
•Lors de la première utilisation, il est conseillé de
du café. Lorsqu'on a atteint la qualité souhaitée, lâcher
laisser couler environ un litre d'eau pour effectuer un
le bouton de mouture du café (17);
nettoyage complet.
FENICE. Avec le doseur, mettre le café moulu dans le
•Procéder ensuite au lavage du groupe de distribution
filtre (une mesure = une tasse; deux mesures = deux
eau chaude/vapeur.
tasses).
•Ouvrir le robinet vapeur/eau chaude (5) en le
•Tasser le café contenu dans le filtre avec le presse-
tournant dans le sens contraire des aiguilles d'une
café (8). En fonction de la mouture et de la pression
montre.
exercée sur le café, on obtiendra une infusion plus ou
•Enfoncer l'interrupteur de distribution d'eau chaude
moins crémeuse (si le café est humide ou moulu fin
(13), la pompe commence le remplissage d'eau.
une légère pression sera suffisante; par contre, si le
Attendre que l'eau sorte de la buse vapeur/eau
café est moulu gros, il faudra exercer une plus forte
chaude (9).
pression). Enlever du bord du filtre l'éventuel excédent
•Lors de la première utilisation, il est conseillé de
de café.
laisser couler environ un litre d'eau pour effectuer un
•Accrocher le porte-filtre (11) sous la douche du
nettoyage complet.
réservoir chauffe-eau (10) en le tournant de gauche à
•Éteindre l'interrupteur d'eau chaude (13) en le
plaçant sur "0" et fermer le robinet vapeur/eau
 Loading...