

Nemox 1700 User Manual [it]
GELATO
Pro 1700
INSTRUCTION BOOK
MODE D’EMPLOI
INSTRUCCIONES PARA EL USO
ISTRUZIONI PER L’USO
GEBRAUCHSANWEISUNG
GELATO Pro 1700
U.K.: INSTRUCTION OF USE Pag. 4 F.: MODE D'EMPLOI Pag. 8 E.: INSTRUCCIONES PARA EL USO Pag. 12
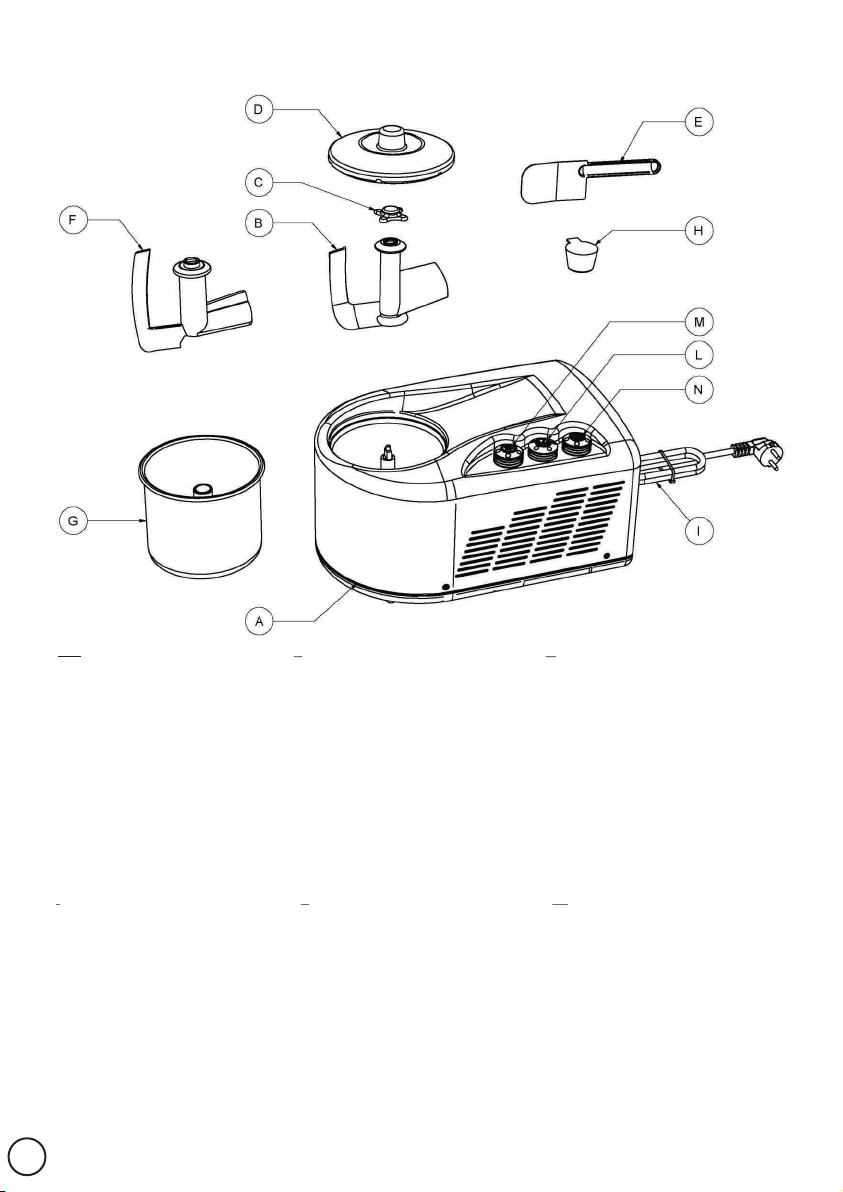
A). Base of appliance, including fixed bowl. A). Corps de l'appareil avec cuve fixe. A). Cuerpo principal del aparato con
B). Mixing paddle for fixed bowl. B). Pale pour cuve fixe.
C). Mixing paddle tightening knob. C). Écrou de serrage de l'agitateur.
D). Transparent lid for fixed and removable D). Couvercle pour cuve fixe et amovible.
bowls.
E). Ice cream spatula. E). Paleta para helado.
F). Mixing paddle for removable bowl. F). Pala de mezclado para recipiente extraíbile.
G). Removable bowl. G). Recipiente extraible.
H). Measuring cup. H). Medidor.
I). Power supply cord. I). Cable de alimentaciòn.
L). Refrigeration switch. L). Interruptor de enfriamiento.
M). Mixing paddle switch. M). Interruptor de la pala de mezclado.
N). Ice-cream storage system switch. N). Interruptor del sistema de conservación.
I: ISTRUZIONI D'USO Pag. 16 D: GEBRAUCHSANWEISUNGEN Seite 20 DK: BRUGSANVISNING S. 24
A). Corpo apparecchio con pentola fissa. A). Gerätegehäuse mit festem Behälter. A). Motorenhed med kompressor og fast skål.
B). Pala miscelatrice per pentola fissa. B). Rührwerk für festen Behälter. B). Rørevinge til fast skål.
C). Pomolo di fissaggio per pale miscelatrici. C). Befestigungsknopf für Rührwerk. C). Låseskrue til fastspænding af rørevinger.
D). Coperchio per pentola fissa ed estraibile. D). Deckel für festen und herausnehmbaren D). Låg.
E). Spatola raccogligelato. E). Isspatel.
F). Pala miscelatrice per pentola estraibile. F). Rørevinge til aftagelig skål.
G). Pentola estraibile. G). Aftagelig skål.
H). Misurino. H). Målebæger.
I). Spina di alimentazione. I). Ledning.
L). Tasto di accensione e inizio L). Fryseknap.
refrigerazione.
M). Tasto comando pala miscelatrice. M). Taste für Rührwerk.
N). Tasto comando dispositivo di N). Taste für Konservierungssystems.
conservazione.
E). Spatule.
F). Pale pour cuve amovible.
G). Cuve amovible.
H). Mesure.
I). Fiche d'alimentation.
L). Bouton de commande de refroidissement.
M). Bouton de commande de la pale.
N). Bouton de commande du système de
conservation.
Behälter.
E). Spachtel.
F). Rührwerk für herausnehmbaren Behälter.
G). Herausnehmbarer Behälter.
H). Messbecher.
I). Netzstecker.
L). Taste für Einschalten und Gefrierbeginn.
recipiente fijo.
B). Pala de mezclado para recipiente fijo.
C). Tornillo para fijar la pala.
D). Tapa para recipiente fijo y extraíbile.
M). Rørevingeknap.
N). Knap til opbevaringssystemet af is.
ENGLISH
Materials and articles destined for use in contact with food products are conform to the EC Regulation 1935/2004. This appliance complies
with the requirements of the Low Voltage Directive 2006/95/EC, and the Electromagnetic Compatibility Directive 2004/108/EC.
IMPORTANT INFORMATION FOR CORRECT DISPOSAL OF THE PRODUCT IN ACCORDANCE WITH EC DIRECTIVE 2002/96/EC.
At the end of its working life, the product must not be disposed of as urban waste. It must be taken to a special local authority differentiated
waste collection centre or to a dealer providing this service. Disposing of a household appliance separately avoids possible negative
consequences for the environment and health deriving from inappropriate disposal and enables the constituent materials to be recovered to
obtain significant savings in energy and resources.As a reminder of the need to dispose of household appliances separately, the product is
marked with a crossed-out wheeled dustbin.
FRANÇAIS
Les matériaux et les objets, qui sont en contact avec des produits alimentaires, sont conformes aux dispositions du Règlement CEE
1935/2004. Cet appareil est conforme aux prescriptions de la Directive de Basse Tension 2006/95/CE et de la Directive pour la
Compatibilité Electromagnétique 2004/108/CE.
AVERTISSEMENTS POUR L'ÉLIMINATION CORRECTE DU PRODUIT AUX TERMES DE LA DIRECTIVE EUROPÉENNE 2002/96/EC.
Au terme de son utilisation, le produit ne doit pas être éliminé avec les déchets urbains. Le produit doit être remis à l'un des centres de collecte
sélective prévus par l'administration communale ou auprès des revendeurs assurant ce service. Éliminer séparément un appareil
électroménager permet d'éviter les retombées négatives pour l'environnement et la santé dérivant d'une élimination incorrecte, et permet de
récupérer les matériaux qui le composent dans le but d'une économie importante en termes d'énergie et de ressources. Pour rappeler
l'obligation d'éliminer séparément les appareils électroménagers, le produit porte le symbole d'un caisson à ordures barré.
ESPAÑOL
Los materiales y los objetos destinados al contacto con productos alimenticios corresponden al Reglamento 1935/2004. Este aparato
cumple lo dipuestos por la Directiva de Baja Tensión 2006/95/CE y por la Directiva de la Compatibilidad Electromagnética 2004/108/CE.
ADVERTENCIAS PARA LA ELIMINACIÓN CORRECTA DEL PRODUCTO SEGÚN ESTABLECE LA DIRECTIVA EUROPEA 2002/96/CE.
Al final de su vida útil, el producto no debe eliminarse junto a los desechos urbanos. Puede entregarse a centros específicos de recogida
diferenciada dispuestos por las administraciones municipales, o a distribuidores que facilitan este servicio. Eliminar por separado un
electrodoméstico significa evitar posibles consecuencias negativas para el medio ambiente y la salud derivadas de una eliminación
inadecuada y permite reciclar los materiales que lo componen, obteniendo así un ahorro importante de energía y recursos. Para subrayar la
obligación de eliminar por separado los electrodomésticos, en el producto aparece un contenedor de basura móvil tachado.
ITALIANO
I materiali e gli oggetti destinati al contatto con prodotti alimentari sono conformi alle prescrizioni al Regolamento CE 1935/2004. Inoltre
questo apparecchio è conforme alle prescrizioni della Direttiva di Bassa Tensione 2006/95/CE e della Direttiva per la Compatibilità
Elettromagnetica 2004/108/CE.
AVVERTENZE PER IL CORRETTO SMALTIMENTO DEL PRODOTTO AI SENSI DELLA DIRETTIVA EUROPEA 2002/96/EC.
Alla fine della sua vita utile il prodotto non deve esser smaltito insieme ai rifiuti urbani. Può essere consegnato presso gli appositi centri di
raccolta differenziata predisposti dalle amministrazioni comunali, oppure presso i rivenditori che forniscono questo servizio.Smaltire
separatamente un elettrodomestico consente di evitare possibili conseguenze negative per l'ambiente e per la salute derivanti da un suo
smaltimento inadeguato e permette di recuperare i materiali di cui è composto al fine di ottenere un importante risparmio di energia e di
risorse. Per rimarcare l'obbligo di smaltire separatamente gli elettrodomestici, sul prodotto è riportato il marchio del contenitore di spazzatura
mobile barrato.
DEUTSCH
Die benutzten Materialen und die Gegenstände, die für den Kontakt mit Lebensmitteln bestimmt sind, entsprechen den CE Verordnung
1935/2004. Dieses Gerät entspricht den Vorschriften der Richtlinie für Niederspannung 2006/95/CE sowie der Richtlinie der
Elektromagnetischen Kompatibilität 2004/108/CE.
WICHTIGER HINWEIS FÜR DIE KORREKTE ENTSORGUNG DES PRODUKTS IN ÜBEREINSTIMMUNG MIT DER EGRICHTLINIE 2002/96/EG.
Am Ende seiner Nutzzeit darf das Produkt NICHT zusammen mit dem Siedlungsabfall beseitigt werden. Es kann zu den eigens von den
städtischen Behörden eingerichteten Sammelstellen oder zu den Fachhändlern, die einen Rücknahmeservice anbieten, gebracht werden. Die
getrennte Entsorgung eines Haushaltsgerätes vermeidet mögliche negative Auswirkungen auf die Umwelt und die menschliche Gesundheit,
die durch eine nicht vorschriftsmäßige Entsorgung bedingt sind. Zudem ermöglicht wird die Wiederverwer tung der Materialien, aus denen
sich das Gerät zusammensetzt, was wiederum eine bedeutende Einsparung an Energie und Ressourcen mit sich bringt. Zur Erinnerung an die
Verpflichtung, die Elektrohaushaltsgeräte getrennt zu beseitigen, ist das Produkt mit einer Mülltonne, die durchgestrichen ist, gekennzeichnet.
DANSK
De materialer og de genstande, der er i kontakt med fødevarer, er lavet i overensstemmelse med bestemmelserne i EU's forordning
1935/2004. Apparatet opfylder kravene fra Lavspændingsdirektivet 2006/95/CE samt Direktivet om Elektromagnetisk kompatibilitet
2004/108/CE.
VIGTIG INFORMATION I FORBINDELSE MED KORREKT BORTSKAFFELSE AF PRODUKTET I OVERENSSTEMMELSE MED DIREKTIV
2002/96/EC.
Når produktet skal bortskaffes, må det ikke smides ud sammen med det almindelige affald. Det skal afleveres på en genbrugsstation eller
lignende. Hvis brugte husholdningsmaskiner behandles rigtigt, undgås mulige negative konsekvenser for miljø og sundhed, som kan
forekomme ved ukorrekt behandling af affald. Samtidig er det også muligt at genanvende komponenter fra produkterne, hvilket er med til at
spare energi og ressourcer. For et minde om, at det er vigtigt at aflevere produktet det rigtige sted, når det skal kasseres, er produktet markeret
med en overkrydset skraldespand.
Made in Italy by
|
32
IMPORTANT SAFEGUARDS
When using electrical appliances, basic safety precautions should always be observed, including the following:
•Read all instructions carefully.
•To protect against risk of electric shock, do not put the main body of appliance in water or any other liquid.
•This appliance has not been designed to be used by persons (including children) with physical, sensory or mental
impairments or who are lacking in experience or knowledge, unless they have been given the necessary
supervision and prior instructions about how to use this appliance by a person responsible for their safety. Young
children should be supervised to ensure that they do not play with the appliance.
•If the supply cord is damaged, it must be replaced by the manufacturer, its service agent or similary qualified
persons in order to avoid a hazard.
•Unplug from outlet when not in use, before putting on or taking off parts, and before cleaning.
•Avoid contact with moving parts.
•Do not operate any appliance with a damaged cord or plug, or after the appliance malfunctions, or is dropped or
damaged in any manner. Return the appliance to an authorized Service Center for examination, repair or electrical
or mechanical adjustment.
•The use of attachments not recommended or sold by the appliance manufacturer may result in fire, electric shock
or injury.
•Do not use outdoors.
•Do not let cord hang over edge of table or counter, or touch hot surfaces.
SAVE THESE INSTRUCTIONS
CAUTION
•An authorized service representative should perform any servicing other than cleaning and user maintenance.
Authorized service personnel only should do repair.
•After removing the appliance from the packaging, check it for damage. If in doubt, do not use the appliance
and contact an authorised service centre.
•Plastic bags, polystyrene, nails, etc. must not be left within reach of children as they are potentially dangerous.
•The appliance's manufacturer and vendor reject any responsibility for failure to comply with the instructions
provided in this user manual.
•Check that the voltage shown on the rating plate corresponds to the voltage of the mains.
•Do not use sharp utensils inside the bowl! Sharp objects will scratch and damage the inside of the bowl. A
rubber spatula or metal spoon may be used, when the appliance is in the “OFF”or “0” position.
•Never clean with scouring powders or hard implements.
•Do not place or use the appliance on hot surfaces, such as stoves, hotplates, or near open gas flames.
•Do not put any part in the dishwasher.
•Do not unplug the unit by pulling on the cord.
•The appliance must be connected to an electrical system and power supply socket with a minimum capacity of
10A, equiped with an efficient earth contact. The manufacturer is not responsible for damages to things or
people in the event that the prescribed safety norms have not been respected.
•Before carrying out any maintenance or cleaning operations, make sure that the appliance has been
disconnected from the electrical mains by removing the plug from the power supply socket.
•Never wash the appliance using water jets or place it in water!
•This appliance is suitable for use with 32°C max. ambient temperature (climatic class “N”).
IMPORTANT:
This Ice Cream Machine contains its own refrigerant which must be allowed to settle after transport. Leave the
Ice Cream Machine on a horizontal surface for at least 12 hours after purchase or after any move which might
have stored the machine the wrong way up.
Leave at least 20 cm on each side of the machine to allow free air circulation. Make sure the vent slots are free
and unobstructed.
4 5
EnglishEnglish
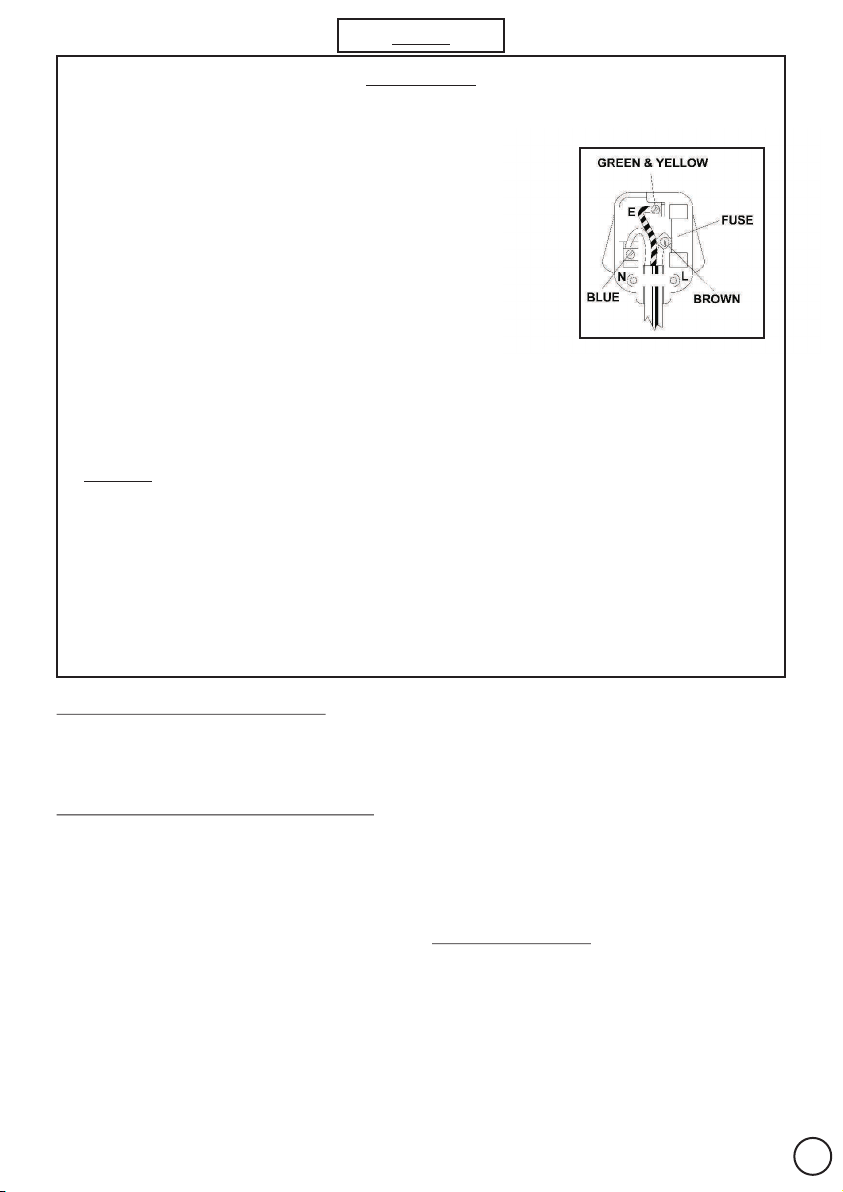
UK USERS ONLY
HOW TO CONNECT THE CORD TO A U.K. PLUG: IMPORTANT
The wires in the mains lead are coloured in accordance with the following code:
•
Green and yellow: Earth
•
Blue: Neutral
•
Brown: Live
Please, read the instructions given below before connecting the cord to a
plug. If in doubt, please, consult a qualified electrician. As the colours of the
wires in the mains lead of this appliance may not correspond with the
coloured markings identifyng the terminals in your plug, proceed as follows:
the wire that is coloured Green and Yellow must be connected to the terminal
in the plug which is marked with the letter E or the Earth symbol (G), or
coloured Green or Green and Yellow.
The wire that is coloured Brown must be connected to the terminal which is
marked with the letter L or coloured Red. The wire that is coloured Blue must
be connected to the terminal which is marked with the letter N or coloured Black.
SAFETY POINTS FOR REWIRABLE OR MOULDED PLUG
The mains lead of this appliance may be already fitted with a BS1363 13A plug.
•
If your socket outlet is not suitable for the plug, then the plug must be removed (cut off if it is a moulded on
plug), the flexible cord insulation should be stripped back as appropriate and a suitable 3 pin plug fitted.
•
WARNING: Dispose of a plug that has been cut from the power supply cord, as such a plug is hazardous if
inserted in a live 13A socket outlet elsewhere in the house.
•
Should the fuse need to be replaced an ASTA marked fuse, approved to BS 1362, of the same rating must be
used.
•
Always replace the fuse cover after fitting a fuse. The plug must NOT be used if the cover is omitted or lost until
a replacement is obtained. Make certain that only the correct fuse cover is used and fitted.
•
For plugs with detachable fuse cover, the replacement must be the same as the colour insert in the base of the
plug, or as directed by the embossed wording on the base of the plug.
•
If the detachable fuse cover is lost a replacement may be purchased from a Service Centre.
•
Information for supply may also be obtained from the plug manufacturer.
ICE CREAM MAKER "GELATO PRO 1700”
The appliance is sold complete with all the accessories
for use with fixed or removable bowl. In the original
package, the removable bowl is stored inside the fixed
bowl.
IMPORTANT ABOUT THE USE OF THE APPLIANCE
•Hygiene is the most important aspect of ice cream
making. Make sure all the parts, in particular those
coming in direct contact with the ice cream, are
scrupulously clean.
•Never turn off the freezing switch (L) when the machine
is working. In case you accidentally switch it off or the
power fails, wait at least 10 minutes before turning it on
again. The compressor is fitted with a safety device to
prevent any possible damage to the motor unit. Should
you restart the machine immediately after it has been
switched off, the compressor will not freeze.
•The paddle movement and the freezing plant are
indipendent: the (L) button turns ON and OFF the
refrigeration and the (M) button turns ON or OFF the
mixing paddle. To stop the machine, press both (M) and
(L) buttons. After the machine has been switched off,
wait approximately 10 minutes before making another
ice cream.
•Variations in speed and noise during ice-cream making
are also to be expected and in no way affect the unit's
normal functioning. In case the ice cream become too
hard, the motor stops by itself. A safety device protects
the motor from possible damages. Should not the
motor begin to work again, wait till the motor cools.
•Keep the appliance far enough from walls and furniture,
which might restrict air circulation, necessary for
cooling the unit. It is normal for warm or hot air to flow
from the lateral air vents. The refrigeration process
requires this.
USING THE FIXED BOWL
1). Carefully clean all parts in direct contact with
ingredients. Warning: make sure unit is unplugged
before starting cleaning.
2). Insert the mixing paddle (B) securely into the drive
shaft in the fixed bowl.
3). Lock the paddle in place by screwing (clockwise)
the knob (C) over the shaft.
4). Press the (L) switch to start the cooling. Pre-cool
the machine for 5 minutes.
5). Press (M) switch to start the mixing paddle.
6). Pour the mixture into the bowl. For best results, it is stopped, the light indicator referring to the ice-cream
suggested to pre-mix ingredients in a separate bowl storage mechanism flashes.
so as to obtain a smooth, lump-free mixture.
Always use ingredients at fridge temperature so as
to reduce temperature differences and cut down
preparation time.
7). Place the transparent cover (D) on the bowl.
Preparation time varies according to quantity,
temperature of the mix, type of ice cream (creamstyle or sherbet), and room temperature.
When ice cream has reached the desired
8).
consistency, switch off (L) and (M) switches.
9). Unscrew knob (C) anticlockwise and pull out the
paddle.
10). When taking out the ice cream for serving or
storing, use the spatula (E). Avoid all metal tools!
11). Allow the motor to cool down (approximately 10
minutes); it is then possible to make a new batch of
ice cream by repeating all the above operations.
12). Unplug the unit when finished.
USING REMOVABLE BOWL
Use of the removable bowl makes it easier to make
consecutive batches of ice cream. The removable bowl is
also easier to clean. When using the removable bowl:
1). Remove the lid (D), unscrew the knob (C) and
remove the mixing paddle (B).
2). Pour two measuring cups (H) (50ml) full of brandy
or other liquor into the fixed bowl. As alternative,
you can use a solution of salt and water (40ml water
and 10g salt). The wall of removable bowl must be
completely wet: this operation is most important to
allow the good cold transmission from fixed to
removable bowl.
3). Insert the removable bowl (G) securely; making
sure it is level with the top part of the unit.
4). Insert the mixing paddle for the removable bowl (F)
and secure the paddle into place by locking knob
(C) clockwise. The appliance is now ready for use.
5). Follow the procedure described in the paragraph
“USING THE FIXED BOWL” from item 4 to item 10.
6). To remove the bowl unscrew knob (C)
anticlockwise. Pull out the bowl (G). If you wish,
you may leave the ice cream in the bowl and use the
latter to store the product in the freezer
compartment (-12° C**).
7). Unplug the unit when finished.
ICE CREM STORAGE SYSTEM
The machine storage function consists in being able to
store the ice-cream in the machine, once this is made, at
the right temperature, consistency and fluffiness for the
desired period of time. An electronic system constantly
monitors ice-cream consistency.
Once this has reached the established value, the paddle
and compressor stop automatically. During the period of
time that the paddle motor and compressor are
Paddle and compressor are automatically restarted just
as soon as the consistency of the ice-cream falls below
the set level. While the paddle and compressor are
operating, the light indicator of the storage mechanism
remains constantly on. To activate the ice cream storage
system press the (N) switch.
NOTE: When the storage mechanism is operative switch (N) pressed - the paddle (M) and freezing plant
switches (L) are bypassed.
USEFUL HINTS
•Mix and blend ice-cream ingredients in a separate bowl.
•Use pre-cooled ingredients.
•Do not fill the bowl more than half full (max. 1.1Kg of
ingredients). This will allow the volume to increase
during churning to maximum bowl capacity.
•To avoid the forming of ice or frost, do not leave the ice
cream in the bowl for too long with the refrigeration on.
Turn off the unit as soon as the ice cream has reached
the desired consistency. Serve the ice cream into precooled recipients.
HOW TO MAKE AN EXCELLENT ICE-CREAM
Making good, healthy, natural ice cream, with the right
consistency, depends on the following factors:
•An appliance in good working order: leave enough
space on the sides of the unit so as to allow air to
circulate freely. This air is necessary to cool the
compressor.
•Good, fresh ingredients.
•A good recipe: a perfect blend of ingredients and
perfect processing.
CLEANING THE MACHINE
•Make sure the machine has been switched off and
unplugged before performing any cleaning operations.
•Wash the paddle, the clear lid, the locking knob and the
removable bowl in a warm, soapy water.
•Use a damp cloth to clean the body of the machine.
NEVER IMMERSE THE MAIN BODY OF THE ICE
CREAM MAKER IN WATER!
•When the removable aluminum bowl is used, it is
essential to eliminate every trace of salt/water
solution from the parts that come in contact whit it, in
order to prevent corrosion.
STORING ICE-CREAM
•In the ice cream maker. When the ice cream is ready
you can keep it covered in the ice cream maker for
approximately 10-20 minutes. Before serving, start the
motor and stir it again for a few minutes to the right
consistency and smoothness. You can activate also the
ice cream storage system by pressing the (N) switch to
store the ice cream into the machine for a max. 12h (for
hygienic reason).
6 7
EnglishEnglish
•In the freezer. •Add the mixture until the cylinder is no more than half
The ice cream can also be stored in the freezer for up to
1-2 weeks, depending on the ingredients used. Do not
store it for too long, in any case never more than two
weeks, as it will lose flavour and quality. Should you
wish to store the ice cream in the freezer pay attention
to the following:
•Store the ice cream in a clean, well sealed bowl
suitable for freezing.
•Storage temperature must be at least -14°C.
•Attach a label to the bowl with the date when it was
made and what kind of ice cream it is.
WARNING!
•The ice cream is sensible to the bacteria. Consequently
it is very important that the ice cream maker and the
utensils used are well cleaned and dried.
•TAKE CARE NEVER TO REFREEZE THE ICE CREAM
ONCE IT HAS MELT.
•Remove the ice cream from the freezer half an hour
before to serve it. Eventually you could leave it for
10/15 minutes at the room temperature to let it reach
the adequate serving temperature.
STORING TIME
Ice cream made of raw ingredients
Sherbets
Ice cream made of cooked
ingredients
HELPFUL HINTS
•Certain recipes involve cooking. Prepare them at least a
day previously to ensure they chill completely and
expand. It is always advisable to chill the basic mixture.
•In the case of cold mixtures, the best results are
obtained by beating the eggs and sugar with an electric
whisk. This helps increase the volume of the mixture.
•The majority of mixtures consist of cream, milk, eggs
and sugar. You can use whatever cream you wish, but
the flavour and texture will change greatly according to
the quality of cream chosen. The higher the percentage
of fat in the cream, the richer the ice cream will be. For
example, whole cream contains a minimum of 36% fat,
whipped cream 30%, cream for coffee or skimmed
cream 18% and half cream plus half milk 10%. In all
cases, the important thing is to always maintain the
same quantity of liquid. For example, the lightest ice
cream can be made by using more milk than cream, or
by eliminating the cream altogether. You can also use
skimmed milk, but the texture of the ice cream
will be very different.
•The ice cream mixture can be kept in the refrigerator for
a number of days. Shake it well before pouring it into the
cylinder.
±1 week
1-2 weeks
±2 weeks
full. The mixture increases in volume during
preparation.
•Alcoholic ingredients slow down the chilling process.
Liqueurs should therefore be added during the final
minutes of preparation.
•The flavour of sorbets depends largely on the degree of
ripeness and sweetness of the fruit andjuice used.
Taste the fruit before adding to the recipe. If it is too
acid, add sugar. If it is very ripe, add less sugar or leave
it out altogether. Remember that cold reduces
sweetness.
•Sweeteners can be used in place of sugar. In this case,
add the sweetener to the mixture and mix until
completely dissolved.
•Mixtures which require heating must not be poured into
the cylinder until they are completely cold.
•If you want to make the mixture sweeter during
preparation, do not add sugar directly into the cylinder
(it does not dissolve). You are recommended to
dissolve the sugar in a little water or skimmed milk and
pour the resulting syrup (cooled) into the cylinder.
•The fruit used in the recipes must always be washed
and dried before use. Even when not specified, fruit
must always be peeled, shelled, destoned, etc.
•To reduce the quantity of ice cream, the quantities
indicated can be broken down or halved.
•When using raw eggs, make sure they are fresh by
breaking them one at a time into a container and
checking that:
1). They do not have a bad smell.
2). The white is not watery but dense and adhering to
the yolk.
3). The yolk is round and swollen.
WHAT COULD GO WRONG?
Under normal conditions, ice cream preparation does not
require more than 40-50 minutes. If the ice cream is still
not formed after 40-50 minutes, check the following
points before contacting an authorised service centre.
•The ingredients must be poured into the ice cream
maker at room temperature or, preferably, at
refrigerator temperature. Ice cream cannot be made
from hot ingredients.
•The cylinder must not be more than half filled. If the
quantity of ingredients is excessive, the time required to
form the ice cream increases considerably and the
result may not be satisfactory.
•The compressor is fitted with a safety device. In the
event of power failure, or if the appliance is turned off
then on again for any reason, operation of the chilling
system is interrupted. If this device trips, the appliance
must be left for 10 minutes before turning on again. If
the ten minutes pause is not respected, operation will
not commence, even if the chilling button is in the ON
position and the relative indicator light is on.

Français Français
INSTRUCTIONS GENERALES DE SECURITE
Pendant l'utilisation des appareils électriques, il est indispensable de respecter scrupuleusement quelques règles de
sécurité fondamentales, en particulier:
•Lire attentivement le mode d'emploi avant d'installer et utiliser l'appareil.
•Ne pas plonger le corps principal de l'appareil dans l'eau ou autres liquides: danger de chocs électriques.
•Cet appareil n'est pas prévu pour être utilisé par des personnes (y compris les enfants) dont les capacités physiques,
sensorielles ou mentales sont réduites, ou des personnes dénuées d'expérience ou de connaissance, sauf si elles ont pu
bénéficier, par l'intermédiaire d'une personne responsable de leur sécurité, d'une surveillance ou d'instructions
préalables concernant l'utilisation de l'appareil. Il convient de surveiller les enfants pour s'assurer qu'ils ne jouent pas
avec l'appareil.
•Si le câble d'alimentation est endommagé, il doit être remplacé par le distributeur, son service aprés vente ou une
personne de qualification similaire, afin d'éviter un danger.
•Débrancher l'appareil de la prise de courant quand il n'est pas utilisé et avant de le démonter ou de le nettoyer.
•Ne pas toucher les parties en mouvement.
•Ne pas utiliser l'appareil si le cordon d'alimentation ou la fiche sont abîmés, ou après un fonctionnement anormal de
l'appareil, ou si l'appareil est tombé par terre ou s'il a été endommagé de quelque façon que ce soit. Dans ces cas, il est
recommandé de s'adresser au Service Après-vente agrée pour les réparations.
•Emploi d'accessoires qui n'ont pas été recomandés ou vendus par le constructeur de cet appareil pourrait entraîner des
risques d'incendie ou des chocs électriques ou des lésions à l’utilisateur.
•Ne pas utiliser l'appareil à l'extérieur.
•Eviter que le cordon d'alimentation puisse pendre le long du bord de la table ou du plan de travail ou touches des surfaces
chaudes.
CONSERVER CES INSTRUCTIONS
ATTENTION
•Toute réparation ne devra être exécutée que par des centres d'assistance technique ou de personnel agrées.
•Après avoir sorti l'appareil de l'emballage, s'assurer qu'il soit intact. En cas de doute, ne pas utiliser l'appareil et s'adresser
à un centre d'assistance technique agrée.
•Les sachets en plastique, le polystyrène, les clous etc., étant des sources potentielles de danger, ne doivent pas être
laissés à la portée des enfants.
•Cet appareil est destiné exclusivement à l'emploi pour lequel il a été conçu. Le constructeur et le vendeur de l'appareil
déclinent toute responsabilité en cas de non-respect des indications contenues dans ce manuel d'utilisation.
•S'assurer que la tension de réseau correspond à celle qui est indiquée sur l'appareil avant d'insérer la fiche dans la prise de
courant.
•Ne pas utiliser d’objets ou utensiles coupants à l’intérieur du bol. Ceux-ci risquent en effet de griffer ou abîmer la cuve.
Une spatule en caoutchouc ou une cuillère plastique peuvent être utilisées lorsque l'appareil est éteint en position “0” ou
“OFF”.
•Ne jamais nettoyer l’appareil avec des utensiles abrasives.
•Ne pas utiliser l’appareil sur surfaces chaudes ou près de flammes.
•Ne pas nettoyer aucune partie de la machine dans le lave vaisselles.
•N’arrêter jamais la machine en retirant la fiche de la prise de courant.
•L'appareil doit obligatoirement être relié au secteur et avoir une prise de courant avec une portée minimum de 10A, avec
contact de mise à la terre efficace. Le constructeur n'est pas responsable des dommages éventuels causés par l'absence
de la mise à terre dans l'installation.
•Avant d'effectuer n'importe quelle opération d'entretien ou de nettoyage, vérifier que l'appareil ait été débranché du
secteur en retirant la fiche de la prise de courant.
•Ne jamais laver l'appareil avec des jets d'eau, ne jamais l'immerger dans l'eau!
•Cet appareil appartient à la classe climatique “N” pour l’utilisation avec une témperature ambiante de 32°C.
IMPORTANT:
Laisser la machine reposer sur un plan horizontal pendant au moins 12 h avant de l'utiliser pour la première fois. Les
agents réfrigérants pourraient en effet être dispersés, au cas où la machine aurait été renversée pendant le transport
et ils doivent avoir le temps de revenir dans la bonne position. Suivre la même procédure par la suite aussi, toutes les
fois que la machine aura été mise en position non horizontale pour quelque motif que ce soit. Placer la machine de
façon à ce qu'il y ait suffisamment d'espace autour (au moins 20 cm), pour ne pas obstruer les prises d'air latérales.
SORBETIÈRE « » Appuyer sur le bouton (L) 5 minutes avant de
L'appareil comprend tous les accessoires qui
permettent de l'utiliser aussi bien avec la cuve fixe et la
cuve amovible. Dans l'emballage d'origine, la cuve l'agitateur.
amovible se trouve à l'intérieur de la cuve fixe.
IMPORTANT POUR L’UTILISATION DE LA MACHINE
•
L'hygiène est la précaution la plus importante à
observer lors de la préparation de glaces. S'assurer
que toutes les parties de la sorbetière sont
parfaitement propres, en particulier les éléments qui
seront en contact avec le mélange.
•
Eviter d'arrêter le refroidissement en appuyant sur le
bouton de commande du refroidissement (L) avant
d'avoir terminé la préparation de la glace. Si cela devait
arriver ou, si pour quelque raison que ce soit, il y avait
une coupure de courant, le dispositif spécial dont est
muni le compresseur ne permettra pas la continuation
du refroidissement pendant environ 10 minutes,
compromettant ainsi la réussite de la glace.
•
Le movement de la pale et le circuit de refroidissement
sont indépendentes: le bouton (L) commande la mise
en marche et l'arrêt du refroidissement. Le bouton (M)
commande la mise en marche et l'arrêt de la pale. Pour
arrêter la machine, désactiver le bouton (M) et (L). Si la
machine a été arrêtée, attendre environ 10 minutes
avant de faire une nouvelle glace.
•
Les variations de vitesse et de bruit pendant la
préparation de la glace sont tout à fait normales et ne
compromettent pas le bon fonctionnement de
l'appareil. Si la glace devenait trop consistante, le
moteur s’arrêterait. Un dispositif s’assure que le
moteur ne subit pas de dommages. Si le moteur ne se
remit pas en route, attendre que ce dernier se
refroidisse.
•
Pendant l'utilisation, garder l'appareil suffisamment
loin des murs ou des meubles qui risqueraient de
bloquer ou réduire la circulation de l'air de
refroidissement. L'air tiède ou chaude qui sort des
pri ses lat érales fait pa r tie int égrante du
fonctionnement normal de l'appareil, qui est équipé
d'un échangeur d'air pour la réfrigération.
UTILISATION AVEC CUVE FIXE
1). Bien laver tous les éléments qui rentrent en contact
avec les aliments. Attention: s'assurer que la fiche
d'alimentation n'est pas branchée avant de
procéder à cette opération.
2). Insérer la pale (B) jusqu'au fond, sur la tige qui se
trouve dans la cuve fixe.
3). Visser (dans le sens des aiguilles d'une montre)
l'écrou de serrage (C) sur la partie supérieure de la
tige.
4). Avant de verser le mélange dans la cuve, il est
conseillé de refroidir préalablement l'appareil.
GELATO PRO 1700
verser la préparation.
5). Appuyer sur le bouton (M) de mise en marche de
6). Verser le mélange dans la cuve. Pour obtenir une
glace excellente, il est conseillé de bien amalgamer
les ingrédients en les fouettant dans un bol à par t
pour obtenir un mélange homogène et sans
grumeaux. Pour un meilleur rendement de
l'appareil se servir d'ingrédients déjà refroidis au
réfrigérateur de façon à réduire l'écart thermique et
réduire ainsi le temps de préparation de la glace.
7). Positionner le couvercle transparent (D). Le temps
de préparation change en fonction de la quantité de
mélange, de la température des ingrédients, du
type de glace (crème glacée ou sorbet) et de la
température ambiance.
8). Lorsque la consistance du mélange indique que la
glace est prête, arrêter l'appareil en appuyant sur le
bouton (L) et (M).
9). Dévisser l'écrou de serrage (C) et enlèver la pale.
10). Pour retirer la glace du récipient se servir de la
spatule (E). Eviter les ustensiles en métal.
11). Après avoir laissé refroidir le moteur (environ 10
minutes), on peut répéter toutes les opérations
pour faire une nouvelle glace.
12). À la fin du cycle, débrancher l'appareil.
UTILISATION AVEC CUVE AMOVIBLE
L'utilisation de la cuve amovible facilite la préparation
consécutive de deux glaces et les opérations de
nettoyage de l'appareil. Pour l'utilisation de la cuve
amovible:
1). Enlever le couvercle transparent (D), dévisser
l'écrou de serrage (C) de la tige et retirer la pale de
la cuve fixe (B).
2). Verser deux mesures (H) (50ml) combles de
cognac ou d'eau de vie dans la cuve fixe.
alternative on peut utiliser une solution de sel et
d'eau (40ml d'eau et 10g de sel).
cuve amovible doit être complètement mouillée:
i
l est très important suivre cette opération au fin
d'obtenir une bonne transmission du froid de la
cuve fixe à la cuve amovible et donc obtenir une
préparation correcte de la glace.
3). Bien insérer la cuve amovible (G) en s'assurant que
le bord de celui-ci est à la hauteur du bord
supérieur de l'appareil.
4). Insérer la pale pour cuve amovible (F). Bien fixer la
pale en serrant l'écrou dans le sens des aiguilles
d'une montre. L'appareil est prêt à être utilisé.
5). Suivez la procédure du paragraph “UTILISATION
AVEC CUVE FIXE” de point 4 à point 10.
6). Pour retirer la cuve amovible dévisser l'écrou de
La paroi de la
En
98
 Loading...