


560501
56050 - ( ) CanPRO
OPERATING INSTRUCTIONS
Important
1. To get the best operation and life from your machine, please read and comply with these instructions.
2. Clean machine thoroughly before and after each use using cleaning instructions below.
3. Minimize the use of alkaline cleaners as they may cause pitting and dulling of the finish.
Operation of CanPRO
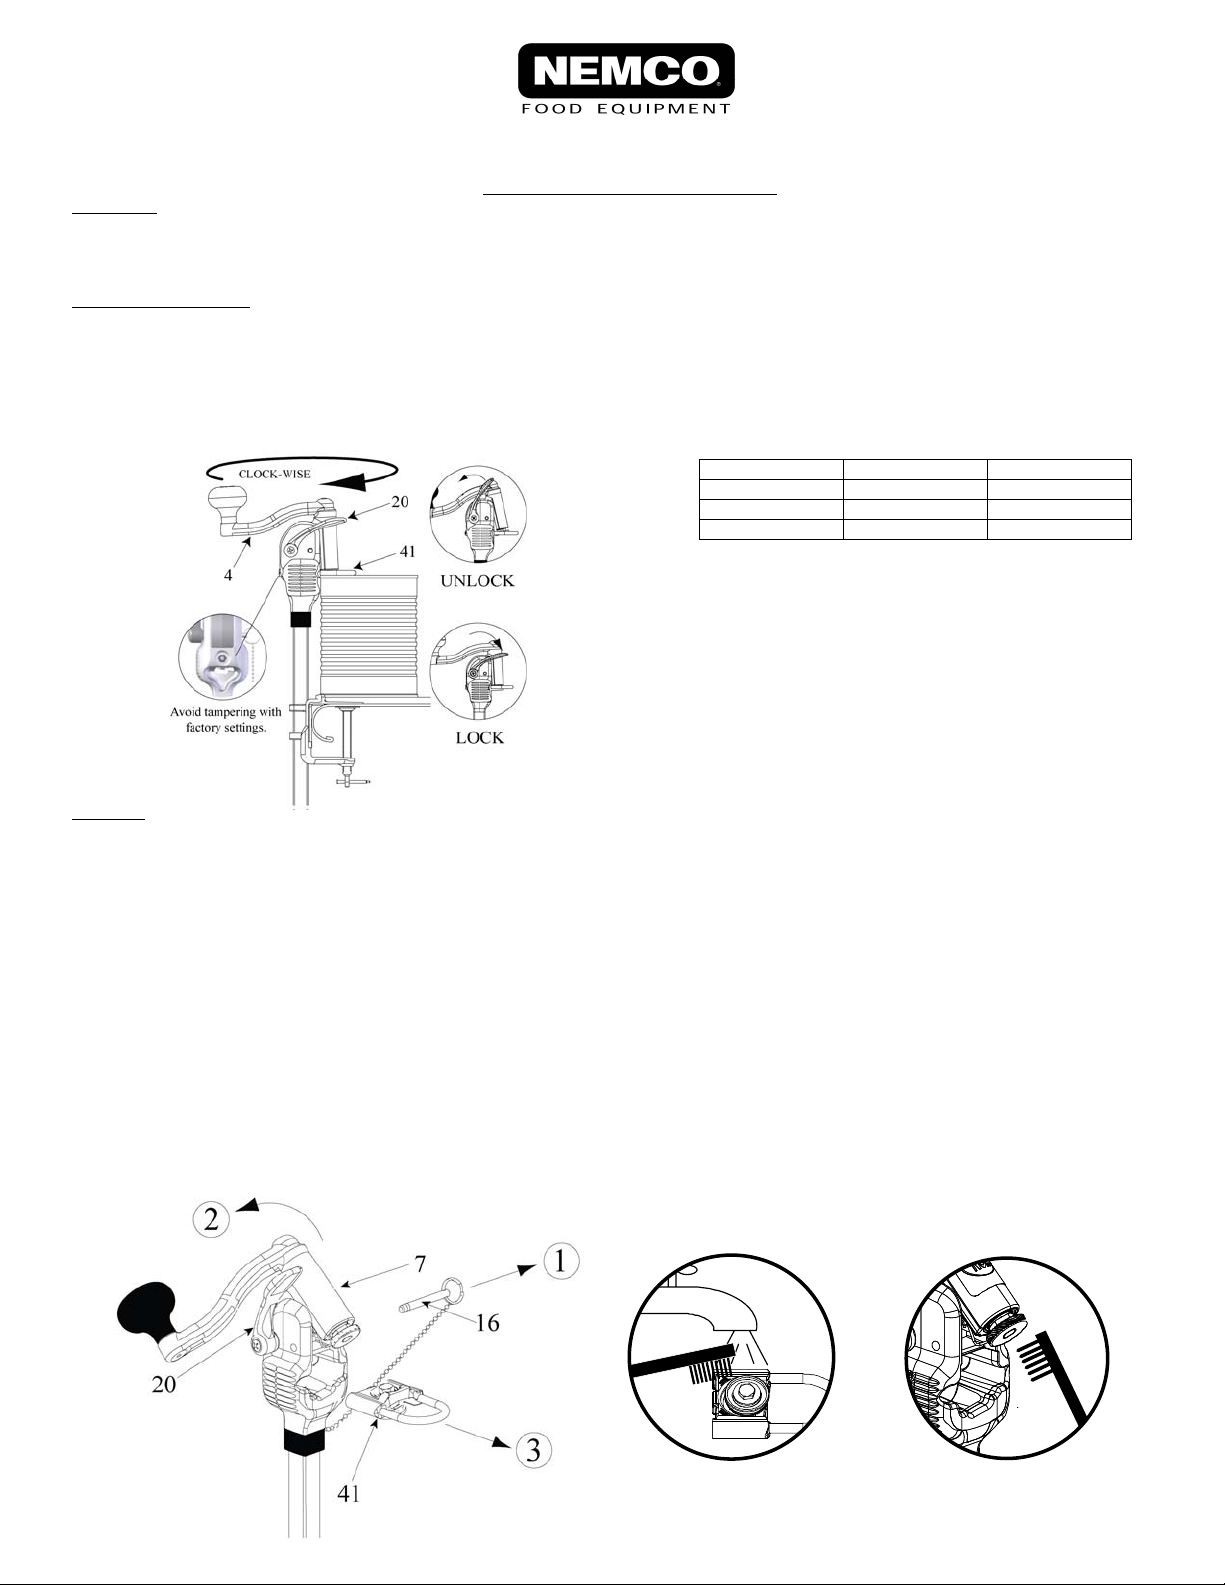
1. Set side handle #20 in the unlock position.
2. Ensure that the Can Sitter is completely pulled out as shown in #36, and place can on the Table Base Can Sitter and gently lower the U-
shaped pin of the Cutter Housing Assembly #41 is over the lid. Be sure that the can is against the face of the can opener.
3. Lock the can in place by pushing down on the Side Handle. Turn Top Handle #4 in a CLOCK-WISE direction to open can. Warning:
Over-rotating beyond the initial seam cut may cause metal slivers. Incision point may be sharp. Train operators when to stop cutting and
how to remove lid safely.
Recommended Handle Turns:
Can Size Diameter Handle Turns
#2
3" 3 Revolutions
#5
5" 5 Revolutions
#10
6" 6 Revolutions
To Clean
WARNING: Cutting area must be kept clean at all times as indicated in the "CLEANING INSTRUCTIONS – USE OF BRUSH." Inspect and
clean the cutter and gripper with the included brush after each use to ensure proper operation. Failure to follow the included "Cleaning
Instructions" will cause damage and VOID WARRANTY.
Disassemble for Cleaning.
1. UNLOCK SIDE HANDLE #20. Slightly press Gripper Housing #7 face to pull out Side Locking Pin #16.
2. Tilt back Gripper Housing #7.
3. IMPORTANT: Pull out Cutter Housing Assembly #41 and clean with brush. Use brush provided to clean around outside of Cutter
Housing and inside the Mechanism Housing. Also use brush to clean all debris from around the Gripper.
4. After cleaning with brush, rinse off residue. SEE SEPARATE “CLEANING INSTRUCTIONS – USE OF BRUSH” FOR LOCATIONS.
Reassemble.
5. Insert Cutter Housing Assembly #41.
6. Return Gripper Housing #7 to closed position.
7. Slightly press Gripper Housing #7 face to re-insert the Side Locking Pin #16. (Ensure side handle #20 is unlocked.)
Note:
1. If cleaned in DISHWASHER, disassemble and clean with brush per above instructions.
2. Proper cleaning maximizes the life of the parts.
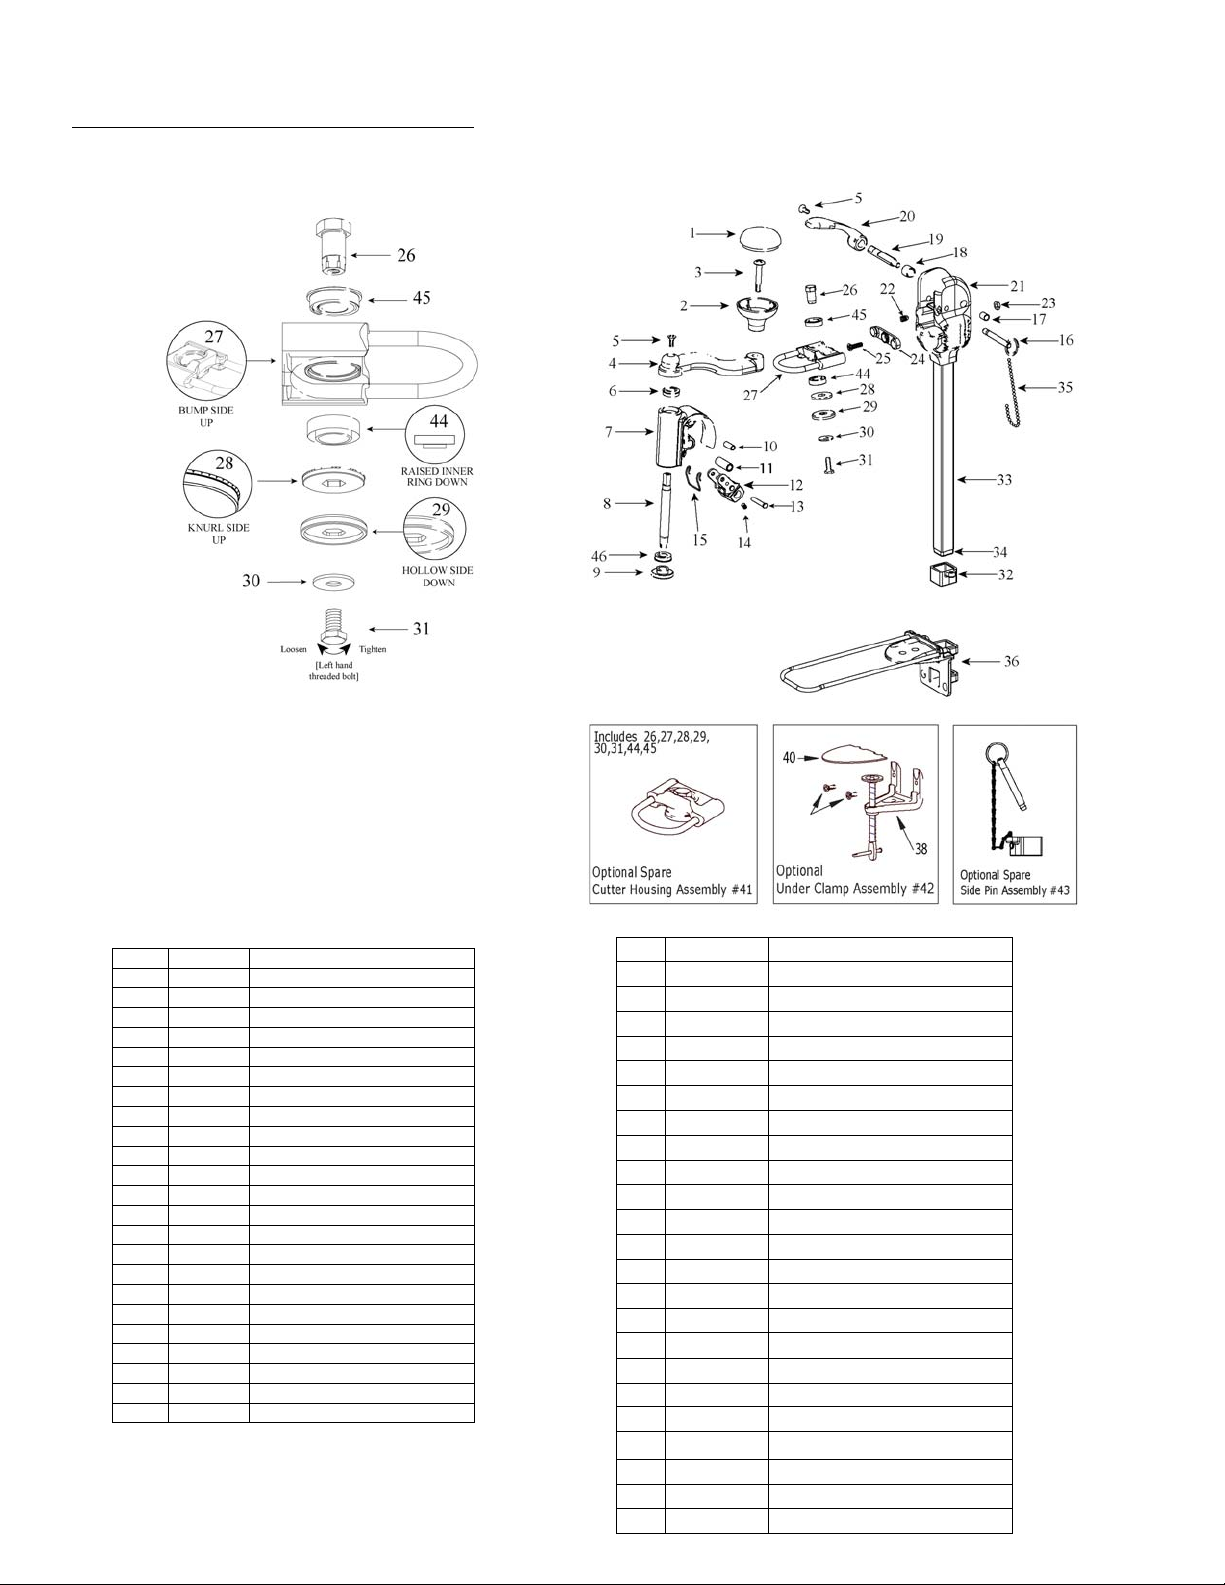
Replacing Cutter from Cutter Housing Assembly
1. Hold Cutter Shaft #26 with wrench and loosen Cutter Locking Bolt #31 (left hand thread) with another wrench by turning clockwise.
2. Remove Cutter Washer #30 and Cutter Spacer #29 and Cutter #28.
3. Replace with new Cutter.
4. Reverse steps 2 and 1 to re-assemble.
No. Part # Description
24
56052
Rubber Depth Control
25
56053
Adjusting Screw
26
56054
Cutter Shaft
27
56055
Cutter Housing
28
56029
Cutte
r
29
56024
Cutter Space
r
30
56056
Cutter Washe
r
31
56057
Cutter Locking Bolt
32
56058
Rubber Pipe Bumpe
r
33
56059
Square Pipe
34
56060
Plastic Pipe End
35
56043
Pin & Chain Assembl
y
36
56070
T
able Base Assembl
y
38
56063
Under Clamp
39
56064
T
able Base Screw
40
56065
Anti-Slip Rubber Pad
41
56022A
Cutter Housing Assembl
y
42
56023
Under Clamp Assembl
y
43
56068
Side Pin Assembly
44
56027
A
-B
Bottom Cutter Bearin
g
45
56027
A
-
T
T
op Cutter Bearin
g
46
56215
Gripper Bearin
g
No. Part # Description
1 56030
T
op Handle Knob Cove
r
2 56031
T
op Handle Knob
3 56032
T
op Handle Knob Screw
4 56033
T
op Handle
5 56034 Handle Screw
6 56027
T
op Handle Bearin
g
7 56035 Gripper Housin
g
8 56036 Gripper Shaft
9 56028 Grippe
r
10 56037 Bushing
11 56038 Bushing
12 56039 Locking Mechanism
13 56040 Locking Pin
14 56041 Allen Set Screw
15 56334 Gripper Housing Sprin
g
16 56026 Side Locking Pin
17 56044 Bushing
18 56045 Bushing
19 56046 Side Handle Shaft
20 56216 RH Side Handle
21 56048 Mechanism Housing
22 56049 Ball End Set Screw
23 56051 Adjusting Nut
CanPro Replacement Parts
Model Numbers : 56050- ( )
 Loading...