

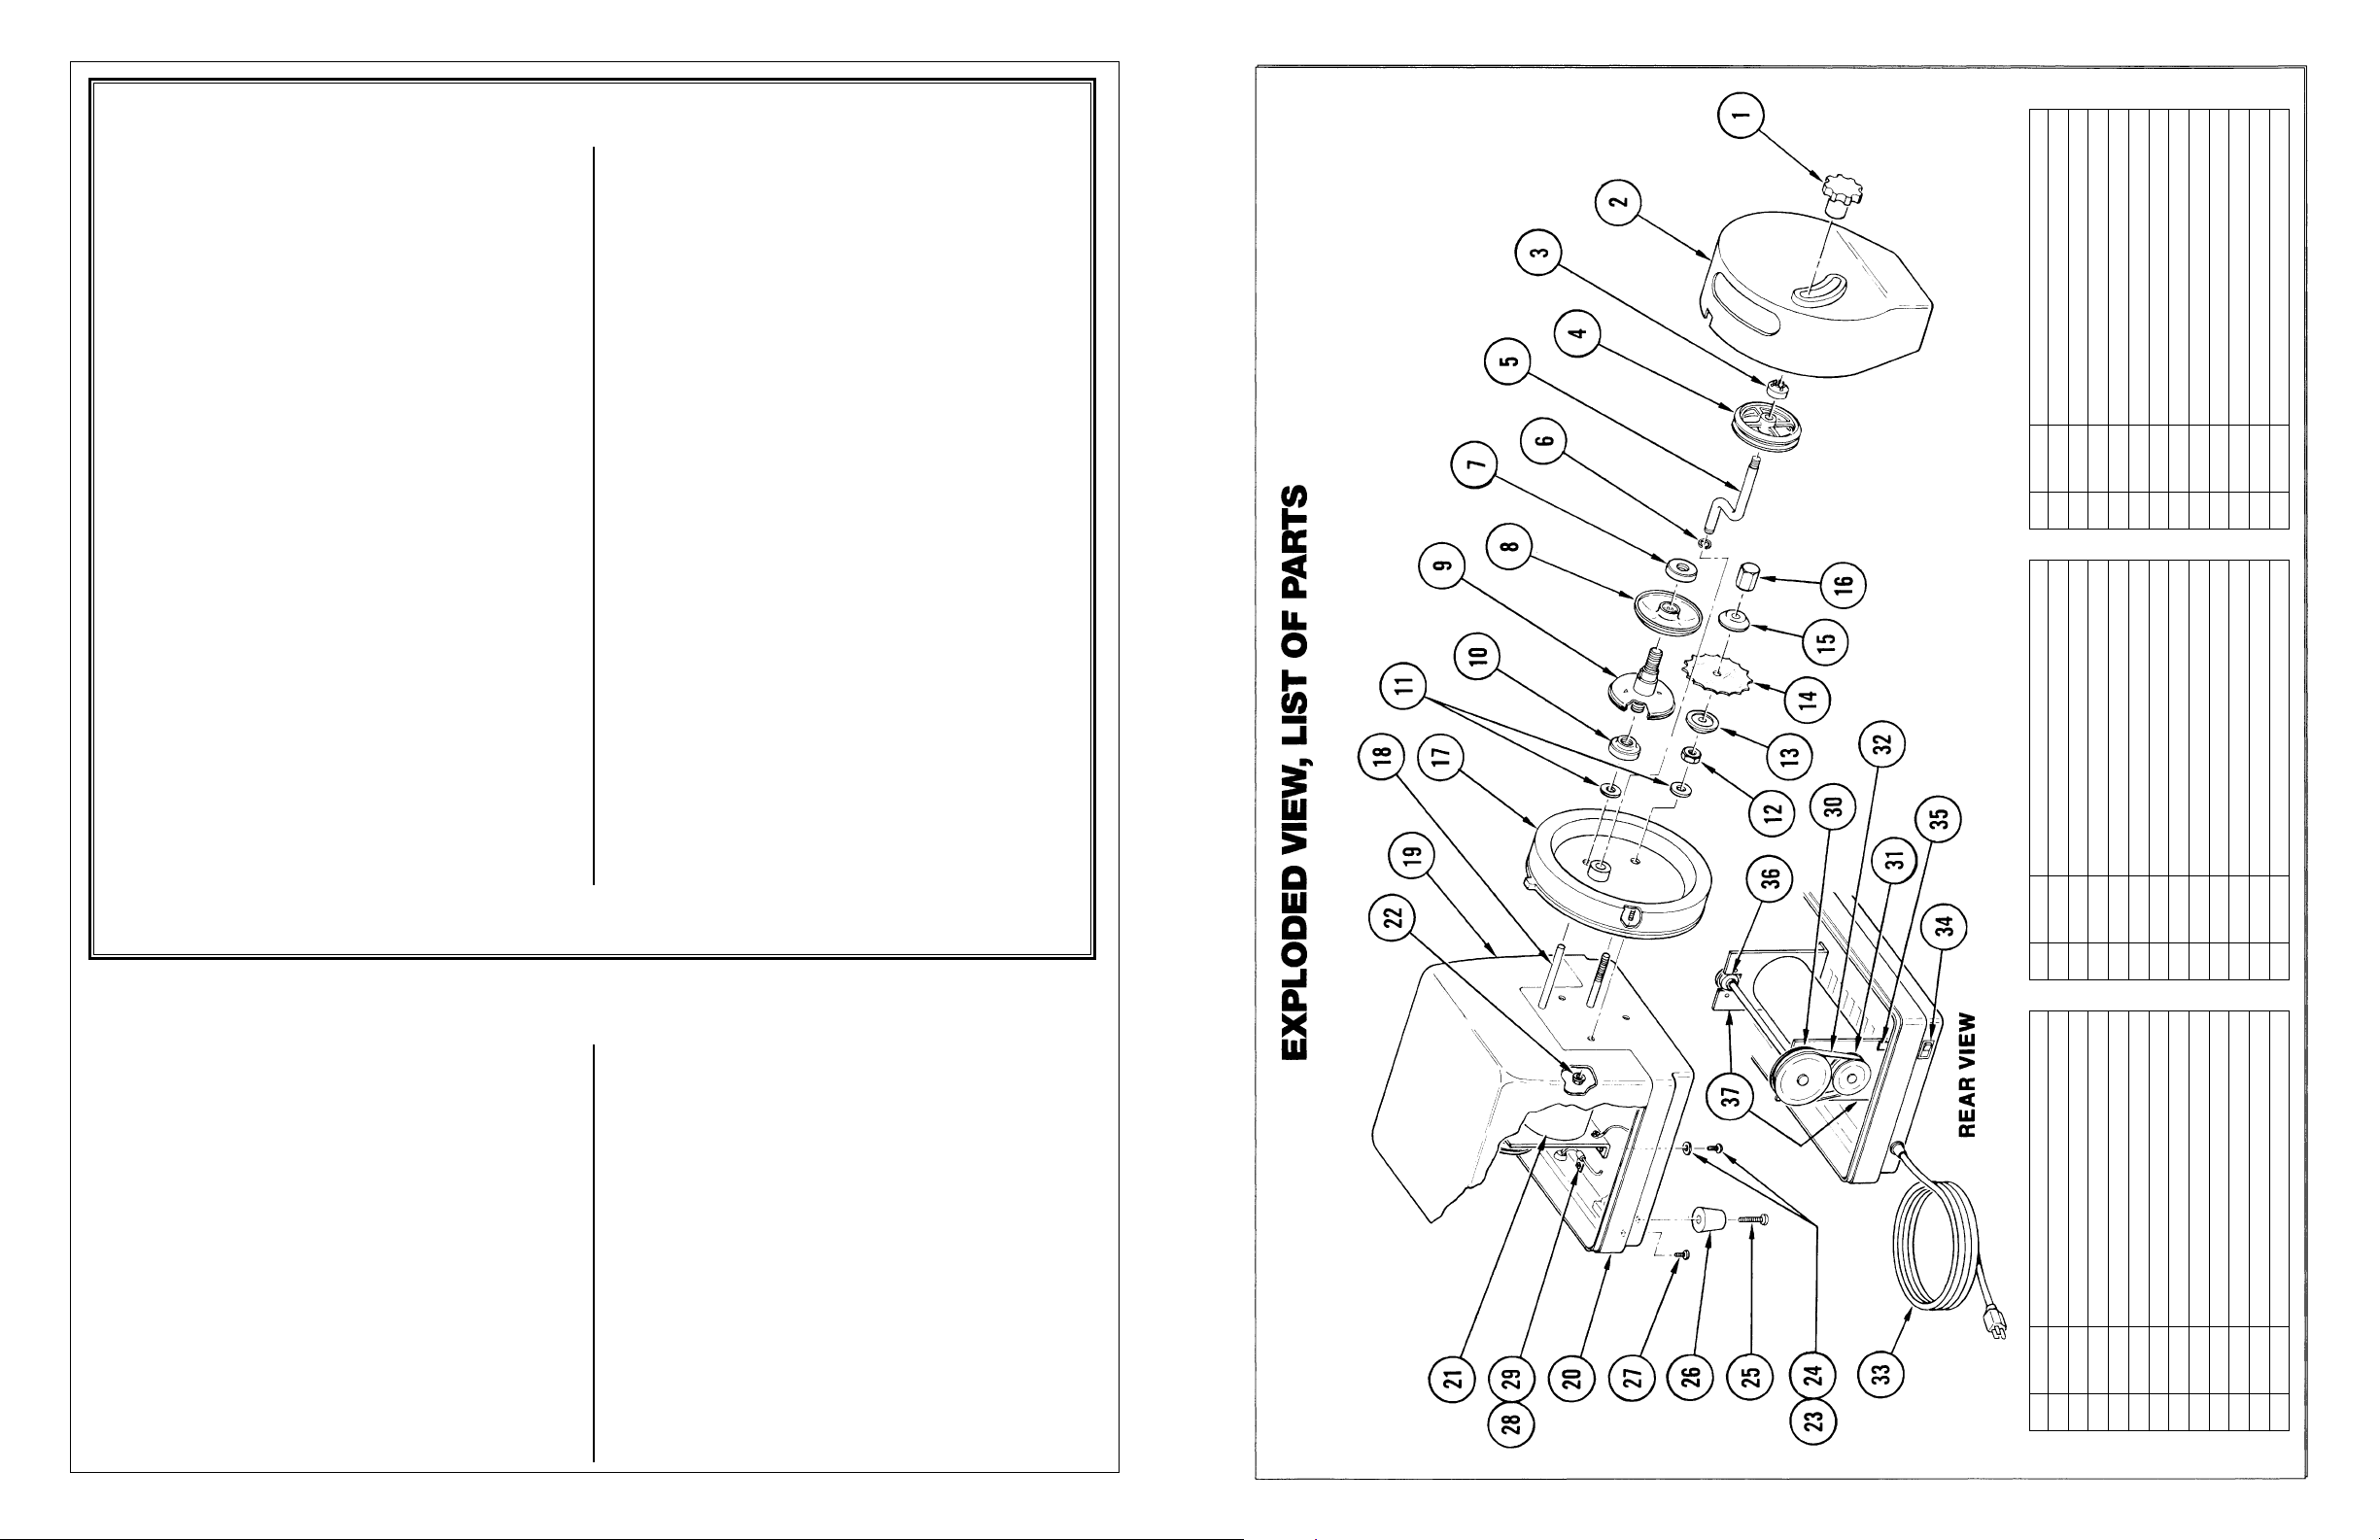
SPARE AND REPLACEABLE PARTS
S
Printed 8/09 Printed in U.S.A.
The only ShrimpPro user-replaceable parts are those in
the shrimp cutting area. While the Blade is made from
long-lasting, hardened stainless steel, it will begin to lose
its effectiveness in time and start tearing rather than
cutting shrimp. Do not attempt to sharpen as Blade will
lose its hardness. Replacement Blades may be ordered
from The NEMCO factory. (See phone, fax and address
below.) Having at least one spare on hand, stored in a
secure and accessible place, will avoid downtime.
Generally, the other components in the cutting area will
not require replacement. However, it is possible for the
Feeder Discs to eventually become too smooth to
reliably grasp all sizes of shrimp. Replacements may be
ordered. We can also provide a new part to replace any
component that is lost or damaged.
number and the nature of the problem (the “Claim
Information”).
(2) The Nemco Customer Service Department will
decide on the most appropriate course of action. If
Nemco determines that it must inspect a product,
the following procedure will be followed.
The end user will obtain a Return Goods Authorization
number from Nemco Customer Service to return the
product to Nemco for inspection. Please be sure to use
this number on the box and on paperwork sent with the
unit. Return the unit to Nemco. The Nemco Service
Department will determine if the problem is covered by
the foregoing warranty. If so, Nemco will repair the unit
and return it to the end user. If the unit is determined not
to be covered by the foregoing warranty, the dealer will
be contacted to determine the next course of action.
PRODUCT SERVICE
The ShrimpPro is inherently very reliable and, because
of its rugged construction, should require little or no
service throughout its lifetime. However, if service is ever
needed, it must be performed at the factory or by an
authorized service center. Any attempt to effect repair
without permission or guidance from the manufacturer
may invalidate the warranty and could be dangerous.
ShrimpPro PRODUCT WARRANTY
REGISTRATION
To validate your warranty, it is important that you fill in
and return the Warranty Certificate promptly. When
completed mail to:
NEMCO Food Equipment, Ltd.
301 Meuse Argonne
Hicksville, OH 43526
Nemco has a staffed service department and we
believe prompt service is extremely important to our
customers. Therefore, we request all product service
inquiries be handled in the following manner:
(1) The end user should call Nemco Customer Service
with the company name, address, phone number,
model number, serial number (if applicable), Nemco
Sales Order number or Dealer Purchase Order
ShrimpPro SPECIFICATIONS
Manufactured by NEMCO Food Equipment, Ltd.
Model No.: 55925
Power: 120 V.A.C., 60 Hz, 1 Amp
240 V.A.C., 50Hz, 0.5 Amp
Shipping Weight: 18 lbs.
U.S. and Foreign Pats.
PRODUCT WARRANTY
Except as otherwise provided below, Nemco Food Equipment, Ltd. ("Nemco") warrants, to the original user, its electrical food preparation products (other than
blades and light bulbs) to be free of electrical and mechanical defects in material and workmanship under "normal use" (defined below) for the shorter of the
following periods: (a) one (1) year from the date placed in service by the original user, or (b) 18 months from the date of shipment from its factory. In addition,
Nemco warrants its non-electrical food preparation products (other than blades) to be free of mechanical defects in material and workmanship under normal use
for two (2) years from the date placed in service by the original user. The warranty provided for herein shall be limited to parts and labor. Any determination
that a product is defective or covered by this warranty, shall be made by Nemco, in its sole discretion. The determination of whether to repair or replace a
defective, covered product, or to refund the purchase price for the product, will be at Nemco’s sole discretion. This warranty does not cover products used outside
the United States, or damages caused by accident, misuse, negligence of any person other than Nemco, current or voltage other than stated on the appliance,
fire, flood or other casualty. Any alteration to the product or unauthorized repair voids this warranty. For purposes of this warranty, the phrase, "normal use" shall
mean the use of the product in connection with food in accordance with the product manual accompanying the product.
Nemco shall be responsible only for repairs or replacements of defective parts performed by Nemco’s authorized service personnel. Authorized service agencies
are located in principal cities throughout the continental United States, Alaska and Hawaii.
THE FOREGOING WARRANTY IS EXCLUSIVE AND IN LIEU OF ALL OTHER WARRANTIES, EXPRESS OR IMPLIED. NEMCO EXPRESSLY DISCLAIMS ANY
IMPLIED WARRANTY THAT ANY OF ITS PRODUCTS IS MERCHANTABLE, FIT FOR A PARTICULAR PURPOSE, OR DOES NOT INFRINGE ON THE RIGHTS OF
ANY THIRD PARTY. THE FOREGOING WARRANTY SHALL BE NEMCO’S SOLE AND EXCLUSIVE OBLIGATION. ANY PERSON’S (BUYER, USER OR OTHERWISE)
EXCLUSIVE REMEDY AGAINST NEMCO, AND NEMCO’S SOLE OBLIGATION, FOR ANY AND ALL CLAIMS, WHETHER FOR BREACH OF CONTRACT,
WARRANTY, TORT (INCLUDING WITHOUT LIMITATION NEGLIGENCE), OR OTHERWISE, SHALL BE LIMITED TO NEMCO REPAIRING OR REPLACING THE
PRODUCT, OR, AT NEMCO’S OPTION, REFUNDING THE PURCHASE PRICE THEREFOR. IN NO EVENT SHALL NEMCO HAVE ANY LIABILITY FOR DAMAGES
IN AN AMOUNT EXCEEDING THE PURCHASE PRICE OF THE PRODUCT
CONSEQUENTIAL DAMAGES. Any person desiring to make any claim against Nemco must do so within six (6) months after expiration of the applicable warranty
period, or such claim shall be forever barred.
, NOR SHALL NEMCO HAVE ANY LIABILITY FOR INCIDENTAL, SPECIAL OR
NEMCO Food Equipment, Ltd.
301 Meuse Argonne
®
Hicksville, Ohio 43526
Phone (419) 542-7751
Fax (419) 542-6690
Toll Free (800) 782-6761
www.nemcofoodequip.com
Printed 10/08 Printed in U.
1
IMPORTANT SAFEGUARDS
123
4
56789
10
11
47137
55981
45184
46959
46960
46961
55970
46328
56017
55979
55974
56016
45409
Depth Adjustment Knob
Cutting Guard
Cutting Guard Washer
Depth Cut Roller (Medium)
Depth Cut Roller (Large)
Depth Cut Roller (Small)
Idler Shaft
Retainer Spring
Jam Nut
Female Feeder Disc
Male Feeder Disc
Pipe Thread Nut
Shaft Seal
12131415161718192021222324
45073
55976
55977
55976
56009
55969
55961
55973
55968
47488
46069
46698
45180
Hex Nut, 3/8 - 16
Blade Support Washer
Cutting Blade
Blade Support Washer
Blade Holder Nut
Front Plate
Feeder Disk Shaft
Top Housing
Bottom Housing
Motor
Thread Cutting Nut
Screw, #10 - 32 x 3/8”
Washer, #10 Lock
25262728293031323334353637
46666
46949
46665
46663
46958
46955
46956
46957
47481
47482
55983
46953
55960
Screw, #10 - 16 x 1”
Leg
Screw, #8 x 3/4”
Screw, #10 x 3/8”
Cable Clamp
Drive Pulley (Large)
Drive Pulley (Small)
Drive Belt
Cordset
Power Switch
Rectifier
Bearing
Mounting Bracket
Parts List
• READ ALL INSTRUCTIONS
• NEVER immerse the power unit in water or
other liquid. Severe electrical shock can result.
• CLOSELY SUPERVISE nearby children when
using ShrimpPro.
• DO NOT operate the ShrimpPro outdoors.
• DO NOT attempt to operate the ShrimpPro if
the unit has been dropped or if power cord or
power plug have been damaged. Return it for
repair. (See SERVICE.) There are no user
serviceable parts.
• DO NOT operate when wearing loose clothing
or accessories (bracelet, neck chain, necktie,
scarf, etc.). These could be caught by the
rotating Discs and cause injury. Loose hair
should be pulled back and secured.
• MAKE SURE that the power cord is unplugged
before removing Cutting Guard.
• AVOID touching the moving Discs. They could
grab your fingers and draw them into the cutter.
• THE SHRIMPPRO is equipped with a power
cord with a three-blade plug. Plug this ONLY
into a matching 120 volt A.C. three-blade outlet.
DO NOT cut off the third blade or attempt to
use with a two-blade extension cord. If you are
too far from the outlet, use a three-wire
extension cord of adequate power rating (see
specifications), obtainable at almost any
hardware store.
• UNPLUG the machine when not in use, before
attempting to clean, when changing Blades or
when making any adjustments to the Discs.
Pull only on the plug, never on the cord.
• MAKE SURE that the power switch is in the
‘OFF’ position before plugging-in or unplugging
the power cord.
• DO NOT attempt to use with unauthorized
attachments or for any application other than
that for which the unit was designed. Such
use could create a hazardous situation or
cause personal injury to the user.
• DO NOT operate on or near hot surfaces or
appliances used for cooking.
• DO NOT let power cord hang over edge of
table or counter.
• WHEN NOT IN USE, store the unit in a safe
place where it will not be a hazard to
passers-by.
• ALWAYS store with Cutting Guard securely
attached so that the blade is covered for safety.
• NEVER attempt to lift ShrimpPro by its Cutting
Guard. Always lift from under the base.
SAVE THESE INSTRUCTIONS
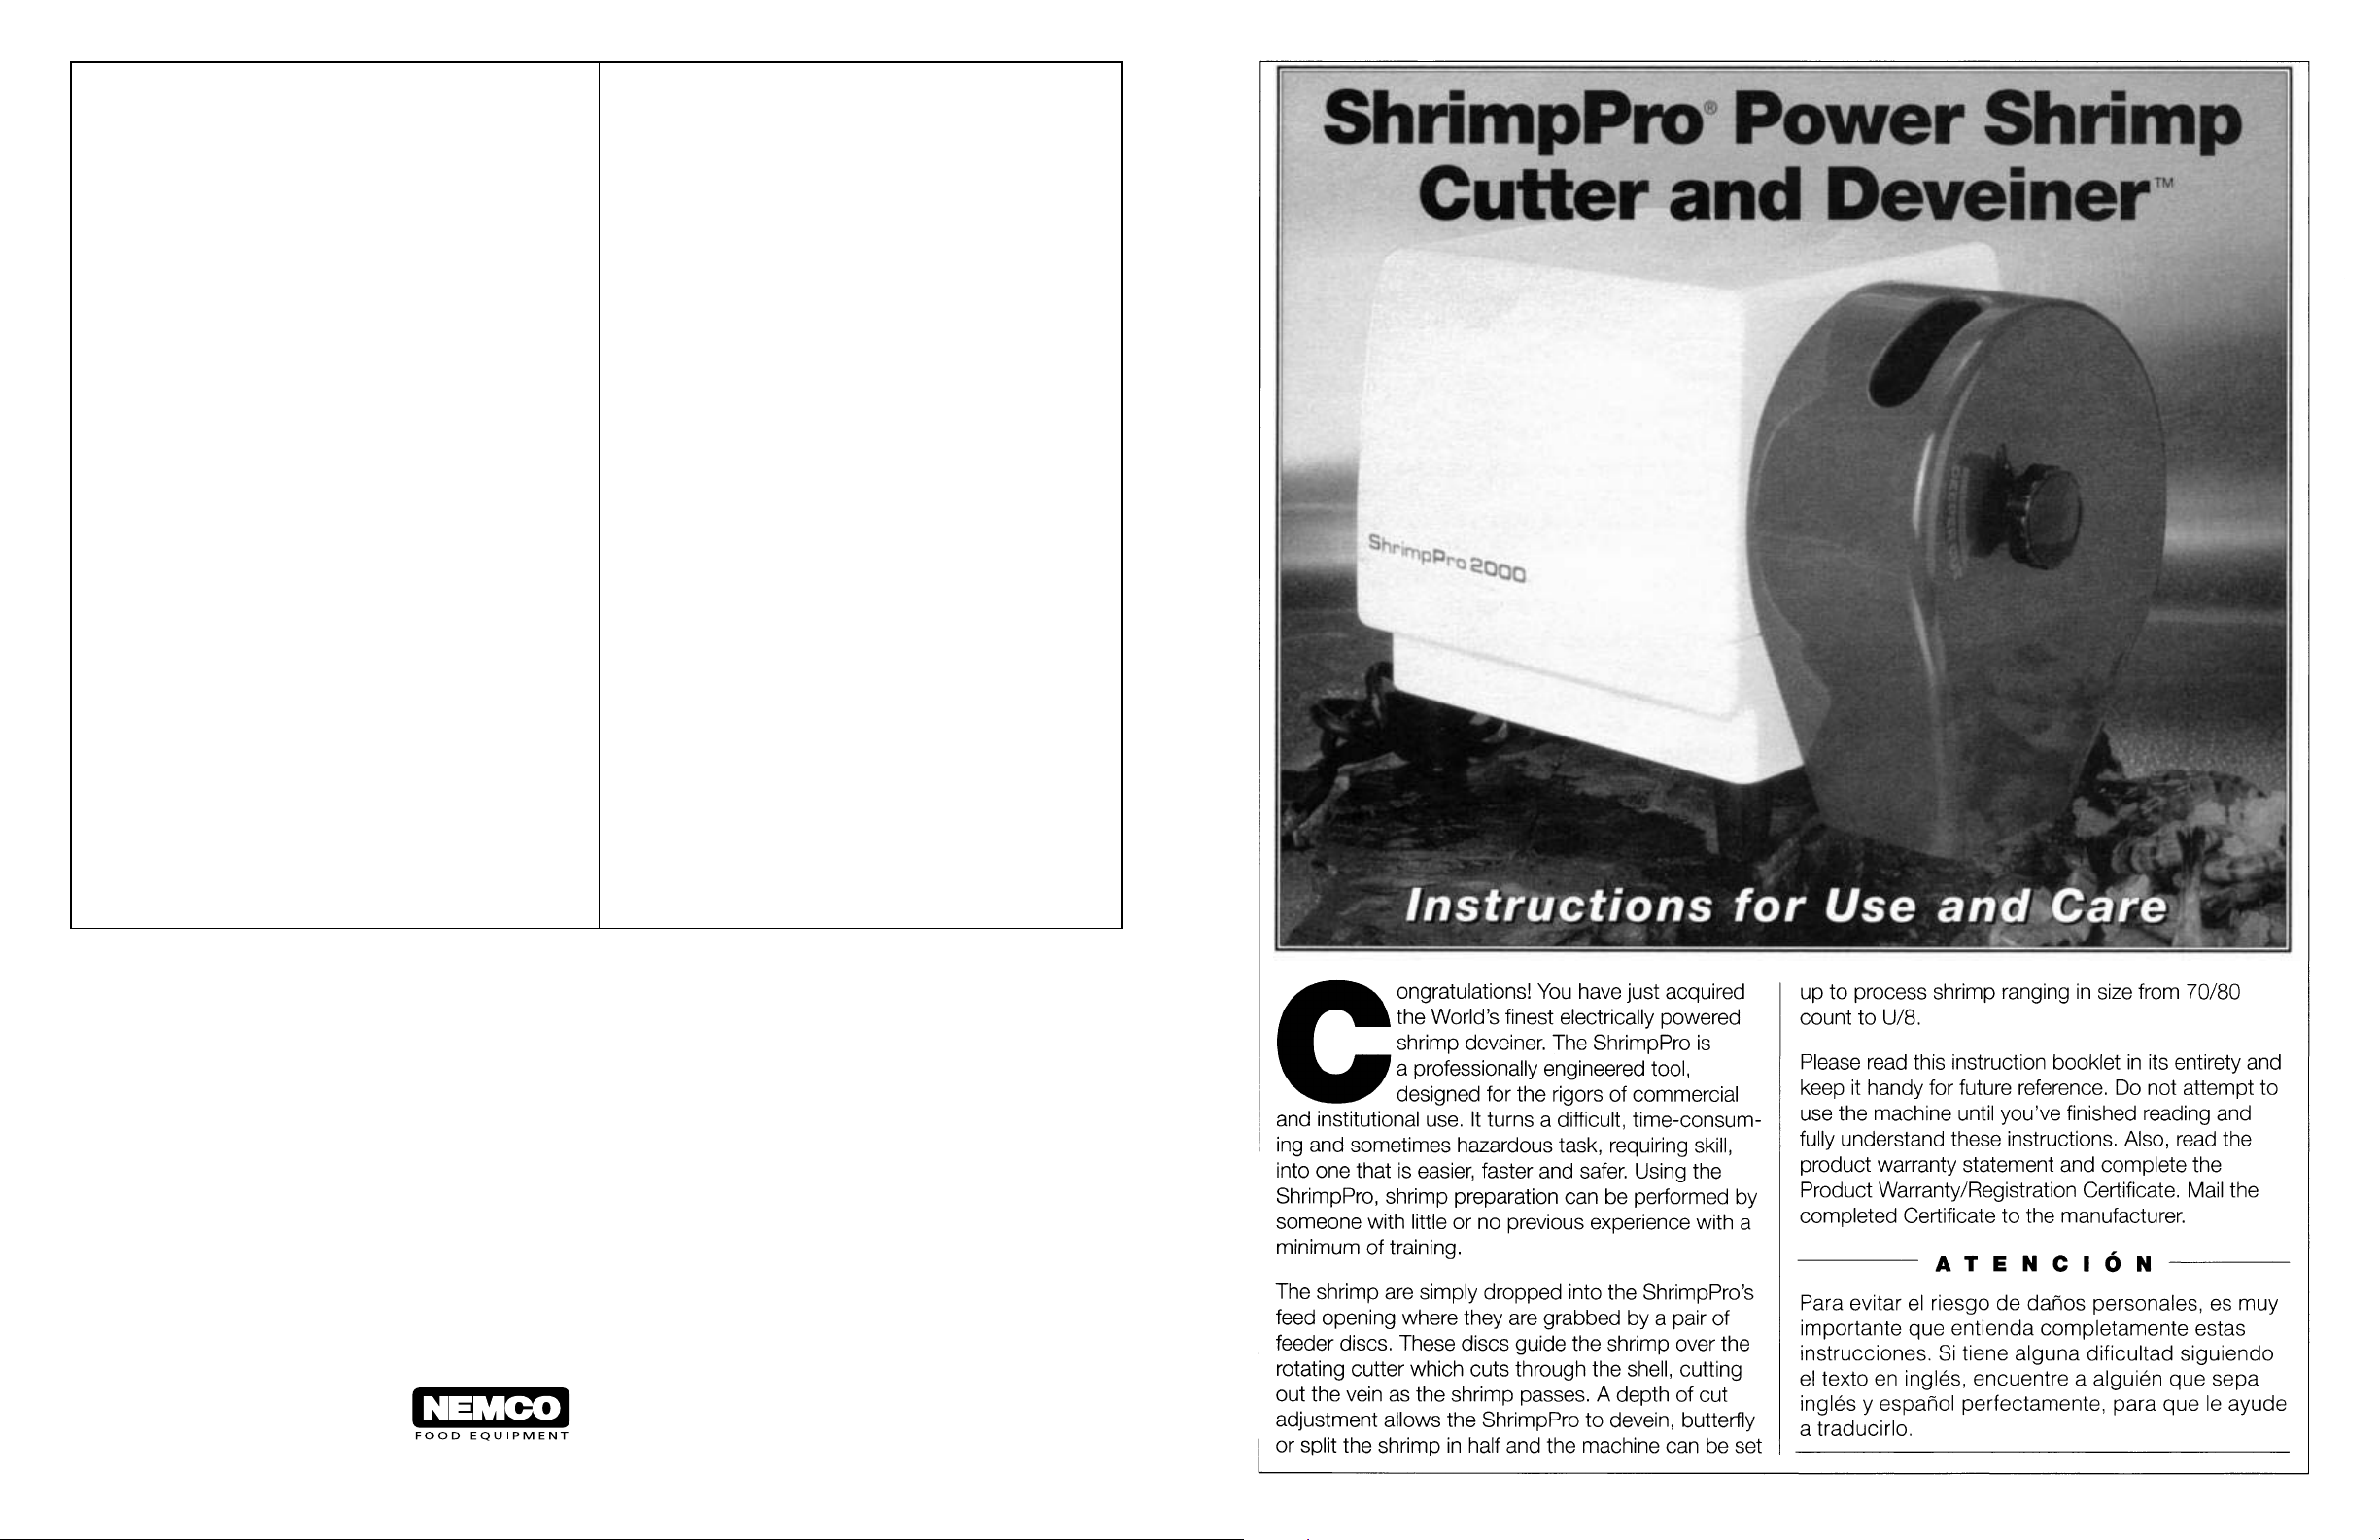
INSTRUCTIONS FOR USE & CARE
UNPACKING
When you open the shipping container, you will find
that the ShrimpPro is fully assembled and ready to
cut medium-sized shrimp (16/20 to 36/40). In the
carton, you will also find two Depth Cut Rollers,
differing in width. If you wish to cut small or large
shrimp, you must replace the already mounted
medium Roller (Item number 4 in the exploded view
drawing of Page 7) with the appropriate alternate
(the wider Roller for larger shrimp and the narrow
one for small shrimp). The procedure for
replacement is given on page 3.
Two 9/16” open end wrenches, used for Cutting
Blade replacement or cleaning, and a bottle
of lubricant with a dropper top are also packed with
the ShrimpPro. This is a food-grade lubricant which
is approved for incidental contact with food.
Examine the ShrimpPro for possible shipping
damage. Remove the Cutting Guard and inspect
cutting area components (see exploded view
drawing). The Cutting Guard (Item number 2)
may be removed by first unscrewing the Depth
Adjustment Knob (Item 1) and then pulling the
Guard away from and off of the machine.
When removing the Guard, make sure that the
Adjustment Knob Washer (Item 3) remains on
the Guard (Item 2). If any damage is noted,
immediately notify both the shipping company
and the manufacturer.
2
7

PRE-OPERATING CHECKS
AND ADJUSTMENTS
Before replacing the Cutting Guard, perform the
following checks:
Note: These steps presume that you will be
processing medium-sized shrimp. If you will be
working small or large shrimp, the Depth Cut Roller
must be changed and the Feeder Discs will need
readjustment. The steps needed to do each of
these are covered later in this booklet.
CAUTION: USE CARE WHEN WORKING NEAR
THE EXPOSED BLADE. IT IS SHARP AND CAN CUT
FINGERS, USE CUT PROTECTIVE GLOVES!
1. Cutting Blade
Make sure that the Round Cutting Blade is secure
on its shaft and cannot slip. Hold the Inner Blade
Nut (closest to the motor - Item 12) with one of the
included wrenches. With the other wrench, turn the
Outer Cap Nut (Item 16) clockwise until it is tight
(See Figure A). Do not overtighten.
3. Feeder Disc
Assembly
Positioning
Look down
over the
Feeder Discs.
Make sure that
the Cutting
Blade is cen-
tered between
the two Discs
and that the
groove in the
Depth Cut Roller is centered over the Blade. If it
is incorrectly positioned, unscrew the Feeder
Shaft inner plastic nut (Item 10) by hand until
the entire Feeder Disc assembly will slide on
its shaft. The nut is unscrewed by turning it clockwise. See Figure C. Align the Disc Assembly so
that the blade is properly centered and hand
tighten the plastic nut.
4. Lubrication
Remove the cap from the dropper tip of the food
2. Depth Cut Roller
lubricant bottle. Puncture the top of the dropper tip
The Depth Cut Roller should be centered between
the two Feeder Discs (See Figure B). If it is not
correctly positioned, unscrew and remove the outer
plastic Jam Nut (Item 7) from the Feeder shaft and
remove the Outer Feeder Disc (Item 8). Slide the
Depth Cut Roller along its shaft until it just touches
the Inner Disc (Item 9). Replace the Outer Disc.
When remounting this Disc, make sure that the
two raised keys on the Inner Disc fit into the two
keyways in the center of the Outer Disk that are
marked ‘M’ (for medium sized shrimp). It may be
necessary to lift the Depth Cut Roller in order to
mate the Discs. Replace the outer Jam Nut and
screw down until finger tight.
6
3

with a pin or small nail. Place several drops of
lubricant on the Depth Adjustment Shaft on both
sides of the Roller at its center hole. Lift the bent
Roller Shaft and slide the Roller back and forth on
it, over the lubricant, until lubricant is worked
under the Roller. To ensure smooth and quiet
operation, the Roller should be lubricated in this
manner before each use.
5. Cutting Guard Replacement
Make sure that the power switch is in the
‘OFF’ position before proceeding. Make sure
that the notch in the top of the Cutting Guard
mates with the projection at the top of the front
plate and that the Guard snaps into place on
both sides. The threaded end of the Depth
Adjusting Shaft fits through the plastic washer
in the open arc in the front of the Guard. Replace
the Adjusting Knob.
PICKING A WORK
LOCATION
Choose a work location with adequate space so that
you can work freely, that is well lighted, and is close
to a standard 120 volt A.C. (240 volt for export
model) three blade wall outlet (the line cord is about
six feet long). Arrange to drape the line cord (and
the extension cord, if one is used) where it will not
interfere with your working freedom of movement
and where it will not trip passersby.
The ShrimpPro should be placed on a flat, nonporous surface with the exit chute over the counter
edge above a sing or catch tray. DO NOT select
a location which can be flooded with water.
The user must always work on the right side of the
machine with the Feed Slot in the Cutting Guard
facing him (Figure D).
CUTTING AND DEVEINING SHRIMP
To be cleanly cut, shrimp must be raw, fully thawed
and firm. The cutting procedure is as follows:
1. After making sure that power switch is in the
‘OFF’ position, plug the line cord into the wall outlet.
2. Place a container, tray or 1/2 size steam table pan
containing thawed, uncooked shrimp on top of
the machine.
3. Loosen Depth Adjustment Knob and slide it to the
shallowest cut position (top of arc, away from
‘Deeper Cut’ arrow as shown in Figure E.) Tighten
Knob.
4. Turn the ShrimpPro ‘ON’.
5. Pick up on shrimp at the tail end. Turn it so the
back of the shrimp is away from you and lower it
into the Feeder opening on the top of the Cutting
Guard (see Figure F). The shrimp should be
inserted so that it falls between the Feeder Discs
and the Depth Cut Roller. The cut shrimp will be
deposited in your sink or catch tray.
WARNING: NEVER, UNDER ANY CIRCUMSTANCES,
ALLOWYOUR FINGERS TO ENTER THE FEEDER
SLOT, A FINGER CAN BE DRAWN INTO THE
MACHINE BY THE FEEDER DISCS AND BE
SEVERELY INJURED.
Also, do not allow foreign objects to enter the slot.
They could cause the ShrimpPro to jam and create
serious damage. Should shrimp not feed properly,
turn the machine off before attempting to correct
the problem.
6. Inspect the cut shrimp. If greater depth of cut is
desired, loosen the Depth Cut Knob and slide it
down to a deeper cut position, then tighten the
Knob.
7. Pass the same cut shrimp through the machine
again and again, adjusting the depth of cut each
time until you get the cut depth that you want.
Depending upon the adjustment, shrimp can be
lightly cut and deveined, butterflied or split, (knob
in the full down position) or cut in any desired
depth from light to full split.
SETTING UP FOR DIFFERENT
SIZE SHRIMP
At delivery, the ShrimpPro has been set up for
shrimp in the medium size range. If you want to cut
shrimp of a different size, you must change the
Depth Cut Roller and readjust the Feeder Disc
spacing. ShrimpPro is shipped with two additional
Rollers; one for small shrimp and one for large
shrimp. The chart below shows which Roller is
designed for each shrimp size group and what
Feeder Disc spacing setting goes with each. Due to
shrimp size and packing variations, your experience
may differ somewhat. Use what works best for you.
Shrimp Size Disc
Range Setting Roller
70/80-41/50 S thinnest (S)
1. Make sure that the ShrimpPro power switch is in
the ‘OFF’ position and unplug the line cord.
NOTE: ALWAYS UNPLUG THE MACHINE BEFORE
REMOVING THE CUTTING GUARD.
2. Remove the Cutting Guard by unscrewing the
Depth Adjustment Knob.
3. Unscrew and remove the Feeder Shaft outer plastic nut, then remove the Outer (female) Feeder Disc.
4. Remove the Depth Cut Roller from the bent shaft.
5. Select the new Depth Cut Roller from the chart
above and slide it onto the Roller shaft until it just
touches the Inner Feeder Disc.
6. Remount the Outer Feeder Disc, making sure that
it always engages the correct keys around the
inner diameter of the Inner Disc as listed in the
chart. Screw the outer plastic nut back on the shaft,
making it hand tight.
7. Loosen the inner Feeder Shaft Nut and slide the
Disc assembly along the shaft until the Cutting
Blade is centered over the groove in the selected
Roller. Hand tighten the inner nut.
A REMINDER — USE CAUTION WHEN WORKING
NEAR THE CUTTING BLADE! IT IS ALWAYS BEST TO
USE CUT PROTECTIVE GLOVES.
8. Replace the Cutting Guard and Depth Adjustment
Knob, making sure that Depth Shaft goes through
the plastic Guide Washer in Guard arc opening.
Set adjustment for shallowest cut.
9. Check power switch. It should be in the ‘OFF’
position. Plug the line cord in.
10. Turn machine on and begin to cut shrimp.
Adjust for depth of cut as described earlier.
36/40-U/15 M medium (M)
U/12-U/8 L thickest (L)
The steps you must take to set the machine up to
cut different size shrimp are similar to those covered
in the earlier Section of PRE-OPERATING CHECKS
AND ADJUSTMENTS. Refer back to that Section’s
text and illustrations if you require clarification of the
instructions below.
4
CLEANING
ShrimpPro should be thoroughly cleaned after each
days use.
CAUTION: DO NOT IMMERSE THE UNIT IN WATER.
THIS COULD CAUSE DAMAGE TO THE MACHINE
AND CREATE THE POSSIBILITY OF OPERATOR
ELECTRICAL SHOCK THE NEXT TIME IT IS USED.
5
 Loading...