

Additional Installation Instructions
Preparation
Caution:
Before installing, turn power OFF at the service panel. Lock service panel to prevent power from being turned
ON accidentally.
Removing Packaging • Cut foil wrap in the area of corner posts.
• Remove foil completely.
• Remove top cardboard.
• Remove all top and side cardboard and Styrofoam braces.
• Place oven in front of cabinets where it is to be installed.
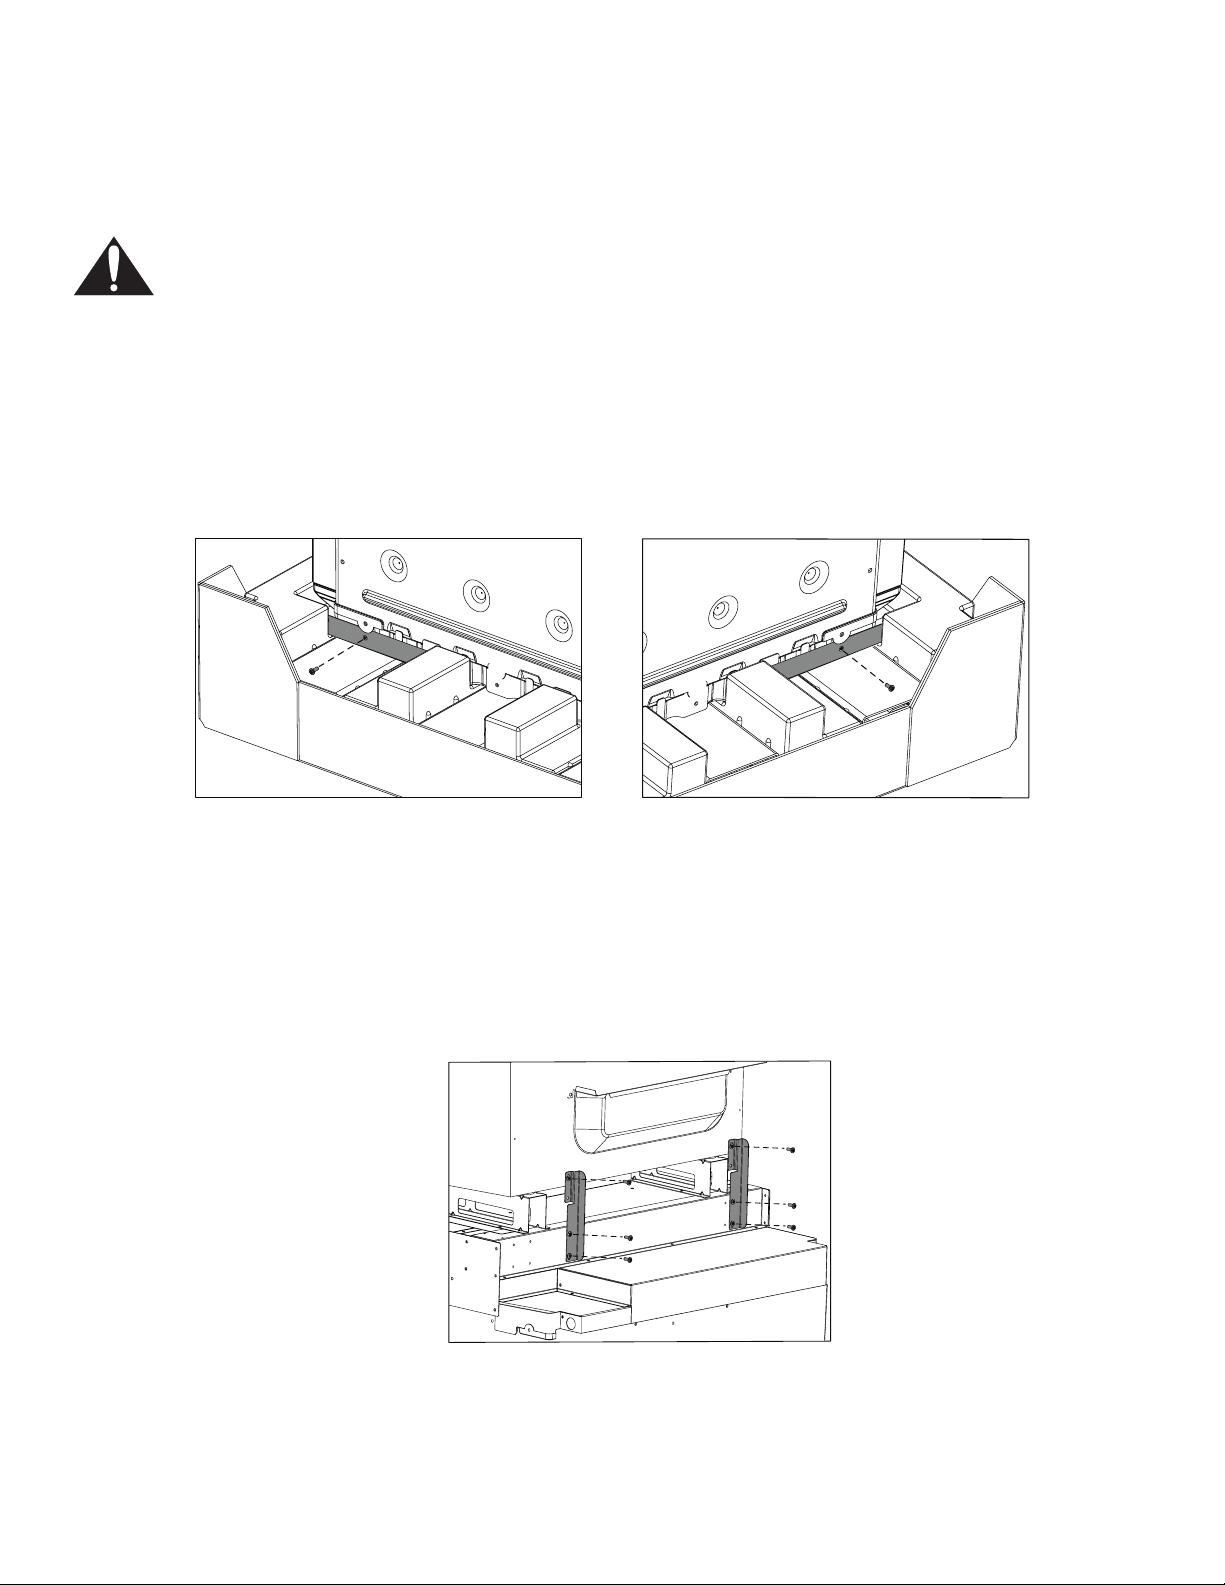
• Unscrew unit from Left and Right Brackets as show in Figure 1: Left and
Right Packaging Bracket Removal.
Note: Bracket remains in packaging base. Unit should stay in packaging base plate
For Convection Microwave Combination Units
Figure 1: Left and Right Packaging Bracket Removal
until ready to be lifted into cabinet cutout.
Remove 2 rear support Convection Microwave Shipping Brackets prior to
installation as shown in Figure 2: Convection Microwave Shipping Bracket
Removal.
Figure 2: Convection Microwave Shipping Bracket Removal
(for Convection Microwave Combination Units Only)
Preparing Oven Place oven in front of cabinets where it is to be installed. Rest it on a jack or
other sturdy support so that it is in line with the cabinet cutout.
Oven Installation
Caution:
Before installing, turn power OFF at the service panel. Lock service panel to prevent power from being turned ON accidentally.
Connecting Electricity –
Three-Wire Connection
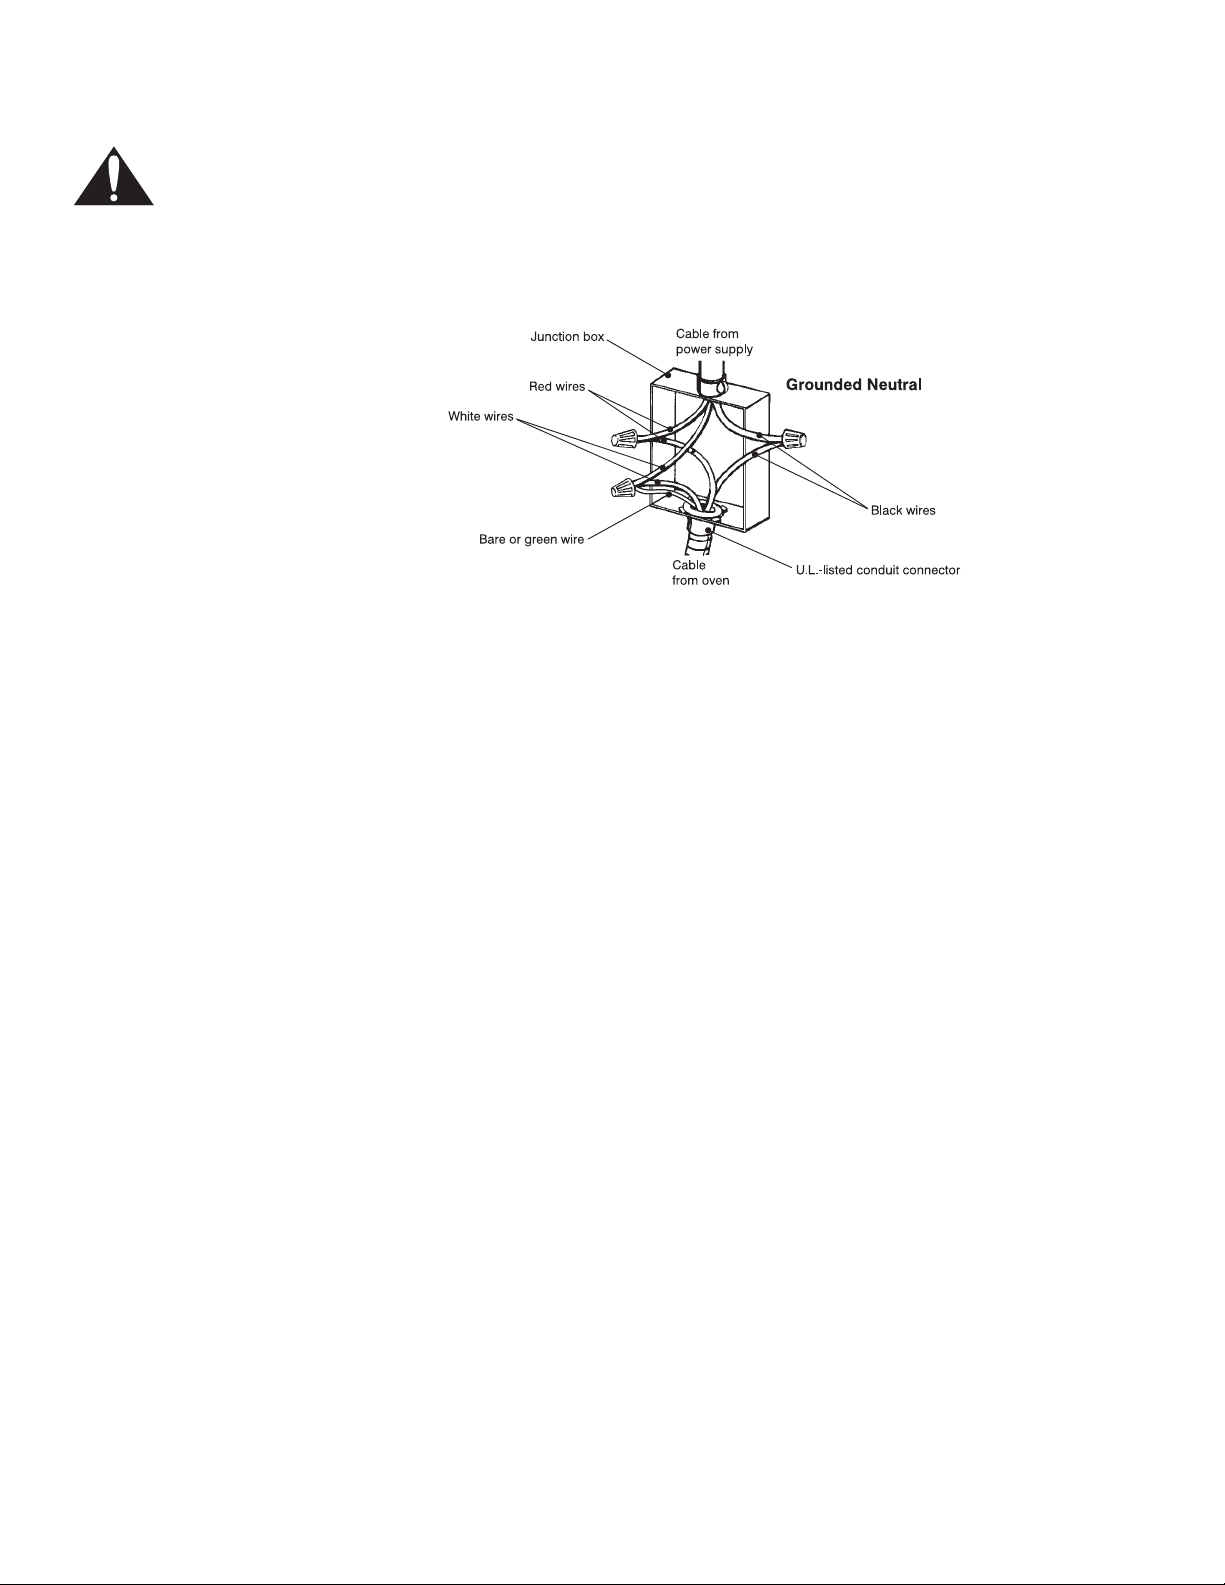
The four-wire connection is preferred, but where local codes permit, the three
wire connection is also acceptable. See Figure 1: 3-Wire Installation.
Figure 3: 3-Wire Installation
• Connect red wire from oven to red wire injunction box.
• Connect black wire from oven to black wire in junction box.
• Connect both green ground wire and white wire from oven to white (or gray)
neutral wire in junction box.
Installing Oven For ease of installation, some oven doors may be removed to reduce the weight
of the oven by 30 lbs (14 kg) per door, before installing into the cabinet. See the
“To remove the oven door” section of the Installation Manual.
• Lift or slide unit into cabinet cutout. Do not lift appliance by door handle.
• Push straight in until oven trim is flush with cabinet wall, being careful not to
crimp flexible conduit between oven and cabinet back wall. The oven should
be straight and level, not crooked.
• Install supplied screws through tap holes in trim. (2 screws for single ovens,
4 screws for double/combo ovens)
Testing Operation • Turn on power at the breaker.
• Check power at junction box using a volt meter.
For 240 V installation, the reading between the red and black wires (line to
line) should be 220 to 240 volts.
For 208 V installation, the reading between the red and black wires (line to
line) should be 190 to 208 volts.
• Test the oven mode.
Select the BAKE mode. See the Use and Care Manual for detailed
operation instructions.
• Verify that the oven light comes on and the oven begins to preheat.
• Test the door lock.
Set the SELF CLEAN mode. Confirm that the door locks when the lock icon
appears in the display.
• If installing a double oven, test the second oven as well.
• If any of the tests do not result as explained above, contact Thermador
service for assistance. Otherwise, the installation is complete at this time.

Instructions supplémentaires d'Installation
Préparation
Attention :
Avant l'installation, couper le courant au panneau de service. Verrouiller le panneau de service pour éviter que
le courant ne soit accidentellement rétabli.
Pour enlever l’emballage • Coupez l’emballage d’aluminium près des tiges de coin.
• Enlevez complètement l’aluminium.
• Enlevez le carton de la partie supérieure.
• Enlevez tous les cartons du dessus et des côtés de même que les attaches
de polystyrène.
• Placez le four en face de l’endroit où il sera installé.
• Dévissez les supports de gauche et de droite de l’appareil, tel qu’indiqué sur
la Figure 1 : Comment enlever les supports de gauche et de droite de
l’emballage.emove top cardboard.
Remarques : Les supports demeurent sur la base de l’emballage. L’appareil devrait rester sur
Pour les fours combinés de micro-ondes et convection
Figure 1 : Comment enlever les supports de gauche et de droite de l’emballage
la plaque de fond de l’emballage jusqu’à ce qu’il soit prêt à être soulevé vers
l’endroit qui lui est destiné.
Enlevez les 2 supports d’expédition du four à micro-ondes/convection avant
l’installation, tel qu’indiqué sur la Figure 2 : Comment enlever les supports
d’expédition du four à micro-ondes/convection.
Figure 2 : Comment enlever les supports d’expédition du four à micro-ondes/con-
vection (pour les appareils combinés de micro-ondes )

Préparation du four Placer le four devant l’armoire où il est installé. Le déposer sur un support
robuste afin qu’il soit aligné avec la découpe de l’armoire.
Installation du four
Attention :
Avant l'installation, couper le courant au panneau de service. Verrouiller le panneau de service pour éviter que
le courant ne soit accidentellement rétabli.
Branchement de
l’électricité – Connexion à
trois fils
La connexion de circuit terminal à 4 fils est recommandée, mais là où les codes
le permettent, la connexion à 3 fils est acceptable. Voir Figure 1: Installation des
trois fils.
Boîte de jonction
Fils rouges
Fils blancs
Fils verts ou dénudés
Câble de
l'alimentation
Câble du four
Neutre mis
à la terre
Connecteur de
conduit listé U.L.
Figure 3 : Installation des trois fils
Fils noirs
• Brancher le fil rouge du four sur le fil rouge de la boîte de jonction.
• Brancher le fil noir du four sur le fil noir.
• Brancher les fils blanc et de mise à la terre vert sur le fil neutre blanc (ou
gris) dans la boîte de jonction.
Installation du four Pour faciliter l'installation, certaines portes de four peuvent être démontées pour
réduire le poids du four de 30 lb (14 kg) pour chaque porte, avant l'installation à
l'intérieur du coffret. Voir la section « Pour enlever la porte du four » du manuel
d’utilisation.
• Faites glisser l’appareil à l’endroit prévu de l’installation. Ne soulevez pas
l’appareil par la poignée de la porte.
• Le pousser droit jusqu’à ce qu’il soit à égalité avec le mur de l’armoire en
faisant attention à ne pas coincer le conduit flexible entre le four et la paroi
arrière de l’armoire. Le four doit être droit et non croche.
• Fixez les vis fournies à travers les trous de mise en perce de la bordure. (2
vis pour les fours simples, 4 vis pour les fours doubles/combos)
Test de contrôle • Mettre l’alimentation en circuit au coupe-circuit.
• Vérifier l’alimentation à la boîte de jonction à l’aide d’un voltmètre.
Pour le 240 V, la lecture entre les fils rouge et noir (ligne à ligne) doit être de
220 à 240 volts.
Pour le 208 V, la lecture entre les fils rouge et noir (ligne à ligne) doit être de
190 à 208 volts.
• Vérifier le mode four.
Choisir le mode BAKE (four). Voir les instructions de fonctionnement dans
le guide d’utilisation et d’entretien.
• Vérifier si l’éclairage du four s’allume et que le four commence à
préchauffer.

• Vérifier le verrouillage de porte.
Régler au mode SELF CLEAN (autonettoyage). S’assurer que la porte se
verrouille lorsque l’icone figure à l’affichage.
• Pour un four double, vérifier le second four.
• Si les vérifications ne donnent pas les résultats escomptés, communiquer
avec le service Thermador pour de l’aide. Autrement, l’installation est
complétée.

Instrucciones adicionales de instalación
Preparación
Precaución:
Antes de realizar la instalación, apague el suministro eléctrico en el panel de servicio. Trabe el panel de servicio
para impedir que se encienda accidentalmente el suministro eléctrico.
Quitar el embalaje • Corte el embalaje de aluminio cerca de las esquinas.
• Quite completamente el aluminio.
• Quite el cartón superior.
• Quite todos los cartones superiores y laterales así como las grapas de
poliestreno.
• Coloque el horno delante del sitio en que se instalará.
• Destornille los tirantes de izquierda et derecha del embalaje, como se
enseña en la Figura 1: Como quitar los tirantes de izquierda y derecha del
embalaje.
Nota: Los tirantes se quedan en la base del embalaje. El equipo debe quedarse el la
Para los hornos combinados de microondas y convección
Figura 1: Como quitar los tirantes de izquierda y derecha del embalaje
base del embalaje hasta levantarlo hacia el sitio en que se instalará.
Quite los dos tirantes de transporte del micro-ondas combinado antes de
instalarlo como se enseña en la Figura 2: Como quitar los tirantes de transporte
del horno microondas y convección.
Figura 2: Como quitar los tirantes de transporte del horno microondas y convec-
ción (para los equipos combinados de microondas y convección)

Preparación del horno Coloque el horno enfrente de los gabinetes donde se debe instalar. Descanse el
horno sobre un gato u otro soporte robusto para que quede alineado con el
recorte para el gabinete.
Instalación del horno
Precaución:
Antes de realizar la instalación, apague el suministro eléctrico en el panel de servicio. Trabe el panel de servicio para impedir que se encienda accidentalmente el suministro eléctrico.
Conectar la electricidad –
Conexión a tres cables
La conexión del circuito con cuatro hilos es preferible pero donde los códigos
locales lo permiten, se acepta también una conexión con tres hilos. Ver Figura
1: Instalación de los tres cables.
Caja de conexiones
Cables rojos
Cables blancos
Cable verde o desnudo
Cable de la fuente
de alimentación
del horno
Neutral de Tierra
Cables negros
Conector de conducto
listado con U.L.
Figura 3: Instalación de los tres cables
• Conecte el cable rojo del horno al cable rojo en la caja de conexiones.
• Conecte el cable negro del horno al cable negro en la caja de conexiones.
• Conecte ambos cables verde y blanco del horno al cable blanco (o gris)
neutral en la caja de conexiones.
Instalar el horno Para facilitar la instalación, las puertas de algunos hornos se pueden retirar
para reducir el peso del horno 30 lb (14 kg) por puerta, antes de instalarlo en el
gabinete. Ver la sección « Para quitar la puerta del horno » en el manual de
instalación.
• Instale el equipo hacia el lugar en que se instalará. No sujete el equipo por
la palanca de la puerta.
• Empuje el horno hacia atrás hasta que el borde quede al ras con la pared
del gabinete. Tenga cuidado para no doblar el conducto flexible entre el
horno y la pared trasera del gabinete. El horno debe quedar en posición
recta, no torcida.
• Instale les tornillos proporcionados à través de los agujeros preperforados
del adorno. (2 tornillos para los hornos simples, 4 tornillos para los hornos
dobles/combos)
Probar el equipo • Prenda la corriente en el interruptor.
• Revise la corriente en la caja de conexiones con un voltímetro.
Para una instalación de 240V, la lectura entre los cables rojos y negros
(línea a línea) debe ser 220 a 240 voltios.
Para una instalación de 208V, la lectura entre los cables rojos y negros
(línea a línea) debe ser 190 a 208 voltios.
• Verifique el modo del horno.
Seleccione el modo BAKE (Hornear). Consulte el manual de uso y cuidado
para instrucciones detalladas de la operación.

• Verifique el que se prendan las luces del horno y que comience a
calentarse.
• Compruebe el bloqueo de la puerta.
Seleccione el modo SELF CLEAN (Autolimpieza). Confirma que se bloquea
la puerta cuando aparece el icono de bloqueo en la pantalla.
• Cuando instala un doble horno, aplique la misma prueba también al otro
horno.
• Si alguna de las pruebas no resulta como se describe arriba, contacte al
servicio de Thermador para recibir ayuda. De otro modo la instalación ya
terminó en este momento.
9000239979 • 5V09Y8 • Rev A • 1/07 © BSH Home Appliances Corporation, 2007
 Loading...